

Page 1

Page 2

Table Of Contents
2 Introduction
2 Launchpad Pro at a Glance
-Labelled diagram
2 Setup in Ableton Live
3 Latch vs Momentary
3 Session Mode
-Clip triggering and Colours
-Scene Launch
-Session Navigation
4 Mixer Buttons
-Record Arm
-Track Select
-Mute
-Solo
-Volume
-Pan
-Sends
13 The Setup Button
-Layout Select
-The Live Layout
-Note, Drum, Fader and Programmer
Layouts
-Setup Page Options
Velocity
Aftertouch
Aftertouch Threshold
Pad Lighting
MIDI Out
MIDI Channel
16 Using the Launchpad Pro, Ableton Live
and Hardware
-Using the Launchpad Pro’s MIDI Ports
-Using Your Audio Interface’s MIDI In/Out
17 Using Standalone Layouts With
-Stop Clip
6 Function Buttons
-Session Mode vs Note/Device Modes
-Shift
-Click
-Undo
-Delete
-Quantise
-Duplicate
-Double
-Record
8 Note Mode/Drum Mode
-General Functionality
-MIDI Instruments
-Drum Racks
10 Device Mode
-The 8 ‘Faders’
Hardware
17 Using Other Software
18 Troubleshooting
-How to Create Macros
-Automation
-General Notes on Device Mode
12 User Mode
-Creating LED Light Shows
1
Page 3
Introduction
The Novation Launchpad Pro is a MIDI controller designed
to inspire music making in Ableton Live and other software,
whether on stage or in the studio.
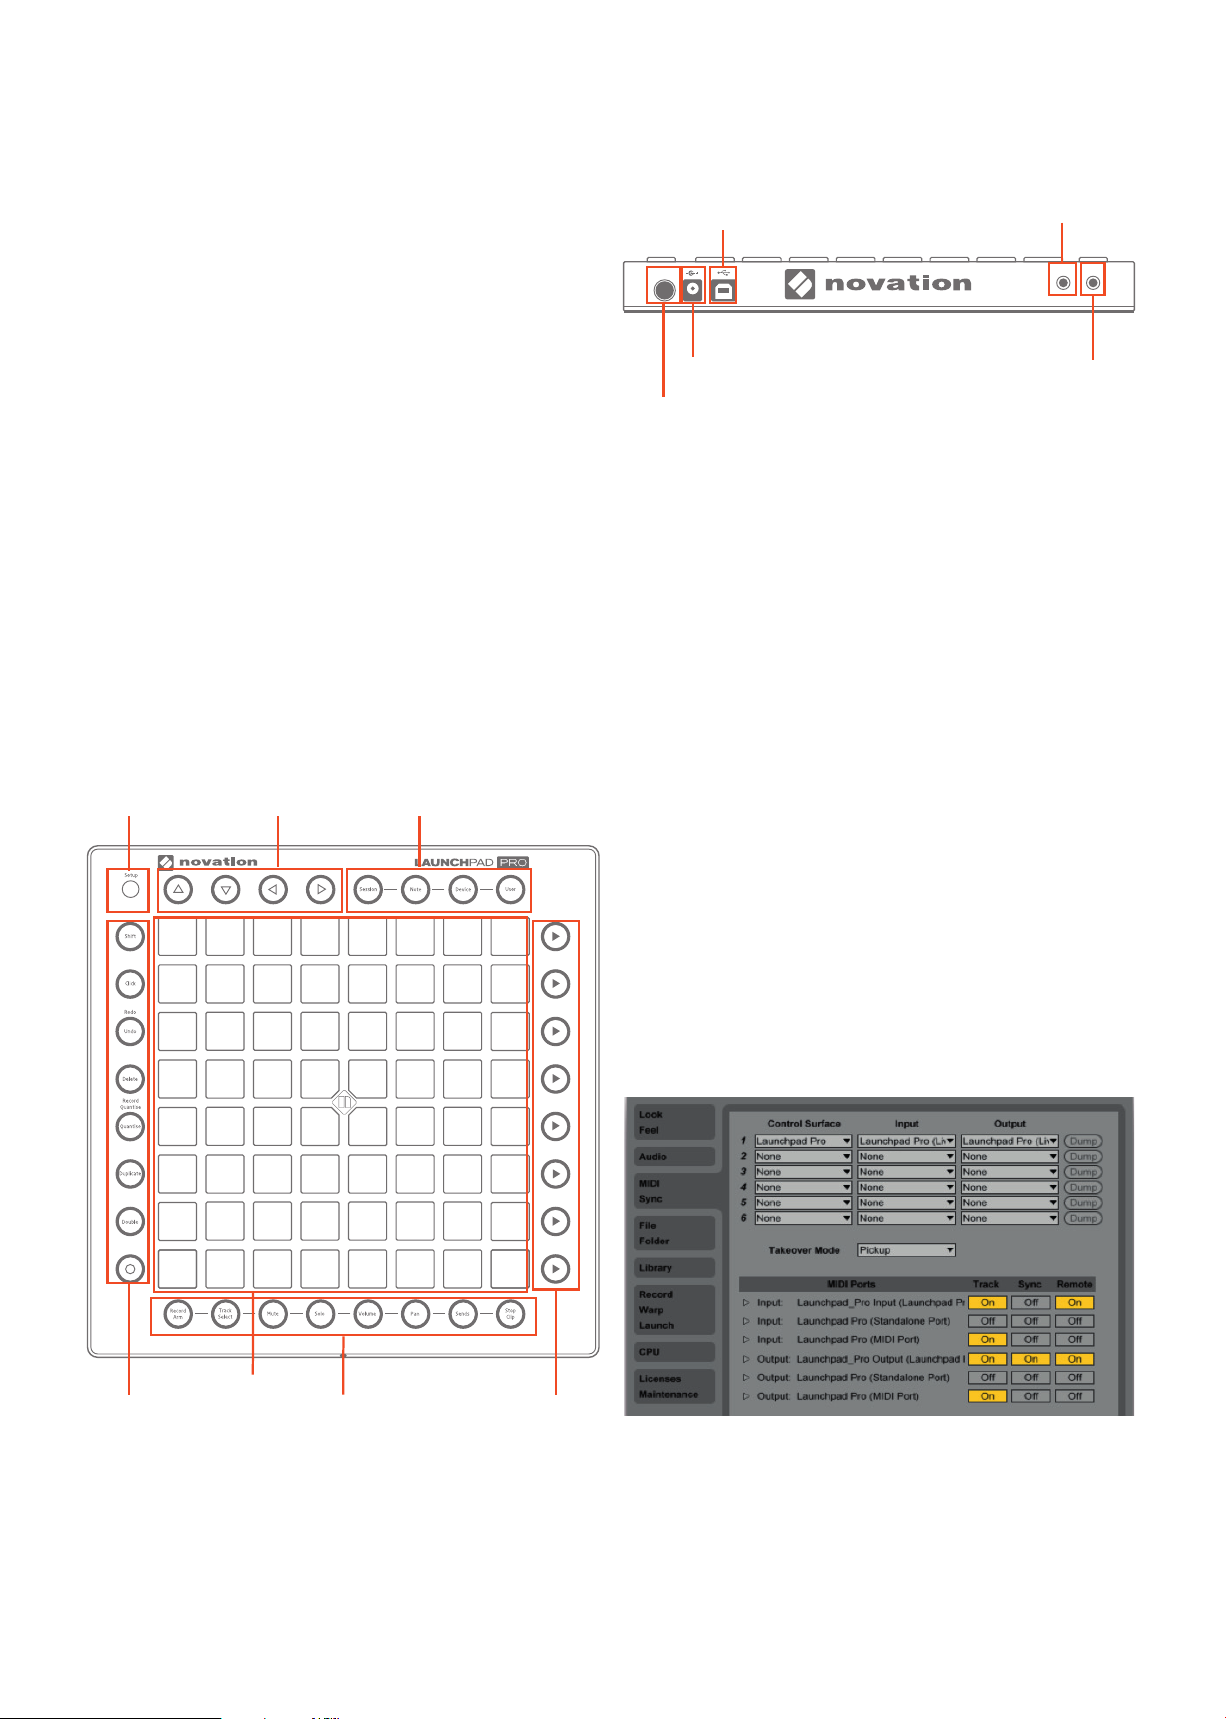
Along the back of the Launchpad Pro are a number of other
important places for connecting power, USB and MIDI
cables.
USB Port
MIDI out port
While the Launchpad Pro can be used with a variety of
software and hardware (outlined in the fi nal chapters), this
user guide primarily focuses on its interaction with Ableton
Live. The following pages will show you where all the
buttons and pads are and how they function, as well as tips
and tricks that we have found to be effective. Ultimately,
however, there is no one way to use this creative piece of
kit—how you use the Launchpad Pro is up to you!
Please see our ‘Getting Started Guide’ if you have issues
setting up the Launchpad Pro, or properly confi guring
Ableton Live.
The Launchpad Pro at a Glance
The following diagram shows the top of the Launchpad Pro,
which has seven main areas:
Setup button
Navigation arrows
Mode select buttons
POWER
Power supply
Power on/off switch
MIDI OUT MIDI IN
MIDI in port
Troubleshooting: If your Launchpad Pro is not working
properly, it could be an issue with your USB Hub,
computer’s USB port, or even the USB cable you are
using. Please use the USB cable included in the box. If this
still does not fi x your issue, connect the included 12V DC
power supply.
With an understanding of where things lie on the Launchpad
Pro, it’s time to learn how to use it.
Setup in Ableton Live
When you load up Ableton Live with the Launchpad
Pro connected to your computer, Launchpad Pro will
automatically spring into life and connect to Ableton.
However it is useful to understand the other options
available in the MIDI sync tab which effect how Ableton Live
and Launchpad Pro work together.
64 pad grid
Function buttons
Mixer
Scene launch buttons
The above areas work together for a fun and creative
musical experience, as explained throughout this guide.
In Ableton Live, go to Preferences. From the list of tabs
on the left, click the MIDI / Sync tab and you will see the
following:
Track On sets the Launchpad Pro as an Input device to play
MIDI tracks (instruments and drums) in Live, and as and
Output device to see played and recorded notes fed-back
to the pad LEDs.
2
Page 4
Set Sync On for the Output of Launchpad Pro so that the
pad LEDs pulse and flash in time with your project tempo.
Remote On for both Input and Output allows the Launchpad
Pro to be manually mapped to parameters in Live, and to
see feedback of that mapping.
Track On for Launchpad Pro MIDI Port allows Live
to playback and record any device connected to the
Launchpad’s physical MIDI connectors.
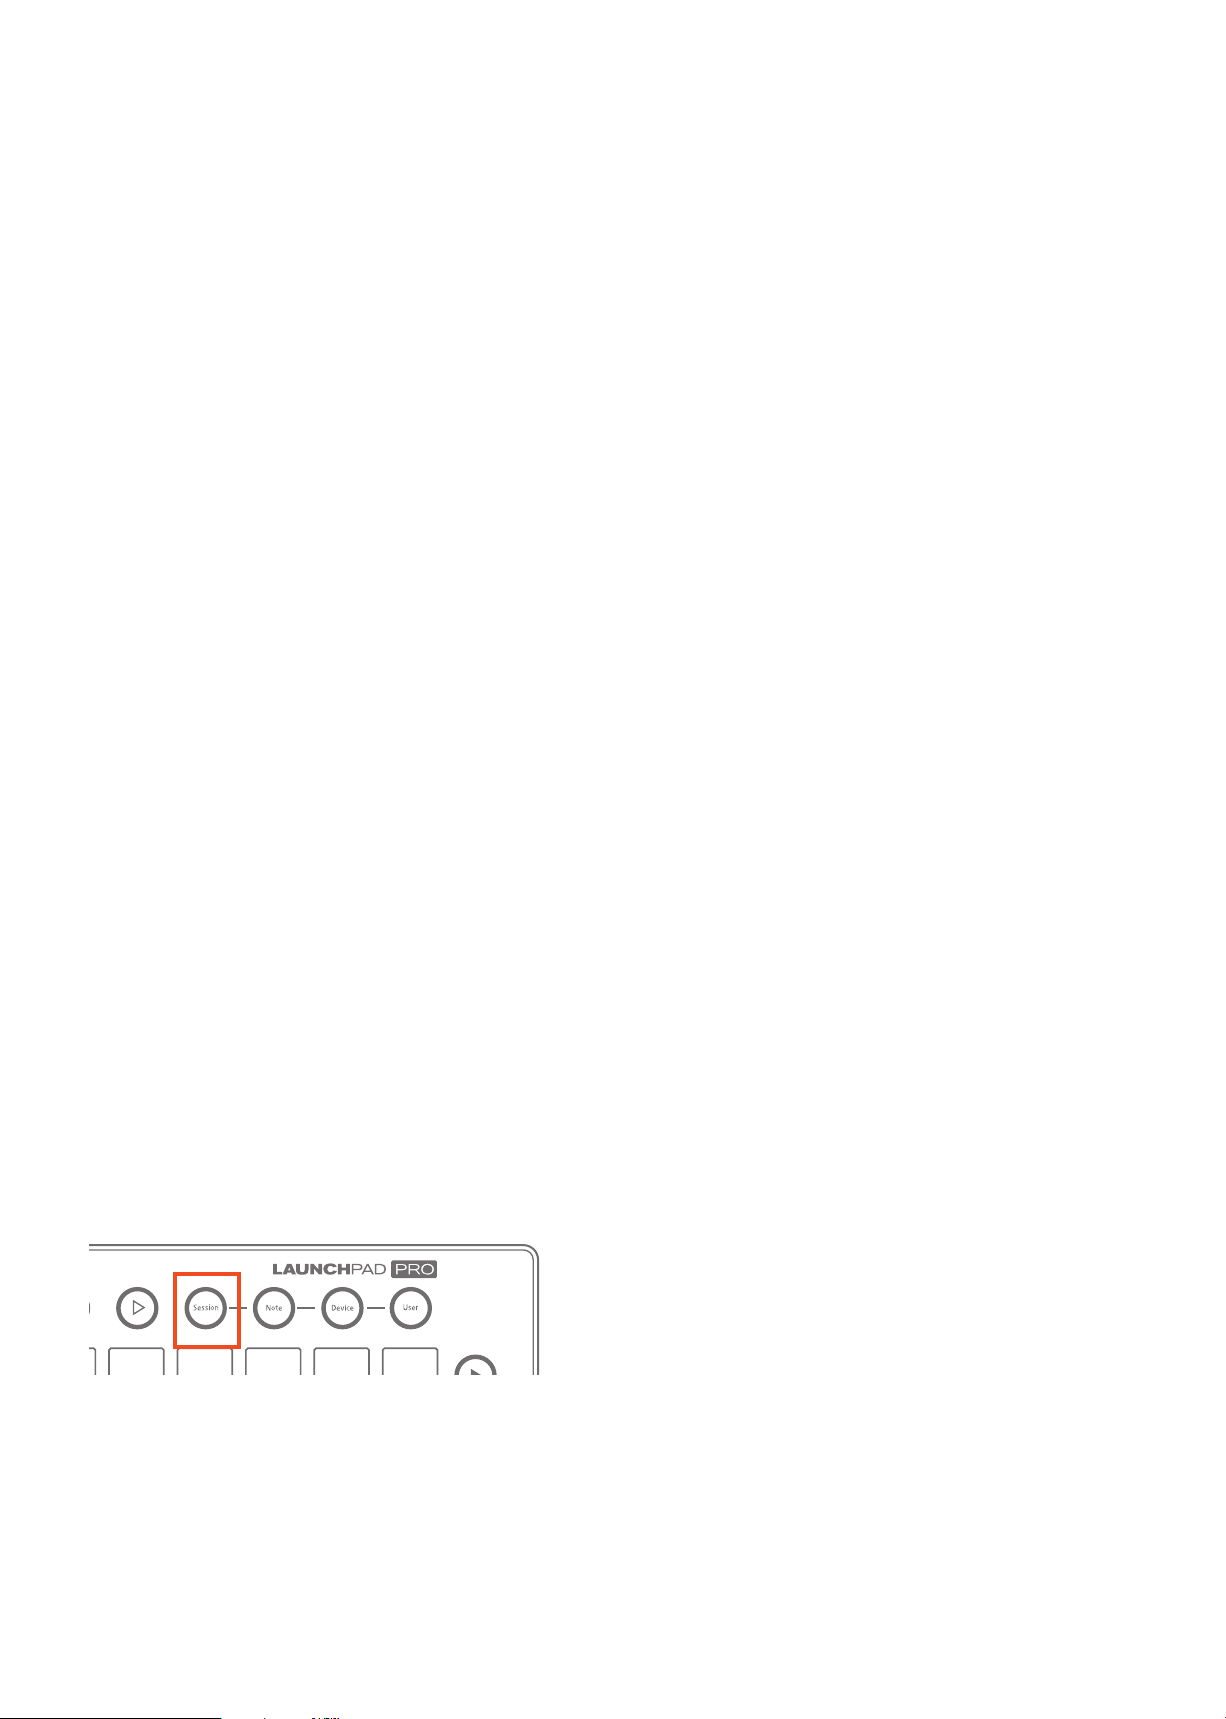
Clip Triggering and Colours
When the Session button is pressed, the Launchpad
Pro’s 8x8 grid of RGB LED pads gives you intuitive
visual feedback on your clips as you launch, stop, edit or
record them. Conversely, you can see the area covered by
these 64 pads on your Live screen inside a coloured, 8x8
rectangular ‘ring’. The colour of this ring changes depending
on which Control Surface chooser you select in Live’s
Preferences (MIDI/Sync tab).
If you find that features described later in this user guide are
not working as expected, please re-check your MIDI port
settings
Latch vs Momentary
Two important behaviours to keep in mind as you learn
about the Launchpad Pro (the Mode Select and Mixer
buttons in particular) are what we’ll refer to as ‘latch’ and
‘momentary’. Understanding these two behaviours will help
you quickly move around the Launchpad Pro during live
performance. Fortunately, the difference between latch and
momentary is simple:
• Latch means that when a button (e.g., Session) is
pressed and quickly released, the functions are available
until the user navigates away (i.e., hits another button). Latch
is best used when spending an indefinite time with Mode or
Mixer parameters.
• Momentary describes the temporary access of Mode
or Mixer functions. Press and hold a button (e.g., Volume),
make adjustments with the RGB pads, then upon release of
the button you will jump back to what you were previously
viewing (e.g., Session). In other words, functionality is
available as long as you hold the button. Momentary
behaviour is great when performing and time is limited.
Session Mode
The first of the Mode Buttons (upper right-hand corner of
the Launchpad Pro) is Session Mode. This may be the most
important of the four mode buttons, since pressing it lets
you physically control Live’s Session View. If you’re new to
Ableton Live, the Session View is where you can launch,
record or edit audio or MIDI ‘clips’ without ever stopping
the music. In other words, this is where you can jam forever.
Pressing a pad on the Launchpad Pro triggers a clip if one
exists in the corresponding slot in Live. Hitting an empty clip
slot, however, on an unarmed track will stop clip playback
on that track. If the track is armed, pressing a pad begins
recording into an empty clip slot.
Clips that are playing (aka ‘launched’) on your Ableton
Live screen appear as slowly pulsing green pads on your
Launchpad Pro. The pad colours of non-playing clips,
however, match the clip colours on your Live screen (e.g.,
a purple clip makes a purple RGB pad). Clips that have
been triggered, but have not yet started to play, quickly flash
green until launched.
Empty clip slots in Live show up as unlit pads on the
Launchpad Pro. Hitting an unlit pad will either do nothing,
or it will stop playing clips on that track. On a record-armed
track, empty clips slots are lit dimly red, indicating that
they are ready to become new audio or MIDI clips. When
triggered, these pads will quickly flash red until they start
recording.
Recording clips slowly pulse red. To stop recording a clip,
press its pad again, or the Record Button (the bottom
Function Button). With recording complete, the pad will
pulse green.
QUICK TIP 1: It might be helpful to think of red pads
on armed tracks as ‘hot’, since pushing them starts the
recording of a new clip, and stops other clips on that track if
they are playing.
Holding Shift (the topmost Function Button) and touching
a pad selects the corresponding clip (or empty clip slot)
without starting, re-launching, or stopping it. This action
brings up the clip’s content in Live’s ‘Detail View’ (the
bottom portion of the screen) and is a handy way to see a
clip’s audio or MIDI before launching it. This is also a quick
way to move from clip to clip for editing.
3
Page 5
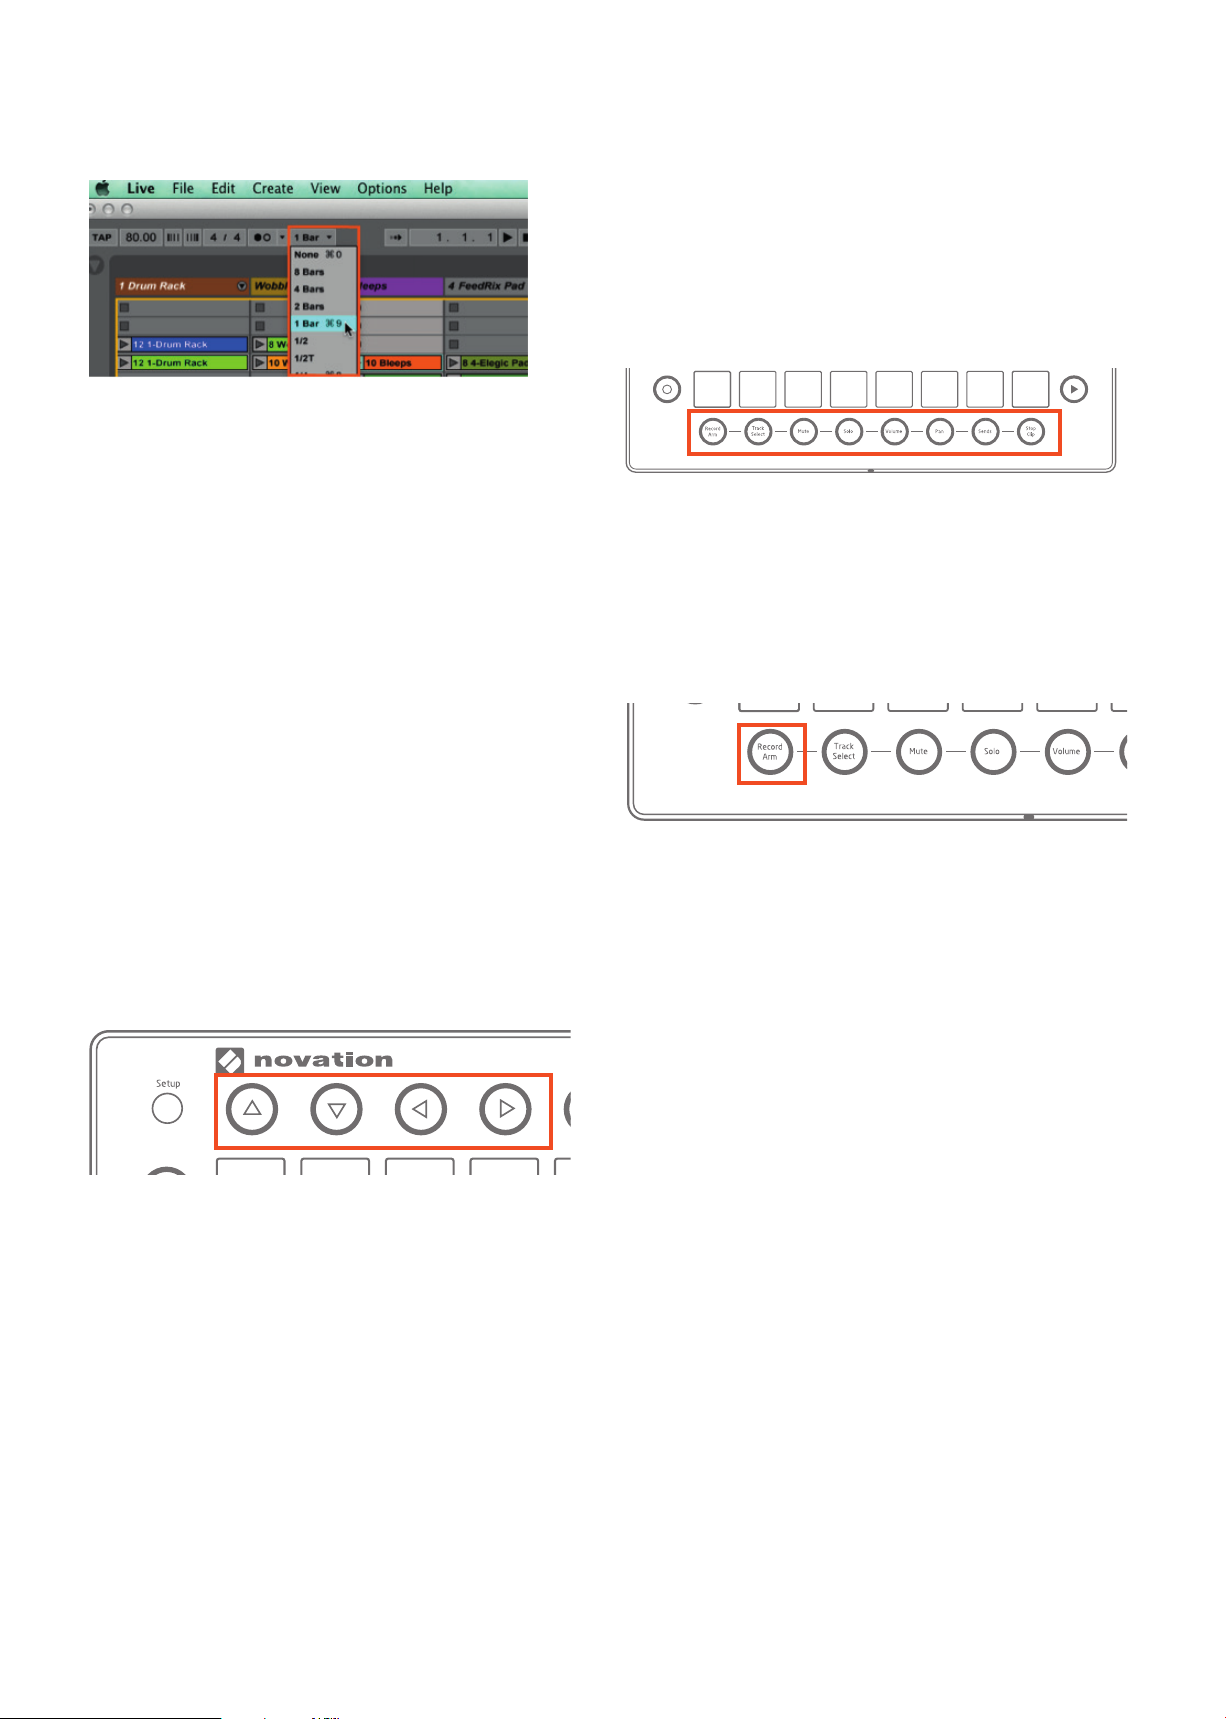
QUICK TIP 2: How quickly your clips launch, stop, or begin
recording depends on Live’s ‘Quantization Menu’, located in
the upper-left corner of the screen.
button. You will now see solid red pads indicating 8x8 areas
containing clips. (If an 8x8 area does not have at least
one clip the pad will be unlit). Simply press one of these
red pads, or use the Up/Down arrow buttons, to jump the
Session View’s focus in 8x8 blocks. If you jump into an 8x8
area where no clips are playing, areas with playing clips will
be represented by solid green pads.
Mixer Buttons
Live’s ‘Quantization Menu’
Scene Launch
Pressing the Scene Launch buttons on the right side of
the Launchpad Pro will trigger horizontal rows of clips, aka
‘scenes’. These buttons allow you to launch, stop, and/
or record multiple clips with one button, and are fantastic
for performance. Just like the 8x8 grid of pads, the Scene
Launch buttons match the scene colours on your Live
screen.
If you have more than 8 tracks the Scene Launch buttons
will launch the whole scene, not just the eight clips you can
see on the pads.
Workfl ow Tip: While everyone uses Live differently, scenes
are often used to break up music into different sections. For
example, you could trigger the verse, chorus and bridge of
your song with just three Scene Launch buttons.
Session Navigation
The Mixer’s eight buttons lie along the very bottom of the
Launchpad Pro, providing quick access to many functions
of Ableton’s Mixer section. Starting on the left, let’s examine
each one.
Record Arm
Press and hold Record Arm to momentarily display the Arm
page, where you can arm or disarm a track by pressing its
bottommost pad (or press and hold up to eight bottommost
pads to arm multiple tracks). Upon release of Record Arm
you will return to the previous page or mode. In Record Arm,
all pads on the track(s) chosen for recording are dimly red.
The simplest way to navigate the Session View is with
the Navigation Arrows, located at the top-left of the
Launchpad Pro.
As one might expect, the Up and Down arrow buttons
move the Pro’s 8x8-pad coverage up or down the Session
View in 1-Scene increments. The Right and Left arrow
buttons move pad coverage left or right, one track at a time.
When you have gone as far as possible in a given direction
the corresponding button will turn off.
With live performance in mind, you may have wondered
how to quickly navigate hundreds, or even thousands of
clips. To move around your Session View in big chunks, fi rst
switch to Session Mode, then press and hold the Session
Press and release of Record Arm ‘latches’ the page.
Pressing Record Arm again brings you to Session Mode.
Reminder: Latching means that functions are available
after the press and release of a button until you navigate
away.
Note that on the Record Arm page the Session Mode is
available on the top seven rows of pads, allowing for further
clip launching/stopping/recording, and so on.
4
Page 6
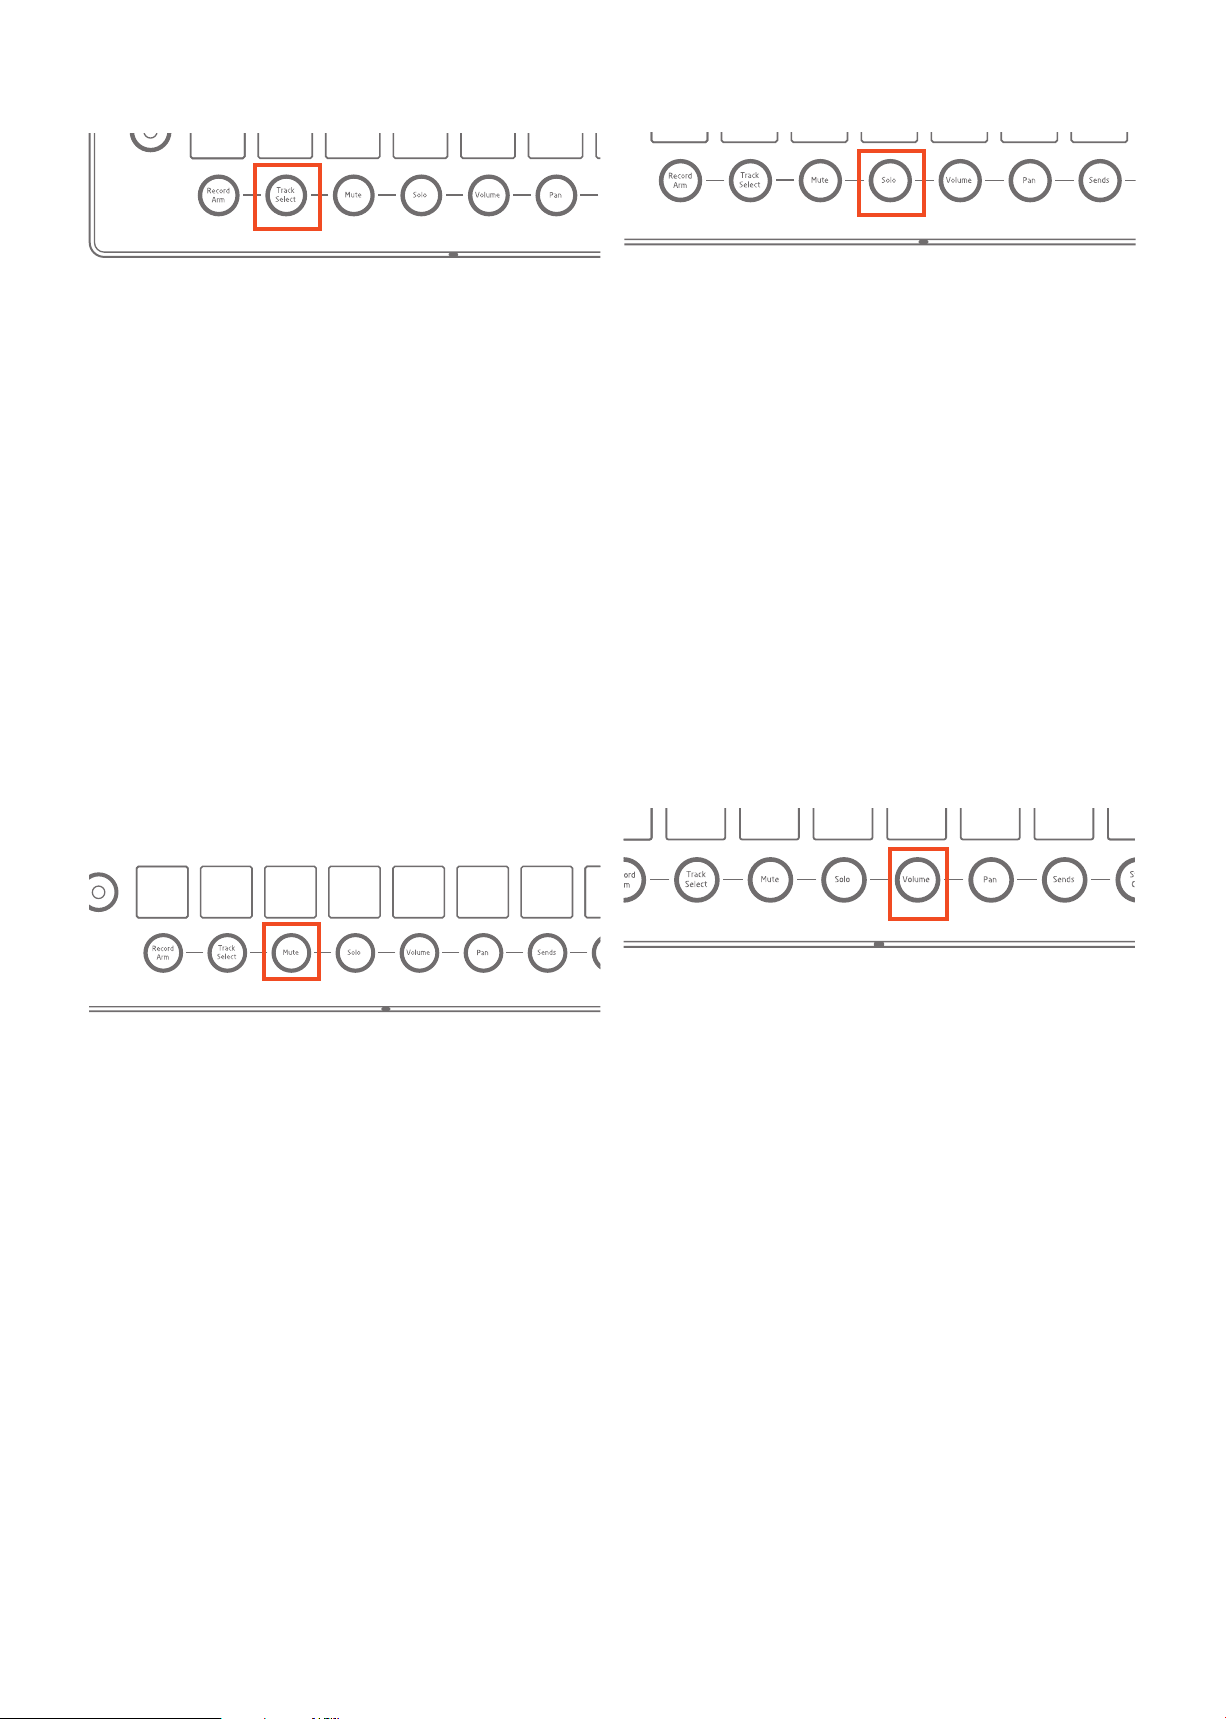
Track Select
Solo
Track Select allows you to focus on a given track, without
record arming it. All of the bottommost pads on this page
are dimly blue but brighten when selected. Note that only
one track can be selected at a time, and one track will
always be selected.
Press and hold Track Select to momentarily make track
selections—upon release you will return to the previous page
or mode.
Press and release of the Track Select button latches the
page, letting you spend more time perusing your tracks. In
latch, pressing Track Select again brings you to Session Mode.
Note that on the Track Select page the Session Mode is
also available on the top seven rows of pads, allowing for
further clip launching/stopping/recording, and so on. Hitting
a Session Mode pad will also select the corresponding track.
Mute
The Solo page allows you to isolate the audio signal of one
or more tracks. This is great for close listening in the studio
or as a performance technique.
Press and hold Solo to momentarily display the Solo page—
upon release you will return to the previous page or mode.
Touching the bottommost pad on a track solos the track,
turning the pad bright blue (or press and hold up to eight
bottommost pads to solo multiple tracks). The bottommost
pads of un-soloed tracks are lit dimly blue.
Press and release of the Solo button latches the mode.
Pressing Solo again exits the mode, returning to Session.
While on the Solo page, the Session Mode is available
on the top seven rows of pads, allowing for further clip
launching/stopping/recording, and so on.
Volume
Mute allows you to quickly ‘kill’ all sound from one or
more tracks.
Press and hold the Mute button to momentarily display the
Mute page—upon release you will return to the previous
page or mode. Touching the bottommost pad on a track
toggles its ‘Track Activators’ on/off (effectively muting or unmuting it). The bottommost pad of muted tracks will show as
dim yellow.
Press and release of the Mute button latches the page.
Pressing Mute again brings you to Session Mode.
Note that on the Mute page the Session Mode is also
available on the top seven rows of pads, allowing for further
clip launching/stopping/recording, and so on.
The volume page turns each 8-pad column into a volume
‘fader’: volume levels for up to 8 tracks at a time are
represented as green pads. Simply hit an empty pad to
move Live’s Track Volume slider.
Press and hold the Volume button to momentarily display
the Volume page, where track volumes can be quickly
adjusted. Upon release you will return to the previous mode
or page.
Press and release of Volume latches the page. Pressing
Volume again brings you to Session Mode.
The Volume page takes advantage of the Pro’s velocitysensitive pads: the softer you hit a pad the slower volume
will change. Conversely, the more force applied to a pad the
faster volume with increase or decrease.
Please note that Session Mode capabilities, such as scene
and clip launching, are not available on the Volume page.
5
Page 7

Pan
The Pan button lets you move a track’s audio signal around
the stereo field.
Press and hold Pan to momentarily display the Pan page—
upon release you will return to the previous page or mode.
In Pan, tracks can be panned left to right in varying degrees.
Pan values for the 8 tracks are shown in orange. With the
middle two pads lit the track will be centred; touch unlit
pads to move the pan knob left or right.
It’s worth mentioning that although the full version of
Ableton Live allows for twelve Sends, only the first eight
sends are accessible on the Launchpad Pro. Also note
that Session Mode capabilities, such as scene and clip
launching, are not available on the Sends page.
Production Tip: The most common effects to put on
Return Tracks are reverbs and delays. Luckily, Ableton
comes with a great reverb, and various delays. Make sure
they are set to 100% wet and send away.
Stop Clip
Press and release of the Pan button latches the mode.
Pressing Pan again brings you to Session Mode
Like with Volume, Pan view takes advantage of the Pro’s
velocity-sensitive pads: the softer you hit a pad the slower a
track’s pan value moves. Conversely, the more force applied
to a pad the faster panning will occur.
Please note that Session Mode capabilities, such as scene
and clip launching, are not available on the Pan page.
Sends
The Sends page lets you send audio from your tracks to
as many as eight return tracks. This page turns each 8-pad
column into a virtual effect-send knob: simply hit an unlit pad
to move a track’s send knob up or down. The send knob you
are controlling is selected with the scene launch buttons:
the topmost button selects Send A, the second one down
selects Send B, and so on.
Press and hold the Sends button to momentarily display the
Sends page—upon release you will return to the previous
page or mode. Press and release of the Send button latches
the page. Pressing Send again brings you to Session Mode.
Like with Volume and Pan, the Sends page uses the Pro’s
velocity-sensitive pads: the softer you hit a pad the slower a
track’s send value will change. Conversely, the more force
applied to a pad the faster the send value changes.
The last mixer button is Stop Clip. Press and hold this
button to momentarily display the Stop Clip page, where
you can stop clips on a per track basis, or stop all clips at
once. Upon release you will return to the previous page
or mode. The bottommost pads of tracks with playing clips
are lit red, but dim when pressed, stopping the clip on that
track. Hitting the top seven Scene Launch buttons will stop
all playing clips in those scenes, while hitting the bottommost
Scene Launch button will stop all clips in your Set.
Press and release of the Stop Clip button latches the page.
Pressing Stop Clip again brings you to Session Mode.
Note that on the Stop Clip page the Session Mode is
also available in the top seven rows of pads, including clip
launching/stopping/recording, and so on.
Function Buttons
The far left column contains circular-buttons
called the Function Buttons, which greatly
assist clip creation and editing.
Activation of the Delete, Quantise, Duplicate
and Double functions depends on your location
on the Launchpad Pro:
• In Session Mode, you must hold down one
of these buttons then touch the pad you want
to affect. For example, while holding Delete, hit
the pad whose clip you want to erase.
• With a clip selected and playing in Note
or Device Modes simply hit Delete, Quantise,
Duplicate or Double to perform their respective
actions.
6
Page 8

Shift
Undo
The top Function Button is Shift. When
pressed and held this button gives you
access to secondary functions, much like
Shift on a computer keyboard. Below are
descriptions of these functions:
• Clip Selection and Viewing: While in
Session Mode, press and hold shift, then
touch a pad to see a clip’s audio or MIDI content in Live’s
‘Clip View’ (bottom of the screen). This will not arm the
track, or trigger the clip in anyway. Rather, this is a great
way to see a clip’s audio or MIDI before deciding what
to do with it. You might, for example, decide to edit the
clip with some of the other Function buttons described
below.
• Drum Rack Pad Selection: While viewing a Drum Rack
in Note Mode press and hold shift. Then touch a pad
corresponding to a Drum Rack Pad. This will reveal the
pad’s instruments or effects in Live’s ‘Device View’ (bottom
of the screen). In live performance, this is a fast way to
select a sound and then start mangling it in Device Mode.
The Undo button does exactly what
one would expect. Press it once to
go backward one step (undoing one
action of your Undo history), twice
to go back two steps (undoing two
actions), and so forth.
As mentioned before, hitting Undo
while holding Shift will perform a
standard ‘Redo’ action.
Delete
The Delete button allows you to clear clips and Drum Rack
notes in various ways.
• In Session Mode, press and hold
Delete, and then touch a pad to delete
its clip.
• Redo: hold shift and hit the Undo button to perform a
standard ‘Redo’.
• Quantise: holding shift and hitting the Quantise button
toggles Record quantise on/off. (See below for more
information on the Quantise button).
Click
Perhaps the simplest button on the
Launchpad Pro, Click turns Live’s
Metronome on/off when pressed and
released. When engaged, Click lights
up green. In all Live modes or pages
(except User) you can press Click to
reference the global pulse.
Tip: Use this blue knob on screen to
adjust to adjust the Metronome volume
if it is too loud or too soft.
• Viewing a Drum Rack in Note
Mode, press and hold Delete then
touch a Drum Rack pad to delete all
occurrences of that note in the clip.
This only works with Drum Racks and
will not work in chromatic Note Mode
(i.e., with other MIDI instruments).
• With a clip selected and playing
in Note or Device Mode, one press of
Delete will erase the clip.
Quantise
The Quantise button lets you correct the timing of your
performances while recording or afterward.
Press and hold Shift to see the state
of record quantisation: if active, the
Quantise button will be lit bright
white; if inactive it will be dim white.
Continue to hold shift and hit Quantise
to toggle record quantise on/off.
When off, the fi rst press of this button
sets record quantisation to Sixteenth
Notes. To change the quantise value
go to Live’s Edit menu and scroll
to ‘Record Quantization’. Choose a
different quantise value here.
7
Page 9

You can always quantise clips after recording as well. With
the Session Mode visible, press and hold Quantise, then hit
a pad to snap its MIDI or audio to the selected quantisation
value. This can be done regardless of whether the clip is
playing.
If a clip is selected and playing in either Note or Device
Mode, one press of Quantise will quantise its audio or MIDI.
Note that Double works for MIDI clips only.
Musical Tip: If your loops are feeling too repetitive try using
Double to lengthen them, and then add variation.
Record
Using the Record button is the most straightforward way
to create new clips, or overdub into exiting ones. It can be
used in a variety of ways:
• On an armed but empty track,
hitting Record begins the recording of a
new clip into the selected slot.
Duplicate
The Duplicate button allows you to copy a clip into the clip
slot directly below. Be aware if there is already a clip in the
slot below, the duplicated clip will
erase the existing clip.
.
• In Session Mode press and
hold Duplicate, then touch a pad to
Duplicate its clip.
• If Live’s Transport is running, after
duplication the new clip will launch.
• If a clip is selected and playing
in either Note or Device Mode, one
press of this button will duplicate the
clip.
Duplicate can also be used to duplicate a whole scene.
Press and hold the Duplicate button in Session Mode, then
hit a scene launch button. Instead of overwriting existing
clips, this will copy and insert the scene, causing any other
clips or scenes to slide down the page.
• On an armed track with clips,
the Shift button can be used to select
an empty clip slot, at which point the
Record button can be pressed to begin
recording there.
• On an armed track with at least
one clip, pressing Record will begin
overdubbing into the last played or
selected clip if no other slot is chosen.
• With playing clips on armed tracks, Record can be used
to punch in and out of overdub record. Note that for audio
clips, only automation can be overdubbed.
• If no tracks are armed, pressing Record can be used
as a quick way to start Live’s transport without recording
anything.
Note Mode
Double
Pressing this Function button doubles clip length. For
example, a 2-bar clip becomes 4 bars; an 8-bar clip
becomes 16 bars, and so on.
• With a clip selected in Session
Mode, press and hold Double, then touch
its pad to double the clip length.
• If a clip is selected and playing in
either Note or Device Mode, one press of
this button will double clip length.
Note Mode lets you play the Launchpad Pro like an
instrument in order to create your own percussive and
melodic ideas. In other words, the Note page is where
you can record, overdub and edit MIDI clips with MIDI
instruments or Live’s Drum Racks. Before looking at the
differences in how Note Mode handles Drum Racks vs
other MIDI instruments it is worth explaining some general
functionality.
8
Page 10

General Functionality
Finally, here are a couple general rules to be aware of:
With a MIDI device (Drum Rack or other) on a record-armed
track pressing the Note button enters Note Mode. How LED
feedback appears on this page depends on whether the
track contains a Drum Rack, or any other MIDI instrument.
These ‘other MIDI instruments’ can be Ableton’s (e.g.,
Operator), VST or Audio Unit plug-ins. If an audio track is
selected, entering Note Mode displays nothing and has no
functionality.
Live’s Clip View (left) and Device View (right).
Press and release the Note button to latch Note Mode.
Further hits of the Note button toggle the Clip View and
Device View on your screen. This allows you to see your
MIDI notes in one view (Clip View), and your instruments
and effects in another (Device View). You might use Clip
View to see existing MIDI notes as you overdub others—
or you might want to see the notes move when you hit
Quantise. Likewise, Device View can be handy to watch as
you make device adjustments, especially when recording
those adjustments as automation.
Note Mode can also be accessed momentarily from other
pages by pressing and holding the Note button. Upon
release you will return to the previous page or mode.
• Pressing the Note button enters Note Mode for the
record-armed track, potentially overriding the current track
selection. In other words, whatever track is armed becomes
auto-selected for Note Mode.
• If multiple tracks are armed, the last track to be armed is
used on the Note page.
• If no track is record armed, selecting a track and
pressing Note will show its Note page. MIDI data, however,
will not be sent until the track is armed.
MIDI Instruments
With any MIDI instrument on a track other than a Drum
Rack (e.g. Ableton Operator or Novation V Station plugin)
pressing the Note Mode button will display the Note page,
aka ‘note grid’. Here, the pad grid serves as a chromatic
MIDI controller perfect for melody, chord or bassline
creation. The pads rise from left to right in semitone (aka
half step) intervals (e.g., C, C#, D, etc), and from bottom to
top in perfect fourth intervals (e.g., C, F, Bb, etc).
The note grid displays both lit and unlit pads: the lit pads
outline the white notes on a piano keyboard (i.e. a C major
scale), while the unlit pads fi ll in the non-diatonic, chromatic
notes. The tonic notes of the scale you choose (see below)
are pink, and the other diatonic notes are blue. Pads turn
green, however, when played manually or during playback.
Notice how the Delete, Quantise, Duplicate and Double
functions are easily used in Note Mode: simply press and
release these buttons to affect the currently playing clip on
the last armed track. Remember, you can always hit Undo if
you make a mistake.
Another attractive feature of Note Mode is that the scene
launch buttons have no default functionality. This means that
they are freely assignable via MIDI mapping. Furthermore,
whatever MIDI mappings you create are unique to Note
Mode and independent of all other modes.
Custom MIDI Mapping: Create your own MIDI mappings
for the scene launch buttons by fi rst clicking the MIDI Map
Mode Switch in Live. Next, hit a parameter, such as a device
on/off switch. Then hit a scene launch button. Finally, click
the MIDI Map Mode Switch again to exit.
By default,
the pad in the
lower-left corner
of the 8x8 note
grid plays the
note C1—the
blue and pink
pads therefore
outline a C
major scale. You
can transpose
this layout up
or down in
semitones by
hitting the Left or Right arrow buttons across one octave
in each direction. Press the Up or Down arrows to shift the
scale by octaves. You can go as low as C-2 and as high as
G8, beyond which the pads will be lit red and will not send
MIDI data.
As you push the Left or Right arrow buttons purple pads
scroll in semitone steps, refl ecting how far you are from C.
For example, if the purple pad is three-pads away from the
9
Page 11

lower-left pad then the blue and pink pads are outlining the
Eb major scale.
“Creating LED Light Shows” tutorial for information on how
to light up User Mode).
Tip: Press the Up and Down arrow buttons simultaneously
to return the lower-left corner pad to C1. Press the Left and
Right arrow buttons simultaneously to return the scale’s root
note to C, staying in the current octave.
Whatever tonic you choose becomes global. If you set the
note grid to begin on F#, for example, the outlined scale for
your other MIDI instruments will also be F# major (until you
change it). This global functionality makes it easy to stay
harmonically consistent across multiple MIDI instruments,
but you can always change the global settings as you
record or perform.
Drum Racks
For a track containing a Drum Rack, pressing the Note
button automatically confi gures the Launchpad Pro to work
with Live’s Drum Racks, an instrument designed for playing
drums, percussion and one-shot samples.
By default, the lower-left corner pad of the 8x8 pad grid
triggers C1 on a Drum Rack. The default fi rst 16 Drum Rack
pads (C1 to D#2) are therefore playable in the lower-left
quarter (4x4) of the Launchpad Pro, as illustrated below:
At any given moment, the Launchpad Pro can only display
64 of a Drum Rack’s potential 128 pads. Accessing all of
a Drum Rack’s pads, therefore, relies on the Navigation
Arrows, which light up green. The Up and Down arrow
buttons move Drum Rack coverage up and down in 4 row
increments (blocks of 16 pads). The Left and Right arrow
buttons move Drum Rack coverage up and down one row of
pads at a time.
Colour-wise, Drum Rack pads containing a sample are lit
yellow, while a pad with no sample stays unlit. Purple pads
show that a Drum Rack sample is soloed; orange pads
mean a sample is muted.
Pads turn green when played manually or during playback.
To select a Drum Rack pad simply hit its corresponding pad,
which will trigger the sample and turn the pad light blue. To
select a Drum Rack pad without triggering it, hold Shift and
touch the corresponding pad. Be aware that the Show/Hide
Devices selector needs to be engaged on a Drum Rack for
this to work.
C2 C#2
C2C2C#2
A1
E1
E1
C1
C1
A1
F1
F1
C#1
C#1
G#1
G#1
D2
D2
A#1
A#1
F#1
F#1
D1
D1
D#2
D#2
B1
B1
G1
G1
D#1
D#1
E2 to G3 are then playable in the 4x4 area directly above
C1 to D#2. Meanwhile, G#3 to B4 continues in the
lower-right 4x4 area, and C5 to D#6 are playable in the
upper-right 4x4 area of the pad grid. The following diagram
illustrates this:
E2 to G3
C#2
G#1
A1
E1
F1
C#1
C1
D2
A#1
F#1
D1
C5 to D#6
D#2
B1
G#3 to B4
G1
D#1
You may notice later that User Mode’s pad layout is identical
to the above diagram, but without LED feedback. (See the
Drum Racks’ Show/Hide Devices Selector.
With a pad selected, you will likely want Device Mode
(described later) to help you adjust its parameters. You can
also press and hold Delete then touch a Drum Rack pad
to delete all occurrences of its note in a clip. This handy
workfl ow is specifi c to Drum Racks, and will not work with
other instruments.
Recording Shortcut: Momentarily enter the Record Arm
page then press a pad. This will automatically arm that track
(if it isn’t already) and begin recording or overdubbing in
that clip slot—highly recommended for live performance.
Device Mode
Device Mode lets you control your MIDI instruments and
10
Page 12

effects without a mouse—a tremendous asset, especially
on stage.
To effectively use Device Mode, fi rst press and release the
Device button, entering the Device page. Next, engage
Track Select momentarily and choose a track by hitting one
of the bottom pads. You can now control the last selected
device on this track with the vertical columns of pads, which
act as virtual ‘faders’ for up to eight parameters.
How to Create Macros
Live’s ‘Blue Hand’ reminds you that you are controlling a
device remotely.
Once in Device Mode use the Left and Right arrow buttons
to move horizontally in the Device View (bottom portion of
Live), selecting whatever instruments and/or effects (MIDI
or audio) you desire. (Note that the Up and Down arrow
buttons do nothing in Device Mode). To control devices on
another track, simply choose the track with Track Select
button.
The 8 ‘Faders’
Like with the Volume page, Device Mode turns each 8-pad
column into a ‘fader’. The faders in Device Mode, however,
are capable of moving one or more knobs or sliders on a
device. Device Mode also uses the velocity-sensitive pads
for precise movements: the softer you hit a pad the slower
a parameter changes; the harder you hit a pad the faster a
change will occur.
Creating your own Macros in Live is easy: right-click (PC)
or control-click (Mac) on any Ableton instrument or effect
parameter and choose ‘Map to Macro (#)’ from the context
menu. The parameter is now controllable as a Macro
Control. You can even assign multiple parameters to
one Macro.
With third-party plug-ins, as seen in the picture above, there
are some extra steps. You fi rst need to hit the ‘Confi gure’
button on the instrument’s title bar, then open the plugin and click on parameters that you would like to control.
When these parameters appear as sliders in the device (like
‘Morph’ and ‘Weird’ above) you can assign them to Macro
Controls using the normal procedure.
Automation
As previously mentioned, accessing a track’s Device page is
done by pressing Track Select (in the Mixer) and selecting a
track. By default, however, in order to record automation in a
clip its track must be armed. This is due to Live’s Preference
of ‘Record Session automation in: Armed Tracks’, as seen
below:
For most native Ableton instruments and effects, eight
parameters have been pre-mapped for every device and
will automatically display across the pad grid. You can
override these mappings by entering ‘MIDI Map Mode’ and
assigning the pad columns to new parameters. We advise
against doing this, however, because this will override the
mapping of that pad column for all other devices in your set!
Instead, Macro Controls are a great way to customize
your Device Mode experience. (See ‘How to Create
Macros’ below). Once your Macros are created, select
the Instrument, Audio Effect or Drum Rack containing the
Macros and they will lie perfectly across the 8-pad columns,
leaving the built-in mappings intact.
11
The ‘Record Session automation in’ preference, found under
the Record/Warp/Launch tab in Live’s Preferences.
Alternatively, you may want to change this to ‘All Tracks’
so you can record automation in Device Mode regardless
of which track is armed. Note that you must still press the
Record button (Function column) to record automation.
The ‘Record Session In’ Preference set to ‘All Tracks’.
Page 13

Another Preference worth mentioning is ‘Select on Launch’,
also located within the Record/Warp/Launch tab. By
default, this is set to ‘On’ meaning that launching a clip will
select it. This means that the faders in Device Mode will
automatically apply to whatever instruments and/or effects
are on that clip’s track.
User Mode could be thought of as ‘blank slate mode’ as it
is reserved for users to create their own MIDI mappings.
For those familiar with the original Launchpad, this mode
is identical to the infamous User 1 Mode. It is also an ideal
canvas for potential Max For Live creations, such as step
sequencers, LED VU meters, and so on.
Live’s ‘Select on Launch’ Preference.
You may prefer, however, to turn ‘Select on Launch’ to ‘Off’
so that launching a clip will not automatically select its track
for Device Mode duties. This might be useful, especially in
live performance, if you use Session Mode to trigger clips,
but you want to always return to another clip or track that
you are adjusting in Device Mode.
General Notes on Device Mode
As per usual, press and release the Device button to latch
Device Mode. Further presses of the Device button toggle
the Clip View and Device View on your screen, allowing
you to see your MIDI notes or instrument and effects,
respectively.
As such, one of User Mode’s intended uses is controlling
Live’s Drum Racks exactly as in Note Mode, but with no
LED feedback. This gives users doing Drum Rack LED light
shows a blank space on which to build (see ‘Creating LED
Light Shows’).
Creating LED Light Shows
LED light shows can add an awesome visual component to
your Launchpad performances. Let’s look at the basics.
First, you will need to press and release the User button to
enter User Mode. Then, add a Drum Rack to a MIDI track,
and fi ll it with samples. These samples are often sections of
fully completed songs, but they could be anything.
Device Mode can also be accessed momentarily from other
pages by pressing and holding the Device button. Upon
release you will return to the previous page or mode.
Like in Note Mode, the Delete, Quantise, Duplicate and
Double functions are easily used in Device Mode: simply
press and release these buttons to affect the currently
playing clip on the selected track. Remember, you can
always hit Undo if you make a mistake.
Finally, just like in Note Mode, Device Mode’s scene launch
buttons have no default functionality. This means that
they are freely assignable via MIDI mapping. Furthermore,
whatever MIDI mappings you create are unique to Device
Mode and independent of all other modes.
User Mode
Next, create another MIDI Track—this track will be triggering
the light show. Set it to receive MIDI from your Drum Rack,
and make sure to set the monitoring section to ‘In’.
Finally, in the ‘MIDI To’ choosers select Launchpad Pro
Output in the top, and Ch. 6 (User Mode’s default channel)
on the bottom.
You should now see the pads light up when pressed.
12
Page 14

It is now time to get creative. A common approach is to set
up multiple chains of MIDI Effects in a MIDI Effect Rack,
and then use the Rack’s ‘Key Zone Editor’ (the yellow switch
below) to give every pad a different LED feedback pattern.
Pro Tip: User Mode operates on MIDI channel 6 by default.
Pressing the Setup Button (see below) allows a different
MIDI channel of User Mode to be selected. This means if
you are using multiple Launchpad Pros (up to six) in User
Mode you can set the MIDI channel for each unit’s User
Mode separately, or you can switch MIDI channel on the
same unit allowing for up to 6 ‘pages’ of User mode.
Setup Button
That’s just the tip of the iceberg for Launchpad light shows—
browse online and you’ll surely fi nd more advanced
techniques. Good luck!
Like Note Mode, the scene launch buttons do nothing in
User Mode (i.e., they have no default functionality). This
means, of course, that they are freely assignable via MIDI
mapping. Furthermore, whatever MIDI mappings you create
are unique to Device Mode and independent of all other
modes. In fact, all buttons in User Mode are free to be MIDI
mapped, with the exception of Session, Note, Device and
User Mode buttons.
Layout Select
LIVE
NOTE
DRUM
FAD ER
Sitting inconspicuously in the upper-left corner of the
Launchpad Pro is the Setup button. Pressing and holding
this button reveals the Setup page (illustrated below), where
you can switch the Launchpad Pro’s functionality between
Live and ‘standalone’ layouts, setting your preferred velocity,
aftertouch, pad lighting, and MIDI channel options along
the way.
PGM
Velocity
LOW
6
14
POLY CHANOFF
MED
USB
HIGH
INT
7
15
LOW
MED
HIGH
INT
MIDI
Pad Lighting MIDI Out
INT MIDI
MIDI Channel
2
1 8
10
9 16
OFF
3
4
11
12
5
13
Aftertouch
Aftertouch Threshold
13
Page 15

In short, the Setup page is for advanced users who want
to specify how the Launchpad Pro’s MIDI interacts with
Ableton Live, other software, or hardware. This is also where
you can assign different playing styles to your Note grid,
Drum Rack, Device Modes, and standalone layouts. Let’s
begin at the top row of pads and discuss their functionality.
Layout Select
Note Layout—Enter this layout by pressing and holding
Setup and touching the blue Note pad. This layout is nearly
the same as the Note Mode found within the Live layout: a
note grid rising from left to right in semitone (aka half step)
intervals, and from the bottom up in perfect fourth intervals.
As expected, the lit pads outline the white notes on a piano
keyboard, which can be transposed in octaves or semitones
with the Up/Down or Left/Right buttons, respectively.
The top row of pads contains five pads that allow you
to switch the ‘layout’ of the Launchpad Pro’s operation
between ‘Live’, or one of four standalones (‘Note’, ‘Drum’,
‘Fader’ and ‘Programmer’). The pad representing the layout
you are currently using will glow brighter than the others—
when you select another layout and release the Setup
button the name of the new layout will scroll across the
Launchpad Pro in big letters. (Press any button or pad to
skip this scrolling text if it takes too long for your needs.)
Although switching between layouts is fairly simple, the
reasons for choosing them deserve some explanation.
The Live Layout
If you are using the Launchpad Pro with Ableton Live (even
in conjunction with external hardware) we recommend—in
the majority of cases—staying in the Live layout. This is
because when Ableton Live detects that it is connected
to the Launchpad Pro the Live layout (the green pad)
is automatically selected. (FYI: when Live is quit, the
Launchpad Pro defaults to the standalone Note layout.)
The Live layout actually contains the Session, Note, Device
and User Modes covered in the previous sections of this
guide. However, the Setup page is also where you can
modify certain MIDI-related aspects of these modes’
behaviors. To customize these modes simply enter them as
explained earlier (e.g. press the Device Mode button). Then,
while holding down the Setup button choose your preferred
velocity, aftertouch, or aftertouch threshold settings by
pressing the corresponding pad(s). You can then repeat the
procedure for the other modes in order to customize each
one to your taste.
Note, Drum, Fader and Programmer Layouts
If you want to use the Launchpad Pro as a ‘standalone’
MIDI controller (i.e., when not using Ableton Live), or if you
want to program your own configuration of the Launchpad
Pro you will need to choose either the Note (blue), Drum
(yellow), Fader (pink) or Programmer (orange) layout.
Examples of how Note, Drum and Fader layouts are used
will be explained in the remaining sections of this guide,
while endeavouring programmers should refer to our
<Programmer’s Reference Guide>.
Being an 8x8 pad grid, this layout is ideal for playing tonal,
chromatic MIDI instruments in other software programs
(e.g., Retro Synth in Logic X). It is also perfect for sending
MIDI to, and receiving MIDI from, hardware synthesizers
that you wish to play chromatically. Simply use the included
MIDI lead and connect the Launchpad Pro’s MIDI Out
to your hardware’s MIDI In—to receive MIDI back from
your hardware connect your hardware’s MIDI Out to the
Launchpad Pro’s MIDI In.
Drum Layout—Enter this layout by pressing and holding
Setup and touching the yellow Drum pad. The Drum layout
resembles Drum Mode in many respects: the 8x8 pad grid
is divided into 4 sections of 4x4 pads, beginning in the
lower-left corner on C1. C1 to D#2 are therefore playable in
the lower-left quarter of the Launchpad Pro, followed by E2
to G3 above it. MIDI notes G#3 to B4 occupy the lowerright 4x4 area, with C5 to D#6 playable in the upper-right
corner of the pad grid.
One noticeable difference between Drum Layout and Drum
Mode is the colouring. C1 to D#2 are colored yellow, E2
to G3 are light pink, G#3 to B4 are light blue, and C5 to
D#6 are light green. In fact, scrolling up or down with the
Navigation Arrows shows that each 4x4 area of the C-2 to
G8 MIDI note range is assigned a different colour to help
you visually organize your kits.
Another noticeable difference between Drum Layout and
Drum Mode is that although Mode Select, Scene Launch,
Function and Mixer buttons send MIDI they will have no
default functionality. You may, however, choose to MIDI
learn these buttons to parameters in your software.
Given its coloured, 4x4 pad areas the Drum layout makes
a great playing surface when using plug-ins such as Native
Instruments’ Battery or FXpansion’s Geist in non-Ableton
environments (Logic, Cubase, etc.). Propellerhead’s Kong
instrument in Reason is another prime candidate for Drum
layout use.
Fader Layout—Similar to Device Mode in the Live layout,
Fader turns the Launchpad Pro’s vertical pad columns into
virtual faders, capable of moving one or more knobs or
sliders on a device or in other software. Fader layout also
uses the velocity-sensitive pads for precise movements: the
14
Page 16

softer you hit a pad the slower a parameter changes; the
harder you hit a pad the faster a change will occur.
• ‘Off’ simply means that aftertouch capabilities are
disabled.
Note that in Fader layout, aftertouch settings will not be
available when pressing and holding the Setup button.
Programmer (PGM) Layout—Programmer layout is
quite advanced, as it is reserved for individuals or firms
that want to design their own software to work with the
Launchpad Pro. Programmer is most similar to User Mode,
but with a different layout. For more information, see the
<Programmer’s Reference Guide>.
Setup Page Options
Each of the selectable layouts feature the following
parameters (except where noted) that can be adjusted to fit
your playing or mixing style.
Velocity—The speed at which you strike a pad is read by
the Launchpad Pro as velocity information. Usually this
means that the harder you hit a pad, the louder your MIDI
instrument will sound, and vice-versa. Therefore, this area
of the Setup page lets you choose which pad sensitivity fits
your playing style.
• ‘Medium’ (Med) is the default and should suite most
playing styles, but if not there are two other options. For
example, if you tend to play your pads softly you could
choose ‘High’, which will skew incoming MIDI values
upwards. The result will be MIDI notes with higher velocities
than otherwise expected. On the other hand, if you play your
pads with a lot of force you might set your velocity to ‘Low’
to counterbalance your strength. Regardless, your velocity
selection will be remembered for each layout, meaning that
you could, say, set your Drum Mode velocity to ‘Off’ and
your Note Mode velocity to ‘Medium’.
• ‘Off’ means that pads will output CC values at 127,
regardless of how hard or soft your strike them.
Aftertouch—This option allows you to choose ‘Off’,
‘Polyphonic’ or ‘Channel’ aftertouch for each Mode or
layout. This defines how Live instruments or third-party plugins respond to pad pressure while pads are held down.
If you are not familiar with aftertouch, it is indeed a powerful
sound design tool. Common examples of aftertouch are
adding vibrato or tremolo, or opening/closing a filter. Most
of Ableton Live’s instruments can respond to channel
aftertouch—Ableton Live, however, does not currently
support polyphonic aftertouch. Please consult your DAW
and third-party plug-ins’ documentation to confirm their
channel or polyphonic aftertouch capabilities.
Aftertouch Threshold—These pads set aftertouch
sensitivity at ‘Low’, ‘Medium’ or ‘High’ thresholds. The
default setting is High, which requires the most pad
pressure in order to send aftertouch messages. When set
to Low the pads will produce aftertouch more easily—great if
you tend to hit your pads lightly.
Note that the following pads have a global effect, meaning
that their settings will apply to all other modes and layouts.
Pad Lighting—These two pads define how pads light up
when receiving MIDI notes.
• Internal (Int) – With this option engaged (lit), pads are lit
locally by pressing pads and/or buttons.
• MIDI – When this is lit, pads can be lit by MIDI data
coming in from the Launchpad Pro’s MIDI In port.
Ableton Live users should leave this set to Internal, but
if you are using your Launchpad Pro with other software
or hardware, you may wish to disengage either of these
depending on the circumstance.
MIDI Out—This pad controls whether MIDI is sent to the
Launchpad Pro’s physical MIDI Out port. This option is
mostly helpful for users who want to use the Launchpad Pro
with hardware MIDI devices. When set to on (lit), MIDI from
the pads and controls will be sent directly to the MIDI Out
port.
Note that this pad has a global effect, meaning that
changing its state will apply to all modes and layouts.
• Polyphonic aftertouch means every pad can have its
own aftertouch amount. In other words, different notes will
respond individually even when multiple notes are held.
• Channel aftertouch means that one aftertouch value
will apply to all held notes. More specifically, the pad that
receives the greatest pressure will dictate the applied
aftertouch amount.
15
MIDI Channel—The bottom two rows of pads represent
the standard 16 MIDI channels. The choice of MIDI
channels is fixed in the Live layout’s Session, Note and
Device Modes; the User Mode’s MIDI channel, however,
can be set to MIDI channels 6, 7, 8, 14, 15 or 16. Therefore,
if you are using multiple Launchpad Pros (up to six) in
User Mode you can set the MIDI channel for each unit’s
User Mode separately. This allows each Launchpad Pro to
operate independently when MIDI mapping.
Page 17

Using the Launchpad Pro,
Ableton Live and Hardware
To get your hardware’s sound back into Live connect the
Line Out on the back of your hardware unit into an input on
your audio interface.
With a little knowledge the Launchpad Pro and Live become
a great team for controlling your external hardware devices,
such as synthesisers, drum machines, and so on.
As mentioned in the previous section, we recommend
using the Live layout (selected automatically when Live
detects the Launchpad Pro) if you want to add external
hardware devices to your Ableton set. There are two basic
methods for setting up the Launchpad Pro, Live and external
hardware, as follows.
Using the Launchpad Pro’s MIDI Ports
First, make sure you set the Setup page’s MIDI Out pad to
‘Off’ (unlit). Live will then be in control of sending MIDI, so
that you are not also playing the hardware directly from the
Launchpad Pro itself, thus sending MIDI twice to
your hardware.
With the Launchpad Pro connected to your computer via
USB, run a MIDI lead (MIDI DIN-5 with adaptor) from the
Launchpad Pro’s MIDI Out port into your hardware unit’s
MIDI In port.
With that done successfully, select the input, in the ‘Audio
From’ section, that is receiving the audio signal from your
hardware.
External Instrument’s ‘Audio From’ chooser.
See the ‘Quick Tip’ in the next section for a short guide on
recording your results.
Using Your Audio Interface’s MIDI In/Out
MIDI OUT MIDI IN
Connecting the Launchpad Pro’s ‘MIDI Out’ (left) to your
hardware’s ‘MIDI In’ (right).
Next, place Live’s External Instrument (found in the
‘Instruments’ folder) on a MIDI track. In the top ‘MIDI To’
chooser select ‘Launchpad Pro Output (Launchpad Pro
(MIDI Port))’.
With the Launchpad Pro connected to your computer via
USB, run a MIDI lead (i.e., a MIDI DIN-5) out of your audio
interface (e.g. Focusrite Scarlett.) into your hardware unit’s
MIDI In port.
Connecting your interface’s ‘MIDI Out’ (left) to your
hardware’s ‘MIDI In’ (right).
External Instrument sending MIDI through the Launchpad
Pro’s MIDI Port.
16
Page 18

Next, place Live’s External Instrument (found in the
‘Instruments’ folder) on a MIDI track. In the top ‘MIDI To’
chooser select your Audio Interface, and in the bottom
chooser select the channel that will send MIDI to
your hardware.
want to ‘print’ your results as audio. To do so, create a new
audio track and select the External Instrument track as its
input in the ‘Audio From’ chooser. Then, simply press record
in empty clip slots to make new audio clips.
Using Standalone Layouts With
At this point, hitting Launchpad Pro pads in Note Mode
should send MIDI to your hardware.
Now it is time to get your hardware’s sound back into Live.
Connect the Line Out on the back of your hardware unit into
an input on your interface.
With that accomplished, select the input—in the ‘Audio
From’ section—that is receiving the audio signal from
your hardware.
Hardware
Let’s take Ableton Live out of the equation entirely. In this
case, the Launchpad Pro can serve as a control surface
for any device able to send and/or receive MIDI. Simply
press and hold the Setup button and choose from the Note,
Drum or Fader layouts to begin sending MIDI out of the
Launchpad Pro. If you suspect that MIDI is not being sent,
check that the ‘MIDI Out’ button found on the Setup page
is lit. This ensures that MIDI created from hitting the control
surface will be sent from the Launchpad Pro’s MIDI Port to
your hardware.
As previously explained (see ‘Using the Launchpad Pro’s
MIDI Ports’) you will need to run a MIDI lead (i.e., a MIDI
DIN-5) out of your Launchpad Pro’s MIDI Out port into
your hardware unit’s MIDI In port. In order to receive MIDI,
connect another MIDI lead from the hardware unit’s MIDI
Out port into the Launchpad Pro’s MIDI In port.
Using Other Software
You can now use chromatic Note Mode to play your
hardware unit, and hear the result in Ableton Live.
Quick Tip: Since Ableton Live’s External Instrument records
MIDI and actually only monitors the audio input , you might
17
Although this user guide primarily covers how to use the
Launchpad Pro with Ableton Live it can also work with
other Digital Audio Workstations or ‘DAWs’ (FL Studio,
Logic, etc). As of publication, Ableton is the only software
company with support for Launchpad Pro. This is likely to
change over time, so please check the resources of your
preferred software to see if Launchpad Pro support has
become available.
Regardless, the Launchpad Pro will still input standard
MIDI data into most DAWs. Please consult your DAW’s
documentation for specifi cs on sending and receiving MIDI,
Page 19

customizing MIDI controls, or any other troubleshooting.
Let’s look at how you might start using the Launchpad Pro
with Logic X, but the methods shown here will apply to most
other music software.
With the unit properly connected, Logic X should by default
receive MIDI from the Launchpad Pro (in Note layout) if
you press its pads. This tiny circle above the time signature
confi rms that Logic is receiving MIDI when lit.
Logic’s ‘MIDI In’ indicator
You now have convenient, hands-on control of your
Logic X session.
Logic X’s ‘Controller Assignments’ window.
Troubleshooting
For all troubleshooting queries, please visit the Novation
Answerbase at www.novationmusic.com/answerbase where
you will fi nd articles covering numerous troubleshooting
examples.
Assuming Logic X is receiving MIDI, simply record arm a
MIDI track that contains an instrument. The Launchpad Pro
will then be able to make melodies and chords in Logic,
using the chromatic note grid in Note layout, or 4x4 pad
areas in Drum layout. Just like in Ableton Live, you can use
the Up and Down arrow buttons to shift octaves, and the
Left and Right arrow buttons to transpose the pad layout
in semitones.
For more in depth control of Logic from the Launchpad Pro
we will have to set it up ourselves. One possibility is to use
Fader layout (see ‘Setup’) to mimic a traditional mixer, and
control selected tracks in Logic.
First, change the Launchpad Pro to the Fader layout on the
Setup page. Once in Fader, you are now ready to ‘learn’
Logic’s parameters to the Launchpad Pro’s virtual faders.
This is be done by fi nding ‘Control Surfaces’ under the
Logic menu, and then selecting ‘Controller Assignments’.
Follow these steps in the pop-up window:
• First, click the ‘Learn’ button
• Next, click the Logic parameter you want to map to
the Launchpad Pro (e.g., Track Stack volume sliders)
• Then, touch the Launchpad Pro’s pads
• Finally, click ‘Learn’ again to exit
18
Page 20

 Loading...