

MSTOVEF
Proven Performance
NorthStar Corn Stove Model # CS550 (Item #173780):
A freestanding room heater that burns shelled feed corn.
Manufactured by the skilled workforce at:
Northern Tool & Equipment Mfg.
NorthStar Parts and Service 1-800-270-0810
Quick Facts:
Installation: Before installing your NorthStar Corn Stove, please read and follow all instructions contained in this manual.
A fire hazard may result if installed incorrectly. Consult local building and fire codes for additional
requirements. Removal or reinstallation costs are not covered by this product’s warranty.
Before cutting holes in your wall, make sure the stove is placed where you want it and check for electrical
wires and plumbing pipes. Cut holes between studs. Use a stud finder to check for studs. Use a long
1/4 drill bit to drill a center point through both walls. Use this center point to make sure the inside and
outside wall holes line up.
Buying Corn: Use cleaned shelled feed corn with 14% or less moisture content only. Buy corn in bulk or bagged from
feed stores, elevators or direct from a farmer. Corn with 11-12% moisture content works best.
Mix 1 to 2 handfuls of oyster shells (North Star #PD366991 or available at feed stores) with each
hopperful of corn.
Starting: 1.) Fill hopper with corn.
2.) Set damper to first notch (see page 7).
3.) Rotate Heat Setting to #1.
4.) Place Mode Selector to Start.
5.) Place crumbled fire starter blocks in corn pot, light with match and close the door.
6.) Use Feed Control to manually prime the corn into the fire pot.
7.) When the Corn Stove warms up, the room blower and automatic corn feed will start. After this point
place Mode Selector switch to Run.
8.) Rotate Heat Setting to desired setting.
9.) Adjust damper to achieve cleanest burn.
10.) The first time the stove is operated, oils will burn out of the fire chamber and create an odor and
possibly some smoke. This will stop after the first 15 minutes of operation.
Stopping: 1.) Rotate Heat Setting to OFF position.
Maintenance: Unplug the Corn Stove before servicing.
Oil blower motors annually. 5-10 drops SAE 20 non-detergent oil.
Check/Clean exhaust piping weekly.
Clean combustion chamber weekly.
™
2050 Airtech Rd.
Faribault, MN 55021
SAVE THESE INSTRUCTIONS
1
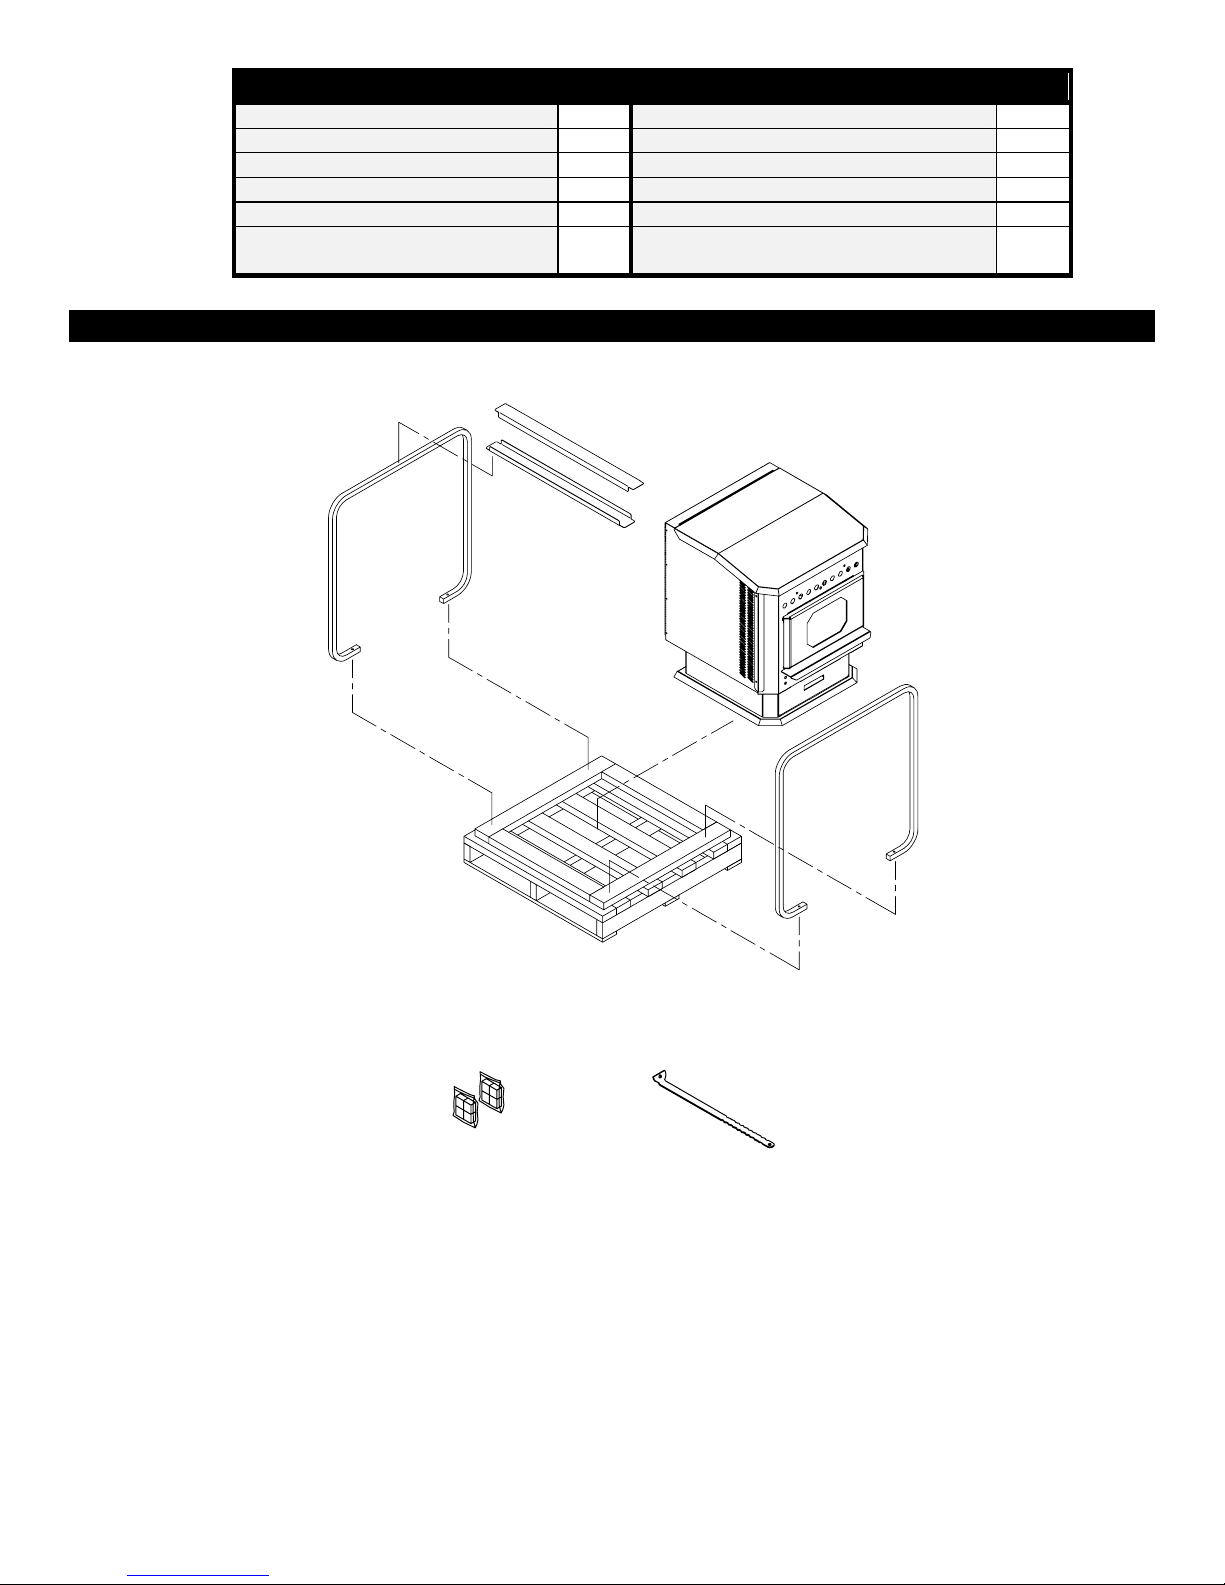
Table of Contents
Quick Facts 1 Operation Instructions 7
Unpacking the Stove 2 Maintenance Instructions 8
Buying Corn 3 Troubleshooting 9-10
Oyster Shells 3 Parts Breakdowns 11-14
Installation Instructions 4-6 Electrical schematic 15
Additional Requirements for
Mobile Home Installations
6 Thermostat Installation 16
Unpacking the Stove:
Remove Cornstove from box and pallet
fig01037
The following items are packed in the drawer
fig01038
Firestarte
r
Bricks
Scraper Rod
Qty-1
2

Buying Corn
The corn you use will affect the dependability and heat output of your stove. Take the
time now to read through this page before using your stove. Enjoy your NorthStar
Corn Stove!
Ask for cleaned corn when buying it from your corn supplier. Buy cleaned corn in bulk or bagged
from feed stores, elevators or direct from a farmer. Corn right from the field will have debris that can
clog the auger. This will result in an unreliable burn requiring constant attention to the stove’s draft
setting. In most cases, debris will eventually cause the flame to go completely out.
Store your corn in a dry place. Check the moisture content periodically to make sure it is not wet.
The moisture content needs to be 14% or less, 11-12% works best. Wet corn will cause unreliable
burn, low heat output, and deterioration of the stove and exhaust piping. Using corn over 14%
moisture will void your warranty.
There are many varieties of corn with different kernel sizes. Your stove burns best with small to
medium sized kernels. Try to buy your corn from the same place. Changing corn suppliers
frequently will cause a different flame requiring different draft settings. DO NOT USE CORN WITH A
HIGH WAX CONTENT!
DO NOT BURN SEED CORN! Seed corn is treated with pesticides that can be fatal if swallowed.
Therefore, seed corn is dangerous to have around the house, especially when children are present.
Oyster Shells
Unburned corn kernel starches cling to the fire pot and form solid masses called
clinkers. Clinkers will plug the air inlet holes in the fire pot and cause the stove to
prematurely burn out.
Oyster shells, when mixed with corn, drastically reduce clinkers. This results in lower
maintenance, less ash, cleaner burn pot, and higher heat output. If you don’t use
oyster shells, your stove will require more attention and will not burn reliably.
Where to buy oyster shells
Oyster shells are fed to chickens, so they are sold at most feed stores. If you cannot find oyster
shells locally, please call NorthStar at 1-800-270-0810. (NorthStar Oyster Shells #PD366991).
How much oyster shells to use
The amount of oyster shells used depends on the starch content of the corn. If your corn has a low
starch content, less oyster shells can be used. High starch content corn will require more oyster
shells. Initially, use 1 to 2 handfuls of oyster shells per hopper of corn. Run the stove for a day, if
there is any buildup of clinkers on the stirrer shaft, increase the amount of oyster shells.
3
Installation Instructions:
When this corn stove is not properly installed, a house fire may result. To reduce the risk of fire, follow the installation instructions.
Contact local building or fire officials about restrictions and installation inspection requirements in your area.
This corn stove must be connected to an exhaust system (chimney) that vents outdoors. Do not connect this corn stove to a chimney
flue serving another appliance.
Please read this entire manual before you install and use this new corn stove. Failure to follow instructions may result in property
damage, bodily injury, or even death.
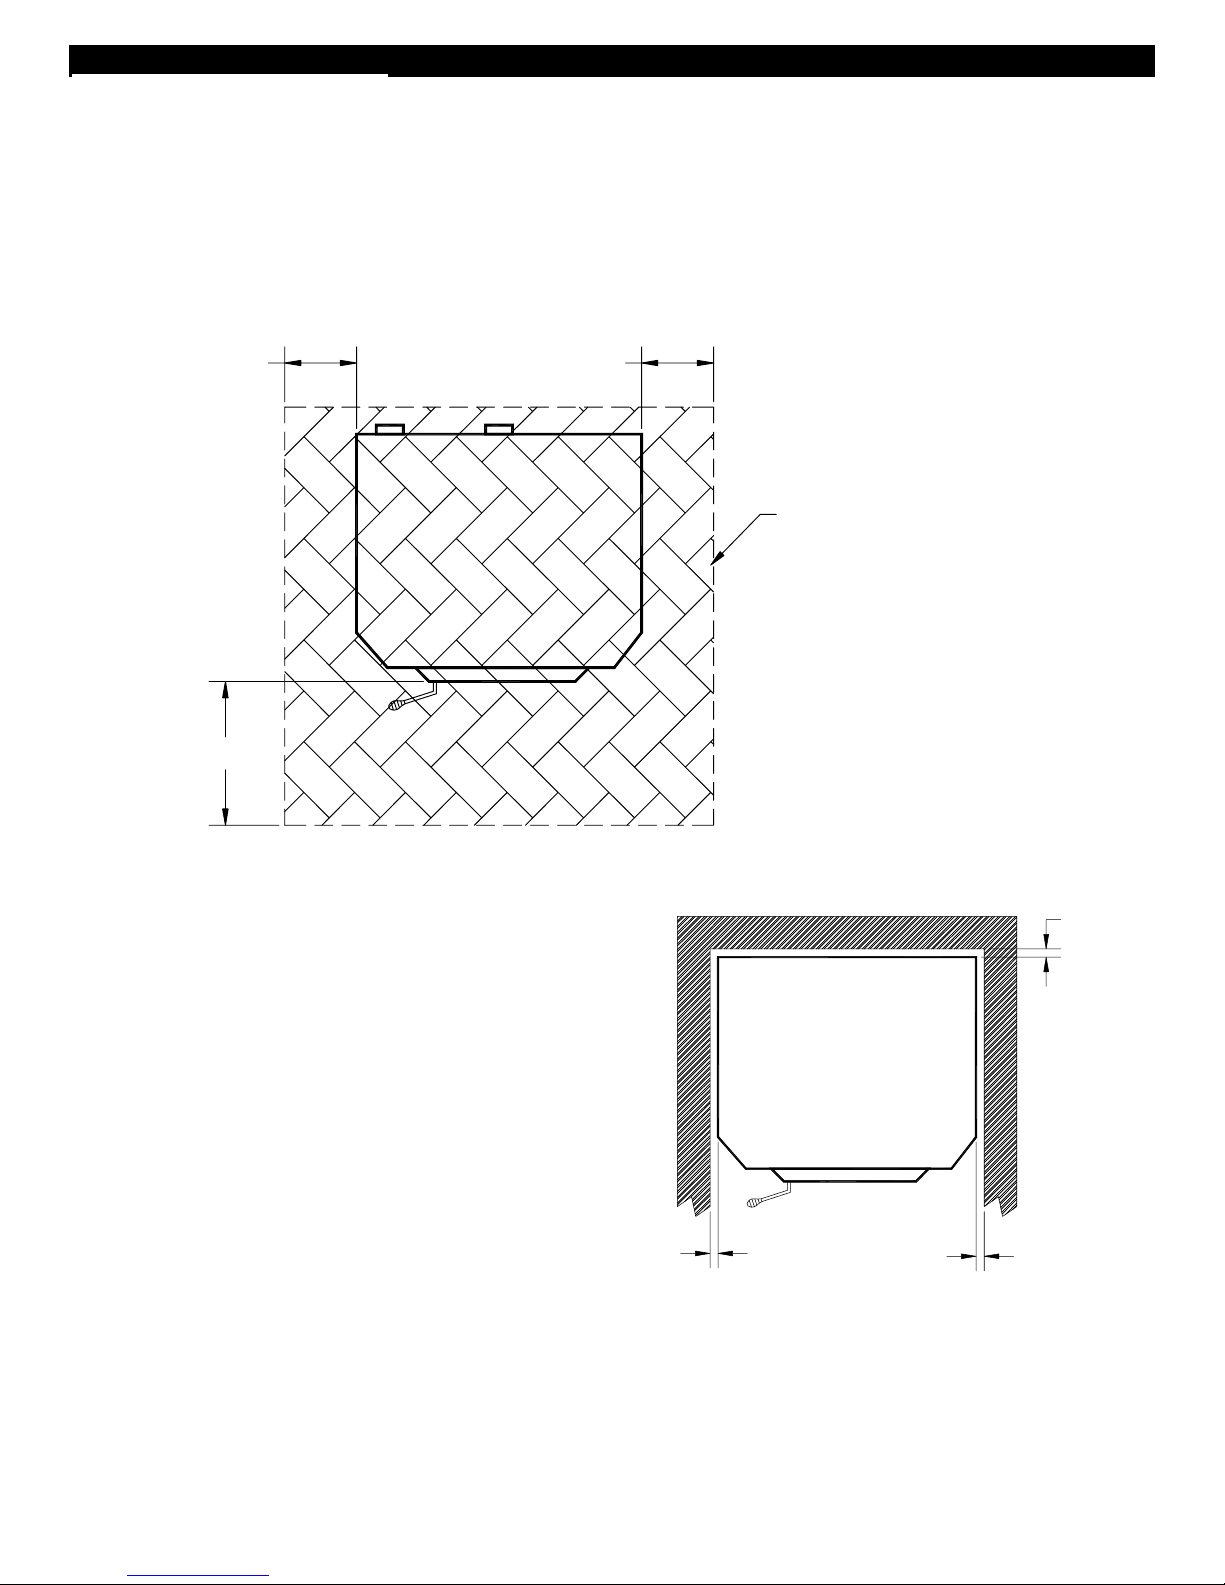
1.) Floor Protection
A.) The floor must be protected directly under the stove
B.) The floor must be protected 6” beyond the viewing and ash door and 6” beyond each side of the stove.
C.) Use non-combustible materials such as ceramic tile or concrete for floor protection.
6"6"
NON-COMBUSTIBLE
FLOOR PROTECTION
6"
2.) Minimum Installation Clearances to
Combustible Materials
A.) 1” minimum clearance to back wall from heater
and chimney connector.
B.) 1” minimum clearance to side wall from heater
and chimney connector.
C.) Install vent piping at clearances specified by the
vent manufacturer.
NOTE: These are minimum clearances from
combustible materials such as shelving or furniture
as established by a nationally recognized testing
laboratory. The clearances for the side walls should
be 24” so side panels can be opened for servicing the
stove.
1"
1"
1"
TOP VIEW OF STOVE
FIG00981
4
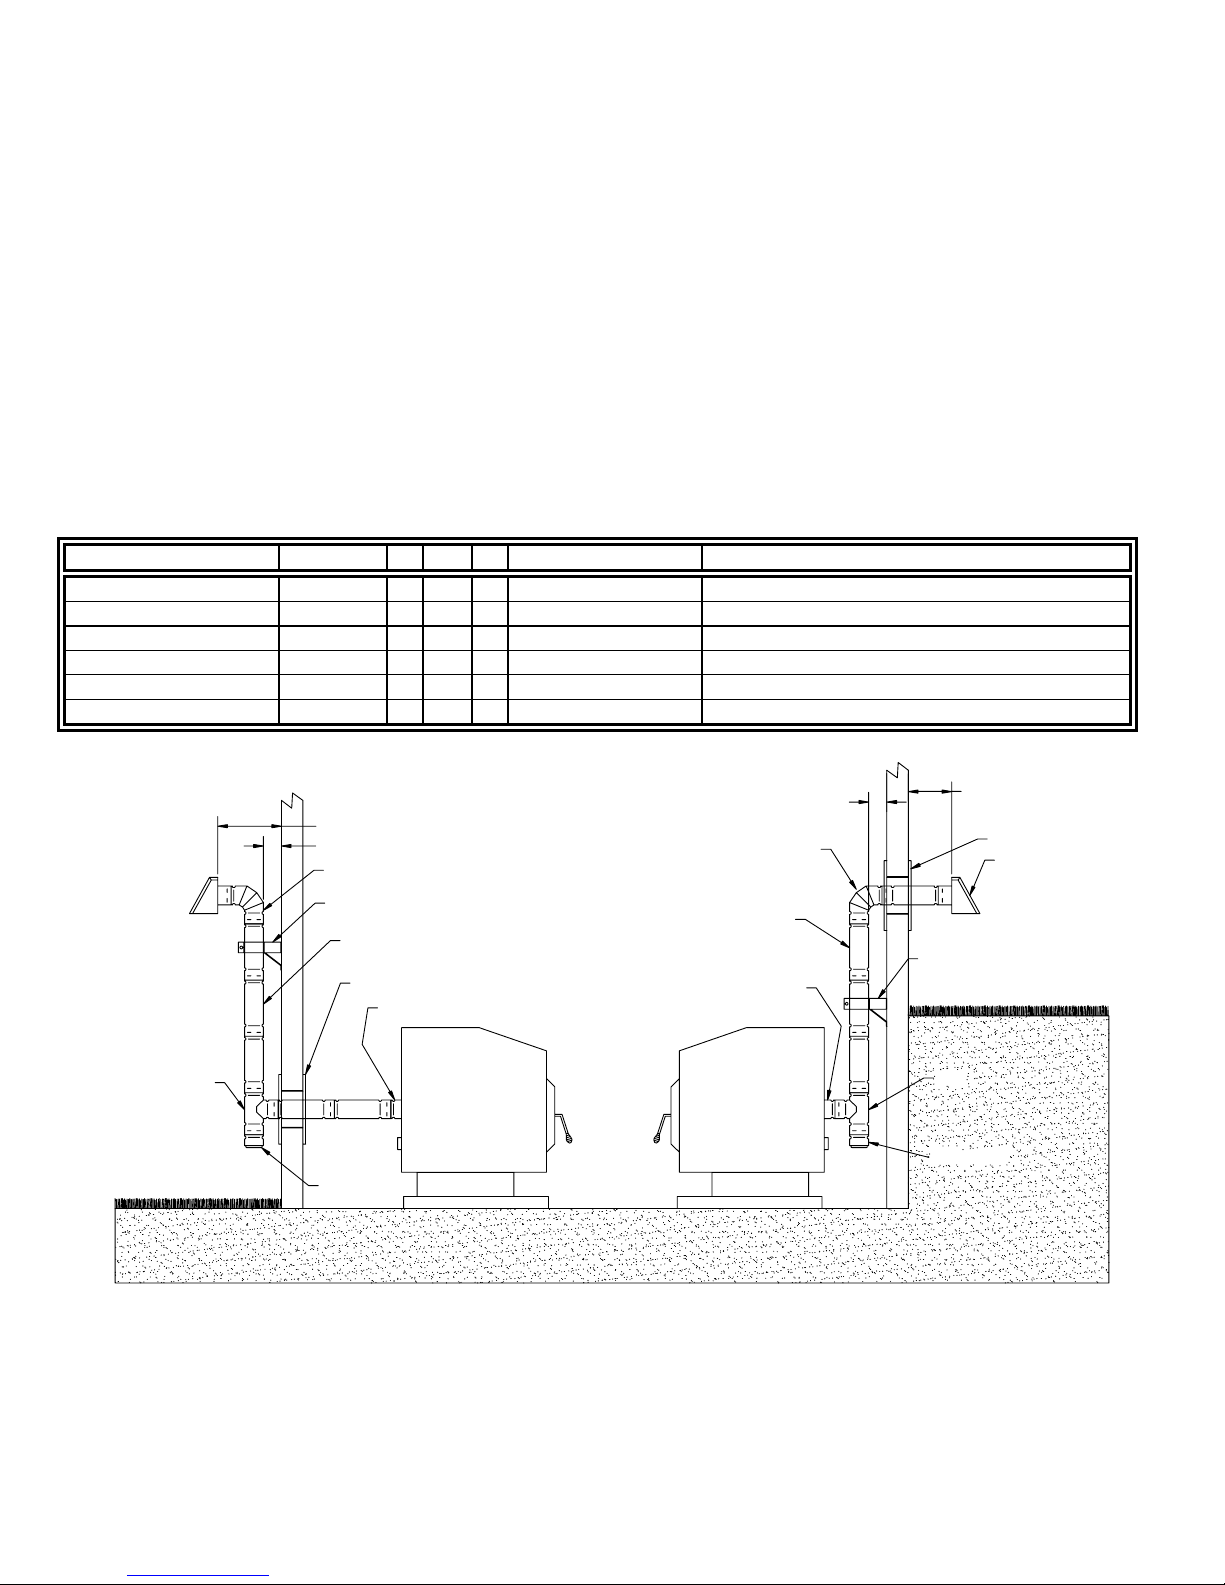
3.) Exhaust system (venting).
Attention! Before cutting holes in your wall, make sure the stove is placed where you want it and check for electrical wires and
plumbing pipes. Always check dimensions of stove and wall thimble before cutting hole in wall. Cut holes between studs.
Use a stud finder to check for studs. Use a long 1/4 drill bit to drill a center point through both walls. Use this center
point to make sure the inside and outside wall holes line up.
Do not install a flue damper in the exhaust venting system of this unit.
A.) The entire exhaust system must be 3” or larger UL approved type “L” vent pipe.
B.) The exhaust system must include the following components:
a.) Pipe adapter (seal to exhaust outlet gas tight with high temperature RTV silicone sealant).
b.) Cleanout Tee
c.) At least 3 ft of vertical pipe.
d.) Wall support every 4 ft of vertical pipe.
e.) No more than 4 ft of horizontal pipe.
f.) Minimum 3” clearance from exhaust pipe to combustibles.
g.) Wall thimble for piping through combustible walls.
h.) Horizontal chimney cap.
C.) The exhaust piping must terminate outside at least 6 inches past the outer wall surface.
D.) Determine equivalent length of exhaust piping. Never exceed 20ft total equivalent pipe length. If altitude is over 2000ft,
do not exceed 15ft equivalent pipe length. If altitude is over 4000ft, do not exceed 12.5ft equivalent pipe length.
Component Equivalent Length Sample
Horizontal Straight Pipe # of feet X 1.0 = Horizontal Straight Pipe: 1 ft x 1 = 1
Vertical Straight Pipe # of feet X 0.5 = Vertical Straight Pipe: 4 ft x .5 = 2
90° Bend or Tee # of bends X 5 = 90° Bends: 1 x 5 = 5
90° Bend or Tee # of tees X 5 = Tees: 1 x 5 = 5
45° Bend # of bends X 3 = 45° Bends: 1 x 3 = 3
Total Length = 1 + 2 + 5 + 5 + 3 = 16 ft
6" MIN
WALL THIMBLE
HORIZONTAL
CHIMNEY CAP
WALL SUPPORT
TEE
CLEANOUT
TEE
6" MIN
3" MIN
90° ELBOW
WALL SUPPORT
1FT STRAIGHT
SECTION (5X)
WALL THIMBLE
PIPE ADAPTER
CLEANOUT
90° ELBOW
1FT STRAIGHT
SECTION (4X)
PIPE ADAPTER
3" MIN
*Complete vent kit item #36624 available through NorthStar Customer service 1-800-270-0810 includes
all parts shown on the left side of the installation diagram above (fig00978).
5
 Loading...