

NorthStar MPPWE Maintenance Manual
MPPWE
ITEM NUMBER:
SERIAL NUMBER:
Engine Model:
Pump Model:
Proven Performance
K-BAR Industries, Faribault, MN, 55021
Flow:
Hose Length:
Nozzle Size:
Pressure:
Lance Length:
Installation, Operation, and Maintenance Manual
PRESSURE WASHER: Cleans dirty surfaces with high pressure water.
To the Owner:
Thank you for purchasing a Northstar pressure washer. Your machine is designed for long life, dependability,
and the top performance you demand! Take time now to read through this manual so you better understand the
machine’s operation, maintenance and safety precautions. Everyone who operates this machine must read and
understand this manual. The time you take now will prolong your machine’s life and prepare you for its safe
operation. Enjoy the exceptional performance of your Northstar pressure washer, the industry leader!
The manufacturer reserves the right to make improvements in design and/or changes in specifications at any
time without incurring any obligation to install them on units previously sold.
Quick Facts
Engine Oil Engine is shipped without oil. Fill before starting.
Use SAE 10W-30 motor oil.
Pump Oil Pump is shipped with oil. Change oil plug and check pump oil level before starting.
Use SAE 30 Non-detergent pump oil (item# 4043) or Cat Pump oil (item# 22158) for oil
changes.
Water Make sure your water flow is 20% higher than the pressure washer’s flow rate.
Make sure your water is clean and particle free.
Storage Do not allow water to freeze in the pump, hose, or spray gun.
Add fuel stabilizer to the fuel tank before long term storage.
Spraying
Chemicals
Maintenance
Schedule
Cat Pump: Oil: change after first 50 hours, then every 3 months or 500 hours.
General Pump: Oil: change after first 40 hours, then every 3 months or 500 hours.
Use any North Star brand or equivalent pressure washer chemicals.
Couple the chemical injector to the pump outlet. Use black nozzle.
Engine: Oil: change after first 20 hours, then annually or every 100 hours.
Spark Plug: clean every 100 hrs., replace annually or every 300 hrs.
Air Filter: clean every 100 hours, replace annually or every 300 hrs.
Read and understand all manuals before operating.
Any Questions, Comments, Problems or Parts Orders
In the United States In the United Kingdom
Northstar Customer Service
Call 1-800-270-0810 Northern Tool and Equipment Co. (UK) Ltd.
Hours: Monday - Friday 7:00 AM to 5:30 PM Unit 2, Keel Close,
Saturday 7:30 AM-11:30 AM Central Time Portsmouth, Hants PO3 5QD, England
Call 02392639752

Table of Contents
Important Safety Instructions 2 Maintenance Instructions 11-12
Machine Component
Identification
Installation Instructions 4-7 Long Term Storage 13
Operation Instructions 8-10 Troubleshooting 14
Safety Features 10-11 Parts Breakdowns 15-20
3 Moving and Handling Instructions 13
Important Safety Instructions
WARNING -Risk of injection or injury to persons - Do not direct discharge stream at persons or animals. Do
not use a hose if exterior damage is evident.
-Risk of explosion. Do not spray flammable liquids. Do not operate in a flammable environment.
CAUTION -Risk of asphyxiation - Exhaust fumes are deadly. For outdoor use only. Avoid inhaling exhaust
fumes.
-Risk of fire. Do not add fuel when the product is operating or hot.
-Gun kicks back. Hold with both hands.
-To reduce the risk of injury, read operating instructions carefully before use.
WARNING - When using this pressure washer, basic precautions should always be followed, including the following:
1.) Read all the instructions before using this product.
2.) To reduce the risk of injury, close supervision is necessary when the pressure washer is used near
children. Do not allow irresponsible use by children. Always stop the unit and bleed or relieve pressures
before leaving unattended, disconnecting hoses, or servicing the pump.
3.) Know how to stop the unit and bleed pressures quickly. Be thoroughly familiar with the controls.
4.) Stay alert - watch what you are doing.
5.) Do not operate when fatigued or under the influence of alcohol or drugs. Never smoke while operating
or fueling this machine.
6.) Keep operating area clear of all persons.
7.) Do not overreach or stand on unstable support. Keep good footing and balance at all times. Wear
footwear capable of maintaining a good grip on wet surfaces. Do not place the machine on soft or
unstable ground.
8.) Follow the maintenance instructions specified in all manuals. Do not run machine without sufficient
lubrication or sufficient water to cool the pump.
9.) Wear safety glasses, gloves, face protection and appropriate clothing when operating the machine.
10.) Do not operate this machine with broken or missing parts. Never alter the manufacturer’s original design
or deactivate any safety device on the machine.
11.) Risk of exposure to dangerous chemicals. Wear protective gloves when handling and cleaning with
chemicals. Follow the chemical manufacturer’s directions. Understand all safety hazards and first aid for
all chemicals being used. Check whether dangerous chemicals have been used and take any
precautions that may have been recommended by the supplier of these chemicals when cleaning filters.
Do not pump highly abrasive fluids or use with incompatible chemicals or solvents.
12.) Know the pressure and temperature limits of your machine. Be sure all high pressure accessories meet
or exceed your machine’s limits. Do not set the pressure relief valve above the machine’s limit.
13.) Do not move this machine by pulling on the hose. Do not use the pump to support other items of
equipment that impose unacceptable loads on the pump. Do not attempt to use this machine as a prop.
14.)To reduce risk of injury, do not secure the spray gun open. Your spray gun is equipped with a built-in
trigger safety latch to guard against accidental trigger release and potentially dangerous high pressure
spray. Rotate the safety latch to the locked position when not spraying.
15.) Do not clean this machine with its own spray. Cleaning should be done with a damp sponge with the
engine OFF.
SAVE THESE INSTRUCTIONS
2

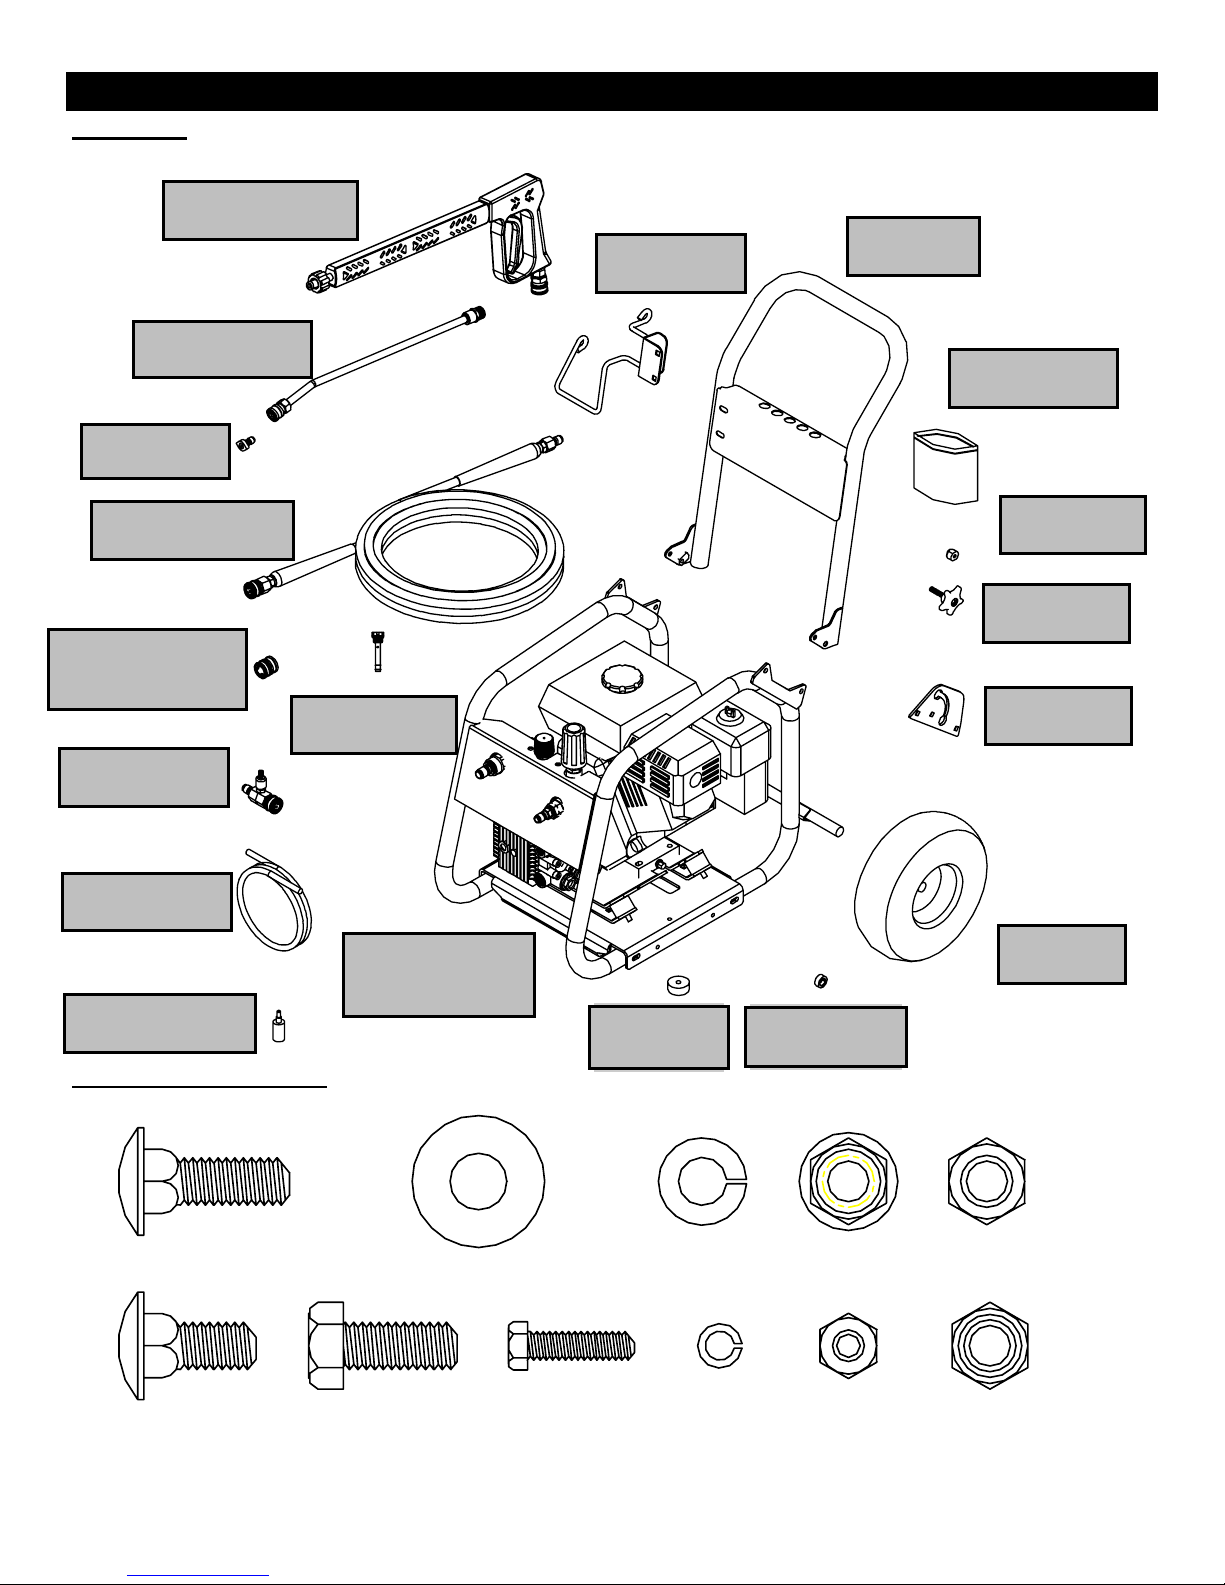
Machine Component Identification
157816, 157817, 157818, 157819, 157820
1
7
3
8
2
6
4
10
5
Ref # Description Ref # Description
1 Hose/Gun Holder 6 Water Outlet (Pressure Hose)
2 Water Inlet (Garden Hose) 7 Pressure Adjustment (unloader)
3 Easy Start Knob 8 Inlet Filter
4 Engine Start/Stop Switch 9 Engine Oil Drain
5 Engine Oil Fill 10 Engine Controls (see engine manual)
9
00477
3
Installation Instructions
I.) Unpack
Separate and identify the components found in the box(es). Use the assembly instructions in this manual for assembly.
Spray Gun & Grip
Qty-1
Hose Hook
Qty-1
Lance Extension
Qty-1
Nozzle
Qty-5
Handle
Qty-1
Fastener Bag
Qty-1
High Pressure Hose
Qty-1
Garden Hose Quick
Couple Socket
Qty-1
Vented Dipstick*
Qty-1
Chemical Injector
Qty-1
Clear Hose
Qty-1
Engine/Pump/Base
Assembly
Chemical Strainer
Qty-1
Qty-1
II.) Open Fastener Bag
A. Open fastener bag and separate the fasteners.
Rubber Foot
Qty-2
Wheel Retainer
Qty 2
Spacers
Qty-2
Handle Knob
Qty-2
Handle Ear
Qty-2
Wheel
Qty-2
5/16-18 x 1”
Carriage Bolt
Qty.- 2
5/16-18 x 3/4”
Carriage Bolt
Qty.- 6
5/16
Flat Washer
Qty.- 2
#5/16 x 3/4”
Hex Bolt
Qty.- 2
#10 x 3/4”
Hex Bolt
Qty.- 1
Lock Washer
Qty.- 6
#10 Lock
Washer
5/16
Qty.- 1
5/16”
Flange Nut
Qty.- 2
#10 Hex Nut
Qty.- 1
5/16-18
Hex Nut
Qty.- 6
5/16-18
Nyloc Nut
Qty.- 2
4
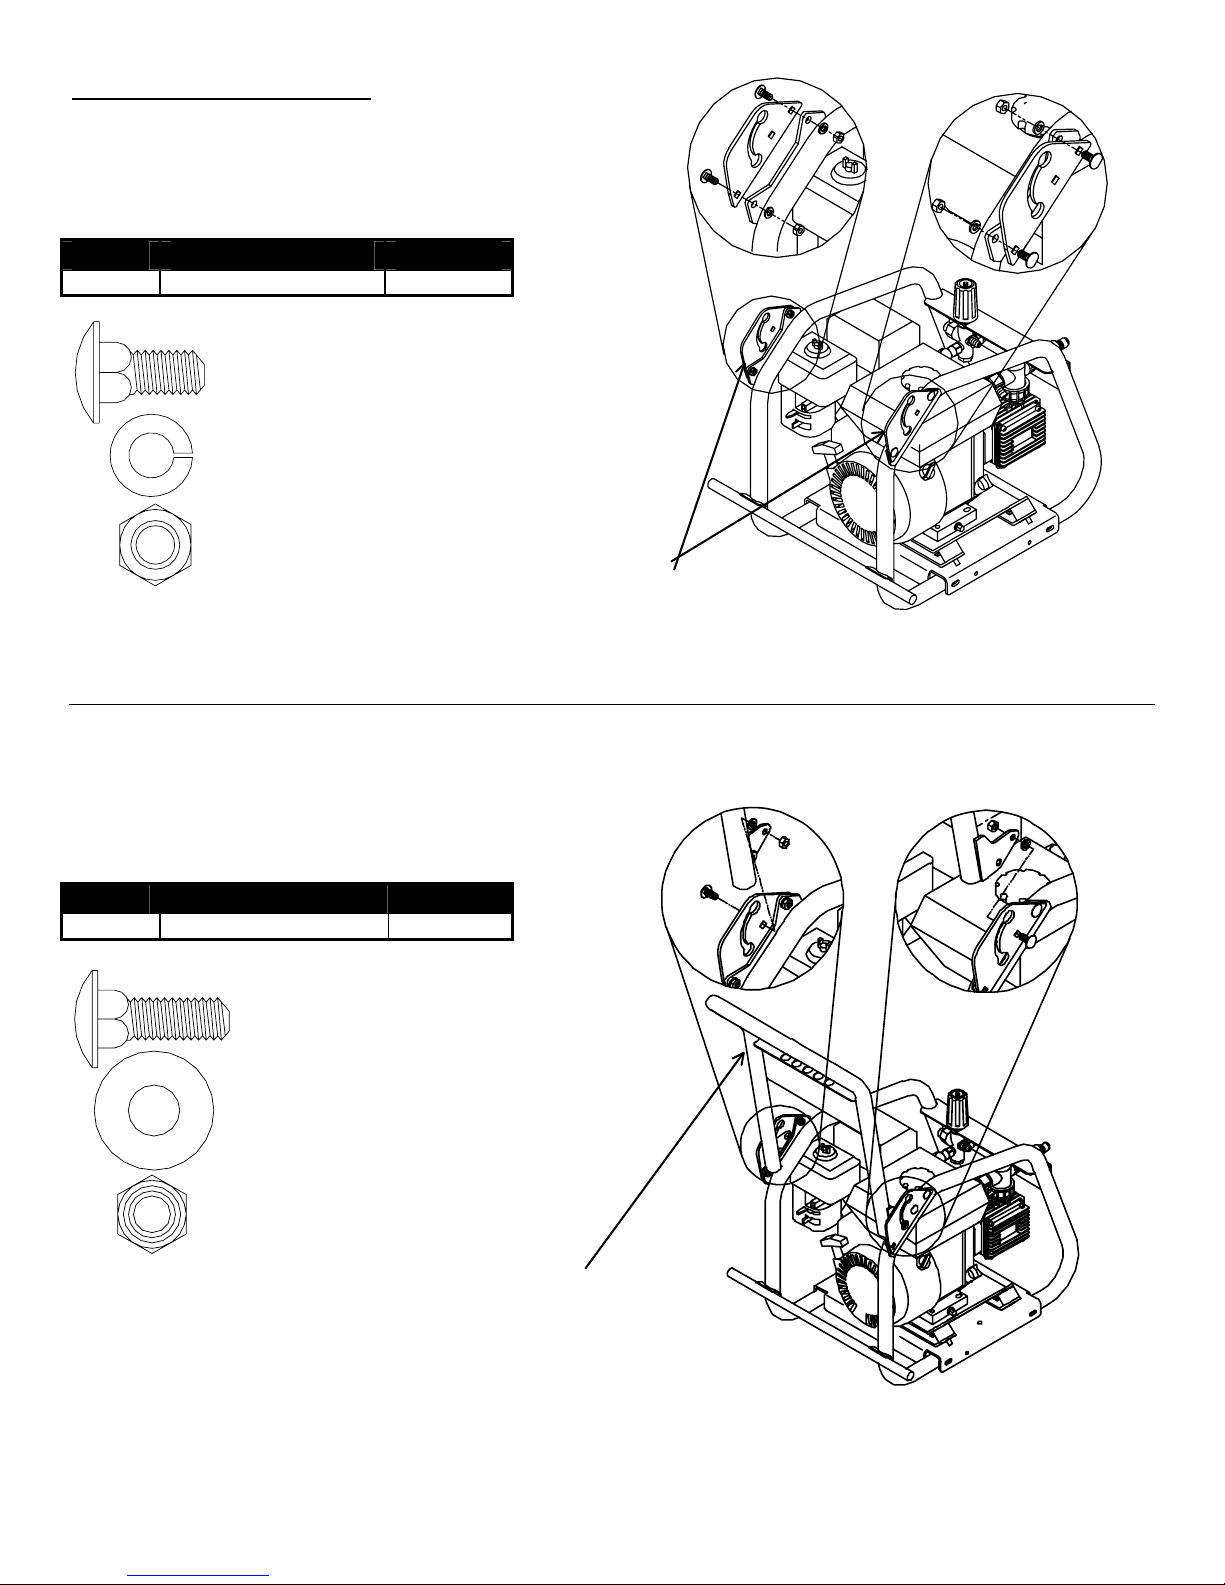
III.) Assembly Instructions
r
A. Assemble Hinge Ears to pressure washer with
carriage bolts, lock washers, and hex nuts. Thread nut
on to bolt hand tight.
Item # Description Qty.
32525 Hinge Ear 2
5/16-18 x 3/4” Carriage Bolt
Qty. 4
5/16 Lock Washer
Qty. 4
5/16-18 Hex Nut
Qty. 4
00489
B. Attach Handle to Hinge Ears with carriage bolts, flat
washers and nyloc nuts. Tighten nyloc nuts then loosen
1/4 turn so handle hinges freely.
Item # Description Qty.
32459 Handle 1
Hinge Ea
00488
5/16-18 x 1” Carriage Bolt
Qty. 2
5/16 Flat Washer
Qty. 2
5/16-18 Nyloc Nut
Qty. 2
00490
Handle
00491
5
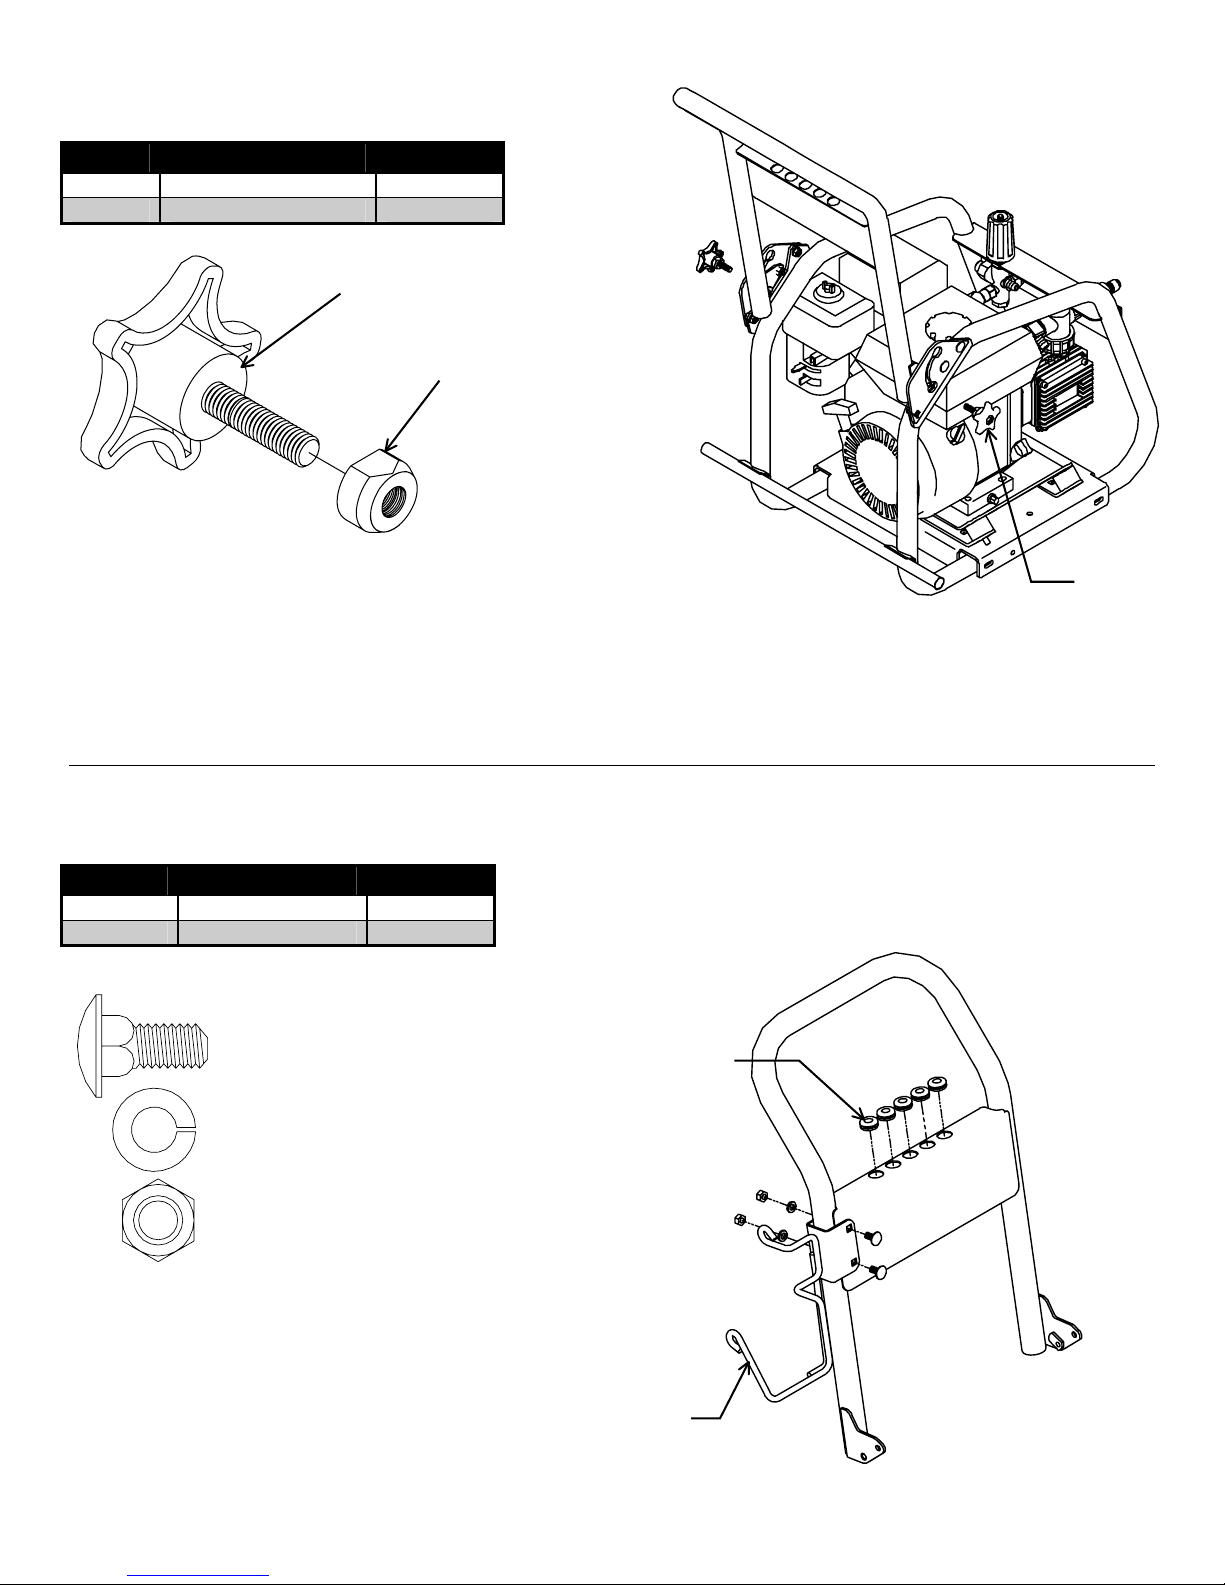
C. Tighten all nuts from step A. Assemble Spacers on to
Knobs. Thread Knob and Spacer to secure Handle.
Item # Description Qty.
32463 Knob 2
32738 Spacer 2
Knob
Spacer
00493
D. Attach Hose Hook to Handle with bolts, lock washer
and hex nuts. Insert Grommets as shown.
Item # Description Qty.
32612 Hose Hook 1
17156 Grommet 5
5/16-18 x 3/4” Carriage Bolt
Qty. 2
Knob
Grommet
5/16 Lock Washer
Qty. 2
5/16-18 Hex Nut
Qty. 2
00489
Hose Hook
00494
6
 Loading...