


M157294F
ITEM NUMBER: 157294
SERIAL NUMBER:
Engine Model:
Pump Model:
Flow: Pressure:
Proven Performance
K-BAR Industries, Faribault, MN, 55021
Installation, Operation, and Maintenance Manual
HOT WATER PRESSURE WASHER: Cleans dirty surfaces with high
To the Owner:
Thank you for purchasing a NorthStar hot water pressure washer. Your machine is designed for long life,
dependability, and the top performance you demand! Take time now to read through this manual so you better
understand the machine’s operation, maintenance and safety precautions. Everyone who operates this machine
must read and understand this manual. The time you take now will prolong your machine’s life and prepare you
for its safe operation. Enjoy the exceptional performance of your NorthStar hot water pressure washer, the
industry leader! The manufacturer reserves the right to make improvements in design and/or changes in
specifications at any time without incurring any obligation to install them on units previously sold.
Hose Length: Lance Length:
Nozzle Size:
pressure hot water.
Quick Facts
Engine Oil Engine is shipped without oil. Fill before starting.
Use SAE 10W-30 motor oil.
Pump Oil Pump is shipped with oil. Change oil plug and check pump oil level before starting.
Use SAE 30 Non-detergent pump oil (item# 4043) for oil changes.
Water Make sure your water flow is 20% higher than the pressure washer’s flow rate.
Make sure your water is clean and particle free.
Storage Do not allow water to freeze in the pump, hose, coil, or spray gun.
Spraying
Chemicals
Maintenance
Schedule
Hours: Monday - Friday 7:00 AM to 5:30 PM Unit 2, Keel Close,
Saturday 7:30 AM-11:30 AM Central Time Portsmouth, Hants PO3 5QD, England
Use any NorthStar brand or equivalent pressure washer chemicals.
Adjust soap adjustment knob to regulate cleaning power.
Engine: Oil: change after first 20 hours, then annually or every 100 hours.
Spark Plug: clean every 100 hours, replace annually or every 300 hours.
Air Filter: clean every 100 hours, replace annually or every 300 hours.
Pump: Oil: change after first 40 hours, then every 3 months or 500 hours.
Read and understand all manuals before operating.
Any Questions, Comments, Problems or Parts Orders
In the United States In the United Kingdom
Northstar Customer Service
Call 1-800-270-0810 Northern Tool and Equipment Co. (UK) Ltd.
Call 02392639752

Table of Contents
Important Safety Instructions 2 Maintenance Instructions 12-15
Specifications 3 Moving and Handling Instructions 16
Machine Component
Identification
Installation Instructions 5-8 Troubleshooting 17
Operation Instructions 9-11 Parts Breakdowns 18-20
Safety Features 12 Electrical Schematic 21
4 Long Term Storage 16
Important Safety Instructions
WARNING -Risk of injection or injury to persons - Do not direct discharge stream at persons. - Do not use a
hose if exterior damage is evident.
-Risk of explosion. Do not spray flammable liquids. Do not operate in a flammable environment.
CAUTION -Risk of asphyxiation. Exhaust fumes are deadly. For outdoor use only. Avoid inhaling exhaust
fumes.
-Risk of fire. Do not add fuel when the product is operating or hot.
-Gun kicks back, hold with both hands.
-To reduce the risk of injury, read and understand operating instructions carefully before use.
WARNING - When using this product basic precautions should always be followed, including the following:
1.) Read all the instructions before using the product.
2.) To reduce the risk of injury, close supervision is necessary when the product is used near children. Do
not allow irresponsible use by children. Always stop the product and bleed pressures before leaving
unattended, disconnecting hoses, or servicing the pump.
3.) Know how to stop the product and bleed pressures quickly. Be thoroughly familiar with the controls.
4.) Stay alert - watch what you are doing.
5.) Do not operate the product when fatigued or under the influence of alcohol or drugs. Never smoke while
operating or fueling this machine.
6.) Keep operating area clear of all persons.
7.) Do not overreach or stand on unstable support. Keep good footing and balance at all times. Wear
footwear capable of maintaining a good grip on wet surfaces - Do not place the machine on soft or
unstable ground.
8.) Follow the maintenance instructions specified in all manuals. Do not run machine without sufficient
lubrication or sufficient water to cool the pump.
9.) Wear safety glasses, gloves, face protection and appropriate clothing when operating the machine.
10.) Do not operate this machine with broken or missing parts. - Never alter the manufacturer’s original
design or deactivate any safety device on the machine.
11.) Risk of exposure to dangerous chemicals. Wear protective gloves when handling and cleaning with
chemicals. Follow the chemical manufacturer’s directions. Understand all safety hazards and first aid for
all chemicals being used. Check whether dangerous chemicals have been used and take any
precautions that may have been recommended by the supplier of these chemicals when cleaning filters.
Do not pump highly abrasive fluids or use with incompatible chemicals or solvents.
12.) Know the pressure and temperature limits of your machine. Be sure all high pressure accessories meet
or exceed your machine’s limits. Do not set the pressure relief valve above the machine’s limit.
13.) Do not move this machine by pulling on the hose. Do not use the pump to support other items of
equipment that impose unacceptable loads on the pump. Do not attempt to use this machine as a prop.
14.) To reduce risk of injury, do not secure the spray gun open. Your spray gun is equipped with a built-in
trigger safety latch to guard against accidental trigger release and potentially dangerous high pressure
spray. Rotate the safety latch to the locked position when not spraying.
15.) Do not clean this machine with its own spray. Cleaning should be done with a damp sponge with the
engine OFF.
16.) NEVER attempt to immediately run or re-light the burner if it doesn’t ignite the first time. Unburned oil or
gas may have accumulated causing potential explosion or fire hazard.
17.) Always make sure all switches and controls are in the OFF position prior to starting the engine.
SAVE THESE INSTRUCTIONS

Specifications
ITEM 157294
Pressure Rating 3000 psi
Flow Output 4 gpm
Pump Type General TS1511
Water Supply Standard tap water @ 20-
100 psi
Engine Horsepower 13 hp
BTU Output 353,700 BTU
Temperature Rise
Maximum Temperature
Approved Fuels #1 or #2 Diesel, Kerosene,
Fuel Capacity 8.5 Gal
Gasoline Capacity 8.5 Gal
Discharge Hose 3/8” X 50’
Dimensions
Length 49”
Width 34”
Height 44”
Weight (shipping) 655 lbs
Weight (dry) 557 lbs
Weight (fueled) 710 lbs
140° F
210° F
Fuel Oil
3
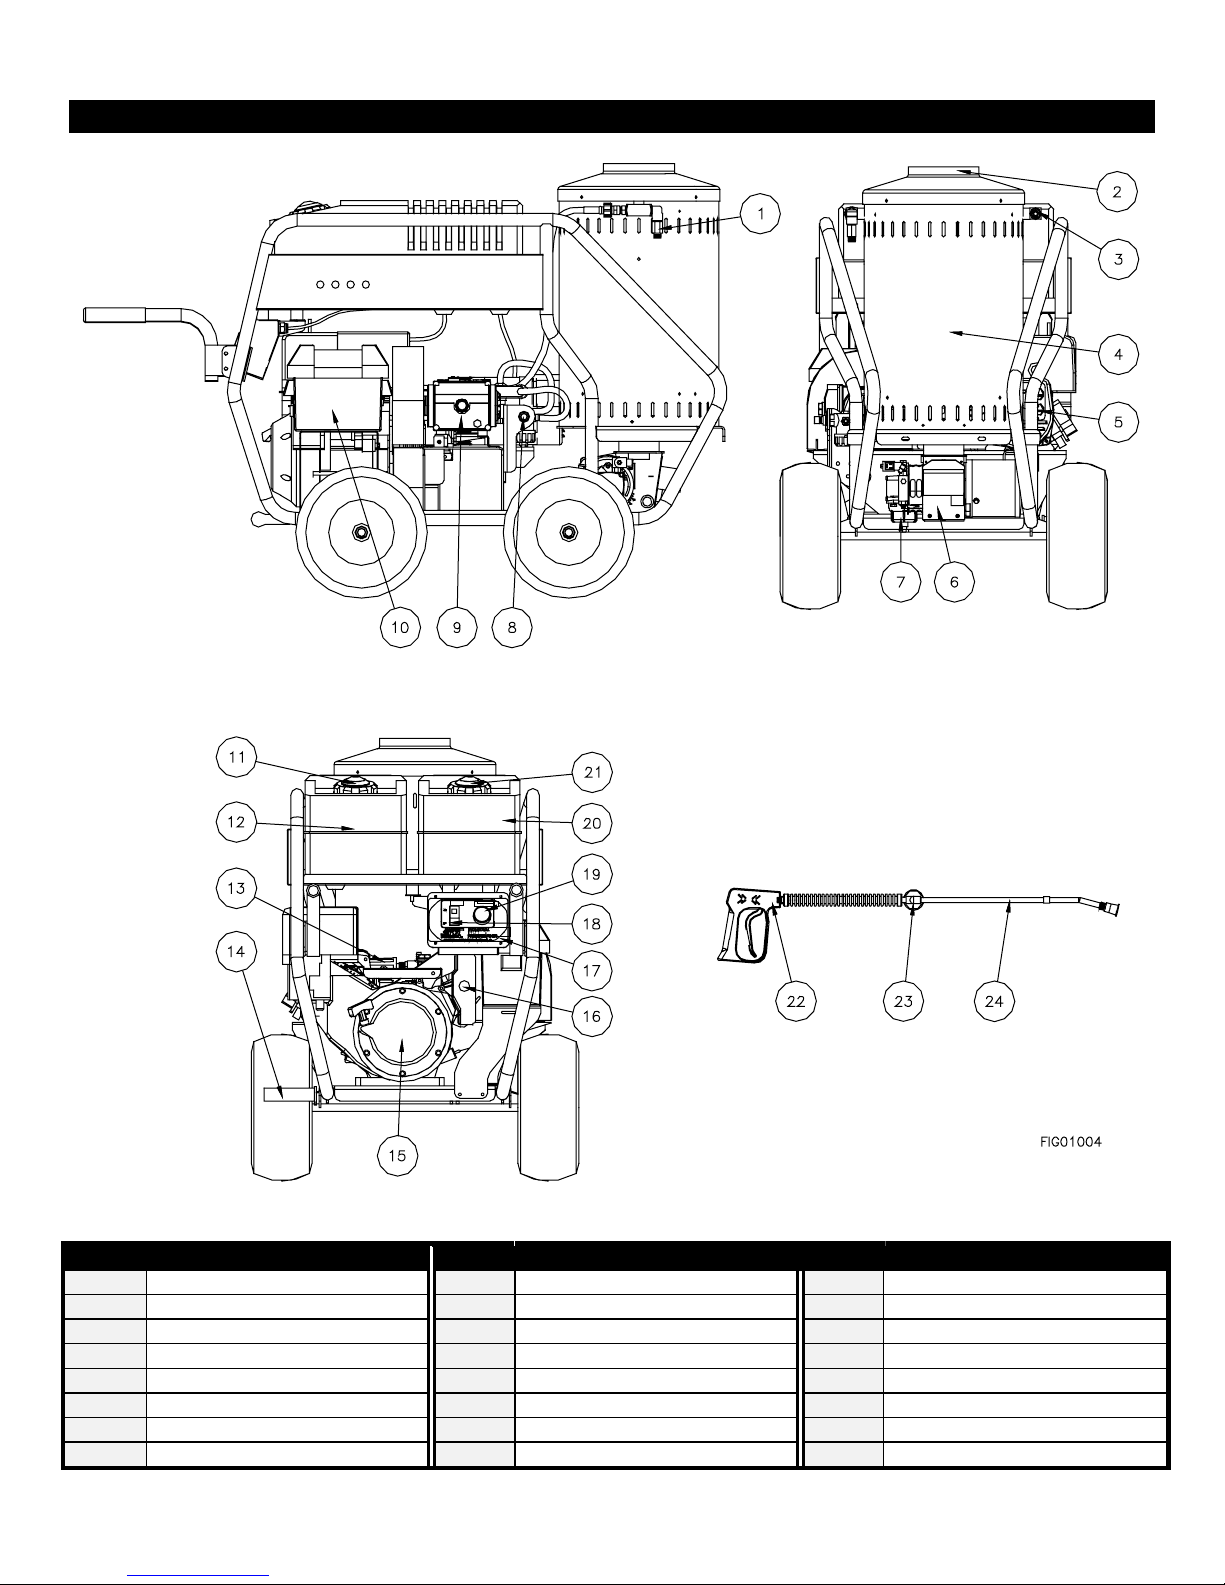
Machine Component Identification
CO
TEMP
HEAT
NTROL
HOT WATER
Ref # Description Ref # Description Ref # Description
1 High Pressure Relief Valve 9Pump 17 Control Panel
2 Exhaust Vent 10 Battery 18 Heat Switch
3 High Pressure Output 11 Gas Cap 19 Thermostat
4 Heating Coil 12 Gas Tank 20 Fuel Tank
5 Generator Head 13 Unloader (psi adjustment) 21 Fuel Cap
6 Burner 14 Brake 22 Spray Gun
7 Fuel Filter 15 Engine 23 Grip
8 Garden Hose Water Inlet 16 Engine Start Switch 24 Dual Lance Wand
4
Installation Instructions
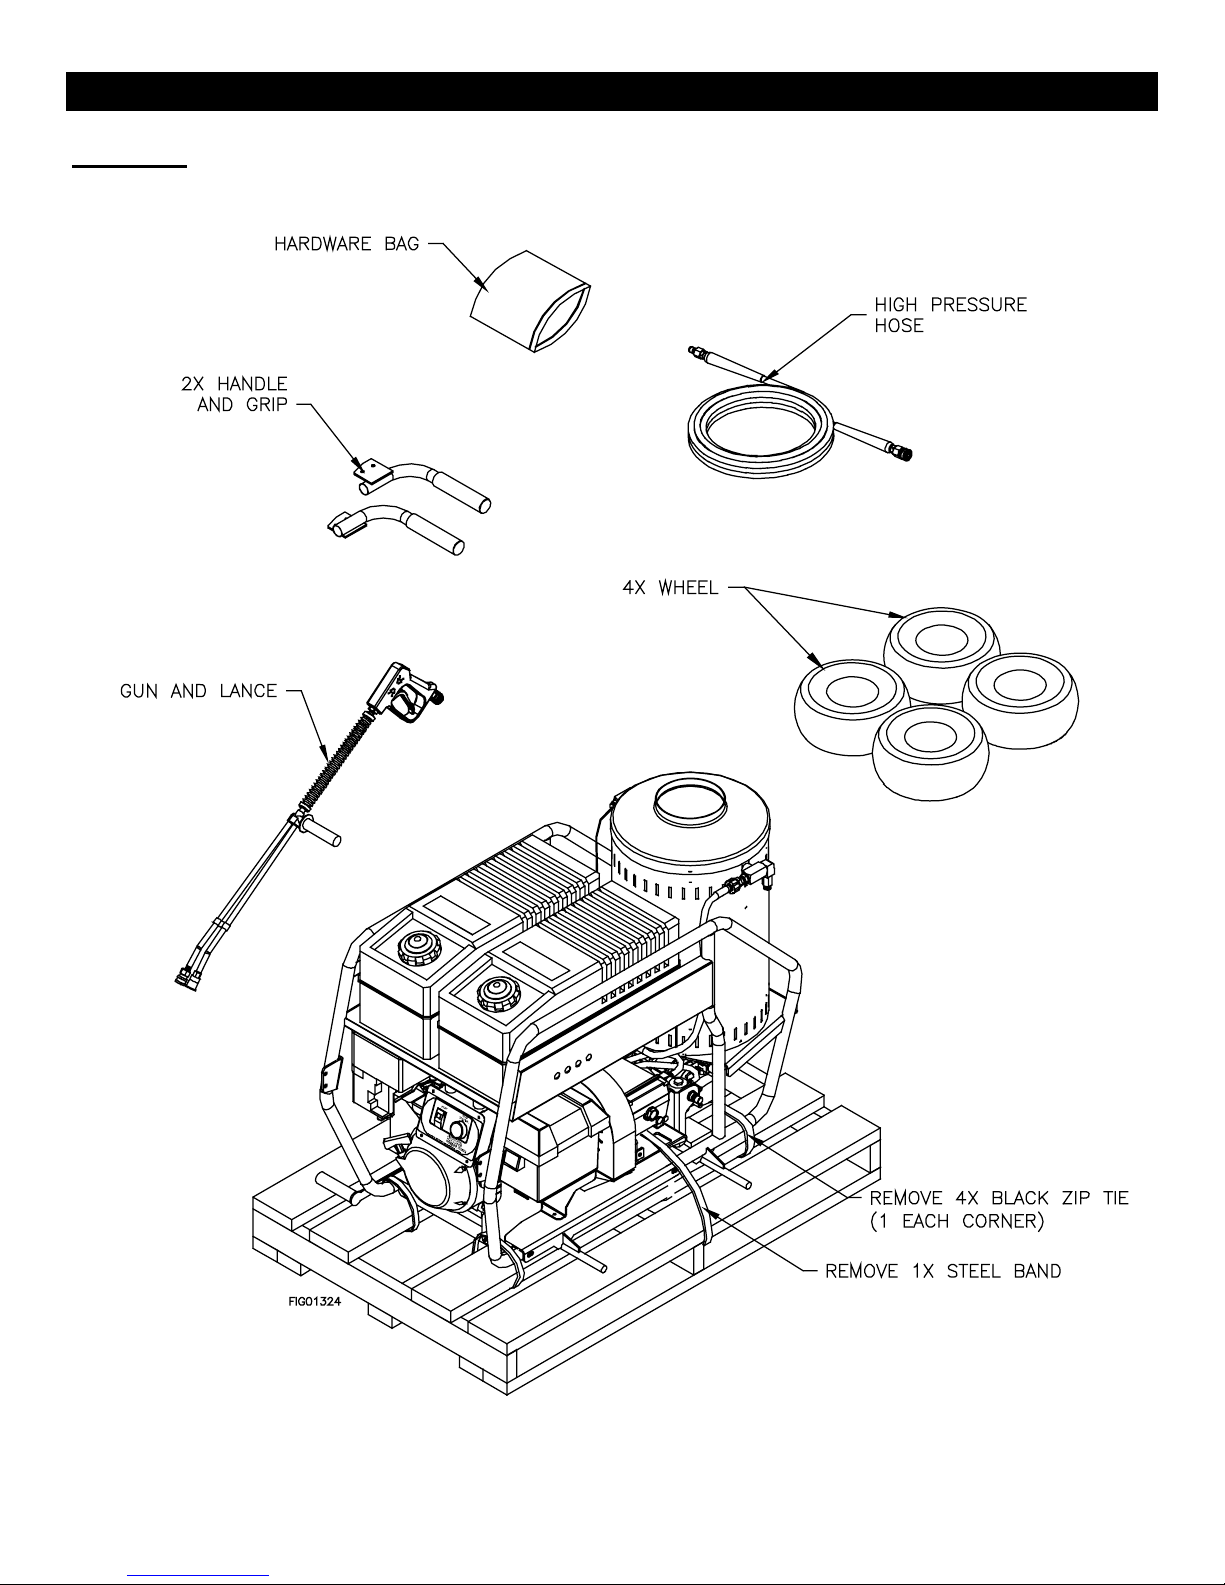
I.) Unpack
Your pressure washer is shipped on one pallet. Separate and identify the components and use the assembly instructions
in this manual for assembly.
5
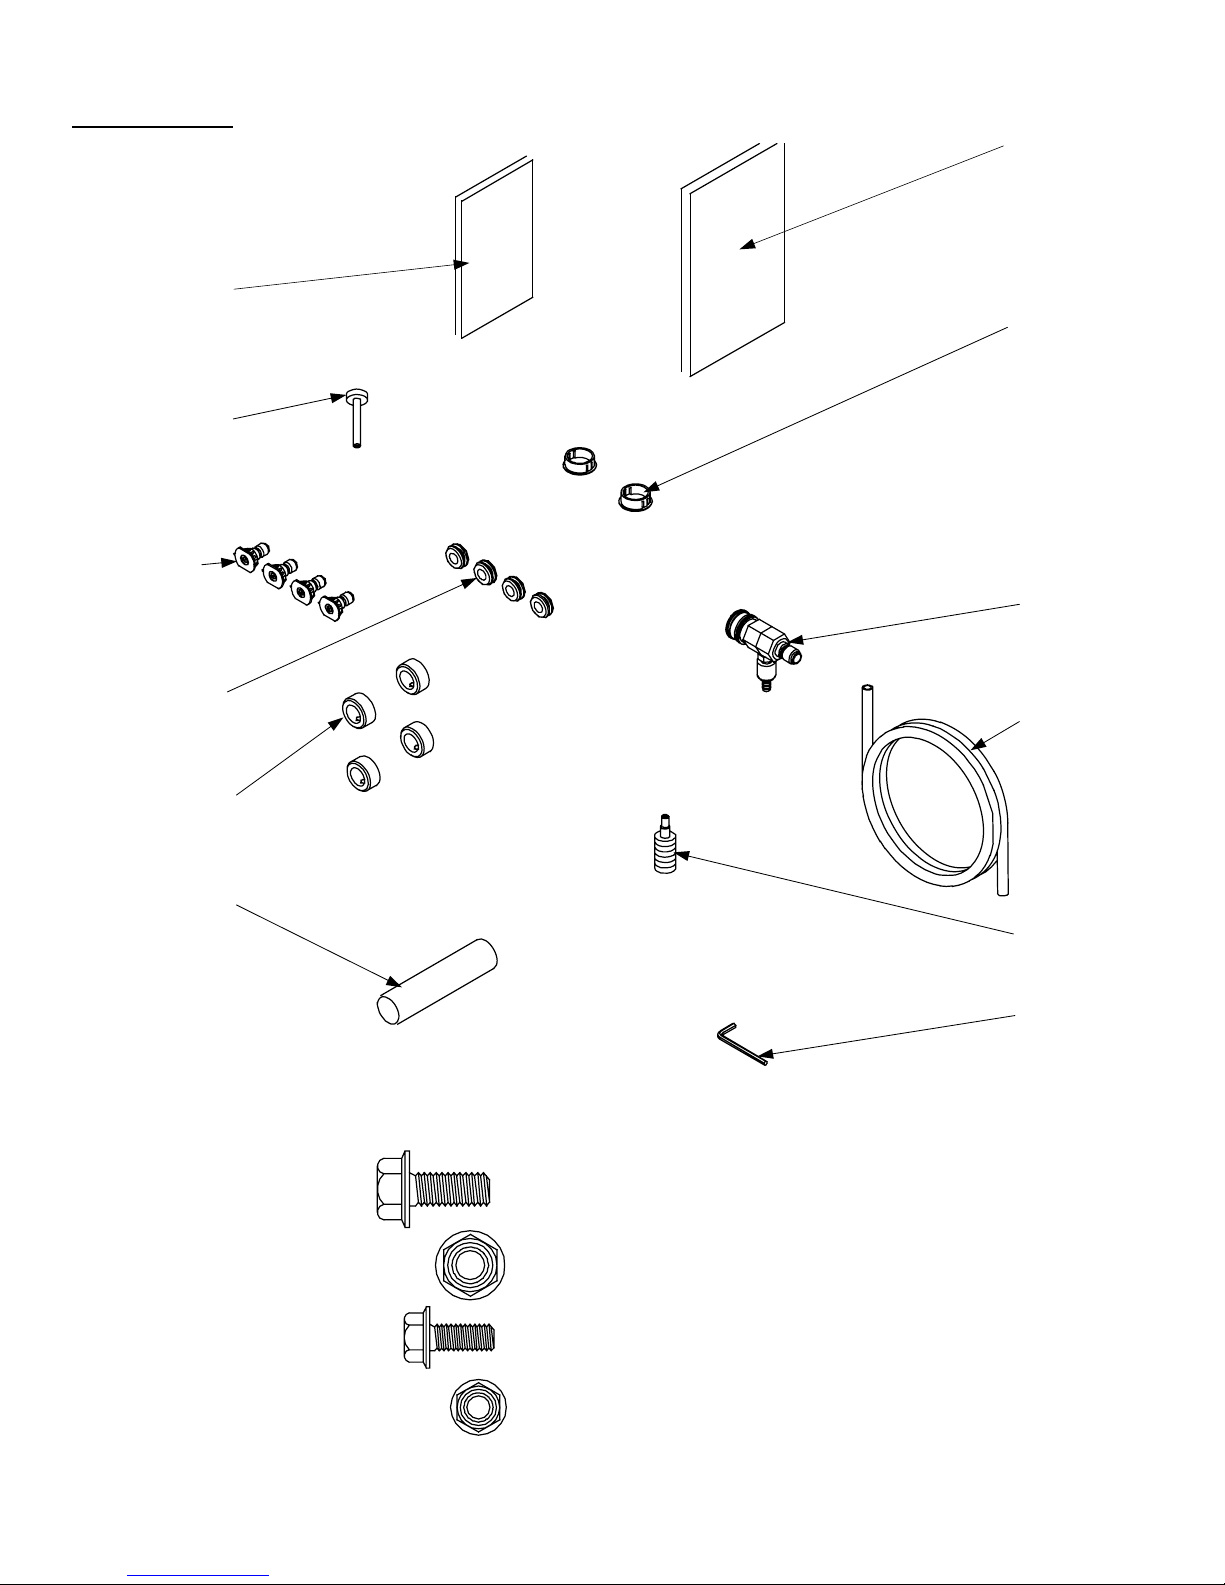
Hardware Bag
p
Honda Manual
1X Vented
Di
stick
4X Nozzles
4X Grommets
Owner’s
Manual
2X Tube Caps
1X Chemical
Injector
4Ft Braided
Hose
4X Wheel
Retainers
1X Spark Plug
Wrench
1X Strainer
1X Hex Key
4X - 5/16 X 3/4” Flange Bolt
4X - 5/16 Flange Nut
2X - 1/4 X 3/4” Flange Bolt
2X - 1/4 Flange Nut
FIG01325
6

II.) Assembly Instructions
A
LIFT BACK OF UNIT BY HANDLES TO
INSTALL REAR WHEELS, THEN LIFT FRONT
OF UNIT TO INSTALL FRONT WHEELS
INSTALL WHEEL ONTO AXLE
FASTEN WHEEL WITH RETAINER,
SECURE RETAINER WITH WRENCH PROVIDED
NOTE: IT IS RECOMMENDED THAT TWO
PEOPLE LIFT THIS UNIT WHILE A THIRD
SLIDES THE WHEELS ONTO THE AXLES
PRESS BRAIDED HOSE ONTO
INJECTOR AND STRAINER
FASTEN HANDLES TO FRAME WITH
5/16 X 3/4” BOLTS AND 5/16 NUTS
INSTALL
TUBE CAPS
III.) Pump Preparation
A.)Remove red shipping plug from oil fill hole.
B.) Install vented dipstick into oil fill hole.
C.)Make sure the oil is 1/2 way up oil sight glass.
IV.) Engine Preparation
A.) Fill engine with 1.16 qt of oil.
B.) Fill fuel tank with unleaded gasoline, 86 octane min.
Quantities Of Fluid
Engine/Pump Type of Fluid QTY
Honda GX390 SAE 10W30 1.16 qt (1.1L)
General TS1511 SAE 30** 40.60oz (1.2L)
**SAE Non-Detergent (Item# 4043)
INSTALL GROMMETS
ND NOZZLES INTO
HOLES IN FRAME
FIG01007
V.) Battery Preparation
A.) Battery is shipped without electrolyte.
B.) Fill each battery cell to the fill line with locally
purchased electrolyte (sulfuric acid and water).
WARNING Sulfuric acid is a corrosive poison. Avoid
contact with skin, eyes or clothing.
C.) Connect battery cables to battery terminals.
WARNING To connect the battery:
Always connect the red, “+”, or positive battery cable
first, then connect the black, “-”, or negative battery
cable.
Always disconnect the black, “-”, or negative cable first,
then disconnect the red, ”+”, or positive cable.
7