

Quick Facts
Engine Oil
Engine is shipped without oil. Fill before starting.
Use SAE 10W-30 motor oil.
Pump Oil
Pump is shipped with oil. Remove the red shipping plug and install vented dipstick.
Use SAE 30 Non-Detergent oil (item# 4043) for oil changes.
Water
Make sure your water flow is 20% higher than the pressure washer’s flow rate.
Make sure your water is clean and particle free.
Storage
Do not allow water to freeze in the pump, hose, or spray gun.
Add fuel stabilizer to the fuel tank before long term storage.
Spraying
Chemicals
Use any North Star brand or equivalent pressure washer chemicals.
Use black nozzle.
Maintenance
Schedule
Engine:
Oil: change after first 20 hours, then annually or every 100 hours.
Spark Plug: clean every 100 hrs, replace annually or every 300 hrs.
Air Filter: clean every 100 hours, replace annually or every 300 hrs.
Pump:
Oil: change after first 40 hours, then every 3 months or 500 hours.
Read and understand all manuals before operating.
M157206S
ITEM NUMBER:157205, 157207
SERIAL NUMBER:
Engine Model:
Pump Model:
Flow: Pressure:
Hose Length: Lance Length:
Nozzle Size:
®
Installation, Operation, and Maintenance Manual
PRESSURE WASHER: Cleans dirty surfaces with high pressure water.
To the Owner:
Thank you for purchasing a NorthStar pressure washer. Your machine is designed for long life, dependability,
and the top performance you demand! Take time now to read through this manual so you better understand the
machine’s operation, maintenance and safety precautions. Everyone who operates this machine must read and
understand this manual. The time you take now will prolong your machine’s life and prepare you for its safe
operation. Enjoy the exceptional performance of your NorthStar pressure washer, the industry leader!
The manufacturer reserves the right to make improvements in design and/or changes in specifications at any
time without incurring any obligation to install them on units previously sold.
Any Questions, Comments, Problems, or Parts Orders
Call NorthStar Product Support 1-800-270-0810

2
Table of Contents
Important Safety Instructions
2
Maintenance Instructions
10-11
Machine Component Identification
3
Moving and Handling Instructions
12
Installation Instructions
4-6
Long Term Storage
12
Operation Instructions
7-9
Troubleshooting
13
Safety Features
9
Parts Explosions
14-15
Limited Warranty
17
Important Safety Instructions
WARNING -Risk of Injection or Injury to Persons - Do Not Direct Discharge Stream at Persons. - Do not
use a hose if exterior damage is evident.
-Risk of explosion. - Do not spray flammable liquids. - Do not operate in a flammable
environment.
CAUTION -Risk of Asphyxiation - Exhaust fumes are deadly. For outdoor use only. Avoid inhaling exhaust
fumes.
-Risk of fire. Do not add fuel when the product is operating or hot.
-Gun kicks back. Hold with both hands.
-To reduce the risk of injury, read operating instructions carefully before use.
WARNING - When using this product basic precautions should always be followed, including the following:
1.) Read all the instructions before using the product.
2.) To reduce the risk of injury, close supervision is necessary when the product is used near children. Do
not allow irresponsible use by children. Always stop the product and bleed pressures before leaving
unattended, disconnecting hoses, or servicing the pump.
3.) Know how to stop the product and bleed pressures quickly. Be thoroughly familiar with the controls.
4.) Stay alert - watch what you are doing.
5.) Do not operate the product when fatigued or under the influence of alcohol or drugs. Never smoke
while operating or fueling this machine.
6.) Keep operating area clear of all persons.
7.) Do not overreach or stand on unstable support. Keep good footing and balance at all times. Wear
footwear capable of maintaining a good grip on wet surfaces - Do not place the machine on soft or
unstable ground.
8.) Follow the maintenance instructions specified in all manuals. Do not run machine without sufficient
lubrication or sufficient water to cool the pump.
9.) Wear safety glasses, gloves, face protection and appropriate clothing when operating the machine.
10.) Do not operate this machine with broken or missing parts. - Never alter the manufacturer’s original
design or deactivate any safety device on the machine.
11.) Risk of exposure to dangerous chemicals. Wear protective gloves when handling and cleaning with
chemicals. Follow the chemical manufacturer’s directions. Understand all safety hazards and first aid
for all chemicals being used. Check whether dangerous chemicals have been used and take any
precautions that may have been recommended by the supplier of these chemicals when cleaning
filters. Do not pump highly abrasive fluids or use with incompatible chemicals or solvents.
12.) Know the pressure and temperature limits of your machine. Be sure all high pressure accessories
meet or exceed your machine’s limits. Do not set the pressure relief valve above the machine’s limit.
13.) Do not move this machine by pulling on the hose. Do not use the pump to support other items of
equipment that impose unacceptable loads on the pump. Do not attempt to use this machine as a prop.
14.)To reduce risk of injury, do not secure the spray gun open. Your spray gun is equipped with a built-in
trigger safety latch to guard against accidental trigger release and potentially dangerous high pressure
spray. Rotate the safety latch to the locked position when not spraying.
15.) Do not clean this machine with its own spray. Cleaning should be done with a damp sponge with the
engine OFF.
SAVE THESE INSTRUCTIONS
3
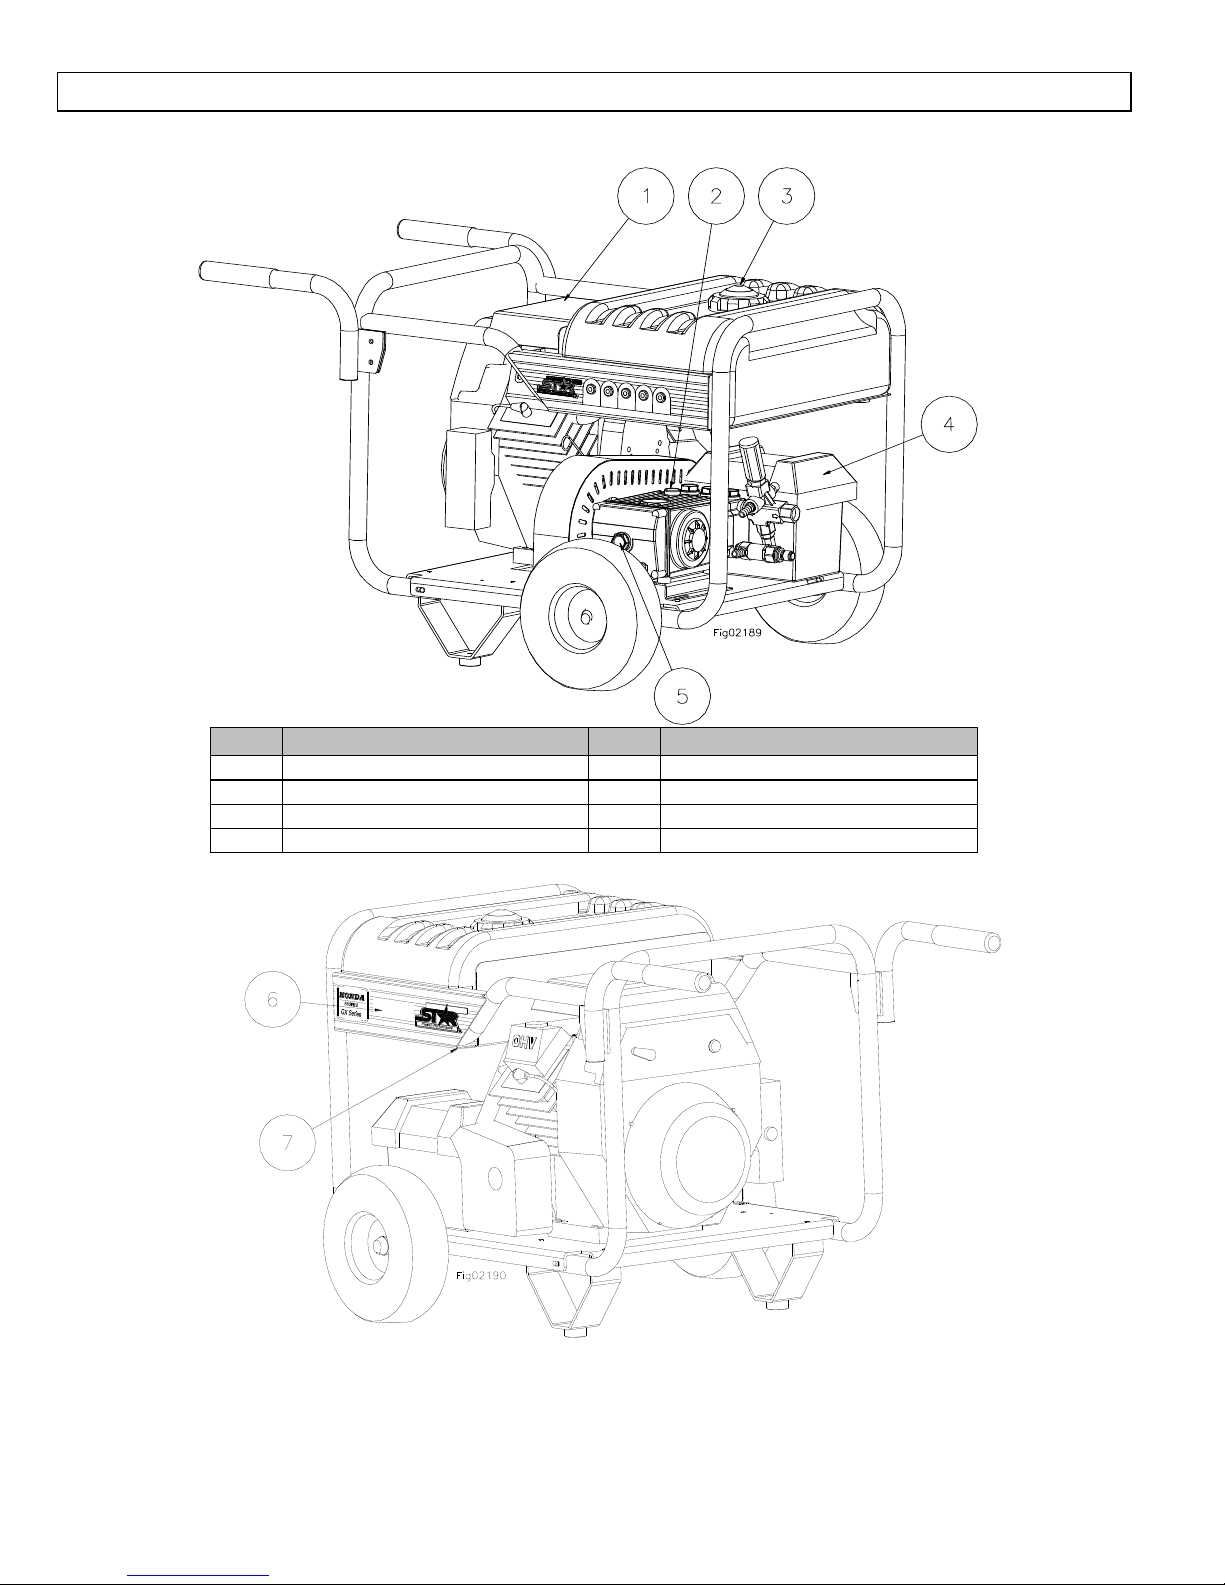
Machine Component Identification
Ref
Description
Ref
Description
1
Engine
5
Pump Oil Sight Glass
2
Pump Oil Fill/Dipstick
6
Startup/Shutdown Instructions
3
Gas Cap with Gauge
7
Fuel Shutoff Valve
4
Battery Box
T
2.) Attach pressure hose
4.) Turn water supply ON.
3.) Attach gun and lance
COMMERCIAL
purge air from pump.
5.) Squeeze trigger to
7.) Start engine
6.) Insert nozzle
POWERED BY
Start
1.) Attach garden hose
1.) Turn engine OFF.
2.) Turn water supply OFF.
3.) Squeeze trigger to
relieve system pressure
4.) Remove garden hose
5.) Remove pressure hose.
6.) Turn fuel valve OFF.
Stop
4
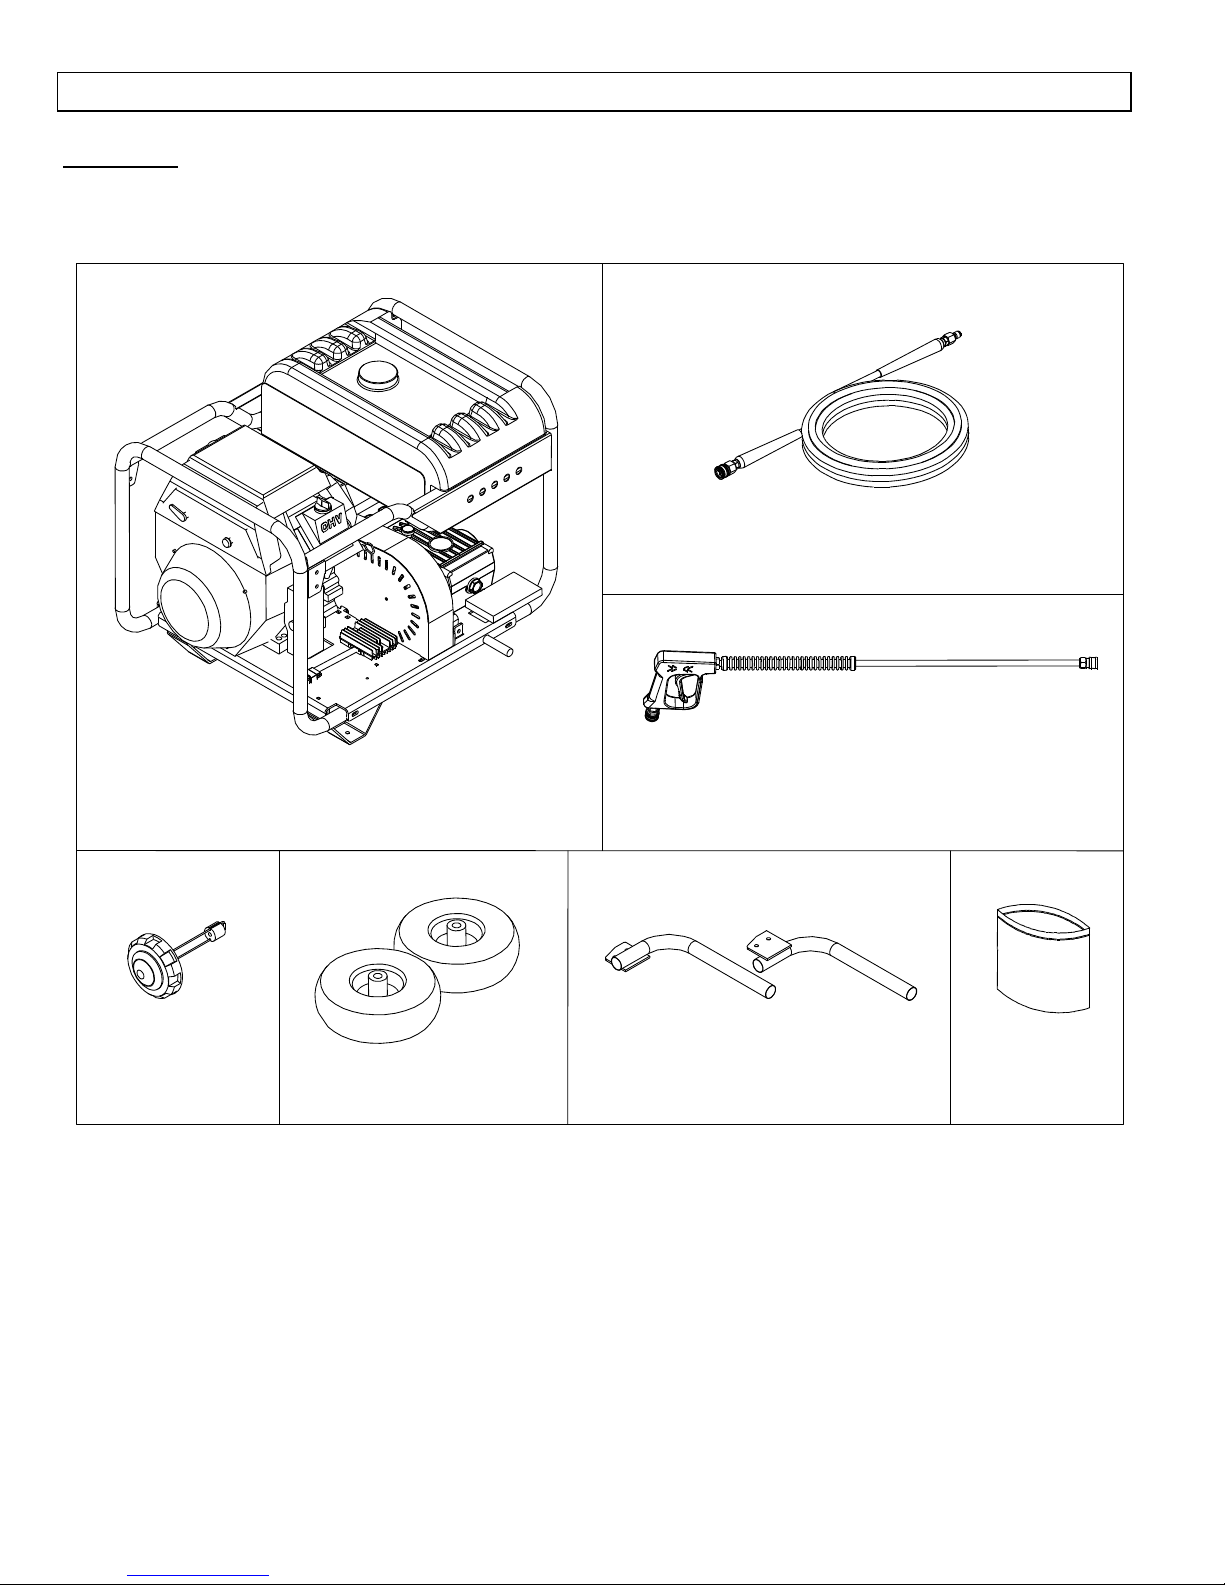
Installation Instructions
FIG02225
MAIN UNIT
HOSE
SPRAY GUN, LANCE, NOZZLE HOLDER
FUEL TANK CAP
(MAY ALREADY
BE INSTALLED)
WHEELS
HANDLES
HARDWARE
BAG
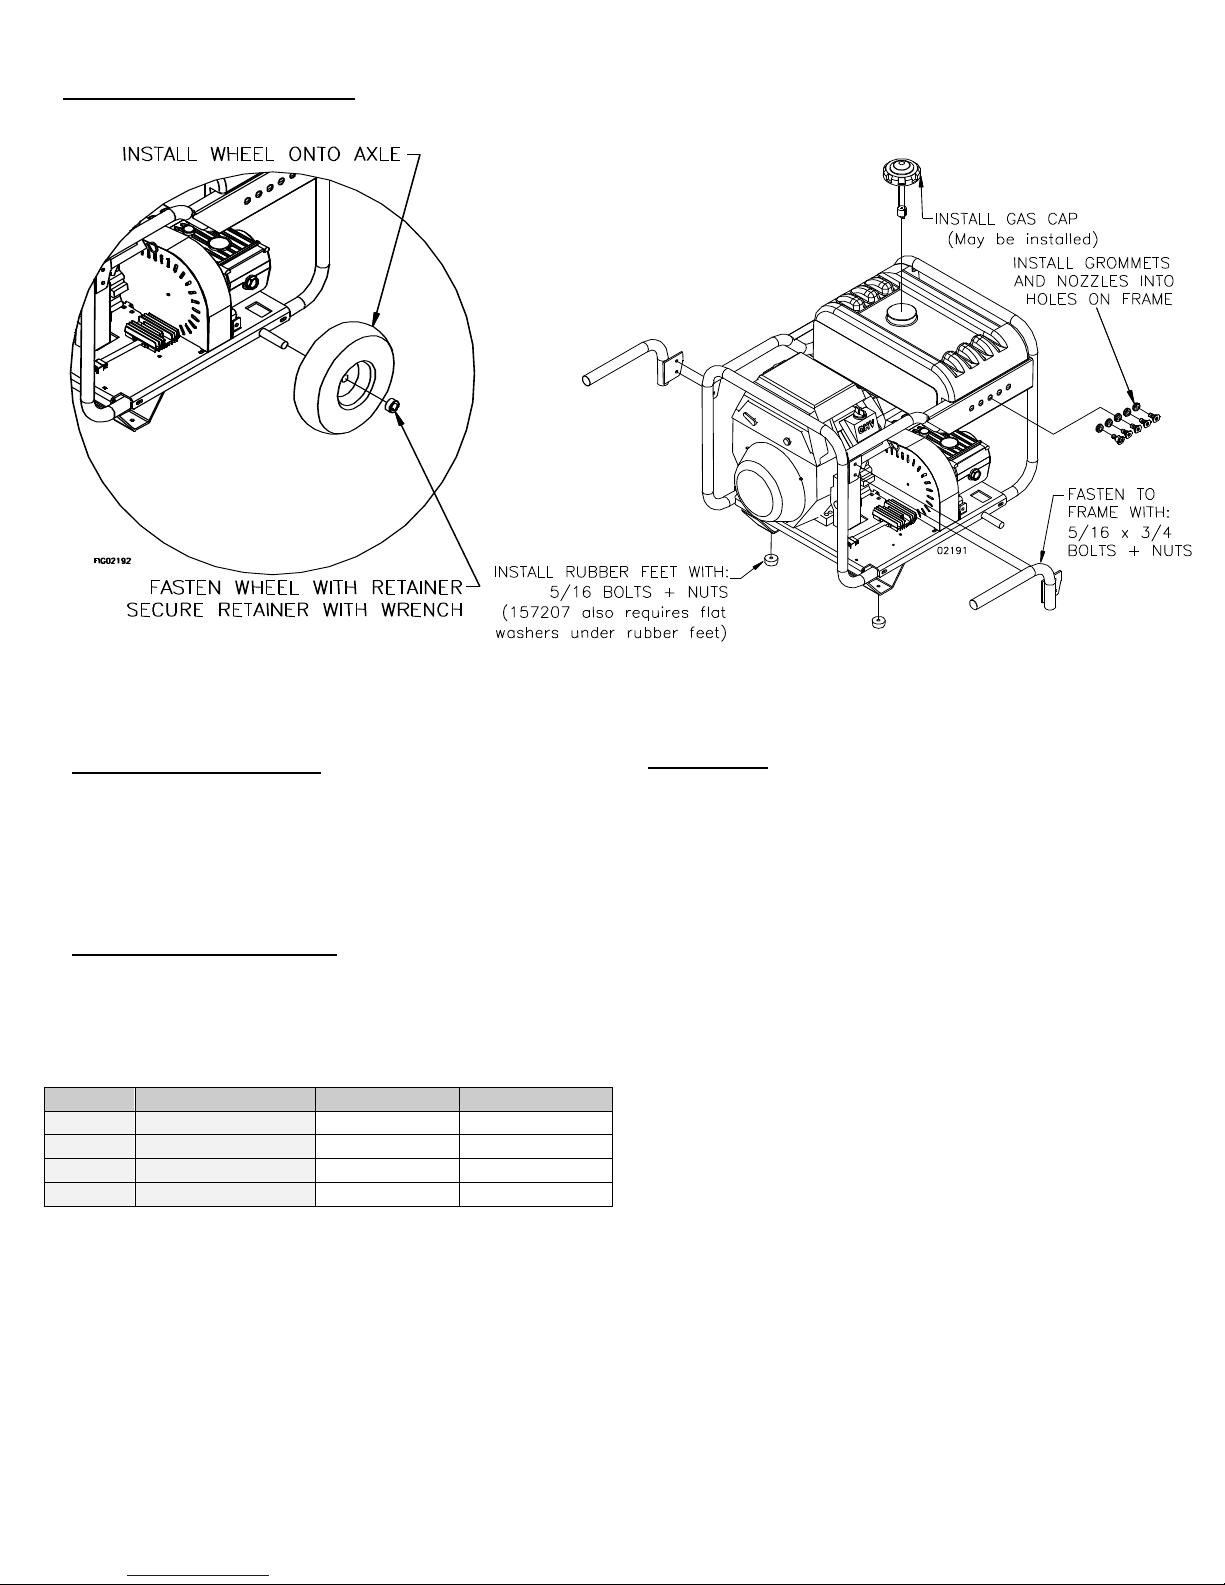
I.) Unpack
Separate and identify the components. Use the assembly instructions in this manual for assembly.
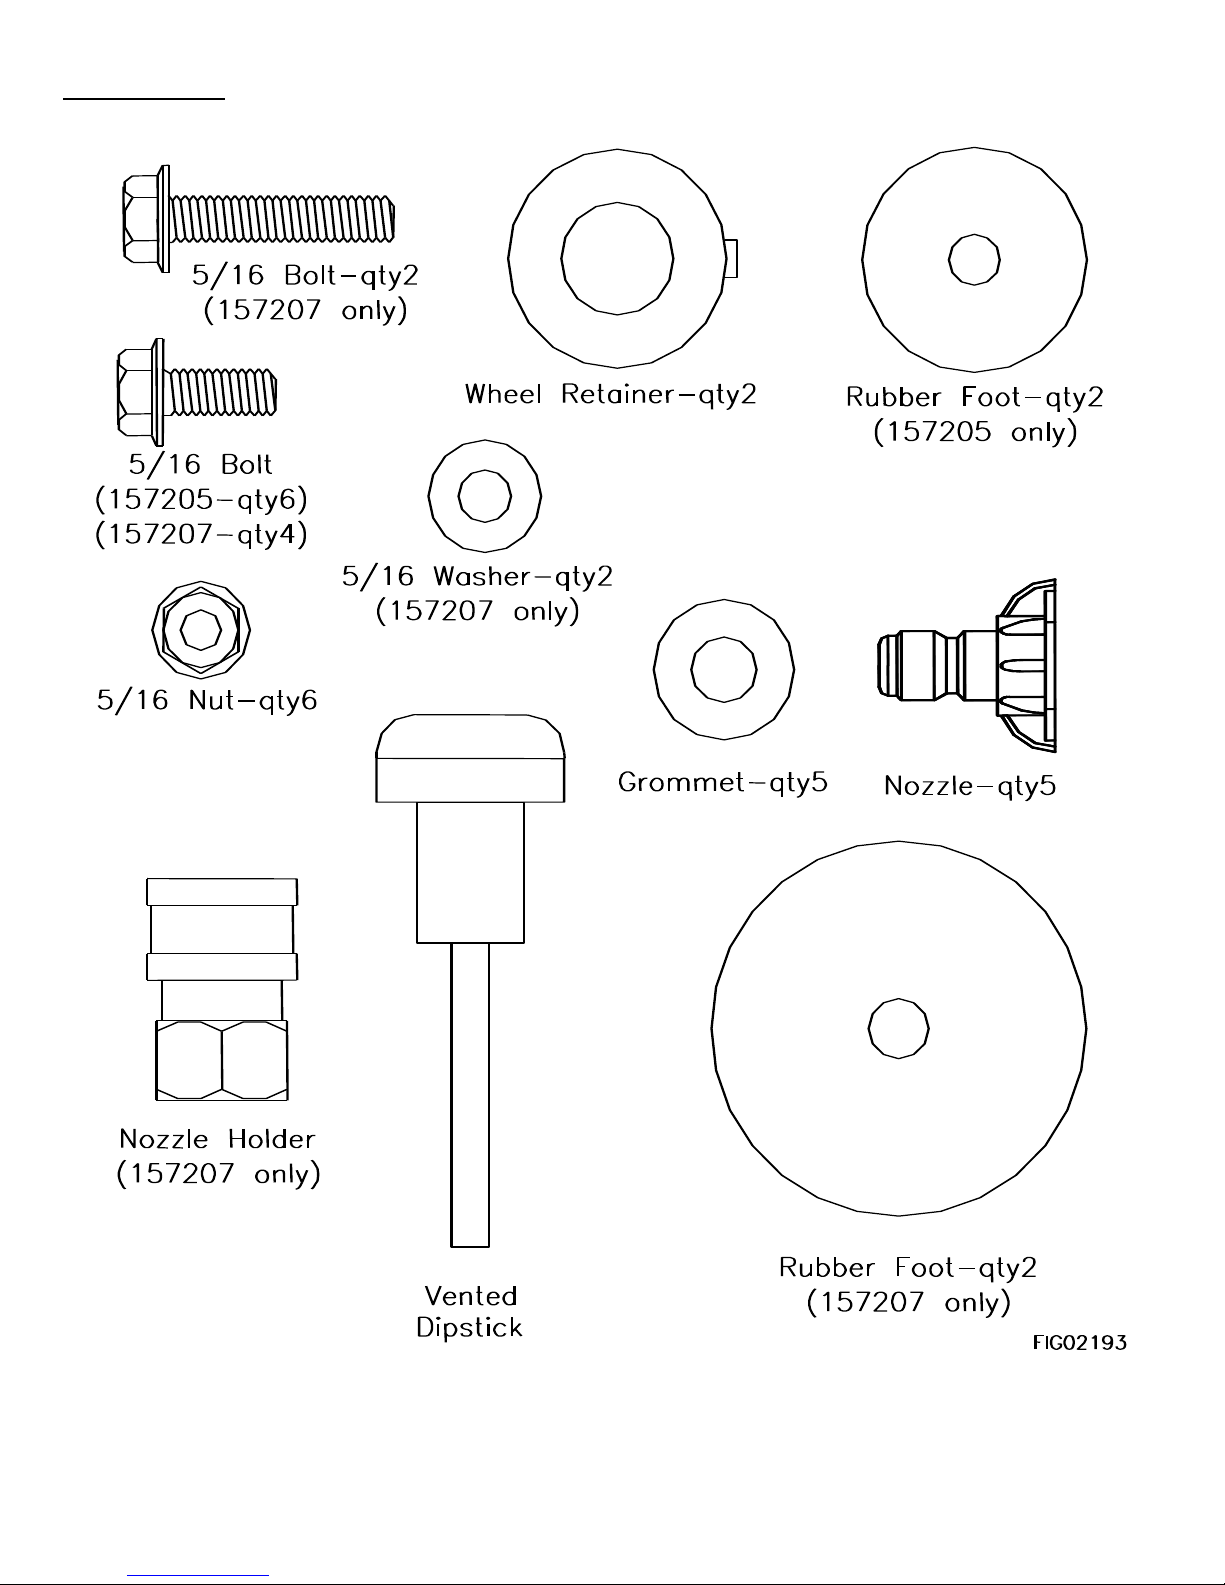
5
Hardware Bag
6
II.) Assembly Instructions
Item #
Engine/Pump
Type of Fluid
QTY
157205
Briggs Vanguard
SAE 10W30
1.75qt (1.7L)
157207
Honda GX670
SAE 10W30
1.48qt (1.4L)
157205
AR RKA 45G40
SAE 30**
15.0oz (.44L)
157207
General T9281
SAE 30**
40.60oz (1.2L)
III.) Pump Preparation
A.) Remove red shipping plug from oil fill hole.
B.) Install vented dipstick into oil fill hole.
C.) Make sure the oil is 1/2 way up oil sight glass.
IV.) Engine Preparation
A.) Fill engine with SAE 10W30 oil.
B.) Fill fuel tank with unleaded gasoline, 86 octane min.
Quantities Of Fluid
**SAE Non-Detergent (Item# 4043)
V.) Battery
Warning: Sulfuric acid is a corrosive poison.
Avoid contact with skin, eyes or clothing. Always
wear safety glasses when working on or near the
battery.
The battery box provides protection for the battery and
will accept a standard lawn tractor size battery (Group
U1-7). The engine requires a 12 volts dc battery, with a
minimum rating of 18 Amp-Hours. When installing a
battery, always connect the red colored (“positive” or “+”)
cable first. When disconnecting a battery, always
remove the black colored (“negative” or “-”) cable first.
 Loading...