

Page 1

C4030 Handset Standard 1.00
Table of Contents
Safety and initial setup ............................................................. 5
Safety information ............................................................................................... 5
Installing the Handset ......................................................................................... 6
Installing and replacing batteries ........................................................................ 7
C4030 Handset features ........................................................ 10
Display screen .................................................................................................. 10
Handset keys .................................................................................................... 11
Icons ................................................................................................................. 12
Using the C4030 handset ...................................................... 13
Handset On/Off ................................................................................................. 13
Receiving calls .................................................................................................. 13
Making a call in the Pre-Dial Mode ................................................................... 14
Volume Adjustment ........................................................................................... 15
Activating Handsfree ......................................................................................... 15
Mute Ringing ..................................................................................................... 15
Silent Mode ....................................................................................................... 16
Ringer types ...................................................................................................... 16
Conference call ................................................................................................. 16
Transferring a call .............................................................................................. 17
Identifying the caller .......................................................................................... 17
Message Waiting Indicator for Call Pilot and Meridian Mail .............................. 17
Key Lock ........................................................................................................... 18
Time of Day ....................................................................................................... 18
Access Meridian PBX features ......................................................................... 19
3
Page 2

C4030 Handset Standard 1.00
Using Handset Menus ........................................................... 20
Selecting a handset menu ................................................................................. 20
Using keypad shortcuts ..................................................................................... 21
Private Phonebook ............................................................................................ 21
Character Table ................................................................................................. 24
Redial List ......................................................................................................... 25
Deleting/Storing an Entry in Redial List ............................................................ 25
Settings ............................................................................................................. 26
Handset sounds ................................................................................................ 27
Handset settings ............................................................................................... 29
Administration ....................................................................... 30
Initial Setup and Subscription ........................................................................... 30
Entering the Identification name ....................................................................... 30
Selecting a DECT system ................................................................................. 31
Troubleshooting ..................................................................... 32
4
Page 3

C4030 Handset Standard 1.00
Safety and initial setup
Safety information
Read the following information before you use the handset.
Safety Precautions
Make sure the adapter voltage is the same as the electrical outlet voltage.
The C4030 handset uses radio signals and does not guarantee a connection
in all circumstances. Do not rely on a cordless telephone to make emergencycalls.
Never use your handset:
• in the vicinity of electrical detonators
• in shielded rooms
• in areas where radio transmission is forbidden
• in aircraft
Do not place a handset near:
• water, moisture, or damp areas
• heat sources, direct sunlight, or unventilated areas
• devices that generate strong magnetic fields such as electrical appliances, fluorescent lamps, computers, radios, televisions or fax machines
• areas where the handset can be covered, its ventilation impaired, liquid
spilled on the unit, or objects inserted into the handset through any openings
• areas with dust, vibration, shock or temperature extremes
Environmental Protection
Your telephone handset also takes into account the relationship between
product and environment during its entire service life.
Usage
This handset uses radio signals that do not guarantee a connection set-up
under all circumstances. Do not rely exclusively on cordless telephones when
making critical calls such as medical emergencies.
5
Page 4

C4030 Handset Standard 1.00
Sensitive Electronic Environment
Operational DECT phones can influence sensitive electronic equipment, for
example, laboratory equipment or medical equipment. This influence can
appear when DECT phones operate near equipment. Do not place the DECT
phone on or within a meter of sensitive electronic equipment even in standby
mode.
Check for small metal objects in the C4030
handset earpiece/mouthpiece before using
the handset.
N441
Do not store or locate flammable liquids,
gases, or explosive materials in the same
compartment or vicinity as the cordless
handset, its parts, or its accessories.
Installing the Handset
Installation Location
Place the charger on a flat, even surface. Do not install any part of the DECT
phone (charger, handset and handset accessories) in the proximity of:
• Water, moisture or damp areas.
• Sources of heat direct sunlight or unventilated areas.
• Devices which generate strong magnetic fields, electrical appliances,
fluorescent lamps, computers, radios, television sets, fax and telephone
terminals.
• Areas where the handset can be covered, under-ventilated, or exposed to
liquid penetration.
• Areas where there is excessive dust, vibration, shock, or extreme temperature fluctuations.
• Near obstacles, like thick walls or metallic structures.
Keep the handset and accessories out of reach of small children at all times.
Installing the Charger: Connect the power line cable to the
back of the charger and plug the AC
adapter into the mains socket outlet.
6
Page 5

C4030 Handset Standard 1.00
Wall mounting the Charger: 1. Drill two holes into the wall, with
vertical spacing of 65 mm, and insert
the screws.
2. Plug the power cable into the
charger.
3. Hang the charging unit on the
screws.
4. Plug the power cable into the wall
socket.
5. Place the telephone handset on the
charger.
Note: Only use the charging unit supplied with the device.
Installing and replacing batteries
Read the following information before you handle the batteries.
• Heat or cold reduces the performance and service life of batteries.
A handset with hot or cold batteries can temporarily fail to operate, even if
the batteries are fully charged. Keep battery temperature between 15 C
and - 25C.
• Dispose of used batteries in accordance with local authority regulations.
Do not dispose of batteries in fire.
Two rechargeable NIMH batteries (type AAA/RO3 1.2 V / 650 mAh) power the
handset.
• Replace batteries with NTTQ00AA.
• Never use damaged, worn out, or non-rechargeable batteries.
• Only use stated battery type and recommended vendor models.
• The manufacturer disclaims responsibility if these recommendations are
not followed!
7
Page 6

C4030 Handset Standard 1.00
To install or remove batteries:
1. Press the top of the battery compartment lid and slide it down.
2. Insert new batteries according to the
marking in the battery compartment. Ensure correct polarity for
each
battery.
3. Slide the lid back in place.
Battery charging
To extend the service life of the batteries:
• Charge batteries at least 15 hours before initial use of handset. To attain
maximum power output, complete three to five charge and discharge
cycles are required.
• Charge regularly.
• Avoid extreme temperatures as they affect the charging capability.
To charge batteries: Place the handset on the charging
unit.
Charge Display
The battery icon
tery charging status. Each bar of the battery icon represents about 1/3 of
maximum charging capacity. When the handset is placed in the charger, flashing segments indicate that charging is taking place.
• The charging status indicator is only relevant after the first charging cycle
has completed.
• Switching the handset Off and On, or replacing the batteries results in
loss of the battery capacity status. The charging status indicator is only
relevant after the next charging cycle has completed.
• After a complete discharge of the batteries, the charging status symbol
appears after a few minutes of charging.
Charge Warning
If the telephone beeps and the empty battery icon displays, batteries require
charging. During a call, the handset switches off after a few minutes.
8
, which is located at top left of the display, indicates bat-
Page 7

C4030 Handset Standard 1.00
Battery Life
(with fully charged batteries)
Talking time: up to 16 hours
Standby time: up to 10 days
Battery discharging
Maintain optimum operating time by periodically discharging batteries. The
batteries can be charged and discharged hundreds of times. Replace the
batteries if operating time (talk and standby time) is significantly shorter than
usual.
To discharge batteries:
Note: Only use the following method to discharge batteries.
1. Turn the handset on and do not
place into charger.
2. Leave until it the handset automatically switches off.
9
Page 8
C4030 Handset Standard 1.00
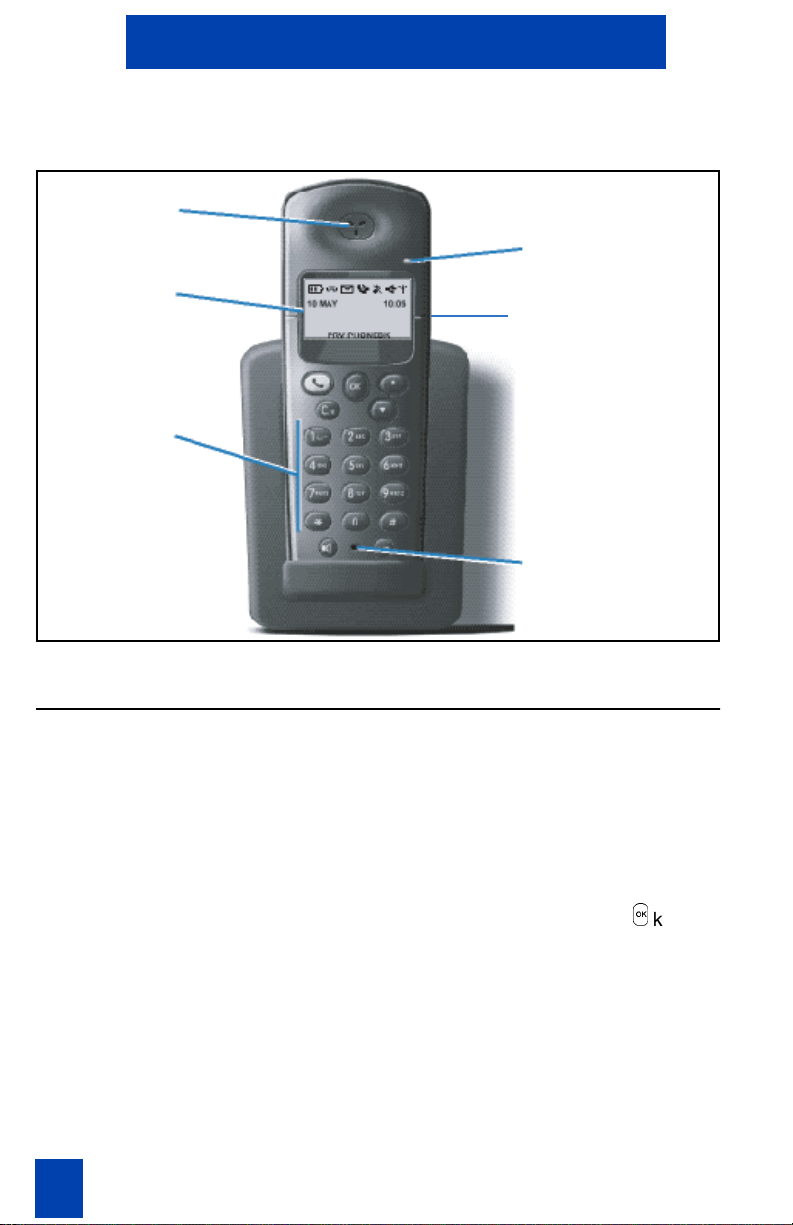
C4030 Handset features
Earpiece
Display
Alphanumeric
Keypad
Incoming Call
Indicator
Headset connecter
Microphone
Display screen
The C4030 displays five lines of information:
• First: Displays several icons.
• Second: Displays text, and in standby mode, date and time.
• Third: Displays text, and in standby mode, identification data.
• Fourth: Displays text.
• Fifth: Displays functionality of the handset, the arrow keys, and
10
O
key.
Page 9
C4030 Handset Standard 1.00
Handset keys
The numerical keys can be used to dial numbers or edit entries in, for
example, the telephone book.
Executes the display command on the
last line.
Makes, accepts, or ends a call.
Starts "Recall" during a call. Moves up
one menu level. Cancels a character
during character input. Cancels whole
input when pressed for at least 2
seconds during character input.
Returns to "standby mode" when
pressed for at least 2 seconds.
Switches the loudspeaker ON/OFF,
also when accepting or initiating a call.
Increases volume during a call.
Scrolls through menus, lists, and
entries.
Activates/deactivates the key-lock
function when pressed for at least 2
seconds.
Enables the use of menu shortcuts.
11
Page 10
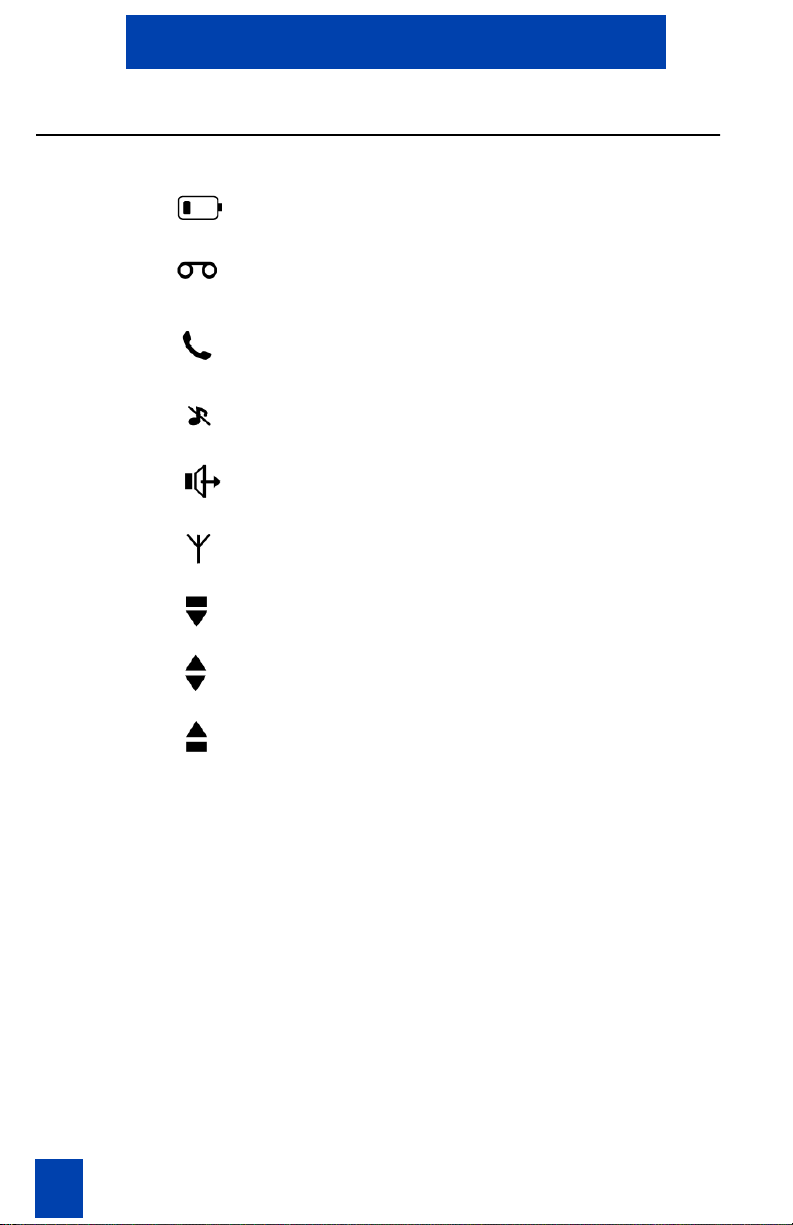
Icons
C4030 Handset Standard 1.00
Battery status / Charging indication.
Voice mail message-waiting
indication.
ON : call in progress.
FLASHING : incoming call.
Mute
Loudspeaker on.
ON : locked to DECT system.
Top of the list is reached.
12
Middle of the list is reached.
Bottom of the list is reached.
Page 11

C4030 Handset Standard 1.00
Using the C4030 handset
Handset On/Off
1. Press the 0 key for 2 seconds to
switch the handset off.
2. Press any key to switch the handset
back on again.
After 2 seconds, the handset
switches on and displays the idle
menu.
r
Note: Use the
other keys for this purpose, then their function is executed
immediately after the set is switched on. Example: When you press
“O” to switch the set back on again, pre-dial begins with an “O” in the
display.
key or the
W
key to switch the set on again. If you use
It is recommended that you leave your handset on at all times.
Receiving calls
To receive calls:
Press the
flashes signalling the call and a
icon displays.
j
key. The green LED
f
13
Page 12

C4030 Handset Standard 1.00
Making a call in the Pre-Dial Mode
To make a call:
1. In Standby mode, dial the
number using the keypad (up to 26
digits).
Note:
on two lines when you enter a
number with more then 10 digits. To
display more than 20 digits, the
character size is reduced.
2. Press the
To correct an error: Move the cursor using the scroll
arrows.
or
Use the
in front of the cursor or insert a
missing digit at the cursor location.
or
Press the
delete the whole line.
To hang up: Press the
The dialed number displays
j
key to initiate the call.
r
key to delete a character
r
key for 2 seconds to
j
key again.
You can place a call by pressing the
f
icon displays as well.
A
m
It is not possible to use the
accesses the shortcut menu.
14
key in pre-dial mode. In pre-dial mode, the key
j
key before dialling the number.
Page 13

C4030 Handset Standard 1.00
Volume Adjustment
You can adjust your handset’s earpiece volume for your listening comfort.
To adjust your earpiece volume:
When the call ends, the volume level switches back to the default setting.
1. During a call, press the
once to increase earpiece volume
(or loudspeaker volume in loud
speaking mode).
2. Press the
the normal level.
W
key again to return to
W
key
Activating Handsfree
You can enable your handset as a speakerphone to allow handsfree
operation.
To activate handsfree: 1. During a call, press the handsfree
key.
2. Press the handsfree key again to
switch handsfree off.
You can also press the handsfree key to initiate or answer a call and
simultaneously switch on the handset. To hang up, press the
j
key.
Mute Ringing
You can switch off handset ringing during an incoming call.
Switch off without answering the call:
While the handset is ringing, press
the
O
key.
15
Page 14

C4030 Handset Standard 1.00
Silent Mode
You can switch off the handset ringing in Standby mode to enable Silent
mode.
To enable Silent mode: 1. Enter the “Handset Sound” menu.
2. Enter the “Ringer volume” menu.
O
3. Select “Silent” and press the
You can also use the shortcut 1.5.1 (see "Using Keypad Shortcuts"). Handset
signalling can be switched on again by selecting another ringer
O
volume and pressing the
key.
key.
Ringer types
You can select different ringer types for the C4030.
Call ringer
shortcut 1.4 to activate
CLI ringer
shortcut 1.0 to activate
The C4030 alerts the melody selected by
the internal call ringer when receiving an
external call.
When the C4030 receives a call, and the
number and name of the caller is stored in
the phone book, the CLI ringer selects the
ringing melody. You can select six available
melodies for the CLI
ringer.
Conference call
During a conversation, it is possible to set-up a conference call.
To set up an enquiry call: 1. Press the
call.
2. Dial a second desired telephone
number.
3. Press the
to conference.
r
After pressing the
the redial list or phonebook by using the
key, you can select a desired telephone number from
s
keys.
r
key to hold the first
r
key again
16
Page 15

C4030 Handset Standard 1.00
Transferring a call
During a call, it is possible to transfer the connected line to another number.
To transfer a call: Press the
desired telephone number.
You can disconnect immediately or
wait for the third party to answer
before disconnecting.
r
After pressing the
phonebook by using the
key you can select a number from the redial list or
s
keys.
r
key followed by the
Identifying the caller
Your C4030 can display the caller’s number during an incoming call.
If enabled by the Meridian PBX, the
handset displays the caller’s
number.
If the caller’s number is
associated with a name in the
private phonebook, the name
displays.
Message Waiting Indicator for Call Pilot and Meridian Mail
The C4030 indicates when a message is waiting for you.
When the
standby mode, the user has a message in the voice mailbox.
After listening to all new voice mail
messages, the
pears.
If the handset is switched off or outof-coverage, the message waiting
indication updates after the
handset re-locks to the DECT
system.
T
icon appears in
T
icon disap-
17
Page 16

C4030 Handset Standard 1.00
Key Lock
You can lock the keypad to prevent an inadvertent key press.
To lock the keypad: 1. Press the
or
Press the keys:
2. Press the
To unlock the keypad: Press the
2 seconds.
When the key lock is active, you can answer calls as normal and use all keys
during the call. The key lock reactivates at the end of the call.
k
key for 2 seconds,
m, 2, 4, 2
O
key twice to confirm.
O
key or m key for
Time of Day
You can set the handset to display the time-of-day.
j
Press the
The 24-hour Time-of-Day displays.
This Feature must be enabled by the system administrator.
key.
.
18
Page 17

C4030 Handset Standard 1.00
Access Meridian PBX features
The C4030 uses feature and special codes to access Meridian PBX features.
To access Meridian PBX features:
Flexible Feature Codes (FFC):
Special Prefix Codes (SPRE):
Features using FFC and SPRE codes:
1. While the handset is idle, enter the
2. Press the
FFC and press the
access the Meridian PBX features.
r
Meridian PBX features during a call.
Dial an FFC code to access
handset features.
Dial a SPRE code plus a one or two
digit number to access some of your
handset’s features. The SPRE codes
are unique to your system; however,
the digits following the SPRE are
fixed. For example, dial SPRE +
74
to call forward all calls to
another number.
Call Forward: to cancel or activate.
Call Park: to park or retrieve a call.
j
key to
key to access the
Ask your System Administrator for the FFC or SPRE codes.
19
Page 18

C4030 Handset Standard 1.00
Using Handset Menus
Selecting a handset menu
Standby mode is the starting point for accessing a handset menu.
To choose a function from the Standby mode:
The following menus are provided:
• PRV PHONBK Private Phone book.
• REDIAL List with last 10 dialled numbers.
• SETTINGS Configuration Settings.
The selected menu displays on the last line of the screen.
To view a menu: Press the
To return to Standby mode, press the
Press the
required to view the various menus.
of the selected menu displays.
r
key for 2 seconds.
s
keys as many times as
O
key. The initial screen
20
Page 19

C4030 Handset Standard 1.00
Using keypad shortcuts
All sub-menus, functions or settings are accessible by means of associated
keypad shortcuts. In each table, the number that appears in front of the submenu, function or setting enables you to access the desired function more
quickly.
1. Press the
2. Enter the shortcut corresponding to
a submenu, function, or setting. The
keypad shortcut displays on the second line of the screen.
3. Press the
selection. The window corresponding to the selected menu, function,
or setting displays.
4. Using the
5. Press the
m
key.
O
key to confirm the
s
keys, select a setting.
O
key to confirm.
Private Phonebook
You can use the Private Phonebook to store, delete, modify, and view
telephone numbers or make calls.
Storing telephone numbers (up to 100 entries):
1. From Standby mode, use the
keypad to dial the telephone number
(up to 26 digits) to be stored.
O
2. Press the
number. Use the keypad to enter a
new name (maximum 14 characters).
key to confirm the new
21
Page 20

C4030 Handset Standard 1.00
Viewing a phonebook entry:
3. Depending on the character you
intend to use, press the appropriate
key once or several times. See
"Character Table".
r
4. Use the
character in front of the cursor.
5. Press the
name.
1. From Standby mode, select the
"PRV PHONBK" menu.
2. Confirm by pressing the
first entry in the selected
phonebook displays.
3. Press the scroll keys to scroll
through the list.
4. To directly access an entry, type in
the first letters of the name to be
viewed. Press the
confirm the search. The first name
displays, followed by the entered
characters.
key to delete the
O
key to confirm the new
O
key. The
O
key to
5. Refine the search by using the scroll
keys.
Making a call: 1. Select a person in the phonebook.
The corresponding name and
telephone number display on the
screen.
Deleting an entry from a phonebook:
22
2. Press the
telephone number.
1. Select an entry to delete from the
phonebook. The corresponding
name and telephone number display
on the screen.
2. Press the
j
key to dial the
O
key to confirm.
Page 21

C4030 Handset Standard 1.00
3. Select the "Delete" option using the
scroll keys.
4. Press the
validation beep and the "Deleted!"
prompt sounds. The current entry is
deleted and the next one displays.
Modifying a phonebook entry: 1. Select a Phonebook entry to
modify the corresponding name and
number display on the screen.
2. Press the
3. Using the
"Change" option.
4. Press the
5. To delete the whole line, press the
r
key to delete a number or hold
down the same key for 2 seconds.
6. Enter the modified number.
7. Press the
number.
8. If required, repeat the operation to
modify the name.
9. Press the
O
key to confirm. A
O
key to confirm.
s
keys, select the
O
key to confirm.
O
key to confirm the new
O
key to confirm.
23
Page 22

C4030 Handset Standard 1.00
Character Table
1 _ 1 ( ) [ ] & $ ¥
2 A B C 2 À Â Ä Â Æ Ç
3 D E F 3 È É Ê Ë
4 G H I 4
5 J K L 5
6 M N O 6 Ô Ö Ø
7 P Q R S 7
8 T U V 8 Ü Û Ü
9 W X Y Z 9 Ÿ
0 . 0 “ ‘ ? ! , ; ... * + - / % # = < > @
* *
# #
î ï
ß
24
Page 23

C4030 Handset Standard 1.00
Redial List
The C4030 telephone stores the telephone numbers of the last 10 calls. You
can view this list, call back your callers directly from the list, or modify the list.
You can also store a telephone number from the Redial list in the private
phonebook.
To view the list of outgoing calls:
1. From Standby mode or during a call,
press the
"REDIAL" menu (Redial list).
2. Press the
on the last line of the display.
3. To scroll through the list, press the
s
keys as many times as required.
The first entry in the redial list
appears on the screen.
Note: You can dial the displayed number directly by pressing the
s
keys to open the
O
key. "REDIAL" appears
j
key.
Deleting/Storing an Entry in Redial List
1. From Standby mode, open the redial
list. The entry corresponding to the
last outgoing call displays.
s
2. Press the
the list.The number to be stored or
deleted displays.
3. Press the
4. Using the
options: Delete, Delete All, or
Store.The selected option displays.
5. Press the
Delete/Delete All A validation beep sounds and the
'Deleted!' prompt displays.
keys to scroll through
O
key.
s
keys, select one of the
O
key.
25
Page 24

C4030 Handset Standard 1.00
Store You are prompted to store the
telephone number in the private
phonebook.
Press the
The confirmation prompt "Stored"
displays. The handset returns to the
redial list.
You can select the Delete All option to remove all entries from the redial list.
O
key to validate.
Settings
The C4030 can be customized and certain functions can be configured by
accessing "SETTINGS".
This main menu has two sub-menus:
• HANDSET SOUNDS
• HANDSET SETTINGS
Each sub-menu is represented in table form on the following pages. The
tables present each function or setting and the corresponding keypad shortcut
that enables faster access to the desired setting.
Only one setting per function can be active at one time.
To change the settings: 1. From Standby mode, press the
s
keys to access "SETTINGS".
26
O
2. Press the
3. Select the desired sub-menu
"Handset sounds" or "Handset
settings”. The designation of the first
function appears in the middle of the
screen.
4. Press the
settings of this function.
5. Use the
function or setting. The box containing the “OK” sign indicates the
setting currently selected.
key to confirm.
O
key to access the
s
keys to select another
Page 25

C4030 Handset Standard 1.00
6. Press the
s
keys to select the
desired setting.
O
7. Press the
key to confirm the new
setting.
The confirmation prompt "Set"
displays.
The handset reverts to Standby
mode.
Handset sounds
Select Handset sounds > Ringer type for external incoming calls.
Select Handset sounds > CLI ringer for incoming calls defined in the
phonebook.
When vibrator is set, the ringer is deactivated.
Note: The box with the “OK” sign indicates the ex-factory setting for your
telephone.
Function Shortcut Settings Default
1.1 Ear-piece volume 1.1.1
1.1.2
1.1.3
Low
Medium
High
1.2 Loudspeaker volume 1.2.1
1.2.2
1.2.3
1.3 Headset volume 1.3.1
1.3.2
1.3.3
Low
Medium
High
Low
Medium
High
27
Page 26

C4030 Handset Standard 1.00
Function Shortcut Settings Default
1.4 Ringer type 1.4.1
1.4.2
1.4.3
1.4.4
1.4.5
1.4.6
1.5 Ringer volume 1.5.1
1.5.2
1.5.3
1.5.4
1.5.5
1.5.6
1.6 Key tones 1.6.1
1.6.2
1.7 Ear-piece tone 1.7.1
1.7.2
1.7.3
1.8 Loudspeaker tone 1.8.1
1.8.2
1.8.3
Melody 1
Melody 2
Melody 3
Melody 4
Melody 5
Melody 6
Silent
Low
Medium
High
Progressive
Vibrator
Off
On
Bass
Standard
Tr e b le
Bass
Standard
Tr e b le
1.9 Headset tone 1.9.1
1.9.2
1.9.3
1.0 CLI ringer 1.0.1
1.0.2
1.0.3
1.0.4
1.0.4
1.0.6
28
Bass
Standard
Tr e b le
Melody 1
Melody 2
Melody 3
Melody 4
Melody 5
Melody 6
Page 27

C4030 Handset Standard 1.00
Handset settings
Only select Handset settings > Select Base when the set has already been
registered to more than one base.
For information about the Handset settings > Register option, see 'Administration' on page 30.
Note: The box with the 'OK' sign indicates the ex-factory setting for your
telephone.
Function Shortcut Settings Default
2.1 Language 2.1.1
2.1.2
2.1.3
2.1.4
2.1.5
2.1.6
2.1.7
2.1.8
2.1.9
2.2 Back light 2.2.1
2.2.2
2.3 Display contrast 2.3.1
2.3.2
2.3.3
2.4 Keypad lock 2.4.1
2.4.2
2.6 Select base 2.6.1
2.6.2
2.6.3
2.6.4
2.7 Register 2.7 PIN
English
Deutsche
Francais
Nederlands
Italiano
Dansk
Svenska
Norsk
Suomi
Off
On
Low
Medium
High
Off
On
Base1
Base2
Base3
Base4
29
Page 28

C4030 Handset Standard 1.00
Administration
Initial Setup and Subscription
The handset can operate with up to 4 DECT systems. Before making a call
with a DECT system, subscribe the handset to the respective system. A PIN
is required for the subscription process.
Register the handset on the DECT system:
The handset reports that the subscription procedure has successfully completed. If it fails to report a completed subscription, contact your system
administrator.
The antenna symbol in the upper right corner of the display indicates that the
handset is locked to a DECT system.
After the registration procedure, change the default identification name to a
logical name.
1. Obtain a PIN from the DECT
management system.
2. Press the
3. Press the
4. Confirm the menu selection by
pressing the
5. Enter the PIN and press the
m,2
O
, and 7 keys.
key to confirm.
O
key.
O
key.
Entering the Identification name
Enter a description for easy identification of the handset:
1. Press them,2, and 7keys.
O
2. Press the
key for confirmation.
30
3. Confirm the menu selection by
O
O
key.
key.
pressing the
4. Enter the description of your choice
(maximum of 10 characters) and
press the
Page 29

C4030 Handset Standard 1.00
The description is stored and displays on the second text line. For example:
“J. B. 7923”.
To make corrections, access the same menu and use the
characters.
r
key to remove
Selecting a DECT system
The handset automatically locks onto the first detected DECT system.
However, you can manually select and subscribe to a DECT system.
To manually select a system: 1. Press the
2. To confirm, press the
3. Press the
4. Scroll and select a DECT system.
5. Press the
To simplify the use of several DECT systems, ensure that they have different
names. The default system name is “Phillips”. See “Entering the
Identification Name” on page 30 to change the system name.
m,2
O
key again.
O
key.
, and 6 keys.
O
key.
31
Page 30

C4030 Handset Standard 1.00
Troubleshooting
Problem
When the handset is placed on the charging unit, no beep sounds.
Cause Solution
The charging unit is not properly
connected to the electricity socket.
Charging contacts are dirty. Clean the charging contacts with a
Key tones are deactivated. Activate the function again.
Check the connection between
charging unit and electrical socket.
clean and dry cloth.
Problem
Batteries remain low though the handset has been charged for 12 hours.
Cause Solution
The charging unit is not properly
connected to the electricity socket.
Handset batteries are defective. Order and insert new batteries.
Check the connection between
charging unit and electrical socket.
Problem
No dial tone.
Cause Solution
The handset is out of range of any DECT
system radio (the antenna symbol does
not display).
Move closer to a radio of the DECT
system.
The handset has not been registered (the
antenna symbol is not displayed).
Batteries are low. Charge batteries.
Ask the MDECT system administrator
to register the handset to the DECT
system.
32
Page 31

C4030 Handset Standard 1.00
Problem
An error beep is heard during a call.
Cause Solution
Batteries are low. Charge batteries.
Problem
The name is not displayed completely.
Cause Solution
Only one text line is used. The display
length cuts off the name by limiting the
text line.
Use short names.
33
Page 32

C4030 Handset Standard 1.00
34
 Loading...