

Page 1
C3060 Portable Telephone
User Guide
COMPANION
Page 2

Page 3

Contents
C3060 Portable Telephone . . . . . . . . . . . . . . . . . . . . . . . . . . . . . . . . . .1
ontents . . . . . . . . . . . . . . . . . . . . . . . . . . . . . . . . . . . . . . . . . . . . . . . .3
C
G
sing your telephone directory . . . . . . . . . . . . . . . . . . . . . . . . . . . . .11
U
sing your services directory . . . . . . . . . . . . . . . . . . . . . . . . . . . . . . .15
U
sing your headset . . . . . . . . . . . . . . . . . . . . . . . . . . . . . . . . . . . . . . .19
U
ustomizing your portable . . . . . . . . . . . . . . . . . . . . . . . . . . . . . . . . .21
C
xtra features . . . . . . . . . . . . . . . . . . . . . . . . . . . . . . . . . . . . . . . . . . . .25
E
atteries and charging . . . . . . . . . . . . . . . . . . . . . . . . . . . . . . . . . . . .32
B
ccessories for your portable . . . . . . . . . . . . . . . . . . . . . . . . . . . . . .37
A
afety information . . . . . . . . . . . . . . . . . . . . . . . . . . . . . . . . . . . . . . . .38
S
echnical specifications for Canada . . . . . . . . . . . . . . . . . . . . . . . . .40
T
aring for your portable . . . . . . . . . . . . . . . . . . . . . . . . . . . . . . . . . . .42
C
sing your C3060 Po rtable with
U
Meridian Companion . . . . . . . . . . . . . . . . . . . . . . . . . . . . . . . . . . . . . .43
sing your C3060 Po rtable with
U
Companion 200 . . . . . . . . . . . . . . . . . . . . . . . . . . . . . . . . . . . . . . . . . . .49
sing your C3060 Po rtable with
U
Norstar Companion . . . . . . . . . . . . . . . . . . . . . . . . . . . . . . . . . . . . . . .53
3
etting started . . . . . . . . . . . . . . . . . . . . . . . . . . . . . . . . . . . . . . . . . . .5
Page 4

4
Page 5
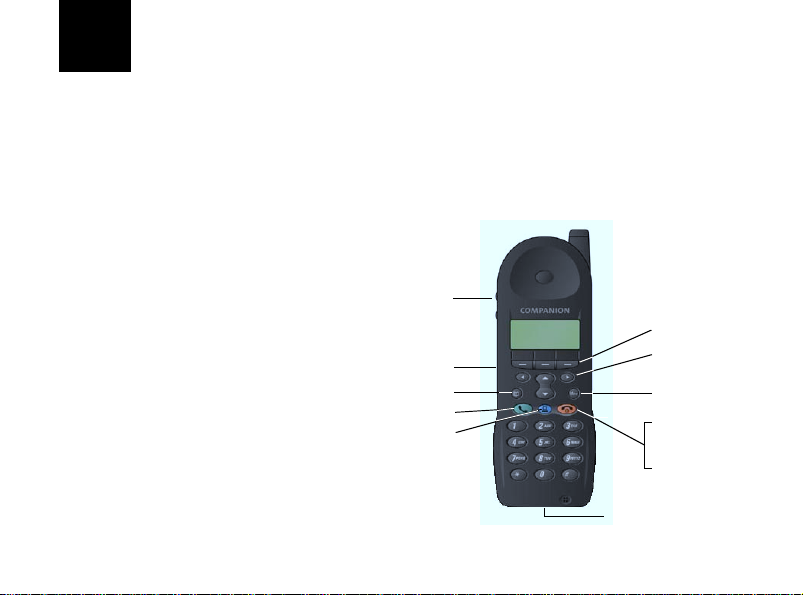
Getting started
The parts of your
portable
Before you use your portable for the first time, see Safety
information on page 38. Yo u should charge its ba ttery pac k
overnight (See All about batteries and recharging
on page 32).
Volume switch
Softkeys
Mute
Directory
Line
Services
Navigation keys
Menu
Power On/Off
Release calls
Terminate activity
Headset /data connector
5
Page 6

Turn t he p or ta b le o n Press and hold the k button for at le as t two seconds.
Turn t he p or ta b le o f f Press the k button for at least two seconds.
Portable screen icons
J,I,H,G
p, Q, P
V
Note: The three buttons directly below your portable’s display are
called softkeys. Their labels appear on the display with an underline
above the button to which they are assigned. A softkey label is shown
like this in this user guide:
Battery strength indicators (strong to very weak)
Radio signal strength indicator (strong to very weak)
Vibrator indicator
REDIAL.
Setting your
portable to ring
6
You can set your portable to one of three ring options by
pressing the m button wh en th e po r t ab le is idl e. Se lect
one of the softke ys for FULL
softkey, or press the m button.
OK
, CHIRP, or NONE then press the
Page 7

FULL provides a normal ring volume and cadence. CHIRP
provide s one short ring at low volume. NONE
audible ring.
provi d es n o
Answering a call Press the i butto n. When the portable is ringing, you
can pre ss the m button to stop the ringing/v ibration and
continue to answ er the call.
Adjusting the ringing
volume
Adjusting the
speaker volume
When the phone is ringing, you can adjust the ringing
volume wi th the volu m e switch. When th e phone is no t
ringing, use the Menu to access the volume adjustment
levels.
While on a call, pressing b or B can adjust the volume in
twelve steps. The steps 0 to 8 raise the volume, with step 0
the lowest volume. The steps 9 to 11 are for noisy
environments. The d i splay show s the volume step for tw o
seconds as follows:
• after adjusting the volume
• before making or re ceivi ng a call at v olume le vel s 9 to 11
7
Page 8
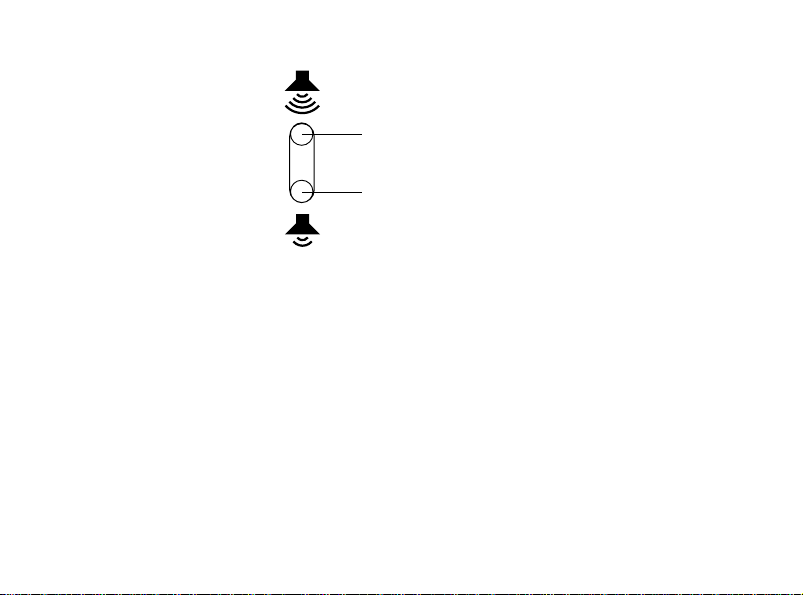
.
to increase volume, press here
to reduce volume, press here
Making a call Dial the tele phone number directly or:
• dial from your directory (See Using your telephone
directory on page 11)
• predial (See Customizing your portable on page 21)
• press a customized softkey (See Customizing softke y s on
page 30)
Accessing features
during a call
8
You can access features or Computer Telephony
Integration (CTI) applications while on a call, by three
methods:
Page 9

1. Press m, then select the appropriate softkey and dial the
access code digits.
2. Select an entry from your Service s directory . (See Using
your services direct ory on page 15.)
3. Dial a feature from a programmable On-a-call softkey.
(See To assign a number to a softkey when the portable is
on a cal l on page 30.)
Ending a call Press the
Making two calls in a
row
Keeping your
connection
Press
NEXT
radio connection for another call.
T o maintain your call, stay in the radio coverage area. If you
have problems with your connection, retrace your steps. The
signal strength icon Q indicates if the signal is becoming
stronger or weaker.
button.
k
after your first call. The portable maintains its
9
Page 10

Muting a call T o prevent your caller from hearing you, press m on the left
side of the portable. The display shows Microphone muted
and then i in j flashes. To end muting, press m again.
Redialing last
number
Your portable is set up so that you can redial the last
number you dialed by pressing
when it appears.
REDIAL
Dialing the last caller You can view the names of the last two callers when
10
appears on the display. Press
the nam es. Pre ss > to view the number. Press
the number or
to delete the number. To add the
ERASE
name to the directory, press
and , or . to view
LAST
.
SAVE
DI A L
LAST
to call
Page 11

Using your telephone directory
Your portable has an alphanumeric directory that al lows
you to store up to 100 entr ies for telephone numbers.
Storing telephone
directory entries
11
1. Press l,
2. Enter the telephone number, then press
3. Enter the first letter of the name by pressing the button
that has the letter you want. For example to enter A,
press 2; to en ter B, press 22. Use 1 to
choose special characters such as , - ’ _ . ( )
4. Enter the rest of the letters as shown in step 3. Use >
to mov e t he c urs or forw ar d if th e nex t le tt er you wan t is
on the same button, or select
5. Wh e n th e name is co mple te , pr e s s
Hint: If you want an entry to appear at the start of your directory, make
its first character a space using
key.
1
ADD
.
.
SAVE
to insert a space.
SPACE
.
SAVE
> or other special characters on the
Page 12

Find an entry in the
telephone directory
Once you have stored entries into the telephone directory,
you can move through them quickly by pressing the first
letter of the ent ry you want. For exa mp le to look for
listings under D, press l, then 3; for listings under E,
press l, then 33. If there is more than one entry
under a letter, press . to keep looking.
Note: Use 1 to choose special characters such as , - ’ _ . ( )
Editing telephone
directory entries
12
1. Press l, then . or , (or the firs t letter of th e entry
you want) unti l y ou reac h t he entr y you want t o chang e.
Directo r y entries are in alphabetical order.
2. To edit the entry’s name press
3. Press
SAVE
.
4. To edit the entry’s number press >, then press
, then edit the name.
EDIT
EDIT
,
then edit the number.
5. Press
, k or press l.
SAVE
Page 13

Deleting an entry 1. Press l, the n , or ..
2. Press
3. Press
CANCEL
4. Press k or l.
. The display will ask Erase item?
ERASE
. The display will show Item erased. (Selec t
OK
if you do not want to erase the entry.)
Dialing from the
Press l, find the entry,
DI A L
.
telephone directory
Pause and link signal When adding a directory item or customizi ng a softkey,
you may need to insert a pause or a link signal. LINK
PAUSE
appears w h en y o u are on a call to enable features
such as Transfer and Co n ference.
To insert a pause when you are predialing a number or
storing it i n your di recto ry, press m and select Pause. The
display shows P.
or
13
Page 14

14
To insert a link signal, press m and select Link signal.
The display shows L. (See Using y our C3060 P or table wi th
Meridian Companion or with Companion 200 or with
Norstar Companion in this guide for using this feature.)
Page 15

Using your services directory
Your portable has a services directory that allows you to
store up to 15 ent ries for feature codes and Computer
Telephon y Integration (CTI) applications.
Note: Although the services directory can store telephone num bers,
use the services directory for feature codes and CTI applications.
If your system has a CTI server, double clicking the j
button displays a pre-programmed menu of CTI
applications.
Note: The pre-program m ed m enu of CTI applications is only available
on certain CTI system s.
Storing services
directory entries
15
1. Press j,
2. Enter the feature code or application code, then press
. (See Using your C3060 Portable with Meridian
SAVE
Companion or with Companion 200 or with Norstar
Companion in this guide for us ing this featur e.) (See the
ADD
.
Page 16

your system administrator for feature codes to access
CTI applications.)
3. Enter the first letter of the name by pressing the button
that has the letter you want. For example to enter A,
press 2; to en ter B, press 22.
4. Enter the rest of the letters as shown in step 3. Use >
to mov e the c urs or for w ar d if th e nex t le tt er you wan t is
on the same button, or select
5. Wh e n th e name is co mple te , pr e s s
Hint: If you want an entry to appear at the start of your directory, make
the directory entries first character a space using
characters on the
1
key.
to insert a space.
SPACE
SAVE
> or other special
.
Find an entry in the
services directory
16
Once you have st ored entries into the services directory,
you can move through them quickly by pressing the first
letter of the entry you wa nt. F or example to look at lis tin gs
under D, press j, then 3; for listings under E, press
j, then 33. If there i s more tha n one e n try under a
letter, press . to keep looking.
Note: Use 1 to choose special characters such as , - ’ _ . ( )
Page 17

Pause, link signal
and feature request
When adding a directory item, you may need to insert a
pause, link or a feature request signal. You can use the
feature request signal to enable CTI applications.
Pause
To insert a pause when you are predialing a number or
storing a pause in your directory, press m and select
Pau se . The display shows P.
Link signal
To insert a link signal, press m and select Link signal or
press Link
Using your C3060 Portable with Meri dian Companion or
with Companion 200 or with Norstar Companion in this
guide for us ing this feature.)
Feature request signal
To insert a feature request s ignal, press m and select
Feature request or press Feat
display shows F. (See Using your C3060 Portable with
Meridian Companion or with Companion 200 or with
Norstar Companion in this guide for using this feature.)
if it is av ailable. The display shows L. (See
if it is available. The
17
Page 18

Editing services
directory entries
1. Press j, then find an entry. Directory entries are in
alphabetical order.
2. To edit the entry’s name press
3. Press
4. To edit the entry’s number press >, then press
5. Press
SAVE
SAVE
.
, k.
Deleting an entry 1. Press j, then find an entry.
. The display will ask Erase item?
ERASE
. The display will show Item erased. (Select
OK
if you do not want to erase the entry.)
SELCT
Dialing from the
2. Press
3. Press
CANCEL
4. Press k or j.
Press j, find an entry,
services directory
18
, then edit the name.
EDIT
.
EDIT
.
Page 19
Using your headset
Use one of the optional headsets to free both hands for
other tasks.
Hint: Use the portable with a holster to protect the portable from falls.
A holster also allows you free m ovem ent while you are on a call.
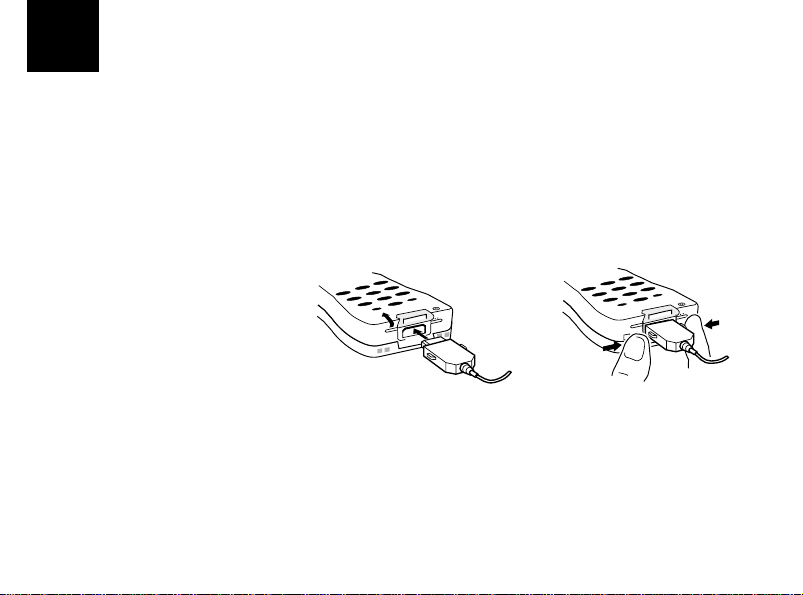
Connecting and
disconnecting the
headset
You can disconnect the headset during a call and the call
remains on the portable.
19
Page 20

Using your portable
with the headset
20
To answer a call, press i. To end a call, press k.
Note: If you wear a hearing aid, use the C3002 headset to prevent
unwanted tones in your hearing aid.
Note: In noisy environm ents you can use the C3002 headset to
provide better voice transm ission and reception.
Page 21

Customizing your portable
Hint: Whenever you are searching through a list, you can press the
first letter of the feature, directory, or system entry you want. If there is
.
.
.
to keep looking.
OFF
>, as in
in this
m ore than one entry under a letter, press
To customize your portable, use the Menu, which contains
a number of fe at u r es in al phabetic al or d er.
Find a menu item To searc h thro ugh th e available options on the Menu press
m
,
,
or ..
Note: The portable displays options in several different ways.
Whenever the display shows a heading followed by a colon, as in
Vib r ator : O n, you can select the underlined softkey,
case, to switch to the other option.
Whenever the display shows a heading followed by
>
Language>, press
then move through by pressing
21
to enter a m enu of options which you can
,
or
Page 22

Key click 1. Select Key click:.
2. Choose
to hear a short bee p when you pre ss a b ut ton.
ON
Keypad light Your portable’s keypad and display light for low-light
conditions. The keypad and d is play lights ind ependent of
key pad light settings when the port able rings.
1. Select Keypad light:.
2. Choose
to light the keypad when pressing a key.
ON
You can extend battery life b y leavi ng the keypad light
when lighting is not required.
Key-protect Key protect prevents accidently pressing the keys.
1. Select Key-protect:.
or
2. Choose
ON
When Key-protect is turned on, press
OFF
.
to activate
START
softkeys or buttons on the portable.
Language 1. Select Language>.
22
OFF
Page 23

.
2. Press >, then , or
to move betw een the In
English and En français s elections.
or
3. Press
SELCT
, to select your choice.
SÉL
Last caller See Last caller on page 26.
Line select To check that a number is correct before you dial, set up
your portable for predialing.
1. Choose Line selct:.
2. Select
MANUAL
, k.
3. Enter the te lep hone num ber, which may be edited usi ng
.
BKSP
4. Press i to dial your call or
to store it in your
SAVE
directory.
Note: You can insert a pause or a link into a predial sequence (See
page 13).
Long tones See Long tones on page 26.
23
Page 24

Message service See Message Service on page 27
Program softkeys See Program softkeys on page 30
Ringer 1. Select Ringer:.
2. Press FULL
3. Press CHIRP
4. Press NONE
for a normal ring volume and cade nce.
for one short ring at low volume.
for no audible ring.
Ring types 1. Select Ring types>.
2. Press >,
3. Press
SELCT
,
to choose a new ring type, k.
or
to hear sample s.
.
Ringer volume 1. Select Ringer volume>.
2. Press > ,
from 1 to 5.
3. Press
SELCT
or ., to hear samples or press a number
,
to choose a new ring v olume, k.
Vibrator Select Vib ra to r: . The display shows V, and the portable
vibrates briefly.
24
Page 25

Extra features
Find a menu item To searc h thro ugh th e available options on the Menu press
m,
or ..
,
Note: The portable displays options in several different ways.
Whenever the display shows a heading followed by a colon, as in
25
Vib r ator : O n, you can select the underlined softkey,
case, to switch to the other option.
Whenever the display shows a heading followed by
Language>, press > to enter a m enu of options which you can
or
then move through by pressing
,
.
.
If your system supports features such as Call Forward or
Call Transfer, you can customize your S ervices directory
to include them or you c an assign them to a softkey (See
Using your services directory on page 15 , Customizing
softkeys on page 30) and (See Using your C30 60 Portable
with Meridia n Companion or wi th Companion 200 or with
Norstar Companion in this guide for using this feature.)
OFF
>, as in
in this
Page 26

You can put CTI feature codes, or sys tem fea ture c odes , or
telephone numbers into your Services directory.
Last caller If your system supports calling line ID, the last caller list
shows the last two incoming calls.
1. Select Last caller:.
2. Press
3. Press
to choose the last caller.
LAST
to save the last caller in the telephone
SAVE
directory.
4. Press
to erase the last caller from the last caller
ERASE
list.
5. Press
to return to the idle display.
END
Long tones 1. Select Long tones:.
2. Choose
banking services and telephone answering machines.
This way you can send a tone that lasts until you take
your finger off the button (up to 3 seconds).
26
k for long tones to respond to electronic
ON,
Page 27

Note: Not all systems support this feature. (See your system
adm inistrator for features your system supports.)
Message waiting Some systems allow your portable to display Message
w
aiting if you have a voice mail message.
Even if your system does not support Message Waiting
indication, you can set up your portable with Message
Service to dial directly into your voice m ailbox.
Message Service First, store a message service code. See To store yo u r
message service code on page 28.
1. Press
2. Press
to
MAIL
to listen to the message and
PLAY
to the next message.
3. Press
4. Press
to listen to th e pr evious message.
PREV
to dial the number. Press
CALL
message.
5. Press
to exit your message service.
END
access the voice mail system.
NEXT
to dele t e th e
DEL
to move on
27
Page 28

28
Note: If you press
EXIT
.
press
, and you want to use your active softkeys,
CALL
Depending on your voice mail system, y ou m ay be required to
change the dial codes. Dial codes are the numbers used to access
voice mail system features. For example, the def ault dial code 76
deletes a message. If your voice mail system is Meridian Mail,
you do not have to change th e dial codes. If yo u change your
message service code, you will have to change the dial codes as
required.
To store your message service code
1. Select Msg service #,
CODE
.
2. Enter ___________ (your voice mail service access
number) and insert on e or more pauses as require d (Se e
Pause and link signal page 13).
3. Enter __________ (your voice mailb ox num ber an d
password) and press
Note: Your voice m ail system m ay require you to press
enter your mailbox number or password.
SAVE
.
# after you
Page 29

4. The display sh ows Dialcodes?
Note: Dialcodes? is only displayed after you first store the
m essage service code. If you erase your m essage service code, you
will have to go through dial codes again and change as required.
Hint: For m ost Meridian Voice Mail system s, select
Norstar Com panion system s that support integrated voice m ail, select
. On som e Norstar Com panion system s, m essage service m ay work
NO
differently. (See your system adm inistrator for assistance.)
5. Pr e ss
DEFAULT
Press
to change the default dial codes. Press
EDIT
when you do not want to chan ge the dial co des.
when you are not using dial codes.
NO
DEFAULT
. For
6. Go through the dial co des and change the val ues for
your voice mail system, if required.
29
Page 30

Program softkeys For direct, one-t ouch access to frequently us ed features or
frequently called numbers, customize your softkeys.
You can program the softkeys for use when the po rtable is
idle or is on a call.
Softkeys not pr ogrammed keep their default values when
the portable is idle or is on a call.
30
The default idle softkeys are
default on a call softkeys are
REDIAL, MAIL
NEXT, LINK
and
and
LAST
SAVE
. The
.
To assign a number to a softkey for use when the
portable is idle or on a call
1. Select Program softkeys.
2. Press the
3. Press the IDLE
SELCT
softkey to use the softkey when the
portable is idle or press the On CALL
softkey
.
softkey to use the
softkey wh en th e p or t ab l e is o n a ca ll.
4. Press the SK
- 1, SK - 2, or SK - 3 to select a softkey.
Page 31

5. Ent er a number at prompt Enter number, and SAVE. Y ou
can press m to acce s s Pause, Link signal or Featu re
request. (See P aus e, link si gnal and featur e r equ est on
page 17.)
6. Enter a key label at prompt Enter key lable and S
AVE.
Label your softkey with up to four characters by
pressing the button that has the le tter you want. For
exam p le to enter A, press 2; to enter B, press
22.
To return a customized softkey to the default setting
1. Select Program softkeys.
2. Press the
SELCT
3. Press the On CALL
4. Press the SK
- 1, SK - 2, or SK - 3 to select the softkey
.
softkey
or IDLE softkey.
you want to return to the default value.
5. Select new
to the softkey. Or select
/
SAVE
softke y to redefine ano ther number and l able
/
/
REDIAL
to return the softkey to the default setting.
MAIL
LAST
/
NEXT
/
LINK
31
Page 32

Batteries and charging
Important battery
information
Preparing the
chargers
32
Before using your rechargeable battery pack for the first
time, it must be cha rged for at least 8 hours. This is
necessary to ensu re full battery life.
Do not leave your portable or battery pack on a battery
charger for e xtended periods when th e bat teries are fully
charged.
Do not expose the battery packs to temperatures above
40°C/104°F for extended periods.
Your portable needs a rechargeable battery pack. Battery
level is shown by the J symbol on the top right of the
display. If the batte ries are v ery lo w , t he dis play fl ashes G
and you hear warning beeps. Your programming will not
be lost if you replace your batteries.
Connect the ac adaptor p lug of the power cable to the rear
of the cha rgers, then attac h the ac adapto r to a p ower
source.
Page 33

Group Charger
The Companion Group Charger accept s up to six ba ttery
packs for charging. Each slot has a LED indicator.
Batteries are charged independent of position. For
example, the fir st battery inserted is the first battery
charged.
Installing battery packs
Insert the battery pack under the tab in the charger slot.
33
Page 34

Individual Charger
34
The Companion Individual Charger can charge a handset
or a spare battery pack. To charge a separate battery pa ck
in the desktop ch arger, you must place the battery pack
under the ta b in the desktop charger.
You can store a spare battery pack in the rear slot of the
battery charger. The rear slot is not a charging slot.
Page 35

Note: All Com panion battery chargers will charge all Com panion
battery packs. Except the Com panion C3050 Standard battery
charger (A0628269/NTHH06BA) which will not charge the hi-cap
(A0628217/NTHH04CA) batteries.
Hint: In high usage environments it is a good idea to have a spare
battery pack. Alternating the spare battery pack between charges will
prolong battery life.
Companion battery charger LED indications
This table applies to the group and individual battery chargers.
LED Indication Description
Red Fast flashing Battery defective. Replace the battery
Red Flashing Battery charging
Yellow Flashing Testing or preparing battery for charging
Green Steady Battery fully charged
Off None Battery not inserted under the tab correctly
35
Page 36

AAA batteries You can also use an optional AAA battery holder with your
portable. Insert the batteries into the battery holder.
Note: The comm ercially available AAA batteries cannot be charged
in any Companion battery charger.
36
Page 37

Accessories for your portable
The follo wing a ccess ories work wi th your C3060 port able :
• C3001 Ear Bud Headset
a sm all and lightweight ear-bud type headset
• C3002 Over-the-head Headset
a full over-the-head band for extra stability and hold with a single
earpiece.
• C3050 Clip-on Holster
a custom -designed holster with an adjustable belt clip.
• C3060 Leather Glov e
a leather glove that holds the portable with a plastic panel covering
the keypad and display.
• C3050 Rugged Prote ctor
a rubber protective case with a built-in rigid black plastic belt clip.
The accessories listed here are available from your Nortel
Networks distributor.
37
Page 38

Safety information
Electromagnetic
energy safety
Hazardous condi tions c an occur while op erating a por table
telephone near constructio n blasting caps or nea r
emerge ncy ser v ic e r ad io receivers .
Do not use this portabl e telephone in locat ions bearing
warning signs that caution against radio transmissi on.
Follow standard hospi tal acceptanc e procedures when
using a portabl e nea r life-support systems.
Battery safety Do not rep l ace batter i es in a hazard o us environmen t
(where sparks a re considered da ngerous, or where th ere are
flammable gases, flammable liquids , dus t, or flammable
fumes).
Do not attempt to charge alkaline batteries.
Do not discard batteries in a fire. Batterie s c an explode
when subjected to e xtremely high temperatures.
38
Page 39

Do not place the portable where the battery cha rging
contacts, on the botto m of the portable, will short out. For
example, placing th e porta ble in a pock et with loos e coins.
Charg e t he b att er y p ack p r o vide d wi th t he por t abl e o nly i n
accordance with the inst r u ctions specified in this manual.
Antenna safety The C3060 portable telephone emits low levels of radio
energy. Although any risk associated with this energy is
minimal, you can furth er minimize your exposure by not
touching the antenna to your face while the portable
telephone is turned on.
Charger safety The C3060 charger power supply is an electrical device
containing hazardous voltages. Do not open the power
supply or the charger.
Care when using
earpiece
Note for hearing aid
users
Do not place the earpiece next to your ea r if a fore ign
object h as b ec ome atta ch e d to th e ea rp eice.
Use of the portable te lephon e can produc e an audible tone
within a hea r ing aid. The C30 02 headset can be used with
hearing ai ds a nd wi ll prevent the occurrenc e of th e audi ble
tone.
39
Page 40

Technical specifications for Canada
Voltage 3.6 V rechargeable batteries
4.5 V (total voltage rating), three AAA alkaline batteries
Frequency band 944 MHz to 952 MHz
Total channel
capacity
Operating
temperature
RF output power 10 mW ERP maximum
40
80
-10°C to 40°C
Page 41

Regulatory
RSS 130 issue 2, effective January 1993.
compliance
Operatio n is subject to the f ollowing conditions:
1. This device may not cause harmful interference.
2. This device must accept any interference rec eived,
including interference that may cause undesired
operation.
Any changes or modi fications applied to the portable
telephone not e xpre ssly a pprov e d b y Nortel could v oi d the
user’s authori t y to operate th e eq u i pm en t .
Privacy This portable telephone uses digit al encoding to prote ct the
speech transmission.
41
Page 42

Caring for your portable
Temperature
extremes
Care and
maintenance
42
Avoid subjecting the port able telephone to extremes in
temperature.
Clean the portable telephone by wiping it wit h a damp
cloth. Do not use solv ents or polishes. If your portable
telephone doe s not work, check all ch arging contacts on
the portable and the charger for dirt, grease , or othe r
material. If necessary, clean th em with a soft dry cloth.
If your portable drops in to a liqui d, let the porta ble dry for
two days before using.
Do not spray cleaning or disinfectant solutions on the
portable. Spray the solution on a cloth and wip e the
portable with the cloth.
Page 43

Using your C3060 Portable with
Meridian Companion
This procedure describes steps to acce ss several features of your
portable telephone. Avail able features vary depending on your
telephone system.
Features
Call Forwar d
1. Press i.
2. Enter ____ _______ (flexible feature code).
3. Dial the number to which you want to forward your calls.
k
k
.
.
4. Press
Cancel Call Forward
1. Press i.
2. Enter ____ ________ (flexible fe ature code).
3. Press
43
Page 44

44
Call Park
1. Whil e on a call, press
2. Enter ____________ (flexible feature code).
3. Enter _____ _______ (the number where you w ant to park
the call ).
4. Press
k to end the current call.
LINK.
Retriev e a pa rk ed ca ll
1. Press
2. Enter ____________ (flexible feature code).
3. Enter the number to which the call was parked.
i.
Conference
1. While on a call with the first party, press LINK.
2. Dial the second number.
3. Wh e n your call is answe red, press
LINK.
Transfer
1. Whil e on a call, press LINK.
2. Dial the second number.
3. When the second number rings, pr ess
k.
Page 45

Call Waiting
While you a re on a call, you r port abl e be eps to i ndi cate yo u ha v e
anothe r call.
1. Press
2. Press
LINK
to answer the second call.
LINK again to re turn to your previous call.
Ring Again
1. When you encounter a busy number, press LINK.
2. Enter ____________ (fle xible feature code).
3. Press
4. Press
k. Y our por ta ble ri ngs you back w hen a bu sy pa rt y
is free.
i. Your portable au to m a tically places th e call.
Cancel Ring Again
1. Press i.
2. Enter ____________ (fle xible feature code).
3. Press
k.
Speed Call
1. Enter ____________ (flexi ble feature code).
2. Enter ____________ (Speed Call code).
System Speed Call
1. Enter ____________ (flexi ble feature code).
45
Page 46

46
2. Enter ____________ (System Speed Call code).
Add a link
1. Press m, , or ..
2. Select
Link signal
. The portable will display an L.
Message Waiting
Your portable displays
mail message. If you have alr eady stored a message waiting
code, you ca n access your messages by selecting
page 27 for more information.)
Message waiting
if you have a voice
CALL. (See
Switch from your portable to your desk telephone
If Wireless Privacy is enabled
•Use Call Transfer.
• Use Conference.
If Wireless Priv acy is disabled
• Use your portable as an extension telephone.
Troubleshoo ting check list
1. Battery char ged? Properly placed?
2. Call Forward canceled?
Page 47

3. Still having trouble? Call your system admi nistrator.
Other frequently used Feature Codes:
Contact for your system:
Nam e:
Tel # :
47
Page 48

48
Troubleshoo ting check list
Page 49

Using your C3060 Portable with
Companion 200
This procedure describes steps to acce ss several features of your
portable telephone. Avail able features vary depending on your
telephone system.
Features
Call Forwar d
1. Press
2. Enter ___________ (Call Forward code).
3. Dial the nu m ber to which you want to forward your calls.
4. Press
Cancel Call Forward
1. Press
2. Enter ___________ (Cancel Call Forward code). You may
49
i.
You may need to wait for a tone.
k.
i.
need to wait for a tone.
Page 50

50
3. Press
k.
Call Park
1. Whil e on a call, press LINK.
2. Enter ________ (Call Park code).
3. Press
k.
Retriev e a pa rk ed ca ll
1. Press
2. Enter ____ _______ (Call Park Retri eval code).
3. Enter the number to which the call was parked.
i.
Conference
1. While on a call with the first party,
LINK.
press
2. Dial the second number.
3. Wh e n your call is answe red, press
LINK.
Transfer
1. Whil e on a call, press LINK.
2. Dial the second number.
3. Wh e n your call is answe red, press
k.
Page 51

Switch from your portable telephone to your desk
telephone:
Troubleshooting checklist
1. Battery charged? Properly placed?
2. Call Forward c anceled?
3. Still having trouble? Call your system admi nistrator.
Other frequently used Feature Codes:
51
Page 52

52
Contact for your system:
Nam e:
Tel # :
Page 53

Using your C3060 Portable with
Norstar Companion
This procedure describes steps to acce ss several features of your
portabl e.
53
Underlined text
Note:
C3060 portable.
indicates a softkey to use below the display of the
Making an internal call
1. Dial the number (you may have to press i to select a
line).
Making an external call
1. Dial external access code: ________ or enter a line pool code
(prov ided by your installer): ________. (You may have to
press
2. Dial the number.
i
to select a line.)
Page 54

54
Features
Transferring using a number
1. Whil e on a call, press LINK.
2. Dial a second internal number.
3. Wh e n call is answ ered, press
Transferring using the directory
1. Whil e on a call, press LINK.
2. Press
3. Use
4. Press
5. Wh en call is answer ed , press
l.
, or . or enter a letter to search through the list of
entries.
DI A L when you have made a selection.
Using Conference
1. While on a call with the first party, press LINK.
2. Dial a second internal number.
3. When it is answered, press
Switching between two calls
While on a call you will hear a beep to indicate an incoming call (call
k.
k.
LINK again.
Page 55

waiting tone).
1. Answer a second incoming call by pressing
caller is put on hold.
2. When you are ready to switch to the other caller, press
LINK. The first
LINK.
Page
1. Press
FEAT
60
or *60. The display shows
Page choice:.
2. To page specific speakers, press
or
To page telephone extensions, press
or
To page speake rs an d e x te nsio ns , press
3. The display shows
the k eypa d o r pre ss
For syst ems earlier than MICS-XC 2.0 , Page can o nly be used if an
Note:
ATA is configured.
T o page telephone extensions on systems earlier than MICS-XC 2.0:
1. Press
i and enter the line pool code associated with the
ATA.
Enter zone:
ALL.
SPKR.
SETS.
BOTH.
. Enter th e page z on e (1 t o 6 ) on
55
Page 56

56
2. Press
3. Enter the p age feature code to use fol lowed by a page zone
number (0 to 6).
LINK
and enter
FEAT
71
or
*71
.
Language selection
You can change the language for system messages. (See the Quick
Reference Table for features that use system messages.)
1. To select English for system m essages, press
or
501
2. To select Fre n ch for system messa ges, pres s
502
3. To select Spanish for system messages, press
503
T o change the portable telephone language:
1. Press
2. Press
m
>, then , or . to move between the In
English
3. Press
SELCT
*501.
or
*502.
or
*503.
and select Language>.
and the En français selections.
or
to select your choice.
SÉL
FEAT
FEAT
FEAT
Quick Reference T able
You may have to press i to select a line to activate some of the
following features.
Page 57

Enter the feature code you want to use.
Feature Activation Code
Call Forward
Cancel Call Forward
Call Park*
Call Park (retrieve)*
Call Pickup - di rected†
Call Pickup - group†
System Speed Dial
Trunk Answer from any
station
Voice Mail retrieval
FEAT
FEAT
During a call press
or
*74
The portable then disp la ys the cal l park loc ation
Press
This is only required when you are on a call.
FEAT
sion number
FEAT
FEAT
Dial code
FEAT
*800
FEAT
*981
or
4
#4 or *#4
and enter the call park locati on.
LINK
76
75
0 or *0
800
981
*4
LINK
or
*76
or
*75
or
or
+
74
FEAT
+ exten-
+ two digit Speed
57
Page 58

58
Feat ure Acti vation Code
985
Query Voice Mail DN
Leave VM Message
Intercept Voice Mail
* These features require MICS-XC 2.0 or later telephone system soft-
ware.
† These features require MICS-XC 3.0 or later telephone system soft-
ware.
The use of the
system software.
FEAT
FEAT
*985
980
FEAT
*980
987
FEAT
*987
softkey requires MIC S-XC 4.1 or la ter telephone
or
or
or
Portable tele phone hints
• The softkeys on your C3060 portabl e operate dif ferent ly
than on your Norstar desk t elephone. Some C3060
portable softkeys work with the local fe atures described
in this guide.
Page 59

• Norstar Voice Mail operates by means of your C3060
portable’s softkeys during voice mail sessions in MICSXC 2.0 systems or later.
Troubleshooting checklist
• Batteries charged ?
• Batteries properly placed?
• Still problems? Call your system administra tor.
Contact for your system:
Nam e:
Tel # :
59
Page 60

60
Troubleshoot ing checkl ist
Page 61

E
Printed on recycled paper
Copyright © 1999 Nortel Networks
All rights reserved.
Meridian, Norstar and Com panion are trademarks of Nortel Networks Corporation.
P0906702
Issue 1.00
Printed in Canada
For m ore inform ation, visit the Companion hom epage at
http://www.nortel.com/com panion
Page 62

 Loading...