

Page 1

User Guide
Nokia Treasure Tag (WS-2)
Issue 2.4 EN-US
Page 2

User Guide
Nokia Treasure Tag (WS-2)
Contents
Get started 3
Pair and connect 5
Set up your sensor 7
Find your sensor 7
Find your phone using your sensor 8
Change the battery 9
Help and support 10
Product and safety information 11
Copyrights and other notices 11
Warranty 12
© 2014 Microsoft Mobile. All rights reserved.
2
Page 3
Get started
Learn how to start using your proximity sensor.
About your proximity sensor
Nokia Treasure Tag (WS-2) is a proximity sensor which helps you easily find your misplaced valuables.
Slip the sensor in your bag, or use the strap to attach it to your keys. If you leave your items behind,
your phone notifies you. If you do lose your stuff, you can check on a map where to start looking.
The proximity sensor is compatible with Windows Phone 8 or later phones with the Nokia Treasure
Tag app (available in Windows Phone Store) and Bluetooth 4.0 or higher. Some of the product features
may depend on the phone model or software version. You get the best experience with a Nokia Lumia
phone. A full list of compatible devices and more info on compatibility is available in Windows Phone
Store and on www.nokia.com/support.
Read this user guide carefully before using the product. Also, read the user guide for the device that
you connect to the product.
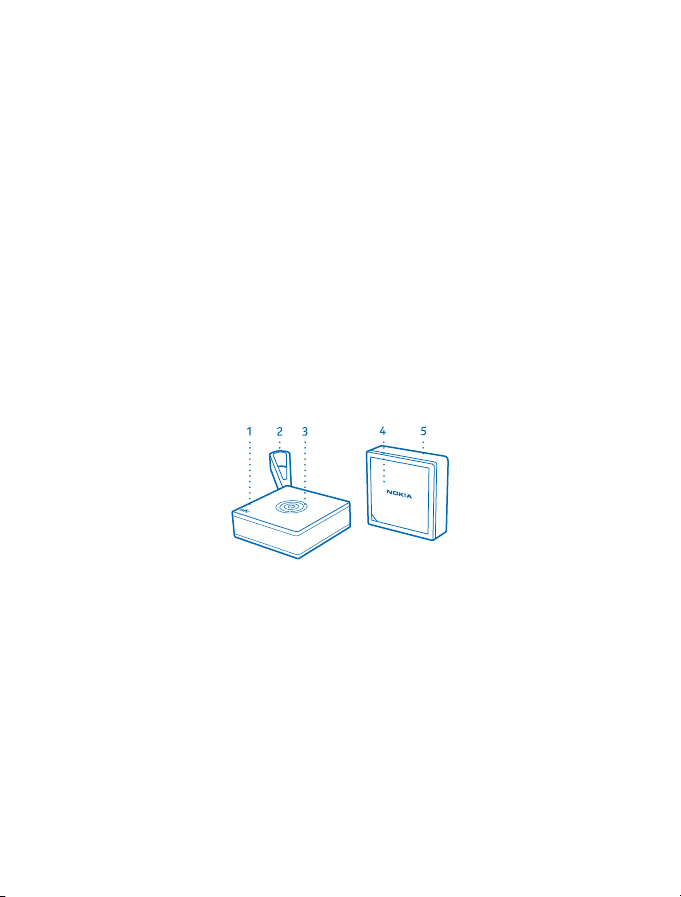
Keys and parts
Get to know your proximity sensor.
1 NFC area
2 Silicone strap with loop
3 Multifunction key
4 Battery cover
5 Silicone strap without loop
The surface of this product is nickel-free.
Some of the accessories mentioned in this user guide, such as charger, headset, or data cable, may
be sold separately.
Switch your sensor on or off
You can switch your sensor on or off.
Your sensor is switched on automatically once the battery is inserted.
© 2014 Microsoft Mobile. All rights reserved.
3
Page 4
To switch your sensor off or back on again, press the multifunction key for 3 seconds.
To switch your sensor off, you can also remove the battery.
Change the strap
Your sensor comes with two silicone straps: one with a loop for attaching, one without.
1. Pull the strap from the sensor. You can use a paperclip or similar tool to carefully pry the edge of
the strap from the groove.
2. Place the sensor in the other strap and carefully stretch and pull the strap into place.
© 2014 Microsoft Mobile. All rights reserved.
4
Page 5

Pair and connect
Before you can use your sensor, you need to pair and connect it to your phone.
You can connect your sensor to your phone using either NFC or Bluetooth. Make sure your sensor is
switched on and you have a SIM in your phone.
Your sensor can be connected to one phone at a time, and your phone can have up to 4 sensors
connected to it. To locate the phone currently connected to your sensor, press the multifunction key
while in range, and the phone plays a notification tone. If you want to connect it to another phone,
restore the sensor to factory settings first.
You can disconnect your sensor from your phone. For more info, see your phone's user guide.
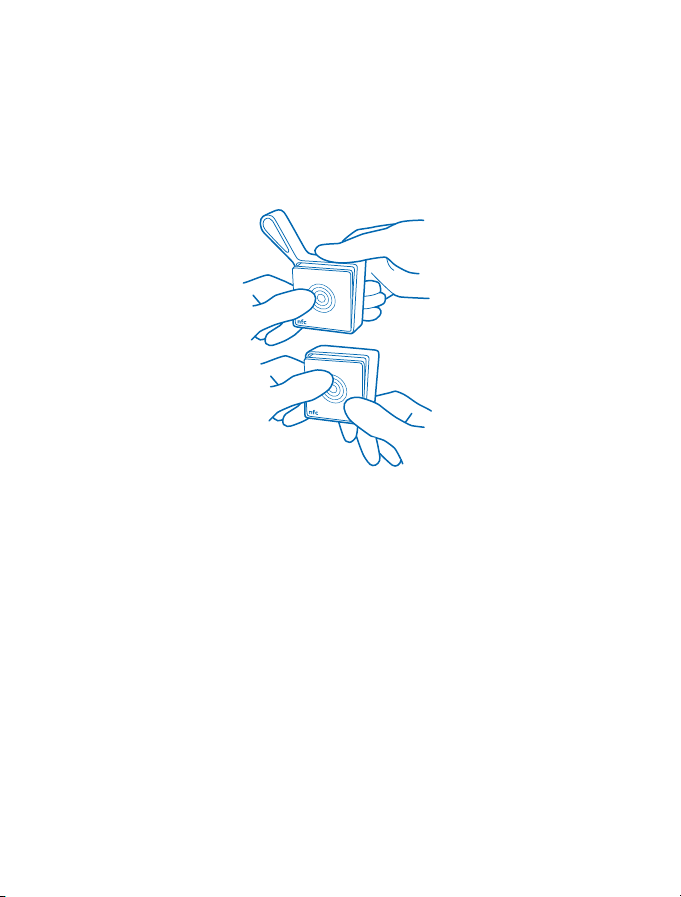
Pair your sensor using NFC
Pair you sensor with your phone quickly using NFC.
1. Make sure you've switched on NFC on your phone.
For more info on NFC, see your phone's user guide.
2. Touch the NFC areas of your sensor and phone together.
3. Follow the instructions shown on your phone.
Pair your sensor using Bluetooth
If your phone doesn't have NFC, you can pair your sensor with your phone using Bluetooth.
You need the Nokia Treasure Tag app to use the sensor. You can download the app from Windows
Phone Store.
1. Make sure you've switched on Bluetooth on your phone.
For more info on Bluetooth, see your phone's user guide.
© 2014 Microsoft Mobile. All rights reserved.
5
Page 6

2. On your phone, tap Nokia Treasure Tag.
3. Select your sensor, and follow the instructions shown on the phone.
© 2014 Microsoft Mobile. All rights reserved.
6
Page 7

Basic use
Learn the basics of using your proximity sensor.
Set up your sensor
Define how and when your sensor alerts you.
On your phone, tap Nokia Treasure Tag.
1. When pairing for the first time, the setup starts automatically. Otherwise, on your phone, tap Set
up under your sensor.
2. To choose an icon for your sensor, tap add icon and the icon you want.
3. To give your sensor a name, tap SENSOR NAME, and type in the name.
4. Select how and where the alert is played.
The alert is triggered whenever the Bluetooth connection between your sensor and phone is lost, or
the signal is weak. A closed door, for example, may trigger an alert. Your phone plays the alert even
if it is in silent mode. If you have many sensors, your phone also shows you a notification about which
sensor was triggered.
Manage your sensor
Check what's going on with your sensor and change its settings. You can also pin your sensor to the
start screen of your phone to access it quickly.
1. Tap Nokia Treasure Tag.
2. Tap the sensor you want to view. If you have several sensors, to check which is which, tap .
Add a sensor to the sensor list
Tap > add sensor.
Edit sensor settings
Select a sensor, and tap > edit sensor.
Pin your sensor on the start screen of your phone
Tap > pin to start. You can also tap and hold the sensor in the sensor list, and select pin to
start.
Disconnect your sensor manually
Tap . The sensor graphic turns gray. To reconnect, tap , or tap the NFC areas of the sensor and
your phone together.
Remove a sensor
Tap > remove sensor.
Find your sensor
Lost your sensor and have no idea where it is? You can start off your search by checking on a map
where your phone lost connection with the sensor.
To check on a map where the connection was lost, GPS coordinates must be available.
© 2014 Microsoft Mobile. All rights reserved.
7
Page 8

Using services or downloading content may cause the transfer of large amounts of data, which may
result in data costs.
1. Make sure you've switched on GPS on your phone.
2. Tap Nokia Treasure Tag and the sensor you want.
3. Wait while your phone tries to search for the sensor.
4. If your phone doesn't find the sensor, tap open map. The approximate area where your phone last
connected to the sensor is shown on the map.
Get directions to your sensor
To get route instructions, in the map view, tap the address notification and directions.
Find connected sensor
On your phone, tap the sensor to play a notification sound. To silence the sensor once found, press
the multifunction key on the sensor, or tap on your phone.
Find your phone using your sensor
Can't remember where you put your phone? Use your sensor to locate it.
1. Press the multifunction key. Your phone plays a notification sound to help you locate it, even if
your phone is in silent mode.
© 2014 Microsoft Mobile. All rights reserved.
8
Page 9

2. When you find your phone, tap the notification on your phone to switch off the notification sound.
Change the battery
Your sensor comes with a battery already inserted, but eventually you need to change it.
Your sensor uses a standard CR2032 battery. When the battery is completely empty, you need to
replace it with a new one before you can use the sensor again.
When the battery runs low, your sensor plays an alert tone, and a notification shows up on your
phone's Nokia Treasure Tag app. If you've pinned your sensor to the start screen of your phone, a
battery icon shows up on the tile.
1. Put a paperclip or similar tool into the gap in the lower left corner on the back of the sensor.
2. Carefully lever the back cover up.
3. Replace the old battery with a new one. Make sure you place the battery in the right way.
4. Align the cut corners on the back cover and device, and snap the cover back into place.
Restore factory settings
You can clear all pairings and reset the sensor back to the original settings.
1. Open the back cover and remove the battery from the sensor.
2. Replace the battery while pressing the multifunction key.
You can also remove your sensor from the connected phone or other device to restore the factory
settings.
After restoring the factory settings, the sensor immediately pairs with any phone that has the sensor
on its list of paired devices. If you remove the sensor from the list, the sensor disconnects from this
phone and restores the factory settings again.
© 2014 Microsoft Mobile. All rights reserved.
9
Page 10

Help and support
When you want to learn more about your device, or if you're unsure how your device should work,
there are several support channels for you to check.
To help you get the most out of your device, you can explore www.nokia.com/support.
There you can find:
• Troubleshooting info
• Discussions
• News on apps and downloads
• Further details about features and technologies, and the compatibility of devices and
accessories
Troubleshooting and discussions may not be available in all languages.
© 2014 Microsoft Mobile. All rights reserved.
10
Page 11

Product and safety information
Wet and dusty conditions
• This product is water-resistant and dust-resistant in compliance with protections rating .
Important: Accessories for use with this device are not as durable, dust-resistant, or water-resistant as the device.
For example, chargers should only be used in dry conditions, never when damp or wet.
• The device is water-resistant against cold, clean fresh water only. Do not expose the device to any other type of liquid, such
as sea water.
• Do not submerge your device in water.
• If the device has been exposed to water, wipe it off with a dry cloth. If it has been exposed to any other liquid, immediately
splash some clean fresh water onto the device. Carefully wipe the device dry.
• If the connectors are dusty, splash clean freshwater onto the connectors. Carefully wipe the device and connector area dry,
and let the connectors dry.
• Only open the back cover in dry and clean conditions, and wipe the device dry and clean first, to prevent water or dust
reaching the interior. Make sure the interior of your device and the back cover seals are dry, clean, and free of any foreign
objects, as they may damage the seals against water.
Take care of your device
• Keep the device dry. Precipitation, humidity, and all types of liquids or moisture can contain minerals that corrode electronic
circuits. If your device gets wet, remove the battery, and let the device dry.
• Do not use or store the device in dusty or dirty areas.
• Do not store the device in high temperatures.
• Do not store the device in cold temperatures. When the device warms to its normal temperature, moisture can form inside
the device and damage it.
• Do not open the device other than as instructed in the user guide.
• Unauthorized modifications may damage the device and violate regulations governing radio devices.
• Do not drop, knock, or shake the device or the battery. Rough handling can break it.
• Only use a soft, clean, dry cloth to clean the surface of the device.
Recycle
Always return your used electronic products, batteries, and packaging materials to dedicated collection points. This way you
help prevent uncontrolled garbage disposal and promote the recycling of materials. All materials of the device can be recovered
as materials and energy. Check how to recycle your Nokia products at www.nokia.com/recycle.
Battery safety
Do not dispose of batteries in a fire as they may explode. Obey local regulations. Recycle when possible.
Use the battery for its intended purpose only. Improper use, or use of unapproved or incompatible batteries may present a risk
of fire, explosion, or other hazard, and may invalidate any approval or warranty. Never use a damaged battery.
Copyrights and other notices
DECLARATION OF CONFORMITY
© 2014 Microsoft Mobile. All rights reserved.
11
Page 12

Hereby, Microsoft Mobile Oy declares that this WS-2 product is in compliance with the essential requirements and other relevant
provisions of Directive 1999/5/EC. A copy of the Declaration of Conformity can be found at www.nokia.com/global/declaration/
declaration-of-conformity.
The availability of products may vary by region. For more info, contact your dealer. This device may contain commodities,
technology or software subject to export laws and regulations from the US and other countries. Diversion contrary to law is
prohibited.
THE CONTENTS OF THIS DOCUMENT ARE PROVIDED "AS IS." EXCEPT AS REQUIRED BY APPLICABLE LAW, NO WARRANTIES OF
ANY KIND, EITHER EXPRESS OR IMPLIED, INCLUDING, BUT NOT LIMITED TO, THE IMPLIED WARRANTIES OF MERCHANTABILITY
AND FITNESS FOR A PARTICULAR PURPOSE, ARE MADE IN RELATION TO THE ACCURACY, RELIABILITY OR CONTENTS OF THIS
DOCUMENT. MICROSOFT MOBILE RESERVES THE RIGHT TO REVISE THIS DOCUMENT OR WITHDRAW IT AT ANY TIME WITHOUT
PRIOR NOTICE.
TO THE MAXIMUM EXTENT PERMITTED BY APPLICABLE LAW, UNDER NO CIRCUMSTANCES SHALL MICROSOFT MOBILE OR ANY
OF ITS LICENSORS BE RESPONSIBLE FOR ANY LOSS OF DATA OR INCOME OR ANY SPECIAL, INCIDENTAL, CONSEQUENTIAL OR
INDIRECT DAMAGES HOWSOEVER CAUSED.
Reproduction, transfer or distribution of part or all of the contents in this document in any form without the prior written
permission of Microsoft Mobile is prohibited. Microsoft Mobile operates a policy of continuous development. Microsoft Mobile
reserves the right to make changes and improvements to any of the products described in this document without prior notice.
Microsoft Mobile does not make any representations, provide a warranty, or take any responsibility for the functionality, content,
or end-user support of third-party apps provided with your device. By using an app, you acknowledge that the app is provided
as is.
FCC/INDUSTRY CANADA/MEXICO NOTICE
This device complies with part 15 of the FCC rules and Industry Canada license-exempt RSS standard(s). Operation is subject to
the following two conditions: (1) This device may not cause harmful interference, and (2) this device must accept any interference
received, including interference that may cause undesired operation. For more info, go to transition.fcc.gov/oet/rfsafety/rf-
faqs.html. Any changes or modifications not expressly approved by Microsoft Mobile could void the user's authority to operate
this equipment.
Note: This equipment has been tested and found to comply with the limits for a Class B digital device, pursuant to part 15 of the
FCC Rules. These limits are designed to provide reasonable protection against harmful interference in a residential installation.
This equipment generates, uses and can radiate radio frequency energy and, if not installed and used in accordance with the
instructions, may cause harmful interference to radio communications. However, there is no guarantee that interference will
not occur in a particular installation. If this equipment does cause harmful interference to radio or television reception, which
can be determined by turning the equipment off and on, the user is encouraged to try to correct the interference by one or more
of the following measures:
• Reorient or relocate the receiving antenna.
• Increase the separation between the equipment and receiver.
• Connect the equipment into an outlet on a circuit different from that to which the receiver is connected.
• Consult the dealer or an experienced radio/TV technician for help.
NOTE: FCC Radiation Exposure Statement: This equipment complies with FCC radiation exposure limits set forth for an
uncontrolled environment. This transmitter must not be co-located or operating in conjunction with any other antenna or
transmitter.
TM & © 2014 Microsoft Mobile. All rights reserved. Nokia is a TM of Nokia Corporation. Third party products/names may be TMs
of their respective owners.
The Bluetooth word mark and logos are owned by the Bluetooth SIG, Inc. and any use of such marks by Microsoft Mobile is under
license.
Warranty
The warranty period for this product is 12 months. For details please visit the local online warranty text web site www.nokia.com/
support.
© 2014 Microsoft Mobile. All rights reserved.
12
 Loading...