

Page 1

Installation and User Guide
fring version 3.23
For Nokia S60 3rd edition (Symbian 9)
Page 2

Table of Contents
Introduction............................................................................................................................1
System Requirements ..........................................................................................................2
Installation Guide ..................................................................................................................3
Downloading fring .............................................................................................................3
Downloading fring via website ................................................................................... 3
Downloading fring after receiving an SMS invitation from a friend................... 6
Installing fring.................................................................................................................... 6
Downloading and installing the generic sis file ....................................................12
The installation process .................................................................................................13
Registering to fring.........................................................................................................13
Selecting your fring nickname and password...........................................................13
Adding Your VoIP Service(s) – (optional)..................................................................14
Adding a SIP Service – (optional)................................................................................16
Using Twitter....................................................................................................................17
Adding Twitter to fring...............................................................................................17
Using Twitter with fring .............................................................................................18
Making a SIP Call ............................................................................................................19
Making your first fring call.............................................................................................20
Using fring.............................................................................................................................21
Getting Started................................................................................................................21
Import of contacts (Automatic)...............................................................................21
Your fring contact list.................................................................................................21
Statuses........................................................................................................................21
Call quality....................................................................................................................22
Opening fring...............................................................................................................22
Minimized view............................................................................................................22
The Options menu.......................................................................................................23
Signing In and Signing Out...........................................................................................24
Making a Call....................................................................................................................24
Making a call to a fring or other VOIP contact.....................................................24
Making a SkypeOut call from fring..........................................................................25
Making a cellular call from fring ..............................................................................25
Receiving a fring call ......................................................................................................25
Chatting.............................................................................................................................26
Chatting with a contact..............................................................................................26
Navigating between chats.........................................................................................26
Ending a chat...............................................................................................................26
Viewing offline chat messages.................................................................................27
Managing Your Contact List..........................................................................................27
Adding a new contact.................................................................................................27
Removing a contact ....................................................................................................28
Showing and hiding your phone contacts..............................................................28
Adding or Signing In to a VoIP Service......................................................................29
History tab........................................................................................................................29
Connection manager.......................................................................................................31
Using fringtones...............................................................................................................33
Privacy
settings................................................................................................................35
Choosing whether fring runs automatically on startup...........................................35
Uninstalling fring .............................................................................................................36
Using Wi-Fi on Your Handset ............................................................................................37
Configuring Wi-Fi on Your Handset.............................................................................37
Accessing Wi-Fi on Your Handset ................................................................................38
Known Issues: .................................................................................................................38
Page 3

Troubleshooting...................................................................................................................39
Frequently Asked Questions..............................................................................................41
Downloading & Installing fring .....................................................................................41
Registering to fring.........................................................................................................42
Connection........................................................................................................................43
General..............................................................................................................................45
Page 4
Introduction
About fring
fring is a mobile VoIP application that allows you to make mobile calls and send
instant messages at no extra cost. fring calls are free
[1]
and leverage your
handset’s built-in mobile internet connection.
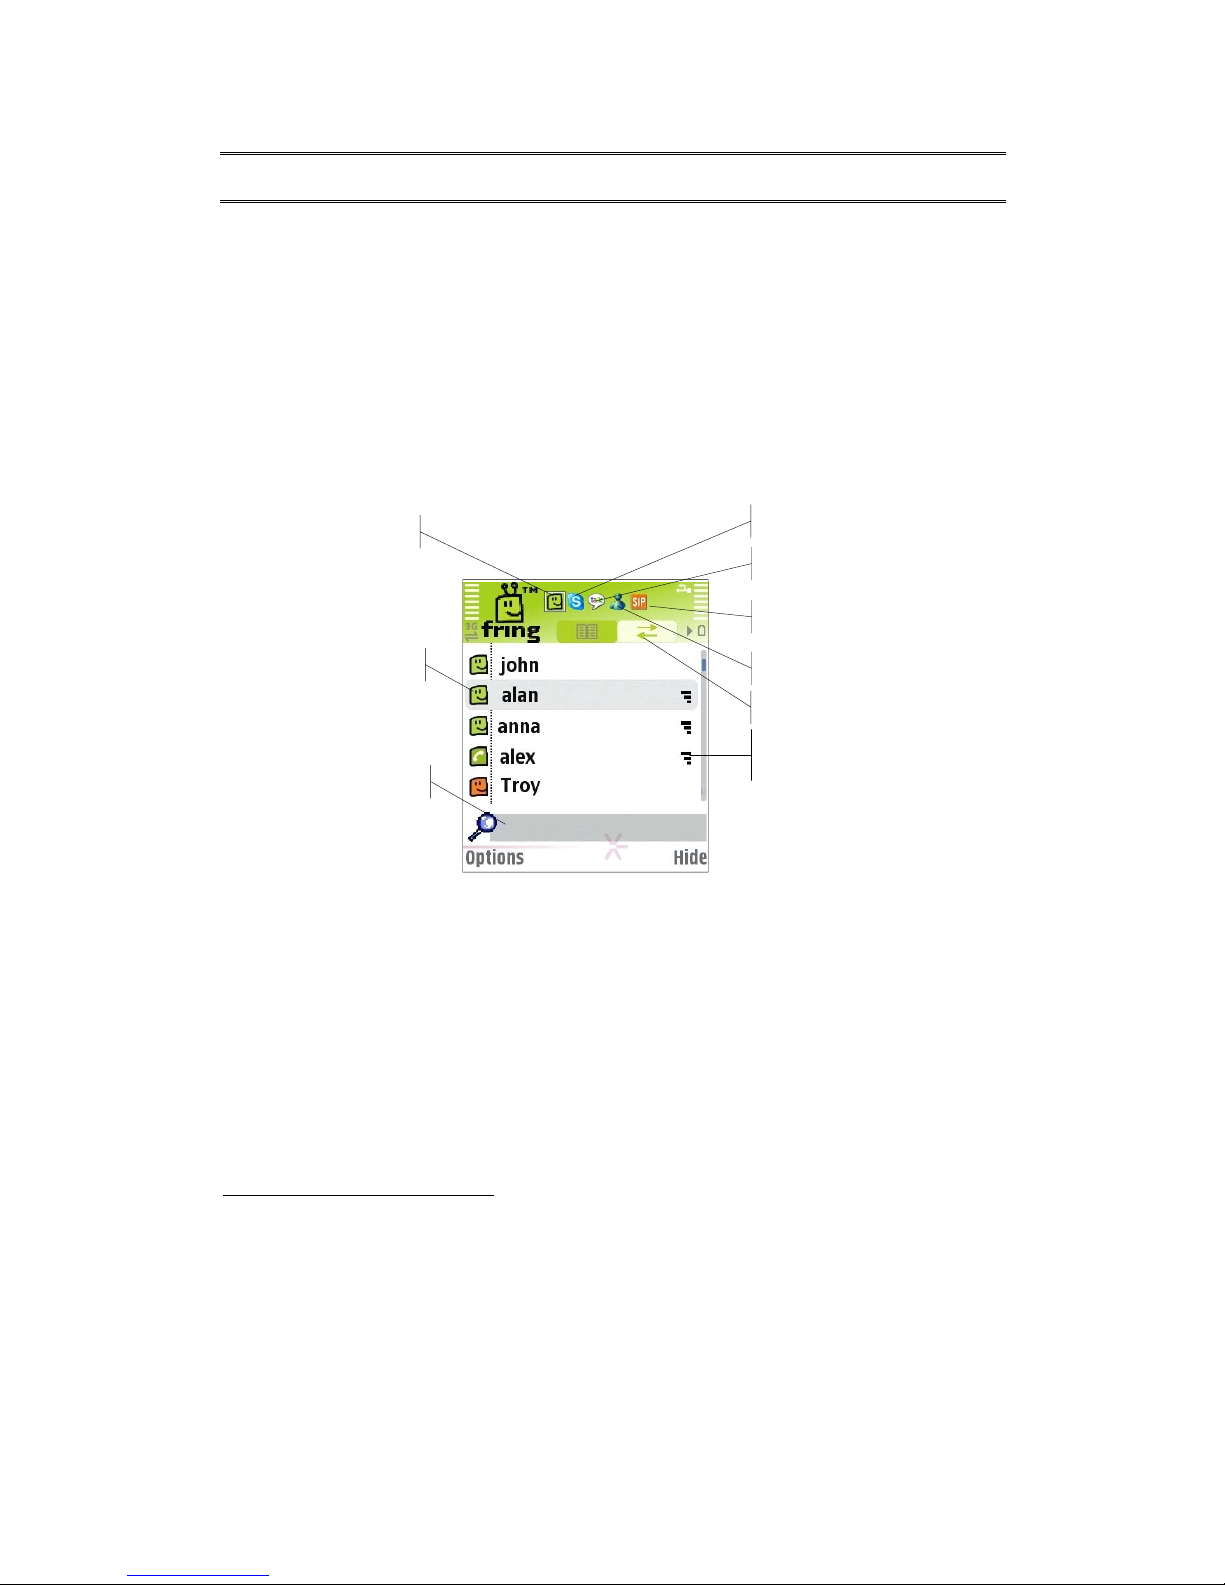
Once you've installed fring, fring's main screen displays your contacts and their
presence status (e.g. online, offline). This list shows the names of your fringsterfriends, your Skype/Google-Talk/MSN contacts and, optionally, the contacts from
your handset.
Expected call quality (available
when your contact has fring)
Navigational tabs
fring connection status
Skype connection status
User status
Search / Dial box
Google-talk connection status
MSN connection status
SIP connection status
From the main contact list you can navigate between your contacts, find their
presence status and initiate a communication session with them. You may
initiate a voice call, start a chat session and move between all open sessions
using your right and left arrows. You can also make SkypeOut calls directly from
your fring contact list.
To sum it up, you'll not only make your phone more useful, you can also save
money.
This guide will help you get started.
1
At no additional cost over your subscription data plan.
1 Page
Page 5

System Requirements
Hardware requirements
In order to use our Beta version, you will need:
• A Nokia S60 handset and
• Internet GPRS, EDGE, 3G data connection (Not a WAP connection) on your
mobile handset.
• Optional: WiFi connection.
Notes:
To initiate a call to a landline (or non-Skype user) using fring, make sure to purchase
SkypeOut/SIP credits.
For internet GPRS/3G data rates, contact your mobile service provider or browse our
community forum at
http://www.fring.com/forums
2 Page
Page 6

Installation Guide
Downloading fring
fring can be downloaded into your mobile handset in the following ways:
¾ From the fring website at
www.fring.com.
¾ Via your mobile device at wap.fring.com
¾ Via an SMS invitation sent to your handset from a friend.
Downloading fring via website
¾ To download fring from the web:
Open
http://www.fring.com in your browser.
The following screen opens.
Figure 1 - fring Homepage
Click the click here link (in the green box).
3 Page
Page 7

A screen with the following form opens.
Figure 2 - fring Download from the Web
1. In the Handset type field, select the type of mobile handset that you
have.
Note: fring is only currently available for the handsets listed in the dropdown box.
2. In the Your country field, select your
country.
Your 3G phone isn't
supported?
Sign up to be notified
when it is!
3. In the Mobile number field, type in the
phone number of your handset.
Note: Enter your area code and phone
number without any spaces. Type it
carefully - your international number is
your fring user-id.
4. In the Email field, type in your email address.
5. Click get it now!
The confirmation screen opens and an
SMS is sent to your handset.
Once you have received the SMS, the
installation and setup process continues on your
handset.
4 Page
Page 8
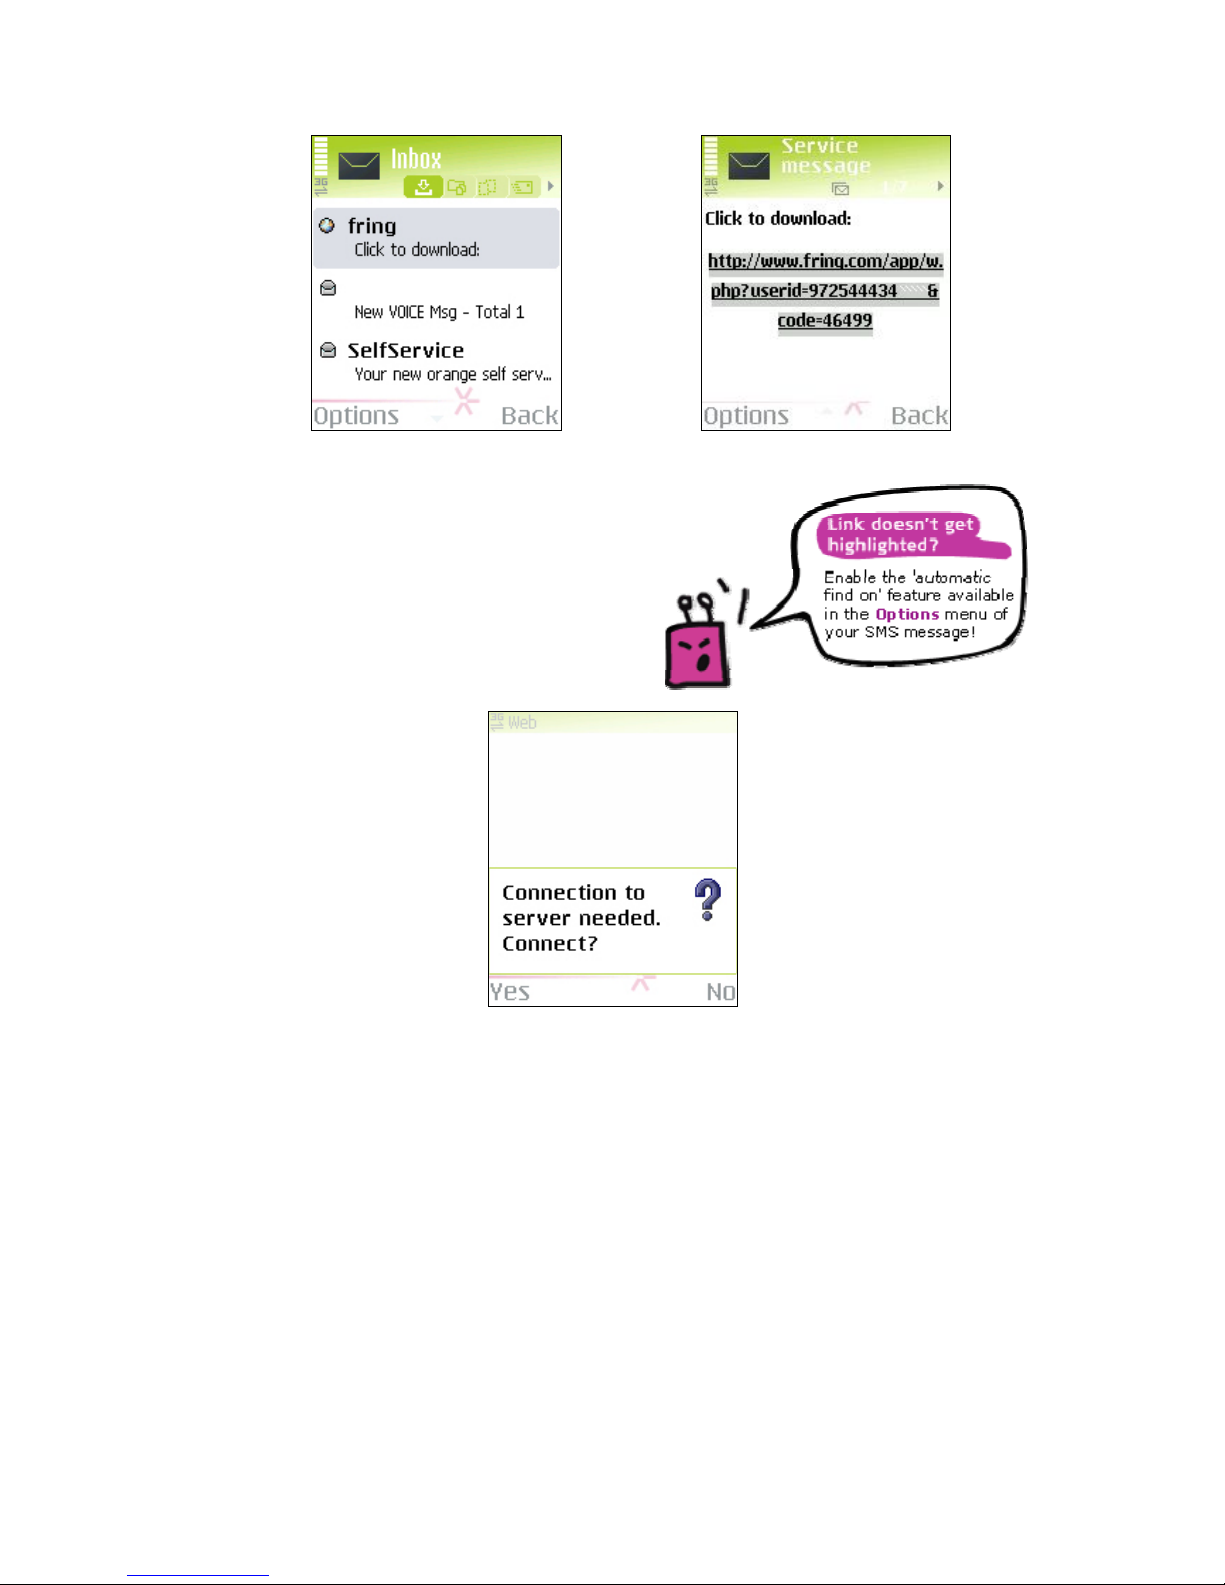
Figure 3 - SMS Message
Figure 4 – SMS Message – Follow Link
On your handset: Open the SMS
message (see
Figure 3) and click the
download link (see
Figure 4).
The following screen appears:
Figure 5 - Downloading - Server connection
6. Click Yes using your left soft key to begin the download process.
Within a few seconds, the handset accesses the website. fring is
downloaded to your handset and you are ready to begin the installation
process.
Note: This process may take a few seconds.
5 Page
Page 9
Downloading fring after receiving an SMS invitation
from a friend
If you have received an SMS invitation to join fring, you can download the
application easily.
¾ To download fring after receiving an SMS invitation
1. Press the download link in your SMS message.
The screen in
Figure 5 (above) appears.
Note: If the link is not highlighted, enable the automatic find on feature
available in the Options menu of your SMS message!
2. Press Yes using your left soft key to begin the download process.
fring is downloaded to your handset and you are ready to begin the
installation process.
Installing fring
Before you can use fring, it needs to be installed on your handset. (For
information about downloading fring, see the previou s section in this guide.)
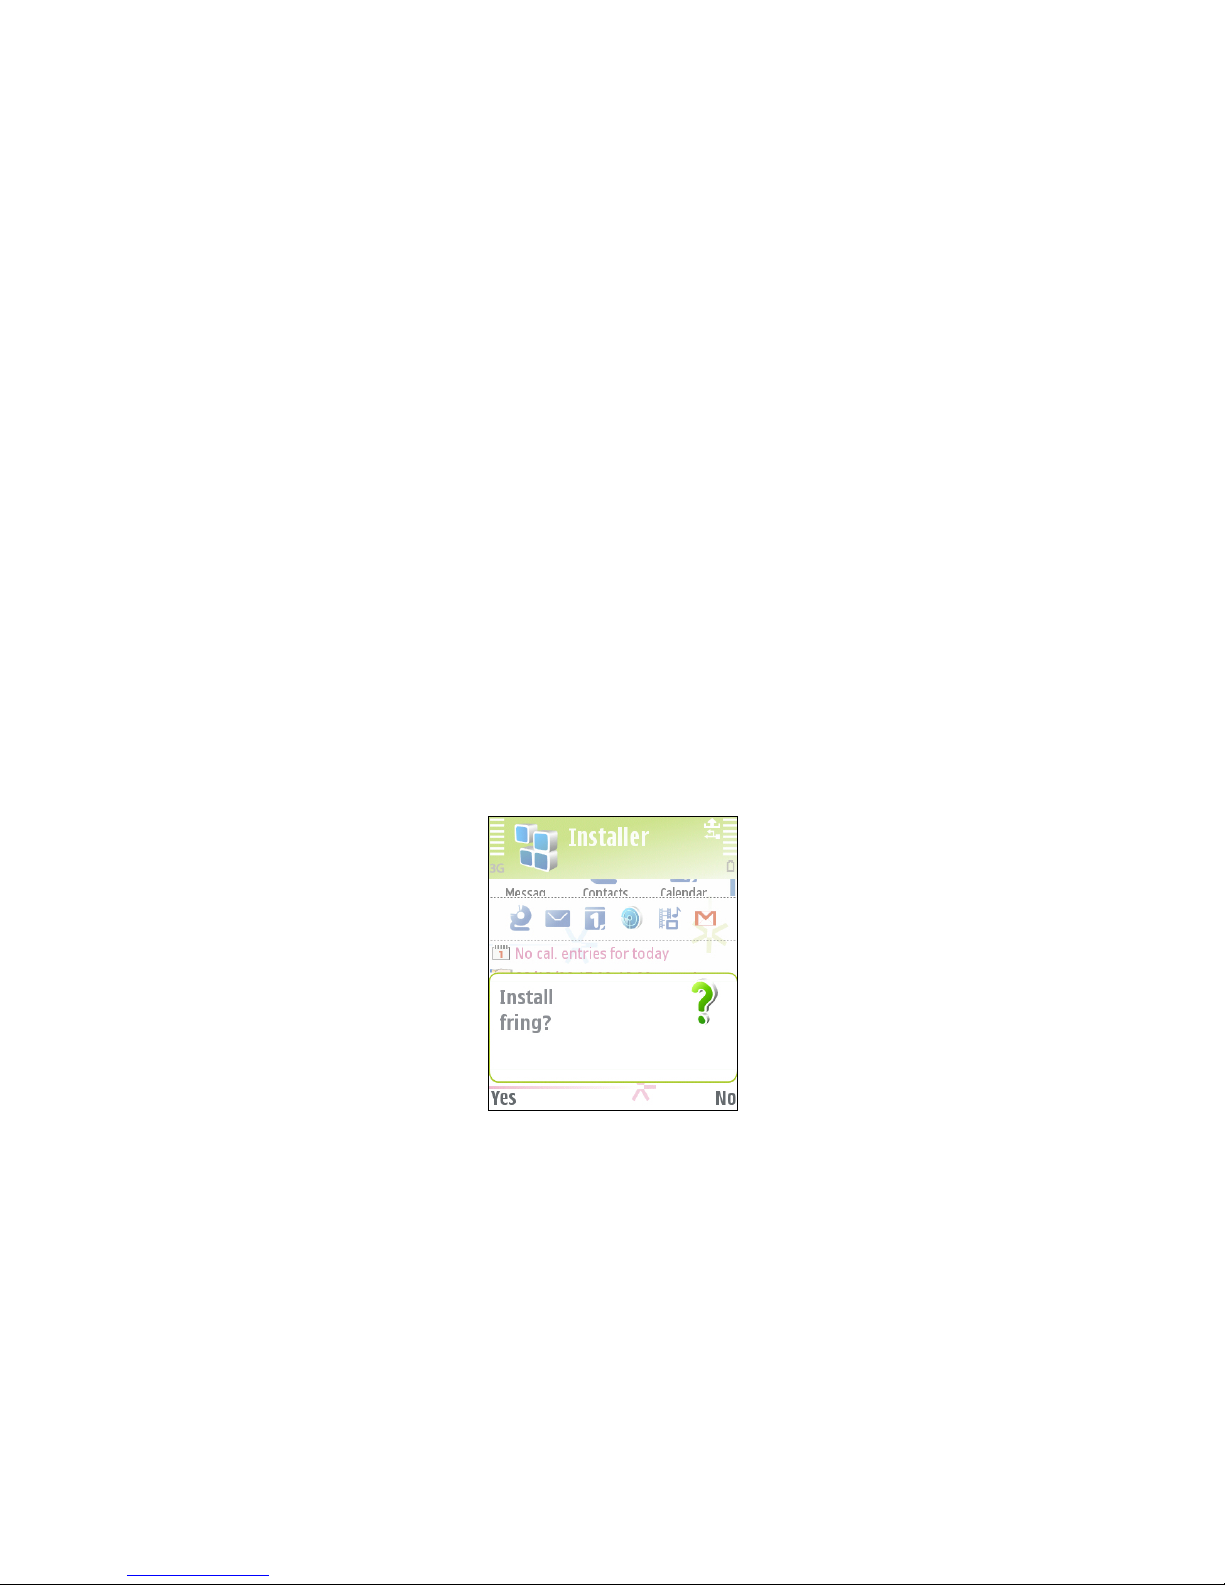
Once you have completed downloading fring, the following screen opens:
Figure 6 - Begin Installation
1. Press Yes using your left soft key.
The following screen opens:
6 Page
Page 10
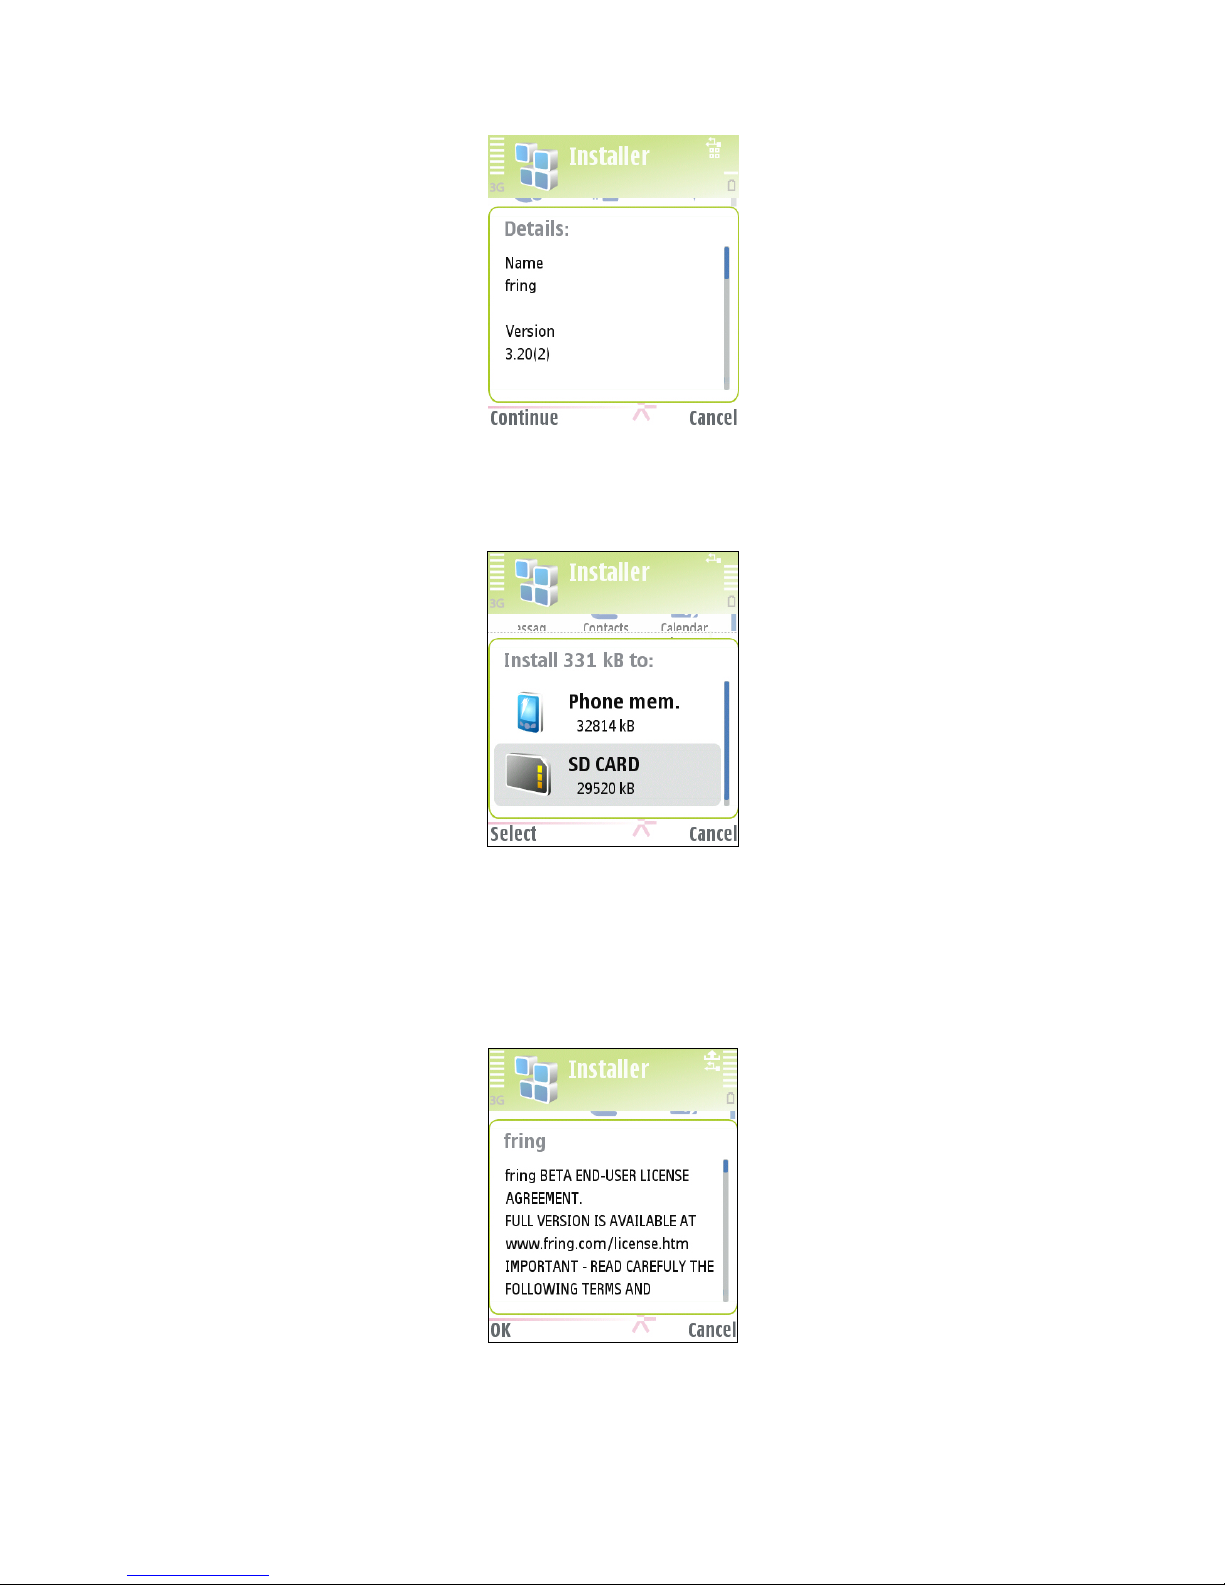
Figure 7 – Application Details
2. Press Continue using your left soft key.
The following screen opens:
Figure 8 – Memory Selection
3. Select the memory you would like to use and press Select using your left
soft key.
Note: fring can be loaded into any available memory space.
4. The following screen opens:
Figure 9 – End User License Agreement (EULA)
5. Before you can begin working with fring, read and accept the EULA.
7 Page
Page 11

¾ To read and accept the EULA:
1. Use the down arrow to scroll through the EULA.
2. Once you have read the EULA and agreed to the terms, press
OK using your left soft key.
3. The full EULA is available on our website at
www.fring.com/license.htm
The installation process continues and the following screen appears.
Figure 9 - Installing
Once fring has been installed, the following screen appears:
Click 'OK' to continue. The following screen appears:
8 Page
Page 12
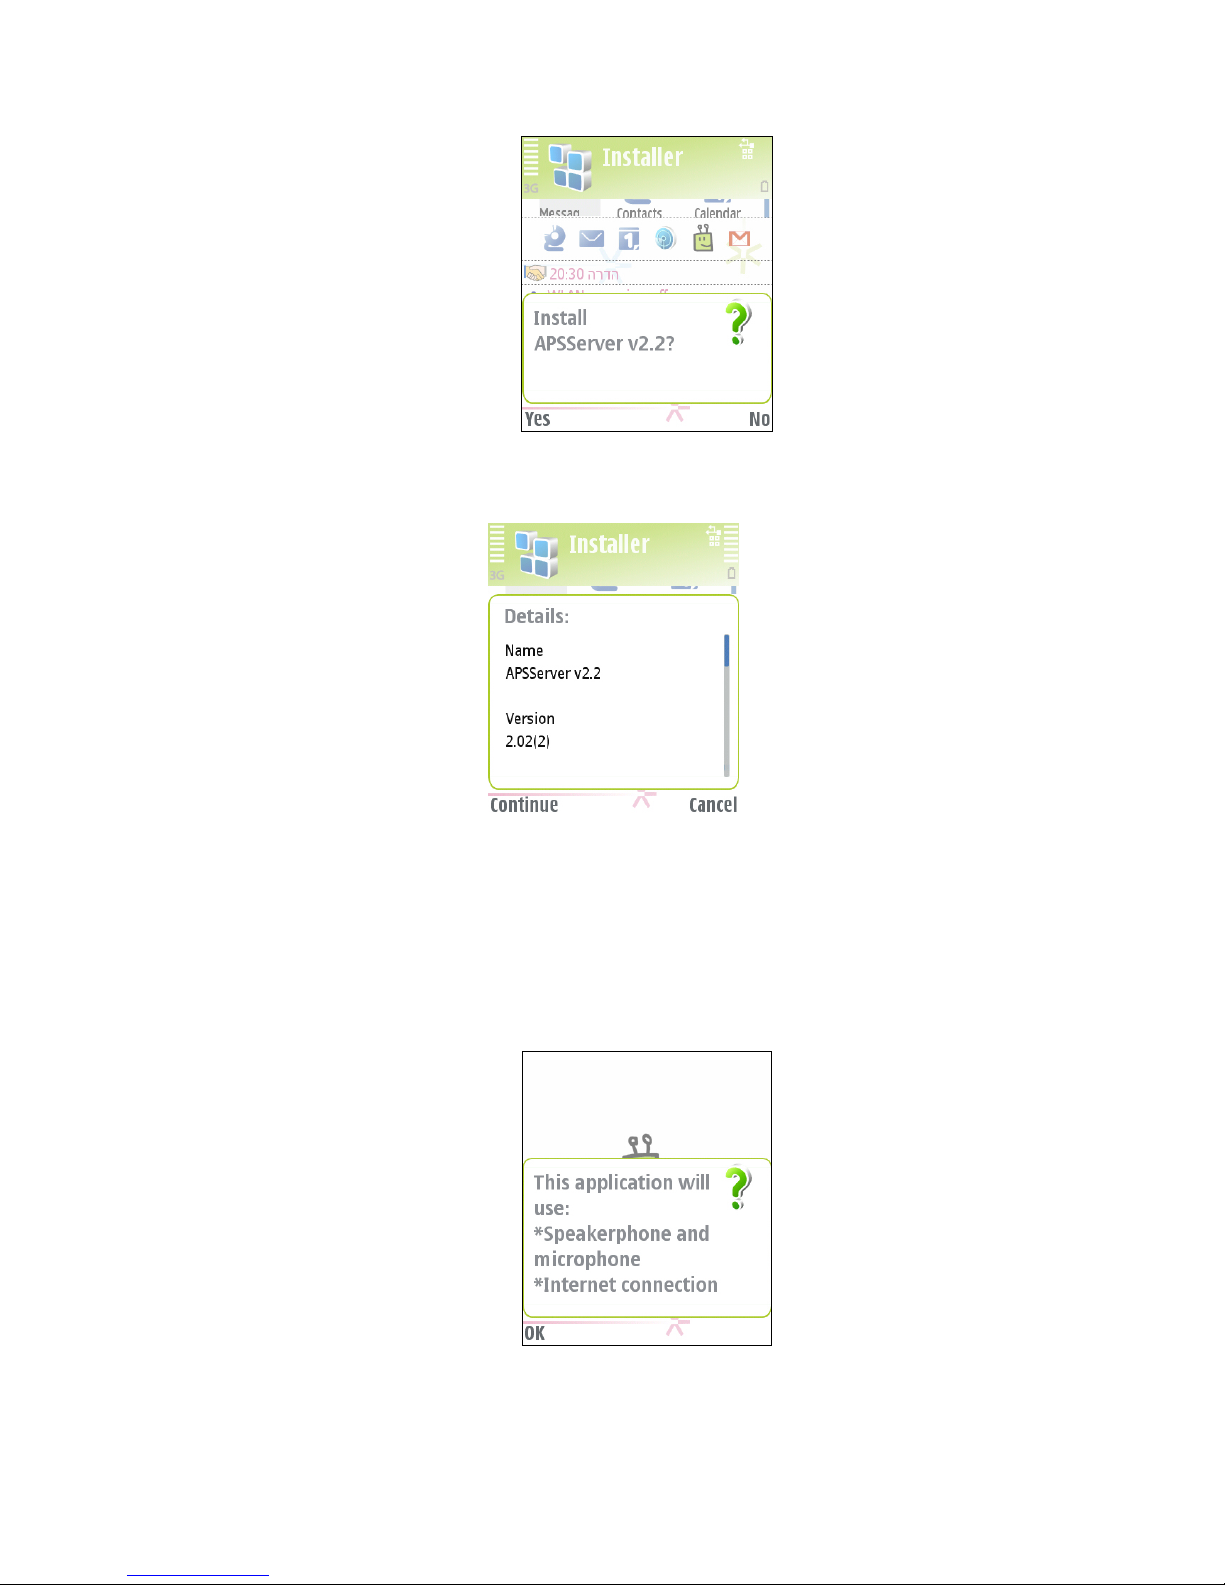
Click 'Yes' to continue. The following screen appears:
Figure 10 - APSServer Details
Click 'Continue' to install APSServer. Once you have fin ished installing
APSServer the following screen appears:
Figure 11- Confirmation Screen 1
6. Press OK using your left soft key.
The following screen opens:
9 Page
Page 13
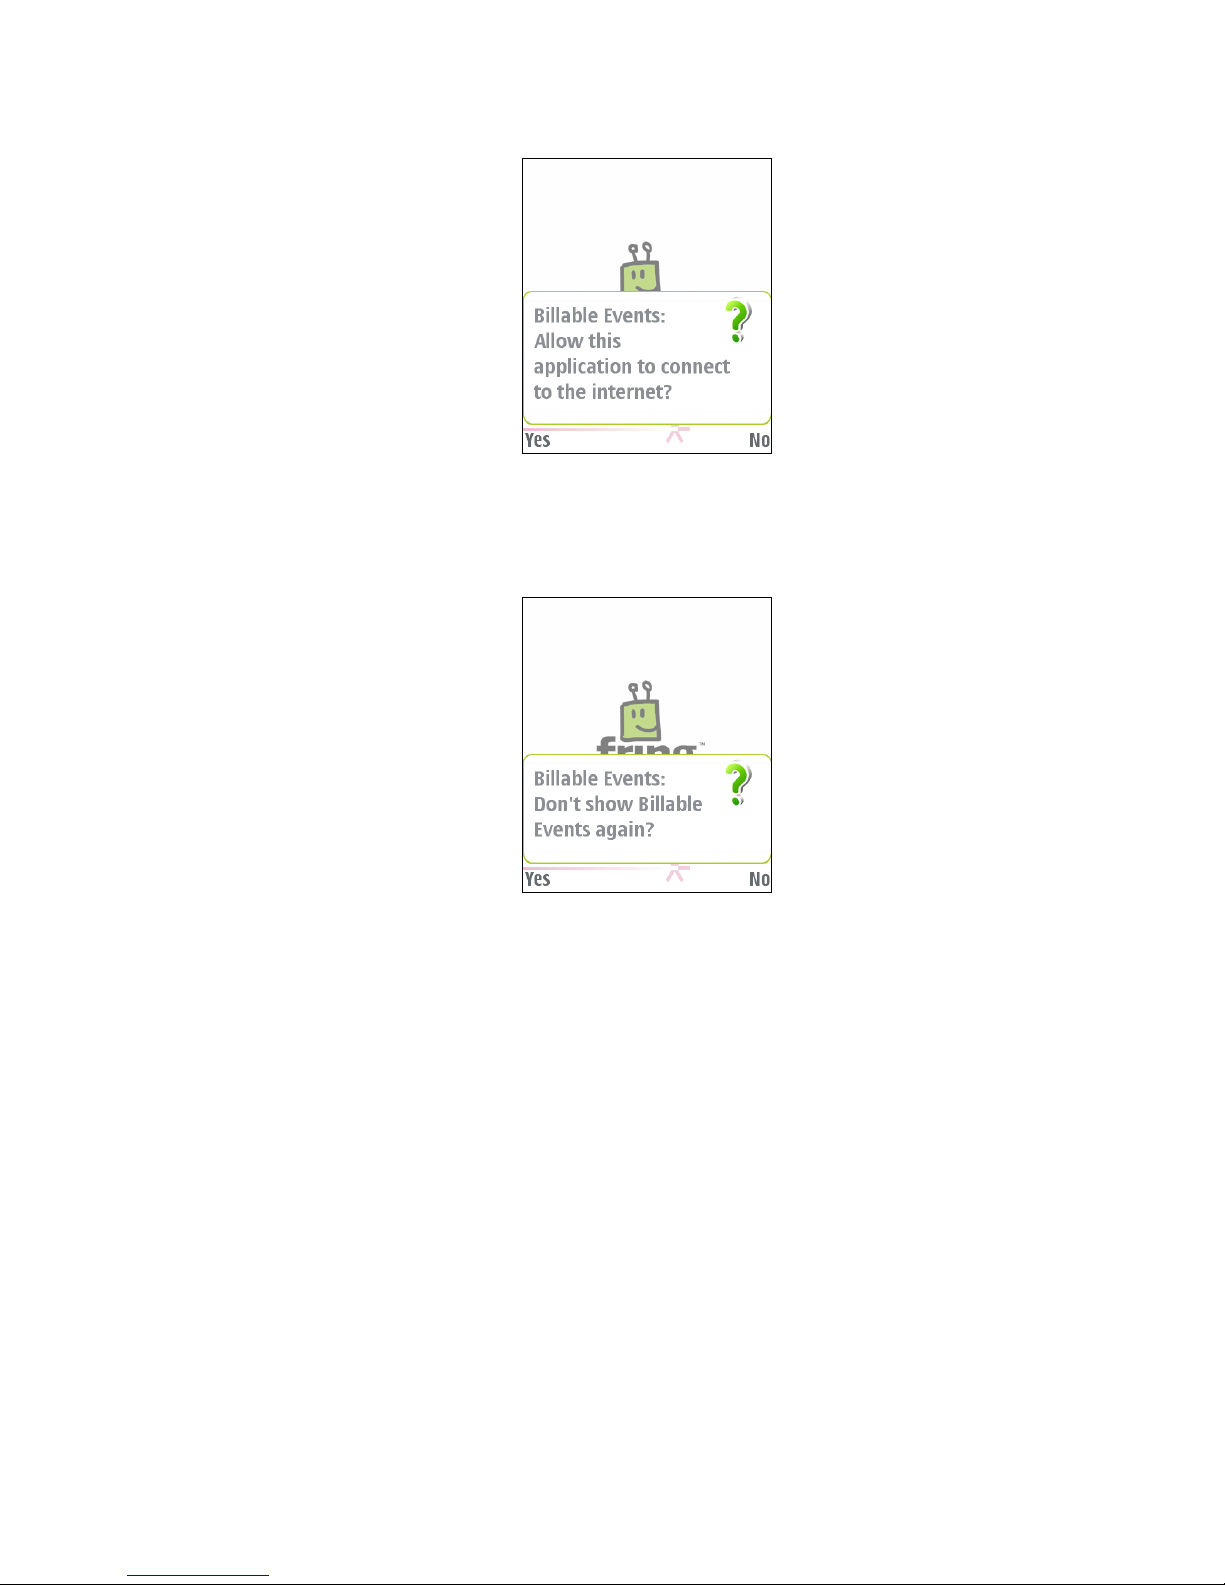
Figure 12- Confirmation Screen 2
7. Press Yes using your left soft key.
The following screen opens:
Figure 13- Billable events display
8. If you do not want repeated notification of billable events, press Yes
using your left soft key.
If you want repeated notification of billable events, press No using your
right soft key.
Notes:
¾ Your choice does not effect the fring installat ion.
¾ During the installation process, the following screen may appear,
indicating that the automatic access point detection did not find an
active access point to access the internet:
10 Page
Page 14

Figure 14 - Automatic search for access points
If this screen appears, press OK using your left soft key.
The following screen opens.
Figure 15- Access Point Screen
9. Select your 3G/GPRS or WiFi connection (and not your WAP connection).
Note: The specific access points may vary depending on your international
location and carrier.
10. Once you've chosen your connection, the following screen will appear
while fring checks its server for updated version:
11 Page
Page 15
Downloading and installing the generic sis file
If, for some reason, you are unable to get the SMS from our website, you can
simply download the SIS file straight to your phone.
Download the SIS file from our website and install it using 'PC Suit e' and a USB
cable.
The installation process should look similar to the ones showed in th e 'Installing
fring' Section in this guide (the previous section)
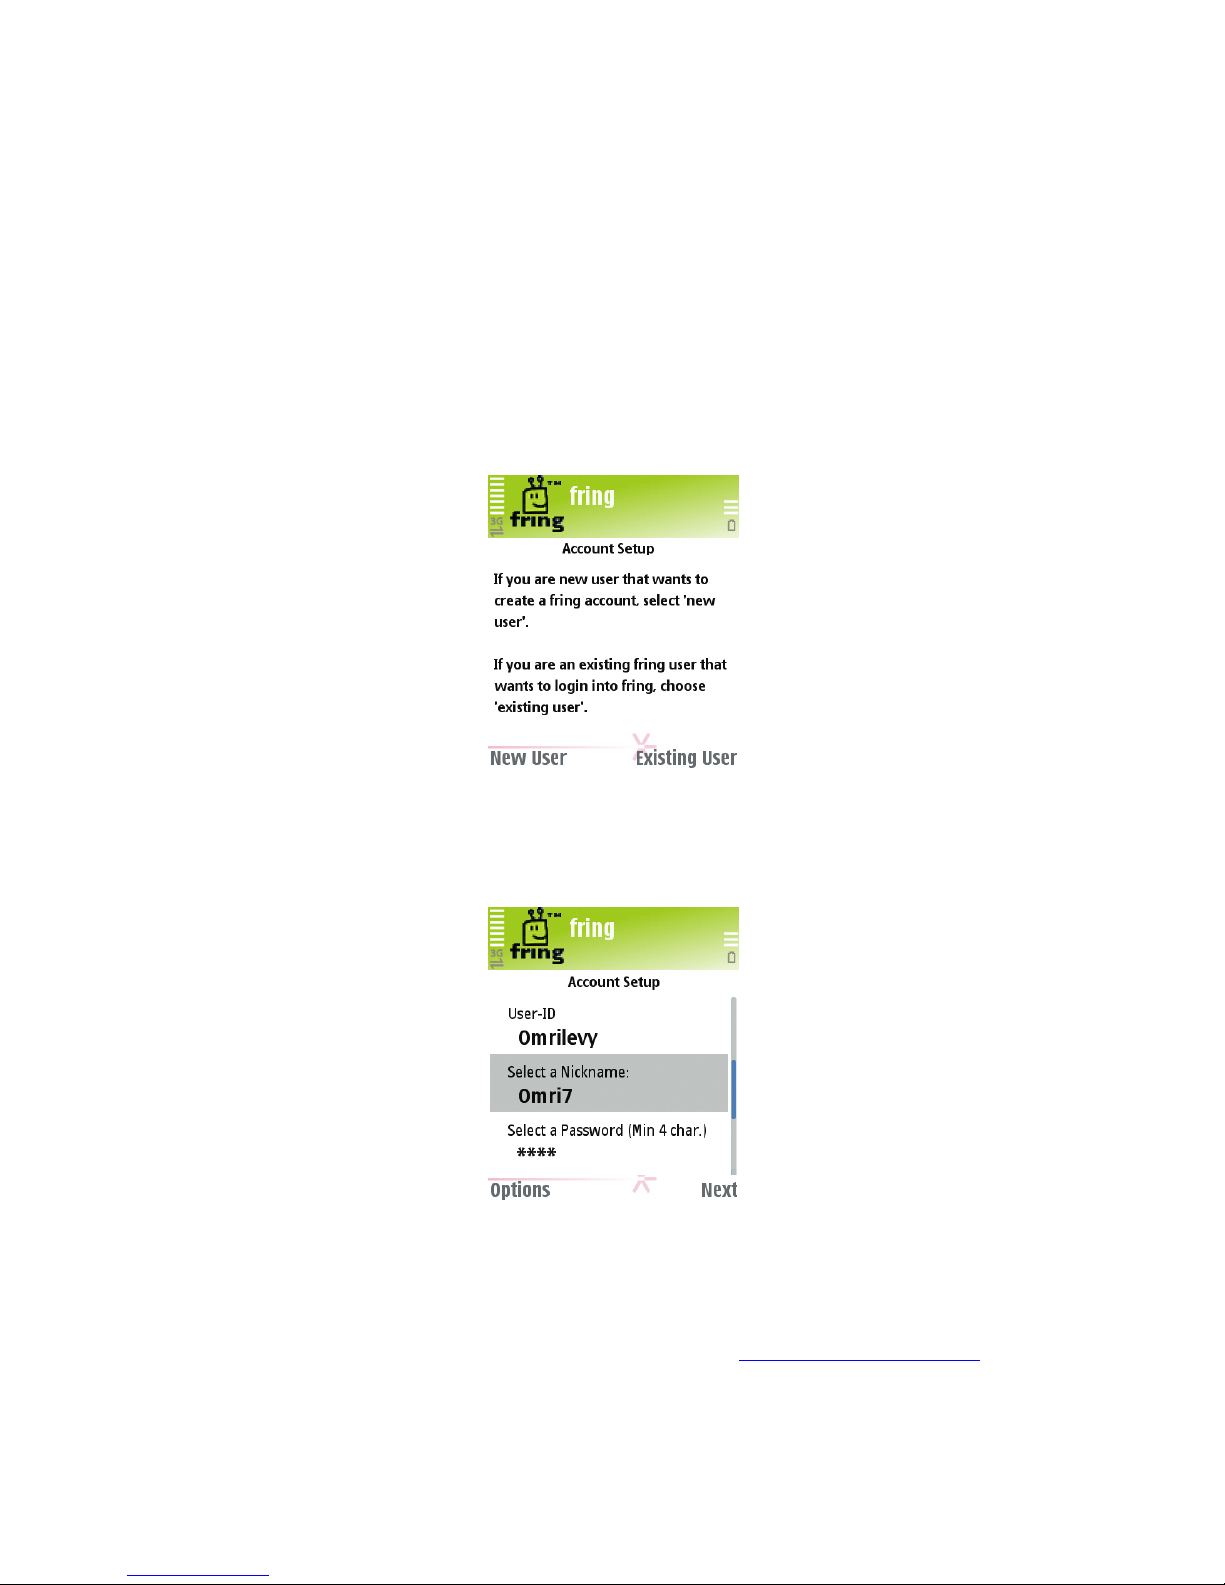
Once you've finished installing, you should see the following screen:
If you have already registered with fring, choose 'Existing User' and enter your
existing credentials to log in.
If this is your first use of fring, please choose "New User' and follow the
instructions on the following screen:
Note: The user ID is unique and therefore you might be looking at the following
screen if the user ID you're trying to register is already registered in our
database.
If you already have an account with fring, click 'Existing user' and enter your
details. If you do not remember your password, go to
www.fring.com/password
and retrieve it.
12 Page
Page 16

The installation process
Registering to fring
A short registration process is required before you can begin to use fring.
The stages of this process are:
¾ Nickname and Password Selection
¾ Service Definition
Selecting your fring nickname and password
Once the installation is complete, an Installation Complete message appears
briefly. You are now ready to select your fring nickname and password.
Figure 16 - Registration Screen
The registration screen allows you to select your nickname and the password you
will use to access your fring account. Your fring nickname will help your friends
13 Page
Page 17

find you easily. A password is required to secure your account and to protect your
fring contact list.
Note: The user-id used to identify your account is the international phone
number of your handset. It cannot be changed. Your friends can search for you
and contact you using this number
¾ To select your nickname:
1. Use the keys on your handset to choose the nickname you want to use.
2. Use the down arrow on your handset to navigate to the next field.
¾ To select your password:
1. Use the keys on your handset to choose the password you want to use.
Note: Passwords must be at least 4 characters.
2. Press Next using your right soft key to move to the next screen. The next
screen allows you to add your VoIP (e.g., Skype) account details.
Adding Your VoIP Service(s) – (optional)
Once you have chosen your fring nickname and password, provide the details of
your VoIP service (e.g., Skype, MSN Messenger or GTalk) so that you can begin
making and receiving VoIP calls.
Note: You can add one or more VoIP services (e.g., Skype) to which you are
registered. Make sure to have your username and password for each.
If you do not already have a VoIP account, register on the Web before you begin
to add networks. You can add a VoIP service at any time. See
Adding or
Signing In to a VoIP Service
in this guide. To add a VoIP service now, follow
the instructions below.
Figure 17 - Define VoIP service - 1
¾ To add a VoIP service:
1. Navigate between the options using the up and down arrows on your
handset. Choose the service from the list and press the joystick in.
14 Page
Page 18

The following screen appears:
Figure 18 - Define VoIP Service – 2
2. In the User ID field, type the username of the service you have selected
(e.g., your Skype username). Navigate to the Password field using the
down arrow on your handset.
3. In the Password field, type the password of the service you have
selected (e.g., your Skype password).
4. Press Ok using your left soft key.
The VoIP selection screen appears.
If you are interested in adding an additional VoIP service, repeat steps 1
to 4 in this section.
If you have completed selecting VoIP services, press Next using your right
soft key.
The following screen appears as fring signs you into the service:
Figure 19 - VoIP Sign-in
5. Once the sign-in is complete, the contact list of your fring contacts,
selected VoIP service(s) contacts and the handset’s contact list appears.
Note: If you have added more than one VoIP service, the contact list will
display contacts from all services in a single list.
15 Page
Page 19

Figure 20 – Contact List
You have successfully completed the registration. You are now ready to
make your first call.
Adding a SIP Service – (optional)
If you have an account with a SIP provider, you can also use it on fring.
¾ To add a SIP service:
Figure 21 - Service Selection
1. Navigate between the options using the up and down arrows on your
handset. Choose SIP from the list (press your joystick in to select items in
the list) and press Next using your right soft key.
The following screen appears:
16 Page
Page 20

Figure 22 – Select SIP Service
2. Choose your SIP provider from the list. If your SIP provider is not listed,
choose Other.
The following screen appears:
Figure 23 – SIP Service Setup
3. Enter your SIP user id and password and press OK using your left soft
key.
Note: For most services, there is both a SIP number and a user name.
Please enter your SIP number here and not your user name.
You are logged into your SIP Service and should now be able to make
outgoing calls through your SIP provider.
Using Twitter
If you have already opened a Twitter account (see www.twitter.com), you can
use it with fring.
Adding Twitter to fring
You can add Twitter to fring in the same way that you add a VoIP Service
¾ To add Twitter or to sign-in as a different user:
17 Page
Page 21

4. Press Menu and choose Settings.
5. From the submenu choose Configure Services
A screen opens displaying the available options.
Figure 24 – Available services
6. Check the checkbox beside the Twitter option.
A screen opens allowing you to enter your Username and Password.
7. Enter your Username and Password and press Ok.
You are signed into Twitter and Twitter appears as a contact in your fring
contacts.
Using Twitter with fring
Once you have signed into Twitter, you can send Twitter messages directly from
your fring contact list.
¾ To send a Twitter message
8. Locate the Twitter contact in your fring contact list (see the Error!
Reference source not found. section in this guide)
9. From the Menu, choose Chat.
10. Type your Twitter message and press Send.
Your message is sent.
18 Page
Page 22

Making a SIP Call
Figure 25 - Call Options Menu
¾ To make a SIP call:
1. Choose a contact in your address book and press Options using your left
soft key.
2. From the Call submenu, choose SIP call.
Your call is made using the SIP account you have added.
Note: Currently, you can only add one SIP account to fring.
19 Page
Page 23

Making your first fring call
Once you have completed the installation and registration processes described
above, you're ready to make your first call. To know that everything is working
correctly, you may choose to call the fring test call.
The fring Echo is a test center that lets you record a message and plays it back to
you. If you successfully record and hear the message that you have recorded,
you're ready to go!
¾ To call the fring Echo:
1. From your contact list choose the
fring test call contact and press
the joystick in.
The call connects to the test center.
2. Listen to the message and follow
the instructions.
Your testing is complete!
20 Page
Page 24

Using fring
Getting Started
Import of contacts (Automatic)
After the installation process, fring imports your contacts. This enables you to
make all your calls from fring, without going back to your address book.
Note: Calls to contacts who do not have fring are regular cellular calls. Calling
through fring does not change the call in any way.
Your fring contact list
Statuses
The following statuses are displayed in the contact list:
On a call
Available / Online
Busy
Offline
21 Page
Page 25

Call quality
The call quality icon appears at the far right of each fring contact who is currently
online. It describes the expected call quality between two parties who are
connected to fring, based on the connections the parties have (e.g., 3G, GPRS or
WiFi).
Note: this icon appears only when your contact is a member of fring.
Opening fring
If you have installed and registered fring, the shortcut will appear in your
handset's Main Menu or under Menu > My own.
¾ To open fring:
Locate the fring shortcut in the Main Menu or under Menu > My own and press
it.
fring opens and is ready for use.
Minimized view
fring is minimized while you are using your handset fo r someth ing else (e.g.,
calculator).
¾ To minimize fring:
Press Hide using the right soft key or press the red button.
¾ To maximize fring:
Press the Menu button for one second and choose fring from the list that is
displayed.
22 Page
Page 26

The Options menu
To open the Options menu, press your left soft key.
The following options are available:
Figure 26 - Options Menu
Option
Description
Call Make a call. If the selected contact is a VoIP contact
(e.g., fring, Skype, MSN Messenger etc), the call is a
VoIP call. If the contact is a regular mobile contact, the
call is made using your cellular plan. See the
Making a
Call section in this guide.
Chat Chat with your selected contact. See the Chatting
section in this guide.
Add new contact Add fring users / Send an SMS invitation to a friend,
inviting him or her to join fring. See the Error!
Reference source not found. section in this guide.
Lock keypad * Lock your phone's keypad. Press the * key to lock the
keypad.
Settings The following settings are available:
1. Add or sign into a VoIP Service. See the
Adding or
Signing In to a VoIP Service
section in this guide.
2. Show / Hide phone contacts – allows you to choose
whether or not to display the contacts from your
handset in your fring contact list.
3. fringtones. Choose the tones you want fring to use.
See the
Using fringtones section in this guide.
4. Disable/Enable autostart – allows you to choose
whether you'd like fring to open when you start your
handset.
23 Page
Page 27

5. Connection Manager – lets you choose the desired
connection.
6. Display my user ID – Shows your fring user ID
7. Privacy settings – See the 'Privacy settings' section
in this guide.
Help Displays the fring help screens.
About Displays information about the installed version of
fring.
Exit Exit fring
Signing In and Signing Out
When you open fring, you are automatically signed in to fring and your other
VoIP services.
¾ To sign out of fring:
1. Press Options using the left soft key.
2. Select the Exit option.
You are signed out of fring.
Making a Call
fring lets you make all of your calls directly from the fring main screen by
importing all of your contacts.
Friends who do not yet have fring can be invited to join. See the Error!
Reference source not found. section in this guide.
Searching your contact list
You can browse your contact list to find contacts quickly.
¾ To find a contact:
Start typing the name of your contact.
The list is filtered according to the characters you have typed.
Making a call to a fring or other VOIP contact
¾ To call a VoIP contact:
1. Choose the user-id of the person you want to call and check that the user
is online.
Press the green button on your phone
– or –
Press Options and then choose call
– or –
Press your joystick in.
24 Page
Page 28

2. After a short time, a dialing sound is heard. If your contact answers the
call, your screen will display the name of the contact and a "Call in
progress" message.
During a call, the following options are available:
¾ hang up – end the current VoIP call.
¾ navigate left or right – continue an open chat session or navigate
to your contact list.
¾ volume control – use the joystick up and down to control the
volume level of the incoming voice.
3. When you are finished with your conversation, press the red button on
your phone
– or –
Press hangup.
The call is disconnected and a "Call terminated" message appears.
Note: fring displays the contacts that you have already added to your VoIP
networks. To add a new VoIP contact, use your computer Internet connection, it
will automatically be displayed on your handset. New fring contacts can be added
directly from your handset.
Making a SkypeOut call from fring
¾ To make a SkypeOut call
1. Choose a contact in your address book and press Options using your left
soft key.
2. From the Call submenu, choose SkypeOut call.
3. Dial the international number (begins with a +)
4. Press Ok.
Your call is dialed.
Note: To make a SkypeOut call from fring, you must have sufficient SkypeOut
credits.
Making a cellular call from fring
You can call your contacts from the fring contact list exactly as you would call
them from the contact list of your handset. Dialing a cellular call from fring uses
your regular cellular voice plan (GSM call).
Note: While your phone is in offline mode, this option will not be av ailable.
Receiving a fring call
fring allows you to both make and receive calls using voice-over-IP (VoIP)
technology.
¾ To receive a fring call
25 Page
Page 29

A call screen appears including the nickname of the caller.
Press accept using your left soft key
- or –
Press the green button on your handset.
Chatting
fring lets you chat with your contacts using instant messaging. You can chat with
one or more of your contacts simultaneously.
Chatting with a contact
¾ To initiate a chat:
1. From your contact list, select the contact you want to chat with and press
Options using the left soft key.
Note: chat is only available for contacts that are listed through fring or
another VoIP service.
2. Select Chat from the Options menu.
The chat screen appears.
As always,
dictionary, number,
symbol and
language options
are available.
3. In the text entry area, write your message and
press Send using the left soft key.
Navigating between chats
If you choose to have two or more chats simultaneously, each will have a
separate tab. Navigate between the chats using the right and left joystick keys.
Ending a chat
¾ To end a chat:
Press the right soft key on your handset.
26 Page
Page 30

Viewing offline chat messages
Chat messages can be received even when you are offline. If you have received a
message, it will appear as an additional tab when you open fring. If you hav e
received messages from more than one user, a tab opens for each user,
displaying the messages they sent.
Managing Your Contact List
All of the contacts from your handset automatically appear in your contact list, in
addition to the contacts from your selected VoIP services (e.g., Skype). Within
your contact list you can:
• Search through your contact list (See Error! Reference source not
found. above)
• Make a fring call (See Making a Call above)
• Initiate a chat (See Chat above)
• Invite a friend
• Dial a number (See Making a Call above)
• Search for a fring contact
• Remove a fring contact
• Show or hide your handset contacts in your fring contact list
Note: If you delete or update a contact in your handset's contact list, the details
will be automatically updated in your fring Contacts.
Adding a new contact
You can search for a contact who has already registered with fring and add her or
him to your contact list.
¾ To search for a fring contact in the fring network:
1. From the contact list menu choose Options using your left soft key.
The Options menu opens.
2. Choose the Add new contact option.
Your address book will open. Æ you can scroll and select 'Select' on any
contact. The contact's phone number will be shown on the search screen
and an options to 'Add' or 'Cancel' will appear. If the user is already a fring
user, the contact will be added to your contact list. If the user has not yet
registered with fring, an SMS will be sent to him, asking him/her to join
fring.
3. If you click 'Back' on the address book screen, you'll be able to
manually enter the phone number (including the int. prefix) and click
add/search.
If the user is already a fring user, the contact will be added to your
contact list. If the user has not yet registered with fring, an SMS will be
sent to him, asking him/her to join fring.
27 Page
Page 31

¾ To close the 'Add new contact' screen and go back to your contact list:
Press the Options button using your left soft key and choose Close search.
- or -
Use the left arrow to switch tabs.
Note: While your phone is in offline mode, you will not be able to use this
feature.
Removing a contact
Only fring contacts can be removed from your contact list.
¾ To remove a fring contact:
1. From the contact list menu choose Options using your left soft key.
The Options menu opens.
2. Choose the Remove option.
The contact is removed.
Showing and hiding your phone contacts
By default, your phone contacts are displayed in your contact list. You can switch
between showing and hiding phone contacts.
¾ To select whether phone contacts are displayed in your fring contact
list or not:
1. From the Options menu choose Settings.
The following menu opens:
Figure 27 - Settings Menu
28 Page
Page 32

2. If Show Phone Contacts appears, your phone contacts are currently
hidden. To show them, choose Show Phone Contacts.
If Hide Phone Contacts appears, your phone contacts are currently
displayed in your fring contact list. To hide them, choose Hide Phone
Contacts.
Adding or Signing In to a VoIP Service
You can add a new VoIP Service or sign-in as a different user at any time.
¾ To add a new VoIP Service or to sign-in as a different user:
1. From the Options menu choose Settings.
The following menu opens:
Figure 28 - Settings Menu
2. Choose Configure Services.
A screen opens displaying the available VoIP networks.
3. Follow the process defined in the
Adding Your VoIP Service(s) – (optional)
section in this guide.
History tab
The history tab keeps a record of every incoming or outgoing voice event in fring.
To view the history tab, move the joystick to the right or to the left.
29 Page
Page 33

Figure 29 - History Tab
The icons on the left side represent the following events:
Outgoing call (blue up arrow)
Missed call (red down arrow)
Incoming call (green down arrow)
Note: If you have chosen to display your phone contacts in fring, voice events
from your phone also appear in the history tab.
30 Page
Page 34

The Options menu in this screen allows you to:
Option
Description
Call Make a call. If the selected contact is a VoIP contact
(e.g., fring, Skype), the call is a VoIP call. If the
contact is a regular mobile contact, the call is made
using your cellular plan. See the
Making a Call section
in this guide.
Chat Chat with your selected contact. See the Chatting
section in this guide.
Delete Delete the entry from the history list.
Clear list Clear the entire history list.
Add new contact Add fring users to your contact list. See the Error!
Reference source not found. section in this guide.
To view the details of each event, press the right soft key. The details appear as
in
Figure 30 below.
Figure 30 - History Details
Connection manager
Figure 31 - Settings Menu
31 Page
Page 35

Change connection
To manually change your fring connection, select Options > Settings >
Change Connection. You can choose your desired Access point from the
results.
Figure 32 – Select access point
If fring is unable to connect using the chosen Access point you'll have an
option to let fring search automatically for the best access point from the
phone's list.
Available WLAN networks
To search for available Wireless LAN on fring, select Options > Settings
> Connection manager > Available WLAN networks. You can then
choose your desired WLAN from the results. To view the details of a
network press the joystick in.
Figure 33 - Settings Menu
Choose the WLAN network to which you would like to connect and press
Select with your left soft key. If the WLAN network is secure, you will be
required to enter a pre-shared key.
Note: If the connection is not confirmed, the screen in
Figure 32 appears
so that you can select a different access point.
32 Page
Page 36

Settings
Under the connection settings menu you can choose whether you'd like
fring to be restricted to one type of connection (ex."Wi-Fi only ") or 'Always
ask' which connection you'd like to use when fring is opened.
AP-Group Management
The AP-Group Management stores a list of Access Points you would like to
use repeatedly. This option allows you to easily prioritize the way fring
connects to the internet. If you've successfully connected to fring using a
specific Access point, you can choose whether you'd like to add this Access
point to the group. In the AP group you can click on 'Options' Æ 'Move
down/up' to change the priority of a specific Access point.
Using fringtones
You can determine what tones are used for incoming calls and messages. You can
also decide whether you want your handset to vibrate when you receive a fring
call or message.
¾ To choose the tones you want fring to use:
4. From the Options menu choose Settings.
The following menu opens:
Figure 34 - Settings Menu
5. Choose fringtones.
The following screen opens.
33 Page
Page 37

Figure 35 - fringtone settings
6. In the fringtone field, choose the current tone.
The following screen opens:
Figure 36 – Choose fringtone
7. Choose the tone you want to use when a fring call is received and press
Select using your left soft key.
8. In the fring message tone field, choose the current tone. The screen in
Figure 36 opens.
9. Choose the tone you want to use when a fring message is received and
press Select using your left soft key.
10. In the fring vibrating alert field, choose whether you want your handset
to vibrate when a fring call or message is received.
When you are finished making changes, press Change using your left soft
key.
Note: The above options are active only when using the following profiles:
General, Outdoors and Silent.
34 Page
Page 38

Privacy settings
You can change a few privacy settings in the following menu
1. Find me using my number – If enabled, other users will be able to search
you by your phone number and not only your nickname. If disabled, us ers will
only be able to search you by your nickname.
Note: This option is only available if you've not installed fring t hrough the sms
process.
2. Show fring signature – fring adds periodic signature to your
Skype/MSN/Google talk messages to let your friends know that you're using your
mobile on fring and therefore typing slowly. If you disable this here the signature
will not appear.
3. Show fring mood msg. – Once you're logged in with your Skype/MSN/Google
talk on fring your mood message will be changed so your friends will know that
you're on fring. You can disable this feature here.
Choosing whether fring runs
automatically on startup
You can decide whether you would like fring to run automatically on startup.
¾ To change whether fring runs automatically on start up or not:
1. From the Options menu choose Settings.
The following menu opens:
35 Page
Page 39

Figure 23 - Settings Menu
2. If Disable autostart appears, fring is currently running when you turn on
your handset. To prevent fring from running automatically, choose
Disable autostart.
If Enable autostart appears, fring currently does not run automatically
when you turn on your handset. To allow fring to run automatically,
choose Enable autostart.
Your preference is saved.
Note: If you are using fring over 3G/GPRS, You may want to disable this
option when traveling abroad due to roaming charges.
Uninstalling fring
¾ To uninstall fring:
1. From the main menu on your handset, choose Tools.
The Tools menu opens.
2. Navigate to the Manager option and choose it.
A list displaying the applications currently inst alled on your handset opens.
3. Navigate to fring and press Options using your left soft key.
4. Navigate to the Remove option and choose it.
A message opens indicating that the fring client will be removed.
5. Press Yes using your left soft key.
The fring client is removed from your handset.
Note: The APS Server component that was installed with fring should be
uninstalled separately.
36 Page
Page 40

Using Wi-Fi on Your Handset
Configuring Wi-Fi on Your Handset
fring works with Wi-Fi on compatible handsets. If your handset is Wi-Fi enabled,
you can make fring calls using a Wi-Fi connection at no cost (not even the costs
associated with data transfers!)
It is recommended to install WLAN Wizard on your handset. WLAN Wizard helps
you set Wi-Fi up on your handset.
WLAN Wizard can be downloaded from this page:
http://europe.nokia.com/A4195015. Once you have downloaded WLAN Wizard,
make sure to install it on your handset before you continue.
¾ To begin using Wi-Fi on your handset:
1. From the Main Menu, choose the Internet folder.
2. Navigate to the WLAN Wizard application and press Options with your
left soft key.
3. In the Options menu, select Install.
The installation process begins. Follow the instructions in the wizard. Once
the installation is complete, the following screen appears.
Figure 37 - WLAN Wizard
Use the Options menu to perform one of the following:
Start Web browsing Begin using the Wi-Fi connection immediately
Refresh Refresh the list of Wi-Fi access points
Details View the details of the selected Wi-Fi access point
Define Access Point Set the access point for future use
37 Page
Page 41

Figure 38 - WLAN Wizard Options
If the selected access point is secured, the following screen appears:
Figure 39 – Pre-shared key entry
Enter the required key.
The access point is available for use.
Accessing Wi-Fi on Your Handset
Once Wi-Fi has been configured on your handset, you can choose to use a Wi-Fi
access point. Using fring via a Wi-Fi access point means the data is transferred by
Wi-Fi, and does not use your data plan.
To access Wi-Fi on your handset, follow the instructions in the Error! Reference
source not found. section above.
Known Issues:
1. If you open the camera in video mode during a fring call, the ring tone will
stop.
2. Sending an invitation SMS while in Offline mode is not available.
3. On Nokia 5500, E50 and 3250 – fring only works through the external speaker.
38 Page
Page 42

Troubleshooting
I didn't receive the SMS Message with the download link.
Please make sure you've entered your
cell phone number correctly and try again.
If you still haven't received the SMS, please
contact our support team who will be
happy to help.
I got a message "Installation Security Error - Unable to install" – what
do I do now?
Before attempting another installation, set the following settings on your
handset:
1. Go to the Menu on your handset and navigate to the Tools option and
choose it.
2. In the Tools menu, navigate to the Manager (application manager)
option and choose it.
3. Press Options using the left soft key.
4. Choose the Settings options and press Select using the left soft key.
5. Set the Software installation option to On.
¾ To set the Software installation option to On:
1. Choose the Software installation option.
2. Use the up and down arrows on your handset to move to the On
option.
3. Press Ok using the left soft key.
6. Set the Online certif. check option to Off.
¾ To set the Online certif. check option to On:
1. Choose the Online certif. check option.
2. Use the up and down arrows on your handset to move to the Off
option.
3. Press Ok using the left soft key.
I get a message saying "Memory Full".
If your memory is full, clear some space by erasing files (e.g., applications, music
files). Once there is sufficient available space, try downloading again.
I've downloaded and installed fring but cannot find it on my handset.
Where was it installed?
This varies from handset to handset. Usually, the shortcut is in the Main Menu of
the handset or under Menu > My own.
I forgot my password.
Please go to http://www.fring.com/password
39 Page
Page 43

I got the SMS but the link is not clickable
Enable the automatic find on feature available in the Options menu of your
SMS message.
40 Page
Page 44

Frequently Asked Questions
Downloading & Installing fring
How do I download fring?
fring can be downloaded from the fring website (www.fring.com), fring WAP site
(wap.fring.com) or via an SMS invitation sent by your friend.
For detailed information about downloading fring, see the
Downloading fring
section in this guide.
Is fring free?
Yes. fring's service is free. Your cost for using fring is the standard data tariff for
air time it takes to download and use fring.
When using fring over 3G data networks, please be aware that you will be subject
to the data usage costs that your service provider charges. If you are using an
unlimited 3G data plan you can talk as much as you like for free. Using fring
over WiFi benefits you with superior voice quality and reduced latency completely free of charge
As a guideline for calculating your data charges when using fring, assume that
fring requires 1MB of data per 15 minutes of talk time.
.
Why do you need my phone number and Email address?
We use your phone number to send an SMS message with a link to download
fring. This number is then used as your user-id. Your Email address is optional
and we will use it to notify you about new sy stem enhancements.
I've received the SMS, how do I install fring?
Refer to the
Installing fring section in this guide.
Where would you recommend installing fring - on my external memory or
phone memory?
It makes no difference. Install fring wherever there is sufficient free memory.
41 Page
Page 45

Registering to fring
How do I register?
See the
Downloading and installing the generic sis file
If, for some reason, you are unable to get the SMS from our website, you can
simply download the SIS file straight to your phone.
Download the SIS file from our website and install it using 'PC Suit e' and a USB
cable.
The installation process should look similar to the ones showed in th e 'Installing
fring' Section in this guide (the previous section)
Once you've finished installing, you should see the following screen:
If you have already registered with fring, choose 'Existing User' and enter your
existing credentials to log in.
If this is your first use of fring, please choose "New User' and follow the
instructions on the following screen:
Note: The user ID is unique and therefore you might be looking at the following
screen if the user ID you're trying to register is already registered in our
database.
If you already have an account with fring, click 'Existing user' and enter your
details. If you do not remember your password, go to www.fring.com/password
and retrieve it.
42 Page
Page 46

The installation process
Registering to fring section in this guide.
Can I use more than one user-id on my handset?
No, each handset is limited to a single user-id.
Can I add more than one Skype account to my fring account?
No, each fring account is limited to a single Skype account.
I bought a new handset; can I use the same user-id and password?
Yes. Download the application again and install it on your new handset. Enter the
same fring nickname and password you used with the old handset. Make sure to
download the correct version for your handset.
I bought a new handset and I have a new phone number (SIM card). I
would like to use my fring account on my new phone. Can I do that?
Currently this option is not available. Please
contact our support team and they
will help you out. Alternatively, you can download fring again, register yourself
with a new user-id and add your old contacts back using fring's search application
Connection
What is GPRS?
GPRS stands for Global Packet Radio System (or General Packet Radio Service).
GPRS is used to send and receive data.
How can I configure my GPRS/3G settings?
43 Page
Page 47

First of all, make sure you are subscribed to a data plan with your cellular
operator.
Each handset and service provider uses different settings to use GPRS/3G in
order to connect to the Internet.
For the right settings for your handset, see:
https://nokiags.wdsglobal.com/standard?siteLanguageId=118; choose your
handset model, your country and your service provider. An SMS will be sent to
you with the correct settings for your phone.
If you are still unable to connect, contact your service provider for detailed
instructions and support.
How do I set up a Wi-Fi connection?
See the Configuring Wi-Fi on Your Handset section in this guide.
44 Page
Page 48

How do I edit my access point's settings?
If you followed the previous instructions, you may have a few options for
connecting your device to the Internet.
¾ To edit one of your access points:
1. Go to the Menu on your handset and navigate to the Tools option and
choose it.
2. In the Tools menu, choose the Settings option.
3. In the Settings menu, navigate to the Connection option and choose it.
4. In the Connection Settings menu, choose the Access points option.
5. Navigate to the Access point you want to edit and choose it.
6. Edit the Access point as desired. Changes are saved automatically.
My client looks like it is connecting forever – what should I do?
It's possible that the GPRS Internet connection on your phone is not configured
properly. Although you may be able to access the Internet, you are probably
using a WAP connection, which is limited. In order to use fring a st andard
GPRS/3G/WiFi connection is required.
For the right settings for your handset, you can go to
https://nokiags.wdsglobal.com/standard?siteLanguageId=118
General
Can I use my Bluetooth instead of GPRS/3G/Wi-Fi?
The current fring version provides connectivity to the VoIP network from our
servers. It cannot be accessed by Bluetooth. This feature is planned for future
releases.
Can I add contacts from VoIP services aside from Skype, MSN
Messenger, ICQ and Google Talk?
Not at this time. This option will be available in a fu ture version.
Can I add contacts from other messaging services like Yahoo?
Not at this time. This option will be available in a fu ture version.
How do I search for other contacts?
You can search through your contact list to find contacts quickly.
¾ To search your contact list:
Start typing the name of your contact.
The list is filtered according to the characters you have typed.
How do I add new contacts to my fring list?
See the Error! Reference source not found. section in this guide.
45 Page
Page 49

What happens to my GSM calls while I'm on a call through fring?
GSM calls take precedence over fring calls. If you are on a fring call and a GSM
call comes through, your fring call will be disconnected.
I've finished a GSM call and fring disappeared, where is it?
Check to see if fring is in its minimized state. Press the menu button for a second
and choose fring from the menu.
Does fring have any effect on my phone battery?
Unfortunately, yes. fring uses wireless data on your mobile phone and therefore
tends to consume extra battery power. The actual usage depends on the length
of the call and special requirements imposed by your specific network.
As a basic guideline, we have found that on the Nokia 6680 handset, battery talk
time is about 3 hours (as opposed to 4 hours of GSM talk time) and battery idle
time is about 18 hours.
Thank you for becoming a fringster… We welcome your
comments and
suggestions and hope you enjoy fring!
46 Page
 Loading...