

Page 1
Wireless LAN Adapter
Getting Started
Page 2

2
A040/A041 Getting Started
Copyright notices
Copyright © Nokia Networks 2000, 2001. All rights reserved.
Nokia is a registered trademark of Nokia Corporation,
Finland.
Windows 95, Windows 98, Windows 2000 and Windows NT
are registered trademarks of Microsoft Corporation.
MS-DOS is a registered trademark of Microsoft Corporation.
Other products may be trademarks or registered trademarks
of their respective manufacturers.
We reserve the right to make changes and improvements to
any of the products described in this guide without prior
notice. Nokia is not responsible for any loss of data, income
or any consequential damage howsoever caused.
ISSUE 2
Page 3

3
Welcome
This guide tells you how to use a Nokia A040/
A041 wireless LAN adapter to provide wireless
communications between a standalone device
(with no wireless capabilities) and an existing
LAN (managed by a Nokia A032 or equivalent
wireless LAN Access Point).
Please read the Important Safety Information
before using your Wireless LAN Adapter.
Failure to comply with these guidelines may be
dangerous or illegal.
How to use this guide
This guide gets you up and running quickly
with your A040/A041. It contains the following
information:
• How to connect the adapter to a standalone
computer
• How to test that the adapter can
communicate wirelessly with an existing
LAN
• What to do if the simple test fails.
Page 4

4
A040/A041 Getting Started
Related documentation
If you need to be able to configure the A040/
A041, please see the A040/A041 Advanced
User Guide , supplied in Acrobat PDF format on
the accompanying CD-ROM, which explains:
• How to use a desktop or laptop PC to
perform optional configuration via a direct
Ethernet or USB connection
• How to monitor and make advanced
configuration changes remotely, using a
suitably privileged network station.
Please see the documentation that came with
your Access Point for details on managing a
wireless network.
Important information
This guide contains information and
instructions relating to two separate and
distinct products:
• Nokia A040 – an Ethernet-only device
• Nokia A041 – a USB-only device.
For the most part, this guide applies to both
product variants. Where appropriate,
information that is specific to either USB or
Ethernet will be highlighted as such. You can
only connect a Nokia A040 to an Ethernet
device, and you can only connect a Nokia
A041 to a USB device.
Page 5

5
Conventions used in this guide
Notes
You’ll find tips or other useful facts in side
notes throughout the manual. Pay particular
attention to notes that start with Note or
WARNING .
Text conventions
We use the following conventions:
•
courier
is used for file names, or to
denote text that appears on your screen
•
courier bold
is used to denote text that
you should type in
• new terms are shown in italic text the first
time they appear
•
bold
text denotes the name of a physical
button or LED on the adapter (e.g. the
alert
LED) or a button on screen that you need to
click (e.g. “click
Restart
”).
Your A040/A041 can
transfer information
between a standalone
computer and an
existing LAN.
Page 6

6
A040/A041 Getting Started
Features
The A040/A041 has the following features:
• Built-in wireless LAN adapter card to
communicate with an Access Point
• Automatic operation – can work as
delivered, with no reconfiguration
• Custom operation – can be reconfigured to
add security, modify your network setup or
perform upgrades
• IT environment – can be monitored and
controlled remotely in a managed
environment
• Supports IEEE802.11 Infrastructure or Peerto-Peer (ad-hoc) modes
• Automatic connection to any Access Point
regardless of network name (optional)
• Can be configured to look for a specific
network name
• Software-configurable sound indicator.
Page 7

Contents
7
Table of contents
Copyright notices . . . . . . . . . . . . . . . . . . . . . . . . . . . . . . . . . 2
Welcome . . . . . . . . . . . . . . . . . . . . . . . . . . . . . . . . . . . . . . . 3
Features . . . . . . . . . . . . . . . . . . . . . . . . . . . . . . . . . . . . . . . . 6
Overview 9
Checklist . . . . . . . . . . . . . . . . . . . . . . . . . . . . . . . . . . . . . . . 10
Connectors . . . . . . . . . . . . . . . . . . . . . . . . . . . . . . . . . . . . . 10
LEDs . . . . . . . . . . . . . . . . . . . . . . . . . . . . . . . . . . . . . . . . . . 11
Reset button . . . . . . . . . . . . . . . . . . . . . . . . . . . . . . . . . . . . 13
Getting started 15
Minimum host computer requirements . . . . . . . . . . . . . . . . 16
Installing USB driver software (Nokia A041) . . . . . . . . . . . 17
Connecting and testing the A040/A041 . . . . . . . . . . . . . . . 20
Troubleshooting . . . . . . . . . . . . . . . . . . . . . . . . . . . . . . . . . 25
Page 8

8
A040/A041 Getting Started
Page 9
Overview
9
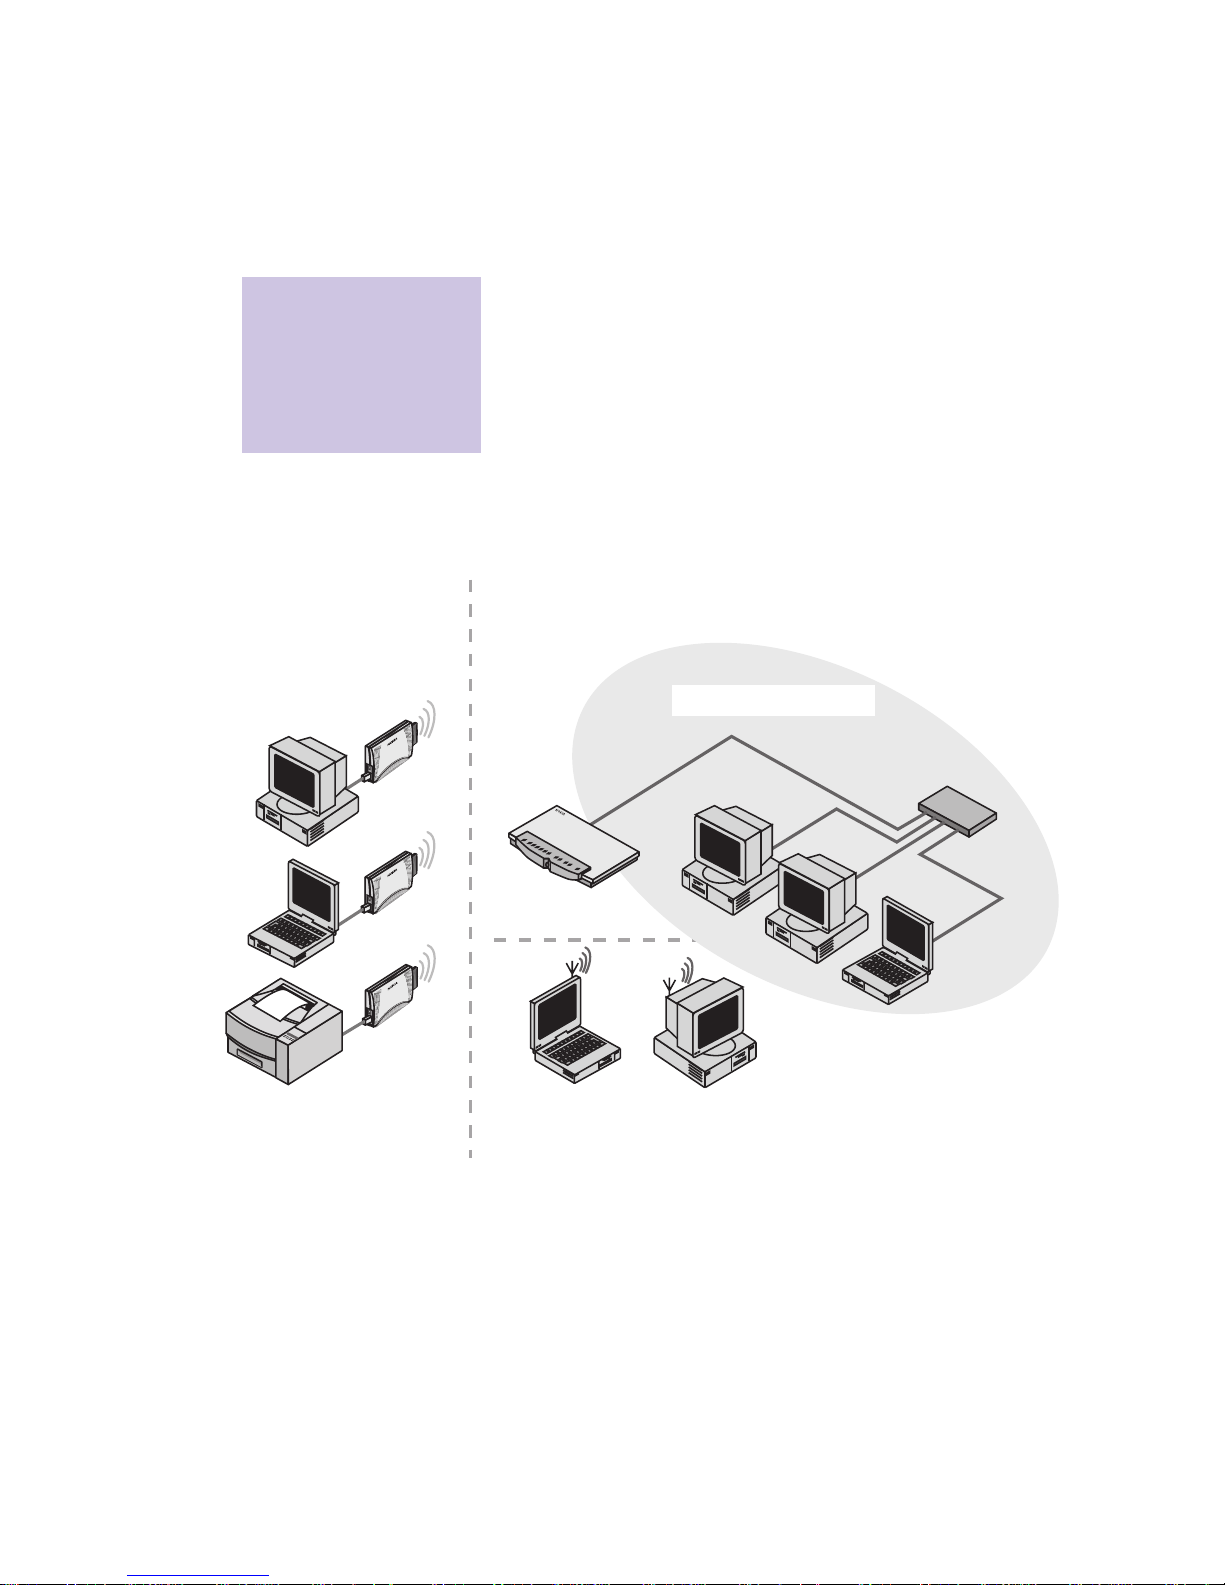
1. Overview
Nokia A040 and Nokia A041 Wireless Lan
Adapters allow you to connect standalone
computers to an existing wired/wireless LAN
that is managed by an IEEE802.11-compliant
Access Point.
You can also use the adapters to access
Ethernet- or USB-equipped resources such as
printers and scanners:
The Nokia A040 and
Nokia A041 are often
referred to simply as
‘adapters’ throughout
this guide.
hub
1
%
5
%
1
0
%
5
0
%
8
0
%
1
0
0
%
b
u
s
y
a
i
r
t
x
a
i
r
t
x
p
o
w
e
r
1
%
5
%
1
0
%
5
0
%
8
0
%
1
0
0
%
b
u
s
y
a
ir tx
a
ir
t
x
la
n
lin
k
la
n
b
u
sy
a
le
rt
access
point
wireless PCs
using radio cards
wired Ethernet LAN
standalone
devices using
Nokia A040/A041s
Page 10

10
A040/A041 Getting Started
Checklist
After unpacking the adapter, check the
contents against the packing list. The
components listed below are included:
• This User Guide
• Nokia A040 Wireless LAN Ethernet Adapter
or
Nokia A041 Wireless LAN USB Adapter
• Ethernet or USB cable, as appropriate
• Power supply
• Nokia A040 or Nokia A041 Utilities CDROM.
Connectors
The adapter has the following connectors:
•
Power connector
– This is where you connect
the power unit. Only use the power unit
supplied with the A040/A041.
•
Host connector
– This is either an RJ45
Ethernet connector (Nokia A040) or a USB
connector (Nokia A041).
WARNING: Use of a
power adapter other
than that supplied
with the unit could be
unsafe.
power connector
host connector
Page 11

Overview
11
LEDs
The adapter has the following LEDs:
•
power
• Normally this shows green
• Solid red indicates a fault
• Flashing red/green – memory update.
•
radio
– This indicates activity on the
wireless LAN connection:
• On – Connected, but no traffic
• Flashing intermittently – Connected, and
there is network traffic.
•
LAN
– Illuminated when there is a good
connection to the host device.
• Off – Not connected
• On – Connected, but no traffic
• Flashing intermittently – Connected, and
there is network traffic.
•
notify
– Used with the
LAN
LED to indicate
connection status to Access Point (see
below).
notify
LAN
power
radio
Note: A solid red
power LED indicates a
fault.
Page 12

12
A040/A041 Getting Started
Special LED/sound sequences
The A040/A041 also has an internal speaker. It
emits sounds in conjunction with special LED
sequences:
Power-on
At power-on, the following things happen:
1
The A040/A041 emits a three-tone chirp.
2
The
LAN
LED lights (assuming there is a
LAN connection).
3
The
notify
and
radio
LEDs flash together and
the adapter beeps for up to 10 seconds while
the adapter scans for an Access Point.
4
If a connection is made to an Access Point,
the adapter emits a three-tone chirp, the
notify
LED goes out and the
radio
LED stays
on.
If the adapter fails to connect to an Access
Point, the beeps stop but the
notify
and
radio
LEDs continue to flash together.
Access Point connection lost
If the connection with an Access Point is lost
for any reason:
1 The
notify and radio LEDs flash together
(they keep flashing until a connection is
regained).
2 The adapter emits beeps for five seconds.
Access Point connection regained
If the connection with an Access Point is
regained:
1 The
notify and radio LEDs stop flashing.
2 The adapter emits a three-tone chirp.
3 The radio LED stays on solid if there is no
activity, or flashes intermittently if there is.
Page 13

Overview
13
New configuration applied
If you alter and save any configuration
settings:
1 The
power LED flashes red and green.
2 The adapter emits a three-tone chirp.
Set-up mode entered
If you put the adapter into set-up mode (see the
Advanced User Guide, supplied as an Acrobat
PDF file on the CD-ROM):
1 All the LEDs come on, then go out again.
2 The unit makes an intermittent beeping
sound.
3 Note that the
notify and radio LEDs do not
flash (as the adapter is not attempting to
connect to an Access Point).
Reset button
The adapter has a reset button hidden on its
underside:
You use this to put the unit into set-up mode
(see the Advanced User Guide, supplied as an
Acrobat PDF file on the CD-ROM).
reset
button
rubber
feet
Page 14

14
A040/A041 Getting Started
Page 15

Getting started
15
2. Getting started
For many applications the A040/A041 will
work straight out of the box with no
configuration changes. This chapter explains
how to:
• Install USB driver software (Nokia A041
only)
• Connect an adapter to a host computer and
check it’s working properly.
If the operational test fails, Troubleshooting on
page 25 explains how to determine whether
you need to reconfigure the adapter from its
factory default state before it will work on your
network.
Page 16

16
A040/A041 Getting Started
Minimum host computer requirements
In order to work correctly, any computer
connected to the A040/A041 must satisfy the
following minimum requirements:
Nokia A040
• Ethernet network interface card (NIC) with
10BaseT connection
• Associated Ethernet drivers installed, as
specified by the manufacturer of the NIC
• Windows 95, 98, 2000 or NT.
You may also need an RJ45 adapter for use
with a PCMCIA Ethernet card
With the Nokia A040, you can also use nonWindows devices that support TCP/IP over
Ethernet.
Nokia A041
• A USB connection
• Nokia A041 – Must have the Nokia A041
USB driver software installed (see page 17)
• Windows 98 or 2000.
Note: Windows 95
and Windows NT do
not support USB plug
and play.
Page 17

Getting started
17
Installing USB driver software (Nokia A041)
You need to install the USB driver software
onto each host computer that will use a Nokia
A041:
1 Insert the Nokia A041 Utilities CD-ROM
into the host computer’s CD drive.
The Nokia Utilities application should run
automatically – you’ll see the following
screen after a few seconds:
2 Double-click on the copyright text to
display the Nokia License Agreement:
Page 18

18
A040/A041 Getting Started
3 Read the License Agreement and click
>>
I agree << at the bottom of the page to
display the CD-ROM home page:
4 Click
Install Nokia A041.
5 You’ll see the installation options at the
bottom of the page:
6 Connect the power unit to the Nokia A041’s
power connector and to a wall outlet.
7 Connect the USB cable to the adapter’s host
connector.
Page 19

Getting started
19
8 Connect the other end of the USB cable to
the host computer.
9 Switch on at the wall outlet.
10 Click
Install USB Drivers.
Windows will detect new hardware and
search for the software for it.
11 Allow Windows to search for the best
driver.
12 If you are prompted to supply the driver,
follow the on-screen instructions and direct
the installation to the CD-ROM. The driver
files are then copied.
You should then be notified that the
installation has been successful.
13 Reboot your machine when prompted.
Note: You must install
the USB drivers before
the IT Proxy software
(part of the A041
utilities).
Page 20

20
A040/A041 Getting Started
Connecting and testing the A040/A041
The simplest method of testing the adapter is to
use the configuration shown here:
Using the adapter in a TCP/IP environment
This section explains how to connect and test
the A040/A041 on a TCP/IP network. If you do
not use TCP/IP, please see Testing on a non-
TCP/IP network on page 24.
Computer A (the host) and computer B should
both be configured to use TCP/IP and have
fixed IP addresses.
We’ll refer to the IP address of computer A (the
host) as IP-A and the IP address of computer B
as IP-B.
1 Check and write down IP-A and IP-B.
2 Switch off computer A (the host).
1
%
5
%
1
0
%
5
0
%
8
0
%
1
0
0
%
b
u
s
y
a
i
r
t
x
a
i
r
t
x
p
o
w
e
r
1
%
5
%
1
0
%
5
0
%
8
0
%
1
0
0
%
b
u
s
y
a
ir
t
x
a
i
r
t
x
l
a
n
l
in
k
la
n
b
u
s
y
a
le
r
t
access point
computer A
(host)
computer B
Nokia
A040/A041
hub
Page 21

Getting started
21
3 Make sure that the Access Point,
computer B and the hub are operating
normally.
4 Connect the power unit to the A040/A041’s
power connector and to a wall outlet.
5 Connect the Ethernet cable (Nokia A040) or
USB cable (Nokia A041) to the adapter’s
host connector.
6 Connect the other end of the Ethernet or
USB cable to the host computer.
7 Switch on at the wall outlet.
8 Switch on the host computer.
After the host computer has powered up,
the adapter’s
power LED should glow a
steady green, and its
LAN LED should be on,
indicating a good connection to the host
computer.
The adapter will start beeping as it searches
for an Access Point. After a short while the
beeps should stop and the adapter will emit
a chirp (three rising tones) indicating that a
connection has been made.
host computer
power connector
host connector
Page 22

22
A040/A041 Getting Started
9 If the beeps stop but there is no chirp, and
the
radio and notify LEDs continue to flash
together, it means that the A040/A041 is
unable to find an eligible Access Point, or
that the Access Point will not allow a
connection. See Troubleshooting on
page 25.
10 (DHCP only) When the A040/A041 has
stopped beeping you should use the
IPConfig utility under Windows to renew
the IP address information in Computer A
and Computer B (see page 23). Make a note
of the IP addresses assigned for use later in
the testing.
11 On Computer B, open an MS-DOS console
window.
12 At the prompt, issue a ‘ping’ command to
the IP address of Computer A. For example,
if IP-A is 192.168.5.21, you would enter:
ping 192.168.5.21
Successful ping
If the ‘ping’ is successful, you should see an
output of the following form:
Note: You only need
to perform this step if
your network uses
automatic IP address
assignment (DHCP).
C:\> ping 192.168.5.21
Pinging 192.168.5.21 with 32 bytes of data:
Reply from 192.168.5.21: bytes=32 time=1ms TTL=32
Reply from 192.168.5.21: bytes=32 time<10ms TTL=32
Reply from 192.168.5.21: bytes=32 time<10ms TTL=32
Reply from 192.168.5.21: bytes=32 time<10ms TTL=32
C:\>
Page 23

Getting started
23
Your A040/A041 is operating correctly, and
you don’t need to perform any special
configuration to make it work.
Unsuccessful ping
If there is a problem, you’ll see the following
output:
See Troubleshooting on page 25 for possible
problems and solutions.
Renewing IP address information
If you’re using DHCP and you need to renew
the IP address information on a computer,
follow the instructions in this section.
Under Windows 95/98
Under Windows 95/98, you do this using
WinIPcfg:
1 Choose
Run from the Start menu.
2 Enter
WinIPcfg and press Return.
3 Select the correct adapter card in the pull-
down menu.
4 Click
Release.
5 Click
Renew.
C:\> ping 192.168.5.21
Pinging 192.168.5.21 with 32 bytes of data:
Request timed out.
Request timed out.
Request timed out.
Request timed out.
C:\>
Page 24

24
A040/A041 Getting Started
Under Windows 2000/NT
1 Open a DOS prompt.
2 Enter
ipconfig /release
This will release the old address.
3 Enter
ipconfig /renew to renew the
address.
You should now be able to access the Access
Point from your client machine.
Testing on a non-TCP/IP network
If you do not use TCP/IP you can still follow
the instructions in Using the adapter in a TCP/
IP environment. When the A040/A041 stops
beeping, indicating a connection has been
made to the Access Point, you can try
transferring a file between Computer A and
Computer B in order to verify that the system is
operating.
Page 25

Getting started
25
Troubleshooting
If the ‘ping’ test fails and your host computer
cannot communicate with a known station on
the wired LAN, check the table below, which
lists some possible problems and solutions:
Some solutions involve reconfiguring the
adapter – you’ll need to follow the instructions
in Preparing to configure an adapter and
Configuration parameters in the Advanced User
Guide
If… …do this
You entered the IP address incorrectly in
the ping test
Try the ping test again.
The A040/A041 is beeping continuously Check that the Access Point is within
range and functioning correctly.
You have multiple Access Points, using
different Network Names
Decide which network name you want to
connect to and configure the A040/A041
with that name.
Your Access Point is using WEP
encryption
You’ll need to configure the A040/A041
with the correct WEP mode and
encryption keys to allow access.
Nokia A040: Your host computer has
incorrect Ethernet drivers installed
Install the Ethernet NIC as if you were
intending to connect to a regular LAN
hub.
Nokia A041: Your host computer is
running Windows 95 or Windows NT
Upgrade to Windows 98 or Windows
2000 or use a different host.
Nokia A041: You forgot to install the
Nokia A041 USB driver software on your
host computer
Install the drivers from the supplied CDROM.
Page 26

26
A040/A041 Getting Started
Page 27

27
Index
A
Access Point
connection lost 12
connection regained 12
B
beeps 12, 21
C
checklist 10
chirp 12, 21
connection 12
connectors 10
conventions 5
copyright 17
D
DHCP 22
F
features 6
H
host
minimum requirements 16
host connector 10, 18, 21
I
IP address information
renewing 23
ipconfig 24
IPConfig utility 22
L
LAN LED 11, 21
LED
special sequences 12
LEDs 11
License Agreement 18
M
MS-DOS console window 22
Page 28

28
A040/A041 Getting Started
N
NIC 16
Nokia License Agreement 17
non-TCP/IP network 24
notify LED 11
P
ping 22
possible problems 25
power connector 10, 18, 21
power LED 11, 21
power-on
LED and sound sequences 12
R
radio LED 11
release 23
renew 23
IP address information 23
reset button 13
RJ45 16
RJ45 Ethernet connector 10
S
set-up mode
accessing 13
LED sequence 13
special LED sequences 12
T
TCP/IP
host requirements 16
testing adapter 20
testing 20
U
USB
connector 10
driver software 16
USB driver software 17
Utilities CD-ROM 17
W
WinIPcfg 23
 Loading...