

Page 1

9244301_6265_2_en_in_tat.fm Page -11 Tuesday, April 25, 2006 4:44 PM
Nokia 6265 User’s Guide
i
Page 2

9244301_6265_2_en_in_tat.fm Page -10 Tuesday, April 25, 2006 4:44 PM
Copyright ©2006 Nokia. All rights reserved.
Nokia, Nokia Connecting People, Nokia 6265, Pop-Port, and the Nokia Original
Enhancements logos are trademarks or registered trademarks of Nokia Corporation.
Other company and product names mentioned herein may be trademarks or trade names of
their respective owners.
T9 text input software Copyright ©1999-2006. Tegic Communications, Inc.
All rights reserved.
Bluetooth wireless technology is a registered trademark of Bluetooth SIG, Inc.
miniSD is a registered trademark of the SD Card Association.
Includes RSA BSAFE cryptographic or security protocol software from
RSA Security.
Java is a trademark of Sun Microsystems, Inc.
The information contained in this user guide was written for the Nokia 6265 product.
Nokia operates a policy of ongoing development. Nokia reserves the right to make changes
to any of the products described in this document without prior notice.
UNDER NO CIRCUMSTANCES SHALL NOKIA BE RESPONSIBLE FOR ANY LOSS OF DATA OR
INCOME OR ANY SPECIAL, INCIDENTAL, AND CONSEQUENTIAL OR INDIRECT DAMAGES
HOWSOEVER CAUSED. THE CONTENTS OF THIS DOCUMENT ARE PROVIDED “AS IS.”
EXCEPT AS REQUIRED BY APPLICABLE LAW, NO WARRANTIES OF ANY KIND, EITHER EXPRESS
OR IMPLIED, INCLUDING, BUT NOT LIMITED TO, THE IMPLIED WARRANTIES OF
MERCHANTABILITY AND FITNESS FOR A PARTICULAR PURPOSE, ARE MADE IN RELATION TO
THE ACCURACY AND RELIABILITY OR CONTENTS OF THIS DOCUMENT. NOKIA RESERVES THE
RIGHT TO REVISE THIS DOCUMENT OR WITHDRAW IT AT ANY TIME WITHOUT PRIOR NOTICE.
EXPORT CONTROLS This device may contain commodities, technology, or software subject to
export laws and regulations from the U.S. and other countries. Diversion contrary to law is
prohibited.
9251213
Issue 1
ii
Page 3

9244301_6265_2_en_in_tat.fm Page -9 Tuesday, April 25, 2006 4:44 PM
Contents
For your safety.............................. viii
About your device ..................................ix
Network services.....................................ix
Shared memory........................................x
Welcome.......................................... xi
Getting help........................................... xi
Find your phone label...................... xi
Nokia support and contact
information........................................ xii
1. Phone at a glance........................1
Keys and parts........................................ 1
Standby mode......................................... 2
Quick keys................................................ 2
Indicators and icons ............................. 2
Phone menus .......................................... 3
Scroll method...................................... 3
Main menu display............................ 4
In-phone help...................................... 4
Security code settings.......................... 4
Go to functions...................................... 5
Select options ..................................... 5
Organise functions............................. 5
2. Set up your phone.......................6
Antenna.................................................... 6
Battery...................................................... 6
Remove the back cover .................... 6
Remove the battery........................... 7
UIM (CDMA SIM) card installation 7
Replace the battery........................... 8
Replace the back cover .................... 8
Charge the battery............................. 8
MiniSD card............................................. 9
Turn your phone on or off................... 9
Connect the headset ............................ 9
Make calls.............................................. 10
Using the keypad.............................. 10
Use the save contact option......... 10
Use the contacts list ....................... 10
Use the last dialled number.......... 10
Make a conference call.................. 10
Answer calls.......................................... 11
Answer or silence an incoming
call........................................................ 11
Adjust the earpiece volume .......... 11
Answer a call with the keypad
locked.................................................. 11
Use the loudspeaker........................ 11
Mute phone during call.................. 11
Options during a call....................... 11
Keyguard................................................ 12
3. Text entry...................................13
Standard mode..................................... 13
Text (Abc) ........................................... 13
Numbers (123).................................. 13
Change language ............................. 13
Punctuation and special
characters........................................... 14
Predictive text mode .......................... 14
Activate and deactivate................. 14
Enter text ........................................... 14
Change case and mode...................... 15
Delete text............................................. 15
4. Messaging ..................................16
Text messages....................................... 16
Text message folders and options 16
Write and send text messages..... 17
Use a template.................................. 18
Read and reply to text messages. 18
Choose a text message option..... 18
Use custom folders.......................... 19
Delete text messages...................... 20
iii
Page 4

9244301_6265_2_en_in_tat.fm Page -8 Tuesday, April 25, 2006 4:44 PM
Text message settings.................... 20
Multimedia messages........................ 21
Multimedia message folders and
options................................................ 22
Write and send multimedia
messages............................................ 23
Read and reply to multimedia
messages............................................ 24
Choose a multimedia message
option.................................................. 24
Delete multimedia messages........ 27
Multimedia message settings...... 27
Distribution lists.................................. 29
Create distribution lists................. 29
Add and remove contacts ............. 29
Manage distribution lists .............. 29
Voice messages.................................... 30
Save voice mailbox number.......... 30
Call and set up your voice mail... 30
Listen to your voice mail............... 30
Automate voice mail ...................... 30
Minibrowser messages ...................... 31
5. Log..............................................32
View missed calls................................ 32
View received calls ............................. 32
View dialled numbers......................... 32
Time of call ........................................... 33
Clear log lists........................................ 33
Call duration......................................... 33
Duration of data or fax calls............ 33
Duration of minibrowser calls......... 34
6. Contacts ..................................... 35
View contacts....................................... 35
Search contacts................................... 35
Add new contacts............................... 36
Save a name and number ............. 36
Save a number (only)...................... 36
Save a contact.................................. 36
Insert dialling codes........................ 36
Save multiple numbers .................. 37
Save other details............................ 37
Change default number................. 37
Send business cards........................ 37
Edit contacts ........................................ 38
Modify contact settings.................... 39
Set up caller groups ........................... 39
Set up a caller group...................... 39
Modify a caller group..................... 39
Set up voice tags................................. 40
Assign a voice tag ........................... 40
Use a voice tag................................. 40
Play back a voice tag...................... 40
Modify a voice tag .......................... 41
Delete a voice tag ........................... 41
Set up speed dialling.......................... 41
Assign a key to speed dialling...... 41
Change speed dialling numbers .. 41
Delete speed dialling numbers .... 41
Display phone number....................... 42
Delete contacts.................................... 42
Delete individual contacts............ 42
Delete all contacts.......................... 42
7. Camera........................................43
Take a photo......................................... 43
Use the self-timer............................... 44
Take a sequence of photos............... 44
Record a video ..................................... 45
Camera options ................................... 45
Modify camera settings .................... 46
Image quality.................................... 46
Image size.......................................... 46
Video clip quality............................. 46
Video clip length.............................. 46
Camera sounds................................. 47
Self-timer lights............................... 47
Default title....................................... 47
Image storage................................... 47
Default mode.................................... 47
iv
Page 5

9244301_6265_2_en_in_tat.fm Page -7 Tuesday, April 25, 2006 4:44 PM
8. Gallery ........................................48
Open a folder........................................ 48
Gallery options..................................... 49
9. Media..........................................51
Media player......................................... 51
Music player.......................................... 51
Play music tracks ............................. 52
Music player options....................... 52
Radio....................................................... 53
Play radio............................................ 53
Radio options .................................... 54
Voice recorder....................................... 55
Record speech or sound................. 55
Recording list .................................... 55
Change the storage folder............. 55
Equaliser................................................. 55
Activate an equaliser set ............... 56
Create a custom equaliser set...... 56
10. Settings....................................57
Profiles.................................................... 57
Activate a profile.............................. 57
Personalise a profile........................ 57
Set a timed profile........................... 57
Display .................................................... 58
Standby mode settings................... 58
Banner................................................. 58
Screen saver....................................... 58
Sleep mode ........................................ 59
Backlight time-out .......................... 59
Themes.................................................... 59
Tones....................................................... 59
Time and date....................................... 60
Clock.................................................... 60
Date...................................................... 60
Set the auto-update of date and
time...................................................... 60
Call........................................................... 61
Anykey answer.................................. 61
Automatic redial............................... 61
Speed dialling.................................... 61
Answer when slide opened............ 61
End call when slide closed ............ 61
Automatic update of service ........ 62
Calling card........................................ 62
Abbreviated dialling........................ 63
International prefix ......................... 63
Data and fax calls............................ 63
Call summary .................................... 64
Show call time on display ............. 64
Ringing tone for no caller ID........ 64
Phone language ................................... 64
Language settings............................ 64
Automatic keyguard........................ 64
Navigation key.................................. 65
Memory status.................................. 65
Security keyguard ............................ 65
DTMF tones........................................ 66
Start-up tone .................................... 66
Help text activation ........................ 66
Confirm UIM service actions ........ 66
Gateway settings ............................. 66
Voice commands.................................. 67
Add a voice tag................................. 67
Activate a voice command............ 67
Voice command options................. 67
Connectivity.......................................... 67
Bluetooth connectivity................... 68
Infrared connectivity....................... 71
Data cable transfer.......................... 71
Data and fax transfer...................... 73
Enhancement settings........................ 73
Headset............................................... 73
Handsfree........................................... 73
Loopset................................................ 73
TTY/TDD............................................... 74
Charger ............................................... 74
Hearing aid ........................................ 74
Security .................................................. 74
PIN code ............................................. 74
PIN code request.............................. 75
Call restrictions ................................ 75
Security level..................................... 75
v
Page 6

9244301_6265_2_en_in_tat.fm Page -6 Tuesday, April 25, 2006 4:44 PM
Access codes..................................... 76
Voice privacy..................................... 76
Personal unblocking key (PUK)
code..................................................... 77
Application settings ........................... 77
Network................................................. 77
Roaming options.............................. 77
Mode................................................... 78
Network services................................. 78
Store a feature code....................... 78
Send my caller ID............................. 79
My number selection...................... 79
Restore factory settings.................... 80
Phone details........................................ 80
11. Organiser.................................. 81
Alarm clock........................................... 81
Set an alarm...................................... 81
Repeat alarm..................................... 81
Set the alarm tone.......................... 82
Set the snooze time-out................ 82
Turn an alarm off............................. 82
Calendar................................................. 82
Open calendar .................................. 82
Calendar options.............................. 83
Make a calendar note .................... 83
View calendar notes (day view)... 83
Options while viewing a day........ 84
Send a calendar note...................... 84
Receive a note in calendar format
(vCal)................................................... 84
Modify calendar settings............... 85
Notes ...................................................... 85
Open notes ........................................ 85
Make a note...................................... 85
Send a note....................................... 86
Notes options ................................... 86
To-do list ............................................... 86
Open to-do list................................. 86
Make a to-do list note................... 86
Edit to-do list notes........................ 87
View to-do list notes...................... 87
Send a to-do list note.................... 87
To-do list options ............................ 88
Calculator.............................................. 88
Use calculator................................... 88
Currency converter.......................... 89
Countdown timer................................ 89
Set the normal timer...................... 89
Change the timer............................. 90
Stop the timer before the alarm
sounds................................................. 90
Stopwatch............................................. 90
Measure split or lap time.............. 90
Save a time........................................ 91
Stopwatch options.......................... 91
Operation note................................. 91
12. Mobile web ..............................92
Mobile Internet access...................... 92
Sign on to the mobile Internet ....... 92
Navigate the mobile Internet.......... 93
Phone keys......................................... 93
Receive a call while online........... 93
Make an emergency call while
online.................................................. 93
Clear the cache and disconnect.. 93
13. Extras........................................95
Games..................................................... 95
Select games..................................... 95
Memory status ................................. 95
Collection.............................................. 95
Select application............................ 95
Memory status ................................. 95
14. PC connectivity........................96
PC data transfer .................................. 96
Nokia PC Suite..................................... 96
15. Enhancements..........................97
vi
Page 7

9244301_6265_2_en_in_tat.fm Page -5 Tuesday, April 25, 2006 4:44 PM
16. Reference information ............99
Batteries and chargers....................... 99
Nokia battery authentication
guidelines............................................ 100
17. Care and maintenance ..........102
18. Additional safety
information...................................103
Operating environment.....................103
Medical devices...................................103
Vehicles .................................................104
Potentially explosive
environments.......................................104
Emergency calls ..................................105
Certification information (SAR)......105
MANUFACTURER’S LIMITED
WARRANTY...................................107
Index .............................................110
vii
Page 8

9244301_6265_2_en_in_tat.fm Page -4 Tuesday, April 25, 2006 4:44 PM
For your safety
Read these simple guidelines.
Not following them may be dangerous
or illegal. Read the complete user
guide for further information.
SWITCH ON SAFELY
Do not switch the phone
on when wireless phone
use is prohibited or when it
may cause interference or
danger.
ROAD SAFETY COMES FIRST
Obey all local laws.
Always keep your hands
free to operate the vehicle
while driving. Your first
consideration while
driving should be road
safety.
INTERFERENCE
All wireless phones may be
susceptible to
interference, which could
affect performance.
SWITCH OFF IN HOSPITALS
Follow any restrictions.
Switch the phone off near
medical equipment.
SWITCH OFF IN AIRCRAFT
Follow any restrictions.
Wireless devices can cause
interference in aircraft.
SWITCH OFF WHEN
REFUELLING
Do not use the phone at a
refuelling point. Do not
use near fuel or chemicals.
SWITCH OFF NEAR BLASTING
Follow any restrictions.
Do not use the phone
where blasting is in
progress.
USE SENSIBLY
Use only in the normal
position as explained in
the product
documentation. Do not
touch the antenna
unnecessarily.
QUALIFIED SERVICE
Only qualified personnel
may install or repair this
product.
ENHANCEMENTS AND
BATTERIES
Use only approved
enhancements and
batteries. Do not connect
incompatible products.
WATER-RESISTANCE
Your phone is not waterresistant. Keep it dry.
BACKUP COPIES
Remember to make backup copies or keep a written
record of all important
information stored in your
phone.
viii
Page 9

9244301_6265_2_en_in_tat.fm Page -3 Tuesday, April 25, 2006 4:44 PM
CONNECTING TO OTHER
DEVICES
When connecting to any
other device, read its user
guide for detailed safety
instructions. Do not
connect incompatible
products.
EMERGENCY CALLS
Ensure the phone is
switched on and in service.
Press the end key as many
times as needed to clear
the display and return to
standby mode. Enter the
emergency number, then
press the call key.
Give your location. Do not
end the call until given
permission to do so.
■ About your device
The wireless device described in this
guide is approved for use on the CDMA
800 and 1900, AMPS 800 networks.
Contact your service provider for more
information about networks.
When using the features in this device,
obey all laws and respect privacy and
legitimate rights of others.
When taking and using images or video
clips, obey all laws and respect local
customs as well as privacy and
legitimate rights of others.
Warning: To use any features
in this device, other than the
alarm clock, the device must
be switched on. Do not switch
the device on when wireless
device use may cause
interference or danger.
■ Network services
To use the phone you must have
service from a wireless service provider
or network operator. Many of the
features in this device depend on
features in the wireless network to
function. These network services may
not be available on all networks or you
may have to make specific
arrangements with your service
provider before you can utilise network
services. Your service provider may
need to give you additional
instructions for their use and explain
what charges will apply.
Some networks may have limitations
that affect how you can use network
services. For instance, some networks
may not support all languagedependent characters and services.
Your service provider may have
requested that certain features be
disabled or not activated in your
device. If so, they will not appear on
your device menu. Your device may
also have been specially configured.
This configuration may include
changes in menu names, menu order
and icons. Contact your service
provider for more information.
ix
Page 10

9244301_6265_2_en_in_tat.fm Page -2 Tuesday, April 25, 2006 4:44 PM
This device supports WAP 2.0 protocols
(HTTP and SSL) that run on TCP/IP
protocols. Some features of this device,
such as Mobile web require network
support for these technologies.
■ Shared memory
The following features in this device
may share memory: Messaging,
Contacts, Gallery, Organiser, and
Extras. Use of one or more of these
features may reduce the memory
available for the remaining features
sharing memory. For example, saving
many photos to the Gallery may use all
of the available memory. Your device
may display a message that the
memory is full when you try to use a
shared memory feature. In this case,
delete some of the information or
entries stored in the shared memory
features before continuing. Some of
the features, such as Messaging and
Contacts, may have a certain amount
of memory specially allotted to them in
addition to the memory shared with
other features.
x
Page 11

9244301_6265_2_en_in_tat.fm Page -1 Tuesday, April 25, 2006 4:44 PM
Welcome
Congratulations on your purchase of
the Nokia 6265 mobile phone.
Your phone provides many functions
which are practical for daily use, such
as a hands-free loudspeaker, camera,
MP3 player, video recorder, and more.
Your phone can also connect to a PC,
laptop, or other device using a USB
data cable, Bluetooth wireless
technology, or infrared.
■ Getting help
Find your phone label
If you need help, Nokia Care Contact
Centre is available for assistance.
Before calling, we recommend that
you write down the Electronic serial
number (ESN) and have it available.
The ESN is found on the type label,
which is located beneath the battery
on the back of the phone. See “Remove
the back cover”, p. 6 and “Remove the
battery”, p. 7 for more information.
xi
Page 12

9244301_6265_2_en_in_tat.fm Page 0 Tuesday, April 25, 2006 4:44 PM
Nokia support and contact
information
For the latest version of this guide,
downloads, services and additional
information related to your
Nokia product, please visit
www.nokia-asia.com/6265/support or
your local Nokia web site.
Should you still require assistance,
please refer to www.nokia-asia.com/
contactus.
To check for the nearest Nokia care
center location for maintenance
services, you may like to visit
www.nokia-asia.com/repair.
xii
Page 13

9244301_6265_2_en_in_tat.fm Page 1 Tuesday, April 25, 2006 4:44 PM
Phone at a glance
1. Phone at a glance
■ Keys and parts
miniSD card slot (1) Centre selection and scroll key (12)
Earpiece (2) Keypad (13)
Display (3) Microphone (14)
Headset connector (4) Charger port (15)
LED indicator (5) Pop-Port™ connector (16)
Left selection key (6) Camera key (17)
Right selection key (7) Camera flash and self-portrait mirror (18)
Call key (8) Loudspeaker (19)
End and power key (9) Volume key (20)
Infrared (10) Camera lens (21)
Strap holder (11)
1
Page 14
9244301_6265_2_en_in_tat.fm Page 2 Tuesday, April 25, 2006 4:44 PM
Phone at a glance
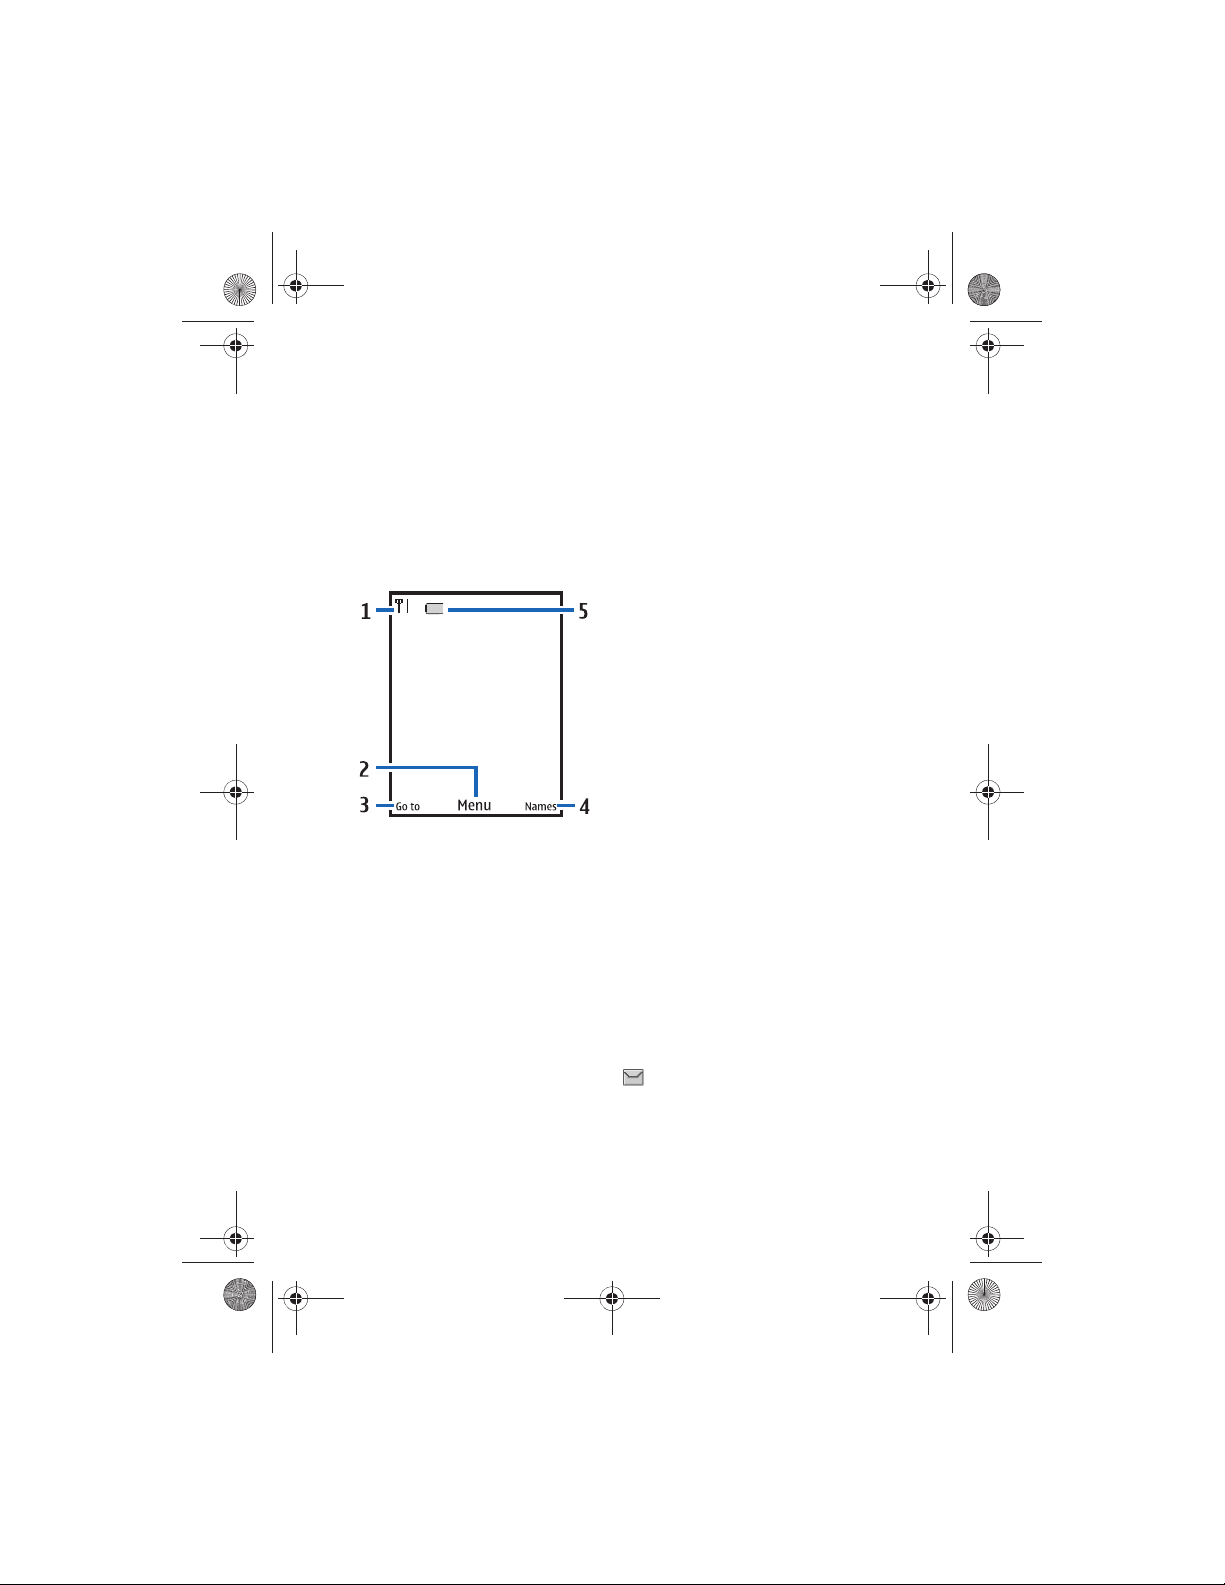
■ Standby mode
Depending on your wireless service
provider or network operator and the
model number of your phone, some or
all of the following selection keys may
appear in standby mode.
The standby mode indicates your
phone is idle.
Signal strength (1)—More bars indicate
a stronger network signal.
Menu (2)—Press the centre selection
key to select this option.
Go to (3)—Press the left selection key
to select this option.
Names or network operator menu (4)—
Press the right selection key to select
this option.
Battery level (5)—A filled in battery
indicates more power.
■ Quick keys
Depending on your wireless service
provider or network operator and the
model number of your phone, some or
all of the following scroll key shortcuts
may be available in standby mode.
In standby mode, the four-way scroll
and centre selection keys instantly
take you to frequently-accessed
menus:
Scroll up key—Go to the contacts list
or network operator menu.
Scroll right key—View the calendar.
Scroll down key—Go to the contacts
list.
Scroll left key—Create a text message.
Centre selection key—Displays
available applications or selects
highlighted menus and submenus.
■ Indicators and icons
Depending on your wireless service
provider or network operator and the
model number of your phone, some or
all of the following indicators and
icons may appear in standby mode.
Icon Indicates...
You have one or more text or
picture messages. See “Read
and reply to text messages”,
p. 18.
2
Page 15

9244301_6265_2_en_in_tat.fm Page 3 Tuesday, April 25, 2006 4:44 PM
Phone at a glance
Icon Indicates...
You have one or more voice
messages. See “Voice
messages”, p. 30.
Your phone keypad is locked.
See “Keyguard”, p. 12.
Your phone is set to the silent
profile. See “Profiles”, p. 57.
The alarm clock is on. See
“Alarm clock”, p. 81.
The countdown timer is
running. See “Countdown
timer”, p. 89.
The stopwatch timing is
running in the background.
See “Stopwatch”, p. 90.
Integrated hands free or
loudspeaker is active.
The timed profile is selected.
See “Profiles”, p. 57.
Phone can be connected to a
Bluetooth wireless technology
device. See “Bluetooth
connectivity”, p. 68.
,
An enhancement, such as
,
headset, handsfree, hearing
,
aid, TTT/TTD, or loopset is
,
active or connected.
or
See “Enhancement settings”,
p. 73.
Voice privacy encryption is
or
active or inactive in the
network.
Phone is roaming outside of
your home network.
Icon Indicates...
Phone is in a digital network.
See "Network services", p. ix.
Phone is in a 1XRTT network.
See "Network services", p. ix.
■ Phone menus
Phone features are grouped according
to function and are accessed through
the main menus. Each main menu
contains submenus and lists from
which you can select or view items and
personalise your phone features.
You can access these menus and
submenus by using the scroll method
or by using a shortcut.
Note: Some features may not
be available, depending on
your network. For more
information, contact your
wireless provider.
Scroll method
1. In standby mode,
select Menu using
the centre
selection key.
Scroll through the
main menu using the scroll key.
On the right side of the screen, a
scroll bar is displayed with a tab
that moves up or do wn as you
move through the menus.
This provides a visual
3
Page 16

9244301_6265_2_en_in_tat.fm Page 4 Tuesday, April 25, 2006 4:44 PM
Phone at a glance
representation of your current
position in the menu structure.
2. When you arrive at a menu, press
Select (the centre selection key) to
enter submenus.
Select Back from the submenu
level to return to the previous
menu.
Press the end key to return to
standby mode from any menu or
submenu.
Main menu display
You can control whether your phone
main menu is displayed as a List,
Grid or Grid with labels. By default,
the main menu displays in Grid with
labels format.
In standby mode, select Menu >
Options > Main menu view > List, Grid,
or Grid with labels.
If supported by your wireless service
provider or network operator, you can
also change the order of menus in your
main menu.
In standby mode, select Menu >
Options > Organise. Highlight a menu,
select Move. Use the scroll key to move
the menu to a new location, select OK.
You can repeat this procedure to
personalise your main menu.
Select Done > Yes to save the changes.
In-phone help
Many features have brief descriptions
(help text) that can be viewed on the
display. To view these descriptions,
scroll to a feature, and wait for about
15 seconds. Scroll down to view all of
the description, or select Back to exit.
In order to view the descriptions,
you must activate help text.
In standby mode, select Menu >
Settings > Phone > Help text
activation > On or Off.
■ Security code
settings
Your device has a security option that
allows you to loc k your phone with a
PIN code. With the PIN code set and
turned on, no outgoing calls are
allowed and the menu cannot be
accessed without the correct code
entered first. This prevents
unauthorised outgoing calls or access
to any information stored on your
device.
The PIN code option is in the Settings
menu. The first time you access the
Security option, you must enter a PIN
code. The default PIN code may vary
depending on your wireless service
provider or network operator who
provided your UIM card.
4
Page 17

9244301_6265_2_en_in_tat.fm Page 5 Tuesday, April 25, 2006 4:44 PM
Phone at a glance
The PIN code protects the UIM card
from unauthorised access. The PIN
code can be 4–8 digits in length.
After three successive incorrect
entries, the PIN code is blocked.
You need to enter the personal
unblocking key (PUK) code.
See “Personal unblocking key (PUK)
code”, p. 77.
■ Go to functions
The Go to menu allows you to change
the function of the left selection key
on your phone so that your most
frequently used functions can be
quickly accessed from the Go to menu
in standby mode.
Select options
1. In standby mode, select Go to >
Options > Select options.
2. Scroll to the options you want to
add.
3. Select Mark to add an option or
Unmark to remove an o ptio n.
4. Select Done when you have added
all desired options.
5. Select Yes to save the changes.
6. In standby mode, select Go to to
display a list of the options that
you selected in step 3.
Organise functions
In standby mode, select Go to >
Options > Organise. Highlight an
option, and select Move. Scroll to move
the option to a new location, and
select OK. You can repeat this
procedure to personalise your Go to
menu.
Select Done > Yes to save the changes.
5
Page 18

9244301_6265_2_en_in_tat.fm Page 6 Tuesday, April 25, 2006 4:44 PM
Set up your phone
2. Set up your phone
■ Antenna
Your device has an
internal antenna.
Hold the device as
you would any other
telephone with the
antenna area
pointed up and over
your shoulder.
Note: As
with any
other
radio
transmitting
device,
do not
touch the
antenna unnecessarily when
the device is switched on.
Contact with the antenna
affects call quality and may
cause the device to operate at
a higher power level than
otherwise needed.
Avoiding contact with the
antenna area when operating
the device optimises the
antenna performance and the
battery life.
■ Battery
Always switch off the power and
disconnect the charger before
removing the battery.
Avoid touching electronic components
while changing the covers.
Always store and use the device with
the covers attached.
Prolonged, continuous use of your
device may increase the device
temperature. The increased
temperature is a normal function of
this product and does not pose a safety
concern for you or the device. If the
temperature is uncomfortable to you,
use a headset or allow your device to
return to room temperature before
your next call.
Remove the back cover
1. With the back of the phone facing
you, press down and hold the back
cover latch.
6
Page 19

9244301_6265_2_en_in_tat.fm Page 7 Tuesday, April 25, 2006 4:44 PM
Set up your phone
2. Slide the back cover toward the
bottom of the phone, lift up and
remove.
Remove the battery
After you have removed the back
cover, insert your finger into the finger
grip, and lift the battery from its
compartment.
UIM (CDMA SIM) card
installation
The User Identity Module (UIM),
also called the CDMA Subscriber
Identity Module (SIM), card and its
contacts can be easily damaged by
scratches or bending, so be careful
when handling, inserting, or removing
the card. The UIM card slot is built into
the mechanics, located under the
battery.
Before installing the UIM card, always
make sure that the phone is switched
off and that you have removed the
cover and battery.
Keep all UIM cards out of the reach of
small children.
1. Open the UIM holder by pressing
the release button.
2. Pivot the holder up.
3. Insert the UIM card into the holder
(beveled corner last) with the
gold-coloured contacts facing
down, matching up with the goldcoloured contacts on the phone.
7
Page 20

9244301_6265_2_en_in_tat.fm Page 8 Tuesday, April 25, 2006 4:44 PM
Set up your phone
4. Pivot the holder down and replace
the battery.
Replace the battery
1. Insert the battery, gold-coloured
contact end first, into the battery
slot.
2. Push down on the other end of the
battery to snap the battery into
place.
Replace the back cover
1. Set the back cover on the phone
with the cover tabs aligned with
the slots in the phone.
2. Press the back cover latch down
and slide the back cover toward the
top of phone.
3. Make sure back cover latch is
secure.
Charge the battery
1. Plug the charger transformer into a
standard ac outlet.
2. Insert the charger output plug into
the round jack at the bottom end of
the phone.
If necessary, you can use a CA-44
adapter cable (1) to connect a
charger and the phone.
After a few seconds, the battery
indicator in the display scrolls.
If the battery is completely
discharged, it may take a few
minutes before the charging
indicator appears on the display or
before any calls can be made.
8
Page 21

9244301_6265_2_en_in_tat.fm Page 9 Tuesday, April 25, 2006 4:44 PM
Set up your phone
■ MiniSD card
To insert the miniSD, complete the
following steps.
1. Slide open
the phone
and lift open
the miniSD
slot cover.
2. Insert card
firmly as
shown in the
illustration.
The card
clicks into place.
To remove miniSD card, firmly press
the card until it releases from card slot
and slides out.
Important: Do not remove the
memory card while reading or
writing to the card. Doing so
may cause data corruption on
the card or the phone.
■ Turn your phone on
or off
1. To turn your
phone on or
off, press and
hold the end
key for at
least 3 seconds.
2. Enter the lock code, if necessary,
and select OK.
■ Connect the headset
A compatible headset, such as HS-5,
may be purchased with your phone or
separately as an enhancement.
See “Enhancement settings”, p. 73 for
information.
1. Plug the headset connector into
the Pop-Port™ connector at the
bottom end of your phone.
appears on the display.
2. Position the headset on your ear.
With the headset connected, you can
make, answer, and end calls as usual.
• Use the keypad to enter numbers.
• Press the call key to place a call.
• Press the end key to end a call.
You can also plug a compatible
headset, such as the such as the HS-9
Universal Headset, into the into the
2.5 mm headset jack on the side of
your phone to allow hands-free
operation. See “Enhancement
settings”, p. 73.
9
Page 22

9244301_6265_2_en_in_tat.fm Page 10 Tuesday, April 25, 2006 4:44 PM
Set up your phone
Warning: When you use the
headset, your ability to hear
outside sounds may be
affected. Do not use the
headset where it can
endanger your safety.
■ Make calls
Using the keypad
1. Enter the phone number (including
the area code), and press the call
key. To delete a character to the
left of the cursor, select Clear.
2. To end the call, press the end key.
To cancel the call attempt, select
End call.
Use the save contact option
1. In standby mode, enter the phone
number (including the area code)
and select Save, enter a name for
the contact, and select OK.
2. To make the call, press the call key.
To return to standby mode,
select Done.
Use the contacts list
1. In standby mode, scroll down to
display your contacts.
2. Scroll to the contact you wish to
dial, press the call key. To view
details of the entry, select Details.
Use the last dialled number
1. In standby mode, press the call key
to display the last 30 numbers
dialled.
2. Scroll to the number or name you
wish to redial, and press the call
key.
Make a conference call
Conference calling is a network service
that allows you to take p art i n a
conference call with two other
participants.
1. Make a call to the first participant.
2. With the first participant on the
line, select Options > New call.
3. Enter the phone number of the
second participant; or, to retrieve a
number from your contacts, select
Search and the number you want
to call.
4. Press the call key. The first
participant is put on hold.
5. When the second participant picks
up, press the call key to connect
the calls.
6. To end the conference call,
select Options > End all calls,
or press the end key.
10
Page 23

9244301_6265_2_en_in_tat.fm Page 11 Tuesday, April 25, 2006 4:44 PM
Set up your phone
■ Answer calls
Answer or silence an
incoming call
1. To answer the call, press the call
key or select Answer.
2. To reject the call, press the end key.
Select Silence to mute the ringing
tone. Select Dismiss or do nothing,
and the call is eventually
forwarded to voice mail.
If your phone is set to Silent in the
Profiles menu, select Dismiss, and
the call is forwarded to voice mail.
Adjust the earpiece volume
Press the up arrow or down arrow on
the volume key located on the right
side of your phone to adjust the
volume of the earpiece.
When adjusting the volume, a bar
chart appears in the display indicating
the volume level.
Answer a call with the
keypad locked
To answer a call with the keypad
locked, simply press the call key.
During the call, all features function as
normal. When you end or reject the
call, the keypad automatically relocks.
See “Keyguard”, p. 12 for details.
When the device is locked, calls may be
possible to the official emergency
number programmed into your device.
Use the loudspeaker
Warning: Do not hold the
device near your ear when the
loudspeaker is in use because
the volume may be extremely
loud.
You can use your phone loudspeaker
during a call:
• To activate the loudspeaker,
select Loudsp..
• To deactivate the loudspeaker,
select Handset.
The loudspeaker is deactivated
automatically when a call or a call
attempt ends or when certain
enhancements are connected.
Mute phone during call
To mute your phone during a call,
select Mute; to unmute the phone,
select Unmute.
Options during a call
Many of the options that you can use
during a call, are network services.
Check with your wireless service
provider or network operator for more
information.
11
Page 24

9244301_6265_2_en_in_tat.fm Page 12 Tuesday, April 25, 2006 4:44 PM
Set up your phone
During a call, select Options and one of
the following:
Loudspeaker or Handset—Activate or
deactivate the loudspeaker while in a
call.
New call—Initiate a conference call.
See “Make a conference call”, p. 10 for
information.
Save—Save a number entered during a
call.
Add to contact—Add a number entered
during a call to a contact in your list.
End all calls—Disconnect from all
active calls.
Send DTMF—Enter the numbers, and
select DTMF to send the numbers as
tones.
Contacts—View the contacts list.
Menu—View the phone menu.
■ Keyguard
With keyguard, you can lock the
keypad to prevent keys from being
pressed accidentally. Remember to
lock your phone keypad to prevent
accidental calls. If the keypad is locked,
it unlocks when you receive a call.
After the call, the lock automatically
reactivates.
When the keyguard is on, calls may be
possible to the official emergency
number programmed into your device.
When the phone slide is open:
• To unlock the keypad, select
Unlock, and press * within
2 seconds.
• To lock the keypad, select Menu,
and press * within 2 seconds.
When the phone slide is closed:
• To unlock the keypad, open the
slide or select Unlock > OK.
• To lock the keypad, select Menu,
and press * within 2 seconds.
12
Page 25

9244301_6265_2_en_in_tat.fm Page 13 Tuesday, April 25, 2006 4:44 PM
3. Text entry
Text entry
You can use two methods for entering
text and numbers: standard mode and
predictive text mode.
■ Standard mode
Standard mode is the only way to enter
text into the contacts list, and to
rename caller groups.
Text (Abc)
• Press a key once to insert the first
letter on the key, twice for the
second letter, etc. If you pause
briefly, the last letter in the display
is accepted and your phone awaits
the next entry.
• Press 0 to enter a space, thereby
accepting a completed word.
• Press 1 as many times as necessary
to scroll through a list of commonly
used characters.
• Press * to display a complete list of
special characters.
• Press and hold # to open Editor
settings > Number mode,
Dictionary on or Dictionary off,
or Writing language.
Numbers (123)
To switch to 1 23 mod e from Abc m od e,
press and hold # at any message entry
screen to bring up the Editor settings
menu list of Number mode, Dictionary
on or Dictionary off, and Writing
language. Select Number mode,
and the device returns to the message
entry screen and switches the ABC icon
in the upper left corner of the display
to the 123 icon (or back). To return to
Abc mode, press and hold #.
Change language
To change the language, do the
following:
1. Press and hold #.
2. At the Editor settings menu list,
select Writing language, and the
new language.
The phone will return to the message
entry screen, and you can compose in
the new language.
13
Page 26

9244301_6265_2_en_in_tat.fm Page 14 Tuesday, April 25, 2006 4:44 PM
Text entry
Punctuation and special
characters
While at any text entry screen, press *
to display special characters (press and
hold * if predictive text is on). Press *
again to cycle through all available
characters. Scroll to navigate through
the list of special characters. Once a
character is highlighted, select Use to
insert the character into your message.
■ Predictive text mode
Predictive text input allows you to
write messages quickly using your
keypad and the built-in dictionary. It is
much faster than the standard mode
method, because for each letter, you
only press the corresponding key on
your keypad once.
Activate and deactivate
At any text entry screen, select and
hold Options to turn predictive text on
or off depending on previous mode; or,
select Options > Dictionary on or
Dictionary off. Press # twice to change
from predictive text mode to standard
mode and back.
Enter text
The illustration below simulates your
display each time a key is pressed.
For example, to write Nokia with
predictive text on and with the English
dictionary selected, press each of the
following keys once:
66542
• Press 0 to enter a space and begin
writing the next word.
• If a displayed word is not correct,
press * to see other matches.
To return to the previous word in
the list of matches, select Previous.
• If ? appears after a word, it is not in
the dictionary. Select Spell to add
the word to the dictionary.
• Press 1 to insert a period into your
message.
• Press and hold * to display special
characters. Press * again to cycle
through all available characters.
• Press and hold the specific number
key to enter a number.
• Press and hold # to bring up the
Editor settings menu list of Number
mode, Dictionary on or Dictionary
off, and Writing language.
14
Page 27

9244301_6265_2_en_in_tat.fm Page 15 Tuesday, April 25, 2006 4:44 PM
■ Change case and
mode
Press # to switch between uppercase,
lowercase, and sentence case, as well
as standard and predictive text modes.
Case and mode are indicated by the
following icons that appear in the
upper left of the display screen.
Uppercase text: standard
mode is on.
Lowercase text: standard
mode is on.
Sentence case text: standard
mode is on. Only available at the
beginning of a sentence.
Uppercase text: predictive
text is on.
Lowercase text: predictive
text is on.
Sentence case text:
predictive text is on. Only available at
the beginning of a sentence.
Text entry
■ Delete text
To delete text, use one of the following
options:
• Select Clear to backspace the
cursor and delete a character.
• Select and hold Clear to backspace
continuously and delete
characters.
15
Page 28

9244301_6265_2_en_in_tat.fm Page 16 Tuesday, April 25, 2006 4:44 PM
Messaging
4. Messaging
Your phone is capable of creating and
receiving text, multimedia, voice and
minibrowser messages. Check with
your service provider to see what
messaging is available for you.
■ Text messages
Text messaging is a network service.
See "Network services", p. ix for more
information. If your wireless service
provider or network operator supports
this feature, you can send and receive
text messages to compatible phones
that are also subscribed to the service.
When composing text messages,
check the number of characters
allowed in the top right corner of the
message. Using special (unicode)
characters takes up more space.
If there are special characters in your
message, the indicator may not show
the message length correctly.
Before the message is sent, the phone
will tell you if the message exceeds the
maximum length allowed for one
message. Also, you can make
distribution lists that contain phone
numbers and names from your contact
list. See “Distribution lists”, p. 29 for
more information.
Note: When sending
messages, your device may
display Message sent. This is
an indication that the message
has been sent by your device
to the message centre number
programmed into your device.
This is not an indication that
the message has been received
at the intended destination.
For more details about
messaging services, check with
your service provider.
Text message folders
and options
In standby mode, select Menu >
Messaging > Text messages and from
the following:
Create message—Create and send
messages.
Inbox—Check for received text
messages. Text messages are
automatically stored in the Inbox when
they are received. A notification
appears when a message arrives in the
Inbox.
Outbox—Check for outgoing text
messages. Text messages are
automatically stored in the Outbox as
they are sent. If your service is
16
Page 29

9244301_6265_2_en_in_tat.fm Page 17 Tuesday, April 25, 2006 4:44 PM
Messaging
interrupted while sending, the text
message is stored in the Outbox until
another delivery attempt is made.
Sent items—Sent text messages are
stored in Sent items.
Drafts—Save incomplete text messages
in a draft. Store drafts of text messages
in Drafts to be completed at a later
time.
Saved text messages—Save text
messages in Saved text messages.
Templates—Select from a collection of
prewritten Templates, when creating
text messages. Preloaded Templates
can be edited and personalised.
My folders—Create and name personal
folders.
Delete messages—Delete messages
from a selected folder or all folders.
Message settings—Change settings for
reading, writing, and sending text
messages.
Send numeric page—Send a numeric
page.
Write and send text
messages
1. In standby mode, select Menu >
Messaging > Text messages >
Create message.
To go quickly to the Create
message screen, scroll left in
standby mode.
2. Compose a text message using the
keypad. See “Choose a text
message option”, p. 18 for
composing options.
3. Select Send to > Recently used,
Send to number, Send to e-mail,
Send to many, or Send to
distribution list (if you have created
one).
4. Select a number or distribution list,
enter the recipient’s phone number
or e-mail address, or select Search
to retrieve a number or e-mail
address from your contacts list;
select Send.
17
Page 30

9244301_6265_2_en_in_tat.fm Page 18 Tuesday, April 25, 2006 4:44 PM
Messaging
Use a template
Templates are short, prewritten
messages that can be retrieved and
inserted into new text messages.
1. In standby mode, select Menu >
Messaging > Text messages >
Create message > Options > Use
template.
2. Select one of the available
templates and complete the text
message using the keypad.
Read and reply to text
messages
When you receive a text message,
a notification appears and the
unopened letter icon ( ) is
displayed.
1. Select Show to read the text
message or Exit to dismiss the
notification.
Scroll to view the whole message,
if necessary.
When unopened messages are in
your inbox, is shown in the
upper left corner during standby
mode as a reminder.
2. Select Reply > Empty screen,
Original text, Template, or one of
the predefined answers provided.
3. Compose your reply with the
keypad, and select Send.
Choose a text
message option
Create message options
When you create or reply to a text
message, depending on the mode of
text input you are using and the
features supported by your wireless
service provider or network operator,
some or all of the following are
available:
Sending options—Mark or Unmark a
message as Urgent, Read receipt,
Callback number, or Signature.
Clear text—Erases all text from your
message.
Insert contact—Insert detail from your
contacts list into your message.
Insert number—Insert a phone number
or find a phone number in the contacts
list.
Save message—Save the message in
Drafts.
Exit editor—Exits the message editor.
Use template—Insert a predefined
template.
Insert smiley—Insert a smiley.
Insert word or Edit word—Enter or edit
the text of a new word that might not
appear in the predictive text
dictionary. This displays only when
predictive text is on.
18
Page 31

9244301_6265_2_en_in_tat.fm Page 19 Tuesday, April 25, 2006 4:44 PM
Messaging
Insert symbol—Insert a special
character. This displays only when
predictive text is on.
Writing language—Choose the
language you want to use.
Dictionary on or Dictionary off—Turn
predictive text on or off.
Matches—View matches found in the
predictive text dictionary for the word
you want to use. This displays only
when predictive text is on.
Read message options
When you read a text message,
the following options are available:
Delete—Discard the text message.
Message details—View the details of
the text message.
Use detail > Number, E-mail address,
or Web address—Select Save to create
a new contact; select Options > Add to
contact, Send message, or Call for
other options.
Save—Save the message to Saved text
messages, Templates, or a folder you
have created.
Divert—Forward the text message to
another phone number.
Lock or Unlock—Lock or unlock the text
message. The appropriate option
appears.
Rename—Edit the title of the text
message.
Use custom folders
Your phone has a folder system that
saves and stores text messages.
Additionally you can create custom
folders.
Create a custom folder
To organise your messages, create
custom folders, and save messages you
want to keep there.
1. In standby mode, select Menu >
Messaging > Text messages >
My folders > Add fldr. to create
your initial custom folder.
Select Menu > Messaging > Text
messages > My folders > Options >
Add folder to create an additional
custom folder.
2. Enter a name for the new folder,
and select OK.
Rename a custom folder
1. In standby mode, select Menu >
Messaging > Text messages >
My folders.
2. Folders you have created appear in
the display. Scroll to the folder you
wish to rename, and select
Options > Rename folder.
3. Select and hold Clear to delete the
existing entry; enter a new name
for the folder; select OK to confirm
or Back to exit.
19
Page 32

9244301_6265_2_en_in_tat.fm Page 20 Tuesday, April 25, 2006 4:44 PM
Messaging
Delete a custom folder
Only folders in My folders can be
deleted. The Inbox, Outbox, Sent items,
Drafts, Saved text messages,
and Templa tes folders are protected.
When you delete a folder, all messages
in the folder are also deleted.
1. In standby mode, select Menu >
Messaging > Text messages >
My folders.
2. Scroll to the folder you wish to
delete, and select Options > Delete
folder.
3. Select Yes to delete or No to exit.
Delete text messages
If your message memory is full and you
have more text messages waiting at
the network, blinks in standby
mode. You can do the following:
• Read some of the unread text
messages, and delete them.
• Delete text messages from some of
your folders.
Delete a single text message
To delete a single text message,
you need to open it first.
1. In standby mode, select Menu >
Messaging > Text messages.
2. Select the folder containing the
text message you wish to delete.
3. Select the message you wish to
delete and Options > Delete.
4. Select Yes to delete the message or
No to exit.
Delete all messages in a folder
1. In standby mode, select Menu >
Messaging > Text messages >
Delete messages and one of the
following:
All—Deletes all text messages in
the folder.
All read—Deletes only the read text
messages in the folder.
All unread—Deletes all unread text
messages in the Inbox.
2. If you select All or All read, select
Mark or Unmark to choose the
folders from which to delete text
messages. Select Options > Mark
all to choose all folders.
3. Select Done after choosing the
folders.
4. Select Yes to delete the message or
No to exit.
Text message settings
Sending options
In standby mode, select Menu >
Messaging > Text messages >
Message settings > Sending options
and the setting you wish to change:
Priority > Normal or Urgent—Select
the priority of the message.
20
Page 33

9244301_6265_2_en_in_tat.fm Page 21 Tuesday, April 25, 2006 4:44 PM
Messaging
Delivery reports—Select On to receive a
note confirming delivery of a text
message.
Send callback number—Select On to
send your default phone to the
recipient.
Signature—Select On to append a
signature to an outgoing text message.
If you have not created a signature,
select On; enter a signature, and select
OK.
Other settings
In standby mode, select Menu >
Messaging > Text messages >
Message settings > Other settings and
the setting you wish to change:
Save incoming text msgs.—Select To
UIM, phone if no mem., Phone only, or
UIM card only.
Message font size—Select the desired
font size for the display.
Message overwriting > Sent items only,
Inbox only, Sent items & Inbox, or Off—
Set your phone to automatically
replace old messages in Inbox or Sent
items when new ones arrive. When the
message memory is full, your phone
cannot send or receive any new
messages.
Save sent messages—Select Always
save or Always prompt to save sent
text messages to Sent items. Select Off
to not save messages.
Auto-playback of sounds—If you have
enhanced text messaging, select On or
Off to control sound clips.
Queue msgs. if no digital—Select On or
On prompt to store text messages in
the Outbox until they can be sent with
a digital service. Select Off to not store
messages.
■ Multimedia messages
Multimedia messaging is a network
service. See "Network services", p. ix
for more information. If your wireless
service provider or network operator
supports this feature, you can send and
receive multimedia messages to
compatible phones that are also
subscribed to the service.
A multimedia message can contain
text, sound, a picture, or a video clip.
Your phone supports multimedia
messages that are up to 600 KB. If the
maximum size is exceeded, the phone
may not be able to receive the
message.
Note: Only devices that have
compatible features can
receive and display
multimedia messages.
The appearance of a message
may vary depending on the
receiving device.
21
Page 34

9244301_6265_2_en_in_tat.fm Page 22 Tuesday, April 25, 2006 4:44 PM
Messaging
Depending upon your network,
you may receive a message that
includes an Internet address where you
can go to view the multimedia
message. Pictures are scaled to fit the
display area of the phone. Your phone
has a multimedia message viewer for
playing messages and a multimedia
inbox for storing saved messages.
Once you save the multimedia
message, you can use the image as a
screen saver or the sound as a ringing
tone.
Copyright protections may prevent
some images, ringing tones, and other
content from being copied, modified,
transferred, or forwarded.
Multimedia messaging only supports
the following formats:
• Picture: JPEG, GIF, animated GIF,
WBMP, BMP, and PNG
• Sound: MP3, eAAC+, SP-MIDI,
AMR audio, QCELP, and
monophonic ringing tones
• Video: clips in H.264 format with
QCIF image size
You cannot receive multimedia
messages if you have a call in progress,
games or other applications running,
or an active browsing session.
Because delivery of multimedia
messages can fail for a variety of
reasons, do n ot re ly so lely upon them
for essential communications.
Multimedia message folders
and options
In standby mode, select Menu >
Messaging > Multimedia msgs. and
from the following:
Create message—Create and send
multimedia messages.
Inbox—Check for received multimedia
messages. Multimedia messages are
automatically stored in the Inbox when
they are received. You receive a
notification when a message arrives in
your Inbox.
Outbox—Check for outgoing
multimedia messages. Multimedia
messages are automatically stored in
the Outbox as they are sent. If yo ur
service is interrupted while sending,
then messages are stored in the
Outbox until another delivery attempt
is made.
Sent items—Sent multimedia messages
are stored in Sent items.
Saved items—Save multimedia
messages for later use in Saved items.
Delete messages—Delete multimedia
messages from the Inbox, Outbox, Sent
items, or Saved items.
Message settings—Change the settings
for multimedia messages.
22
Page 35

9244301_6265_2_en_in_tat.fm Page 23 Tuesday, April 25, 2006 4:44 PM
Messaging
Write and send
multimedia messages
1. In standby mode, select Menu >
Messaging > Multimedia msgs. >
Create message.
2. Compose a message using the
keypad. See “Choose a multimedia
message option”, p. 24 for
composing options.
3. Select Send to > Recently used,
To phone number, To e-mail
address, Many, or Distribution lists.
4. Select a number or distribution list,
and enter the recipient’s phone
number or e-mail address; or select
Search to retrieve a number or
e-mail address from your contacts
list.
5. Select Send.
The multimedia message is moved to
the Outbox for sending.
The wireless network may limit the size
of multimedia messages. If the inserted
picture exceeds this limit, the device
may make it smaller so that it can be
sent by multimedia messaging.
It takes more time to send a
multimedia message than to send a
text message. While the multimedia
message is being sent, the animated
indicator is displayed and you
can use other functions on the phone.
If there is an interruption while the
message is being sent, the phone
automatically tries to resend it a few
times. If this fails, the message remains
in the Outbox and you can try to
manually resend it later. Check your
Outbox for unsent messages.
Note: When sending
messages, your device may
display the words Multimedia
message sent. This is an
indication that the message
has been sent by your device
to the message centre number
programmed into your device.
This is not an indication that
the message has been
received at the intended
destination. For more details
about messaging services,
check with your service
provider.
23
Page 36

9244301_6265_2_en_in_tat.fm Page 24 Tuesday, April 25, 2006 4:44 PM
Messaging
Messages that you send are saved in
Sent items if the setting Save sent
messages is set to Yes. See
“Multimedia message settings”, p. 27.
This is not an indication that the
message has been received at the
intended destination.
Read and reply to
multimedia messages
When a multimedia message is
received, appears in the display
along with the percentage display
indicating the download progress.
Once the message has been fully
downloaded, and a notification
appears in the display.
1. To view the multimedia message
immediately, select Show.
To save the message to the inbox
for later viewing, select Exit.
To view a saved message, select
Menu > Messaging > Multimedia
msgs. > Inbox and the message you
want to view.
While viewing a message, select
Play to play the entire message
2. Select Reply or Options > Reply to
all, and compose your reply.
3. Select Send.
If blinks and Multimedia memory
full. View waiting message. appears,
the memory for multimedia messages
is full. To view the waiting message,
select Show. Before you can save the
message, you need to delete some of
your old messages. See “Delete
multimedia messages”, p. 27 for more
information.
Important: Exercise caution
when opening messages.
Multimedia message objects
may contain malicious
software or otherwise be
harmful to your device or PC.
Choose a multimedia
message option
Create message options
When you create or reply to a
multimedia message, depending on the
mode of text input you are using and
the features supported by your wireless
service provider or network operator,
some or all of the following options are
available:
Album—Send message to an online
album. This is an online network
service. Check with your service
provider for more information.
Insert > Image, Sound clip, or Video
clip—Insert an image, sound clip,
or video clip file from your Gallery.
Open the desired folder, and select the
file and Options > Insert.
24
Page 37

9244301_6265_2_en_in_tat.fm Page 25 Tuesday, April 25, 2006 4:44 PM
Messaging
Copyright protections may prevent
some images, ringing tones, and other
content from being copied, modified,
transferred, or forwarded.
Insert > New image—Opens the
camera to create a new image that you
attach to the message.
Insert > New sound clip—Opens the
voice recorder to create a new sound
clip that you attach to the message.
Insert > Slide—Insert a slide into your
message. Each slide can contain text,
business card, calendar note,
one image, and one sound clip.
Insert > Business card—Insert contact
as a business card.
Insert > Calendar note—Insert a
calendar note.
Delete > Image, Sound clip, or Video
clip—Delete an image, sound clip,
or video clip file from your message.
Only appears when your message has a
file attachment.
Delete > Slide—Delete the current slide
from your message.
Edit subject—Edit the subject heading.
Clear text—Erases all text from the
current slide in your message.
Preview—Preview the message or slide
presentation before sending it.
Select Stop to end the preview.
Select Play to start the preview again
or Back to return to the list of options.
Previous slide—Move to the previous
slide. Option only appears if there is a
previous slide.
Next slide—Move to the next slide.
Option only appears if there is next
slide.
Slide list—Shows a list of all slides.
Select the slide you wish to edit.
Slide timing—Set the timing interval
for each slide. By default, each slide
appears for 12 seconds.
Place text first or Place text last—Move
text to the top or bottom of the slide.
By default, the text appears at the
bottom or last.
Save message—Saves the message to
Saved items.
More options > Insert contact—Insert a
name from your contacts list into your
message.
More options >
Insert number—Insert a
phone number or find a phone number
in the contacts list.
More options > Message details—
Shows the details of your multimedia
message.
Exit editor—Exits the message editor.
Insert smiley—Insert a smiley.
Insert word or Edit word—Enter or edit
the text of a new word that might not
appear in the predictive text
dictionary. This appears only when
predictive text is on.
25
Page 38

9244301_6265_2_en_in_tat.fm Page 26 Tuesday, April 25, 2006 4:44 PM
Messaging
Insert symbol—Insert a special
character. This appears only when
predictive text is on.
Writing language—Choose the
language you want to use.
Dictionary on or Dictionary off—Turn
predictive text on or off.
Matches—View matches found in the
predictive text dictionary for the word
you want to use. This appears only
when predictive text is on.
Read message options
When you read a multimedia message,
the following options are available:
Set contrast—Adjust the contrast of an
image. This option is only available
when viewing an image.
Details—Displays the details of a
highlighted file attachment.
Save image, Save sound clip, or Save
video clip—Save the corresponding file
to the Gallery. Images, sound clips,
and video clips must be opened before
you can save them.
Save link—Save the corresponding Web
link. This appears only when a Web link
is highlighted.
View text—View only the text included
in the message.
Open image, Open sound clip, or Open
video clip—View or listen to the
corresponding file.
Business card—Open an attached
business card.
Calendar note—Open an attached
calendar note.
Delete—Delete the message you are
viewing.
Reply or Reply to all—Enter a reply and
send it to the original sender and any
other recipients of the message.
Use detail—Use a corresponding
number or e-mail address. The number
or e-mail address must be highlighted.
Send to number, Send to e-mail, or
Send to many—Forward the message to
a phone number, to an e-mail address,
or to multiple recipients.
Forward to album—Forward the
message to an online album. This is an
online network service. Check with
your service provider for more
information.
Message details—View the sender’s
name and phone number, the message
centre used, reception date and time,
message size and type.
26
Page 39

9244301_6265_2_en_in_tat.fm Page 27 Tuesday, April 25, 2006 4:44 PM
Messaging
Delete multimedia
messages
If your message memory is full and you
have more multimedia messages
waiting at the network, blinks in
standby mode. You can do the
following:
• Read some of the unread
multimedia messages, and delete
them.
• Delete multimedia messages from
some of your folders.
Delete a single multimedia
message
To delete a single multimedia message,
you need to open it first.
1. In standby mode, select Menu >
Messaging > Multimedia msgs..
2. Select the folder containing the
multimedia message you wish to
delete.
3. Select the message you wish to
delete and Options > Delete.
4. Select Yes to delete or No to exit.
Delete all multimedia
messages in a folder
1. In standby mode, select Menu >
Messaging > Multimedia msgs. >
Delete messages > Inbox, Outbox,
Sent items, or Saved items.
2. Select Yes to delete the all
messages in the folder or No to
exit.
Multimedia message
settings
Save sent messages
You can save the multimedia messages
that you send to the Sent items folder.
In standby mode, select Menu >
Messaging > Multimedia msgs. >
Message settings > Save sent
messages > No or Yes.
Delivery reports
You can request delivery reports to
inform you if a message is delivered.
In standby mode, select Menu >
Messaging > Multimedia msgs. >
Message settings > Delivery reports >
On or Off.
Scale image down
You can request for images to be
automatically scaled down.
In standby mode, select Menu >
Messaging > Multimedia msgs. >
Message settings > Scale image
down > Yes or No.
Default slide timing
You can set the default time in mm:ss
for the slides of a multimedia message.
In standby mode, select Menu >
Messaging > Multimedia msgs. >
Message settings > Default slide
timing, enter a slide time, and select
OK.
27
Page 40

9244301_6265_2_en_in_tat.fm Page 28 Tuesday, April 25, 2006 4:44 PM
Messaging
Allow multimedia reception
Before you can use the multimedia
message feature, you must specify
whether you want to receive message
at all times or only if you are in the
service provider’s home system. This is
a network service. Check with your
service provider for more information.
The default setting of the multimedia
message service is generally on.
The appearance of a multimedia
message may vary depending on the
receiving device.
You can choose to receive all
messages, to block all messages, or to
receive messages only when you are in
the service provider’s home network.
In standby mode, select Menu >
Messaging > Multimedia msgs. >
Message settings > Allow multimedia
recept. and one of the following:
Yes—Allow all incoming messages.
In home network—Allow incoming
messages only if you are in the service
provider’s home system. This is a
network service. Check with your
service provider for more information.
No—Block all incoming messages.
Incoming multimedia
messages
You can set how your phone retrieves
incoming multimedia messages.
In standby mode, select Menu >
Messaging > Multimedia msgs. >
Message settings > Incoming multim.
msgs. and one of the following:
Retrieve—Sets the phone to
automatically retrieve all multimedia
messages. When new messages arrive,
you are notified that a multimedia
message is received. If you choose to
automatically retrieve messages,
you can select Show to read the
multimedia message or Exit to view
them in your inbox later.
Retrieve manually—Choose the
messages you wish to retrieve.
When new messages arrive, you are
notified that a multimedia message is
available for retrieval. If you select to
manually retrieve messages, select
Show to open the message
notification, then Retrieve. Select Exit
to save the notification to your inbox,
and retrieve the message later.
Reject—Sets the phone to reject
multimedia messages.
28
Page 41

9244301_6265_2_en_in_tat.fm Page 29 Tuesday, April 25, 2006 4:44 PM
Messaging
Allow or block advertisements
Allows you to block advertisements.
This setting is not available if
multimedia reception is blocked.
In standby mode, select Menu >
Messaging > Multimedia msgs. >
Message settings > Allow adverts > Yes
or No.
This is a network service. Check with
your service provider for more
information.
■ Distribution lists
Distribution lists allow you to send text
or multimedia messages to a
designated group of people.
Create distribution lists
1. In standby mode, select Menu >
Messaging > Distribution lists >
New list.
If you create a second distribution
list, select Menu > Messaging >
Distribution lists > Options >
Create new list.
2. Enter a name for the list, and select
OK.
3. To add a contact to this list,
select Add new, and add the
contacts one by one.
A distribution list only contains phone
numbers of recipients.
Add and remove contacts
To add contacts, select Menu >
Messaging > Distribution lists > the
list > Add new. Add the contacts one
by one.
To remove contacts, select Menu >
Messaging > Distribution lists > the
list > Options > remove contact name.
Manage distribution lists
1. In standby mode, select Menu >
Messaging > Distribution lists.
2. Lists you create are displayed.
Scroll to the list you wish to
modify; select Options and one of
the following:
Create new list—Create a new
distribution list.
Send message—Send message to
the distribution list.
Rename list—Rename the
distribution list.
Clear list—Clear the distribution list
of all current contacts.
Delete list—Delete the distribution
list.
29
Page 42

9244301_6265_2_en_in_tat.fm Page 30 Tuesday, April 25, 2006 4:44 PM
Messaging
■ Voice messages
If you subscribe to voice mail, your
wireless provider will furnish you with
a voice mailbox number. You need to
save this number to your phone to use
voice mail. When you receive a voice
message, your phone will beep,
displaying a message, or both. If you
receive more than one message,
your phone shows the number of
messages received.
Save voice mailbox number
Your wireless provider may have
already saved your voice mailbox
number to you r pho ne. If so,
the number will appear in the display
in step 2. Select OK to leave the
number unchanged.
1. In standby mode, select Menu >
Messaging > Voice messages >
Voice mailbox number.
2. If the number is not displayed or
incorrect, enter your voice mailbox
area code and number.
3. Select OK.
Call and set up your
voice mail
1. After you save the voice mailbox,
in standby mode, press and hold 1.
2. When you connect to voice mail
and the prerecorded greeting
begins, follow the automated
instructions to set up your voice
mail.
Listen to your voice mail
After you set up voice mail, you can
dial the number in one of four ways:
• Dial the number using the keypad.
• Press and hold 1.
• Select Listen if there is a
notification on the display.
• In standby mode, select Menu >
Messaging > Voice messages >
Listen to voice messages.
When you connect and the
prerecorded greeting begins, follow
the automated instructions to listen to
your voice messages.
Automate voice mail
Voice mail services vary by service
provider. The following instructions are
examples of common operations.
Please check with your service provider
for specific instructions for using your
voice mail service.
30
Page 43

9244301_6265_2_en_in_tat.fm Page 31 Tuesday, April 25, 2006 4:44 PM
Messaging
Write down number and
process
1. Write down your voice mailbox
number.
2. Call and check your voice mail as
you normally would.
3. Write down your interaction with
the recorded prompts step-by-step.
Note that each voice mail service
may vary. Your steps may resemble
the following:
Dial 2145551212, pause 5 seconds,
press 1, pause 2 seconds,
press 1234, and press *.
Be precise; you will need this
information in “Set up voice mail with
dialling codes”, p. 31.
Set up voice mail with
dialling codes
1. In standby mode, select Menu >
Contacts > Speed dials.
2. Scroll to an empty speed dialling
slot, and select Assign.
3. Enter your voice mailbox number,
including the area code.
4. Refer to dialling codes, and enter
any codes as necessary using the
information that you saved from
“Write down number and process”,
p. 31.
For example, if you pause for
5 seconds after connecting to voice
mail, enter p twice after the voice
mailbox number, for example,
2145551212pp. For more
information on dialling codes see
“Insert dialling codes”, p. 36.
5. Enter any remaining pauses or
other information that allows you
to listen to your messages, and
select OK.
6. Enter a name (such as voice mail),
and select OK.
To dial and listen to your voice mail,
press and hold the assigned speed
dialling key in standby mode.
■ Minibrowser
messages
Minibrowser messaging is a network
service. See "Network services", p. ix
for more information.
If your wireless service provider or
network operator supports this feature,
you can check for e-mail messages
using the minibrowser. In standby
mode, select Menu > Messaging >
Minibrowser msgs. > Connect.
See “Mobile web”, p. 92 for more
information on using your phone to
access web pages.
31
Page 44

9244301_6265_2_en_in_tat.fm Page 32 Tuesday, April 25, 2006 4:44 PM
Log
5. Log
Log stores information about the last
30 missed, 30 received, or 30 dialled
calls. It als o add s the total duration of
all calls. When the number of calls
exceed the maximum, the most recent
call replaces the oldest.
Whether viewing missed, received,
or dialled calls, the menu options are
the same:
Time of call—Display the date and time
of the call.
Send message—Send a message to the
number.
Edit number—Edit the number and
associate a name with the number.
Save—Enter a name for the number
and save it to your contacts list.
Add to contact—Add the number to an
existing name in your contacts list,
if the number is not associated with a
name.
Delete—Clear the number from
memory.
Call—Call the number.
■ View missed calls
The missed calls feature does not
function when your phone is switched
off. Missed calls are calls that were
never answered.
1. In standby mode, select Menu >
Log > Missed calls; if a missed call
notification appears, select List.
2. Scroll to a name or number, select
Options, and a menu option.
■ View received calls
Received calls are calls that have been
answered.
1. In standby mode, select Menu >
Log > Received calls.
2. Scroll to a name or number, select
Options, and a menu option.
■ View dialled numbers
Dialled calls are previous numbers you
have dialled from your phone:
1. In standby mode, press the call key;
or select Menu > Log > Dialled
numbers.
2. Scroll to a name or number,
select Options, and a menu option.
32
Page 45

9244301_6265_2_en_in_tat.fm Page 33 Tuesday, April 25, 2006 4:44 PM
Log
■ Time of call
You can make or receive up to five calls
to or from the same number and view
the time each call occurred. Your clock
must be set for this feature to work
accurately.
1. While viewing a missed, received,
or dialled call, select Options >
Time of call.
2. Scroll down to view the most
recent call times from this number.
3. Select Back to return to the options
list.
■ Clear log lists
You can delete any missed, dialled, or
received calls from phone memory.
In standby mode, select Menu > Log >
Clear log lists > All call lists, Missed
calls, Received calls, Dialled numbers,
or Message recipients.
■ Call duration
Note: The actual invoice for
calls and services from your
service provider may vary,
depending on network
features, rounding off for
billing, taxes and so forth.
You can view the duration of your
calls.
In standby mode, select Menu > Log >
Call duration and one of the following
options:
Last call duration—Check the time of
your last call.
Dialled calls' duration—Check the
combined time of calls you dialled for
either Home or Roaming.
Received calls' duration—Check the
combined time of calls you received for
either Home or Roaming.
All calls' duration—Check the
combined time of all calls.
Life timer—Check the total airtime
minutes logged on your phone.
Clear timers—Enter your lock code,
and select OK to clear all timers on
your phone.
Note: Some timers, including
the life timer, may be reset
during service or software
upgrades.
■ Duration of data or
fax calls
Data/fax calls are a network service.
See "Network services", p. ix for more
information. If your wireless service
provider or network operator supports
this feature, you can view the size or
duration of sent or received data and
fax calls.
33
Page 46

9244301_6265_2_en_in_tat.fm Page 34 Tuesday, April 25, 2006 4:44 PM
Log
Note: The actual invoice for
calls and services from your
service provider may vary,
depending on network
features, rounding off for
billing, taxes and so forth.
In standby mode, select Menu > Log >
Data/fax calls and one of the following
options:
Last sent data/fax—View the size (KB)
of the last sent data or fax call.
Last received data/fax—View the size
(KB) of the last received data or
fax call.
All sent data/fax—View the size (KB) of
all sent data and fax calls.
All received data/fax—View the size
(KB) of all received data and fax calls.
Last data/fax's duration—View the
duration time of the last data or
fax call.
All data/fax calls' duration—View the
duration time of all calls.
Clear all data/fax registers—Select
OK > Yes to clear all data and fax
registers.
■ Duration of
minibrowser calls
Minibrowser is a network service.
See "Network services", p. ix, for more
information. If your wireless service
provider or network operator supports
this feature, you can view the size or
duration of sent or received data from
the minibrowser.
Note: The actual invoice for
calls and services from your
service provider may vary,
depending on network
features, rounding off for
billing, taxes and so forth.
In standby mode, select Menu > Log >
Minibrowser calls and one of the
following options:
Last sent browser data—View the size
(KB) of the last send browser data.
Last rcvd. browser data—View the size
(KB) of the last received data.
All sent browser data—View the size
(KB) of all sent browser data.
All received browser data—View the
size (KB) of all received browser data.
Last browser session—View the
duration time of the last browser
session.
All browser sessions—View the
duration time of all browser sessions.
Clear all browser registers—Select OK >
Yes to clear all browser registers.
34
Page 47

9244301_6265_2_en_in_tat.fm Page 35 Tuesday, April 25, 2006 4:44 PM
6. Contacts
Contacts
The contacts list can hold up to 500
contacts with multiple numbers and
text notes for each contact.
The amount of numbers and text
entries that you can save may vary,
depending on length and the total
number of entries in the contacts list.
In standby mode, select Menu >
Contacts and from the following
options:
Names—List of contacts currently on
your phone.
Settings—Change your contact
settings.
Caller groups—Assign contacts to
caller groups.
Voice tags—Assign voice commands to
phone numbers.
Speed dials—Assign specific keys to
phone numbers.
My numbers—Shows the current
number assigned to the phone.
Delete all contacts—Delete all contacts
on your phone.
To quickly access your contacts scroll
up or down while in standby mode.
■ View contacts
In standby mode, select Menu >
Contacts > Names or scroll down to
see your current list of contacts.
While viewing your contact list, you
can select Details for the contact
information or Options and one of the
following:
Search—Search your contacts.
Add new contact—Add a new contact.
Delete contact—Delete the highlighted
contact.
Copy—Copy the highlighted contact to
the UIM (SIM card) from the phone
memory or vice versa.
To make a call, highlight a contact,
and select Call.
■ Search contacts
In standby mode, select Menu >
Contacts > Names > Options > Search.
Enter the first character of the contact
name, and highlight the contact you
wish to view.
Note: If the right selection key
on your phone is Names,
you can select Names >
Options > Search in standby
mode.
35
Page 48

9244301_6265_2_en_in_tat.fm Page 36 Tuesday, April 25, 2006 4:44 PM
Contacts
■ Add new contacts
Save a name and number
1. In standby mode, enter the phone
number you wish to save.
2. Select Save.
3. Enter the name, and select OK >
Done.
When you enter a number, you can
select Options > Insert pause ('p') to
insert a pause code or Options > Insert
wait ('w') to insert a wait code.
Save a number (only)
1. In standby mode, enter the phone
number you wish to save.
2. Select and hold Options.
Save a contact
1. In standby mode, select Menu >
Contacts > Names > Options >
Add new contact.
2. Enter the name, and select OK.
3. Enter the phone number, and select
OK.
Insert dialling codes
You can insert special characters called
dialling codes into phone numbers
such as voice mail, and save the
number to a speed dialling location.
Dialling codes instruct the receiving
system to pause, wait, bypass, or
accept the numbers that follow them
in the dialling string.
You can automate voice mail with
dialling codes. For more information,
see “Automate voice mail”, p. 30.
Press * repeatedly to cycle through
dialling codes. When the desired code
appears in the display, pause briefly
and the code is inserted into the
dialling string.
The following dialling codes are
available:
Dialling
code
* Bypasses a set of
+ Causes the international
p Pauses for 2.5 seconds
w Waits for you to press the
Indicates...
instructions.
access code to be replaced
by +.
before sending any
numbers that follow.
call key before sending the
numbers or codes that
follow.
36
Page 49

9244301_6265_2_en_in_tat.fm Page 37 Tuesday, April 25, 2006 4:44 PM
Contacts
Save multiple numbers
You can save different types of phone
numbers per contact. The first number
you save for any entry is automatically
set as the default, but the default
number can always be changed.
1. In standby mode, scroll down to
display your list of contacts.
2. Select the contact to which you
want to add a phone number.
3. Select Details > Options > Add
detail > Number > General,
Mobile, Home, Office, or Fax.
4. Enter the phone number, and select
OK.
If you want to change the number
type, highlight the number and select
Details > Options > Change type >
General, Mobile, Home, Office, or Fax.
Save other details
To add an address or note an existing
contact, do the following:
1. In standby mode, scroll down to
display your list of contacts.
2. Scroll to the contact to which you
want to add an address or note.
3. Select Details > Options > Add
detail > E-mail address, Web
address, Postal address, or Note.
4. Enter the text for the note or
address, and select OK.
To associate an image or tone to an
existing contact, do the following:
1. In standby mode, scroll down to
display your list of contacts.
2. Scroll to the contact to which you
want to add an address or note.
3. Select Details > Options > Add
detail > Image to save an ima ge
from the Gallery or to save a new
image with the camera function, or
Tone to select the default tone or a
new tone from the Gallery.
Change default number
To change the default number for an
existing contact.
1. In standby mode, scroll down to
display your list of contacts.
2. Select the contact for which you
want to change the default number
and Details.
3. Highlight the new default number,
and select Options > Set as default.
Send business cards
You can send a business card to a
compatible phone or other handheld
device.
1. In standby mode, scroll down to
display your list of contacts.
2. Select the contact to which you
want send as a business card and
Details.
37
Page 50

9244301_6265_2_en_in_tat.fm Page 38 Tuesday, April 25, 2006 4:44 PM
Contacts
3. Select the number to use and
Options > Send business card >
Via multimedia, Via text message,
Via infrared, or Via Bluetooth.
4. Select Default number or All
details.
5. Enter the number for your
recipient, or select Search to
retrieve a number from your
contacts; select OK.
■ Edit contacts
1. In standby mode, scroll down to
display your list of contacts.
2. Highlight a contact, select Details.
3. Highlight the name, number, detail,
or image you wish to edit and
select Options. The type of detail
you highlight determines your
selection of options. Choose one of
the following options:
View—View the phone number of
the contact.
Add det ail > Name—Add a name to
the contact. This option appears
only if the contact does not have a
name.
Add det ail > Number > General,
Mobile, Home, Office, or Fax—Add
a number to the contact.
Add detail > E-mail address, Web
address, Postal address, Note,
Image, or Tone—Add an additional
detail to the contact.
Edit name, Edit number, or Edit
detail—Edit the detail of the
contact.
Change image—Change the image
associated with the contact.
Delete contact—Delete the entire
contact entry from your contacts.
Delete—Delete the detail from this
contact.
Send message—Create and send a
text message to the contact.
Use number—Display the phone
number, ready for use.
Set as default—Make the number
the default for the contact.
Change type > General, Mobile,
Home, Office, or Fax—Change the
number type.
Add voice tag—Add a voice tag to
the contact.
Save to Gallery—Save the image to
your Gallery.
Copy number—Copy the number to
the UIM (SIM card) from the phone
memory or vice versa.
38
Page 51

9244301_6265_2_en_in_tat.fm Page 39 Tuesday, April 25, 2006 4:44 PM
Contacts
Send business card > Via infrared,
Via text message, Via Bluetooth,
or Via multimedia—Send the
contact as a business card to
another phone.
Caller groups > Select No group to
remove the contact from a caller
group or Family, VIP, Friends,
Business, or Other to add the
contact to an existing caller group.
Speed dials—Assign the contact to
your speed dialling list.
■ Modify contact
settings
In standby mode, select Menu >
Contacts > Settings and the setting
you wish to change:
Memory in use > Phone and SIM,
Phone, or SIM card—Select the default
memory location for contacts.
Contacts view—Select Normal name
list, Name and number, Large name list,
or Name and image view.
Memory status—View the amount of
phone memory used as well as the
amount of phone memory available.
■ Set up caller groups
You can add contacts to any of five
caller groups, and assign a unique
ringing tone or graphic to that group.
This enables you to identify callers
from the group by their unique ringing
tone or graphic.
Set up a caller group
1. In standby mode, scroll down to
display your list of contacts.
2. Highlight a contact, select Details.
3. Highlight a number, select
Options > Caller groups and the
select the caller group you wish to
add the number to.
Modify a caller group
In standby mode, select Menu >
Contacts > Caller groups > Family, VIP,
Friends, Business, or Other and one of
the following options:
Group name—Rename the group to
your preference.
Group ringing tone—Set the ringing
tone for the group.
Group logo—Turn the graphic for the
caller group on or off.
Group members—Add or remove
members from the caller group.
39
Page 52

9244301_6265_2_en_in_tat.fm Page 40 Tuesday, April 25, 2006 4:44 PM
Contacts
■ Set up voice tags
Before using voice tags, note the
following:
• Voice tags are not languagedependent. They are dependent on
the speaker's voice.
• You must say the name exactly as
you said it when you recorded it.
• Voice tags are sensitive to
background noise. Record voice
tags, and use them in a quiet
environment.
• Very short names are not accepted.
Use long names, and avoid similar
names for different numbers.
Note: Using voice tags may be
difficult in a noisy
environment or during an
emergency, so you should not
rely solely upon voice dialling
in all circumstances.
Assign a voice tag
To use voice dialling, you must first
assign a voice tag to a number.
1. In standby mode, scroll down to
display your list of contacts.
2. Highlight a contact, select Details.
3. Highlight the number you want to
assign a voice tag, select Options >
Add voice tag.
4. Select Start, then speak clearly into
the microphone. Do not select Quit
unless you want to cancel the
recording.
5. After you finish speaking, the
phone automatically stops
recording, saves, and replays the
voice tag.
appears next to the phone
numbers which have voice tags
assigned.
Use a voice tag
1. In standby mode, select and hold
Names.
2. When you hear several beeps and
Speak now appears, release the key.
3. Pronounce the voice tag clearly
into the microphone.
When the phone finds the voice
tag, a notification appears, and the
phone automatically dials the
number. If the phone does not
locate a number or recognise the
voice tag, No match found appears.
Play back a voice tag
1. In standby mode, select Menu >
Contacts > Voice tags.
2. Scroll to the voice tag you want to
play back, and select Playback.
40
Page 53

9244301_6265_2_en_in_tat.fm Page 41 Tuesday, April 25, 2006 4:44 PM
Contacts
Modify a voice tag
1. In standby mode, select Menu >
Contacts > Voice tags.
2. Scroll to the voice tag you want to
change, and select Change.
3. Select Start, and speak clearly into
the microphone. The phone repeats
your voice tag, and Voice tag
changed appears.
Delete a voice tag
1. In standby mode, select Menu >
Contacts > Voice tags.
2. Scroll to the voice tag you want to
delete, and select Delete.
Delete voice tag? appears.
3. Select Yes to erase the voice tag.
■ Set up speed dialling
You can associate any entry in your
contacts with a key from 2–9; to dial
those entries, press and hold the
assigned key.
Assign a key to
speed dialling
1. In standby mode, select Menu >
Contacts > Speed dials.
2. Scroll to any empty slot, and select
Assign.
3. Enter the number (including the
area code), and select OK; or select
Search to retrieve a number from
your contacts.
4. If necessary, enter the contact
name for the number, and select
OK.
If Speed dials is off, the phone displays
a prompt asking if you want to activate
Speed dials. Select Yes to activate
Speed dials.
Change speed dialling
numbers
1. In standby mode, select Menu >
Contacts > Speed dials.
2. Scroll to the Speed dials entry you
wish to change, and select
Options > Change.
3. Enter the new number, or select
Search to retrieve a number from
your contacts; select OK.
4. If necessary, enter the contact
name for the number, and select
OK to change the key assignment.
Delete speed dialling
numbers
1. In standby mode, select Menu >
Contacts > Speed dials.
2. Scroll to the Speed dials location
you wish to delete.
3. Select Options > Delete > Yes to
delete the key assignment.
41
Page 54

9244301_6265_2_en_in_tat.fm Page 42 Tuesday, April 25, 2006 4:44 PM
Contacts
■ Display phone
number
In standby mode, select Menu >
Contacts > My numbers to display your
phone number.
■ Delete contacts
Delete individual contacts
1. In standby mode, scroll down to
display your list of contacts.
2. Highlight a contact, and select
Options > Delete contact > Yes or
No.
Delete all contacts
1. In standby mode, select Menu >
Contacts > Delete all contacts >
Yes.
2. Enter your lock code, and press OK.
See “Security level”, p. 75 for more
information.
42
Page 55

9244301_6265_2_en_in_tat.fm Page 43 Tuesday, April 25, 2006 4:44 PM
7. Camera
Camera
You can take photos and record video
clips with the built-in camera and
adjust its settings. The camera lens is
on the back of the phone.
The camera produces photos in JPEG
format and video clips in H.263 (QCIF)
format. After you take a picture or
video, you can attach it to a
multimedia message, send it as a
multimedia message, save it as a
wallpaper, save it to a compatible PC
using Nokia PC Suite software, and
upload it to a Web address with the
content image uploader. When you
attach a picture to a contact,
the picture is displayed when the
contact calls you.
If there is not enough memory to take
a new photo, delete old photos or other
files in the Gallery.
This device supports an image capture
resolution of 320 x 240 pixels on the
display. The image resolutions in these
materials may appear different.
Keep a safe distance when using the
flash. Do not use the flash on people or
animals at close range. Do not cover
the flash while taking a picture.
When the phone is in camera mode,
the interface will switch from portrait
to landscape. Turn the phone on its
side to use the camera and view the
available options.
■ Take a photo
You can use your camera to take
photographs. To take a picture,
complete the following steps:
1. In standby mode, press the camera
key or select Menu > Camera.
This activates the camera. The
display is now landscape.
If you are in Video mode, select
Options > Still image to switch to
Still image mode.
43
Page 56

9244301_6265_2_en_in_tat.fm Page 44 Tuesday, April 25, 2006 4:44 PM
Camera
2. To take a
picture,
press the
camera key
or select
Capture to
take the photo. Press the volume
key displayed here or the scroll keys
to zoom in and out.
When taking a photo, a shutter
sound is heard. The phone saves the
photo in the Images folder of the
Gallery menu. The saved photo is
shown on the display.
3. Select Back to take another photo,
Delete to erase the photo, or
Options and one of the following:
Zoom—Zoom in on a captured
photo; scroll to navigate around
the photo.
New image—Returns to camera
mode.
Send > Via multimedia, Via
Bluetooth, or Via infrared—Send a
photo to a compatible phone or PC.
Attach to contact—Attach the
photo to a contact.
Rename—Edit the name of the
photo.
Open Gallery—Open the Gallery,
where photos are saved.
Set contrast—Scroll to adjust the
contrast of the photo.
Edit image—Opens the photo for
editing.
Use image > Set as wallpaper,
Set as screen saver, or Set as
contact image—Use the photo.
Details > View details of the photo.
■ Use the self-timer
You can use the camera self-timer to
delay taking a photo for approximately
10 seconds.
1. In standby mode, select Menu >
Camera > Options > Self-timer on.
2. Select Start.
A beep sounds while the self-timer
is running, and beeps faster when
the camera is about to capture the
photo. After the time-out, the
camera takes the photo and saves
it to the Images folder of the
Gallery menu.
■ Take a sequence of
photos
You can use the camera image
sequence option to take up to four
photos in quick succession.
1. In standby mode, select Menu >
Camera > Options > Img. sequence
on.
44
Page 57

9244301_6265_2_en_in_tat.fm Page 45 Tuesday, April 25, 2006 4:44 PM
Camera
2. Select Sequence.
The camera take five photos in
sequence. After the photos are
taken, the camera saves them to a
folder in the Images folder of the
Gallery menu.
■ Record a video
1. In standby mode, press the camera
key or select Menu > Camera.
This activates the camera.
The display is now landscape.
If you are in Still image mode,
select Options > Video to switch to
Video mode.
2. Select Record to begin recording
the video clip.
While you are recording, the
indicator and the remaining
recording time are shown at the
top of the display.
3. Select Pause to pause the
recording, Continue to resume the
recording, or Stop to stop the
recording.
The phone saves the video clip in
the Video clips folder of the Gallery
menu.
4. Select Back to take another video
clip, Play to play the video clip, or
Options and one of the following.
Delete—Delete the video clip from
the Gallery.
New video clip—Returns to video
mode.
Send > Via multimedia, Via
infrared, or Via Bluetooth—Send
the video clip to a compatible
phone or PC.
Rename—Edit the name of the
video clip.
Open Gallery—Opens the Gallery,
where video clips are saved.
Mute audio or Unmute audio—Turn
the video clip sound on or off.
Set contrast—Use the scroll keys to
adjust the contrast of the video
clip.
Use video clip > Set as screen
saver—Use the video clip.
Details—View details of the video
clip.
■ Camera options
In standby mode, select Menu >
Camera > Options and from the
following:
Still image or Video—Choose camera
mode to take a picture or record a
video.
Mute audio or Unmute audio—Turn the
sound on or off for the video clip.
Option only appears when camera is in
video mode.
45
Page 58

9244301_6265_2_en_in_tat.fm Page 46 Tuesday, April 25, 2006 4:44 PM
Camera
Night mode on or Night mode off—
Switches the camera night mode on
and off.
Flash on or Flash off—Turns the camera
flash on and off.
Self-timer on or Self-timer off—Turns
the self-timer on and off. This option
only appears in still image mode.
Img. sequence on or Img. sequence
off—Turns image sequencing on or off.
The pictures are then saved to the
gallery. This option only appears in still
image mode.
View previous—View the previous
photo or video taken. This option only
appears when a photo has been taken
during that session.
Open Gallery—Open the Gallery to view
saved images, videos, and recordings.
Settings—Change the settings for the
phone camera.
■ Modify camera
settings
Image quality
Define file compression when saving
the image. High-quality images have
less file compression and provide the
best image quality, but take more
memory.
In standby mode, select Menu >
Camera > Options > Settings > Image
quality > High, Normal, or Basic.
Image size
Set the size of an image when taking a
picture. A larger image has better
resolution, but takes more memory.
In standby mode, select Menu >
Camera > Options > Settings > Image
size and a resolution size.
Video clip quality
Define file compression when saving
the video clip. High-quality video clips
have less file compression and provide
the best image quality, but take more
memory.
In standby mode, select Menu >
Camera > Options > Settings > Video
clip quality > High, Medium, or Low.
Video clip length
You can change the maximum length
of a video clip. The maximum size of a
video clip can be 600 KB. A recording
will stop once it reaches the maximum
size, even if the maximum length is set
longer. Only video clips that are default
length or shorter can be sent in a
multimedia message.
In standby mode, select Menu >
Camera > Options > Settings > Video
clip length > Default or Maximum.
46
Page 59

9244301_6265_2_en_in_tat.fm Page 47 Tuesday, April 25, 2006 4:44 PM
Camera
Camera sounds
You can turn off the camera sounds
that happen when a picture is taken or
video recorded.
In standby mode, select Menu >
Camera > Options > Settings >
Camera sounds > On or Off.
Self-timer lights
You can turn off the self-timer lights
that appear when a picture is taken.
In standby mode, select Menu >
Camera > Options > Settings >
Self-timer lights > On or Off.
Default title
You can change the default title your
phone uses to assign names to new
photos and video clips.
In standby mode, select Menu >
Camera > Options > Settings >
Default title > Automatic or My title.
If you select My title, enter new text
upon which filenames the phone
creates are based on.
Image storage
You can change where your phone
camera stores files.
In standby mode, select Menu >
Camera > Options > Settings > Image
and video storage > Default folder or
Other folder. If you select Other folder,
locate the new your new location.
This setting in only available when you
are using a miniSD card.
Default mode
You can change the default mode of
your phone camera.
In standby mode, select Menu >
Camera > Options > Settings >
Default mode > Standard photo or
Video.
47
Page 60

9244301_6265_2_en_in_tat.fm Page 48 Tuesday, April 25, 2006 4:44 PM
Gallery
8. Gallery
You can save pictures, video clips,
recordings, music files, and ringing
tones to folders in the Gallery, and add
new folders to the ones already there.
You can download images and tones
using multimedia messaging, text
messaging, mobile Internet sites,
or Nokia PC Suite.
Your phone supports a digital rights
management system to protect
content that you have acquired.
A piece of content, such as a ringing
tone, can be protected and associated
with certain usage rules, for example,
the number of usage times or a certain
usage period. The rules are defined in
the content activation key that can be
delivered with the content or
separately, depending on the service
provider. You may be able to update
these activation keys. Always check
the delivery terms of any content and
activation key before acquiring them,
as they may be subject to a fee.
Copyright protection may prevent
some images, ringing tones, and other
content from being copied, modified,
transferred, or forwarded.
Your phone has about 20 MB of
memory for storing files in the Gallery.
This memory is not shared with other
functions, such as contacts. If the
phone displays a message that the
memory is full, delete some existing
files before proceeding. You can also
use a compatible miniSD cards to add
memory.
Warning: Use only
compatible miniSD cards with
this device. Other memory
cards, such as multimedia
cards, do not fit in the miniSD
card slot and are not
compatible with this device.
Using an incompatible
memory card may damage
the memory card as well as
the device, and data stored on
the incompatible card may be
corrupted.
■ Open a folder
In standby mode, select Menu >
Gallery to view the folder system.
The phone folder system includes:
Memory card—If there is a miniSD card
in the phone, the miniSD name is
displayed below the signal strength
indicator. You can access your miniSD
card folder system.
Images—By default, camera photos are
saved to this folder.
48
Page 61

9244301_6265_2_en_in_tat.fm Page 49 Tuesday, April 25, 2006 4:44 PM
Gallery
Video clips—By default, camera video
clips are saved to this folder.
Music files—By default, music files are
saved to this folder.
Themes—A set of themes included with
your phone are stored here.
Graphics—A set of graphics included
with your phone are stored here.
Tones—A set of ring tones included
with your phone are stored here.
Recordings—By default, voice
recordings are saved to this folder.
Received files—Files sent directly to
your phone are stored here.
Your folders—Folders you create
appear after the preset folders.
To open a folder, highlight the folder
and select Open. Once you open the
folder list and highlight a file, you can
access the file or the options
associated with that specific file type.
■ Gallery options
In standby mode, select Menu >
Gallery > Options and one of the
following:
Set password—Create a password (1–8
characters) for the miniSD card, to
protect it against unauthorised use.
This option is available only for the
miniSD card folder.
Change password—Change the miniSD
card password that you have created.
This option is available only for the
miniSD card folder and if you have
created a password.
Delete password—Delete the miniSD
card password that you have created.
This option is available only for the
miniSD card folder.
Rename memory card—Enter a name
for the miniSD card. This option is
available only for the miniSD card
folder.
Format memory card—Delete all files
and folders stored on the miniSD card.
This option is available only for the
miniSD card folder.
Delete folder—Delete a folder you have
created. You cannot delete a preset
folder.
Move—Move the selected folder into
another folder. After selecting Move,
highlight another folder, and select
Move to. You cannot move a preset
folder.
Rename folder—Rename a folder you
have created. You cannot rename a
preset folder.
Details—Show the name, size, and date
of creation of the selected folder.
Type of view—Choose whether to view
the folders as a list with details, list
only or a grid.
Sort—Sort the contents of the selected
folder by name, date, format, or size.
49
Page 62

9244301_6265_2_en_in_tat.fm Page 50 Tuesday, April 25, 2006 4:44 PM
Gallery
Add fol der—Create a new folder.
Memory status—Check the available
memory for the phone handset or the
miniSD card.
Activation key list—View the list of
available activation keys. You can
delete activation keys if desired.
Mark or Mark all—Allows you to mark
Gallery folders to be moved into
another folder. This function only
applies to folders you have created.
Other options appear depending on the
type of files that exist in the folders.
50
Page 63

9244301_6265_2_en_in_tat.fm Page 51 Tuesday, April 25, 2006 4:44 PM
9. Media
Media
■ Media player
With Media player you can download,
view, and play compatible images,
audio and video files, and animated
images from a variety of sources.
Media player plays streaming videos
and streaming audio from a network
server. Streaming functionality is a
network service and requires network
support. Check the availability of these
services, pricing, and tariffs with your
network operator or the service
provider whose service you wish to use.
Service providers will also give you
instructions on how to use their
services.
In standby mode, select Menu >
Media > Media player and one of the
following:
Online media—Connects to the
operator’s network. This is a network
service. Check with your service
provider for pricing and information.
Open Gallery—Open the Gallery.
From the Gallery, you can play stored
audio and video files. See “Gallery”,
p. 48.
Go to address—Enter the address of a
mobile Internet service, and select OK.
FF/Rew interval—Choose the interval at
which a video clip will fast forward or
rewind.
■ Music player
Your phone includes a Music player for
listening to music or other tracks in
MP3 or AAC format. You can transfer
files from a PC to your phone using a
USB data cable, an infrared, or a
Bluetooth wireless technology
connection. To transfer music tracks
from a compatible PC and manage the
music tracks and track lists, see the
instructions for the Nokia Audio
Manager application in the Nokia PC
Suite online help. See “Data cable
transfer”, p. 71; “Infrared
connectivity”, p. 71; and “Bluetooth
connectivity”, p. 68 for more
information on transferring music
tracks to your phone.
Music files stored in the Music files
folder of the Gallery are automatically
detected and added to the default
playlist. Music files stored elsewhere,
such as in a miniSD card folder, must
be defined in a track list before you can
listen to them.
51
Page 64

9244301_6265_2_en_in_tat.fm Page 52 Tuesday, April 25, 2006 4:44 PM
Media
You can listen to the sound files
through a compatible headset or the
phone loudspeaker.
You can make or answer a call while
using Music player. During a call, the
playback is paused. When the call ends,
Music player restarts where it left off.
Play music tracks
In standby mode, select Menu >
Media > Music player. If there are no
music files in the Music files folder, you
can select another folder before
entering the Music player. The details
of the first track on the default track
list are shown.
To use the graphical keys, , ,
, or , on the display, scroll left
or right to the desired key, and select it.
Play track—To play a track, select .
Adjust volume—To adjust the volume
level, use either the volume key or the
left and right selection keys.
Stop track—To stop the playing, select
or press and hold the end key.
Skip tracks—To skip to the beginning
of the next track, select . To skip to
the beginning of the previous track,
select twice.
Rewind or fast forward—To rewind the
current track, select and hold .
To fast forward the current track,
select and hold . Release the key at
the position you want.
Warning: Listen to music at a
moderate level. Continuous
exposure to high volume may
damage your hearing.
Music player options
Select Music files or other music folder
and Options and one of the following:
Play via Bluetooth—Make a connection
to an audio enhancement using
Bluetooth connectivity.
Track list—View all the tracks available
on a track list. To play a track, highlight
the track, and select Play.
Select Options > Send to send the
music file. Select Options > Refresh all
tracks to refresh the track list
(for example, after adding new tracks
to the list). Select Options > Change
track list to change the track list that is
52
Page 65

9244301_6265_2_en_in_tat.fm Page 53 Tuesday, April 25, 2006 4:44 PM
Media
shown when you open the Music
player menu, if several track lists are
available in the phone.
Play options—Select Random to play
the tracks on the track list in random
order. Select Repeat to play the current
track or the entire track list repeatedly.
Media equaliser—The equaliser
enhances the sound quality when
using a headset (only) with the Music
player by amplifying or attenuating
frequency bands. There are five preset
equaliser settings (Normal, Pop, Rock,
Jazz, and Classical) and two
customisable settings.
Headset or Loudspeaker—With the
headset attached you can toggle
between listening to the Music player
through a headset or the loudspeaker.
When using a compatible headset, you
can skip to the next track by pressing
the headset key quickly. To stop the
playing, press and hold the headset
key.
Warning: When using the
stereo headset your ability to
hear outside sounds may be
affected. Do not use the
stereo headset where it can
endanger your safety.
Send > Via multimedia, Via infrared, or
Via Bluetooth—Send music files to a
compatible device.
Memory status—View used and free
memory of Handset and Memory card.
■ Radio
Your phone has an FM radio that also
functions as an alarm clock radio.
You can listen to the FM radio on your
phone through the hands-free speaker
enhancement or with a headset.
For FM stereo, connect a compatible
music stand or stereo headset to the
connector on the bottom of the phone
or connect a 2.5 mm headset to the
headset port on the side of the phone.
The FM radio depends on an antenna
other than the wireless device
antenna. A compatible headset or
enhancement needs to be attached to
the device for the FM radio to function
properly.
The quality of a radio broadcast
depends on coverage of the radio
station in that particular area.
Warning: Listen to music at a
moderate level. Continuous
exposure to high volume may
damage your hearing.
Play radio
In standby mode, with an
enhancement or headset connected,
select Menu > Media > Radio.
The Radio turns on and plays the last
radio frequency you used.
53
Page 66

9244301_6265_2_en_in_tat.fm Page 54 Tuesday, April 25, 2006 4:44 PM
Media
To use the graphical keys, , ,
, or , on the display, scroll left
or right to the desired key, and select it.
Channel search—To start a channel
search, select and hold or .
To change the radio frequency in 0.1
MHz steps, briefly press or .
Switch off—Press and hold the end key
to turn off the radio.
Adjust volume—To adjust the volume
level, use the volume key.
Save channel—To save the channel to
a memory location 1 to 9, press and
hold the corresponding number key. To
save a channel to a memory location
10 to 20, briefly press 1 or 2, then press
and hold desired number. Enter the
name of the channel, select OK.
Select channel—To select to a channel,
select or . To go directly to a
saved channel, briefly press the
corresponding number keys.
When an application using a browser
connection is sending or receiving
data, it may interfere with the radio.
When you place or receive a call,
the radio automatically mutes.
Once the call is ended, the radio
switches back on.
Radio options
In standby mode, select Menu >
Media > Radio. The radio turns on.
Select Options and one of the
following:
Switch off—Turns off the radio.
Save station—Enter a name for the
channel, and select OK. Select one of
20 locations to save the channel
location.
Stations—Select from list of current
saved channels on your phone.
Use Options > Delete station to clear
channels or Options > Rename to
rename channels.
Mono output or Stereo output—Listen
to the radio in monaural mode or in
stereo (default). Stereo output is
available through a stereo
enhancement.
Headset or Loudspeaker—With the
headset attached, listen to the radio
through a headset or the loudspeaker.
54
Page 67

9244301_6265_2_en_in_tat.fm Page 55 Tuesday, April 25, 2006 4:44 PM
Media
Set frequency—Manually enter the
frequency of a known radio station,
and select OK. You can also press * to
set a frequency.
■ Voice recorder
Voice recorder allows you to make a
short (up to 3 minutes) recording and
save it to the Recordings folder or
another folder in the Gallery.
The recorder cannot be used when a
data call is active.
Record speech or sound
1. In standby mode, select Menu >
Media > Voice recorder.
2. To start the recording, select record
virtual button.
3. Hold the phone in the normal
position near your ear, and record
your message.
4. When you are finished recording,
select stop virtual button.
The recording is given a default name
and saved to the Recordings list. The
default location of the Recordings list
is the Recordings folder in the Gallery.
After you have made a recording you
can select Play last recorded to replay
the recording and Send last recorded >
Via infrared, Via Bluetooth, or Via
multimedia to send the recording to a
compatible phone. These options are
only available during the current
recording session.
Recording list
1. In standby mode, select Menu >
Media > Voice recorder >
Recordings list.
2. Navigate through the Recordings
folder, and select a recording you
want to modify.
3. Select Open to open and play the
recording or Options to use the
Gallery options.
Change the storage folder
You can select a folder other than
Recordings as the default folder to
store your voice recordings.
1. In standby mode, select Menu >
Media > Voice recorder > Select
memory.
2. Highlight the new location,
and select Set.
■ Equaliser
The equaliser enhances the sound
quality when using Music player by
amplifying or attenuating frequency
bands. There are five preset equaliser
settings (Normal, Pop, Rock, Jazz,
and Classical) and two customisable
settings.
55
Page 68

9244301_6265_2_en_in_tat.fm Page 56 Tuesday, April 25, 2006 4:44 PM
Media
Activate an equaliser set
In standby mode, select Menu >
Media > Equaliser, and highlight the
desired equaliser setting, and select
Activate. Select Options > View to
display the equaliser settings.
Create a custom
equaliser set
1. In standby mode, select Menu >
Media > Equaliser.
2. Highlight a customisable setting,
and select Options > Edit.
The selected set appears in the
display with the bar on the far left
highlighted. The bars adjust
frequencies, from the lowest
(the far left bar) to the highest
(the far right bar). The higher the
indicator on a particular bar, the
more that frequency is amplified.
3. To adjust the lowest frequency,
scroll up and down to move the
indicator on the bar.
4. To adjust other frequencies, scroll
right and left to move to the other
bars.
5. Repeat steps 3 and 4 to adjust the
setting for each frequency.
6. When you are finished, select Save.
7. To rename the setting, select
Options > Rename, enter a new
name, and select OK.
8. To activate the setting, select
Activate.
56
Page 69

9244301_6265_2_en_in_tat.fm Page 57 Tuesday, April 25, 2006 4:44 PM
10. Settings
Settings
Use the Settings menu to change
profiles, display settings, themes,
tone settings, time and date settings,
call settings, phone settings, voice
commands, connectivity,
enhancements, security settings,
application settings, network settings,
network services, restore factory
settings, and view phone details.
■ Profiles
Profiles define how your phone reacts
when you receive a call or message,
how your keypad sounds when you
press a key, and more. Ringing options,
keypad tones, and other settings for
each of the available profiles can be
left at their default setting,
or personalised to suit your needs.
The following profiles are available:
General, Silent, Meeting, Outdoor,
and two customisable profiles.
Profiles are also available for
enhancements such as a headset and
car kit. See “Enhancement settings”,
p. 73.
Activate a profile
In standby mode, select Menu >
Settings > Profiles > General, Silent,
Meeting, Outdoor, or custom profile >
Activate.
Personalise a profile
To modify a profile, do the following:
In standby mode, select Menu >
Settings > Profiles > General, Silent,
Meeting, Outdoor, Pager, or custom
profile > Personalise > and a profile
option. You cannot rename the
General profile. To personalise profile
tones, see “Tones”, p. 59.
Set a timed profile
Timed profiles can be used to prevent
missed calls. For example, suppose you
attend an event that requires your
phone be set to Silent before the event
starts, but you forget to return it to
General until long after the event.
A timed profile can prevent missed
calls by returning your phone to the
default profile at a time you specify.
57
Page 70

9244301_6265_2_en_in_tat.fm Page 58 Tuesday, April 25, 2006 4:44 PM
Settings
To set a timed profile, do the following:
1. In standby mode, select Menu >
Settings > Profiles > General,
Silent, Meeting, Outdoor, or
custom profile > Timed.
2. Enter the time for the profile to
expire, and select OK.
Timed profiles can be set up to 24
hours in advance.
■ Display
Standby mode settings
Wallpaper
You can set either an Image or a folder
of images (Slide set) as wallpaper for
the phone display.
In standby mode, select Menu >
Settings > Display > Standby mode
settings > Wallpaper and one of the
following:
On—Active wallpaper on your phone.
Off—Deactivate wallpaper on your
phone.
Image—Choose an image from the
Gallery for wallpaper. Select Open to
browse the Graphics folder. Select the
image of your choice for the wallpaper.
Slide set—Select a folder in your
Gallery to act as a slide show for the
wallpaper.
Font colour
You can set font colour of your phone
when in standby mode.
1. In standby mode, select Menu >
Settings > Display > Standby mode
settings > Standby font colour.
2. Scroll to select a colour from the
colour grid.
Banner
Banner is a network service.
See "Network services", p. ix for more
information.
If your wireless service provider or
network operator supports this feature,
you can choose whether the display
shows the operator logo or a custom
banner, when the phone is in standby
mode.
In standby mode, select Menu >
Settings > Display > Banner > Default
or Personalise.
Screen saver
You can choose a screen saver for the
phone display. In standby mode,
select Menu > Settings > Display >
Screen saver and one of the following:
On—Active screen saver on your phone.
Off—Deactivate screen saver on your
phone.
58
Page 71

9244301_6265_2_en_in_tat.fm Page 59 Tuesday, April 25, 2006 4:44 PM
Settings
Screen savers > Image, Slide set, Video
clip, Digital clock, or Open Camera—
Choose an image, video clip or other
option to act as your screen saver.
Time-out > Modify the idle time before
the screen saver activates.
Note: Power saver is
automatically activated
following screen saver timeout to optimise battery life.
Sleep mode
Sleep mode is a power-saving feature
that turns the phone display off during
inactivity. You can activate the sleep
mode feature on your phone. In
standby mode, select Menu >
Settings > Display settings > Sleep
mode > On or Off.
When Sleep mode is activated the
display is completely blank. A blinking
LED indicator shows that the phone is
still on.
Backlight time-out
You can control the time-out of the
backlight on your phone.
In standby mode, select Menu >
Settings > Display > Backlight timeout > Default (15 seconds). To change
the time-out between 15 seconds and
5 minutes, select Customize.
■ Themes
Themes allows you to personalise the
ringtone, screensaver and background
on your phone.
In standby mode, select Menu >
Settings > Themes > Select theme and
a theme of your choice.
■ Tones
You can adjust the ringing volume,
keypad tones, and more for the active
profile.
In standby mode, select Menu >
Settings > Tones and one of the
following:
Incoming call alert—Select how your
phone will alert you when there is an
incoming call: Ringing, Ascending,
Ring once, Beep once, Off.
Ringing tone—Select Open Gallery >
Tones to select the ringing tone for
incoming calls.
Ringing volume—Use the left and right
scroll keys to set the volume of your
ringing tone.
Vibrating alert—Activate the vibrating
call alert. Select On to activate the
vibrating alert.
Message alert tone—Select the alert
tone for incoming messages: Off,
Standard, Special, Beep once,
Ascending, Ringing tone.
59
Page 72

9244301_6265_2_en_in_tat.fm Page 60 Tuesday, April 25, 2006 4:44 PM
Settings
Keypad tones—Use the left and right
scroll keys to set the volume of your
keypad tones (or turn them off).
Warning tones—Turn warning and
confirmation tones on or off.
Alert for—Set the phone to alert only
when a member of a selected caller
group calls. See “Set up caller groups”,
p. 39 for more information.
■ Time and date
Clock
Show or hide the clock
In standby mode, select Menu >
Settings > Time and date > Clock >
Show clock or Hide clock.
Set the time
1. In standby mode, select Menu >
Settings > Time and date > Clock >
Set the time.
2. Enter the time (in hh:mm format),
and select OK.
3. Select am or pm (this option
displays only when 12-hour format
is in use).
Change the time zone
In standby mode, select Menu >
Settings > Time and date > Clock >
Time zone and your time zone based on
Greenwich Mean Time (GMT), plus or
minus hours in your time zone.
For example, GMT-8 is US Pacific time
in Los Angeles, CA. GMT does not
include Daylight savings time, so add
or subtract accordingly.
Change the format
In standby mode, select Menu >
Settings > Time and date > Clock >
Time format > 24-hour or 12-hour.
Date
Show or hide the date
In standby mode, select Menu >
Settings > Time and date > Date >
Show date or Hide date.
Set the date
In standby mode, select Menu >
Settings > Time and date > Date > Set
the date, enter the date, and select OK.
Change the format
1. In standby mode, select Menu >
Settings > Time and date > Date >
Date format and the format of your
choice.
2. With Date on the display,
select Date separator, and the
separator of your choice.
Set the auto-update of date
and time
Auto-update is a network service.
See "Network services", p. ix for more
information.
60
Page 73

9244301_6265_2_en_in_tat.fm Page 61 Tuesday, April 25, 2006 4:44 PM
Settings
If your wireless service provider or
network operator supports this feature,
you can allow the digital network to
set the clock, which is useful when you
are out of your home area
(for example, when you have traveled
to another network or time zone).
In standby mode, select Menu >
Settings > Time and date > Autoupdate of date/time > On, Confirm
first, or Off.
If you use the Auto-update of date/
time option while outside your digital
network, you may be prompted to
enter the time manually. Network time
will replace the time and date when
you reenter your digital network.
If your battery has been removed or
has discharged outside the digital
network, you may be prompted to
enter the time manually (once the
battery is replaced or recharged, and
you are still outside of the digital
network).
■ Call
Anykey answer
When Anykey answer is on, briefly
press any key except the right selection
or end key to answer a call.
In standby mode, select Menu >
Settings > Call > Anykey answer > On
or Off.
Automatic redial
Occasionally, your network may
experience heavy traffic, resulting in a
fast busy signal when you dial.
With automatic redial activated, your
phone redials the number, and notifies
you once the network is available.
In standby mode, select Menu >
Settings > Call > Automatic redial >
On or Off.
Speed dialling
To activate or deactivate Speed
dialling, do the following:
In standby mode, select Menu >
Settings > Call > Speed dialling > On
or Off. For more information on Speed
dialling, see “Set up speed dialling”,
p. 41.
Answer when slide opened
Set your phone to answer a call when
you open the slide. If the setting is off,
you must press the call key after you
open the slide.
In standby mode, select Menu >
Settings > Call > Answ. when slide
opened > On or Off.
End call when slide closed
Set your phone to end a call when you
close the slide. If the setting is off,
you must press the end key after you
close the slide.
61
Page 74

9244301_6265_2_en_in_tat.fm Page 62 Tuesday, April 25, 2006 4:44 PM
Settings
In standby mode, select Menu >
Settings > Call > End call when slide
closed > On or Off.
Automatic update of service
If supported by your wireless service
provider or network operator, this
feature allows you to set your phone to
automatically receive updates from
your network that may improve service
and coverage.
In standby mode, select Menu >
Settings > Call > Automatic service
update > On or Off.
Calling card
If you use a calling card for long
distance calls, you can save the calling
card numbers in your phone. Your
phone can store up to four calling
cards.
Save information
1. In standby mode, select Menu >
Settings > Call > Calling card.
2. Enter your security code or lock
code, and select OK. See “Security
level”, p. 75.
3. Scroll to one of the four memory
locations, and select Options >
Edit > OK > Dialling sequence.
4. Select one of the following
sequence types:
Access + phone + card—Dial the
access number, the phone number,
the card number and PIN, if
required.
Access + card + phone—Dial the
access number, the card number
and PIN, if required, then phone
number.
Prefix+ phone + card—Dial the
prefix (numbers that must precede
the phone number) and phone
number you want to dial, then card
number and PIN, if required.
5. Enter the required information
(access number or prefix and card
number), and select OK to confirm
your entries.
6. Select Card name.
7. Enter the card name, and select OK.
Contact your calling card company for
more information.
Make calls
After you have saved your calling card
information in your phone, you can
make a call using your calling card.
1. In standby mode, select Menu >
Settings > Call > Calling card.
2. Enter your security code, and select
OK.
3. Scroll to the calling card of your
choice, and select OK.
62
Page 75

9244301_6265_2_en_in_tat.fm Page 63 Tuesday, April 25, 2006 4:44 PM
Settings
4. Press the end key to return to
standby mode; then enter the
phone number, including any prefix
(such as 0 or 1) that your calling
card may require when you make a
calling card call. See your calling
card for instructions.
5. Press and hold the call key for a few
seconds until Card call is displayed.
6. When you hear the tone or system
message, select OK.
Abbreviated dialling
If supported by your wireless service
provider or network operator, you can
create 4-5 digit numbers sequences for
your contacts when Abbreviated
dialling is activated.
In standby mode, select Menu >
Settings > Call > Abbreviated
dialling > On or Off.
International prefix
If supported by your service provider,
you can store an international prefix
into your phone. When you enter + at
the beginning of a phone number, your
phone automatically inserts the
international prefix that you have
stored.
1. In standby mode, select Menu >
Settings > Call > International
prefix.
2. Enter the international prefix
(for example, 0011), and select OK.
3. In standby mode, enter + and the
phone number you want to call.
For example, +3546789.
The phone dials the international
prefix you have stored in your
phone and the phone number you
have entered. For example, the
phone dials 0011354789.
Data and fax calls
Receive data or fax calls
Data/fax calls is a network service.
See "Network services", p. ix for more
information.
If your wireless service provider or
network operator supports this feature,
you can set up the phone to send or
receive data or fax calls when a
terminal, such as a PDA or PC,
is connected.
For better performance during data
calls, place the phone on a stationary
surface. Do not move the phone by
holding it in your hand during a data
call.
For more information on connectivity,
refer to the PC/PDA Connectivity
Guide. The PC/PDA Connectivity Guide
can be downloaded from the Nokia
website at www.nokia-asia.com.
63
Page 76

9244301_6265_2_en_in_tat.fm Page 64 Tuesday, April 25, 2006 4:44 PM
Settings
1. In standby mode, select Menu >
Settings > Call > Data/fax calls >
Incoming data/fax call and one of
the following:
Normal—The phone receives
incoming calls as usual.
Data calls only—The phone receives
only data calls.
Fax calls only—The phone receives
only fax calls.
2. Select Data calls only or Fax calls
only.
3. When you are finished receiving
the fax or data call, repeat steps 1
and 2, and select Normal.
View data transfer
You can view the transmission speed
when sending or receiving data or fax
calls.
In standby mode, select Menu >
Settings > Call > Data/fax calls > Data
rate display > Graphic or Off.
Call summary
Your phone can display the time spent
on a call when you hang up.
In standby mode, select Menu >
Settings > Call > Call summary > On
or Off.
Show call time on display
Your phone can display the call time
during the phone call.
In standby mode, select Menu >
Settings > Call > Show call time on
display > On or Off.
Ringing tone for no caller ID
You can select a different ringing tone
for calls received with no caller ID.
In standby mode, select Menu >
Settings > Call > Ring. tone for no
caller ID > On or Off. See “Personalise a
profile”, p. 57 for more information on
selecting a ringing tone.
■ Phone language
Language settings
Phone language allows you set the
language of the display text seen on
the phone. In standby mode,
select Menu > Settings > Phone >
Phone language and the language of
your choice.
Automatic keyguard
Automatic keyguard allows you to
automatically lock your phone after a
defined time.
In standby mode, select Menu >
Settings > Phone > Automatic
keyguard > On or Off.
64
Page 77

9244301_6265_2_en_in_tat.fm Page 65 Tuesday, April 25, 2006 4:44 PM
Settings
Navigation key
If supported by your wireless service
provider or network operator, you can
set the features that are activated
when you press the scroll key.
1. In standby mode, select Menu >
Settings > Phone > Navigation key.
2. Highlight the scroll up, scroll down,
scroll right, or scroll left arrow;
select Change.
3. Select a function to assign to the
action.
Memory status
You can view the memory usage of
your phone or miniSD card. If you do
not have a miniSD card, you will only
see the options for your phone
memory.
Phone memory
In standby mode, select Menu >
Settings > Phone > Memory status >
Phone and one of the following
possible options.
Free memory—Shows the amount of
phone memory available for file
storage.
Contacts—Shows the amount of phone
memory currently used for Contacts.
Text messages—Shows the amount of
phone memory currently used for Text
messsages.
Gallery—Shows the amount of phone
memory currently used for Gallery.
Organiser—Shows the amount of
phone memory currently used for
Organiser.
Applications—Shows the amount of
phone memory currently used for
Applications.
Multimedia msgs.—Shows the amount
of phone memory currently used for
Multimedia messages.
Card memory
In standby mode, select Menu >
Settings > Phone > Memory status >
Card name and of the following:
Free memory—Shows the amount of
phone memory available for file
storage.
Used memory—Shows the amount of
phone memory currently used for file
storage.
Size—Shows the total amount of
phone memory you can use for file
storage.
Security keyguard
If supported by your wireless service
provider or network operator,
Automatic keyguard controls whether
the security keyguard is on or off.
In standby mode, select Menu >
Settings > Phone > Automatic
keyguard > On or Off.
65
Page 78

9244301_6265_2_en_in_tat.fm Page 66 Tuesday, April 25, 2006 4:44 PM
Settings
DTMF tones
DTMF tones are the tones that sound
when you press the keys on your phone
keypad. You can use DTMF to nes for
many automated dial-up services such
as banking and airlines or for entering
your voice mailbox number and
password.
DTMF tones are sent during an active
call. You can send them manually from
your phone keypad, or send them
automatically by saving them in your
phone.
Set type
In standby mode, select Menu >
Settings > Phone > DTMF tones >
Manual DTMF tones and one of the
following:
Continuous—The tone sounds for as
long as you press and hold a key.
Fixed—Used to send tones of the
duration you specify in the DTMF to ne
length option.
Off—Used to turn off tones. No tones
are sent when you press a key.
Set length
You can also specify DTMF tone length
when using the Fixed option.
In standby mode, select Menu >
Settings > Phone > DTMF tones >
DTMF tone length > Short
(0.1 seconds) or Long (0.5 seconds).
Start-up tone
If the Start-up tone is activated, the
tone sounds when you turn on your
phone. In standby mode, select
Menu > Settings > Phone > Start-up
tone > On or Off.
Help text activation
Your phone displays brief descriptions
for most menu items. When you arrive
at a feature or menu, pause for about
15 seconds and wait for the help text
to display. Scroll to page through the
full help text, if necessary.
The default setting for help text is on.
However, you can turn help text on or
off.
In standby mode, select Menu >
Settings > Phone > Help text
activation > On or Off.
Confirm UIM service actions
You can select whether or not to
confirm UIM card service actions.
In standby mode, select Menu >
Settings > Phone > Confirm SIM serv.
actions > Yes or No.
Gateway settings
You can select and modify your the
gateway settings for your phone.
66
Page 79

9244301_6265_2_en_in_tat.fm Page 67 Tuesday, April 25, 2006 4:44 PM
Settings
In standby mode, select Menu >
Settings > Phone > Gateway
settings > Unicom default or
Pers onal ised .
■ Voice commands
You can set up to five Voice commands,
which allow hands-free operation of
certain phone features.
Add a voice tag
Before using Voice commands, you
must first add a voice tag to the phone
function.
1. In standby mode, select Menu >
Settings > Voice commands.
2. Select a function option you wish
to tag, and select Add.
3. Select Start, and speak the voice
tag clearly into the microphone.
Do not select Quit unless you want to
cancel the recording.
The phone replays then saves the
recorded tag. appears next to the
function option for which you add a
voice tag.
Activate a voice command
After you have associated a voice
command tag with a phone function,
you can issue a command by speaking
the voice command tag.
1. In standby mode, select and hold
Names.
2. When Speak now appears,
pronounce the voice tag clearly
into the microphone.
When the phone finds the voice
command tag, Found: appears, and the
phone plays the recognised voice
command tag through the earpiece.
The function you requested is
activated.
Voice command options
You can modify voice command tags.
In standby mode, select Menu >
Settings > Voice commands, highlight
the voice command tag, and select one
of the following options:
Play—Listen to the voice command tag.
Options > Change—Change the voice
command tag.
Options > Delete—Erase the voice
command tag.
■ Connectivity
You can connect the phone to a
compatible device using an IR
connection. You can also connect the
phone to a compatible PC using IR or a
USB data cable; and use the phone as a
modem to enable connectivity from
the PC.
67
Page 80

9244301_6265_2_en_in_tat.fm Page 68 Tuesday, April 25, 2006 4:44 PM
Settings
For more information, see the Nokia PC
Suite online help. Nokia PC Suite and
all related software can be
downloaded from the U.S. Mobile
Phone products section of www.nokiaasia.com/pcsuite.
Important: Only install and
use applications and other
software from sources that
offer adequate security and
protection against harmful
software.
Bluetooth connectivity
Bluetooth technology connectivity
enables cost-free wireless connections
between electronic devices and can be
used to send and receive images, texts,
gallery files, voice recordings, video
clips, notes, business cards, and
calendar notes. It can also be used to
connect wirelessly to products that use
Bluetooth wireless technology, such as
computers. You can synchronise your
phone and your PC using Bluetooth
connectivity.
Since devices with Bluetooth
connectivity communicate using radio
waves, your phone and the other
device do not need to be in direct
line-of-sight.
The two devices only need to be within
a maximum of 30 feet (10 metres) of
each other. The connection can be
subject to interference from
obstructions such as walls or other
electronic devices.
The Bluetooth wireless technology
application whether used actively or in
the background, consumes the battery
and reduces the operating time of the
phone.
This device is compliant with
Bluetooth Specification 1.2 and
supports the following profiles:
• Object push profile (OPP)
• File transfer profile (FTP)
• Dial-up networking profile (DUN)
• Generic object exchange profile
(GOEP)
• Headset profile (HSP)
• Hands-free profile (HFP)
• Generic access profile (GAP)
• Serial port profile (SPP)
To ensure interoperability between
other devices supporting Bluetooth
technology, use Nokia approved
enhancements for this model.
Check with the manufacturers of other
devices to determine their
compatibility with this device.
There may be restrictions on using
Bluetooth technology in some
locations. Check with your local
authorities or service provider. If you
want more information on this
function, visit the Bluetooth
68
Page 81

9244301_6265_2_en_in_tat.fm Page 69 Tuesday, April 25, 2006 4:44 PM
Settings
Technology organisation website:
https://www.bluetooth.org/.
Pairing
You can set up a permanent
association (pairing) between your
phone and another device with
Bluetooth technology. Some devices
may require pairing before data
transfer can take place.
To pair with a device, you and the
owner of the other device must agree
on a pass code of 1–16 numeric
characters. The first time you try to
connect the devices, you must each
enter the same pass code. Once the
devices are paired, you will not need to
use the pass code again, so there is no
need to remember it.
Paired devices are placed in your
paired device list. You can view the list
even when Bluetooth connectivity is
not active or when the devices in the
list are not available for connection.
In standby mode, select Menu >
Settings > Connectivity > Bluetooth >
Paired devices > Options and one of
the following:
Assign short name—Give a nickname to
the selected device (visible to you
only).
Request conn. authorisation—Select
No if you want the phone to connect to
the selected device automatically or
Yes if you want the phone to ask for
your permission first.
Delete pairing—Delete the pairing to
the selected device.
Pair new device—Search for active
devices with Bluetooth technology
within range, scroll to the desired
device, and select Pair to establish
pairing with that device. Do not accept
Bluetooth connectivity from sources
you do not trust.
Bluetooth connectivity
settings
You can define how your phone is
shown to other devices with Bluetooth
connectivity.
In standby mode, select Menu >
Settings > Connectivity > Bluetooth >
Bluetooth settings and one of the
following:
My phone's visibility—Select Shown to
all to show the phone to all other
devices with Bluetooth connectivity or
Hidden to show the phone only to the
paired devices. Operating the phone in
hidden mode is a safer way to avoid
malicious software.
My phone's name—Change your phone
name that is seen by other users.
69
Page 82

9244301_6265_2_en_in_tat.fm Page 70 Tuesday, April 25, 2006 4:44 PM
Settings
Set up a connection
1. In standby mode, select Menu >
Settings > Connectivity >
Bluetooth > On. The active
Bluetooth technology connection
is indicated by at the top of the
display.
2. Select Search for audio enhanc. to
search for compatible devices with
Bluetooth connectivity. The list of
found devices appears in the
display.
3. Select the desired device. If
required, enter the Bluetooth
connectivity pass code of the
device to complete the pairing.
4. If required, enter the Bluetooth
connectivity pass code of the
device to pair with the device.
Your phone connects to the device.
You can start data transfer.
To view the device you are connected
to, select Menu > Settings >
Connectivity > Bluetooth > Active
device.
To deactivate Bluetooth connectivity,
select Menu > Settings >
Connectivity > Bluetooth > Off.
Deactivation of the Bluetooth
technology connection will not affect
other functions of the phone.
Send data
Instead of using the Connectivity
menu, you can use other phone menus
to send various types of data to other
devices with Bluetooth connectivity.
For example, you can send a video clip
from the Video clips folder of the
Gallery menu. See the appropriate
sections of the user guide for
information about sending different
types of data.
Receive a data transfer
When a Bluetooth technology
connection is active in your phone, you
can receive notes, business cards, video
clips, and other types of data transfers
from another device with Bluetooth
connectivity. When you receive a data
transfer, an alarm sounds, and a
message appears in standby mode.
To view the transferred item
immediately from standby mode,
select Show. To view the item at a later
time, select Exit.
Depending on the nature of the item,
it is saved in the appropriate menu in
your phone. For example, a business
card would be saved in Contacts, and a
calendar note would be saved in
Calendar.
70
Page 83

9244301_6265_2_en_in_tat.fm Page 71 Tuesday, April 25, 2006 4:44 PM
Settings
Infrared connectivity
You can set up the phone to receive
data through its infrared (IR) port.
To use an IR connection, transmission
and reception must be to or from an IR
compatible phone or device.
Warning: Do not point the IR
beam at anyone’s eye or allow
it to interfere with other IR
devices. This device is a
Class 1 laser product.
Send and receive data
1. Ensure that the IR ports of the
sending and receiving devices are
pointing at each other and that
there are no obstructions between
the devices.
The preferable distance between
the two devices in an IR connection
is from 3 inches to 3 feet.
2. To activate IR in you r pho ne, s elec t
Menu > Settings > Connectivity >
Infrared.
3. The user of the other device should
activate IR as well.
If data transfer is not started within
2 minutes after the activation of the IR
port, the connection is cancelled and
must be restarted.
Connection indicator
• When is shown continuously,
the IR connection is activated and
your phone is ready to send or
receive data using its IR port.
• When blinks, your phone is
trying to connect to the other
device or a connection has been
lost.
Data cable transfer
You can transfer data from your phone
to a compatible PC, or from a
compatible PC to your phone using a
CA-53 USB data cable.
Important: Disconnect the
USB data cable from the
phone to make a call.
Enable default mode
connection
Connect to your PC in Default mode to
transfer phone data and files between
your phone and PC using Nokia’s PC
Suite.
1. Connect your PC and your phone
with a CA-53 USB data cable.
A notification appears on the
display that asking which mode
you want to select.
2. Select Accept > Default mode.
A notification appears on the
display stating a connection is
active.
71
Page 84

9244301_6265_2_en_in_tat.fm Page 72 Tuesday, April 25, 2006 4:44 PM
Settings
You can now use PC Suite to connect
to your phone.
Enable data storage
connection
Connect to your PC in Data storage
mode to transfer music, photo, and
video files to the phone miniSD card,
and from the phone miniSD to your PC
with Windows Explorer.
1. Connect your PC and your phone
with a CA-53 USB data cable.
A notification appears on the
display that asking which mode
you want to select.
2. Select Accept > Data storage.
The notification Data storage mode
displays while the phone is in data
transfer mode.
3. Open Windows Explorer.
Your phone miniSD card will
appear as a local drive (named by
Nokia 6265), and with a drive letter
assigned to it.
4. Click on the folders to display a
window that shows the contents of
the folder on the phone miniSD
card.
5. Open a second instance of
Windows Explorer and display the
contents of the folder on your PC
where you have MP3 files, photo
files, or video files stored.
6. Select the files on your PC that you
wish to transfer to the phone.
7. Drag and drop the files from the
second window into the first
window and place in a folder.
8. The files are transferred to the
phone and can be played by the
Music player, or accessed by the
Media player.
If you selected a file or files that
require more memory than can fit on
the available phone memory, you will
get an error note. Deselect some of
your selected files until the required
memory is less than or equal to the
available memory on your phone.
Disable data storage
connection
1. To disable the USB data cable,
double-click the green arrow on
the task bar at the bottom of your
PC screen.
A window pops up that shows
Unplug or Eject Hardware.
2. Click on USB Device in the
Hardware devices window.
A popup window shows Stop a
Hardware device.
3. Highlight USB device, and click OK.
The popup window Safe to Remove
Hardware is shown with the
message “The ‘USB Device’ device
can now be safely removed from
the system”.
4. Click OK.
72
Page 85

9244301_6265_2_en_in_tat.fm Page 73 Tuesday, April 25, 2006 4:44 PM
Settings
Important: To ensure that all
memory card operations are
completed in a controlled
way, do not unplug the
connectivity cable until
Windows notifies you that it
is safe to do so. Uncontrolled
completion or unexpected
disruptions of the memory
card operations may cause
the memory card and the
information stored on it to
become corrupted.
A corrupted memory card
may have to be formatted
before it can be used again.
When a memory card is
formatted, all information on
the card is permanently lost.
Data and fax transfer
You can make data and fax transfers
during a phone call. For more
information, see “Data and fax calls”,
p. 63.
■ Enhancement
settings
The Enhancements menu displays the
hearing aid compliant option by
default, but shows other options only if
the phone is or has been connected to
a compatible enhancement type.
Headset
In standby mode, select Menu >
Settings > Enhancements > Headset
and one of the following:
Default profile—Choose the profile you
wish to be automatically activated
when a headset is connected.
Automatic answer—Calls are answered
automatically after one ring when a
headset is connected. Select On or Off.
Handsfree
In standby mode, select Menu >
Settings > Enhancements > Handsfree
and one of the following:
Default profile—Choose the profile you
wish to be automatically activated
when a car kit is connected.
Automatic answer—Calls are answered
automatically after one ring when a
car kit is connected. Select On or Off.
Lights—Choose to keep the phone
lights always on, or to shut off
automatically after several seconds.
Select On or Automatic.
Loopset
A LPS-4 Loopset accessory allows your
device to optimise sound quality when
coupled with a hearing aid that is set
to T-coil mode.
73
Page 86

9244301_6265_2_en_in_tat.fm Page 74 Tuesday, April 25, 2006 4:44 PM
Settings
In standby mode, select Menu >
Settings > Enhancements > Loopset >
Use Loopset > Yes or No.
If the Loopset is connected and
recognised through the Pop-Port™
connector, the phone automatically
uses the Loopset.
TTY/TDD
Check with the manufacturer of the
TTY/TDD device for a connecting cable
that is compatible with your phone.
TTY/TDD communications depend on
network availability. Check with your
service provider for availability and
description of services.
In standby mode, select Menu >
Settings > Enhancements > Text
phone > Use text phone > Yes or No.
Charger
In standby mode, select Menu >
Settings > Enhancements > Charger
and one of the following:
Default profile—Select the profile you
want to automatically activate when
your phone is connected to the
charger.
Lights— Select On or Automatic to
keep the phone lights always on or to
shut off automatically after several
seconds.
Hearing aid
To optimise sound quality, you can set
your phone to couple to a T-coilequipped hearing aid.
In standby mode, select Menu >
Settings > Enhancements > Hearing
aid > Hearing aid mode > On or Off.
Verify that the hearing aid is set to
T-coil mode, and hold the phone
against the ear.
Only activate the T-coil hearing aid
mode when using your device with a
hearing aid or it may impact the audio
performance of the device.
■ Security
PIN code
The PIN code protects the UIM card
from unauthorised access. The PIN
code can be 4–8 digits in length.
After three successive incorrect
entries, the PIN code is blocked.
You need to enter the personal
unblocking key (PUK) code. See
“Personal unblocking key (PUK) code”,
p. 77.
Note: The PIN code must be
obtained form your wireless
service provider or network
operator. The PIN code is
typically provided with your
UIM card.
74
Page 87

9244301_6265_2_en_in_tat.fm Page 75 Tuesday, April 25, 2006 4:44 PM
Settings
PIN code request
To provide extra security in case your
phone is lost or stolen, enable your
phone to request the PIN code when
powered on.
1. In standby mode, select Menu >
Settings > Security > PIN code
request.
2. Enter the PIN code, and select OK.
3. Select On.
Call restrictions
Select call restrictions to block or allow
numbers for incoming and outgoing
calls. With any numbers entered as
allowed numbers, all those entered as
blocked numbers are ignored. With a
number blocked, the phone blocks any
call from it, and send the caller to the
voice mail.
1. In standby mode, select Menu >
Settings > Security > Call
restrictions.
2. Enter the security code, and select
OK. See “Security”, p. 74.
3. Select the types of calls you want
to restrict:
Restrict outgoing calls—Set
restrictions on making calls.
Restrict incoming calls—Set
restrictions on receiving calls.
4. Select whether to block or allow
numbers:
Blocked numbers—Set the numbers
the phone can only block, allowing
all the rest.
Allowed numbers—Set the numbers
the phone can only call or receive,
blocking all the rest.
5. Select one of these options: Select,
Add restriction (unavailable with
memory full), Edit (unavailable
with no number added), or Delete
(unavailable with no number
added).
Note: With restricted calls,
you may still call the official
emergency number
programmed into your device.
Security level
Your device can be set to different
security levels to control device use
and memory settings. In standby mode,
select Menu > Settings > Security >
Security level. Enter your security code,
and select OK and one of the following
options:
None—Disable security level
protection.
Memory—Enable or disable memory
protection.
Phone—Enable or disable phone
protection.
75
Page 88

9244301_6265_2_en_in_tat.fm Page 76 Tuesday, April 25, 2006 4:44 PM
Settings
Access codes
You can change your security code and
PIN code. Avoid using codes similar to
emergency numbers such as 911 to
prevent accidental dialling of the
emergency number.
Change security code
The security code controls access to
features such as the security level and
is supplied with the phone. The preset
code is 12345. When you change the
security code, keep the new code
secret and in a safe place, separate
from your phone.
If you enter the wrong security code
five times in succession, you will not be
able to enter a code for 5 minutes,
even if you power off the phone
between incorrect entries.
1. In standby mode, select Menu >
Settings > Security > Access
codes > Change security code.
2. Enter the current security code
(default is 12345), and select OK.
3. Enter the new security code (up to
10 characters), and select OK.
4. Enter the new security code again,
and select OK.
Change PIN code
Before you can change your PIN code,
you must enable PIN code request.
See “PIN code request”, p. 75.
1. In standby mode, select Menu >
Settings > Security > Access
codes > Change PIN code.
2. Enter the current PIN code,
and select OK.
3. Enter the new PIN code, and select
OK.
4. Enter the new PIN code again,
and select OK.
Voice privacy
Voice privacy is a network service.
See "Network services", p. ix. If your
wireless service provider or network
operator supports this feature, the
voice privacy feature protects the
privacy of your current phone
conversation from other callers placing
phone calls on your same network. In
standby mode, select Menu >
Settings > Security > Voice privacy >
On or Off.
76
Page 89

9244301_6265_2_en_in_tat.fm Page 77 Tuesday, April 25, 2006 4:44 PM
Settings
Personal unblocking key
(PUK) code
The PUK code is used to restore a
blocked PIN code. The PUK code is
8 characters in length and cannot be
changed. The PUK code must be
obtained from your wireless service
provider or network operator.
Important: If you enter an
incorrect PUK code 10 times
in succession, the UIM card is
rejected and can no longer be
used. You must contact your
wireless service provider or
network operator for a new
UIM card.
■ Application settings
The Application settings menu changes
game and application settings.
In standby mode, select Menu >
Settings > Application settings and
one of the following:
Application sounds > On or Off—Play
sounds during an application.
Application lights > Application
defined or Default—Play lights during
an application.
Application vibration > On or Off—
Vibrate phone during an application.
■ Network
The menu options you see in your
phone are based on your service
provider’s network. The network
determines which options actually
appear in the phone menu. Check with
your service provider for more
information.
The Network menu personalises the
way your phone chooses a network in
which to operate while you are within
or outside of your primary or home
system. Your phone is set to search for
the most cost-effective network.
If your phone cannot find a preferred
network, it selects a network
automatically based on the option you
choose in the Network menu.
Roaming options
If supported by your wireless service
provider or network operator, you can
select which roaming option you wish
to use. In standby mode, select Menu >
Settings > Network > Roaming options
and one of the following.
Home only—You can make and receive
calls in your home area only.
Automatic—The phone automatically
searches for service in another digital
network. If one is not found, the phone
uses analogue service. The roaming
rate applies when not in the home
service area.
77
Page 90

9244301_6265_2_en_in_tat.fm Page 78 Tuesday, April 25, 2006 4:44 PM
Settings
Automatic A—The phone automatically
searches for service in another digital
network. The roaming rate applies
when not in the home service area.
Automatic B—The phone automatically
searches for service in another digital
network. If one is not found, the phone
uses analogue service. The roaming
rate applies when not in the home
service area.
Mode
If supported by your wireless service
provider or network operator, you can
choose whether your phone will use
digital or analogue service. In standby
mode, select Menu > Settings >
Network > Mode and one of the
following.
Digital preferred—You prefer to make
calls on a digital network, but will find
another network, if necessary.
Analogue only—You can make and
receive calls on an analogue network
only.
Analogue per call—You can select an
analogue network on a call to call
basis.
IS-95 per call—You can select an IS-95
network on a call to call basis.
Digital only—You can make and receive
calls on a digital network only.
■ Network services
The following features are network
services. See also "Network services",
p. ix.
Store a feature code
Network feature setting allows you to
activate network services in your
phone using feature codes received
from your service provider.
1. In standby mode, select Menu >
Settings > Network services >
Network feature setting.
2. Enter the feature code from your
service provider (for example, *900
for activating Divert if busy), and
select OK.
3. Select Call divert.
4. Scroll to the type of forwarding
that matches the feature code you
entered (for example, Divert if
busy), select Activate.
The activated feature code is now
stored in your phone, and you are
returned to the Feature code: prompt.
Continue entering other feature codes
(for example, *900 to cancel Divert if
busy), or press the end key to return to
standby mode.
When you enter a network feature
code successfully the feature becomes
visible in the Network services menu.
78
Page 91

9244301_6265_2_en_in_tat.fm Page 79 Tuesday, April 25, 2006 4:44 PM
Settings
Call diverting
Call divert tells your network to
redirect incoming calls to another
number. Call divert is a network service
and may not work the same in all
networks, so contact your wireless
provider for availability and
information.
To activate, do the following:
1. In standby mode, select Menu >
Settings > Network services > Call
divert and one of the following:
Divert all calls—Forwards all calls
to the number you specify.
Divert if busy—Forwards incoming
calls when you are in a call.
Divert if not answered—Forwards
incoming calls to another number
if you are unable to answer.
You can set a delay before
forwarding takes place.
Divert if out of reach—Forwards
incoming calls when your phone is
off.
2. Select Activate.
3. Enter the number to which your
calls, data, or other information are
forwarded, and select OK.
To cancel, in standby mode, select
Menu > Settings > Network services >
Call divert > Cancel all diverts.
Cancel all diverts may affect your
ability to receive voice mail messages.
Contact your wireless provider for
specific details.
Call waiting
Call If your wireless provider supports
this feature, call waiting notifies you
of an incoming call even while you are
in a call. You can accept, reject, or
ignore the incoming call.
To activate, in standby mode, select
Menu > Settings > Network services >
Call waiting > Activate.
During a call, select Answer or press
the call key to answer the waiting call.
The first call is put on hold. Press the
end key to end the active call.
To cancel, in standby mode, select
Menu > Settings > Network services >
Call waiting > Cancel.
Send my caller ID
If your wireless service provider or
network operator supports this feature,
you can prevent your number from
appearing on the receiving party’s
caller ID.
In standby mode, select Menu >
Settings > Network services > Send my
caller ID > Yes or No.
My number selection
In standby mode, select Menu >
Settings > Network services >
My number selection. This feature is
carrier dependent.
79
Page 92

9244301_6265_2_en_in_tat.fm Page 80 Tuesday, April 25, 2006 4:44 PM
Settings
■ Restore factory
settings
You can reset some of the menu
settings to their original values.
Data that you have entered or
downloaded is not deleted
(for example, entries in your contacts
list are not affected).
1. In standby mode, select Menu >
Settings > Restore factory sett.
2. Enter the lock code, and select OK.
Note: Depending on your
wireless service provider or
network operator, your device
may request the security code
(defaulted to 12345) instead
of the lock code.
■ Phone details
You can view the current details of
your phone. In standby mode, select
Menu > Settings > Phone details and
one of the following options:
User details—Shows the phone’s
current number details.
Version details—Shows the hardware,
software and browser version
information for the phone.
System details—Shows the digital
network the phone is on.
Icon details—Shows the icons used.
80
Page 93

9244301_6265_2_en_in_tat.fm Page 81 Tuesday, April 25, 2006 5:08 PM
11. Orga nis er
Organiser
Your phone contains features to help
organise your everyday life, including
an alarm clock, calendar, calculator,
countdown timer, and stopwatch.
■ Alarm clock
Set an alarm
The alarm clock is based on the phone
clock. It sounds an alert any time you
specify and even works if the phone is
turned off.
1. In standby mode, select Menu >
Organiser > Alarm clock > Alarm
time.
2. Enter the time for the alarm in
hh:mm format, and select OK.
3. Select am or pm if 12-hour clock
format is on.
Alarm on appears briefly in the display,
and appears in standby mode.
If you need to reset the alarm select
Menu > Organiser > Alarm clock >
Alarm time > On from standby mode.
To turn off the alarm, select Menu >
Organiser > Alarm clock > Alarm
time > Off from standby mode.
Repeat alarm
You can set the alarm to repeat every
day or only on certain days of the
week.
1. In standby mode, select Menu >
Organiser > Alarm clock > Repeat
alarm > On.
2. Check the day or days of the week
you wish to repeat the alarm,
and select Mark. Select Unmark to
remove a day.
3. Select Done when you have added
all desired days.
If you need to revise the days for a
repeated alarm, select Menu >
Organiser > Alarm clock > Repeat
alarm > Repetition days from standby
mode.
If you need to stop a repeated alarm,
select Menu > Organiser > Alarm
clock > Repeat alarm > Off in standby
mode.
81
Page 94

9244301_6265_2_en_in_tat.fm Page 82 Tuesday, April 25, 2006 4:44 PM
Organiser
Set the alarm tone
You can set which tone is played when
the alarm sounds.
In standby mode, select Menu >
Organiser > Alarm clock > Alarm tone
and one of the following:
Standard—Select the default alarm.
Radio—Select the radio as the alarm.
Ringing tone—Select a ring tone as the
alarm.
Open Gallery—Select a file from the
Gallery as the alarm.
Set the snooze time-out
You can set the Snooze time-out for
the alarm.
In standby mode, select Menu >
Organiser > Alarm clock > Snooze
time-out and choose a snooze time.
When the alarm sounds, your phone
beeps, vibrates (if vibrate alert is on in
the currently active profile), and lights
up.
With the phone on, select Stop to shut
the alarm off or Snooze. If you select
Snooze, the alarm stops for 10
minutes.
If you do not press a key, the alarm
stops (snoozes) for the Snooze time-
out, then sounds again.
If the alarm time is reached while the
phone is switched off, the phone
switches itself on and starts sounding
the alarm tone. If you select Stop, the
device asks whether you want to
activate the phone for calls. Select No
to switch off the device or Yes to make
and receive calls. Do not select Yes
when wireless phone use may cause
interference or danger.
Turn an alarm off
In standby mode, select Menu >
Organiser > Alarm clock > Alarm
time > Off.
■ Calendar
The calendar keeps track of reminders,
calls you need to make, meetings,
memo, and birthdays. It can even
sound an alarm for any of these events.
Monthly view provides an overview of
the selected month and weeks.
You can also jump to a specific date.
Any days or dates that appear in bold
font contain calendar notes such as a
meeting or reminder. A short summary
of notes for the day appear at the
bottom of the screen.
Open calendar
In standby mode, select Menu >
Organiser > Calendar.
Scroll to move the cursor in the
calendar view.
82
Page 95

9244301_6265_2_en_in_tat.fm Page 83 Tuesday, April 25, 2006 4:44 PM
Organiser
Calendar options
In standby mode, select Menu >
Organiser > Calendar > Options and
one of the following:
Week vi ew—View your calendar by
weeks. To return to month view select
Back, while in the Week view.
Make a note—Create a note on the
selected date.
Go to date—Jump to a specific date.
Enter the date (for example, 15/07/
2005), and select OK.
Go to today—Jump to the current date.
Settings—Modify the calendar
settings.
Go to to-do list—Go directly to your
to-do list.
Delete all notes—Delete all calendar
notes.
Make a calendar note
You can make a calendar note for a
specific date. You can choose from five
types of notes. Your phone asks for
further information depending on
which note you select. You can also set
an alarm for your note.
1. In standby mode, select Menu >
Organiser > Calendar.
2. Highlight the date for which you
want to make a note. Scroll or
select Options > Go to date.
3. Select Options > Make a note and
one of the following
Meeting—Enter the subject, and
select Save. Enter a location, and
select Save. Enter a start and end
time. Choose an alarm option.
Call—Enter the phone number,
and select Save. Enter a name,
and select Save. Enter a time.
Choose an alarm option. You can
also select Options > Search to
search your contacts.
Birthday—Enter the person’s name,
and select Save. Enter the year of
birth. Choose an alarm option.
Memo—Enter the subject, and
select Save. Enter an start and end
date. Choose an alarm option.
Reminder—Enter the reminder,
and select Save. Choose an alarm
option.
View calendar notes
(day view)
You can view the calendar notes for a
day.
1. In standby mode, select Menu >
Organiser > Calendar.
2. Scroll to the date you want to view
or select Options > Go to date.
Days with notes appear in bold
type.
3. Select View to see the list of notes
for that day.
83
Page 96

9244301_6265_2_en_in_tat.fm Page 84 Tuesday, April 25, 2006 4:44 PM
Organiser
To view a specific note, highlight the
note, and select View again. If the re
are no notes for that date, select Add
to create a new calendar note.
Options while viewing a day
When viewing a day’s list of note,
you can highlight a note, select
Options and one of the following:
Make a note—Create a new note for
the selected date.
Delete—Delete the note.
Edit—Edit the note.
Use detail—Use a detail contained in
the note.
Move—Move the note to another date
on your calendar.
Repeat—Enable the note to recur on a
regular basis (daily, weekly, biweekly,
monthly, and yearly). Repeat is not
available for Birthday note.
Go to date—Jump to another date on
your calendar.
Go to today—Return to the current
date.
Send note > Send as message,
Via calendar, Via infrared,
or Via Bluetooth—Send a calendar
note in calendar format (vCal), in a text
message, in a multimedia message,
or directly to another device.
Copy—Copy the note. You can paste
the note to another date.
Settings—Modify the calendar
settings.
Go to to-do list—Go directly to your
to-do list.
Send a calendar note
1. In standby mode, select Menu >
Organiser > Calendar.
2. Highlight the note you wish to
send, and select Options > Send
note > Send as message, Via
calendar, Via infrared, or Via
Bluetooth to send the calendar
note in calendar format (vCal), in a
text message, in a multimedia
message, or directly to another
device.
Receive a note in calendar
format (vCal)
When you receive a calendar note in
calendar-to-calendar format (vCal),
your phone displays Calendar note
received.
Select Show to view the calendar note.
Select Save to save the note to your
calendar or Options > Discard to
discard the note.
84
Page 97

9244301_6265_2_en_in_tat.fm Page 85 Tuesday, April 25, 2006 4:44 PM
Organiser
Modify calendar settings
In standby mode, select Menu >
Organiser > Calendar > Options >
Settings and one of the following:
Set the date—Enter the current date,
and select OK.
Set the time—Enter the current time,
and select OK.
Time zone—Select your current time
zone.
Date format—Select your preferred
date format.
Date separator—Select your preferred
date separator.
Time format—Select your preferred
time format.
Default view—Select a monthly or
weekly view.
Week starts on—Select the day the
week starts.
Auto-delete notes—Select when to
delete past notes.
■ Notes
You can write text notes with the
Notes. You can also send notes using
text message, IR, or Bluetooth
connectivity.
Open notes
In standby mode, select Menu >
Organiser > Notes. You see your
current list of notes.
If there are no notes, select Add to
create your first note. If there are
existing notes, highlight a note,
and select View.
Make a note
Initial note
In standby mode, select Menu >
Organiser > Notes > Add. Create your
note, and select Save.
Additional notes
In standby mode, select Menu >
Organiser > Notes > Options > Make a
note. Create your note, and select
Save.
Create note options
When you create a note, the following
options are available:
Insert time and date—Adds the time
and date to your note.
Close—Returns you to the notes list.
Insert smiley—Inserts a smiley into
your message.
Insert word or Edit word—Enter or edit
the text of a new word that might not
appear in the predictive text
dictionary. Option only appears when
predictive text is on.
85
Page 98

9244301_6265_2_en_in_tat.fm Page 86 Tuesday, April 25, 2006 4:44 PM
Organiser
Insert symbol—Inserts a special
character into your message.
Option only appears when predictive
text is on.
Writing language—Choose the
language you want to use.
Dictionary on or Dictionary off—Turn
predictive text on or off.
Matches—View matches found in the
predictive text dictionary for the word
you want to use. This displays only
when predictive text is on.
Send a note
1. In standby mode, select Menu >
Organiser > Notes.
2. Highlight the note you wish to
send, and select Options > Send
note > Send as message, Via
infrared, or Via Bluetooth to send
the note in a text message, in a
multimedia message, or directly to
another device.
Notes options
In standby mode, select Menu >
Organiser > Notes > Options and one
of the following:
Make a note—Create a new note.
Delete—Delete the note you selected.
Edit—Edit the note you selected.
Use detail—Use a detail contained in
the note.
Send note > Send as message, Via
infrared, or Via Bluetooth—Send a note
in a text message, in a multimedia
message, or directly to another device.
Delete all notes—Delete all notes.
The note options appear only when you
have created one or more notes.
■ To-do list
Use the To-do list feature to keep track
of your tasks. You can save a task or
errand as a to-do list note, select a
priority level for the to-do list note,
and mark it as done when you have
completed it. You can sort the to-do
list notes by priority or by date.
Open to-do list
In standby mode, select Menu >
Organiser > To-do list. You see your
current to-do list.
If there are no to-do tasks, select Add
to create your first to-do list note.
If there are existing to-do list notes,
highlight a to-do list note, and select
View.
Make a to-do list note
Initial to-do list note
In standby mode, select Menu >
Organiser > To-do list > Add. Enter the
subject, and select Save > High,
Medium, or Low.
86
Page 99

9244301_6265_2_en_in_tat.fm Page 87 Tuesday, April 25, 2006 4:44 PM
Organiser
Additional to-do list notes
In standby mode, select Menu >
Organiser > To-do l ist > Options >
Add. Enter the subject, and select
Save > High, Medium, or Low.
Create to-do list note options
When you create a to-do list note, the
following options are available:
Insert smiley—Insert a smiley into your
message.
Insert word or Edit word—Enter or edit
the text of a new word that might not
appear in the predictive text
dictionary. This displays only when
predictive text is on.
Insert symbol—Insert a special
character into your message. This
displays only when predictive text is
on.
Writing language—Choose the
language you want to use.
Dictionary on or Dictionary off—Turn
predictive text on or off.
Matches—View matches found in the
predictive text dictionary for the word
you want to use. This displays only
when predictive text is on.
Edit to-do list notes
In standby mode, select Menu >
Organiser > To-do l ist > View > Edit.
Edit the subject, select Save.
View to-do list notes
In standby mode, select Menu >
Organiser > To-do list > View.
Deadline—Change the deadline of the
to-do list note.
Mark note as done or Mark as not
done—Indicate whether the to-do list
note is completed or not.
Delete—Delete the to-do list note.
Use detail—Use a detail contained in
the note.
Edit priority—Change the priority to
High, Medium, or Low.
Send > Send as message, Via calendar,
Via infrared, or Via Bluetooth—Send
the to-do list note in calendar format
(vCal), in a text message, in a
multimedia message, or directly to
another device.
Go to Calendar—Leave the to-do list,
and go to the calendar.
Save to Calendar—Save the to-do list
note to your calendar.
Send a to-do list note
1. In standby mode, select Menu >
Organiser > To-do list.
2. Highlight the note you wish to
send, and select Options > Send >
Send as message, Via calendar,
Via infrared, or Via Bluetooth to
send the to-do list note in calendar
format (vCal), in a text message,
87
Page 100

9244301_6265_2_en_in_tat.fm Page 88 Tuesday, April 25, 2006 4:44 PM
Organiser
in a multimedia message, or
directly to another device.
To-do list options
In standby mode, select Menu >
Organiser > To-do l ist > Options and
one of the following:
Add—Create a new to-do list note.
Delete—Delete the to-do list note you
selected.
Mark note as done or Mark as not
done—Indicate whether the to-do list
note is completed or not.
Use detail—Use a detail contained in
the note.
Sort by deadline or Sort by priority—
Sort the to-do list by either date or
priority.
Send > Send as message, Via calendar,
Via infrared, or Via Bluetooth—Send
the to-do list note in calendar format
(vCal), in a text message, in a
multimedia message, or directly to
another device.
Go to Calendar—Leave the to-do list,
and go to the calendar.
Save to Calendar—Save the to-do list
note you selected to your calendar.
Delete done notes—Delete the to-do
list note you selected to your calendar.
Delete all notes—Delete all to-do list
notes.
The to-do list options appear only
when you have created one or more
notes.
■ Calculator
The calculator in your phone adds,
subtracts, multiplies, divides,
calculates the square and the square
root, changes the sign of the number
entered, and converts currency values.
Note: This calculator has a
limited accuracy and is
designed for simple
calculations.
Use calculator
1. In standby mode, select Menu >
Organiser > Calculator.
2. Enter the first number in the
calculation.
Press # for a decimal point if
necessary.
Press the scroll key up or down to
change the sign of your number or
value.
Press * to cycle through the add (+),
subtract (-), multiply (*), and divide
(/) characters. Pause briefly to
select the displayed character.
3. Enter the second number in your
calculation.
4. Select Equals.
88
 Loading...