

Page 1

OWNER’S
MANUAL
Page 2
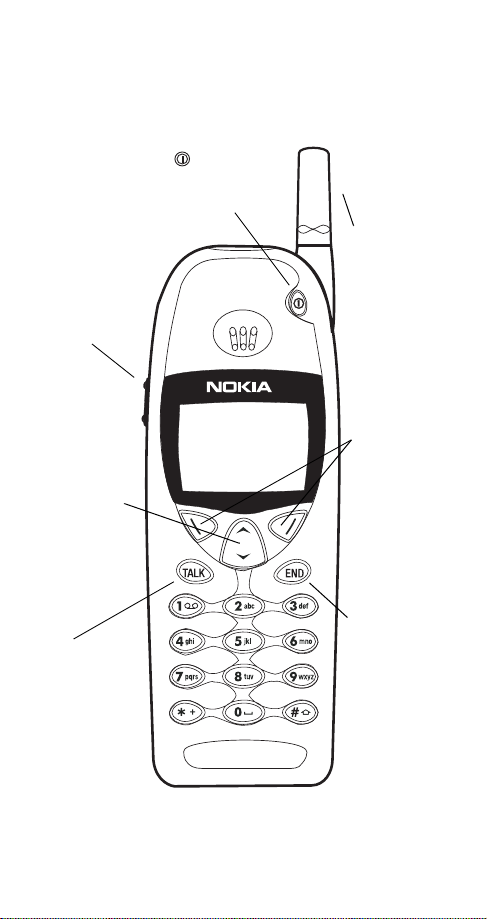
Keys
t
Volume button
Adjusts volume of
earpiece or
speaker.
Scroll
button
Scroll through
menus,
submenus, and
phone book.
Press and hold
for continuous
scrolling.
ó
Dials the number
on the display.
Power key
Press and hold to
turn your phone on
or off.
0HQX 1DPHV
Fixed
antenna
Do not
attempt to
extend or
remove!
Softkeys
Their current
function is
displayed
above the key
(for example,
here their
functions are
Menu and
Names).
ô
Press this key to
end a phone
call, or to return
to the start
screen when no
in a call.
Page 3

Quick guide to functions
Note: If you have trouble accessing a feature, try starting from
the start screen. To get to the start screen, press
time except during a call (unless you want to hang up).
Accessing your phone book - Press W
skip ahead in the list, press the number key that
corresponds to the first letter of the name)
Answering a call - Press any key exce pt
Answering a call with call waiting - Press
(press
Clearing a digit from the display - Press
Emergency 9 call - Press and hold 9 for three sec-
onds
Ending a call - Press
Keyguard activation - Press and hold ô
.H\V ORFNHG
Keyguard deactivation - Press
Last number redial - Press
Listening to voice messages - With
VDJH
voice mail subscription)
Making a call - Enter phone number , then press
to swap calls; press ô to end each call)
ó
(Emergency K e y 9 feature must be set to o n! )
ô
appears, or press
0HQX
ó
on display, press
/LVWHQ
or press
8QORFN
twice
1HZ YRLFH PHV0
ó
or V(to
(requires
ô at any
ô
or
ó
&OHDU
until
ó
One-touch dialing - Press and hold one key, 2
through 8, for two seconds
Profiles - To change profiles, press , scroll to the
desired profile, and press
Storing a name and number (Quick Save) -
Enter the phone number and press
if you wish (optional), then press
Switching on/off
Volume adjust - Press top or bottom volume button
(on the left side of the phone)
2.
Press and hold
-
.Enter a name
6DYH
2.
Page 4

Quick guide to the menu
Back one level - Press
%DFN
Entering the menu - From start scr e en, pr es s
Exiting the menu - Press
press
ô
Scrolling the menu - Press W
([LW
or
or
%DFN
V
Selecting a submenu or option - Press
2.
Using shortcuts - Press
, then menu number
0HQX
Menu summary:
1 Messages
1 Text messages
2 Message settings
3 Voice messages
4 News & info service
5 Service command
editor
2 Call log
1 Missed calls
2 Received calls
3 Dialed calls
4 Clear call lists
5 Call timers
6 Show call costs
1
4Settings
1
1
1
1
5Forwarding
1
1,4
1 Call settings
2 Security settings
3 Phone settings
4 Analog module
settings
1 Forward all voice
1
calls
2 Forward when not
able to take calls
3 Forward all fax calls
4 Forward all data calls
0HQX
repeatedly, or
or
6HOHFW
5
1
1
1
1
7 Show costs in
1
3 Profiles
1 Normal
2 Silent
3 Meeting
4 Outdoor
5 Pager
2
6 Car
7 Headset
1
Appears only if supported by your operator and/or SIM card
2
Appears once used with car kit
3
Appears once used with headset
4
Not available in analog systems
5
Appears only with the optional analog module attached
3
5 Cancel all call
forwarding
6Games
7 Calculator
8Calendar
9 Keyguard
1
Page 5
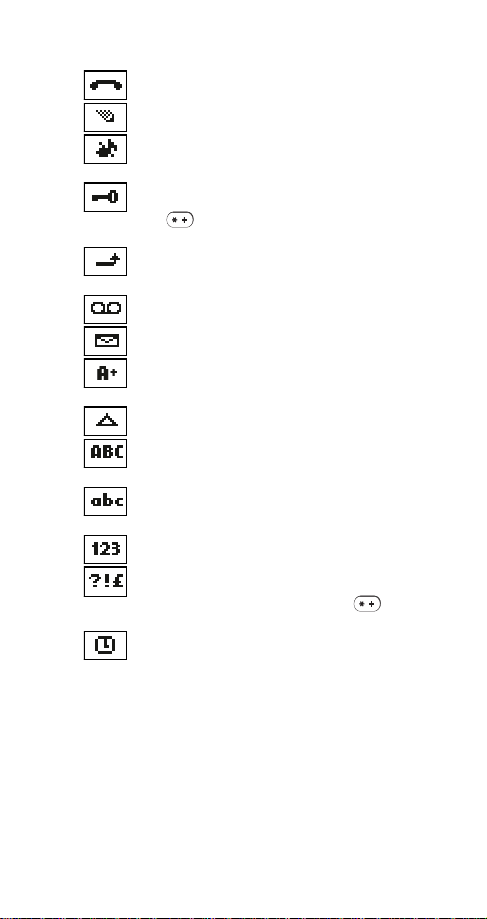
Indicators and Icons
You have an active call.
The phone is waiting for you to enter a response.
Ringing option is set to
warning tones, and message alert tone are turned off.
Keyguard has been activated. Your phone will not
accept any keypresses. To deactivate, press
then .
Your phone has been set to forward all incoming
voice calls to another number.
You have one or more voice messages waiting.
You have one or more text messages waiting.
Analog mode is active.
on page 82.
Your phone is roaming outside of its home system.
Any characters you enter will be upper-case letters.
Press the # key to switch letter case.
Any characters you enter will be lower-case letters.
Press the # key to switch letter case.
Any characters you enter will be numbers.
You are in special character mode; select a special
character and press
switch to this mode by pressing the key.)
The alarm clock is set.
and keypad tones,
6LOHQW
8QORFN
See Optional Analog Module
. (When entering letters,
,QVHUW
,
1
Page 6

Contents
1. For Your Safety . . . . . . . . . . . . . . 3
FCC/Industry Canada Notice . . . . . . . . . . . . . . . . . . . . .4
Using this Guide . . . . . . . . . . . . . . . . . . . . . . . . . . . . . . .4
2. Getting Connected . . . . . . . . . . . 5
Installing the SIM card . . . . . . . . . . . . . . . . . . . . . . . . . .5
Battery information . . . . . . . . . . . . . . . . . . . . . . . . . . . . .6
When is a good time to charge? . . . . . . . . . . . . . . . 8
3. The Very Basics . . . . . . . . . . . . 10
Switching on the phone . . . . . . . . . . . . . . . . . . . . . . . .10
Checking signal strength . . . . . . . . . . . . . . . . . . . . . . .10
Making a call . . . . . . . . . . . . . . . . . . . . . . . . . . . . . . . .11
Ending a call. . . . . . . . . . . . . . . . . . . . . . . . . . . . . . . . .11
Answering a call . . . . . . . . . . . . . . . . . . . . . . . . . . . . . .12
Switching off the phone . . . . . . . . . . . . . . . . . . . . . . . .12
Keyguard . . . . . . . . . . . . . . . . . . . . . . . . . . . . . . . . . . .12
4. Working The Menu . . . . . . . . . . 13
Navigating tools . . . . . . . . . . . . . . . . . . . . . . . . . . . . . .13
What is the start screen? . . . . . . . . . . . . . . . . . . . . . .14
The main menu . . . . . . . . . . . . . . . . . . . . . . . . . . . . . .14
Help text. . . . . . . . . . . . . . . . . . . . . . . . . . . . . . . . . . . .15
Summary of Menu Items . . . . . . . . . . . . . . . . . . . . . . .16
5. Features A-Z . . . . . . . . . . . . . . . 18
6. Optional Analog Module . . . . . . 82
Analog features . . . . . . . . . . . . . . . . . . . . . . . . . . . . . .83
Analog system selection. . . . . . . . . . . . . . . . . . . . . . . .83
Digital/analog selection. . . . . . . . . . . . . . . . . . . . . . . . .85
Module security . . . . . . . . . . . . . . . . . . . . . . . . . . . . . .86
7. Call Forwarding Codes . . . . . . . 87
8. Accessories . . . . . . . . . . . . . . . 89
Batteries. . . . . . . . . . . . . . . . . . . . . . . . . . . . . . . . . . . .89
Charging Times . . . . . . . . . . . . . . . . . . . . . . . . . . .90
Talk and Standby Times. . . . . . . . . . . . . . . . . . . . .90
Chargers and other accessories. . . . . . . . . . . . . . . . . .91
9. Reference Information . . . . . . . 95
10. Technical Information . . . . . . .101
2
Page 7
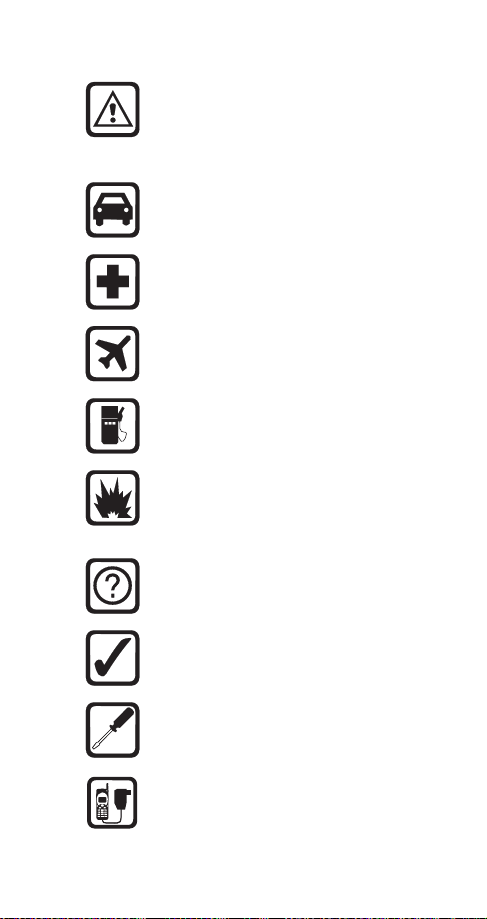
1. For Your Safety
Read these simple guidelines before using your
phone. Failure to comply with these guidelines
may be dangerous or illegal.
For more detailed safety information, see Important Safety Information on page 95.
Road Safety Comes First
Dont use a hand-held phone while driving; park
the vehicle first.
Switch Off In Hospitals
Follow any regulations or rules. Switch phone off
near medical equipment.
Switch Off On Aircraft
Wireless phones can cause interference. Using
them on aircraft is illegal.
Switch Off Wh en Refueling
Dont use phone at a refueling point. Dont use
near fuel or chemicals.
Switch Off Near Blasting
Do not use the phone where blasting is in
progress. Observe restrictions, and follow any
regulations or rules.
Interference
All wireless phones may get interference which
could affect performance.
Use Sensibly
Use only in the normal position (to ear). Dont
touch the antenna unnecessarily.
Qualified Service
Only qualified service personnel must install or
repair equipment.
Accessories and Batteries
Use only approved accessories and batteries.
Do not connect incompatible products.
3
Page 8

FCC/Industry Cana da No t ic e
Your phone may cause TV or radio interference (e.g. when
using a telephone in close proximity to receiving equipment).
The FCC/Industry Canada can require you to stop using your
telephone if such interference cannot be eliminated. If you
require assistance, contact your local service facility.
This device complies with part 15 of the FCC rules. Operation
is subject to the condition that this device does not cause
harmful interference.
Using this Guide
The wireless phone described in this guide is
approved for use in GSM 1900 and AMPS networks.
Network services
A number of features included in this guide are called
network services. They are special services provided
by wireless service providers. Before you can take
advantage of any of these network services, you must
subscribe to the service(s) from your home service
provider and obtain instructions for their use.
Updates
The latest version of this Owners Manual may be
found on Nokias World Wide Web site at
www.nokia.com.
4
Page 9

2. Getting Connected
So youve just bought your new phone, taken it out of
the box, and youre wondering what to do next. To get
started, just follow a few easy steps.
1)
Install the SIM card
2)
Attach and charge the battery
3)
If you purchased an optional analog module,
attach it to the phone
See Optional Analog Module on page 82.
Note: The analog module is a separate accessory that may be
purchased from your service provider. It allows you to make
and receive calls in analog networks.
Installing the SIM card
Before you can use your phone, you need to put a
valid miniature SIM card in the phone. The card comes
from your network operator or service provider.
Before installing the SIM card, switch off the phone and wait
for a few seconds before removing the battery.
The SIM card and its contacts can be easily damaged by
scratches or bending, so be careful when you handle, insert or
remove the card.
Note: Keep all miniature SIM cards out of small childrens
reach.
1)
If the battery is already attached, remove it.
Removing the battery on page 9.
2)
Open the SIM card
holder: slide the latch
toward the top of the
phone, then lift it up
See
5
Page 10
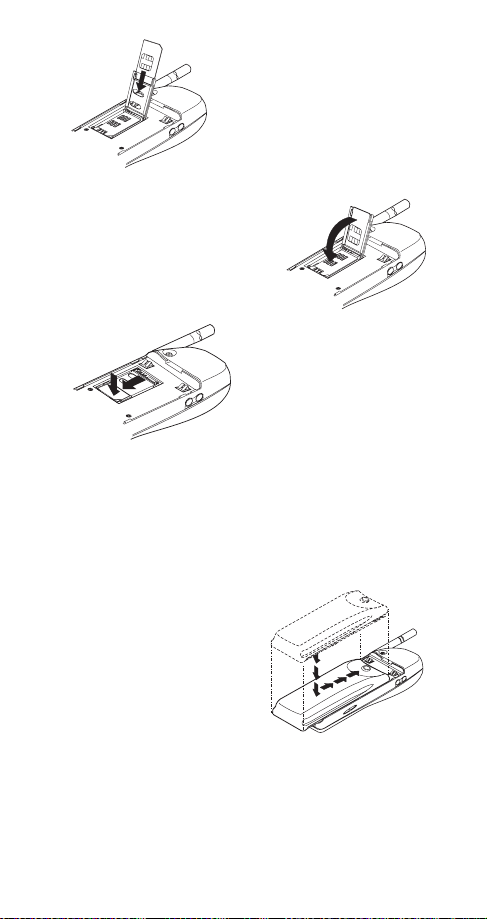
4)
Close the holder
6)
Attach the battery (see below)
Battery information
Attaching the battery
To attach the battery, place
it on the back of the phone
as shown and slide it
toward the top of the
phone until it clicks into
place.
3)
Place the SIM card in its
slot. Make sure that the bevelled corner is top right and
the gold contacts of the card
face into the phone.
5)
Slide the SIM card
holder toward the bottom
of the phone until it locks
into place
6
Page 11
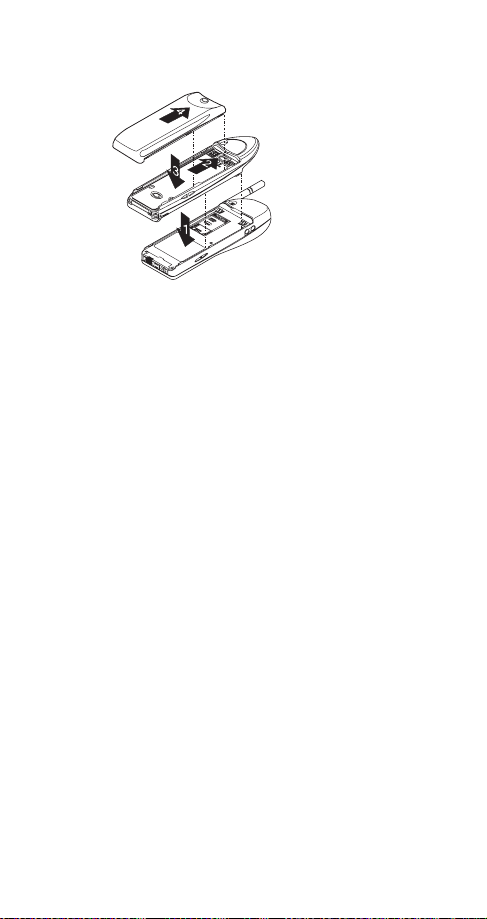
Attaching the battery when using optional
analog module
1)
Place the analog
module on the back of
the phone
2)
Slide the module
toward the top of the
phone until it clicks into
place
3)
Place the battery
on top of the analog
module
4)
Slide the battery toward the top of the phone until
it clicks into place
Charging your new battery
Your phone is powered by a rechargeable Li-Ion or
NiMH battery, which should be charged for 24 hours
without interruption. Note that a new NiMH batterys
full performance is achieved only after two or three
complete charge and discharge cycles.
Note: Use only batteries approved by the phone manufacturer
and recharge your battery only with the chargers approved by
the manufacturer.
Also, see Important Battery Information on page 98 for
important battery usage information and Talk and Standby
Times on page 90 for approximate battery operation times.
With your phone on or off, simply connect the lead
from the charger to the bottom of your phone or place
it on a charging stand. Then connect the charger to a
standard 120V AC outlet.
Note: If you have purchased an optional analog module, be
sure to remove it and replace the battery before placing the
phone in a charging stand. Although the phone will fit in the
stand with the analog module attached, charging will not take
place.
When the battery begins charging, the battery
strength indicator on the right side of the display will
scroll and your phone will beep once. When you
7
Page 12

charge the battery for the first time, the battery
strength indicator bars will not scroll the entire time. If
your phone is off, the scroll bars will disappear shortly
after charging begins; if your phone is on, the scroll
bars will stop scrolling after a while. This is normal. Be
sure to charge the battery for the entire 24-hour period
without interruption.
If your phone displays
1RW FKDUJLQJ
, charging is suspended. Check that the battery is not connected to a
non-approved charging device. If the battery is very
hot or cold, wait for a while; charging will automatically
resume after the battery is restored to its normal operating state. If charging still fails, contact your dealer.
When is a good time to charge?
Actually, you can charge anytime. If you have a NiMH
battery, you should allow it to discharge once in a while
(see Discharging NiMH batteries on page 9).
Whenever your phone beeps once and displays
, you only have a couple of minutes of talk time
WHU\ ORZ
%DW0
remaining. The repetition rate of these battery-low
warnings depend on the remaining battery capacity
and the battery condition. These warnings are more
frequent when youre in a call.
Note: The phone will not give you the warning tone under
certain conditions. See Warning tones on page 79.
Once all the power has drained from your battery,
youll hear three beeps with the message
on your display. At this point, your phone will
EDWWHU\
5HFKDUJH
switch itself off and youll need to recharge your
battery.
When is charging complete?
When the charge indicators stop scrolling,
your phone is considered fully charged.
However, a slight increase in charge may
occur if your phone is left connected to the
charger. This is called trickle charge.
8
Page 13
Charging times depend on the type of battery and
charger used.
For approximate charging and oper-
ating times, see Batteries on page 89.
If the battery is too hot or cold, charging may be interrupted until the battery reaches its normal operating
temperature.
Can I make calls while charging?
Yes, you can. But your battery may not charge while a
call is in progress. Charging should resume once you
end the call.
Discharging NiMH batteries
An NiMH battery lasts longer and performs better if you
fully discharge it from time to time. To discharge the battery, leave your phone switched on until the battery is
drained. The phone will display several messages that
the battery is low and that you need to recharge it; just
ignore them. After the phone turns itself off, connect the
charger and fully recharge the battery.
Note: Do not attempt to discharge the battery by any other
means.
When do I need to buy a new battery?
The battery can be charged and discharged hundreds
of times, but it will eventually wear out. When the operating time (talk-time and standby time) is noticeably
shorter than normal, its time to buy a new battery.
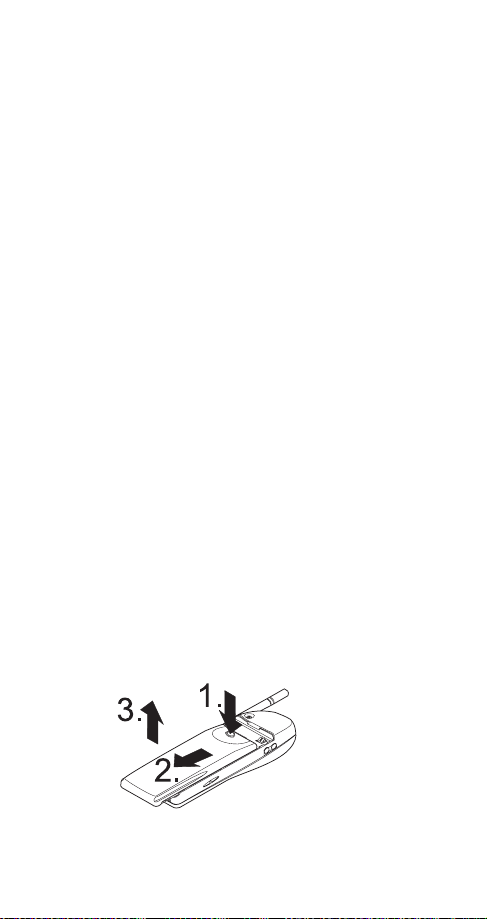
Removing the battery
Note: Switch off the phone before removing the battery!
1)
Press and hold
the button at the
top of the battery
2)
Slide the battery
toward the bottom
of the phone
3)
Lift the battery off the phone
9
Page 14

3. The Very Basics
Your phone is designed with many powerful features
that you can learn to use as needed. This chapter covers the basic information you need to use your phone.
Everything else is covered in
on page 18.
Switching on the phone
Press and hold the key for one second to switch on
the phone.
If the phone asks for a PIN code, see PIN and PIN2
codes on page 63. If the phone asks for a Security
code, see Security code on page 71.
NORMAL POSITION: Hold the phone as you would any other
telephone with the antenna pointed up and over your
shoulder.
TIPS ON EFFICIENT OPERATION: As with any other radio
transmitting device, do not touch the antenna unnecessarily
when the phone is switched on. Contact with the antenna affects call quality and may cause the phone to operate at a
higher power level than otherwise needed.
WARNING! Do not switch on the phone when wireless phone
use is prohibited or when it may cause interference or danger.
Checking signal strength
Your phone operates on radio waves, and the quality
of radio reception depends entirely on the strength of
the radio signal in your area.
This radio coverage is maintained by a wireless network and the quality of calls on a wireless phone
depends on the strength of the wireless radio signal.
Features A-Z
starting
Get a strong signal
When you are at the start screen
14)
or in a call, the strength of the radio signal
(see page
is indicated by the signal indicators on the left
side of your phones display. These indicators
scroll as the strength of the signal increases
and decreases.
10
Page 15

Improving your phones reception may be easy.
Try moving your phone slightly, or move towards a
window if youre calling from inside a building.
Making a call
Enter the area code and phone
number and press
ó
Making an international call
Enter the + character (press
twice), country code, area code and phone number.
Editing a number on display
V
to move the cursor to the left and W to move
Press
it to the right. Press
to delete the character to the
&OHDU
left of the cursor.
Dialing a phone number stored in the phone
book
W
View entries by pressing
then press
ó
or V from the start screen,
Emergency calls
See Emergency calls on page 39.
IMPORTANT!
when:
It is switched on,
It has a valid SIM card installed, and
It is located in the service area of a GSM 1900 or analog
network (if using the optional analog module) where your
SIM card can be used and the radio signal strength is
adequate.
Ending a call
The phone can make and receive calls only
Press ô
11
Page 16
Answering a call
The phone rings according to the settings in the
currently selected profile
To answer, press any key except
Note: If Keyguard is on (see page 49), only ó answers
calls.
To reject a call, press ô.
Note: If you are using the optional analog module, pressing
stops the ringing but does not answer or reject the call.
ô
Switching off the phone
Press and hold the key for one second
Briefly press the key (
lighted) then press
phone is connected to a headset or handsfree car kit.)
Keyguard
You can lock your phones keypad with this convenient feature.
Keyguard makes sure that keys
dont get pressed by accident
when the phone is in your pocket
or purse.
Note: Keyguard is not a security feature and will not prevent
unauthorized use of your phone.
To l o c k th e k ey s
Press and hold
Press
0HQX
Press
0HQX
ô
9
(see page 63)
ô
.H\V ORFNHG
will appear, high-
appears,
6ZLWFK RII$
. (This does not work if the
2.
until
OR
.
or
OR
OR
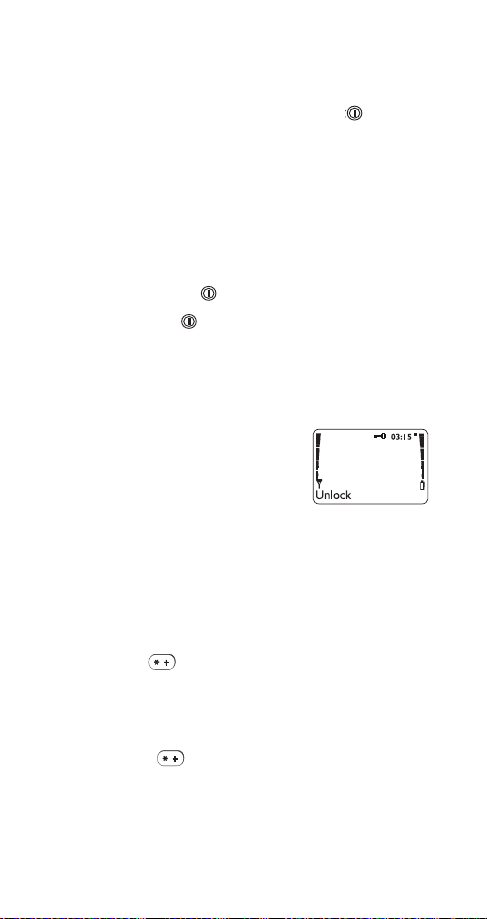
To unlock the keys
Press
8QORFN 25
Press and hold ô until
press
2.
See page 49 for more information about Keyguard.
8QORFN NH\V"
12
appears, then
Page 17

4. Working The Menu
Your phone contains several menus and submenus,
giving you access to certain options and allowing you
to customize your phone to suit your individual
preferences.
Navigati n g tools
Softkeys
Your phone has two softkeys that
appear below the display. Their
current function is indicated by the
words appearing above them.
Simply press the corresponding
key under the choice you wish to
select.
This illustration shows the phone at the start screen
(see What is the start screen? on page 14)
on the left and
start screen always displays
on the right.
1DPHV
phones menus and submenus.
access your phone book
page 59)
Scroll button
Your phone has a scroll button located just below the
display screen. The scroll button has two arrows on it
that look like
navigate through your phones menus and submenus,
as well as through your phone book
book on page 59)
.
0HQX
V
and W. You will press these arrows to
.
0HQX
allows you to access your
(see Phone book on
allows you to
1DPHV
(See Phone
. The
Scroll bar
When you access your phones menu and submenus, you will notice a scroll bar at the far right
of the screen. This bar indicates where you are
in the menu structure; each tab on the bar represents a different menu item.
13
Page 18

For example, press
with the first (top) tab displayed. A different tab
appears each time you press the
up and down through the menu structure. The scroll
bar works the same way with submenus.
Menu & submenu numbering
When you scroll to a menu or submenu, the menu
number and/or submenu number appears on the display above the scroll bar. If you become familiar with
these numbers, you can use them as shortcuts for
accessing different menus.
For example, when you enter menu 2 (
number
display. If you enter menu 4 (
(
6HFXULW\ VHWWLQJV
right-hand corner.
See "Using shortcuts" on page 15.
What is the ‘start screen’?
The start screen appears when you first turn your
phone on, in its idle state (
Your phone must be at the start screen in order to use
most of its features.
When you want to get to the start screen
Press
want to hang up).
appears in the top right-hand corner of the
5
), your phone will display
ô
at any time except during a call (unless you
once. The scroll bar appears
0HQX
W
or V key to move
&DOO ORJ
), submenu 2
6HWWLQJV
see illustration on page 13
705
) the
in the top
).
The main menu
From the start screen, press
menu. When in a call, press
then press
To view main menu items one by one, press
allows you to select and enter menus and
6HOHFW
submenus.
6HOHFW
.
14
to access the main
0HQX
2SWLRQV
, scroll to
0HQX
W
or V.
,
Page 19

allows you to exit the present menu or submenu
%DFN
and go back a level. Press repeatedly to return to the
main menu, then press
ô
returns your phone to the start screen. If you
ô
press
example, a setting, phone number, name, etc.), the
phone displays the start screen and the input is not
saved.
Remember: If you press ô during a call, the phone will hang
up!
Scrolling through the main menu
1)
2)
3)
4)
Using shortcuts
This is a quick and easy way to access a menu without
having to scroll through other menus.
Press
number.
Press the menu and submenu numbers within a couple of seconds of each other when using this method.
For a summary of your phones menu structure, see
"Summary of Menu Items" on page 16.
when the phone is requesting input (for
Press
0HQX
W
or V to reach the desired menu item
Press
Press
6HOHFW,2SWLRQVor2.
enter submenus and to choose options
Press
back one level
to exit the present menu or
([LW
, then menu number, then submenu
0HQX
to return to the start screen.
([LW
(whichever appears) to
%DFN
to go
Help text
Many of the menu functions have brief help text. To
view the help text, scroll to the menu item and wait for
about 15 seconds. Press
the text or
%DFN
to exit.
to see the next page of
0RUH
15
Page 20

Summary of Menu Items
1 Messages
1 1 Te xt Messages
1 1 1 Inbox
1 1 2 Outbox
1 1 3 Write messages
1 2 Message settings
1 2 1 Set 1
1 2 2 Set 2
1 2 3 Set 3
1 2 4 Set 4
1 2 5 Set 5
1 2 6 Common
1 3 Voice messages
1 3 1 Listen to voice messages
1 3 2 Voice mailbox number
1
1
1
1 4 News & info service
1 5 Service comm an d edi tor
2Call log
2 1 Missed calls
2 2 Received calls
1
1
2 3 Dialed cal ls
2 4 Clear call lists
2 5 Call timers
2 6 Show call costs
2 7 Show costs in
1,4
1
3Profiles
3 1 Normal
3 2 Silent
3 3 Meeting
3 4 Outdoor
3 5 Pager
3 6 Car
3 7 Headset
2
3
1
16
Page 21

4 Settings
4 1 Call settings
4 1 1 Automatic redial
4 1 2 Call waiting
4 1 3 Send own number
4 1 4 Line in use
4 1 5 Calling card
1
1,4
4 2 Security settings
4 2 1 SIM card security
4 2 2 Phone security
4 2 3 Module security
4 2 4 Restrict calls
4 2 5 Fixed dialing
4 2 6 Call cost limit
5
1
1
4 2 7 Access codes
4 3 Phone settings
4 3 1 Language
4 3 2 List of own numbers
4 3 3 Clock
4 3 4 Alarm clock
4 3 5 System selection
1
4 3 6 Touch tone length
4 3 7 Emergency key 9
4 4 Analog module settings
5
4 4 1 Digital/analog selection
4 4 2 Analog system selection
5Forwarding
5 1 Forward all voice calls
1
1
5 2 Forward when not able to take calls
5 3 Forward all fax calls
5 4 Forward all data calls
5 5 Cancel all call forwarding
1
1
1
6Games
7 Cal cu la tor
8 Calendar
9 Keyguard
1
Appears only if supported by your operator and/or SIM card
2
Appears once used with car kit
3
Appears once used with headset
4
Not available in analog systems
5
Appears only with the optional analog module attached
1
17
Page 22

5. Features A-Z
Access codes
These help protect against unauthorized use of your
phone and SIM card:
security code
PIN and PIN2 codes
system password
module code
Access codes consist of numbers. If the phone asks
you for one of these codes, key in the requested code
and press
erase, then enter the correct digit.
To change access codes:
1)
Press
FRGHV
(For details on how to work the Menu, see page 13)
2)
Press
change, and press
3)
The phone prompts you for the existing code, the
new code, and verification of the new code. At
each prompt, enter the information and press
Note: You cant change the PIN code unless SIM card security
(see page 74) is on.
Note: Avoid using access codes that are similar to emergency
numbers, such as 911, to prevent accidental dialing of the
emergency number.
(see page 71
(for optional analog module; see page 85
. If you make a mistake, press
2.
4 2 7 (
0HQX
)
(see page 63)
(see page 75)
-
6HWWLQJV
6HFXULW\ VHWWLQJV
)
W
to scroll through the codes you wish to
6HOHFW
&OHDU
-
to
$FFHVV
2.
)
.
Alarm clock
The alarm clock feature is based
on your phones internal clock and
sounds an alert at a time you spec-
See Clock on page 36 for
ify.
information on your phones clock.
18
Page 23

Setting the alarm clock
1)
Press
FORFN
(For details on how to work the Menu, see page 13)
2)
Enter the alarm time, using two digits for both
)
0HQX
4 3 4 (
6HWWLQJV
-
3KRQH VHWWLQJV
-
$ODUP
hours and minutes
3)
Press
2.
4)
Select either
Note: Step 4 is necessary only if you have selected am/pm
format; see Selecting time format on page 36 for more
information.
or SP and press
DP
2.
Turning the alarm clock off
1)
Press
FORFN
(For details on how to work the Menu, see page 13)
2)
Press
)
0HQX
W
to
4 3 4 (
and press
2II
6HWWLQJV
-
3KRQH VHWWLQJV
2.
-
$ODUP
When the alarm sounds
Press
OR
Press
to shut off the alarm
6WRS
and the alarm will sound again in 5
6QRR]H
minutes.
If you let the alarm sound for 1 minute without pressing
a key, it stops for 5 minutes, then starts again.
Advanced
If you turn off the phone and the alarm is set, the
phone switches itself on at alarm time, then the alarm
sounds. If you press
. Press
SKRQH RQ"
<HV
6WRS
to keep it on or 1R to switch it off.
.HHS WKH
, the phone displays
REMEMBER! Do not switch on the phone when wireless phone use is prohibited or when it may cause
interference or danger.
All calls timers
See Call timers on page 30.
19
Page 24

Analog module
See "Optional Analog Module" on page 82.
Analog system selection
See Analog system selection on page 83.
Automatic answer
This is one of the settings in your phones profiles
page 63)
. With this on, your phone answers incoming
voice calls after one ring.
Note: This is available only when your phone is connected to
a headset or to an approved handsfree car kit equipped with
the ignition sense option, with the ignition on.
Activating automatic answer
1)
Press
(For details on how to work the Menu, see page 13)
2)
Use
3)
Choose
$XWRPDWLF $QVZHU
4)
Press
Note: This feature will not function with data calls.
3 (
0HQX
3URILOHV
W
to select
&XVWRPL]H
W
to reach 2Q (or
)
&DU
or
+HDGVHW
, then press
and press 2.. Press W to reach
and press
2II
.
6HOHFW
to deactivate it)
Automatic redial
When this feature is turned on, your phone will redial
the number youre trying to call up to 10 times. Press
ô
to stop the call attempts.
Automatic redial will not redial a busy number while you initiate
or answer another call.
(see
2SWLRQV
Activating automatic redial
1)
Press
UHGLDO
(For details on how to work the Menu, see page 13)
2)
Press
4 1 1 (
0HQX
6HWWLQJV
)
W
or V to 2Q and press
-
&DOO VHWWLQJV
2.
20
-
$XWRPDWLF
Page 25

Business cards
Your phone can send or receive electronic business
cards consisting of a name and phone number. You
can save received business cards to your phone book.
For details on the phone book, see "Phone book" on
page 59.
Sending business cards
1)
Recall the name from your phone book
2)
Press
3)
Press
4)
Press
5)
Press
6)
Enter or recall the destination phone number
7)
Press
, if shown, or skip to Step 3
'HWDLOV
2SWLRQV
W
or V to reach
6HOHFW
2.
6HQG EXV1 FDUG
Viewing received business cards
When you receive a business card, the phone displays
%XVLQHVV FDUG UHFHLYHG
and sounds an alert
on the Message alert tone; see page 52)
Caution: If you press
ness card, the business card will be deleted!
1)
When your phone displays
press
2SWLRQV
2)
is selected. Press
6KRZ
3)
Scroll through the available information
at any time before saving the busi-
([LW
%XVLQHVV FDUG UHFHLYHG
2.
(depending
.
,
Saving viewed business cards
1)
After viewing the business card, press
, then press
to
2)
At the
then press
3)
At the
then press
6DYH
1DPH=
1XPEHU=
2.
prompt, edit the name if desired,
2.
prompt, edit the number if desired,
2.
21
%DFN
, scroll
Page 26
Deleting viewed business cards
After viewing the business card, press
.
([LW
, then press
%DFN
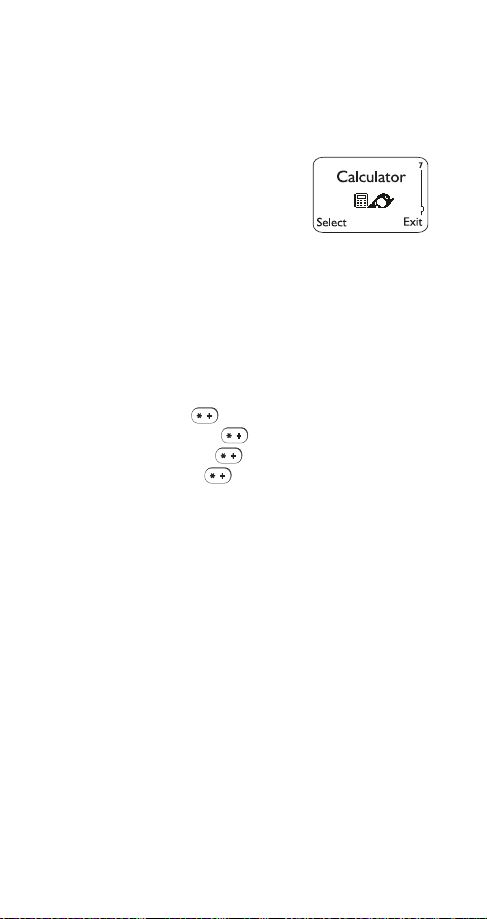
Calculat or
Your phones calculator adds, subtracts, multiplies, divides, and
converts between currencies.
REMEMBER! Your phone must be
switched on to use this function. Do not
switch on the phone when wireless phone use is prohibited or
when it may cause interference or danger.
Using the calculator
1)
Press
(For details on how to work the Menu, see page 13)
2)
Enter the first number in the calculation
3)
To add, press once (
To subtract, press twice (
To multiply, press three times (
0HQX
7 (
&DOFXODWRU
)
+
appears)
ð
appears)
∗
appears)
To divide, press four times ( / appears)
4)
Enter the second number
Repeat steps 3 and 4 as many times as needed.
5)
Press
2SWLRQV. (TXDOV
Note: When you are entering numbers, press
any mistakes.
Note: You can also choose
from the list of options.
'LYLGH
is selected. Press
&OHDU
$GG, 6XEWUDFW, 0XOWLSO\
2.
to erase
, and
Decimals
Press the # key once to enter a decimal point.
Currency conversion
Before you can begin converting currencies, you need
to set the exchange rate.
1)
Press
7, then press
0HQX
2SWLRQV
22
Page 27

2)
3)
Scroll to
Scroll to
([FKDQJH UDWH
+RZ PDQ\ KRPH XQLWV WR D YLVLWHG XQLW
, then press
2.
enter the number of domestic units to a foreign
unit) or
+RZ PDQ\ YLVLWHG XQLWV WR D KRPH XQLW
enter the number of foreign units to a domestic
unit)
4)
5)
2.
Press
Enter the exchange rate (press # to enter a decimal point)
6)
Press
2.
Now you can do a conversion:
1)
Enter the amount to be converted
2)
Press
2SWLRQV
3)
Scroll to
7R YLVLWHG
4)
Press
Calendar
2.
to convert to domestic units or
7R K R P H
to convert to foreign units
The calendar keeps track of
reminders, calls you need to make,
meetings, and birthdays. It can
even sound an alarm when its time
for you to make a call or go to a
meeting.
REMEMBER! Your phone must be switched on to use this
function. Do not switch on the phone when wireless phone
use is prohibited or when it may cause interference or danger.
(to
(to
Using the calendar
1)
Press
0HQX
8 (
&DOHQGDU
)
(For details on how to work the Menu, see
page 13)
If you havent set the time and date, your phone
prompts you to
6HW SKRQH FORFN
. If you have already
set the time and date, go to Step 2.
23
Page 28

When your phone prompts you for the time with
, enter the time in hours and minutes (using
KK=PP
two digits for each), then press
Press W or V to reach DP or SP, then press
2.
2.
You can set the time format to either 24-hour or
am/pm using the Clock. See Selecting time format on page 36.
When your phone prompts you for the date with
PP2GG2\\\\
, enter the month and day (using two
digits for each) and year (using four digits), then
.
press
2.
Tip:
Use W to move the cursor right and V to
move it left. When you enter a digit, it writes over
the number to the right of the cursor.
2)
Your phone displays the current date and gives
you two choices:
2SWLRQV
and
%DFN
About the date display
The phone automatically displays todays date. To
To skip directly
W
scroll to a different date, press
or V.
to a different date, see Option 5: Go to date on
page 26.
If you have set any calendar notes for the displayed
date, the appropriate icon(s) appear in the lower righthand corner:
Birthday reminder
Meeting reminder
Call reminder
Other reminder
. Then
Once youre at the date you want, press
W
to select the option you want, and press
use
2SWLRQV
6HOHFW
The options are:
Option 1: View day
This option allows you to view, erase, edit, move, and
24
.
Page 29

send notes that were made for the selected day. Press
W
or V to scroll through notes. Options while viewing
a note are
QRWH
(UDVH, (GLW, 0RYH
(to send the note).
(to another date), and
6HQG
Option 2: Make note
With this option, youll need to choose
0HHWLQJ
, or
. Your phone will prompt you for
%LUWKGD\
5HPLQGHU, &DOO
more information depending on which one you
choose.
See Entering letters and numbers on page 41 for
help with entering information at the
6XEMHFW=
prompt.
You can set an alarm for any of the note types. Your
phone must be turned on in order for the alarm to
sound. If you set an alarm, when the alarm sounds, you
can choose
pressing
3RVWSRQH
2.
or
. Pressing 2. stops the alarm;
3RVWSRQH
resets the alarm for 10 minutes later.
Option 3: Erase notes
W
or V to reach
Press
, then press 2..
DW RQFH
2I FKRVHQ GD\
displays each note for the day you selected
before pressing
vidually. Press
V
to leave it and view other notes.
2QH E\ RQH
displays notes in chronological order, birth-
2I FKRVHQ GD\, 2QH E\ RQH
, so you can delete them indi-
2SWLRQV
to delete the note, or press W or
(UDVH
, or
$OO
days first, so you can delete them individually. Press
to delete the note, or press W or V to leave it and
(UDVH
view other notes.
$OO DW RQFH
allows you to delete all calendar notes at
once. The phone asks you to confirm your decision
before erasing the notes.
,
Option 4: View all
This option allows you to scroll through birthday notes
in chronological order, then other notes in chronological order.
25
Page 30

Option 5: Go to date
This option allows you to go directly to the specified
date instead of scrolling. Enter a date in
format, then press
to go to that date.
2.
PPGG\\\\
Option 6: Set the date
This option allows you to set todays date in your
phone. Enter the date in
.
2.
Calendar note received
Your phone displays
PPGG\\\\
&DOHQGDU QRWH UHFHLYHG
format, then press
when
someone sends you a note that you can save in your
calendar. Saving a note in your calendar is equivalent
to making the note yourself; you can work with it in the
same way as any other note in your calendar, including
setting an alarm.
For information on sending calendar notes, see
page 24.
Viewing received calendar notes
Caution: If you press
at any time bef or e sav ing t he
([LW
calendar note, the calendar note will be deleted!
1)
When your phone displays
press
2SWLRQV
2)
is selected. Press
6KRZ
3)
W
to scroll through the note
Press
&DOHQGDU QRWH UHFHLYHG
2.
,
Editing viewed calendar notes
1)
After viewing the calendar note, press
2)
Scroll to
(GLW
3)
Edit the note
Note: The V key will move the cursor to the left, and W will
move it to the right. Press
4)
Press
2.
when youre done
to backspace.
&OHDU
%DFN
26
Page 31

Saving received calendar notes
1)
After viewing the calendar note, press
editing, press
2)
Scroll to
2SWLRQV
, then press
6DYH
2.
%DFN
Deleting viewed calendar notes
After viewing the calendar note, press
.
([LW
, then press
%DFN
Call cost limit
This feature allows you to limit the amount of money
you spend on your mobile phone bills. When the limit
you set is reached, no calls can be made except for
emergency calls.
Note: The actual time invoiced for calls by your service provider may vary, depending on network features, rounding-off for
billing, and so forth.
See also Show call costs on page 73. To choose
whether you want call cost measured in charging units
or dollars, see Show costs in on page 74.
Setting a call cost limit
1)
Press
FRVW OLPLW
For details on how to work the menu, see page 13.
2)
The phone asks for your PIN2 code
page 63)
3)
Use
4)
When you see
4 2 6 (
0HQX
)
. Enter it and press
W
to reach
6HOHFW
1XPEHU RI XQLWV=
6HWWLQJV 0 6HFXULW\ VHWWLQJV 0 &DOO
(see
.
2.
then press
2.
enter the number
of charging units or dollars (press # to insert a
decimal point) and press
2.
The number of remaining units is shown when the display is clear.
, or after
Removing a call cost limit
1)
Follow steps 1 and 2 in Setting a call cost limit
27
Page 32

W
2)
Call forwarding
See Forward calls on page 45.
Call hold
You can put a single call on hold. If you subscribe to
the Call Waiting network service, you can also put one
call on hold when you receive another call.
Putting a call on hold
While in a call, press
call.
Making a call with one already in progress
While in a call, enter (or recall from the phone book) the
second phone number and press
OR
1)
2)
3)
WIth either method, the first call is automatically put on
hold.
The currently active call is indicated by the icon and
the held call by the icon.
to reach
Use
Press
2SWLRQV
W
to reach
Use
Enter (or recall from the phone book) the second
phone number, and press
then press
2II
. Press
+ROG
1HZ FDOO
2.
8QKROG
ó
and press
&DOO
to return to the
.
6HOHFW
.
Switching between two calls in progress
ó
Press
OR
Press
Ending the active call
Press
6ZDS
ô
(the held call becomes active).
28
Page 33

Ending both calls
1)
Press
2SWLRQV
2)
W
Use
Call log
to reach
(QG DOO FDOOV
and press
This feature automatically keeps
track of numbers youve dialed,
numbers that have called you, and
the amount of time youve spent
on calls.
Using call log
1)
Press
(For details on how to work the Menu, see page 13)
2)
Press
then press
2-1
2-2
2-3
2-4
2-5
2-6
2-7
Tip:
You can dial any of the phone numbers by pres-
ó
sing
2 (
0HQX
W
to reach one of the following options,
6HOHFW
0LVVHG FDOOV
5HFHLYHG FDOOV
'LDOHG FDOOV
&OHDU FDOO OLVWV
&DOO WLPHUV
6KRZ FDOO FRVWV
6KRZ FRVW LQ
)
&DOO ORJ
See page 55.
-
See page 65.
-
See page 38.
-
See page 35.
-
See page 30.
-
See page 73.
-
See page 74
-
while the number is on the display.
.
6HOHFW
.
The Options soft key
When you access
and press
FDOOV
2SWLRQV
'LDOHG FDOOV, 0LVVHG FDOOV
, a list of options will appear on
, or
5HFHLYHG
your phones display.
shows the date and time of the last call. Press
&DOO WLPH
the scroll button to scroll through up to five recent call
dates/times for this phone number.
(GLW QXPEHU
allows you to edit the dialed number and
save it with a name to your phone book.
29
Page 34

allows you to enter a name for the number and
6DYH
save both to your phone book.
erases the number from the call list.
(UDVH
9LHZ QXPEHU
displays the phone number if the asso-
ciated name is currently displayed.
Call settings
This feature consists of automatic redial, call waiting,
send own number, line in use, and calling card.
See the individual entries for each of these features.
Call timers
The phone automatically tracks the amount of time
youve spent in the last call and in all digital calls.
For information on call timers for
analog calls, see Call timers for
analog calls on page 84.
Viewing duration of last call
or all digital calls
1)
Press
(For details on how to work the Menu, see page 13)
2)
Press
0HQX
W
to view
2 5 (
&DOO ORJ
/DVW FDOO GXUDWLRQ
-
&DOO WLPHUV
)
or
'LJLWDO FDOOV
GXUDWLRQ
Setting timers back to 0
1)
Press
2)
Press
press
3)
Enter your security code, then press
0HQX
W
to reach
2.
2 5 (
&DOO ORJ
-
&OHDU GLJLWDO FDOO WLPHUV
&DOO WLPHUV
)
, then
2.
again
Showing the current call timer during calls
1)
2)
Press
Press
0HQX
W
to reach
2 5 (
&DOO ORJ
/DVW FDOO GXUDWLRQ
-
&DOO WLPHUV
)
, then press
'HWDLOV
30
Page 35

3)
&XUUHQW FDOO
4)
Press
is displayed; press
W
to reach 2Q, then press
6HOHFW
2.
During a call, the amount of time spent in that call will
be displayed.
Note: The actual time invoiced for calls by your service provider
may vary, depending upon network features, rounding-off for
billing, and so forth.
Note: Each phone number in your SIM card has its own timers.
Call waiting
This is a network service that allows you to receive an
incoming call when youre already in a call. The phone
beeps to let you know of the incoming call. Contact
your service provider for details.
Activating or cancelling call waiting
1)
Press
(For details on how to work the Menu, see page 13)
2)
Press
3)
Press
4 1 2 (
0HQX
W
to highlight
2.
-
6HWWLQJV
&DOO VHWWLQJV
$FWLYDWH/ &DQFHO/or6WDWXV
-
&DOO ZDLWLQJ
Using call waiting
ó
Press
or
to answer a waiting call. The call
$QVZHU
you were on is put on hold.
To reject the call, press
, and press
5HMHFW
Note: If you dont want to answer the call, you can also just let
it ring.
6HOHFW
, press W to reach
2SWLRQV
.
To switch between the two calls, press ó or
To end the active call, press
then press
. The held call becomes active.
6HOHFW
2SWLRQV
, scroll to
6ZDS
'URS FDOO
)
.
,
Third call waiting
If you have both an active and a held call and a third call
ó
is waiting, press 1
. This drops the active call and
answers the waiting call; the held call is unaffected.
31
Page 36

Or, you can press
2SWLRQV
and scroll to
(QG DOO FDOOV
ends both the active and the held call, and the waiting
call is handled as a normal incoming call.
Caller groups
You can create groups of names in your
(see page 59)
, and give each group a different ringing
3KRQH ERRN
tone. Then youll know when someone from that group
is calling you because of the way the phone rings.
Adding names to a caller group
Note: The names and numbers that you add to a group must
already be stored in your Phone book. See Saving names and
numbers on page 70.
1)
With the display clear, press
W
until you see the
name or number you want
2)
Press
3)
Press
4)
Use
5)
Use
add this name or number. Press
, if shown, or skip to Step 3
'HWDLOV
2SWLRQV
W
to reach
W
to reach the group to which you want to
&DOOHU JURXSV
. Press
6HOHFW
6HOHFW
.
Defining a ringing tone for a caller group
1)
With the display clear, press
2)
3)
4)
W
to reach
Press
W
to reach the group you want. Press
Use
W
until you see
Press
W
to reach the tone you want to hear when
Use
&DOOHU JURXSV
1DPHV
. Press
5LQJLQJ WRQH
6HOHFW
. Press
anyone from this group calls you. Press
Tip
: You can set your phone to ring
only
when people
from certain caller groups call you, and to otherwise be
See the Caller group description under Ring-
silent.
ing options on page 67.
.
6HOHFW
2.
. This
6HOHFW
.
.
Renaming a caller group
1)
Follow steps 1-3 in
Defining a ringing tone for a
caller group
32
Page 37

2)
3)
W
until you see
Press
Enter the group name
5HQDPH JURXS
(see Entering letters and
numbers on page 41 for details)
. Press
and press
Removing names from a caller group
1)
Follow steps 1-4 in
Adding names to a caller
group
2)
W
Use
to reach
Caller ID
1R JURXS
. Press
6HOHFW
.
Caller ID is a network service that displays the phone
number of the person calling you, if it is available.
Check with your service provider for details.
If the caller can be identified, the caller's phone number (or name, if stored in the phone book) and the text
appears while the phone is ringing. If the name
FDOOLQJ
is too long to be displayed, its end is replaced with an
ellipsis (...).
If you subscribe to the Call Forwarding network service and the incoming call has been forwarded from
another phone number, the
.
or
FDOOLQJ
Calling card
sign is shown after
!
If you wish to use a calling card for
long distance calls, you must first
store your calling card information
into your phone. Your phone can
store two calling cards.
6HOHFW
2.
&DOO
.
Programming a calling card
1)
Press
FDUG
)
0HQX
4 1 5 (
6HWWLQJV
-
&DOO VHWWLQJV
(For details on how to work the Menu, see
page 13)
33
-
&DOOLQJ
Page 38

2)
3)
4)
5)
Note: The order of the following steps may vary, depending on
which dialing sequence your card uses.
6)
7)
8)
W
or V to reach desired calling card, then
Press
press
2SWLRQV
W
or V to reach
Press
Enter security code and press
At
'LDOLQJ VHTXHQFH
choose the dialing sequence your card uses
chart on page 34)
, then press
(GLW
, press
6HOHFW
, then press
2.
2.
. Press W or V to
(see
.
6HOHFW
Enter access number (usually the 1-800 number
listed on the back of the calling card), press
Enter card number and/or PIN, press
phone will display
W
Press
or V to reach
6DYH FKDQJHV"
&DUG QDPH=
. Press 2..
and press
2.
2.
. Your
6HOHFW
Enter card name using your phones keypad,
.
press
2.
(See Entering letters and numbers on page 41 if
you need help on entering the card name.)
For details about your phones security code, see
Security code on page 71.
.
Dialing
Sequence
Access no.
+ Phone no.
+ card no.
Access no.
+ card no.
+ phone no.
Prefix
+ phone no.
+ card no.
Use for cards that
require you to:
Dial 1-800 access number,
then phone numbe r, then card
number (+ PIN if required)
Dial 1-800 access number,
then card number (+ PIN if
required), then phone number
Dial the prefix (any numbers
that must precede the phone
number) and phone number
you want to dial, then card
number (then PIN, if required)
34
Cards
using this
sequence
MCI, AT&T True
Choice, Sprint
Canada, Unitel
networkMCI,
WorldPhone MCI
GTE, PacBell,
AT&T, Stentor
Page 39

Choosing a calling card to use
1)
Press
FDUG
(For details on how to work the Menu, see page 13)
2)
Press
3)
6HOHFW
4)
Enter security code at
0HQX
4 1 5 (
6HWWLQJV
-
&DOO VHWWLQJV
)
W
or V to reach desired card, press
is highlighted; press
2.
6HFXULW\ FRGH=
-
, press
Making calling card calls
1)
Enter the phone number, including any prefix (such
as 0 or 1) that your calling card may require when
you make a calling card call. See your calling card
for instructions.
2)
Press and hold
phone displays
3)
Your phone will display
. Wait for the tone, then press 2..
QXPEHU
4)
Your phone will display
. Wait for the tone, then press 2..
EHU
Note: Steps 3 and 4 may be switched depending on the
dialing sequence you chose.
This procedure may not apply to all calling card options programmed into your phone. Please look at the back of your
calling card or contact your long distance company for more
information.
Change access cod es
ó
for a few seconds until your
&DUG FDOO
3UHVV 2. WR VHQG SKRQH
3UHVV2.WRVHQGFDUGQXP0
See Access codes on page 18.
&DOOLQJ
2SWLRQV
2.
Change module code
See Change module code on page 85.
Clear call lists
This feature will clear all dialed numbers, as well as
numbers of answered calls and missed calls. You
cannot undo this operation, so be careful.
35
Page 40

Also, see Call log on page 29.
1)
Press
(For details on how to work the Menu, see page 13)
2)
Highlight either
press
2 4 (
0HQX
will clear all call lists, while the others
2. ($OO
-
&DOO ORJ
&OHDU FDOO OLVWV
$OO, 0LVVHG, 'LDOHG
, or
)
5HFHLYHG
clear their respective call lists)
Note: Missed, Received, and Dialed calls lists are also erased
when you use a SIM card that is not one of the 5 most previous cards used with the phone, or you change the phone
security setting. See Phone security on page 62.
Clear timers
See Call timers on page 30.
Clock
Your phone has an internal clock
that can be displayed on the start
screen. It also features an alarm
(see page 18).
clock
Setting the clock
1)
Press
(For details on how to work the Menu, see page 13)
2)
Press
3)
Enter the current time, using two digits for both
0HQX
W
to
4 3 3 (
6HWWLQJV
$GMXVW WLPH
-
, press
3KRQH VHWWLQJV
6HOHFW
hours and minutes
4)
Press
2.
5)
Select
or SP and press 2. (if am/pm time for-
DP
mat has been selected; see below)
If this is the first time you have set the clock, the phone
will prompt you to enter the date. Enter the date in
PPGG\\\\
format and press 2..
-
and
&ORFN
)
Selecting time format
1)
Press
(For details on how to work the Menu, see page 13)
0HQX
4 3 3 (
6HWWLQJV
-
3KRQH VHWWLQJV
36
-
&ORFN
)
Page 41

2)
3)
4)
Displaying or hiding the clock
This feature allows you to toggle between displaying
the clock on the start screen or hiding it.
1)
2)
3)
Conference calls
This is a network service that allows you to make conference calls with your phone. Check with your service
provider for details.
First, call the first person
Then, call other participants
Either of the following methods automatically puts the
existing call on hold as you make the new call:
1)
2)
3)
4)
5)
W
to
Press
Press
Press
Press
(For details on how to work the Menu, see page 13)
Press
choice appears, depending on the current setting)
Press
Make a call as usual.
While in a call, enter the phone number of the
person you want to conference in, and press
OR
Press
6HOHFW
phone book, then press
After the second party answers, press
Press
To add other people to the call, repeat steps 1-3
To end the conference call, press
7LPH IRUPDW
W
to either
2.
4 3 3 (
0HQX
W
to either
6HOHFW
, press Wto
2SWLRQV
. Enter or recall the phone number from the
W
to
&RQIHUHQFH
and press
570KRXU
6HWWLQJV
+LGH FORFN
and press
or
DP2SP
-
3KRQH VHWWLQJV
or
'LVSOD\ FORFN
1HZ FDOO
ó
or
&DOO
6HOHFW
, then press
2SWLRQV
6HOHFW
ô
-
&ORFN
(only one
ó
)
37
Page 42

Having a private conversation with one of the
participants
1)
While in the call, press
2)
Press
W
to
3ULYDWH
2SWLRQV
and press
6HOHFW
. A list of the
participants appears.
3)
Scroll to the desired person and press
2.
other participants can continue to talk to each
other.
4)
To re-join the conference call, press
5)
Press
W
to
&RQIHUHQFH
and press
2SWLRQV
6HOHFW
Dropping individual participants from the
conference call
1)
While in a conference call, press
2)
Press
W
to
3ULYDWH
and press
2SWLRQV
6HOHFW
. A list of the
participants appears.
3)
Scroll to the desired person and press
2.
other participants can continue to talk to each
other.
4)
5)
Press
Press
2SWLRQV
W
to
'URS FDOO
and press
6HOHFW
Currency co nversion
See Currency conversion on page 22.
Current call duration
See Call timers on page 30.
. The
. The
Data calls
See Fax and data calls on page 43.
Dialed calls
Your phone automatically stores
the last 10 numbers youve dialed.
See Call log on page 29 for
details on other call lists.
38
Page 43

Viewing the dialed calls list
1)
Press
2)
Press
3)
To dial the number, press
press
page 29)
Erasing the dialed calls list
See Clear call lists on page 35.
Dice
See "Games" on page 46.
Digital/analog selection
See Digital/analog selection on page 85.
Distinct ringing
This allows you to set the phone to ring in a special
way when certain people call you.
ing on page 33.
Earpiece volume
The volume buttons on the side of
you to adjust the earpiece volume during a phone call.
Pressing the top button increases the volume and
pressing the bottom button decreases the volume.
If an accessory with its own loudspeaker is connected
to your phone, the volume buttons will adjust the
volume for that accessory.
2 3 (
0HQX
W
or V to reach the desired number
(see The Options soft key on
2SWLRQV
&DOO ORJ
-
'LDOHG FDOOV
ó
; for other options,
See Caller group-
your
)
phone allow
Emergency calls
Before attempting any emergency calls, see Emergency
Calls on page 97 for important safety information.
1)
If the phone is not on, switch it on. Some networks
may require that a valid SIM card is properly
inserted in the phone.
39
Page 44

2)
Key in the emergency number for your present
location (e.g. 911 or other official emergency
number). Emergency numbers vary by location.
Press
ó
3)
IMPORTANT!
This phone, like any wireless phone, operates using radio
signals, wireless and landline networks as well as user-programmed functions which cannot guarantee connection in all
conditions. Therefore you should never rely solely upon any
wireless phone for essential communications (e.g. medical
emergencies).
Remember, to make or receive any calls the phone must be
switched on and in a service area with adequate signal
strength. Emergency calls may not be possible on all wireless
phone networks or when certain network services and/or
phone features are in use. Check with local service providers.
If certain features are in use (Keyguard, fixed dialing, restrict
calls, etc.), you may first need to turn those features off before
you can make an emergency call. Consult this document and
your local cellular service provider.
When making an emergency call, remember to give all the
necessary information as accurately as possible. Remember
that your wireless phone may be the only means of communication at the scene of an accident - do not cut off the call until
given permission to do so.
Emergency Key 9
With this feature on, the phone attempts to make an
emergency call when you press 9 then
ó
phone dials the emergency number programmed into
your phone.
Note: This feature is not active until you follow the steps in
Activating Emergency Key 9.
Note: You can also dial an emergency call by pressing and
holding 9 until the phone indicates it is attempting to make an
emergency call. However, this method does not work when
Keyguard is active or when the phone is connected to a
modem.
. The
Activating Emergency Key 9
1)
Press
(PHUJHQF\ NH\ <
0HQX
4 3 7 (
)
6HWWLQJV
-
40
3KRQH VHWWLQJV
-
Page 45

(For details on how to work the Menu, see page 13)
2)
Press
W
to reach 2Q or
, then press
2II
2.
IMPORTANT!
Official emergency numbers vary by location (for example,
911). You can only program one emergency number into your
phone to be dialed automatically by Emergency Key 9, and it
might not be the proper number in all circumstances.
Entering letters an d nu mb er s
You can enter letters as well as numbers when storing
information into your phone. Simply press the corresponding number key repeatedly until the desired
letter appears on the display (for example, use the 2
key to enter A, B, or C).
ABC mode
When your phone prompts you to enter letters, it will
automatically switch over to ABC mode.
ABC
Your phone displays the
icon to ind icate that it is
in ABC mode.
ABC
When
is displayed, you can enter these characters:
Key Characters Key Characters
1 .,?!-1 7 PQRS7
2ABC2 8TUV8
3DEF3 9WXYZ9
4GHI4 0space, 0
5JKL5 ∗ (See page 42 for
details.)
6 MNO6 # Changes letter case
While youre editing a name, the
W
cursor to the left, and
to correct any mistakes.
&OHDU
will move it to the right. Press
V
key will move the
If you wish to enter an empty space between characters, press 0 for each space.
41
Page 46

Changing letter case
Press the # key to switch between upper- and lowercase letters. The
icon will switch to
$%&
to indicate
DEF
you are using lower case.
Entering numbers
To enter numbers while in ABC mode, you can:
press and hold the corresponding key until the number
appears, or
switch between ABC mode and number mode by pressing
and holding the # key.
Special characters (for storing names)
When you are in ABC mode
(see page 41)
you can
press the key and the following special characters
will appear. If your SIM card supports special characters, you can use these characters when storing
W
names in your phone book. Simply press
highlight the one you wish to use, then press
. , ? ! : ; - + #
∗
( ) _ @ & $ £ % / < > ¿ ¡ § =
or V to
,QVHUW
.
Special characters in phone numbers
You can use special characters to dial or save international phone numbers as well as phone numbers of
automated services such as bank account information. When entering numbers, press the key
repeatedly to use these characters.
Character Use
This character is used to send command strings to the
-
network. Contact your service provider for details.
This character is a prefix used for dialing international
.
numbers.
42
Page 47

Character Use
Use this ch aract er t o sa ve ph one numbe rs of aut oma ted
S
services that require you to enter a password or other
information after th e call is answered. For example, if
your bank’s phone number is 555-1212 and you need
to enter your account number (12345) and password
(6789), you could save this phone number as
8884545S45678S9:;<
Note: I n digital networks, digits to the right of the S are
sent after a 2.5-second pause. In analog networks,
digits to the right of the S are not sent until you press
.
6HQG
This character creates a wait; digits to the right of the Z
Z
are not sent until you press
character cannot be saved.
Erasing stored names and numbers
. Currently this
6HQG
See Erasing stored names and numbers on
page 61.
Erasing your entire phone book
See Erasing your entire phone book on page 61.
Fax and data calls
Your phone can send and receive data and faxes via
an optional data adapter that connects to the base of
the phone. The phone automatically recognizes the
type of the connected terminal.
Making a fax or data call:
1)
Connect the appropriate data or fax terminal to the
phone
If you try to make a data or fax call and the data
adapter is not connected or connected incorrectly, the text
3OHDVH FRQQHFW WHUPLQDO
will appear.
Check that the data adapter is properly set up.
43
Page 48

2)
Enter or recall phone number from the phone
book
3)
End the call by pressing
For more information, refer to documentation supplied with
your data adapter, data application or fax application.
Note: You cannot make a data or fax call while you have active
or held calls in progress.
ô
Receiving a fax or data call
A fax or data call can be answered only from the data
terminal, even when the phone keypad is locked.
Fixed dialing
This lets you restrict your outgoing calls to phone
numbers included in the fixed dialing list or beginning
with the same digit(s) as an entry in the list.
Note: Fixed dialing works only with SIM cards that support it.
For other types of call restrictions, see Restrict calls on
page 66.
Turning fixed dialing on or off
1)
Press
GLDOLQJ
(For details on how to work the m enu, see page 13)
Use W to reach 2Q or
2)
Enter your PIN2 code and press
Note: If you turn fixed dialing on and dont have any numbers
in the list, you cant make any calls!
Note: When fixed dialing is set to on, calls may be possible to
certain emergency numbers in some networks (e.g. 911 or
other official emergency number).
0HQX
)
4 2 5 (
6HWWLQJV 0 6HFXULW\ VHWWLQJV 0 )L[HG
then press
2II
2.
2.
Adding numbers to the fixed dialing list
1)
Press
GLDOLQJ
2)
Use
3)
Use
0HQX
)
W
to reach
W
to reach
4 2 5 (
6HWWLQJV 0 6HFXULW\ VHWWLQJV 0 )L[HG
then press
1XPEHUV
then press
$GG
6HOHFW
2.
44
Page 49

4)
Enter your PIN2 code and press
5)
Enter the name (optional) and press
6)
Enter the number and press
2.
Repeat steps 3-6 for each number you want to
add to the list.
Forward calls
Call forwarding is a network service that lets you forward your
incoming calls to another phone
number. Check with your service
provider for details.
Forwarding calls
1)
Press
(For details on how to work the menu, see page 13)
2)
Use
press
51
52
53
54
3)
$FWLYDWH
4)
At the
5 (
0HQX
)RUZDUGLQJ
W
to reach one of the following options, then
:
6HOHFW
)
)RUZDUG DOO YRLFH FDOOV
)RUZDUG ZKHQ QRW DEOH WR WDNH FDOOV
)RUZDUG DOO ID[ FDOOV
)RUZDUG DOO GDWD FDOOV
is selected;
1XPEHU=
press
2.
prompt, enter the phone number
to which you want to forward calls and press
You can press
to verify that you entered
1XPEHU
the correct number.
2.
2.
2.
Cancelling call forwarding
To cancel call forwarding, press
Note: Cancelling all call forwarding may also cancel any
automatic forwarding of calls to voice mail that your service
provider has activated for you. Contact your service provider
for details.
0HQX
5 5.
45
Page 50

Getting call forwarding status
Note: Status is not available for
.
WDNH FDOOV
1)
Repeat steps 1-2 in
2)
W
to reach
Use
Press
to show the phone number to
1XPEHU
)RUZDUG ZKHQ QRW DEOH WR
Forwarding calls
and press
6WDWXV
2.
which the calls are forwarded.
Note: When
is displayed when the display is clear.
)RUZDUG DOO YRLFH FDOOV
is turned on, the icon
Games
Challenge yourself or a friend to the four fun games in
your phone. In the main menu scroll down to
press
REMEMBER! Your phone must be switched on to use this
function. Do not switch on the phone when wireless phone
use is prohibited or when it may cause interference or danger.
, and choose one of the following.
6HOHFW
Memory
Reveal pictures to find pairs in as few tries as possible.
Move the cursor with the 2 (up), 4 (left), 6 (right), and 8
(down) keys. Press the 5 key to reveal pictures. Press
the # key to jump right over revealed pictures or move
from the bottom right of the screen to the top left.
Press the key to jump left over revealed pictures
or move from the top left of the screen to the bottom
right. Once found, pairs stay visible.
*DPHV
,
Snake
Feed the snake with as many goodies as possible and
watch it grow. Use keys 2, 4, 6, and 8 to turn the
snake toward food. The longer the snakes tail grows,
the higher the score. If the snake hits its own tail or the
surrounding wall, the game is over.
Logic
Find the secret combination of figures in a column.
Possible figures are shown at the top of the display.
46
Page 51

Press the 5 key repeatedly to select a figure and the 2,
4, and 8 keys to move the cursor. Once you think you
have the right combination, press the key. The
result appears as a set of marks above the column. A
correct figure in the right place gets a full mark; a correct
figure in the wrong place gets a half mark. The game
ends when the correct figures are in the right place.
To copy a figure from the previous column, move
7LS=
the cursor over it using the 2, 4, or 8 key, then press
the 5 key.
Dice
This game takes the place of an actual set of dice. Use
option to set the number of dice, up to six.
/HYHO
the
You can roll, lock, and unlock each die as many times
as you wish.
When you start a new game, the dice roll for a couple
of seconds and then stop. Use the 4 (left) and 6 (right)
keys to select a die. Press the 5 key to lock or unlock
the selected die.
Press to roll the unlocked dice again.
Inbox
When you receive a text message
(see page 76)
text message is stored in the Inbox.
The phone displays
0HVVDJH UHFHLYHG
and the
indicator, and makes a sound (depending on the
Message alert tone;
see page 52
).
, the
Message storage
The Inbox and Outbox share a given amount of
memory in your SIM card. When this memory is full
and there is no more room to store messages, the
message indicator blinks. If you are sent a text
message when the memory is full, the phone displays
the message
1R VSDFH= PHVVDJH ZDLWLQJ
. You should
delete one or more old messages to make room for
the new message. The network will wait and re-send
the message at a later time.
47
Page 52

Note: Depending on your SIM c ard, the Inbox and Outbox can
contain a total of up to 50 messages.
Reading messages immediately
If your phone says
0HVVDJH UHFHLYHG
, press
5HDG
. This
takes you to the Inbox, with the new message
selected. Press
again. If necessary, use W and V
5HDG
to scroll through the message.
Reading messages any time
1)
Press
(For details on how to work the m enu, see page 13.)
0HQX
1 1 1 (
0HVVDJHV
-
7H[W PHVVDJHV
-
,QER[
A list of message headers appears.
The icon in front of the header indicates that a
message has been read. The icon indicates
that a message has not yet been read.
2)
W
Use
to reach the message you want, and press
5HDG
3)
If the message is long, use
W
and V to scroll
through the message
4)
The message text is followed by the senders name
or phone number, and reception date and time
When youve seen the last message, the indicator
disappears.
Working with messages in the Inbox
You can access options while youre reading a message. Just press
then press
(UDVH
5HSO\
.
2.
deletes the message. Press 2. to confirm.
sends a reply to the sender of the message.
Enter your message and press
and press 2.. The phone displays the return
6HQG
number. Edit the number if desired, then press
allows you to edit a message.
(GLW
, scroll to the one you want,
2SWLRQV
2SWLRQV
. Use W to reach
.
2.
)
48
Page 53

*HW QXPEHU
a message, if there is one. You can use it like any other
number. If there is more than one number, scroll to the
desired number, then press
)RUZDUG
message (if necessary), press
at the
message, then press
2.
the phone book and press
'HWDLOV
able: senders name and phone number, SMS center
used for sending, reception date and time, reply path
availability.
In-call menu
While in a call, press
menu. See separate entries for call hold, call waiting,
conference calls, touch tones, and transfer a call.
Keyguard
This feature prevents accidental key presses when
your
keypad. If any keys are pressed while Keyguard is
activated,
Activating Keyguard
Press and hold
Press
Press
retrieves an included phone number from
.
2.
sends the message to someone else. Edit the
ó
prompt, then press 2.. Or, edit the
1XPEHU=
. Enter the recipients phone number or recall it from
shows these details of the message, if avail-
phone is in your pocket or purse by locking your
3UHVV 8QORFN DQG WKHQ -
0HQX
9
0HQX
ô
OR
until
2SWLRQV. 6HQG
2SWLRQV
.H\V ORFNHG
, enter the number
is selected. Press
.
2.
to access the in-call
appears.
appears, OR
Deactivating Keyguard
Press
8QORFN
Press and hold ô until
press
2.
OR
49
8QORFN NH\V"
appears, then
Page 54

Answering a call with Keyguard active
When Keyguard is active, you can only press
answer a call.
Some notes about Keyguard
When Keyguard is ON, calls may be possible to the
emergency number programmed into your phone
(e.g. 911 or other official emergency number). However,
one-key emergency dialing (the 9 key) does not operate.
Briefly pressing the key turns lights on for 15
seconds.
Keyguard is automatically turned off when the phone is
connected to a car kit.
Keypad tones
This is one of the settings in your phones profiles
(see page 63)
. It sets the volume of the tone that you
hear when you press the phones keys.
Setting the keypad tones
1)
Press
(For details on how to work the Menu, see page 13)
2)
Use
keypad tones for, and press
3)
Highlight
.H\SDG WRQHV
4)
Press
plays a sample of each. Press
3 (
0HQX
W
to highlight the profile you want to set the
3URILOHV
)
2SWLRQV
&XVWRPL]H
W
to scroll through the options; your phone
and press 2.. Press W to
and press
6HOHFW
.
for the one you
2.
want.
ó
to
Language
Because many wireless phone
customers speak English as a
second language, your phone
allows you to choose your phones
displayed language.
50
Page 55

Choosing a language for your phone
1)
Press
/DQJXDJH
(For details on how to work the Menu, see page 13)
2)
Use
press
Note: A shortcut for choosing English is to press
Last call duration
See Call timers on page 30.
Last number redial
To redial the last dialed number, press ó twice while
at the start screen.
To dial any of the 10 last dialed numbers
ó
Press
and press
the menu;
Lights
To turn your phones lights on for 15 seconds, press
any key. If Keyguard is on, press the power key.
If you are using your phone with a handsfree car kit,
you can set lights to
(after 15 seconds, lights turn off until the next key is
pressed, phone rings, etc.). Do this by customizing
your phones
4 3 1 (
0HQX
)
W
or V to select the language you want and
2.
, then press W to reach the desired number,
ó
again. You can also view this list using
see Dialed calls on page 38
profile
&DU
-
6HWWLQJV
2Q
3KRQH VHWWLQJV
0HQX
.
(lights stay on) or
(see Profiles on page 63).
$XWRPDWLF
-
4 3 1 1.
Line in use
Alternate line service allows you to have more than one
phone number. Contact your service provider for
details. If you subscribe to this service, you can
choose which phone number you want to make calls
with. You can receive calls on either line regardless of
the line selected for outgoing calls.
1)
Press
0HQX
4 1 4 (
6HWWLQJV
51
-
&DOO VHWWLQJV
-
/LQH LQ XVH
)
Page 56

(For details on how to work the m enu, see page 13)
2)
W
to reach the line you want, and press
Use
Note: If you switch the phone on with a new SIM card, the
phone chooses Line 1 automatically.
List of own numbers
If your SIM card supports this feature, you can view the
phone number(s) of your SIM card.
Viewing own numbers
1)
Press
RZQ QXPEHUV
(For details on how to work the m enu, see page 13)
2)
Use
0HQX
4 3 2 (
6HWWLQJV
-
3KRQH VHWWLQJV
)
W
to reach the desired entry (for example, the
name of the service provider and PCS)
Listen to voice messa g es
See Voice messages on page 78.
Logic
See "Games" on page 46.
Memory
See "Games" on page 46.
Menu
See Working The Menu on page 13.
-
2.
/LVW RI
Message alert tone
This is one of the settings in your phones profiles
(see page 63)
. It sets the tone that your phone makes
when you get a text message.
Also, see Text messages on page 76.
1)
Press
(For details on how to work the Menu, see page 13)
0HQX
3 (
3URILOHV
)
52
Page 57

W
2)
3)
4)
to highlight the profile you want to set the
Use
message alert tone for, and press
Highlight
reach
Use
&XVWRPL]H
0HVVDJH DOHUW WRQH
W
to scroll through your choices (your phone
and press 2.. Press W to
, then press
plays samples) and press
2SWLRQV
2.
6HOHFW
Message received
Text messaging is a network service that allows you to
send and receive text messages with your phone
Text messages on page 76)
. Check with your service
provider for details.
When you receive a text message, the phone displays
0HVVDJH UHFHLYHG
and the indicator, and makes a
sound (depending on the Message alert tone;
page 52
).
To read the message, press
. This takes you to the
5HDG
Inbox, with the new message selected. Press
again to read the message.
See Inbox on page 47 for more details on received
text messages.
Message settings
Text messaging is a network service that allows you to
send and receive text messages with your phone
Text messages on page 76)
. Check with your service
provider for details.
You can specify some of the ways your phone handles
text messages. Depending on your SIM card, you can
have up to five sets of settingsfor example, one for
e-mail messages, one for pages, one for faxes, etc.
.
5HDG
(see
see
(see
Specifying a set of message settings
1)
Press
(For details on how to work the menu, see page 13)
2)
Press
tings for, and press
1 2 (
0HQX
W
to reach the set you want to specify set-
0HVVDJHV
-
0HVVDJH VHWWLQJV
6HOHFW
53
)
Page 58

3)
W
to reach the options listed below and
Press
press
6HOHFW
0HVVDJH FHQWHU QXPEH U
center phone number and press
to get the number from your phone book
6HDUFK
: Either enter the message
2.
, or press
(if it is stored there).
Your service provider gives you your message center
number. You need it to send text messages.
0HVVDJHV VHQW DV
format, then press 2..
(0PDLO
In order to receive a converted message, the recipient
needs to have the appropriate terminal device.
0HVVDJH YDOLGLW\
: Use W to reach
7H[ W, )D[, 3DJH
: Use W to reach the amount of
time that messages are stored at the message
center, then press
5HQDPH WKLV VHW
message settings and press
.
2.
: Enter a new name for this set of
.
2.
Specifying settings for all messages
1)
Press
&RPPRQ
(For details on how to work the m enu, see page 13)
2)
Press
FHQWHU
'HOLYHU\ UHSRUWV
press
0HQX
1 2 6 (
0HVVDJHV
-
0HVVDJH VHWWLQJV
)
W
to reach
and press
'HOLYHU\ UHSRUWV
6HOHFW
: Press W to reach
means that the network will try to
2.. <HV
or
5HSO\ YLD VDPH
or 1R then
<HV
send delivery reports for the messages you send.
5HSO\ YLD VDPH FHQWHU
means that the network will
try to route the reply to this text message via your
own message center.
or
-
Microphone
You can mute and unmute your phones microphone
while a call is in progress. The difference between
mute and hold is that mute allows you to continue to
hear the other person.
54
Page 59

To mute the phones microphone during a call; press
, scroll to
2SWLRQV
microphone, press
Note: If you are using the optional analog module,
pears as the right softkey during a call. Press
microphone and
Muting and unmuting also affects the microphones of
any accessories connected to the phone.
Missed calls
Your phone automatically stores the last 10 numbers
that have tried unsuccessfully to reach you.
log on page 29 for details on other call lists.
0XWH
8QPXWH
8QPXWH
, then press
.
to unmute it.
. To unmute the
6HOHFW
0XWH
ap-
0XWH
to mute the
See Call
When the display says
Press
can scroll through the list of numbers. To dial the displayed number, press
(see The Options soft key on page 29)
press
Viewing the missed calls list at any time
1)
2)
3)
Erasing the missed calls list
See Clear call lists on page 35.
Module call timers
See Call timers for analog calls on page 84.
Module securit y
See Module security on page 86.
. If you have missed more than one call, you
/LVW
.
%DFN
Press
Press
To dial the number, press
press
page 29)
2 1 (
0HQX
W
or V to reach the desired number
(see The Options soft key on
2SWLRQV
0LVVHG FDOOV
ó
; for options, press
-
&DOO ORJ
0LVVHG FDOOV
ó
55
; to exit,
)
; for other options,
2SWLRQV
Page 60

Names
See Working The Menu on page 13 and Phone
book on page 59.
News & Info service
This network service allows you to
receive news and information from
the network. Contact your service
provider for details.
Using the News & Information service
1)
Press
(For details on how to work the m enu, see page 13)
2)
Use
press
- Turns on News & Info reception.
2Q
- Turns off News & Info reception.
2II
7RSLF LQGH[
1 4 (
0HQX
W
to reach one of the following options and
2.
0HVVDJHV
-
1HZV ) LQIR VHUYLFH
- Gets a list of available topics from the
network.
- Lets you work with the available topics.
7RSLF V
See Working with Topics.
/DQJXDJH
- Chooses the language for messages.
Scroll to the language(s) you want and press
for each one you want. Then press
to save or
to ignore the changes.
1R
%DFN
, then
)
0DUN
<HV
Working with topics
Once youve chosen
in Step 2 above, you have
7RS L FV
the following choices.
- Use W to reach this and press 2..
6HOHFW
W
Use
to scroll through available topics.
3)
Press
to select or
0DUN
8QPDUN
to deselect a
topic. Repeat this as many times as you need.
4)
Press
%DFN
56
Page 61

5)
Press
to save your changes or 1R to ignore the
<HV
changes
- Use W to reach this and press 2..
$GG QHZ
Enter the topic number and press
Enter the name and press
- Use W to reach this and press 2..
(GLW
W
Use
to reach the topic you want to edit.
Edit the number and press
2.
2.
.
2.
.
. Repeat this with the
name.
- Use W to reach this and press 2.. Use W to
(UDVH
reach the topic you want to erase and press
One-touch dialing
This feature allows you to make phone calls quickly
and easily with the touch of a button.
The second through eighth phone numbers you store
to your phone book are automatically assigned to keys
2 through 8. You can change the key assignments
using the following procedure.
Note: Keys 1 and 9 are used exclusively for dialing your voice
mailbox and for attempting emergency calls (See Voice messages on page 78 and Emergency Calls on page 97).
Storing one-touch dial locations
At the start screen,
1)
Press
1DPHV
2)
3)
4)
5)
6)
W
or V to highlight
Press
Press
6HOHFW
W
or V to scroll to the desired key
Press
Press
$VVLJQ
W
or V to choose the name you want to
Press
1
0WRXFK GLDOLQJ
assign to the selected key, then press
2.
2.
.
57
Page 62

Calling a number using one-touch dialing
Press and hold a key (2 through 8) for a few seconds
to call the number in the corresponding one-touch dial
location.Your phone recalls the phone number from
the memory, displays it briefly, then dials it.
Note: If you press and hold 1, your phone calls your voice mailbox. If you press and hold 9 and Emergency Key 9 is on, your
phone attempts a call to the emergency number programmed
into your phone.
Changing numbers in one-touch dial list
With this feature, you can assign a different number to
any one-touch dial location.
At the start screen,
1)
Repeat steps 1 through 3 in
Storing one-touch
dial locations
2)
W
or V to select location you wish to
Press
change
3)
4)
5)
2SWLRQV
Press
W
or V to
Press
W
or V to select different name for location
Press
and press
2.
&KDQJH
, then press
6HOHFW
Erasing one-touch dial locations
1)
Repeat steps 1 through 3 in
Storing one-touch
dial locations
2)
3)
4)
5)
W
Press
or V to select location you wish to erase
Press
2SWLRQV
W
Press
At the
or V to
prompt, press
(UDVH"
(UDVH
, then press
2.
6HOHFW
Outbox
Text messages that you have written and saved are
stored in the Outbox. The icon in front of a message
heading shows that you have attempted to send the
58
Page 63

message to the text message center. The icon
shows that you have not yet tried to send the message.
Using the Outbox
1)
2)
Press
Use
Press
1 1 2 (
0HQX
W
to scroll through the message headers.
to read the selected message.
5HDG
0HVVDJHV
-
7H[W PHVVDJHV
-
2XWER[
Working with messages in the Outbox
While reading a message, press
2SWLRQV
to work with
messages. Scroll to one of the following options:
deletes the message. Press 2. to confirm the
(UDVH
erase or
allows you to edit the message. Use
(GLW
space over letters,
number keys to enter letters.
on page 41 for details.)
2SWLRQV
writing a new message (
&OHDU VFUHHQ
*HW QXPEHU
to exit.
%DFN
to back-
W
or V to move the cursor, and the
&OHDU
(See Entering Letters
When youre done, press
again. You get the same options you get while
See Write messages on page 80.
6HQG, 6HQG VSHFLDO, 6DYH
).
, and
displays the number that was included in
the message (if available). You can treat it like any other
number.
forwards the message to someone else. The
)RUZDUG
steps are the same as sending a message.
See Write
messages, Send option, on page 80.
)
Phone book
Depending on your SIM card, you can store up to 255
numbers (and associated names) in the phone book.
(See Checking available memory on page 62.)
numbers are right at your fingertips for easy dialing. To
W
access them, simply press
or V from the start
screen.
Things to know about the phone book
The maximum length of stored numbers and names
depends on your SIM card.
59
These
Page 64

A name may appear only once in memory. If you try to
store a name that already exists in memory, the phone
will ask if you want to replace the currently stored name.
Accessing names in the phone book
W
At the start screen, press
or V. To skip ahead
quickly in the list, press the number key that corre-
ó
sponds to the first letter of the name. Press
to call
the number.
Accessing phone book functions
At the start screen,
1)
Press
1DPHV
2)
3)
W
or V to highlight desired submenu
Press
Press
6HOHFW
About the submenus
The phone book has several submenus from which
you can choose.
allows you to search for a specific name.
6HDUFK
allows you to enter new names and numbers.
$GG QHZ
lets you erase every name and number in your
(UDVH DOO
phone book. You can erase one name and number at
a time by pressing
'HWDLOV
, then
2SWLRQV
when viewing
a name already in the directory.
lets you choose your scrolling view (
2SWLRQV
1DPH.QXPEHU
, or
1DPH RQO\
), as well as check how
many more names your phone can store
ing available memory on page 62)
1
0WRXFK GLDOLQJ
touch dial locations
&DOOHU JURXSV
allows you to assign up to seven one-
(see page 57 for details)
allows you to rename or change the ring-
ing tone for a caller group
page 32)
.
.
(see Caller groups on
1DPH OLVW
(see Check-
.
,
60
Page 65

Storing a name and number
1)
Press
1DPHV
2)
Scroll to
6HOHFW
3)
Enter name using the keypad (use # to switch
between upper and lower case) and press
4)
Enter phone number and press
$GG QHZ
and press
2.
2.
If your phone book is full, you will be given the option
to replace an existing entry.
Also, see Entering letters and numbers on page 41
and Saving names and numbers on page 70.
Changing a stored number or name
1)
Recall stored name
2)
Press
3)
Edit the name, if desired, then press
4)
Edit the number, if desired, then press
2SWLRQV
, then select
(GLW
2.
2.
Erasing stored names and numbers
At the start screen,
1)
Recall stored name
2)
Press
2SWLRQV
3)
Highlight
Note: You cannot undo Erase functions so be careful!
, then press
(UDVH
6HOHFW
, then
2.
Erasing your entire phone book
1)
Press
1DPHV
2)
3)
4)
5)
6)
W
to highlight
Press
Press
6HOHFW
2.
at
$UH \RX VXUH"
Press
Enter security code at
Press
2.
(UDVH DOO
6HFXULW\ FRGH=
61
Page 66

Warning: This feature will erase your entire phone
book, which cannot be undone!
Checking available memory
1)
2)
3)
Press
Press
Press
1DPHV
W
or V to reach
W
or V to reach
, then press
2SWLRQV
0HPRU\ VWDWXV
, then press
6HOHFW
Your phone will tell you how many memory locations
are free and how many are being used. (One number
and associated name is stored in each memory
location.)
Phone security
You can set the phone to require the security code
when you switch on the phone after installing a new
SIM card.
Setting phone security
1)
Press
2)
Press
3)
Enter your security code and press
4)
Use
means that the security code is not required
2II
0HQX
W
to reach
W
to reach
4 2 (
6HWWLQJV 0 6HFXULW\ VHWWLQJV
3KRQH VHFXULW\
or 2Q, and press
2II
then press
2.
2.
when the phone is switched on.
means that the when you switch on the phone
2Q
and youre using a new SIM card, the phone will
require you to enter the security code.
6HOHFW
)
6HOHFW
Phone settings
Menu 4 3 in your phone lets you choose settings for
the following items (each entry is described separately
in this guide):
of the menus and display
/DQJXDJH
/LVW RI RZQ QXPEHUV
than one, that your SIM card can use)
(your own phone numbers, if more
62
Page 67

(set the time and time format, hide the clock)
&ORFN
$ODUP FORFN
6\VWHP VHOHFWLRQ
use if more than one is available)
7RXFK WRQH OHQJWK
(PHUJHQF\ NH\ <
(set alarm time)
(how your phone chooses a network to
(short or long)
(on or off)
PIN and PIN2 codes
The PIN (Personal Identity Number) code is a 4- to 8digit number usually supplied with the SIM card given to
you by your service provider. If you use SIM card
security
(see page 74)
, the phone will require you to
enter the PIN code every time you switch on the phone.
When the phone requires the PIN or PIN2 code, it dis-
(QWHU 3,1 FRGH=
plays
then press
2.
or
(QWHU 3,15 FRGH=
. Enter the code
If you enter a wrong PIN code three times in succession, enter the PUK code
on page 65)
press
and press
. Re-enter the new code and press 2..
2.
(see PUK and PUK2 codes
. Enter a new PIN code and
2.
The PIN2 code is a 4- to 8-digit number and is supplied with some SIM cards. It is required to access
some functions. These functions must be supported
by your SIM card.
If you enter a wrong PIN2 code three times in succession, follow the same instructions as for the PIN code
but this time using the PUK2 code.
See Access Codes on page 18 for information on
how to change either of these codes.
Profiles
You can adjust and customize your
phone to whatever environments
you find yourself in (i.e. meetings, a
movie, etc.). With profiles, you can
control your phones lights, ringing
volume, ringing tone, message alert, keypad tones,
warning tones, etc. in a matter of seconds.
63
Page 68

Note: The default setting is
1RUPDO
.
Accessing profiles
At the start screen, press
0HQX
3
Selecting different profiles
If you want to change your phones profile, briefly
W
press the key. Then press
profile and press
. This allows you to select other
2.
or V to choose another
profiles, but not customize them.
Note: When you connect your phone to a headset or handsfree car kit, the phone automatically selects the
profile. You cannot choose a different profile while these
&DU
accessories are connected.
+HDGVHW
or
Customizing profiles
1)
Press
(For details on how to work the Menu, see page 13)
2)
Press
3)
Press
6HOHFW
&XVWRPL]H
changing the current settings. (If you choose
WRPL]H
3 (
0HQX
W
or V to reach the desired profile
2SWLRQV
)
3URILOHV
to see the following choices:
activates the currently selected profile.
allows you to customize a profile by
&XV0
, youll have access to several lists and submenus that will enable you to adjust the settings on
the current profile. When you change a setting in
the current profile, it only affects that preset menu
and will not change your phones normal settings.)
allows you to rename any profile except
5HQDPH
the Normal profile.
4)
5)
W
or V to reach the desired item
Press
Press
. If you wish to go back to the main
2.
menu, press
%DFN
.
Renaming profiles
1)
Press
0HQX
3 (
3URILOHV
)
64
Page 69

(For details on how to work the Menu, see page 13)
2) W
or V until desired profile is highlighted
Note: You cannot rename the Normal profile.
3)
Press
2SWLRQV
4) W
or V to
5HQDPH
5)
Press
2.
6)
Enter new name and press
PUK and PUK2 codes
2.
The PUK (Personal Unblocking Key) may be supplied
with the SIM card. If not, contact your service provider
for the code. The code is required to change a blocked
PIN code.
If you enter a wrong PUK code ten times in succession, the SIM card becomes invalid. Contact your
service provider for a new card.
The PUK2 code, supplied with some SIM cards, is
required to change a blocked PIN2 code. If you enter
a wrong code ten times in succession, you cant use
the functions requiring the PIN2 code. Contact your
service provider for a new card.
You cant change the PUK or PUK2 code. If you lose
it, contact your service provider.
Read messages
See Inbox on page 47.
Recalling s aved names and num b ers
With a clear display, press W to begin scrolling through
stored names and numbers.
page 59 for a description of the
Received calls
See Phone book on
key.
'HWDLOV
Your phone automatically stores the phone numbers
of the 10 most recent calls youve answered.
See Call
log on page 29 for details on other call lists.
65
Page 70

Viewing the received calls list
1)
Press
2)
Press
3)
To dial the number, press
press
2 2 (
0HQX
W
or V to reach the desired number
(see The Options soft key on
2SWLRQV
&DOO ORJ
-
5HFHLYHG FDOOV
ó
; for other options,
)
page 29)
Erasing the received calls list
See Clear call lists on page 35.
Recharge battery
See Charging your new battery on page 7.
Restrict calls
This is a network service that lets you restrict the calls
your phone can make and receive. Check with your
service provider for details.
Note: When calls are restricted, calls may be possible to certain emergency numbers in some networks (e.g. 911 or other
official emergency number).
Restricting calls
1)
Press
5HVWULFW FDOOV
2)
Use
restrict, and press
0HQX
4 2 4 (
6HWWLQJV
-
6HFXULW\ VHWWLQJV
)
W
to scroll through the types of calls you can
when you see the one
6HOHFW
you want:
2XWJRLQJ FDOOV
,QWHUQDWLRQDO FDOOV
: Calls cannot be made.
: Calls cannot be made to foreign
countries.
,QWHUQDWLRQDO H[FHSW WR KRPH FRXQWU\
: When abroad,
calls can be made only within the current country and
to your home country, i.e. the country where your
home network operator is located.
,QFRPLQJ FDOOV
,QFRPLQJ FDOOV LI URDPLQJ
: Calls cannot be received.
: Calls cannot be received out-
side your home area.
66
-
Page 71

&DQFHO DOO FDOO UHVWULFWLRQV
: Turns off all call restrictions.
Calls can be made and received in a normal way.
Note: If you selected
which follow will not be available.
3)
Use
W
and press
$FWLYDWH
&DQFHO DOO FDOO UHVWULFWLRQV
or V to reach one of the following options,
:
2.
: The phone will ask you to enter the
System password. Enter it and press
: The phone will ask you to enter the System
&DQFHO
password. Enter it and press
: The phone will list the call types for which
6WDWXV
the call restriction is active. Use
.
2.
W
or V to scroll
through the list.
For more information about your system password, see
System password on page 75.
Ringing options
This is one of the settings in your phones profiles
page 63)
. You can choose how your phone notifies
you of an incoming call. This setting does not affect
incoming text message alert tones
(see page 76)
Selecting ringing options
1)
Press
(For details on how to work the Menu, see page 13)
2)
Use
ringing options for, and press
3)
Highlight
LQJ RSWLRQV
4)
Highlight your choice (described on next page)
and press
5LQJ
,QFUHDVLQJ
3 (
0HQX
W
to highlight the profile you want to set the
3URILOHV
)
2SWLRQV
&XVWRPL]H
and press 2.. Press W to
, then press
6HOHFW
.
2.
: The phone rings.
: The ringing volume starts low and
increases with successive rings.
5LQJ RQFH
%HHS RQFH
: The phone rings once.
: The phone gives a short beep.
67
, the steps
.
2.
(see
.
5LQJ0
Page 72

&DOOHU JURXSV
: Sets the phone to Silent
calls from people in selected caller groups
Caller grouping on page 33)
light the desired group(s) and press
or
Press
to de-select them.
8QPDUN
and then
%DFN
to save or 1R to ignore the
<HV
. Press
W
0DUN
changes. If you have any caller groups marked,
the phone does not ring unless the call is from a
person who belongs to the selected group(s).
: The phone sounds no tone.
6LOHQW
When
is selected and keypad tones, warning
6LOHQW
tones and message alert tone are turned off,
the icon is shown when the display is clear.
Note: The call alert setting is stored individually for operation
with a handsfree headset and a handsfree car kit.
Ringing tone received
Your phone can receive ringing tones that can be
saved as the
entry in your list of ringing tones.
3HUV RQD O
Contact your service provider for details about sending ringing tones to your phone.
When your phone receives a ringing tone, it displays
5LQJLQJ WRQH UHFHLYHG
.
Listening to received ringing tones
Caution: If you press
at any time bef or e sav ing t he
([LW
ringing tone, the ringing tone will be deleted!
1)
When your phone displays
press
2SWLRQV
2)
is selected. Press 2.. The phone plays
3OD\EDFN
5LQJLQJ WRQH UHFHLYHG
the ringing tone.
except
(see
to high-
to select
for
,
Saving received ringing tones
1)
After listening to the ringing tone, press
2)
W
to reach
Use
6DYH WRQH
The tone is saved to the
and press
3HUVRQDO
of ringing tones.
68
%DFN
2.
entry in your list
Page 73

Deleting received ringing tones
After listening to the ringing tone, press
([LW
.
press
%DFN
Ringing tones
You can assign ringing tones to profiles (
see page 63
and to caller groups. This entry describes how to set
ringing tones for profiles.
For information on setting
tones for caller groups, see Defining a ringing tone for
a caller group on page 32.
As outlined in the table below, the sound your phone
makes when you receive a call depends on the ringing
option for the currently selected profile, whether the
caller is assigned to a caller group, and, if the
ringing option is selected,
JURXSV
which
caller group
the caller belongs to.
Ringing option for currently selected profile (see page 67)
Caller is not in
a caller group
Caller is in a
caller group
Ring/Increasing/
Ring once
Profile ringing
tone
Caller group
ringing tone
Beep once Silent Caller groups
Beep No
Beep No
sound
sound
No sound
Caller is in a
marked caller
group
Caller is in an
unmarked
caller group
, then
&DOOHU
Caller group
ringing tone
No sound
)
Note: Ringing tone settings are stored separately for each of
your own phone numbers.
Selecting ringing tones
1)
Press
(For details on how to work the Menu, see page 13)
2)
Use
ringing tones for, and press
3)
Highlight
LQJ WRQH
3 (
0HQX
W
to highlight the profile you want to set the
3URILOHV
)
2SWLRQV
&XVWRPL]H
, then press
and press 2.. Press W to
.
6HOHFW
5LQJ0
69
Page 74

4)
W
to scroll through the options. After you
Press
hear the tone you wish to use, press
2.
Ringing volume
This is one of the settings in your
phones profiles
(see page 63)
. It
sets the default ringing volume for
incoming voice calls and message
alert tones.
Setting the ringing volume
1)
Press
(For details on how to work the Menu, see page 13)
2)
Use
ringing volume for, and press
3)
Highlight
5LQJLQJ YROXPH
4)
Press
3 (
0HQX
W
to highlight the profile you want to set the
3URILOHV
)
2SWLRQV
&XVWRPL]H
W
to scroll through the options. When you
and press 2.. Press W to
, then press
6HOHFW
.
hear the volume level you wish to use, press
Note: The ringing volume setting is stored individually for the
handsfree headset and handsfree car kit.
Saving names and numbers
You can save names and numbers in the Phone book.
Either use the method described in Phone book under
(see About the submenus on
the option
page 60)
, or the qui ck save methods describ ed below.
$GG QHZ
If your phone book is full, you will be given the option to
replace an existing entry.
.
.
2.
Quick save of name and number
At the start screen,
1)
Enter the phone number and press
2)
The phone prompts you to enter a
name if you wish (optional), then press
70
6DYH
1DPH=
. Enter a
.
2.
Page 75

For details on entering names, see Entering letters
on page 41.
Quick save of number only
To save a number quickly, enter the phone number,
then press
and hold
. The number is saved to your
6DYH
phone book and you can add a name to it later.
Security cod e
The security code is required by some security features including Phone security
(see page 62)
When the phone requires the security code, it displays
6HFXULW\ FRGH
:. Enter the code then press 2..
If you enter an incorrect security code five times in a
row, the phone will not accept the correct code for the
next five minutes.
This code comes with your phone. The default security
code is 12345.
For information on how to change the
security code, see Access codes on page 18.
the code secret and in a safe place, separate from the
phone.
Security settings
Menu 4 2 in your phone lets you choose settings for
the following items (each entry is described separately
in this guide):
6,0 FDUG VHFXULW\
3KRQH VHFXULW\
0RGXOH VHFXULW\
attached)
5HVWULFW FDOOV
)L[HG GLDOLQJ
&DOO FRVW OLPLW
$FFHVV FRGHV
(appears only if optional analog module
The following table provides a summary of how different types of security codes are used in your phone.
.
Keep
71
Page 76

Code Purpose For more information
Security code Required by several phone features. If
PIN code If SIM card security is on, the phone
PIN2 code Required by several phone features. See entries for show call
System password Required by the Restrict Calls feature. See “Restrict calls” on
Module code (used
with optional analog
module only)
phone security is on, the phone
requests the security code the first
time you use it after installing a new
SIM card.
requests the PIN code every time the
phone is turned on.
If module security is on, the phone
requests the module code when the
phone is turned on, the optional analog module is attached, and either (a)
the module code has not been
changed from the default of 12345, or
(b) the module code has been
changed but it is different from the
security code.
See entries for call timers,
calling card, phone book,
and phone security.
See “SIM card security” on
page 74.
costs, call cost limit, fixed
dialing, and PIN and PIN2
codes.
page 66.
See “Module security” on
page 55.
Send own number
This is a network service that specifies whether or not
you wish to display your phone number to the person
you are calling. Contact your service provider for
details.
Note: This feature is only effective when calling to a number
that is equipped with Caller ID.
1)
Press
QXPEHU
(For details on how to work the Menu, see page 13)
2)
Press
work setting),
not show it) and press
4 1 3 (
0HQX
)
W
to reach
-
6HWWLQJV
3UHVHW
(to show your number), or
2Q
&DOO VHWWLQJV
(to use the default net-
2.
-
6HQG RZQ
2II
Note: These menu items may vary by SIM card
and service provider.
If you dont make a selection, your phone uses the
default network setting. Check with your service provider to find out the network default.
(to
72
Page 77

Service command editor
You can use this feature to activate network services
remotely by using numeric commands that you get
from your service provider.
Sending commands
1)
Press
2)
Enter the service command, including numbers
3)
Press
0HQX
6HQG
1 5 (
0HVVDJHV 0 6HUYLFH FRPPDQG HGLWRU
Settings
Menu 4 in your phone lets you
choose settings for your phone.
It consists of the following areas,
which are described under their
own headings:
&DOO VHWWLQJV
6HFXULW\ VHWWLQJV
3KRQH VHWWLQJV
•
$QDORJ PRGXOH VHWWLQJV
analog module attached)
(appears only when optional
Show call costs
This network service allows you to check the cost of
the last or current call, or the total cost of all calls that
you have made or received since the counters were
last reset. Contact your service provider for details.
To choose whether call costs are shown in charging units or in
dollars, see Show costs in.
Note: This feature is not supported in analog mode (using the
optional analog module).
Note: Each phone line has its own cost counters.
)
Show call costs
1)
Press
0HQX
2 6 1 (
&DOO ORJ
73
-
6KRZ FDOO FRVWV
)
Page 78

2)
W
to see
Press
/DVW FDOO FRVW
current call if applicable) or
(cost of last call, or
$OO FDOOV FRVW
(cost of all
calls since counters were last reset)
Clear call cost counters
1)
2)
Press
Press
0HQX
W
to reach
2 6 1 (
-
&DOO ORJ
6KRZ FDOO FRVWV
&OHDU FRXQWHUV
. This resets all
cost counters. (You will be prompted to enter the
PIN2 code to do this.)
Caution: The clear counters command cannot be undone.
Note: The actual invoice for calls and services from your service provider may vary, depending upon network features,
taxes and so forth.
Show costs in
This feature allows you to choose whether you want to
show call costs and set call cost limits in charging
units or in dollars.
Note: This feature appears only if supported by your operator
and SIM card.
1)
Press
2)
Press
press
3)
If you selected
2 7 (
0HQX
W
or V to reach
6HOHFW
&XUUHQF\
-
&DOO ORJ
6KRZ FRVWV LQ
or
&XUUHQF\
, enter the price of each
8QLWV
)
, then
charging unit (contact your network operator for
this information) and press
. If you chose
2.
call costs and call cost limits will be measured in
charging units.
)
,
8QLWV
SIM card security
You can set the phone to require you to enter the PIN
code every time you switch on the phone. Note that
some SIM cards do not allow this feature to be turned
off.
1)
Press
FDUG VHFXULW\
2)
At the prompt, enter your PIN code and press
0HQX
4 2 1 (
)
6HWWLQJV
-
6HFXULW\ VHWWLQJV
74
-
6,0
2.
Page 79

Press
W
to reach 2Qor
. Press 2..
2II
3)
Snake
See "Games" on page 46.
Start screen
See What is the start screen? on page 14.
System password
This is a password you get from your service provider.
You need it to activate Call Restrictions.
(See Restrict
calls on page 66.)
Contact your service provider for details.
System selection
This menu specifies how the phone should choose a
PCS system (network), as there may be more than one
available. The selection you make stays active until
you change it or change the SIM card.
1)
Press
VHOHFWLRQ
2)
Press
6HOHFW
In
$XWRPDWLF
0HQX
4 3 5 (
6HWWLQJV
-
3KRQH VHWWLQJV
)
W
to highlight
$XWRPDWLFor0DQXDO
.
, the phone automatically selects one of
the available systems. The phone beeps when it
switches to another system.
In
then lists them. Use
and press
, the phone searches for available systems
0DQXDO
6HOHFW
W
to highlight the one you want
. The phone then requests registration,
and displays the result. If you lose connection while in
Manual mode, the phone prompts you to select a
system again.
For information on analog system selection, see
Analog system selection on page 83.
-
6\VWHP
.Press
75
Page 80

Text messages
The text message network service allows you to send
short text messages to other phones that have text
message capability. You can also ask the service provider to convert the message to other formats such as
email and fax. The messages are first sent to your
Message Center, then delivered to the recipient.
To send and receive text messages, the phone needs
your message center number.
See Message settings
on page 53.
See these related topics
Inbox on page 47 for information on received
messages.
Outbox on page 58 and Write messages on page 80
for information on writing and sending.
To uch tone length
This feature allows you to set the length of touch
tones.
Setting touch tone length
1)
Press
WRQH OHQJWK
2)
Press
100 ms.) or
3)
Press
436 (
0HQX
)
W
or V to reach
/RQJ
2.
6HWWLQJV 0 3KRQH VHWWLQJV 0 7RX F K
(sets the tone length to
6KRUW
(sets the tone length to 500 ms.)
To uch tones
Your phone can generate various sounds, called touch
tones, when the keys are pressed.
Touch tones can be used for many automated, overthe-phone services such as voice mail, calling cards,
and checking airline arrival/departure times and bank
balances. Touch tones can be sent only when a call is
active.
76
Page 81

Storing touch tone strings
Touch tone strings can be used for sending and
receiving information with your phone. For example,
you can store your office voice mailbox number along
with your password for easy access to your
messages.
Store touch tone strings the same way you store
phone numbers
(see page 61)
.
You can store a whole digit sequence in your phone
book and send it as touch tones for frequently used
strings of numbers.
Sending a touch tone string
During a call,
1)
2)
3)
Note: Use caution when sending confidential information over
the air when using touch tones in analog mode.
2SWLRQV
Press
Scroll to
7RXFK WRQHV
and press
2.
Enter touch tone string or recall string from the
phone book and press
2.
Storing touch tone strings with phone
numbers
1)
Enter the phone number (for example, your office
voice mailbox)
2)
Press three times (
Note: See Special characters in phone numbers on
page 42.
3)
Enter the touch tone string (for example, voice
appears)
S
mailbox password)
4)
Store the number as you normally would
When you dial this number, your phone first dials the
phone number, waits 2.5 seconds (because of the
S
character), then sends the rest of the touch tone
string.
77
Page 82

Transfer a call
If your network and SIM card support this feature, when
you have one active and one held call, you can connect
the two calls and disconnect yourself from the call.
During a call, press
6HOHFW
.
press
2SWLRQV
, scroll to
7UD QV IHU
Vibrating alert
This is one of the settings in your phones profiles
(see page 63)
. If your phone has the BMS-2V vibrating
battery attached, you can set your phone to vibrate
when you receive a voice call.
Activating vibrating alert
1)
Press
(For details on how to work the Menu, see page 13)
2)
Press
vibrating alert for, and press
3)
Highlight
reach
4)
Use
choose
have set
Note: The vibrating batter y does not work when your phone is
connected to a handsfree headset or a handsfree car kit.
3 (
0HQX
W
to highlight the profile you want to set the
3URILOHV
)
2SWLRQV
&XVWRPL]H
9LEUDWLQJ DOHUW
W
to highlight 2Q or
2Q
5LQJLQJ RSWLRQV
and press 2.. Press W to
, then press
and press 2.. If you
2II
6HOHFW
.
, your phone will vibrate even if you
(see page 67)
to
Voice mailbox n umber
This number dials your voice mailbox. See Voice
messages in the next section.
, and
6LOHQW
.
Voice messages
Voice mail is a network service that may require a
subscription from your service provider.
Your phone will notify you when you receive a voice
message.
1HZ YRLFH PHVVDJH
will appear on the display
along with the icon, and youll hear a short beep.
Your phone will display the number of voice messages
if youve received more than one.
78
Page 83

Setting up your voice mailbox
Before you can retrieve any voice messages, you need
to store your voice mailbox number. Your service
provider usually gives this number to you.
When youre ready to store your voice mailbox number, press
PDLOER[ QXPEHU
number and press
1 3 2 (
0HQX
0HVVDJHV 0 9RLFH PHVVDJHV 0 9RLFH
). Then enter your voice mailbox phone
. This number can be up to 32
2.
digits long and is used until you change it. If your
phone number changes, you may need to change
your voice mailbox number along with it.
Greetings, passwords, and prompts
These may vary in different wireless systems. If you
need information about how to record your greeting,
delete voice messages, change your password, etc.,
contact your service provider.
Listening to your voice messages
1HZ YRLFH PHVVDJH
If
is displayed, just press
follow the instructions. If youd rather listen to your
messages later, press
([LW
.
To listen to messages anytime, press and hold the
1 key. Or if you prefer, you can access your voice mailbox by pressing
/LVWHQ WR YRLFH PHVVDJHV
Volume
0HQX
1 3 1 (
0HVVDJHV 0 9RLFH PHV VD JHV 0
).
See the separate entries for Earpiece volume, Keypad
tones, and Ringing volume.
/LVWHQ
and
Warning tones
This is one of the settings in your phones profiles
page 63)
. Warning tones include tones your phone
makes for conditions such as errors, confirmations,
power on, battery low, and recharge battery. You can
set warning tones on or off.
79
(see
Page 84

Turning warning tones on and off
1)
Press
(For details on how to work the Menu, see page 13.)
2)
Use
warning tones for, and press
3)
Highlight
:DUQLQJ WRQHV
4)
Use
Write messages
You can write text messages
Text messages on page 76)
3 (
0HQX
W
to highlight the profile you want to set the
&XVWRPL]H
W
to highlight 2Qor
)
3URILOHV
2SWLRQV
and press 2.. Press W to
, then press
.
6HOHFW
and press 2.
2II
(see
then
send them. It is a good idea to
save your written messages in the
Outbox in case there is a message
delivery problem
(see Outbox on page 58).
Writing a message
1)
Press
PHVVDJHV
(For details on how to work the Menu, see page 13)
2)
Enter a message of up to 160 characters. The
0HQX
)
1 1 3 (
0HVVDJHV
-
7H[W PHVVDJHV
number of available characters is shown in the
top right corner of the display.
For details on
entering letters, see Entering letters on page 41.
Note: You can exit the message any time (by
pressing
Menu 1 1 3 (
PHVVDJHV
ô) and return to it later by pressing
-
0HVVDJHV
). However, if you turn off the phone
7H[W PHVVDJHV
without saving the message, it will be lost.
3)
Once you are finished writing, press
W
to reach the desired function and press 2.:
sends the message. Enter or recall the
6HQG
recipients phone number (or enter e-mail
address, if applicable) and press
2.
-
:ULWH
2SWLRQV
.
-
, press
:ULWH
80
Page 85

6HQG VSHFLDO
an alternate message setting
tings on page 53).
allows you to send a message using
(see Message set-
You choose a setting to use,
then specify whether you want to enter a phone
) or a routing address (
number (
EHUV
1XPHULF
). The phone will prompt you for the number
7H[W 2QXP0
or routing address.
Note: If you choose to send the message by e-mail, the
phone prompts you for the e-mail address and number if
you choose
address if you choose
or the e-mail address and routing
1XPHULF
7H[ W 2QXPEHUV
.
A routing address may be required when sending
messages via fax, page, or e-mail. For help using
this feature, contact your service provider.
stores the message in the Outbox.
6DYH
&OHDU VFUHHQ
deletes all characters from the
message.
You can check whether messages have been
delivered to the text message center by using the
Delivery Reports feature
all messages on page 54)
(see Specifying settings for
.
81
Page 86

6. Optional Analog Module
With an optional Nokia PLUS analog module and a
dual-mode SIM card, you can use your phone in analog networks. See your dealer for details on how to
purchase this accessory and activate your
subscription.
Attaching the analog module
First remove the battery.
on page 9.
4)
Slide the battery toward the top of the phone until
it clicks into place
Removing the anal o g mod ul e
First remove the battery.
on page 9.
See Removing the battery
1)
Place the analog
module on the back of
the phone
2)
Slide the module
toward the top of the
phone until it clicks into
place
3)
Place the battery
on top of the analog
module
See Removing the battery
1)
at the top and bottom
of the analog module
2)
down and away from
the top of the phone
82
Press the buttons
Slide the module
Page 87

Analog features
In order for you to use the analog module, your service
provider will have to add certain information to your
SIM card. See your service provider for details.
Once you have installed the upgraded SIM card and
attached the analog module, your phone gives you
access to analog network features. Note that some
features described in this manual will not be available
due to the difference between digital and analog
networks.
While in analog mode, the phone displays the icon
in the top
in the top left corner and the word
$QDORJ
center of the display.
Analog system selection
In each analog service area there are usually two
service providers. The service provider you sign up
with, also known as your home system, is of type A or
B. Systems that are of the same type as your home
system are called home-type systems; systems that
are of the opposite type as your home system are
called non-home-type systems.
Your service provider may have programmed a list of
preferred systems into your SIM card. Your phone
may search for systems in this list when service is not
available in your home system.
The analog system selection feature allows you to
request the order in which your phone looks for
available systems.
Note: Using
+RPH RQO\
or
3UHI1 V\VWHP
is usually the
most economical choice.
1)
Press
$QDORJ V\VWHP VHOHFWLRQ
2)
Scroll to one of the following choices:
0HQX
4 4 2 (
6HWWLQJV
).
-
$QDORJ PRGXOH VHWWLQJV
-
83
Page 88

3UHI1 V\VWHP
If service is not available in your home
system, the phone searches for a preferred
system (either home type or non-home type), then
a home-type system, then a non-home-type system.
+RPH W\SH
If service is not available in your home
system, the phone searches for a preferred system (home type only), then a home-type system.
1RQKRPH W\SH
The phone searches for a preferred
system (non-home-type only), then a non-hometype system.
+RPH RQO\
The phone uses its home system only
(that is, it will not roam).
3)
Press
Note: In some areas, the wireless system automatically recognizes roaming phones. In other areas, you need to contact the
service provider before the system can recognize your phone.
The operator needs to know your phone number, your
phone's IMEI or your analog modules SN (serial number), and
how you plan to pay for your calls. There is normally an
additional charge for roaming calls.
Your phones IMEI is located on the back, under the battery.
Your analog modules SN is located on the back of the module. Your IMEI/SN can normally be read over the air by roaming
wireless service providers when you call them to register your
roaming presence on their wireless network.
6HOHFW
.
Call timers for an alog calls
When you have the analog module attached, your
phone automatically keeps track of the amount of time
youve spent on analog calls.
1)
Press
(For details on how to work the Menu, see page 13)
2)
Press
0HQX
W
to reach
2 5 (
&DOO ORJ
$QDORJ FDOOV GXUDWLRQ
-
&DOO WLPHUV
)
To set timers back to 0
1)
Press
(For details on how to work the Menu, see page 13)
0HQX
2 5 (
&DOO ORJ
-
&DOO WLPHUV
)
84
Page 89

2)
3)
W
Press
press
to reach
2.
&OHDU DQDORJ FDOO WLPHUV
Enter the module code, then press
2.
, then
again
To show the current call timer during calls
See Showing the current call timer during calls on
page 30.
Change module code
Your analog module has a module code that
the Module security feature described on page 86.
The module code is initially set to 12345. To change
the module code:
1)
Press
$FFHVV FR GHV
(For details on how to work the Menu, see page 13)
2)
The phone prompts you for the existing code, the
4 2 7 5 (
0HQX
-
&KDQJH PRGXOH FRGH
6HWWLQJV
-
6HFXULW\ VHWWLQJV
)
new code, and verification of the new code. At
each prompt, enter the information and press
Digital/analog selection
You can choose which type of network you want your
phone to use:
DQDORJ
1)
Press
'LJLWDO2DQDORJ VHOHFWLRQ
For details on how to work the Menu, see page 13.
2)
Use
press
'LJLW1)DQDORJ
$QDORJ RQO\, 'LJLWDO RQO\
).
4 4 1 (
0HQX
6HWWLQJV
)
W
to reach one of the following choices, then
:
6HOHFW
The phone will work in digital or
, or either (
-
$QDORJ PRGXOH VHWWLQJV
analog networks. The phone chooses the best
one for you.
'LJLWDO RQO\
The phone will work in GSM 1900
digital networks only.
$QDORJ RQO\
The phone will work in analog networks
only.
is used in
-
2.
'LJLW1)
-
85
Page 90

Module securit y
If you purchased an optional analog module, you can
protect it from unauthorized use by turning on module
security. When module security is on, the phone
requests the module code when you turn the phone
on if (a) you have not changed the module code from
the default of 12345, or (b) you have changed it
differs from the security code.
(See Change module
code on page 85 for information about changing the
module code.)
If you enter the correct code, the phone allows you to
access analog module functions.
If you enter an incorrect code, you cant access analog
module functions.
If you choose6NLS, the phone ignores menu items that
pertain to the analog module and acts as if the analog
module isnt attached.
Activating module security
1)
Press
0RGXOH VHFXULW\
(For details on how to work the Menu, see page 13)
2)
At the
code and press
3)
Press
4 2 3 (
0HQX
6HWWLQJV
)
0RGXOH FRGH=
prompt, enter the module
2.
W
to highlight 2Q or
-
6HFXULW\ VHWWLQJV
. Press 2..
2II
-
and
it
86
Page 91

7. Call Forwarding Codes
The codes described in this section give you greater
control over call forwarding features in GSM 1900
networks than do the menu items in your phone.
Enter these codes using the keypad on your phone.
In place of the letter N in the codes below, substitute
the number to which you want to forward calls. After
entering the code, press
Call forwarding types
There are six types of call forwarding. For each type,
you can activate call forwarding, request the status
(including the number to which calls are being forwarded), and cancel call forwarding.
Forwarding type Activate Status Cancel
When unable to take calls * *62*N# *#62# ##62#
When no answer **61*N# *#61# ##61#
When busy **67*N# *#67# ##67#
Unconditional **21*N# *#21# ##21#
When unable to take calls, no
answer, or busy (combines first
three types)
All calls (com bines first four
types)
ó
.
**004*N# *#004# ##004#
**002*N# *#002# ##002#
Example:
You want to forward calls to 972-555-1111
when unable to take calls.
> Enter
--95-<:58884444&
You just forgot which phone number you
forwarded your calls to.
> Enter
You want to cancel this particular call
forward.
> Enter
then press ó.
-&95&
&&95&
87
then press ó.
then press ó.
Page 92

Adding a call type
You can specify whether you want call forwarding to
apply only to certain types of calls by adding an asterisk (*) and two-digit code before the # in the forwarding
codes listed in the previous table.
Call type Code
All call types 10
Voice calls only 11
Data calls only 12
Fax calls only 13
Text messages only 16
All call types except text messages 19
Example:
Forwarding status of different call types
If you have used the same forwarding type for more
than one type of call (for example, forward both data
calls and fax calls when no answer), when you request
a status you can press the scroll keys to see the forwarding status for each call type. Each type is
displayed on a separate screen.
Adding a timeout
You can specify a timeout during which call forwarding
is not active (i.e., call forwarding does not take effect
until this number of seconds has passed after the
phone receives the call attempt). To do this, add an
asterisk (*) and the time period in seconds to the
codes listed above.
You want to forward fax calls only to
972-555-1111 when your line is busy.
> Enter
--9:-<:58884444-46&
ó
.
88
then press
Page 93

8. Accessories
An extensive range of accessories is available for your
phone. You can select the accessories that best suit
your specific communication needs.
For availability, please check with your local dealer.
A few practical rules for accessory operation:
Keep the accessories out of small children's reach.
When you disconnect the power cord of any accessory,
grasp and pull the plug, not the cord.
Check regularly that all wireless phone equipment in your
vehicle is mounted and operating properly.
Installation of complex car equipment must be com-
pleted by qualified personnel only.
WARNING!
Use only batteries, chargers and accessories approved by the phone manufacturer for use with this
particular phone model. The use of any other types
will invalidate any approval or warranty applying to
the phone, and may be dangerous.
Batteries
Several batteries are available for your phone:
BLS-2 Extended Li-Ion 900 mAh
BMS-2S Extended NiMH 900 mAh
BMS-2V Vibrating NiMH 900 mAh
BLS-4 Ultra Extended Li-Ion 1500 mAh
89
Page 94

Charging Times
The table below displays approximate battery charging
times. These charging times will charge your phone to
about 80% of its capacity, and the battery strength
indicator will stop scrolling. If you wish to obtain 100%
battery capacity, please allow another two hours for
maintenance charge.
Battery
BLS-2 Extended
Li-Ion 900 mAh
BMS-2S Extended
NiMH 900 mAh
BMS-2V Extended
NiMH Vibra 900 mAh
BLS-4 Ultra Extended
Li-Ion 1500 mAh
Standard
Travel
Charger
ACP-7U
Rapid T ravel
Charger
ACP-9U
4 hrs.
5 hrs. 3 hrs. 30 min.
Rapid Cig.
Charger
2 hrs.
1 hr. 30 min.
Talk and Standby Times
The table below displays approximate talk and
standby times. Variations will occur depending on SIM
card, network settings, and usage.
Battery
BLS-2 Extended
Li-Ion 900 mAh
BMS-2S Extended NiMH
900 mAh
BMS-2V Extended NiMH
Vibra 900 mAh
BLS-4 Ultra Extended
Li-Ion 1500 mAh
Talk Time Standby Time
Digital Analog Digital Analog
3 to 5
hrs.
5 to 8
hrs.
1 hr.
30 min.
to 3 hrs.
2 hrs.
45 min.
to 5 hrs.
60 to
225 hrs.
100 to
375 hrs.
Lighter
LCH-9
16 to 26
hrs.
26 to 44
hrs.
90
Page 95

New batteries must be charged with your
phone off for at least 24 hours before initial
use. A new NiMH batterys full performance
is achieved only after two or three complete
charge and discharge cycles!
Nickel Metal Hydride or Lithium Ion
batteries must be recycled or disposed of properly. Must not be
NiMH
Li-Ion
disposed of in municipal waste.
Chargers and other accessories
WARNING!
This apparatus is intended for use when supplied with
power from the Standard Travel Charger (ACP-7U),
Rapid Travel Charger (ACP-9U), or Rapid Cigarette
Lighter Charger (LCH-9). Other usage will invalidate
any approval given to this apparatus and may be
dangerous.
The following chargers and other accessories are
available for your phone; please see your dealer for
details. Also, refer to any accessory options manual
that may have been included in your sales package for
the entire line of authentic Nokia accessories.
Note: When a charger is not in use, disconnect it from the
power source. Do not leave the battery connected to a charger
for longer than a week, since overcharging may shorten its life.
If left unused, a fully charged battery will discharge itself over
time.
ACP-7U Standard Travel Charger
Use this durable and economical charger to charge all battery
options. Plug the charger into a
wall outlet and connect the connector to the bottom of your
phone. Check the charging status on the phone display
(See
Charging Times on page 90.)
91
Page 96

Calls can be made during charging, but charging will
stop for the duration of the call and the battery bar
scrolling stops.
Note: If the battery is completely empty, you cannot use the
phone until it has enough charge to operate.
The Standard Travel Charger is available for different
voltage levels and can also be used with the DCH-9
Compact Desktop Charging Stand.
ACP-9U Rapid Travel Charger
The extremely light, functionally
designed Rapid Travel Charger
charges your phone battery quickly.
(See Charging Times on page 90.)
Plug the charger into a wall outlet
and connect the connector to the
bottom of your phone. Check the
charging status on the phone display. You can use your phone while
charging.
Operating within a voltage range of 100V-240V AC
(50Hz-60Hz), the Rapid Travel Charger is practically
voltage-independent in normal office and household
use. Like the Standard Travel Charger, the Rapid Travel
Charger is compatible with all battery options.
The Rapid Travel Charger can also be used with the
DCH-9 Compact Desktop Charging Stand.
LCH-9 Rapid Cigarette Lighter Charger
The multivoltage Rapid
Cigarette Lighter Charger
allows you to charge your
phone when you travel.
The small charger's functional design fits well with
most car lighters and
interiors.
92
Page 97

Charging Times are the same as for the Rapid Travel
Charger ACP-9U
(see Charging Times on page 90)
Calls can be made during the charging.
A green light indicates that the Rapid Cigarette Lighter
Charger is ready to charge. Check the charging status
on the phone display. The input voltage is 12 or 24 V
DC, negative grounding.
The Rapid Cigarette Lighter Charger can be used with
all accessories available for your phone.
Avoid prolonged charging with the Rapid Cigarette
Lighter Charger when the car engine is not running.
This may cause the battery of your car to drain.
Note: In some cars the cigarette lighter plug is not provided
with power when the ignition is switched off. Verify that the
green LED light is lit.
DCH-9 Compact Desktop Charging Stand
Compatible with all
battery options, the
Compact Desktop
Charging Stand can
be used with the
Standard Travel
Charger ACP-7U or
the Rapid Travel
Charger ACP-9U. The Compact Desktop Charging
Stand provides mounting for both the phone and a
spare battery. Plug the charger into a wall outlet and
connect the connector to the back of the Compact
Desktop Charging Stand. Place your phone and/or a
spare battery in the stand to begin battery charging.
When the phone is charging, no lights are displayed on
the stand; check the charging status of the phone battery on the phone display.
Note: If you have attached an optional analog module, be
sure to remove it and replace the battery before placing the
phone in the charging stand. Although the phone will fit in the
stand with the analog module attached, charging will not take
place.
.
93
Page 98

Charging moves to the rear slot once the front battery
is 100% charged.
When the spare battery is charging, check the status
indicator on the left side of the charging stand. A red
light indicates that the battery is charging; a green light
indicates that the battery is charged to at least 80% of
its capacity.
DCH-9 Rear Slot Charging Times
Using ACP-7U Using ACP-9U
Battery option
BLS-2 Extended
Li-Ion 900 mAh
BMS-2S Extended
NiMH 900 mAh
BMS-2V Extended
NiMH Vibra 900 mAh
BLS-4 Ultra Extended
Li-Ion 1500 mAh
Front
empty
6 hrs.
30 min.
slot
12
hrs.
Front
8 hrs.
30 min.
15 hrs.
45 min.8hrs.
slot
full
Front
slot
empty
4 hrs.
30 min.
The phone has the built-in intelligence to maintain the
battery, so there is no need for a discharge feature on
the stand.
Front
slot
full
5 hrs.
30 min.
10 hrs.
30 min.
94
Page 99

9. Reference Information
Important Safety Information
Traffic Safety
Do not use a hand-held telephone while driving a vehicle.
If using a hand-held phone park the vehicle before conversing.
Always secure the phone in its holder; do not place the phone
on the passenger seat or where it can break loose in a collision
or sudden stop.
The use of an alert device to operate a vehicles lights or horn
on public roads is not permitted.
Remember, road safety always comes first!
Operating Environment
Remember to follow any special regulations in force in any
area and always switch off your phone whenever it is forbidden to use it, or when it may cause interference or danger.
When connecting the phone or any accessory to another device, read its users guide for detailed safety instructions. Do
not connect incompatible products.
As with other mobile radio transmitting equipment, users are
advised that for the satisfactory operation of the equipment
and for the safety of personnel, it is recommended that the
equipment should only be used in the normal operating position (held to your ear with the antenna pointing over your
shoulder).
Electronic Devices
Most modern electronic equipment is shielded from radio frequency (RF) signals. However, certain electronic equipment
may not be shielded against the RF signals from your wireless
phone.
Pacemakers
Pacemaker manufacturers recommend that a minimum separation of 6 inches (20 cm.) be maintained between a handheld
wireless phone and a pacemaker to avoid potential interference with the pacemaker. These recommendations are
consistent with the independent research by and recommendations of Wireless Technology Research.
95
Page 100

Persons with pacemakers:
Should always keep the phone more than 6 inches (20
cm) from their pacemaker when the phone is switched on;
Should not carry the phone in a breast pocket;
Should use the ear opposite the pacemaker to minimize
the potential for interference.
• If you have any reason to suspect that interference is
taking place, switch off your phone immediately.
Hearing Aids
Some digital wireless phones may interfere with some hearing
aids. In the event of such interference, you may want to consult your service provider.
Other Medical Devices
Operation of any radio transmitting equipment, including
cellular phones, may interfere with the functionality of inadequately protected medical devices. Consult a physician or the
manufacturer of the medical device to determine if they are adequately shielded from external RF energy or if you have any
questions. Switch off your phone in health care facilities when
any regulations posted in these areas instruct you to do so.
Hospitals or health care facilities may be using equipment that
could be sensitive to external RF energy.
Vehicles
RF signals may affect improperly installed or inadequately
shielded electronic systems in motor vehicles (e.g. electronic
fuel injection systems, electronic anti-skid (anti-lock) braking
systems, electronic speed control systems, air bag systems).
Check with the manufacturer or its representative regarding
your vehicle. You should also consult the manufacturer of any
equipment that has been added to your vehicle.
Posted Facilities
Switch your phone off in any facility where posted notices so
require.
Potentially Explosive Atmospheres
Switch off your phone when in any area with a potentially explosive atmosphere and obey all signs and instructions.
Sparks in such areas could cause an explosion or fire resulting
in bodily injury or even death.
96
 Loading...