

Nokia 6161i Owner's Manual

OWNER’S
MANUAL
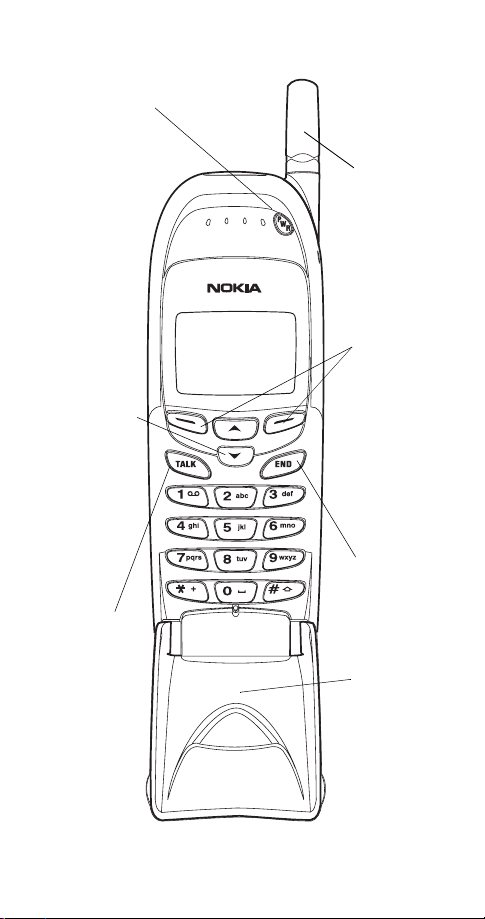
Keys
Power key
Press a nd hold t o turn yo ur ph one
on or off.
Menu Names
Scroll keys
Scroll through
menus, submenus, and
the phone
book. Press
and hold for
continuous
scrolling.
ó
Dials the
number on
the display.
Fixed
antenna
Do not
attempt to
extend or
remove!
Softkeys
Their current
function is
displayed
above the key
(for example,
here their
functions are
“Menu” and
“Names”).
ô
Push this key
to end a
phone call.
Keypad
cover
Flip it open to
answer a call
and to access
the keypad.
Flip it closed
to end a call.
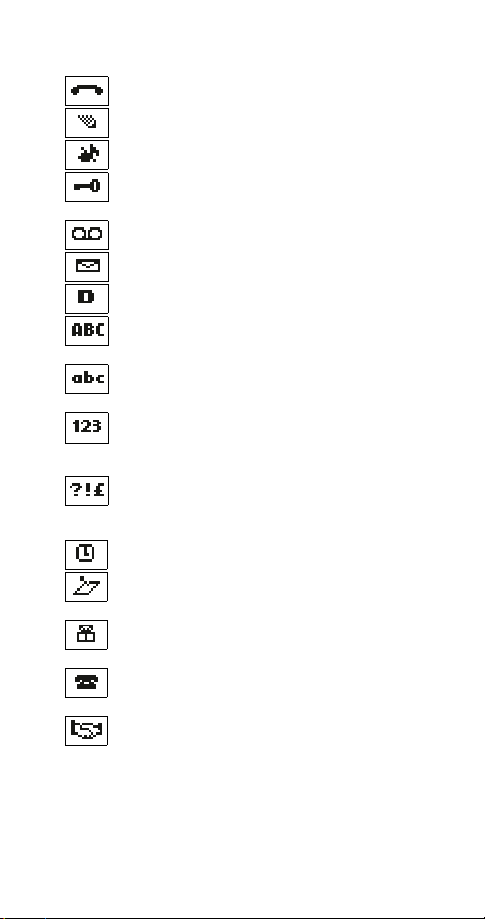
Indicators and Icons
You have an active call.
The phone is waiting for you to enter a response.
All tones for the current profile have been set to
Keyguard has been activated to help prevent any
accidental keypresses.
You have one or more voice messages waiting.
You have one or more unread text messages waiting.
Digital service is available.
Any characters you enter will be upper-case letters or
numbers. Press the # key to switch letter case.
Any characters you enter will be lower-case letters or
numbers. Press the # key to switch letter case.
This appears when you press and hold the # key when
storing names. Letters can not be entered when this
appears, allowing quicker access to numbers.
You are in “special character” mode; select a special
character and press
can switch to this mode by pressing the ∗ key.)
The alarm clock is set.
You have a reminder in your calendar to do something
(appears only on Calendar display).
You have a reminder in your calendar that it’s
someone’s birthday (appears only on Calendar display).
You have a reminder in your calendar to call someone
(appears only on Calendar display).
You have a reminder in your calendar of a meeting
(appears only on Calendar display).
Silent.
Insert. (When entering letters, you

Table of Contents
1. Safety At A Glance . . . . . . . . . . . . . . . 1
2. Getting Connected. . . . . . . . . . . . . . . 3
Attaching your battery . . . . . . . . . . . . . . . . . . . . . . . . . . . . . . .3
Removing the battery . . . . . . . . . . . . . . . . . . . . . . . . . . . . . . . .3
Charging your new battery . . . . . . . . . . . . . . . . . . . . . . . . . . . .4
When is a good time to charge? . . . . . . . . . . . . . . . . . . . . . .4
Important Battery Information . . . . . . . . . . . . . . . . . . . . . . . . . .6
3. The Basics . . . . . . . . . . . . . . . . . . . . . 7
Switching the phone on and off . . . . . . . . . . . . . . . . . . . . . . . . .7
Get a good signal . . . . . . . . . . . . . . . . . . . . . . . . . . . . . . . . . . .7
Using the keypad cover . . . . . . . . . . . . . . . . . . . . . . . . . . . . . .8
Making a call . . . . . . . . . . . . . . . . . . . . . . . . . . . . . . . . . . . . . .8
Ending a call . . . . . . . . . . . . . . . . . . . . . . . . . . . . . . . . . . . . . .9
Answering a call . . . . . . . . . . . . . . . . . . . . . . . . . . . . . . . . . . .9
Keyguard. . . . . . . . . . . . . . . . . . . . . . . . . . . . . . . . . . . . . . . .10
4. Using Your Phone. . . . . . . . . . . . . . . .11
The display . . . . . . . . . . . . . . . . . . . . . . . . . . . . . . . . . . . . . .11
What is the ‘start screen’? . . . . . . . . . . . . . . . . . . . . . . . . . . .12
Scrolling through the main menu . . . . . . . . . . . . . . . . . . . . . .12
Help text . . . . . . . . . . . . . . . . . . . . . . . . . . . . . . . . . . . . . . . .13
Summary of menu items . . . . . . . . . . . . . . . . . . . . . . . . . . . .14
5. Features A to Z . . . . . . . . . . . . . . . . 16
Access codes . . . . . . . . . . . . . . . . . . . . . . . . . . . . . . . . . . . .16
Alarm clock . . . . . . . . . . . . . . . . . . . . . . . . . . . . . . . . . . . . . .16
All calls timer . . . . . . . . . . . . . . . . . . . . . . . . . . . . . . . . . . . . .17
Automatic answer . . . . . . . . . . . . . . . . . . . . . . . . . . . . . . . . .17
Automatic redial. . . . . . . . . . . . . . . . . . . . . . . . . . . . . . . . . . .18
Calculator . . . . . . . . . . . . . . . . . . . . . . . . . . . . . . . . . . . . . . .18
Storing exchange rate . . . . . . . . . . . . . . . . . . . . . . . . . . . .19
Converting currency . . . . . . . . . . . . . . . . . . . . . . . . . . . . . .19
Calendar . . . . . . . . . . . . . . . . . . . . . . . . . . . . . . . . . . . . . . . .19
Call forwarding . . . . . . . . . . . . . . . . . . . . . . . . . . . . . . . . . . .21
Call log . . . . . . . . . . . . . . . . . . . . . . . . . . . . . . . . . . . . . . . . .22
Call restrictions . . . . . . . . . . . . . . . . . . . . . . . . . . . . . . . . . . .23
Call settings. . . . . . . . . . . . . . . . . . . . . . . . . . . . . . . . . . . . . . 23
Call timers . . . . . . . . . . . . . . . . . . . . . . . . . . . . . . . . . . . . . . .24
i

Call waiting . . . . . . . . . . . . . . . . . . . . . . . . . . . . . . . . . . . . . 24
Caller groups . . . . . . . . . . . . . . . . . . . . . . . . . . . . . . . . . . . . 25
Caller ID. . . . . . . . . . . . . . . . . . . . . . . . . . . . . . . . . . . . . . . . 27
Calling card . . . . . . . . . . . . . . . . . . . . . . . . . . . . . . . . . . . . . 27
Making calling card calls . . . . . . . . . . . . . . . . . . . . . . . . . 29
Clear call lists. . . . . . . . . . . . . . . . . . . . . . . . . . . . . . . . . . . . 29
Clear timers . . . . . . . . . . . . . . . . . . . . . . . . . . . . . . . . . . . . . 30
Clock. . . . . . . . . . . . . . . . . . . . . . . . . . . . . . . . . . . . . . . . . . 30
Setting the clock . . . . . . . . . . . . . . . . . . . . . . . . . . . . . . . 30
Selecting time format . . . . . . . . . . . . . . . . . . . . . . . . . . . . 31
Displaying or hiding the clock . . . . . . . . . . . . . . . . . . . . . . 31
Conference call . . . . . . . . . . . . . . . . . . . . . . . . . . . . . . . . . . 31
Current call timer . . . . . . . . . . . . . . . . . . . . . . . . . . . . . . . . . 32
Customer care contact number . . . . . . . . . . . . . . . . . . . . . . . 32
Dialed calls . . . . . . . . . . . . . . . . . . . . . . . . . . . . . . . . . . . . . 32
Digital/analog selection . . . . . . . . . . . . . . . . . . . . . . . . . . . . . 33
Earpiece volume. . . . . . . . . . . . . . . . . . . . . . . . . . . . . . . . . . 33
Emergency calls . . . . . . . . . . . . . . . . . . . . . . . . . . . . . . . . . . 34
Emergency key 9 . . . . . . . . . . . . . . . . . . . . . . . . . . . . . . . . . 34
Entering letters and numbers . . . . . . . . . . . . . . . . . . . . . . . . 35
ABC mode . . . . . . . . . . . . . . . . . . . . . . . . . . . . . . . . . . . . 35
Changing letter case . . . . . . . . . . . . . . . . . . . . . . . . . . . . 36
123 mode . . . . . . . . . . . . . . . . . . . . . . . . . . . . . . . . . . . . 36
Games. . . . . . . . . . . . . . . . . . . . . . . . . . . . . . . . . . . . . . . . . 38
Inbox . . . . . . . . . . . . . . . . . . . . . . . . . . . . . . . . . . . . . . . . . . 39
In-call menu. . . . . . . . . . . . . . . . . . . . . . . . . . . . . . . . . . . . . 39
Keypad tones . . . . . . . . . . . . . . . . . . . . . . . . . . . . . . . . . . . . 40
Language . . . . . . . . . . . . . . . . . . . . . . . . . . . . . . . . . . . . . . 41
Last call timer . . . . . . . . . . . . . . . . . . . . . . . . . . . . . . . . . . . 41
Last number redial . . . . . . . . . . . . . . . . . . . . . . . . . . . . . . . . 41
Life timer . . . . . . . . . . . . . . . . . . . . . . . . . . . . . . . . . . . . . . . 41
Lights . . . . . . . . . . . . . . . . . . . . . . . . . . . . . . . . . . . . . . . . . 42
Listen to voice messages . . . . . . . . . . . . . . . . . . . . . . . . . . . 42
Lock code . . . . . . . . . . . . . . . . . . . . . . . . . . . . . . . . . . . . . . 42
Changing your lock code . . . . . . . . . . . . . . . . . . . . . . . . . 42
Manual touch tones . . . . . . . . . . . . . . . . . . . . . . . . . . . . . . . 43
Memory status . . . . . . . . . . . . . . . . . . . . . . . . . . . . . . . . . . . 43
Messages . . . . . . . . . . . . . . . . . . . . . . . . . . . . . . . . . . . . . . 43
Message alert tone . . . . . . . . . . . . . . . . . . . . . . . . . . . . . . . . 44
Microphone . . . . . . . . . . . . . . . . . . . . . . . . . . . . . . . . . . . . . 44
ii

Missed calls. . . . . . . . . . . . . . . . . . . . . . . . . . . . . . . . . . . . . .45
NAM selection . . . . . . . . . . . . . . . . . . . . . . . . . . . . . . . . . . . .45
Network feature setting . . . . . . . . . . . . . . . . . . . . . . . . . . . . .46
Storing codes . . . . . . . . . . . . . . . . . . . . . . . . . . . . . . . . . .46
Network services . . . . . . . . . . . . . . . . . . . . . . . . . . . . . . . . . .47
One-touch dialing. . . . . . . . . . . . . . . . . . . . . . . . . . . . . . . . . .47
Outbox . . . . . . . . . . . . . . . . . . . . . . . . . . . . . . . . . . . . . . . . .49
Paging. . . . . . . . . . . . . . . . . . . . . . . . . . . . . . . . . . . . . . . . . .49
Phone book . . . . . . . . . . . . . . . . . . . . . . . . . . . . . . . . . . . . . .49
Storing a name and number . . . . . . . . . . . . . . . . . . . . . . . .50
Recalling names & numbers . . . . . . . . . . . . . . . . . . . . . . . .51
Erasing stored names and numbers . . . . . . . . . . . . . . . . . .51
Phone lock . . . . . . . . . . . . . . . . . . . . . . . . . . . . . . . . . . . . . .52
Phone settings . . . . . . . . . . . . . . . . . . . . . . . . . . . . . . . . . . . .52
Profiles . . . . . . . . . . . . . . . . . . . . . . . . . . . . . . . . . . . . . . . . .53
Customizing Profiles . . . . . . . . . . . . . . . . . . . . . . . . . . . . .54
Public system selection . . . . . . . . . . . . . . . . . . . . . . . . . . . . .54
Received calls . . . . . . . . . . . . . . . . . . . . . . . . . . . . . . . . . . . .55
Restore factory settings . . . . . . . . . . . . . . . . . . . . . . . . . . . . .56
Restrict calls . . . . . . . . . . . . . . . . . . . . . . . . . . . . . . . . . . . . .56
Ringing options . . . . . . . . . . . . . . . . . . . . . . . . . . . . . . . . . . .58
Ringing tones. . . . . . . . . . . . . . . . . . . . . . . . . . . . . . . . . . . . .59
Ringing volume . . . . . . . . . . . . . . . . . . . . . . . . . . . . . . . . . . .59
Roaming . . . . . . . . . . . . . . . . . . . . . . . . . . . . . . . . . . . . . . . .60
Scrolling view . . . . . . . . . . . . . . . . . . . . . . . . . . . . . . . . . . . .61
Security settings . . . . . . . . . . . . . . . . . . . . . . . . . . . . . . . . . .61
Security code. . . . . . . . . . . . . . . . . . . . . . . . . . . . . . . . . . . . .61
Changing your security code . . . . . . . . . . . . . . . . . . . . . . .62
Send own number . . . . . . . . . . . . . . . . . . . . . . . . . . . . . . . . .62
Settings. . . . . . . . . . . . . . . . . . . . . . . . . . . . . . . . . . . . . . . . .63
Storing a name & number. . . . . . . . . . . . . . . . . . . . . . . . . . . . 63
Quick save . . . . . . . . . . . . . . . . . . . . . . . . . . . . . . . . . . . .63
System . . . . . . . . . . . . . . . . . . . . . . . . . . . . . . . . . . . . . . . . .63
Text messages and pages. . . . . . . . . . . . . . . . . . . . . . . . . . . .64
Writing text messages . . . . . . . . . . . . . . . . . . . . . . . . . . . . 65
Sending text messages . . . . . . . . . . . . . . . . . . . . . . . . . . .65
Receiving text messages . . . . . . . . . . . . . . . . . . . . . . . . . .66
Reading text messages . . . . . . . . . . . . . . . . . . . . . . . . . . .66
Reading options. . . . . . . . . . . . . . . . . . . . . . . . . . . . . . . . .67
Forwarding a message. . . . . . . . . . . . . . . . . . . . . . . . . . . .67
iii

Replying to a message . . . . . . . . . . . . . . . . . . . . . . . . . . . 67
Receiving a page . . . . . . . . . . . . . . . . . . . . . . . . . . . . . . . 68
Touch tones . . . . . . . . . . . . . . . . . . . . . . . . . . . . . . . . . . . . . 68
Touch tone length . . . . . . . . . . . . . . . . . . . . . . . . . . . . . . . . . 70
Unlocked phone number . . . . . . . . . . . . . . . . . . . . . . . . . . . . 70
Vibrating alert. . . . . . . . . . . . . . . . . . . . . . . . . . . . . . . . . . . . 70
Voice messages . . . . . . . . . . . . . . . . . . . . . . . . . . . . . . . . . . 71
Storing your voice mailbox number . . . . . . . . . . . . . . . . . . 71
Greetings, passwords, and prompts . . . . . . . . . . . . . . . . . 72
Listening to your voice messages . . . . . . . . . . . . . . . . . . . 72
Voice privacy . . . . . . . . . . . . . . . . . . . . . . . . . . . . . . . . . . . . 72
Volume . . . . . . . . . . . . . . . . . . . . . . . . . . . . . . . . . . . . . . . . 73
Warning and game tones . . . . . . . . . . . . . . . . . . . . . . . . . . . 73
Welcome note . . . . . . . . . . . . . . . . . . . . . . . . . . . . . . . . . . . 73
Write new . . . . . . . . . . . . . . . . . . . . . . . . . . . . . . . . . . . . . . 74
6. Accessories. . . . . . . . . . . . . . . . . . . 75
Batteries . . . . . . . . . . . . . . . . . . . . . . . . . . . . . . . . . . . . . . . 75
Chargers & Other Accessories. . . . . . . . . . . . . . . . . . . . . . . . 77
7. Troubleshooting. . . . . . . . . . . . . . . . 80
8. Reference Information . . . . . . . . . . 81
9. Technical Data . . . . . . . . . . . . . . . . . 86
10. NOKIA One-Year Limited Warranty. . 87
11. Index . . . . . . . . . . . . . . . . . . . . . . . . 91
iv
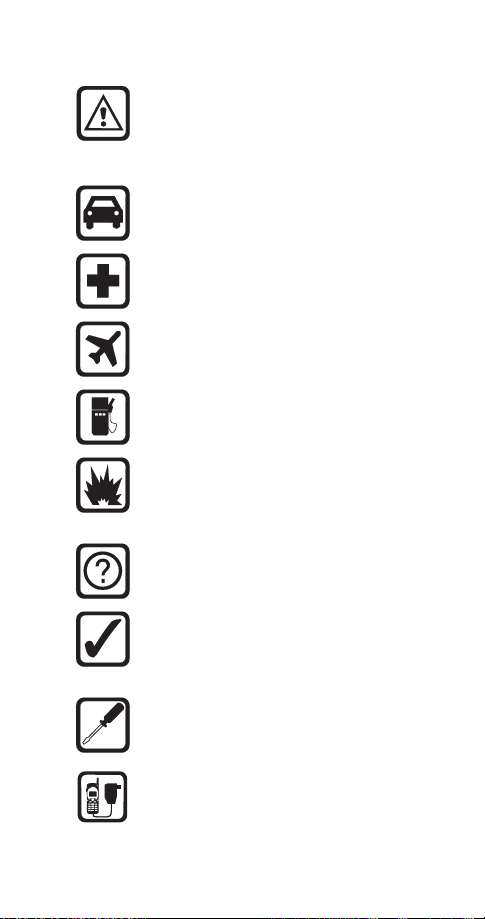
1. Safety At A Glance
Read these simple guidelines before using your
phone. Failure to comply with these guidelines may
be dangerous or illegal.
For more detailed safety inform ation, see “Important
Safety Information” on page 81.
Road Safety Comes First
Don’t use a hand-held phone while driving; park the
vehicle first.
Switch Off In Hospitals
Switch off your phone when near medical
equipment. Follow any regulations or rules in force.
Switch Off On Aircraft
Mobile phones can cause interference. Using them
on aircraft is illegal.
Switch Off When Refueling
Do not use the phone at a refueling point. Do not
use near fuels or chemicals.
Switch Off Near Blasting
Do not use the phone where blasting is in progress.
Observe restrictions, and follow any regulations or
rules in force.
Interference
All mobile phones may get interference which could
affect performance.
Use Sensibly
Use only in the normal position (to ear). Avoid
unnecessary contact with the antenna when phone
is on.
Qualified Service
Only qualified service personnel may install or repair
cellular phone equipment.
Accessories and Batteries
Use only approved accessories and batteries.
Do not connect incompatible products.
1

FCC/Industry Canada Notice
Your phone may cause TV or radio interference (e.g. when using
a telephone in close proximity to receiving equipment). The
FCC/Industry Canada can require you to stop using your
telephone if such interference can not be eliminated. If you
require assistance, contact your local service facility.
This device complies with part 15 of the FCC rules. Operation is
subject to the condition that this device does not cause harmful
interference.
Using this Guide
The wireless phone described in this guide is approved for use
in TDMA/AMPS networks.
A number of features included in this guide are called Network
Services. They are special services provided by wireless service
providers. Before you can take advantage of any of these
Network Services, you must subscribe to the service(s) from
your home service provider and obtain instructions for their use.
Updates
The latest version of this Owner’s Manual may be found on
Nokia’s World Wide Web site at www.NokiaUSA.com.
Interactive manual
Now, Nokia has a great new way for you to learn how to use all
of your phone features. Go to www.NokiaHowTo.com to
access the Nokia Interactive Owner’s Manual. It provides an
interactive way to get step-by-step instructions for any of your
phone’s features.
Disclaimer
It’s possible that you may not be able to activate your phone on
all wireless systems. Please ask your service provider for details.
2
2. Getting Connected
You’ll need to charge your battery once your phone has
been activated. This section will help familiarize you on
how, and when, to charge your battery.
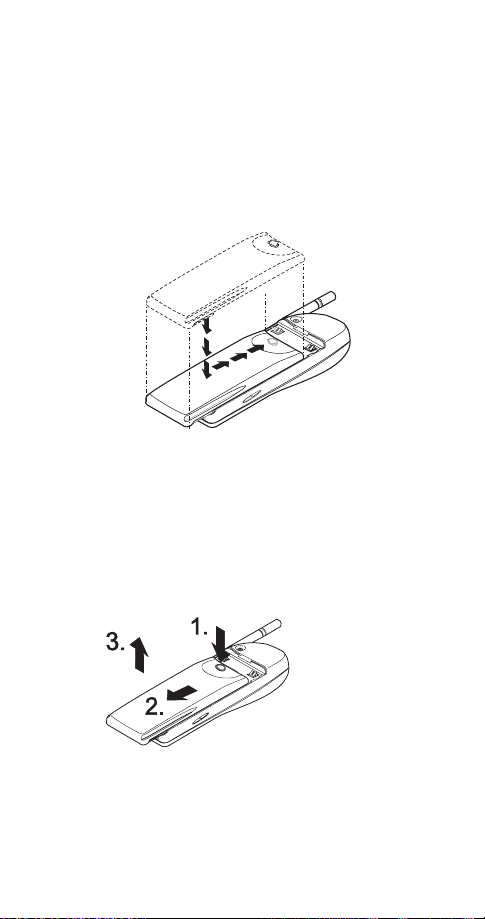
Attaching your battery
Simply place the battery in the grooves on the back of
your phone. Then slide the battery upward until it clicks.
Note: Use only those batteries approved by the phone
manufacturer and recharge your battery only with the chargers
approved by the manufacturer.
See “Important Battery Information” on page 6.
Removing the battery
Note: Switch off the phone before removing the battery!
Press and hold the
1.
button at the top of
the battery.
Slide the battery
2.
toward the bottom of
the phone.
Lift the battery off
3.
the phone.
3

Charging your new battery
Your phone can be used with either a rechargeable
Li-Ion or NiMH battery. Note that a new battery’s full
performance is achieved only after two or three
complete charge and discharge cycles.
With your phone on or off, connect the charger to a
standard 120V AC outlet. Then connect the lead from
the charger to the bottom of your phone or place it on
a charging stand.
When the battery begins charging, your phone will beep
once and the battery strength indicator on the right side
of the display will scroll.
Note: If the battery is totally empty, it may take a few minutes
before the charging indication appears on the display.
If your phone displays
Not charging
, charging is
suspended. Check that the battery is not connected to
a non-approved charging device. If the battery is very
hot or cold, wait for a while; charging will automatically
resume after the battery is restored to its normal
operating state. If charging still fails, contact your dealer.
When is a good time to charge?
You can charge your battery anytime. If you have a
NiMH battery, you should allow it to completely
discharge once in a while.
When your phone beeps once and displays
Battery low
you only have a couple of minutes of talk time
remaining. The repetition rate of these battery-low
warnings depend on the remaining battery capacity and
the battery condition. These warnings are more
frequent when you’re in a call.
Note: The phone will not give you the warning tone under
certain conditions. See “Warning and game tones” on page 73.
Once all the power has drained from your battery, you’ll
hear three beeps with the message
Recharge battery
your display. At this point, your phone will switch itself
off and you’ll need to recharge your battery.
,
on
4

When is charging complete?
When the charge indicators stop scrolling, your
phone is considered fully charged. However, a
slight increase in charge may occur if your
phone is left connected to the charger for a
while. This is called “trickle charge.”
Charging times depend on the type of battery and
charger used.
For approximate charging and operating times, see “Standby
and Talk Times” on page 76.
Can you make calls while charging?
Yes, you can. But your battery may not charge while a
call is in progress. Charging should resume once you
end the call.
Discharging NiMH batteries
A NiMH battery lasts longer and performs better if you
fully discharge it from time to time. To discharge the
battery, leave your phone switched on until the battery
is drained. The phone will display several messages that
the battery is low and that you need to recharge it; just
ignore them. Do not attempt to discharge the battery by
any other means.
5

Important Battery Information
• The battery can be charged and discharged hundreds of
times but it will eventually wear out. When the operating
time (talk time and standby time) is noticeably shorter than
normal, it is time to buy a new battery.
• Use only batteries approved by the phone manufacturer
and recharge your battery only with the chargers approved
by the manufacturer. When a charger is not in use,
disconnect it from the power source. Do not leave the
battery connected to a charger for longer than a week,
since overcharging may shorten its life. If left unused a fully
charged battery will discharge itself over time.
• (NiMH batteries only) For good operation times, discharge
the battery from time to time by leaving your phone
switched on until it turns itself off (or by using the battery
discharge facility of any approved accessory available for
your phone). Do not attempt to discharge the battery by
any other means.
• Temperature extremes will affect the ability of your battery
to charge: allow it to cool down or warm up first.
• Use the battery only for its intended purpose.
• Never use any charger or battery which is damaged or
worn out.
• Do not short circuit the battery. Accidental short circuiting
can occur when a metallic object (coin, clip, or pen)
causes direct connection of the + and - terminals of the
battery (metal strips on the back of the battery), for
example when you carry a spare battery in your pocket or
purse. Short circuiting the terminals may damage the
battery or the connecting object.
• Leaving the battery in hot or cold places, such as in a
closed car in summer or winter conditions, will reduce the
capacity and lifetime of the battery. Always try to keep the
battery between 59º F and 77º F (15º C and 25º C). A
phone with a hot or cold battery may temporarily not work,
even when the battery is fully charged. NiMH batteries’
performance is particularly limited in temperatures below
14º F (-10º C). Li-Ion batteries’ performance is particularly
limited in temperatures below 32º F (0º C).
• Do not dispose of batteries in a fire!
• Dispose of used batteries in accordance with any local
regulations.
6

3. The Basics
You have purchased a powerful phone, with lots of
features. Read this section for some very basic
information on how to use your phone.
A more comprehensive description of your phone is
covered in “Features A to Z” starting on page 16.
Switching the phone on and off
Press and hold the
the phone on or off.
key for two seconds to switch
ð
ð
key (
ð key
Switch off!
7
will appear,
Switching off with the
Quickly press the
highlighted) then press OK.
Note: This method is available in all profiles except Headset and
Car.
NORMAL POSITION: Hold the phone as you would any other
telephone with the antenna pointed up and over your shoulder.
TIPS ON EFFICIENT OPERATION: As with any other radio
transmitting device, do not touch the antenna unnecessarily
when the phone is switched on. Contact with the antenna
affects call quality and may cause the phone to operate at a
higher power level than otherwise needed.
WARNING! Do not switch on the phone when wireless phone
use is prohibited or when it may cause interference or danger.
See “Safety At A Glance” on page 1 for more information.
Get a good signal
Your phone operates on radio waves, and the quality of
radio reception depends entirely on the strength of the
radio signal in your area.
This radio coverage is maintained by a wireless network
and the quality of calls on a wireless phone depends on
the strength of the wireless radio signal.

Checking signal strength
When you are at the start screen
or in a call, the signal strength is indicated by
the indicators on the left side of your phone’s
display. These indicators scroll as the strength
of the signal increases and decreases.
Increasing your phone’s signal may be easy. Try moving
your phone slightly, or move towards a window if you’re
calling from inside a building.
Using the keypad cover
When
Keypad cover setting
simply by opening the keypad cover. When you want to
hang up, just close the cover and the call will end.
When the keypad cover setting is off, you must open
the keypad cover to answer any calls. Once opened,
you can press any key (except the
answer a call.
To end a call, press
cover.
Activating the keypad cover
Press
1.
2.
Note: If you’re using a headset and wish to close the keypad
cover and still keep the call active, press
closing the keypad cover.
Press
Menu
W
ô
4 2 6
or V to On and press
(see page 12)
is on, you can answer calls
and ô keys) to
ð
before closing the keypad
OK
Options once before
Making a call
When you want to make a call, open the keypad cover,
enter the area code and phone number and press
Editing a number on display
Press
to move the cursor to the left and W to move it
V
to the right. Press
of the cursor.
to delete the character to the left
Clear
8
ó

Dialing stored phone numbers
View stored names and numbers by pressing
from the start screen (
See “Phone book” on page 49 for details on storing numbers.
Calling card calls
See “Calling card” on page 27.
Emergency calls
See “Emergency calls” on page 34.
Ending a call
If
Keypad cover setting
cover. Otherwise, press
See “Using the keypad cover” on page 8.
Answering a call
The phone rings according to the
settings in the currently selected
(see page 53)
profile
If
Keypad cover setting
cover to answer the call. Otherwise, press any key
except
Note: If Keyguard is on (see page 10), only ó answers calls.
See “Using the keypad cover” on page 8.
Want to stop your phone from ringing without
answering the call?
Press
answering a call if it’s inconvenient to talk.
You can still answer the call if
person who is calling is still flashing on your display.
If you don’t wish to answer the call, it will be forwarded to
your voice mailbox if you have a voice mail subscription.
See “Voice messages” on page 71 for details on your voice
mailbox.
or ð.
ô
when the phone rings. This keeps you from
ð
see page 12)
is active, simply close the keypad
ô
.
is active, simply open the keypad
, then press
.
or the name of the
Call
W
ó
or V
9

Keyguard
This feature helps to prevent accidental key presses
(e.g. when
by locking your keypad.
If any keys are pressed while
Keyguard is activated,
and then *
Activating Keyguard
There are three different ways to activate Keyguard.
Keys locked
• Press and hold ô
• Press
• Press
Deactivating Keyguard
• Press Unlock, then ∗
Note: When Keyguard is
programmed into your phone (e.g. by pressing 911 then
may be possible. However, Emergency key 9 doesn’t work.
Answering a call with Keyguard active
During an incoming call the keypad automatically
unlocks. However, you can answer a call only by
opening the keypad cover if it’s active; otherwise, press
only
ó
becomes active again.
phone is in your pocket, in your purse)
your
Press Unlock
will display.
will appear on the display when activated.
Menu ∗
Menu 9 at the start screen
ON, calls to the emergency number
. After you end the call, Keyguard automatically
ó)
Some notes about Keyguard
• Calls may be possible to the emergency number
programmed into your phone (e.g. 911 or other official
emergency number). The number is displayed only after
you have keyed in its last digit.
•Pressing the
• Keyguard is automatically turned off when the phone is
connected to a car kit.
ð key quickly turns lights on for 15 seconds.
10
4. Using Your Phone
The first few days you have your phone, play with it to
learn how the menu and submenu system works.
The more you learn how to access these menus and
submenus, the more fun you’ll have with your phone.
This section describes the different methods of using
your phone menus and submenus.
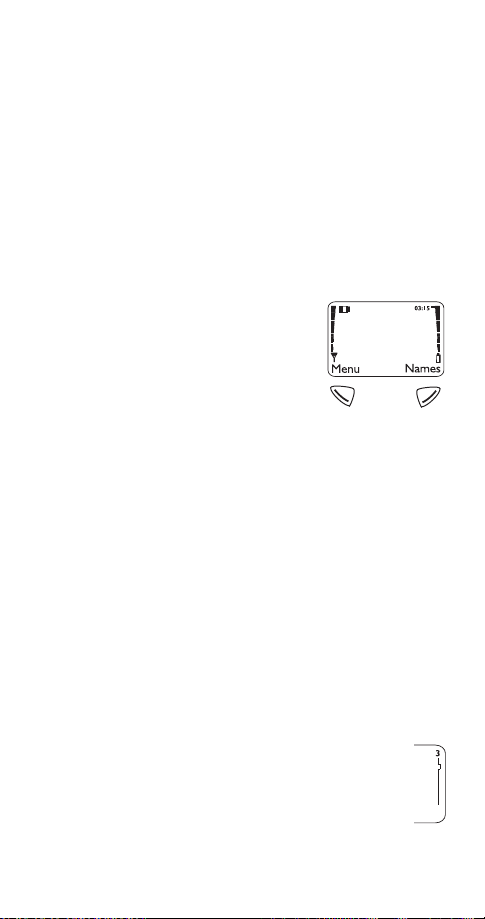
The display
Soft keys
Your phone has two soft keys
located below the display. The
current function is indicated by the
texts appearing directly above
them. Press the corresponding key
under the choice you wish to select.
This illustration shows the phone at the start screen
(see “What is the ‘start screen’?” on page 12)
screen always displays
the right.
menus and submenus.
your phone book
Scroll keys
Your phone has two scroll keys located just below the
display screen. The scroll keys have arrows on them
that look like
your phone’s menus and submenus, as well as through
your phone book
allows you to access your phone’s
Menu
(see “Phone book” on page 49)
and W. Press these to navigate through
V
(See “Phone book” on page 49)
on the left and
Menu
allows you to access
Names
. The start
on
Names
.
.
Scroll bar
When you access your phone’s menu and
submenus, you will notice a scroll bar at the far
right of the screen. This bar indicates your
location in the menu structure; each “tab” on the
bar represents a different menu item.
11

For example, press
once. The scroll bar appears
Menu
with the first (top) tab displayed. A different tab appears
each time you press the
or V key to move up and
W
down through the menu structure. The scroll bar works
the same way with submenus.
Menu & submenu numbering
When you scroll to a menu or submenu, the menu
number and/or submenu number appears on the
display above the scroll bar.
For example, when you scroll to menu 2 (
Call log
number 2 appears in the top right-hand corner of the
display. If you scroll to menu 4 (
(
Security settings
), your phone will display
Settings
), submenu 3
4-3
right-hand corner.
See “Summary of menu items” on page 14 for a list of your
phone’s features along with their menu locations.
Also, see “Using shortcuts” on page 13
.
What is the ‘start screen’?
The start screen appears when you first turn your phone
on, in its idle state.
When you want to get to the start screen, press
any time except during a call (unless you want to hang
up).
Note: If you press ô when the phone is requesting input
(i.e., a setting, phone number, name, etc.), the phone displays
the start screen and the input is not saved.
) the
in the top
at
ô
Scrolling through the main menu
Press
at the start screen. Then press
Menu
reach the desired menu item.
Press
Select, Options or OK
(whichever appears) to
enter submenus and to choose options.
Press
to exit the present menu or
Exit
Back
one level.
12
or V to
W
to go back

Using shortcuts
This is a quick and easy way to access a menu without
having to scroll through other menus.
Press
, then menu number, then submenu
Menu
number.
Press the menu and submenu numbers within a couple
of seconds of each other when using this method.
For a summary of your phone’s menu structure, see “Summary
of menu items” on page 14
.
Help text
If you’re not sure how a feature works, wait just a few
seconds and help text will appear for most of your
phone’s features. Press
the text or
Back
to exit.
to see the next page of
More
13

Summary of menu items
1Messages
1 1 Text Messages
1 1 1 Inbox
1 1 2 Saved
1 1 3 Write new
1 1 4 Outbox
1 1 5 Erase all
1 2 Voice messages
1 2 1 Listen to voice messages
1 2 2 Voice mailbox number
1 3 Welcome Note
2Call log
2 1 Missed calls
2 2 Dialed calls
2 3 Received calls
2 4 Clear call lists
2 5 Call timers
3 Profiles
3 1 Normal
3 1 1 Select
3 1 2 Customize
(following submenus appear in all profiles)
3 1 2 1 Ringing options
3 1 2 2 Ringing volume
3 1 2 3 Ringing tone
3 1 2 4 Vibrating alert (w/vibrating battery only)
3 1 2 5 Keypad tones
3 1 2 6 Warning and game tones
3 1 2 7 Message alert tone
3 2 Silent
3 3 Meeting
3 4 Outdoor
3 5 Pager
3 6 Car
(once used with car kit)
3 7 Headset (once used with headset)
14

4Settings
4 1 Call settings
4 1 1 Emergency key 9
4 1 2 Automatic redial
4 1 3 Calling card
4 2 Phone settings
4 2 1 Clock
4 2 2 Alarm clock
4 2 3 Touch tones
4 2 4 Restore factory settings
4 2 5 Language
4 2 6 Keypad cover setting
4 3 Security settings
4 3 1 Restrict calls
4 3 2 Access codes
4 4 Network services
4 4 1 Voice privacy
4 4 2 Call forwarding
4 4 3 Call waiting
4 4 4 Send own number
4 4 5 Network feature setting
4 4 6 NAM selection
4 4 7 Digital/analog selection
(may not appear in all systems)
4 4 8 Public system selection
(may not appear in all systems)
5System
5 1 Automatic
5 2 Manual
5 3 New search
6Games
6 1 Memory
6 2 Snake
6 3 Logic
6 4 Dice
7 Calculator
8Calendar
9 Keyguard
15

5. Features A to Z
ABC mode
This allows you to enter names into your phone book.
)
.
OK
.
See “Entering letters and numbers” on page 35
Access codes
This is a security feature that allows you access to
certain phone features, such as the phone lock
and unlocked phone number
Also, see “Lock code” on page 42 and “Security code” on
page 61.
(
page 70
Alarm clock
The alarm clock operates off your
phone’s clock. The volume for the
alarm clock is determined by the
current ringing volume.
Note: If you have selected the Silent or Beep once ringing
option (see page 58), your alarm clock will quietly beep one
time.
See “Clock” on page 30 for information on your phone’s clock.
Setting the alarm clock
Press
1.
clock
Enter time you wish to set alarm (use two-digit
2.
Menu
)
4 2 2 (
Settings
-
Phone settings
fields for hours and minutes). Existing digits will be
replaced with the new alarm time.
Press
3.
4.
Note: Step 4 appears only if you have selected am/pm format;
see “Selecting time format” on page 31 for more information.
OK
Select either am or pm and press
(
page 52
-
Alarm
)
When the alarm goes off
Press
to shut off the alarm.
Stop
16

Snoozing
Press
Snooze
.
The alarm will go off again in 10 minutes. If you let the
phone alarm for 1 minute without pressing a key, it
stops alarming for 10 minutes then starts again.
Turning the alarm clock off
Press
clock
Note: If you have selected the Silent or Meeting profile, your
alarm will only beep once. The best profile to use while using the
alarm clock is
modified from their original settings.
For more information on Profiles, see page 53.
4 2 2 (
Menu
), then scroll to
Settings
and press OK.
Off
-
Phone settings
Normal or Outdoor, unless these have been
-
All calls timer
This feature keeps track of how much time you have
spent on all calls with your phone.
See “Call timers” on page 24
.
Automatic answer
This is one of the settings in your phone’s Profiles
(see page 53)
. With this on, your phone answers
incoming voice calls after one ring.
Note: This can only be used when your phone is connected to
a headset or to an ap proved handsfree car kit equipped with the
ignition sense option, with the ignition on.
Alarm
Activating automatic answer
Press
1.
Your phone lists each profile. Use
2.
either the
Note: Car and Headset will not appear unless your phone has
already been connected to a car kit or headset at least one time.
Highlight
3.
Automatic answer
Press
4.
Menu
Car
Customize
3 (
or
)
Profiles
Headset
and press OK. Press
, then press
to On and press OK.
W
to highlight
W
profile and press
again.
Select
Options
to
W
17
.

Automatic redial
Your phone will redial the number you’re trying to call up
to 3 times after you hear a quick, busy signal. Press
to stop the call attempts.
This feature attempts to redial numbers that are busy
due to the wireless network. It will not redial numbers to
a busy party.
Activating automatic redial
Press
redial
4 1 2 (
Menu
), then press
-
Settings
W
Call settings
or V to On and press OK.
-
Automatic
Calculator
Your phone’s calculator adds,
subtracts, multiplies, divides, and
converts currency.
Remember! Your phone must be switched
on to use this feature. Do not switch on the
phone when wireless phone use is prohibited or when it may
cause interference or danger.
Using the calculator
Press
1.
Enter the first number in the calculation (press # for
2.
Menu
7 (
Calculator
)
decimals)
To add, press ∗ (+ appears)
3.
To subtract, press ∗∗ twice (- appears)
To multiply, press
To divide, press
(* appears)
∗∗∗
( / appears)
∗∗∗∗
To add a decimal, press the # key
Enter the second number
4.
Repeat these steps as many times as needed. Press
to erase any mistakes.
Clear
Press
5.
Note: You can also choose Add, Subtract, Multiply, and
Options
. With
highlighted, press
Equals
Divide from the list of options.
OK
ô
18

Storing exchange rate
Press
1.
Scroll to
2.
Press
3.
visited unit
unit
7, then press
Menu
Exchange rate
or V at either
W
or
How many visited units to a home
Options
and press
OK
How many home units to a
, depending on how you wish to convert the
currency. Press OK once you decide.
Enter the appropriate exchange rate and press OK
4.
(use the # key for decimals)
Phone will display
5.
Rate saved
Converting currency
Press
1.
Enter number of units, then press
2.
Press
3.
press
Converted currency is displayed
4.
7
Menu
or V to either
W
OK
To home
Options
or
To visited
Calendar
The calendar keeps track of
birthdays, meetings, simple
reminders, and calls you need to
make. It can even sound an alarm
when it’s time for you to make a call
or go to a meeting.
Remember! Your phone must be switched on to use this
feature. Do not switch on the phone when wireless phone use
is prohibited or when it may cause interference or danger.
Note: Your phone must remain on to use the calendar’s alarm
feature. If your phone is off, the alarm will not sound at its
scheduled time.
, and
Using the calendar
Press
1.
If you haven’t set the time and date, your phone
2.
Menu
8 (
Calendar
)
prompts you to set your phone’s clock
19

When your phone prompts you for the time with
, enter the time in hours and minutes (using
hh:mm
two-digit fields), then press
Time format (24-hour or am/pm) is set using the Clock.
See “Selecting time format” on page 31.
OK
When your phone prompts you for the date with
mm/dd/yyyy
, enter the month and day (using twodigit fields) and year (using a four-digit field), then
press OK.
Use W to move the cursor right and V to move it
Tip:
left. When you enter a digit, it writes over the number to
the right of the cursor.
Your phone displays the current day. You can also
3.
scroll to different days by pressing
Once you’re at the date you want, press
4.
Then use
press
to highlight the option you want, and
Wý
The options are:
Select.
W
or V.
Options
.
Option 1: View day
With this option, you can view the notes of the day
currently on display.
to scroll through the notes. Each note allows you
Use
W
to choose the following
clears the note from your calendar.
Erase
gives you the same prompts you got when you
Edit
Options
:
made the note.
gives you the date prompt so you can move the
Move
note to another date.
Option 2: Make note
With this option, you’ll need to choose
Meeting
, or
. Your phone will prompt you for
Birthday
Reminder, Call
more information depending on which one you choose.
You can also set an alarm for any calendar note.
See “Entering letters and numbers” on page 35 for help with
entering information at the
Note: When the alarm goes off, you can press
Press
OK to shut off the alarm.
Subject: prompt.
Postpone or OK.
20
,

Option 3: Erase notes
With this option, you’ll need to choose which notes to
erase. If you choose all the notes for the day currently
on display (
Of Chosen Day
), or
One By One
(for all notes
in the calendar), your phone presents each note to you
with the option
If you choose
or
Erase
All at Once
.
Back
, your phone will delete all
calendar notes. When prompted to confirm the erase,
press
Yes
or No.
Option 4: View all
This allows you to view the notes of the entire calendar.
or V to scroll through the notes.
Use
W
will appear if there are no notes in the calendar.
empty
Calendar memory
Option 5: Go to date
Enter the date you wish to go to.
Option 6: Set the date
Enter the day and month (using two-digit fields) and
year (using a four-digit field), then press OK.
Call forwarding
This network service is used to forward incoming calls
to another number so you won’t miss an important call.
Check with your service provider for details.
Note: Before you can activate this feature, you should first store
the feature code given to you by your service provider.
Otherwise, this feature may not appear in the menu.
However, you can use the feature code manually, if you choose,
by including the feature code in front of the phone number
(e.g., *72 555 1212)
See “Network feature setting” on page 46 for more details.
Press
1.
forwarding
Scroll to desired call forwarding feature
2.
on next page)
Menu
4 4 2 (
)
and press
Settings
Select
-
Network services
(see options
-
Call
21

Highlight
3.
Enter phone number at
4.
Activate
and press
Number:
OK
(or press
locate number in phone book) and press
Your phone will attempt to call the network to
5.
confirm the feature code you entered in Menu 4 4 5
see “Network feature setting” on page 46
(
Once the feature code had been confirmed, the
6.
feature is activated
Call forwarding options
Forward all calls
Forward if busy
forwards all incoming calls.
forwards calls only when you’re on the
phone.
Forward if not answered
forwards calls if you don’t
answer.
Forward if out of reach
forwards calls if you are out of
the serving wireless network.
Cancel all call forwarding
cancels all call forwarding
options you have active.
Call log
This feature automatically keeps
track of numbers you’ve dialed,
numbers that have called you, and
the amount of time you’ve spent on
calls.
Search
OK
to
)
Using call log
Press
1.
Scroll to one of the following options, then press
2.
Select
2-1
2-2
2-3
2-4
2-5
2 (
Menu
Call log
or
OK
Missed calls
Dialed calls
Received calls
Clear call lists
Call timers
-
)
See page 45
-
See page 32
-
See page 55.
-
See page 29.
-
See page 24.
.
.
22

You can dial any of the phone numbers by pressing
Tip:
while the number is on the display.
ó
The ‘Options’ soft key
When you access
and press
calls
your phone’s display.
Call time
first connected (if clock has been set)
Edit number
Save
book.
Erase
View number
stored in the phone book and the name is displayed
instead of the number.
Call restrictions
This feature allows you to restrict incoming and
outgoing calls to and from certain numbers.
See “Restrict calls” on page 56 for details.
Call settings
This feature allows you to access and activate some of
your phone’s features.
Using call settings
1.
2.
shows the date and time when the call was
allows you to save the number into your phone
will erase the number from the call list.
Press
Press
press
4-1-1
4-1-2
4-1-3
Dialed calls, Received calls
, a list of options will appear on
Options
allows you to edit the dialed number.
will appear only if the number has been
4 1 (
Menu
to reach one of the following options, then
W
Select
Emergency key 9
Automatic redial
Calling card
Settings
-
-
See page 27
-
-
Call settings
See page 34
See page 18
, or
)
.
.
.
Missed
23
 Loading...