

Page 1

User’s Guide for Nokia 6150
Page 2

Nokia is a registered trademark of Nokia Corporation, Finland.
©2004. Nokia Mobile Phones. All rights reserved.
Nokia Mobile Phones operates a policy of continuous development. Therefore, we reserve the right to
make changes and improvements to any of the products described in this guide without prior notice.
Issue 2
Copyright © 2004 Nokia. All rights reserved.
Page 3

Quick and Easy
Congratulations for choosing this Nokia phone! This page provide some basic tips on using your phone.
For more detailed information, read through the Owner’s Guide.
Making your first call
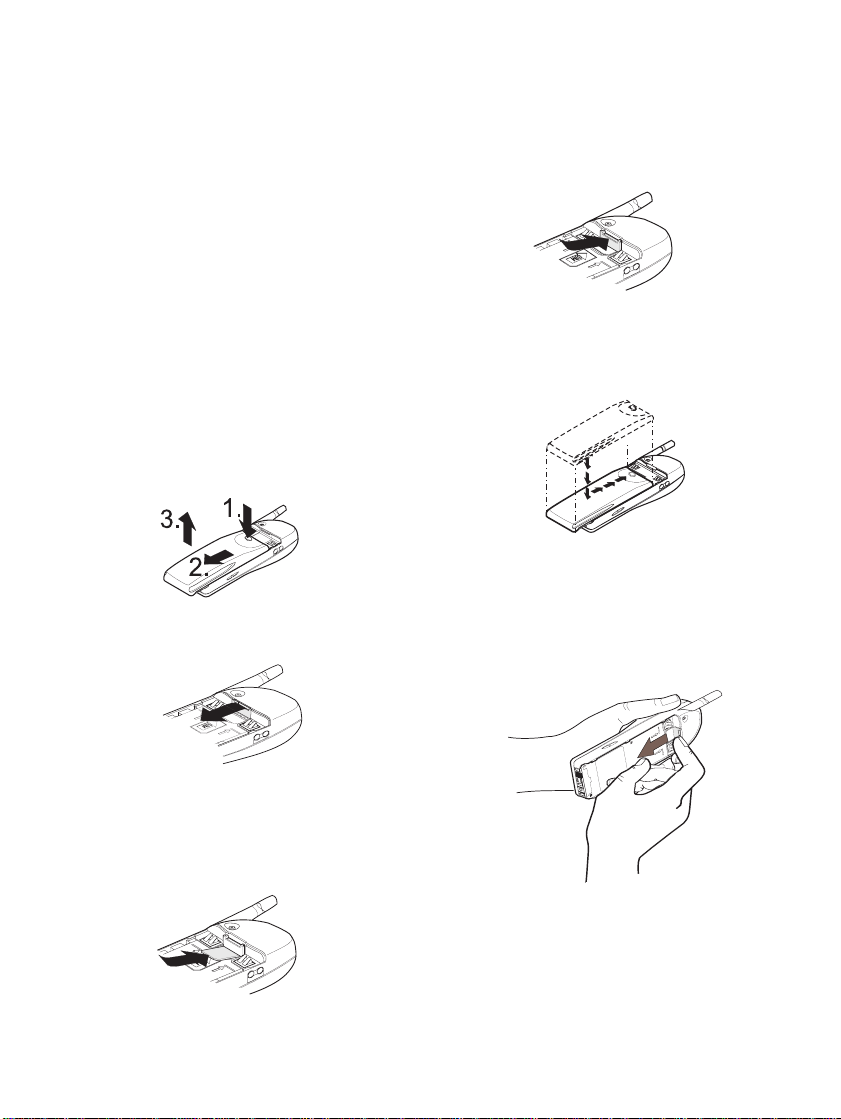
1 With the phone battery removed, insert your SIM card. Install and charge the battery. See Chapter
‘Getting Started’ for details.
2 Switch on your phone by pressing and holding . Wait until the operator or service provider’s name
appears on the display.
3 Key in the area code and phone number and press .
4 End the call by pressing .
Call Functions
Answering a call
Press .
Ending a call
Press .
Redial
When the display is clear, press to access the last dialled numbers. Press to dial the desired
number.
Adjusting the Earpiece Volume
Press the volume keys on the side of the phone.
Phone Book Functions
Quick Save
Key in the phone number and press Save. Key in the name and press OK.
Copyright © 2004 Nokia. All rights reserved.
Page 4
Quick Find
When the display is clear, press , (key in
the first letter of the name), scroll with or
to the desired name.
Using Phone Book during a Call
To access Phone Book during a call, press
Options, select Names.
Speed Dialling
Press a number key - , press .
If the Speed Dialling function in
Menu 4-3-3 is activated, press and hold the
corresponding number key - until
the call is started.
Calling your voice mailbox
Press and hold . If the phone requests for
your voice mailbox number, key it in and
press OK.
Essential Shortcuts
Locking the Keypad / Unlocking the Keypad
Press Menu then (within 3 seconds) /
Press Unlock, then .
Changing Ringing Tone
Press Menu, choose Profiles, press Se-
lect, choose the desired profile, press Options, choose Personalise, press OK.
To change the ringing tone, choose Ring-
ing tone, press Select, choose the de-
sired setting, press OK.
Writing & Sending a Message
Press Menu , , Key in a message,
(press to change between upper and
lower case characters, press and hold
for numbers, press for special characters), press Options, choose Send, press
OK, enter the phone number, press OK.
Copyright © 2004 Nokia. All rights reserved.
Page 5

Contents
Using This Guide .................................................................. 8
About Labels and
Security Code ....................................................................... 8
Accessories ............................................................................ 8
1. Your Phone............................................................. 9
The Display Indicators ......................................................10
The Selection Keys ............................................................10
Protection Cap of the Antenna Connector ................10
2. Getting Started...................................................11
Installing the SIM card ....................................................11
Removing the SIM Card ..................................................11
Charging a Battery ............................................................12
Switching the Phone On and Off ..................................12
3. Call Functions......................................................14
Making and Answering Calls .........................................14
Making Calls.....................................................................14
Answering a Call .............................................................15
In-Call Options ................................................................15
Adjusting the Earpiece Volume...................................16
Keypad Lock (Keyguard)................................................16
4. Phone Book..........................................................17
About the Phone Book (Names) ....................................17
Entering the Phone Book..............................................17
Selecting the Phone Book
(Memory in Use)..............................................................17
Setting the Type of View for Stored Names
and Phone Numbers.......................................................17
Storing a Phone Number with a Name
(Add Entry)........................................................................18
Recalling a Name and Phone Number......................18
Erasing a Name and Phone Number..........................19
Assigning a Phone Number as a Speed
Dial Number .....................................................................19
Caller Groups....................................................................19
Phone Book Status..........................................................20
Service Numbers (Service Nos) ...................................20
Copying and Printing via IR .........................................21
5. Using the Menu ..................................................22
Accessing a Menu Function by Scrolling ................... 22
Accessing a Menu Function by Using
Its Shortcut ......................................................................... 22
List of Menu Functions ...................................................24
6. Messages (Menu 1)............................................27
About Messages ................................................................ 27
Reading a Text Message
(Inbox - Menu 1-1)........................................................ 27
Sending a Text Message (Outbox- Menu 1-2
and Write Messages - Menu 1-3) ............................. 27
Message Settings (Menu 1-4)..................................... 28
Info Service (Menu 1-5) ...............................................29
Fax or Data Call (Menu 1-6) ....................................... 29
Service Command Editor (Menu 1-7)....................... 29
Voice Messages (Menu 1-8)........................................ 29
7. Call Register (Menu 2)......................................31
About Call Register ..........................................................31
Missed Calls (Menu 2-1) ..............................................31
Received Calls (Menu 2-2)...........................................31
Dialled Numbers (Menu 2-3) ...................................... 31
Erase Recent Call Lists
(Menu 2-4)....................................................................... 31
Show Call Duration (Menu 2-5)................................. 31
Show Call Costs (Menu 2-6) ....................................... 32
Call Cost Settings
(Menu 2-7)....................................................................... 32
8. Profiles (Menu 3) ...............................................33
What You Can Do with Profiles ....................................33
Selecting Different Profiles.......................................... 33
Customising Profiles...................................................... 33
Settings for Profiles ....................................................... 34
Renaming Profiles .......................................................... 34
9. Settings (Menu 4) ..............................................35
Alarm Clock (Menu 4-1) ................................................. 35
Clock (Menu 4-2) .............................................................. 35
Setting the Clock:........................................................... 35
Copyright © 2004 Nokia. All rights reserved. 5
Page 6

Call Settings (Menu 4-3) .................................................36
Anykey Answer (Menu 4-3-1) .....................................36
Automatic Redial (Menu 4-3-2) .................................36
Speed Dialling (Menu 4-3-3).......................................36
Call Waiting Options
(Menu 4-3-4) ...................................................................36
Own Number Sending
(Menu 4-3-5) ...................................................................36
Phone Line in Use
(Menu 4-3-6) ...................................................................36
Phone Settings (Menu 4-4) ............................................36
Language (Menu 4-4-1)................................................36
Cell Info Display (Menu 4-4-2)...................................37
List of Own Numbers
(Menu 4-4-3) ...................................................................37
Welcome Note (Menu 4-4-4)......................................37
Network Selection
(Menu 4-4-5) ...................................................................37
Security Settings
(Menu 4-5) ..........................................................................37
PIN-Code Request
(Menu 4-5-1) ...................................................................37
Call Barring Service
(Menu 4-5-2) ...................................................................37
Fixed Dialling (Menu 4-5-3) ........................................38
Closed User Group
(Menu 4-5-4) ...................................................................38
Security Level (Menu 4-5-5)........................................38
Change Access Codes
(Menu 4-5-6) ...................................................................38
Phone Line Change
(Menu 4-5-7) ...................................................................38
Restore Factory Settings
(Menu 4-6) ..........................................................................39
10. Call divert (Menu 5)........................................40
11. Games (Menu 6)..............................................41
12. Calculator (Menu 7)........................................ 43
Using the Calculator .........................................................43
To Make a Currency Conversion ....................................43
14. Infrared (Menu 9)............................................46
Receiving Data via the IR Port ......................................46
Sending Data via the IR Port .........................................46
Checking the Status of an IR Connection ..................46
15. Smart Messaging
Services (Menu 10).................................................47
Using Nokia and Operator Services .............................47
Storing Access Numbers...............................................47
Downloading the List of Services...............................47
Saving a Service Message as a Bookmark ...............48
Using a Service Saved as a Bookmark ......................48
An Example of Downloading and Using
a Nokia Service................................................................ 48
Other Services ....................................................................49
Saving a Service Address..............................................49
Accessing a Service ........................................................49
16. SIM Services......................................................50
17. Reference Information...................................51
Access Codes ......................................................................51
Security Code (5 digits).................................................51
PIN Code (4 to 8 digits).................................................51
PIN2 Code (4 to 8 digits)..............................................51
PUK Code (8 digits) ........................................................51
PUK2 Code (8 digit)........................................................51
Barring Password ............................................................51
DTMF Tones ......................................................................51
Battery Information ..........................................................52
Charging and Discharging the Battery..................... 52
Care and Maintenance ....................................................53
Important Safety Information ....................................... 54
Important User Information........................................... 56
Genuine Accessories......................................................... 58
BATTERIES......................................................................... 59
INDOOR..............................................................................59
INDOOR & VEHICLE........................................................60
VEHICLE .............................................................................61
BELT CLIP (BCH-16)........................................................63
CELLULAR DATA...............................................................63
13. Calendar (Menu 8)..........................................44
18. Index....................................................................64
6 Copyright © 2004 Nokia. All rights reserved.
Page 7
For Your Safety
Read these simple guidelines. Breaking the
rules may be dangerous or illegal. Further detailed information is given in this manual.
ROAD SAFETY COMES FIRST
Don’t use a hand-held phone while driving;
park the vehicle first.
INTERFERENCE
All wireless phones may get interference
which could affect performance.
SWITCH OFF IN HOSPITALS
Follow any regulations or rules. Switch phone
off near medical equipment.
SWITCH OFF IN AIRCRAFT
Wireless phones can cause interference. Using them on aircraft is illegal.
SWITCH OFF WHEN REFUELING
Don’t use phone at a refuelling point. Don’t
use near fuel or chemicals.
SWITCH OFF NEAR BLASTING
Don’t use phone where blasting is in progress.
Observe restrictions, and follow any regulations or rules.
USE SENSIBLY
Use only in normal position (to ear). Don’t
touch the antenna unnecessarily.
USE QUALIFIED SERVICE
Only qualified service personnel must install
or repair equipment.
ACCESSORIES AND BATTERIES
Use only approved accessories and batteries.
Do not connect incompatible products.
CONNECTING TO OTHER DEVICES
When connecting to any other device, read its
Owner’s guide for detailed safety instructions. Do not connect incompatible products.
Remember to make backup copies of all important data.
MAKING CALLS
Ensure the phone is switched on and in service. Enter the phone number, including the
area code, then press . To end a call
press . To answer a call press .
EMERGENCY CALLS
Ensure the phone is switched on and in service. If the word “Clear” appears on the display above the key, press and hold
Clear to clear the display. Enter the emer-
gency number, then press
cation. Do not end the call until told to do so.
. Give your lo-
INFRARED PRECAUTIONS
Do not point the IR beam at anyones’s eyes or
allow it to interfere with other IR devices.
Copyright © 2004 Nokia. All rights reserved. 7
Page 8

Using This Guide
Accessories
The wireless phone described in this guide is a
dual band phone approved for use on the
GSM900 and GSM1800 networks and on the
GSM900/1800 dual band networks.
A number of features included in this guide are
called network services. They are special services
provided by wireless service providers. Before
you can take advantage of any of these network
services, you must subscribe to these service(s)
from your home operator or service provider and
obtain instructions for their use.
NOTE: Should you have any problems in
handing over between GSM 900 and
GSM 1800 networks or vice versa, please
contact your network operator’s customer service department.
About Labels and Security Code
IMPORTANT! Your phone has labels on
it. These are important for service and
related purposes, so be careful not to
lose the label or the information it contains.
IMPORTANT!
supplied with your phone. Change the
code in Menu 4-5-6, ‘Change Access
Codes’. Keep the new code secret and in
a safe place which is separate from the
phone.
The security code 12345 is
The following manufacturer-approved rechargeable batteries are available for your phone:
NiMH batteries BMS-2V, BMS-2S and BMS-2,
and Li-Ion batteries BLS-2, BLS-4 and BLS-5 and
BLS-2H.
This apparatus is intended for use when supplied
with power from ACP-7, ACP-9, LCH-9 and DCH-
9. Other usage will invalidate any approval given
to this apparatus and may be dangerous.
Belt Clip
Use only the belt clip BCH-16.
WARNING! Use only batteries, chargers
and accessories approved by the phone
manufacturer for use with this particular phone model. The use of any other
types will invalidate any approval or
warranty applying to the phone, and
may be dangerous.
For availability of approved accessories,
please check with your dealer.
When you disconnect the power cord of
any accessory, grasp and pull the plug,
not the cord.
8 Copyright © 2004 Nokia. All rights reserved.
Page 9
Your Phone
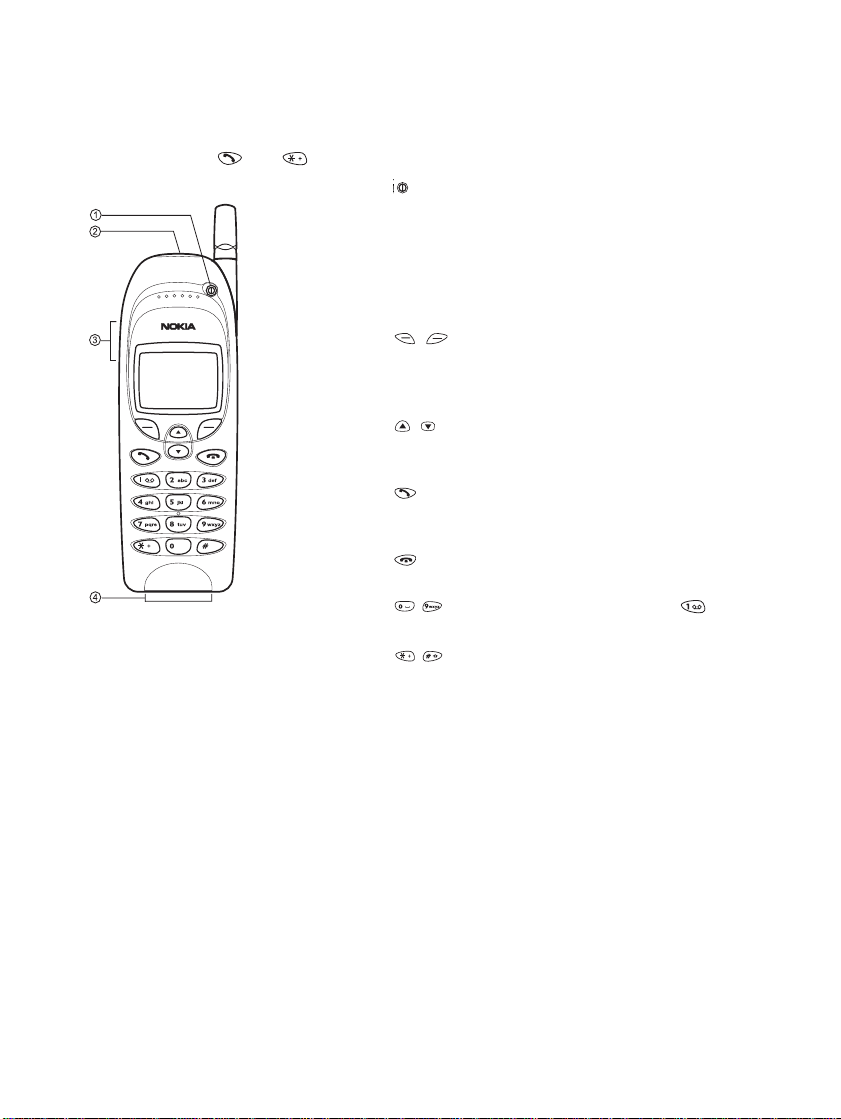
1. Your Phone
The phone is equipped with the keys given below. Throughout this guide, all key presses are represented by icons such as and
1. Power key
2. Infrared (IR) port
3. Volume keys
4. Connectors for
external devices
.
Power key
Switches the phone on or off. Pressing this key
briefly while the display is clear or during a call
will result in the list of profiles being displayed.
Pressing the power key briefly while in the
Phone Book or menu functions will turn the
phone’s display light on for 15 seconds.
Selection keys
Each of these keys performs the function indicated by the text shown on the display immediately above it.
Scroll keys
Use these keys to scroll through names, phone
numbers, menus or setting options.
Dials a phone number and answers a call.When
the display is clear: shows the most recently
dialled number.
Ends or rejects a call. Also exits from any function at any time.
Enter numbers and characters. calls your
voice mailbox when pressed and held.
Used for various purposes in different func-
tions.
Volume keys
The upper key increases and the lower key
decreases the earpiece volume.
Copyright © 2004 Nokia. All rights reserved. 9
Page 10
The Display Indicators
The Selection Keys
Display indicators and icons inform you about
the operation of the phone. Indicators and icons
related to the different phone functions are explained later in this Owner’s Guide.
Clear Display
The indicators described below are shown when
the phone is ready for use, and no characters
have been entered by the user. This screen is also
called idle mode. The name of the current cellular network operator or service provider will be
shown on the display.
OPERATOR
P and bar
T and bar
2
Indicates in which cellular network
the phone is currently used.
Shows the signal strength of the
cellular network at your current
location. The higher the bar, the
stronger the signal.
Shows the battery charge level.
The higher the bar, the more
power there is in the battery.
Indicates line 2 is currently selected for use.
The phone is waiting for you to
enter a response.
All ringing and warning tones for
the current profile has been set
to Silent.
The alarm clock is set.
All call diverted.
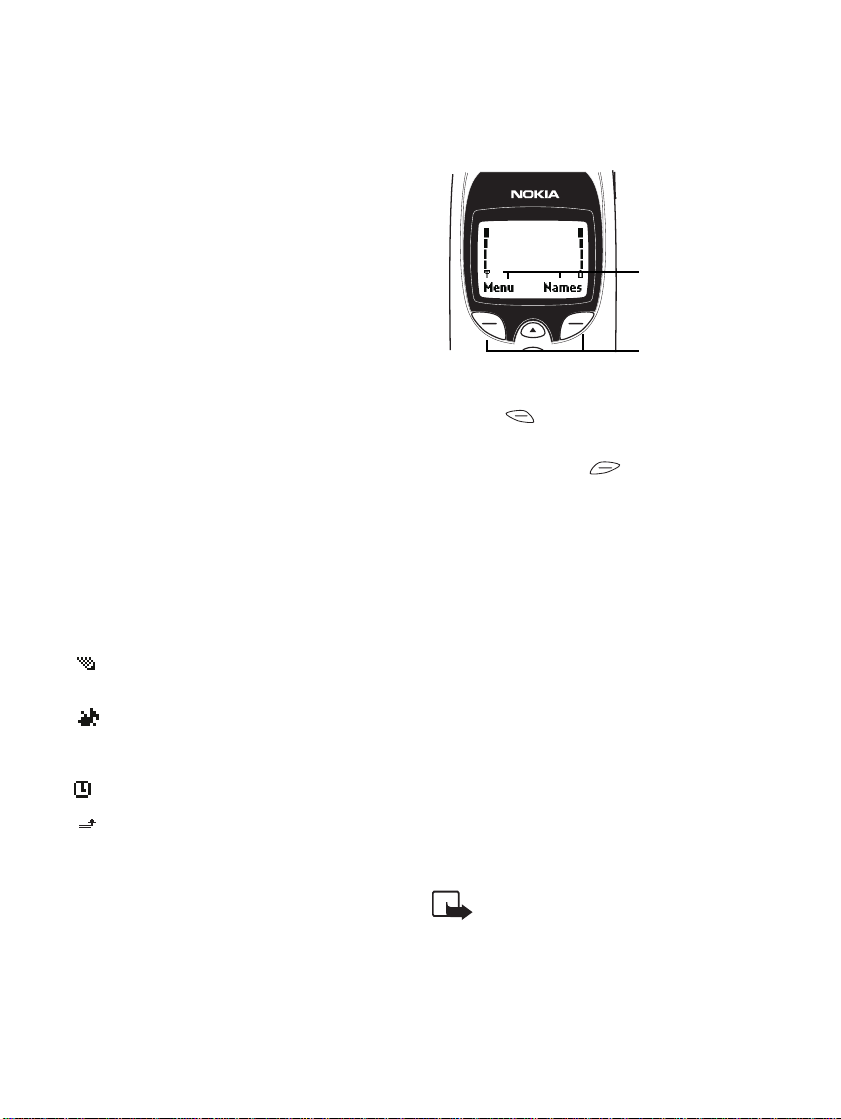
Below the display you can find two so-called selection keys. Their functions depend on the guide
texts shown on the display above the keys.
Guide text
Selection keys
For example, when there is the word ‘Menu’
above the key, pressing this key enters the
menu functions.
Similarly, pressing the key under the word
‘Names’ allows access to the Phone Book functions.
In this User Guide, the selection keys are indicated by the relevant guiding text appearing in bold
(e.g. Menu or Names).
Protection Cap of the Antenna Connector
At the back of the phone below the antenna
there is a connector for an external antenna.
The connector is protected by a rubber cap. To
attach an external antenna to the phone, first
remove the cap and then connect the antenna.
After removing the external antenna, remember
to replace the cap.
NOTE: Keep the cap out of small chil-
dren’s reach.
10 Copyright © 2004 Nokia. All rights reserved.
Page 11
2. Getting Started
Getting Started
Installing the SIM card
• Keep all miniature SIM cards out of the reach
of small children.
• The SIM card and its contacts can easily be
damaged by scratches or bending, so be careful when handling, inserting or removing the
card.
• Before installing the SIM card, always make
sure that the phone is switched off and then
remove the battery.
1 With the back of the phone facing you, press
the locking catch of the battery downwards(1. + 2.), and lift the battery off the
phone (3.).
2 Release the SIM card holder by drawing it in
the direction of the arrow.
4 Slide the SIM card holder back to keep the
card in its place.
5 Place the battery onto the back of the phone
as shown below. Slide the battery up the body
of the phone until the catch engages (a click
is heard).
Removing the SIM Card
Lift the battery off the phone as described above.
Keep the phone on its side and release the SIM
card holder. Then remove the SIM card.
3 Insert the SIM card ensuring that the bevelled
corner is on the right side and that the golden
connectors are downwards. Follow the directions on the phone.
Copyright © 2004 Nokia. All rights reserved. 11
Page 12
Charging a Battery
Once placed in the phone, the battery is ready for
charging.
NOTE:
• Use only batteries and chargers approved
by the phone manufacturer.
• In some vehicles, the ignition must be on in
order to charge the phone with the cigarette lighter charger.
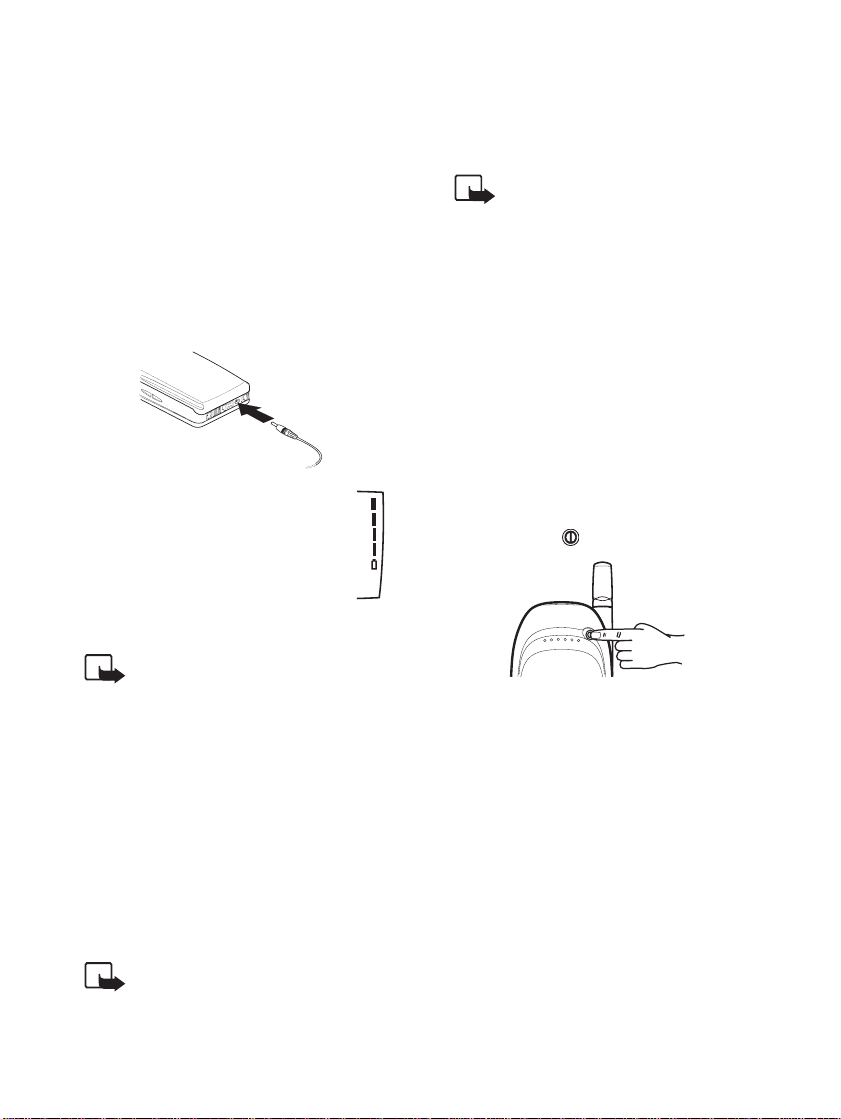
1 Connect the lead from the charger to the bot-
tom of the phone.
2 Connect the charger to an AC wall
outlet. The battery indicator bar
will start to scroll.
The text Charging is briefly displayed if the phone is switched on.
You can use the phone while it is
charging.
NOTE: If the battery is totally flat, it
may take a few minutes before the
charging indication appears on the
display or any calls can be made.
If using the ACP-7 charger and either
the BLS-2, BLS-2H, BMS-2, BMS-2S,
BMS-2V batteries for the first time,
be sure to charge them at least 12
hours.
The charging time depends on the
charger and battery used. For example, charging BLS-2 battery using
ACP-7 takes about 4 hours and using
ACP-9 about 2 hours.
Note: Charging times may be longer
in countries where there is major
fluctuation.
3 The battery is fully charged when the battery
indicator bar stops scrolling, and the text
Battery full is briefly displayed (if the
phone is on). Charging time depends on the
charger and battery used.
NOTE: For a full charge, let the phone
charge for about 2 hours.
4 Disconnect the charger from the AC outlet
and the phone.
If the text Not charging is displayed, charging has been suspended. Wait for a while, disconnect the charger, plug it in again and retry. If
charging still fails, contact your dealer.
For more information, see chapter ‘Reference In-
formation’ - ‘Battery Information’.
Switching the Phone On and Off
Press and hold the key for a second.
If the phone asks for a PIN code:
The PIN code is usually supplied with the SIM
card.
• Key in the PIN code, which is displayed as as-
terisks, and press OK.
See also ‘Reference Information - Access
Codes’.
If the phone asks for a security code:
• Key in the security code, which is displayed as
asterisks, and press OK.
See also ‘Reference Information - Access
Codes’.
12 Copyright © 2004 Nokia. All rights reserved.
Page 13

WARNING! Do not switch on the
phone when wireless phone use is
prohibited or when it may cause interference or danger.
TIPS ON EFFICIENT OPERATION: As with any
other radio transmitting device, do not touch the
antenna unnecessarily when the phone is
switched on. Contact with the antenna affects
call quality and may cause the phone to operate
at a higher power level than otherwise needed.
Getting Started
Copyright © 2004 Nokia. All rights reserved. 13
Page 14

3. Call Functions
Making and Answering Calls
Making Calls
1 Key in the phone number including the area
code.
To edit a number on the display, press to
move the cursor to the right and to move
it to the left. Press Clear to delete the character to the left of the cursor.
2 Press to call the number.
3 Press to end the call (or to cancel the
call attempt).
Normal position: Hold the phone as you would
any other telephone with the antenna pointed
up and over your shoulder.
NOTE: If you accidentally select phone
line 2 and your SIM card does not support this function, you cannot make any
calls. You can get back to phone line 1 by
pressing and holding and press OK
when the display is clear.
NOTE: When you are using the phone
with the car kit CARK-91, you can
switch from handsfree mode to privacy
mode by picking up the optional external handset HSU-1. To switch back to
handsfree, first press Options and
then put down the handset within 15
seconds.
International Calls
1 Press twice for the international prefix
(+ character replaces the international access
code).
2 Enter the country code, area code and phone
number.
3 To call the number, press .
Making a Call Using the Phone Book
1 Press Names.
2 When Search is highlighted press Select.
3 Key in the first letter of the name and press
OK.
You can skip this step if you wish.
4 Use and to reach the desired name.
5 Press .
Last Number Redial
The last ten phone numbers you called or attempted to call are stored in the phone’s memory. To redial one of these last-dialled numbers:
1 With display clear, press once to access
the list of the last-dialled numbers.
2 Use or to reach the desired number or
name then press .
Calling Your Voice Mailbox
1 Press and hold when the display is clear.
2 If the phone asks for the voice mailbox num-
ber, key it in and press OK. You obtain this
number from your service provider.
To edit this number at a later time, see ‘Voice
mailbox number (Menu 1-8-2)’.
14 Copyright © 2004 Nokia. All rights reserved.
Page 15
Call Functions
Speed Dialling a Phone Number
If you have assigned a phone number to one of
the speed dialling keys ( to ), you can
call that phone number in either of the following
ways:
• Press the corresponding speed dialling key
and press .
• If the Speed Dialling function is set to on (see
Menu 4-3-3): Press and hold the corresponding speed dialling key ( to ) until
the call is started.
dials your voice mailbox number.
NOTE: Pressing and holding
Answering a Call
1 To answer the call, press .
2 Press to end the call.
To reject an incoming call, press
TIP:
. If the ‘Divert when busy’
function is activated to divert the
calls, for example to your voice mailbox, rejecting an incoming call will
also divert the call. See chapter 10 -
‘Call Divert (Menu 5)’.
NOTE: If more than one name is found
in the Phone Book with the same last
seven digits as the caller’s phone
number, only the caller’s phone number will be displayed, if this is available.
Call Waiting
This network service allows you to answer an incoming call while you have a call in progress if
you have activated the menu function Call Waiting Options (Menu 4-3-4).
1 Press Answer or . The first call is put on
hold. To reject the new call, press Options,
choose Reject and press Select.
2 To switch between the two calls, press Swap
or .
3 To end the active call, press .
In-Call Options
Your phone provides a number of control functions that you can use during a call. You cannot
utilise all of these functions at all times. Many of
the In-Call options are network services. By
pressing Options during a call the following
In-Call options may be available:
Hold or Unhold to hold or release a call
New Call to make a call when you
have a call in progress
Send DTMF to send DTMF tones
End all calls to end all calls
Names to access the Phone Book
Menu to access menu functions
Mute to mute the phone’s micro
phone
Transfer to connect a call on hold
with an active call and to
disconnect you from both
calls
Making a Conference Call
This feature allows up to six persons to take part
in a conference call (network service).
1 While in a call, press options and choose
New Call. The first call is put on hold.
2 To join the first conference participant into
the call, press Options, choose Confer-
ence and press Select.
3 To add a new participant to the call, repeat
steps 1 and 2.
4 To drop a single participant from the call,
press Options, choose Private and
press Select. Select the participant that
you want to drop and press OK. Then press
.
5 To end the conference call, press .
Copyright © 2004 Nokia. All rights reserved. 15
Page 16
Adjusting the Earpiece Volume
You can adjust the volume of the phone’s earpiece (this can also be done during a call). Use
the keys on the side of the phone. The upper key
increases the volume and the lower key decreases the volume.
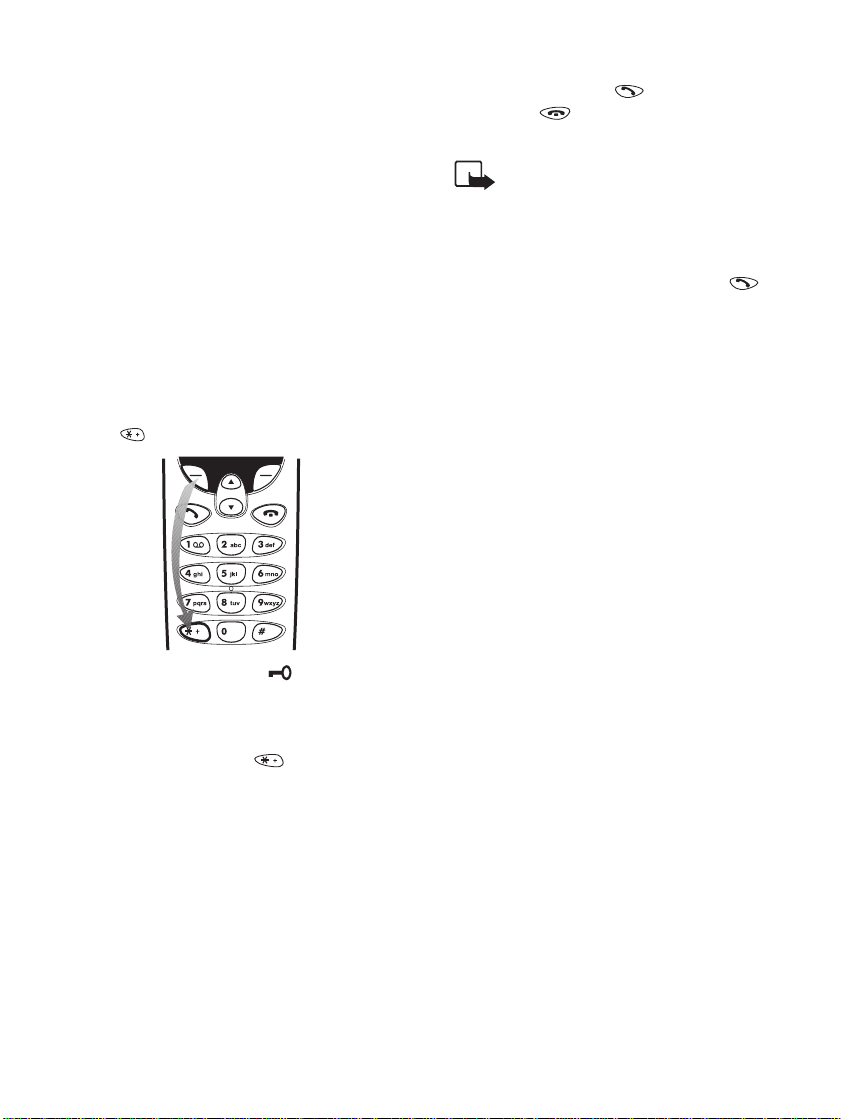
Keypad Lock (Keyguard)
This feature locks the keypad to prevent keys being pressed by accident (for example when your
phone is in your pocket or in your purse).
To lock the keypad:
While the display is clear, press Menu and
then within three seconds.
When the keyguard is on:
To answer a call, press . To end or reject
a call, press . During a call, the phone
can be operated in the normal way.
NOTE: When Keyguard is on, calls may
be possible to the emergency number
programmed into your phone (e.g.
112 or other official emergency
number).
Key in the emergency number and press .
The number is displayed only after you have
keyed in its’ last digit.
When the keypad is locked, appears at the
top of the display.
To unlock the keypad:
Press Unlock and then within two sec-
onds.
16 Copyright © 2004 Nokia. All rights reserved.
Page 17
4. Phone Book
Phone Book
About the Phone Book (Names)
You can store phone numbers and their associated names in the memory of the phone (internal
Phone Book) or the SIM card (SIM Phone Book).
The internal Phone Book can store 150 names
(each of which can have up to 20 characters) and
phone numbers (each of which can have up to 30
digits) at a time. The phone supports SIM cards
which can store up to 255 names and phone
numbers.
In addition to storing names and phone numbers,
Phone Book also offers a wide range of functions
for managing them.
Entering the Phone Book
1 While the display is clear: Press Names or
press or .
During a call: Press Options, scroll with
or to Names, and press Select.
Selecting the Phone Book (Memory in Use)
Setting the Type of View for Stored Names and Phone Numbers
The phone can show the stored phone numbers
and names in three different ways, called ‘Types
of view’. You can select:
Name list
shows three names at a time:
Name, number
shows a single name and phone number together:
Large font
shows just one name at a time:
1 While the display is clear, press Names.
2 Scroll with or to Options and press
Select.
3 Scroll to Memory in use and press Se-
lect.
4 Scroll to SIM card or Phone and press
Select.
NOTE: After the SIM card is changed,
the SIM Phone Book is automatically
selected.
Copyright © 2004 Nokia. All rights reserved. 17
To Set the ‘Type of View’
1 While the display is clear, press Names.
2 Scroll with or to Options and press
Select.
3 Scroll with or to Type of view and
press Select.
4 Scroll with or to Name List or
Name, Number or Large font and press
OK to select the option.
Page 18
Storing a Phone Number with a Name (Add Entry)
You can store phone numbers and their associated names in the internal or the SIM Phone Book.
1 With the display clear, press Names.
2 Scroll with or to Add entry and
press Select.
3 Key in a name and press OK.The characters
available are listed below:.
. , ? ! - & 1
A B C 2 Ä À Á Â Ã ÆÇ
D E F 3 È É Ë Ê
G H I 4 Î Ï Ì Í Ý G
J K L 5 £
M N O 6 Ö Ô Ò Ó Ø Ñ
P Q R S 7 $ ß
T U V 8 Ü Ù Û Ú
W X Y Z 9
space, 0
special characters, e.g. +
and %
upper or lower case
• To insert a space, press .
• Pressing brings up a list of special characters. Move through the list to the desired
character with or and press Use to
insert it in the name.
• If the character list continues on to another
screen, you can scroll between the screens by
pressing .
• If you make a mistake, you can remove characters to the left of the cursor by pressing
Clear as many times as necessary. Pressing
and holding Clear will clear the screen.
• and move the cursor left and right,
respectively.
4 Key in an area code and phone number, and
press OK.
TIP: If you key in the + character for
the international prefix (press
twice) in front of the country code,
you will be able to use the same
phone number when you are calling
from abroad.
TIP: QUICK SAVE: With the display
clear, key in the phone number and
press Save. Key in the name and
press OK.
• If the next letter is located on the same key
as the present one, press or (or wait
until the cursor appears again) and then key
in the letter.
• To switch between upper case and lower case,
press quickly. The symbol ABC or abc
shown at the top of the display indicates the
selected case.
• To insert a number, press and hold the key labelled with the desired number. To switch between letters and numbers, press and hold
.
18 Copyright © 2004 Nokia. All rights reserved.
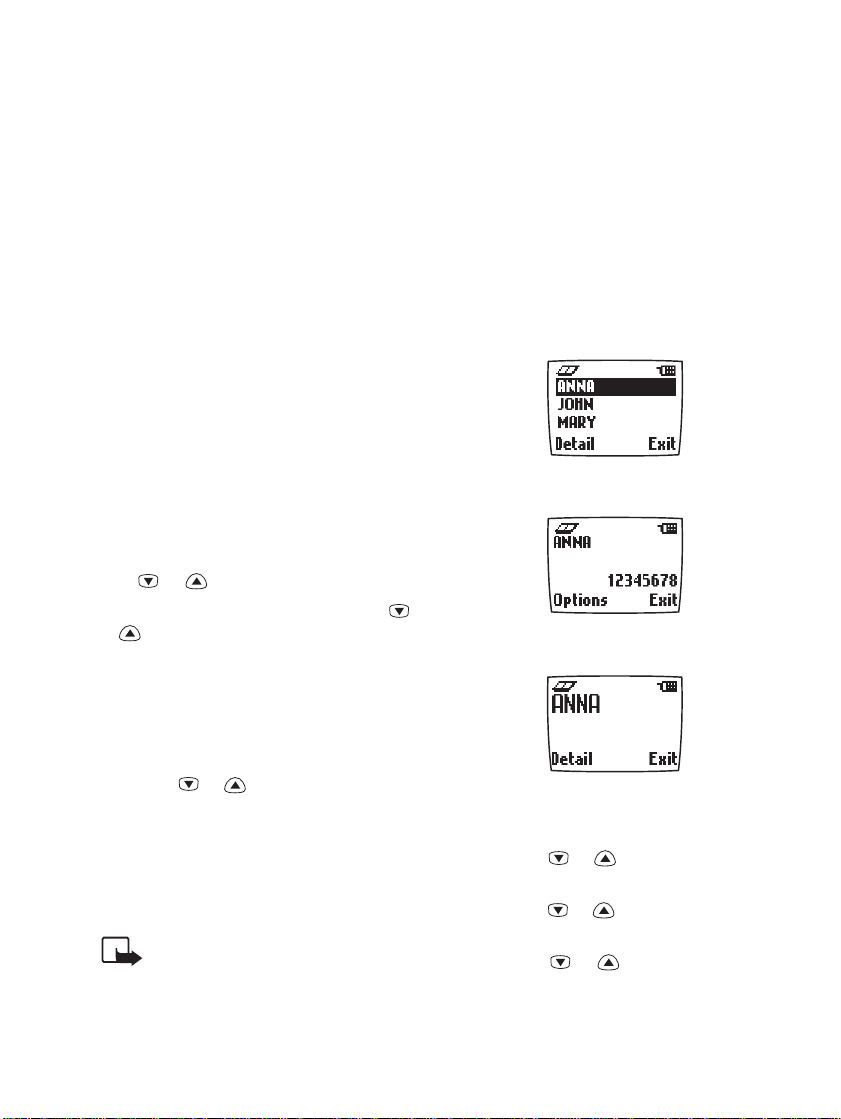
Recalling a Name and Phone Number
1 While the display is clear, press Names.
2 Choose Search and press Select.
3 Key in the first character of the name you are
searching for.
4 Press OK or for the first name, or for
the last name beginning with the character
you keyed in Step 3 above.
5 or at the top of the display shows
that the name and phone number is stored in
Page 19
Phone Book
the SIM or internal Phone book, respectively.
6 Press or until the desired name ap-
pears.
TIP: QUICK SEARCH: Press Names,
key in the first letter, for example A,
and scroll with or until the
desired name appears.
Erasing a Name and Phone Number
You can remove names and phone numbers from
the selected Phone Book one by one or all at
once.
One by One
1 Recall the name and the number that you
want to erase.
2 Press Options.
3 Scroll with or to Erase and press
OK.
All at Once
1 While the display is clear, press Names.
2 Scroll with or to Erase and press
Select. Then choose Erase all and
press Select.
3 Scroll to the Phone Book to be erased
(Phone or SIM card) and press Select.
4 At the prompt Are you sure, press OK,
key in the security code and press OK. For
more information about the security code,
see chapter ‘Reference Information’ - ‘Access
Codes’.
Assigning a Phone Number as a Speed Dial Number
The first nine names & phone numbers stored in
Phone Book are automatically stored as speed
dial numbers and can be speed dialled via the
number keys - . If you want to assign
another number to one of the speed dial keys, do
as follows:
1 Press Names and choose Speed Dials. If
no phone number is assigned to a key, press
Assign.
NOTE: Assign is also shown when the
phone has automatically assigned a
phone number from the Phone Book
to a speed dialling key.
2 Search for the desired name and/or phone
number from Phone Book, and press OK to select it.
If a phone number is already assigned to a key,
you can view the number, change it or erase it by
first pressing Options.
To Use the Speed Dial Key
Press the desired speed dial key ( to )
and press to make the call.
NOTE: Pressing and holding calls
your voice mailbox.
Caller Groups
You can set the phone to sound a specific ringing
tone and flash a preselected graphic on the display when you receive a call from a particular
phone number.
To make this happen, first include the phone
number in the desired caller group. Then define a
ringing tone and graphic for the caller group.
NOTE: You can set the phone to ring only
when you receive calls from phone numbers that belong to a specific caller
group. See chapter 8 ‘Profiles (Menu 3)’.
Copyright © 2004 Nokia. All rights reserved. 19
Page 20
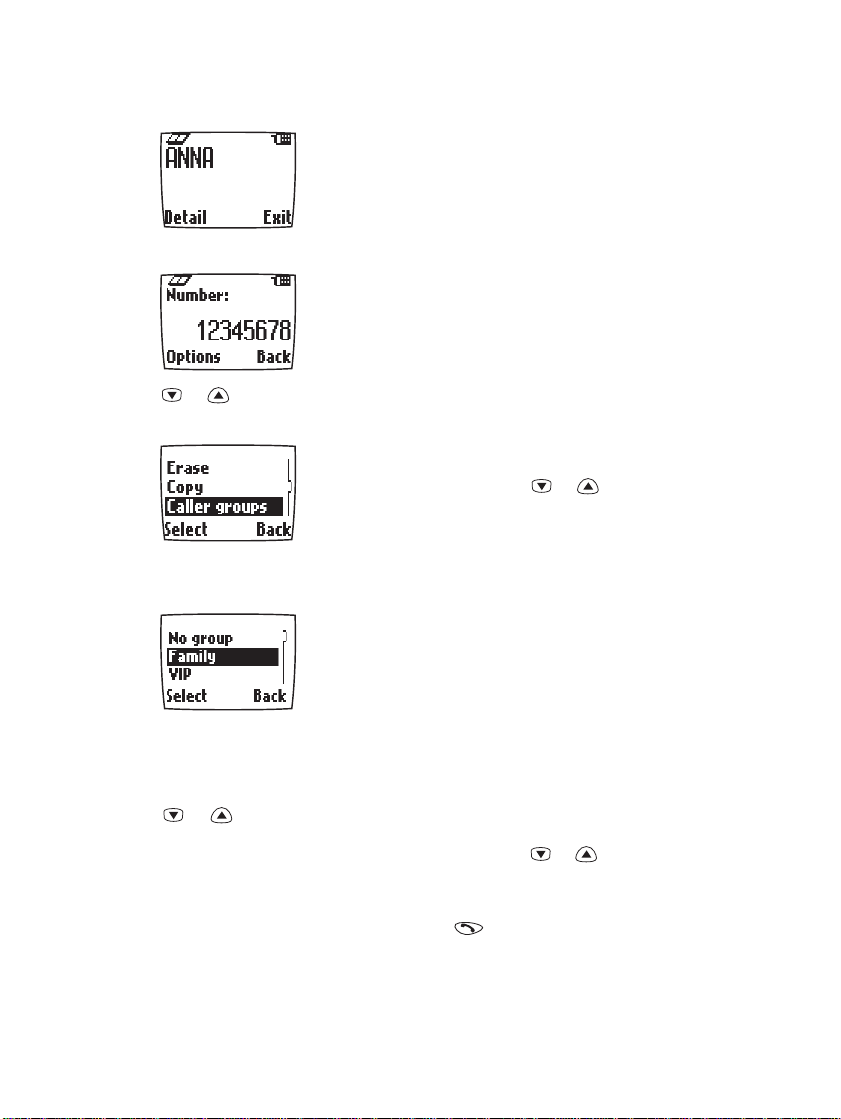
Including a Phone Number in a Caller Group
1 Recall the name and phone number that you
want to include in the caller group.
2 Press Options.
3 Scroll with or to Caller groups,
and press Select.
4 Scroll to the desired caller group, e.g. Fami-
ly, and press Select.
Group ringing tone
Scroll to the desired ringing tone and press
OK. Preset is the tone selected for the cur-
rently selected profile.
Group graphic:
Scroll to On, Off, View graphic, Send
via IR, Send graphic (send via SMS),
and press Select.
5 If you selected Send graphic (network
service), key in the recipient’s phone number
or recall it from Phone Book and press OK.
Phone Book Status
You can check how many names and phone
numbers are stored and how many locations are
still free in Phone Book.
1 While the display is clear, press Names.
2 Scroll with or to Options and press
Select.
3 Scroll to Memory status and press Se-
lect.
4 Scroll to SIM card or Phone. The number
of free locations and locations in use is displayed.
Service Numbers (Service Nos)
Setting the Ringing Tone and Graphic for a Caller Group
1 While the display is clear, press Names.
2 Scroll with or to Caller groups
and press Select.
3 Scroll to one of the caller groups and press
Select.
4 Scroll to one of the following functions and
press Select.
Rename group
Key in the name and press OK.
20 Copyright © 2004 Nokia. All rights reserved.
This function makes it easy to call the service
numbers of your service provider.
This function is displayed only if there are service
numbers stored on your SIM card.
1 While the display is clear, press Names.
2 Scroll with or to Service nos and
press Select.
3 Scroll to the desired service number and press
to call the number.
Page 21

Copying and Printing via IR
Using the phone’s infrared (IR) port, you can
copy names and phone numbers to a compatible
phone or a PC which is running an appropriate
application. You can also print phone numbers
and names from Phone Book on a compatible
printer.
1 Recall the name and phone number to be
copied.
2 Make sure that the other phone or the PC is
set up to receive data via its IR port.
3 Once you are in the Details of the given name
or phone number: Press Options, scroll
with or to Send via IR (to copy
the phone number / name) or Print via
IR (to print names and phone numbers on a
compatible printer) and press Select.
Copying a Name and a Phone Number to Your Phone from another Phone
To copy names and phone number from another
compatible phone, you need to first set your
phone to receive data through its IR port by entering the Infrared menu (Menu 9). The user of
the other phone should then send the name and
phone number, ‘Business Card’, as described above.
Once the name and phone number have been
copied, scroll to Show, Save or Discard, and
press OK.
Phone Book
Copyright © 2004 Nokia. All rights reserved. 21
Page 22

5. Using the Menu
The phone offers an extensive range of functions
which allows you to tailor the phone to your
needs. These functions are arranged in menus
and submenus.
Most of the menu functions are provided with a
brief help text. To view the help text, scroll to the
desired menu function and wait for 10 seconds.
The menus and submenus can be accessed by
scrolling or by using the appropriate shortcut.
Accessing a Menu Function by Scrolling
1 To access the menu facility, press Menu. Press
or to reach the desired main menu,
e.g. Settings. Press Select to enter the
menu.
2 If the menu contains any submenus, find the
one you want with or . Press Select
to enter the submenu (e.g. Call Set-
tings).
3 If the menu you have selected contains sub-
menus, repeat step 2. Press Select to enter
the next submenu (e.g. Speed Dial-
ling).
4 Press or to find the setting of your
choice. Press OK to confirm the chosen setting.
TIP: You can return to the previous
menu level by pressing Back or exit
the menu without changing any settings by pressing and holding Exit.
TIP: You can always exit the menu
without changing the menu settings
by pressing .
Accessing a Menu Function by Using Its Shortcut
The menu items (menus, submenus and
setting options) are numbered and can
be accessed quickly by using their
shortcut number. The shortcut index
number is shown in the top right corner of the display. For menu shortcuts,
see the list of menu functions.
1 Press Menu.
2 Key in quickly, within three seconds, the in-
22 Copyright © 2004 Nokia. All rights reserved.
Page 23

dex number of the menu function you want
to access.
For example, to set the Anykey function to on:
Press Menu, , and .
Menu for entering the menu
for Settings
for Call Settings
for Anykey Answer
To access the menu 1:
Key in the index number 1 and wait until the
submenu level 1 opens. Then quickly key in the
index numbers of the desired submenu.
Or, alternatively:
Key in the index number 01 and then quickly key
in the index numbers of the desired submenu.
Using the Menu
Copyright © 2004 Nokia. All rights reserved. 23
Page 24

List of Menu Functions
1Messages
1 Inbox
2 Outbox
3Write messages
4 Message settings
5 Info service
6 Fax or data call
7 Service command editor
8 Voice messages
2Call register
1 Missed calls
2 Received calls
3 Dialled numbers
4 Erase recent call lists
5 Show call duration
**)
1
1Set 1
1 Message centre number
2 Messages sent as
3 Message validity
4 Rename this set
2
2 Common
1 Delivery reports
2 Reply via same centre
1 Listen to voice messages
2 Voice mailbox number
**)
1 Last call duration
2 All calls’ duration
3 Received calls’ duration
4 Dialled calls’ duration
5 Clear timers
6 Show call costs
1 Last call cost
2 All calls’ cost
3 Clear counters
7 Call costs settings
1 Call costs’ limit
2 Show costs in
3 Profiles
1 General
1Activate
2 Personalise
1 Incoming call alert
2 Ringing tone
3 Ringing volume
4 Vibrating alert
3
5 Message alert tone
6 Keypad tones
7 Warning and game tones
2 Silent
1Activate
2 Personalise (same submenus as in Gen-
eral)
3Rename
3 Meeting (same submenus as in Silent)
4 Outdoor (same submenus as in Silent)
5 Pager (same submenus as in Silent)
4
6Car
1 Personalise
1 Incoming call alert
2 Ringing tone
3 Ringing volume
5 Message alert tone
6 Keypad tones
1. The number of sets depends on how many sets your
SIM card offers. Each set appears in its own submenu
and may have any name.
2. The shortcut number of this submenu depends on
the number of sets available.
3. This setting is available only when the phone is
used with a special vibrating battery.
4. This profile is shown only if the phone is or has
been used with the car kit CARK-91.
24 Copyright © 2004 Nokia. All rights reserved.
Page 25

Using the Menu
7 Warning tones
8 Automatic answer
9 Lights
7Headset
1
1 Personalise (same submenus as in Gen-
eral plus Automatic answer)
4 Settings
**)
1 Alarm clock
2 Clock
3 Call settings
1 Anykey answer
2 Automatic redial
3 Speed dialling
4 Call waiting options
5 Own number sending
6 Phone line in use
2
4 Phone settings
1Language
2 Cell info display
3 List of own numbers
4 Welcome note
5 Network selection
6 Notifications on SIM update
5 Security settings
1 PIN code request
2 Call barring service
1 Outgoing calls
2 International calls
3 International except to home country
4 Incoming calls
5 Incoming calls if abroad
6 Cancel all barrings
3 Fixed dialling
4 Closed user group
5 Security level
6 Change access codes
1 Change security code
2 Change PIN code
3 Change PIN2 code
4 Change barring password
7 Phone line change
3
6 Restore factory settings
5 Call divert
1 Divert all voice calls with-
out ringing
2 Divert when busy
3 Divert when not answered
4 Divert when phone off or no coverage
5 Divert when off, no answer,
or no coverage
4
6 Divert all fax calls
7 Divert all data calls
8 Cancel all diverts
6Games
1 Memory
2Snake
3 Logic
7 Calculator
8 Calendar
9Infrared
1. This profile is shown only if the phone is or has
been used with the headset HDC-9.
2. This function is available only if your SIM card supports it.
Copyright © 2004 Nokia. All rights reserved. 25
3. This function is available only if your SIM card supports it.
4. This function is available only if your SIM card supports it.
Page 26

10 Services
1
1 Personal Bookmarks
Service name
Add New Service
2 Operator Services
Service name
Operator Settings
Operator Access Number 1
Operator Access Number 2
Update Operator Services
3 Nokia Services
Service name
Nokia Settings
Nokia Access Number 1
Nokia Access Number 2
Update Nokia Services
11 SIM Services
2
)
*
)
*
)
*
1. This is a network service and may not be supported
by your network. For availability, contact your network
operator or service provider.
2. This menu is shown only if supported by your SIM
card. The name and the contents of this menu vary depending on the SIM card.
*) In this menu you will see the names of the available
services.
**)
Certain menus may not appear on the Nokia 6150 if
specific settings have been activated on you SIM card.
26 Copyright © 2004 Nokia. All rights reserved.
Page 27

6. Messages (Menu 1)
Messages (Menu 1)
About Messages
This menu includes functions related to text
(SMS) messages, voice messages, fax and data
calls, as well as service commands and the network’s information service messages.
Reading a Text Message (Inbox - Menu 1-1)
When you receive a text message, and the
number of new messages followed by mes-
sage(s) received will appear and a short
tone will be heard.
1 Press Read to read the message immediately
or Exit to view it later.
To view the message later:
Once you are in the
with or to Inbox, and press Select.
2 Scroll to the desired message and press Read
to view it. Use or to browse through
the message and related information, such as
Sender’s phone number and Reception date
and time.
3 While reading the message, press Options
to access the available options, and press OK:
• Erase
• Reply
•Edit
• Use number (extracts a phone number
from the message for calling or saving)
• Forward (allows you to send the message onwards)
• Print via IR (uses the phone’s infra-
Messages menu, scroll
red port to print the message on a compatible printer)
• Details shows details of the message:
Sender’s name and phone number, the
Message centre used for sending, Reception date and time, Reply path availability.
NOTE:
in front of the header means that
the message has not yet been read.
in front of the header indicates a
delivery report.
When blinks your phone has no
more space for new messages. Use
the ‘Erase’ function in the ‘Inbox’
submenu to make some space.
When is not shown all received
messages have been read and there is
still free space for at least one new
message.
Sending a Text Message (Outbox- Menu 1-2 and Write Messages - Menu 1-3)
The SMS network service allows you to send
short text messages to phones which have SMS
capability.
NOTE: Before you can send any messages,
you need to store the number of your
Messages centre in menu ‘Message settings’, Message centre number. You will
receive this number from your operator
or service provider when you subscribe
to the Short Message Service (SMS).
Copyright © 2004 Nokia. All rights reserved. 27
Page 28

Writing, Sending and Saving a Text Message
Within the Write messages menu you can
write and edit text messages of up to 160 characters. For instructions on how to enter characters, see chapter ‘Storing a phone number with a
name’.
When you have finished writing your message,
press Options to display the following functions: Send, Send by set (sends the message to a preselected set - see below), Save,
(stores the message in the Outbox), Clear
screen (removes all the characters that you
have keyed in from the display).
You can save your own messages in the ‘Outbox’
submenu (Menu 1-2) for use at a later time.
NOTE 1: When sending messages via the
SMS Network Service, your phone may
display the words Message Sent.
This is an indication that the message
has been sent by your phone to the message centre number programmed into
your phone.
This is not an indication that the message has been received at the intended
destination.
NOTE 2: In some countries it may be pos-
sible to send messages between different GSM cellular networks, either within
the same country or internationally.
Check with your home network operator
or service provider to confirm if your
SMS Service is capable of this operation.
Viewing your own messages
Once you are in the Messages menu, scroll to
Outbox and press Select. Scroll to the de-
sired message.
Pressing Read shows the message. Pressing Op-
tions while you are reading a message allows
access to the same functions as ‘Inbox’ (Menu 1-
1), except for Reply.
Message Settings (Menu 1-4)
Set 1 (Menus 1-4-1)
A setting group or ‘set’ is a collection of the set-
tings required for sending text messages.
You can, for example, send a text message as a
fax (provided that this function is supported by
your operator or service provider) by simply selecting the set in which you have defined the
proper settings for fax transmissions.
Each set has its own submenu:
• Message centre number
Use this menu to store the phone number of
the message centre needed for sending text
messages.
Key in or edit the phone number and confirm
with OK.
• Message sent as
Normally, this menu choice should be set to
Text. Your messaging service may however
offer you the facility of converting your text
messages into alternative formats (e-mail,
fax or paging) which are suitable for the
equipment that will be receiving the message. Contact your service provider for availability of this function.
• Message validity
This network service allows you to set the
length of time that your text messages will be
stored at the message centre while attempts
are made to deliver them to you.
• Rename this set
Allows you to rename the set.
1. The total number of sets depends on how many sets
your SIM card offers.
1
28 Copyright © 2004 Nokia. All rights reserved.
Page 29

Common (Menu 1-4-)
• Delivery reports
You can request the network to send delivery
reports about your text messages (this is a
network service).
• Reply via same centre
You can request the network to route the reply to your text message via your own message centre (network service).
1
Info Service (Menu 1-5)
This network service allows you to receive messages about a variety of topics (such as weather
or traffic conditions) from your operator or service provider. For available topics and relevant
topic numbers, contact your operator or service
provider.
By selecting On, you will receive messages about
the active topics. You can edit the topic list, and
mark the topics as active or inactive.
Topic Index retrieves a list of available top-
ics from the network. By selecting Topics, you
can add a topic to the topics list. Key in the topic
number and name. You can also Edit or Erase
the topic list.
Select Language to set the language for the
messages. Only messages in the selected language will be shown. If automatic language selection is on, the language is chosen according to
the SIM card.
Fax or Data Call (Menu 1-6)
The phone can send and receive data through the
Nokia Cellular Data Suite PC application (network service). For more details, refer to the documentation supplied with your Nokia Cellular
Data Suite and communications applications.
1. The shortcut number of this menu depends on the
number of sets available.
Messages (Menu 1)
Making a data or fax call
1 Once in the Messages menu, select Fax
and data or Also voice and press
Select. Also voice allows you to
switch from voice mode to data (or fax) mode
during a call.
2 Key in or recall the desired phone number and
press OK.
3 If you selected Also voice in step 1, to
switch between voice and data/fax mode
during a call, press Options, select Voice
Mode or Data Mode (or Fax Mode) and
press OK.
4 After the transmission, end the call by press-
ing .
Receiving a data or fax call
You can answer a data or fax call in the normal
way, even when the phone keypad is locked.
Service Command Editor (Menu 1-7)
From this submenu you can send service requests
(such as activation commands) for network services, to your operator or service provider.
Voice Messages (Menu 1-8)
Listen to Voice Messages (Menu 1-8-1)
When you enter this submenu, the phone automatically calls your voice mailbox at the phone
number stored in Menu 1-8-2.
TIP: Alternatively, press and hold
when the display is clear.
NOTE: When a note about a received
message is shown on the display, you
can press Listen to listen to the message.
Copyright © 2004 Nokia. All rights reserved. 29
Page 30

Voice Mailbox Number (Menu 1-8-2)
Within menu Voice Mailbox Number you
can store the phone number of your voice mailbox. Key in the number and press OK. This number will remain unchanged until you replace it.
You will obtain the number from your service
provider.
NOTE: Each phone line can have its own
voice mailbox number (see page 36 ) if
suppoted by the SIM card.
30 Copyright © 2004 Nokia. All rights reserved.
Page 31

7. Call Register (Menu 2)
Call Register (Menu 2)
About Call Register
Your phone will only register missed and received calls if the network you are using supports
the Calling Line Identification function, the
phone is switched on and is within the network’s
service area.
Missed Calls (Menu 2-1)
This function allows you to view a list of the last
ten phone numbers from which somebody has
tried to call you with no success (network service).
Using the options provided in the Missed calls
menu you can view the date and time of each
call, and view, edit, erase or save the number in
the Phone Book.
TIP: When a note about missed calls is
being displayed, press List to see the
phone number.
Received Calls (Menu 2-2)
This function allows you to view a list of the ten
phone numbers from which you have most recently accepted calls (network service).
Using the options provided in the Received calls
menu you can view the date and time of each
call, and view, edit, erase or save the number in
the Phone Book.
Dialled Numbers (Menu 2-3)
This function allows you to view a list of the ten
phone numbers that you have most recently dialled, i.e. called or tried to call.
Using the options provided in the Dialled calls
menu you can view the date and time of each
call, and view, edit, erase or save the number in
the Phone Book.
Erase Recent Call Lists (Menu 2-4)
This function allows you to delete all the phone
numbers which appear in Menus 2-1, 2-2 and 2-
3.
These phone numbers are also erased in the fol-
lowing cases:
• When you switch on the phone with a SIM
card inserted which is not one of the five
SIM cards used most recently with the
phone.
• When you change the ‘Security level’ setting (see chapter 9, ‘Settings’ - Menu 4-5-
5).
Show Call Duration (Menu 2-5)
This function allows you to view the duration of
your incoming and outgoing calls in hours, minutes and seconds. You can also (by first entering
the security code) clear the call timers. See chap-
ter Reference Information - ‘Access Codes’.
NOTE: The actual time invoiced for calls
by your operator or service provider may
vary, depending upon network features,
rounding-off for billing, and so forth.
Copyright © 2004 Nokia. All rights reserved. 31
Page 32

Show Call Costs (Menu 2-6)
This network service allows you to check the
costs of your last call (or all calls and clear the
counters). To clear the counters you will need to
have the PIN2 code. See chapter Reference In-
formation - ‘Access Codes’.
The costs are shown in terms of units set within
Menu 2-7-2, for each SIM card independently.
NOTE: The actual time invoiced for calls
by your operator or service provider may
vary, depending upon network features,
rounding-off for billing, taxes and so
forth.
Call Cost Settings (Menu 2-7)
Call Costs’ Limit (Menu 2-7-1)
This network service allows you to limit the costs
of your calls to a selected number of charging
units or units of currency (as set in Menu 2-7-2).
If you have selected On, the number of remaining
units is shown when the display is clear.
When all units have been used, no calls can be
made except emergency calls to the number 112.
Depending on the SIM card you may need the
PIN2 code to set a call cost limit. See chapter
Reference Information - ‘Access Codes’.
Show Costs in (Menu 2-7-2)
The phone can show the call cost limits in terms
of charging units or the desired currency. Contact your operator or service provider for charging unit prices.
To select the currency or unit this menu, you will
need the PIN2 code. See chapter Reference In-
formation - ‘Access Codes’.
32 Copyright © 2004 Nokia. All rights reserved.
Page 33

8. Profiles (Menu 3)
Profiles (Menu 3)
What You Can Do with Profiles
You can adjust and customise the alert of your
phone to suit a wide variety of events and environments (e.g. meetings, movies, etc.).
Selecting Different Profiles
If you want to change the current Profile being
used by your phone press the key quickly.
Press or to choose another Profile and
press OK.
NOTE: Doing this allows you to choose
other Profiles, but you cannot customise
them here.
TIP: Quick Silent If you want to activate
the Silent profile quickly, press
and
file, press and .
. To change to the previous pro-
Customising Profiles
(e.g. selecting a ringing tone for the General profile)
1 Once you are in Profiles, Menu 3, the follow-
ing Profiles list appears:
• General (this is the default setting)
• Silent
• Outdoor
• Meeting
• Pager
•Car
• Headset
NOTE: Car and Headset will not
appear in the Profiles list unless car
kit CARK-91 or headset HDC-9 are
connected to your phone. However,
the settings for the Car and Head-
set will remain in the menu once
connected.
2 Scroll to the desired profile (e.g. General)
and press Options.
3 Select Personalise and press OK.
Selecting Activate only makes the selected
profile the current one, the profile cannot be
customised in this way.
OTE: When the phone is connected to
N
the car kit CARK-91 or headset HDC-9,
the Activate function will not be available.
4 Select the setting that you wish to customise,
for example Ringing Tone.
5 Scroll to the desired option and press OK.
Copyright © 2004 Nokia. All rights reserved. 33
Page 34

Settings for Profiles
Incoming Call Alert
This setting defines how the phone will notify
you about an incoming voice call. The options
available are: Ringing, Ascending, Ring
once, Beep Once, Caller Groups and
Off.
Caller Groups (Network must support CLI)
The phone will ring only when calls are received from phone numbers which belong to
the selected caller group. (Also a graphic is
shown, if specified to the group.)
Scroll to the desired group and press Mark to
select or Unmark to deselect it. Repeat this
as many times as necessary. Next, press
Back and then Yes to save or No to discard
the changes. See also chapter 4 ‘Phone Book‘,
‘Caller Groups’.
Ringing Tone
Sets the ringing tone for voice calls.
Ringing Volume
Sets the volume level for the ringing, message
and alarm clock alert tones.
Vibrating Alert (With optional battery BMS2V)
Sets the phone to vibrate when a voice call is received. The vibrator does not operate when the
phone is connected to a charger, deskstand or
handsfree car kit.
Message Alert Tone
Sets the ringing tone for text messages.
Keypad Tones
Sets the volume level for keypad tones.
Warning and Game Tones
Sets the phone to sound a warning tone, for example when the battery is running out of power
or when you play one of the games offered by
your phone. This setting has no effect on the
tones which are related to network services.
Automatic Answer (in Car and Headset Profile Only)
Sets the phone to answer an incoming voice call
after a single ring. This function can be used
when the car kit is equipped with ignition sense
and ignition is switched on. Scroll to On or Off
and press OK.
Lights (in Car Profile Only)
Sets the display and keypad lights. Scroll with
or to On (always on) or Automatic (on
for 15 seconds after key press or incoming call
alert) and press OK.
OTE: While in Phone Book or the menu
N
functions, you can switch on the lights
for 15 seconds by pressing quickly
even if ‘Automatic’ is selected.
Renaming Profiles
This function allows you to edit the name of the
selected profile.
1 When the desired Profile is highlighted, press
Options.
2 Scroll with or to Rename and press
OK.
3 Enter the new name and press OK.
NOTE: This function is not available in
the General
profiles.
, Headset and Car
34 Copyright © 2004 Nokia. All rights reserved.
Page 35

9. Settings (Menu 4)
Settings (Menu 4)
Alarm Clock (Menu 4-1)
The phone can be set to alarm at a specified
time. The alarm clock uses the time format set
for the clock, either 12-hours or 24-hours.
The alarm clock will still work even when the
phone is switched off.
In this menu you can set the alarm time and select On to change the alarm time or Off to turn
the alarm clock off.
When the alarm time is reached
The phone will sound an alert tone (unless In-
coming Call Alert is set to Off or Beep
once). When the phone is alerting, ALARM! is
also shown and the phone’s lights flash. If you let
the phone sound the alarm for a full minute or if
you press any other key, the alarm stops for a few
minutes and then resumes. You can end this
‘snoozing’ by pressing Stop or by switching the
phone off.
NOTE:
If the alarm time expires while the
phone is switched off, the phone starts
alarming. If you press Stop, the phone
asks whether you want to activate the
phone for calls. Press Yes to switch on
the phone or No to keep the phone off.
Do not switch on the phone when wireless phone use is prohibited or when it
may cause interference or danger.
NOTE: While the phone is snoozing, you
cannot make any calls, except emergency calls (e.g. 112 or other official emergency number).
Clock (Menu 4-2)
The phone has its own clock. The current time is
shown on the display except when you are in the
Phone Book or Menu functions.
In this menu you can set the time display On or
Off, set the time or select between the 12 -hour
or 24 -hour time formats.
Setting the Clock:
1 Once in Menu 4-2, press Select.
2 Scroll to Set the time, and press Se-
lect.
3 Enter the present time at Time:, and press
OK.
The clock also supports the following functions:
Messages (Menu 1), Call register (Menu 2), Alarm
clock (Menu 4-1), and Calendar (Menu 8).
NOTE: If the battery is removed from the
phone for a longer time, you may need
to set the time again.
Copyright © 2004 Nokia. All rights reserved. 35
Page 36

Call Settings (Menu 4-3)
Anykey Answer (Menu 4-3-1)
When this function is set on, you can answer an
incoming call by pressing any key briefly, except
and .
Automatic Redial (Menu 4-3-2)
When the Automatic Redial function is set on,
your phone will make up to ten attempts to connect the call after an unsuccessful call attempt.
Speed Dialling (Menu 4-3-3)
When the Speed Dialling function is set to on,
the names and phone numbers assigned to the
speed dial keys to can be dialled by
pressing and holding the corresponding number
key. Pressing and holding the key dials your
voice mailbox number.
Phone Line in Use (Menu 4-3-6)
The SIM card may be used with two subscriber
numbers, ‘phone lines’ (network service). This
function is available only if your SIM card supports it.
You can select the desired line for making calls.
However, calls on both lines can be answered
disregarding the selected line.
If you select line 2 and have not subscribed to
this network service, you will not be able to make
calls.
When you have prevented the line selection
within the ‘Phone line change’ function, you
cannot use this function.
NOTE: when the phone is roaming, i.e.
used in other than its’ home network,
you may not be able to use line 2 and
not receive any calls.
Call Waiting Options
Phone Settings (Menu 4-4)
(Menu 4-3-4)
When this network service is activated, the network will notify you of a new incoming call while
you have a call in progress.
Own Number Sending (Menu 4-3-5)
This network service allows you to set whether
your phone number is shown to or hidden from
the person that you are calling. Preset resets
the phone to the default setting, On or Off, that
you have agreed upon with your operator or service provider.
36 Copyright © 2004 Nokia. All rights reserved.
Language (Menu 4-4-1)
Within this menu you can select the language in
which the display texts will be shown. If the setting Automatic is selected, the language used
is chosen based on the current SIM card. English
will be used if the language on the SIM card is
not found in the phone.
This setting also affects the time and date formats of the following functions: Alarm clock
(Menu 4-1), Clock (Menu 4-2), Calendar (Menu
8).
Page 37

Settings (Menu 4)
Cell Info Display (Menu 4-4-2)
This network service allows you to set the phone
to indicate when it is used in a cellular network
based on Micro Cellular Network (MCN) technology (network service).
List of Own Numbers (Menu 4-4-3)
Within this menu you can store, erase and edit
the phone numbers assigned to your SIM card, if
this is allowed by the card.
This function is a memory aid, which you can use
to check your own phone numbers if you need to
do so.
For this reason, the edits that you make here do
not affect in any way the actual subscriber number(s) of your SIM card.
Welcome Note (Menu 4-4-4)
This menu allows you to set the message (up to
36 characters in length) which is shown briefly
when the phone is switched on.
Network Selection (Menu 4-4-5)
The network to which you are connected can be
selected either automatically or manually.
In Automatic mode the phone automatically selects one of the cellular networks available in
your area; the selected network can be GSM900,
GSM1800 or GSM900/1800.
In Manual mode the phone will show a list of the
available networks and you can select the network you wish to use if this network has a roaming agreement with your home network
operator. If no such agreement is in force, the
text No Access will be displayed and you must
select another network. The phone will stay in
manual mode until the automatic mode is selected or another SIM card is inserted into the
phone.
Security Settings (Menu 4-5)
Your phone is equipped with a versatile security
system to prevent unauthorised use of the phone
or the SIM card. See also chapter Reference In-
formation - ’Access Codes’.
PIN-Code Request (Menu 4-5-1)
Within this menu you can set the phone to ask
for the PIN code of your SIM card when the
phone is switched on. You will need the PIN code
to turn this request function on.
Note that some SIM cards do not allow the PIN
code request to be turned off.
Call Barring Service (Menu 4-5-2)
This network service allows you to restrict making and receiving calls with your phone. For this
function you need the barring password.
You have the following barring modes to choose:
Outgoing calls
Calls cannot be made.
International calls
Calls cannot be made to foreign countries.
International except to home
country
Calls can be made only within and to your
home country.
Copyright © 2004 Nokia. All rights reserved. 37
Page 38

Incoming calls
Calls cannot be received.
Incoming calls if abroad
Calls cannot be received outside your home
country.
Cancel all barrings
For each function (except Cancel all bar-
rings) you have the following options: Activate, Cancel, or Status (shows the types of
barred call).
NOTE: When calls are barred, calls may be
possible to certain emergency numbers
in some networks (e.g. 112 or other official emergency number).
When you make a call and a barring
mode is set on, the phone may display a
note reminding you of this.
Fixed Dialling (Menu 4-5-3)
This service restricts your outgoing calls to selected phone numbers, if this function is supported by your SIM card. To save and edit the
numbers on the list, you will need to have the
PIN2 code.
NOTE: When Fixed Dial Option is set on,
calls may be possible to certain emergency numbers in some networks (e.g.
112 or other official emergency number).
Closed User Group
NOTE: When calls are limited to Closed
User Groups, calls may be possible to
certain emergency numbers in some
networks (e.g. 112 or other official
emergency number).
Security Level (Menu 4-5-5)
This menu allows you to set the phone security
level on to avoid unauthorised use of the phone.
You will need the security code to set the security level. The available options are: None, Mem-
ory (security code is required when Phone Book
memory is selected) and Phone (security code
required when a new SIM card is inserted).
NOTE: When you change the security lev-
el, all the recent calls lists are cleared.
Change Access Codes (Menu 4-5-6)
With this menu you can change the access
codes: security code, PIN code, PIN2 code and
barring password. These codes can only include
the characters 0 to 9. The phone prompts you to
enter the current code and the new code. It also
prompts you to verify the new code by entering
it again.
NOTE: Avoid using access codes similar to
the emergency numbers, such as 112, to
prevent accidental dialling of the emergency number.
(Menu 4-5-4)
This network service specifies the group of people to whom you can call and who can call you.
Preset resets the phone to use a user group
that the SIM card owner has agreed upon with
the operator or service provider.
38 Copyright © 2004 Nokia. All rights reserved.
Phone Line Change (Menu 4-5-7)
You can allow or prevent the selection of a
phone line.
When Not allowed is selected, you cannot
use the ‘Phone line in use’ function.
1 Once in the Security settings sub-
menu, scroll with or to Phone
Page 39

line change and press Select.
2 Key in the PIN2 code and press OK.
3 Scroll to Allowed or Not allowed and
press OK.
Restore Factory Settings (Menu 4-6)
You can reset some of the menu settings to their
original values. The security code is needed for
this function.
Settings (Menu 4)
Copyright © 2004 Nokia. All rights reserved. 39
Page 40

10. Call divert (Menu 5)
This network service is used to forward incoming
calls to your voicemail (only voice calls) or to another number so you won’t miss an important
call.
For details, contact your service provider.
The divert modes available are:
• Divert all voice calls with-
out ringing (Menu 5-1)
• Divert when busy (Menu 5-2) (for
voice calls only)
• Divert when not answered (Menu
5-3) (for voice calls only)
• Divert when phone off or no
coverage (Menu 5-4)
Voice calls are diverted when they are not
answered, or your phone is busy, switched
off or outside the network service area.
• Divert when phone off, no an-
swer or, no coverage (Menu 5-5)
Voice calls are diverted when they are not
answered, or your phone is busy, switched
off or outside the network service area.
This function is available only if your SIM
card supports it.
• Divert all fax calls (Menu 5-6)
• Divert all data calls (Menu 5-7)
• Cancel all diverts (Menu 5-8)
All diverts are set off.
For each mode you can select Activate (sets
the divert mode on if allowed by the network),
Cancel (sets the divert mode off) or Status
(shows the call types affected by the divert
mode).
Within the submenu
(Menu 5-8), you can cancel all call diverts.
TIP: If Divert when busy is acti-
vated, rejecting an incoming call will
also divert a call.
Cancel all diverts
40 Copyright © 2004 Nokia. All rights reserved.
Page 41

11. Games (Menu 6)
Games (Menu 6)
Not only can you use the phone for communication, you can also use it for some serious fun.
NOTE: Your phone must be switched on to
use this function. Do not switch on the
phone when the use of a wireless phone
is prohibited or when it may cause interference or danger.
You can choose between the following games:
Memory
Reveal pictures to find pairs with as few tries as
possible. Move the cursor with the following
keys: (up), (left), (right),
(down), (jumps over revealed pictures and
moves on to next row when at end of row),
(jumps over revealed pictures and moves back to
previous row when at start of row). reveals
the pictures. Once found, pairs stay visible.
Snake
Feed the snake with as many goodies as possible.
Use - (except for ) for moving the
snake. The longer the snake’s tail grows, the
higher is your score. When the snake hits its own
tail or the surrounding wall, the game is over.
Starting a 2-player Game
Before starting the game, ensure that the IR
ports of the two devices are pointing at each
other and that the IR connection is activated.
Both players need to start the 2-player game on
their phones.
Logic
Find out a secret combination of figures. Available figures are shown at the top of the display
before you accept the first guess row. Use
and to move the cursor and to select
the figure. To copy a figure from a previously ac-
cepted guess row, start scrolling with , move
the cursor to the desired figure in the normal
way and accept the selection with .
Once you think that you have got the right combination, press . The result is presented as a
set of marks over the row. A correct figure in
right place gives a full mark; a correct figure in
wrong place gives a half a mark. When all the
figures are correct and in right places, the game
ends.
NOTE: While playing, pressing either se-
lection key pauses the game (1-player
games only). To resume a paused game,
select Continue.
When you select a game, you can choose
from the following options:
New game
Starts a new game session.
NOTE: This option is replaced with 1
player / 2 player selection if
you can play against a similar phone
via the infrared port.
Top score
Shows the highest score achieved on the
game with your phone. Available only in the
games which keep track of the score.
Instructions
Shows a brief help text about the game. You
can scroll the text with More (or and
).
Level
Allows you to set the difficulty level. Select
the desired level with or and press
OK.
Copyright © 2004 Nokia. All rights reserved. 41
Page 42

Continue
Allows you to resume a paused game. Available only when there is a game that has been
paused.
Last view
Shows the final view of game immediately
after the game ended.
42 Copyright © 2004 Nokia. All rights reserved.
Page 43

12. Calculator (Menu 7)
Calculator (Menu 7)
The calculator in your phone adds, subtracts,
multiplies, divides, and converts currency values.
NOTE: Your phone must be switched on to
use this function. Do not switch on the
phone when the use of a wireless phone
is prohibited or when it may cause interference or danger.
Using the Calculator
1 Once in Calculator menu, press Select.
2 When an ‘0’ is displayed on the screen, enter
the first number in the calculation (press
for decimals).
3 To add, press once (+ will appear).
To substract, press twice (- will appear).
To multiply, press three times (* will
appear).
To divide, press four times (/ will appear).
To add a decimal, press .
Or: Press Options, scroll with or to
the desired function, and press OK.
4 Enter the second number. Repeat these steps
as many times as needed. Press Clear to
erase any mistakes.
5 Press Options. Highlight Equals and
press OK. You can also choose the Add,
Subtract, Multiply, and Divide func-
tions from the list of options.
NOTE: This calculator has a limited ac-
curacy and rounding errors may occur, especially in long divisions.
To Make a Currency Conversion
1 To set the exchange rate, press Options,
scroll to Exchange rate and press OK.
2 Scroll to either of the displayed options and
press OK. Key in the exchange rate (press
for a decimal point) and press OK.
3 To make the conversion, key in the amount to
be converted, press Options, scroll to To
domestic or To foreign and press OK.
Copyright © 2004 Nokia. All rights reserved. 43
Page 44

13. Calendar (Menu 8)
The calendar can keep track of reminders, calls
that you need to make, meetings, and birthdays.
It can even sound an alarm at times when you
should make a call or go to a meeting.
NOTE: Your phone must be switched on to
use this function. Do not switch on the
phone when the use of a wireless phone
is prohibited or when it may cause interference or danger.
1 Once in Menu 8, scroll to the desired date.
2 Press Options to obtain the following
functions. Scroll to the desired function and
press OK.
View day
Shows notes set for the chosen day. Use
or to browse through the note(s). Pressing
Options while in a note allows access to
the following functions.
Erase (deletes the note), Edit (allows
you to edit the note), Move (allows you to
change the date and time of the note),
Send note (allows you to send the note
as a text message (SMS)). Send via IR
(copies the note to another compatible
phone by using the infrared port).
Make note
Allows you to write a note. You can choose
from the following types of note:
Reminder (indicated by )
Key in the note and the date and press OK.
Call ()
Key in the desired phone number (or recall
it from Phone Book) and the date when the
call should be made, press OK. Repeat this
to set the time at which the call should be
made.
Meeting ()
Key in a note and the date of meeting,
press OK. Repeat this to set the time of the
meeting.
Birthday ()
Key in the person’s name, the date of birth
(include the year) and press OK. The note
and the person’s age will be shown in every
coming year.
You can set the phone to sound a
tone in anticipation for a note: Press
Yes, key in the alarm date and press
OK. Repeat this with the alarm time.
The presence of a tone alert is indicated by when you view the notes.
Erase notes
Allows you to delete the selected note(s).
Scroll to one of the displayed options and
press OK.
View all
Shows the notes that are set for all days. Use
or to browse through the note(s).
Pressing Options allows access to the same
functions as in ‘View day’. Scroll to the desired function and press OK.
Go to date
Allows you to jump to the desired date.
Set the date
Allows you to change the current date.
Print via IR
Allows you to print all the notes on a compatible printer using the phone’s infrared port.
44 Copyright © 2004 Nokia. All rights reserved.
Page 45

When the phone sounds an alert for a
note
The phone will flash its lights, beep, and display
the note. If the display is showing a Call note,
you can call the displayed number by pressing
.
If the phone was set to sound a tone alert, pressing Postpone suspends the alert for 10 minutes. Pressing this key again will postpone the
alarm for another 10 minutes. To stop the alarm,
press or OK.
NOTE: If the battery is removed from the
phone for a longer time, you may need
to set the time again.
Calendar (Menu 8)
Copyright © 2004 Nokia. All rights reserved. 45
Page 46

14. Infrared (Menu 9)
In this menu you can set up your phone to receive data through its infrared (IR) port. You can
receive e.g. electronic business cards and ringtones from other infrared enabled devices. You
can also play the 2-player Snake game using the
Infrared connection. For further information on
compatibility, contact your device dealer.
The phone is a Class 1 Laser Product.
NOTE: The preferable distance between
the two devices in infrared connection is
one meter at most.
There must be no obstructions between
the two communicating devices.
The IR ports of the two devices must
point at each other.
Receiving Data via the IR Port
To receive data from another compatible phone:
1 Ensure that the IR ports of the two devices
are pointing at each other.
2 Enter the Infrared menu to activate the IR
port for data reception.
If data transfer is not started within 45 seconds
after the activation of the IR port, the connection is cancelled and will have to be started
again.
Sending Data via the IR Port
This function allows you to send data to a compatible phone or PC.
You can select:
• Send graphic via IR for a desired caller group
to notify that a member of a caller group is
calling.
• Copy names and numbers from Phone Book
to a compatible phone or PC.
• Print names and numbers from Phone Book to
a compatible printer.
• Print a text message on a compatible printer.
Checking the Status of an IR Connection
The status of an IR connection is indicated by
.
When is displayed continuously, there is an
IR connection between your phone and the other
device.
When is not displayed, no IR connection exists.
When blinks, your phone is trying to establish a connection with the other device or a connection has been lost.
46 Copyright © 2004 Nokia. All rights reserved.
Page 47

Smart Messaging Services (Menu 10)
15. Smart Messaging Services (Menu 10)
Nokia Smart Messaging enables the use of a variety of network services offered by operators or
service providers. Some services may be available
through the Internet and, although your phone
does not support full World Wide Web browsing,
you may be able to access certain Internet services directly from your phone such as news,
weather reports, traffic reports, flight times and
dictionaries.
NOTE: The availability of Nokia and oper-
ator services vary and you may need to
subscribe to them. Please contact your
local operator or service provider for
rates and further information.
Services are saved and accessed via menu 10
which has three submenus: Personal Book-
marks (Menu 10-1), Operator Services
(Menu 10-2) and Nokia Services (Menu
10-3). These menus are dynamic, which means
that the content of each submenu will vary according to the services you have saved under
that submenu.
To be able to use services, you first need to subscribe to the Short Message Service (SMS). When
you order a new Smart Messaging service, the
operator sends a message to your phone. To add
the new service under Menu 10, save the message. To access the service, simply select the
menu item.
NOTE: As the services that are available
vary, this guide can give you only some
of the basic guidelines on how to use
such services. For more detailed information on using a specific service, contact your service provider and follow the
guide texts on your phone’s display.
Using Nokia and Operator Services
The following instructions provide some basic
guidelines on how to use Smart Messaging services.
Storing Access Numbers
To be able to use Smart Messaging services, you
will first need to have the service access numbers
saved in your phone’s memory.
Nokia access numbers are stored in the NOKIA
SETTINGS menu. Nokia access number 1 is
+358405202999 and Nokia access number 2 is
99999. Do not remove them; when you receive a
message, the phone checks whether it is sent
from the authorised source specified in this
menu.
As regards Operator services, you will be given
the necessary access numbers by your service
provider. Store these numbers in the OPERA-
TOR SETTINGS menu.
Downloading the List of Services
Once the access numbers have been saved, you
can download the list of services provided by the
network in the following way:
1 Select the menu item UPDATE NOKIA
SERVICES or UPDATE OPERATOR SERVICES.
2 Press the left Select: a request mes-
sage for the list of available services will be
sent.
Copyright © 2004 Nokia. All rights reserved. 47
Page 48

3 Wait until you receive the reply message from
the network.
NOTE: The content of the reply mes-
sage will depend on the service provider. The message can, for example,
contain one particular service or a
list of services.
Saving a Service Message as a Bookmark
If the reply message from a network contains a
service or a list of services, you can either start
using the service immediately, or you can save it
under Menu 10-1 as a personal bookmark. Saving the service message as a bookmark provides
you with a quick and easy way of accessing that
service next time round.
To save a service message as a personal
bookmark:
1 Once you have received the list of available
services, select the desired service by highlighting it and pressing OK.
2 Scroll to the end of the message with the
key. The text SAVE THE SERVICE MES-
SAGE? will be displayed.
3 Press the left OK
If there is no room available to save a new
service, the text ERASE ONE OF THE OLD
ONES FIRST and the list of the current
bookmarks will be displayed.
4 Enter a name for the bookmark (or accept the
name that the phone suggests). The text
SERVICE MESSAGE SAVED will appear
once saving has been successfully completed.
to save the message.
Using a Service Saved as a Bookmark
The instructions in this section are one way of
using a service. Note that this method may not
apply to all services. Follow the guide texts
shown on the display or contact your service
provider for more information.
Once you have saved a service message as a
bookmark in Menu 10-1, access the service in
the following way:
1 Once in Menu 10-1, select the desired service
by highlighting it.
2 Press the left Option for options.
(Erase removes the bookmark from the list,
Select activates the bookmark).
3 Press the left OK at Select high-
lighted: a message requesting the latest information about that service will be sent.
An Example of Downloading and Using a Nokia Service
This section gives you the instructions on how to
use a Nokia service. Your phone enables you to
download a new ringing tone from the network
if this service is supported by the network operator and the Nokia service provider.
To download a ringing tone:
1 Once in the Nokia Services menu, select
Ring tones service and press the left
Select. A request for the list of avail-
able ringing tones will be sent to the network.
NOTE: In order to be able to select
Ringtones, you must first request
and receive the list of available services as described in ‘Downloading a
List of Services’, on page 46.
2 Wait until you receive the reply message from
the network. When the reply message has
48 Copyright © 2004 Nokia. All rights reserved.
Page 49

Smart Messaging Services (Menu 10)
been received, SERVICE MESSAGE RE-
CEIVED will be displayed. Press the left
OK to receive the message.
3 Press More until the text filename is dis-
played and press the left Select to
access the list of available ringing tones. You
can scroll through the list with the and
keys.
NOTE: If you want easy access to the
list of ringing tones at a later time,
save the list as a bookmark. For instructions on how to do this, refer to
‘Saving a Service as a Bookmark’ on
page 47.
4 Select the desired tone by highlighting it and
press the left
5 Press the left Send
ringtone
ing tone will be sent to the network.
When the phone receives the ringing tone the
text RINGING TONE RECEIVED will be
displayed.
6 Press the left Options for options:
Playback (to play the new ringing tone)
and Save (to save the ringing tone in the
ringing tone list as Personal).
You can only download and save one ringing
tone at a time. The next time that you save a
new ringing tone, the ringing tone previously
saved under Personal will be overwritten.
OK.
when at the Get
. A request for the selected ring-
Other Services
Some Smart Messaging services may be saved
and accessed in different ways to Nokia and Operator services. The service address for such services may be sent to your phone by a service
provider, or you can manually add a service address by using the ADD NEW SERVICE menu.
For availability of services and additional information, contact your service provider.
Saving a Service Address
Once in the ADD NEW SERVICE menu, give
the following information: title: (enter the
name of the service), Access No.1: (enter
the number of the server) and Access No.2:
(enter the number of the service). This information will be given to you by your service provider.
A service address can also be sent to you from
the network. When a new service address is sent
to your phone, the text NEW SERVICE RE-
CEIVED: and the name of the service will be
displayed.
To add this new service address to your Per-
sonal Bookmarks menu, press the left
Options and then press Save
service (or press
more information before saving the new service).
Details if you want to receive
to save the new
Accessing a Service
Once in the Personal Bookmarks menu,
select the service address by highlighting it and
press the left Option to choose between
the following options:
Connect (a message requesting information
will be sent).
When you select connect, you may be asked to
enter a keyword. Enter a keyword and press the
left
word, simply press the left
Edit (to change the settings of a service ad-
dress)
Erase (to remove the selected service address
from the menu).
OK. If you don’t wish to enter any key-
OK.
Copyright © 2004 Nokia. All rights reserved. 49
Page 50

16. SIM Services
In addition to the functions available in the
phone, your SIM card may provide additional
services that you can access in the menu 11 (SIM
Services). Menu 11 is shown only if it is supported by your SIM card. The name and contents of
the menu depend entirely on the services available.
You can set the phone to display the confirmation messages when you are using the SIM card
services by selecting the option Shown within
the menu 4-4-6 (Notifications on SIM
update).
For availability, rates and information on using
the SIM services, contact your SIM card vendor your network operator, service provider or other
third-party vendor.
Accessing these services may involve
sending an SMS or making a phone call
for which you may be charged.
50 Copyright © 2004 Nokia. All rights reserved.
Page 51

Reference Information
17. Reference Information
Access Codes
You can use the access codes described in this
section to avoid unauthorised use of your phone
and SIM card.
The access codes (except PUK and PUK2 codes)
can be changed by using Menu 4-5-6. See the
following section.
NOTE: Avoid using access codes similar
to emergency numbers, such as 112, to
prevent accidential dialling of the emergency number.
Security Code (5 digits)
The security code can be used to avoid unauthorised use of your phone. The security code (se-
curity code) is usually supplied with the
phone. Change the security code before you start
using your phone. Keep the new code secret and
in a safe place, which is separate from the phone.
The default code is 12345.
NOTE: If you key in an incorrect security
code five times in succession, the phone
will not accept the correct code for the
next five minutes.
PIN Code (4 to 8 digits)
The PIN (Personal Identification Number) code
protects your SIM card against unauthorised use.
The PIN code is usually supplied with the SIM
card. When the PIN code request is enabled
(Menu 4-5-1), the code is asked each time the
phone is switched on.
NOTE: If you key in a wrong PIN code
three times in succession, key in the PUK
code and press OK. Key in a new PIN
code and press OK. Key in the new code
again and press OK.
PIN2 Code (4 to 8 digits)
The PIN2 code, supplied with some SIM cards, is
required to access some functions, such as
charging unit counters. These functions are only
available if supported by your SIM card.
NOTE: If you key in a wrong PIN2 code
three times in succession, follow the
same instructions as for the PIN code
but this time using the PUK2 code.
PUK Code (8 digits)
The PUK (Personal Unblocking Key) code is required to change a blocked PIN code. The PUK
code may be supplied with the SIM card. If not,
contact your local service provider for the code. If
you lose the code, contact your service provider.
PUK2 Code (8 digit)
The PUK2 code, supplied with some SIM cards, is
required to change a blocked PIN2 code. If you
lose the code, contact your service provider.
Barring Password
The barring password is needed when using the
‘Call Barring’ function. You obtain the password
from your service provider.
DTMF Tones
The phone can send DTMF tones to communicate
with answering machines, computerised telephony services etc.
Copyright © 2004 Nokia. All rights reserved. 51
Page 52

The tones can be sent even when the keypad
tones are set off.
Manual transmission
Make a call to the desired phone number and key
in the numbers that you want to send as DTMF
tones.
Automatic transmission
Start a call in the normal way. Then, do as follows: Press Options, scroll with or to
Send DTMF, and press Select. Key in the
DTMF sequence or recall it from Phone book, and
press OK to send it.
Pressing Exit ends the DTMF transmission but
not the call.
Placing pauses and waits in a DTMF sequence
When keying in a DTMF sequence, you can place
pause and wait characters in front of or between
DTMF numbers.
For a pause of 2.5 seconds, press three
times quickly (p is displayed). When sending the
sequence, all numbers following the pause(s) are
sent as DTMF tones.
For a wait character, press four times
quickly (w is displayed).
To send a DTMF sequence which contains wait
characters:
1 Start a DTMF call in the normal way.
2 Press Send as many times as there are wait
characters. Numbers after the waits are sent
as DTMF tones.
NOTE: Pause and wait characters cannot be
stored on some SIM cards.
Linking a phone number to a DTMF sequence
You can link a phone number to a DTMF sequence for sending them together.
1 Key in a phone number or recall it from Phone
book.
2 Press twice quickly (for +).
3 Key in the number of the speed dialling loca-
tion that holds the DTMF sequence (this step
can be skipped) and store the phone number
in the internal Phone book.
See also “Speed Dialling” on page 36.
Call the phone number in the normal way.
Battery Information
The following manufacturer-approved rechargeable batteries are available for your phone:
NiMH batteries BMS-2V, BMS-2S and BMS-2,
and Li-Ion batteries BLS-2, BLS-2H, BLS-4 and
BLS-5.
The approximate operation times for new batteries are:
Talk time to the batteries BMS-2S, BMS-2, BMS2H, BMS-2V and BLS-2 is from 2.5 to 4.5 hours
and for the battery BLS-4 from 4.5 to 7 hours.
Standby time for the batteries BMS-2S, BMS-2,
BMS-2V and BLS-2 is from 55 to 260 hours and
for the battery BLS-4 from 95 to 430 hours.
Charging and Discharging the Battery
• Your phone is powered by a rechargeable bat-
tery.
• Note that a new battery's full performance is
achieved only after two or three complete
charge and discharge cycles!
• The battery can be charged and discharged
hundreds of times but it will eventually wear
out. When the operating time (talk-time and
stand-by time) is noticeably shorter than nor-
mal, it is time to buy a new battery.
• Use only batteries approved by the phone
manufacturer and recharge your battery only
with the chargers approved by the manufac-
turer.
52 Copyright © 2004 Nokia. All rights reserved.
Page 53

Reference Information
• When a charger is not in use, disconnect it
from the power source. Do not leave the battery connected to a charger for longer than a
week, since overcharging may shorten its life.
If left unused a fully charged battery will discharge itself over time.
• For good operation times, discharge the
NiMH battery from time to time by leaving
your phone switched on until it turns itself
off (or by using the battery discharge facility
of any approved accessory available for your
phone). Do not attempt to discharge the battery by any other means.
• Temperature extremes will affect the ability
of your battery to charge: allow it to cool
down or warm up first.
• When the battery is running out of power and
only few minutes of talk time remain, a warning tone is heard and Battery low is
briefly displayed. When no more talk time is
left, Battery empty is displayed and a
warning tone is sounded and the phone
switches itself off.
Using the Batteries
• Use the battery only for its intended purpose.
• Never use any charger or battery which is
damaged or worn out.
• Do not short-circuit the battery. Accidental
short-circuiting can occur when a metallic
object (coin, clip or pen) causes direct connection of the + and - terminals of the battery (metal strips on the back of the battery)
for example when you carry a spare battery in
your pocket or purse. Short-circuiting the
terminals may damage the battery or the
connecting object.
• Leaving the battery in hot or cold places, such
as in a closed car in summer or winter conditions, will reduce the capacity and lifetime of
the battery. Always try to keep the battery
between 15 C and 25 C (59 F and 77 F). A
phone with a hot or cold battery may temporarily not work, even when the battery is fully
charged. NiMH batteries performance is particularly limited in temperatures below -10°C
(14 F). Li-Ion batteries performance is particularly limited in temperatures below -0 C (32
F).
• Do not dispose of batteries in a fire!
Batteries must be recycled or disposed
of properly.
Must not be disposed of in municipal
waste!
Care and Maintenance
Your phone is a product of superior design and craftsmanship and should be treated with care. The suggestions below will help you to fulfill any warranty
obligations and to enjoy this product for many years.
When using your phone, battery, charger OR any accessory:
• Keep it and all its parts and accessories out of small
children's reach.
• Keep it dry. Precipitation, humidity and liquids con-
tain minerals that will corrode electronic circuits.
• Do not use or store it in dusty, dirty areas. Its mov-
ing parts can be damaged.
• Do not store it in hot areas. High temperatures can
shorten the life of electronic devices, damage batteries, and warp or melt certain plastics.
• Do not store it in cold areas. When the phone
warms up (to its normal temperature), moisture
can form inside the phone, which may damage
electronic circuit boards.
• Do not attempt to open it. Non-expert handling of
the device may damage it.
• Do not drop, knock or shake it. Rough handling can
break internal circuit boards.
• Do not use harsh chemicals, cleaning solvents, or
strong detergents to clean it. Wipe it with a soft
cloth slightly dampened in a mild soap-and-water
solution.
Copyright © 2004 Nokia. All rights reserved. 53
Page 54

• Do not paint it. Paint can clog the device’s moving
parts and prevent proper operation.
• Use only the supplied or an approved replacement
antenna. Unauthorised antennas, modifications or
attachments could damage the phone and may violate regulations governing radio devices.
• If the phone, battery, charger or any accessory are
not working properly, take them to your nearest
qualified service facility. The personnel there will
assist you, and if necessary, arrange for service.
Important Safety Information
Traffic Safety
Do not use a hand-held telephone while driving a vehicle. If using a hand-held phone park the vehicle before conversing. Always secure the phone in its holder;
do not place the phone on the passenger seat or where
it can break loose in a collision or sudden stop.
The use of an alert device to operate a vehicle's lights
or horn on public roads is not permitted.
Remember road safety always comes first!
Operating Environment
Remember to follow any special regulations in force in
any area and always switch off your phone whenever
it is forbidden to use it, or when it may cause interference or danger.
When connecting the phone or any accessory to another device, read its Owner’s guide for detailed safety
instructions. Do not connect incompatible products.
As with other mobile radio transmitting equipment,
users are advised that for the satisfactory operation of
the equipment and for the safety of personnel, it is recommended that the equipment should only be used in
the normal operating position (Held to your ear with
the antenna pointing over your shoulder.).
Do not point the infrared beam at anyone’s eye or allow it to interfere with other infrared devices.
Electronic Devices
Most modern electronic equipment is shielded from radio frequency (RF) signals. However, certain electronic
equipment may not be shielded against the RF signals
from your wireless phone.
Pacemakers
Pacemaker manufacturers recommend that a minimum separation of 20 cm (6 inches) be maintained between a hand-held wireless phone and a pacemaker to
avoid potential interference with the pacemaker. These
recommendations are consistent with the independent
research by and recommendations of Wireless Technology Research.
Persons with pacemaker:
• Should always keep the phone more than 20 cm (6
inches) from their pacemaker when the phone is
switched on;
• Should not carry the phone in a breast pocket;
• Should use the ear opposite the pacemaker to minimize the potential for interference.
• If you have any reason to suspect that interference
is taking place, switch off your phone immediately.
Hearing Aids
Some digital wireless phones may interfere with some
hearing aids. In the event of such interference, you
may want to consult your operator or service provider.
Other Medical Devices
Operation of any radio transmitting equipment, including cellular phones, may interfere with the functionality of inadequately protected medical devices.
Consult a physician or the manufacturer of the medical
device to determine if they are adequately shielded
from external RF energy or if you have any questions.
Switch off your phone in health care facilities when
any regulations posted in these areas instruct you to
do so. Hospitals or health care facilities may be using
equipment that could be sensitive to external RF energy.
54 Copyright © 2004 Nokia. All rights reserved.
Page 55

Reference Information
Vehicles
RF signals may affect improperly installed or inadequately shielded electronic systems in motor vehicles
(e.g. electronic fuel injection systems, electronic antiskid (anti-lock) braking systems, electronic speed control systems, air bag systems).
Check with the manufacturer or its representative regarding your vehicle. You should also consult the manufacturer of any equipment that has been added to
your vehicle.
Posted Facilities
Switch your phone off in any facility where posted notices so require.
Potentially Explosive Atmospheres
Switch off your phone when in any area with a potentially explosive atmosphere and obey all signs and instructions. Sparks in such areas could cause an
explosion or fire resulting in bodily injury or even
death.
Users are advised to switch off the phone when at a refuelling point (service station). Users are reminded of
the need to observe restrictions on the use of radio
equipment in fuel depots (fuel storage and distribution
areas), chemical plants or where blasting operations
are in progress.
Areas with a potentially explosive atmosphere are often but not always clearly marked. They include below
deck on boats; chemical transfer or storage facilities;
vehicles using liquified petroleum gas (such as propane
or butane); areas where the air contains chemicals or
particles, such as grain, dust or metal powders; and any
other area where you would normally be advised to
turn off your vehicle engine.
Vehicles
Only qualified personnel should service the phone, or
install the phone in a vehicle. Faulty installation or service may be dangerous and may invalidate any warranty which may apply to the unit.
Check regularly that all wireless phone equipment in
your vehicle is mounted and operating properly.
Do not store or carry flammable liquids, gases or explosive materials in the same compartment as the phone,
its parts or accessories.
For vehicles equipped with an air bag, remember that
an air bag inflates with great force. Do not place objects, including both installed or portable wireless
equipment in the area over the air bag or in the air bag
deployment area. If in-vehicle wireless equipment is
improperly installed and the air bag inflates, serious injury could result.
Switch off your phone before boarding an aircraft. The
use of wireless telephones in an aircraft may be dangerous to the operation of the aircraft, disrupt the
wireless telephone network and may be illegal.
Failure to observe these instructions may lead to suspension or denial of telephone services to the offender,
or legal action or both.
Emergency Calls
IMPORTANT! This phone, like any wireless
phone, operates using radio signals, wireless
and landline networks as well as user-programmed functions which cannot guarantee
connection in all conditions. Therefore, you
should never rely solely upon any wireless
phone for essential communications (e.g.
medical emergencies).
Remember, to make or receive any calls the phone
must be switched on and in a service area with adequate cellular signal strength. Emergency calls may not
be possible on all wireless phone networks or when
certain network services and/or phone features are in
use. Check with local cellular service providers.
To make an emergency call:
1 If the phone is not on, switch it on.
Some networks may require that a valid SIM card is
properly inserted in the phone.
2 If the word ‘Clear’ appears on the display above the
key, press and hold
onds to ready the phone for calls.
3 Key in the emergency number for your present lo-
cation (e.g. 112 or other official emergency number). Emergency numbers vary by location.
4 Press the key.
Clear for several sec-
Copyright © 2004 Nokia. All rights reserved. 55
Page 56

If certain features are in use (Keypad lock, Fixed Dialling, etc.), you may first need to turn those features off
before you can make an emergency call. Consult this
document and your local cellular service provider.
When making an emergency call, remember to give all
the necessary information as accurately as possible.
Remember that your wireless phone may be the only
means of communication at the scene of an accident do not cut off the call until given permission to do so.
Important User Information
This section explains how to deactivate the EFR
CODEC should you find that it is difficult to make
or receive calls when travelling and roaming
onto another network.
1. Introduction
The Nokia 6150 (GSM) come equipped the latest
codec and audio technology for superior sound
and voice quality.
Currently, there are three different codecs defined for GSM 900/PCN 1800:
• full-rate (FR)
• enhanced full-rate (EFR)
•half-rate (HR)
The Nokia 6150 phone can support all these codecs.
The FR codec is supported by all GSM 900/PCN
1800 cellular networks and phones.
The network automatically selects which codec
is used, FR or EFR (if supported by the network).
The Nokia phone supplied within this sales package has the EFR codec activated to so that you
can automatically enjoy the benefits of EFR if
supported by your network operator. Currently
only some networks support the EFR codec in addition to the FR codec.
2. Deactivating/Activating The EFR Codes
The Nokia 6150 fully meet and comply with all
EFR codec and relevant compatibility specifications.
However, as a result of some networks not yet
complying with the latest specifications you may
find it impossible to make or receive calls, if the
EFR codec is activated, e.g. when you are visiting
or roaming in a foreign network.
If problems are encountered in making a call
(with the display of "Check operator services" or
another similar message), OR receiving calls, deactivating the EFR codec may resolve the problem. To deactivate or reactivate the EFR codec
follow the instructions given in the next section.
Please note that there is no indication on the
phone as to whether or not the EFR codec is activated or deactivated.
a) To deactivate the EFR CODEC
With the display clear perform the following key
press sequence:
#3370# or #EFR0#
i.e. press the "#" key, then the "3" key and so on...
b) To activate the EFR CODEC
With the display clear perform the following key
press sequence:
*3370# or *EFR0#
i.e. press the "*" key, then the "3" key and so on...
Notes to a) and b)
i) Immediately after pressing *3370# (or
#3370#) the phone will automatically power itself off and then on again - this is NORMAL and
also serves to indicate that deactivation (or activation) has occurred. During the automatic power off/on sequence the LCD display will become
clear, the back lights will switch off and then the
display will come back on.
56 Copyright © 2004 Nokia. All rights reserved.
Page 57

Reference Information
ii) If during activation/deactivation the wrong key is pressed, clear the wrong entry by pressing the
right selection key labeled “CLEAR”.
iii) If at any time you choose to quit the process then press the END key (the red key above the 3 key)
OR the selection key labeled “CLEAR” until all entered numbers are cleared.
3. Suggested Tip
you may wish to store the above activation/deactivation sequences in the phone book.
Name: EFR ON
Number: *3370#
Name: EFR OFF
Number: #3370#
To save the activation sequence to the phonebook, the name MUST be entered first otherwise deacti-
vation or activation of the EFR codec will occur.
Copyright © 2004 Nokia. All rights reserved.
Page 58

Genuine Accessories
A new extensive range of accessories are available for your
phone. You can select the accessories that accommodates
your specific communication needs.
For availability of the accessories, please check with your
local dealer.
A few practical rules for accessories operation:
• Keep the accessories out of small children's reach.
• When you disconnect the power cord of any accessory, grasp and pull the plug, not the cord.
•Check regularly that all cellular phone equipment in a vehicle is mounted and operating properly.
Use only batteries, chargers and accessories approved by the phone manufacturer. The use of any other
types may invalidate any approval or warranty applying to the phone, and may be dangerous.
58 Copyright © 2004 Nokia. All rights reserved.
Page 59

BATTERIES
Optional Batteries
A range of battery options are available for your phone.
Type Tech. Capacity Talktime* Standby*
BLS-5 Li-lon 600mAH 1 h 20 mins - 3 h 30 - 100 h
BLS-2 Li-lon 900mAH 2 h 30 mins - 4 h 30 mins 55 - 260 h
BLS-2H Li-lon 1000mAH 2 h 40 mins - 5 h 60 - 280 h
BMS-2/BMS-2S NiMH 900mAH 2 h 30 mins - 4 h 30 mins 55 - 260 h
BMS-2V NiMH 900mAH 2 h 30 mins - 4 h 30 mins 55 - 260 h
BLS-4 Li-lon 1500mAH 4 h 30 mins - 7 h 95 - 430 h
INDOOR
Fast & Light Charger (ACP-9)
Extremely light, the functionally designed multi-voltage Fast & Light Charger, ACP-9, charges your phone battery quickly. Plug the charger into a wall
socket and insert the connector to the bottom of your phone.
The charging time is approximately 2 hours for BLS-2. Check the charging
status on the phone display. You can also use your phone while charging.
The Fast & Light Charger can also be used with the Desktop Stand, DCH-9.
Reference Information
Desktop Stand (DCH-9)
The Desktop Stand, DCH-9, provides mounting places for both the phone
and a spare battery. Connect your charger to the back of the Desktop Stand, and then plug the charger into
a wall outlet. Place your phone and/or spare battery in the stand to begin battery charging. The charging
order is the phone battery first, and then the spare battery. Check the charging status of the phone battery
on the phone display.
Compatible with all battery options, the Desktop Stand is used together with the Fast & Light Charger, ACP9 or standard charger, ACP-7.
The stand is equipped with a LED indicator for the spare battery. A continuous red light indicates recharging,
and green light indicates the spare battery is charged. Charge the battery until the light turns green.
* Operation times are network dependent. Variation may occur. With EFR operation times are about
5% shorter, with HR 5-10% longer.
Copyright © 2004 Nokia. All rights reserved. 59
Page 60

INDOOR & VEHICLE
Personal Handsfree Kit with Remote Control
The compact and functional Personal Handsfree Kit with Remote Control. By using the remote control option, you can answer and end calls by pressing the button on the microphone part of the Personal Handsfree.
A cost effective handsfree solution for indoor or outdoor use.
60 Copyright © 2004 Nokia. All rights reserved.
Page 61

Reference Information
VEHICLE
Mobile Charger (LCH-9)
The multivoltage Mobile Charger, LCH-9, ensures your phone is ready for use wherever you travel. This small
charger's functional design fits most car lighters and interiors.
The charging time for the BLS-2 battery is about 2 hours, and you can use your phone freely during charging.
A green light indicates that the Mobile Charger is ready for charging. Check the charging status on the phone
display. The input voltage can be 12 or 24 V DC, negative grounding.
Avoid prolonged charging with the Mobile Charger when the car engine is not running; this may cause the
battery of your car to drain. Note also that in some cars the cigarette lighter plug is not provided with electricity if the ignition is switched off. Verify that the green LED light is on.
Phone Holder (MBC-1)
Designed to fit and complement your car's interiors, the Phone Holder, MBC-1, holds your phone firmly in
place.
You can easily place the phone into the holder with on hand.
Pressing the release button on either side of the holder loosens the bottom lock. You can now remove the
phone from the holder and take it with you.
The Phone Holder is easy to install in a convenient location.
Always secure the phone in its holder. Do not place the phone on the passenger seat or in a place where in
can break loose in a collision or sudden stop.
Copyright © 2004 Nokia. All rights reserved. 61
Page 62

Complete Handsfree Car Kit (CARK-91)
You may choose Complete Handsfree Car Kit to provide a convenient charging facility with an external antenna connection, handsfree capability, and excellent sound quality.
* Phone Holder, MCC-1, keeps your phone firmly in place. You can easily insert or remove the phone from
the phone holder with one hand.
* The Handsfree Unit, HFU-2, with external speaker and HF-Microphone, HFM-8 offers you a seamless
handsfree function.
* The External Antenna Connector provides optimum reception quality.
* Standard features include ignition sense, car radio mute and motorised antenna control.
* When N6150 is used with the Complete Car Kit (CARK-91) or upgrade kit (CARK-95), a dual band car
anetenna is required.
62 Copyright © 2004 Nokia. All rights reserved.
Page 63

Reference Information
BELT CLIP (BCH-16)
The fast and easy way to carry and use your phone.
For installation information, look at the above drawing.
CELLULAR DATA
Nokia Data Suite
Nokia Date Suite is a software based solution for cellular data communication.
It allows you to send and receive data using a PC running Windows 95.
Data Suite operates via your PCs serial communication port or via a infrared port.
The cable can be connected directly to your phone or to the external data cable (DAC-2) from the Complete
Car Kit (Cark-91).
Copyright © 2004 Nokia. All rights reserved. 63
Page 64

18. Index
Symbol
(+ character replaces the international
access code)
14
A
access codes
changing
definition 51
see also barring password,PIN code,
alarm clock
anykey answer 36
assigning a phone number as a speed dial
number
automatic answer 34
Automatic Redial 36
automatically stored phone numbers 31
See also call register
38
PIN2 code, PUK code,PUK2 code
and security code
35
19
B
barring password 51
battery
charge indication
charging/discharging 52
installing 11
notes for using 53
removing 11
10
C
calculator 43
calendar 44
call barring 37
call costs 32
limiting 32
selecting units to display 32
call duration 31
call register 31
call waiting 36
Caller groups 19
caller groups 19
calls
answering
answering during a call 15
ending 3, 9
making
rejecting 15
care and maintenance 53
cell info display 37
clear display,definition 10
clock 35
closed user groups 38
conference calls 15
copying name and phone number via IR 2 1
copying names and phone numbers
via IR
currency conversion 43
3, 15
by speed dialling
international calls 14
redialling last dialled number 14
using phone book 14
voice mailbox 14
14
21
D
data call 29
deleting characters from display 14
display indicator 10
displaying your number to called party 36
divert calls 40
DTMF tones 51
E
earpiece volume 16
entering menu functions 22
erasing a name and phone number 19
exiting from a menu function 22
64 Copyright © 2004 Nokia. All rights reserved.
Page 65

Index
exiting from any function 9
F
fax call 29
fixed dialling 38
G
games 41
H
help text for menu functions 22
hiding your number from called party 36
I
incoming call alert 34
info service 29
infrared 46
K
key in a name 18
keying in a name 18
keypad
locking/unlocking
overview of 9
tones 34
16
L
language of display texts 36
last dialled number 14, 36
lights 34
M
memory functions
entering
memory functions. See Phone book menu
functions
message alert tones 34
microphone, muting/unmuting 15
missed calls 31
17
17
N
network,selecting 37
O
one touch dialling
See speed dialling
own number 37
36
P
Phone book
caller groups
entering 17
selecting 17
storing a name and phone number 18
phone book 17
about 17
assigning a phone number as a speed
dial number
entering 17
erasing a name and phone number 19
printing 21
recalling a name and phone number
19
19
18
setting the type of view for stored
names and phone numbers
status 20
storing a phone number with a name
17
18
phone line
change
38
selecting 36
PIN code 51
PIN2 code 51
profiles 33
protection cap of the antenna connector
10
PUK code 51
PUK2 code 51
R
recalling a name and phone number 18
restore factory settings 39
ringing tone 34
ringing volume 34
Copyright © 2004 Nokia. All rights reserved. 65
Page 66

S
safty instructions 54
security code 51
setting request on or off 37
security level 38
selection keys 10
service number 20
signal strength 10
SIM card
installing
removing 11
speed dialling 36
storing a name and phone number 18
storing a phone number with a name (add
entry)
swapping between two calls 15
switching phone on or off 12
11
18
T
text messages
deleting
delivery reports 28, 29
reading 27
routing reply messages via your own
selecting alternative format for 28
setting validity period 28
storing phone number of message cen-
writing 27
27
centre
tre
28
29
W
warning and game tones 34
welcome note 37
V
vibrating alert 34
voice mailbox
calling
4, 9, 14
phone number of 29
voice message
listening to
voice messages
listening to
66 Copyright © 2004 Nokia. All rights reserved.
29
14
 Loading...