

Page 1

Nokia 603 User Guide
Issue 3.0
Page 2
2Contents
Contents
Safety 5
Get started 6
Keys and parts 6
Insert the SIM card 6
Insert a memory card 8
Charge your phone 10
Switch the phone on or off 11
Lock the keys and screen 12
Change the volume of a call, song, or
video 13
Nokia account 14
Copy contacts or photos from your
old phone 14
Antennas 15
Headset 15
About NFC 16
Activate NFC 17
Connect to a Bluetooth accessory
using NFC 17
Attach the wrist strap or lanyard 17
Use the user guide in your phone 18
Basic use 18
Use the toolbar 18
Touch screen actions 18
Use shortcuts 21
Switch between open applications 21
Write text 22
Icons shown on your phone 27
Set your phone to blink for missed
calls or messages 28
Search your phone and the internet 29
Prolong battery life 29
Personalisation and Nokia Store 30
Profiles 30
Change your theme 32
Home screen 33
Organise your apps 36
Nokia Store 36
Telephone 38
Call a phone number 38
Search for a contact from the dialler 39
Call a contact 39
Switch the loudspeaker on during a
call 40
Make a conference call 40
Call the numbers you use the most 41
Use your voice to call a contact 41
Make calls over the internet 42
Call the last dialled number 43
Record a phone conversation 43
Turn to silence your phone 43
View your missed calls 44
Call your voice mailbox 44
Forward calls to your voice mailbox or
another phone number 44
Prevent making or receiving calls 45
Allow calls only to certain numbers 45
Contacts 46
About Contacts 46
Save phone numbers and mail
addresses 46
Save a number from a received call or
message 46
Contact your most important people
quickly 47
Add your important contacts to the
home screen 47
Add a photo for a contact 48
Set a ringtone for a contact 48
Create a contact group 48
Send a message to a group of
people 49
Send your contact information using
My Card 49
Copy contacts from the SIM card to
your phone 49
Page 3

Contents 3
Back up your contacts to Nokia
services 49
Social networks 50
About Social 50
See your friends' status updates in
one view 50
Post your status to social networking
services 51
Link your online friends to your
contacts list 51
See your friends' status updates on
the home screen 51
Upload a photo or video to a service 51
Contact a friend from a social
networking service 52
Add an event to your phone calendar 52
Messages 53
About Messaging 53
Send a message 53
Read a received message 54
Send an audio message 55
Change the writing language 55
Mail 55
About Mail 55
About Exchange ActiveSync 55
Add a mailbox 56
Read a received mail 57
Send a mail 58
Respond to a meeting request 58
Open mail from the home screen 59
Maps 59
About Maps apps 59
Navigate to your destination 60
Find and view locations 65
Save and share places 69
Report incorrect map information 70
Internet 71
About the web browser 71
Browse the web 71
Add a bookmark 72
Subscribe to a web feed 72
Allow a website to use your location
info 72
Unreadable characters while
browsing the web 73
Access an online service using NFC 73
Camera and photos 74
About the camera 74
Change the shooting mode 74
Take photos 74
Record videos 77
Save location info to your photos and
videos 78
Send a photo or video 79
Share a photo or video directly from
the camera 79
Send a photo or other content to
another phone that supports NFC 80
Set where to save photos and videos 80
Photos 81
Entertainment 85
Music player 85
About Nokia Music 87
Record sounds 88
FM radio 88
Play a game with a friend using NFC 90
Pay with your phone 90
Videos 91
Watch Web TV 92
Stream content wirelessly 93
Clock and calendar 95
Clock 95
Calendar 97
Office 100
Quickoffice 100
Page 4

4Contents
Read PDF documents 100
Use the calculator 100
Write a note 101
Translate words 101
Open or create zip files 101
Chat with your colleagues 102
Connectivity 102
Internet connections 102
Keep track of your data traffic 103
Wi-Fi 103
VPN connections 105
Close a network connection 106
Bluetooth 106
USB data cable 109
Phone management 110
Keep your phone software and
applications up to date 110
Manage files 112
Free up phone memory 114
Manage applications 114
Synchronise content 115
Copy contacts or pictures between
phones 117
Protect your phone 117
Find more help 120
Support 120
Nokia original accessories 120
Practical rules about accessories 120
Battery 121
Product and safety information 121
Index 128
Page 5

Safety 5
Safety
Read these simple guidelines. Not following them may be dangerous or illegal. For
further info, read the complete user guide.
SWITCH OFF IN RESTRICTED AREAS
Switch the device off when mobile phone use is not allowed or when it may
cause interference or danger, for example, in aircraft, in hospitals or near
medical equipment, fuel, chemicals, or blasting areas. Obey all instructions
in restricted areas.
ROAD SAFETY COMES FIRST
Obey all local laws. Always keep your hands free to operate the vehicle while
driving. Your first consideration while driving should be road safety.
INTERFERENCE
All wireless devices may be susceptible to interference, which could affect
performance.
QUALIFIED SERVICE
Only qualified personnel may install or repair this product.
BATTERIES, CHARGERS, AND OTHER ACCESSORIES
Use only batteries, chargers, and other accessories approved by Nokia for
use with this device. Do not connect incompatible products.
KEEP YOUR DEVICE DRY
Your device is not water-resistant. Keep it dry.
PROTECT YOUR HEARING
To prevent possible hearing damage, do not listen at high volume levels for
long periods. Exercise caution when holding your device near your ear while
the loudspeaker is in use.
Page 6
6 Get started
Get started
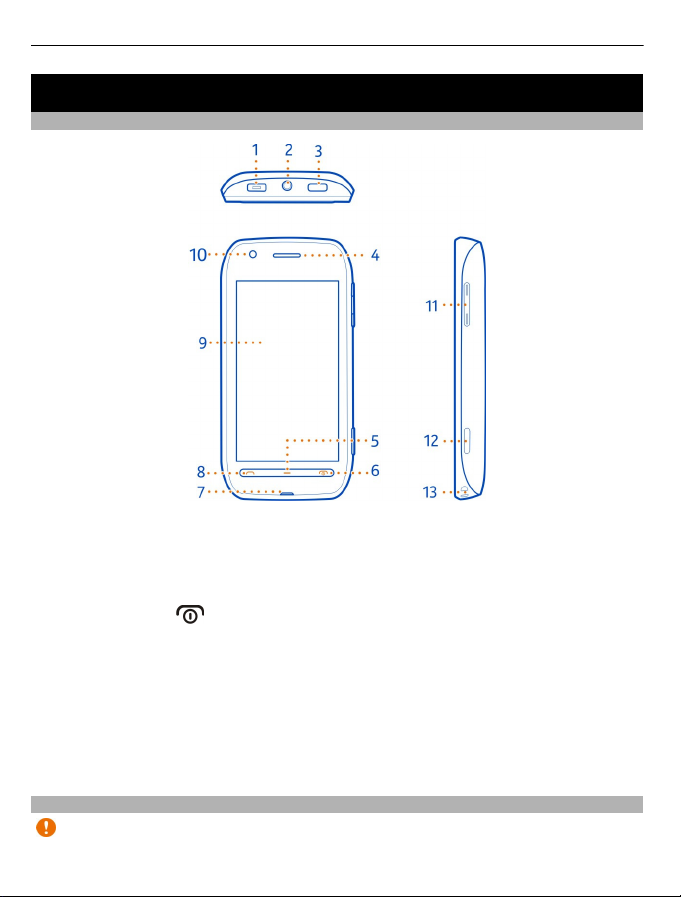
Keys and parts
1 Micro-USB/Charger connector
2 Headset connector (Nokia AV connector 3.5 mm)
3 Lock key
4 Earpiece
5 Menu key
6 End/Power key
7 Microphone
8 Call key
9 Touch screen
10 Proximity sensor. Automatically switches the touch screen off during calls.
11 Volume/Zoom keys
12 Camera key
13 Lanyard/Wrist strap hole
If there is protective tape on the camera lens, remove the tape.
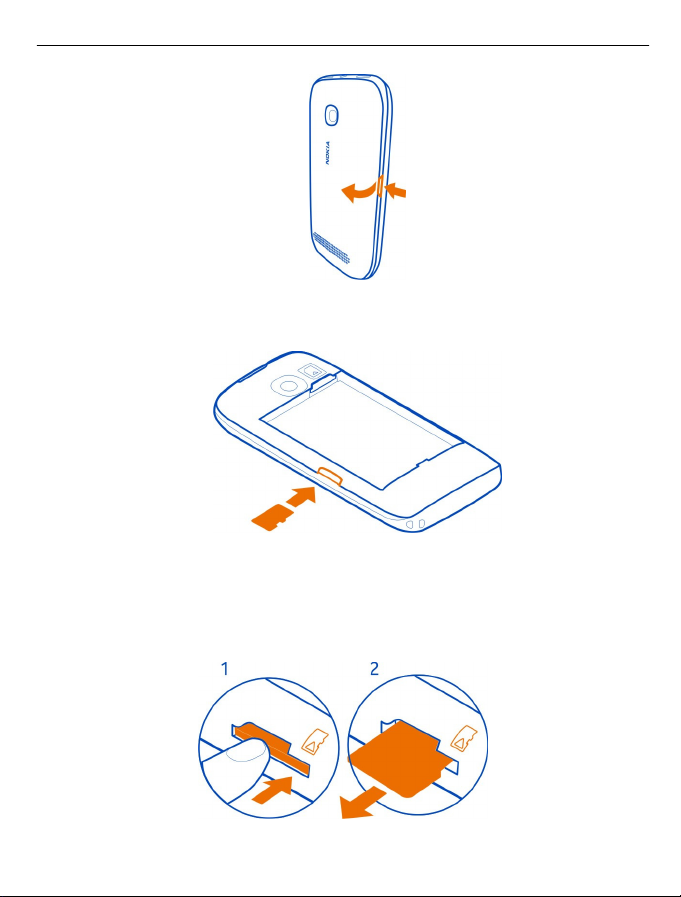
Insert the SIM card
Important: This device is designed to be used with a mini-UICC SIM card, also
known as a micro-SIM card only. A micro-SIM card is smaller than the standard SIM
Page 7
Get started 7
card. Use of incompatible SIM cards may damage the card or the device, and may
corrupt data stored on the card.
Do not attach any stickers to your SIM card.
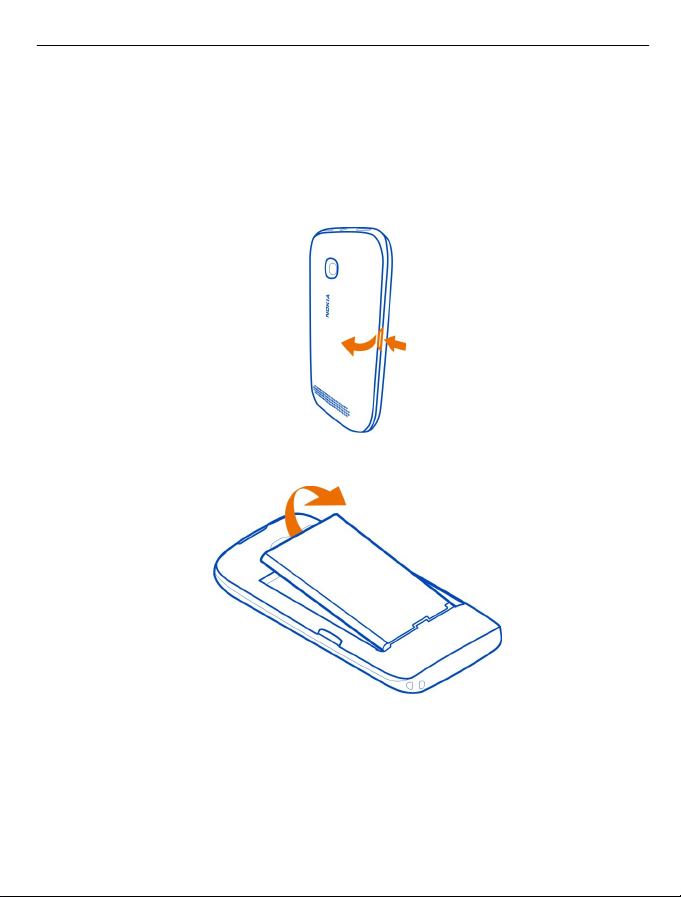
1 Make sure the phone is switched off.
2 Place your fingernail in the gap on the right edge of the back cover, and carefully
lift and remove the cover.
3 If the battery is inserted, lift it out.
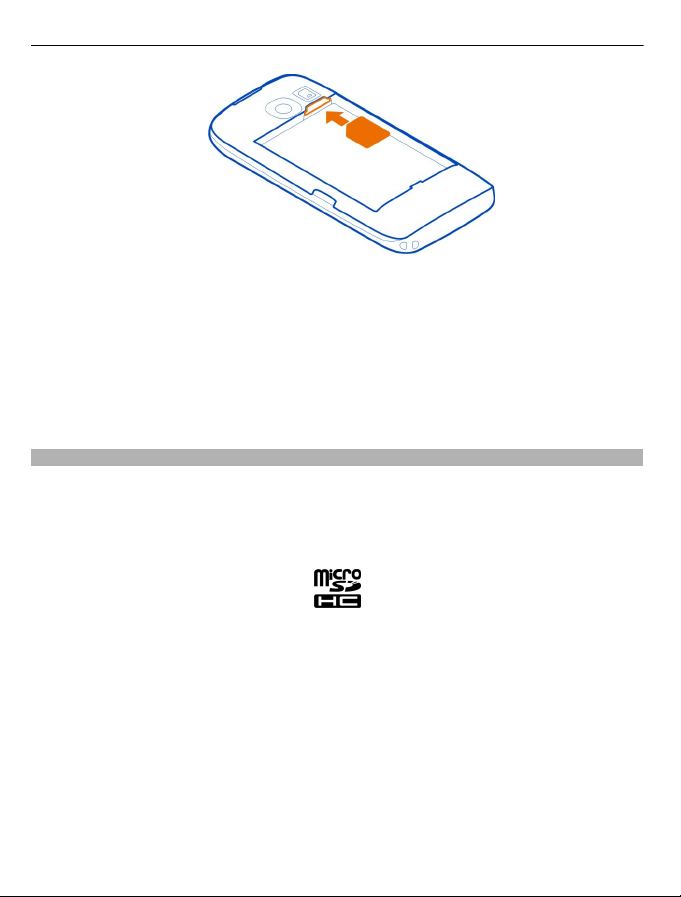
4 Make sure the contact area of the card is facing down, and insert the SIM card.
Page 8
8 Get started
5 Line up the battery contacts, insert the battery, and replace the back cover.
Remove the SIM card
1 Switch the phone off.
2 Remove the back cover.
3 Remove the battery, if inserted.
4 Place your fingernail in the slot above the SIM card, push the SIM card towards
the bottom edge of the phone, and remove the card.
Insert a memory card
Memory cards are available separately.
Use only compatible MicroSD and MicroSDHC cards approved by Nokia for use with
this device. Incompatible cards may damage the card and the device and corrupt data
stored on the card.
1 Place your fingernail in the gap on the right edge of the back cover, and lift the
cover off.
Page 9
Get started 9
2 Make sure the contact area of the memory card is facing down, and insert the
card. Push the card in, until it locks into place.
3 Replace the back cover.
Remove the memory card
1 Push the card in, until it is released.
2 Pull the card out.
Page 10
10 Get started
Important: Do not remove the memory card when an app is using it. Doing so may
damage the memory card and the device and corrupt data stored on the card.
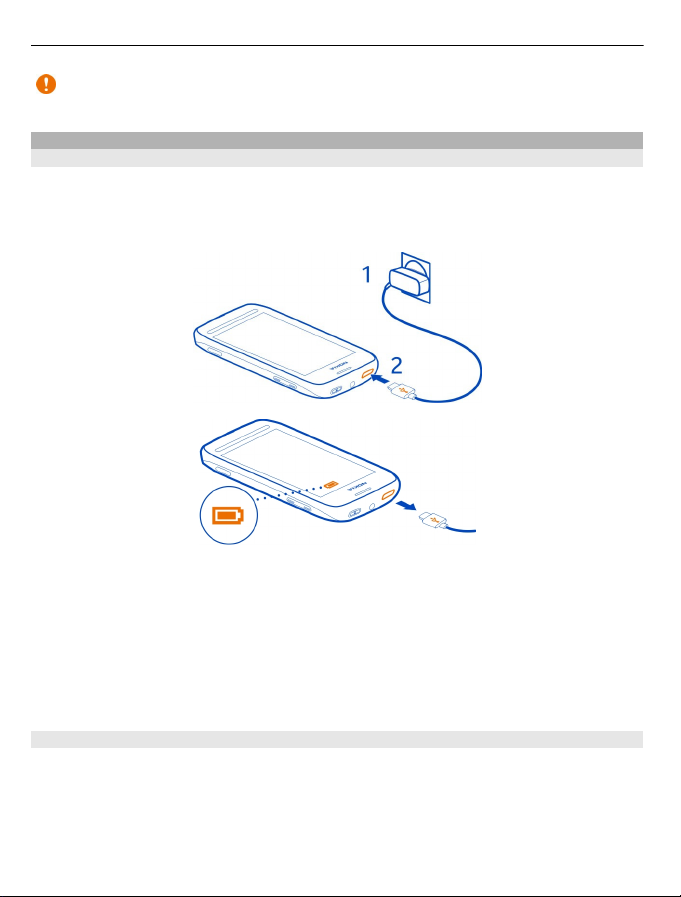
Charge your phone
Charge the battery
Your battery has been partially charged at the factory, but you may need to recharge
it before you can switch on your phone for the first time.
If the phone indicates a low charge, do the following:
Tip: If there is no wall outlet available, you can also charge over USB. Use a compatible
USB data cable to connect your phone to a compatible device, such as a computer.
You can also copy data while charging.
You do not need to charge the battery for a specific length of time, and you can use
the phone while it is charging.
If the battery is completely discharged, it may take several minutes before the
charging indicator is displayed or before any calls can be made.
Charge the battery over USB
Battery low, but you don't have a charger with you? You can use a compatible USB
cable to connect your phone to a compatible device, such as a computer.
You can use USB charging when a wall outlet is not available. Data can be transferred
while charging the device. The efficiency of USB charging power varies significantly,
and it may take a long time for charging to start and the device to start functioning.
Page 11
Get started 11
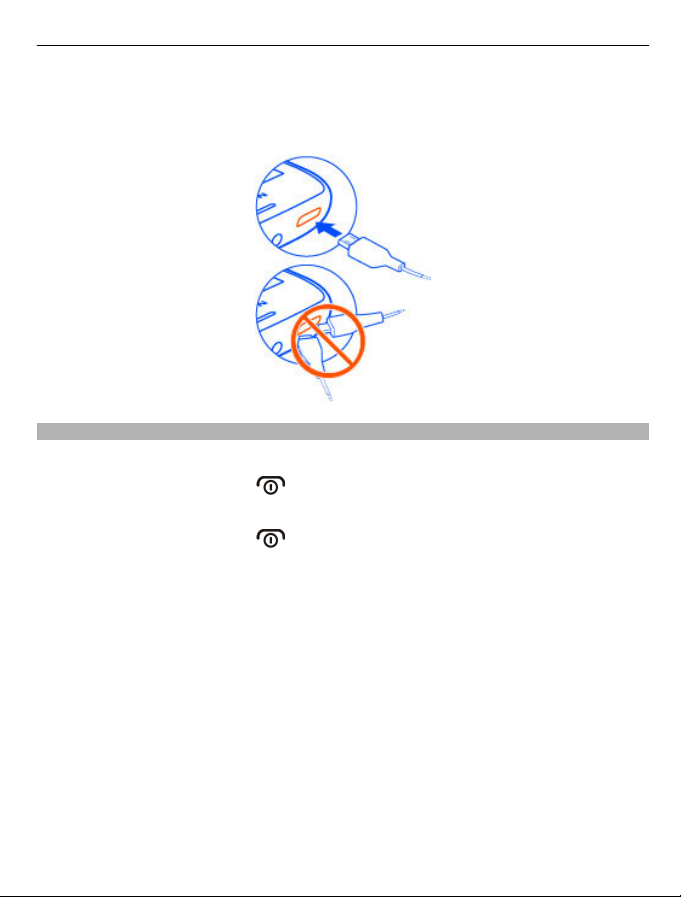
You can use your phone while it's charging.
To avoid breaking the charger connector, be careful when connecting or
disconnecting the charger cable.
Switch the phone on or off
Switch on
Press and hold the power key
until the phone vibrates.
Switch off
Press and hold the power key
.
Page 12
12 Get started
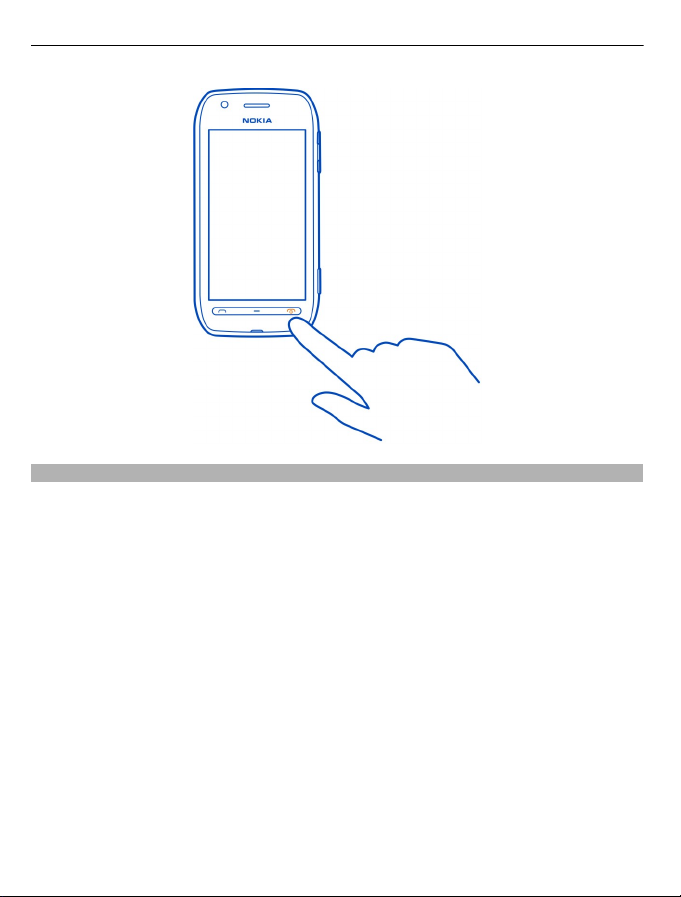
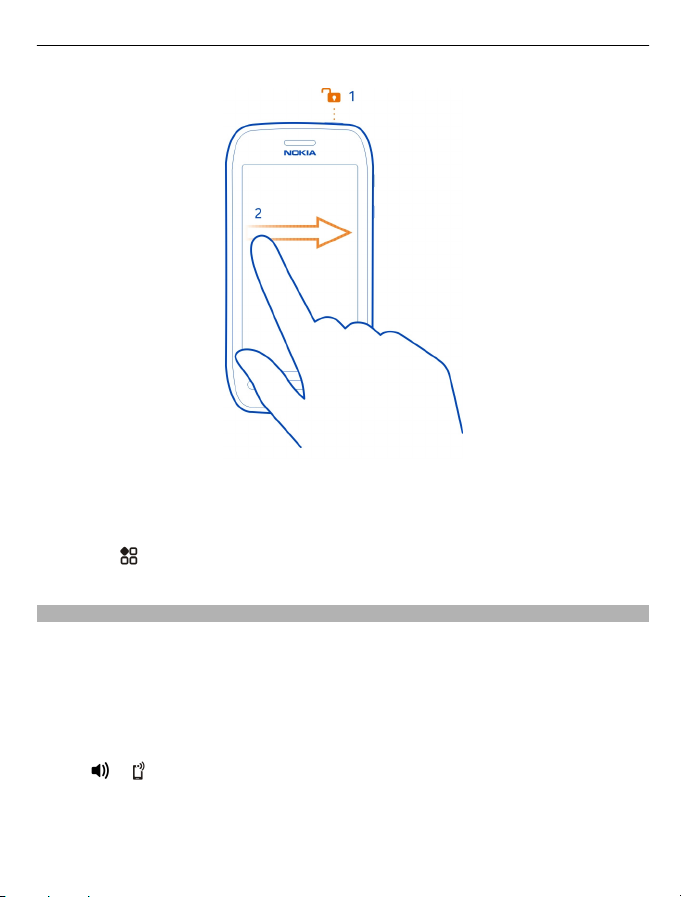
Lock the keys and screen
To avoid accidentally making a call when your phone is in your pocket or bag, lock the
keys and screen of your phone.
Press the lock key.
Unlock the keys and screen
Press the lock key, then drag the lock screen left or right. If the lock key is out of
reach, press the menu key instead.
Page 13
Get started 13
When you're not using your phone, the keys and screen lock automatically after a
while. You can set the length of the delay.
Set how long before the keys and screen lock
1 Select
> Settings and Phone > Display > Screen/keylock time-out.
2 Set the length of time after which the keys and screen are locked automatically.
Change the volume of a call, song, or video
Use the volume keys.
You can change the volume during a call or when an app is active.
The built-in loudspeaker lets you speak and listen from a short distance without
having to hold the phone to your ear.
Switch the loudspeaker on or off during a call
Select
or .
Page 14

14 Get started
Nokia account
When you switch your phone on for the first time, your phone guides you through
creating a Nokia account.
You can:
• Access all Nokia services with a single username and password, both on your
phone and a compatible computer
• Download content from Nokia services
• Save details about your phone model and contact information. You can also add
your payment card details.
• Save your important walking and driving routes to Nokia Maps
To learn more about the Nokia account and Nokia services, go to www.nokia.com/
support.
To create a Nokia account later, go to account.nokia.com.
Copy contacts or photos from your old phone
Want to copy important info from your previous Nokia phone and start using your
new phone quickly? Use the Phone switch app to copy, for example, your contacts,
calendar entries, and photos to your new phone, free of charge.
Your previous phone needs to support Bluetooth.
1Select > Settings > Connectivity > Data transfer > Phone switch.
2 Select your old phone from the list, then pair the phones. Bluetooth needs to be
on in both phones.
3 If the other phone requires a passcode, type in the passcode in both phones.
The passcode is for the current connection only, and you can define it yourself.
The passcode in some phones is fixed. For details, see the user guide of the other
phone.
4 Select what you want to copy, then select OK.
Page 15
Get started 15
If your old Nokia phone doesn't have the Phone switch app, your new phone sends it
in a message using Bluetooth. To install the app, open the message in your old phone,
then follow the instructions shown on the phone.
Tip: You can also use the Phone switch app to copy content from other phones later.
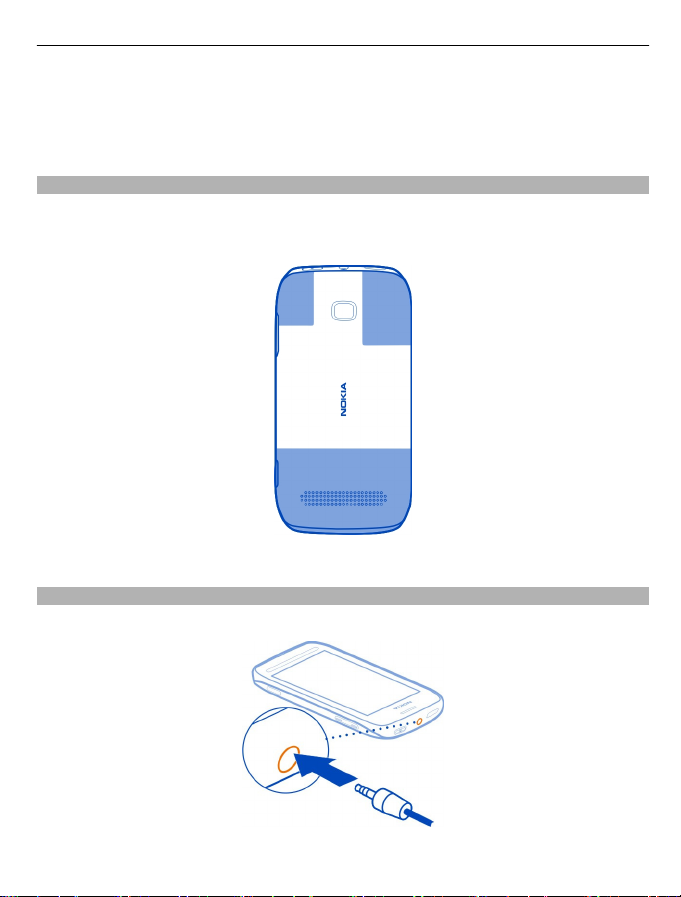
Antennas
Avoid touching the antenna area while the antenna is in use. Contact with antennas
affects the communication quality and may reduce battery life due to higher power
level during operation.
The antenna area is highlighted.
Headset
You can connect a compatible headset or compatible headphones to your phone.
Page 16
16 Get started
Do not connect products that create an output signal, as this may damage the device.
Do not connect any voltage source to the Nokia AV connector. If you connect an
external device or headset, other than those approved by Nokia for use with this
device, to the Nokia AV connector, pay special attention to volume levels.
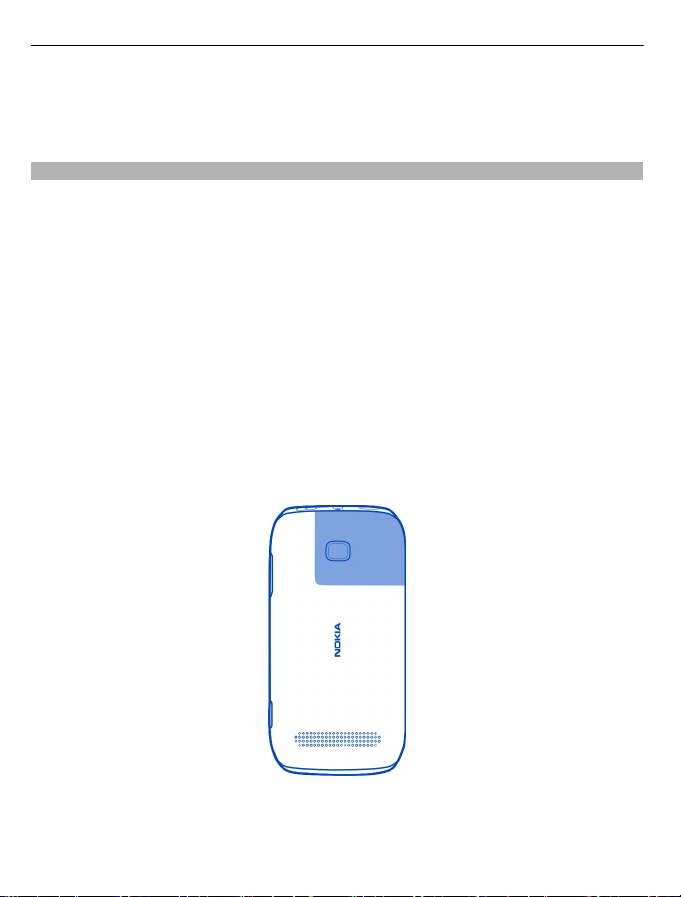
About NFC
Near Field Communication (NFC) makes connecting and sharing easy and fun. Nokia
phones and accessories that support NFC are connected wirelessly when you touch
them together.
With NFC, you can:
• Share the content you've created between two compatible phones that support
NFC.
• Connect to compatible Bluetooth accessories that support NFC, such as a
headset or a wireless loudspeaker.
• Pay with your phone, if supported by your network service provider.
• Touch tags to get more content for your phone or to access online services.
• Play multi-player games against other owners of compatible phones that support
NFC.
The NFC area is on the back of your phone, around the camera. Touch other phones,
accessories, or readers with the NFC area.
You can use NFC when the phone screen is on. You may be able to pay or use your
phone as a ticket even when your phone is locked, depending on your service provider.
For more info, watch the NFC tutorial videos on your phone.
Page 17
Get started 17
Tip: You can download more content supported by NFC from Nokia Store.
Activate NFC
Select
> Settings and Connectivity > NFC > NFC > On.
Connect to a Bluetooth accessory using NFC
Touch the NFC area of the accessory with the NFC area of your phone, and select
Yes.
Disconnect the accessory
Touch the NFC area of the accessory again.
For more information, see the user guide of the accessory.
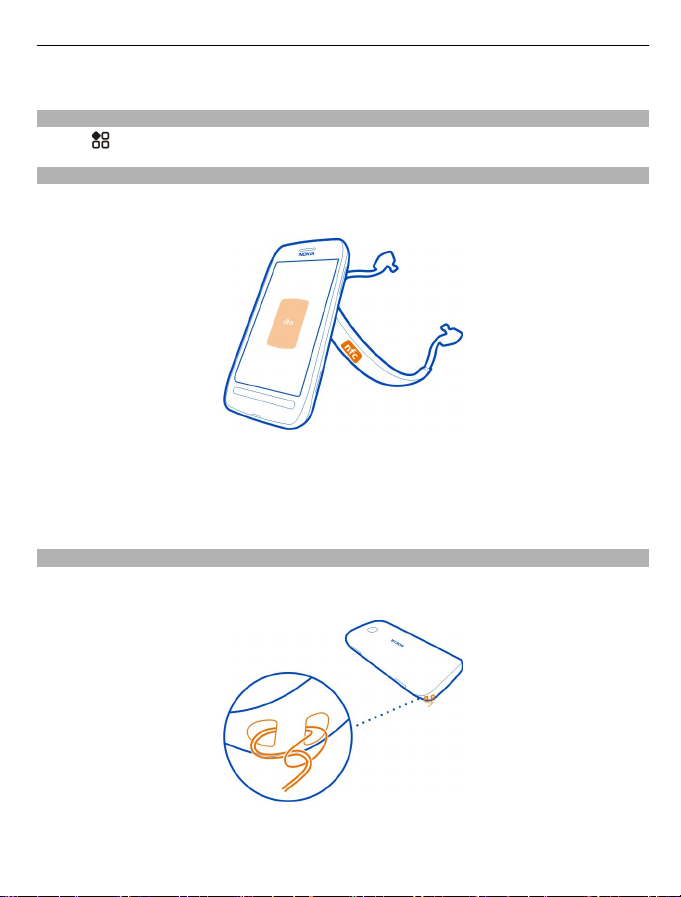
Attach the wrist strap or lanyard
Thread the strap or lanyard through one hole and back out from the other, thread
the strap or lanyard through the loop, and pull to tighten.
Page 18
18 Basic use
Use the user guide in your phone
Your phone has a built-in user guide. It's always with you, available when needed.
Select
Search the user guide
When the user guide is open, select
search field.
Open an application from the user guide
Select the application link in a topic.
To switch back to the user guide, press and hold the menu key, swipe left or right,
then select the user guide.
Links to related topics may be at the end of instructions.
Tip: You also receive text messages and pop-up tips that give useful information
about using your phone. To view the tips later, select
> User guide.
> Search, then write a letter or a word in the
> Tips and Offers.
Basic use
Use the toolbar
The toolbar at the bottom of the display helps you browse your phone easily.
Open the main menu.
Make a call.
Return to the previous view.
Search for applications.
Open the options menu.
Touch screen actions
To use your phone, tap or tap and hold the touch screen.
Important: Avoid scratching the touch screen. Never use an actual pen, pencil, or
other sharp object on the touch screen.
Open an app or item
Tap the app or item.
Tap and hold to see more options
Place your finger on an item until the menu opens.
Page 19

Basic use 19
Example: To send a contact card or delete an alarm, tap and hold the contact or alarm,
then select the option you want.
Drag an item
Tap and hold the item, then slide your finger across the screen.
Example: You can drag items on the home screen, or when arranging the main menu.
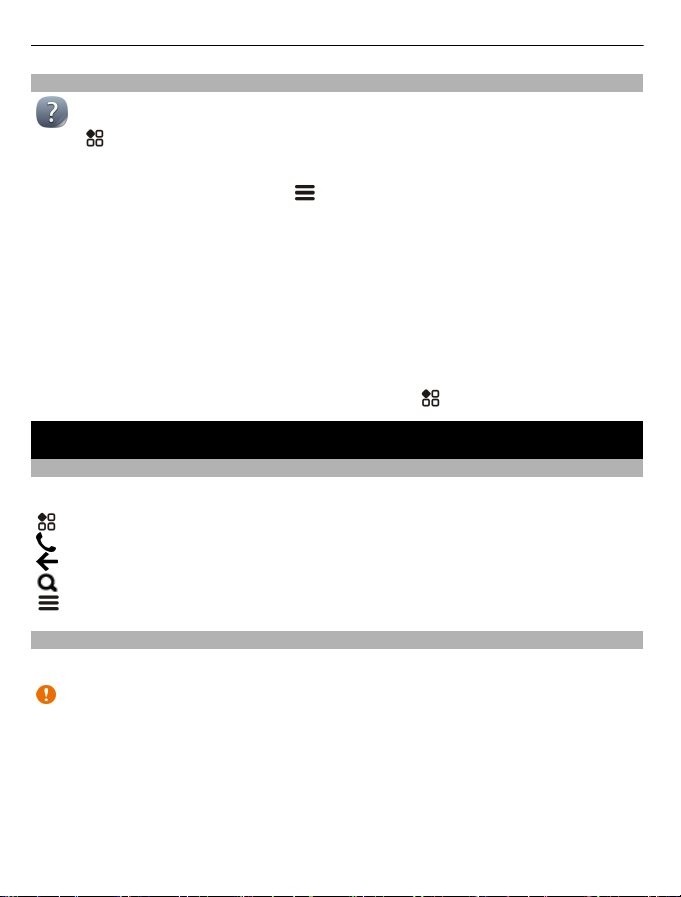
Swipe
Place your finger on the screen, then slide it in the direction you want.
Page 20
20 Basic use
Example: To switch to another home screen, swipe left or right.
To quickly scroll through a long list or menu, slide your finger quickly up or down the
screen, then lift your finger. To stop the scrolling, tap the screen.
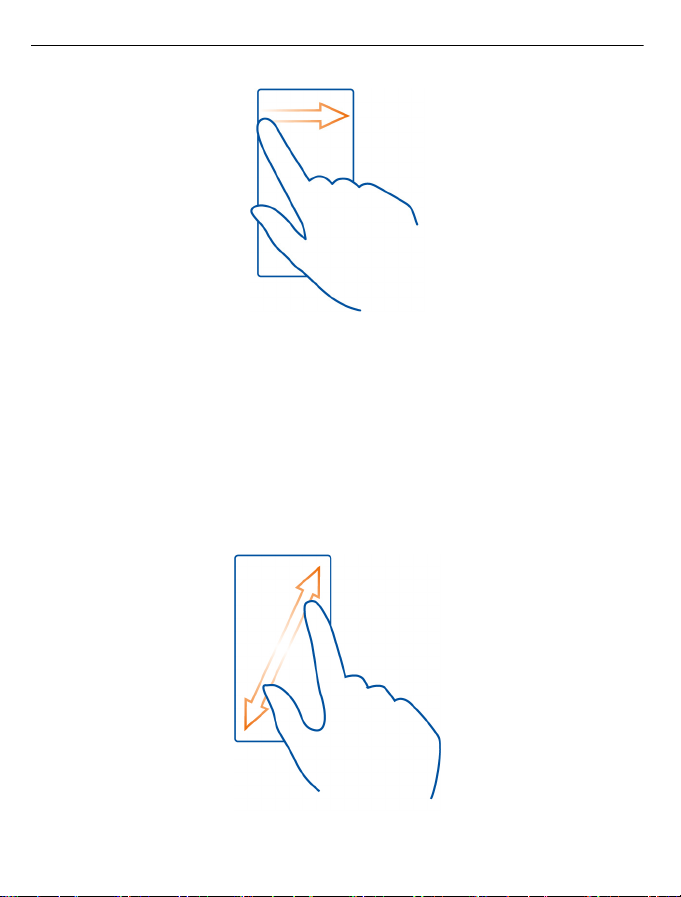
Zoom in or out
Place two fingers on an item, such as a map, photo, or web page, then slide your
fingers apart or together.
Tip: You can also tap the item twice.
Page 21

Basic use 21
Use shortcuts
You don't have to navigate long paths to, for example, open or close an internet
connection, or to silence your phone. You can access these settings directly in the
status menu, no matter what application or view you're in.
Swipe down from the notification area.
In the status menu, you can do the following:
• View notifications of missed calls or unread messages
• Silence your phone
• Modify the connectivity settings
• View available Wi-Fi connections, and connect to a Wi-Fi network
• Manage Bluetooth connections
Tip: When listening to music, you can quickly access the music player from the status
area.
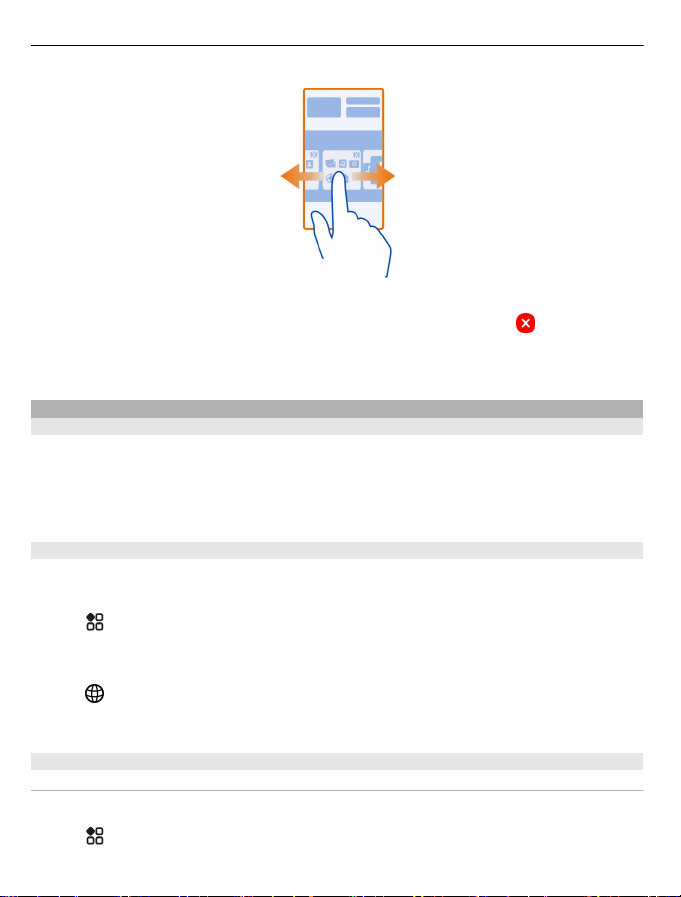
Switch between open applications
You can see which applications and tasks are open in the background, and switch
between them.
Press and hold the menu key, swipe left or right, and select the desired application.
Page 22
22 Basic use
Applications running in the background increase the demand on battery power and
use memory. To close an application that you are not using, select
Tip: To close all open applications, select and hold the task switcher, and from the
pop-up menu, select Close all.
Write text
The on-screen keyboard and keypad
You can write using the on-screen keyboard or on-screen keypad.
Some options can vary depending on whether you use the keyboard or keypad,
whether you hold the phone in landscape or portrait mode, or the language you want
to write in.
Add a writing language
Need to write in another language? You can easily switch between several writing
languages.
Select
language.
Switch between languages when writing
Select
shown when more than one writing language has been selected.
> Settings and Phone > Language > Writing language, and select the
repeatedly, until the language you want is shown. The language key is only
.
Write with the on-screen keyboard
Switch the keyboard on
You can use the on-screen keyboard both in landscape and portrait mode.
Select
language and Qwerty.
> Settings and Phone > Language > Writing language, and select the
Page 23
Basic use 23
The on-screen keyboard in portrait mode may not be available in all writin g languages.
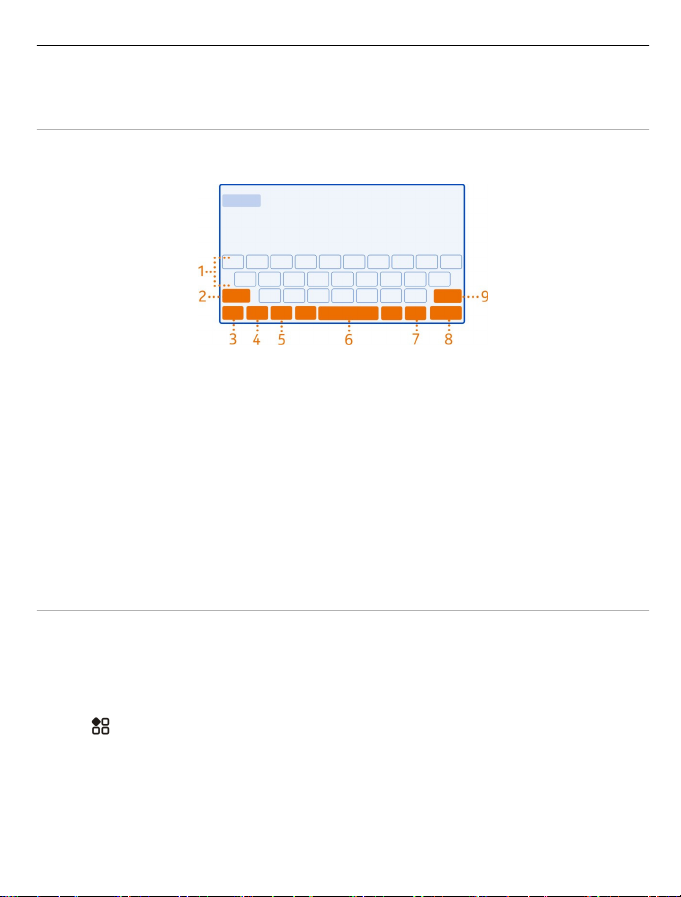
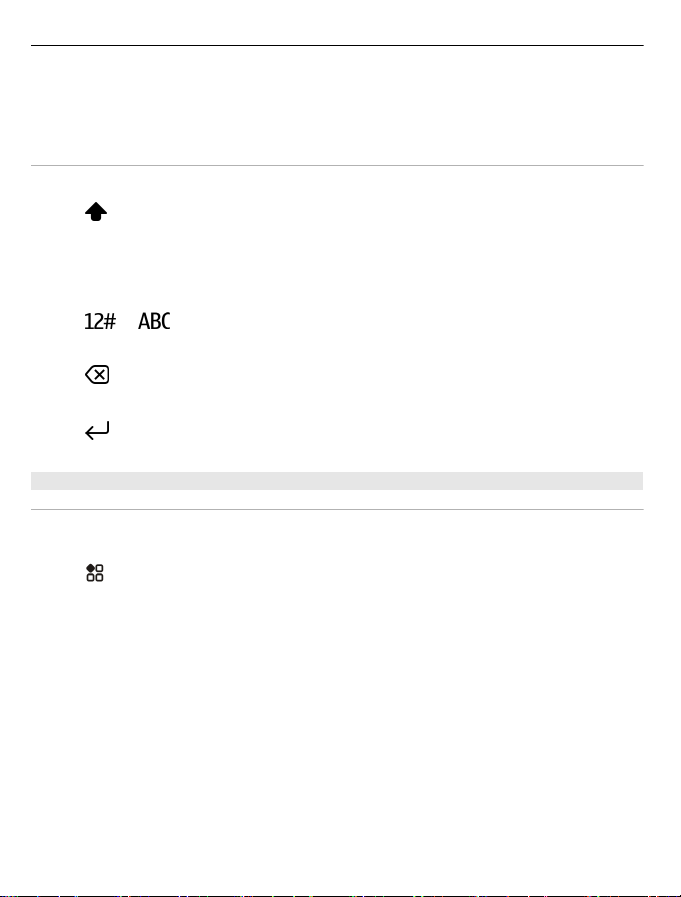
Keys on the keyboard
The layout of the keyboard may vary, depending on the writing language, input mode,
and character range you use.
1 Keyboard
2 Shift and caps lock key - Change the character case. To switch to caps lock mode,
select the key twice. In some languages, this key opens a new set of characters.
3 Close key - Close the keyboard.
4 Character/number mode key - Type in special characters or numbers.
5 Language key - Switch between writing languages. Only shown when more than
one language has been selected.
6 Space key
7 Smiley key
8 Enter key - Move the cursor to the next row. Additional uses are based on context.
For example, in the web browser, it can act as the Go icon.
9 Backspace key - Delete a character.
Use predictive text with the keyboard
To speed up your writing, your phone can guess what you are starting to write.
Predictive text is based on a built-in dictionary to which you can add new words. This
feature is not available for all languages.
Switch predictive text on or off
Select
language and Word suggestion.
> Settings and Phone > Language > Writing language, and select a
Use predictive text when writing
1 Start writing a word.
2 Your phone suggests possible words as you write. When the correct word is
shown, select the word.
Page 24
24 Basic use
Add a new word to the dictionary
Select the word you have written in the candidate bar.
Write using the keyboard
Switch between character cases
Select
Add an accent to a character
Select and hold the character, then select the character from the pop-up.
Switch between number and letter mode
Select
Delete a character
Select
Move the cursor to the next row
Select
Write with the on-screen keypad
Switch the keypad on
If you prefer to use the number keypad when writing in portrait mode, you can switch
from the on-screen keyboard to the on-screen keypad.
Select
language and Phone keypad.
.
or .
.
.
> Settings and Phone > Language > Writing language, then select the
Page 25
Basic use 25
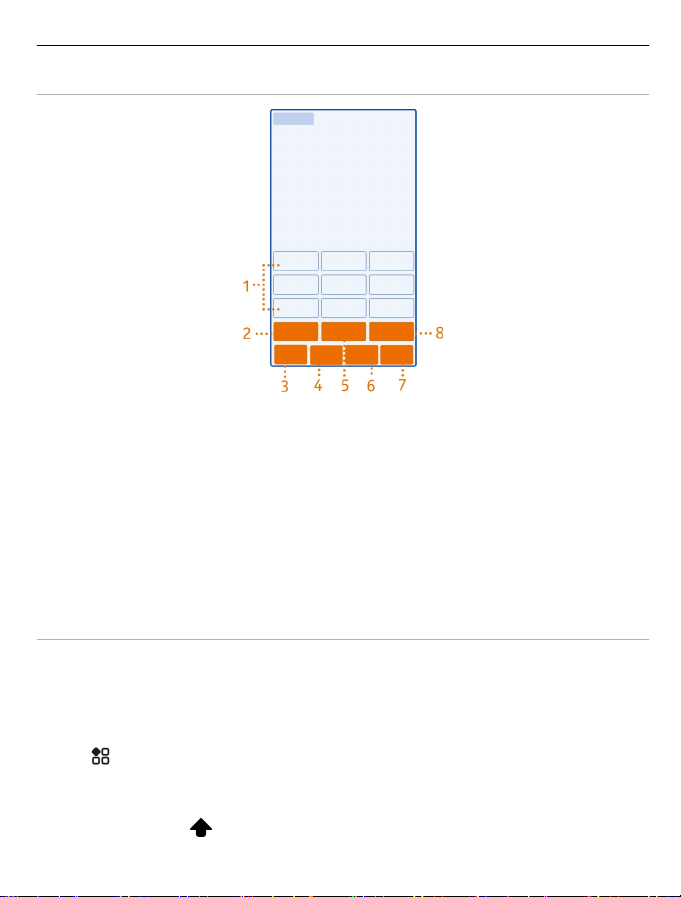
Keys on the keypad
1 Character keys
2 Character/number mode key - Type in special characters or numbers.
3 Close key - Close the keypad.
4 Language key - Switch between writing languages. Only shown when more than
one language has been selected.
5 Space/enter key – Type in a space or move the cursor to the next row. Additional
uses are based on context. For example, in the web browser, it can act as the Go
icon.
6 Smiley key
7 Backspace key - Delete a character.
8 Shift key - Change the character case. This may not be available in all languages.
Use predictive text with the keypad
To speed up your writing, your phone can guess what you are starting to write.
Predictive text is based on a built-in dictionary to which you can add new words. This
feature is not available for all languages.
Switch predictive text on
Select
language and Word suggestion.
Switch predictive text off
When writing, select
> Settings and Phone > Language > Writing language, and select a
twice.
Page 26
26 Basic use
Use predictive text when writing
1 Start writing a word.
2 Your phone suggests possible words as you write. When the correct word is
shown, select the word.
Add a new word to the dictionary
Select the word you have written in the candidate bar.
Use traditional text with the keypad
Type in a character
1 Select a character key repeatedly until the character is shown. There are more
characters available than are shown on the key.
2 If the next letter is on the same key, wait until the cursor is shown, then select
the key again.
Switch between number and letter mode
Select
Switch between character cases
Select
Type in a space
Select
Delete a character
Select
Move the cursor to the next row
Select
or .
.
.
.
.
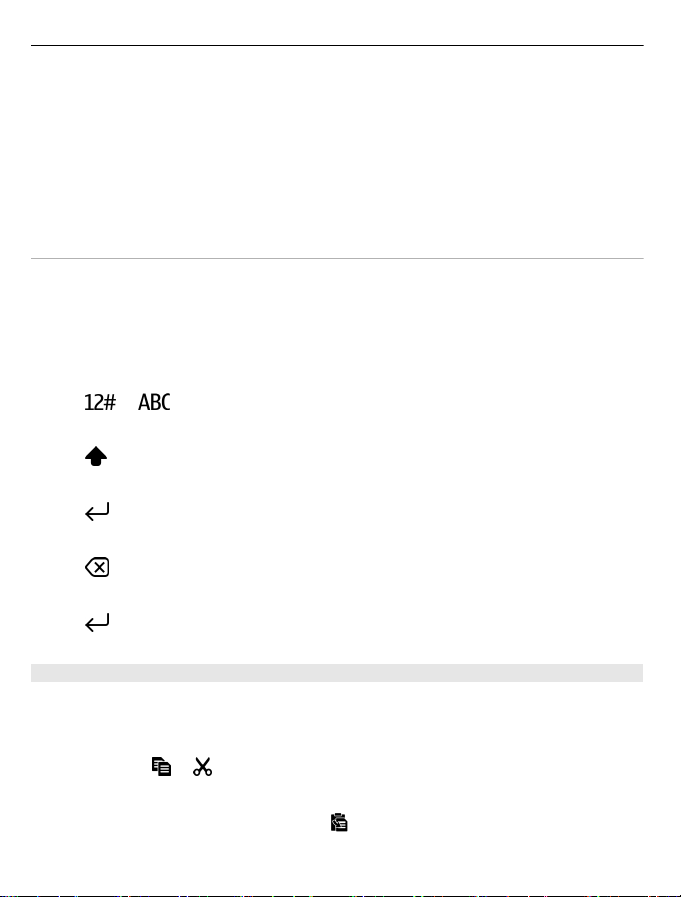
Copy or paste text
Want to edit your text more quickly? Copy, cut, and paste to rearrange text easily.
Copy or cut text
Select and hold a word, drag the cursor to highlight the section you want to copy or
cut, then select
Paste text
Select and hold the text box, then select
or .
.
Page 27

Icons shown on your phone
General icons
The touch screen and keys are locked.
Someone has tried to call you.
You have unread messages.
If the message icon is blinking, your Inbox folder may be full.
You have a missed calendar event.
An alarm is set.
Messages are waiting to be sent in the Outbox folder.
You're using your second phone line.
Incoming calls are forwarded to another number. If you have two phone lines,
a number indicates the active line.
Your phone is ready for an internet call.
A data call is active.
Bluetooth and USB icons
Basic use 27
Bluetooth is on.
If the icon is blinking, your phone is trying to connect to another device.
Your phone is sending data over Bluetooth.
A USB cable is connected to your phone.
The phone is syncing.
Page 28
28 Basic use
A compatible headset is connected to your phone.
A compatible car kit is connected to your phone.
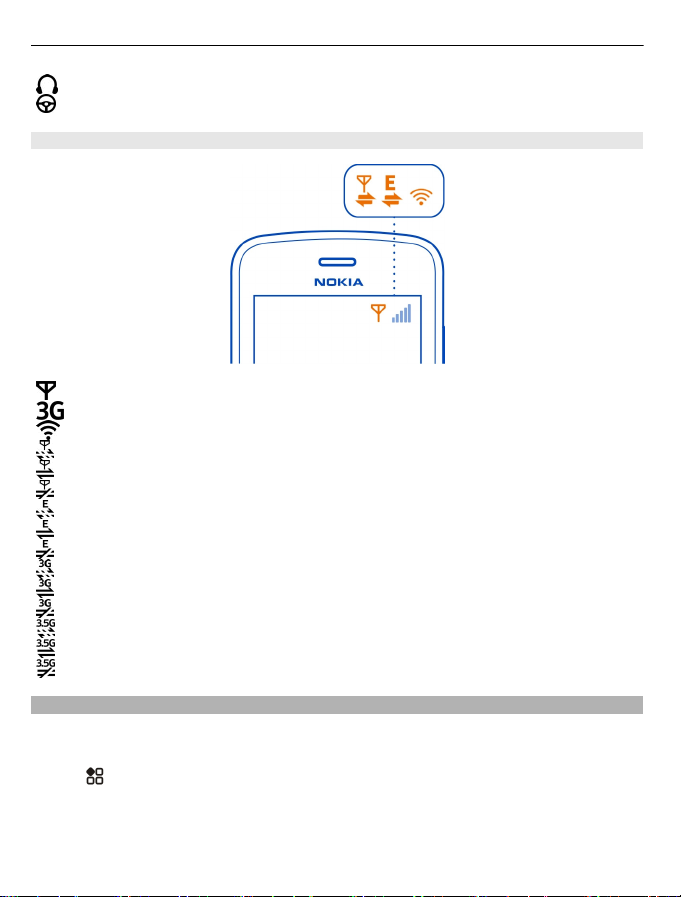
Network icons
Your phone is connected to a GSM network.
Your phone is connected to a 3G network.
A Wi-Fi connection is open.
A GPRS data connection is opening or closing.
A GPRS data connection is open.
A GPRS data connection is on hold.
An EGPRS data connection is opening or closing.
An EGPRS data connection is open.
An EGPRS data connection is on hold.
A 3G data connection is opening or closing.
A 3G data connection is open.
A 3G data connection is on hold.
An HSPA connection is opening or closing.
An HSPA data connection is open.
An HSPA connection is on hold.
Set your phone to blink for missed calls or messages
When the phone notification light blinks, you have missed a call or a message has
arrived.
Select
> Settings and Phone > Notification lights > Notification light.
Page 29
Basic use 29
Search your phone and the internet
Explore your phone and the internet. You can search for mail, contacts, photos,
music, or apps stored on your phone and on the internet.
Select
1 Start writing a search word, then select from the proposed matches.
2 To search on the internet, select the internet search link at the end of the search
Tip: You can add a search widget to the home screen. Tap and hold an empty area of
the home screen, then select Add widget and the search widget from the list.
Prolong battery life
If it seems you're always looking for a charger, there are steps you can take to reduce
the power consumption of your phone.
• Always charge the battery fully.
• When power saving mode is on, phone settings, such as Network mode and the
Switch power saving mode on
Press the power key
mode off, press the power key
Close the apps you are not using
Press and hold the menu key, swipe until the app you want to close is shown, then
select
> Search.
results. You need an active internet connection.
screen saver, are optimised.
, then select Turn power saving on. To switch power saving
, then select Turn power saving off.
.
Sounds, themes, and effects
• Mute unnecessary tones, such as key tones.
• Use wired headphones, rather than the loudspeaker.
• Change the length of the time-out period after which the phone screen switches
off.
Set the length of the time-out period
Select
Switch to a dark theme and wallpaper
Select
> Settings and Phone > Display > Light time-out.
> Settings and Themes > General.
Page 30
30 Personalisation and Nokia Store
To change the wallpaper, on the home screen, select > Change wallpaper.
Lower the brightness of the screen
Select
Switch the Big clock screen saver off
Select
Network use
• If you are listening to music or otherwise using your phone, but do not want to
• Set your phone to check for new mail less frequently.
• Use a Wi-Fi connection to connect to the internet, rather than a mobile data (GPRS
• If your phone is set to use both GSM and 3G networks (dual mode), the phone
Set your phone to use only the GSM network
Swipe down from the notification area, then select the mobile network and Network
mode > GSM.
Switch Bluetooth off when not needed
Swipe down from the notification area, then select
Stop your phone scanning for available Wi-Fi networks
Swipe down from the notification area, then select
Open a mobile data (3G or GPRS) connection only when needed
To close the mobile data connection, swipe down from the notification area, then
select
> Settings and Phone > Display > Brightness.
> Settings and Themes > Screen saver > None.
make or receive calls, switch to the offline profile.
or 3G) connection.
uses more power when searching for the 3G network.
.
.
.
Personalisation and Nokia Store
Profiles
About profiles
Select > Settings > Profiles.
Waiting for a call but can't let your phone ring? Your phone has various settings groups
called profiles, which you can personalise for different events and environments. You
can also create your own profiles.
Page 31

Personalisation and Nokia Store 31
You can personalise the profiles in the following ways:
• Change the ringtone and message alert tones.
• Change the volume of the ringtone and key tones.
• Mute key tones and notification tones.
• Activate vibration alerts.
• Set the phone to say the name of the contact who is calling.
Tip: Want quick access to the profiles? Add a profile widget to the home screen.
Personalise your ringtone and other tones
You can personalise your phone tones for each profile.
Select
Select the profile, Personalise, and the desired option.
Tip: To download more ringtones from Nokia Store, select Download sounds. For
more information, go to www.nokia.com/support.
Tip: To set your favourite song from the music player as your ringtone, select
Songs.
Silence your phone
When the silent profile is switched on, all ringtones and alert tones are muted. Switch
to this profile when you are, for example, at the cinema or in a meeting.
Swipe down from the notification area, then select Silent.
Change your profile for meetings
Set your phone to discreetly beep once instead of ringing, when you're in a meeting.
1 Select
2 Select Meeting > Activate.
Tip: Want quick access to the profiles? Add a profile widget to the home screen.
> Settings > Profiles.
> Settings > Profiles.
Set a timed profile
You can activate a profile until a set time, after which the previously used profile is
activated.
Select
1 Select the desired profile, and select Timed.
> Settings > Profiles.
Page 32

32 Personalisation and Nokia Store
2 Set the time that you want the timed profile to expire at.
Use your phone offline
In places where you do not want to make or receive calls, you may still access your
music, videos, and offline games if you switch to the offline profile.
Press the power key
When the offline profile is switched on, your connection to the mobile network is
closed. All radio frequency signals between the phone and the mobile network are
prevented. If you try to send a message, it is placed in the Outbox folder, and is sent
only when you switch to another profile.
You can also use your phone without a SIM. Switch the phone off, and remove the
SIM. When you switch back on, the offline profile is switched on.
Important: In the offline profile you cannot make or receive any calls, or use other
features that require cellular network coverage. You may be able to call the official
emergency number programmed into your device.To make calls, you must first
change to another profile.
When the offline profile is switched on, you can still connect to a Wi-Fi network to, for
example, read your mail or browse the internet. You can also use Bluetooth.
If NFC is switched on, it is on also in the offline profile. To switch NFC off, select
Settings and Connectivity > NFC, then switch NFC to Off.
Switch the phone off when mobile phone use is not allowed or when it may cause
interference or danger. Remember to comply with any applicable safety
requirements.
Create a new profile
How can you make your phone meet your needs at work or college or home? You can
create new profiles for different situations, and give them appropriate names.
Select
Select
Tip: You can set a ringtone specifically for your profile. Select Ringtone.
> Settings > Profiles.
> Create new, and define your profile settings.
, then select Turn offline mode on.
>
Change your theme
Themes can freshen up your phone – change the look and colour scheme.
1Select
> Settings > Themes.
Page 33

Personalisation and Nokia Store 33
2 Select General and a theme.
Tip: To download more themes from Nokia Store, select Download themes. To learn
more about Nokia Store, go to www.nokia.com/support.
Home screen
About the home screen
On the home screen, you can:
• See notifications or indicators of missed calls and received messages
• Open your favourite apps
• Control apps, such as the music player
• Add shortcuts for different features, such as writing a message
• View your favourite contacts, and quickly call or send messages to them
You can have more than one home screen – try separating your work and private life
onto their own home screens.
Your home screen is interactive. To quickly check your calendar, select the date. To
set an alarm, select the clock.
Personalise the home screen
Want to see your favourite landscape or pictures of your family in the background of
the home screen? You can change the wallpaper, and rearrange items on each home
screen individually, to personalise them to your liking.
Change the wallpaper
Tap and hold an empty area on the home screen, and select Change wallpaper.
Tip: Download more background images from Nokia Store. For more information, go
to www.nokia.com/support.
Rearrange items on the home screen
Tap and hold an item, and drag it to a new location.
Page 34

34 Personalisation and Nokia Store
Tip: You can drag and drop items between different home screens.
Add a new home screen
Select
> Add another home screen.
Add a widget to the home screen
Interested in today's weather or what's currently in the news? You can add miniapplications (widgets) to your home screen, and see your most relevant information
at a glance.
Tap and hold an empty area on the home screen, and from the pop-up menu, select
Add widget and a widget.
A widget can enhance the related application, and may also change the way the
application works.
Tip: You can download more widgets from Nokia Store.
Using services or downloading content may cause transfer of large amounts of data,
which may result in data traffic costs.
Some home screen widgets may connect to the internet automatically. To prevent
this, close the mobile data connection. Swipe down from the notification area, and
select
.
Remove a widget from the home screen
Select and hold the widget, and select
.
Page 35

Personalisation and Nokia Store 35
Add a shortcut to the home screen
Did you know that you can create shortcuts to your most used applications and
features? You can add shortcuts to applications or actions, such as writing a message.
Tap and hold an empty area on the home screen, and from the pop-up menu, select
Add shortcut and the application or action.
Switch between home screens
You can have more than one home screen. For example, create separate home
screens for work and private life, and personalise them to have different content.
To switch to another home screen, swipe left or right.
indicates your current home screen.
Add your important contacts to the home screen
Add your most important contacts to the home screen, so you can quickly call or send
messages to them.
Select
Select a contact that is stored in your phone memory and
screen.
Call a contact
On the home screen, select the contact, and press the call key. If the contact has
more than one number, select the desired number.
Send a message to a contact
On the home screen, select the contact and Message.
Remove a contact from the home screen
On the home screen, select and hold the contact, and select
> Contacts.
> Add to Home
.
Page 36

36 Personalisation and Nokia Store
The contact is removed from the home screen, but remains in your contacts list.
Organise your apps
Want to find your most used apps more quickly? In the main menu, you can organise
your apps into folders, hiding your least used apps.
Select
Create a new folder
Select
Move an app to a folder
Select and hold the app, then select Move to folder and the new folder.
Tip: To drag and drop apps and folders, in the menu, tap and hold the screen, then
select Arrange.
Nokia Store
About Nokia Store
Did you know that you can personalise your phone with more apps? Or download
games, also free of charge? Browse the Nokia Store to find the latest content that is
designed specifically for your phone.
You can download:
• Games
• Apps
• Videos
• Themes and wallpapers
• Ringtones
You can also get content that is relevant to your tastes and location.
To download from Nokia Store, you need a Nokia account.
When you sign in, you are offered content compatible with your phone.
You can search for and download content directly on your phone, or browse Nokia
Store on your comp atib le co mput er an d send l inks to cont ent t o you r pho ne as a tex t
message.
.
> New folder.
Select > Store, then sign in to your Nokia account.
Page 37

Personalisation and Nokia Store 37
Some items are free of charge; others you need to pay for with your credit card or on
your phone bill.
The availability of payment methods depends on your country of residence and your
network service provider.
To learn more about Nokia Store, go to www.nokia.com/support.
Search Nokia Store
Check out the latest and most downloaded apps or games, and items recommended
for you and your phone. You can browse the different categories, or search for a
specific item.
1 Select
2 Select
3 Write search words in the search field, then select
When you view an item, related items are also shown.
Tip: To see what others have to say about an item, take a look at the reviews. You can
also see a description, the price, and the size of the download.
Download a game, app, or other item
Download free games, apps, or videos, or buy more content to your phone. From
Nokia Store, you can find content designed specifically for your phone.
1 Select
2 Select the item.
3 If the item has a price, select Buy. If the item is free, select Download.
4 You can pay with a credit card, or, if available, on your phone bill.
To save your card details to your Nokia account, select Add.
5 Select Pay.
6 To confirm, type in your Nokia account username and password, then select
Continue to start downloading.
When the download is complete, you can open or view the item. You can continue
browsing for more content while downloading.
The content type determines where the item is stored in your phone. To change the
default location, select
items.
Tip: Use a Wi-Fi connection to download larger files, such as games, apps, or videos.
> Store, then sign in to your Nokia account.
.
.
> Store, then sign in to your Nokia account.
> Installation preferences and where you want to store
Page 38

38 Telephone
Tip: To avoid typing in your payment card details over and over when buying items
from Nokia Store, save your details to your Nokia account. You can add more than
one payment card, and choose which one to use when buying.
The availability of payment methods depends on your country of residence and your
network service provider.
For more info on an item, contact the publisher of the item.
View your downloads
While an item is downloading, you can continue to browse for other content and add
items to your download queue.
1Select
2Select
You can see the status of currently downloading items in the New downloads section.
One item is downloaded at a time, and pending items wait in your download queue.
Previously downloaded items are shown in the Download history section.
Tip: If you need to, for example, temporarily close your Wi-Fi connection, select the
downloading item, then in the details view, select Pause. To resume downloading,
select Resume. Pause pending items individually.
If a download fails, you can re-download the item.
Rate and review an item
Do you want to share your opinion on an item with other Nokia Store users? Rate the
item, and write your own review.
You can post one review per item that you have downloaded.
1 Select the item and Review.
2 Rate the item and write your review, then select Submit.
If you want to edit your review, select Edit review.
3 To publish your review, select Submit.
Help us keep Nokia Store clean, and report if you find inappropriate content. Select
Report abuse and the reason. Give additional details, if needed.
> Store, then sign in to your Nokia account.
.
Telephone
Call a phone number
1 On the home screen, select
, then type in the phone number.
Page 39

Telephone 39
To delete a number, select .
To type in the + character, used for international calls, select * twice.
2 Press the call key.
3 To end the call, press the end key.
Search for a contact from the dialler
On the home screen, select
You can also search by company name. Select each number key once for each letter.
For example, to search for Nokia, select 6, 6, 5, 4, then 2.
Call the found contact
Select the contact.
Send a message to the contact
Select and hold the contact, and from the contact card, select Message.
, then start writing the contact's first or second name.
Call a contact
1 Select
2 To search for a contact, select
first or second name in the search field.
3 Select the contact.
4 In the contact card, select Voice call.
5 If the contact has more than one phone number, select the number you want to
call.
> Contacts.
, then write the first letters or characters of the
Page 40

40 Telephone
Switch the loudspeaker on during a call
To allow others in the room to join in with a call, switch the built-in loudspeaker on.
Select
Switch the loudspeaker off
Select
Make a conference call
You can have a conference call with up to six people, including yourself. Conference
calls are a network service.
Video conference calls are not supported.
1 Make a call to the first person.
2 To make a call to another person, select
3 When the new call is answered, select
Add another person to a conference call
Call the person, then select
.
.
search for a contact, select
. The first call is put on hold.
. Type in the phone number, or to
> Conference.
.
Have a private conversation with one person in the conference call
Select
is put on hold on your phone. The other people continue the conference call.
To return to the conference call, select
three people in the call, select
> Show participants. Go to the person, then select . The conference call
> Conference. Or, if there are more than
.
Page 41

Telephone 41
Drop someone from a conference call you have started
Select
End an active conference call
Press the end key.
Call the numbers you use the most
You can quickly call your friends and family when you assign your most-used phone
numbers to the number keys of your phone.
Select
Assign a phone number to a number key
1 Select the number key to which you want to assign the phone number.
2 Select the contact from your contacts list.
Remove or change a phone number assigned to a number key
Select and hold the assigned key, and from the pop-up menu, select Remove or
Change.
Make a call
On the home screen, select
Use your voice to call a contact
You can use your voice to make calls or control your phone.
Voice commands are not dependent on the speaker’s voice. Commands are
automatically created by your phone.
When adding contacts or editing voice commands, do not use very short or similar
names for different contacts or commands.
> Show participants. Go to the person, then select .
> Settings and Calling > Speed dialling.
) is reserved for the voice mailbox.
1 (
, then select and hold the assigned number key.
Note: Using voice tags may be difficult in a noisy environment or during an
emergency, so you should not rely solely upon voice dialling in all circumstances.
When you use voice dialling, the loudspeaker is in use. Hold the phone a short distance
away when you say the voice command.
1 On the home screen, press and hold the call key. If a compatible headset with the
headset key is attached, press and hold the headset key.
Page 42

42 Telephone
2 A short tone sounds, and Speak now is shown. Say clearly the name that is saved
for the contact.
3 The phone plays a synthesised voice command for the recognised contact in the
selected phone language, and shows the name and number. To cancel the voice
dialling, select Quit.
Listen to a voice command for a contact
1 Select a contact and
2 Select a contact detail.
If several numbers are saved for a name, you can say also the name and the number
type, such as mobile or telephone.
Make calls over the internet
About internet calls
You can make and receive calls over the internet. Internet call services may support
calls between computers, between mobile phones, and between a VoIP device and a
traditional telephone. The internet call service is a network service.
Some internet call service providers allow free internet calls. For availability and
connectivity costs, contact your internet call service provider.
To make or receive an internet call, you must be in the service area of a Wi-Fi network
or have a packet data (GPRS) connection in a 3G network, and be signed in to an
internet call service.
Install an internet call service
You can search for internet call services from Nokia Store. For more info, go to
www.nokia.com/support.
1 Download an installation widget for the internet call service.
2 To start the installation, select the installation widget.
3 Follow the instructions shown on the phone.
When an internet call service has been installed, a tab for the service is shown in the
contacts list.
> Voice tag details.
Make an internet call
When you are signed in to an internet call service, you can make a call from the friends
list or the contacts list.
Select
> Contacts.
Page 43

Telephone 43
Call a contact in the friends list
1 Open the internet call service tab, then sign in to an internet call service.
2 Select a contact from the friends list, then select Internet call.
Make an internet call to a phone number
1 On the home screen, select
2 Select
Call the last dialled number
Trying to call someone, but they are not answering? It's easy to call them again. In
the call log, you can see info about the calls you have made and received.
On the home screen, press the call key, then select the number or contact.
Record a phone conversation
You can record your phone conversations.
1 During a voice call, select
2 To start recording, select
3 To stop recording, select
files folder in the Files app.
You cannot use the recorder during a data call or when a GPRS connection is open.
Turn to silence your phone
If your phone rings in a situation where you do not want to be disturbed, you can turn
the phone to silence the ringtone.
Switch the turn to silence feature on
Select
and an option for making an internet call.
> Settings and Phone > Sensor settings > Silence calls > On.
, then type in the number.
> Go to Home screen, then select > Recorder.
.
. The sound clip is automatically saved to the Sound
When your phone rings, turn your phone face down.
Page 44

44 Telephone
View your missed calls
On the home screen, you can see when you have missed calls. The number of all
missed events, including missed calls and received messages, is shown.
To view the phone number, swipe down from the notification area, then select the
missed calls notification. The caller's name is shown if stored in the contacts list.
Call back the contact or number
Select the contact or number.
View the missed calls list later
On the home screen, press the call key, then open the missed calls tab
Call your voice mailbox
You can forward calls to your voice mailbox, where callers can leave you a message if
you don't answer. Voice mailbox is a network service.
On the home screen, select
, and select and hold 1.
.
Change the phone number of your voice mailbox
1Select
2 Select and hold the mailbox, and select Change number.
3 Type in the number (ask your network service provider for it), and select OK.
Forward calls to your voice mailbox or another phone number
If you cannot answer your calls, you can forward incoming calls.
Select
Forward voice calls when unanswered
Select If not answered > Activate > To voice mailbox.
Forward voice calls when you are currently in a call
Select If busy > Activate > To voice mailbox.
More than one forwarding option can be used at the same time.
Forward all voice calls to another phone number
1Select All voice calls > Activate > To other number.
2 Type in the number. To use a number saved in your contacts list, select Find.
Call barring and call forwarding cannot be used at the same time.
> Settings and Calling > Call mailbox.
> Settings and Calling > Call forwarding > Voice calls.
Page 45

Telephone 45
Prevent making or receiving calls
Sometimes you may want to restrict the calls that can be made or received with your
phone. You can, for example, restrict all outgoing international calls or incoming calls
when you are abroad.
Select
To change the settings, you need the barring password from your network service
provider.
Prevent making calls
1 If an internet call service is installed, select Mobile call barring.
2 To prevent making any calls or international calls, select Outgoing calls or
3 Select Activate. Call barring affects all calls, including data calls.
Prevent receiving calls
1 If an internet call service is installed, select Mobile call barring.
2 To prevent receiving any calls or international calls when you are abroad, select
3 Select Activate.
Prevent anonymous internet calls
Select Internet call barring > Anonymous call barring > On.
Call barring and call forwarding cannot be used at the same time.
Allow calls only to certain numbers
You can allow calls only to family members or other key phone numbers, and block
all other phone numbers.
Select
Not all SIMs support the fixed dialling service. You need your PIN2 code from your
service provider.
Switch fixed dialling on
Select
> Settings and Calling > Call barring.
International calls. To prevent making international calls, but allow calls to your
home country, select International calls except to home country.
Incoming calls or Incoming calls when roaming.
> Contacts and > SIM numbers > Fixed dialling numbers.
> Activate fixed dialling, then type in the PIN2 code.
Select the people to whom calls are allowed
1 Select
> New SIM contact.
Page 46

46 Contacts
2Type in the PIN2 code.
3 Write the contact name and phone number to which calls are allowed, then select
.
To add a contact from the contacts list to the fixed dialling list, select
from Contacts and a contact.
To send a text message to a SIM contact while the fixed dialling service is active, you
need to add the text message centre number to the fixed dialling list.
> Add
Contacts
About Contacts
Select > Contacts.
You can save and organise your friends' phone numbers, addresses, and other
contact information. If you want to keep in touch with your most important contacts
easily, you can set them as favourites.
Save phone numbers and mail addresses
You can save your friends' phone numbers, mail addresses, and other information to
your contacts list.
Select
Add a contact to the contacts list
1Select
2 Select a contact detail, and fill in the field.
3 When you have added the details, select
> Contacts.
.
.
Edit contact information
1 Select a contact and
2 Select a contact detail, and modify the information.
3 When you have edited all the necessary details, select
Add more details to a contact card
Select a contact,
Save a number from a received call or message
Have you received a call or a message from a person whose phone number is not yet
saved in the contacts list? You can easily save the number in a new or existing contact
list entry.
.
.
> , and the desired contact detail.
Page 47

Contacts 47
Save a number from a received call
1 On the home screen, press the call key.
2 Open the Received calls tab
3 Select and hold a phone number, and from the pop-up menu, select Save to
Contacts.
4 Select whether you want to create a new contact list entry or update an existing
one.
Save a number from a received message
1 Select
2 In the Conversations list, select and hold a message, and from the pop-up menu,
select Save to Contacts.
3 Select whether you want to create a new contact list entry or update an existing
one.
Contact your most important people quickly
You can set your most important contacts as favourites. Your favourites are at the
top of the Contacts list, so you can contact them quickly.
Select
Set a contact as a favourite
Select and hold a contact, and from the pop-up menu, select Add to favourites.
Remove a contact from favourites
Select and hold a contact, and from the pop-up menu, select Remove from
favourites. The contact is not deleted from your standard contacts list.
> Messaging.
> Contacts.
.
Add your important contacts to the home screen
Add your most important contacts to the home screen, so you can quickly call or send
messages to them.
Select
Select a contact that is stored in your phone memory and
screen.
Call a contact
On the home screen, select the contact, and press the call key. If the contact has
more than one number, select the desired number.
> Contacts.
> Add to Home
Page 48

48 Contacts
Send a message to a contact
On the home screen, select the contact and Message.
Remove a contact from the home screen
On the home screen, select and hold the contact, and select
The contact is removed from the home screen, but remains in your contacts list.
Add a photo for a contact
Want to see quickly who is calling you? Add a photo for a specific contact.
Select
1 Select a contact.
2Select
3 Select a photo from Gallery.
Change or remove a photo
Select the photo and Change image or Remove image.
Set a ringtone for a contact
Want to be able to hear that a particular person is calling you? You can set a ringtone
specifically for that person.
Select
1 Select a contact and
2Select Ringtone and a ringtone.
> Contacts.
next to the contact's name, then select Add image.
> Contacts.
.
.
Create a contact group
If you add your family members or friends to a contact group, you can easily send a
message to all of them at the same time.
1Select
2Open the
3 Write a name for the group, then select OK.
4On the
5 Mark the contacts you want to add to the group, then select Select.
> Contacts.
tab, then select .
tab, select the group and > Add members.
Page 49

Contacts 49
Send a message to a group of people
Would you like to send a message to all your family members quickly? If you have
assigned them to a group, you can send a message to all of them at the same time.
Select
1Open the
2 Select and hold a group title, and from the pop-up menu, select Create
Send your contact information using My Card
My card is your electronic business card. With My card, you can send your contact
information to others.
Select
Send your contact information as a business card
1 Select and hold My card, and from the pop-up menu, select Send as contact
2 Select the sending method.
Edit your contact information in My Card
1 Select My card.
2 Select
3 To add more details, select
Copy contacts from the SIM card to your phone
If you have contacts stored on your SIM card, you can copy them to your phone. You
can add more details to contacts that are stored on your phone, such as alternative
phone numbers, addresses, or a picture.
Select
Select
> Contacts.
tab.
message.
> Contacts.
card.
and the detail to edit.
.
> Contacts.
> SIM numbers > Copy all to phone.
Back up your contacts to Nokia services
If you back up your contacts to Nokia services, you can easily copy your contacts to
a new phone. If your phone is stolen or damaged, you can still access your contacts
list online.
Select
Select
> Contacts.
> Nokia Sync > Sync now.
Page 50

50 Social networks
If you allow automatic syncing, all the changes you make in the contacts list are
automatically backed up to Nokia services.
You need a Nokia account to use Nokia services. You are asked to create an account,
if you access a Nokia service using your phone.
If you use Nokia Sync to automatically sync your contacts, do not allow contact
syncing with any other service as there may be conflicts. Nokia Sync for contacts is
not available if you sync contacts in Mail for Exchange.
Social networks
About Social
Select > Social, then sign in to the social networking services that you use.
To power up your social networking experience, use the Social app. When signed in
to social networking services through the Social app, you can do the following:
• See your friends' status updates from multiple services in one view
• Post your own status update to multiple services at the same time
• Share photos you take with the camera
• Share videos you record with your phone
• Link your online friends' profiles to their contact info in your phone
• Add events from the service calendar to your phone calendar
Only those features that are supported by the social networking service are available.
Using social networking services requires network support. This may involve the
transmission of large amounts of data and related data traffic costs. For information
about data transmission charges, contact your network service provider.
The social networking services are third party services and not provided by Nokia.
Check the privacy settings of the social networking service you are using as you may
share information with a large group of people. The terms of use of the social
networking service apply to sharing information on that service. Familiarise yourself
with the terms of use and the privacy practices of that service.
See your friends' status updates in one view
When you are signed in to social networking services through the Social app, you can
see your friends' status updates from all those services in a single view. You do not
have to switch between different apps to see what everyone is up to.
1Select
> Social.
Page 51

Social networks 51
2 Select a service, then sign in.
3 Select
4 Select another service, then sign in.
5 Select
All the feeds from the services you have added are automatically included in the
view.
Post your status to social networking services
With the Social app, you can post your status update to social networking services.
1 Select
2 Select
3 Write your status update in the text field.
Link your online friends to your contacts list
You can link your online friends' profiles from social networking services to their
contact info in your phone. After linking, you can view their contact info directly from
the Social app, and see their latest status updates in your contacts list.
1 Select
2 Select an online friend's profile picture and Link Profile to Contact.
3 From your contacts list, select the contact to which to link the profile.
See your friends' status updates on the home screen
With the Social widget, you can see your online friends' status updates directly on the
home screen when you're signed in to social networking services through the Social
app.
Add the Social widget to the home screen
Select and hold an empty area on the home screen, then select Add widget >
Social.
Open the Social app from the home screen
On the home screen, select the Social widget. If you're signed in, the status updates
view opens. If you're not signed in, the sign-in view opens.
> My Accounts > Add social network.
> All Activity.
> Social, then sign in to the social networking services that you use.
> All Activity.
> Social.
Upload a photo or video to a service
Use the Social app to upload your photos or videos to social networking services.
1 Select
2 Select
> Social, then sign in to a social networking service.
.
Page 52

52 Social networks
3 Select whether to upload a photo or video.
4 To mark the items to upload, select the items.
The maximum file size is 4 MB for photos and 10 MB for videos.
5 If uploading a single photo, you can add a caption and a tag with a comment to a
particular section of the photo.
To upload a video, the feature needs to be supported by the social networking
service, and you need to use a Wi-Fi connection.
6Select
Take a photo and upload it
1Select
2 Select the option for uploading a photo from the camera.
3 Take a photo.
4 Add a caption and a tag with a comment to a particular section of the photo.
Contact a friend from a social networking service
When commenting your friend's status is not enough, you can call or send a message
to the friend.
1Select
2 Select a friend's profile picture, then select the communication method.
This feature is available if you have linked your online friends to their contact info in
your phone, or if your friends have added their own contact info to their details in the
service.
The available communication methods vary. To call or send a text message to a friend,
the feature needs to be supported by the service.
.
.
> Social.
Add an event to your phone calendar
When responding to invitations to events in a social networking service, you can add
the events to your phone calendar, so you can view upcoming events even if you are
not online.
Select
1 Select an invitation to an event.
2 Add the event to your phone calendar.
This feature is available only if supported by the service.
> Social and a service, and sign in.
Page 53

Messages 53
Messages
About Messaging
Select > Messaging.
You can send and receive various kinds of messages:
• Text messages
• Audio messages
• Multimedia messages that contain pictures and videos
• Group messages
Messaging requires network support.
Send a message
Keep in touch with your family and friends through text and multimedia messages.
1 Select
2 To add a contact as a recipient, select To. You can also type in a phone number.
3 Write your message in the text box, then select
Tip: To include an attachment, such as a photo or video, select
4 Select
Tip: To send a message to a contact from your contacts list, select and hold a contact,
then select Send message.
Sending a message with an attachment may be more expensive than sending a normal
text message. For more information, contact your service provider.
You can send text messages that are longer than the character limit for a single
message. Longer messages are sent as two or more messages. Your service provider
may charge accordingly.
Characters with accents, other marks, or some language options, take more space,
limiting the number of characters that can be sent in a single message.
If a text message is very long, it may be converted to a multimedia message. If you
want to send the message as a text message, select
Message type > Text.
> Messaging and .
.
.
.
> Sending options >
Page 54

54 Messages
If you send a text message to one or more recipients, and the contact information of
one of the recipients is a mail address instead of a phone number, the text message
is converted to a multimedia message.
If the item you insert in a multimedia message is too large for the network, the device
may automatically reduce the size.
Only compatible devices can receive and show multimedia messages. Messages may
look different in different devices.
Read a received message
When someone sends you a message, a notification is shown on the home screen.
You can open the message directly from the home screen.
Select Show to open the message.
Messages are combined into conversations, containing all the messages to and from
a contact in a single view. To read a conversation, select it from the list in the
Messaging view.
Reply to the message
1 With the message open, select
2 Write your reply, then select
Tip: To quickly reply to a message, select Tap to write.
Forward the message
1 With the message open, select
2 To add a contact as a recipient, select To. You can also type in a phone number.
3 Edit the message if needed, then select
Save an attached photo or other file
1 In the conversation, select the message containing the file.
2 Select and hold the file, then select Save and a memory. Files are saved to their
respective apps, such as Gallery.
Read the message later
1Select
2 Select the conversation containing the message.
3 Select the message.
> Messaging.
.
> .
> Forward.
> .
Page 55

Mail 55
Send an audio message
You can record a sound clip, such as a birthday song, and send it to your friend as an
audio message.
1 Select
2 Select
3 To add a contact as a recipient, select To, a contact and
a phone number.
4 To add a sound clip as an attachment, select
To record a new sound clip, select
5 Select
Change the writing language
You can change the language in which you write your messages and mails.
1 Select
2 Select Writing language.
> Messaging.
.
. You can also type in
> and the sound clip.
> , then record the new clip.
.
> Settings and Phone > Language.
About Mail
Select > Mail.
You can automatically transfer mail from your existing mail address to your phone,
and read, respond to, and organise your mail on the go. You can add several mailboxes
to your phone and access them directly from your home screen.
Sending or receiving mail on your phone may be chargeable. For information on
possible costs, contact your service provider.
Mail is a network service, and may not be available in all regions.
About Exchange ActiveSync
Select > Mail and New mailbox > Exchange ActiveSync.
Would you like to have your work mail, contacts, and calendar at hand, whether you
are sitting by your computer or on the go with your phone? You can synchronise the
important content between your phone and a Mail for Exchange server.
Mail for Exchange can be set up only if your company has a Microsoft Exchange server.
In addition, your company IT administrator must have activated Microsoft Exchange
ActiveSync for your account.
Page 56

56 Mail
This device is able to communicate with Microsoft Exchange ActiveSync enabled
servers. The provision of this device to you does not grant you, and you do not receive,
any rights under any Microsoft intellectual property with respect to any server
software, or server device, that is accessed using this device or with respect to use
of Microsoft Exchange ActiveSync apart from this device.
Before starting to set up Mail for Exchange, make sure you have the following:
• A corporate mail address
• Your Exchange server name (contact your company IT department)
• Your network domain name (contact your company IT department)
• Your office network password
Depending on the Exchange server configuration, you may need to enter additional
information. If you do not know the correct information, contact your company IT
department.
With Mail for Exchange, the use of the phone lock code may be mandatory.
Synchronisation takes place automatically in intervals defined when setting up the
Mail for Exchange account. Only content defined when setting up the account is
synchronised. To synchronise additional content, modify the Mail for Exchange
settings.
Add a mailbox
Do you use more than one mail address? You can have several mailboxes in your
phone. Mail is a network service.
Select
When you open the Mail app for the first time, your phone asks you to create a mailbox.
If you accept, follow the instructions shown on the phone.
If you want to use your business mail with your phone, set up the mail using Exchange
ActiveSync. For the setup, you need the name of your Microsoft Exchange Server and
network domain. For more info, contact your Mail for Exchange administrator.
Add a mailbox later
You can also create a mailbox later. Select Mail > New mailbox, then follow the
instructions shown on the phone.
> Mail.
Tip: If you add a mail widget to your home screen, you can easily access your mail
directly from the home screen.
Page 57

Mail 57
Delete a mailbox
Select and hold the mailbox, then select Delete mailbox.
Read a received mail
You can use your phone to read and reply to mail.
Select
Select the mailbox and the mail.
Tip: To quickly read new mail, add a mail widget to your home screen.
Tip: To zoom in or out, place two fingers on the screen, then slide them together or
apart.
> Mail.
Open or save an attachment
Select the attachment and Open or Save. If there is more than one attachment, you
can save them all at once.
Reply to the mail
1 Select
2 Write your reply, then select
3 Select
Forward the mail
1 Select
2 Type in the mail address. To add a recipient from your contacts list, select
> .
.
.
> .
.
Page 58

58 Mail
3 Edit the message, if you want, then select .
4Select
Tip: If your mail contains a web address and you would like to open the address in the
phone browser, select the address.
Read the next or previous mail in the mailbox
Use the arrow icons.
Send a mail
Would you like to send a mail while on the go? With your phone, you can read and send
mail, even when not sitting at your desk.
Select
1Select
2 Type in the mail address. To add a recipient from your contacts list, select
add a Bcc field, select
3 Write the subject and your message, then select
Tip: To add an attachment, select
4Select
Respond to a meeting request
You can open and save or accept meeting requests. When you save or accept a
meeting request, it appears in your calendar.
Meeting requests are handled in the Exchange ActiveSync mailbox.
Select
Open the meeting request, and save it to your calendar or, if available, select
Accept, Decline, or Tentative.
Check your availability
Select
.
> Mail and a mailbox.
.
. To
> > Other recipient fields > Show Bcc field.
.
.
.
> Mail and the Exchange ActiveSync mailbox.
> View calendar.
To edit, reply, or forward an accepted meeting request, open the request in your
calendar.
The available options may vary.
Page 59

Maps 59
Open mail from the home screen
You can have several mail widgets on your home screen, depending on your phone.
Each mail widget contains one mailbox, showing the three latest received mails. You
can open the mails directly from the widget.
Tip: To see more mails, scroll down.
Add a mail widget to the home screen
On the home screen, tap and hold an empty area, then select Add widget and the mail
widget. If you have more than one mailbox, select which one to use.
Tip: For a more compact widget, showing only the mailbox name and
mail has arrived, select Add widget > Mail, new arrival.
means that new mail has arrived.
when new
Maps
About Maps apps
Maps shows you what is nearby and guides you where you want to go. Maps also
provides you with weather forecasts and links to the latest travel guides.
• Find cities, streets, and services using Maps.
• Sync your favourite locations and routes between your phone and the Nokia Maps
web service.
• Find your way with turn-by-turn directions using Drive.
• Get scheduled directions door-to door combining different modes of public
transport using Public Transport.
• Check the current weather and the forecast for the coming days, if ava ilable, using
Weather.
• Get linked to the latest information on what's there to see and do, where to spend
the night, or how to book a room using Guides.
Coordinate info may not be available in all regions.
Some services may not be available in all countries, and may be provided only in
selected languages. The services may be network dependent. For more information,
contact your network service provider.
Using services or downloading content may cause transfer of large amounts of data,
which may result in data traffic costs.
Page 60

60 Maps
Contents of digital maps may sometimes be inaccurate and incomplete. Never rely
solely on the content or the service for essential communications, such as in
emergencies.
Some content is generated by third parties and not Nokia. The content may be
inaccurate and is subject to availability.
Navigate to your destination
Drive to your destination
When you need turn-by-turn directions while driving, Drive helps you get to your
destination.
Select
Drive to a destination
Select Set destination and an option.
Start driving without a set destination
Select Just drive. The map follows your location.
Drive to your home
Select Drive home.
> Drive.
When you select Drive home for the first time, you are asked to give your home
location.
Change your home location
Select
Obey all local laws. Always keep your hands free to operate the vehicle while driving.
Your first consideration while driving should be road safety.
> Settings > Home Location > Redefine.
Page 61

Maps 61
Change the voice guidance language for driving
Voice guidance helps you find your way to a destination, leaving you free to enjoy the
journey.
Select
Select
Voice guidance may not be available for your language.
Switch voice guidance off
Select
Change the look of the Drive view
Would you like to see a more realistic 3D map, or are you using Drive at night, when
it's dark? With the different map modes, you can see the info you need clearly at all
times.
Select
View the map in 3D
Select
To see the map clearly also when it is dark, you can activate night mode.
Activate night mode
Select
By default, the map rotates to your driving direction.
Orient the map to north
Select
> Drive.
> Settings > Voice guidance and a language.
> Settings > Voice guidance > None.
> Drive.
> . To go back to 2D mode, select the icon again.
> > Colours > Night mode.
. To rotate the map back to your driving direction, select again.
Select your preferred route
Drive can choose the route that best suits your needs and preferences.
1 Select
2 Select
3 Select Route selection > Faster route or Shorter route.
4 To combine the advantages of both the shorter and the faster routes, select
Route selection > Optimised.
> Drive.
> > Route settings.
Page 62

62 Maps
You can also choose to allow or avoid using, for example, motorways, toll roads, or
ferries.
Get traffic and safety info
Enhance your driving experience with real-time info about traffic events, lane
assistance, and speed limit warnings.
Select
Show traffic events on the map
During drive navigation, select
lines.
You can set your phone to notify you when you exceed the speed limit.
Get speed limit warnings
1Select
2In the Speed limit alert status field, select On.
3 To set by how much you can go over the speed limit before being warned, select
You can set Drive to avoid traffic events, such as traffic jams or roadworks in route
planning and guidance. Drive checks the route regularly during navigation, updating
the guidance automatically.
Avoid traffic events
Select
The availability of traffic information may vary according to the region and country.
The location of speed cameras may be shown on your route during navigation, if this
feature is enabled. Some jurisdictions prohibit or regulate the use of speed camera
location data. Nokia is not responsible for the accuracy, or the consequences of using
speed camera location data.
> Drive.
> Traffic. The events are shown as triangles and
> > Alerts.
Speed limit < 80 km/h or Speed limit > 80 km/h.
> > Route settings > Avoid traffic.
Walk to your destination
When you need directions to follow a route on foot, Maps guides you over squares,
and through parks, pedestrian zones, and even shopping centres.
Select
1 Select a place and its info area at the top of the screen.
2Select Navigate > Walk here.
> Maps.
Page 63

Maps 63
By default, the map is oriented to north.
Rotate the map to your walking direction
Select
You can also select what type of route you want walk navigation to follow.
Select the walking mode
1 Select
2 Select Preferred route > Streets or Straight line.
While walking, you can check the dashboard for info, such as how far you have walked
and what your average speed has been.
Check the tripmeter from the dashboard
In the walk navigation view, select
Reset the tripmeter
Select
The trip meter may not be accurate, depending on the availability and quality of your
GPS connection.
Change the voice guidance language for walking
You can easily change the language for voice guidance, or switch it off completely.
Select
Select
Voice guidance may not be available for your language.
Switch voice guidance off
Select
. To rotate the map back to north, select again.
> Settings > Maps & Walk > Route settings.
Straight line is useful on off-road terrain as it shows the walking direction.
> Dashboard.
> Reset. To reset all counters, select > Reset all.
> Maps.
> Settings > Maps & Walk > Voice guidance and a language.
> Settings > Maps & Walk > Voice guidance > None.
Find your way using Public Transport
Scheduling your journey using trams, trains, and buses can be hard – why not let your
phone do the planning?
1 Select
2 Select Journey planner.
> Public Transport.
Page 64

64 Maps
3 If you don't want to start your journey from where you are right now, write your
start point in the From box, then select from the matches.
4 Write your destination in the To box, then select from the matches.
5 To see earlier or later journeys, drag the screen left or right. Hold your finger in
place until the journeys are calculated.
6 To see a journey in detail, select the journey.
Tip: In the journey details view, to see the next or previous journey, swipe left or right.
Tip: Need help when walking to the bus stop? To see the stop in Maps, in the journey
details view, select the walking section of your journey.
If the needed map data is not stored on your phone, and you have an active data
connection to the internet, a map for the area is automatically downloaded.
Planning to set off later in the day? You can set what time you want your journey to
start or what time you want to arrive.
Change the time of the journey
Select
Public transport routing is available for selected regions around the world.
In some areas, timetables are not available, and the journey plans are only estimates.
In these areas, you can't see earlier or later journeys, or change the time of the
journey.
The Public Transport service is free of charge.
Using services or downloading content may cause transfer of large amounts of data,
which may result in data traffic costs.
, then select Depart or Arrive.
Find nearby stops and stations
Don't know where the nearest bus stop is? Public Transport finds nearby stops and
stations, and checks the next departures for you.
1Select
2 If you don't want to search for departures from where you are right now, write a
start point in the Search for transport near box, then select from the matches.
3 Select a stop or station.
Tip: To see the nearby stops and stations on a map, after selecting your start point,
select
> Public Transport and Transport nearby.
.
Page 65

Maps 65
In some areas, timetables are not available, and the journey plans are only estimates.
In these areas, you can't see the departures from the stops and stations.
Find and view locations
See where you are on a map
If you need to get your bearings, check where you are on a map. You can also explore
different cities and countries.
Select
find you,
If accurate positioning is not possible, a red halo around the location icon shows the
general area you might be in. In densely populated areas, the accuracy of the estimate
is better, and the red halo is not as wide.
Browse the map
Drag the map with your finger. By default, the map is oriented north. If you want the
map to rotate so that it shows the direction you're facing, select
See your current or last known location
Select
Zoom in or out
Select + or -.
Tip: You can also place two fingers on the map, and slide your fingers apart to zoom
in or together to zoom out. Not all phones support this feature.
> Maps.
shows where you are. When searching for your location, blinks. If Maps can't
shows your last known location.
.
.
Tip: Want to see your holiday photos on the map? Set your camera to save location
info to your photos, and you can see your photos in Maps at the place they were taken.
To switch the feature off, select
If you browse to an area not covered by the street maps that are stored on your phone,
and you are connected to the internet, new street maps are automatically
downloaded.
Prevent downloading new street maps automatically
1 Select
2 Select Connection > Offline.
Map coverage varies by country and region.
> Settings > General.
, and clear the Your photos check box.
Page 66

66 Maps
Find a location
Maps helps you find specific locations and businesses.
Select
1 Enter search words, such as a street address or place name.
2 Select an item from the list of proposed matches.
Return to the list of proposed matches
Select
Tip: In the search view, you can also select from the list of your previous search words.
Search for different types of nearby places
Select
Tip: You can use the details page of a found location to easily navigate to the place,
to view its contact information, or to save or share the location. Select the place, and
the place is shown on the map. To view the details page, select the information area
at the top of the screen.
If no search results are found, make sure the spelling of your search words is correct.
Problems with your internet connection may also affect results when searching
online.
If you have maps of the searched area stored on your phone, to avoid data transfer
costs, you can also get search results without an active internet connection, but the
search results may be limited.
> Maps and .
The location is displayed on the map.
.
and a category, such as transport, accommodation, or shopping.
Download and update maps
Save new street maps to your phone before a journey, so you can browse the maps
without an internet connection when travelling.
Select
To download and update maps on your phone, you need an active Wi-Fi connection.
Download new maps
1Select Add new maps.
2 Select a continent and a country, then select Download.
> Maps and > Map Loader.
Page 67

Maps 67
Update maps
Select Check for updates.
Remove a map
Select and hold a country, then confirm that you want to remove the map.
Tip: You can also use the Nokia Suite PC app to download the latest street maps and
voice guidance files, and copy them to your phone. To download and install Nokia
Suite, go to www.nokia.com/support.
When you install a newer version of the Maps app on your phone, the country or region
maps are deleted. Before using Nokia Suite to download new maps, open and close
the Maps app, and make sure you have the latest version of Nokia Suite installed on
your computer.
Change the look of the map
You can change the look of the map so that you can see just the info you need.
Select
Show prominent buildings and attractions
Select
Show public transport routes
Select
The available features may vary by region.
Guides
Are you planning a trip or visiting a new city? Want to know what's there to see and
do, or where you could spend the night or have dinner? Guides gets you connected
to travel guides, booking services, and event listings for the latest detailed
information.
Select
Open a service or guide
Select the title.
To return to the main page, select Guides.
> Maps.
> Landmarks.
> Transit lines.
> Guides.
The service may not be available in your country.
Page 68

68 Maps
Weather
Is it going to rain in the afternoon? How warm will it be on Saturday? Use Weather to
check the current conditions or a forecast for the coming days.
Select
Browse the detailed forecast
To browse forwards or backwards in time, drag the time slider at the bottom of the
view.
View a five-day forecast
Select
The service may not be available in your country.
About positioning methods
Maps shows your location on the map using GPS, A-GPS, Wi-Fi, or network (cell ID)
based positioning.
A-GPS and other enhancements to GPS may require transferring small amounts of
data over the cellular network.
> Weather.
. To go back to the detailed forecast view, select .
GPS The global positioning system (GPS) is a navigation system that
A-GPS The Assisted GPS (A-GPS) network service retrieves location
Wi-Fi Wi-Fi positioning improves positioning accuracy when GPS signals
Cell ID With network (cell ID) based positioning, Maps locates you
The availability and quality of GPS signals may be affected by your location, satellite
positions, buildings, natural obstacles, weather conditions, and adjustments to GPS
uses satellites to work out where you are.
information using the cellular network, and assists GPS in
calculating your current location.
Your phone is set up to use the Nokia A-GPS service, unless your
network service provider has its own A-GPS settings. To get the
assistance data to your phone, you need to be able to connect to
the internet. Your phone gets the data from the service only when
needed.
are not available, especially when you are indoors or between tall
buildings.
through the cellular system your phone is currently connected to.
Page 69

Maps 69
satellites made by the United States government. GPS signals may not be available
inside buildings or underground.
Do not use GPS for precise location measurement, and never rely solely on the
location info provided by GPS and cellular networks.
Depending on the available positioning methods, the accuracy of positioning may
vary from a few metres to several kilometres.
Switch positioning methods off
To save on data costs, especially when abroad, you can switch off assisted GPS (AGPS), Wi-Fi, or network (cell ID) positioning.
1 Select
2 Select Application settings > Positioning > Find my location > Positioning
methods.
3 Switch off the positioning methods you don't want to use.
Working out your location may take much longer, the location can be more inaccurate,
and the GPS receiver can lose your location more frequently.
Save and share places
Save or view a place
To aid your travel planning, you can search for places, such as hotels, attractions, or
petrol stations, and save them to your phone.
Select
Save a place
1 To search for an address or place, select
2 Select the place's info area at the top of the screen.
3 On the details page, select
View a saved place
In the main view, select
> Settings.
> Maps.
.
.
> > Places and the place.
Group the places into a collection, for example, when planning a trip.
Add a saved place to a collection
1 Select Places.
2 Select and hold the place, then select Organise collections.
3 Select New collection or an existing collection, then select .
Page 70

70 Maps
Sync your Favourites
Plan a trip on your computer at the Nokia Maps website, sync the saved places with
your phone, and access the plan on the go.
1 Make sure you're signed in to your Nokia account.
2Select
3Select
one.
Syncing requires an internet connection, and may involve the transmission of large
amounts of data through your service provider’s network. For info about data
transmission charges, contact your network service provider.
To use the Nokia Maps web service, go to maps.nokia.com.
Send a place to a friend
When you want to show your friends where a place is on the map, you can send the
place to them.
Select
To view the place on the map, your friends don't need to have a Nokia phone, but an
internet connection is required.
1 Select a place and its information area at the top of the screen.
2Select Share > Share via SMS or Share via Email.
A mail or text message containing a link to the location on the map is sent to your
friend.
Report incorrect map information
If you notice that information on the map is incorrect or missing, report it to Nokia.
Select a place from the map, its information area at the top of the screen, and
Report.
The service may not be available for your country or region. Reporting incorrect or
missing information requires an internet connection.
You can report issues, such as:
• Missing or incorrect street names
• Streets that are blocked or unsuitable for walking on
• Incorrect restrictions or speed limits
> Maps.
> > . If you do not have a Nokia account, you are asked to create
> Maps.
Page 71

You can add further details when reporting.
Internet
About the web browser
Internet 71
Select
Catch up on the news, and visit your favourite websites. You can use your phone web
browser to view web pages on the internet.
To browse the web, you must be connected to the internet.
Browse the web
Select
Tip: If you don't have a flat-rate data plan from your network service provider, to save
data costs in your phone bill, you can use a Wi-Fi network to connect to the internet.
Go to a website
Write a web address in the address bar, then select
Search the internet
Write your search word in the address bar, then select the search word below the
address bar.
Zoom in or out
Place two fingers on the screen, then slide your fingers together or apart.
Send a web link
Tap and hold a web page, then select Send and how you want to send the link.
Open a new browser window
Select
Switch between browser windows
1 Select
2 Swipe left or right, then select a window.
A cache is a memory location that is used to store data temporarily. If you have, or
have tried to, access confidential info or a secure service, requiring passwords, clear
the cache after each use.
> Web.
> Web.
.
> .
.
Page 72

72 Internet
Empty the cache
Select
Add a bookmark
If you visit the same websites all the time, add them to your bookmarks, so you can
easily access them.
Select
While browsing, tap and hold the web page, then select Add bookmark.
Go to a bookmarked website while browsing
Select
Tip: You can also add bookmarks to the main menu of your phone. While browsing,
tap and hold the web page, then select Install as application.
Subscribe to a web feed
You don't have to visit your favourite websites regularly to keep up with what's new
on them. You can subscribe to web feeds and get links to latest content automatically.
Select
Web feeds on web pages are usually marked with
example, the latest news headlines or blog entries.
1 Go to a blog or web page that contains a web feed.
2 Tap and hold the web page, then select Add feed.
Update a feed
In the Web feeds view, select and hold the feed, then select Refresh.
Set a feed to automatically update
In the Web feeds view, select and hold the feed, then select Edit > Automatic
updates.
> Settings > Privacy > Clear privacy data > Cache.
> Web.
> and a bookmark.
> Web.
. They are used to share, for
Allow a website to use your location info
Select
Websites may ask to access your current location info to, for example, personalise
the info they show you. If you allow a website to use your location info, your location
> Web.
Page 73

Internet 73
may be visible to others, depending on the website. Read the privacy policy of the
website.
If asked, select Allow once or Always allow.
Remove access to location info from a website
1 Select
> Settings > Privacy > Location permissions.
2 Tap and hold a website, then select Delete.
Remove access to location info from all websites
Select
> Settings > Privacy > Clear privacy data > Location permissions.
Unreadable characters while browsing the web
Select
If unreadable characters are shown, select
> Web.
> Settings > Page > Default encoding
and the correct encoding for the character set of the language.
Access an online service using NFC
When you touch an NFC tag that contains a web address with the NFC area of your
phone, the website opens in your phone web browser.
Tip: NFC tags can also contain information such as a phone number or business card.
When you see a phone number in an advertisement that supports NFC, to call the
number, touch the tag.
Page 74

74 Camera and photos
Camera and photos
About the camera
To open the camera, press the camera key.
Why carry a separate camera if your phone has all you need for capturing memories?
With your phone camera, you can easily take photos or record videos.
You can later use your phone to view or edit the photos and videos, share them on
the internet, or send them to compatible devices.
Change the shooting mode
Want to take good photos and videos without the hassle of adjusting the settings for
different conditions? Or would you like to create your own personal settings profiles
to meet your needs? Or perhaps something in between? You can easily change the
shooting mode to your liking.
There are three shooting modes to select from:
— Automatic — Let the camera decide what the best settings are.
— Scenes — Select from some ready-made settings tailored for different conditions.
— Creative — Go fully manual.
Change the shooting mode
Select
the settings.
Take photos
Take a photo
To open the camera, press the camera key.
and a shooting mode. If necessary, tap the right side of the screen to leave
Page 75

Camera and photos 75
Your phone has a full focus camera. With the camera, you can take photos where
objects both in the foreground and background are in focus.
Press the camera key. Do not move the phone before the photo is saved and the
camera is ready for a new photo.
The photos are saved in Gallery.
View your camera roll
Your camera roll shows the photos you've taken recently. To open the camera roll,
select
. To view the previous photo or video, swipe right.
Zoom in or out when taking a photo
To zoom in, place a finger on the screen, and slide it up. When the screen includes
the area you want to zoom in to, lift your finger. To zoom out, place a finger on the
screen, and slide it down.
Page 76

76 Camera and photos
You can also use the volume keys to zoom – you may find it easier to change the zoom
level.
Photo tips
To open the camera, press and hold the camera key.
• Use both hands to keep the camera steady.
• If you don't use the camera for about a minute, it goes to sleep. To wake the
camera up, press the camera key briefly.
To get the best photos, the way you like it, take your pick – the camera offers you
three different shooting modes:
• If you prefer to let the camera decide what the best settings are, use Automatic
mode. All you need to do is to point and shoot.
• Scenes mode offers you some ready-made scenes for various situations.
Example: Landscape mode: to get distant scenery in focus. Snow mode: for very
white environments. Spotlight mode: at concerts where the performer is under
spotlights, in front of a dark background.
• Creative mode lets you define the camera settings yourself and save the different
settings profiles for easy use later on.
To change the shooting mode, select
. If necessary, tap the right side of the screen
to leave the settings.
Page 77

Camera and photos 77
Take a photo in the dark
To take photos even in dim light, switch to night mode.
1 To open the camera, press the camera key.
2 Make sure you are in the Scenes shooting mode. To switch the mode, select
Scenes.
3 Select
.
Record videos
Record a video
Besides taking photos with your phone, you can also capture your special moments
as videos.
To open the camera, press the camera key.
>
1 To switch from photo mode to video mode, if necessary, select
.
2 To start recording, press the camera key.
3 To zoom in, place a finger on the screen, and slide it up. When the screen includes
the area you want to zoom in to, lift your finger. To zoom out, place a finger on
the screen, and slide it down.
You can also use the volume keys to zoom – you may find it easier to change the
zoom level.
4 To stop recording, press the camera key.
Page 78

78 Camera and photos
The videos are saved in Gallery. To quickly view the video you've recorded, select >
. To view the previous photo or video, swipe right.
Tip: You can send your video in a multimedia or mail message. To limit the video size
for sending, before recording, select
enough size, such as 360p.
Video tips
To open the camera, press and hold the camera key.
> Creative > Resolution, and select a small
• To switch from photo mode to video mode, select
• For best results, close any open applications before recording.
• Record to your phone mass memory, if possible.
• If recording videos to a memory card, for best performance, use a compatible,
fast, high-quality microSD card. The recommended microSD card class is 4 (32
Mbit/s (4 MB/s)) or higher.
Before first use, back up any important content on the card, and use the phone
to format the card, even if the card has previously been formatted or used in a
Nokia phone. Formatting deletes all content on the card.
If the memory card gets slower over time, back up any important content on the
card, and use the phone to format the card.
Save location info to your photos and videos
Do you want to know exactly where you were when you took a particular photo or
video? Or would you rather not include this info in your photos or videos? Change the
location recording settings in your phone.
Switch location recording on or off
1Select
2Switch Save location info in Camera to Yes or No.
Location info can be attached to a photo or video, if your location can be determined
using GPS or network methods. If you share a photo or video that contains location
info, the location info may be visible to those who view the photo or video. You can
switch geotagging off in the camera settings.
It may take several minutes to obtain the coordinates of your location.
The availability and quality of GPS signals may be affected by your location, satellite
positions, buildings, natural obstacles, weather conditions, and adjustments to GPS
satellites made by the United States government. GPS signals may not be available
inside buildings or underground.
> Settings and Privacy.
.
Page 79

Camera and photos 79
Do not use GPS for precise location measurement, and never rely solely on the
location info provided by GPS and cellular networks.
Send a photo or video
A picture can say more than words. Send a photo or video of that special moment or
important info you need to get across in a multimedia or mail message, or using
Bluetooth.
Send in a multimedia or mail message
1 Take a photo or record a video.
2 Select
3 Select Via message or Via mail.
4 To add a contact as a recipient, select To. You can also write the recipient's name,
phone number, or address in the To field.
5 Select
It can be slow and cost more to send large photo and video files. To limit the size for
sending, before taking a photo or recording a video, select
Resolution, and select a small enough size, such as 2 MP or 360p.
Send using Bluetooth
1 Take a photo or record a video.
2 Select
Bluetooth.
3 Select the phone or device to connect to, or search for more devices.
If the other phone or device asks for a passcode, type in the passcode.
Tip: You can also send photos and videos from Gallery. Select a photo or video, tap
the screen to show the toolbar, and select
, tap the screen to show the toolbar, then select > Send.
.
> Creative >
, tap the screen to show the toolbar, then select > Send > Via
> Send.
Share a photo or video directly from the camera
Want to share the best shots with your friends? Upload your photo or video to a social
networking service.
1 To open the camera, press the camera key.
2 After taking a photo or recording a video, select
toolbar, then select
Tip: If you're already signed in to a social networking service, you can share
directly to that service. Select
the service icon on the photo toolbar.
> Share.
, tap the screen to show the toolbar, and select
, tap the screen to show the
Page 80

80 Camera and photos
When you share your photo or video for the first time, you may need to sign in to
the social networking service. You only have to sign in the first time you share
something.
3 Add a comment if you like, and select Share.
Not all social networking services support all file formats or videos recorded in high
quality.
Tip: You can also share your photos and videos with another phone that supports
NFC. To share, after taking a photo or recording a video, touch the other phone with
the NFC area.
Using services or downloading content may cause transfer of large amounts of data,
which may result in data traffic costs.
Send a photo or other content to another phone that supports NFC
You can share your own photos, videos, contacts, and My Card when you touch
another compatible phone that supports NFC.
Share a photo
1 Select the photo in Gallery.
2 Touch the NFC area of the other phone with the NFC area of your phone. The
photo is sent using Bluetooth.
The location of the NFC area may vary. For more info, see the user guide of the other
phone.
Set where to save photos and videos
If there is a memory card in your phone, you can set where to save the photos you
take and videos you record.
1Select
> Settings.
Page 81

Camera and photos 81
2 Select Application settings > Camera > Memory in use and an option.
Tip: You can also change the settings when using the camera. Select
and in Creative
shooting mode, select Preferences.
Photos
About Gallery
Select > Gallery.
Browse and view the photos you have taken, or watch the videos you have recorded.
To find your photos and videos easily, add or edit tags in Gallery.
View photos and videos
Select
> Gallery.
Browse photos
Swipe up or down.
View a photo
Select the photo.
To view the following photo, swipe from right to left. To view the previous photo,
swipe from left to right.
Zoom in
Place two fingers on the screen, and slide your fingers apart. To zoom out, slide your
fingers together.
Page 82

82 Camera and photos
Tip: To zoom in quickly, double-tap the screen. To zoom in fully, double-tap the
screen again. To zoom back out, double-tap the screen once more.
View the toolbar
Tap the screen.
Play a video
Select the video and
.
View the properties of a photo or video
Open the photo or video in full screen view. Select the title that shows how many
megapixels the photo is or the resolution of the video.
Photos and videos can be sent to you in a mail or multimedia message. To later view
these photos and videos, save them to Gallery.
Save a photo or video to Gallery
1 In the multimedia message, select the photo or video.
2 Tap the screen, and select
> Save.
Edit or add a tag
Photos and videos are automatically tagged according to the time they were taken.
You can edit or delete these tags, or add new ones yourself.
Select
> Gallery.
Page 83

Camera and photos 83
Edit or delete a tag
Select and hold the tag, and select Rename tag or Delete tag.
Add a tag
Select and hold the photo you want to have as the first photo in the new tag group,
and select Add tag.
Edit a photo you have taken
You can do quick edits, such as crop, resize, fix contrast, and add effects to the photos
you have taken.
1 Select
2 Tap the photo to show the toolbar, and select
3 From the toolbar, select
4 To save the edited photo, select
original photo.
Tip: To quickly crop a photo, select the photo in Gallery, tap the screen to show the
toolbar, and select
select Crop.
Edit a video you have recorded
Cut and trim your videos down to the essentials.
1 Select
2 Select
3 Drag the start and end frames to mark the length of your video.
4 To preview your video, select
5 To save your video, select
> Gallery and the photo.
> Edit.
, , or .
. The edited photo does not replace the
. Place your finger on the screen, drag to crop the area, and
> Gallery and a video.
> Edit.
.
.
Share a photo or video from Gallery
Want to upload your photos or videos to a social networking service for your friends
and family to see? You can do that directly from Gallery.
1 Select
2 Select a photo or video, tap the screen to show the toolbar, and select
Share.
> Gallery.
>
Page 84

84 Camera and photos
Tip: If you're already signed in to a social networking service, you can share
directly to that service. Select
the service icon on the photo toolbar.
When you share your photo or video for the first time, you may need to sign in to
the social networking service. You only have to sign in the first time you share
something.
3 Add a comment if you like, and select Share.
Tip: You can also share your photos and videos with another phone that supports
NFC. To share, select a photo or video, and touch the other phone with the NFC area
of your phone.
Delete photos and videos
If you've got a lot of photos and videos on your phone, you can get rid of the ones
that didn't turn out so well. You can easily delete them in Gallery.
1Select
2Select
Sync your photos and videos between your phone and computer
Did you take photos or record videos with your phone that you'd like to watch on your
computer? Using a USB cable, you can easily sync your photos and videos between
your phone and a computer.
1 Connect your phone to a compatible computer with a compatible USB cable.
If syncing between a memory card in your phone and a computer, make sure the
memory card is in your phone.
2 Open Nokia Suite on your computer, then follow the instructions shown in Nokia
Suite.
Back up your photos
Want to make sure that you will not lose any important photos? You can use Nokia
Suite to back up your photos to your computer.
1 Connect your phone to a compatible computer with a compatible USB cable.
If copying between a memory card in your phone and a computer, make sure the
memory card is in your phone.
2 Open Nokia Suite on your computer, then follow the instructions shown in Nokia
Suite on how to sync Gallery.
> Gallery.
, mark the photos and videos, and select Delete.
, tap the screen to show the toolbar, and select
Page 85

Entertainment 85
Entertainment
Music player
About the music player
Select > Music player.
You can use your phone's music player to listen to music and podcasts while on the
move.
Play music
Select
1 Select
2 Select a song or album.
Tip: To listen to the songs in a random order, select
Pause and resume playback
To pause playback, select
Fast-forward or rewind a song
Select and hold
Play a song on repeat
Select
> Music player.
, , , or to view songs, artists, albums, or genres.
.
; to resume, select .
or .
.
Page 86

86 Entertainment
Tip: When listening to music, you can return to the home screen, leaving the music
playing in the background.
Create a playlist
Want to listen to different music for different moods? With playlists, you can create
selections of songs to play in a specific order.
Select
1 Select and hold a song, album, or genre, then select Add to playlist.
2 Select a playlist, or select New playlist to create a new one.
Play a playlist
Select
Remove a song from playlist
In the playlist view, select and hold the song, then select Remove.
This does not delete the song from the phone; it only removes it from the playlist.
Tip: Music player automatically creates a playlist for songs that are most played,
recently played, never played, and recently added.
View lyrics when listening to a song
To view lyrics during playback, copy the lyrics files into the same folder as the music
files. The lyrics file names must match the corresponding music file names.
The music player supports basic and enhanced LRC formats, and also lyrics that are
embedded in a song, using the ID3v2 metadata format.
This app is provided for personal use of legally obtained content only.
> Music player.
and a playlist.
Play a podcast
1Select
2Select
3 Select the podcast. If a podcast has been partially played, it continues playing
from the position it was previously stopped.
Tip: When listening to a podcast, you can return to the home screen, leaving the Music
player app playing in the background.
> Music player.
> Podcasts.
Page 87

Entertainment 87
Sync music between your phone and PC
Do you have music on your PC that you want to listen on your phone? Nokia Suite is
the fastest way to copy music to your phone, and you can use it to manage and sync
your music collection.
1 Connect your phone to a compatible computer with a compatible USB cable.
2 On your phone, swipe down from the notification area, then select USB > Nokia
Suite.
3 On your computer, open Nokia Suite. Make sure you have the latest version of
Nokia Suite.
4 Drag and drop your music to your phone. For more information, see the Nokia
Suite help.
5In Music player, select
Download the latest version of Nokia Suite from www.nokia.com/support.
Some music files can be protected by digital rights management (DRM) and cannot
be played on more than one device.
> Music library > Refresh.
About Nokia Music
Select > Nokia Music.
With Nokia Music, you can buy and download songs to your phone. Browse Nokia
Music, and discover new music and old favourites.
This service may not be available in all regions or countries, and different services
and options are available, depending on your country of residence.
To download music, you need to create a free Nokia account.
Page 88

88 Entertainment
You can create a Nokia account, join Nokia Music, and sign in to your account using
the following:
• Your phone
• A compatible web browser
If you already have a Nokia account, you can use that account for Nokia Music.
If you have any credit or downloads, or you have subscribed to unlimited downloading
with your Nokia account, do not close the account. If you do, all these will be lost.
All intellectual property and other rights in and to the songs belong and are expressly
reserved to third party licensors, such as the relevant record label or artist, author,
composer, or publisher. You will only be entitled to use music downloaded from Nokia
Music in accordance with the restrictions on use that apply to that particular piece of
music as set out under "Rights" on the product pages of Nokia Music. Music that you
purchased from other sources must be used in accordance with the terms of such
purchase. You are responsible for your compliance with the applicable intellectual
property and other rights in the music you use.
Record sounds
Select
Record a sound clip
Select
Stop recording
Select
application.
Send a recorded sound clip as an audio message
Select
> Recorder.
.
. The sound clip is automatically saved to the Sound files folder in the Files
> Send.
FM radio
About the FM radio
Select > FM radio.
You can listen to FM radio stations using your phone. Just plug in a headset, and select
a station.
To listen to the radio, you need to connect a compatible headset to the device. The
headset acts as an antenna.
Page 89

Entertainment 89
It is not possible to listen to the radio through a Bluetooth headset.
You can listen to the radio even when offline mode is activated in your phone and you
do not have cellular network coverage. The quality of the radio broadcast depends
on the FM radio signal coverage at your location.
You can make or answer a call while listening to the radio. The radio is automatically
muted during an active call.
Find and save radio stations
Search for your favourite radio stations, and save them, so you can easily listen to
them later.
Select
The first time you use the FM radio, the app automatically searches for available radio
stations. If no stations are found, you can set a frequency manually. You can also use
the automatic scanning feature later.
Set a frequency manually
1 Select
2 To set the frequency, select the up or down arrows. The supported frequency
Scan for all available stations
Select
> FM radio.
> > Tune stations manually.
range is 87.5–108.0 MHz.
> .
Listen to the radio
Enjoy your favourite FM radio stations on the go!
Select
> FM radio.
Page 90

90 Entertainment
Go to the next or previous station
Select
View all available stations
Select
Scan for another available station
Select and hold
Tip: To easily access the radio, add the radio widget to the home screen.
Reorder the list of saved stations
You can reorder the list of saved stations, so that your favourites are at the top.
Select
The stations you have saved are listed in the Station list view.
Move a station on the list
1 From the toolbar, select
2 Select and hold the station title, and from the pop-up menu, select Move.
3 Select the new place on the list.
Play a game with a friend using NFC
Want to have fun playing games with a friend? If you and a friend both have a
compatible phone that supports NFC, you can play games against each other.
1 Open a game that supports NFC.
2 Follow the in-game instructions.
or .
.
or .
> FM radio.
.
Pay with your phone
Forgot your wallet or purse at home? Not a problem – you can pay with your phone
or use it as a ticket, if supported by your network service provider.
To find out which services are available in your area, contact your network service
provider. You need a SIM that supports NFC. The services are tied to your SIM.
Get started
1 To activate the service, contact your network service provider.
2Select
3Select Connectivity > NFC > Cards > On.
> Settings.
Page 91

Entertainment 91
Set your phone to ask before allowing any card transactions
Select Ask before using cards > Yes.
Note: If this setting is off, your phone doesn't ask for confirmation before allowing
card transactions, not even when your phone or keys and screen are locked.
Pay with your phone
1 Touch the reader with the NFC area of your phone.
2 To allow the card transaction, select Yes. After the confirmation, you have a short
time to make the payment.
3 Touch the reader again. Your service provider may ask you to confirm the
payment.
Using your service provider's compatible Near Field Communication (NFC) payment
or ticketing services with this phone requires a service subscription with your service
provider and the installation of your service provider’s app. Payment and ticketing
apps and services are provided by third parties. Nokia does not provide any warranty
or take any responsibility for any such apps and services including end user support,
functionality or any monetary transactions or loss of monetary value. Back up your
phone and contact your service provider before providing your phone for repair or
maintenance to ensure the availability of the payment or ticketing services after
repair or maintenance. You may need to reinstall the third-party payment or ticketing
app after the repair or maintenance. For any questions about payment or ticketing
apps and services, contact your service provider.
Videos
About Videos
Select > Videos.
You can browse, download, and watch videos on your phone when out and about.
Tip: Get new videos from Nokia Store. For more information, go to www.nokia.com/
support.
Using services or downloading content may cause transfer of large amounts of data,
which may result in data traffic costs.
Play a video
Select
To browse your video collection, open the
recorded, select
> Videos.
> Gallery.
tab. To browse the videos you have
Page 92

92 Entertainment
To browse video services, open the tab.
Watch a video
Select a video to play. To use the video player controls, tap the screen.
Watch a video with surround sound
Connect compatible headphones to your phone, then select
Headphone feature on.
Pause or resume playback
Select
Fast-forward or rewind
Select and hold
Copy your videos between your phone and computer
Have you recorded videos with your phone that you want to watch on your computer?
Or do you want to copy your videos from your phone to your computer? Use a
compatible USB data cable to copy your videos between your phone and a computer.
1 Use a compatible USB data cable to connect your phone to a computer.
2 Open Nokia Suite on your computer, and follow the displayed instructions.
Watch Web TV
You can keep up with the news and catch up on the latest episodes of your favourite
TV series.
Select
To stream content over the air, you need to use a 3G, 3.5G, or Wi-Fi connection. Using
Web TV services may involve the transmission of large amounts of data. For
information about data transmission charges, contact your network service provider.
The selection of pre-installed Web TV services depends on the country and network
service provider. The content of the Web TV services varies by service.
1 To browse Web TV content, swipe the screen.
2 To start playback, select the thumbnail image.
3 To show or hide the controls during playback, tap the screen.
4 To change the volume, use the volume keys.
or .
or .
If copying between a memory card in your phone and a computer, make sure the
memory card is inserted.
and a Web TV service.
to switch the Dolby™
Page 93

Entertainment 93
Add a Web TV widget to your home screen
Tap and hold an empty area of the home screen, and select Add widget and the
desired Web TV service.
Stream content wirelessly
About DLNA play
Select
Would you like to see the photos or videos in your phone on another device, such as
your TV? Or listen to the music on your phone through your home stereo? With DLNA
play, you can stream your media content to your DLNA devices wirelessly.
You need the following:
• A Wi-Fi network. For best results, your wireless router should be connected to
• Wi-Fi on in your phone, and the phone has to be connected to the same Wi-Fi
There are different types of DLNA devices. If you can connect to the device on your
phone and can control the streaming, the device is a renderer. If you can view the
media on your phone from your device, the device is a player. To find out what kind
of DLNA device you have, you can also check the device user guide.
For more info on how to set up the Wi-Fi connection, go to www.nokia.com/support.
Stream content
You can stream photos and videos on your phone to another device that supports
DLNA, such as a TV.
Use your phone to stream content to your DLNA device
1 Select
2 To stream photos, select Photos. To stream videos, select Videos. To stream
3 Select the photo, video, or song.
> DLNA play.
your DLNA device over a cable connection.
network that your DLNA device is on.
> DLNA play and your DLNA device.
If your phone can't detect any devices, there might not be any renderer DLNA
devices in your Wi-Fi network. Check if you can use your DLNA device to see the
content on your phone.
music, select Music.
The connection to your DLNA device opens automatically. When content is being
pushed to your DLNA device,
is shown.
Page 94

94 Entertainment
You can also zoom a photo, or stream just a part of a photo.
Stream a part of a photo
1 Select the photo, place two fingers on the screen, then slide them apart or
together to crop the area.
Tip: To move the cropped area, tap and hold the area, then drag it.
2 To start streaming the cropped area, lift your finger.
The photo is pushed to your DLNA device after 3 seconds. To start immediately,
tap the area.
Use your DLNA device to stream content saved on your phone
1Select
> Settings and Connectivity > DLNA server > DLNA server > On.
2 Use your DLNA device to detect your phone, then view the content on your phone
through the DLNA device.
Tip: To quickly access the DLNA server, add the DLNA server widget to your home
screen. To add, tap and hold an empty area on a home screen, then select Add widget
and the widget.
Page 95

Clock and calendar 95
Clock and calendar
Clock
About the clock
Select > Clock.
Tip: To open the clock, you can also select the clock on the home screen.
Set and manage alarms, and check local times in different countries and cities.
Set the time and date
On the home screen, select the clock.
Select
Set an alarm
You can use your phone as an alarm clock.
On the home screen, select the clock.
1 Select
2 Set the alarm time, and write a description.
3 To set the alarm to sound, for example, at the same time every day, select Repeat
Remove an alarm
Select and hold the alarm, and select Delete alarm.
Snooze an alarm
When an alarm sounds, you can snooze the alarm. This pauses the alarm for a defined
length of time.
When the alarm sounds, select Snooze.
Set the length of the snooze time
1 On the home screen, select the clock.
2 Select
Tip: You can snooze alarms also by turning your phone face down.
> Time or Date.
.
and the appropriate option.
> Alarm snooze time, and set the length of time.
Page 96

96 Clock and calendar
Update the time and date automatically
You can set your phone to update the time, date, and time zone automatically.
On the home screen, select the clock.
Select
Tip: Want to set the time and date manually? Select Automatic time update > Off.
Change the time zone when travelling
You can set the clock to the local time when travelling abroad or view the time in
different locations.
On the home screen, select the clock.
Select
Add a location
Select
Set your current location
After you have added locations to the world clock view, select and hold a location,
and select Set as current location.
The time in your phone is changed according to the selected location. Make sure the
time is correct.
> Automatic time update > On.
and your current location, for example, London, UK.
and a location.
Tip: Want to remove a location quickly? In the world clock view, select and hold a
location, and select Remove.
Check the time in different cities
To view the time in different locations, add them to your world clock view.
On the home screen, select the clock.
Page 97

Clock and calendar 97
Select and your current location, for example, London, UK.
Add a location
Select
Calendar
About the calendar
With your phone calendar, you can keep your schedules organised.
Tip: Want quick access to your calendar? Add a calendar widget to the home screen.
Browse your calendar in different views
Want to see all your calendar events for a particular day? You can browse your
calendar events in different views.
1 Select
2 Select
Tip: To go to the previous or next day or month, in the appropriate view, swipe left
or right.
Add a calendar event
1 Select
2 Select
3 Fill in the fields.
4 To repeat the calendar event at regular intervals, select
5 Select Save.
Tip: You can also add a calendar event in the day view. Select and hold the starting
time, and drag the arrows to set the duration.
and a location. You can add up to 50 locations.
Select > Calendar.
> Calendar.
and a view.
> Calendar.
. The calendar event type is meeting by default.
and the time interval.
Select Repeat until, then type in the end date.
Page 98

98 Clock and calendar
Use separate calendars for work and free time
You can have more than one calendar. Create one for work and another for your free
time.
Select
Create a new calendar
1Select
2 Write a name, then set a colour code for the calendar.
3 Set the visibility for the calendar. When a calendar is hidden, the calendar events
4Select
Change the settings for a calendar
1 In the Calendars view, select the calendar you want to change.
2 Change the name, colour, and visibility.
3Select
> Calendar.
> Calendars > .
and reminders are not shown in different calendar views or on the home screen.
.
.
Add an entry to a particular calendar
1 When adding a calendar event, select
2 Fill in the fields, then select Save.
Colour codes show which calendar an event belongs to.
Add a task to your to-do list
Do you have important tasks to handle at work, library books to return, or maybe an
event you want to attend? You can add tasks (to-do notes) to your calendar. If you
have a particular deadline, set a reminder.
1Select
> Calendar.
and the calendar.
Page 99

Clock and calendar 99
2 Select .
3 Select the event type field
4 Fill in the fields.
5 To add a reminder for the task, select
6 Select Save.
Remember a birthday
You can add a reminder for birthdays and other special dates. The reminders are
repeated annually.
1 Select
2 Select
3 Select the event type field
4 Fill in the fields.
5 Select Save.
Send a meeting request
You can create meeting requests, and send them to the participants.
Before you can create and send a new meeting request, you need to set up a mailbox.
1 Select
2 Open an event, then select
3 Add the meeting participants as recipients of the request mail.
4 To send the request, select
Add the location to a calendar event
Do you have an appointment in a place you have never visited? You can add the
location info to your calendar event.
1 Select
2 Select
3 Select
manually write the location in the text field.
4 Select Save.
> Calendar.
.
> Calendar.
> Calendar.
.
Enter location, then select the location in the Maps app. You can also
, then select To-do as the event type.
.
, then select Anniversary as the event type.
> Send > Via mail.
.
Page 100

100 Office
Office
Quickoffice
About Quickoffice
Select > Quickoffice.
Quickoffice consists of the following:
• Quickword for viewing Microsoft Word documents
• Quicksheet for viewing Microsoft Excel worksheets
• Quickpoint for viewing Microsoft PowerPoint presentations
To buy the editor version of Quickoffice, select Updates and upgrades.
The office apps support common features of Microsoft Word, PowerPoint, and Excel
(Microsoft Office 2000, XP, and 2003). Not all file formats are supported.
Read Microsoft Word, Excel, and PowerPoint documents
You can view Microsoft Office documents, such as Word documents, Excel
worksheets, or PowerPoint presentations.
Select
Open a file
Select Browse files and the memory where the file is stored, browse to the correct
folder, and select the file.
Sort files
Select
> Quickoffice.
> Sort by.
Read PDF documents
Select > Adobe Reader.
Open a file
Select Browse files and the memory where the file is stored. Browse to the correct
folder, and select the file.
Use the calculator
Select > Calculator.
 Loading...