

Page 1

Nokia 1600
用戶指南
Copyright © 2006
諾基亞。版權所有,翻印必究。
Page 2
一致性聲明
本公司
(NOKIA CORPORATION)
列議會規定
一致性聲明的副本可於
http://www.nokia.com/phones/declaration_of_conformity/
(Council Directive):1999/5/EC
全權聲明本
。
RH-64
產品符合下
內找到。
Copyright © 2006 Nokia.
未取得
儲存本文件全部或部份內容。
美國專利號碼
Copyright © 1997-2006。Tegic Communications, Inc.
Nokia、Nokia Connecting People、Xpress-on 是 Nokia Corporation
的商標或註冊商標。本文件中所提及的其他產品與公司名稱可能
分別為其各自擁有者之商標或註冊名稱。
Nokia
Nokia
出變更和改進的權利,恕不預先通知。
在任何情況下,對因此所造成的數據丟失、虧損或任何特別、意
外、直接或間接的損失,
1
的書面同意,嚴禁以任何形式複製、傳輸、分發或
Nokia
音調是
Nokia Corporation
奉行持續研發的政策。
Copyright © 2006
版權所有,翻印必究。
和其他申請中的專利。
5818437
文字輸入軟件
T9
版權所有。
的聲音標誌。
保留對本文件中所描述產品作
Nokia
恕不負責。
Nokia
諾基亞。版權所有,翻印必究。
Page 3

本文件的內容以 「現有形式」提供。除所適用的法律外,有關本
文件內容的正確性與可靠性,不論是明示或默示性,包括但不僅
限於,對特殊目的的商用性與適用性都不提供任何保證。
保留隨時修訂或收回本文件之權利,恕不預先通知。如要獲取最
新的產品資料,請瀏覽
各種特定產品的供應情況可能依地區而異。請向就近的
銷商查詢。
此裝置可能包含受美國或其他國家出口法律和條例約束的商品、
技術或軟件。嚴禁一切非法改裝。
http://www.nokia.com.hk
。
Nokia
Nokia
經
Copyright © 2006
諾基亞。版權所有,翻印必究。
2
Page 4

目錄
為了您的安全
一般訊息
密碼功能
共用記憶體
Nokia
聯絡資料
使用須知
1.
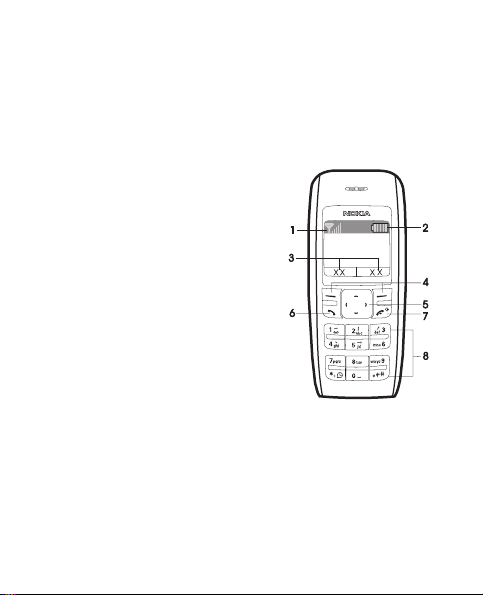
基本概念
插入
SIM
為電池充電
開機與關機
演示模式
................ 5
...................... 10
......................... 10
..................... 11
的支援及
......................... 11
.................. 12
......................... 12
卡和電池
..................... 14
..................... 15
......................... 15
待機模式下的快捷
操作
................................. 16
鎖定鍵盤
腕帶
2.
......................... 16
................................ 17
通話功能
.................. 18
撥打與接聽電話
喇叭
................................. 18
Copyright © 2006
3
輸入法
3.
中文輸入
輸入法圖示
在各種輸入法間切換
筆劃輸入法
拼音輸入法
字元預測
開啟或關閉智慧預測型
英文字輸入法
........ 13
使用傳統英文輸入法
使用智慧預測型英文字
輸入法
輸入複合字
書寫文字的秘訣
功能表
4.
訊息
................................ 27
訊息設定
寫訊息
............. 18
諾基亞。版權所有,翻印必究。
閱讀文字訊息
草稿及寄件備份
圖片訊息 (網絡服務
刪除訊息
..................... 19
........................ 19
................... 19
... 20
................... 20
................... 22
....................... 23
................ 23
.... 24
............................ 24
................... 25
............ 25
..................... 27
....................... 27
........................... 28
............... 28
........... 29
) ... 29
....................... 29
Page 5

通訊錄
............................. 30
尋找姓名及電話號碼
通訊錄設定
通話記錄
設定
鬧鐘
備忘錄
附加功能
......................... 32
通話計時器
................................. 33
提示音設定
顯示設定
操作模式
時間設定
通話設定
手機設定
費用設定
配套設定
右選擇鍵設定
....................... 33
....................... 34
....................... 34
....................... 34
....................... 35
....................... 36
....................... 36
................................. 37
............................. 37
......................... 38
計算機
........................... 38
換算器
........................... 38
鈴聲編輯器
農曆
............................... 39
... 30
................... 31
................... 32
................... 33
............... 36
................... 39
SIM 服務 ........................ 40
電池訊息
5.
充電與放電
................. 41
.................... 41
諾基亞電池認證指引
原裝增強配套
6.
電池
................................ 46
保養與維修
7.
其他安全資訊
8.
索引
............................. 56
.......... 45
............... 47
.......... 49
.... 42
Copyright © 2006
諾基亞。版權所有,翻印必究。
4
Page 6
為了您的安全
為了您的安全
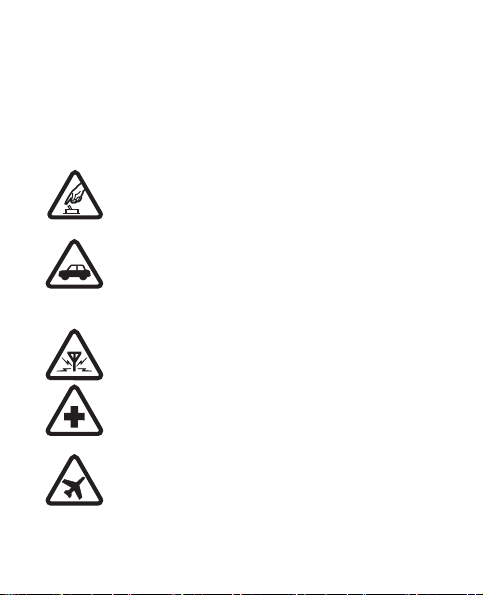
請閱讀下列簡易的使用原則。違反這些規則可能發生危
險或觸犯法律。請通讀完整的用戶指南以獲取詳情。
開機安全
當禁止使用無線電話,或可能造成干擾或危險
時,請勿開機。
行車安全第一
遵守所有當地法律。駕駛車輛時,為便於操縱
汽車,請務必保持雙手活動自如。行車安全應
該是您駕駛車輛時優先考慮的因素。
干擾
所有的無線電話都可能受到干擾,影響效能。
在醫院內請關機
請遵守任何限制性規定。位處醫療儀器附近時
請關機。
乘飛機時請關機
請遵守任何限制性規定。無線裝置在飛機上會
造成干擾。
5
Copyright © 2006
諾基亞。版權所有,翻印必究。
Page 7
為了您的安全
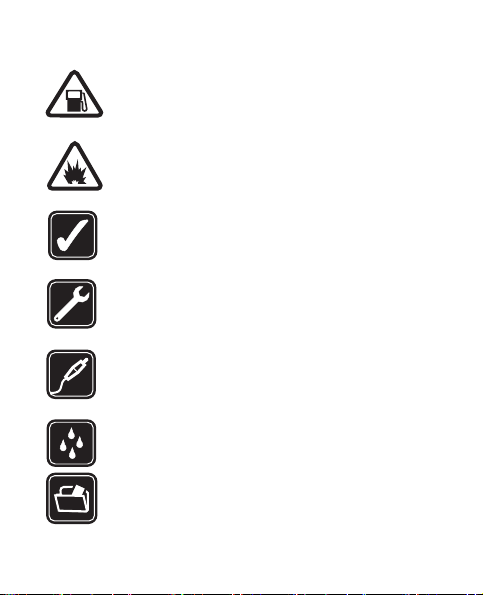
加油時請關機
請勿在加油站使用手機。切勿在燃料或化學品
附近使用手機。
在爆破作業現場請關機
請遵守任何限制性規定。進行爆破工程時,切
勿使用手機。
正確使用
請按產品說明文件所描述的正確姿勢使用手
機。如非必要請勿觸摸天線。
合格的維修
僅容許符合資格的服務人員安裝或維修本
手機。
增強佩套與電池
請僅使用經認可的增強配套與電池。請勿連接
不兼容的產品。
防水性
本手機不防水。請保持乾燥。
備份
請謹記為存儲於手機中的所有重要資料備份或
保留書面記錄。
Copyright © 2006
諾基亞。版權所有,翻印必究。
6
Page 8
為了您的安全
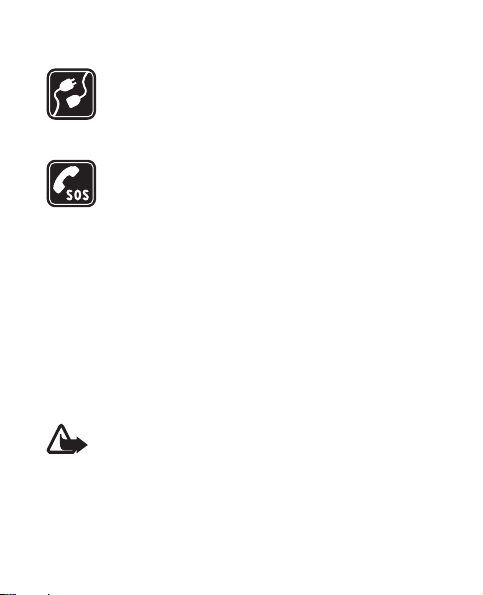
連接其他裝置
在連接任何其他裝置前,請先閱讀其使用指
南,獲取詳細的安全指示。請勿連接不兼容的
產品。
緊急求助電話
確定手機已經開啟且處於服務區域內。按結束
鍵所需次數以清除螢幕顯示並返回至開始螢
幕。輸入緊急求助號碼,然後按通話鍵。說明
您的位置。當接到掛掉電話的指示後才可結束
通話。
■ 關於本手機
本手冊所述的無線手機適用於
絡。請與服務供應商聯絡以獲取有關網絡的詳情。
使用本手機的功能時,請遵守一切法律,並尊重他人的
隱私權及合法權利。
警告:要使用手機的任一功能,手機必須開啟
使用鬧鐘時除外)。在使用手機可能導致干擾或
(
危險的情況下,請勿開機。
EGSM 900 與 GSM 1800
網
7
Copyright © 2006
諾基亞。版權所有,翻印必究。
Page 9

為了您的安全
■ 網絡服務
要使用手機,您必須具有無線服務供應商所提供的服務。
本手機中的很多功能視乎無線網絡的功能而定。這些網
絡服務
(Network Services)
使用網絡服務
(Network Services)
應商作出特定申請。您的服務供應商可能需要提供有關
使用方法及收費情況的更多說明。一些網絡可能有限制,
影響您使用網絡服務。例如,有些網絡不支援所有與口
頭語言相關的功能及服務。
服務供應商可能要求停用或關閉手機的某些功能。若是
這樣,這些功能便不會出現在手機功能表中。您的手機
可能已經過特別設定。該設定可能改變包括功能表名稱、
功能表順序及圖示。請與服務供應商聯絡獲取詳情。
也許並不適用於所有網絡,在
前您可能需要向服務供
Copyright © 2006
諾基亞。版權所有,翻印必究。
8
Page 10
為了您的安全
■ 充電器與增強配套
在移除電池前務必關閉裝置及取下充電器。
在使用充電器前請先檢查充電器的型號
AC-2、ACP- 7 或 ACP- 12
警告:請僅使用經
充電器供電。
Nokia
機型號的電池、充電器及增強配套。使用其他未
經認可的配件,可能會影響手機的使用許可或擔
保,甚至引發危險。
有關經認可的增強配套的供應情況,請向經銷商查詢。
充電器具體型號視乎插頭類型而有所不同。例如,
1.
對於
ACP-12C、ACP-12E 及 ACP-12X
9
型插頭,充電器的具體型號可以是
ACP- 12
Copyright © 2006
諾基亞。版權所有,翻印必究。
1
。本裝置由
認可的適用於此特定手
等。
Page 11

一般訊息
一般訊息
■ 密碼功能
• 密碼隨手機一起提供,有助於防止他人未經授權使用
您的手機。預設密碼是
•
PIN 碼隨 SIM
使用您的
•
PIN2 碼隨 SIM
• 若連續三次錯誤輸入
輸入
PUK 或 PUK2
聯絡本地的服務供應商。
選擇功能表
設定的方式。
卡一起提供,有助於防止他人未經授權
卡。
SIM
卡一起提供,用於存取某些服務。
> 設定 >
保密設定設定手機使用密碼與安全
PIN 或 PIN2
碼。若沒有
12345
。
碼後,手機將要求
PUK 或 PUK2
碼,請
Copyright © 2006
諾基亞。版權所有,翻印必究。
10
Page 12

一般訊息
■ 共用記憶體
本手機內的以下功能使用共用記憶體:訊息、通訊錄及
鈴聲編輯器。使用其中任何一項或多項功能都會減少其
他功能可用的記憶體空間。例如,儲存大量文字訊息可
能會用盡盡所有的可用記憶體。此時當您試圖使用共用
記憶體功能時,手機會顯示記憶體已滿的訊息。在這種
情況下,必須先刪除在共用記憶體中儲存的某些資訊或
項目,然後再繼續。某些功能 (如通訊錄) 除了與其他功
能共用記憶體外,可能還會佔用一定量的記憶體空間。
■
Nokia
如要獲取該指南的最新版本、與您的
載、服務及附加資料,請瀏覽
或您當地的
www.nokia.com.hk/settings
費配置設定 (例如:
的配置設定)。
如您仍需協助,請參閱
要查看就近的
可以瀏覽
11
的支援及聯絡資料
網站。您亦可於
Nokia
MMS、GPRS
維修中心地址以獲取保養服務,您
Nokia
www.nokia.com.hk/carecenter
Copyright © 2006
www.nokia.com.hk/support
下載更多有關您手機型號的免
www.nokia.com.hk/contactus
諾基亞。版權所有,翻印必究。
、電子郵件及其他服務
Nokia
。
產品相關的下
。
Page 13
使用須知
1.
■ 基本概念
當手機開啟並且未輸入字符時,
則處於待機模式。
• 網絡訊號強度
• 電池充電量
• 選擇鍵功能
• 選擇鍵
• 捲動鍵
• 通話鍵
• 結束鍵與電源鍵
• 鍵盤
(8)
(1)
(2)
(3)
(4)
(5)
(6)
(7)
使用須知
Copyright © 2006
諾基亞。版權所有,翻印必究。
12
Page 14
使用須知
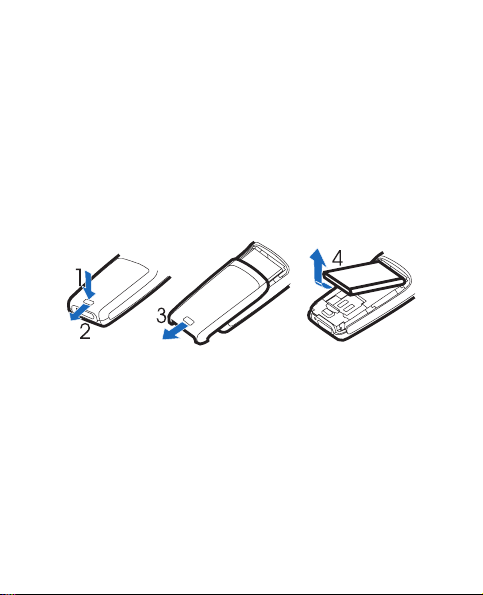
■ 插入
請將所有
有關使用
應商聯絡。
其他廠商。
按後殼釋放鍵
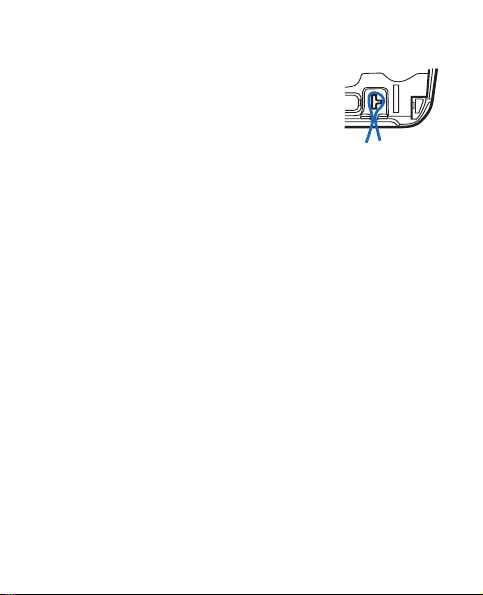
1.
用手指提起電池後將其卸下
從手機的指夾中小心的提起
2.
卡,確保卡的斜角位於右上方且金色接觸面朝下
Copyright © 2006
13
卡和電池
SIM
卡置於兒童無法觸及之處。
SIM
卡服務的供應情況及資訊,請與
SIM
卡供應商可能是服務供應商、網絡商或
SIM
,打開後殼,然後將其卸下
(1)
諾基亞。版權所有,翻印必究。
。
(4)
SIM 卡夾 (5)
SIM
(2, 3)
。插入
卡供
SIM
(6)
。
。
Page 15

使用須知
合上
SIM 卡夾 (7)
入電池
(8, 9)
,然後按壓直至將其鎖定到位。插
。
■ 為電池充電
把充電器連接到交流電源插座上。
1.
把充電器的插頭連接到手機底部的
2.
插孔。電池指示條開始捲動。
若顯示未能充電,請稍後,斷開充
電器,然後再插上重試。若仍然未能開始充電,請聯
絡您的經銷商。
電池充電完畢後,指示條將停止捲動。分別從手機及
3.
交流電源插座上斷開充電器。
Copyright © 2006
諾基亞。版權所有,翻印必究。
14
Page 16
使用須知
■ 開機與關機
按住結束鍵數秒。
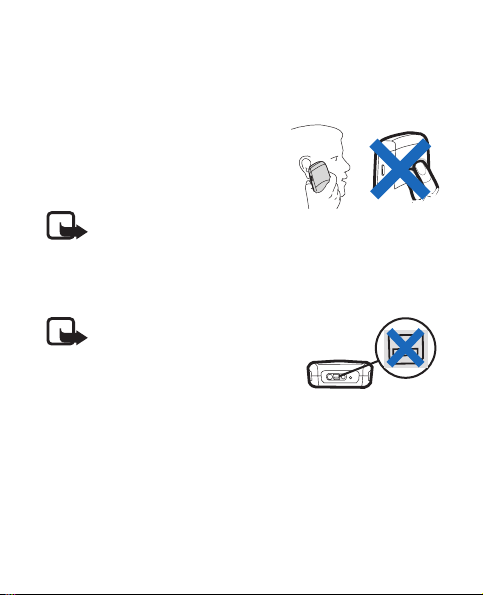
請保持正常操作姿勢使用手機。
本手機設有內部天線。
注意:如同任何其他無
線電發射裝置,在手機開啟時請勿接觸天線。接
觸天線會影響通話品質,並使手機的耗電量增
加。使用手機時不接觸天線可優化天線性能,並
延長電池的使用時間。
注意: 請避免接觸此接口,
因為該接口對靜電釋放非
常敏感。
■ 演示模式
您可以檢視手機某些功能的用法。若未安裝
選擇示範
若已安裝
本功能或更多。
基本功能、更多或遊戲。
>
卡,請選擇功能表
SIM
附加功能
>
卡,請
SIM
> 示範 >
基
15
Copyright © 2006
諾基亞。版權所有,翻印必究。
Page 17
使用須知
■ 待機模式下的快捷操作
向上捲動可存取通話記錄。
向下捲動查看儲存在通訊錄中的姓名與號碼。
向左捲動編寫訊息。
向右捲動啟動演示模式。
長按
可啟動語音時鐘。
*
按通話鍵一次可存取已撥打的號碼列表。捲動至所要的
姓名或號碼,然後按通話鍵即可撥打電話。
■ 鎖定鍵盤
要在待機模式下鎖定鍵盤可防止意外按下
按鍵,選擇功能表,並快速按*;要解除鎖
定,選擇開鎖,並快速按*。
當鍵盤鎖開啟時,仍可撥打預先編入手機
的官方緊急求助電話。
輸入緊急號碼後按通話鍵。您輸入的緊急號碼可能不顯
示在螢幕上。
Copyright © 2006
諾基亞。版權所有,翻印必究。
16
Page 18
使用須知
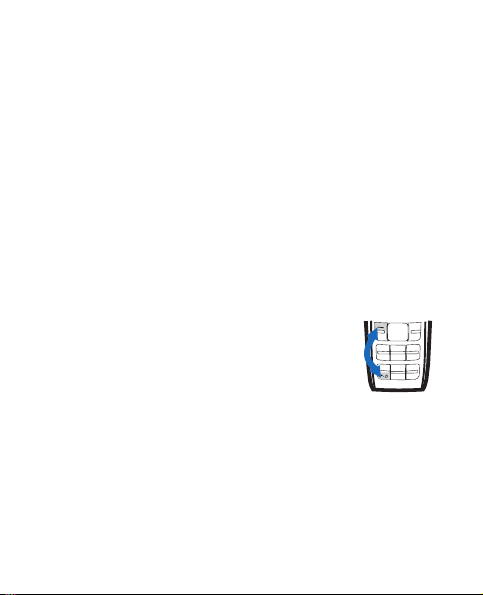
■ 腕帶
除下後蓋,如圖所示插入腕帶。裝回後
蓋。
17
Copyright © 2006
諾基亞。版權所有,翻印必究。
Page 19
通話功能
通話功能
2.
■ 撥打與接聽電話
要撥打電話,請進行如下操作:
輸入帶區號 (如必要) 的電話號碼。必要時還需輸入國
1.
家代碼。
按通話建撥打該號碼。在通話期間,向右捲動可加大
2.
或向左捲動降低聽筒或耳機中的音量。
要接聽來電,按通話鍵。要拒絕接聽來電,按結束鍵。
■ 喇叭
如果可用,選擇喇叭或手機可在通話期間使用喇叭或手
機的聽筒。
警告:請勿在喇叭啟用時將手機靠近耳朵,因
為音量可能會非常大。
Copyright © 2006
諾基亞。版權所有,翻印必究。
18
Page 20
輸入法
輸入法
3.
可用於手機的輸入法是根據市面上所銷售的輸入法預先
設定的。
■ 中文輸入
當語言設為 「繁體中文」時,您可以使用 「筆劃」輸入
法輸入繁體中文。當語言設為 「簡體中文」時,您可以
使用 「拼音」或 「筆劃」輸入法輸入簡體中文。請參閱
「手機設定」,刊於第
輸入法圖示
螢幕的左上角顯示輸入法圖示。輸入法的名稱和螢幕上
的相應圖示如下所示。
拼音
筆劃
大寫字母
小寫字母
數字輸入
35 頁
。
19
Copyright © 2006
諾基亞。版權所有,翻印必究。
Page 21
輸入法
請注意,並不是所有的輸入法對所有的情況都適用。務
必檢查圖示,獲知正在使用的是哪一種輸入法。
在各種輸入法間切換
可以透過以下方法在各種輸入法間切換:
• 反復按
• 編寫文字訊息時選擇操作,然後從選項列表中選擇需
,直至想要的輸入法圖示顯示在螢幕的左
#
上角;
要的輸入法。
筆劃輸入法
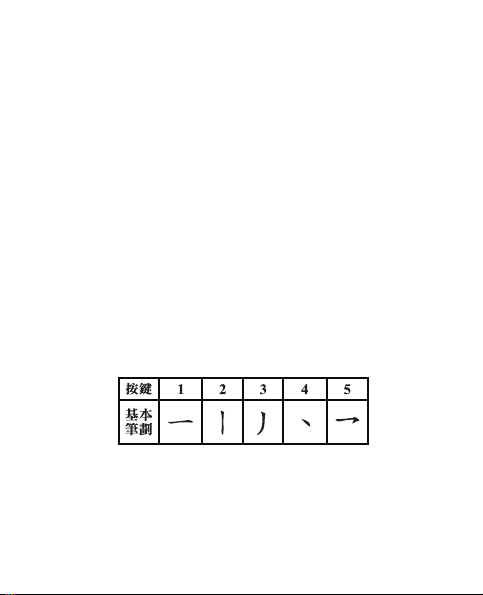
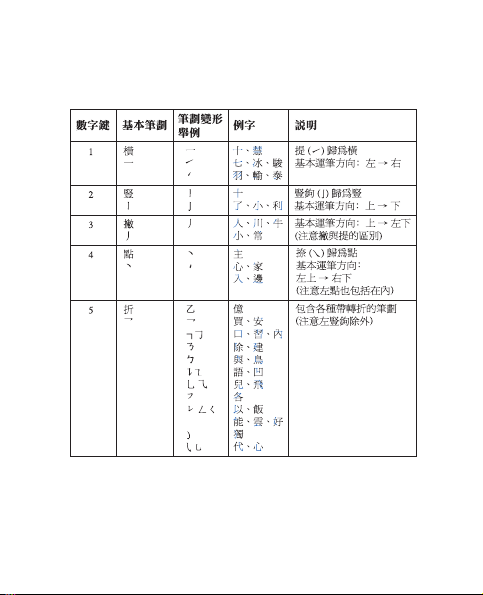
組成中文字元的筆劃可分為五種:橫、豎、撇、點及勾。
每種筆劃分別對應一個從
1 至 5
的數字鍵。
Copyright © 2006
諾基亞。版權所有,翻印必究。
20
Page 22
輸入法
筆劃分類如下表所示:
21
Copyright © 2006
諾基亞。版權所有,翻印必究。
Page 23
輸入法
使用筆劃輸入法
輸入筆劃:根據標準筆劃次序,按相應的數字鍵以輸
1.
入筆劃。
選擇清除可刪除游標左邊的筆劃。選擇並按住清除可
刪除所有輸入的筆劃。
若您不清楚下一個是什麼筆劃或筆劃種類,按
6
為該筆劃的替代,然後繼續輸入其他筆劃。一個問
號出現在輸入區以代表該筆劃。
在候選字元中捲動並選擇需要的中文字元,然後選擇
2.
確認。
可輸入的筆劃數沒有限制,輸入的筆劃越多,候選字
元列表就越短。
拼音輸入法
拼音符號印於數字鍵上。不管符號在哪個數字鍵上,您
只需按鍵一次,手機將會按邏輯組合拼音符號。
對想要輸入的每個拼音符號按對應的數字鍵一次 (輸
1.
入「ü」時用 「v」代替)。
按
一次輸入第一聲,按兩次輸入第二聲,依此類
1
推。按
五次輸入輕聲。
1
作
Copyright © 2006
諾基亞。版權所有,翻印必究。
22
Page 24

輸入法
選擇清除可刪除游標左邊的拼音符號 (或聲調符號)。
長按右選擇鍵 (清除) 可刪除輸入的所有拼音符號及聲
調符號。
如有必要,可按
2.
捲動候選列表以突出顯示需要的中文字元,然後選擇
3.
確認選取該字元。
可獲取下一個可能的拼音組合。
*
字元預測
手機可預測後續中文字元 (若這些字元可以與您已輸入的
最後一個中文字元構成合理的短語)。從候選字元選擇了
您需要的字元後,字元預測便會結束。要在不需要時結
束預測,選擇返回或按正常方式開始輸入下一字元。
■ 開啟或關閉智慧預測型英文字輸入法
在寫入文字時,選擇操作
• 要啟動預測型文字輸入法,請在辭典選項列表中選擇
一種語言。預測型文字輸入法只適合列表中的語言。
• 要變更為傳統的文字輸入法,請選擇關閉預想字典。
預想字典。
>
23
Copyright © 2006
諾基亞。版權所有,翻印必究。
Page 25

輸入法
■ 使用傳統英文輸入法
重覆按
並不是數字鍵下的所有可用字元都印製在該鍵上。可用
的字元視乎選擇的語言而定。請參閱 「手機設定」,刊
於第
35
• 要輸入與前一字母在同一按鍵上的字母,請向左或向
右捲動,或等候遊標出現,然後輸入新字母。
• 最常用的標點符號和特殊字元可在數字鍵
有關編寫文字的更多說明,請參閱 「書寫文字的秘訣」,
刊於第
中的數字鍵,直到想要的字元出現。
1 至 9
頁。
。
25 頁
上獲得。
1
■ 使用智慧預測型英文字輸入法
可以透過按一次鍵輸入任何字母。智慧預測型英文字輸
入法所使用的是內置字典,也可以向該字典中加入新的
單字。
使用按鍵
1.
入一個字母。每次按鍵之後,該單字就發生變化。
例如: 選擇了英文字典後,要寫入
6、6、5、4、2
有關編寫文字的更多說明,請參閱 「書寫文字的秘
訣」,刊於第
Copyright © 2006
開始編寫文字。按任何鍵一次即可輸
2 至 9
。
頁。
25
諾基亞。版權所有,翻印必究。
Nokia
,按
24
Page 26

輸入法
正確寫完該單字後,透過使用
2.
捲動鍵以確認它。
若該單字不正確,重覆按
項。當想要的單字出現時,確認該單字。
若在單字後顯示 「?」字元,表示您要書寫的單字不
在字典中。要將單字加入字典,選擇拼寫,輸入該單
字 (使用傳統英文字輸入法),然後按確認。當字典存
滿字時,新單字將代替最早加入的單字。
開始寫下一個單字。
3.
加上空格,或按任何
0
操作,選擇其他對應
* 或
輸入複合字
寫入單字的前半部份並透過向右捲動確認。寫入該單字
的後半部份,然後確認該單字。
■ 書寫文字的秘訣
也可在書寫文字時應用下列功能:
• 使用捲動鍵移動游標。
• 要在沒有顯示任何符號的情況下插入數字,長按需要
的數字鍵。
• 要在沒有顯示候選字或預測字列表時插入空格,按
25
Copyright © 2006
諾基亞。版權所有,翻印必究。
0
。
Page 27

輸入法
• 要在沒有顯示任何符號的情況下刪除游標左方的字
元,選擇清除。長按右選擇鍵 (清除) 可刪除所有字
元。
• 要在數字與其他輸入法之間切換,請長按#。
• 使用傳統英文輸入法或中文輸入法時按
字元列表。使用預測型英文輸入法,長按
可開啟特殊
*
可開啟特
*
殊字元列表。
捲動至您要的字元,然後選擇確定。
Copyright © 2006
諾基亞。版權所有,翻印必究。
26
Page 28

功能表
功能表
4.
在待機模式下選擇功能表,然後選擇需要的功能表及子
功能表。選擇退出或返回可退出當前功能表。按結束鍵
直接返回至待機模式。
此處未完全說明某些功能表的功能或選項。
■ 訊息
訊息設定
要修改訊息設定,選擇功能表
選擇訊息設定組
圖片訊息的電話號碼。您可從服務供應商處取得此號碼。
選擇支援不同字元 (網絡服務) 設定在發送文字訊息時是
使用完整編碼或是簡式編碼編碼。
選擇號碼過濾檢視或編輯已篩選的號碼清單。
訊息中心號碼儲存需用於發送文字與
>
> 訊息 >
訊息設定。
27
Copyright © 2006
諾基亞。版權所有,翻印必究。
Page 29
功能表
寫訊息
本手機支援發送長度超過單條訊息限定的文字訊息。長
訊息將作為連續的兩條或多條訊息發送。您的服務供應
商可能會收取相應收費。使用重音或其他符號的字元以
及來自其他語言 (例如英文) 的字元,會佔用更多的空間,
從而限制可在單條訊息中發送的字元數量。
多段訊息的可用字元數及當前部份的編號會顯示於螢幕
的右上方,例如
在待機模式下,選擇功能表
1.
輸入訊息。
2.
要發送訊息,請選擇操作
3.
號碼,並選擇確認。
注意:發送訊息時,您的手機將顯示訊息已發出
字樣。表示手機已按預先編好訊息中心號碼向其
發送了訊息。但這不表示收訊人已經收到訊息。
有關訊息服務詳情,請向服務供應商查詢。
917/1
。
> 訊息 >
發送,輸入收訊人的電話
>
寫訊息。
閱讀文字訊息
在待機模式下收到文字訊息時,新訊息的數量及圖示
亦會顯示在螢幕上。
Copyright © 2006
諾基亞。版權所有,翻印必究。
28
Page 30
功能表
選擇顯示立即檢視訊息,或選擇退出 稍後在功能表
息
收件匣中檢視。
>
>
草稿及寄件備份
在草稿功能表中,可檢視儲存在儲存訊息功能表中的訊
息。在寄件備份功能表中,可檢視已發送訊息的副本。
圖片訊息 (網絡服務
您可以接收及發送包括圖片的訊息。收到的圖片訊息儲
存於收件匣資料夾內。請注意,每條圖片訊息都由幾條
短訊息組成。因此,發送一條圖片訊息所需的費用可能
多於發送一條短訊息的費用。
注意: 圖片訊息功能僅在網絡商或服務供應商支
援時才能使用。而且只有在兼容裝置有圖片訊息
功能時才能接收與顯示圖片訊息。訊息的外觀視
乎接收裝置而異。
)
刪除訊息
要刪除所有已讀訊息或一個資料夾中的所有訊息,選擇
功能表
料夾。
29
> 訊息 >
Copyright © 2006
刪除訊息
全部已讀訊息或要刪除的資
>
諾基亞。版權所有,翻印必究。
訊
Page 31

■ 通訊錄
您可在手機記憶體及
及電話號碼。內建的電話簿可儲存多達
姓名。
尋找姓名及電話號碼
用功能表指令搜尋
在待機模式下,選擇功能表
1.
輸入您所尋找姓名的首字元或首字母,然後選擇尋
2.
找。
輸入姓名的字元或字母時,可以按
使用彈出窗口搜尋
在待機模式下,向下捲動以突出顯示第一個姓名 (或
1.
號碼)。
輸入正在搜尋的姓名的第一筆。筆劃顯示在彈出視窗
2.
中。如有需要,可以在彈出視窗中輸入更多筆劃。
或者輸入正在搜尋的姓名的每一個字元的第一筆。
將顯示匹配的中文姓名。
卡記憶體中儲存姓名
SIM
通訊錄
>
個
200
尋找。
>
更改輸入法。
#
功能表
Copyright © 2006
諾基亞。版權所有,翻印必究。
30
Page 32

功能表
搜尋非中文姓名:當該彈出視窗在螢幕上顯示時,
反復按
切換至需要的輸入法,然後輸入姓名的
#
開始字元。
請注意,列出的姓名順序可能與通訊錄中的順序不一樣。
亦可在通訊錄功能表使用下列選項:
新增姓名
刪除
複製
製到
將姓名及電話號碼儲存到通訊錄中
—
逐個或同時刪除多個姓名及手機號碼。
—
將姓名及電話號碼同時或逐個地從內建通訊錄複
—
通訊錄,反之亦然
SIM
通訊錄設定
選擇功能表
記憶體選擇
卡中。更換
顯示方式
絡人的詳情 (顯示方式已設為姓名列表或僅顯示一個姓名
的方式) 時,儲存於
用
用
記憶體狀態
及在每個通訊錄中還可儲存多少個項目。
31
通訊錄
>
—
SIM
選擇姓名及電話號碼的顯示方式。當檢視聯
—
設定以及從可用選項作出選擇:
>
選擇將姓名及電話號碼儲存於手機或
卡時,
卡的記憶體將被自動選取。
SIM
卡記憶體內的姓名或電話號碼將
SIM
SIM
表示;儲存於手機記憶體內的姓名或電話號碼則
表示。
查看已經儲存了多少個姓名及電話號碼,
—
Copyright © 2006
諾基亞。版權所有,翻印必究。
Page 33

功能表
注意:本手機及姓名顯示相關的功能是基於對通
訊錄儲存的電話號碼最相近的匹配,但只支援最
後七位號碼的匹配。
■ 通話記錄
手機會記錄未接來電、已接來電及已撥電話的
號碼,以及大致的通話時間及發送與收到的訊
息數量。
僅當手機已開機,且處於系統的服務範圍之內同時系統
支援以上功能時,手機才會記錄未接來電和已接來電。
通話計時器
選擇功能表
時間、所有已接電話、已撥電話或通話的大致總時間。
要重新設定計時器,選擇計時器置零,輸入安全碼,然
後選擇確認。
通話記錄
>
注意:服務供應商對通話和服務所列出的實際收
費可能會有所不同,這視乎網絡功能、開單時數
目的四捨五入、稅項等因素而定。
通話計時檢視大致的最後通話
>
Copyright © 2006
諾基亞。版權所有,翻印必究。
32
Page 34

功能表
■ 設定
在此功能表中,您可以調整手機的各種設定。
要將某些功能表設定重設為預設值,選擇原廠
設定
提示音設定
選擇功能表
鈴聲
鈴聲音量
音量 設為第
級升到設定的響鈴級別。
1
振動提示
訊息提示聲
警告音— 設定手機響起警報聲,例如,當電池電量耗盡
時。
> 設定 >
設定來電鈴聲。
—
—
—
—
顯示設定
選擇功能表
> 設定 >
提示音設定及下列選項:
設定鈴聲及訊息提示聲的音量。如果將鈴聲
級或更高,有來電時,您的手機將以從第
2
將手機設為振動提示來電或短訊息。
設定手機收到文字訊息時響起的鈴聲。
顯示設定。
33
Copyright © 2006
諾基亞。版權所有,翻印必究。
Page 35

功能表
選擇佈景,捲動至想要的佈景,並選擇操作
輯啟用或編輯佈景。
選擇螢幕保護時鐘將手機設定為顯示數字時鐘或普通時
鐘,及所有主要螢幕圖示作為螢幕保護圖案。
啟動或編
>
操作模式
您可以自訂操作模式以使用某些功能,例如鈴聲及螢幕
保護圖案。
選擇功能表
然後選擇個人化選擇。
> 設定 >
操作模式,想要修改的操作模式,
時間設定
選擇功能表
選擇時鐘可隱藏或顯示時鐘、設定時間或修改時間格式。
若電池已從手機取出,您可能需要重新設定時間及日期。
> 設定 >
時間設定。
通話設定
選擇功能表
Copyright © 2006
> 設定 >
通話設定以及下列選項:
諾基亞。版權所有,翻印必究。
34
Page 36

功能表
選擇來電轉接 (網絡服務) 可將您的來電轉接至留言信箱
或其他電話號碼。捲動至想要的轉接選項,選擇啟動來
電轉接啟動選定的轉接選項,選擇取消來電轉接關閉,
要檢查所選選項是否已啟動,請選擇查詢狀態;要為某
些轉接設定延時,選擇設定延時時間 (某些轉接選項不可
用)。可同時啟動多個轉接選項。當轉接所有語音來電啟
動時,待機模式下螢幕將顯示 。要關閉所有來電轉
接,選擇取消所有來電轉接。
選擇發送本手機號 (網絡服務) 決定將您的電話號碼向通
話對方顯示或隱藏。
選擇自動重撥可設定手機一次撥號不成功時,自動嘗試
重撥
次。
10
來電等待服務 (網絡服務) 當您正在通話中時,可讓網絡
通知您新的來電。
手機設定
選擇功能表
> 設定 >
選擇語言可選擇顯示語言文字。
手機設定。
35
Copyright © 2006
諾基亞。版權所有,翻印必究。
Page 37

功能表
費用設定
注意:服務供應商對通話和服務所列出的實際收
費可能會有所不同,這視乎網絡功能、開單時數
目的四捨五入、稅項等因素而定。
選擇功能表
視預付話費資訊;通話計時器 開啟或關閉通話時間顯
示;通話總結開啟或關閉大致通話時間報告。
> 設定 >
注意:如果卡上已無話費餘額,就只能撥打預先
編入手機的官方緊急電話。
配套設定
選擇功能表
選擇自動接聽將手機設定為
僅當其中一個增強配套已連接至手機時,配件設定的功
能表項目才會顯示。
> 設定 >
右選擇鍵設定
在待機模式下,選擇捷徑可存取快捷操作清單。要定義
或管理快捷操作,選擇功能表
費用設定、預付儲值 (網絡服務) 檢
配套設定
耳機或助聽器。
>
秒鐘後自動接通來電。
5
> 設定 >
右導航鍵設定。
Copyright © 2006
諾基亞。版權所有,翻印必究。
36
Page 38

功能表
捲動至選擇操作選擇要用作快捷操作的功能,捲動至組
織可管理快捷操作清單中各個功能的次序。
■ 鬧鐘
在待機模式下,選擇功能表
設定響鬧時間。捲動至響鬧鈴聲選擇響鬧鈴
聲,捲動至重複響鬧將鬧鐘設為在一週的某些
天內響鬧一次或重複響鬧,捲動至語音時鐘可讓手機讀
出時間。鬧鈴響起後,選擇停止停止響鬧,或按重響停
止響鬧並將其設定在
若到了響鬧時間處於關機狀態,手機便會自動開啟並響
起響鬧聲。若選擇停止,手機會詢問您是否要開機準備
通話。按否關閉手機,或按確認即可撥打及接聽電話。
當使用無線電話可能造成干擾或危險時,請勿選擇確認。
> 鬧鐘 >
分鐘之後再響一次。
10
響鬧時間
■ 備忘錄
要儲存帶響鬧的簡短文字備忘,選擇
功能表
時,選擇退出可停止響鬧,或選擇重響令手
機在
備忘錄
>
10
>
分鐘後再鬧一次。
增加新備忘錄。備忘逾時
37
Copyright © 2006
諾基亞。版權所有,翻印必究。
Page 39

功能表
■ 附加功能
計算機
注意:此計算器的準確度有限,僅適用於作簡單
計算。
選擇功能表
按
1.
數字的正負號,按
向上或下捲動可顯示 +、-、
2.
需要時重複第
3.
要得到結果,選擇等於。
4.
換算器
您可以在不同的計算單位之間轉換。
在待機模式下選擇功能表
最近五次的轉換情況,選擇最後
預先定義的單位類型:溫度、重量、長度、面積、體積
以及貨幣。
您可使用常用轉換新增您自己的轉換項目。
進行轉換時,向上或向下捲動可變換轉換單位的位置。
附加功能
>
至
鍵插入數字,按
0
9
1 及 2
Copyright © 2006
計算機。
>
插入小數點。要更改輸入
#
。
*
。
x 或 /
步。
附加功能
>
諾基亞。版權所有,翻印必究。
換算器。要存取
>
次轉換亦可選擇六個
5
38
Page 40

功能表
鈴聲編輯器
選擇功能表
一種鈴聲。您可輸入並建立自己的鈴
聲。例如,按
按
9 拉長 (+)
入間隔,
(e 與 b
完成鈴聲後,請選擇操作
清除螢幕或退出。
在背景下運行應用程式會增加電池電量的消耗,縮短電
池使用時間。
附加功能
>
4 表示 f
音符或間隔時間。按
設定八度音階,
*
音不可用)。
鈴聲編輯器及
>
音。按
8 縮短 (-)
插
0
銳化聲音
#
播放、儲存、節奏、發送、
>
農曆
只有在手機的語言設定為中文時,農曆才可用。
請在待機模式下選擇功能表
農曆資訊將顯示出來。
向上或向下捲動可檢視前一天或後一天的農曆資訊。
要尋找某個特定日期 (陽曆) 的農曆資訊,請選擇尋找,
輸入想要的日期,並選擇確認。
附加功能
>
農曆。當日的
>
39
Copyright © 2006
諾基亞。版權所有,翻印必究。
Page 41

功能表
■
SIM
才顯示此功能表。功能表的名稱及內容視
卡而定。
有關資訊請聯絡您的服務供應商。
服務
SIM
卡可提供其他服務。僅當
Copyright © 2006
諾基亞。版權所有,翻印必究。
SIM
卡支援時,
SIM
40
Page 42

電池訊息
電池訊息
5.
■ 充電與放電
本手機由充電電池供電。新電池在第二到三次完全充電
和放電之後才能達到最佳效能。電池可以充電、放電數
百次,但最終亦會失效。若通話時間及待機時間明顯少
於正常時間時,則表示需要更換電池。請僅使用經
認可的電池,以及同樣用於本手機的充電器為電池充電。
若更換的電池是第一次使用或在較長的時間內未使用,
可能需要先將其連至充電器後斷開,然後再重新接上才
能開始充電。
不用充電器時將其從電源插座及手機上斷開。不要將充
滿電的電池一直連接在充電器上,過分充電可能縮短電
池壽命。若已完全充電的電池擱置不用,電池本身便會
不斷放電。
如果電池電量已完全用盡,可能要過幾分鐘後螢幕上才
會出現充電圖示,或才能進行通話。
不要把電池用作其他用途。請勿使用損壞的充電器或電
池。
Nokia
41
Copyright © 2006
諾基亞。版權所有,翻印必究。
Page 43

電池訊息
請勿使電池發生短路。當金屬物品 (如硬幣、萬字夾或
筆) 直接接觸電池的正極 (+) 及負極 (-) 時,就可能會發
生意外短路。(這些物品具有電池金屬條的作用。) 例如,
當您將備用電池放在口袋或錢包中時,就有可能發生這
種情況。短路可能會損壞電池或觸及的物品。
把電池置於過熱或過冷的地方 (如夏天或冬天的密閉車廂
中),會縮減電池電容量及壽命。請盡量將電池置於
至
°C
(59
°F
至 77°F)
25
過冷的電池,即使電池電量已飽和,手機亦可能暫時無
法操作。電池的效能在冰點以下將大打折扣。
切勿將電池丟入火中,可能發生爆炸。電池受損時亦可
能發生爆炸。請依據當地的法規處置電池。如有可能,
請將電池置於回收處。請勿將電池當成家庭廢棄物丟棄。
之間的溫度環境中。若裝上過熱或
15
°C
■ 諾基亞電池認證指引
為了您的安全,請堅持使用諾基亞原廠電池。要證實您
購買的是一枚諾基亞的原廠電池,應向一間獲授權的諾
基亞經銷商購買,及使用以下的步驟檢查全息影像標籤:
成功完成以下步驟並不能完全保證電池的可靠性。如果
您有任何理由相信您的電池不是可靠的諾基亞原廠電池,
便應該停止使用,然後將其帶往最近的諾基亞授權服務
點或經銷商尋求協助。您的諾基亞授權服務點或經銷商
Copyright © 2006
諾基亞。版權所有,翻印必究。
42
Page 44

電池訊息
將檢查電池的可靠性。如果不能確認可靠性,請將電池
送回至您購買的地方。
授權全息影像
當您查看標籤上的全息影像,
1.
您應該從一個角度看到諾基亞
的牽手符號,及從另一個角度
看到諾基亞的原廠增強配套標
誌。
當您從左、右、下和上角度注
2.
視全息影像時,應該可以在每
邊分別看到1、2、3、4點。
43
Copyright © 2006
諾基亞。版權所有,翻印必究。
Page 45

電池訊息
如果您的電池不是可靠的電池怎麼辦?
如果您不能透過您諾基亞電池標籤上的全息影像確認是
否為可靠的諾基亞電池,請不要使用此電池。將其帶往
最近的諾基亞授權服務點或經銷商尋求協助。使用未經
製造商許可的電池可能造成危險,並可能導致操作失效
和對您的裝置及其增強配套造成損壞。這樣亦會令裝置
的所有許可和保養失效。
要尋找更多有關原廠諾基亞電池的資料,請瀏覽
www.nokia.com/battery
。
Copyright © 2006
諾基亞。版權所有,翻印必究。
44
Page 46

原裝增強配套
原裝增強配套
6.
您的手機有更多齊備的增強配套可供選
擇。請選擇符合您個人通訊需要的增強
配套。
有關與本型號手機相兼容的配件信息,
請參見
www.nokia.com.hk
如要獲取有關增強配套的供應情況,請向您當地的經銷
商查詢。
。
有關附件及增強配套的幾條實用準則。
• 把所有配件及增強配套置於兒童不能觸及的地方。
• 切斷任何附件或增強配套的電源時,請握住插頭拔
出,不要拉電線。
• 請定期檢查汽車中的增強配套是否安裝妥當並且操作
正常。
• 僅容許合格的人員安裝複雜的車用增強配套。
只可使用手機生產商認可的電池、充電器及增強配套。
使用其他類型產品可能令適用於電話的任何保證或擔保
失效,並可能發生危險。
45
Copyright © 2006
諾基亞。版權所有,翻印必究。
Page 47

■ 電池
原裝增強配套
類型 規格 通話時間
BL-5CA
鋰電池 長達
*
3 小時 -
4 小時 10 分鐘
上述時間為在優化網絡環境下通常所能達致的通話時間
*
及備用時間,實際通話時間及備用時間可能視乎
待機時間
長達
213 小時 -
小時
337
*
SIM
卡、網絡及使用設定、使用方式及環境而有所不同,可
能會明顯短於上述時間。使用內建免提功能亦會影響手
機的待機時間及備用時間。
Copyright © 2006
諾基亞。版權所有,翻印必究。
46
Page 48

保養與維修
保養與維修
7.
本手機運用優良技術設計,務請小心使用。以下建議將
有利於維持手機的保固範圍。
• 請保持手機乾燥。雨水、濕氣與各種液體或水份可能
含有腐蝕電路的礦物質。若手機受潮,請取出電池,
待手機完全乾燥後再重新裝電池。
• 請勿將手機存放在佈滿灰塵、髒亂的地方或在該地方
使用手機。活動式零件及電子元件可能較容易因此
損壞。
• 請勿將手機置於高溫處。高溫可能會縮短電子裝置的
壽命、破壞電池,並使某些塑膠零件變形或溶化。
• 請勿將手機置於溫度過低的地方。當手機恢復其正常
的溫度時,其內部可能會產生濕氣,這可能會損壞電
路板。
• 請勿違反本指南的指示自行拆卸手機。
• 請勿扔擲、敲擊或搖晃手機。粗暴的使用方式可能會
破壞內部的電路板及精密構造。
• 請勿使用刺激性的化學製品、清潔溶劑或腐蝕性的清
潔劑來清潔電話。
47
Copyright © 2006
諾基亞。版權所有,翻印必究。
Page 49

保養與維修
• 請勿為手機塗上顏料。塗料可能會妨礙設備的活動式
零件,影響正常使用。
• 請使用所提供的或合格的替換天線。未經認可的天
線、改裝物或其他附件可能會損壞電話,並可能違反
無線裝置管制法。
• 請在室內使用充電器。
• 將裝置送往服務中心前,請緊記為您想要保留的數據
作備份 (例如,通訊錄及日曆備註)。
以上所有建議適用於手機、電池、充電器或其他任何增
強配套。若手機不能正常工作,請送到就近的授權服務
機構進行維修。
Copyright © 2006
諾基亞。版權所有,翻印必究。
48
Page 50

其他安全資訊
其他安全資訊
8.
手機及其增強配套可能包含較小的附件。請將所有配件
置於兒童無法觸及之處。
■ 使用環境
請謹記,在任何場所均須遵守所有特定的強制性規定,
且在任何禁止使用手機或可能造成干擾或危險的場所,
亦請務必關機。使用手機時保持正常操作姿勢。以正常
使用姿勢在耳朵附近或距離身體至少
處使用本手機時,其輻射強度符合
攜帶手機套或其他手機固定設備時,其不能含有金屬物
質,並距離身體不少於上述距離。
手機某些部分具有磁性。手機可能會吸附某些金屬物件。
請勿將信用卡或其他磁化儲存媒介放在手機附近,否則,
所儲存的資訊可能會被擦除。
2.2 厘米 (7/8 英吋)
暴露準則。隨手機
RF
49
Copyright © 2006
諾基亞。版權所有,翻印必究。
Page 51

其他安全資訊
■ 醫療裝置
任何無線傳輸裝置 (包括手機) 的運作都可能干擾防護不
足的醫療設備功能。請詢問醫生或醫療裝置的製造商,
確認這些裝置是否可充分抵禦外部的
的疑慮。請在醫療診所等區域張貼的相關法規的指示下,
關閉手機。醫院或醫療診所可能正在使用容易受外部
能量影響的設備。
心律調校器
心律調校器製造商建議在手機與心律調校器之間保持最
少
15.3 厘米 (6 英吋)
擾。上述建議與
研究所) 的建議與其獨立的研究結論一致。心律調校器使
用者:
• 始終將本手機與心律調校器的距離保持在
• 請勿將手機置於胸間的口袋中
• 用未使用心律調校器一邊的耳朵接聽電話,以降低干
如果您擔心發生干擾,請關閉並移開該裝置。
以上
(6 英吋)
擾的可能性。
的距離,以免對心律調校器產生干
Wireless Technology Research (
能量,或提出您
RF
無線技術
15.3
RF
厘米
Copyright © 2006
諾基亞。版權所有,翻印必究。
50
Page 52

其他安全資訊
助聽器
有些數碼無線電話可能會干擾助聽器。若發生干擾,請
向服務供應商諮詢。
■ 汽車
訊號可能會影響汽車內安裝不當或防護不足的電子系
RF
統 (例如電子加油系統、電子防滑 (防鎖) 煞車系統、電子
車速控制系統、安全氣囊系統)。請向製造商或其代理商
查詢關於汽車或新增設備方面的問題。
應僅由合格的專業人員維修手機,或是在汽車中裝設手
機。錯誤的安裝或維修可能會產生危險,而且可能使任
何適用於該設備的保固失效。請定期檢查汽車中所有的
無線電話裝備是否已裝妥並且運作正常。請勿將易燃液
體、氣體或易爆物與手機及其組件或增強配套一齊置於
汽車放物箱中。對於裝有安全氣囊的汽車,請謹記安全
氣囊膨脹時會產生一股強大的力量。請勿將物件 (包括固
定或可攜式無線裝備) 放置在安全氣囊上或安全氣囊可衝
擊到的地方。若車內的無線設備安裝不當,安全氣囊充
氣脹大時可能會引致嚴重的傷亡事故。
在飛機中禁止使用手機。登機前請將手機關閉。在飛機
上使用無線電話可能會危及飛機的運作安全、干擾無線
通訊網絡,而且屬違法。
51
Copyright © 2006
諾基亞。版權所有,翻印必究。
Page 53

其他安全資訊
■ 可能發生爆炸的場所
在任何可能發生爆炸的環境請關閉手機,並遵守所有的
告示及指引。可能發生爆炸的環境包括平時被建議關閉
汽車引擎的地方。在這類地方產生火花可能會造成爆炸
或失火,導致身體受傷甚至死亡。在燃料存放點 (如在加
油站的油泵附近) 請關閉手機。注意在加油站、燃料存放
及銷售區域、化工廠或進行爆破工程的地方使用無線電
裝備的限制。這類可能發生爆炸的地方通常 (但不一定
會有清楚的標示。這些地方包括船艙、化學品輸送或儲
存設施、使用液化石油燃料 (如丙烷或丁烷) 的交通工具、
空氣中含有化學物或微粒 (例如顆粒、塵埃或金屬粉末
的地方。
)
)
■ 緊急求助電話
重要資訊:無線電話 (包括本手機) 利用無線電波
訊號、無線網絡、有線網絡及用戶可編制程式的
功能進行運作。因此,無法保證這些功能在任何
情況下都能連接。請切記,不能僅僅依賴任何手
機進行重要的通訊 (例如,醫療緊急事件)。
Copyright © 2006
諾基亞。版權所有,翻印必究。
52
Page 54

其他安全資訊
如果要撥打緊急電話:
若手機尚未開機,請先開機。檢查訊號強度是否足夠。
1.
有些網絡可能需將有效的
視需要按結束鍵數次清空螢幕,使手機撥號就緒。
2.
輸入您目前所在地的官方緊急號碼。緊急電話號碼按
3.
所在地點不同而有所分別。
按通話鍵。
4.
如果某些功能正在使用中,撥打緊急電話之前,您可能
必須先關閉這些功能。查詢本指南或聯絡您的服務供應
商獲取更多資料。
撥打緊急電話時,請盡可能提供正確的必要訊息。發生
事故時您的手機可能是唯一的通訊工具。因此只有在接
到掛掉電話的指示後才可結束通話。
卡正確地插入手機。
SIM
53
Copyright © 2006
諾基亞。版權所有,翻印必究。
Page 55

其他安全資訊
■ 證書資訊
本手機符合有關暴露於無線電波的國際準則
本流動電話是一部無線電收發器。其設計及製造不超出
國際準則
是該準則的一部份,其中規定了普通人可接收的射頻能
量等級。此準則是由獨立的科學機構經過長期全面的科
學研究評估之後編寫而成。它包括了為保障所有人 ─ 不
論年齡與健康狀況 ─ 重要安全的最低要求。
流動裝置的暴露標準採用的計量單位是比吸收率 (簡稱
。國際準則中規定的
SAR)
(W/kg) *SAR
中所檢定的最高功率之下進行的。儘管
的最高功率下測量的,但使用手機時的實際
該最大值。這是因為手機設計有多種運作功率級別,以
此只使用連接網絡所需的功率。一般而言,離無線接收
站越近,手機所需輸出的功率就越低。
在耳朵旁使用手機進行測試時,本手機的最高
0.82 W/kg
Copyright © 2006
(SAR)
(ICNIRP)
。
推薦的射頻
SAR
測試是以標準操作手機姿勢在所有測試頻帶
諾基亞。版權所有,翻印必究。
暴露限制。這些限制
(RF)
限制為
2.0 瓦特/
SAR
是在所檢定
SAR
SAR 值為
千克
遠低於
54
Page 56

其他安全資訊
值可能視乎國際報告、測試需求和網絡帶寬而有所
SAR
不同。使用裝置配件及增強配套可能會導致不同的
值。附加的
SAR
資料可能在
www.nokia.com
上的產品資
料中提供。
日用流動電話的
*
瓦特/千克
(W/kg)
限制為平均每
SAR
克人體組織
10
。此準則融合了實際安全限度,為公眾
提供更多保護,也向公眾解釋了測量上的任何變化。
值視乎國家報告要求及網絡波段而定。如需其他地
SAR
區的
資料,請瀏覽
SAR
www.nokia.com
網頁中的產品
資訊。
SAR
2.0
55
Copyright © 2006
諾基亞。版權所有,翻印必究。
Page 57

索引
字母
的支援及聯絡
Nokia
資料
11
服務
SIM
40
一劃
一般訊息
10
四劃
中文輸入
手機設定
19
35
五劃
充電與放電
充電器與增強配套
功能表
右選擇鍵設定
41
27
36
六劃
共用記憶體
在通訊錄中搜尋姓名
使用功能表指令
11
Copyright © 2006
八劃
使用智慧預測型英文字輸
入法
24
使用傳統英文輸入法
其他安全資訊
可能發生爆炸的
場所
52
汽車
51
醫療裝置
附加功能
38
九劃
保養與維修
9
拼音輸入法
為了您的安全
為電池充電
計算機
38
十劃
原裝增強配套
30
時間設定
諾基亞。版權所有,翻印必究。
34
24
50
47
22
5
14
45
56
Page 58

書寫文字的秘訣
訊息
27
25
圖片訊息 (網絡服務)
29
配套設定
36
十一劃
基本概念
密碼功能
設定
通訊錄
通訊錄設定
通話記錄
通話設定
12
10
33
操作模式
30
快速搜尋
32
34
34
30
31
十二劃
備忘錄
37
插入
提示音設定
換算器
筆劃輸入法
費用設定
57
卡和電池
SIM
33
38
20
36
Copyright © 2006
開啟或關閉智慧預測型
英文字輸入法
開機與關機
十三劃
農曆
39
鈴聲編輯器
電池
46
電池訊息
類型
46
41
十四劃
演示模式
緊急求助電話
網絡服務
15
8
十五劃
撥打緊急電話
撥打與接聽電話
鬧鐘
13
37
十六劃
輸入法
19
諾基亞。版權所有,翻印必究。
23
15
39
52
53
18
Page 59

十九劃
證書資訊
關於本手機
二十三劃
顯示設定
54
33
7
Copyright © 2006
諾基亞。版權所有,翻印必究。
58
Page 60

Nokia 1600
User’s Guide
Copyright © 2006 Nokia. All rights reserved.
Page 61

DECLARATION OF CONFORMITY
We, NOKIA CORPORATION declare under our sole responsibility that the
product RH-64 is in conformity with the provisions of the following
Council Directive: 1999/5/EC.
A copy of the Declaration of Conformity can be found at
http://www.nokia.com/phones/declaration_of_conformity/.
Copyright © 2006 Nokia. All rights reserved.
Reproduction, transfer, distribution or storage of part or all of the
contents in this document in any form without the prior written
permission of Nokia is prohibited.
US Patent No 5818437 and other pending patents. T9 text input software
Copyright © 1997-2006. Tegic Communications, Inc. All rights reserved.
Nokia, Nokia Connecting People, Xpress-on are trademarks or registered
trademarks of Nokia Corporation. Other product and company names
mentioned herein may be trademarks or tradenames of their respective
owners.
Nokia tune is a sound mark of Nokia Corporation.
Nokia operates a policy of continuous development. Nokia reserves the
right to make changes and improvements to any of the products described
in this document without prior notice.
1
Copyright © 2006 Nokia. All rights reserved.
Page 62

Under no circumstances shall Nokia be responsible for any loss of data or
income or any special, incidental, consequential or indirect damages
howsoever caused.
The contents of this document are provided “as is”. Except as required by
applicable law, no warranties of any kind, either express or implied,
including, but not limited to, the implied warranties of merchantability
and fitness for a particular purpose, are made in relation to the accuracy,
reliability or contents of this document. Nokia reserves the right to revise
this document or withdraw it at any time without prior notice.
The availability of particular products may vary by region. Please check
with the Nokia dealer nearest to you.
THIS DEVICE MAY CONTAIN COMMODITIES, TECHNOLOGY OR SOFTWARE
SUBJECT TO EXPORT LAWS AND REGULATIONS FROM THE US AND OTHER
COUNTRIES. DIVERSION CONTRARY TO LAW IS PROHIBITED.
Copyright © 2006 Nokia. All rights reserved.
2
Page 63

Table of contents
Table of contents
For your safety.................. 5
General information ....... 10
Access codes ......................... 10
Shared memory .................... 11
Nokia support and contact
information ........................... 12
1. Get started.................. 13
How to get started.............. 13
Insert a SIM card and
battery .................................... 14
Charge the battery .............. 15
Switch on or off................... 16
Demo mode ........................... 17
Shortcuts in the standby
mode........................................ 17
Lock the keypad ................... 18
Wrist strap............................. 18
3
Copyright © 2006 Nokia. All rights reserved.
2. Call functions............. 19
Make a call and answer
a call........................................ 19
Loudspeaker .......................... 19
3. Write text................... 20
4. Menu functions.......... 22
Messages ............................... 22
Message settings ............. 22
Create message ................ 23
Read a text message....... 24
Drafts and Sent items..... 24
Picture messages (network
service)................................ 25
Delete messages............... 25
Contacts................................. 26
Search for a name and
phone number................... 26
Settings for contacts ...... 27
Page 64

Table of contents
Call register........................... 28
Call timers.......................... 28
Settings .................................. 29
Tone settings..................... 29
Display settings ................ 30
Profiles ................................ 30
Time settings..................... 30
Call settings....................... 31
Phone settings .................. 32
Cost settings ..................... 32
Enhancement settings.... 33
Right selection key
setting................................. 33
Clock ....................................... 34
Reminders.............................. 34
Extras...................................... 35
Calculator........................... 35
Converter............................ 35
Composer ........................... 36
SIM services.......................... 37
Copyright © 2006 Nokia. All rights reserved.
5. Battery information... 38
Charging and discharging.. 38
Nokia battery authentication
guidelines ............................... 40
6. Genuine
Enhancements.................. 42
Battery .................................... 43
7. Care and
maintenance.................... 44
8. Additional safety
information ..................... 46
Index ................................ 54
4
Page 65

For your safety
For your safety
Read these simple guidelines. Not following them may be
dangerous or illegal. Read the complete user guide for further
information.
SWITCH ON SAFELY
Do not switch the phone on when wireless phone
use is prohibited or when it may cause interference
or danger.
ROAD SAFETY COMES FIRST
Obey all local laws. Always keep your hands free to
operate the vehicle while driving. Your first
consideration while driving should be road safety.
INTERFERENCE
All wireless phones may be susceptible to
interference, which could affect performance.
SWITCH OFF IN HOSPITALS
Follow any restrictions. Switch the phone off near
medical equipment.
SWITCH OFF IN AIRCRAFT
Follow any restrictions. Wireless devices can cause
interference in aircraft.
5
Copyright © 2006 Nokia. All rights reserved.
Page 66

For your safety
SWITCH OFF WHEN REFUELLING
Do not use the phone at a refuelling point. Do not
use near fuel or chemicals.
SWITCH OFF NEAR BLASTING
Follow any restrictions. Do not use the phone where
blasting is in progress.
USE SENSIBLY
Use only in the normal position as explained in the
product documentation. Do not touch the antenna
unnecessarily.
QUALIFIED SERVICE
Only qualified personnel may install or repair this
product.
ENHANCEMENTS AND BATTERIES
Use only approved enhancements and batteries.
Do not connect incompatible products.
WATER-RESISTANCE
Your phone is not water-resistant. Keep it dry.
BACK-UP COPIES
Remember to make back-up copies or keep a written
record of all important information stored in your
phone.
Copyright © 2006 Nokia. All rights reserved.
6
Page 67

For your safety
CONNECTING TO OTHER DEVICES
When connecting to any other device, read its user
guide for detailed safety instructions. Do not
connect incompatible products.
EMERGENCY CALLS
Ensure the phone is switched on and in service.
Press the end key as many times as needed to clear
the display and return to the start screen. Enter the
emergency number, then press the call key.
Give your location. Do not end the call until given
permission to do so.
■ About your device
The wireless device described in this guide is approved for use on
the EGSM 900 and GSM 1800 networks. Contact your service
provider for more information about networks.
When using the features in this device, obey all laws and respect
privacy and legitimate rights of others.
Warning: To use any features in this device,
other than the alarm clock, the device must be
switched on. Do not switch the device on when
wireless device use may cause interference or danger.
7
Copyright © 2006 Nokia. All rights reserved.
Page 68

For your safety
■ Network services
To use the phone you must have service from a wireless service
provider. Many of the features in this device depend on features
in the wireless network to function. These network services may
not be available on all networks or you may have to make
specific arrangements with your service provider before you can
utilize network services. Your service provider may need to give
you additional instructions for their use and explain what
charges will apply. Some networks may have limitations that
affect how you can use network services. For instance, some
networks may not support all language-dependent characters
and services.
Your service provider may have requested that certain features
be disabled or not activated in your device. If so, they will not
appear on your device menu. Your device may also have been
specially configured. This configuration may include changes in
menu names, menu order and icons. Contact your service
provider for more information.
Copyright © 2006 Nokia. All rights reserved.
8
Page 69

For your safety
■ Chargers and enhancements
Always switch the device off and disconnect the charger before
removing the battery.
Check the model number of any charger before use with this
device. This device is intended for use when supplied with power
from an AC-2, ACP-7 or ACP-12 charger.
Warning: Use only batteries, chargers, and
enhancements approved by Nokia for use with this
particular model. The use of any other types may
invalidate any approval or warranty, and may be
dangerous.
For availability of approved enhancements, please check with
your dealer.
9
Copyright © 2006 Nokia. All rights reserved.
Page 70

General information
General information
■ Access codes
• The security code, supplied with the phone, helps to protect
your phone against unauthorized use. The preset code is
12345.
• The PIN code, supplied with the SIM card, helps to protect
the card against unauthorized use.
• The PIN2 code, supplied with some SIM cards, is required to
access certain services.
• PUK and PUK2 codes may be supplied with the SIM card.
If you enter the PIN or PIN2 code incorrectly three times in
succession, you will be asked for the PUK or PUK2 code.
If you do not have them, contact your local service provider.
Select Menu > Settings > Security settings to set how your
phone uses the access codes and security settings.
Copyright © 2006 Nokia. All rights reserved.
10
Page 71

General information
■ Shared memory
The following features in this device may share memory:
Messages, Contacts, and Composer. Use of one or more of these
features may reduce the memory available for the remaining
features sharing memory. For example, saving many text
messages may use all of the available memory. Your device may
display a message that the memory is full when you try to use a
shared mem ory feature. In this case, de le te some of the
information or entries stored in the shared memory features
before continuing. Some of the features, such as Contacts may
have a certain amount of memory specially allotted to them in
addition to the memory shared with other features.
11
Copyright © 2006 Nokia. All rights reserved.
Page 72

General information
■ Nokia support and contact information
For the latest version of this guide, downloads, services and
additional information related to your Nokia product,
please visit www.nokia.com.hk/support or your local Nokia web
site. You may also download free configuration settings such as
MMS, GPRS, e-mail, and other services for your phone model at
www.nokia.com.hk/settings.
Should you still require assistance, please refer to
www.nokia.com.hk/contactus.
To check for the nearest Nokia care center location for
maintenance services, you may like to visit
www.nokia.com.hk/carecenter.
Copyright © 2006 Nokia. All rights reserved.
12
Page 73

Get started
1. Get started
■ How to get started
When the phone is ready for use
and no characters have been keyed
in, the phone is in the standby
mode.
• Network intensity (1)
• Battery charge level (2)
• Selection key functions (3)
• Selection keys (4)
• Scroll keys (5)
•Call key(6)
• End key and power key (7)
•Keypad(8)
13
Copyright © 2006 Nokia. All rights reserved.
Page 74

Get started
■ Insert a SIM card and battery
Keep all SIM cards out of the reach of small children.
For availability and information on using SIM card services,
contact your SIM card vendor. This may be the service provider,
network operator, or other vendor.
This phone is intended for use with BL-5C battery.
1. Press the back cover release button (1), open the back cover,
and remove it (2, 3). Lift the battery from the finger grip,
and remove it (4).
2. Carefully lift the SIM card holder from the finger grip of the
phone (5). Insert the SIM card, ensuring that the bevelled
corner is on the upper right side and that the golden contact
is facing downward (6). Close the SIM card holder (7),
and press it to lock it into place. Insert the battery (8, 9).
Copyright © 2006 Nokia. All rights reserved.
14
Page 75

Get started
■ Charge the battery
1. Connect the charger to an ac wall outlet.
2. Connect the plug from the charger to the
jack on the bottom of the phone.
The battery indicator bar starts scrolling.
If Not charging is displayed, wait for a while, disconnect the
charger, plug it in again, and retry. If charging still fails,
contact your dealer.
3. When the battery is fully charged, the bar stops scrolling.
Disconnect the charger from the phone and the ac outlet.
15
Copyright © 2006 Nokia. All rights reserved.
Page 76

■ Switch on or off
Press and hold the end key for a few seconds.
Use the phone only in its normal
operating position.
Your device has an internal antenna.
Note: As w ith any other
radio transmitting device, do not touch the antenna
unnecessarily when the device is switched on.
Contact with the antenna affects call quality and may
cause the device to operate at a higher power level
than otherwise needed. Avoiding contact with the
antenna area when operating the device optimizes the
antenna performance and the battery life.
Note: Avoid touching this
connector as it is sensitive to
electrostatic discharge.
Get started
Copyright © 2006 Nokia. All rights reserved.
16
Page 77

Get started
■ Demo mode
You may view how to use certain features of your phone. If the
SIM card is not installed, select Demo > Basics, More or Games.
If the SIM card is installed, select Menu > Extras > Demo >
Basics or More.
■ Shortcuts in the standby mode
Scroll up to access Call register.
Scroll down to access the names and numbers saved in
Contacts.
Scroll left to write a message.
Scroll right to access the demo mode.
Press and hold * to activate the speaking clock.
Press the call key once to access the list of dialed numbers.
Scroll to the name or number that you want, and to call the
number, press the call key.
17
Copyright © 2006 Nokia. All rights reserved.
Page 78

Get started
■ Lock the keypad
To lock the keypad to prevent keys from being
pressed accidentally, in the standby mode,
select Menu, and press * quickly; to unlock,
select Unlock, and press * quickly.
When the keypad lock is on, calls may be possible
to the official emergency number programmed into your device.
Enter the emergency number, and press the call key.
The emergency number you have entered may not be displayed
on the screen.
■ Wrist strap
Remove the back cover, insert the strap as
shown in the picture. Replace the back cover.
Copyright © 2006 Nokia. All rights reserved.
18
Page 79

Call functions
2. Call functions
■ Make a call and answer a call
To make a call, do the following:
1. Enter the phone number including the area code if necessary.
The country code should be included, if necessary.
2. Press the call key to call the number. Scroll right to increase
or left to decrease the volume of the earpiece or headset
during the phone call.
To answer an incoming call, press the call key. To reject the call
without answering, press the end key.
■ Loudspeaker
If available, you may select Loudsp. or Hands. to use the
loudspeaker or the earpiece of the phone during a call.
Warning: Do not hold the device near your ear when
the loudspeaker is in use, because the volume may be
extremely loud.
19
Copyright © 2006 Nokia. All rights reserved.
Page 80

Write text
3. Write text
You can enter text in two different ways: the traditional text
input indicated by , or predictive text input (built-in
dictionary) indicated by .
To use traditional text input, press the key marked with the letter
that you want repeatedly until the letter appears.
To turn on predictive text input when writing text, select
Options > Dictionary and the desired language; to turn it off,
select Options > Dictionary off.
To use predictive text input, do the following:
1. To enter the word you want, press each key once for a single
letter.
2. If the displayed word is the one you want, press 0, and start
writing the next word.
To change the word, press * repeatedly until the word you
want appears.
If ? is displayed after the word, the word is not in the
dictionary. To add the word to the dictionary, select Spell,
enter the word (using traditional text input), and select OK.
Copyright © 2006 Nokia. All rights reserved.
20
Page 81

Write text
Tips for writing text with traditional and predictive text input:
• To add a space, press 0.
• To quickly change the text input method when writing text,
press # repeatedly and check the indicator at the top of the
display.
• To add a number, press and hold the desired number key.
• To get a list of special characters when using traditional text
input, press *; when using predictive text input, press and
hold *.
21
Copyright © 2006 Nokia. All rights reserved.
Page 82

Menu functions
4. Menu functions
In the standby mode, select Menu and the desired menu and
submenu. Select Exit or Back to exit the current level of menu.
Press the end key to return to the standby mode directly.
Not all menu functions or option items are described here.
■ Messages
Message settings
To edit your message settings, select Menu > Messages >
Message settings.
Select Sending profile > Message centre number to save the
phone number needed for sending text and picture messages.
You obtain this number from your service provider.
Select Character support (network service) to set whether the
Full or Reduced coding is used when sending a text message.
Select No. screening to view or edit the list of filtered numbers.
Copyright © 2006 Nokia. All rights reserved.
22
Page 83

Menu functions
Create message
Your device supports the sending of text messages beyond the
character limit for a single message. Longer messages will be
sent as a series of two or more messages. Your service provider
may charge accordingly. Characters that use accents or other
marks, and characters from some language options like Chinese,
take up more space limiting the number of characters that can
be sent in a single message.
The number of available characters and the current part number
of a multipart message is shown on the top right of the display,
for example, 917/1.
1. In the standby mode, select Menu > Messages > Create
message.
2. Write the message.
3. To send the message, select Options > Send, enter the
recipient’s phone number, and select OK.
23
Copyright © 2006 Nokia. All rights reserved.
Page 84

Menu functions
Note: When sending messages, your device may
display Message sent. This is an indication that the
message has been sent by your device to the message
centre number programmed into your device. This is
not an indication that the message has been received
at the intended destination. For more details about
messaging services, check with your service provider.
Read a text message
When you receive text messages, the number of new messages
as well as an icon are shown on the display in the standby
mode.
Select Show to view the messages immediately, or Exit to view
it later in Menu > Messages > Inbox.
Drafts and Sent items
In the Drafts menu, you can view the messages that you saved with the Save message menu. In the Sent items menu, you can view the copies of the messages that you sent.
Copyright © 2006 Nokia. All rights reserved.
24
Page 85

Menu functions
Picture messages (network service)
You can receive and send messages that contain pictures.
Received picture messages are saved in the Inbox. Note that
each picture message comprises several text messages.
Therefore, sending one picture message may cost more than one
text message.
Note: The picture message function can be used only if
it is supported by your network operator or service
provider. Only compatible devices that offer picture
message features can receive and display picture
messages. The appearance of a message may vary
depending on the receiving device.
Delete messages
To delete all read messages or all the messages in a folder,
select Menu > Messages > Delete messages > All read or the
desired folder.
25
Copyright © 2006 Nokia. All rights reserved.
Page 86

Menu functions
■ Contacts
You can save names and phone numbers in the
phone memory and in the SIM card memory.
The internal phone book can store up to 200 names.
Search for a name and phone number
Scroll down in the standby mode, and enter the first letters of
the name. Scroll to the name that you want.
You can also use the following options in the Contacts menu:
Add contact—To save names and phone numbers in the phone
book
Delete—To delete names and phone numbers from the phone
book individually or all at once
Copy—To copy names and phone numbers all at once or one by
one from the internal phone book to the SIM phone book, or vice
versa
Copyright © 2006 Nokia. All rights reserved.
26
Page 87

Menu functions
Settings for contacts
Select Menu > Contacts > Settings and from the available
options:
Memory in use—To select whether the names and phone
numbers are saved in Phone or SIM card. When you change the
SIM card, SIM card memory is automatically selected.
Contacts view—To select how the names and phone numbers are
shown. When you view the Details of a contact with Contacts
view set to Name list or Name only, the name or phone number
saved in the SIM card memory is indicated by and the name
or phone number saved in the phone memory is indicated by
.
Memory status—To check how many names and phone numbers
are already saved and how many can still be saved in each phone
book
27
Copyright © 2006 Nokia. All rights reserved.
Page 88

Menu functions
■ Call register
The phone registers the phone numbers of missed,
received, and dialed calls; the approximate length of
your calls; and the number of sent and received messages.
The phone registers missed and received calls if it is switched on,
within the network service area, and the network supports these
functions.
Call timers
Select Menu > Call register > Call duration to view the
approximate duration of the last call, all received calls, all
dialled calls, or the approximate duration of all calls.
To reset the timers, select Clear timers, enter the security code,
and select OK.
Note: The actual invoice for calls and services from
your service provider may vary, depending upon
network features, rounding off for billing, taxes and
so forth.
Copyright © 2006 Nokia. All rights reserved.
28
Page 89

Menu functions
■ Settings
In this menu, you can adjust various phone settings.
To reset some menu settings to their default values,
select Restore factory set.
Tone settings
Select Menu > Settings > Tone settings and from the available
options:
Ringing tone—To set the tone for incoming calls
Ringing volume—To set the volume level for the ringing and
message alert tones. If you set Ringing volume to be level 2 or
above, your phone rings with the ringing volume ascending from
level 1 to the level you have set when there is an incoming call.
Vibrating alert—To set the phone to vibrate when you receive a
call or a text message
Message alert tone—To set the tone to sound when you receive a
text message
Warning t ones—To set the phone to sound tones, for example,
when the battery is running out of power
29
Copyright © 2006 Nokia. All rights reserved.
Page 90

Menu functions
Display settings
Select Menu > Settings > Display settings.
Select Themes, scroll the desired theme, and select Options >
Activate or Edit to acitvate or edit the theme.
Select Power saver clock to set the phone to show the digital or
classic clock and all the main display icons as a screen saver.
Profiles
You can customize the profiles to use certain features, such as
ringing tones and screen saver.
Select Menu > Settings > Profiles, the profile that you want to
modify, and Personalise.
Time settings
Select Menu > Settings > Time settings.
Select Clock to hide or show the clock, to set the time, or to edit
the time format.
If the battery was removed from the phone, you may need to set
the time and date again.
Copyright © 2006 Nokia. All rights reserved.
30
Page 91

Menu functions
Call settings
Select Menu > Settings > Call settings, and the following
options:
Select Call divert (network service) to divert your incoming calls
to your voice mailbox or to some other phone number. Scroll to
the divert option you want and select Activate to set the
selected divert option on and Cancel to set it off; to check
whether the selected option is active, select Check status;
to specify a delay for certain diverts, select Set delay time
(not available for all divert options). Several divert options may
be active at the same time. When Divert all voice calls is
activated, is shown on the display in the standby mode.
To deactivate all call diverts, select Cancel all diverts.
Select Send my caller identity (network service) to determine if
your phone number is displayed to or hidden from the person
you are calling.
Select Automatic redial to set your phone to make up to 10
attempts to connect the call after an unsuccessful call attempt.
Select Call waiting service (network service) to let the network
notify you of a new incoming call while you have a call in
progress.
31
Copyright © 2006 Nokia. All rights reserved.
Page 92

Menu functions
Phone settings
Select Menu > Settings > Phone settings.
Select Language to select the language for the display texts.
Cost settings
Note: The actual invoice for calls and services from
your service provider may vary, depending on network
features, rounding off for billing, taxes, and so forth.
Select Menu > Settings > Cost settings, and Prepaid tracker
(network service) to view information of prepaid credit; In-call
timer to turn the call time display on or off; Call summary to turn
the approximate call time report on or off.
Note: When no more charging units or currency units
are left, calls may only be possible to the official
emergency number programmed into the device.
Copyright © 2006 Nokia. All rights reserved.
32
Page 93

Menu functions
Enhancement settings
Select Menu > Settings > Enhancement settings > Headset or
Loopset.
Select Automatic answer to set the phone to automatically
answer an incoming call after 5 seconds.
The accessory settings menu item becomes visible only after one
of the accessories has been connected to the phone.
Right selection key setting
In the standby mode, you may select Go to to access a list of
shortcuts. To define or organize the shortcuts, select Menu >
Settings > Right selection key settings. Scroll to Select options to
select the functions that you want as shortcuts; scroll to
Organise to organize the order of the functions in the shortcut
list.
33
Copyright © 2006 Nokia. All rights reserved.
Page 94

Menu functions
■ Clock
In the standby mode, select Menu > Clock > Alarm
time to set the time for the alarm. Scroll to Alarm
tone to select the tone for the alarm, Repeat alarm to set the
alarm to sound only once or repeatedly on certain days of the
week and Speaking clock to let the phone speak the time. When
the alarm sounds, select Stop to stop the alarm or Snooze to
stop the alarm and set it to ring again in 10 minutes.
If the alarm time is reached while the device is switched off,
the device switches itself on and starts sounding the alarm tone.
If you select Stop, the device asks whether you want to activate
the device for calls. Select No to switch off the device or Yes to
make and receive calls. Do not select Yes when wireless phone
use may cause interference or danger.
■ Reminders
To save a short text note with an alarm, s elect
Menu > Reminders > Add ne w. When the reminder
time is reached, select Quit to stop the alarm or
Postp. to let the phone alarm again in 10 minutes.
Copyright © 2006 Nokia. All rights reserved.
34
Page 95

Menu functions
■ Extras
Calculator
Note: This calculator has limited accuracy and is
designed for simple calculations.
Select Menu > Extras > Calculator.
1. Press keys 0 to 9 to insert digits and # to insert a decimal
point. To change the sign of the entered number, press *.
2. Scroll up or down to highlight +, -, x, or /.
3. Repeat steps 1 and 2 if necessary.
4. To get the result, select Equals.
Converter
You can convert different measurement units.
In the standby mode, select Menu > Extras > Converter.
To access your last five conversions, select Last 5 conv. You can
also select to use the six predefined unit categories:
Temperature, Weight, Length, Area, Volum e, and Currency.
You can add your own conversions with My conversions.
35
Copyright © 2006 Nokia. All rights reserved.
Page 96

Menu functions
When doing a conversion, you may scroll up or down to swap the
positions of the units in the conversion.
Composer
Select Menu > Extras > Composer and a
tone. You can create your own ringing tones
by keying in the notes. For example, press 4
for note f. Press 8 to shorten (-) and 9 to
lengthen (+) the duration of the note or rest.
Press 0 to insert a rest, * set the octave, and
# to make the note sharp (not available for notes e and b).
When the tone is complete, select Options > Play, Save, Tempo,
Send, Clear screen or Exit.
Leaving applications running in the background increases the
demand on battery power and reduces the battery life.
Copyright © 2006 Nokia. All rights reserved.
36
Page 97

Menu functions
■ SIM services
Your SIM card may provide additional services that
you can access. This menu is shown only if it is
supported by your SIM card. The name and contents of the menu
depend on the SIM card.
For information, contact your service provider.
37
Copyright © 2006 Nokia. All rights reserved.
Page 98

Battery information
5. Battery information
■ Charging and discharging
Your device is powered by a rechargeable battery. The full
performance of a new battery is achieved only after two or three
complete charge and discharge cycles. The battery can be
charged and discharged hundreds of times, but it will eventually
wear out. When the talk and standby times are noticeably
shorter than normal, replace the battery. Use only Nokia
approved batteries, and recharge your battery only with Nokia
approved chargers designated for this device.
If a replacement battery is being used for the first time or if the
battery has not been used for a prolonged period, it may be
necessary to connect the charger and then disconnect and
reconnect it to start the charging.
Unplug the charger from the electrical plug and the device when
not in use. Do not leave fully charged battery connected to a
charger, since overcharging may shorten its lifetime. If left
unused, a fully charged battery will lose its charge over time.
Copyright © 2006 Nokia. All rights reserved.
38
Page 99

Battery information
If the battery is completely discharged, it may take a few
minutes before the charging indicator appears on the display or
before any calls can be made.
Use the battery only for its intended purpose. Never use any
charger or battery that is damaged.
Do not short-circuit the battery. Accidental short-circuiting can
occur when a metallic object such as a coin, clip, or pen causes
direct connection of the positive (+) and negative (-) terminals
of the battery. (These look like metal strips on the battery.)
This might happen, for example, when you carry a spare battery
in your pocket or purse. Short-circuiting the terminals may
damage the battery or the connecting object.
Leaving the battery in hot or cold places, such as in a closed car
in summer or winter conditions, will reduce the capacity and
lifetime of the battery. Always try to keep the battery between
15°C and 25°C (59°F and 77°F). A device with a hot or cold
battery may not work temporarily, even when the battery is fully
charged. Battery performance is particularly limited in
temperatures well below freezing.
Do not dispose of batteries in a fire as they may explode.
Batteries may also explode if damaged. Dispose of batteries
according to local regulations. Please recycle when possible.
Do not dispose as household waste.
39
Copyright © 2006 Nokia. All rights reserved.
Page 100

Battery information
■ Nokia battery authentication guidelines
Always use original Nokia batteries for your safety. To check that
you are getting an original Nokia battery, purchase it from an
authorised Nokia dealer, and inspect the hologram label using
the following steps:
Successful completion of the steps is not a total assurance of the
authenticity of the battery. If you have any reason to believe
that your battery is not an authentic, original Nokia battery, you
should refrain from using it, and take it to the nearest authorised
Nokia service point or dealer for assistance. Your authorised
Nokia service point or dealer will inspect the battery for
authenticity. If authenticity cannot be verified, return the
battery to the place of purchase.
Authenticate hologram
1. When you look at the hologram on
the label, you should see the
Nokia connecting hands symbol
from one angle and the Nokia
Original Enhancements logo when
looking from another angle.
Copyright © 2006 Nokia. All rights reserved.
40
 Loading...