

Page 1
FOREWORD READ FIRST—THEN DRIVE SAFELY
Welcome to the growing family of new NISSAN
owners. This vehicle is delivered to you with
confidence. It was produced using the latest
techniques and strict quality control.
This manual was prepared to help you understand the operation and maintenance of your
vehicle sothat youmay enjoymany miles(kilometers) ofdriving pleasure. Please read through this
manual before operating your vehicle.
A separate Warranty Information Booklet
explains details about the warranties covering your vehicle. The “NISSAN Service
and Maintenance Guide” explains details
about maintaining and servicing your vehicle. Additionally, a separate Customer
Care/Lemon Law Booklet (U.S. only) will
explain how to resolve any concerns you
may have with your vehicle, as well as
clarify your rights under your state’s lemon
law.
Your NISSAN dealership knows your vehicle
best. When you require any service or have any
questions, they will be glad to assist you with the
extensive resources available to them.
Before driving your vehicle please read this Owner’s Manual carefully. This will ensure familiarity
with controls and maintenance requirements, assisting you in the safe operation of your vehicle.
WARNING
IMPORTANT SAFETY INFORMATION REMINDERS FOR SAFETY!
Follow these important driving rules to
help ensure a safe and comfortable trip
for you and your passengers!
● NEVER drive under the influence of alcohol or drugs.
● ALWAYS observe posted speed limits
and never drive too fast for conditions.
● ALWAYS give your full attention to driving and avoid using vehicle features or
taking other actions that could distract
you.
● ALWAYS use your seat belts and appropriate child restraint systems. Pre-teen
children should be seated in the rear
seat.
● ALWAYS provide information about the
proper use of vehicle safety features to
all occupants of the vehicle.
● ALWAYS review this Owner’s Manual
for important safety information.
For descriptions specified for four-wheel drive
models, a
ning of the applicable sections/items.
As with other vehicles with features for
off-road use, failure to operate four-wheel
drive models correctly may result in loss of
control or an accident. Be sure to read
“Driving safety precautions” in the “Starting and driving” section of this manual.
ON-PAVEMENT AND OFF-ROAD DRIVING
This vehicle will handle and maneuver
differently from an ordinary passenger
car because it has a higher center of
gravity for off-road use. As with other
vehicles with features of this type, failure to operate this vehicle correctly may
result in loss of control or an accident.
Be sure to read “On-pavement and offroad driving precautions”, and “Avoiding collision and rollover”, and “Driving
safety precautions”, in the “Starting and
driving” section of this manual.
mark is placed at the begin-
Page 2
WHEN READING THE MANUAL
MODIFICATION OF YOUR VEHICLE
This vehicle should not be modified.
Modification could affect its
performance, safety or durability, and
may even violate governmental
regulations. In addition, damage or performance problems resulting from modifications may not be covered under
NISSAN warranties.
This manual includes information for all options
available on this model. Therefore, you may find
some information that does not apply to your
vehicle.
All information, specifications and illustrations in
this manual are those in effect at the time of
printing. NISSAN reserves the right to change
specifications or design without notice and without obligation.
IMPORTANT INFORMATION ABOUT
THIS MANUAL
You will see various symbols in this manual. They
are used in the following ways:
WARNING
This is used to indicate the presence of a
hazard that could cause death or serious
personal injury. To avoid or reduce the
risk, the procedures must be followed
precisely.
CAUTION
This is used to indicate the presence of a
hazard that could cause minor or moderate personal injury or damage to your vehicle. To avoid or reduce the risk, the procedures must be followed carefully.
APD1005
If you see this symbol, it means “Do not do this”
or “Do not let this happen.”
If you see a symbol similar to these in an illustration, it means the arrow points to the front of the
vehicle.
Arrows in an illustration that are similar to these
indicate movement or action.
Arrows in an illustration that are similar to these
call attention to an item in the illustration.
Page 3

CALIFORNIA PROPOSITION 65
WARNING
WARNING
Engine exhaust, some of its constituents,
and certain vehicle components contain
or emit chemicals known to the State of
California to cause cancer and birth defects or other reproductive harm. In addition, certain fluids contained in vehicles
and certain products of component wear
contain or emit chemicals known to the
State of California to cause cancer and
birth defects or other reproductive harm.
CALIFORNIA PERCHLORATE
ADVISORY
Some vehicle parts, such as lithium batteries, may contain perchlorate material. The
following advisory is provided: “Perchlorate
Material – special handling may apply, See
www.dtsc.ca.gov/hazardouswaste/perchlorate.”
© 2007 NISSAN NORTH AMERICA, INC.
All rights reserved. No part of this Owner’s
Manual may be reproduced orstored ina retrieval
system, or transmitted in any form, or by any
means, electronic, mechanical, photocopying,
recording or otherwise, without the prior written
permission of Nissan North America, Inc.
Page 4

NISSAN CUSTOMER CARE PROGRAM
NISSAN CARES...
Both NISSAN and your NISSAN dealer are dedicated to serving all your automotive needs. Your satisfaction with your vehicle and your NISSAN dealer are
our primary concerns. Your NISSAN dealer is always available to assist you with all your automobile sales and service needs.
However, if there is something that your NISSAN
dealer cannot assist you with or you would like to
provide NISSAN directly with comments or
questions, please contact the NISSAN Consumer Affairs Department using our toll-free
number:
For U.S. customers
1-800-NISSAN-1
(1-800-647-7261)
For Canadian customers
1-800-387-0122
We appreciate your interest in NISSAN and thank you for buying a quality NISSAN vehicle.
The ConsumerAffairs Departmentwill ask for the
following information:
– Your name, address, and telephone number
– Vehicle identification number (attached to the
top of the instrument panel on the driver’s
side)
– Date of purchase
– Current odometer reading
– Your NISSAN dealer’s name
– Your comments or questions
OR
You can write to NISSAN with the information at:
For U.S. customers
Nissan North America, Inc.
Consumer Affairs Department
P.O. Box 685003
Franklin, TN 37068-5003
For Canadian customers
Nissan Canada Inc.
5290 Orbitor Drive
Mississauga, Ontario L4W 4Z5
Page 5
Table of
Illustrated table of contents
0
Contents
Safety—Seats, seat belts and supplemental restraint system
Instruments and controls
Pre-driving checks and adjustments
Heater, air conditioner and audio systems
Starting and driving
In case of emergency
Appearance and care
Maintenance and do-it-yourself
Technical and consumer information
Index
1
2
3
4
5
6
7
8
9
10
Page 6

Page 7

0 Illustrated table of contents
Airbags, seat belts and child restraints ...............0-2
Exterior front ......................................0-3
Exterior rear.......................................0-4
Passenger compartment ...........................0-5
Instrument panel...................................0-6
Engine compartment check locations ................0-8
Warning/indicator lights ............................0-9
Page 8
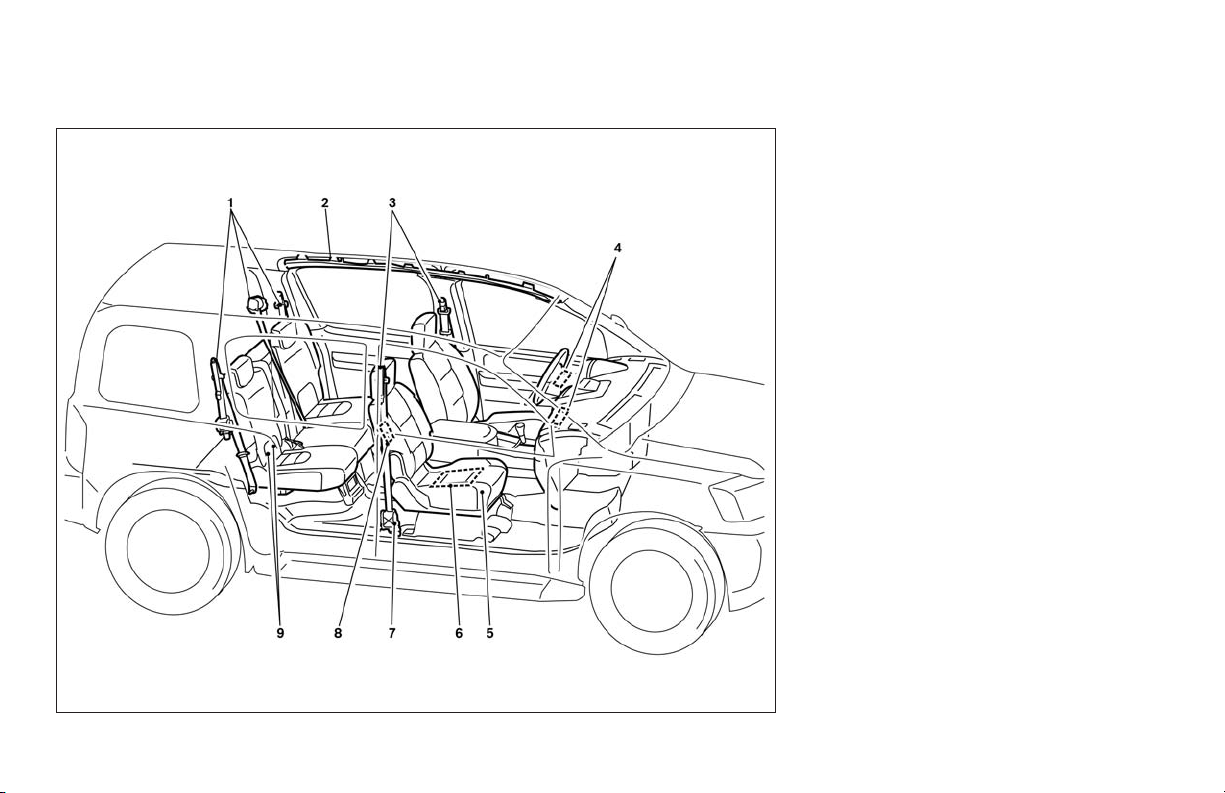
AIRBAGS, SEAT BELTS AND CHILD
RESTRAINTS
1. 2nd row seat belts (P. 1-10)
2. Supplemental curtain side-impact and
rollover air bags (if so equipped)
(P. 1-41)
3. Front seat belts (P. 1-10)
4. Supplemental front impact air bags
(P.1-41)
5. Seats (P. 1-2)
6. Occupant classification sensor
(pressure sensor) (P.1-41)
7. Seat belt pretensioners (P. 1-54)
8. Supplemental side air bag modules
(if so equipped) (P.1-53)
9. LATCH (Lower Anchors and Tethers for
CHildren) (P. 1-24)
See the page number indicated in parentheses for operating details.
0-2 Illustrated table of contents
WII0055
Page 9
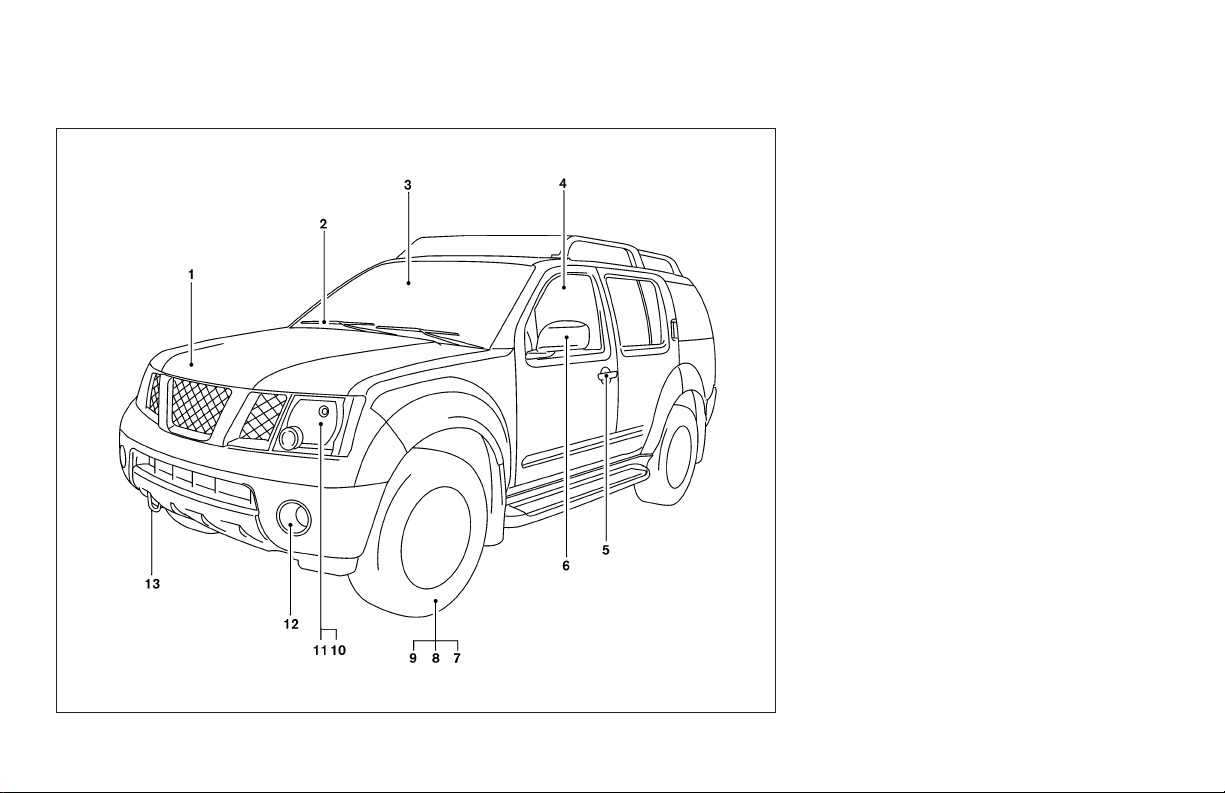
EXTERIOR FRONT
1. Engine hood (P. 3-8)
2. Windshield wiper and washer switch
(P. 2-21)
3. Windshield (P. 8-19)
4. Power windows (P. 2-41)
5. Door locks, keyfob, keys
(P. 3-3, 3-5, 3-2)
6. Mirrors (P. 3-12)
7. Tire pressure (P. 8-31)
8. Flat tire (P. 6-2)
9. Tire chains (P. 5-35)
10. Replacing bulbs (P. 8-27)
11. Headlight and turn signal switch
(P. 2-23)
12. Fog light switch (P. 2-25)
13. Tow hooks (P.6-11)
See the page number indicated in parentheses for operating details.
WII0058
Illustrated table of contents 0-3
Page 10
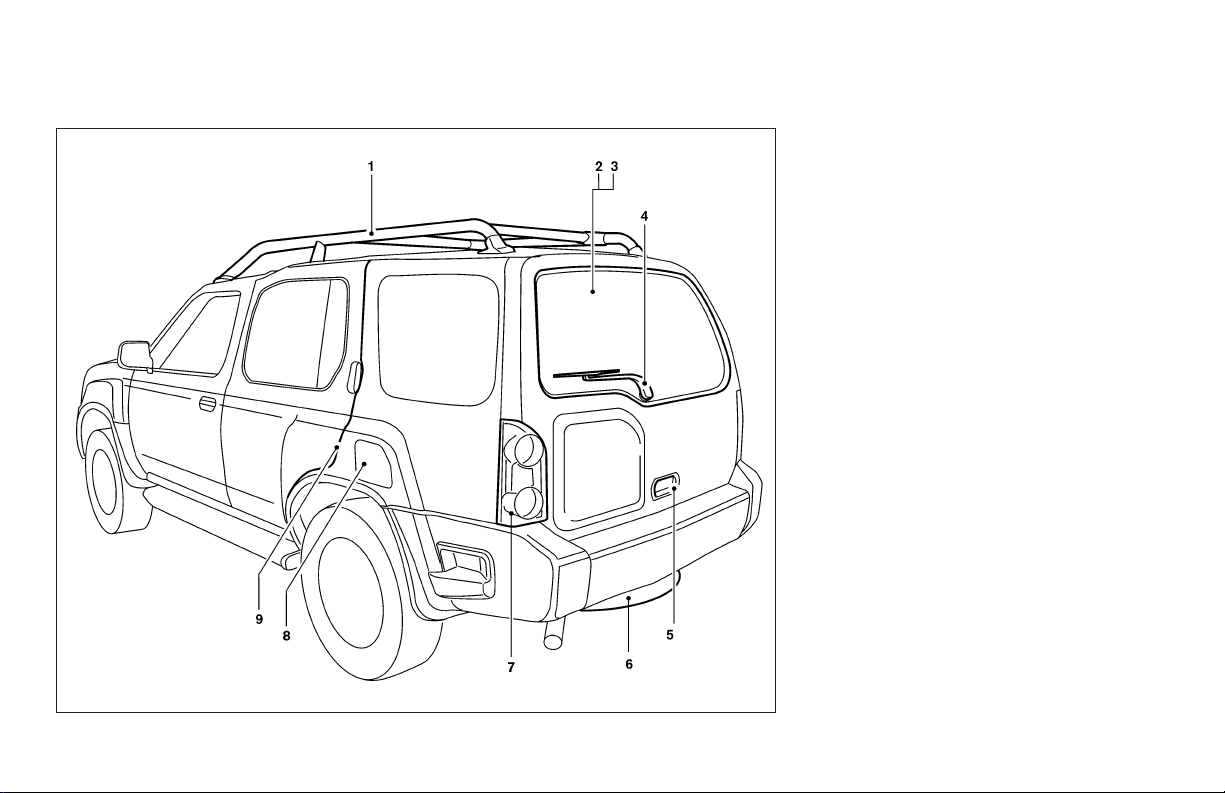
EXTERIOR REAR
1. Roof rack (P. 2-38)
2. Vehicle loading (P. 9-12)
3. Rear window defrost (P. 2-22)
4. Rear window washer (P.2-22)
5. Lift gate (P. 3-9)
6. Spare tire (P.6-2)
7. Replacing bulbs (P. 8-27)
8. Fuel-filler door (P.3-9)
9. Child safety rear door lock (P.3-5)
See the page number indicated in parentheses for operating details.
0-4 Illustrated table of contents
WII0057
Page 11
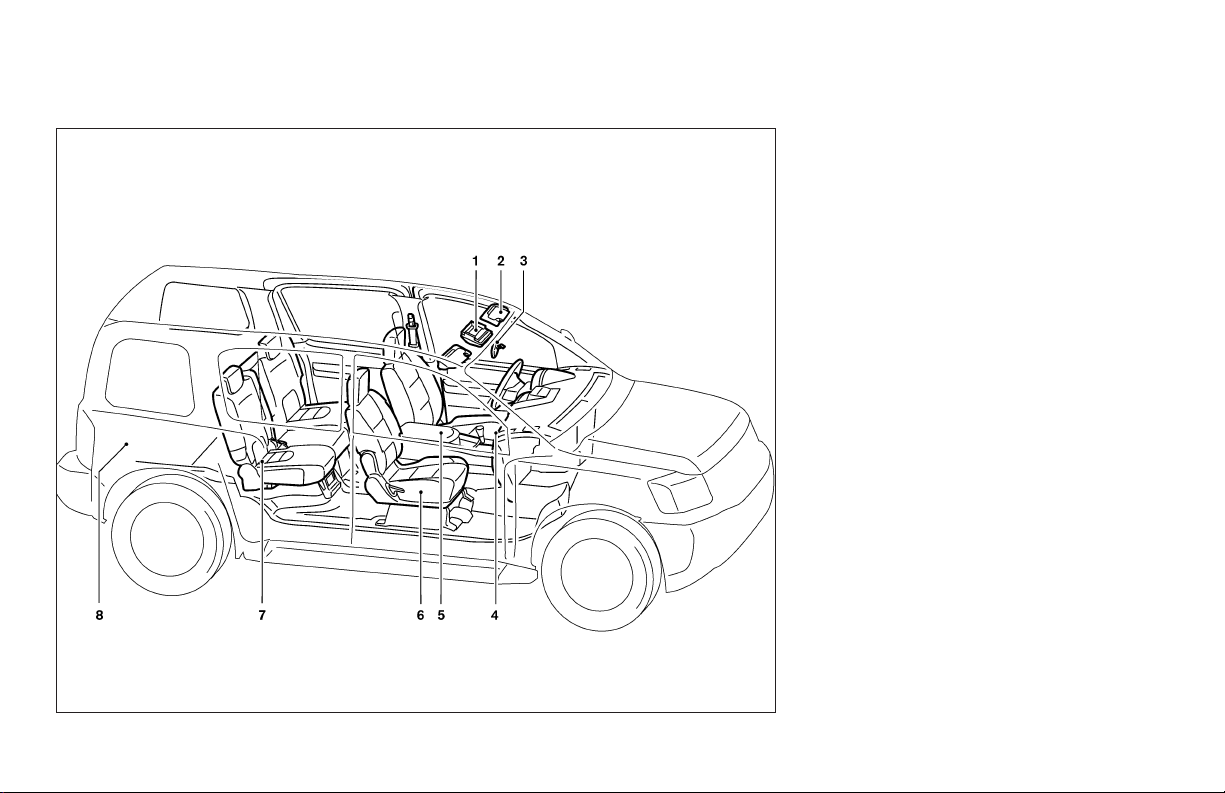
PASSENGER COMPARTMENT
1. Map lights (P. 2-44)
2. Sun visors (P. 3-11)
3. Inside mirror (P.3-12)
4. Glove box (P. 2-32)
5. Console box (P. 2-32)
6. Front seats (P. 1-2)
7. Rear seats (P.1-7)
8. Storage (P. 2-31)
See the page number indicated in parentheses for operating details.
WII0056
Illustrated table of contents 0-5
Page 12
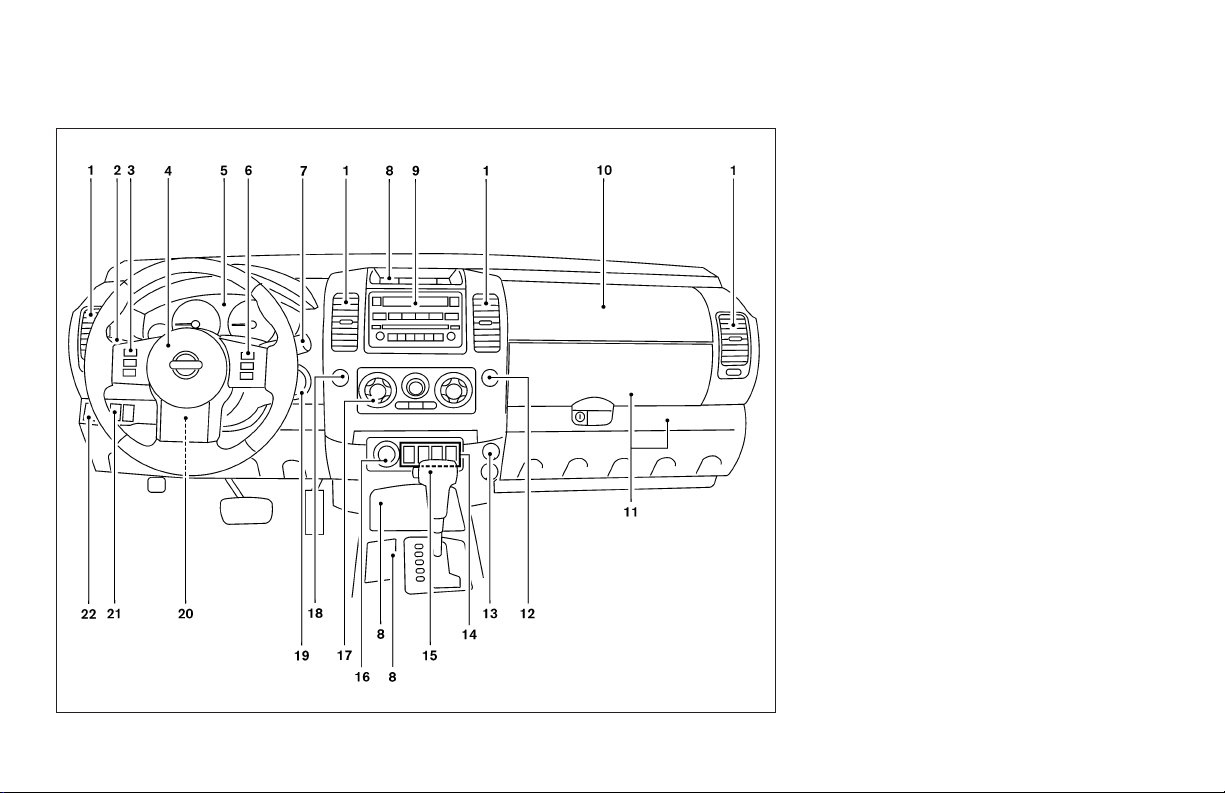
INSTRUMENT PANEL
1. Ventilators (P. 4-2)
2. Headlight/fog light (if so equipped)/turn
signal switch (P. 2-23)
3. Steering wheel switch for audio control
(if so equipped) (P. 4-26)
4. Driver supplemental air bag/horn
(P. 1-41, P. 2-26)
5. Meters, gauges and warning/indicator
lights (P. 2-3, 2-9)
6. Cruise control main/set switches
(if so equipped) (P. 5-18)
7. Windshield wiper/washer switch and
rear window wiper/washer switch
(P. 2-21, P. 2-22)
8. Storage (P. 2-31)
9. Audio system controls (P. 4-10)
10. Front passenger supplemental air bag
(P. 1-41)
11. Upper and lower glove box (P. 2-32)
12. Passenger air bag status light (P. 1-50)
13. Power outlet (P. 2-29)
14. Electronic locking rear differential
(E-Lock) system switch (if so
equipped) (P. 2-28)
Hill descent control switch
(if so equipped) (P. 2-27)
WIC0915
0-6 Illustrated table of contents
Page 13

Vehicle dynamic control (VDC) OFF
switch (P. 2-26)
15. Shift selector lever (P. 5-12)
16. 4WD shift switch (if so equipped)
(P. 5-21)
17. Climate controls (P. 4-2)
18. Hazard warning flasher switch (P. 2-25)
19. Ignition switch (P. 5-8)
20. Tilt steering wheel control (P. 3-11)
21. Clutch interlock (clutch start) switch
(if so equipped) (P. 2-29)
22. Power outside mirror controls
(if so equipped) (P. 3-13)
See the page number indicated in parentheses for operating details.
Illustrated table of contents 0-7
Page 14
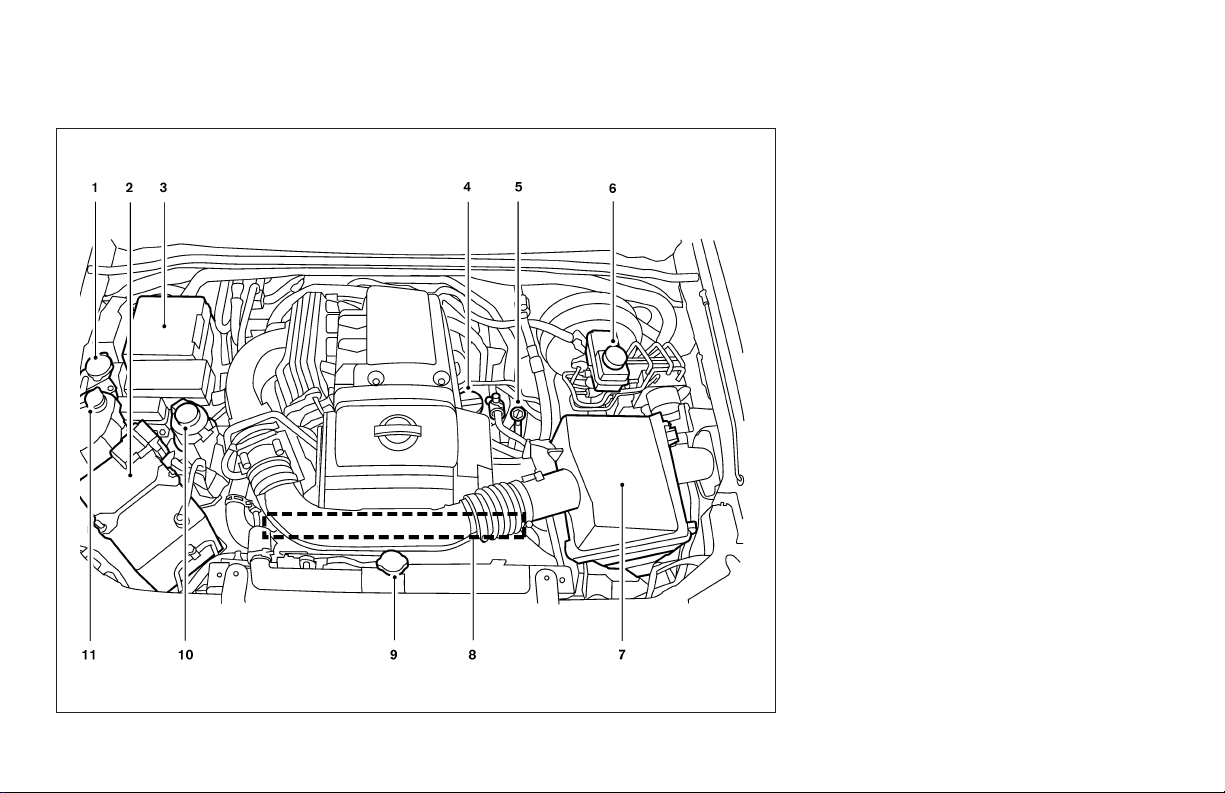
ENGINE COMPARTMENT CHECK
LOCATIONS
VQ40DE engine
1. Windshield washer fluid reservoir
(P. 8-12)
2. Battery (P. 8-13)
3. Fuse/fusible link box (P. 8-22)
4. Engine oil filler cap (P. 8-8)
5. Engine oil dipstick (P. 8-8)
6. Brake fluid reservoir (P. 8-12)
7. Air cleaner (P. 8-17)
8. Drive belt location (P.8-15)
9. Radiator cap (P. 8-7)
10. Power steering fluid reservoir (P. 8-11)
11. Engine coolant reservoir (P. 8-7)
See the page number indicated in parentheses for operating details.
0-8 Illustrated table of contents
WDI0507
Page 15
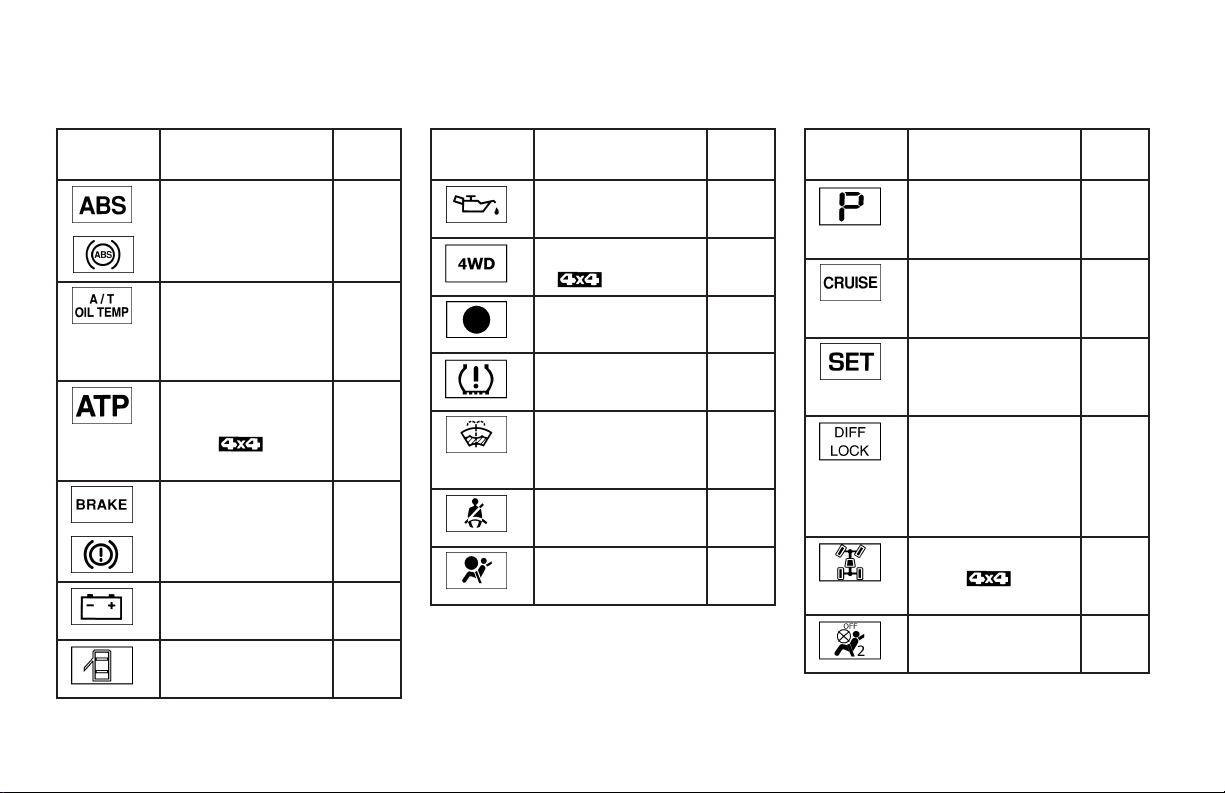
WARNING/INDICATOR LIGHTS
Warning
light
or
or
Name Page
Anti-lock Braking
System (ABS) warning light
Automatic transmission oil temperature
warning light (if so
equipped)
Automatic transmission park warning
light (
model)
Brake warning light 2-11
Charge warning
light
Door open warning
light
2-10
2-10
2-10
2-11
2-11
Warning
light
Name Page
Engine oil pressure
warning light
4WD warning light
(
Low fuel warning
light
Low tire pressure
warning light
Low windshield
washer fluid warning
light
Seat belt warning
light and chime
Supplemental air
bag warning light
model)
2-11
2-12
2-12
2-12
2-13
2-13
2-14
Indicator
light
Name Page
Automatic transmission position indicator light
Cruise main switch
indicator light (if so
equipped)
Cruise set switch
indicator light (if so
equipped)
Electronic locking
rear differential (ELock) system on
indicator light (if so
equipped)
4WD shift indicator
light (
model)
Front passenger air
bag status light
2-14
2-14
2-14
2-15
2-15
2-15
Illustrated table of contents 0-9
Page 16
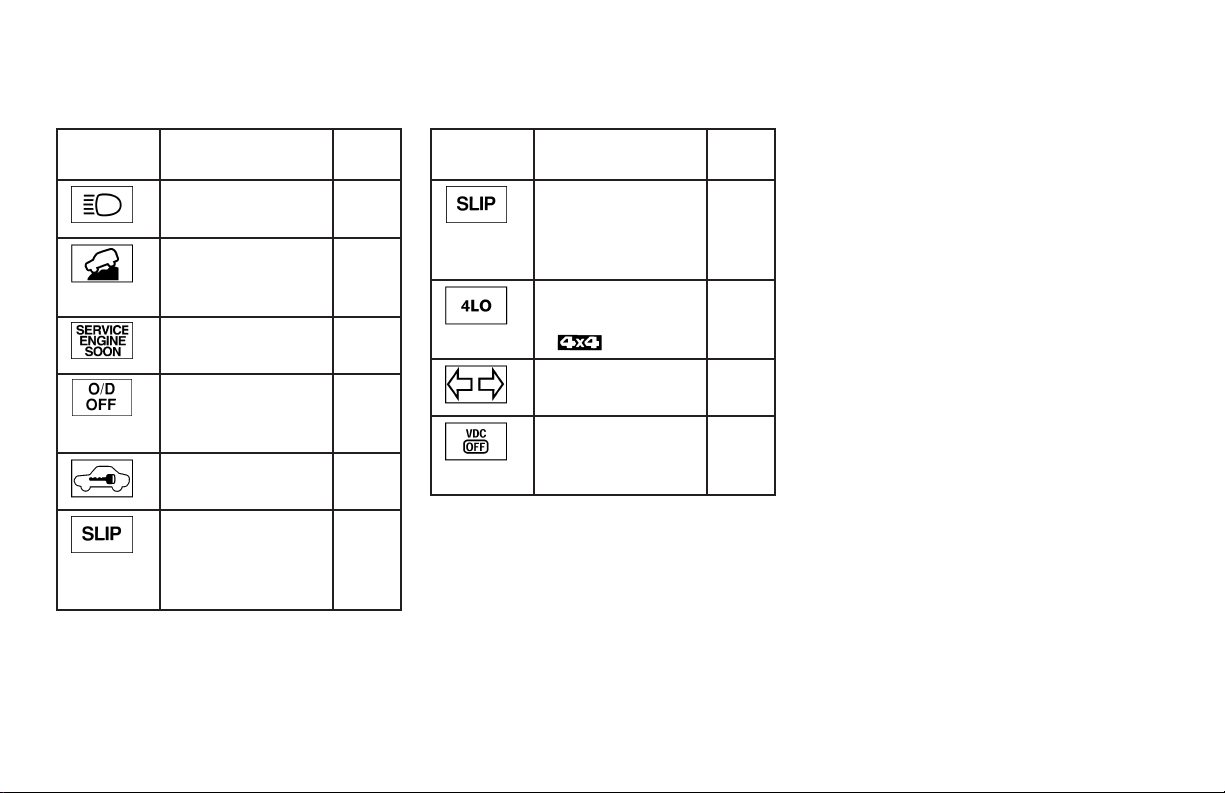
Indicator
light
Name Page
Indicator
light
Name Page
High beam indicator
light (Blue)
Hill descent control
system on indicator
light (if so equipped)
Malfunction indicator lamp (MIL)
Overdrive off indicator light (automatic
transmission only)
Security indicator
light (if so equipped)
Slip indicator light
for models with
ABLS (if so
equipped)
0-10 Illustrated table of contents
2-15
2-27
2-15
2-16
2-16
2-16
Slip indicator light
for models with
VDC (if so
equipped)
Transfer 4LO position indicator light
(
Turn signal/hazard
indicator lights
Vehicle dynamic
control off indicator
light
model)
2-16
2-17
2-17
2-17
Page 17

1 Safety—Seats, seat belts and
supplemental restraint system
Seats ............................................1-2
Front manual seat adjustment ....................1-2
Head restraint adjustment .......................1-4
Active Head Restraint (front seats) ...............1-5
Flexible seating.................................1-5
Seat belts .......................................1-10
Precautions on seat belt usage..................1-10
Child safety...................................1-12
Pregnant women ..............................1-14
Injured persons................................1-14
Three-point type seat belt with retractor..........1-14
Seat belt extenders ............................1-21
Seat belt maintenance .........................1-21
Child restraints...................................1-22
Precautions on child restraints ..................1-22
Lower Anchors and Tethers for CHildren
system (LATCH) ...............................1-24
Top tether strap child restraint ..................1-25
Child restraint installation using LATCH ..........1-26
Child restraint installation using the seat
belts .........................................1-30
Booster seats ....................................1-36
Precautions on booster seats ...................1-36
Booster seat installation ........................1-38
Supplemental restraint system .....................1-41
Precautions on supplemental restraint
system .......................................1-41
Supplemental air bag warning labels.............1-56
Supplemental air bag warning light ..............1-56
Page 18
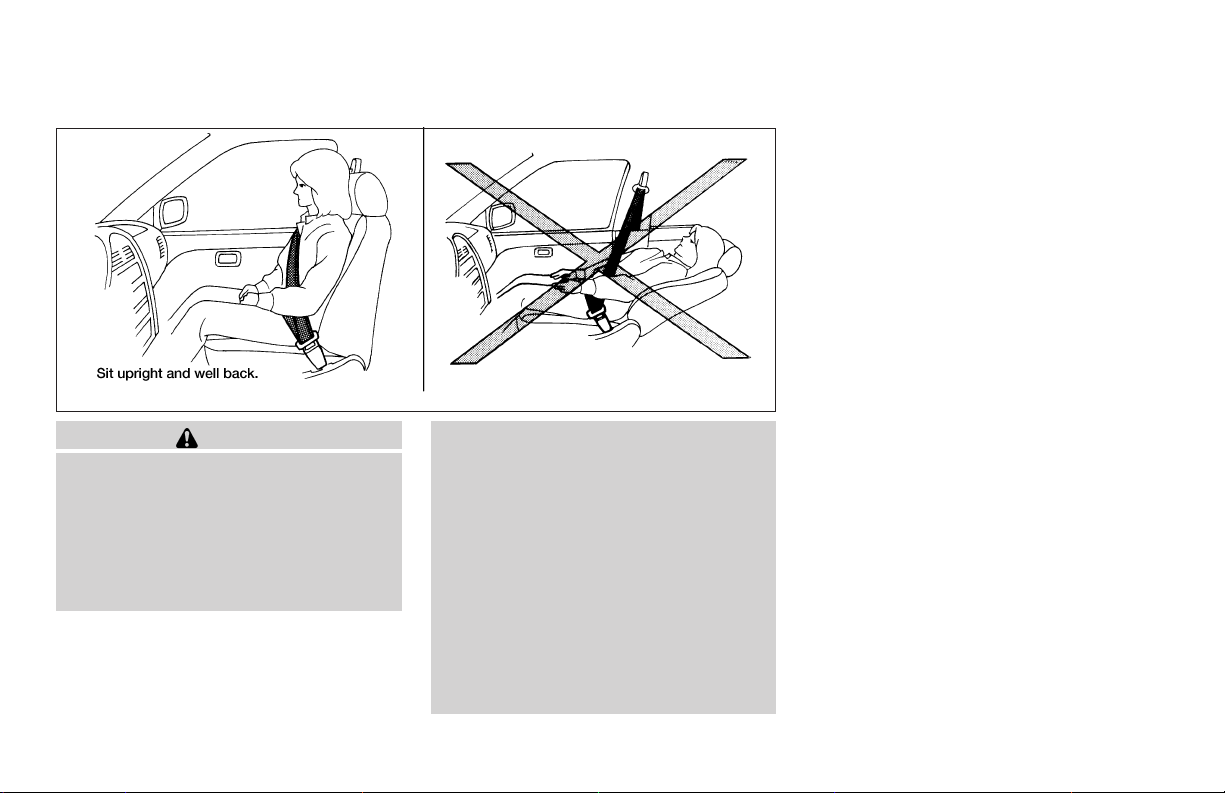
SEATS
WARNING
● Do not ride in a moving vehicle when
the seatback is reclined. This can be
dangerous. The shoulder belt will not
be against your body. In an accident,
you could be thrown into it and receive
neck or other serious injuries. You
could also slide under the lap belt and
receive serious internal injuries.
FRONT MANUAL SEAT
ADJUSTMENT
ARS1152
● For the most effective protection when
the vehicle is in motion, the seat should
be upright. Always sit well back in the
seat with both feet on the floor and
adjust the seat properly. See “Precautions on Seat Belt Usage” later in this
section.
● After adjustment,gently rockin theseat
to make sure it is securely locked.
● Do not leave children unattended inside
the vehicle.They could unknowingly activate switches or controls. Unattended
children could become involved in serious accidents.
1-2 Safety—Seats, seat belts and supplemental restraint system
Page 19
WRS0175 WRS0176 WRS0131
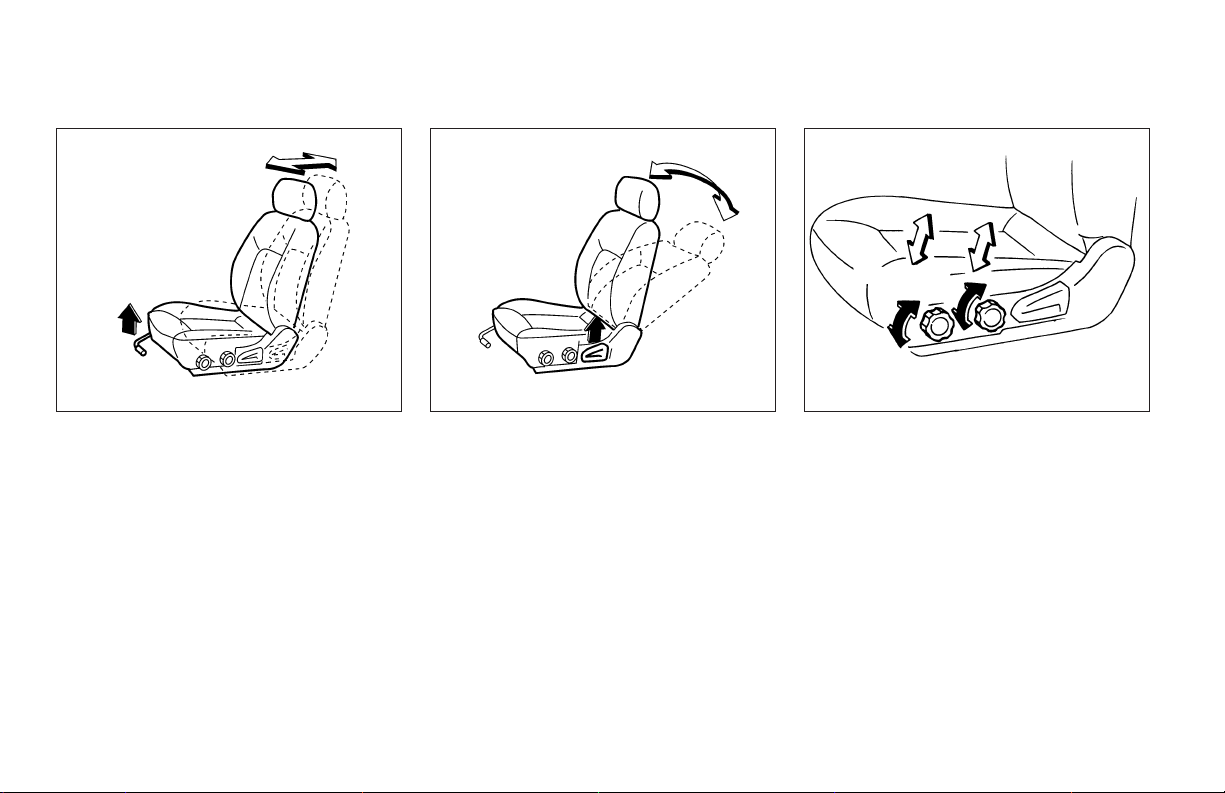
Forward and backward
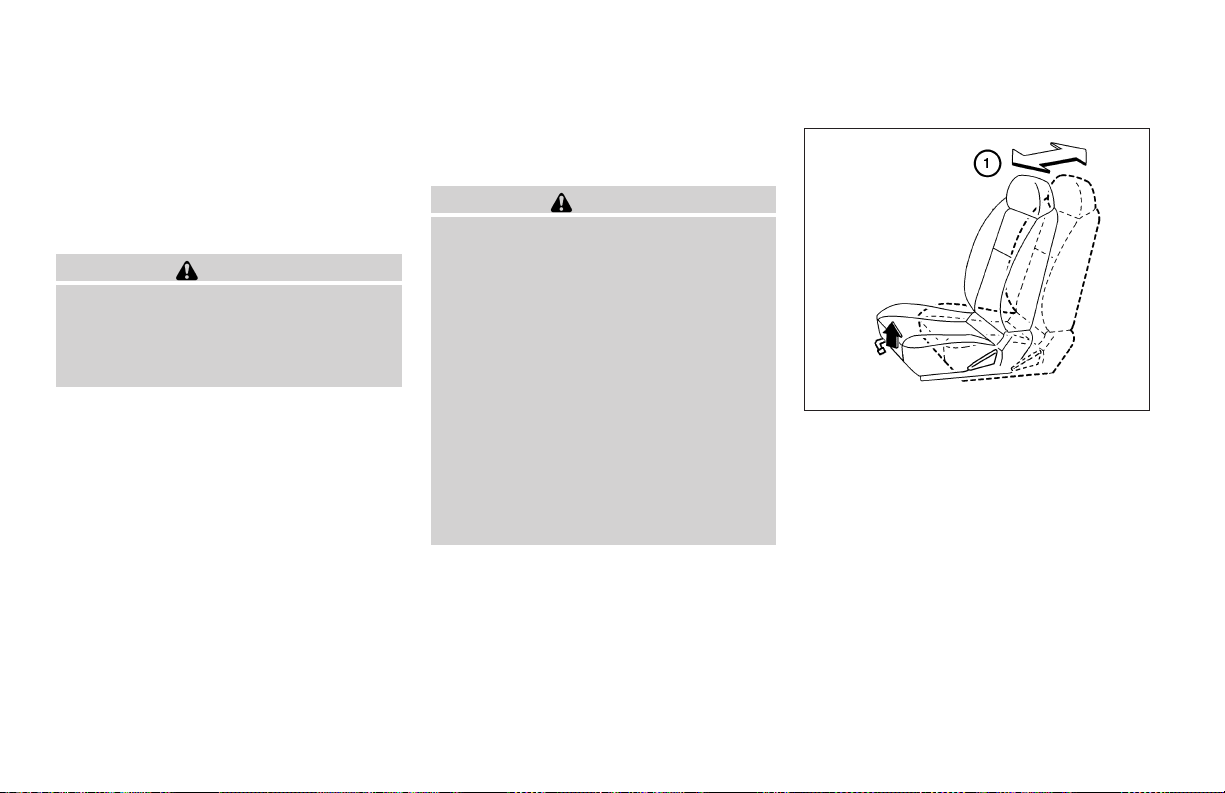
Pull the lever up and hold it while you slide the
seat forwardor backward to the desiredposition.
Release the lever to lock the seat in position.
Reclining
Torecline the seatback, pull the lever up andlean
back. To bring the seatback forward, pull thelever
up and lean your body forward. Release the lever
to lock the seatback in position.
The reclining feature allows adjustment of the
seatback for occupants of different sizes for
added comfort and to help obtain proper seat
belt fit. See “Precautions on seat belt usage” later
in thissection. Also,the seatbackcan be reclined
to allow occupants to rest when the vehicle is
stopped and the transmission is in P (Park).
Safety—Seats, seat belts and supplemental restraint system 1-3
Seat lifter (if so equipped for driver’s
seat)
Turn either dial to adjust the angle and height of
the seat cushion to the desired position.
Page 20
WRS0389 WRS0213 WRS0134
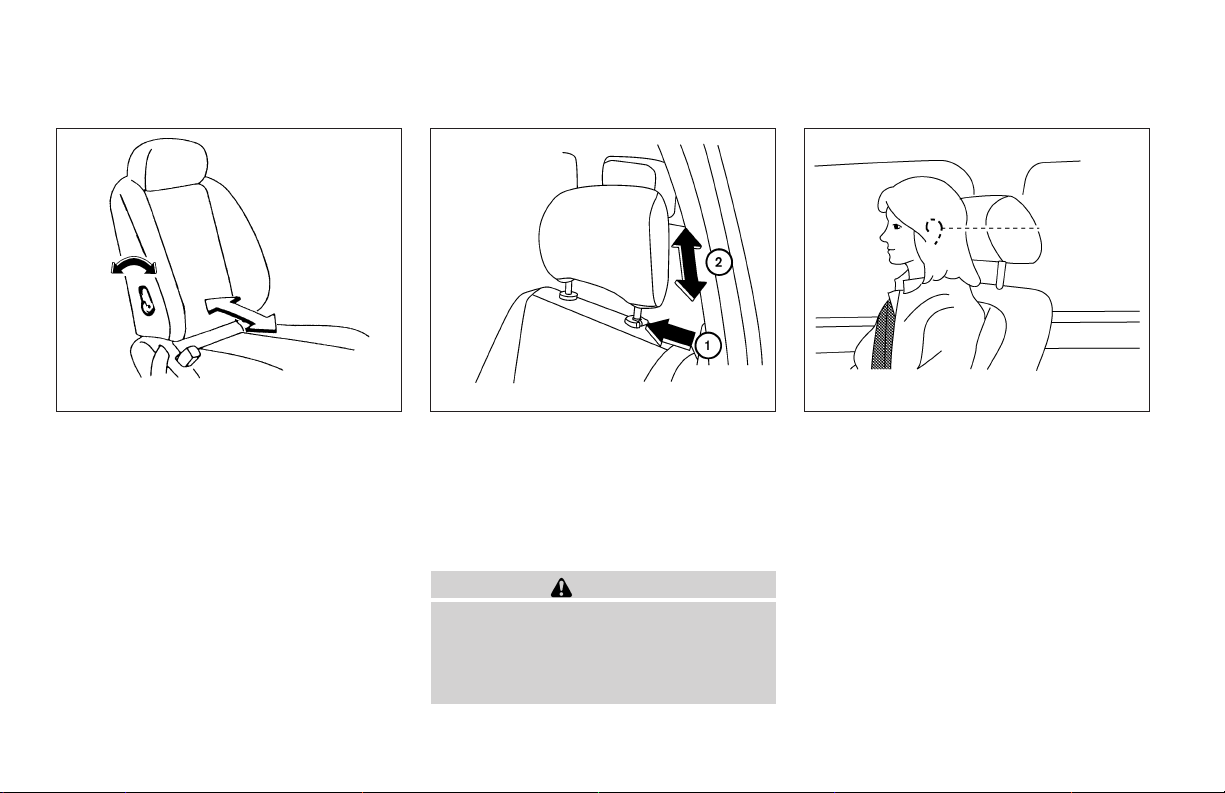
Lumbar support (if so equipped for
driver’s seat)
The lumbar support feature provides lower back
support to the driver. Move the lever forward or
backward to adjust the seat lumbar area.
HEAD RESTRAINT ADJUSTMENT
To raise the head restraint, pull it up. To lower,
push and hold the lock knob and push the head
restraint down.
The head restraints on the rear seats are removable.
WARNING
Head restraints should be adjusted properly as they may provide significant protection against injury in an accident. Do
not remove them. Check the adjustment
after someone else uses the seat.
1-4 Safety—Seats, seat belts and supplemental restraint system
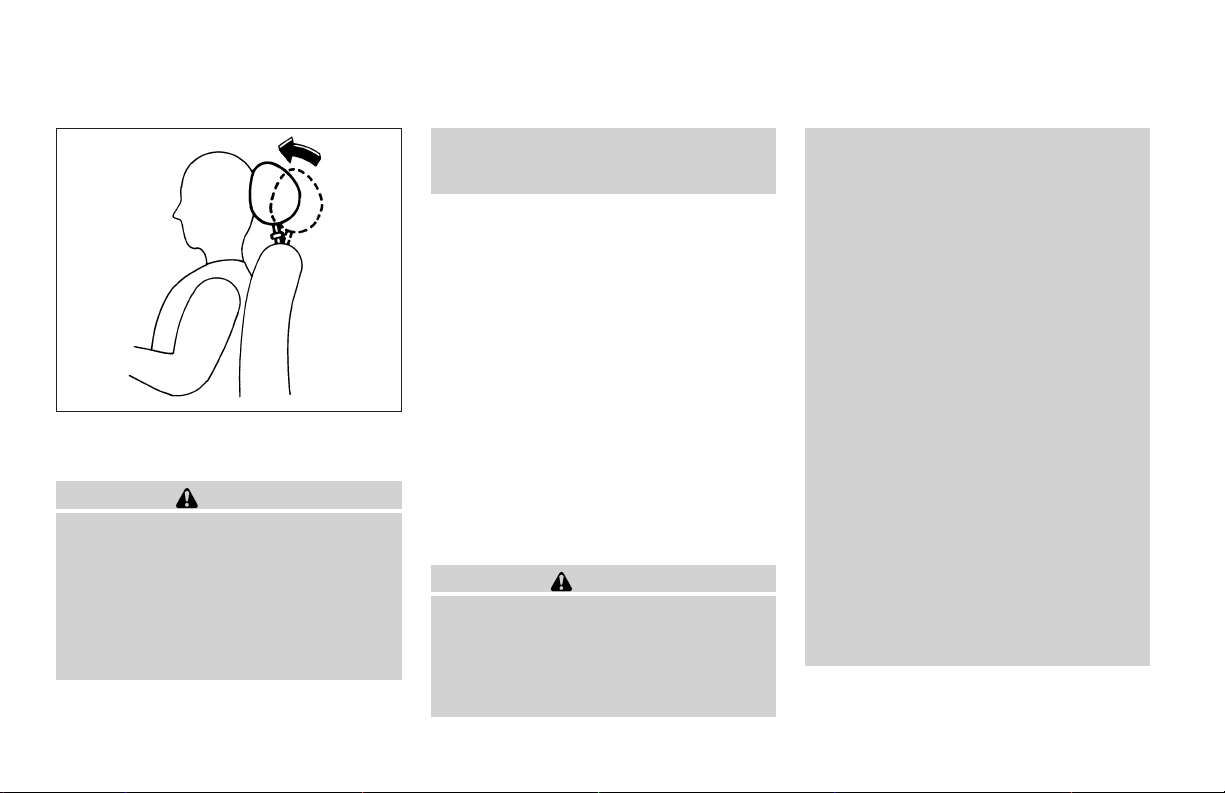
Adjust the head restraint so the center is level
with the center of your ears.
Page 21
SPA1025
ACTIVE HEAD RESTRAINT (front
seats)
WARNING
● Always adjust the head restraints properly as specified in this section. Failure
to doso can reduce the effectiveness of
the Active Head Restraint.
● Active Head Restraints are designed to
supplement other safety systems. Always wear seat belts. No system can
prevent all injuries in any accident.
● Do not attach anything to the head restraint stalks. Doing so could impair
Active Head Restraint function.
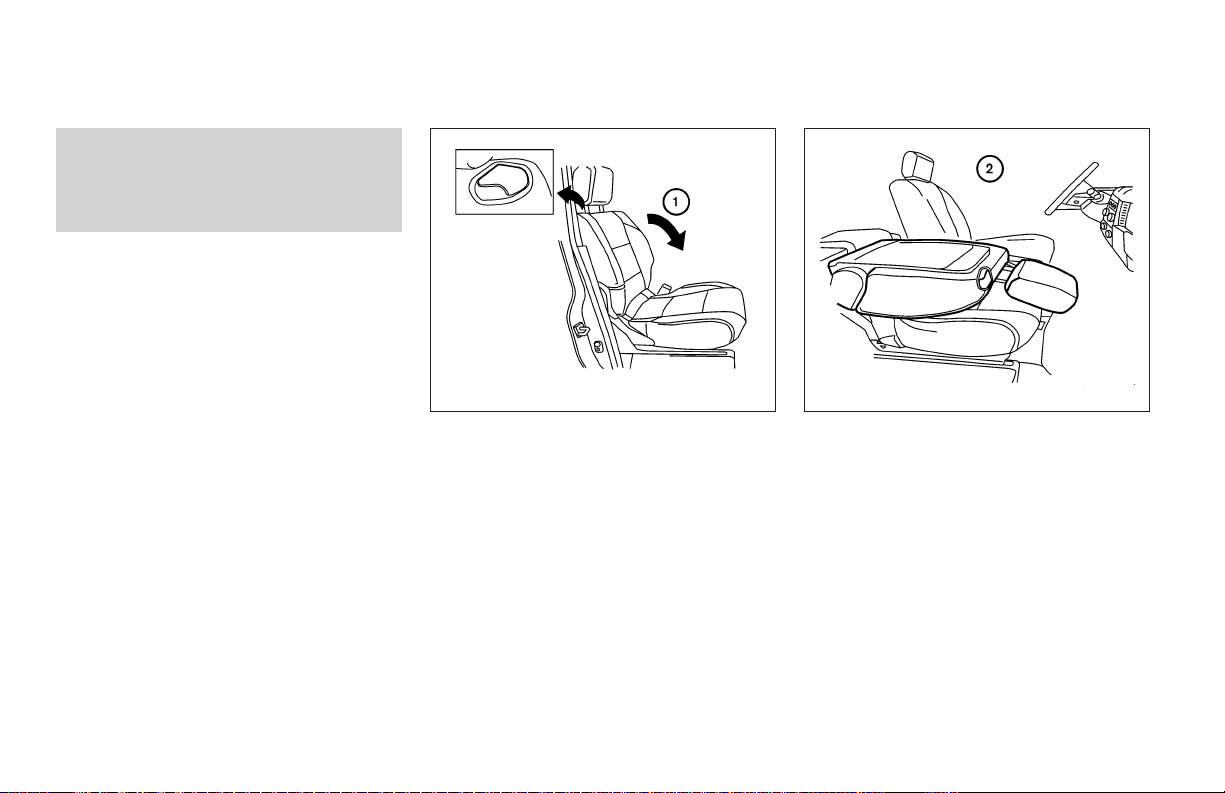
The Active Head Restraint moves forward utilizing the force that the seatback receives from the
occupant in a rear-end collision. The movement
of the head restraint helps support the occupant’s head by reducing its backward movement
and helping absorb some of the forces that may
lead to whiplash type injuries.
Active HeadRestraints are effective for collisions
at low to medium speeds in which it is said that
whiplash injury occurs most.
Active Head Restraints operate only in certain
rear-end collisions. After the collision, the head
restraints return to their original positions.
Properly adjust the Active Head Restraints as
described earlier in this section.
FLEXIBLE SEATING
WARNING
● Never allow anyone to ride in the cargo
area or on the rear seats when they are
in the fold-down position. In a collision,
people riding in these areas without
proper restraints are more likely to be
seriously injured or killed.
● Do not allow people to ride in any area
of your vehiclethat is not equipped with
seats and seat belts. Be sure everyone
in your vehicle is in a seat and using a
seat belt properly.
● Do not fold down the rear seats when
occupants are in the rear seat area or
any luggage is on the rear seats.
● Head restraints should be adjusted
properly as they may provide significant
protection against injury in an accident.
Always replace and adjust them properly if they have been removed for any
reason.
● If the head restraints are removed for
any reason, they should be securely
stored to prevent them from causing
injury to passengers or damage to the
vehicle in case of sudden braking or an
accident.
● When returning the seatbacks to the
upright position, be certain they are
completely secured in the latched position. If they are not completely secured,
passengers may be injured in an accident or sudden stop.
Safety—Seats, seat belts and supplemental restraint system 1-5
Page 22
● Properly secure all cargo to help prevent it from sliding or shifting. Do not
place cargo higher than the seatbacks.
In asudden stop or collision, unsecured
cargo could cause personal injury.
LRS0608 LRS0609
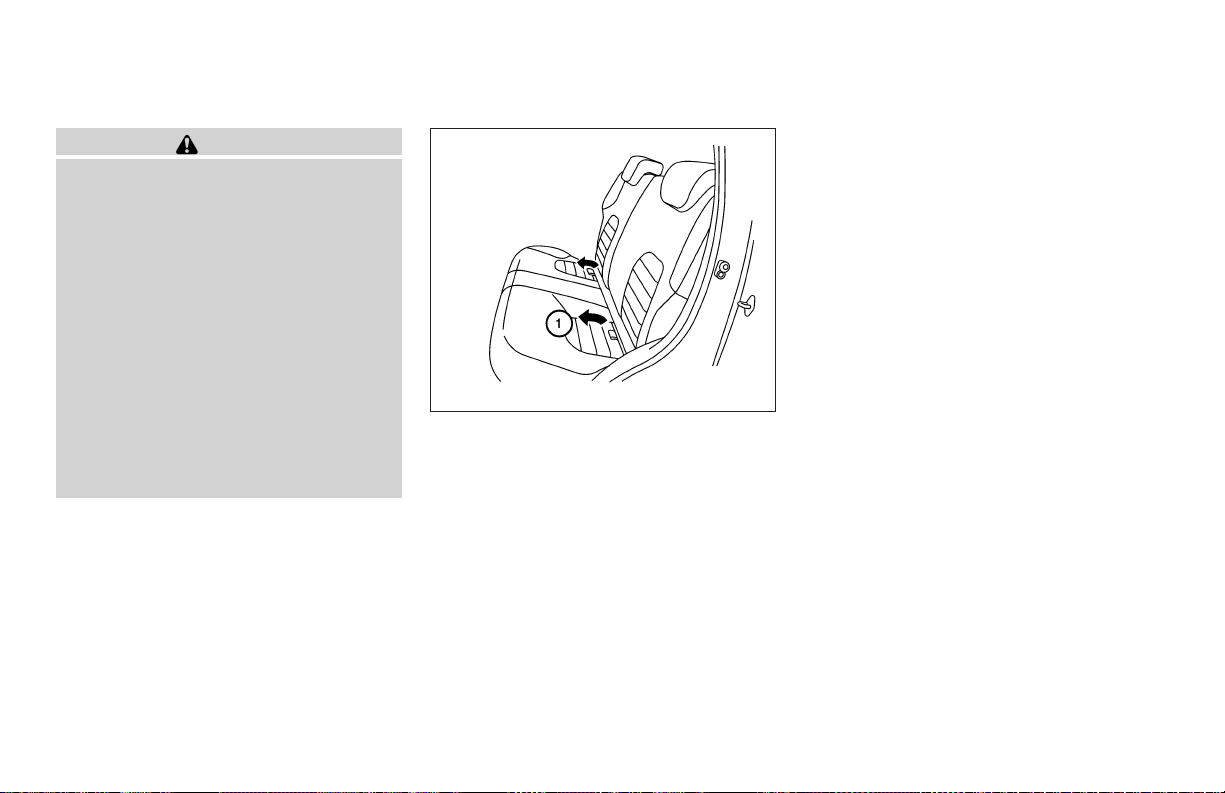
Folding the front passenger’s seatback
(if so equipped)
To fold the front passenger’s seatback flat for
extra storage length when transporting long
items:
1
Slide the seat to the rear-most position. Lift
s
up on the recline lever, located on the outside edge of the seat, and fold the seatback
forward as far as it will go. Then lift up on the
latch located on the upper corner of the
seatback to release the back of the seat.
2
Once the seatback is released it will enable
s
you to fold the front passenger seatback flat
over the seat cushion.
3. To return the front passenger’s seat to a
seating position lift up on the seatback and
push it up to anupright position.Then pull up
on the recline lever and lean the seatback to
a proper seating position. Release the lever
to lock the seatback in position.
1-6 Safety—Seats, seat belts and supplemental restraint system
Page 23
WARNING
● If you fold the front passenger’s seatback flat forward to carry longer objects, be sure this cargo is properly secured and not near an air bag. In a
crash, an inflating air bag might force
that object toward a person. This could
cause severe injury or even death. Secure objects away from the area in
which an air bag would inflate. See
“Precautions on supplemental restraint
system” later in this section.
● Never allow anyone to ride in the cargo
area or on the front passenger’s seat
when it is in the fold-down position. Use
of these areas by passengers could result in serious injury in an accident or
sudden stop.
LRS0577
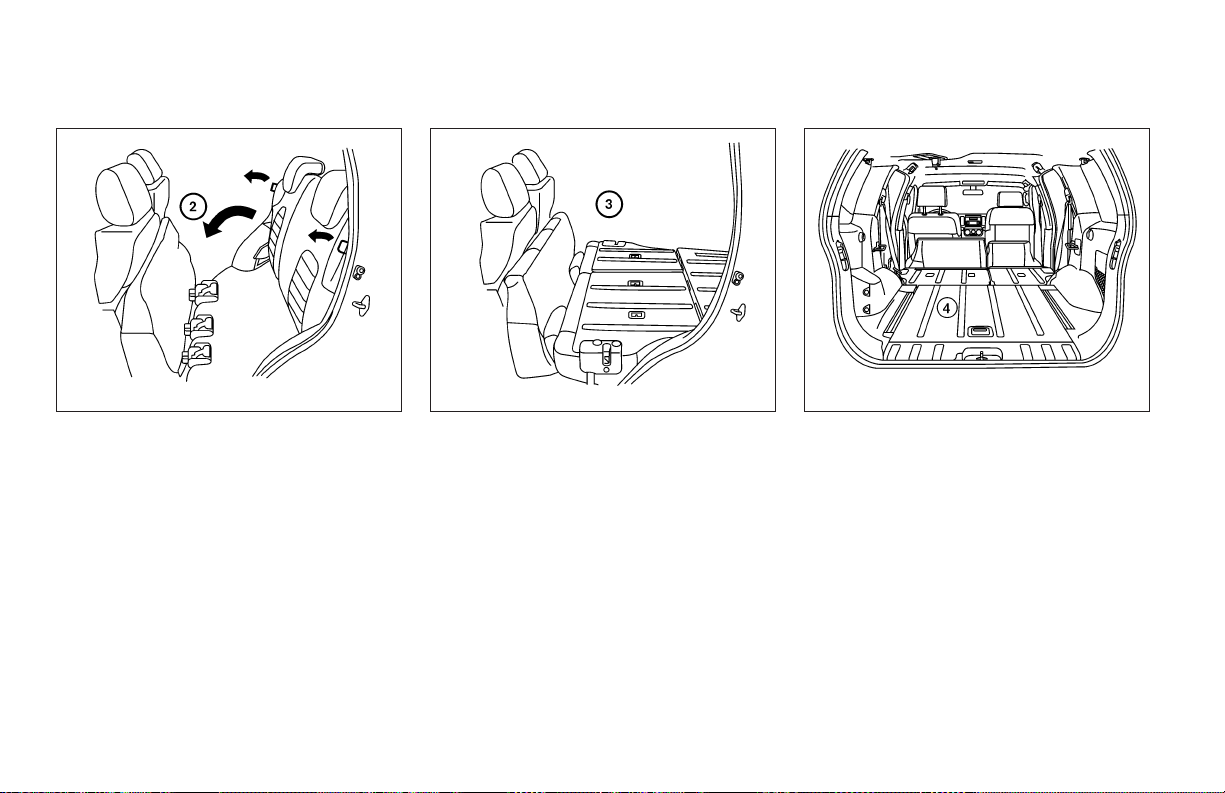
Folding the 2nd row bench seat
To fold the 2nd row bench seat flat for maximum
cargo hauling:
1
Disconnect and secure the center seat belt
s
and tongues into the retractor base. See
“Stowing the center seat belt” later in this
section. Then properly stow the outboard
seat belts in the seat belt hooks before folding down the rear seats. See “Seat belt
hook” in this section for more information.
Lower the head restraints to the full “down”
position. Pull the strap forward, located in
the center of each seat cushion, and fold
each seat cushion toward the front of the
vehicle.
Safety—Seats, seat belts and supplemental restraint system 1-7
Page 24
LRS0578 LRS0579 LRS0580
2
Then pull the straps located on the outside
s
edge of each seatback to fold the seatbacks
forward.
3
This provides a level cargo floor.
s
1-8 Safety—Seats, seat belts and supplemental restraint system
4
To return the bench seats to a seating posi-
s
tion reverse this process. Raise the seatbacks to an upright position. Make
sure to hold the seat belts above the
seat cushion, then push the seat cushion down into place.
Page 25
LRS0585
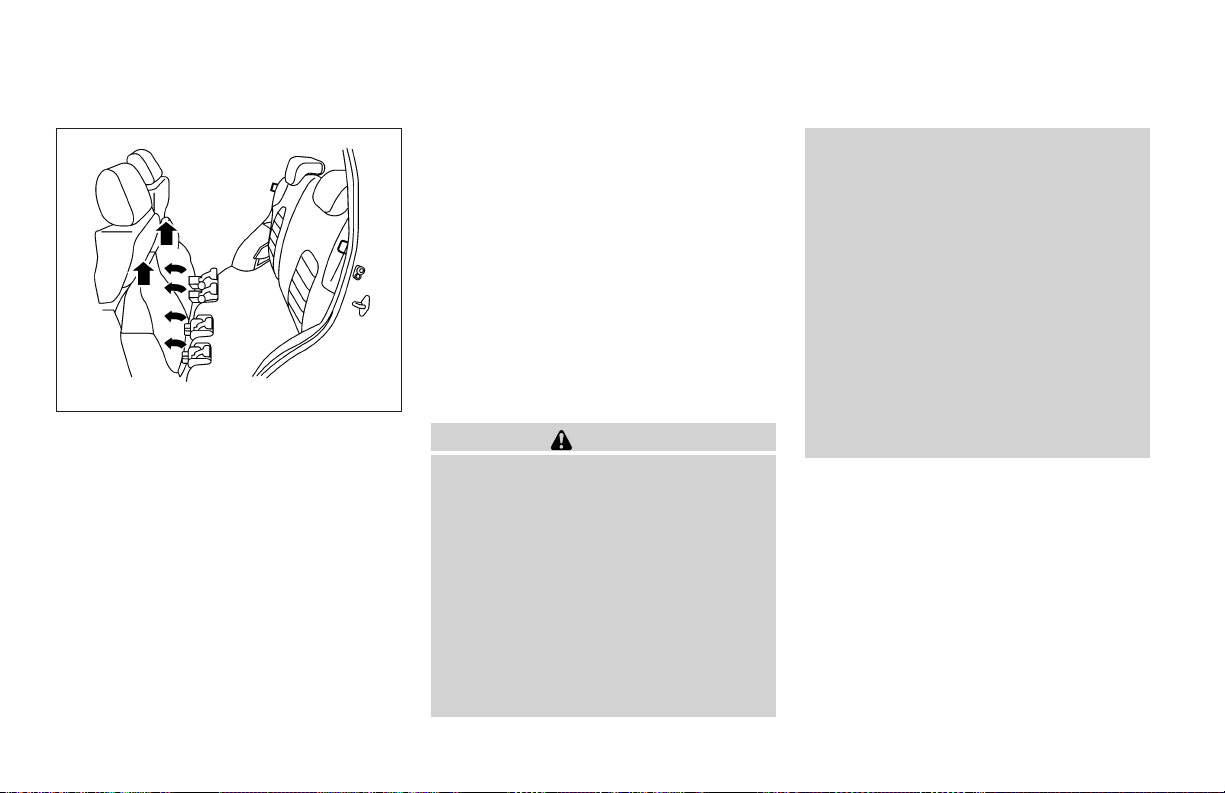
Removing the 2nd row bench seat
cushions
The rear seat cushion can be removed to provide
additional space when folding the 2nd row seatbacks flat. To remove the 2nd row bench seat
cushions:
1. Pull the straps forward, located in the center
of each seat cushion to fold the seat cushions forward.
2. Lift up and fold each of the red release
handles on the seat base toward the front of
the vehicle. The will release the seat cushion
from the seat base.
3. Then lift up on the seat cushion to remove it
from the seat base. Be sure to store it in a
secure place.
To return the rear seat back to a seating position:
1. Push the anchor bars on the bottom of the
seat cushions down into the seat base.
2. Rotate the seat cushion toward the rear of
the vehicle and push down until they are
folded flat to secure eachseat cushion to the
seat base. Make sure to hold the seat
belts above the seat cushion and properly push the seat cushion down into
place.
WARNING
● Never allow anyone to ride in the cargo
area or on the rear seat when it is in the
fold-down position. Use of these areas
by passengers without proper restraints
could result in serious injury in an accident or sudden stop.
● Do not allow people to ride in any area
of your vehiclethat is not equipped with
seats and seat belts. Be sure everyone
in your vehicle is in a seat and using a
seat belt properly. Never ride in the rear
seat unless the seat bottom cushions
are in place and latched.
● Properly secure all cargo with ropes or
straps to help prevent it from sliding or
shifting. In a sudden stop or collision,
unsecured cargo could cause personal
injury.
● When returning the seatbacks to the
upright position, be certain they are
completely secured. If they are not completely secured in the latched position,
passengers may be injured in an accident or sudden stop.
● If the seat cushions are removed for any
reason, they should be securely stored
to prevent them from causing injury to
passengers or damage to the vehicle in
case of sudden braking or an accident.
Safety—Seats, seat belts and supplemental restraint system 1-9
Page 26
SEAT BELTS
PRECAUTIONS ON SEAT BELT
USAGE
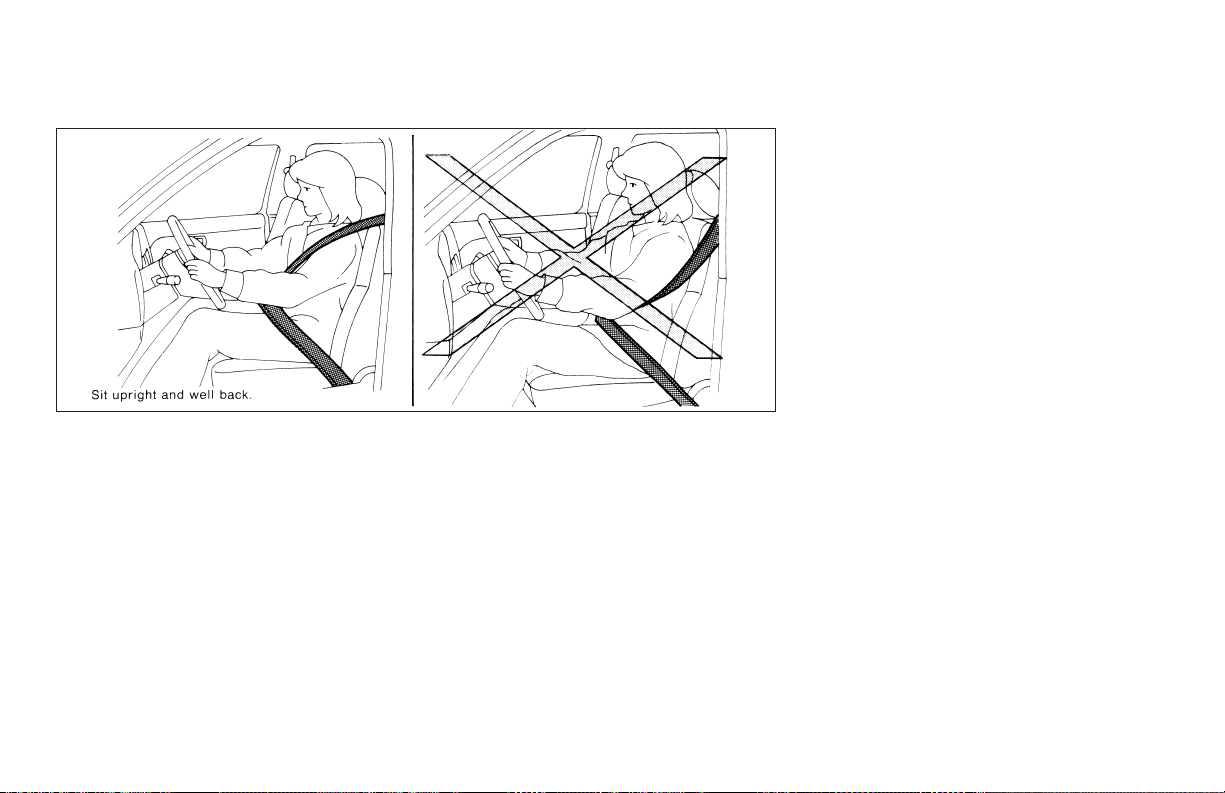
If you are wearing your seat belt properly adjusted andyou are sitting upright and well backin
your seat with both feeton the floor, your chances
of beinginjured or killed in an accident and/orthe
severity of injury may be greatly reduced.
NISSAN strongly encourages you and all of your
passengers to buckle up every time you drive,
even if your seating position includes a supplemental air bag.
Most U.S. states and Canadian provinces
or territories specify that seat belts beworn
at all times when a vehicle is being driven.
SSS0136
1-10 Safety—Seats, seat belts and supplemental restraint system
Page 27
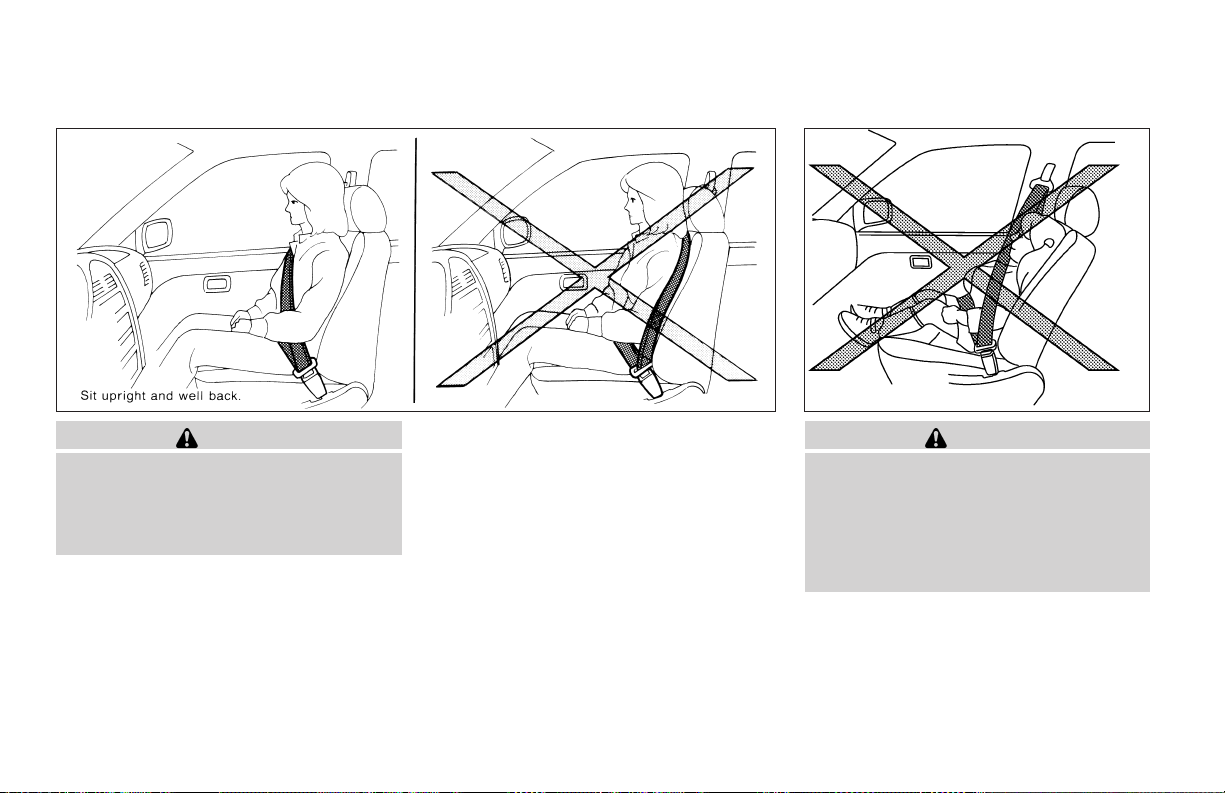
WARNING
● Every person who drives or rides in this
vehicle should use a seat belt at all
times. Children should be properly restrained in the rear seat and, if appropriate, in a child restraint.
SSS0134 SSS0016
WARNING
● The seat belt should be properly adjusted to a snug fit. Failure to do so may
reduce the effectiveness of the entire
restraint system and increase the
chance or severity of injury in an accident. Serious injury or death can occur
if the seat belt is not worn properly.
Safety—Seats, seat belts and supplemental restraint system 1-11
Page 28
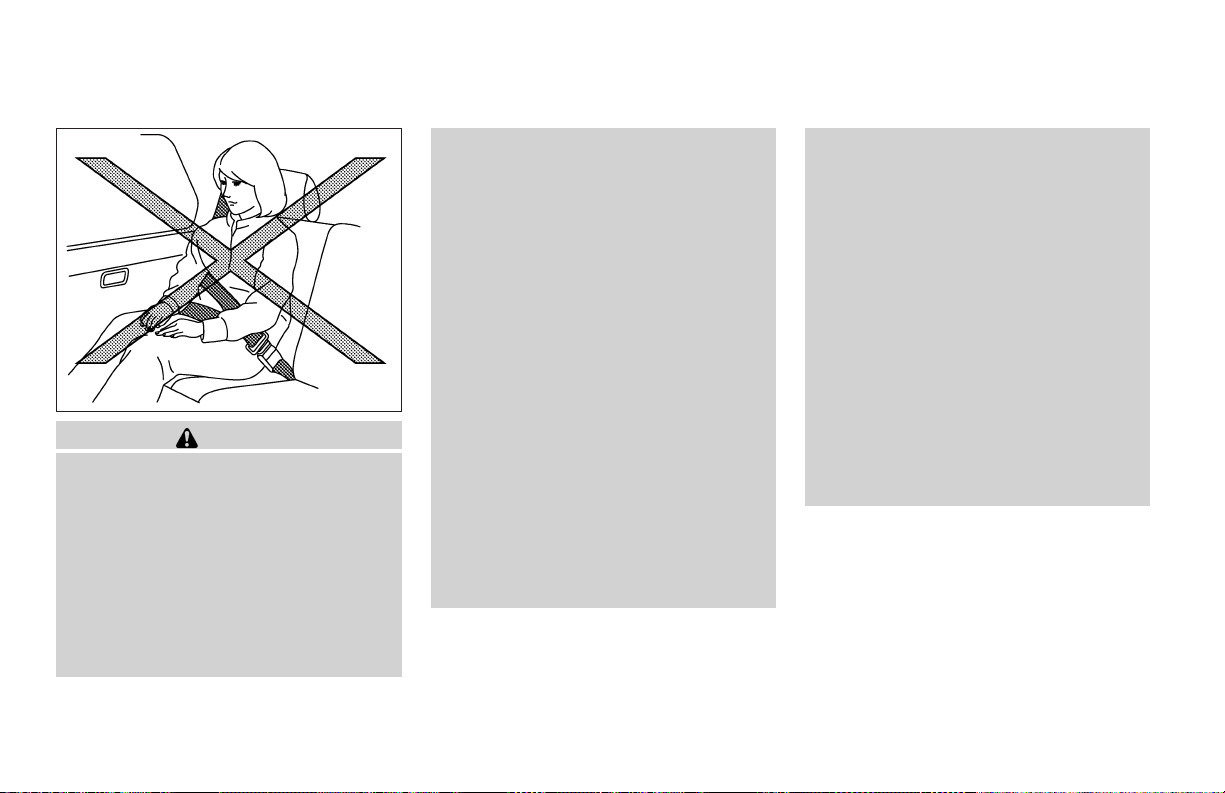
● Be sure the seat belt tongue is securely
fastened to the proper buckle.
● Do not wear the seat belt inside out or
twisted. Doing so may reduce its
effectiveness.
● Do not allow more than one person to
use the same seat belt.
● Never carry more people in the vehicle
than there are seat belts.
● If the seat belt warning light glows continuously while the ignition is turned
SSS0014
WARNING
● Always route the shoulder belt over
your shoulder and across your chest.
Never run the belt behind your back,
under your armor acrossyour neck. The
belt should be away from your face and
neck, but not falling off your shoulder.
● Position the lap belt as low and snug as
possible AROUND THE HIPS, NOT THE
WAIST. A lap belt worn too high could
increase the risk of internal injuries in
an accident.
ON with all doors closed and all seat
belts fastened, it may indicate a malfunction in the system. Have the system
checked by a NISSAN dealer.
● Once the pretensioner has activated, it
cannot be reused and must be replaced
together with the retractor. See your
NISSAN dealer.
● Removal and installation of the pretensioner system components should be
done by a NISSAN dealer.
1-12 Safety—Seats, seat belts and supplemental restraint system
● All seat belt assemblies, including retractors and attaching hardware,
should be inspected after any collision
by a NISSAN dealer. NISSAN recommends that all seat belt assemblies in
use during a collision be replaced unless the collision was minor and the
belts show no damage and continue to
operate properly. Seat belt assemblies
not in use during a collision should also
be inspected and replaced if either
damage orimproper operation is noted.
● All child restraints and attaching hardware should be inspected after any collision. Always follow the restraint
manufacturer’s inspection instructions
and replacement recommendations.
The child restraints should be replaced
if they are damaged.
CHILD SAFETY
Children need adults to help protect them.
They need to be properly restrained.
In addition to the general information in this
manual, child safety information is available from
many other sources, including doctors, teachers,
government traffic safety offices, and community
organizations. Every child is different, so be sure
to learn the best way to transport your child.
Page 29

There are three basic types of child restraint
systems:
● Rear facing child restraint
● Front facing child restraint
● Booster seat
The proper restraint depends on the child’s size.
Generally, infants up to about 1 year and less
than 20 pounds (9 kg) should be placed in rear
facing child restraints. Front facing child restraints are available for children who outgrow
rear facing child restraints and are at least 1 year
old. Booster seats are used to help position a
vehicle lap/shoulder belt on a child who can no
longer use a front facing child restraint.
WARNING
Infants and children need special protection. The vehicle’s seat belts may not fit
them properly. The shoulder belt may
come too close to the face or neck. The
lap belt may not fit over their small hip
bones. In an accident, an improperly fitting seat belt could cause serious or fatal
injury. Always use appropriate child
restraints.
All U.S. states and Canadian provinces or territories require the use of approved child restraints
for infants and small children. See “Child Restraints” later in this section.
Also, there are other types of child restraints
available for larger children for additional protection.
NISSAN recommends that all pre-teens
and children be restrained in the rear seat.
According to accident statistics, children
are safer when properly restrained in the
rear seat than in the front seat.
This is especially important because your
vehicle has a supplemental restraint system (Air bag system) for the front passenger. See “Supplemental restraint system”
later in this section.
Infants
Infants up to at least 1 year old should be placed
in a rear facing child restraint. NISSAN recommends that infants be placed in child restraints
that comply with Federal Motor Vehicle Safety
Standards or Canadian Motor Vehicle Safety
Standards. You should choose a child restraint
that fits your vehicle and always follow the manufacturer’s instructions for installation and use.
Small Children
Children that are over one year old and weigh at
least 20 lbs (9 kg) can be placed in a forward
Safety—Seats, seat belts and supplemental restraint system 1-13
facing child restraint. Refer to the manufacturer’s
instructions for minimum and maximum weight
and height recommendations. NISSAN recommends that small children be placed in child
restraints that comply with Federal Motor Vehicle
Safety Standards or Canadian Motor Vehicle
Safety Standards. You should choose a child
restraint that fits your vehicle and always follow
the manufacturer’s instructions for installation
and use.
Larger children
Children who are too large for child restraints
should beseated andrestrained by the seat belts
which are provided. The seat belt may not fit
properly if the child is less than 4 feet 9 inches
(142.5 cm) tall and weighs between 40 lbs (18
kg) and 80 lbs (36 kg). A booster seat should be
used to obtain proper seat belt fit.
NISSAN recommends that a child be placed in a
commercially available booster seat if the shoulder beltin the child’s seating position fits closeto
the face or neck or if the lap portion of the seat
belt goes across the abdomen. The booster seat
should raise the child so that the shoulder belt is
properly positioned across the top, middle portion of the shoulder and the lap belt is low on the
hips. A booster seat can only be used in seating
positions that have a three-point type seat belt.
The booster seat should fit the vehicle seat and
Page 30
have a label certifying that it complies with Federal Motor Vehicle Safety Standards or Canadian
Motor Vehicle Safety Standards. Once the child
has grown so the shoulder belt is no longer on or
near the face and neck, use the shoulder belt
without the booster seat.
WARNING
Never let a child stand or kneel on any
seat and do not allow a child in the cargo
areas while the vehicle is moving. The
child could beseriously injured or killed in
an accident or sudden stop.
PREGNANT WOMEN
NISSAN recommends that pregnant women use
seat belts. The seat belt should be worn snug,
and always position the lap belt as low as possible around the hips, not the waist. Place the
shoulder belt over your shoulder and across your
chest. Never run the lap/shoulder belt over your
abdominal area. Contact your doctor for specific
recommendations.
INJURED PERSONS
NISSAN recommends that injured persons use
seat belts. Check with your doctor for specific
recommendations.
THREE-POINT TYPE SEAT BELT
WITH RETRACTOR
WARNING
● Every person who drives or rides in this
vehicle should use a seat belt at all
times.
● Do not ride in a moving vehicle when
the seatback is reclined. This can be
dangerous. The shoulder belt will not
be against your body. In an accident,
you could be thrown into it and receive
neck or other serious injuries. You
could also slide under the lap belt and
receive serious internal injuries.
● For the most effective protection when
the vehicle is in motion, the seat should
be upright. Always sit well back in the
seat with both feet on the floor and
adjust the seat belt properly.
Manual front seat shown
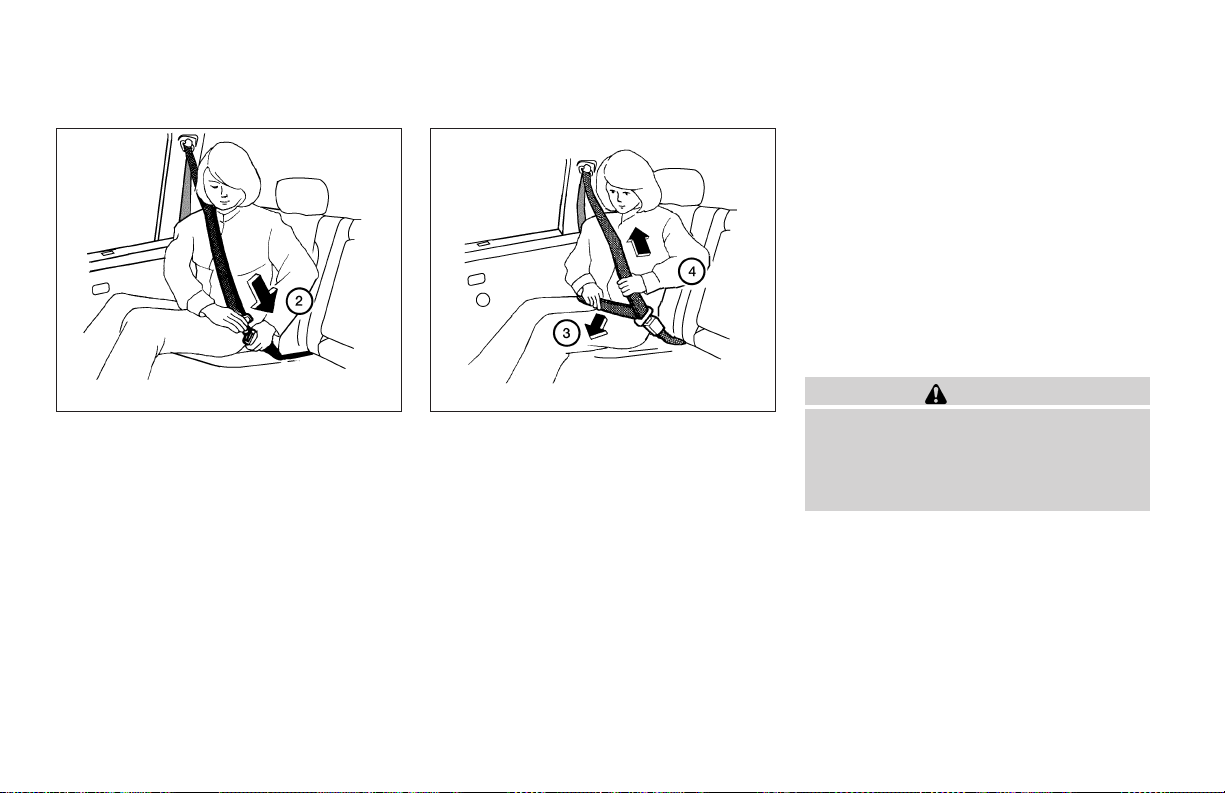
Fastening the seat belts
1
Adjust the seat. See “Seats” earlier in this
s
section.
WRS0174
1-14 Safety—Seats, seat belts and supplemental restraint system
Page 31
Once retracted, the seat belt is in theEmergency
Locking Retractor (ELR) mode. See “Child restraints” later in this section for more information.
The ALR should be used only for child restraint installation. During normal seat belt
use by a passenger, the locking mode
should not be activated. If it is activated it
may cause uncomfortable seat belt tension. It can also change the operation of
the front passenger air bag. See “Front
passenger air bag and status light” later in
this section.
LRS0594 LRS0595
2
Slowly pull the seat belt out of the retractor
s
and insert the tongue into the buckle until
you hear and feel the latch engage.
● The retractor is designed to lock during
a sudden stop or on impact. A slow
pulling motion permits the seat belt to
move, and allows you some freedom of
movement in the seat.
● If the seat belt cannot be pulled from
its fully retracted position, firmly pull
the belt and release it. Then smoothly
pull the belt out of the retractor.
3
Position the lap belt portion low and snug
s
on the hips as shown.
4
Pull the shoulder belt portion toward the
s
retractor to take up extra slack. Be sure the
shoulder belt is routed over your shoulder
and across your chest.
The front passenger seat and the rear seating
positions three-point seat belts have a locking
mechanism for child restraint installation. It is
referred to as the Automatic Locking Retractor
(ALR) mode or child restraint mode.
When the ALR is activated the seat belt cannot
be extended again until the seat belt tongue is
detached from the buckle and fully retracted.
Safety—Seats, seat belts and supplemental restraint system 1-15
WARNING
When fastening the seat belts, be certain
that the seatbacks are completely secured in the latched position. If they are
not completely secured, passengers may
be injured in an accident or sudden stop.
Page 32
WRS0139 SSS0240
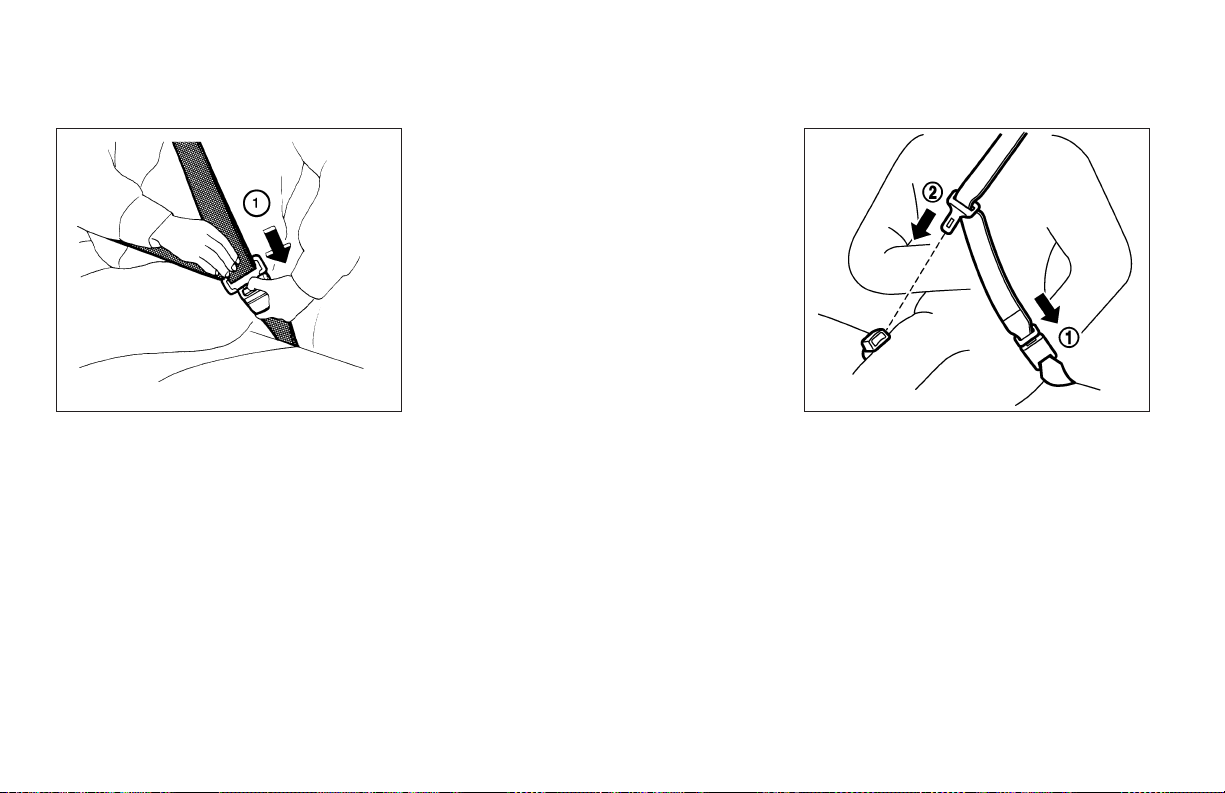
Unfastening the seat belts
1
Tounfasten the seatbelt, pressthe button on
s
the buckle. The seat belt automatically retracts.
Checking seat belt operation
Seat belt retractors are designed to lock seat belt
movement by two separate methods:
● When the seat belt is pulled quickly from the
retractor.
● When the vehicle slows down rapidly.
To increase your confidence in the seat belts,
check the operation as follows.
● Grasp the shoulder belt and pull forward
quickly. The retractor should lock and restrict further belt movement.
If the retractor does not lock during this check or
if you have any questions about seat belt operation, see a NISSAN dealer.
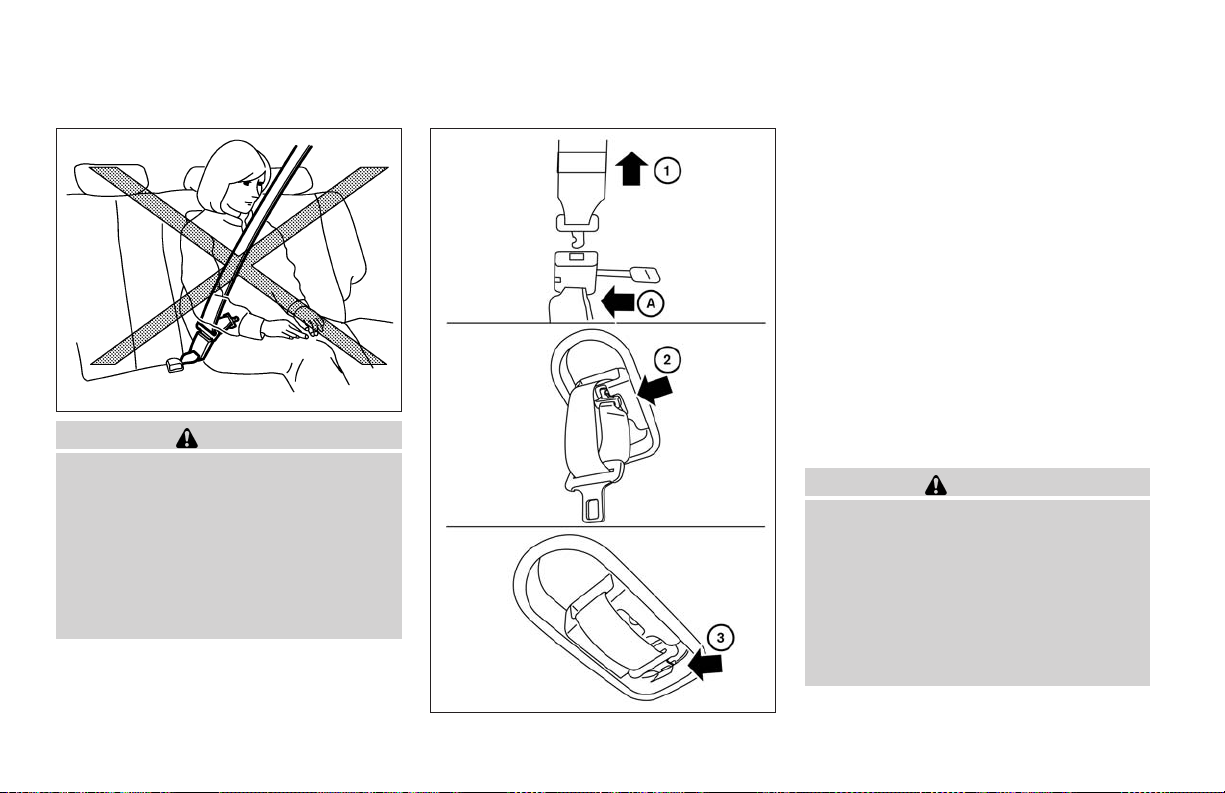
Center of the rear bench seat
The center seat belt has a connector tongue
and a seat belt tongue
tongue and the seat belt tongue must be securely
latched for proper seat belt operation.
2
. Both the connector
s
s
1
1-16 Safety—Seats, seat belts and supplemental restraint system
Page 33
SSS0241
WARNING
● Always fasten the connector tongue
and the seat belt in the order shown.
● Always make sure both the connector
tongue and the seat belt tongue are
secured when using the seat belt. Do
not use it with only the seat belt tongue
attached. This could result in serious
personal injuryin case of an accident or
a sudden stop.
LRS0601
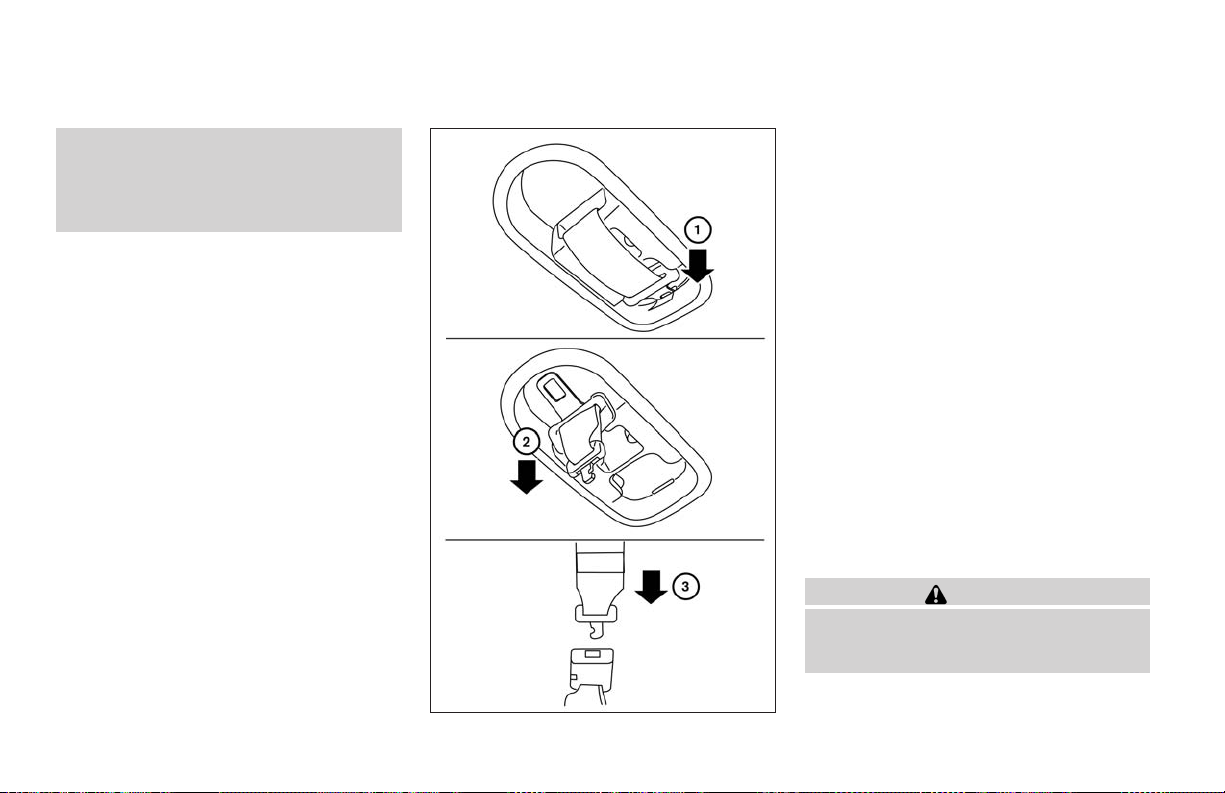
Stowing the center seat belt
When folding down the rear seat, the rear center
seat belt can be retracted into a stowed position
as follows:
1
1. Hold the connector tongue
seat beltdoes notretract suddenly when the
tongue is released from the connector
buckle.
2. Insert a suitable tool such as a key
the connector buckle and release the connector tongue
3. Fold the connector as illustrated
4. Then secure the connector tongue into the
retractor base
1
.
s
3
in the ceiling.
s
so that the
s
2
s
A
into
s
.
WARNING
● Do not unfasten the rear center seat
belt connector except when folding
down the rear seat.
● When attaching the rear center seat
belt connector, be certain that the seatbacks are completely secured in the
latched position and the rear center
seat belt connector is completely
secured.
Safety—Seats, seat belts and supplemental restraint system 1-17
Page 34
● If the rear center seat belt connector
and the seatbacks are not secured in
the correct position, serious personal
injury may result in an accident or sudden stop.
LRS0602
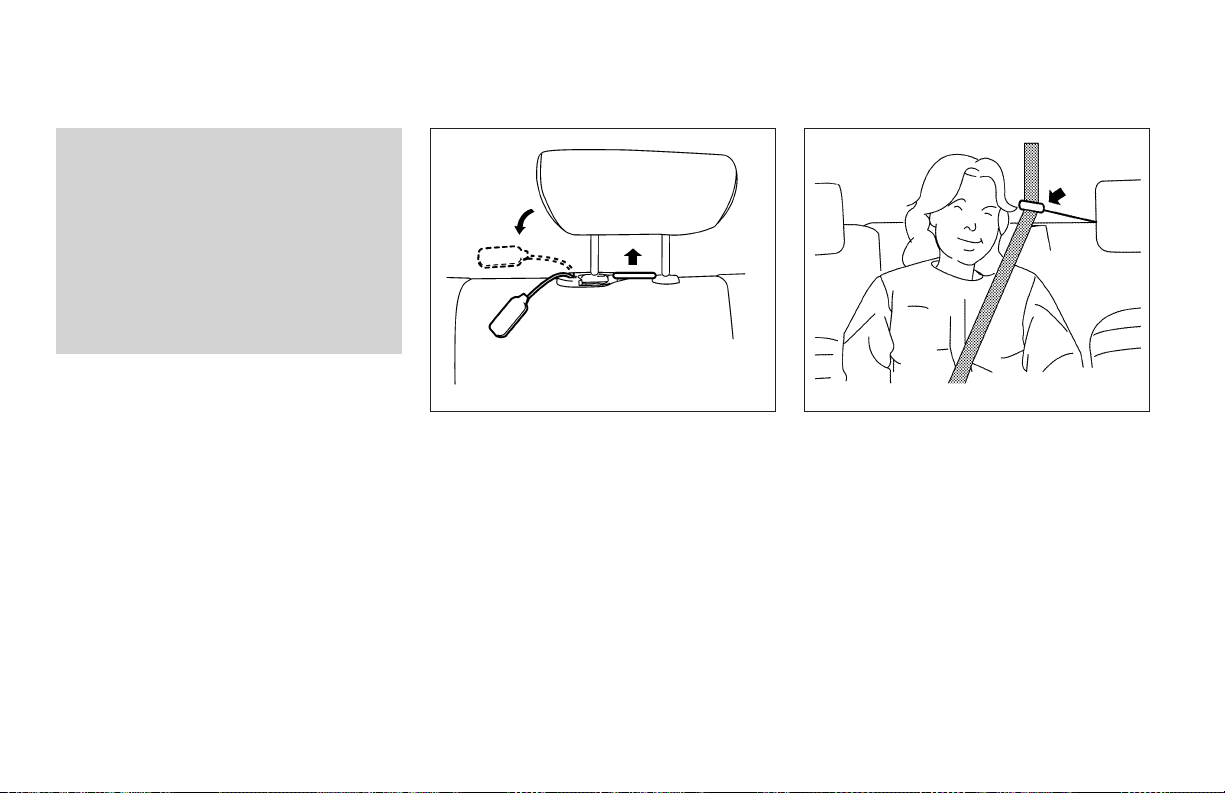
Attaching the center seat belt
Always be sure the center seat belt connector
tongue and connector buckle are attached. Disconnect only when folding down the rear seat.
To connect the buckle:
1
Pull out the seat belt tongue from the retrac-
s
tor base.
2
Pull out the connector tongue from the
s
molded retractor base.
3
Pull the seat belt and secure the receiver
s
buckle until it clicks.
The center seat belt connector tongue and receiver buckle are indicated by the > and < mark.
The center seat belt connector tongue can be
attached only into the rear center seat belt connector buckle.
To fasten the seat belt, see “Fastening the seat
belt” earlier in this section.
WARNING
● Do not unfasten the rear center seat
belt connector except when folding
down the rear seat.
1-18 Safety—Seats, seat belts and supplemental restraint system
Page 35
● When attaching the rear center seat
belt connector, be certain that the seatbacks are completely secured in the
latched position and the rear center
seat belt connector is completely
secured.
● If the rear center seat belt connector
and the seatbacks are not secured in
the correct position, serious personal
injury may result in an accident or sudden stop.
LRS0611 LRS0610
2nd row center seat belt comfort
guide
When using the 2nd row center seat belt it may
be necessary to use the comfort guide to adjust
the shoulder belt height for occupants ofdifferent
sizes for added comfort and to help obtain proper
seat belt fit.
1. Raise the head restraint on the 2nd row
driver’s side seating position. Remove the
comfort guide from the stowed position by
pulling the cord from the channel.
2. Insert the shoulder belt into the back of the
comfort guideso that the seat belt lays flatin
the guide. Be sure that the comfort guide
routes the seat belt properly over the center
of your shoulder and across your chest. The
belt should be away from your face and
neck, but not falling off of your shoulder.
Safety—Seats, seat belts and supplemental restraint system 1-19
Page 36
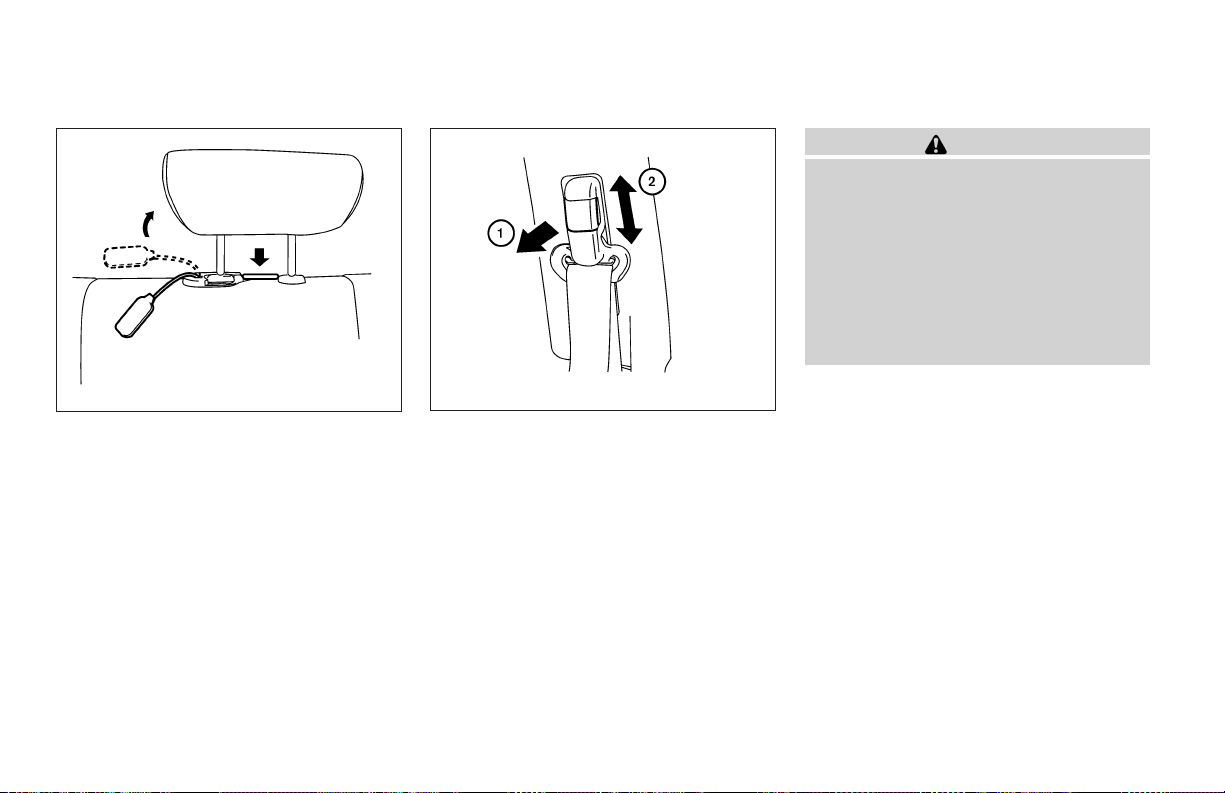
WARNING
● After adjustment, release the adjustment button and try to move the shoulder belt anchor up and down to make
sure it is securely fixed in position.
● The shoulder belt anchor height should
be adjusted to the position best for you.
Failure to do so may reduce the effectiveness of the entire restraint system
and increase the chance or severity of
injury in an accident.
LRS0612
3. To return the seat belt comfort guide to the
stowed position, route the comfort guide
strap in the channel under the 2nd row driver’s side seating position head restraint and
attach the guide in the clip.
Front and 2nd row outboard seats
Shoulder belt height adjustment (front
and 2nd row outboard seats)
The shoulder belt anchor height should be adjusted to the position best for you. (See “Precautions on seat belt usage” earlier in this section.)
To adjust, pull out
move the shoulder belt anchor
position, sothe belt passes over thecenter of the
shoulder. The belt should be away from yourface
and neck, but not falling off your shoulder. Release the adjustment button to lock the shoulder
belt anchor into position.
1
the adjustment button and
s
1-20 Safety—Seats, seat belts and supplemental restraint system
2
to the desired
s
LRS0242
Page 37
LRS0583
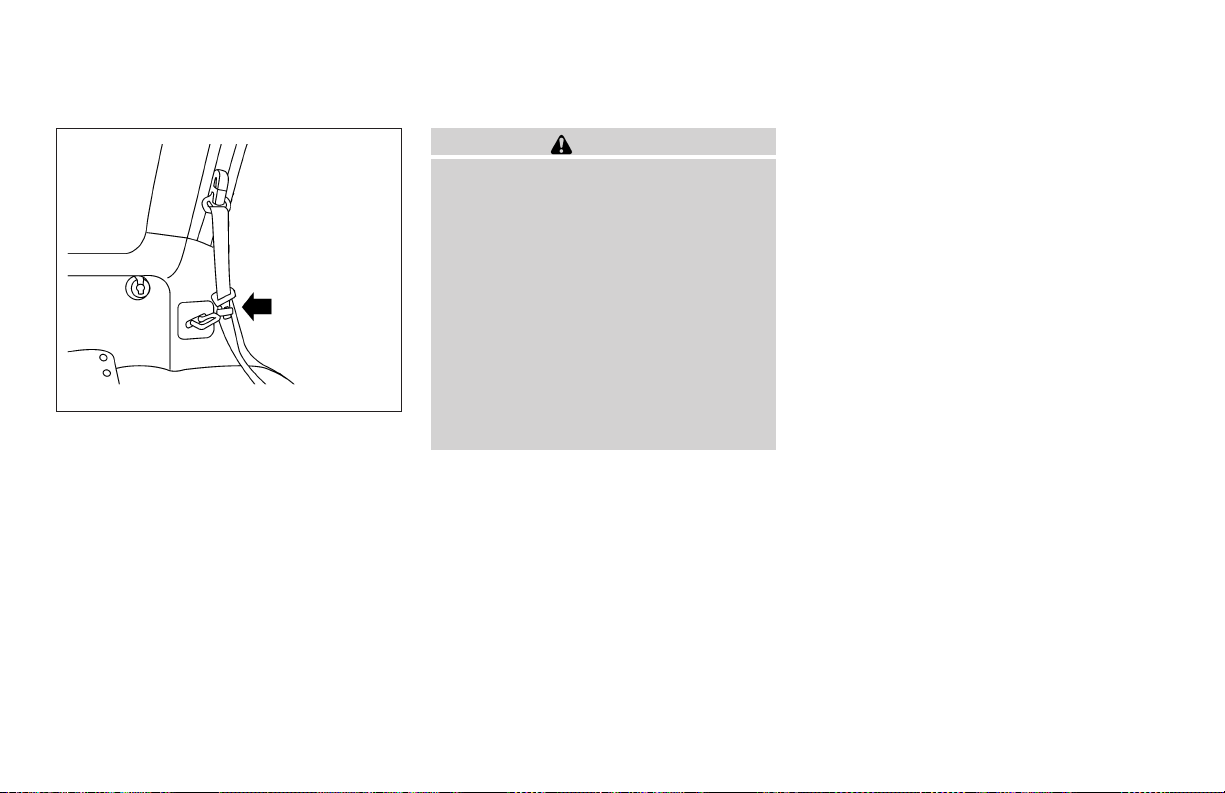
Seat belt hook
When theseat belt is not in use and when folding
down the rear seats, hook the rear seat belts on
the seat belt hooks.
SEAT BELT EXTENDERS
If, because of body size or driving position, it is
not possible to properly fit the lap-shoulder belt
and fasten it, an extender is available which is
compatible with the installed seat belts. The extender adds approximately 8 inches (200 mm) of
length and may be used for either the driver or
front passenger seating position. See a NISSAN
dealer for assistance if an extender is required.
WARNING
● Only NISSAN seat belt extenders, made
by the same company which made the
original equipment seat belts, should
be used with NISSAN seat belts.
● Adults and children who can use the
standard seat belt should not use an
extender. Such unnecessary use could
result in serious personal injury in the
event of an accident.
● Never use seat belt extenders to install
child restraints. If the child restraint is
not secured properly, the child could be
seriously injured in a collision or a sudden stop.
SEAT BELT MAINTENANCE
● To clean the seat belt webbing, apply a
mild soap solution or any solution recommended for cleaning upholstery or carpet.
Then wipe with a cloth and allow the seat
belts to dry in the shade. Do not allow the
seat belts to retract until they are completely
dry.
● If dirt builds up in the shoulder belt
guide of the seat belt anchors, the seat
belts may retract slowly. Wipe the shoulder
belt guide with a clean, dry cloth.
Safety—Seats, seat belts and supplemental restraint system 1-21
● Periodically check to see that the seat
belt andthe metal components, such as
buckles, tongues, retractors, flexible wires
and anchors, work properly. If loose parts,
deterioration, cuts or other damage on the
webbing is found, the entire seat belt assembly should be replaced.
Page 38
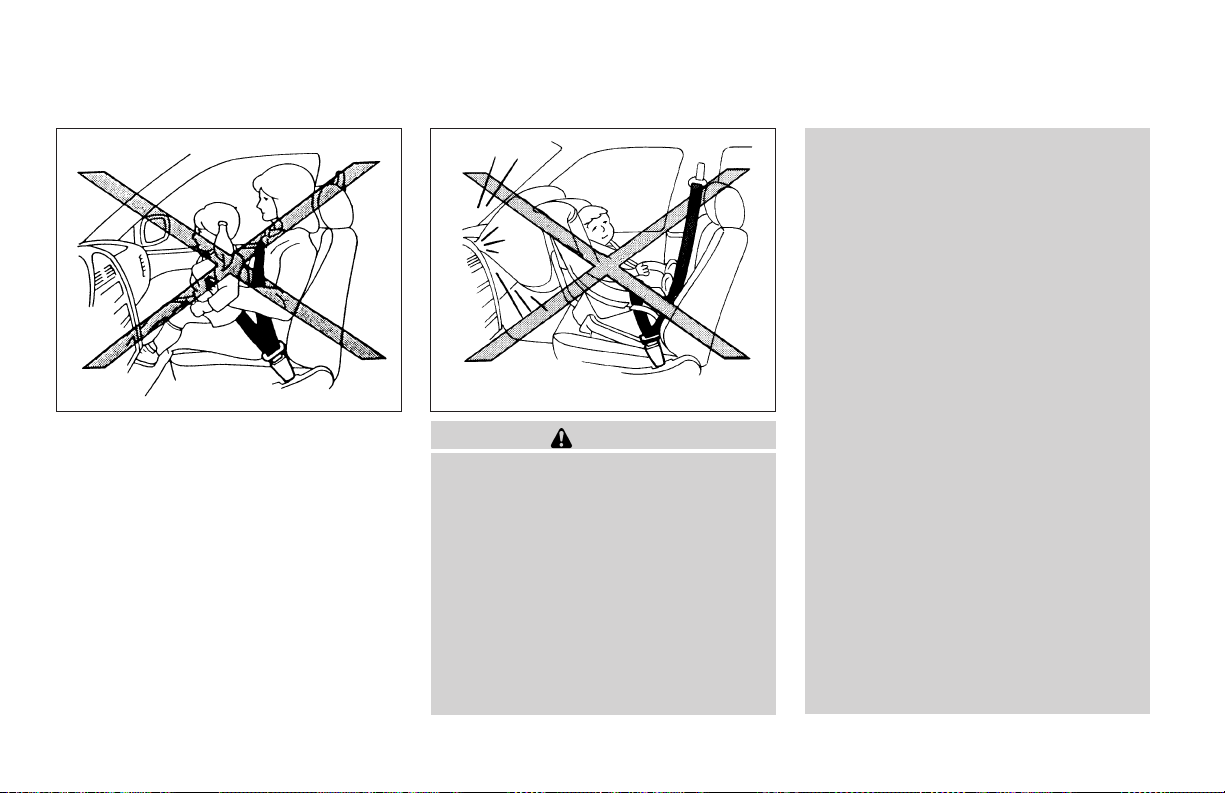
CHILD RESTRAINTS
PRECAUTIONS ON CHILD
RESTRAINTS
ARS1098 WRS0256
WARNING
● Infants and small children should always be placed in an appropriate child
restraint while riding in the vehicle.
Failure to use a child restraint can result in serious injury or death.
● Infants and small children should never
be carried on your lap. It is not possible
for even thestrongest adultto resistthe
forces of a severe accident. The child
could be crushed between the adult and
parts of the vehicle. Also, do not put the
same seat belt around both your child
and yourself.
● Even with the NISSAN Advanced Air
Bag System, never install a rear-facing
child restraint in the front seat. An inflating supplemental front air bag could
seriously injure or kill your child. A rearfacing child restraint must only be used
in the rear seat.
● NISSAN recommends that the child restraint be installed in the rear seat. According to accident statistics, children
are safer when properly restrained in
the rear seat than in the front seat. If
you must install a front facing child restraint in the front seat, see “Child restraint installation using the seat belts”
later in this section.
● Improper use or improper installation
of a child restraint can increase the risk
or severity of injury for both the child
and other occupants of the vehicle and
can lead to serious injury or death in an
accident.
● Follow all of the child restraint manufacturer’s instructions for installation
and use. When purchasing a child restraint, be sure to select one which will
fit your child and vehicle. It may not be
possible to properly install some types
of child restraints in your vehicle.
1-22 Safety—Seats, seat belts and supplemental restraint system
Page 39
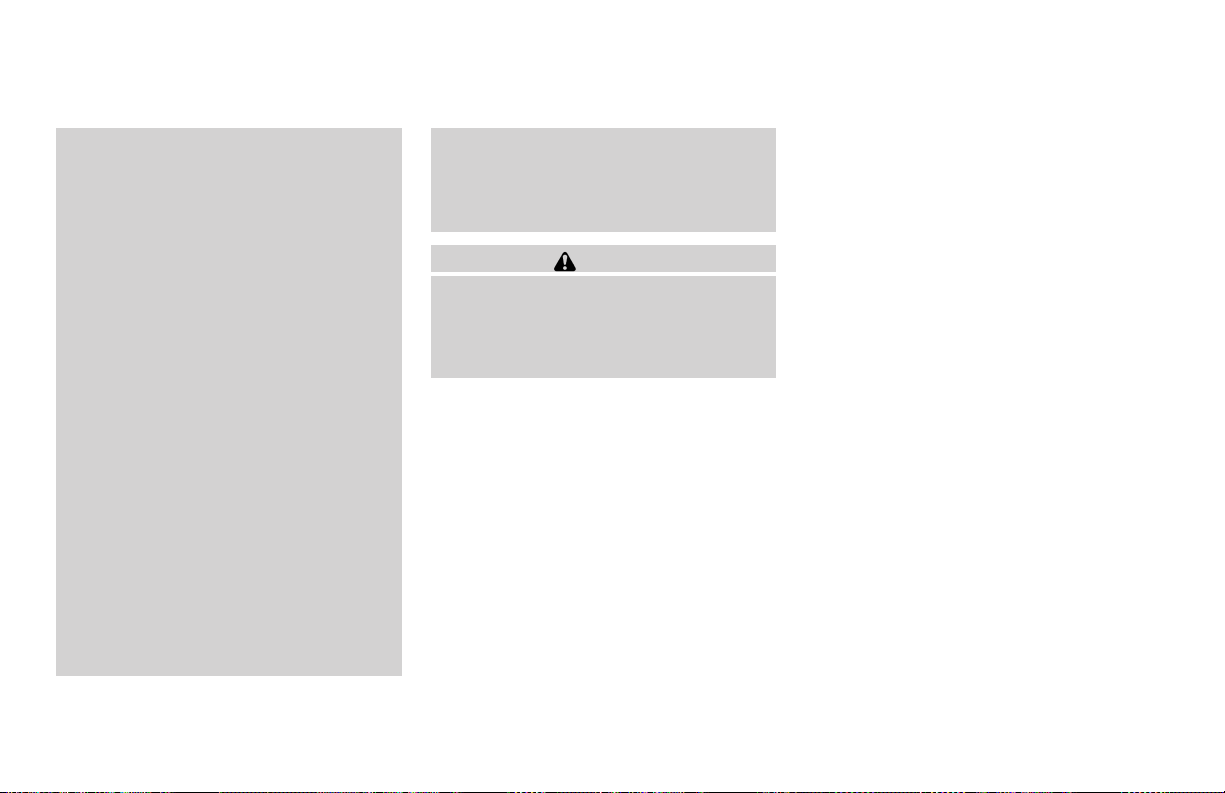
● If the child restraint is not anchored
properly, the risk of a child being injured in a collision or a sudden stop
greatly increases.
● Child restraint anchor points are designed to withstand only those loads
imposed by correctly fitted child restraints. Under no circumstances are
they to be used for adult seat belts or
harnesses.
● Adjustable seatbacks should be positioned to fit the child restraint, but as
upright as possible.
● After attaching the child restraint, test it
before you place the child in it. Push it
from side to side while holding the seat
near the LATCH attachment or by the
seat belt path. Try to tug it forward and
check to see if the belt holds the restraint in place. The child restraint
should not move more than 1 inch (25
mm). If the restraint is not secure,
tighten the belt as necessary, or put the
restraint in another seat and test it
again. You may need to try a different
child restraint. Not all child restraints fit
in all types of vehicles.
● When your child restraint is not in use,
keep it secured with the LATCH System
or a seat belt to prevent it from being
thrown around in case of a sudden stop
or accident.
CAUTION
Remember that a child restraint left in a
closed vehicle can become very hot.
Check the seating surface and buckles
before placing your child in the child
restraint.
This vehicle is equipped with a universal child
restraint lower anchor system, referred to as the
Lower Anchors and Tethers for CHildren System
or LATCH.Some childrestraints includetwo rigid
or webbing-mounted attachments that can be
connected to these lower anchors. For details,
see the “Lower Anchors and Tethers for CHildren
System (LATCH)” later in this section.
If you do not have a LATCH compatible child
restraint, the vehicle seat belts can be used. See
“Child restraint installation using the seat belts”
later inthis section. In general, child restraints are
also designed to be installed with the lap portion
of a lap/shoulder seat belt.
Several manufacturers offer child restraints for
infants and small children of various sizes. When
selecting any child restraint, keep the following
points in mind:
● Choose only a restraint with a label certifying
that it complies with Federal Motor Vehicle
Safety Standard 213 or Canadian Motor
Vehicle Safety Standard 213.
● Check the child restraintin yourvehicle to be
sure it is compatible with the vehicle’s seat
and seat belt system.
● If the child restraint is compatible with your
vehicle, place your child in the child restraint
and check the various adjustments to be
sure the child restraint is compatible with
your child. Choose a child restraint that is
designed for your child’s height and weight.
Always followall recommended procedures.
All U.S. states and Canadian provinces or
territories require that infants and small
children be restrained in an approved child
restraint at all times while the vehicle is
being operated.
Safety—Seats, seat belts and supplemental restraint system 1-23
Page 40
WRS0438
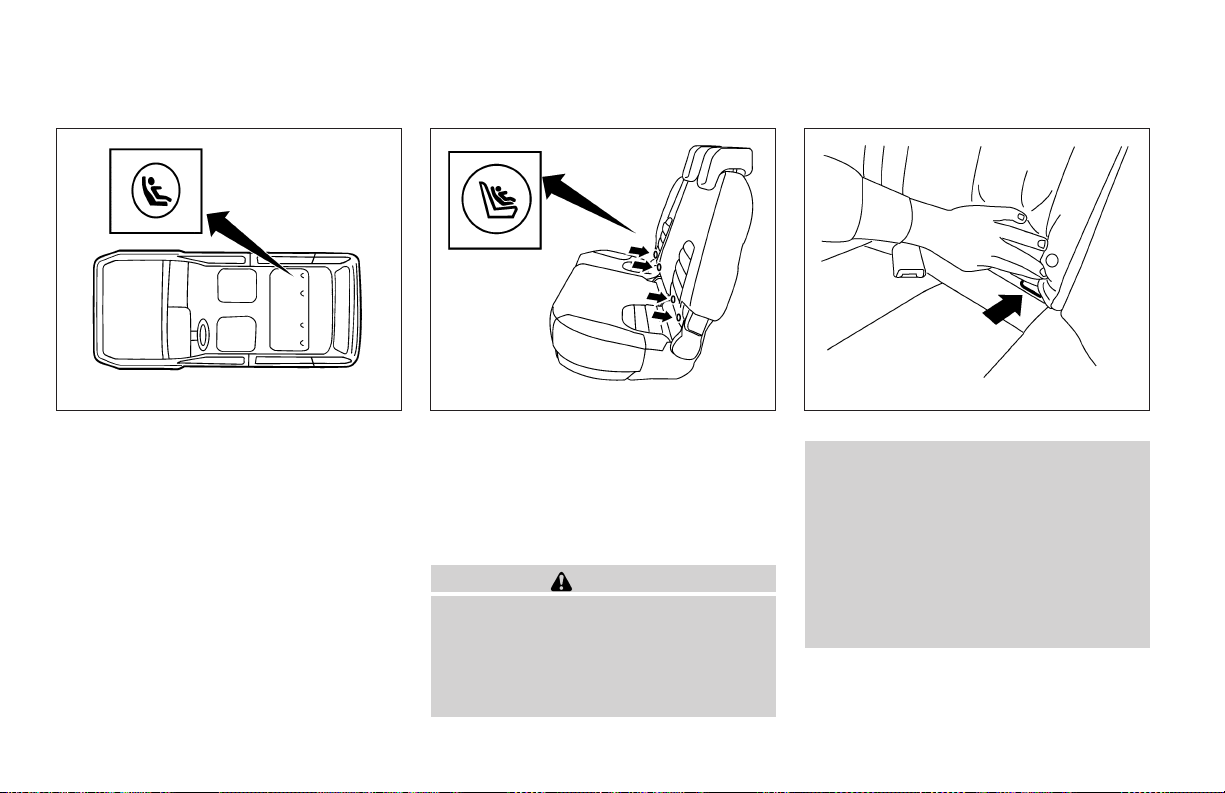
LATCH system anchor locations
LOWER ANCHORS AND TETHERS
FOR CHILDREN SYSTEM (LATCH)
Your vehicle is equipped with special anchor
points that are used with Lower Anchors and
Tethers for CHildren System (LATCH) compatible child restraints. This system may also be
referred to as the ISOFIX or ISOFIX compatible
system. With this system, you do not have to use
a vehicle seat belt to secure the child restraint.
The LATCH anchor points are provided to install
child restraints in the rear outboard seating positions only. Do not attempt to install a child restraint
in the center position using the LATCH anchors.
LATCH lower anchor point locations
The LATCH anchors are located at the rear ofthe
seat cushion near the seatback. A label is attached to the seatback to help you locate the
LATCH anchors.
● Attach LATCH compatible child restraints only at the locations shown in
the illustration. If a child restraint is not
secured properly, your child could be
seriously injured or killed in an
accident.
LATCH label locations
WARNING
1-24 Safety—Seats, seat belts and supplemental restraint system
LRS0589
WRS0700
LATCH lower anchor location
● Do not secure a child restraint in the
center rear seating position using the
LATCH anchors. The child restraint will
not be secured properly.
● Child restraint anchor points are designed to withstand only those loads
imposed by correctly fitted child restraints. Under no circumstance are
they to be used for adult seat belts or
harnesses.
Page 41
LRS0661
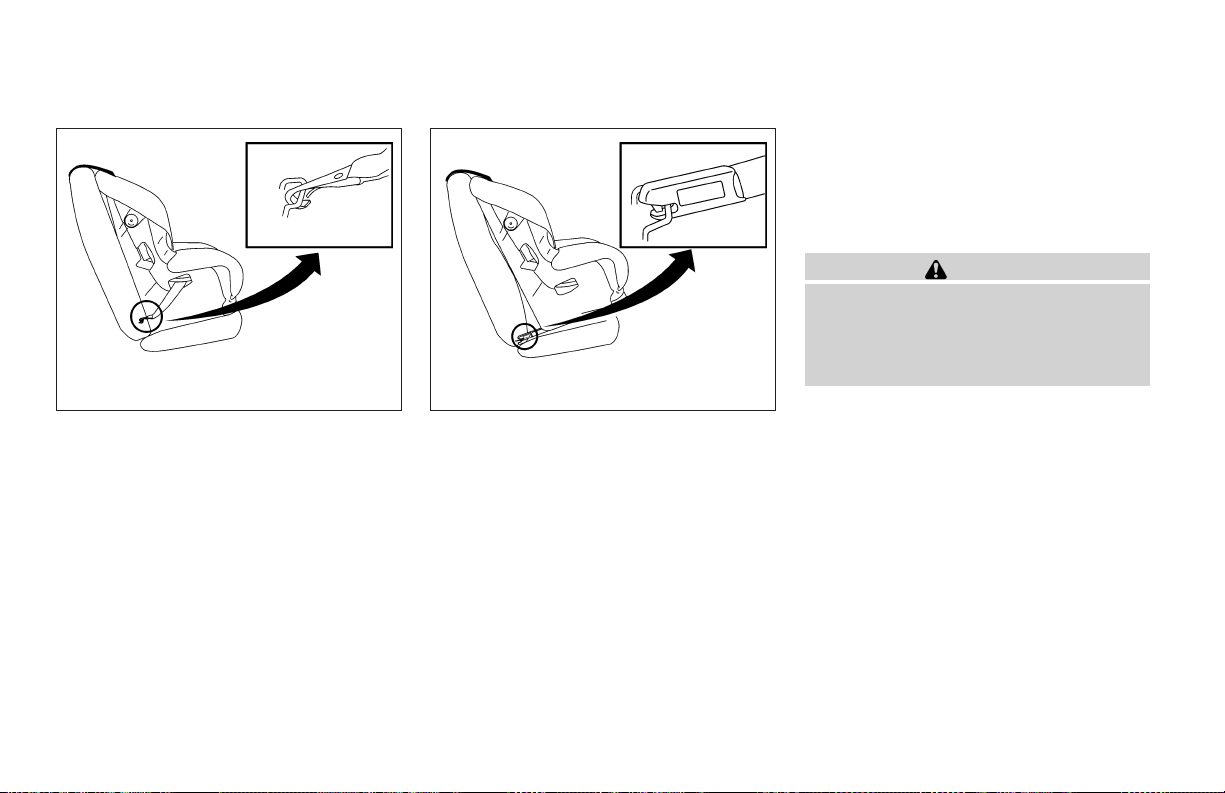
LATCH webbing-mounted attachment
Installing child restraint LATCH anchor
attachments
LATCH compatible child restraints include two
rigid or webbing-mounted attachments that can
be connected to two anchors located at certain
seating positions in your vehicle. With this system, you do not have to use a vehicle seat belt to
secure the child restraint. Check your child restraint for a label stating that it is compatible with
LATCH. This information may also be in the instructions provided by the child restraint manufacturer.
LRS0662
LATCH rigid-mounted attachment
LATCH child restraints generally require the use
of a top tether strap. See “Top tether strap child
restraint” later in this section for installation instructions.
When installing a child restraint, carefully read
and follow the instructions in this manual and
those supplied with the child restraint. See“Child
restraint installationusing LATCH”in this section.
TOP TETHER STRAP CHILD
RESTRAINT
If the manufacturer of your child restraint requires
the use of a top tether strap, it must be securedto
the anchor point.
WARNING
Child restraintanchor points are designed
to withstand only those loads imposed by
correctly fitted child restraints. Under no
circumstances are they to be used for
adult seat belts or harnesses.
Top Tether Anchor Point Locations
Anchor points are located on the back of each
seatback forall three seating positions of the 2nd
row bench seat as shown.
If you have any questions when installing a
top tether strap child restraint on the rear
seat, consult your NISSAN dealer for details.
Safety—Seats, seat belts and supplemental restraint system 1-25
Page 42
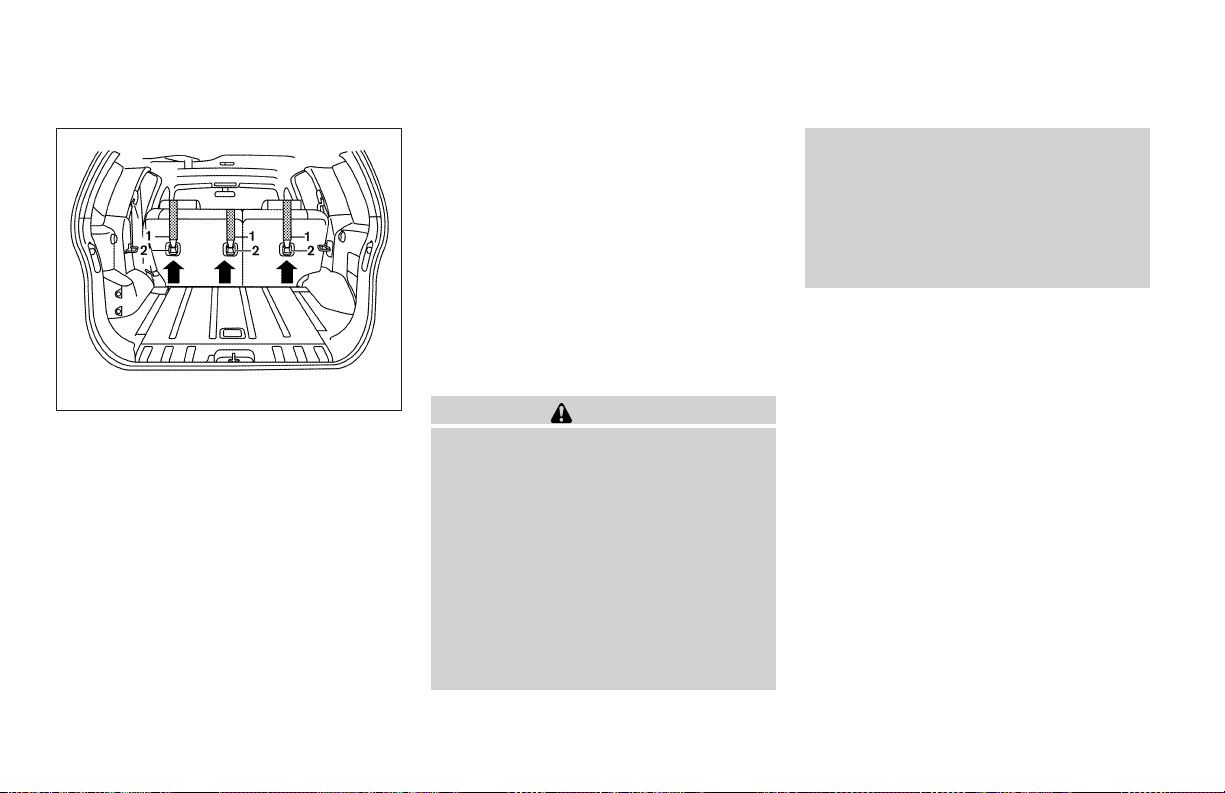
LRS0588
2nd row bench seat
Installing top tether strap
First, secure the child restraint with the seat belt
or the LATCH system (rear outboard seat positions only), as applicable.
1. Top tether strap
2. Anchor point
For the 2nd row bench seat, install the top tether
strap as follows:
1. Position the top tether strap over the top of
the head restraint with the head restraint in
the full “down” position.
2. Secure the tether strap to the tether anchor
point on the seat directly behind the child
restaint.
3. Tighten the tether strap according to the
manufacturer’s instructions to remove any
slack.
For best child restraint fit, see the child restraint
installation instructions in this section and the
child restraint manufacturer’s instructions.
CHILD RESTRAINT INSTALLATION
USING LATCH
WARNING
● Attach LATCH compatible child restraints only at the locations shown. For
the LATCH lower anchor locations, see
“Lower Anchors and Tethers for CHildren System (LATCH)” in this section. If
a child restraint is not secured properly,
your child could be seriously injured or
killed in an accident.
● The LATCH anchors are designed to
withstand only those loads imposed by
correctly fitted child restraints. Under
no circumstance are they to be used for
adult seat belts or harnesses.
● Inspect the lower anchors by inserting
your fingers into the lower anchor area
and feeling to make sure there are no
obstructions over the LATCH anchors,
such as seat belt webbing or seat cushion material. The child restraint will not
be secured properly if the LATCH anchors are obstructed.
Front-facing
Follow these steps to install a front-facing child
restraint using LATCH:
1. Position the child restraint on the seat. Always follow the child restraint manufacturer’s instructions.
1-26 Safety—Seats, seat belts and supplemental restraint system
Page 43
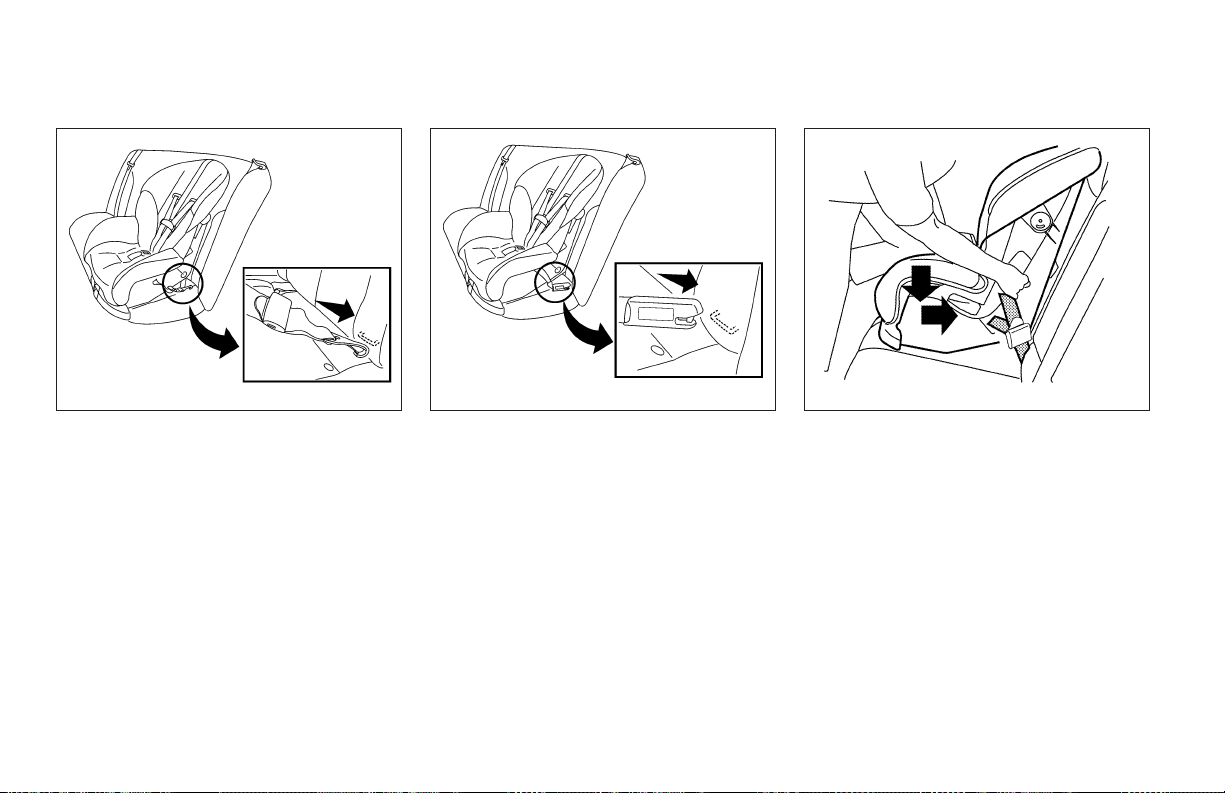
LRS0663
Front facing web-mounted – step 2
2. Secure the child restraint anchor attachments to the LATCH lower anchors.
3. The back of the child restraint should be
secured against the vehicle seat back..
If necessary, adjust or remove the head restraint
to obtain the correct child restraint fit. See“Head
restraint adjustment” in this section. If the head
restraint isremoved, store it in asecure place. Be
sure to install the head restraint when the child
restraint is removed. If the seating position does
not have an adjustable head restraint and it is
LRS0664
Front facing rigid-mounted – step 2
interfering with the proper child restraint fit, try
another seating position or a different child restraint.
Safety—Seats, seat belts and supplemental restraint system 1-27
LRS0671
Front facing – step 4
4. For child restraints that are equipped with
webbing mounted attachments, remove any
additional slack from the anchor attachments. Press downward and rearward firmly
in the center of the child restraint with your
knee to compress the vehicle seat cushion
and seatback while tightening the webbing
of the anchor attachments.
5. If the child restraint is equipped with a top
tether strap, route the top tether strap and
secure the tether strap to the tether anchor
point. See “Top tether strap child restraint”in
this section.
Page 44
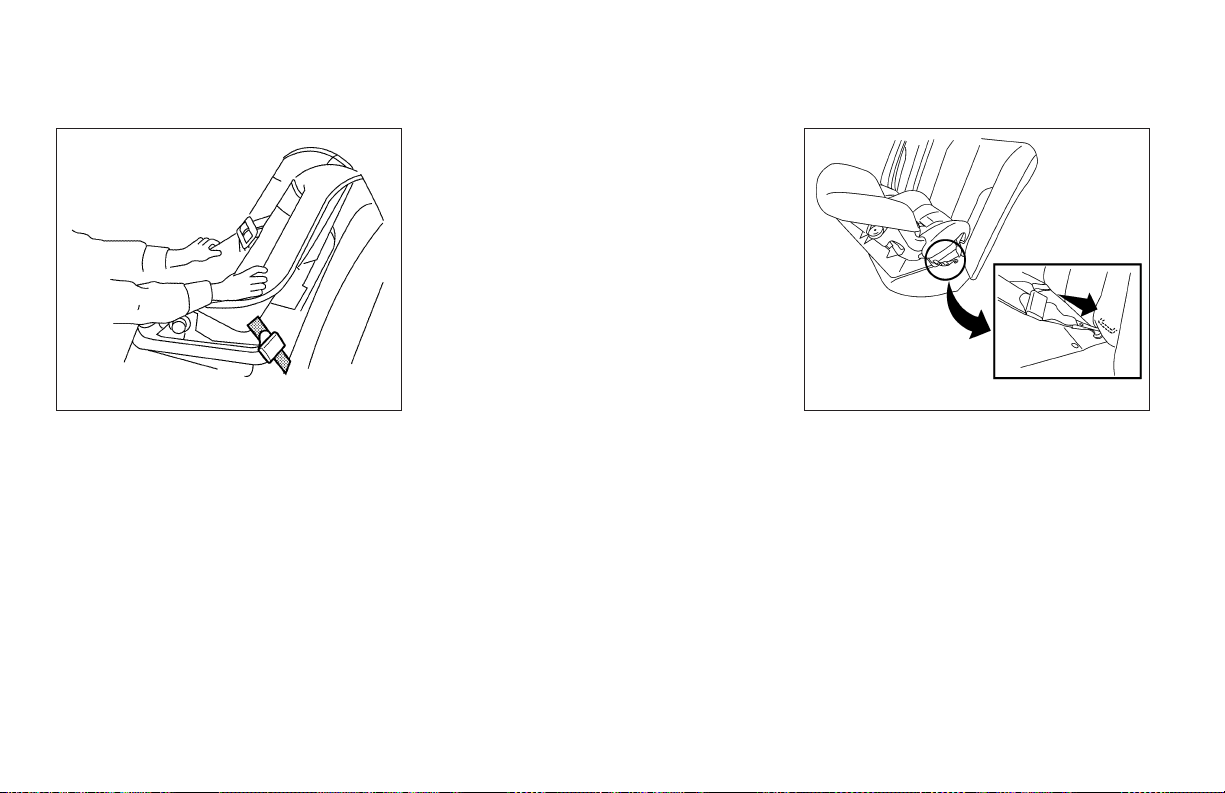
7. Check to make sure the child restraint is
properly secured prior to each use. If the
child restraint is loose, repeat steps 3
through 6.
Rear-facing
Follow these steps to install a rear-facing child
restraint using LATCH System:
1. Position the child restraint on the seat. Always follow the child restraint manufacturer’s instructions.
WRS0697
Front facing – step 6
6. Before placing the child in the child restraint,
hold the child restraint near the LATCH attachment and use force to push the child
restraint from side to side, and tug it forward
to make sure that it is securely held in place.
It shouldnot move more than 1 in (25 mm). If
it does move more than 1 in (25 mm), pull
again on the anchor attachments to further
tighten the child restraint. If you areunable to
properly secure the restraint, move the restraint to another seating position and try
again, or try a different child restraint. Not all
child restraints fit in all types of vehicles.
1-28 Safety—Seats, seat belts and supplemental restraint system
LRS0665
Rear facing web-mounted – step 2
2. Secure the child restraint anchor attachments to the LATCH lower anchors.
Page 45
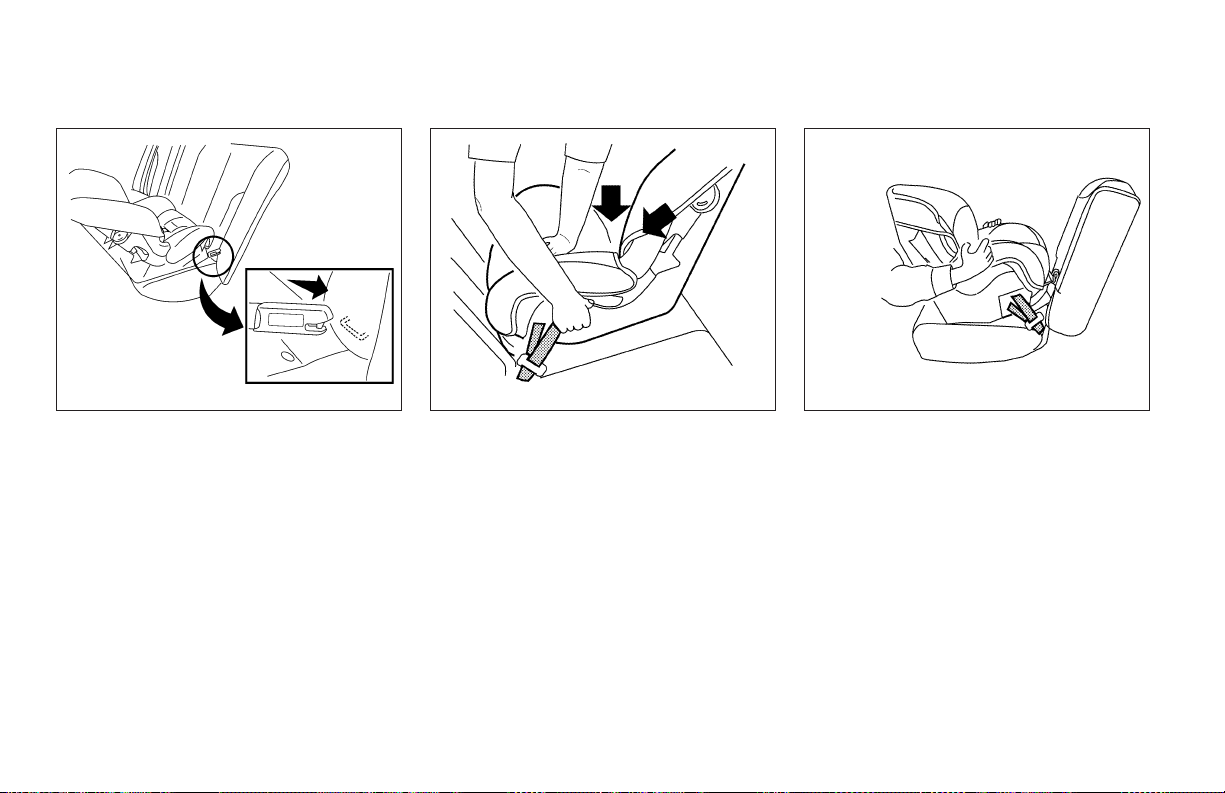
LRS0666
Rear facing rigid-mounted – step 2
3. For child restraints that are equipped with
webbing mounted attachments, remove any
additional slack from the anchor attachments. Press downward and rearward firmly
in the center of the child restraint with your
hand to compress the vehicle seat cushion
and seatback while tightening the webbing
of the anchor attachments.
LRS0673
Rear facing – step 3
4. Before placing the child in the child restraint,
hold the child restraint near the LATCH attachment and use force to push the child
restraint from side to side, and tug it forward
to make sure that it is securely held in place.
It shouldnot move more than 1 in (25 mm). If
it does move more than 1 in (25 mm), pull
again on the anchor attachments to further
tighten the child restraint. If you areunable to
properly secure the restraint, move the restraint to another seating position and try
again, or try a different child restraint. Not all
child restraints fit in all types of vehicles.
Safety—Seats, seat belts and supplemental restraint system 1-29
LRS0674
Rear facing – step 4
5. Check to make sure the child restraint is
properly secured prior to each use. If the
child restraint is loose, repeat steps 2
through 4.
Page 46
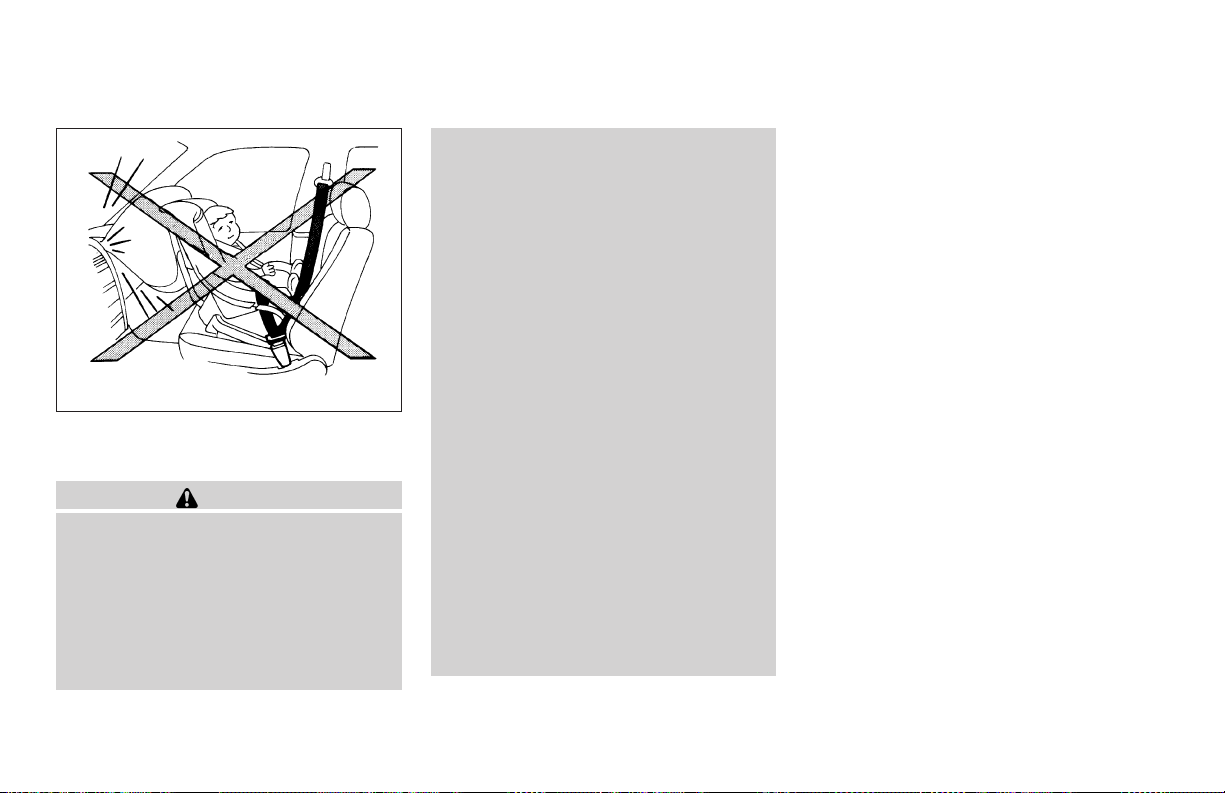
WRS0256
CHILD RESTRAINT INSTALLATION
USING THE SEAT BELTS
WARNING
● Even with the NISSAN Advanced Air
Bag System, never install a rear-facing
child restraint in the front passenger
seat. Supplemental front air bags inflate with great force. A rear-facing
child restraint could be struck by the
supplemental front air bag in a crash
and could seriously injure or kill your
child.
● NISSAN recommends that child restraints be installed in the rear seat.
However, if you must install a forward
facing child restraint in the front passenger seat, move the passenger seat
to the rearmost position. Also, be sure
the front passenger air bag status light
is illuminated to indicate the passenger
air bag is OFF. See “Frontpassenger air
bag and status light” later in this section for details.
● The three-point seat belt in your vehicle
is equipped with an Automatic Locking
Retractor (ALR) which must be used
when installing a child restraint.
● Failure to use the ALR mode will result
in the child restraint not being properly
secured. The restraint could tip over or
otherwise be unsecured and cause injury to the child in a sudden stop or
collision. Also, it can change the operation of the front passenger air bag. See
“Front passenger air bag and status”
later in this section.
● A child restraint with a top tether strap
should not be used in the front passenger seat.
The instructions in this section apply to child
restraint installation using the vehicle seat belts in
the rear seat or the front passenger seat.
1-30 Safety—Seats, seat belts and supplemental restraint system
Page 47
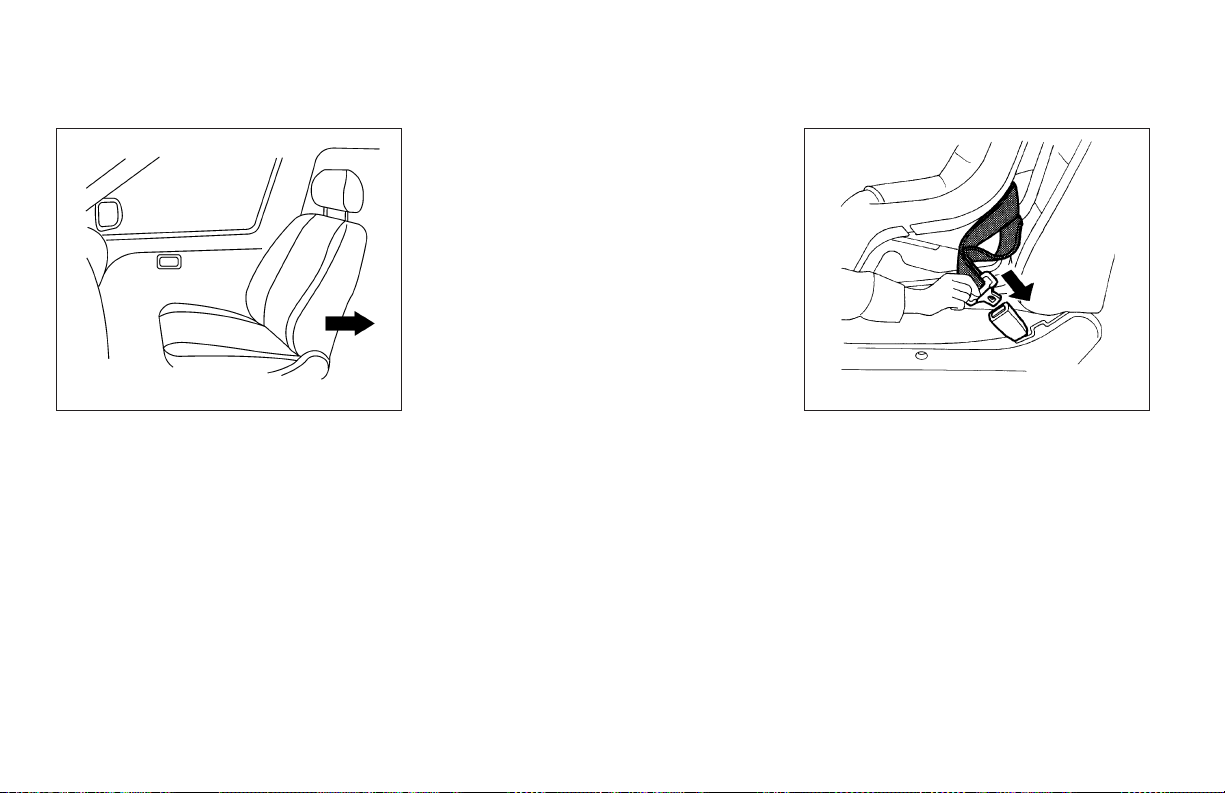
WRS0699
Front-facing (front passenger seat) – step 1
Front-facing
Follow these steps to install a front-facing child
restraint using the vehicle seat belt in the rear
seats or in the front passenger seat:
1. If you must install a child restraint in
the front seat, it should be placed in a
front-facing direction only. Move the
seat to the rearmost position. Child
restraints for infants must be used in
the rear-facing direction and therefore
must not be used in the front seat.
2. Position the child restraint on the seat. Always follow the child restraint manufacturer’s instructions
The back of the child restraint should be secured
against the vehicle seatback. If necessary, adjust
or remove the head restraint to obtain the correct
child restraint fit. See “Head restraint adjustment” in this section.
If the head restraint is removed, store it in a
secure place. Be sure to install the head restraint
when the child restraint is removed. If the seating
position does not have an adjustable head restraint and it is interfering with the proper child
restraint fit, try another seating position or a different child restraint.
WRS0680
Front facing – step 3
3. Route the seat belt tongue through the child
restraint andinsert it into the buckle until you
hear and feel the latch engage. Be sure to
follow the child restraint manufacturer’s instructions for belt routing.
Safety—Seats, seat belts and supplemental restraint system 1-31
Page 48
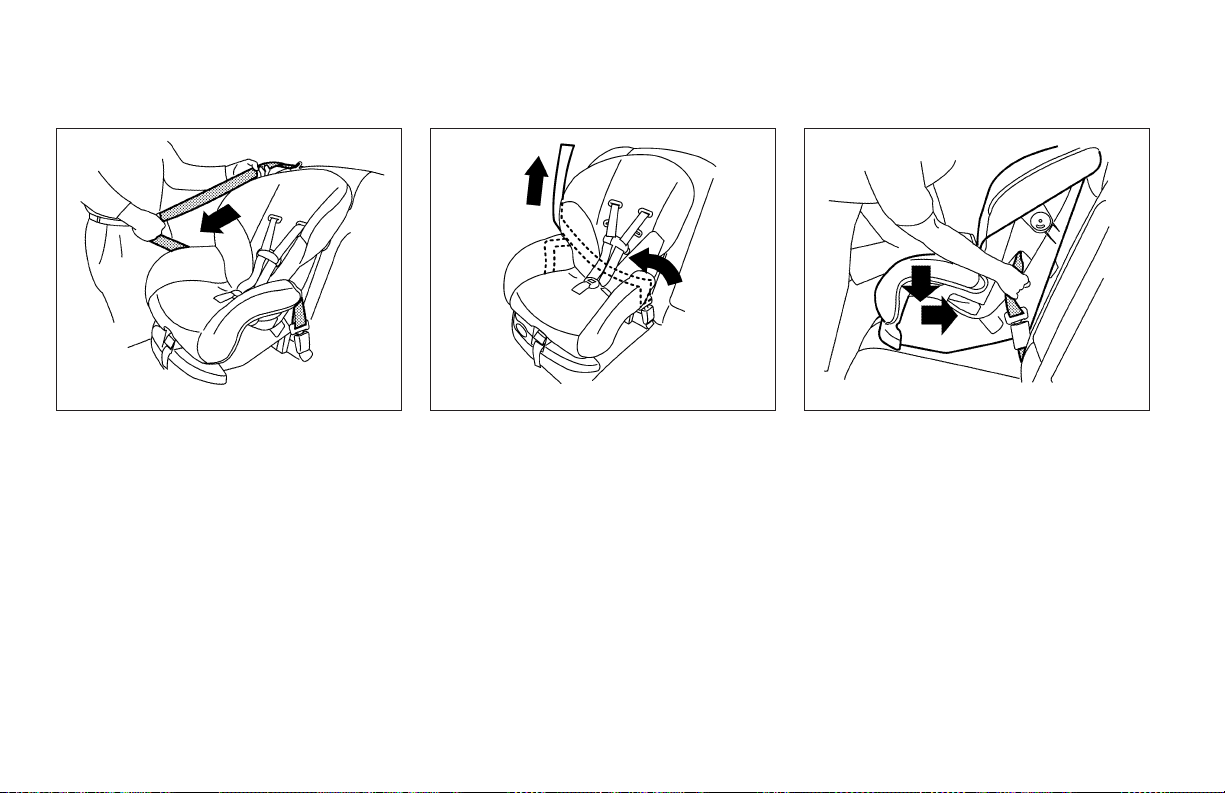
LRS0667
Front facing – step 4
4. Pull the shoulder belt until the belt is fully
extended. At this time, the seat belt retractor
5. Allow the seat belt to retract. Pull up on the
Front facing – step 5
shoulder belt to remove any slack in thebelt.
is in the Automatic Locking Retractor mode
(child restraint mode). It reverts to emergency locking retractor mode when the seat
belt is fully retracted.
1-32 Safety—Seats, seat belts and supplemental restraint system
LRS0668
WRS0681
Front facing – step 6
6. Remove any additional slack from the seat
belt; press downward and rearward firmly in
the center of the child restraint with your
knee to compress the vehicle seat cushion
and seatback while pulling up on the seat
belt.
Page 49
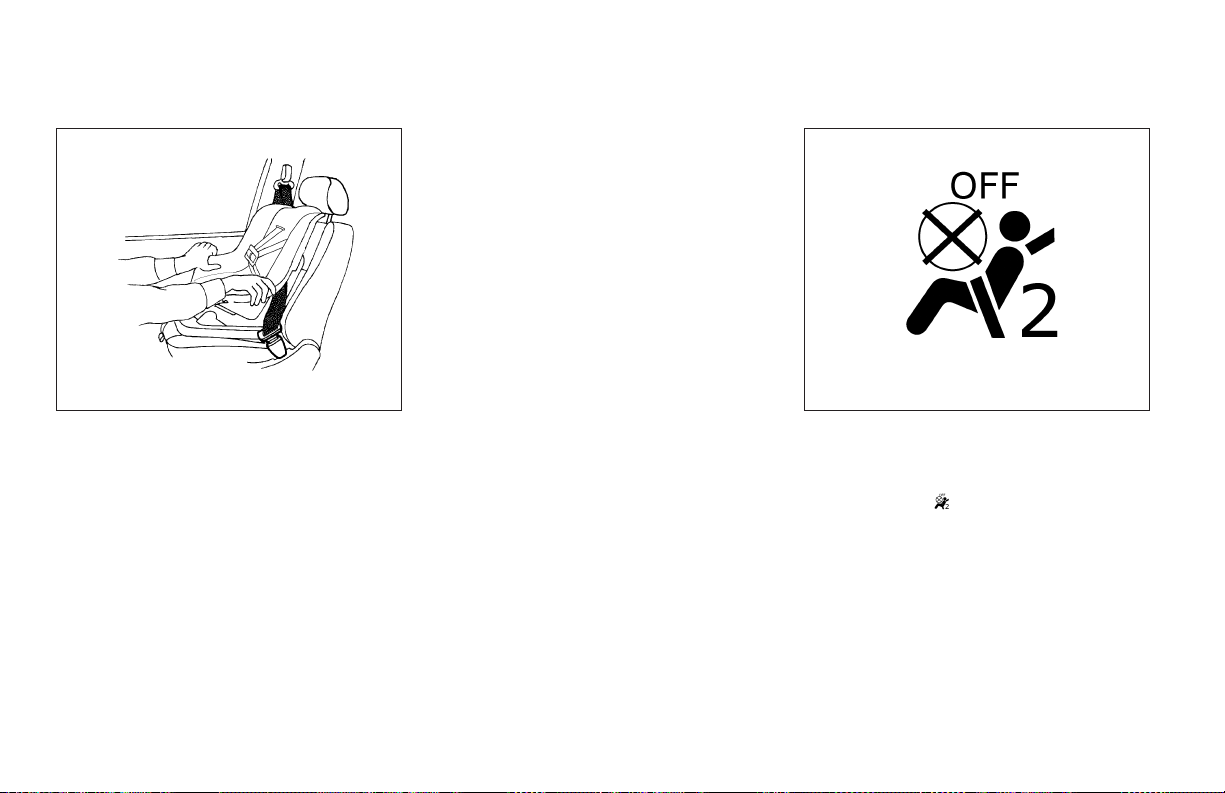
WRS0698
Front facing – step 7
7. If the child restraint is equipped with a top
tether strap, route the top tether strap and
secure the tether strap to the tether anchor
point. See “Top tether strap child restraint”in
this section. Do not install child restraints
that require the use of a top tether strap to
seating positions that do not have a top
tether anchor.
8. Before placing the child in the child restraint,
hold the child restraint near the seat belt
path anduse forceto pushthe childrestraint
from side to side, and tug it forward to make
sure thatit is securely held in place. Itshould
not move more than 1 in (25 mm). If it does
move more than 1 in (25 mm), pull again on
the shoulder belt to further tighten the child
restraint. Ifyou are unable to properly secure
the restraint, move the restraint to another
seating position and try again, or try a different child restraint. Not all child restraintsfit in
all types of vehicles.
9. Check that the retractor is in the Automatic
Locking Retractor mode by trying to pull
more seat belt out of the retractor. If you
cannot pullany more belt webbing outof the
retractor, the retractor is in the Automatic
Locking Retractor mode.
10. Check to make sure the child restraint is
properly secured prior to each use. If the
seat belt is not locked, repeat steps 3
through 8.
WRS0475
Front facing – step 11
11. If the child restraint is installed in the front
passenger seat, turn the ignition switch to
the ONposition. The front passenger air bag
status light
should illuminate. If this
light is not illuminated see 9Front passenger
air bag and status light9 in this section.
Move the child restraint to another
seating position. Have the system
checked by a NISSAN dealer.
After the child restraint is removed and the seat
belt is fully retracted, the Automatic Locking Retractor mode (child restraint mode) is canceled.
Safety—Seats, seat belts and supplemental restraint system 1-33
Page 50
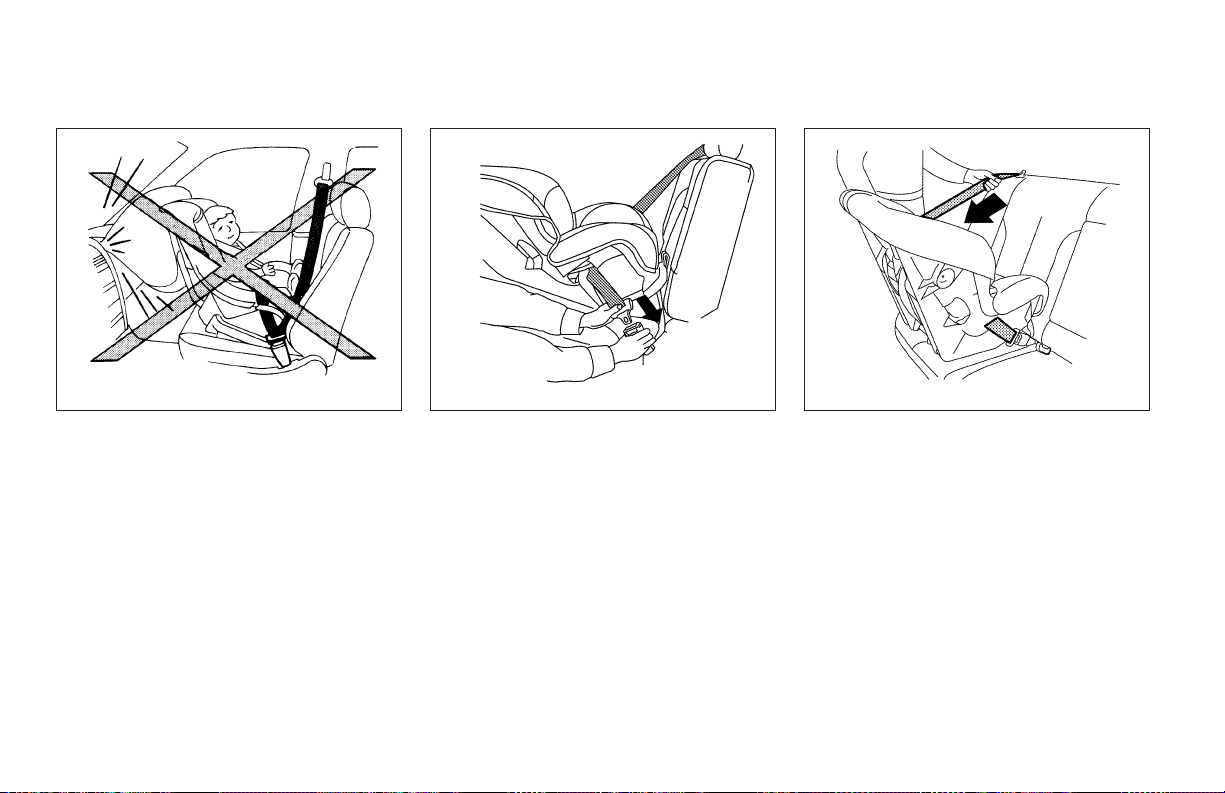
WRS0256
Rear-facing – step 1
Rear-facing
Follow these steps to install a rear-facing child
restraint using the vehicle seat belt in the rear
seats:
2. Route the seat belt tongue through the child
Rear facing – step 2
restraint andinsert it into the buckle until you
hear and feel the latch engage. Be sure to
follow the child restraint manufacturer’s instructions for belt routing.
1. Child restraints for infants must be
used in the rear-facing direction and
therefore must not be used in the front
seat. Position thechild restraint on the seat.
Always follow the restraint manufacturer’s
instructions.
1-34 Safety—Seats, seat belts and supplemental restraint system
WRS0761
LRS0669
Rear facing – step 3
3. Pull the shoulder belt until the belt is fully
extended. At this time, the seat belt retractor
is in the Automatic Locking Retractor mode
(child restraint mode). It reverts to emergency locking retractor mode when the seat
belt is fully retracted.
Page 51
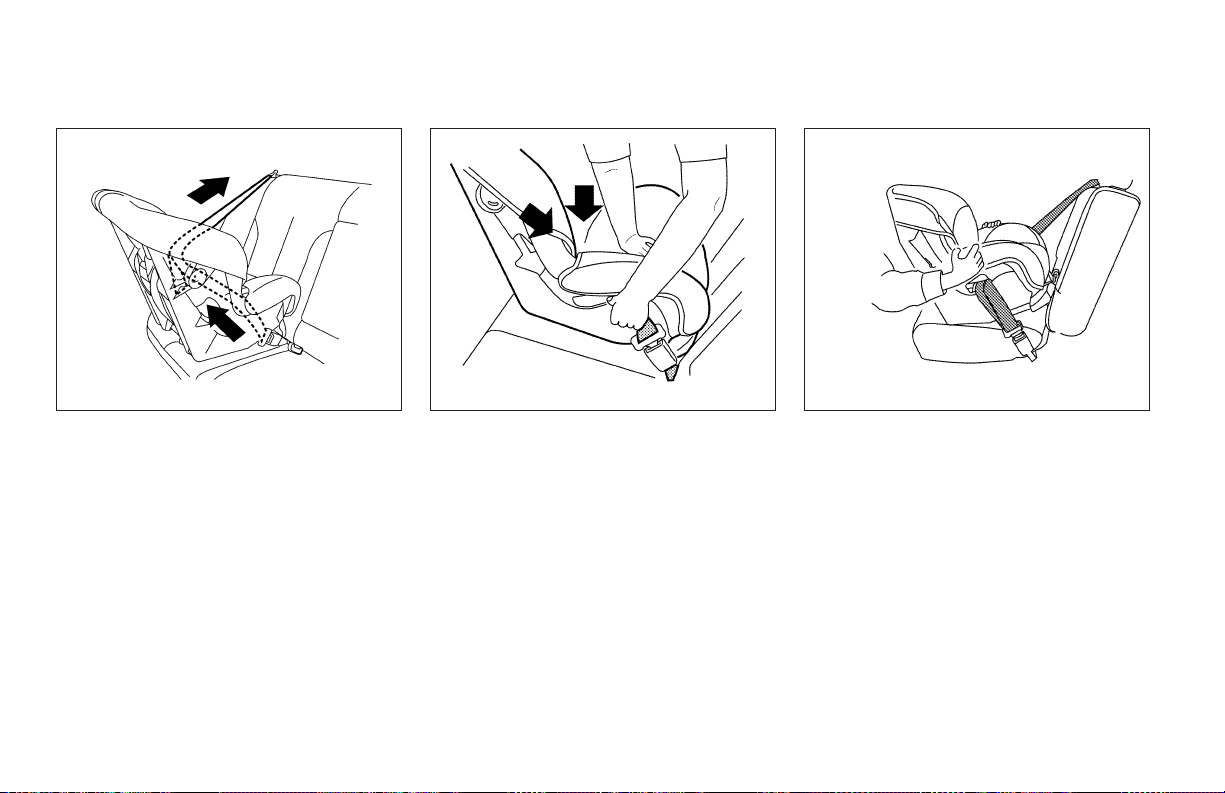
LRS0670
Rear facing – step 4
4. Allow the seat belt to retract. Pull up on the
shoulder belt to remove any slack in thebelt.
WRS0762
Rear facing – step 5
5. Remove any additional slack from the child
restraint; press downward and rearward
firmly in the center of the child restraint to
compress the vehicle seat cushion and seatback while pulling up on the seat belt.
Safety—Seats, seat belts and supplemental restraint system 1-35
WRS0763
Rear facing – step 6
6. Before placing the child in the child restraint,
hold the child restraint near the seat belt
path anduse forceto pushthe childrestraint
from side to side, and tug it forward to make
sure thatit is securely held in place. Itshould
not move more than 1 in (25 mm). If it does
move more than 1 in (25 mm), pull again on
the shoulder belt to further tighten the child
restraint. Ifyou are unable to properly secure
the restraint, move the restraint to another
rear seating position and try again, or try a
different child restraint. Not all child restraints fit in all types of vehicles.
Page 52
BOOSTER SEATS
7. Check that the retractor is in the Automatic
Locking Retractor mode by trying to pull
more seat belt out of the retractor. If you
cannot pull any more seat belt webbing out
of the retractor, the retractor is in the Automatic Locking Retractor mode
8. Check to make sure thatthe child restraint is
properly secured prior to each use. If the belt
is not locked, repeat steps 3 through 7.
After the child restraint is removed and the seat
belt fully retracted, the Automatic Locking Retractor mode (child restraint mode) is canceled.
ARS1098
PRECAUTIONS ON BOOSTER
SEATS
WARNING
● Infants and small children should always be placed in an appropriate child
restraint while riding in the vehicle.
Failure to use a child restraint or
booster seat can result in serious injury
or death.
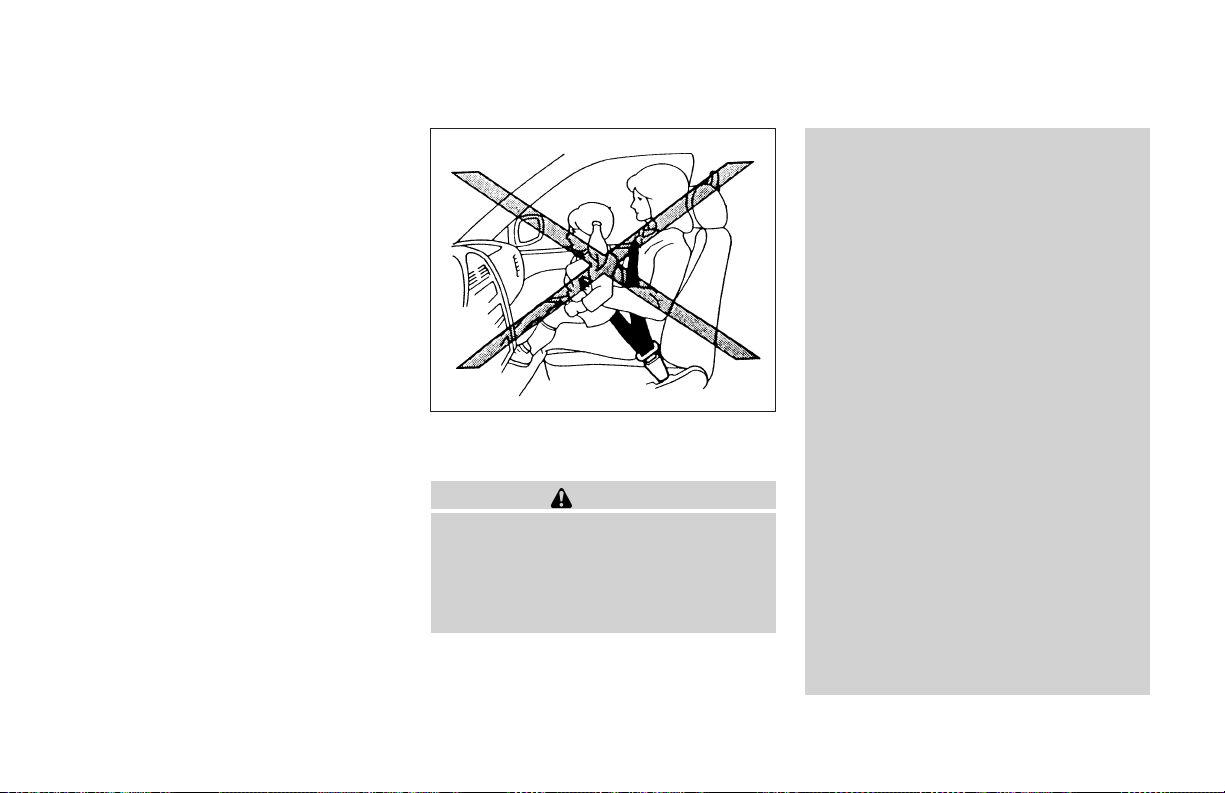
● Infants and small children should never
be carried on your lap. It is not possible
for even thestrongest adultto resistthe
forces of a severe accident. The child
could be crushed between the adult and
parts of the vehicle. Also, do not put the
same seat belt around both your child
and yourself.
● NISSAN recommends that the booster
seat be installed in the rear seat. According to accident statistics, children
are safer when properly restrained in
the rear seat than in the front seat. If
you must install a booster seat in the
front seat, see “Booster seat installation” in this section.
● A booster seat must only be installed in
a seating position that has a
lap/shoulder belt. Failure to use a
three-point type seat belt with a
booster seat can result in a serious injury in sudden stop or collision.
● Improper use or improper installation
of a booster seat can increase the risk
or severity of injury for both the child
and other occupants of the vehicle and
can lead to serious injury or death in an
accident.
1-36 Safety—Seats, seat belts and supplemental restraint system
Page 53
● Do not use towels, books, pillows or
other items in place of a booster seat.
Items such as these may move during
normal driving or a collision and result
in serious injury or death. Booster seats
are designed to be used with a
lap/shoulder belt. Boosterseats aredesigned to properly route the lap and
shoulder portions of the seat belt over
the strongest portions of a child’s body
to provide the maximum protection during a collision.
● Follow all of the booster seat manufacturer’s instructions for installation and
use. When purchasing a booster seat,
be sure to select one which will fit your
child andvehicle. It may not be possible
to properly install some types of
booster seats in your vehicle.
● If the booster seat and seat belt is not
used properly, the risk of a child being
injured in a collision or a sudden stop
greatly increases.
● Adjustable seatbacks should be positioned to fit the booster seat, but as
upright as possible.
● After placing the child in the booster
seat and fastening the seat belt, make
sure the shoulder portion of the belt is
away from thechild’s face and neck and
the lap portion of the belt does not
cross the abdomen.
● Do not put the shoulder belt behind the
child or under the child’s arm. If you
must install a booster seat in the front
seat, see “Booster seat installation”
later in this section.
● When your booster seat is not in use,
keep it secured with a seat belt to prevent it from being thrown around in
case of a sudden stop or accident.
CAUTION
Remember that a booster seat left in a
closed vehicle can become very hot.
Check the seating surface and buckles
before placing your child in the booster
seat.
LRS0455
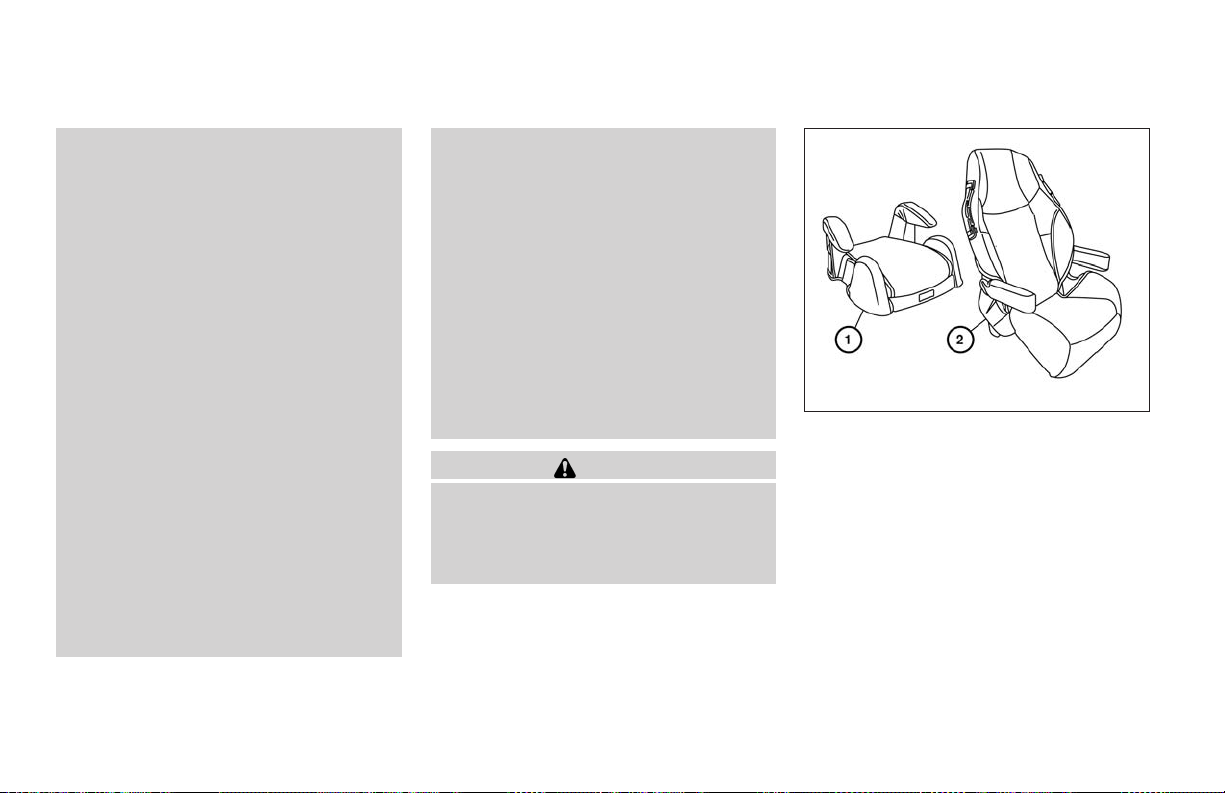
Booster seats of various sizes are offered by
several manufacturers. When selecting any
booster seat, keep the following points in mind:
● Choose only a booster seat with a label
certifying thatit complies with Federal Motor
Vehicle Safety Standard 213 or Canadian
Motor Vehicle Safety Standard 213.
● Check the booster seat in your vehicle to be
sure it is compatible with the vehicle’s seat
and seat belt system.
Safety—Seats, seat belts and supplemental restraint system 1-37
Page 54
LRS0453 LRS0464
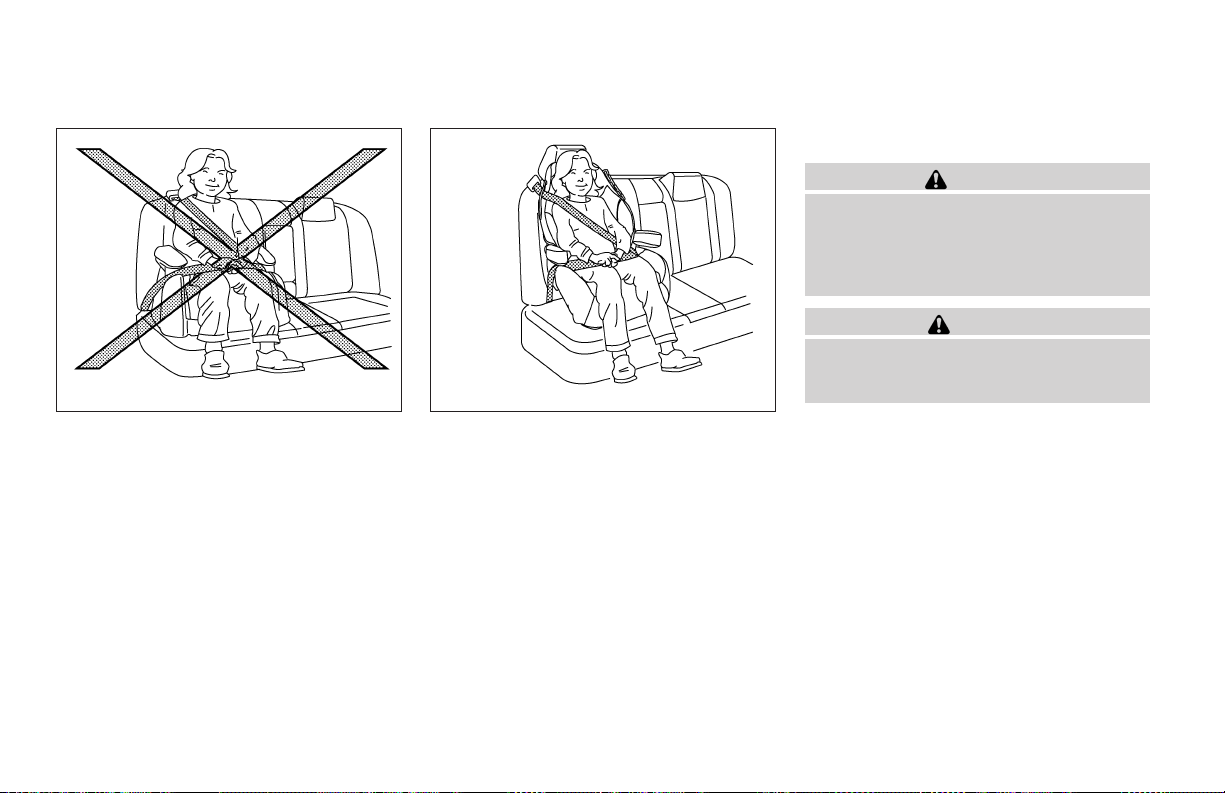
● Make sure the child’s head will be properly
supported by the booster seat or vehicle
seat. The seat back must be at or above the
center of the child’s ears. For example, if a
low back booster seat
vehicle seat back must be at or above the
center of the child’s ears. If the seat back is
lower than the center of the child’s ears, a
high back booster seat
● If the booster seat is compatible with your
vehicle, place your child in the booster seat
and check the various adjustments to be
sure the booster seat iscompatible withyour
child. Always follow all recommended procedures.
1
is chosen, the
s
2
should be used.
s
All U.S. states and Canadian provinces or
territories require that infants and small
children be restrained in an approved child
restraint at all times while the vehicle is
being operated.
The instructions in this section apply to booster
seat installation in the rear seats or the front
passenger seat.
1-38 Safety—Seats, seat belts and supplemental restraint system
BOOSTER SEAT INSTALLATION
WARNING
NISSAN recommends that booster seats
be installed in the rear seat. However, if
you must install a booster seat in the front
passenger seat, move the passenger’s
seat to the rearmost position.
CAUTION
Do not use the lap/shoulder belt automatic locking retractor mode when using
a booster seat with the seat belts.
Follow these steps to install a booster seat in the
rear seat or in the front passenger seat:
Page 55
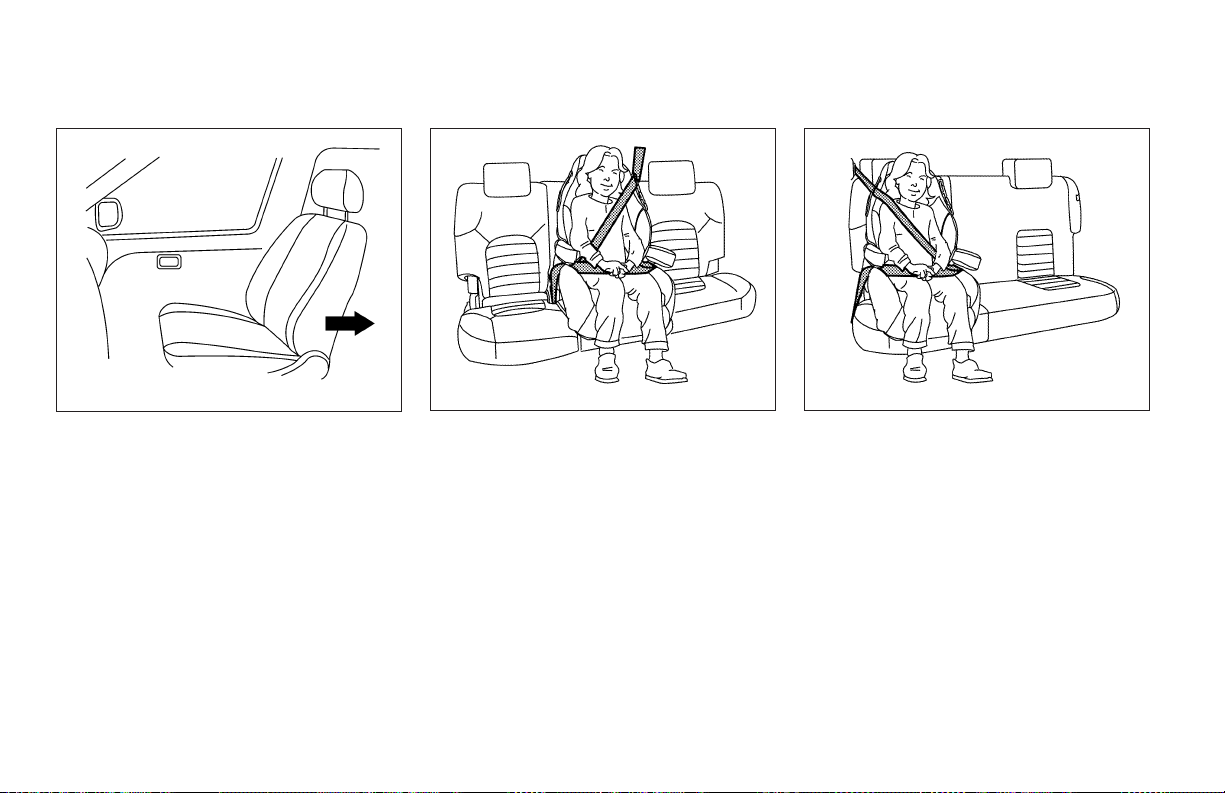
WRS0699
1. If you must install a booster seat in the
front seat, move the seat to the rearmost position.
2. Position the booster seat on the seat. Only
place it in a front facing direction. Always
follow the booster seat manufacturer’s instructions.
LRS0591
Rear center position
Rear outboard position
3. The booster seat should be positioned on
the vehicle seat so that it is stable. If necessary, adjust or remove the head restraint to
obtain the correct booster seat fit. See
“Head restraint adjustment” earlier in this
section. If the head restraint is removed,
store it in a secure place. Be sure to install
the head restraint when the booster seat is
removed. If the seating position does not
have an adjustable head restraint and it is
interfering with the proper booster seat fit,
try another seating position or a different
booster seat.
Safety—Seats, seat belts and supplemental restraint system 1-39
LRS0586
Page 56
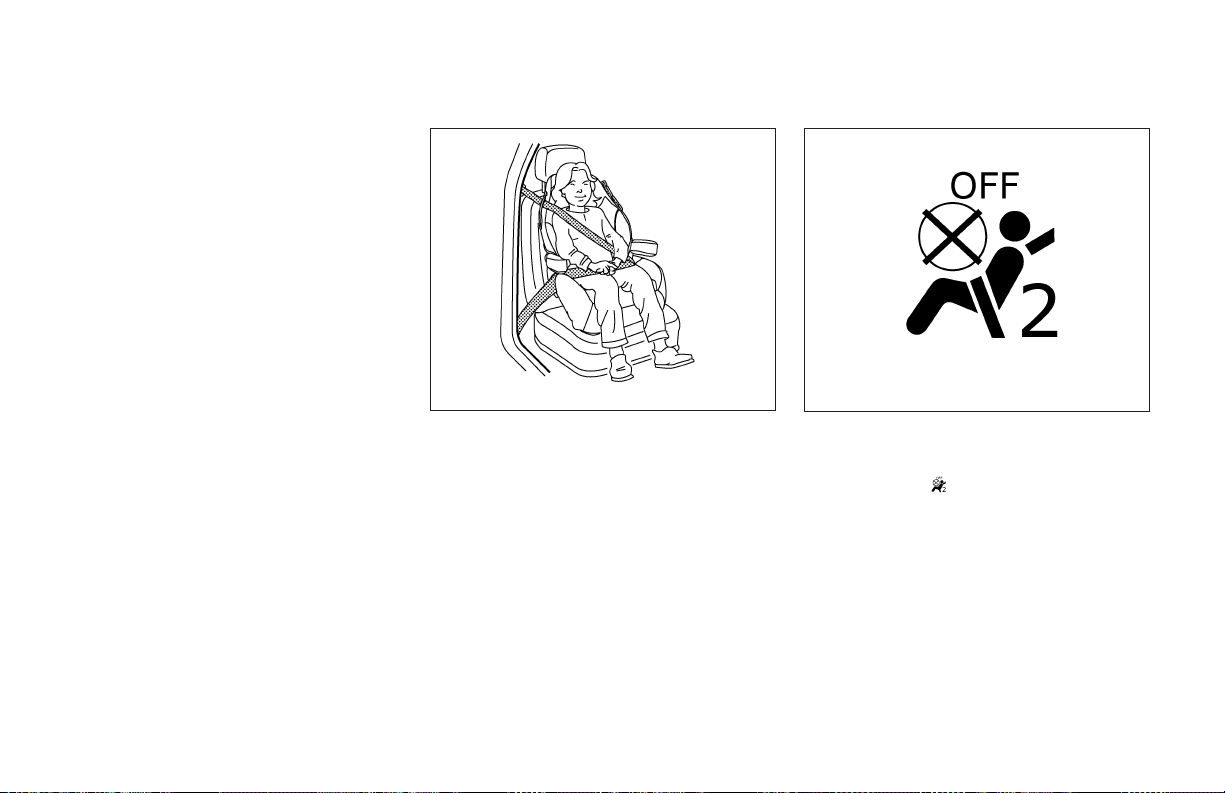
4. Position the lap portion of the seat belt low
and snug on the child’s hips. Be sure to
follow the booster seat manufacturer’s instructions for adjusting the belt routing.
5. Pull the shoulder belt portion of the seat belt
toward the retractor to take up extra slack.
Be sure the shoulder belt is positioned
across the top, middle portion of the child’s
shoulder. Be sure to follow the booster seat
manufacturer’s instructions for adjusting the
belt routing.
Front passenger position
6. Follow the warnings, cautions and instructions for properly fastening a seat belt
shown in the “Three-point seat belt with
retractor” earlier in this section.
1-40 Safety—Seats, seat belts and supplemental restraint system
LRS0454
WRS0475
7. If the booster seat is installed in the front
passenger seat, turn the ignition switch to
the ONposition. The front passenger air bag
status light
may or may not illuminate,
depending on the size of the child and the
type of booster seat being used. See “Front
passenger air bag and status light” later in
this section.
Page 57

SUPPLEMENTAL RESTRAINT
SYSTEM
PRECAUTIONS ON
SUPPLEMENTAL RESTRAINT
SYSTEM
This Supplemental Restraint System (SRS) section contains important information concerning
the driver and passenger supplemental front air
bags (NISSAN Advanced Air Bag System), front
seat-mounted side-impact supplemental air
bags, roof-mounted curtain side-impact and rollover supplemental air bags andpretensioner seat
belts.
Supplemental front impact air bag system:
The NISSAN Advanced Air Bag System can help
cushion the impact force to the head and chest of
the driver and front passenger in certain frontal
collisions.
Front seat-mounted side-impact supplemental air bag system (if so equipped): This
system can help cushion the impact force to the
chest area of the driver and front passenger in
certain side impact collisions. The supplemental
side air bag is designed to inflate on the side
where the vehicle is impacted.
Roof-mounted curtain side-impact and
rollover supplemental air bag (if so
equipped): This system can help cushion the
impact force to the head of occupants in front
and rear outboard seating positions in certain
side impactor rollovercollisions. Ina side impact,
the curtain air bags are designed to inflate on the
side where the vehicle is impacted. In a rollover
both curtain air bags are designed to inflate and
remain inflated for a short time.
These supplemental restraint systems are designed to supplement the crash protection provided by the seat belts and are not a substitute
for them. Seat belts should always be correctly
worn and the occupant seated a suitable distance away from the steering wheel, instrument
panel and door finishers. See “Seat belts” earlier
in thissection for instructions and precautions on
seat belt usage.
The supplemental air bags operate only
when the ignition switch is in the ON or
START position.
After turning the ignition key to the ON
position, the supplemental air bag warning
light illuminates. The supplemental air bag
warning light will turn off after about 7
seconds if the system is operational.
Safety—Seats, seat belts and supplemental restraint system 1-41
Page 58
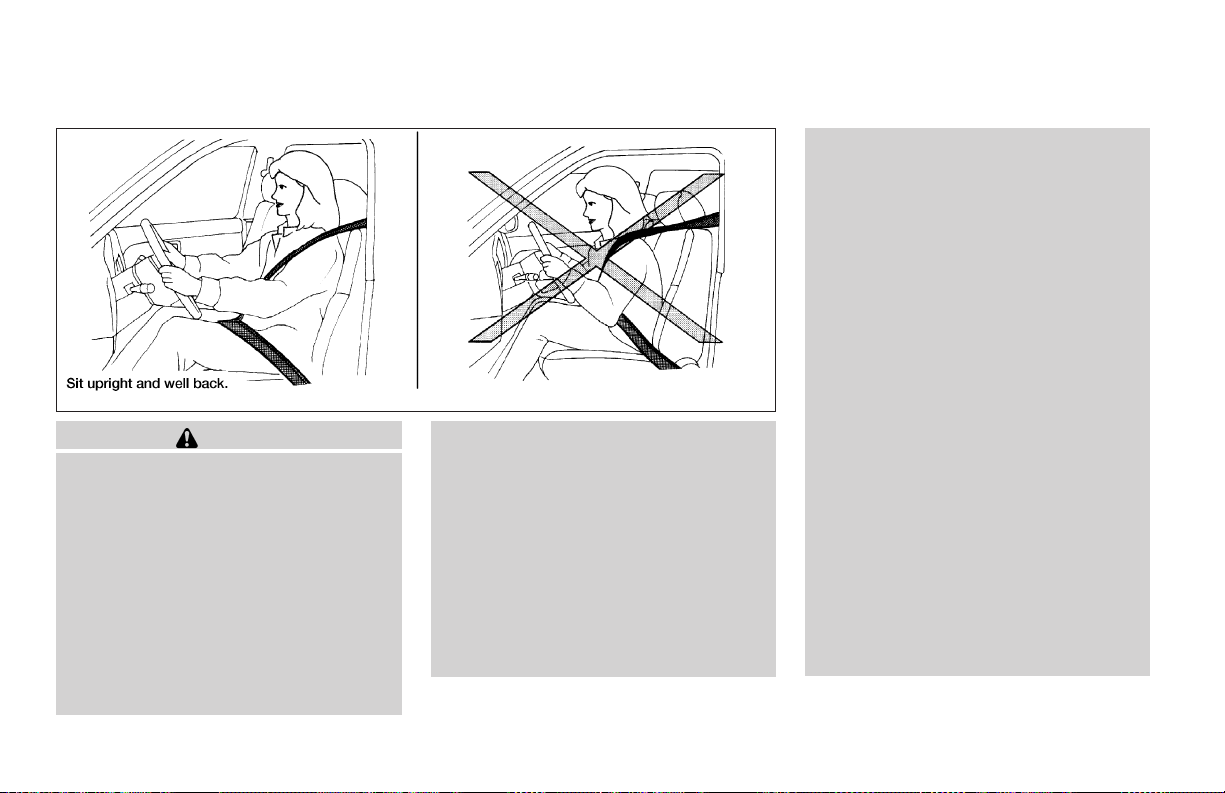
WARNING
● The supplemental front air bags ordinarily will not inflate in the event of a
side impact, rear impact, rollover, or
lower severity frontal collision. Always
wear your seat belts to help reduce the
risk or severity of injury in various kinds
of accidents.
● The front passenger air bag will not
inflate if the passenger air bag status
light is lit or if the front passenger seat
is unoccupied. See “Front passenger air
bag and status light” later in this
section.
WRS0031
● The seat belts and the supplemental
front air bags are most effective when
you are sitting well back and upright in
the seat. The front air bags inflate with
great force. Even with the NISSAN Advanced Air Bag System, if you are unrestrained, leaning forward, sitting sideways or out of position in any way, you
are at greater risk of injury or death in a
crash. You may also receive serious or
fatal injuries from the supplemental
front air bag if you are up against it
when it inflates.Always sit back against
the seatback and as far away as practical from the steering wheel or instrument panel. Always use the seat belts.
● The driver and front passenger seat belt
buckles are equipped with sensors that
detect if the seat belts are fastened. The
advanced air bag system monitors the
severity of a collision and seat belt usage then inflates the air bags. Failure to
properly wear seat belts can increase
the risk or severity of injury in an
accident.
● The front passenger seat is equipped
with an occupant classification sensor
(pressure sensor) that turns the front
passenger air bag OFF under some
conditions. This sensor is only used in
this seat. Failure to be properly seated
and wearing the seat belt can increase
the risk or severity of injury in an accident. See “Front Passenger air bag and
status light” later in this section.
● Keep hands on the outside of the steering wheel. Placing them inside the
steering wheel rim could increase the
risk that they are injured when the
supplemental front air bag inflates.
1-42 Safety—Seats, seat belts and supplemental restraint system
Page 59
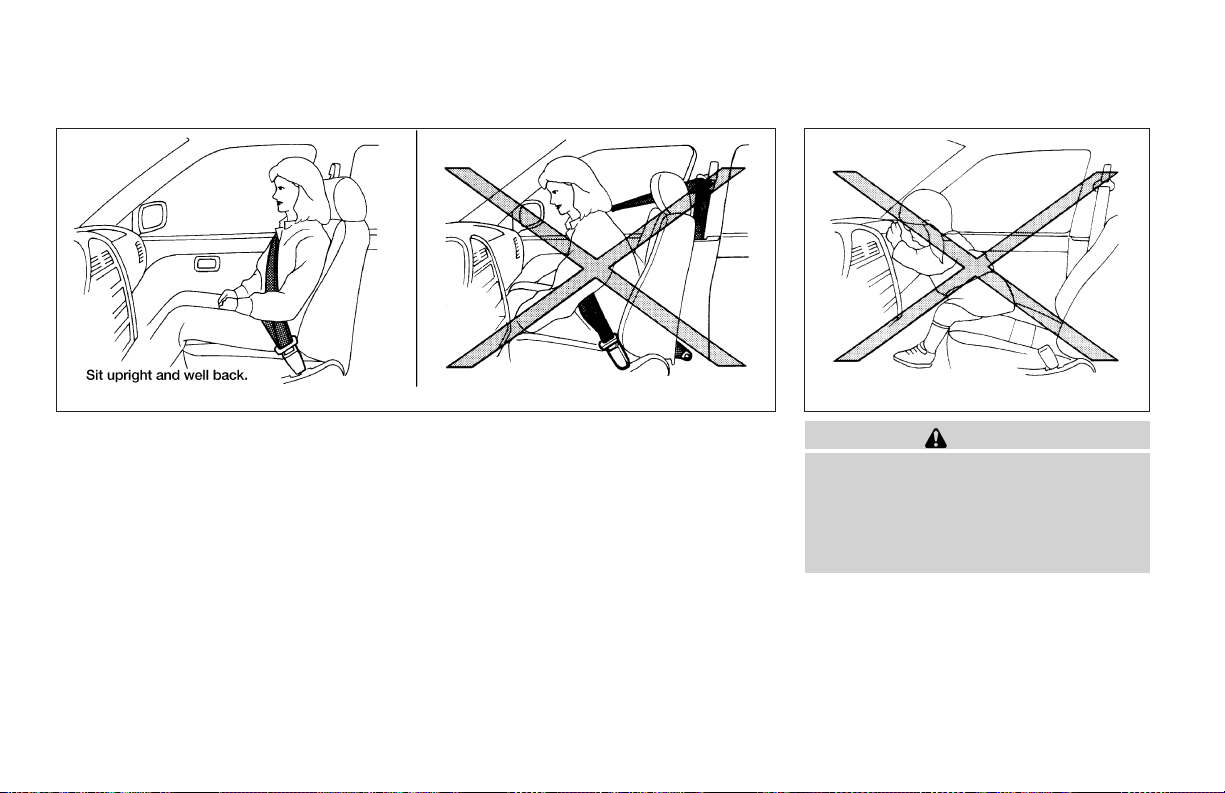
ARS1133 ARS1041
WARNING
● Never let children ride unrestrained or
extend their hands or face out of the
window. Do not attempt to hold them in
your lap or arms. Some examples of
dangerous riding positions are shown
in the illustrations.
Safety—Seats, seat belts and supplemental restraint system 1-43
Page 60
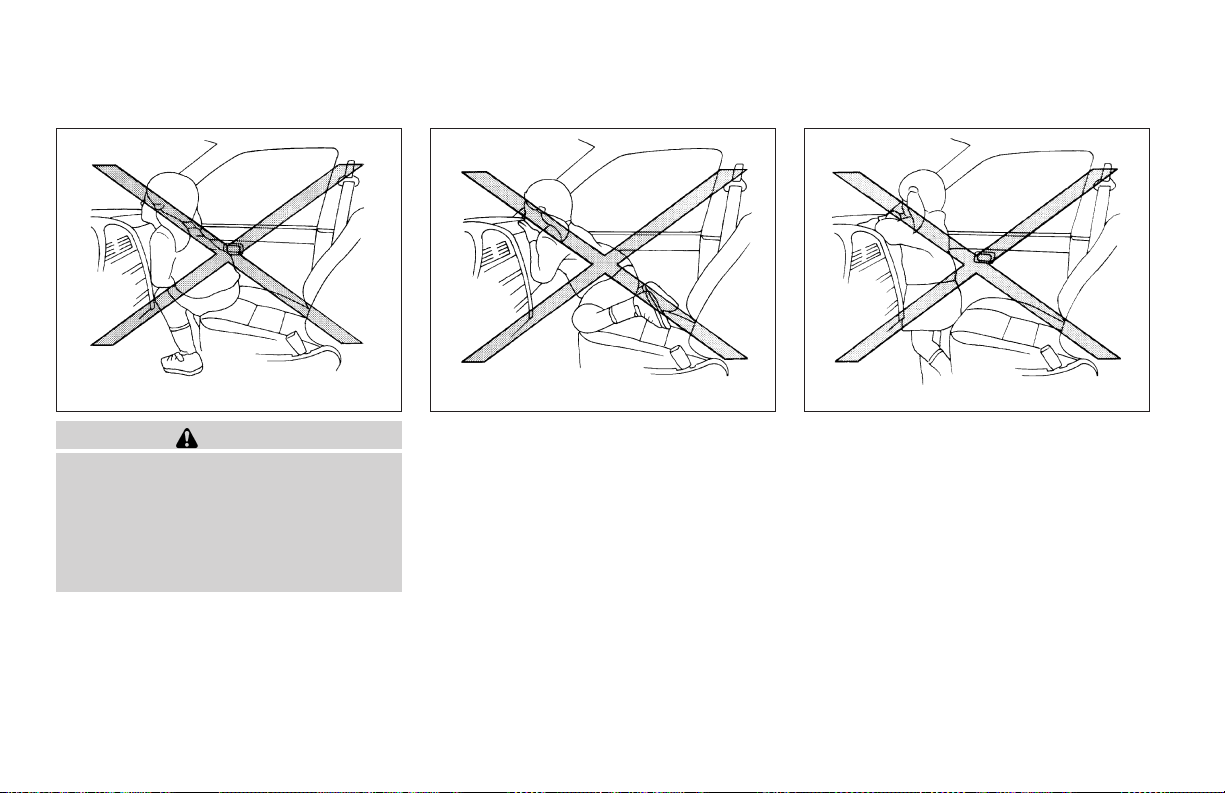
ARS1042 ARS1043 ARS1044
WARNING
● Children may be severely injured or
killed when the supplemental front air
bags, side air bags or curtain sideimpact and rollover air bags inflate if
they are not properly restrained. Preteens and children should be properly
restrained in the rear seat, if possible.
1-44 Safety—Seats, seat belts and supplemental restraint system
Page 61
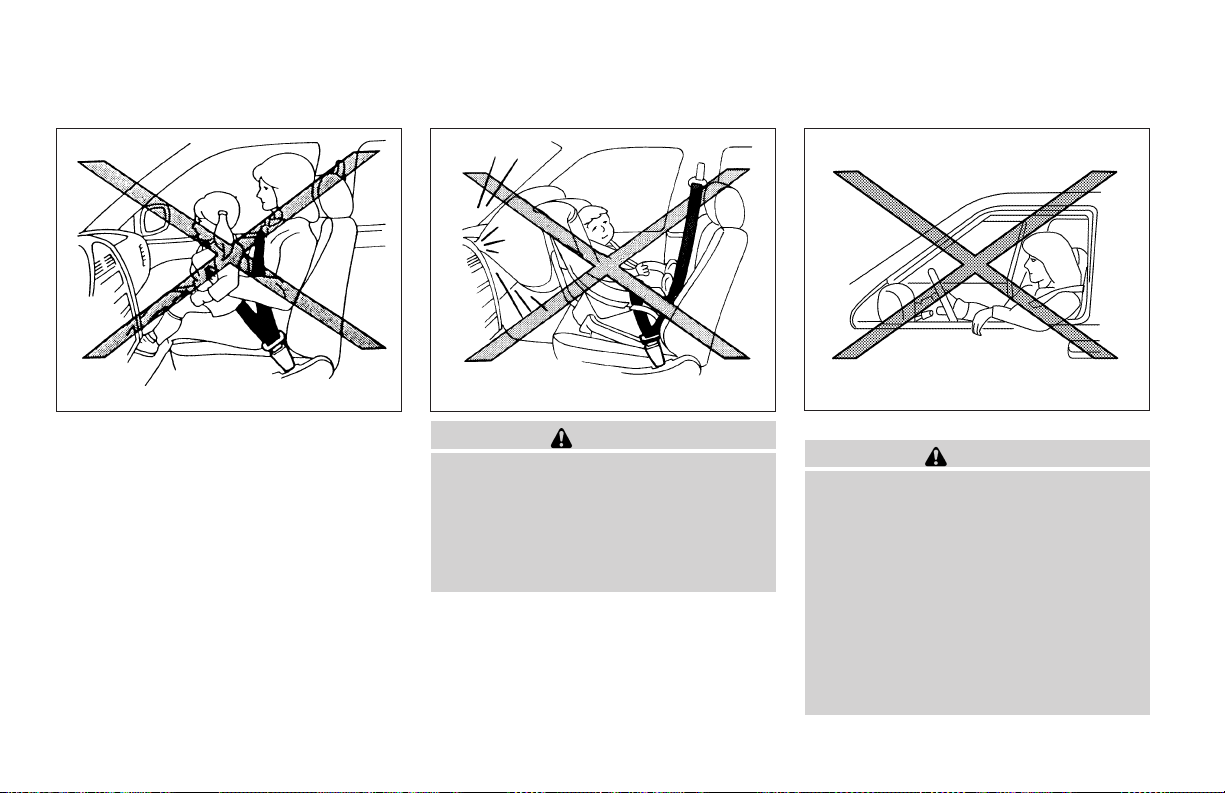
ARS1045 WRS0256
WARNING
● Even with the NISSAN Advanced Air
Bag System, never install a rear-facing
child restraint in the front seat. An inflating supplemental front air bag could
seriously injure or kill your child. See
“Child restraints” earlier in this section
for details.
Safety—Seats, seat belts and supplemental restraint system 1-45
WRS0431
Do not lean against doors or windows.
WARNING
Front seat-mounted side-impact supplemental air bags (if so equipped) and roofmounted curtain side-impact and rollover
supplemental air bags (if so equipped):
● The supplemental side air bag and curtain side-impact and rollover air bag
ordinarily will not inflate in the event of
a frontal impact, rear impact, or lower
severity side collision. Always wear
your seat belts to help reduce the risk or
severity of injury in various kinds of
accidents.
Page 62
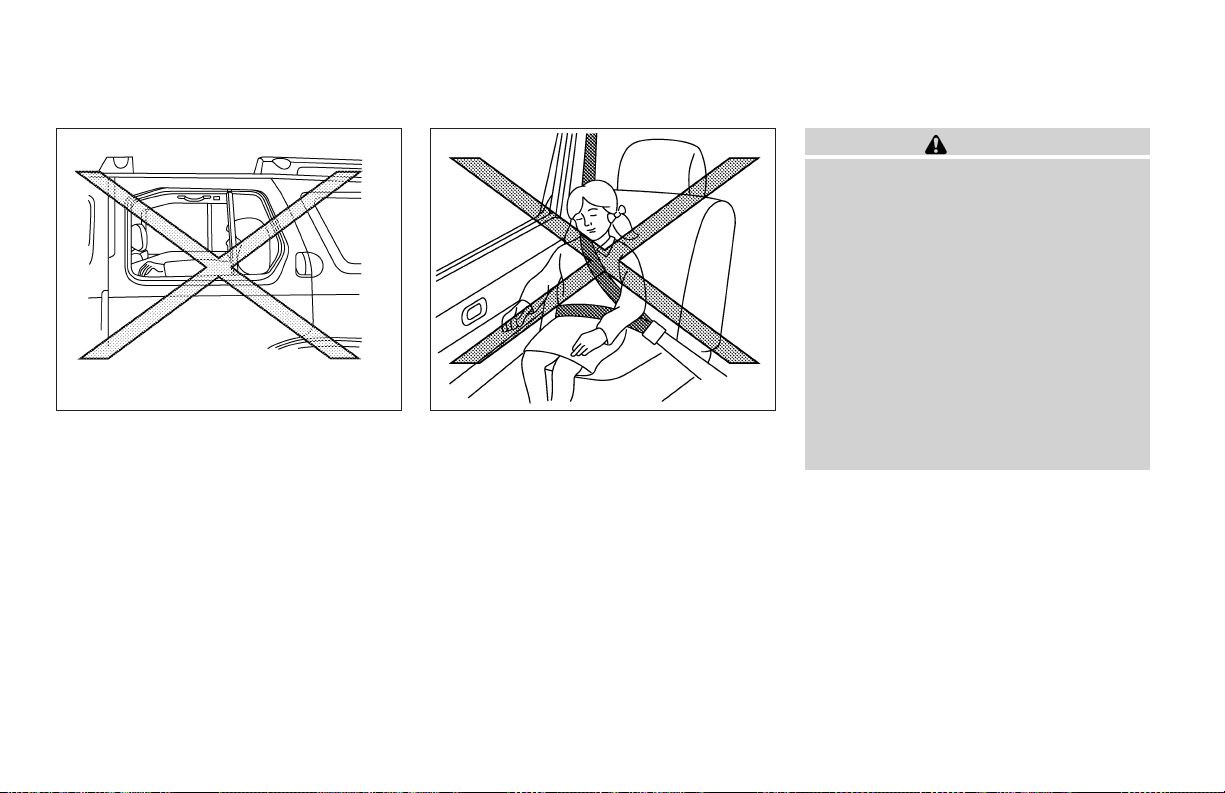
WRS0365
Do not lean against doors or windows.
SSS0162
Do not lean against doors or windows.
WARNING
● The seat belts, the supplemental side
air bags and curtain side-impact and
rollover air bags are most effective
when you are sitting well back and upright in the seat. The side air bag and
curtain air bag inflate with great force.
Do not allow anyone to place their
hand, leg or face near the side air bag
on the side of the seatback of the front
seat or near the side roof rails. Do not
allow anyone sitting in the front seatsor
rear outboard seats to extend their
hand out of the window or lean against
the door. Some examples of dangerous
riding positions are shown in the previous illustrations.
1-46 Safety—Seats, seat belts and supplemental restraint system
Page 63
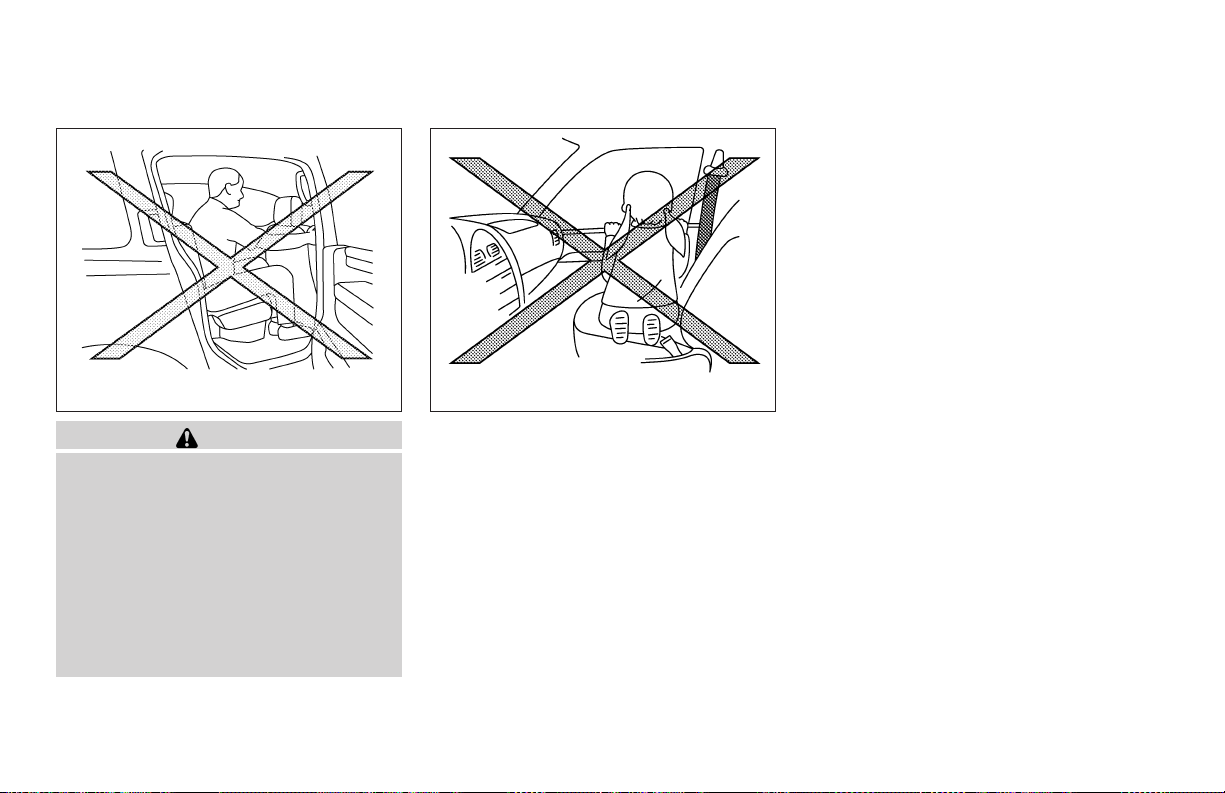
WRS0363 SSS0159
WARNING
● When sittingin the 2nd row rear seat, do
not hold onto the seatback of the front
seat. If theside airbag inflates,you may
be seriously injured. Be especially careful with children, who should always be
properly restrained. Some examples of
dangerous riding positions are shown
in the illustrations.
● Do not use seat covers on the front
seatbacks. They may interfere with
supplemental side air bag inflation.
Safety—Seats, seat belts and supplemental restraint system 1-47
Page 64
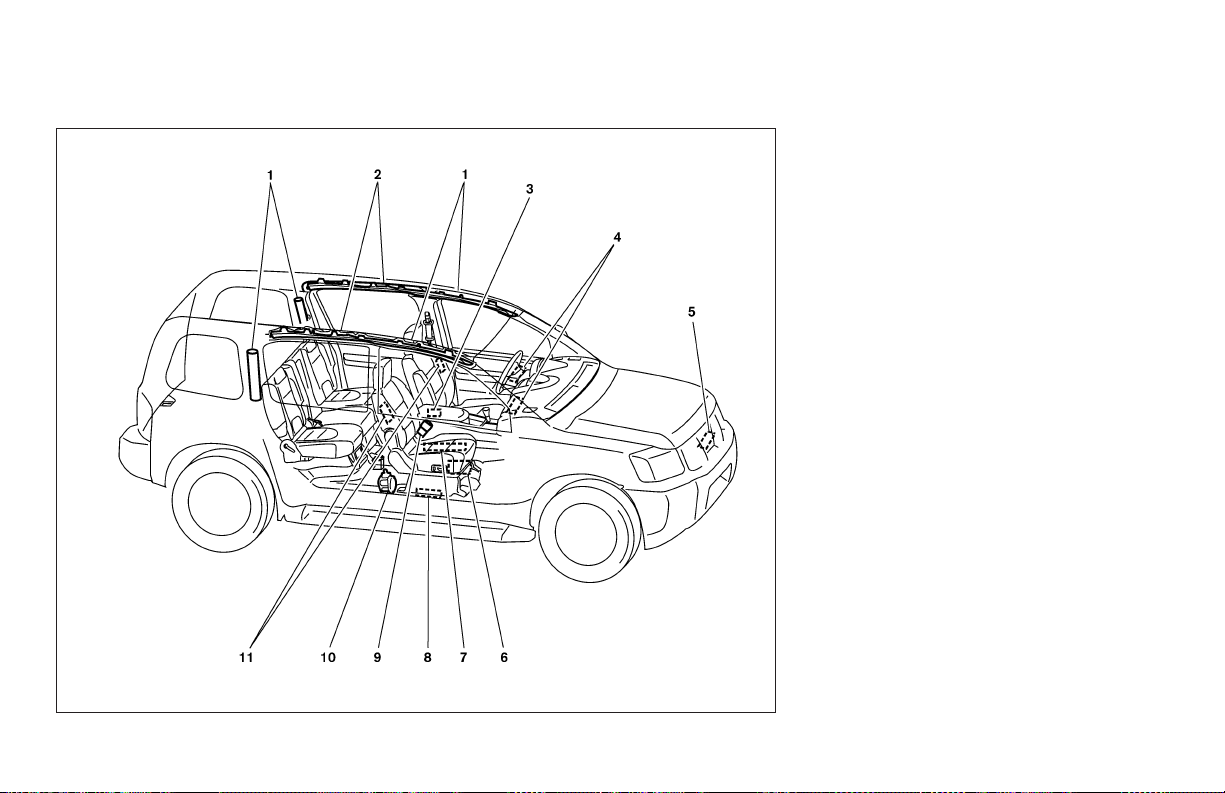
LRS0593
1. SRS curtain side-impact and rollover air
bag modules (if so equipped)
2. SRS curtain side-impact and rollover air
bags (if so equipped)
3. Diagnosis sensor unit
4. Supplemental front air bag modules
5. Crash zone sensor
6. Occupant classification system control
unit
7. Occupant classification sensor
(pressure sensor)
8. Satellite sensors
9. Seat belt buckle switches
10. Pre-tensioner retractor
11. Supplemental side air bag modules
(if so equipped)
NISSAN Advanced Air Bag System
(front seats)
This vehicle is equipped with the NISSAN Advanced Air Bag System for the driver and front
passenger seats. This system is designed to
meet certification requirements under U.S. regulations. It is also permitted in Canada. However,
all of the information, cautions and warnings in this manual still apply and must be
followed.
1-48 Safety—Seats, seat belts and supplemental restraint system
Page 65

The driversupplemental front air bag is located in
the center of the steering wheel. The passenger
supplemental front air bag is mounted in the
dashboard above the glove box. The supplemental front air bags are designed to inflate in higher
severity frontal collisions, although they may inflate if the forces in another type of collision are
similar tothose of a higher severity frontal impact.
They may not inflate in certain frontal collisions.
Vehicle damage (or lack of it) is not always an
indication of proper supplemental front air bag
system operation.
The NISSAN Advanced Air Bag System has dual
stage inflators. It also monitors information from
the crash zone sensor, the diagnosis sensor unit,
seat belt buckle sensors, occupant classification
sensor (pressure sensor) and passenger seat
belt tensionsensor. Inflatoroperation is based on
the severity of a collision and seat belt usage for
the driver. For the front passenger, it additionally
monitors the weight of an occupant or object on
the seat and seat belt tension. Based on information from the sensors, only one front air bag may
inflate ina crash,depending on the crash severity
and whether the front occupants are belted or
unbelted. Additionally, the front passenger air
bag may be automatically turned OFF under
some conditions, depending on the weight detected on the passenger seat and how the seat
belt is used. If the front passenger air bag is OFF,
the passenger air bag status light will be illuminated (if the seat is unoccupied, the light will not
be illuminated, but the air bag will be off). See
“Front passenger air bag and status light”later in
this section for further details. One front air bag
inflating does not indicate improper performance
of the system.
If you have any questions about your air bag
system, please contact NISSAN oryour NISSAN
dealer. If you are considering modification of your
vehicle due to a disability, you may also contact
NISSAN. Contact information is contained in the
front of this Owner’s Manual.
When a supplemental front air bag inflates, a
fairly loud noise may be heard, followed by the
release of smoke. This smoke is not harmful and
does not indicate a fire. Care should be taken to
not inhale it, as it may cause irritation and choking. Those with a history of a breathing condition
should get fresh air promptly.
Supplemental front air bags, along with theuse of
seat belts, help to cushion the impact force on
the face and chest of the front occupants. They
can help save lives and reduce serious injuries.
However, an inflating front air bag may cause
facial abrasions or other injuries. Front air bags
do not provide restraint to the lower body.
Even with NISSAN advanced air bags, seat belts
should be correctly worn and the driver and pas-
Safety—Seats, seat belts and supplemental restraint system 1-49
senger seated upright as far as practical away
from the steering wheel or instrument panel. The
supplemental front airbags inflatequickly in order
to help protect the front occupants. Because of
this, the force of the front air bag inflating can
increase the risk of injury if the occupant is too
close to, or is against, the front air bag module
during inflation.
The front air bags deflate quickly after a collision.
The supplemental front air bags operate
only when the ignition switch is in the ON
or START position.
After turning the ignition key to the ON
position, the supplemental air bag warning
light illuminates. The supplemental air bag
warning light will turn off after about 7
seconds if the system is operational.
Page 66
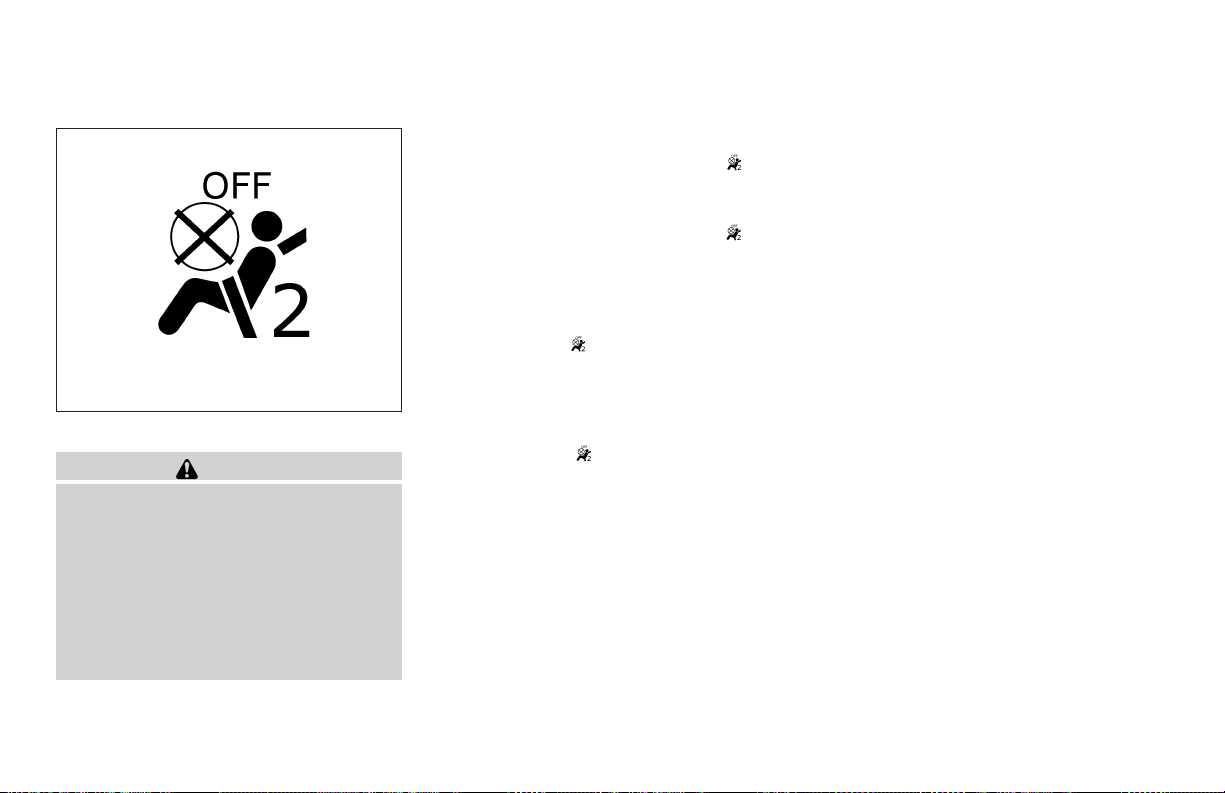
Status light
The front passenger air bag status light
located near the climate controls. The light operates as follows:
● Unoccupied passenger’s seat: The
OFF and the front passenger air bag is OFF
and will not inflate in a crash.
● Passenger’s seat occupied by a small adult,
child or child restraint as outlined in this
section: The illuminates to indicate
that the front passenger air bag is OFF and
WRS0475
Front passenger air bag and status light
WARNING
The front passenger air bag is designed to
automatically turn OFF under some conditions. Read this section carefully to
learn how it operates. Proper use of the
seat, seat belt and child restraints is necessary for most effective protection. Failure to follow all instructions in this
manual concerning the use of seats, seat
belts and child restraints can increase the
risk or severity of injury in an accident.
will not inflate in a crash.
● Occupied passenger seat and the passenger meet the conditions outlined in this section: The light
the front passenger air bag is operational.
Front passenger air bag
The front passenger air bag is designed to automatically turn OFF when the vehicle is operated
under some conditions as described below in
accordance with U.S. regulations. If the front
passenger air bag is OFF, it will not inflate in a
crash. The driver air bagand otherair bags inyour
vehicle are not part of this system.
The purpose of the regulation is to help reduce
the risk of injury or death from an inflating air bag
to certain front passenger seat occupants, such
is OFF to indicate that
1-50 Safety—Seats, seat belts and supplemental restraint system
as children, by requiring the air bag to be automatically turned OFF. Certain sensors are used
is
to meet the requirements.
One sensor used is the occupant classification
sensor (pressure sensor). Itis in the bottom ofthe
is
front passenger seat cushion and is designed to
detect an occupant and objects on the seat by
weight. It works together with seat belt sensors
described later. For example, if a child is in the
front passenger seat, the advanced air bag system is designed to turn the passenger air bag
OFF in accordance with the regulations. Also, if a
child restraint of the type specified in the regulations is on the seat, its weight and the child’s
weight can be detected and cause the air bag to
turn OFF. Occupant classification sensor operation can vary depending on the front passenger
seat belt sensors.
The front passenger seat belt sensors are designed to detect if the seat beltis buckledand the
amount of tension on the seat belt, such as when
it is in the Automatic Locking Retractor mode
(child restraint mode). Based on the weight on
the seat detected by the occupant classification
sensor and the belt tension detected on the seat
belt, the Advanced Air Bag System determines
whether the front passenger air bag should be
automatically turned OFF as required by the
regulations.
Page 67

Front passenger seat adult occupants who are
properly seated and using the seat belt as outlined inthis manual should not cause the passenger air bag to be automatically turned OFF. For
small adults it may be turned OFF, however if the
occupant takes his/her weight off the seat cushion (for example, by not sitting upright, by sitting
on an edge of the seat, or by otherwise being out
of position), this could cause the sensor to turn
the air bag OFF. In addition, if the occupant
improperly uses the seat belt in the Automatic
Locking Retractor mode (child restraint mode),
this could cause the air bag to be turned OFF.
Always be sure to beseated and wearing the seat
belt properly for the most effective protection by
the seat belt and supplemental air bag.
NISSAN recommends that pre-teens and children
be properly restrained in a rear seat. NISSAN also
recommends that appropriate child restraints and
booster seats be properly installed in a rear seat. If
this is not possible, the occupant classification
sensor and seat belt sensors are designed to operate as described above to turn the front passenger air bag OFF for specified child restraints as
required by the regulations. Failing to properly secure child restraints and to use the Automatic
Locking Retractormode (child restraint mode) may
allow the restraint to tip or move in an accident or
sudden stop. This can also result in the passenger
air bag inflating in a crash instead of being OFF.
See “Child restraints” earlier in this section for
proper use and installation.
If the front passenger seat is not occupied the
passenger air bag is designed not to inflate in a
crash. However, heavy objects placed on the
seat could result in air bag inflation, because of
the object’s weight detected by the occupant
classification sensor. Other conditions couldalso
result in air bag inflation, such as if a child is
standing on the seat, or if two children are on the
seat, contrary to the instructions in this manual.
Always be sure that you and allvehicle occupants
are seated and restrained properly.
Using the passenger air bag status light, you can
monitor when the front passenger air bag is automatically turned OFF with the seat occupied.
The light will not illuminate when the front passenger seat is unoccupied.
If an adult occupant isin the seat but the passenger air bag status light is illuminated (indicating
that the air bag is OFF), it could be that the
person isa smalladult, oris notsitting onthe seat
properly or not using the seat belt properly.
If a child restraint must be used in the front seat,
the passenger air bag status light may or may not
be illuminated, depending on the size of the child
and the type of child restraint beingused. Ifthe air
bag status light is not illuminated (indicating that
the air bag might inflate in a crash), it could be
Safety—Seats, seat belts and supplemental restraint system 1-51
that the child restraint or seat belt is not being
used properly. Makesure that the child restraintis
installed properly, the seat belt is used properly
and the occupant is positioned properly. If the air
bag status light is not illuminated, reposition the
occupant or child restraint in a rear seat.
If the passenger air bag status light will not illuminate even though you believe that the child
restraint, the seat belts and the occupant are
properly positioned, the system may be sensing
an unoccupied seat (in which case the air bag is
OFF). Your NISSAN dealer can check that the
system is OFF by using a special tool. However,
until you have confirmed with your dealer that
your air bag is working properly, reposition the
occupant or child restraint in a rear seat.
The air bag system and passenger air bag status
light will take a few seconds to register a change
in the passenger seat status. For example, if a
large adult who is sitting in the front passenger
seat exits the vehicle, the passenger air bag
status light will go from OFF to ON for a few
seconds and then to OFF. This is normal system
operation and does not indicate a malfunction.
If a malfunction occurs in the front passenger air
bag system, the supplemental air bag warning
light
in the center of the instrument panel, will blink.
Have the system checked by a NISSAN dealer.
, located in the meter and gauges area
Page 68

Other supplemental front air bag precautions
WARNING
● Do not place any objects on the steering wheel pad or on the instrument
panel. Also, do not place any objects
between any occupant and the steering
wheel or instrument panel. Such objects may become dangerous projectiles and cause injury if the supplemental front air bag inflates.
● Immediately after inflation, several
front air bag system components will be
hot. Do not touch them; you may severely burn yourself.
● No unauthorized changes should be
made to any components or wiring of
the supplemental air bag system.This is
to prevent accidental inflation of the
supplemental air bag or damage to the
supplemental air bag system.
● Do not make unauthorized changes to
your vehicle’s electrical system, suspension system or front end structure.
This could affect proper operation of
the supplemental front air bag system.
● Tampering with the supplemental front
air bag system may result in serious
personal injury. Tampering includes
changes to the steering wheel and the
instrument panel assembly by placing
material over the steering wheel pad
and above the instrument panel or by
installing additional trim material
around the air bag system.
● Modifying or tampering with the front
passenger seat may result in serious
personal injury. For example, do not
change the front seats by placing material on the seat cushion or by installing
additional trim material, such as seat
covers, on the seat that are not specifically designed to assure proper air bag
operation. Additionally,do not stow any
objects under the front passenger seat
or the seat cushion and seatback. Such
objects may interfere with the proper
operation of the occupant classification sensor (pressure sensor).
● No unauthorized changes should be
made to any components or wiring of
the seat belt system.This mayaffect the
supplemental front air bag system.
Tampering with the seat belt system
may result in serious personal injury.
● Work on and around the supplemental
front air bag system should be done by
a NISSAN dealer. Installation of electrical equipment should also be done by a
NISSAN dealer. The Supplemental Restraint System (SRS) wiring should not
be modified or disconnected. Unauthorized electrical test equipment and
probing devices should not be used on
the air bag system.
● A cracked windshield should be replaced immediately by a qualified repair facility. A cracked windshield could
affect the function of the supplemental
air bag system.
● The SRS wiring harness connectors are
yellow and orange for easy
identification.
When selling your vehicle, we request that you
inform the buyer about the supplemental front air
bag system and guide the buyer to the appropriate sections in this Owner’s Manual.
1-52 Safety—Seats, seat belts and supplemental restraint system
Page 69
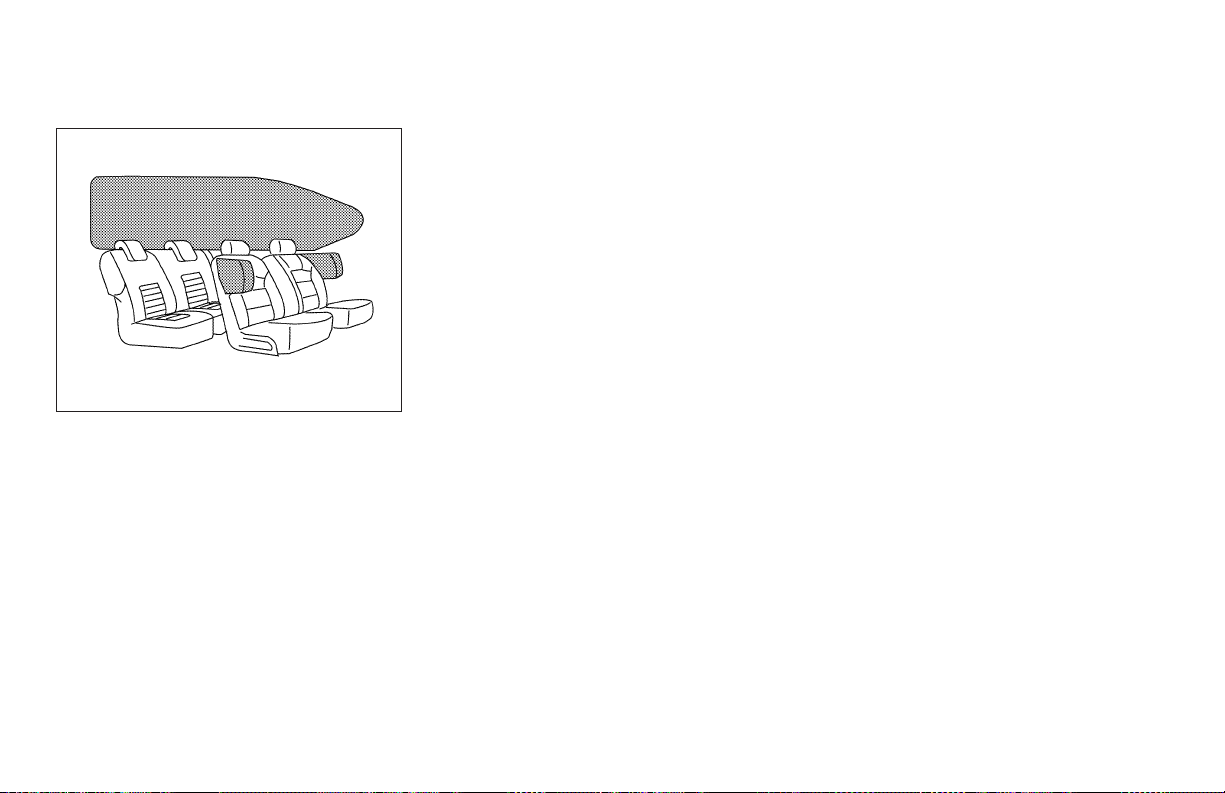
LRS0592
Front seat-mounted side-impact
supplemental air bags (if so equipped)
and roof-mounted curtain side-impact
and rollover supplemental air bag (if so
equipped) system
The front seat-mounted side-impact supplemental air bags are located in the outside of the
seatback of the front seats. The roof-mounted
curtain side-impact and rollover supplemental air
bags are located in the side roof rails in all 3rows.
These systems are designed to meet voluntary
guidelines to help reduce the risk of injury to
out-of-position occupants. However, all of the
information, cautions and warnings in this
manual still apply and must be followed.
The supplemental side air bags and curtain sideimpact and rollover air bags are designed to
inflate in higher severity side collisions, although
they may inflate if the forces in another type of
collision are similar to those of a higher severity
side impact. They are designed to inflate on the
side where the vehicle is impacted. They may not
inflate in certain side collisions. As a result, certain vehicle movements (for example, during severe off roading) may cause the airbags to inflate.
Curtain side-impactand rollover air bags are also
designed to inflate in certain types of rollover
collisions or near rollovers. As a result, certain
vehicle movements (for example, during severe
off roading) may cause the airbags to inflate.
Vehicle damage (or lack of it) is not always an
indication of proper supplemental side air bag
and curtain side-impact and rollover air bag operation.
When the supplemental side air bag and curtain
air bags inflate, a fairly loud noise may be heard,
followed by release of smoke. This smoke is not
harmful and does not indicate a fire. Care should
be taken not to inhale it, as it may cause irritation
and choking. Those with a history of a breathing
condition should get fresh air promptly.
Supplemental sideair bags, along with theuse of
seat belts, help to cushion the impact force on
Safety—Seats, seat belts and supplemental restraint system 1-53
the chest of the front occupants. Curtain sideimpact and rollover air bags help to cushion the
impact forceto the head of occupants in the front
and rear outboard seating positions in all rows.
They can help save lives and reduce serious
injuries. However, an inflating side air bag, or
curtain air bag may cause abrasions or other
injuries. Supplemental side air bags and curtain
side-impact and rollover air bags do not provide
restraint to the lower body.
The seat belts should be correctly worn and the
driver and passenger seated upright as far as
practical away from the supplemental side air
bag. Rear seat passengers should be seated as
far away as practical from the door finishers and
side roof rails. The side air bags and curtain air
bag inflate quickly in order to help protect the
occupants. Because of this, the force of the side
air bag and curtain air bag inflating can increase
the risk of injury if the occupant is too close to, or
is against, these air bag modules during inflation.
The side air bag will deflate quickly after the
collision is over.
The curtain side-impact and rollover air bag will
remain inflated for a short time.
The supplemental side air bags and curtain
side-impact and rollover air bags operate
only when the ignition switch is in the ON
or START positions.
Page 70
After turning the ignition key to the ON
position, the supplemental air bag warning
light illuminates. The supplemental air bag
warning light will turn off after about 7
seconds if the system is operational.
WARNING
● Do not place any objects near the seatback of the front seats. Also, do not
place any objects (an umbrella, bag,
etc.) between the front door finisher
and the front seat. Such objects may
become dangerous projectiles and
cause injury if the supplemental side air
bag inflates.
● Right afterinflation, severalside airbag
and curtain side-impact and rollover air
bag system components will be hot. Do
not touch them; you may severely burn
yourself.
● No unauthorized changes should be
made to any components or wiring of
the side air bag and curtain air bag
system. This is to prevent accidental
inflation of the side air bag and curtain
air bag or damage to the side air bag
and curtain air bag system.
● Do not make unauthorized changes to
your vehicle’s electrical system, suspension system or side panel. This
could affect proper operation of the
supplemental curtain air bag system.
● Tampering with the supplemental side
air bag system may result in serious
personal injury. For example, do not
change the front seats by placing material near the seatbacks or by installing
additional trim material, such as seat
covers, around the side air bag.
● Work around and on the curtain air bag
system should be done by a NISSAN
dealer. Installation of electrical equipment should also be done by a NISSAN
dealer. The SRS wiring harnesses*
should not be modified or disconnected. Unauthorized electrical test
equipment and probing devices should
not be used on the side air bag or curtain air bag system.
* The SRSwiring harness or connectors are
yellow or orange for easy identification.
When selling your vehicle, we request that you
inform the buyer about the supplemental side air
bag and curtain air bag system and guide the
buyer to the appropriate sections in this Owner’s
Manual.
1-54 Safety—Seats, seat belts and supplemental restraint system
Seat belts with pretensioners (Front
seats)
WARNING
● The seat belts with pretensioners cannot be reused after activation. It must
be replaced together with the retractor
and buckle as a unit.
● If the vehicle becomes involved in a
frontal collision but the pretensioner is
not activated, be sure to have the pretensioner system checked and, if necessary, replaced by your NISSAN
dealer.
● No unauthorized changes should be
made to any components or wiring of
the seat belts with pretensioners. This
is to prevent accidental activation of
the seat belts with pretensioners or
damage to the seat belts with pretensioners operation. Tampering with the
seat belts with pretensioners may result
in serious personal injury.
Page 71
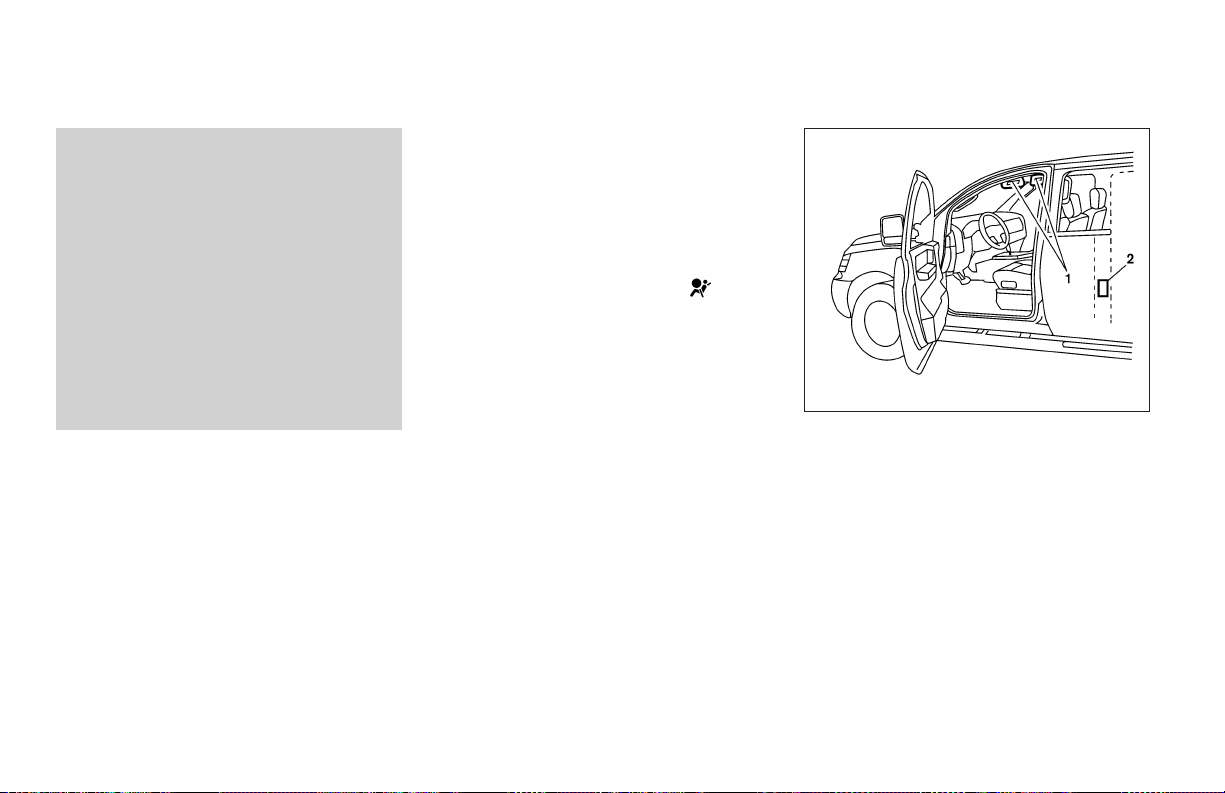
● Work around and on the seat belts with
pretensioners should be done by a
NISSAN dealer. Installation of electrical
equipment should also be done by a
NISSAN dealer. Unauthorized electrical
test equipment and probing devices
should not be used on the seat belts
with pretensioners.
● If you need to dispose of the pretensioner or scrap the vehicle, contact a
NISSAN dealer. Correct pretensioner
disposal procedures are set forth in the
appropriate NISSAN Service Manual.
Incorrect disposal procedures could
cause personal injury.
The front seat belts with pretensioners activates
in conjunctionwith the front supplemental air bag
systems. Working with the seat belt retractor, it
helps tighten the seat belt when the vehicle becomes involved in certain types of collisions,
helping to restrain front seat occupants.
The pretensioner is encased with the seat belt’s
retractor. These seat belts are used the same as
conventional seat belts.
When the pretensioner activates, smoke is released and a loud noise may be heard. This
smoke is not harmful and does not indicate a fire.
Care should be taken not to inhale it, as it may
cause irritation and choking. Those with a history
of a breathing condition should get fresh air
promptly.
After the pretensioners have activated, load limiters allow the seat belt to release webbing (if
necessary) to reduce forces against the chest.
If any abnormality occurs inthe pretensioners,the
supplemental air bag warning light
will not
come on, will flash intermittently or will turn on for
7 seconds and remain on after the ignition key
has been turned to the ON or START position. In
this case, the pretensioner may not function
properly. They must be checked and repaired.
Take your vehicle to the nearest NISSAN dealer.
When selling your vehicle, we request that you
inform thebuyer about the seat belts with pretensioners and guide the buyer to the appropriate
sections in this Owner’s Manual.
Safety—Seats, seat belts and supplemental restraint system 1-55
LRS0397
1. SRS Air bag warning labels
The warning labels are located on the sur-
face of the sun visor.
2. Front seat-mounted side-impact supple-
mental air bags warning label (if so
equipped)
The warning label is located on the side of
the passenger’s side center pillar.
Page 72
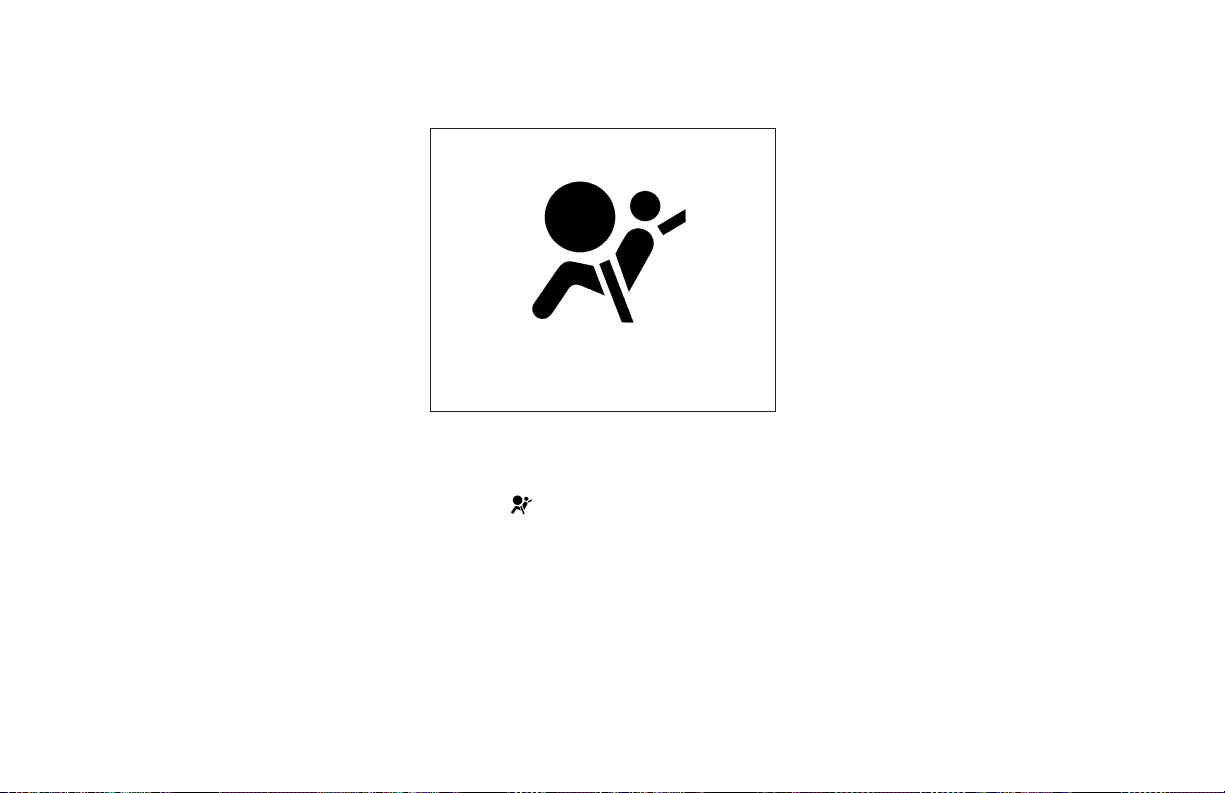
SUPPLEMENTAL AIR BAG
WARNING LABELS
Warning labels about the supplemental front air
bags, front seat-mounted side-impact supplemental air bags and roof-mounted curtain sideimpact and rollover supplemental airbag systems
are placed in the vehicle as shown in the illustration.
SUPPLEMENTAL AIR BAG
WARNING LIGHT
The supplemental air bag warning light,
displaying
tors the circuits of the supplemental front air bag,
front seat-mounted side-impact supplemental air
bags and roof-mounted curtain side-impact and
rollover supplemental air bag and seat belts with
pretensioners systems.The circuitsmonitored by
the supplemental air bag warning light are the Air
bag Control Unit (ACU), crash zone sensor, satellite sensors, rollover sensor, front air bag modules, side air bag modules, curtain air bag modules, pretensioner and all related wiring.
in the instrument panel, moni-
1-56 Safety—Seats, seat belts and supplemental restraint system
LRS0100
When the ignition key is in the ON or START
position, the supplemental air bag warning light
illuminates for about 7 seconds and then turns
off. This means the system is operational.
If any of the following conditions occur, the
supplemental front air bag, front seat-mounted
side-impact supplemental air bags, roofmounted curtain side-impact, rollover supplemental air bag and pretensioner seat belt systems need servicing:
● The supplemental air bag warning light re-
mains on after approximately 7 seconds.
● The supplemental air bag warning light
flashes intermittently.
● The supplemental air bag warning light does
not come on at all.
Under these conditions, the supplemental front
air bag, front seat-mounted side-impact supplemental air bags, roof-mounted curtain sideimpact and rollover supplemental air bag or pretensioner systems may not operate properly. It
must be checked and repaired. Take your vehicle
to the nearest NISSAN dealer.
Page 73
WARNING
If the supplemental air bag warning light
is on, it could mean that the supplemental
front air bag, front seat-mounted sideimpact supplemental air bags, roofmounted curtain side-impact and rollover
supplemental air bag and/or seat belt
with pretensioners will not operate in an
accident. To help avoid injury to yourself
or others, have your vehicle checked by a
NISSAN dealer as soon as possible.
Repair and replacement procedure
The supplemental front air bags, front seatmounted side-impact supplemental air bags,
roof-mounted curtain side-impact and rollover
supplemental air bag and pretensioners are designed to inflate on a one-time-only basis. As a
reminder, unless it is damaged, the supplemental
air bag warning light remains illuminated after
inflation hasoccurred. Repairand replacementof
these supplemental air bag systems should be
done only by a NISSAN dealer.
When maintenance work is required on the vehicle, the supplemental front air bags, front seatmounted side-impact supplemental air bags,
roof-mounted curtain side-impact and rollover
supplemental air bag, pretensioners and related
parts should be pointed out to the person per-
forming the maintenance. The ignition key should
always be in the LOCK position when working
under the hood or inside the vehicle.
WARNING
● Once asupplemental frontair bag,front
seat-mounted side-impact supplemental air bags, roof-mounted curtain sideimpact and rollover supplemental air
bag has inflated,the airbag modulewill
not function again and must be replaced. Additionally, if any of the
supplemental front air bags inflate, the
activated seat belts with pretensioners
must also be replaced.The airbag module and seat belts with pretensioners
should be replaced by a NISSAN dealer.
The air bag module and seat belts with
pretensioners cannot be repaired.
● The supplemental front air bag, roofmounted curtain side-impact and rollover supplemental air bag systems, and
the seat belts with pretensioners
should be inspected by a NISSAN
dealer if there is any damage to the
front end or side portion of the vehicle.
Safety—Seats, seat belts and supplemental restraint system 1-57
● If you need to dispose of the supplemental air bag, seat belts with pretensioners or scrap the vehicle, contact a
NISSAN dealer. Correct supplemental
air bag and seat belts with pretensioners disposal procedures are set forth in
the appropriate NISSAN Service
Manual. Incorrect disposal procedures
could cause personal injury.
Page 74

2 Instruments and controls
Instrument panel...................................2-2
Meters and gauges ................................2-3
Speedometer and odometer .....................2-4
Trip computer (if so equipped) ...................2-5
Tachometer....................................2-6
Engine coolant temperature gauge ...............2-6
Fuel gauge ....................................2-7
Engine oil pressure gauge .......................2-8
Voltmeter ......................................2-8
Warning/indicator lights and audible reminders .......2-9
Checking bulbs ...............................2-10
Warning lights ................................2-10
Indicator lights ................................2-14
Audible reminders .............................2-18
Security systems (if so equipped) ..................2-18
Vehicle security system (if so equipped)..........2-18
NISSAN vehicle immobilizer system
(if so equipped) ...............................2-20
Windshield wiper and washer switch ...............2-21
Switch operation ..............................2-21
Rear window wiper and washer switch..............2-22
Rear window and outside mirror (if so equipped)
defroster switch ..................................2-22
Headlight and turn signal switch....................2-23
Headlight control switch........................2-23
Daytime running light system (Canada only) ......2-24
Instrument brightness control ...................2-24
Turn signal switch .............................2-25
Fog light switch (if so equipped) ................2-25
Hazard warning flasher switch .....................2-25
Horn ............................................2-26
Vehicle dynamic control (VDC) off switch............2-26
Hill descent control switch (if so equipped)..........2-27
Electronic locking rear differential (E-Lock) system
switch (if so equipped) ............................2-28
Clutch interlock (clutch start) switch
(if so equipped) ..................................2-29
Power outlet .....................................2-29
Storage .........................................2-31
Storage trays .................................2-31
Console box ..................................2-32
Glove box ....................................2-32
Sunglasses holder (if so equipped) ..............2-32
Map pockets..................................2-33
Seat pockets..................................2-33
Cup holders ..................................2-34
Page 75

Cargo area storage ............................2-35
Luggage hooks................................2-35
Cargo nets ...................................2-37
Roof rack .....................................2-38
Windows ........................................2-41
Power windows (if so equipped) ................2-41
Manual windows ..............................2-43
Interior lights .....................................2-43
Map lights .......................................2-44
Cargo light ......................................2-44
Page 76
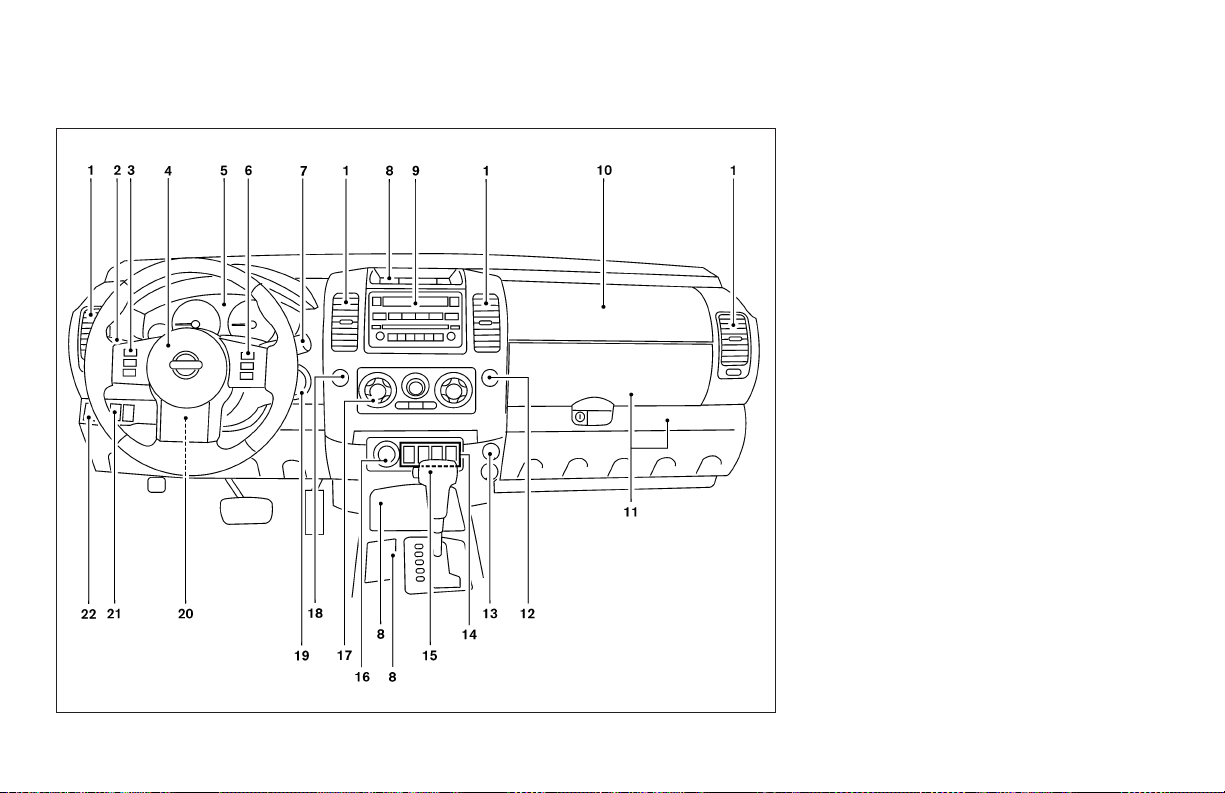
INSTRUMENT PANEL
1. Ventilators (P. 4-2)
2. Headlight/fog light (if so equipped)/turn
signal switch (P. 2-23)
3. Steering wheel switch for audio control
(if so equipped) (P. 4-26)
4. Driver supplemental air bag/horn
(P. 1-41, P. 2-26)
5. Meters, gauges and warning/indicator
lights (P. 2-3, 2-9)
6. Cruise control main/set switches
(if so equipped) (P. 5-18)
7. Windshield wiper/washer switch and
rear window wiper/washer switch
(P. 2-21, P. 2-22)
8. Storage (P. 2-31)
9. Audio system controls (P. 4-10)
10. Front passenger supplemental air bag
(P. 1-41)
11. Upper and lower glove box (P. 2-32)
12. Passenger air bag status light (P. 1-50)
13. Power outlet (P. 2-29)
14. Electronic locking rear differential
(E-Lock) system switch (if so
equipped) (P. 2-28)
Hill descent control switch
(if so equipped) (P. 2-27)
WIC0915
2-2 Instruments and controls
Page 77
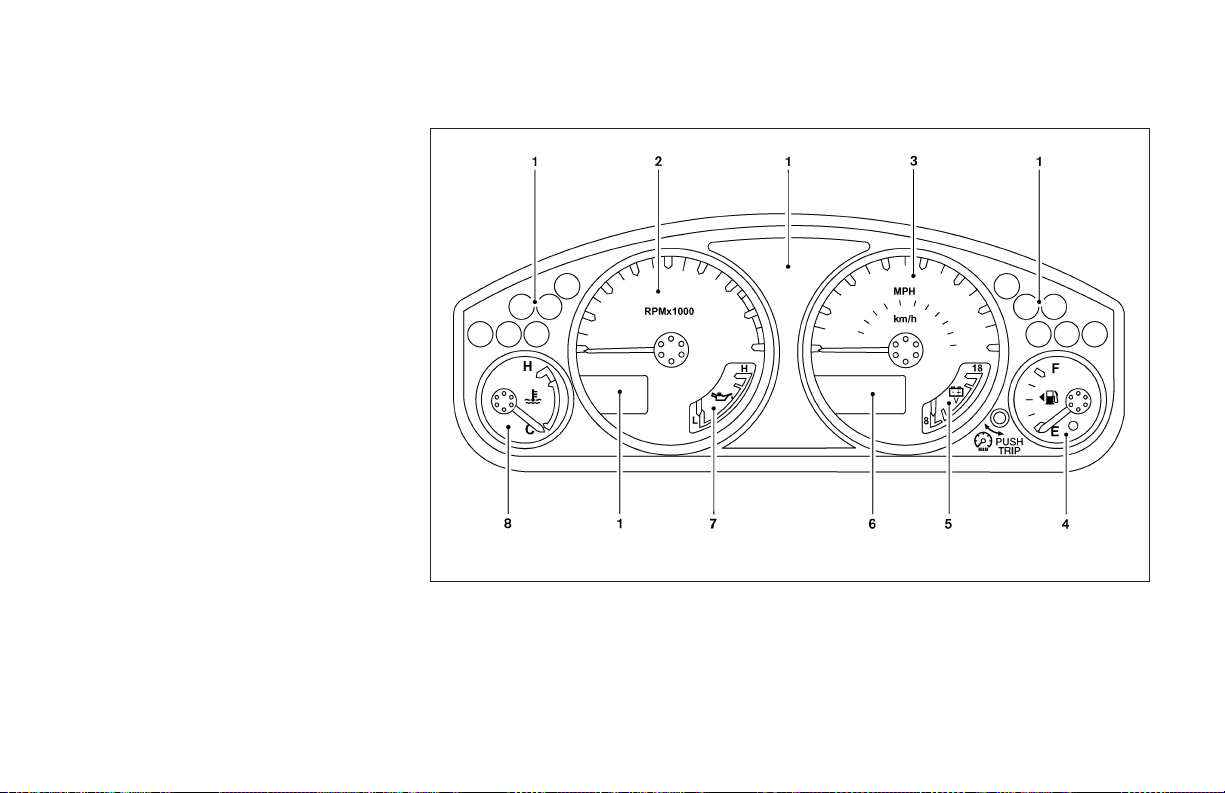
Vehicle dynamic control (VDC) OFF
switch (P. 2-26)
15. Shift selector lever (P. 5-12)
16. 4WD shift switch (if so equipped) (P.
5-21)
17. Climate controls (P. 4-2)
18. Hazard warning flasher switch (P. 2-25)
19. Ignition switch (P. 5-8)
20. Tilt steering wheel control (P. 3-11)
21. Clutch interlock (clutch start) switch
(if so equipped) (P. 2-29)
22. Power outside mirror controls
(if so equipped) (P. 3-13)
See the page number indicated in parentheses for operating details.
METERS AND GAUGES
1. Warning/indicator lights
2. Tachometer
3. Speedometer
4. Fuel gauge
5. Voltmeter
WIC0911
6. Odometer/Twin trip odometer/Trip computer (if so equipped)
7. Engine oil pressure gauge
8. Engine coolant temperature gauge
Instruments and controls 2-3
Page 78
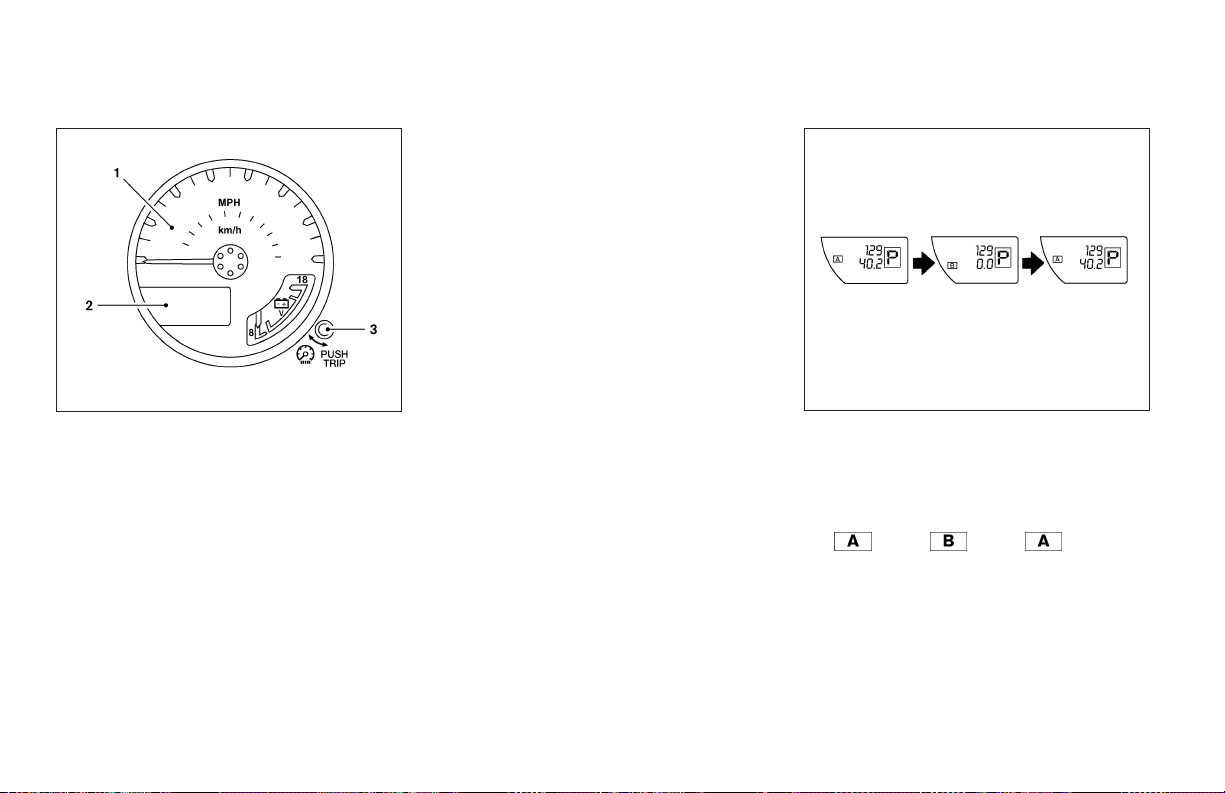
The odometer records the total distance the vehicle has been driven.
The twin trip odometer records the distance of
individual trips.
WIC0912
1. Speedometer
2. Odometer/Twin trip odometer
3. Change button
SPEEDOMETER AND ODOMETER
Speedometer
The speedometer indicates vehicle speed in
miles per hour (MPH) and kilometers per hour
(km/h).
Odometer/Twin trip odometer
The odometer/twin trip odometer is displayed
when the ignition switch is in the ON position.
2-4 Instruments and controls
LIC0780
With twin trip odometer
Changing the display:
For vehicles equipped with twin trip odometer,
pushing the change button changes the display
as follows:
Trip
→ Trip → Trip
Page 79
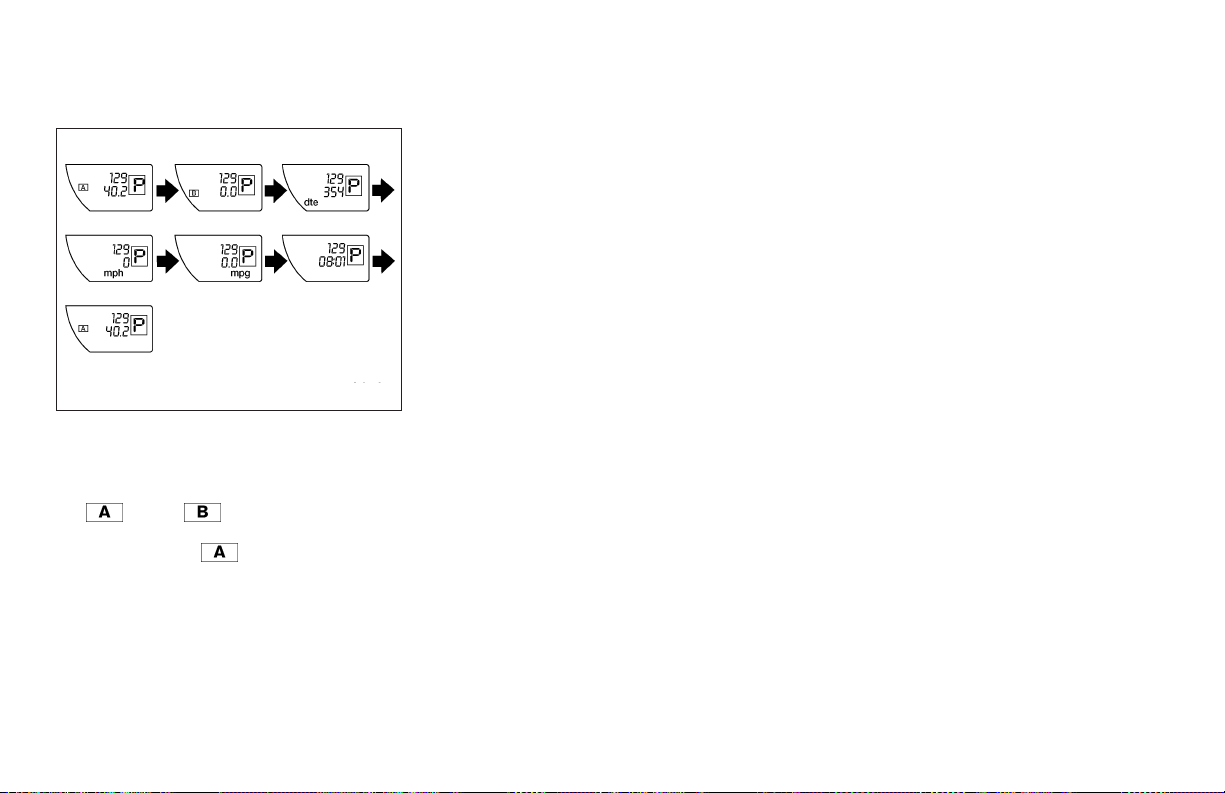
LIC0781
With trip computer
For vehicles equipped with trip computer, pushing the change button changes the display as
follows:
Trip
Average speed → Average fuel consumption →
Journey time → Trip
For additional information, refer to “Trip computer” later in this section.
Resetting the trip odometer:
Pushing the change button for more than 1 second resets the trip odometer to zero.
→Trip →Distance to Empty →
TRIP COMPUTER (if so equipped)
The display of the trip computer is situated in the
speedometer display. When the ignition is turned
to ON, the display scrolls all the modes of thetrip
computer and then shows the mode chosen before the ignition switch was turned OFF.
When the ignition switch is turned to ON, modes
of the trip computer can be selected by pushing
the trip computer change button. The following
modes can be selected:
Distance to empty (dte—mile or km)
The distance to empty (dte) mode provides you
with an estimation of the distance that can be
driven before refueling. The dte is constantly being calculated, based on the amount of fuel in the
fuel tank and the actual fuel consumption.
The display is updated every 30 seconds.
The dte mode includes a low range warning
feature: whenthe fuellevel is low, thedte modeis
automatically selected and the digits blink in order to draw the driver’s attention. Press the
change button if you wish to return to the mode
that was selected before the warning occurred.
The dte mark (dte) will remain blinking until the
vehicle is refueled.
When the fuel level drops even lower, the dte
display will change to (----).
NOTE:
● If the amount of fuel added while the
ignition switch is OFF is small, the display just before the ignition switch is
turned OFF may continue to be displayed.
● When driving uphill or rounding curves,
the fuel in the tank shifts, which may
momentarily change the display.
Average speed (MPH or km/h)
The average speed mode shows the average
vehicle speed since last reset. Resetting is done
by pressing the change button for more than
approximately 1 second. The display is updated
every 30 seconds. The first 30 seconds after a
reset, the display shows (----).
Average fuel consumption (Mpg or
l/100km)
The average fuel consumption mode shows the
average fuel consumption since the last reset.
Resetting is done by pressing the change button
for more than approximately 1 second. The display is updated every 30 seconds. At about the
first 1/3 miles (500 m) after a reset, the display
shows (----).
Instruments and controls 2-5
Page 80
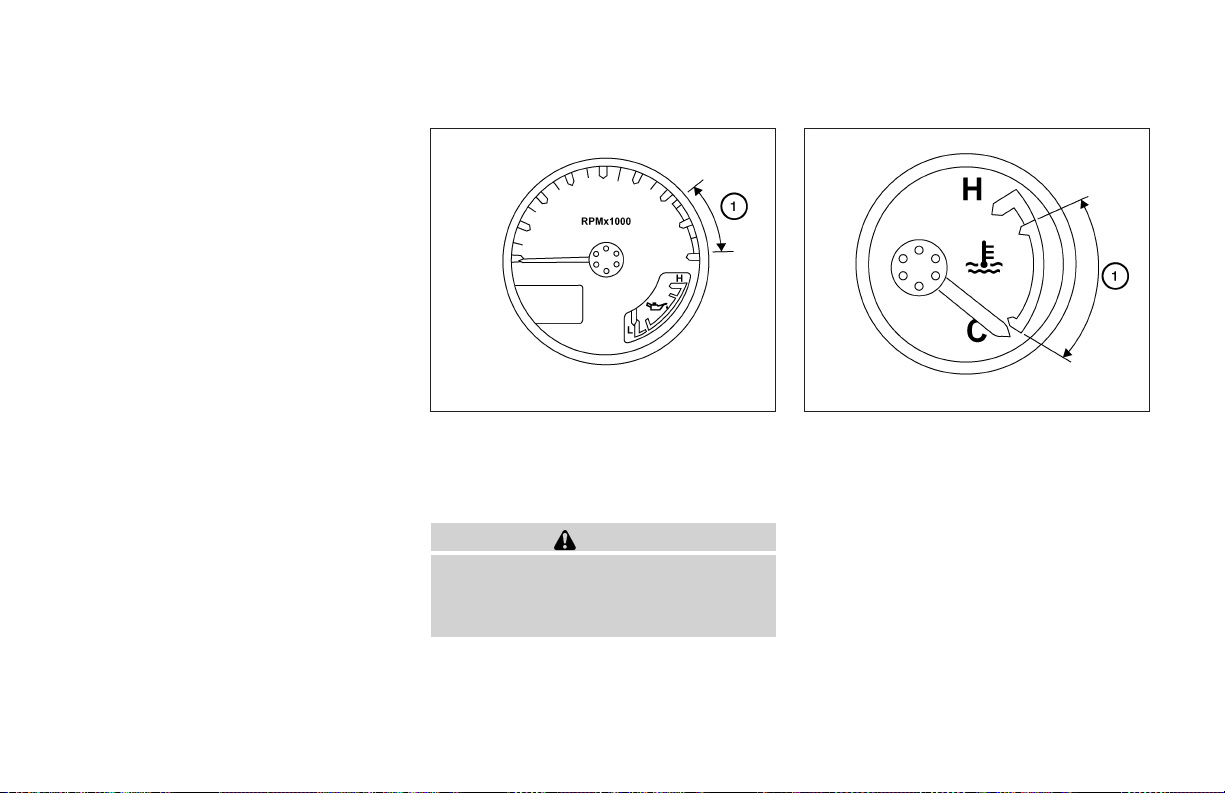
Journey time
The journey time mode shows the time since the
last reset. The displayed time can be reset by
pressing the change button for more than approximately 1 second.
Trip computer reset
Pushing the change button for more than 3 seconds will reset all modes except Trip A and distance to empty (dte).
LIC0738 LIC0739
TACHOMETER
The tachometer indicates engine speed in revolutions per minute (rpm). Do not rev the engine
into the red zone
When engine speed approaches the red
zone, shift to a higher gear. Operating the
engine in the red zone may cause serious
engine damage.
1
.
s
CAUTION
ENGINE COOLANT TEMPERATURE
GAUGE
The gaugeindicates theengine coolanttemperature. The engine coolant temperature is within the
normal range
within the zone shown in the illustration.
The engine coolant temperature varies with the
outside air temperature and driving conditions.
1
when the gauge needle points
s
2-6 Instruments and controls
Page 81
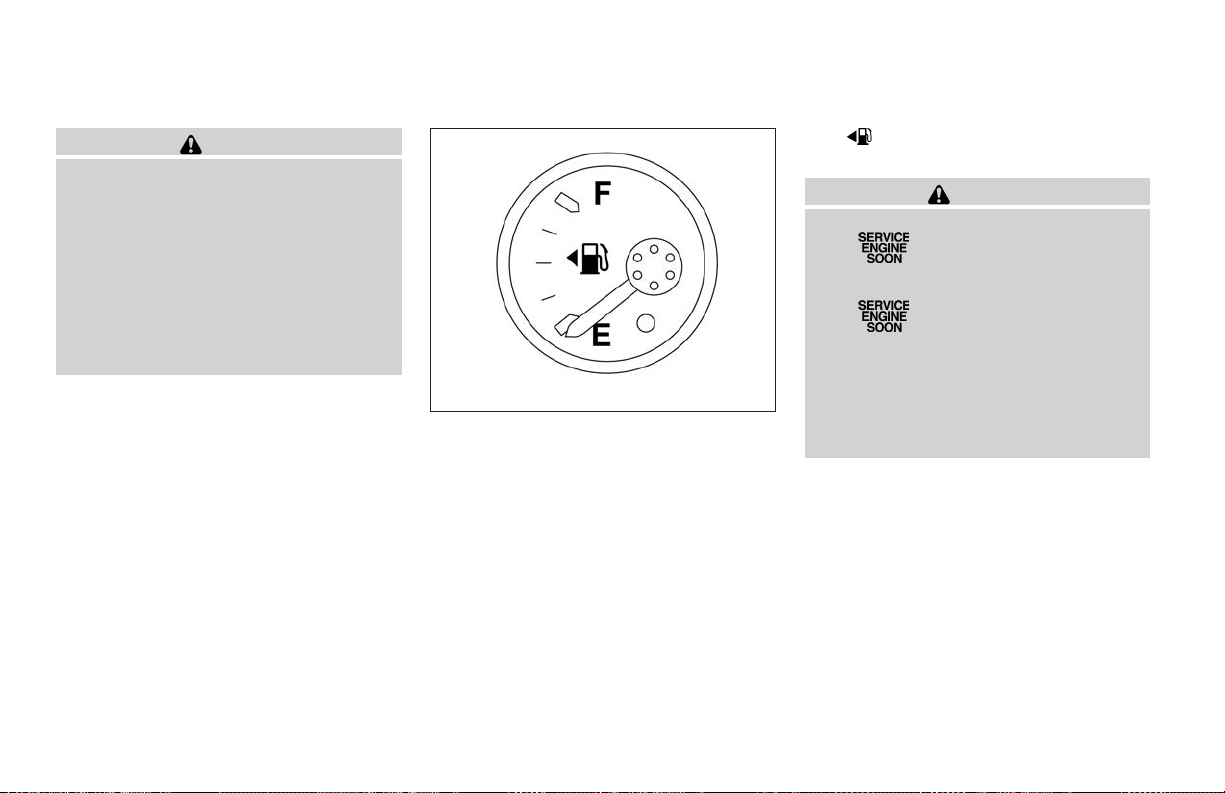
CAUTION
If the gauge indicates coolant temperature near the hot (H) end of the normal
range, reduce vehicle speed to decrease
temperature. If the gauge is over the normal range, stop the vehicle as soon as
safely possible. If the engine is overheated, continued operation of the vehicle may seriously damage the engine.
See “If your vehicle overheats” in the “In
case of emergency”section for immediate
action required.
LIC0740
FUEL GAUGE
The gauge indicates the approximate fuel level
in the tank.
The gauge may move slightly during braking,
turning, acceleration, or going up or down hills.
The gauge needle returns to E (Empty) after the
ignition key is turned to OFF.
The low fuel warning light comes on when the
amount of fuel in the tank is getting low.
Refill the fuel tank before the gauge registers E (Empty).
The
located on the driver’s side of the vehicle.
indicates that the fuel-filler door is
CAUTION
● If the vehicle runs out of fuel,
the
(MIL) may come on. Refuel as soon as
possible. After a few driving trips,
the
light remains on after a few driving
trips, have the vehicle inspected by a
NISSAN dealer.
● For additional information, see “Malfunction indicator light (MIL)” later in
this section.
malfunction indicator light
light should turn off. If the
Instruments and controls 2-7
Page 82
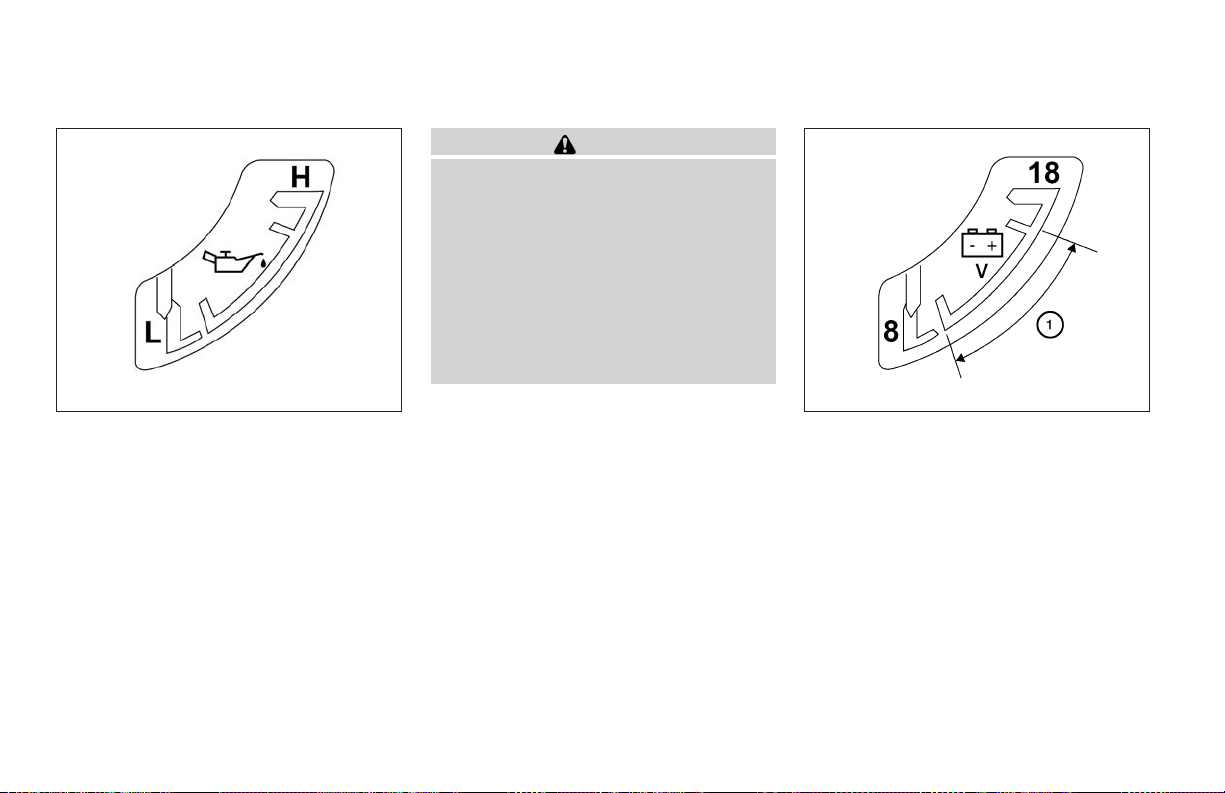
LIC0741 WIC0913
ENGINE OIL PRESSURE GAUGE
The gauge indicates the engine lubrication system oil pressure while the engine is running.
CAUTION
● This gauge is not designed to indicate
low engine oil level. Use the dipstick to
check the oil level. (See “Engine oil” in
the “Maintenance and do-it-yourself”
section.)
● If the gauge needle does not move with
the proper amount of engine oil, have
the vehicle checked by a NISSAN
dealer. Continued vehicle operation in
such a condition could cause serious
damage to the engine.
VOLTMETER
When the ignition key is turned to the ON position, the voltmeter indicates the battery voltage.
When the engine is running, it indicates the generator voltage.
While cranking the engine, the volts drop below
the normal range. If the needle is not in the normal
range (11 – 15 volts)
running, it may indicate that the charging system
is not functioning properly. Have the system
checked by a NISSAN dealer.
1
while the engine is
s
2-8 Instruments and controls
Page 83
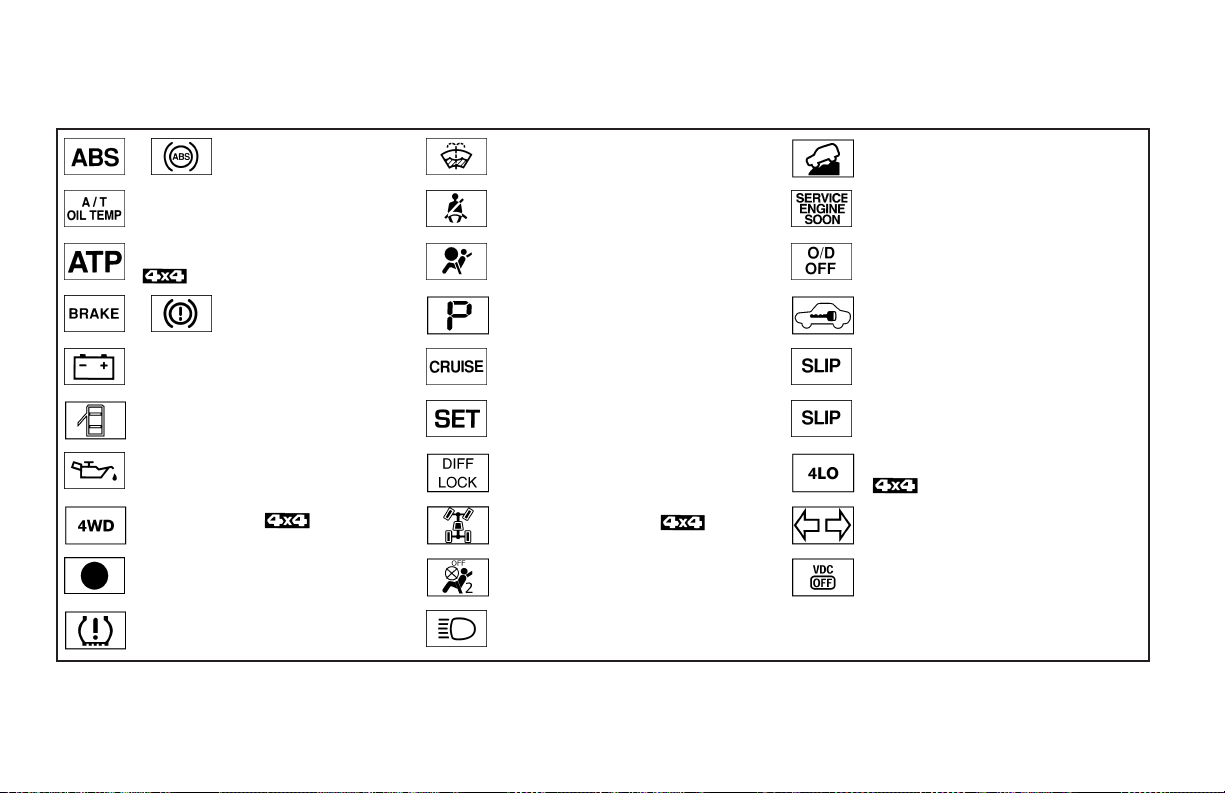
WARNING/INDICATOR LIGHTS AND
AUDIBLE REMINDERS
or Anti-lock Braking System (ABS)
Automatic transmission oil temperature warn-
ing light (if so equipped)
Automatic transmission park warning light
(
or Brake warning light Automatic transmission position indicator light Security indicator light (if so equipped)
Charge warning light Cruise main switch indicator light (if so
Door open warning light Cruise set switch indicator light (if so
Engine oil pressure warning light Electronic locking rear differential (E-Lock)
4WD warning light ( model) 4WD shift indicator light ( model) Turn signal/hazard indicator lights
Low fuel warning light Front passenger air bag status light Vehicle dynamic control off indicator light
Low tire pressure warning light High beam indicator light (Blue)
warning light
model)
Low windshield washer fluid warning light Hill descent control system on indicator light
Seat belt warning light and chime Malfunction indicator light (MIL)
Supplemental air bag warning light Overdrive off indicator light (automatic trans-
equipped)
equipped)
system on indicator light (if so equipped)
(if so equipped)
mission models only)
Slip indicator light for models with ABLS (if so
equipped)
Slip indicator light for models with VDC (if so
equipped)
Transfer 4LO position indicator light
(
model)
Instruments and controls 2-9
Page 84
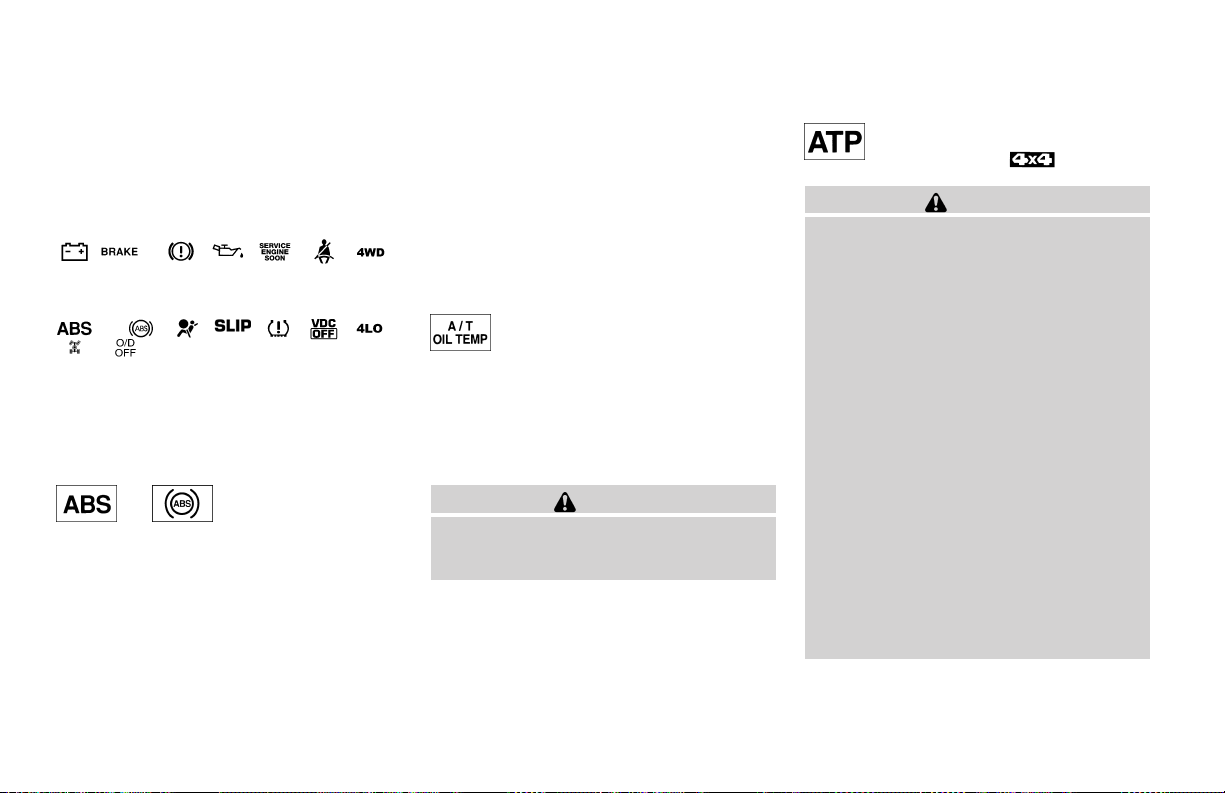
CHECKING BULBS
With all doors closed, apply the parking brake
and turn the ignition key to the ON position
without starting the engine. The following lights
will come on:
, or , , , ,
The following lights come on briefly and then go
off:
or , , , , , ,
,
If any light fails to come on, it may indicate
a burned-out bulb or an open circuit in the
electrical system. Have the system repaired
promptly.
WARNING LIGHTS
or Anti-lock Braking
System (ABS)
warning light
When the ignition switch is in the ON position,
the Anti-lock Braking System (ABS)warning light
illuminates and then turns off. This indicates the
ABS is operational.
If the ABS warning light illuminates while the
engine is running, or while driving, it may indicate
the ABS is not functioning properly. Have the
system checked by a NISSAN dealer.
If an ABS malfunction occurs, the anti-lock function isturned off.The brake system then operates
normally, but without anti-lock assistance. See
9Brake system9 in the 9Starting and driving9 section.
Automatic transmission oil
temperature warning light (if
so equipped)
This light comeson whenthe automatic transmission oil temperature is too high. If the light comes
on while driving, reduce the vehicle speed as
soon as safely possible until the light turns off.
CAUTION
Continued vehicle operation when the A/T
oil temperature warning light is on may
damage the automatic transmission.
Automatic transmission park
warning light (
WARNING
● If the ATP light is ON, this indicates that
the automatic transmission P (Park) position will not function and the transfer
case is in neutral.
● When parking, always make sure that
the 4WD shift indicator light illuminates
and the parking brake is set. Failure to
engage the transferposition in 2WD, 4H
or 4LO could result in the vehicle moving unexpectedly, resulting in serious
personal injury or property damage.
● Shift the 4WD switch into the 2WD, 4H
or 4LO position again to turn off the ATP
warning light when the automatic transmission selector lever is in the P position and the ATP warning light is ON.
(Before shifting the4WD switchinto the
4LO position, move the automatic
transmission selector lever into the N
position once, shift the selector lever
into P again and make sure the ATP
warning light is OFF.)
model)
2-10 Instruments and controls
Page 85
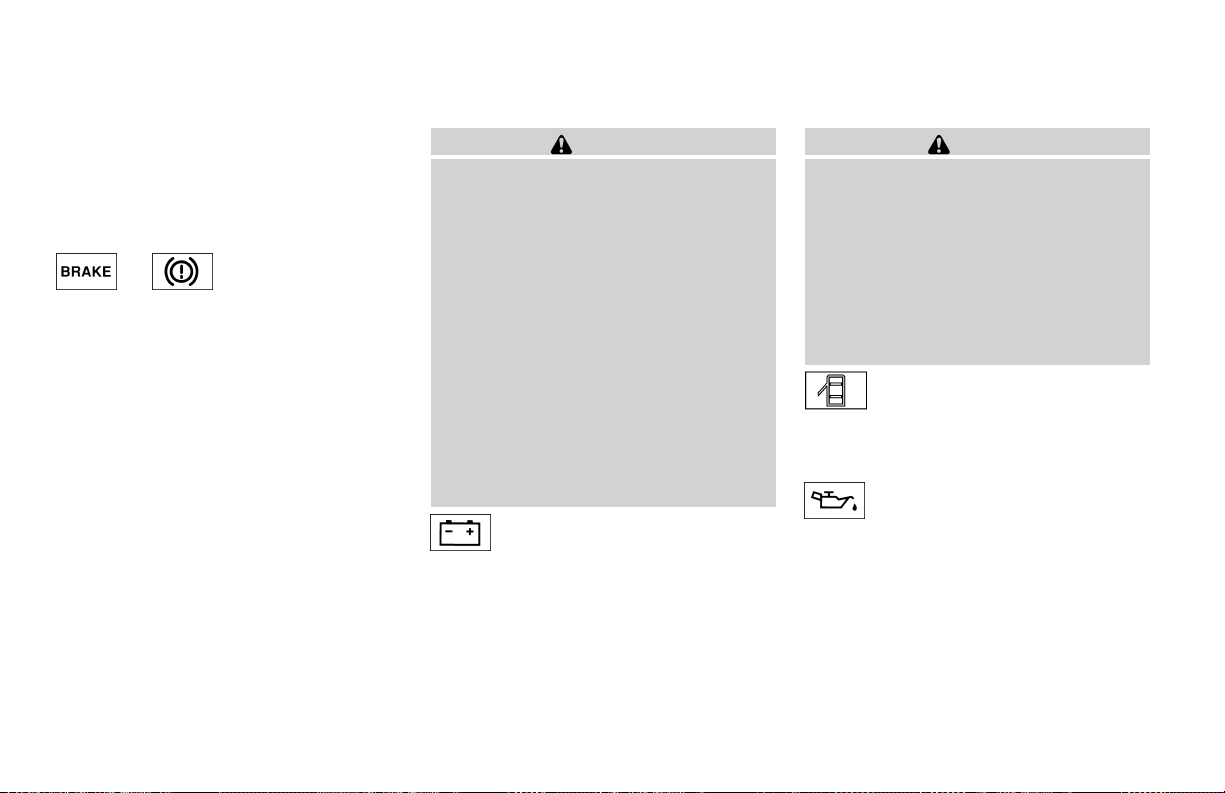
This light indicates that the automatic transmission parking function is not engaged. If the transfer control is not secured in any drive position
while the automatic transmission selector lever is
in the P (Park) position, the transmission will
disengage and the drive wheels will not lock.
or Brake warning light
This lightfunctions for both the parking brake and
the foot brake systems.
Parking brake indicator
When the ignition key is in the ON position, the
light comeson whenthe parkingbrake isapplied.
Low brake fluid warning light
When the ignition key is in the ON position, the
light warns of a low brake fluid level. If the light
comes on while the engine is running with the
parking brake not applied, stop the vehicle and
perform the following:
1. Check the brake fluid level. Add brake fluid
as necessary. See “Brake fluid”in the “Maintenance and do-it-yourself” section of this
manual.
2. If the brake fluid level is correct, have the
warning system checked by a NISSAN
dealer.
WARNING
● Your brake system may not be working
properly if the warning light is on. Driving could be dangerous. If you judge it
to be safe, drive carefully to the nearest
service station for repairs. Otherwise,
have your vehicle towed because driving it could be dangerous.
● Pressing the brake pedal with the engine stopped and/or a low brake fluid
level may increase your stopping distance and braking will require greater
pedal effort as well as pedal travel.
● If the brake fluid level is below the
MINIMUM or MIN mark on the brake
fluid reservoir, do not drive until the
brake system has been checked at a
NISSAN dealer.
Charge warning light
If this light comes on while the engine is running,
it may indicate the charging system is not functioning properly. Turn the engine off and check
the generator belt. If the belt is loose, broken,
missing, or if the light remains on, see a NISSAN
dealer immediately.
CAUTION
● Do not ground electrical accessories
directly to the battery terminal. Doing
so will bypass the variable control system and the vehicle battery may not
charge completely. Refer to “Variable
voltage control system” in the “Maintenance and do-it-yourself” section later
in this manual.
● Do not continue driving if the generator
belt is loose, broken or missing.
Door open warning light
This lightcomes on when any of the doors are not
closed securelywhile theignition keyis inthe ON
position.
Engine oil pressure warning
light
This light warns of low engine oil pressure. If the
light flickers or comes on during normal driving,
pull off the road in a safe area, stop the engine
immediately and call a NISSAN dealer or other
authorized repair shop.
Instruments and controls 2-11
Page 86
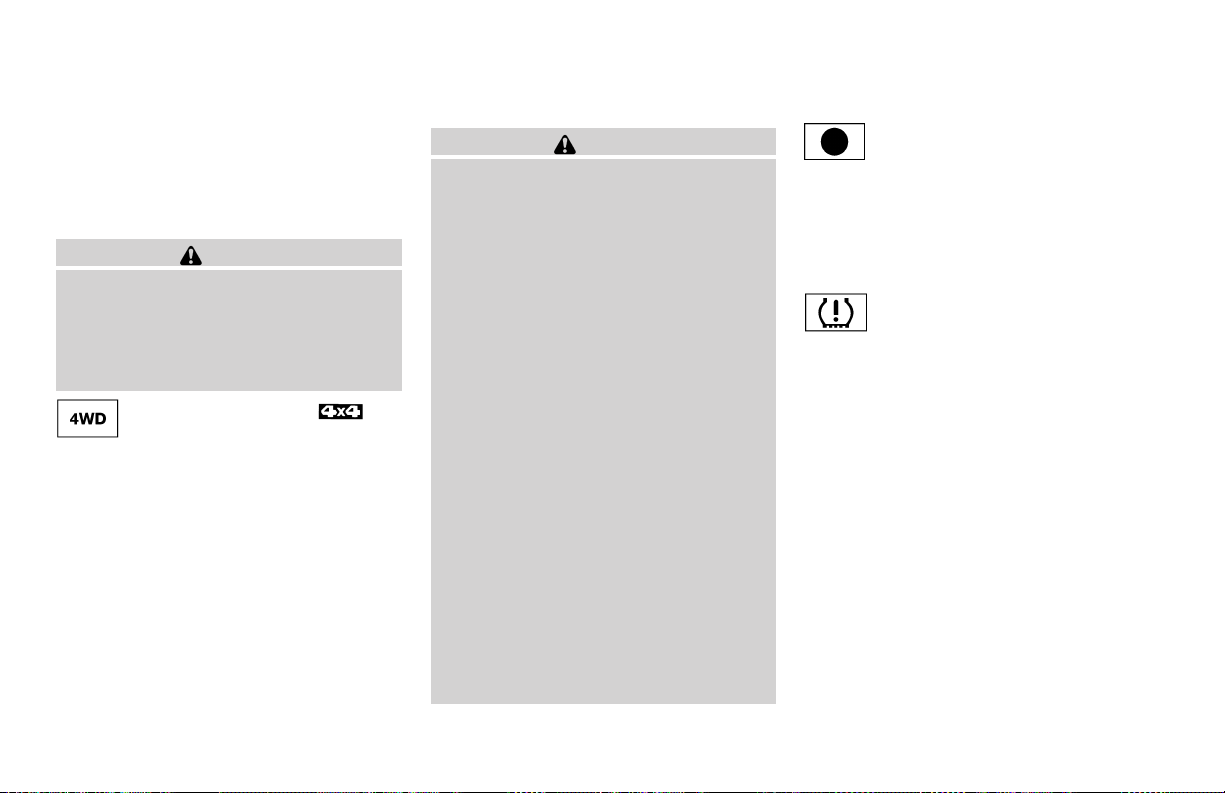
The engine oil pressure warning light is not
designed to indicate a low oil level. Use the
dipstick to check the oil level. See “Engine oil” in
the “Maintenance and do-it-yourself” section of
this manual.
CAUTION
Running the engine with the engine oil
pressure warning light on could cause serious damage to the engine almost immediately. Such damage is not covered by
warranty. Turn off the engine as soon as it
is safe to do so.
4WD warning light (
model)
The 4WD warning light comes on when the key
switch is turned to ON. It turns off soon after the
engine is started.
If the engine or vehicle is not functioning properly,
the warning light will either remain illuminated or
blink. See “4WD warning light” in the “Starting
and driving” section.
2-12 Instruments and controls
CAUTION
● If the warning light comes on or blinks
during operation, have your vehicle
checked by a NISSAN dealer as soon as
possible.
● Do not drive on dry hard surface roads
in the 4H or 4LO position. If the 4WD
warning light turns on when you are
driving on dry hard surface roads:
– in the 4H position, shiftthe 4WD shift
switch to 2WD.
– in the 4LO position for automatic
transmission models, stop the vehicle and shift the transmission selector lever to the N position with the
brake pedal depressed and shift the
4WD shift switch to 2WD.
– in the 4LO position for manual trans-
mission models, stop the vehicle and
shift the transmission shift lever to
the N position with the clutch pedal
depressed and shift the 4WD shift
switch to 2WD.
● If the warning light is still on after the
above operation, have your vehicle
checked by a NISSAN dealer as soon as
possible.
Low fuel warning light
This light comes on when the fuel level in the fuel
tank is getting low. Refuel as soon as it is convenient, preferably before the fuel gauge reaches E
(Empty). There willbe a small reserve of fuel
in the tank when the fuel gauge needle
reaches E (Empty).
Low tire pressure warning
light
Your vehicle is equipped with a Tire Pressure
Monitoring System (TPMS) that monitors the tire
pressure of all tires except the spare.
The low tire pressure warning light warns of low
tire pressure or indicates that the TPMS is not
functioning properly.
After the ignition switch is placed in the ON
position, this light illuminates for about 1 second
and turns off.
Low tire pressure warning:
If the vehicle is being driven with low tire pressure, the warning light will illuminate.
When the low tire pressure warning light illuminates, you should stop and adjust the tire pressure to the recommended COLD tire pressure
shown on the Tire and Loading Information label.
The low tire pressure warning light does not
Page 87
automatically turn off when the tire pressure is
adjusted. After the tire is inflated to the recommended pressure, the vehicle must be driven at
speeds above 16 MPH (25 km/h) to activate the
TPMS and turn off the low tire pressure warning
light. Use a tire pressure gauge to check the tire
pressure.
For additional information, see “Tire Pressure
Monitoring System (TPMS)” in the “Starting and
driving”section andin the“In case of emergency”
section.
TPMS malfunction:
If the TPMS is not functioning properly, the low
tire pressure warning light will flash for approximately 1 minute when the ignition switch is
placed in the ON position. The light will remain on
after the 1 minute. Have the system checked by a
NISSAN dealer.
For additional information, see “Tire Pressure
Monitoring System (TPMS)” in the “Starting and
driving” section.
WARNING
●
If the light illuminates while driving,
avoid sudden steering maneuvers or
abrupt braking, reduce vehicle speed,
pull off the road to a safe location and
stop the vehicle as soon as possible. Serious vehicle damage could occur and
may lead to an accident and could result
in serious personal injury. Check the tire
pressure for all four tires. Adjust the tire
pressure to the recommended COLD tire
pressure shown on the Tire and Loading
Information label to turn the low tire
pressure warning light OFF. If the light
still comes on while driving after adjusting the tire pressure, a tire may be flat. If
you havea flat tire, replace it with a spare
tire as soon as possible.
●
When a spare tire is mounted ora wheel is
replaced, tire pressure will not be indicated, the TPMS will not function and the
low tire pressure warning light will flash
for approximately 1 minute. The light will
remain on after 1 minute. Contact your
NISSAN dealer as soon as possible for
tire replacement and/or system resetting.
● Replacing tires with those not originally
specified by NISSAN could affect the
proper operation of the TPMS.
CAUTION
● The TPMS is not a substitute for the
regular tire pressure check. Be sure to
check the tire pressure regularly.
● If the vehicle is being driven at speeds
of less than 16 MPH (25 km/h), the
TPMS may not operate correctly.
● Be sure to install the specified size of
tires to the 4 wheels correctly.
Low windshield washer fluid
warning light
This light comes on when the windshield washer
fluid is at a lowlevel. Add windshield washer fluid
as necessary. See “Window washer fluid” in the
“Maintenance and do-it-yourself” section of this
manual.
Seat belt warning light and
chime
The light and chime remind you to fasten your
seat belts. The light illuminates whenever the
ignition key is turned tothe ON or STARTposition
and remainsilluminated until the driver’s seatbelt
is fastened. At the same time, the chime sounds
for about 6 seconds unless the driver’s seat belt
is securely fastened.
Instruments and controls 2-13
Page 88
The seat belt warning light may also illuminate if
the front passenger’s seat belt is not fastened
when thefront passenger’sseat is occupied . For
7 seconds after the ignition switch is in the ON
position, the system does not activate the warning light for the front passenger.
Refer to “Seat belts” in the “Safety—Seats, seat
belts and supplemental restraint system”section
for precautions on seat belt usage.
Supplemental air bag warning
light
When the ignition key is in the ON or START
position, the supplemental air bag warning light
illuminates for about 7 seconds and then turns
off. This means the system is operational.
If any of the following conditions occur, the
supplemental front air bags, supplemental side
air bags(if soequipped), curtain side-impact and
rollover air bags (if so equipped), and pretensioner seat belt systems need servicing and
your vehicle must be taken to a NISSAN dealer:
● The supplemental air bag warning light remains on after approximately 7 seconds.
● The supplemental air bag warning light
flashes intermittently.
● The supplemental air bag warning light does
not come on at all.
Unless checked and repaired, the supplemental
restraint system (air bag system) and/or the pretensioner seat belts may not function properly.
For additional details see “Supplemental restraint
system” in the “Safety—Seats, seat belts and
supplemental restraint system” section of this
manual.
WARNING
If the supplemental air bag warning light
is on, it could mean that the supplemental
front air bag, supplemental side air bag (if
so equipped), curtain side-impact and
rollover air bag systems (if so equipped)
and/or pre-tensioner seat belt systems
will not operate in an accident. To help
avoid injury to yourself or others, have
your vehicle checked by a NISSAN dealer
as soon as possible.
INDICATOR LIGHTS
Automatic transmission
position indicator light
When the ignition key is turned to the ON position, this indicator light shows the automatic
transmission selector lever position. See “Driving
the vehicle” in the “Starting and driving” section
of this manual.
Cruise main switch indicator
light (if so equipped)
The light comes on when the cruise control main
switch is pushed. The light goes out when the
main switch is pushed again. When the cruise
main switch indicator light comes on, the cruise
control system is operational.
Cruise set switch indicator
light (if so equipped)
The light comes on while the vehicle speed is
controlled by the cruise control system. Ifthe light
blinks while the engine is running, it may indicate
the cruise control system isnot functioning properly. Have the system checked by a NISSAN
dealer.
2-14 Instruments and controls
Page 89
Electronic locking rear
differential (E-Lock) system
on indicator light (if so
equipped)
This light comes on when the electronic locking
rear differential (E-Lock) system clutch is fully
engaged.
The indicator light flashes when the system is first
turned on. When the system fully engages, the
light remains on. If the switch is on and the
indicator light continues to flash, the system is
not engaged.
For additional information, see “Electronic locking rear differential (E-Lock) system switch” later
in this section and “Electronic locking rear differential (E-Lock) system” in the “Starting and driving” section of this manual.
4WD shift indicator light
(
The light should turn off within 1 second after
turning the ignition switch to ON.
While the engine is running, the 4WD shift indicator light will illuminate the position selected by
the 4WD shift switch.
model)
The 4WD shift indicator light may blink
while shifting from one drive mode to the
other.
Front passenger air bag
status light
The front passenger air bag status light ( )
will be lit and the passenger front air bag will be
OFF depending on how the front passenger seat
is being used.
For frontpassenger airbag statuslight operation,
see “Front passenger air bag and status light” in
the “Safety — Seats, seat belts andsupplemental
restraint system” section of this manual.
High beam indicator light
(blue)
This blue light comes on when the headlight high
beams are on and goes out when the low beams
are selected.
The high beam indicator light also comes on
when the passing signal is activated.
Hill descent control system on
indicator light (if so equipped)
When the ignition switch is turned ON, this light
comes on briefly and then turns off.
The light comes on when the hill descent control
system is activated.
If the hill descent control switch is on and the
indicator light blinks, the system is not engaged.
If the indicator light does not come on or blink
when the hill descent switch is on, the system
may notbe functioningproperly. Havethe system
checked by a NISSAN dealer.
For additional information, see “Hill descent control switch” later in this section and “Hill descent
control system” in the “Starting and driving” section of this manual.
Malfunction indicator light
(MIL)
If this indicator light comes on steady or blinks
while the engine is running, it may indicate a
potential emission control malfunction.
The malfunction indicator light may also come on
steady ifthe fuel-fillercap isloose ormissing, orif
the vehicle runs out of fuel. Check to make sure
the fuel-filler cap is installed and closed tightly,
and that the vehicle has at least 3 gallons (11.4
liters) of fuel in the fuel tank.
After a few driving trips, the
turn off if no other potential emission control
system malfunction exists.
Instruments and controls 2-15
light should
Page 90
If this indicator light comes on steady for 20
seconds and then blinks for 10 seconds when
the engine is not running, it indicates that the
vehicle is not ready for an emission control system inspection/maintenance test. See “Readiness forinspection/maintenance (I/M)test” in the
“Technical and consumer information”section of
this manual.
Operation
The malfunction indicator light will come on in
one of two ways:
● Malfunction indicator light on steady — An
emission control system malfunction has
been detected. Check the fuel-filler cap. If
the fuel-filler cap is loose or missing, tighten
or install the cap and continue to drive the
vehicle. The
a fewdriving trips. If the
turn off after a few driving trips, have the
vehicle inspected by a NISSAN dealer. You
do not need to have your vehicle towed to
the dealer.
● Malfunction indicator light blinking — An engine misfire has been detected which may
damage the emission control system. To reduce or avoid emission control system damage:
light should turn off after
light doesnot
2-16 Instruments and controls
– do not drive at speeds above 45 MPH
(72 km/h).
– avoid hard acceleration or deceleration.
– avoid steep uphill grades.
– if possible, reduce the amount of cargo
being hauled or towed.
The malfunction indicator light may stop blinking
and come on steady. Have the vehicle inspected
by a NISSAN dealer. You do not need to have
your vehicle towed to the dealer.
CAUTION
Continued vehicle operation without having the emission control system checked
and repaired as necessary could lead to
poor driveability, reduced fuel economy,
and possible damage to the emission control system.
Overdrive off indicator light
(automatic transmission
models only)
This light comes on when the overdrive function
is OFF.
The automatic transmission overdrive function is
controlled by the overdrive switch.
See “Driving the vehicle” in the “Starting and
driving” section of this manual.
Security indicator light
This light blinks whenever the ignition switch is in
the LOCK, OFF or ACC position. This function
indicates the security system equipped on the
vehicle is operational.
For additional information, see “Security systems” later in this section.
Slip indicator light for models
with ABLS (if so equipped)
This indicator light comes on if the active brake
limited slip is activated. If activated, the system
will apply braking to the slipping drive wheel(s),
giving the non-slipping wheel(s) more traction.
Slip indicator light for models
with VDC (if so equipped)
This indicator light will blink when the traction
control system is limiting wheel spin. Slippery
road conditions may exist if the slip indicator
blinks on. If this happens, adjust your driving
accordingly.
The slip indicator light also comes on when you
turn the ignition key to the ON position. The light
will turn off after about 2 seconds if the system is
Page 91
operational. If the light does not come on or does
not go off, have the traction control system
checked by a NISSAN dealer.
If the battery is removed or discharged, the traction control system is disabled and the slip indicator light will not turn off after 2 seconds when
the ignition switch is turned to the ON position.
To reset the system, you must perform the reset
procedure. Refer to “Vehicle dynamic control
(VDC) system” in the “Starting and driving” section of this manual.
If the light does not go off after performing the
reset procedure,have the traction control system
checked by a NISSAN dealer.
Transfer 4LO position
indicator light (
The light should turn off within 1 second after
turning the ignition switch to ON.
This lightcomes onwhen the 4WD shift switch is
set in the 4LO position with the ignition key in the
ON position.
The transfer case may be damaged if you shift the
switch while driving.
Make sure the transfer 4LO position indicator
light turns on when you shift the4WD shiftswitch
to 4LO.
model)
The indicator light may blink while shifting
from one drive mode to the other.
The 4LO indicator light must stop blinking and
remain illuminated or turn off before shifting the
transmission into gear. If the transmission selector leveris shifted from the N position to any other
gear when the 4LO indicator light is blinking, the
vehicle may move unexpectedly.
When you shift between 4H and 4LO, follow the
instructions below:
● For automatic transmission models, stop the
vehicle and shift the transmission selector
lever to the N position with the brake pedal
depressed, then depress and turn the 4WD
shift switch to 4LO or 4H.
● For manual transmission models, stop the
vehicle and shift the transmission selector
lever to the N position with the clutch pedal
depressed, then depress and turn the 4WD
shift switch to 4LO or 4H.
You cannot move the transfer 4WD shift switch
between 4Hand 4LO unless you stop the vehicle
and shift the transmission selector lever to the N
position with the brake pedal (AT models) or
clutch pedal (MT models) depressed.
Turn signal/hazard indicator
lights
The appropriatelight flashes when the turn signal
switch is activated.
Both lights flash when the hazard switchis turned
on.
Vehicle dynamic control off
indicator light
This indicator light comes on when the vehicle
dynamic control off switch is pushed to OFF, the
transfer case is in the 4LO position (
model), or when the vehicle dynamic control system is not functioning properly. This indicates the
vehicle dynamic control system is not operating.
Push thevehicle dynamiccontrol off switch again
or restart the engine and the system will operate
normally. See “Vehicle dynamic control (VDC)
system” in the “Starting and driving” section of
this manual.
The vehicle dynamic control light also comes on
when youturn the ignition key tothe ON position.
The light will turn off after about 2 seconds if the
system is operational. If the light stays on or
comes on along with the SLIP indicator light
while you are driving, have the vehicle dynamic
control system checked by a NISSAN dealer.
Instruments and controls 2-17
Page 92
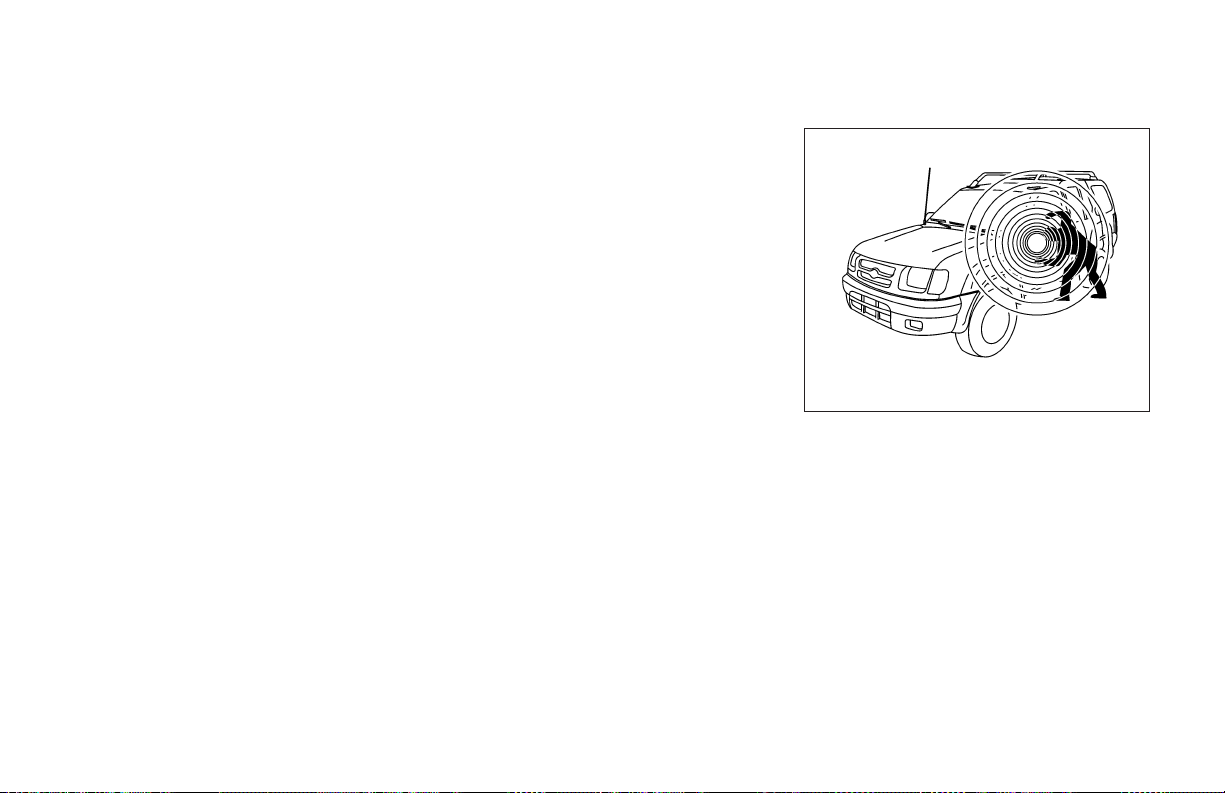
SECURITY SYSTEMS (if so equipped)
If the battery is removed or discharged, the vehicle dynamic control system is disabled and the
VDC indicator light will not turn off after 2 seconds whenthe ignitionswitch isturned tothe ON
position. To reset the system, you must perform
the reset procedure. Refer to “Vehicle dynamic
control (VDC) system” in the “Starting and driving” section of this manual.
If the light does not go off after performing the
reset procedure,have the traction control system
checked by a NISSAN dealer.
While the vehicle dynamic control system is operating, you might feel slight vibration or hear the
system working when starting the vehicle or accelerating, but this is normal.
The VDC system will be disabled and the VDC
light will illuminate when the electronic locking
rear differential (E-lock) system switch (if so
equipped) is turned on and the E-lock system is
engaged. If the E-lock system disengages or the
switch is turned off, the VDC system will be
enabled and the VDC light will turn off.
AUDIBLE REMINDERS
Brake pad wear warning
The discbrake padshave audible wear warnings.
When a disc brake pad requires replacement, it
makes a high pitched scraping sound when the
vehicle is in motion, whether or not the brake
pedal is depressed. Have the brakes checked as
soon as possible if the warning sound is heard.
Key reminder chime
A chime sounds if the driver’s door is opened
while the key is leftin the ignition switch. Remove
the key and take it with you when leaving the
vehicle.
Light reminder chime
With the ignition switch in the OFF position, a
chime sounds when the driver’sdoor is opened if
the headlights or parking lights are on.
Turn the headlight control switch off before leaving the vehicle.
LIC0372
Your vehicle may have two types of security systems:
● Vehicle security system (if so equipped)
● NISSAN Vehicle Immobilizer System (if so
equipped)
VEHICLE SECURITY SYSTEM (if so
equipped)
The vehicle security system provides visual and
audible alarm signals if someoneopens thedoors
when the system is armed. It is not, however, a
motion detection type system thatactivates when
a vehicle is moved or when a vibration occurs.
2-18 Instruments and controls
Page 93
The system helps deter vehicle theft but cannot
prevent it, nor can it prevent the theft of interior or
exterior vehicle components in all situations. Always secure your vehicle even if parking for a
brief period. Never leave your keys in the ignition,
and alwayslock the vehicle when unattended. Be
aware of your surroundings, and park in secure,
well-lit areas whenever possible.
Many devicesoffering additionalprotection, such
as component locks, identification markers, and
tracking systems, are available at auto supply
stores and specialty shops. Your NISSAN dealer
may also offer such equipment. Check with your
insurance company to see if you may be eligible
for discountsfor varioustheft protectionfeatures.
How to arm the vehicle security
system
1. Close all windows. (The system can be
armed even if the windows are open.)
2. Remove the key from the ignition switch.
3. Close all doors. Lock all doors. The doors
can be locked with the key, power door lock
switch (if the door is opened, locked and
then closed), or with the keyfob.
Keyfob operation:
● Push the
All doors lock. The hazard lights flash
button on the keyfob.
twice and the horn beepsonce to indicate
all doors are locked.
● When the
all doors locked, the hazard lights flash
twice and the horn beeps once as a reminder that the doors are already locked.
The horn may or may not beep. Refer to
“Silencing the horn beep feature” in the
“Pre-driving checks and adjustments” section later in this manual.
4. Confirm that the
on. The
seconds. The vehicle security systemis now
pre-armed. After about 30 seconds the vehicle security system automatically shifts
into the armed phase. The
to flash once every 3 seconds. If, during the
30-second pre-arm time period, the driver’s
door is unlocked by the key or the keyfob, or
the ignition key is turned to ACC or ON, the
system will not arm.
● If the key is turnedslowly when locking
the driver’s door, the system may not
arm. Furthermore, if the key is turned
beyond the vertical positiontoward the
unlock position to remove the key, the
system may be disarmed when the key
is removed. If the indicator light fails to
glow for 30 seconds, unlock the door
once and lock it again.
button is pushed with
indicator light comes
light stays on for about 30
light begins
● Even when the driver and/or passengers are in the vehicle, the system will
arm with all doors closed and locked
with the ignition key in the OFF position.
Vehicle security system activation
The vehiclesecurity systemwill give the following
alarm:
● The headlights blink and the horn sounds
intermittently.
● The alarm automatically turns off after approximately 50seconds. However, the alarm
reactivates if the vehicle is tampered with
again. The alarm can beshut offby unlocking
the driver’s door with the key, or by pressing
the
The alarm is activated by:
● opening a door without using the key or
keyfob (even if the dooris unlocked by using
the inside lock knob or the power door lock
switch).
button on the keyfob.
How to stop an activated alarm
The alarm stops only by unlocking the driver’s
door with the key, or by pressing the
ton on the keyfob.
Instruments and controls 2-19
but-
Page 94
NISSAN VEHICLE IMMOBILIZER
SYSTEM (if so equipped)
The NISSAN Vehicle Immobilizer System will not
allow the engine to start without the use of a
registered key.
If the engine fails to start using a registered key
(for example, when interference is caused by
another registered key, an automated toll road
device or automatic payment device on the key
ring), restart the engine using the following procedures:
1. Leave the ignition switch in the ON position
for approximately 5 seconds.
2. Turn the ignition switch to the OFF or LOCK
position, and wait approximately 10 seconds.
3. Repeat steps 1 and 2.
4. Restart the engine while holding the device
(which may have caused the interference)
separate from the registered key.
If the no start condition re-occurs, NISSAN recommends placing the registered key on a separate key ring to avoid interference from other
devices.
2-20 Instruments and controls
Statement related to Section 15 of FCC
Rules for NISSAN Vehicle Immobilizer System (CONT ASSY — IMMOBILIZER, ANT
ASSY — IMMOBILIZER)
This device complies with part 15 of the
FCC Rules and RSS-210 of Industry
Canada. Operation is subject to the following two conditions;
(1) This device may not cause harmful interference, and (2) this device must accept
any interference received, including interference that may cause undesired operation of the device.
CHANGES OR MODIFICATIONS NOT EXPRESSLY APPROVED BY THE PARTY RESPONSIBLE FOR COMPLIANCE COULD
VOID THE USER’S AUTHORITY TO OPERATE THE EQUIPMENT.
LIC0474
Security indicator light
The security indicator light blinks whenever the
ignition switch is in the LOCK, OFF or ACC
position. This function indicates the NISSAN Vehicle Immobilizer System is operational.
If theNISSAN Vehicle ImmobilizerSystem ismalfunctioning, the light will remain on while the
ignition key is in the ON position.
If the light still remains on and/or the engine will not start, see a NISSAN dealer for
NISSAN Vehicle Immobilizer System service as soon as possible. Please bring all
registered keys that you have when visiting
your NISSAN dealer for service.
Page 95
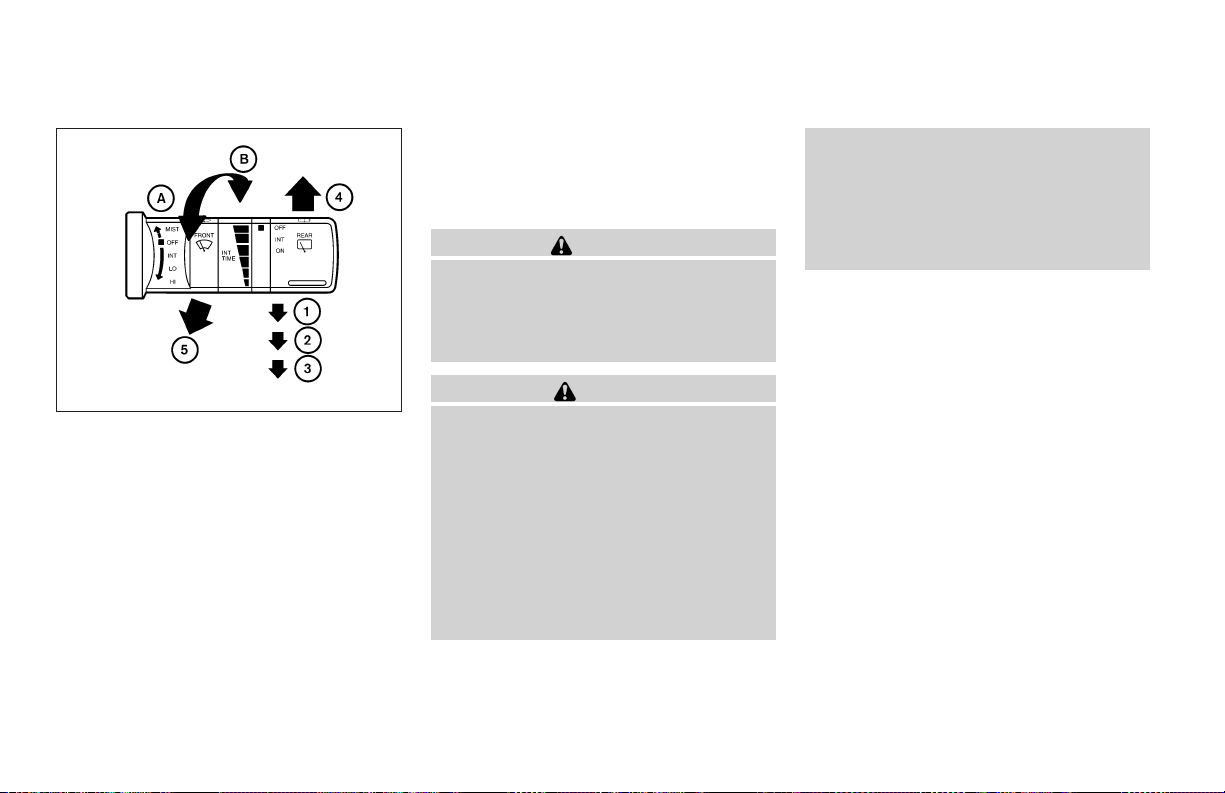
WINDSHIELD WIPER AND WASHER
SWITCH
4
Push the lever up
tion (MIST) of the wiper.
Pull the lever toward you
washer. Thewiper willalso operateseveral times.
to have one sweep opera-
s
5
to operate the
s
WARNING
In freezing temperatures the washer solution may freeze on the windshield and
obscure your vision which may lead to an
accident. Warm the windshield with the
defroster before you wash the windshield.
● Pre-mix washer fluid concentrates with
water to the manufacturer’s recommended levels before pouring the fluid
into the window washer reservoir tank.
Do not use the window washer reservoir
tank to mix the washer fluid concentrate and water.
WIC0843
SWITCH OPERATION
The windshield wiper and washeroperates when
the ignition switch is in the ON position.
Push the lever down to operate the wiper at the
following speed:
1
Intermittent (INT) — intermittent operation
s
can be adjusted by turning the knob toward
A
(Slower) or
s
2
Low (LO) —continuous low speed operation
s
3
High (HI) — continuous high speed opera-
s
tion
B
s
(Faster).
CAUTION
● Do not operate the washer continuously for more than 30 seconds.
● Do not operate the washer if the reservoir tank is empty.
● Do not fill the window washer reservoir
tank with washer fluid concentrates at
full strength. Some methyl alcohol
based washer fluid concentrates may
permanently stain the grille if spilled
while filling the window washer reservoir tank.
Instruments and controls 2-21
Page 96
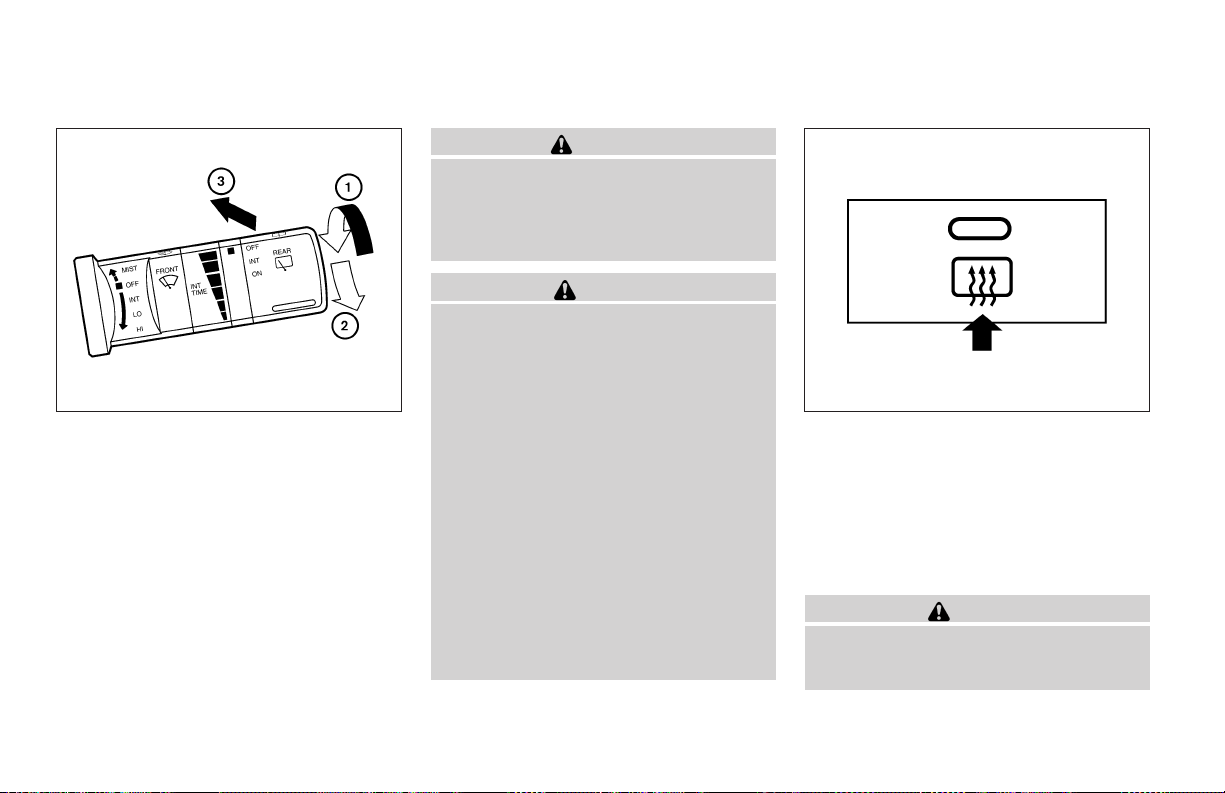
REAR WINDOW WIPER AND
WASHER SWITCH
WIC0844 LIC0783
The rearwindow wiper and washer operate when
the ignition switch is in the ON position.
Turn the switch clockwise from the OFF position
to operate the wiper.
1
Intermittent (INT) – intermittent operation
s
(not adjustable)
2
ON – continuous low speed operation
s
Push the switch forward
washer. Thewiper willalso operateseveral times.
3
to operate the
s
WARNING
In freezing temperatures the washer solution may freeze on the window and obscure your vision. Warm the rear window
with the defroster before you wash the
rear window.
CAUTION
● Do not operate the washer continuously for more than 30 seconds.
● Do not operate the washer if the reservoir tank is empty.
● Do not fill the window washer reservoir
tank with washer fluid concentrates at
full strength. Some methyl alcohol
based washer fluid concentrates may
permanently stain the grille if spilled
while filling the window washer reservoir tank.
● Pre-mix washer fluid concentrates with
water to the manufacturer’s recommended levels before pouring the fluid
into the window washer reservoir tank.
Do not use the window washer reservoir
tank to mix the washer fluid concentrate and water.
REAR WINDOW AND OUTSIDE
MIRROR (if so equipped)
DEFROSTER SWITCH
To defrost the rear window glass and outside
mirrors (if so equipped), start the engine and
push the rear window defroster switch on. The
rear window defroster indicator light on the
switch comes on. Push the switch again to turn
the defroster off.
The rear window defroster automatically turns off
after approximately 15 minutes.
CAUTION
When cleaning the inner side of the rear
window, be careful not to scratch or damage the rear window defroster.
2-22 Instruments and controls
Page 97
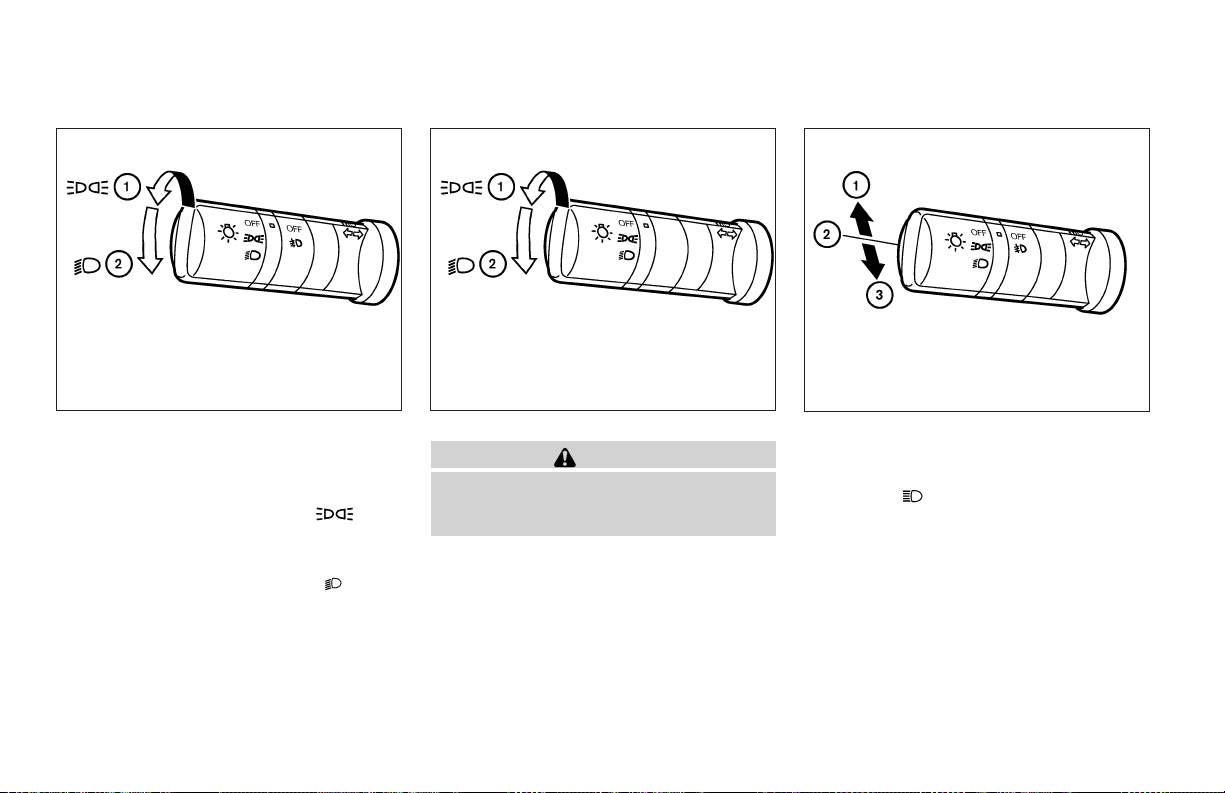
HEADLIGHT AND TURN SIGNAL
SWITCH
LIC0706
Type A
HEADLIGHT CONTROL SWITCH
Lighting
1
When turning the switch to the posi-
s
tion, the front parking, tail, license plate and
instrument panel lights come on.
2
When turning the switch to the posi-
s
tion, theheadlights comeon andall theother
lights remain on.
LIC0688
Type B
CAUTION
Use the headlights with the engine running to avoid discharging the vehicle
battery.
Headlight beam select
1
To select the high beam function, push the
s
lever forward. The high beam lights come on
and the
2
Pull the lever back to select the low beam.
s
3
Pulling and releasing the lever flashes the
s
headlight high beams on and off.
Instruments and controls 2-23
light illuminates.
WIC0859
Page 98
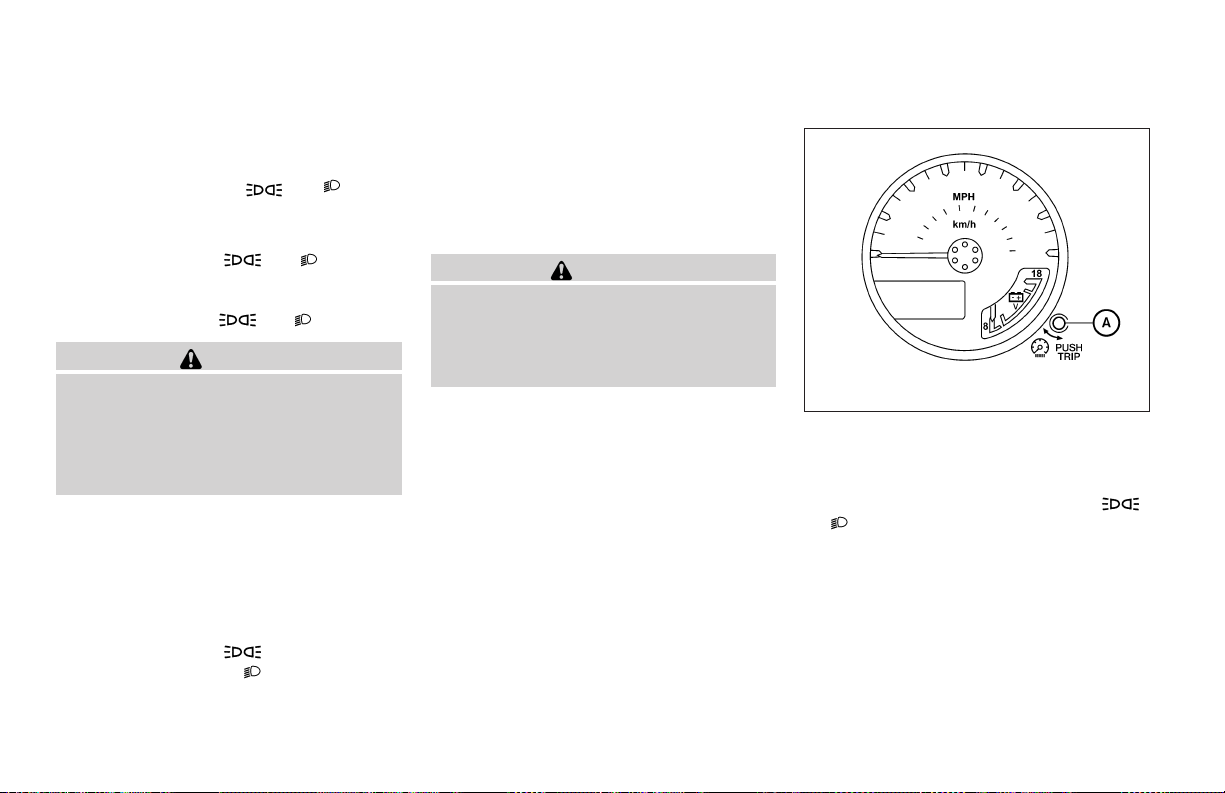
Battery saver system
If the ignition switch is turned OFF while the
headlight switch is in the
tion, the headlights will turn off after 5 minutes.
After the headlights automatically turn off with the
headlight switch in the
the headlightswill illuminateagain for5 minutes if
the headlight switch is moved to theOFF position
and then turned to the
or posi-
or position,
or position.
CAUTION
Even though the battery saver feature automatically turns off the headlights after a
period of time, you should turn the headlight switch to the OFF position when the
engine is not running to avoid discharging
the vehicle battery.
DAYTIME RUNNING LIGHT SYSTEM
(Canada only)
The headlights automatically illuminate at a reduced intensity when the engine is started with
the parking brake released. The daytime running
lights operate with the headlight switch in the
OFF position or in the
headlight switch to the
illumination when driving at night.
position. Turn the
position for full
If the parking brake is applied beforethe engineis
started, the daytime running lights do not illuminate. The daytime running lights illuminate when
the parking brake is released. The daytime running lights will remain on until the ignition switch
is turned off.
WARNING
When the daytime running light system is
active, tail lights on your vehicle are not
on. It is necessary at dusk to turn on your
headlights. Failure to do so could cause
an accident injuring yourself and others.
WIC0917
INSTRUMENT BRIGHTNESS
CONTROL
The instrument brightness control operates when
the headlight control switch is in the
or
Turn the control
instrument panel lights when driving at night.
position.
A
to adjust the brightness of
s
,
2-24 Instruments and controls
Page 99
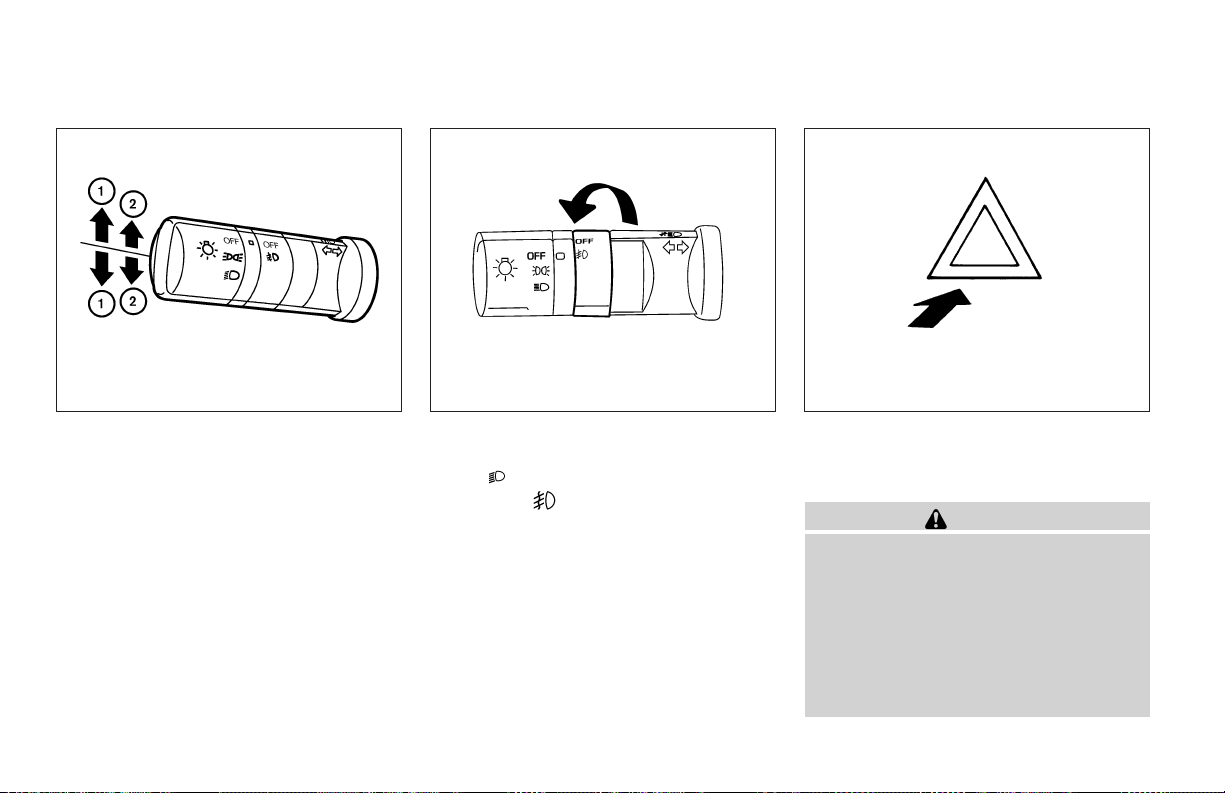
TURN SIGNAL SWITCH
Turn signal
1
Move the lever up or down to signal the
s
turning direction. When the turn is completed, the turn signals cancel automatically.
Lane change signal
2
Tosignal a lane change, move the lever up or
s
down to the point where the indicator light
begins to flash, but the lever does not latch.
HAZARD WARNING FLASHER
SWITCH
WIC0860 WIC0861 LIC0394
FOG LIGHT SWITCH (if so equipped)
Toturn the fog lights on, turn theheadlight switch
to the
switch to the
To turn the fog lights off, turn the fog light switch
to the OFF position.
The headlights must be on and the low beams
selected for the fog lights to operate. The fog
lights automatically turn off when the high beam
headlights are selected.
position, then turn the fog light
position.
Push the switch on to warn other drivers when
you must stop or park under emergency conditions. All turn signal lights flash.
WARNING
● If stopping for an emergency, be sure to
move the vehicle well off the road.
● Do not use the hazard warning flashers
while moving on the highway unless
unusual circumstances force you to
drive so slowly that your vehicle might
become a hazard to other traffic.
● Turn signals do not work when the hazard warning flasher lights are on.
Instruments and controls 2-25
Page 100
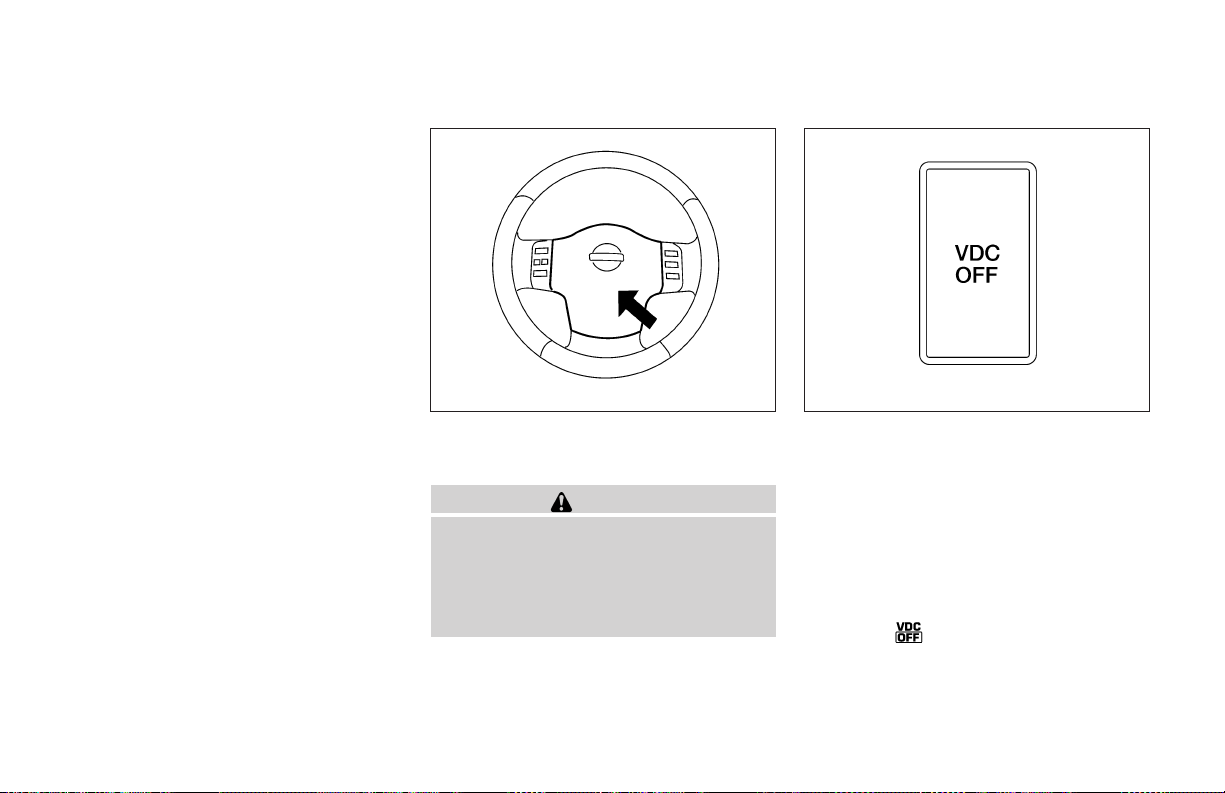
The flashers will operate with the ignition switch
in any position.
Some state laws may prohibit the use of
the hazard warning flasher switch while
driving.
2-26 Instruments and controls
HORN VEHICLE DYNAMIC CONTROL (VDC)
OFF SWITCH
LIC0604 WIC0534
To sound the horn, push the center pad area of
the steering wheel.
WARNING
Do not disassemble the horn. Doing so
could affect proper operation of the
supplemental front air bag system. Tampering with the supplemental front air bag
system may result in serious personal
injury.
The vehicle should be driven with the Vehicle
Dynamic Control (VDC) system on for most driving conditions.
If the vehicle is stuck in mud or snow, the VDC
system reduces the engine output to reduce
wheel spin. The engine speed will be reduced
even ifthe accelerator is depressed to the floor. If
maximum engine power is needed to free a stuck
vehicle, turn the VDC system off.
To turn off the VDC system, push the VDC OFF
switch. The
Push the VDC OFF switch again or restart the
engine to turn ON the system. See “Vehicle dynamic control (VDC) system” in the “Starting and
driving” section.
indicator will come on.
 Loading...