


QUICK REFERENCE GUIDE
2010 TITAN
13
03
05
08 09
11
VEHIC LE INFOR MATION DISPLAY
01
LOW TIRE PRESS URE WARN ING LIG HT
02
HEADLIG HT AND TUR N SIGNAL CO NTROL
03
WIND SHIE LD WIPE R/WASHER SWITCH
04
CARGO LAMP SWITCH
05
(BEH IND STEE RIN G WHEE L)
06
07
08
09
10
11
*See your Owner’s Manual for more information.
01
06 07
10
STEERI NG WHE EL SWITCHES FOR AU DIO
CONTROL/ BLUETOOTH
CRUI SE CONTROL
PEDAL POSITI ON ADJUSTME NT SWITCH
REAR SONAR SYSTEM OFF SWITCH
STEERI NG WHE EL TILT ADJUSTMENT*
HOOD RE LEASE*
®
02
04
12
FOUR-WHE EL DR IVE (4WD)
12
SHIFT SWITCH
CONTROL PANEL D ISPLAY
13
AUDIO SYSTEM
14
AUTOMATIC CLIMATE CONTROL
15
FRONT PASSENGER AIR BAG
16
STATUS LIGHT
14
15
16
17
18 19 20 2121
AUXILIARY AUDIO I NPUT JACK*
17
E-LOCK SWITCH
18
TOW MODE SWITCH
19
VEHICLE DYNAMIC CONTROL (VDC)
20
OFF SWITCH
HEATED SEATS*
21

TABLE OF CONTENTS
Remote Keyless Entry System (if so equipped).........................2
Automatic Door Locks .............................................2
Windshield Wiper/Washer Switch ...................................3
Headlight and Turn Signal Control ...................................3
Steering Wheel Switches for Audio Control/Bluetooth
®
(if so equipped) ...4
Cruise Control (if so equipped)......................................5
Automatic Climate Control (if so equipped)............................5
FM/AM/XM
®
* Radio with CD Changer (if so equipped) .................7
Control Panel Display with Navigation System (if so equipped) ...........9
Clock Set/Adjustment (Navigation System only)........................9
Vehicle Information Display ........................................10
Instrument Brightness Control/Trip Change Button ....................10
Automatic Drive Positioner (if so equipped)...........................10
Pedal Position Adjustment Switch (if so equipped) ....................11
Manual Shift Mode . . . . . . . . . . . . . . . . . . . . . . . . . . . . . . . . . . . . . . . . . . . . . . . 12
Four-Wheel Drive (4WD) Shift Switch (if so equipped) .................12
Vehicle Dynamic Control (VDC) Off Switch...........................12
Tow Mode Switch ................................................13
E-Lock Switch (if so equipped) .....................................13
Front Passenger Air Bag Status Light ...............................13
Tire Pressure Monitoring System (TPMS) ............................14
Seat Belt Warning Light and Chime.................................14
Cargo Light Switch (if so equipped).................................14
Child Safety Rear Door Locks (Crew Cab models only).................14
Rear Sonar System Off Switch (if so equipped) .......................14
Wide Open Doors (King Cab models only) ...........................15
Utili-track™ Channel System (if so equipped) .........................15
Outside Mirror Control Switch (if so equipped)........................15
Moonroof Controls (if so equipped) .................................16
Front Seat Adjustments ...........................................16
Folding the Rear Bench Seat.......................................17
Folding the Rear Bench Seatback Down .............................17
Homelink
®
Universal Transceiver (if so equipped)......................17
NISSAN Mobile Entertainment System (if so equipped) ................19
Rear Audio Controls (if so equipped) ................................20
Bluetooth
®
Hands-free Phone System (if so equipped) .................22
Navigation System (if so equipped) .................................25
This easy-to-use Quick Reference Guide is intended to help you more fully
appreciate some of the unique features and functions of your new vehicle.
However, it is not intended to replace your Owner’s Manual. The Owner’s
Manual contains more detailed information to help you better understand the
important safety warnings, features, operation and maintenance of your
vehicle. All information, specifications, photographs and illustrations in this
publication are those in effect at the time of printing. NISSAN reserves the
right to change specifications or design without notice and without
obligation.
REMOTE KEYLESS ENTRY SYSTEM (if so equipped)
LOCK DOORS
Press the
button to lock all doors.
UNLOCK DOORS
Press the
Press the button again within 5 seconds to unlock all doors.
button once to unlock the driver’s door only.
USING THE PANIC ALARM
Press and hold the
the headlights will stay on for 25 seconds. The panic alarm stops when it has run for 25
seconds or when any button is pressed on the keyfob.
button for longer than 0.5 seconds. The panic alarm will sound and
OPENING THE WINDOWS
Press and hold the
not able to close the windows after opening them.)
button longer than 3 seconds to open the front windows. (The keyfob is
SILENCING THE HORN BEEP FEATURE
For vehicles without Navigation system:
To deactivate: Press and hold the
To activate: Press and hold the
For vehicles with Navigation system:
If you change the horn beep feature with the keyfob, the display screen will not show the
current mode. Use the keyfob to return to the previous mode and set the horn beep feature
using the control panel.
Press the SETTING button on the control panel.
Select “Vehicle Electronic Systems.”
Press ENTER.
Select “Keyless Remote Response — Horn.”
Set operation conditions to turn horn beep ON or OFF when locking the vehicle with the
keyfob.
and
buttons for at least 2 seconds.
and
buttons for at least 2 seconds.
AUTOMATIC DOOR LOCKS
All doors will lock automatically when the vehicle speed reaches 15 MPH(24 km/h).
All doors will unlock automatically when the transmission is shifted to (P) PARK.
The automatic lock and unlock functions can be deactivated or activated
independently of each other. To deactivate or activate the automatic lock or unlock
system, perform the following procedure.
1. Close all doors.
2. Place the ignition in the ON position.
2
3. Do one of the following within 20 seconds of performing Step #2:
• To change AUTO UNLOCK settings: push and hold the power door lock switch to the
• To change AUTO LOCK settings: push and hold the power door lock switch to the
position (UNLOCK ) for more than 5 seconds.
position (LOCK ) for more than 5 seconds.
4. When activated, the hazard indicator will flash twice. When deactivated, the hazard indicator
will flash once.
5. The ignition switch must be placed in the OFF and ON position again between each setting
change.
WINDSHIELD WIPER/WASHER SWITCH
The ignition switch must be in the ON position to activate
the windshield wipers.
Move the lever to the following positions to operate the
windshield wipers:
1A
Intermittent (INT) – Front wipers operate
intermittently and can be further adjusted by
twisting the time control ring
02
Low Speed (LO) – Continuous low-speed
1B
.
operation of front wipers.
03
High Speed (HI) – Continuous high-speed
operation of front wipers.
04
Mist (MIST) – Lift the lever up for one sweep of the front wipers.
Pull the lever toward you to activate front washer fluid and several sweeps of the wipers.
1B
04
1A
02
03
HEADLIGHT AND TURN SIGNAL CONTROL
TO ACTIVATE THE AUTOLIGHT SYSTEM
(if so equipped):
Turn the headlight control switch
to the AUTO position to
01
01
activate the autolight system. The autolight system can:
Turn the headlights on automatically when it is dark.
Turn the headlights off automatically when it is light.
Keep the headlights on for 45 seconds after you turn the ignition switch to OFF and all doors
are closed.
02
TO DEACTIVATE THE AUTOLIGHT SYSTEM:
Turn the headlight control switch
01
to the OFF,
or
position.
HEADLIGHT CONTROL SWITCH
Turn the headlight control switch
license plate and instrument panel lights.
Turn the headlight control switch
lights remain on.
01
01
to the
to the
position to turn on the front parking, tail,
position to turn on the headlights. All other
FOG LIGHT OPERATION (if so equipped)
NOTE: The headlights must be on and the low beams selected for the fog lights to operate.
Turn the switch (inside collar)
Turn the switch (inside collar)
to the
02
to the OFF position to turn off the fog lights.
02
position to turn on the fog lights.
HIGH BEAM
Push the headlight control switch forward
the high beam function. The blue
illuminates. Pull the headlight switch back to the original
position to select the low beam. The blue
light goes off.
Pull and release the headlight control switch
the headlight high beams on and off.
to select
A
indicator light
indicator
to flash
B
A
B
STEERING WHEEL SWITCHES FOR AUDIO CONTROL/
BLUETOOTH® (if so equipped)
Press the MODE button to turn the audio system on.
To choose Preset A, B, C, CD, DVD or AUX (if so equipped), press
MODE repeatedly.
The tuning up or down switch can be used to perform the following:
• Push the switch for less than 1.5 seconds to change to a preset
station.
• Push and hold the switch for more than 1.5 seconds to seek the
next or previous broadcasting radio station.
• Push the switch while playing a CD for less than 1.5 seconds to change tracks on the CD.
• If the vehicle is equipped with a CD changer, push and hold the switch for more than
1.5 seconds to change between CDs.
Push the VOL control switch up or down to increase or decrease the volume.
4
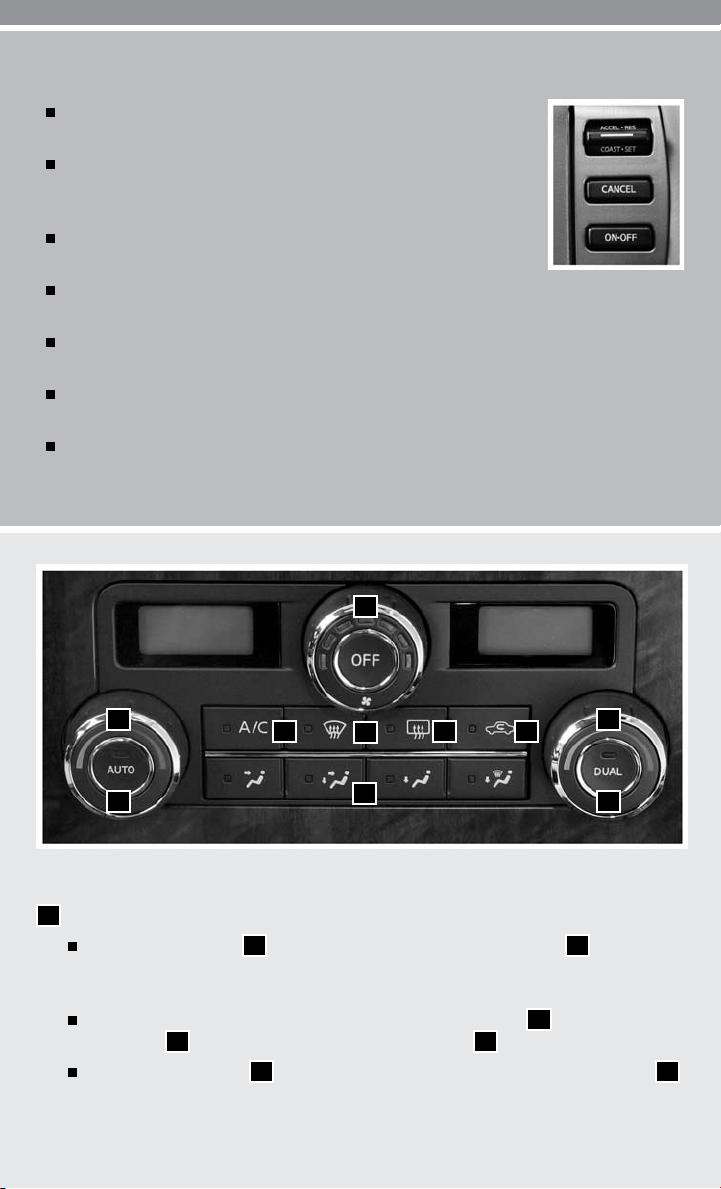
CRUISE CONTROL (if so equipped)
To activate the cruise control, push the ON·OFF switch. The CRUISE
indicator light in the Vehicle Information Display will illuminate.
To set cruising speed, accelerate the vehicle to the desired speed,
push the COAST·SET switch and release. The SET indicator light in
the Vehicle Information Display will illuminate.
To reset at a faster cruising speed, push and hold the ACCEL·RES
switch. When the vehicle attains the desired speed, release the switch.
To reset at a slower cruising speed, push and hold the COAST·SET
switch. Release the switch when the vehicle slows to the desired speed.
To cancel cruise control, push the CANCEL switch or tap the brake pedal. The SET indicator
light in the Vehicle Information Display will go out.
To resume a preset speed, push and release the ACCEL·RES switch. The vehicle returns to
the last set cruising speed when the vehicle speed is over 25 MPH (40 km/h).
To turn off cruise control, push the ON·OFF switch. Both the CRUISE indicator light and the
SET indicator light in the Vehicle Information Display will go out.
06
02 04
01 03
09
07
05
08 10
AUTOMATIC CLIMATE CONTROL (if so equipped)
01
AUTO BUTTON
Press the AUTO button
temperature. This will allow the fan speed, air flow distribution and temperature to be
automatically maintained at the selected temperature.
To disable auto mode, press one of the air flow mode control buttons
control dial
or press the front defroster control button
06
When the AUTO button
is pressed, DUAL will illuminate.
. Turn the driver’s side temperature control dial
01
07
is pressed, AUTO will illuminate. When the D UAL button
01
02
, turn the fan speed
05
.
to the desired
03
5
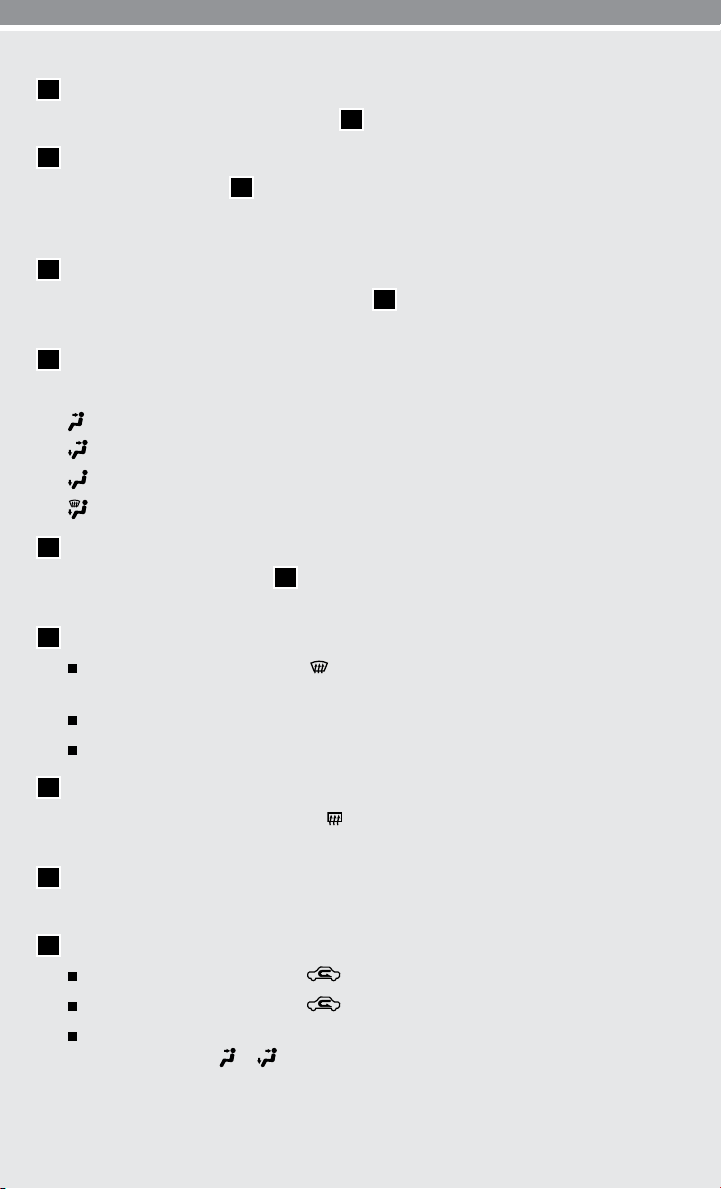
02
DRIVER’S SIDE TEMPERATURE CONTROL DIAL
Turn the driver’s temperature control dial
03
DUAL BUTTON
Press the DUA L button
to turn the passenger’s side temperature controls on or off. This
03
left for cold air or right for hot air.
02
will allow the passenger’s side temperature to be adjusted independently from the driver’s
side control.
04
PASSENGER’S SIDE TEMPERATURE CONTROL DIAL
Turn the passenger’s temperature control dial
left for cold air or right for hot air. Doing so
04
will activate dual mode.
05
AIR FLOW MODE CONTROL BUTTONS
Press the buttons to select the following air flow outlets:
Air flows from the center and side vents.
Air flows from the center, side and foot vents.
Air flows mainly from the foot vent.
Air flows from the defroster and foot vents.
06
FAN SPEED CONTROL DIAL/OFF BUTTON
Turn the fan speed control dial
to the left (slower) or right (faster) to manually control fan
06
speed. Press the OFF button to turn climate control off.
07
DEFROSTING/DEMISTING FRONT AND SIDE WINDOWS
Press the defroster control button to turn the system on. The A/C automatically turns on
when the defroster mode is selected.
Turn the driver’s side temperature control dial left or right to set the desired temperature.
To set the defroster on high, turn the fan speed dial all the way to the right.
08
DEFROSTING REAR WINDOW AND OUTSIDE HEATED MIR RORS (if so equipped)
Push the rear window defroster switch
on. Push the switch again to manually turn the
defroster off. This function automatically turns off in approximately 15 minutes.
09
A/C ON/OFF BUTTON
Press the A/C button to manually turn the A/C on or off.
10
AIR RECIRCULATION BUTTON
Press the air recirculation button to recirculate air inside the vehicle.
Press the air recirculation button again to turn air recirculation off.
The air recirculation mode can only be selected if the air flow control mode is in the
following positions:
6
or
.
01
02
03
06
07
08
04
05
09
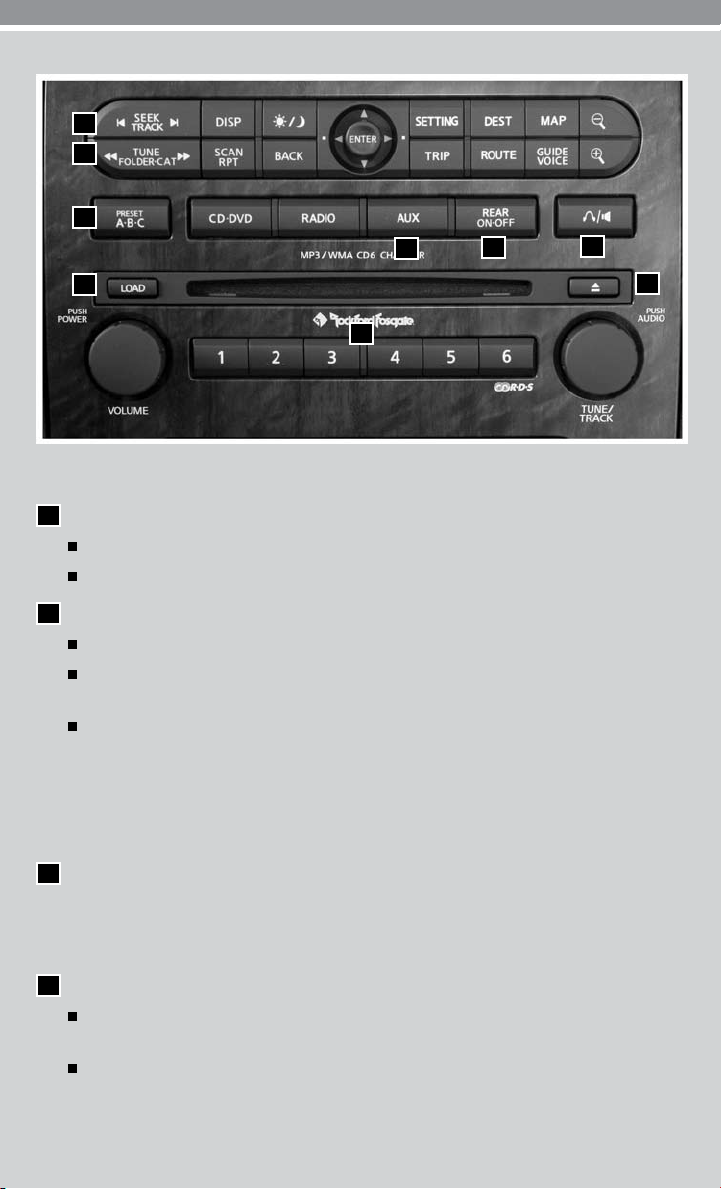
FM/AM/XM®* RADIO WITH CD CHANGER (if so equipped)
01
SEEK/TRACK BUTTON
To scan quickly through each broadcasting station, press the SEEK/TRACK button.
To skip from one track to another on a CD, press the SEE K/TRACK button.
02
TUNE/FOLDER·CAT BUTTON
To manually tune the radio, press the TUNE/FOLDER·CAT button.
When the TUNE/FOLDER·CAT button is pressed while a CD is playing, it will fast forward
or rewind. When the button is released, the CD will play at normal speed.
MP3 PLAYBACK (if so equipped)
In addition to playing audio CDs, the audio system can play MP3 files recorded on CD-ROM,
CD-R and CD-RW discs. Each disc can have a maximum of eight folder levels and 255
folders. A total of 512 MP3 files can be played back. During MP3 playback, some recorded
ID3 tag information can be displayed by pressing the DISP button. Use the TUNE/
FOLDER·CAT button to navigate the MP3 folders.
03
PRESET A·B·C BUTTON
The radio is equipped with three separate banks, each with six station presets. Press the
PRESET A·B·C button until you reach the desired bank. You may store any combination of
FM, AM or XM® radio presets on each bank.
04
LOAD BUTTON
LOAD A SINGLE DISC - Press the LOAD button for less than 1.5 seconds. Select the
loading slot by pressing one of the CD select buttons (1 - 6), then insert the CD.
LOAD UP TO 6 DISCS - Press and hold the LOAD button for more than 1.5 seconds.
The slot numbers (1-6) will illuminate on the display when CDs are loaded into the changer.
7

05
STATION AND CD SELECT BUTTONS
To store a station in a preset you must first select the A, B or C memory bank by pressing the
PRESET A·B·C button, then tune to the desired FM, AM or XM® station. Now press and hold
the desired station select button (1 - 6) for at least 2 seconds. When the preset indicator
illuminates, a beep will sound, indicating memorization is complete. To retrieve a previously
set station, select the memory bank where the preset was set, then press the corresponding
station select button (1 - 6).
While playing a CD, to select a different CD loaded into the CD changer; press one of the
CD select buttons (1 - 6).
06
AUX BUTTON
Press the AUX button to play a compatible device, such as an MP3 player, when it is plugged
into the auxiliary audio input jack.
NOTE: You may need to adjust the volume on any compatible device plugged into the auxiliary jack
to find the most desired sound level of the audio system.
07
REAR ON·OFF BUTTON
To turn rear audio controls on, press the REAR ON·OFF button. Press again to turn the rear
controls off.
08
SPEAKER CONTROL BUTTON
Press the
button to turn the rear speakers off and headphones on. Press the
button
again to turn the rear seat speakers back on and headphones off.
09
EJECT BUTTON
A SINGLE DISC - Press the button for less than 1.5 seconds. Select the eject slot by
pressing a CD select button (1 - 6). The CD will then eject.
ALL DISCS - Press and hold the button for more than 1.5 seconds. The CDs will be
ejected one after another.
*XM® Satellite Radio is only available on vehicles equipped with optional XM® satellite
subscription service.
8
CONTROL PANEL DISPLAY WITH NAVIGATION SYSTEM
(if so equipped)
TRIP BUTTON
When the TRIP button is pressed, the
following modes will display on the screen:
Warning messages (if there are any)
TRIP 1 (Elapsed Time, Driving
Distance, Average Speed)
TRIP 2 (Elapsed Time, Driving
Distance, Average Speed)
FUEL ECONOMY (Average Fuel Economy, Distance to Empty)
MAINTENANCE (Engine Oil, Tire Rotation and Tire Pressure)
OFF
MAINTENANCE ITEMS
You can set the engine oil and the tire rotation intervals. To display the setting of the maintenance
interval, select the ENGINE OIL or TIRE ROTATION key using the joystick, then press the ENTER
button. To set the maintenance interval, select the MAINTENANCE SCHEDULE key using the
joystick, then push the joystick to the right or left. To reset the maintenance interval, select the
RESET key using the joystick and press the ENTER button. To view the vehicle’s tire pressure
(if so equipped), select the TIRE PRESSURE key using the joystick and press the ENTER button.
DISPLAY SCREEN SETTINGS
The setting screen will appear when the SETTING button is pressed. Select the DISPLAY key with
the joystick and press the ENTER button to choose from various display screen options. The DISPLAY
key will allow you to adjust the information shown on the screen, such as brightness or contrast.
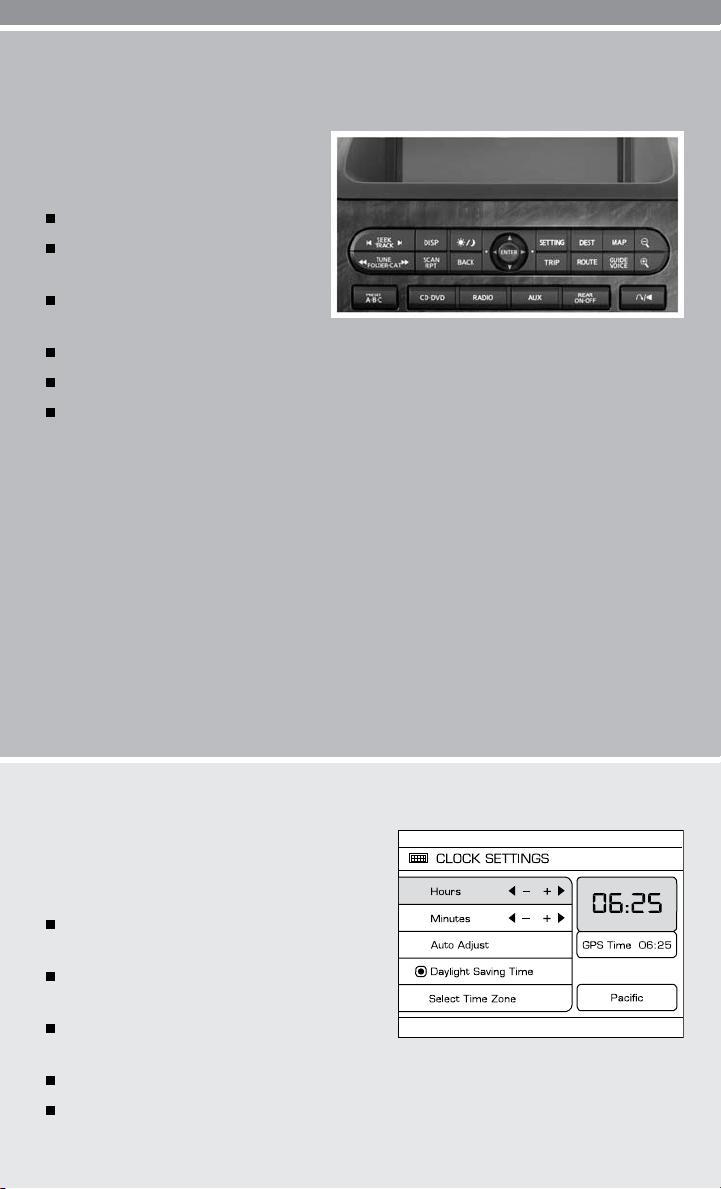
CLOCK SET/ADJUSTMENT (Navigation System only)
Press the SETTING button, then select SYSTEM
SETTINGS with the joystick and press the ENTER
button. Next select CLOCK and press the ENTER
button to access the following clock settings:
Hours – Adjust the time by increasing or
decreasing by hour.
Minutes – Adjust the time by increasing or
decreasing by minute.
Auto Adjust – The time will be reset to the
GPS time.
Daylight Saving Time – Turn this item on for daylight savings time application.
Select Time Zone – Choose the time zone.
9

VEHICLE INFORMATION DISPLAY
When the INFO button
will display on the screen:
Warnings (if there are any)
MPG (instant fuel economy)
MPG/MPH (average fuel economy and speed)
Time/Miles (elapsed time since last reset)
Range (average distance to empty)
Rotate the button to highlight the desired mode. Press the
INFO button
to enter the highlighted mode.
01
SETTING MODE
When the setting mode is selected, you are able to set
reminders for alerts, maintenance intervals or language displays.
The ALERT mode allows you to set alerts notifying yourself of time to rest or icy traveling
conditions.
The MAINTENANCE mode allows you to set alerts to remind you of maintenance intervals
for engine oil, oil filter, tires and others.
The DISPLAY mode allows you to change the unit of measurement (US or metric) display.
is pressed, the following modes
01
INSTRUMENT BRIGHTNESS CONTROL/TRIP CHANGE BUTTON
The instrument brightness control operates when the headlight control
switch is in the
Turn the control to adjust the brightness of the instrument panel lights.
Press the TRIP CHANGE button to select trip computer features.
or
position.
AUTOMATIC DRIVE POSITIONER (if so equipped)
The automatic drive positioner system has two features:
Memory storage function.
Entry/Exit function.
MEMORY STORAGE FUNCTION
Two positions for the driver’s seat, accelerator and brake pedals and outside
mirrors can be stored in the automatic drive positioner memory. Follow these
procedures to set driver preferences.
SET THE DESIRED POSITIONING
1. Set the automatic transmission lever to the P (PARK) position.
2. Turn the ignition on and adjust the driver’s seat, accelerator and brake pedals and outside
mirrors to the desired positions.
3. Press the SET (memory) button and within 5 seconds press a position button (1 or 2) for at
least 1 second until the indicator light illuminates. The position is now stored in memory.
10

LINK TO KEYFOB
Within 5 seconds of setting the memory position (indicator light is on and ignition is on), press
the
A keyfob can be linked to each memory button.
If memory positioning is reset to a new set of positions, the keyfob automatically re-links.
button on the keyfob.
RECALLING A MEMORY SETTING FROM THE MEMORY PAD
Set the automatic transmission lever to the P (PARK) position, then:
Within 45 seconds of opening the driver’s door, push the memory switch (1 or 2) for at least
1 second,
OR
Turn the ignition switch to the ON position and push the memory switch (1 or 2) for at least
1 second.
FROM THE KEYFOB
If properly linked, operation of the
and brake pedals and outside mirrors to the memorized positions.
button will automatically return the driver’s seat, accelerator
ENTRY/EXIT FUNCTION
The driver’s seat automatically moves to allow the driver to get into and out of the driver’s seat more
easily. The driver’s seat slides backward when:
The driver’s door is opened with the key turned to LOCK.
The key is turned from ACC to LOCK with the driver’s door open and the automatic transmission
lever is in the P (PARK) position.
The driver’s seat returns to the previous position when:
The key is inserted into the ignition switch.
The driver’s door is closed with the key turned to LOCK.
The key is turned from ACC to ON while the automatic transmission lever is in the P (PARK)
position.
PEDAL POSITION ADJUSTMENT SWITCH (if so equipped)
The accelerator and brake pedals can be adjusted for driving comfort.
Adjust the pedals when the automatic transmission lever is in P (PARK).
Push
Push
to move the position of the pedals forward.
01
02
to move the position of the pedals backward.
01
02
11

MANUAL SHIFT MODE
When the MANUAL SHIFT ON/OFF button is pressed
while driving, the transmission enters the manual shift
mode. Shift ranges can be selected manually.
In the manual shift mode, the shift range is displayed
on the position indicator in the meter. After pressing
the MANUAL SHIFT ON/OFF button, the position
indicator first displays M4 (4th).
WHEN SHIFTING UP
Move the shift lever to the + (up) side. (Shifts to higher range.)
WHEN SHIFTING DOWN
Move the shift lever to the – (down) side. (Shifts to lower range.)
The transmission will automatically downshift the gears. (For example, if you select the 3rd
range, the transmission will shift down between the 3rd and 1st gears.)
Moving the shift lever rapidly to the same side twice will shift through the ranges in succession.
FOUR-WHEEL DRIVE (4WD) SHIFT SWITCH (if so equipped)
This system provides three positions so the driver can select the
desired drive mode according to driving conditions.
2WD – Dry, paved roads.
4H – Rocky, sandy or snow-covered roads. Before placing 4WD
shift switch in 4H position from 2WD, ensure vehicle speed is less
than 62.5 MPH [100 km/h].
4LO – When maximum power and traction are required (steep
grades, rocky, sandy or muddy roads).
NOTE: The vehicle must be stopped and in N (NEUTRAL) with the brake pedal depressed when
shifting into and out of 4LO.
VEHICLE DYNAMIC CONTROL (VDC) OFF SWITCH
In an emergency, VDC can help you stay on your steered path. The system
uses various sensors to monitor driver inputs and vehicle motion. If your vehicle
begins to skid or slide, this advanced system can reduce engine output and
apply individual brake pressure to specific wheels to help you maintain control.
VDC may need to be temporarily shut off if you are trying to free a vehicle stuck
in snow or mud. VDC does not prevent accidents due to careless or dangerous
driving techniques. Always be mindful of vehicle speed and driving conditions.
Push the Vehicle Dynamic Control (VDC) OFF switch to deactivate the
VDC system. The
Push the Vehicle Dynamic Control (VDC) OFF switch again to activate the VDC system. The
light in the instrument panel gauge area will turn off.
The VDC system is active while the vehicle is running until the switch is pushed to turn off.
12
light will illuminate in the instrument panel gauge area.

TOW MODE SWITCH
Tow mode raises transmission shift points and should be used when pulling a
heavy trailer or hauling a heavy load.
Tow mode includes the following features:
Grade logic — Reduces transmission shifts when pulling a trailer or hauling
a load up steep grades.
Downhill Speed Control (DSC) — Automatically downshifts when driving
down a slope with a trailer or heavy load to help control vehicle speed.
To activate the system:
Push the TOW MODE switch to activate tow mode. The indicator light on the TOW MODE
switch illuminates when tow mode is selected.
Push the TOW MODE switch again to turn tow mode off.
Tow mode is automatically canceled when the engine is turned off.
E-LOCK SWITCH (if so equipped)
The Electronic Locking Rear Differential (E-Lock) system can help
provide added traction if the vehicle is stuck or becoming stuck.
To activate the system:
The 4WD switch must be in the 4LO position (4-wheel drive vehicles),
The vehicle must be stopped or moving at 4 mph or less, and
The E-Lock system switch must be turned on. Once the vehicle
is free, the system should be turned off.
FRONT PASSENGER AIR BAG STATUS LIGHT
This vehicle is equipped with the Nissan Advanced Air Bag System. Under
some conditions, depending on the type of occupant or object detected in
the front-passenger’s seat by the occupant classification sensor, the front
passenger air bag is designed to automatically turn OFF. When the front
passenger air bag is OFF, the front passenger air bag status light will
illuminate*. For example:
When the system detects that the front-passenger’s seat is occupied by a small adult, child
or child restraint as outlined in the Owner’s Manual, the
the front passenger air bag is OFF and will not inflate in a crash.
When the front-passenger’s seat is occupied and the passenger meets the conditions outlined
in the Owner’s Manual, the
is operational.
*When the system detects that the front-passenger’s seat is unoccupied, the front
passenger air bag status light will not illuminate even though the front passenger
air bag is OFF.
will not illuminate to indicate that the front passenger air bag
will illuminate to indicate that
13

TIRE PRESSURE MONITORING SYSTEM (TPMS)
This system monitors tire pressure. If the low tire pressure warning light
illuminates, check the tire pressure in all four tires.
Adjust the low tire pressure to the recommended COLD tire pressure
shown on the Tire and Loading Information label located in the driver’s
door opening. After tire pressures are adjusted, the vehicle will need to
be driven at speeds above 16 MPH (25 km/h) to activate the TPMS and
turn off the low tire pressure warning light.
SEAT BELT WARNING LIGHT AND CHIME
The light and chime remind you to fasten your seat belts. The
light illuminates whenever the ignition key is turned to the ON
or START position and remains illuminated until the driver’s
seat belt is fastened. At the same time, the chime sounds for
approximately 6 seconds, unless the driver’s seat belt is
securely fastened.
With the ignition ON, the seat belt warning light may also
illuminate if the front-passenger’s seat is occupied with the
front passenger’s seat belt not fastened.
CARGO LIGHT SWITCH (if so equipped)
Push the switch down
The cargo light stays on for approximately 20 seconds when the ignition
is turned off unless the switch is pushed to the off position.
to turn on the cargo light.
01
01
CHILD SAFETY REAR DOOR LOCKS (Crew Cab models only)
Child safety door locks help prevent the rear doors from being opened
accidentally, especially when small children are in the vehicle. The child
safety lock levers are located on the edge of the rear doors. When the lever
is in the LOCK position, the door can only be opened from the outside.
REAR SONAR SYSTEM OFF SWITCH (if so equipped)
When backing up, this system will beep to alert you to obstacles within 5.9 ft
(1.8 m) of the rear bumper. The system beeps faster as the vehicle gets closer
to the obstacle. A continuous tone sounds when an obstacle is less than 10 in
(25 cm) away from the bumper. Turn the system off by pushing the rear sonar
system OFF switch. Push the switch again to enable the system. The system
will automatically reset the next time the ignition switch is turned on.
14

WIDE OPEN DOORS (King Cab models only)
OPEN
CLOSE
The wide open doors open 168 degrees to allow
access to the rear of the cab.
Open the driver’s or passenger’s door.
From the outside, pull the door handle
outward. Open the door to the desired
position.
From the inside, pull the inside door handle
toward you. The door will unlock automatically.
Open the door to the desired position.
Do not open the driver’s side wide open door while refueling or damage may result to the fuel-filler
door or the wide open door.
UTILI-TRACK™ CHANNEL SYSTEM (if so equipped)
The Utili-track™ channel system allows you to
move tie-down clamps in the bed to the best
location to secure a load.
The tie-down cleats must be installed so
the clamp is properly seated in the notches
in the rail. If the tie-down cleat is not seated
in the notches, it will not be flush with the rail
and cannot be properly tightened. The bolt in
the center of the cleat must be tightened
hand-tight (20 – 40 inch pounds).
Check the tightness of the tie-down cleat periodically during a trip to make sure the center
bolt has not become loose.
The channel end stoppers can be used to help prevent cargo from sliding or shifting off the end
of the truck bed. They must be installed so they are properly seated in the detents in the channel.
OUTSIDE MIRROR CONTROL SWITCH (if so equipped)
POWER FOLDING MIRRORS (if so equipped)
Move the switch
Adjust each mirror to the desired position using the
switch
Push the
02
.
to select the left or right mirror.
01
switch
to fold both mirrors in or out.
03
01
02
03
15

MOONROOF CONTROLS (if so equipped)
The ignition switch must be in the ON position to operate the
moonroof controls.
TILTING THE MOONROOF
Push the tilt switch to the UP
moonroof up.
Push the tilt switch to the DOWN
moonroof down.
position to tilt the
01
02
position to tilt the
SLIDING THE MOONROOF
Push the switch toward the OPEN
Push the switch toward the CLOSE
Push the switch in any direction while the moonroof is sliding open or closed to stop the
moonroof in the desired position.
position to fully open the moonroof.
03
position to fully close the moonroof.
04
01
02
FRONT SEAT ADJUSTMENTS
WITH MANUAL SEATS (if so equipped)
Pull up on the lever under the front of the seat and slide
forward or backward. Release the lever to lock the seat
in position.
Lift the lever
on the side of the seat to adjust your
01
seatback forward or backward; release the lever when
you have found a comfortable angle and the seat belt
fits properly.
01
03
04
WITH POWER SEATS (if so equipped)
Move the control
cushion forward or backward.
Pull up on the control
down to lower the cushion.
Push the switch
backward.
forward or backward to adjust the seat
02
to raise the seat cushion; press
02
forward to move the seatback forward; push it back to move the seatback
03
LUMBAR SUPPORT (if so equipped)
Your driver’s seat has a lumbar support; adjust it by moving
the lever
16
04
up or down.
02
03
04

FOLDING THE REAR BENCH SEAT
To fold the rear bench seat for storage capacity
behind the front seats, or to remove the jacking
tools from the storage area:
Lift up on the lever
of the seat, while lifting the front of the seat
cushion up.
Fold the bottom of the seat cushion toward
the back of the vehicle until it locks in place.
Repeat this process to raise and secure the
seat cushion on the other side of the vehicle
for maximum storage capacity.
, located on the side
01
FOLDING THE REAR BENCH SEATBACK DOWN
To fold the rear bench seatback flat:
Pull up on the strap
seatback and fold the seatback forward over the seat base.
To raise the seats, lift the seatbacks and make sure they are fully
latched in the upright position.
, located on the outside corner of each
01
01
01
HOMELINK® UNIVERSAL TRANSCEIVER (if so equipped)
SYSTEM OPERATING TIPS
Garage doors, electrical gates, entry doors, etc., will be activated during programming. To avoid
injury, make sure that people and objects are clear of all doors or gates during programming.
Your vehicle’s engine should be turned off while programming the HomeLink® Transceiver.
To program your HomeLink® Transceiver to operate a garage door, gate, entry door opener or
home or office lighting, you need to be at the same location as the device.
NOTE: Garage door openers (manufactured after 1996) have “rolling code protection.”
To program a garage door opener equipped with “rolling code protection,” you will need to
use a ladder to get to the garage door opener motor, to be able to access the “smart” or
“learn” program button.
17

PROGRAMMING YOUR HOMELINK® UNIVERSAL TRANSCEIVER
(Mirror, Sun Visor or Overhead Console)
1. To begin, press and hold the two
outer HomeLink® buttons (to clear
the memory) until the indicator light
blinks slowly (after 20 seconds).
Release both buttons.
2. Position the end of the handheld
transmitter 1-3 inches (26-76 mm)
away from the HomeLink® surface.
3 Using both hands, simultaneously press and hold both the HomeLink® button you want to
program and the handheld transmitter button. DO NOT release the buttons until step
4 has been completed.
4. Hold down both buttons until the indicator light on the HomeLink® flashes, changing from
a “slow blink” to a “rapidly flashing blink.” This could take up to 90 seconds. When the
indicator light flashes rapidly, both buttons may be released. The rapidly flashing light
indicates successful programming. To activate the garage door or other programmed
device, press and hold the programmed HomeLink® button - releasing when the device
begins to activate.
5. If the indicator light on the HomeLink® blinks rapidly for 2 seconds and then turns solid,
HomeLink® has picked up a “rolling code” garage door opener signal. You will need to
proceed with the next steps to train HomeLink® to complete the programming which may
require a ladder and another person for convenience.
6. Press and release the “smart” or “learn” program button located on the garage door opener’s
motor to activate the “training mode.” This button is usually located near the antenna wire
that hangs down from the motor. If the wire originates from under a light lens, you will need
to remove the lens to access the program button.
NOTE: Once you have pressed and released the program button on the garage door
opener’s motor and the “training light” is lit, you have 30 seconds in which to perform
step 7. Use the help of a second person for convenience to assist when performing this step.
7. Within 30 seconds of pressing and releasing the garage door opener program button,
firmly press and release the HomeLink® button you’ve just programmed. Press and release
the HomeLink® button up to three times to complete the training.
8. Your HomeLink® button should now be programmed. To program the remaining HomeLink
buttons for additional door or gate openers, follow steps 2-8 only.
®
18

01
04 05 06 07 08
03
02
09
10
NISSAN MOBILE ENTERTAINMENT SYSTEM (if so equipped)
DVD PLAYER CONTROLS
EJECT BUTTON – Press once to eject a DVD from the player.
01
DVD SLOT – Insert the DVD here.
02
POWER ON/OFF BUTTON – With the ignition in the ACC or ON position, press this
03
button to turn the DVD player on or off.
MODE BUTTON – Press this button to switch the Audio/Video source between DVD and
04
AUX input.
STOP BUTTON – Press the button once to stop the disc in play.
05
PLAY/ PAUSE BUTTON – Press this button once to begin play; press again to pause play.
06
MENU BUTTON – Press this button when the DVD is in PLAY mode and the DVD menu
07
will appear in the display. Press the button again to resume play.
DISPLAY BUTTON – Press this button for less than 2 seconds and the display menu will
08
appear on screen. Press the button for longer than 2 seconds to exit the display information
screen.
NAVIGATION KEYS – These buttons perform a number of functions, depending on which
09
mode the player is in.
INPUT JACKS – These are used to plug additional compatible devices into the DVD system.
10
They are color-coded (yellow – video input; white – left channel audio input; red – right
channel audio input).
PLAYING A DIGITAL VIDEO DISC
The DVD player plays DVD videos, video CDs and audio CDs. To play a DVD, begin by turning the
ignition to ACC or ON and pressing the POWE R button. Insert the disc into the slot. The disc is
automatically drawn in. The player can be operated by using the DVD control panel buttons or the
remote control. Press the CD·DVD button, on the audio control panel, to toggle between the CD
and DVD operation. If you press the REAR ON·OFF button, it will turn the rear audio controls on
and off.
PLAYING A COMPACT DISC
The DVD player plays DVD videos, video CDs and audio CDs. To play a CD, begin by turning the
ignition to ACC or ON and pressing the POWER button. Insert the disc into the slot. The disc
is automatically drawn in. The player can be operated by using the control panel buttons or the
remote control.
19

USING THE AUXILIARY INPUT JACKS
Auxiliary input jacks are used to plug in compatible devices, such as video games and portable
video players. The jacks are located on the control panel and are color-coded for identification.
Refer to the section titled DVD Player Controls for a description.
FLIP DOWN SCREEN
The flip down screen has a wireless remote control
receiver. The screen rotates down for viewing and
back up into the housing when not in use.
02 03 04
01
06 06
05
REAR AUDIO CONTROLS (if so equipped)
To lock or unlock audio controls, press the REAR ON·OFF button on the front radio control panel.
VOLUME CONTROL BUTTON – This button allows the rear passengers to adjust the
01
headphone volume.
MODE BUTTON – This button allows the rear passengers to change between FM, AM,
02
CD and DVD.
SPEAKER CONTROL BUTTON – Press this button to turn the rear speakers off and the
03
headphones on. Press again to turn the rear speakers on and the headphones off.
NEXT BUTTON – When this button is pressed while in FM or AM mode, the radio will
04
change to the next preset. The NEXT button does not function when playing a DVD or CD.
SEEK BUTTON – In FM or AM mode this button allows rear seat passengers to find the
05
next radio station up or down the band frequency. In CD mode, this button allows the rear
passengers to choose the next or previous selection on the disc.
HEADPHONE JACKS – These allow two rear seat passengers to listen privately to the
06
audio system.
20

WIRELESS HEADPHONES
The wireless headphones include separate buttons
for power and volume control. Headphones automatically turn off after 30 seconds if no sound is present.
For optimum wireless headphone performance,
increase the volume on the rear seat controller to the
maximum level and adjust the wireless headphone
volume using the volume control on the wireless
headphones. Using a lower volume setting on the rear
seat controller can cause static noise in the wireless
headphones.
The wireless headphone audio signal originates from the
rear audio controls. This signal needs an unobstructed
path to the headphones to maintain performance.
REMOTE CONTROL
Power Button
01
Stop Button
02
Next Track/Chapter
03
and Previous
Track/Chapter Buttons
Title Button
04
Enter Button
05
Display Button
06
Mode Button
07
Subtitle Button
08
Audio Button
09
Angle Button
10
Clear Button
11
Pause Button
12
Play Button
13
Fast Forward/Fast Reverse Buttons
14
Menu Button
15
Navigation Keys
16
Back Button
17
Numeric Keypad
18
21

BLUETOOTH® HANDS-FREE PHONE SYSTEM (if so equipped)
With an overhead microphone and sound
transmitted through the audio system speakers,
the Bluetooth® Hands-free Phone System
controls location
utilizes Bluetooth® wireless technology
and voice recognition to provide hands-free
cellular phone communication.
SYSTEM OPERATING TIPS
Close all windows. Surrounding noises may
interfere with system operation and performance.
Press the
Wait for the tone before speaking.
Begin speaking a command within 5 seconds of the tone.
To go back to the previous command, say “Go back” or “Correction.”
To cancel a voice recognition session, simply wait 5 seconds, say “Cancel” or “Quit,” or press
the
To increase or decrease the volume of the voice prompts, push the VOL (volume) control
switch up or down on the steering wheel or turn the POWER/VOLUME knob on the audio
system while the system is responding.
Speak in a clear and natural voice without pausing between words.
If the Voice Recognition system does not recognize your voice commands, train the system
using the Speaker Adaptation Mode.
Some commands are not available while the vehicle is in motion.
The “Help” command can be used in any menu to hear a list of available commands.
Please refer to the cellular phone manufacturer’s Owner’s Manual for detailed information
regarding your Bluetooth® phone.
For recommended phones and detailed instructions, please visit
www.nissanusa.com/bluetooth.
button on the steering wheel to activate voice recognition.
button.
Bluetooth
®
PAIRING YOUR PHONE
To use the hands-free feature, you need to set up, or pair, the system to recognize your compatible
cellular phone(s). Five Bluetooth®-enabled phones can be paired. After setup, the system automatically
connects with a paired phone when the ignition is in the ACC or ON position, as long as the phone
is on and in the vehicle.
PAIRING PROCEDURE
NOTE: The vehicle must be stationary when pairing the phone.
1. Press the
2. Say “Setup.”
3. Wait for the tone, then say “Pair phone.”
22
button on the steering wheel and wait for the tone.

4. Wait for the tone, then say “New phone.”
5. Initiate pairing from the phone.
The pairing procedure varies according to each cellular phone model. For detailed
pairing instructions and a list of compatible phones, please visit
www.nissanusa.com/bluetooth.
When prompted for a PASSKEY code, enter “1234” from the handset. The PASSKEY
code is assigned by NISSAN and cannot be changed.
6. Say a name for the phone when the system asks you to provide one. You can give the phone
a name of your choice.
7. Say a number between 1 and 5 when the system asks you for a priority level. The priority
level determines which phone interacts with the system when two or more paired phones
are active in the vehicle at the same time. Choose 1 if this is the only phone or the
primary phone.
8. Say “Yes” or “No” when the system asks if you would like to select a custom ring tone.
Follow the instructions provided by the system to choose a ring tone.
SETTING UP YOUR PHONEBOOK – ADDING NEW ENTRIES
Each paired phone has its own dedicated phonebook. Each phonebook can store up to 40 names.
Each name can have up to four locations/numbers: Home, Office, Mobile and Other.
NOTE: The vehicle must be stationary when adding new entries.
1. Press the
2. Say “Phonebook.”
3. Wait for the tone, then say “New entry.”
4. When prompted, say the name for the new entry. For example, say “Michelle.” If the name
is too short or too long, or if it sounds too much like a name that is already stored in the
phonebook, the system tells you and prompts you to say a name again. Choose a new name.
5. Say “Yes” or “No” when the system asks you to confirm the name is correct.
6. Say a location (“Home,” “Office,” “Mobile” or “Other”) when the system asks you to provide
one. The system acknowledges the location.
By Voice command - When prompted, say a phone number for the location. For example,
say “five five five one two one two.” The system repeats the number and prompts you for
the next command.
By Bluetooth® transfer - Say “Transfer entry.” The system acknowledges the command
and asks you to initiate the transfer from the phone handset. The new contact phone
number will be transferred from the cellular phone via the Bluetooth® communication
link. The transfer procedure varies according to each cellular phone. See the cellular
phone Owner’s Manual for details.
7. Say “Store” when you are finished entering numbers. The system confirms the name,
location and number.
8. Say “Yes” or “No” when the system asks if you would like to store another location for the
same name. If you do not respond to the system prompt, the system ends the New Entry
session.
button and wait for the tone.
23

MAKING A PHONE CALL
1. Press the
2. After the tone, do one of the following:
Say “Call [name] [location].” For example, say “Call Michelle Home.”
Say “Call [number].” For example, say “Call 123-456-7891.”
Say “Redial” to redial the previous phone number called by the system.
Say “Call International” to dial more than 10 digits or any special characters.
button.
RECEIVING/ENDING A PHONE CALL
When you receive a phone call, a ring tone sounds through the audio system.
To accept the call, press the
To hang up the phone at the end of a call or to disconnect during call placement, press the
button.
button. To reject the call, press the
button.
HOW TO SAY NUMBERS
NISSAN voice recognition permits numbers to be spoken in a variety of ways.
Say “zero” or “oh” for “0.” Example: 1-800-662-6200 – Say “one eight zero zero six six two
six two oh oh.”
Say “pound” for “#.” Say “star” for “*” (available when using the “Call International” command
and the “Send” command during a call).
Say “plus” for “+” (available only when using the “Call International” command).
Say “pause” for a 2-second pause (available only when storing a phonebook number).
24

NAVIGATION SYSTEM (if so equipped)
GETTING STARTED
The Navigation
System begins
when the ignition
is placed in the
ACC or ON
position. To help
ensure safe driving, some functions are grayed out, or muted, while driving. Park the vehicle in a
safe location and then operate the Navigation System.
BASIC FUNCTIONS
START-UP SCREEN
Read the precautions carefully, highlight the “OK”
key using the joystick and press the ENTER button.
NAVIGATION DISPLAY SCREEN
Displays navigation features and map.
01 02 030704
08
06
05
DISABLED WHILE DRIVING
Not all features can be manually operated while
the vehicle is in motion. The text for these
restricted features turns from white to gray and
cannot be selected.
DAY/NIGHT BUTTON
Press the
the day screen (bright) and the night screen
(dark). Within 10 seconds of pressing the
button
map display screen by moving the joystick right
or left.
01
button
, you can adjust the brightness of the
to switch between
01
25

MOVING AROUND WITHIN A MAP
To maneuver around the navigation display
screen, tilt the joystick in the direction that you
want to move across the map. Keep tilting the
joystick to continuously move across the map
in that direction. Once you start moving on
the map, the cross pointer appears.
SETTING BUTTON
Press the SETTING button
navigation preferences.
to change or set
02
DEST (DESTINATION) BUTTON
Press the DEST button
book and alternative ways to program a destination.
to display the address
03
MAP BUTTON
Press the MAP button
location map screen.
to display the current
04
ROUTE BUTTON
Press the ROUTE button
ways to modify the route to a destination.
to display various
07
ZOOM OUT/IN BUTTONS
Press the
increase or decrease the scale of the map display.
26
button
05
or the
button
05
to

BACK BUTTON
Press the BACK button
to return to the previous function shown on the navigation display.
08
GUIDE VOICE BUTTON
Press the GUIDE VOICE button
to hear the current navigation situation.
06
SWITCHING THE MAP VIEW
Press the MAP button
map screen is displayed.
Press the ENTER button.
Highlight the “Map View” key and press the
ENTER button.
Highlight either one of the “Plan View” keys or
one of the “BirdviewTM” keys and press the
ENTER button to select the map view. Press
the MAP button
the changes.
04
. The current location
04
or the “Back” key to accept
PLAN VIEW
Displays the map in a 2-dimensional environment
similar to a road map.
BIRDVIEW™
Displays the map in an elevated perspective.
27

SELECTING A MENU SCREEN
1. To select a preferred menu key, use the joystick to highlight the corresponding key on the
screen and press the ENTER button.
2. Depending on the key you select, a detailed menu screen, a character input screen or a
setting screen, etc., is displayed. On the screen displayed, make adjustments, input
information, etc., accordingly.
3. Press the BACK button
in some cases pressing the BACK button
4. Press the MAP button
any changes.
NOTE: Depending on the menu selected, pressing the MAP button
current location map screen.
to return to the previous screen without applying any changes;
08
to return to the current location map screen without applying
04
will accept the changes you made.
08
may not return you to the
04
STORING YOUR HOME IN YOUR ADDRESS BOOK
Press the DEST button
Highlight the “Address Book” key and press the
ENTER button.
Highlight the “Home (Add New)” key and press
the ENTER button, a confirmation message is
displayed. Highlight the “Yes” key and press the
ENTER button.
03
.
Highlight the “Street Address” key and press the
ENTER button. A character input screen is
displayed.
Enter the address of your home, highlight the “OK”
key and press the ENTER button. The map screen
is displayed.
28

Moving the joystick right or left, adjust your home
location if necessary. After adjusting the location,
press the ENTER button.
Your home is displayed at the center of the map.
A confirmation message is displayed and the
system sets your home as the destination.
Press the MAP button
current location map screen. The home icon is
displayed on the screen.
to return to the
04
SETTING A STREET ADDRESS AS A DESTINATION
Press the DEST button
Highlight the “Street Address” key and press
the ENTER button. A character input screen
is displayed.
Make sure the correct region is selected before
inputting the name of the location.
Enter the house number; when finished highlight
the “OK” key and press the ENTER button. If you
do not know the house number, highlight the “Skip”
key and press the ENTER button.
03
.
Enter the name of the street. After finishing the
entry, highlight the “OK” key and press the
ENTER button. A list of cities is displayed.
Highlight the correct city of the destination from
the list and press the ENTER button.
29

The selected destination is displayed at the center
of the map. Highlight the “OK” key and press the
ENTER button after confirming the location of the
displayed destination. The system sets the
destination to the selected location and starts
calculating a route.
SETTING A PLACE AS A DESTINATION
Press the DEST button
A nearby airport is set as a destination in this
example.
Highlight the “Points of Interest” key and press
the ENTER button.
Highlight the “Travel” key and press the ENTER
button.
From the category list, highlight the “AIRPORT”
key and press the ENTER button. A character
input screen appears.
Make sure the correct region is selected before
inputting the name of the location.
03
.
After inputting the name of the location, highlight
the “OK” key and press the ENTER button. A list
screen appears.
Highlight the preferred airport key from the list and
press the ENTER button.
30

The selected destination is displayed at the center
of the map. Highlight the “OK” key after confirming
the location of the displayed destination, and press
the ENTE R button. The system sets the destination
to the selected location and starts calculating a
route.
BEGINNING ROUTE GUIDANCE
After setting a destination and performing route calculation, the suggested route is displayed.
Highlight the “OK” key and press the ENTER
button. The system will navigate through the
guide points using visual and voice guidance.
When approaching a guide point, the system
automatically changes to a split screen and shows
an enlarged view of the intersection on the left half.
When arriving at the destination, the route
guidance automatically ends.
31

MEMO

MEMO

Nissan, the Nissan Brand Symbol, “SHIFT_” tagline,
Z and Nissan model names are Nissan trademarks.
© 2009 Nissan North America, Inc.
QR0E-0A60U0
Printing: August 2009 (15)
 Loading...