

QU ICK REFERE NCE GUI DE
2005 MAXI MA
SH IFT_exhilaration
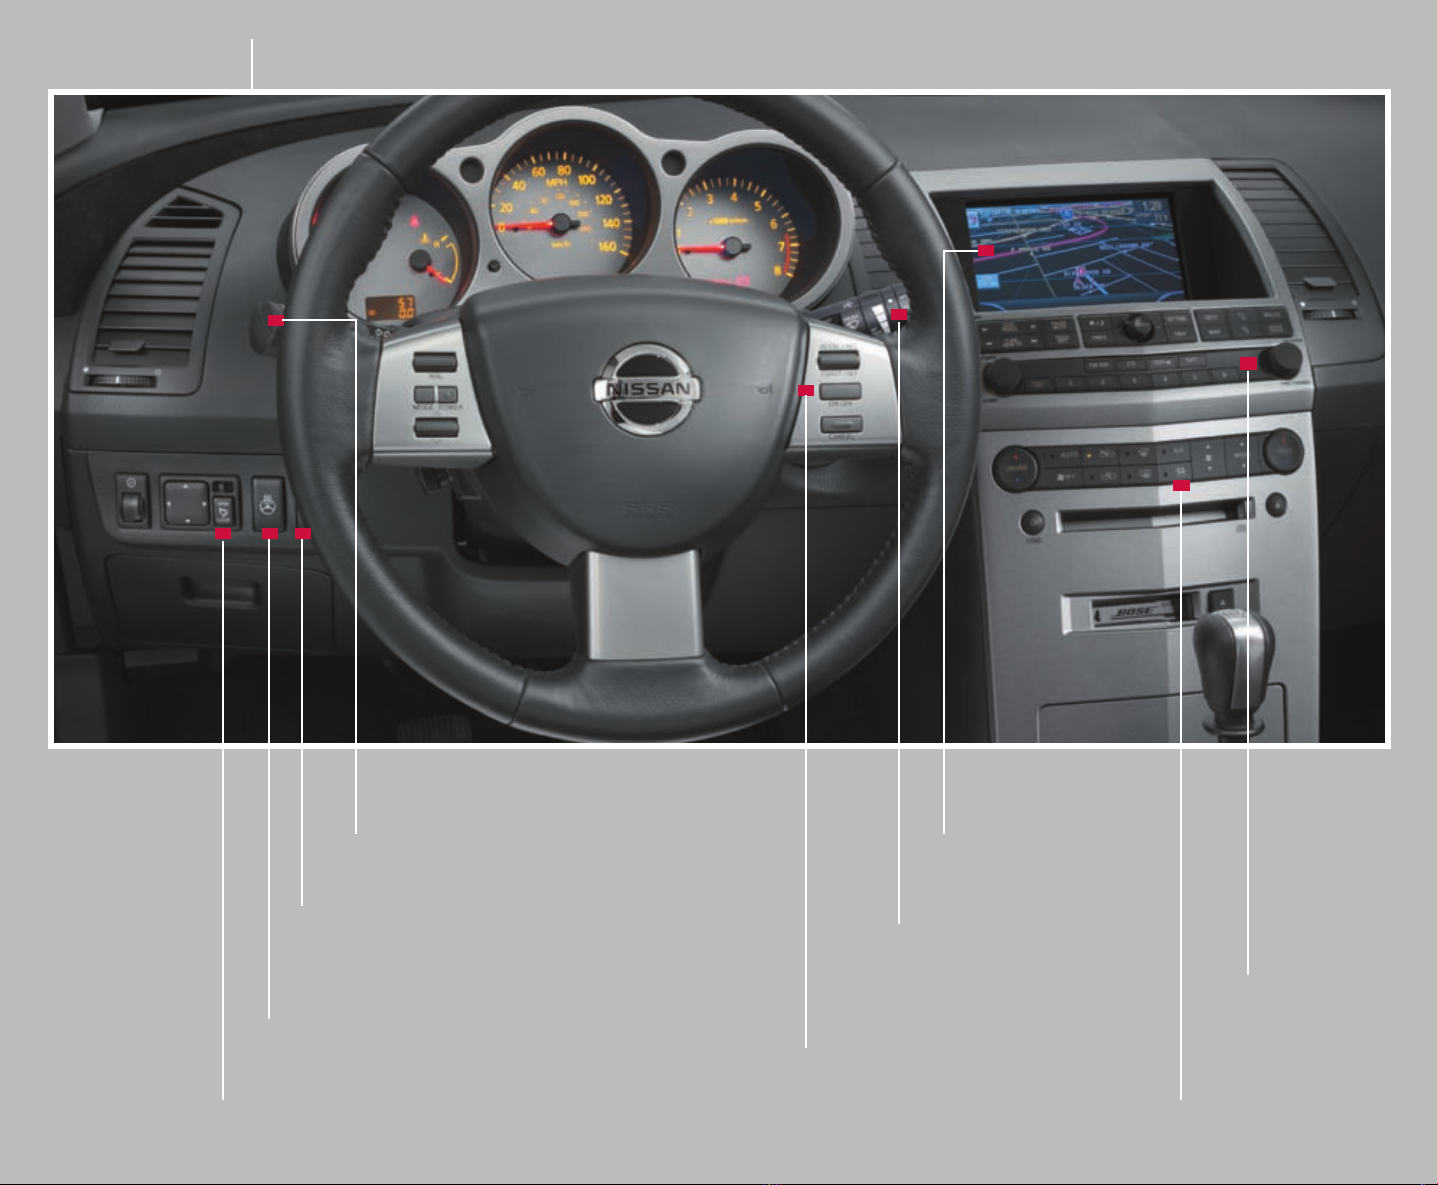
NISSAN MAXIMA INSTRUMENT PANEL FEATURES
HEATED STEERING WHEEL SWITCH
(if so equipped)
01
POWER FOLDING
OUTSIDE MIRRORS
02
HEADLIGHT AND TURN
SIGNAL CONTROL
TRACTION CONTROL SYSTEM (TCS) OFF SWITCH
(BEHIND STEERING WHEEL) (if so equipped)
04
03
CRUISE CONTROL
W/STEERING WHEEL
MOUNTED CONTROLS
05
CONTROL PANEL DISPLAY
WINDSHIELD WIPER/
WASHER SWITCH
07
06
CLIMATE CONTROLS
AUDIO SYSTEM
01
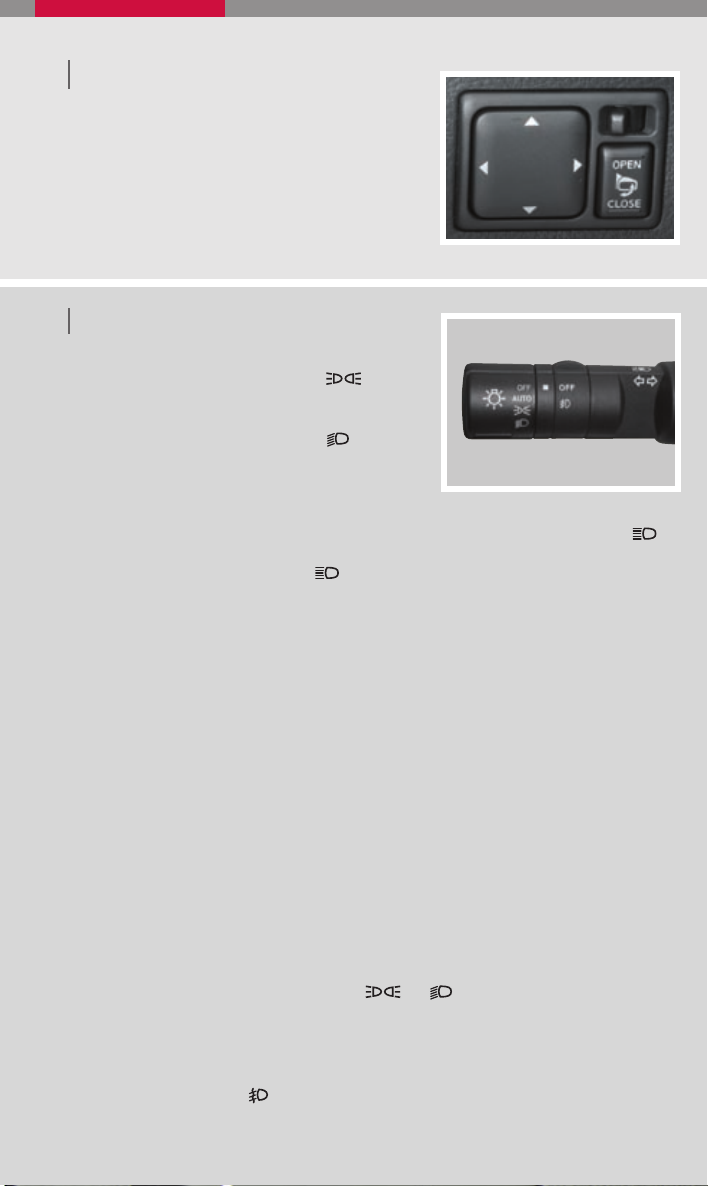
POWER FOLDING OUTSIDE MIRRORS
(if so equipped)
■ Push the switch toward the CLOSE position
to fold the driver’s and passenger’s outside
mirrors inward toward the vehicle.
■ Push the switch toward the OPEN position
to return the mirrors to the outward position.
02
HEADLIGHT AND TURN SIGNAL CONTROL
HEADLIGHT SWITCH
■ Turn the headlight switch to the
position to turn on the front parking, tail,
license plate and instrument panel lights.
■ Turn the headlight switch to the position
to turn on the headlights. All other lights
remain on.
HIGH BEAM
■ Push the headlight switch forward to select the high beam function. The blue
indicator light illuminates. Pull the headlight switch back to the original position to
select the low beam. The blue indicator light goes off.
■ Pull and release the headlight switch to flash the headlight high beams on and off.
TURN SIGNAL SWITCH
■ Move the headlight control switch up or down to signal the turning direction.
When the turn is completed, the turn signals cancel automatically.
■ To signal a lane change, move the headlight control switch up or down to the
point where the indicator light begins to flash, but the headlight control switch
does not latch.
AUTOMATIC HEADLIGHT OPERATION
The autolight system can:
■ Turn the headlights on automatically when it is dark.
■ Turn the headlights off automatically when it is light.
■ Keep the headlights on for 45 seconds after you turn the ignition switch to OFF
and all doors are closed.
TO ACTIVATE THE AUTOLIGHT SYSTEM :
■ Turn the headlight switch to the AUTO position, then turn the ignition switch to ON.
TO DEACTIVATE THE AUTOLIGHT SYSTEM:
■ Turn the headlight switch to the OFF,
FOG LIGHT OPERATION
Note: The headlights must be on and the low beams selected for the fog lights
to operate.
■ Turn the switch to the position to turn on the fog lights.
■ Turn the switch to the OFF position to turn off the fog lights.
or position.
03
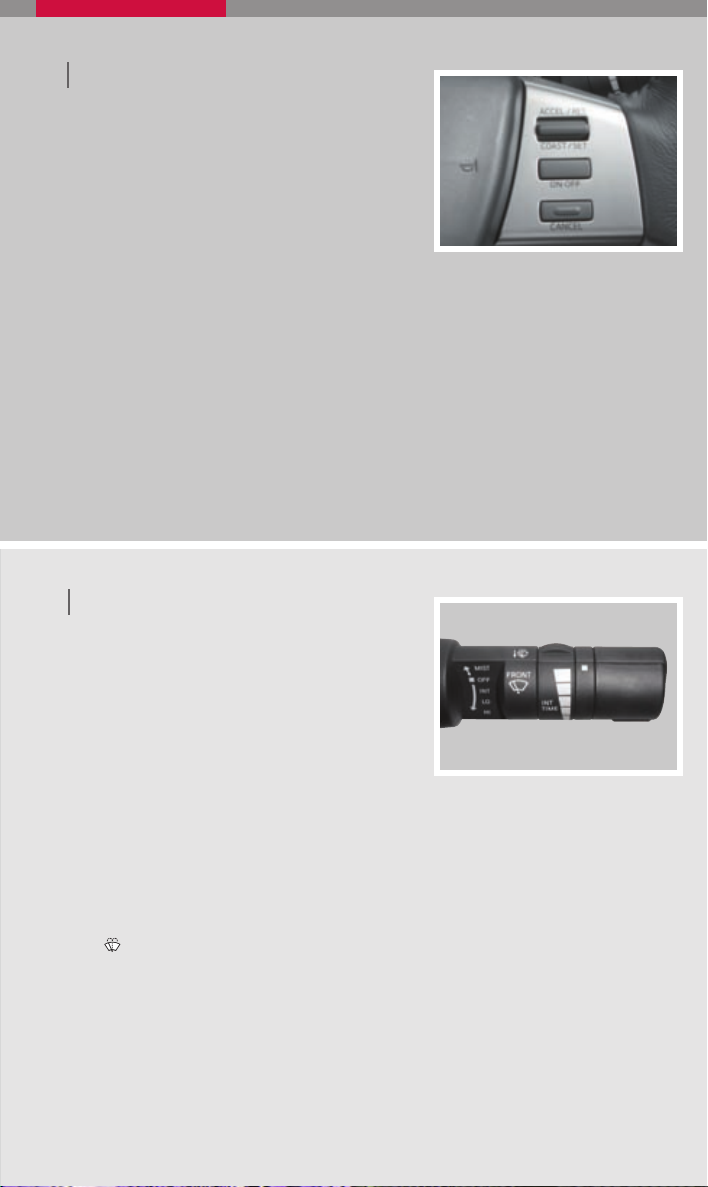
CRUISE CONTROL W/STEERING WHEEL
MOUNTED CONTROLS
■ To turn on the cruise control, push the main
(ON/OFF) switch on. The indicator light in
the instrument panel comes on.
■ To set cruising speed, accelerate the vehicle
to desired speed, push the COAST/SET
switch and release it. The SET indicator light
in the instrument panel comes on.
■ To reset at a faster cruising speed, push and
hold the ACCEL/RES switch. When the
vehicle attains the speed you desire, release the switch.
■ To reset at a slower cruising speed, push and hold the COAST/SET switch. Release
the switch when the vehicle slows to the desired speed.
■ To resume a preset speed, push and release the ACCEL/RES switch. The vehicle
returns to the last set cruising speed when the vehicle speed is over 25 MPH
(40 km/h).
■ To turn cruise control off, press the CANCEL switch or push the main (ON/OFF)
switch off. Both the CRUISE indicator light and SET indicator light in the instrument
panel go out.
04
WINDSHIELD WIPER/WASHER SWITCH
■ The ignition switch must be in the ON
position to activate the windshield wipers.
■ Push the lever down to operate the
windshield wipers.
■ Switch operation includes:
INT
Intermittent – Wipers operate intermittently
and can be adjusted by turning the time
control. Also, the intermittent operation
speed varies in accordance with the
vehicle speed. (For example, when the vehicle speed is high, the intermittent
operation speed will be faster.)
Low speed – Wipers operate at a continuous low speed.
LO
High speed – Wipers operate at a continuous high speed.
HI
MIST
Mist – Lift the lever up for one sweep operation of the wiper.
Wash – Pull the lever toward you. Wipers automatically wipe several times.

05
CONTROL PANEL DISPLAY
TRIP BUTTON
When the TRIP button is
pressed, the following modes
will display on the screen:
■ Warning message
(if there are any)
■ TRIP 1 (Elapsed Time,
Driving Distance,
Average Speed)
■ TRIP 2 (Elapsed Time,
Driving Distance,
Average Speed)
■ FUEL ECONOMY (Average Fuel Economy, Distance to Empty)
■ MAINTENANCE (Engine Oil, Tire Rotation)
■ OFF
MAINTENANCE ITEMS
You can set the engine oil and the tire rotation interval. To display the setting of the
maintenance interval, select the Engine Oil or Tire Rotation key using the joystick and
press the ENTER button. To set the maintenance interval, select the Maintenance
Schedule key using the joystick and push the joystick to the right or left. To reset
the maintenance interval, select the Reset key using the joystick and press the
ENTER button.
DISPLAY SCREEN SETTINGS
The SETTING screen will appear when the SETTING button is pressed. Select the
DISPLAY key with the joystick and press the ENTER button to choose from various
display screen options. The DISPLAY key will allow you to personalize the information
shown on the display screen, such as climate control or audio system display.
SET TING THE CLOCK
Select the HOURS or MINUTES key and move the joystick to the right or left to adjust
the time. The time will change step by step. After completion of the setting, press the
PREV button.
Refer to your Owner’s Manual and Navigation System Owner’s Manual for additional
information on your navigation system.

02
03
04
05
01
07
06
AUTOMATIC CLIMATE CONTROL
DRIVER TEMPERATURE CONTROL BUTTON
01
Press the DRIVER TEMPERATURE CONTROL button >or <to adjust the desired
08
09
temperature of the outlet air for the driver’s side only if the DUAL button is not pressed. If
the DUAL zone button is not activated, the driver’s side temperature control will adjust the
temperature of the outlet air for all outlets.
AUTO BUTTON
02
Press the AUTO button for automatic cooling and/or dehumidified heating. The indicator
light on the button will come on when the system is activated.
FRESH AIR BUTTON
03
Press the button to draw outside air into the passenger compartment. The indicator
light on the button will come on when the system is activated.
DEFROSTING/ DE FOGGING FRONT AND SIDE WINDOWS
04
■ Push the FRONT WINDOW DEFROSTER switch on. The indicator light on the
button will come on.
■ Press the TEMPERATURE button up or down to set the desired temperature.
■ Make sure the AIR RECIRCULATION button is off to allow fresh air to be drawn
into the vehicle. To set the defroster on high, press the manual FAN SPEED button to
set fan speed to maximum.
MODE BUTTON
05
The MODE button allows you to select the air flow outlets.
Air flows from the center and side vents.
Air flows from the center, side, and foot vents.
Air flows mainly from the foot vents.
Air flows from the defroster and foot vents.
Air flows mainly from the defroster vents.
PASSENGER TE MPERATURE CONTROL BUTTON
06
Press the PASSENGER TEMPERATURE CONTROL button >or < to adjust the
desired temperature of the outlet air when the DUAL button is activated.
AIR RECIRCULATION BUTTON
07
Press the AIR RECIRCULATION button to recirculate air inside the vehicle. The
indicator light on the button will come on. Press the AIR RECIRCULATION button
again to turn air recirculation off. The indicator light on the button will turn off.
DEFROSTING/ DE FOGGING REAR WINDOW AND OUTSIDE
08
HEATED MIRRORS (if so equipped)
Push the REAR WINDOW DEFROSTER switch on. The indicator light on the button
will come on. Push the switch again to manually turn the defroster off. NOTE: The rear
window defroster automatically turns off in approximately 15 minutes.
PASSENGER SIDE TEMPERATURE CONTROL ON/OFF BUTTON
09
Press the DUAL button to turn the passenger side temperature controls on or
off, then press the PASS button arrows >or < to adjust the temperature of the
passenger air flow outlets. The indicator light on the button will come on when the system
is activated.
06

01
02
05
FM/AM/SAT RADIO WITH COMPACT DISC (CD) CHANGER (if so equipped)
07
SEE K/TRACK CHANGE BUT TON
01
03
04
06
07
To scan quickly through each broadcasting station press the SEEK/TRACK button. The
tuner will pause for 5 seconds on each broadcasting station. To skip from one track to
another on a CD, press the SEEK/TRACK button. Each time the button is pressed, the
CD will advance or skip back one track.
TUNE/REW/FF BUTTON
02
To manually tune the radio, press the TUNE button. To fast forward or rewind a track
while playing a CD, press the REW/FF button. The disc will play at an altered speed until
the button is released.
PAUSE /MUTE BUTTON
03
To mute or pause the audio sound, press the PAUSE/MUTE button. To release the mute
or pause, press the button again.
PROG/RPT BUTTON
04
To change the play pattern of the CD, press the PROG/RPT button. To activate the Radio
Data System (RDS), press the PROG /RPT button. RDS provides information about radio
stations (type, call numbers, etc.)
PRESET A · B ·C BUT TON
05
Press the PRESET A.B.C button to change between the preset storage banks. The radio
displays the icon A, B, or C to indicate which set of presets is active. Each memory bank
can hold any combination of AM, FM, and SAT* presets.
CD PLAY BUTTON
06
To insert a CD in the CD player or changer, insert a CD into the slot by pushing the
LOAD button, select a slot (1-6) and load the CD. The slot number (1-6) will illuminate
when loaded. To begin play, press the CD button.
STATION AND CD SELECT BUTTONS
07
To store a station in a preset you must first select A, B, or C memory bank by pressing
the PRESET A·B·C button and tune to the desired AM, FM or SAT* station. Then press
the desired station select button for at least 2 seconds. When the preset indicator
illuminates, a beep will sound, indicating memorization is complete. To retrieve a
previously set station, select the memory bank where the preset was set, then press the
corresponding station select button.
TUNING AND AUDIO CONTROL KNOB
08
To manually tune the radio, turn the TUNE knob. Adjust the Bass, Midrange, Treble,
Fade, Balance, and Speed Sensitive Volume (SSV) (if so equipped) by pressing the
AUDIO knob until the desired mode appears in the display. Then turn the TUNE knob to
adjust to the desired level.
08
* SAT presets are only available on SAT equipped vehicles.

NISSAN MAXIMA ADDITIONAL FEATURES
REMOTE KEYLESS ENTRY SYSTEM
LOCK DOORS
Press the LOCK button to lock all doors.
UNLOCK DOORS
Press the UNLOCK button once to unlock
the driver’s door only. Press the button again
within 5 seconds to unlock all doors.
RELEASING TRUNK LID
Press and hold the TRUNK RELEASE button
for longer than 0.5 seconds to open the
trunk lid.
USING THE PANIC ALARM
Press and hold the PANIC button for longer
than 0.5 seconds. The panic alarm will
sound and the headlights will stay on for 25
seconds. The panic alarm stops when it has
run for 25 seconds or when any button is pressed on the keyfob.
HORN BEEP FEATURE
The horn beep feature can be deactivated. Refer to the “Display screen, heater, air
conditioner and audio systems” section in your Owner’s Manual for the procedure.
REMOTE OPENING OF FRONT WINDOWS
To open the front windows with the keyfob, press and hold the UNLOCK button for longer
than 3 seconds after the doors are unlocked. The windows cannot be closed by using
the keyfob.
OPENING AND CLOSING WINDOWS WITH THE KEY
The driver’s door key operation allows you to open and close windows equipped with
automatic operation at the same time.
■ To open the windows, turn the driver’s door key toward the rear of the vehicle for longer
than 1 second after the door is unlocked.
■ To close the windows, turn the driver’s door key toward the front of the vehicle for longer
than 1 second after the door is locked.
CHILD SAFETY REAR DOOR LOCK
Child safety locks help prevent the rear doors from
being opened accidentally, especially when small
children are in the vehicle. The child safety lock levers
are located on the edge of the rear doors. When the
lever is in the LOCK position, the door can be opened
only from the outside.

SUNROOF CONTROLS (if so equipped)
TILTING THE SUNROOF
03
■ To tilt the sunroof up, push the tilt switch to
the UP position.
automatically close and then tilt up.
If the roof is open, it will
01
■ To tilt the sunroof down, push the tilt switch
to the DOWN position.
02
SLIDING THE SUNROOF
■ To open the roof, slide the switch to the
03
OPEN position.
If the roof is tilted up, it
04
02
will automatically tilt down and then open.
04
■ To close the roof, slide the switch to the CLOSE position.
■ The position of the sliding roof lid can be chosen by the position of the sliding switch.
■ To fully open or close the roof, move the switch completely to the OPEN or
CLOSE position.
INTERIOR TRUNK LID RELEASE
The interior trunk lid release mechanism provides a
means of escape for children and adults in the event
they become locked inside the trunk.
■ To open the trunk from the inside, pull the
illuminated release handle until the lock releases,
then push up on the trunk lid. The handle is
located inside the trunk compartment on the
interior of the trunk lid.
■ The release handle is made of a material that
glows in the dark after a brief exposure to
ambient light.
01
FRONT PASSENGER AIRBAG STATUS LIGHT
This vehicle is equipped with the Nissan Advanced
Air Bag System. The right front passenger air bag
is designed to automatically turn off under some
conditions. If the right front passenger air bag is off,
the right front PASSENGER AIRBAG status light will
be illuminated. The light will also be illuminated any
time the right front passenger seat is not occupied.
Refer to the Owner’s Manual for detailed information
regarding the Nissan Advanced Air Bag System.

TRUNK LID OPENER
The trunk lid opener lever is located on the driver’s door.
■ To open the trunk lid, pull the opener lever out.
■ To close the trunk lid, lower and push the trunk lid
down securely.
6-SPEED MANUAL
TRANSMISSION
LOCK-OUT
■ In 6-speed manual transmission
equipped vehicles, the shift lever is
equipped with a Reverse lock-out
feature that prevents accidental
selection of Reverse (instead of
6th gear).
SHIFTING TO REVERSE
■ Lift up on the collar just below the
shift lever, then move it to the right
and back into Reverse.
FUEL FILLER LID OPENER
The fuel filler lid opener lever is located on the
driver’s door.
■ To open the fuel filler lid, push the lever.
■ To lock, close the fuel filler lid securely.
REAR CENTER CONSOLE/TRUNK
ACCESS (4 passenger model only)
The trunk can be accessed through
the rear center console panel between
the rear seats. The panel can be
locked using the master key to prevent
unauthorized access.

AUTOMATIC DRIVER POSITIONER
(if so equipped)
The automatic driver positioner system has
two features:
■ Memory storage function
■ Entry/exit function (for automatic
transmission model only)
MEMORY STORAGE FUNCTION
Two positions for the driver’s seat, steering
column, and outside mirrors can be stored in
the automatic driver positioner memory. Follow
these procedures to set driver preferences.
SET THE DESIRED POSITIONING
1. For vehicles equipped with automatic transmission, set the shift selector lever to the
Park position. For vehicles equipped with manual transmission, place the shift lever in the
Neutral position and set the parking brake.
2. Turn the ignition on and adjust the driver’s seat, steering column, and outside mirrors to
the desired positions.
3. Press the SET (memory) button and within 5 seconds press the position button (1 or 2)
for at least 1 second until the indicator light illuminates. The position is now stored
in memory.
LINK TO KEYFOB
■ Within 5 seconds of setting the memory position (indicator light is on and ignition is on),
press the
■ A keyfob can be linked to each memory button.
■ If memory positioning is re-set to a new location, it will be necessary to re-link the keyfob.
RECALLING A MEMORY SETTING FROM THE MEMORY PAD
■ With the ignition on and shift selector lever in the Park position (automatic transmission) or
Neutral position with the parking brake set (manual transmission), press the position button
(1 or 2) for at least 1 second.
FROM THE KEYFOB
■ If properly linked, operation of the
steering column and mirrors to the memorized position.
ENTRY/EXIT FUNCTION (for automatic transmission model only)
The driver’s seat and steering column automatically move to allow the driver to get into and
out of the driver’s seat more easily. The driver’s seat slides backward and the steering
column moves up when:
■ The key is removed from the ignition switch.
■ The driver’s door is opened with the key turned to LOCK.
■ The key is turned from ACC to LOCK with the driver’s door open and the automatic
transmission shift selector lever is in the Park position.
The driver’s seat and steering column return to the previous position when:
■ The key is inserted into the ignition switch.
■ The driver’s door is closed with the key turned to LOCK.
■ The key is turned from ACC to ON while the automatic transmission shift selector lever is
in the Park position.
button on the remote.
button will automatically return the driver’s seat,

FRONT SEAT ADJUSTMENTS
With manual seats (passenger’s side, if so equipped):
FORWARD AND BACKWARD
■ Pull up on the lever under the front of the seat and slide backward or forward to the
desired position. Release the lever to lock the seat in position.
RECLINING
■ Lift the lever on the side of the seat to adjust your seatback backward or forward; release
the lever when you have found a comfortable angle and the seat belt fits properly.
With power seats (driver’s seat, if so equipped for passenger’s seat):
FORWARD AND BACKWARD
■ Move the control forward or backward to adjust
the seat cushion forward or backward.
01
■ SEAT LIFTER: Pull up to raise the seat cushion;
press down to lower the cushion.
02
01
02
03
02
04
RECLINING
■ Push the switch forward to move the
seatback forward; push it back to move
the seatback backward.
03
LUMBAR SUPPORT (driver’s seat, manual or power, if so equipped):
■ Your driver’s seat has a lumbar support; adjust it by moving the manual lever up or down.
Or, if equipped with power lumbar, adjust it by pushing the switch forward or backward.
04
FOLDING DOWN THE REAR SEATS (5 passenger model only)
FROM INSIDE THE VEHICLE
■ Fold down the center/passenger’s
side of the rear seat by depressing the
release button.
01
01
■ Fold down the driver’s side of the rear
seat by reaching through the opening
and pulling on the strap located behind
the seat.
02
02
FROM THE TRUNK
■ Fold down the center/passenger’s side
of the rear seat by pulling the strap
located behind the seat.
03
04
■ Fold down the driver’s side of the rear
seat by pulling on the strap located
behind the seat.
04
03

This easy-to-use Quick Reference Guide is intended to help you more fully appreciate some
of the unique features and functions of your new vehicle. However, it is not intended to replace
your Owner’s Manual. The Owner’s Manual contains more detailed information to help you
better understand the important safety warnings, features, operation, and maintenance of
your vehicle.
SH IFT_
Nissan, the Nissan Brand Symbol, “SH IFT_ “ t agline, Z and Nissan model names are Niss an trademarks.
©2004 Nissan North America, Inc.
QR5E-0A34U2 Printing: April 2005 (03)
 Loading...