

Page 1
Operations Manual
Français p. 57 Español p. 115
Page 2
The official seal is your assurance that this product is
licensed or manufactured by Nintendo. Always look for
this seal when buying video game systems, accessories,
games and related products.
Wii U System Manuals
Types of Manuals
Please carefully read this Operations Manual before setup or use of the Wii U™ system. If you
have problems or questions after reading all of the instructions, please visit our customer service
area at support.nintendo.com or call 1-800-255-3700. Also, additional pre-installed electronic
manuals are available for the Wii U system and software applications from the HOME Menu, as
described on the next page.
Product recycling information:
Visit recycle.nintendo.com
IMPORTANT: The Wii U system specifications and Wii U Services are constantly evolving and we
may update or change the Wii U system or the Wii U Services in whole or in part, without notice
to you. Such updates may be required for you to play new Wii U games, enjoy new features, or
continue to access the Wii U Services. After the Wii U system is updated, any existing or future
unauthorized modification of the hardware or software of your Wii U system, or the use of an
unauthorized device in connection with your system, will render the system permanently unplayable. Content obtained through the unauthorized modification of the hardware or software of
your Wii U system will be removed.
Printed manuals
• Wii U Quick Start Guide
This guide covers the basic information for setting up and using your Wii U system.
• Wii U Operations Manual (this manual)
This manual gives the names of each component and describes how to recharge the
controller, configure System Settings, and perform various procedures. It also provides
troubleshooting and support information.
Pre-installed electronic manuals
• Wii U Electronic Manual
This manual describes the Wii U features and gives detailed instructions on how to use the
preinstalled software.
• Wii Menu Electronic Manual
This manual describes the Wii Menu features and gives detailed instructions on how to use
the included software.
( )
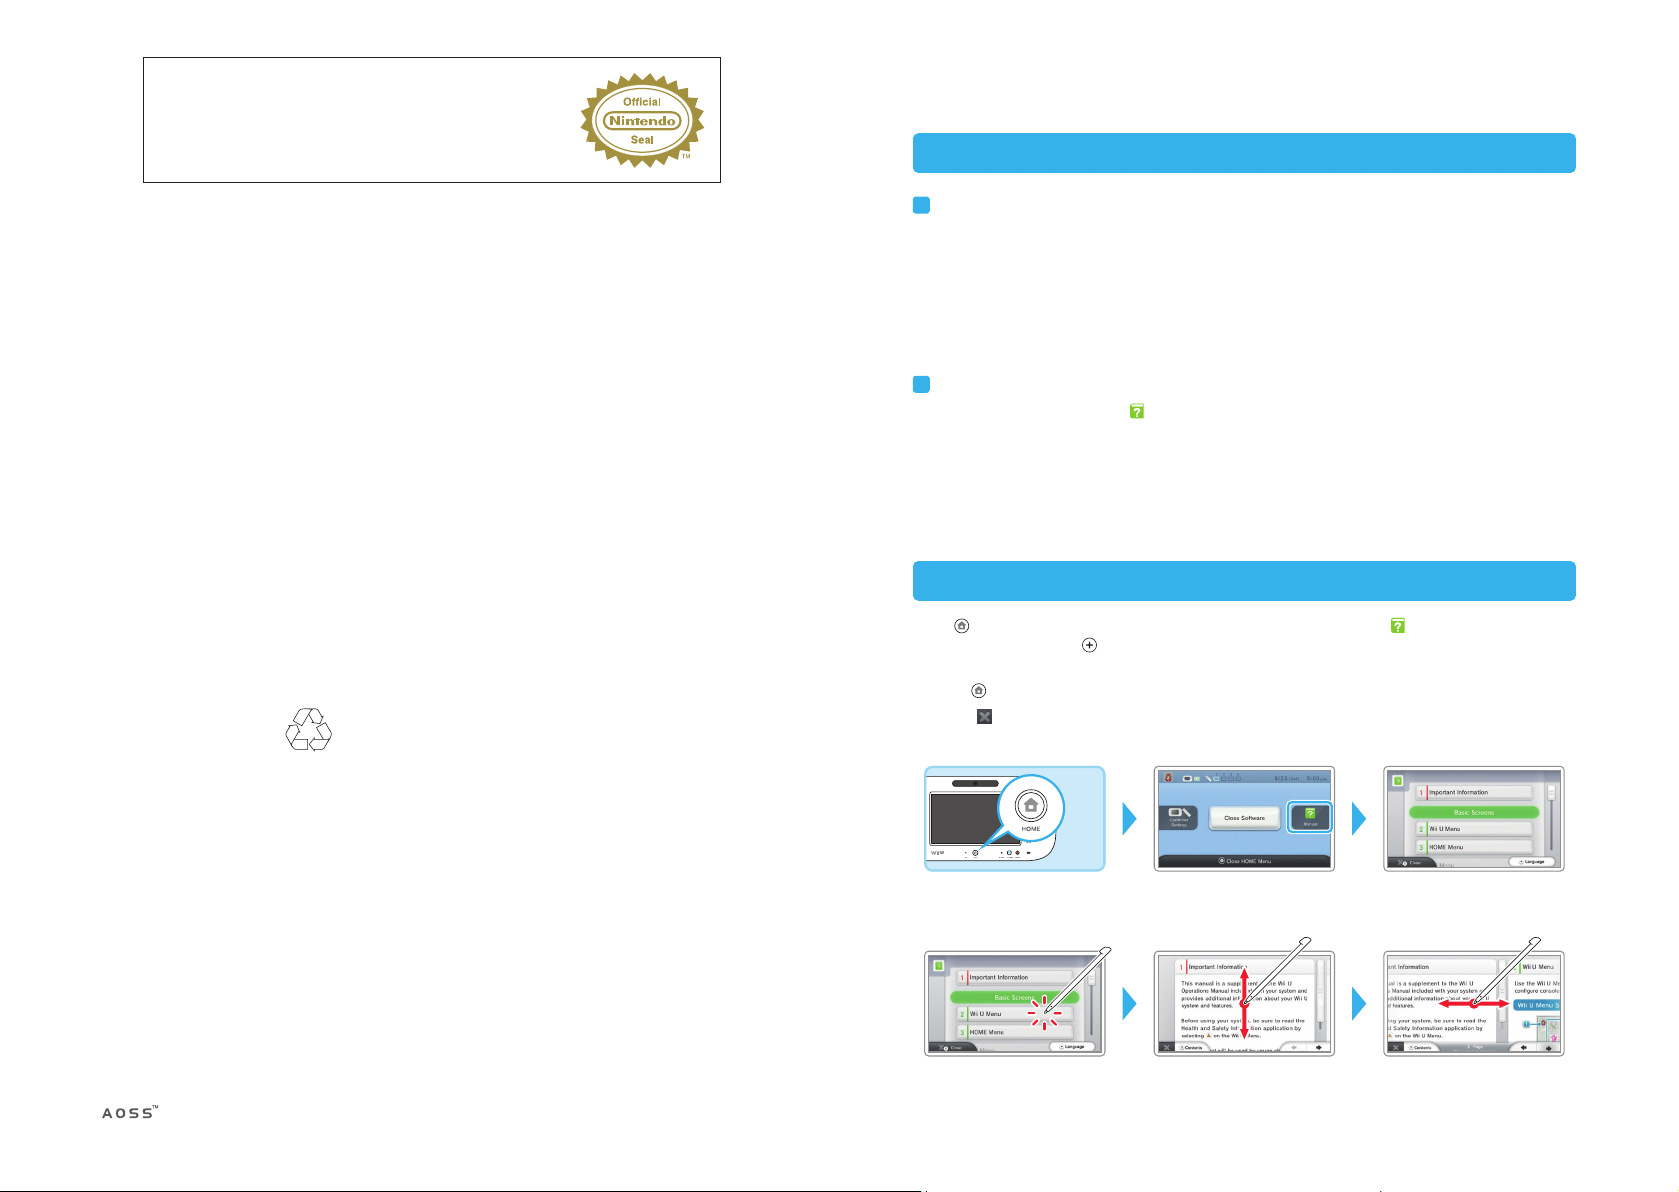
Viewing an Electronic Manual
Press on the Wii U™ GamePad to open the HOME Menu, then tap to open the Wii U
Electronic Manual. Press or select the button in the lower right corner of the screen to switch
languages.
• Press while playing a Wii U software title to see the electronic manual for that software.
• Touch at the bottom left of the screen to close the manual and return to the previous
screen you were viewing before opening the HOME Menu.
HOME Menu Electronic Manual Contents
Use the stylus to tap and slide or use the L or R Stick (p. 10) to view the manual.
This product only plays Wii and Wii U Game Discs manufactured for use in the Americas.
This WiiU console is for use only in the Americas.
Patents issued and pending both domestically and internationally. Visit patents.nintendo.com for
list of patent numbers.
NOTE: This product does not contain latex. This product complies with applicable laws barring the use of toxic materials
such as lead, mercury, cadmium, hexavalent chromium, PBB, or PBDE in consumer products.
and AOSS™ are the trademarks of BUFFALO INC.
The Wi-Fi Protected Setup icon is a registered trademark of the Wi-Fi Alliance.
Trademarks are property of their respective owners. Wii U is a trademark of Nintendo. © 2012 Nintendo.
Viewing pagesSelecting items Changing pages
NOTE: Above images are for reference only; the actual screen content may vary.
1
Page 3

Contents
Wii U System Manuals . . . . . . . . . . . . . . . . . . . . . . . . . . . . . . . . . . . . . . . . . . . . . . . 1
Types of Manuals . . . . . . . . . . . . . . . . . . . . . . . . . . . . . . . . . . . . . . . . . . . . . . . . . . . . . . . . 1
Viewing an Electronic Manual . . . . . . . . . . . . . . . . . . . . . . . . . . . . . . . . . . . . . . . . . . . . . 1
Health and Safety Information . . . . . . . . . . . . . . . . . . . . . . . . . . . . . . . . . . . . . . . . 4
System Setup
System Components . . . . . . . . . . . . . . . . . . . . . . . . . . . . . . . . . . . . . . . . . . . . . . . . 8
Charging the WiiU GamePad. . . . . . . . . . . . . . . . . . . . . . . . . . . . . . . . . . . . . . . .18
Charging Options. . . . . . . . . . . . . . . . . . . . . . . . . . . . . . . . . . . . . . . . . . . . . . . . . . . . . . .18
Battery LED Status . . . . . . . . . . . . . . . . . . . . . . . . . . . . . . . . . . . . . . . . . . . . . . . . . . . . . .19
Charging the WiiU Pro Controller . . . . . . . . . . . . . . . . . . . . . . . . . . . . . . . . . . . .20
Charging Procedure. . . . . . . . . . . . . . . . . . . . . . . . . . . . . . . . . . . . . . . . . . . . . . . . . . . . . 20
Battery LED Status . . . . . . . . . . . . . . . . . . . . . . . . . . . . . . . . . . . . . . . . . . . . . . . . . . . . . .21
Turning the Power On/Off . . . . . . . . . . . . . . . . . . . . . . . . . . . . . . . . . . . . . . . . . . .22
Options for Turning the Power On . . . . . . . . . . . . . . . . . . . . . . . . . . . . . . . . . . . . . . . .22
Turning the Power Off . . . . . . . . . . . . . . . . . . . . . . . . . . . . . . . . . . . . . . . . . . . . . . . . . . .23
Turning Only the Wii U GamePad Screen Off . . . . . . . . . . . . . . . . . . . . . . . . . . . . . . .23
Pairing Controllers . . . . . . . . . . . . . . . . . . . . . . . . . . . . . . . . . . . . . . . . . . . . . . . . .24
Pairing Procedure for Controllers . . . . . . . . . . . . . . . . . . . . . . . . . . . . . . . . . . . . . . . . .24
Pairing Procedure for the Wii U GamePad. . . . . . . . . . . . . . . . . . . . . . . . . . . . . . . . . .24
Using Wii Remote Controllers. . . . . . . . . . . . . . . . . . . . . . . . . . . . . . . . . . . . . . . .25
Installing the Sensor Bar . . . . . . . . . . . . . . . . . . . . . . . . . . . . . . . . . . . . . . . . . . . . . . . . .25
Recommended Play Environment. . . . . . . . . . . . . . . . . . . . . . . . . . . . . . . . . . . . . . . . . 26
Using the Wii Remote Jacket . . . . . . . . . . . . . . . . . . . . . . . . . . . . . . . . . . . . . . . . . . . . .27
Installing Batteries in the Wii Remote. . . . . . . . . . . . . . . . . . . . . . . . . . . . . . . . . . . . . . 27
Wearing the Wii Remote Wrist Strap . . . . . . . . . . . . . . . . . . . . . . . . . . . . . . . . . . . . . .28
Using the Nunchuk. . . . . . . . . . . . . . . . . . . . . . . . . . . . . . . . . . . . . . . . . . . . . . . . . . . . . .29
Disconnecting the Nunchuk . . . . . . . . . . . . . . . . . . . . . . . . . . . . . . . . . . . . . . . . . . . . . .30
Internet Settings . . . . . . . . . . . . . . . . . . . . . . . . . . . . . . . . . . . . . . . . . . . . . . . . . . .34
Internet Connection Requirements. . . . . . . . . . . . . . . . . . . . . . . . . . . . . . . . . . . . . . . .34
Parental Controls. . . . . . . . . . . . . . . . . . . . . . . . . . . . . . . . . . . . . . . . . . . . . . . . . . .36
Restriction Options . . . . . . . . . . . . . . . . . . . . . . . . . . . . . . . . . . . . . . . . . . . . . . . . . . . . .36
System Operations
Transferring System Data. . . . . . . . . . . . . . . . . . . . . . . . . . . . . . . . . . . . . . . . . . . .38
Data You Can Transfer . . . . . . . . . . . . . . . . . . . . . . . . . . . . . . . . . . . . . . . . . . . . . . . . . . .38
Transfer Procedure . . . . . . . . . . . . . . . . . . . . . . . . . . . . . . . . . . . . . . . . . . . . . . . . . . . . . .39
On-Screen Keyboard . . . . . . . . . . . . . . . . . . . . . . . . . . . . . . . . . . . . . . . . . . . . . . .40
Wii U On-Screen Keyboard. . . . . . . . . . . . . . . . . . . . . . . . . . . . . . . . . . . . . . . . . . . . . . .40
Input Modes . . . . . . . . . . . . . . . . . . . . . . . . . . . . . . . . . . . . . . . . . . . . . . . . . . . . . . . . . . .40
Controller Calibration. . . . . . . . . . . . . . . . . . . . . . . . . . . . . . . . . . . . . . . . . . . . . . .41
Calibrating the Touch Screen . . . . . . . . . . . . . . . . . . . . . . . . . . . . . . . . . . . . . . . . . . . . .41
Resetting the L and R Control Sticks . . . . . . . . . . . . . . . . . . . . . . . . . . . . . . . . . . . . . . .41
Battery Replacement . . . . . . . . . . . . . . . . . . . . . . . . . . . . . . . . . . . . . . . . . . . . . . .42
Wii U GamePad. . . . . . . . . . . . . . . . . . . . . . . . . . . . . . . . . . . . . . . . . . . . . . . . . . . . . . . . .42
Wii U Pro Controller . . . . . . . . . . . . . . . . . . . . . . . . . . . . . . . . . . . . . . . . . . . . . . . . . . . . .44
Wii U Console . . . . . . . . . . . . . . . . . . . . . . . . . . . . . . . . . . . . . . . . . . . . . . . . . . . . . . . . . .46
Consumer Information
Troubleshooting . . . . . . . . . . . . . . . . . . . . . . . . . . . . . . . . . . . . . . . . . . . . . . . . . . .48
Warranty and Service Information . . . . . . . . . . . . . . . . . . . . . . . . . . . . . . . . . . . .54
Regulations for Equipment Use . . . . . . . . . . . . . . . . . . . . . . . . . . . . . . . . . . . . . .55
System Configuration
System Settings. . . . . . . . . . . . . . . . . . . . . . . . . . . . . . . . . . . . . . . . . . . . . . . . . . . .32
Configuring Settings . . . . . . . . . . . . . . . . . . . . . . . . . . . . . . . . . . . . . . . . . . . . . . . . . . . .32
User Settings . . . . . . . . . . . . . . . . . . . . . . . . . . . . . . . . . . . . . . . . . . . . . . . . . . . . . .33
Adding Users. . . . . . . . . . . . . . . . . . . . . . . . . . . . . . . . . . . . . . . . . . . . . . . . . . . . . . . . . . .33
Switching Users . . . . . . . . . . . . . . . . . . . . . . . . . . . . . . . . . . . . . . . . . . . . . . . . . . . . . . . .33
2 3
Page 4
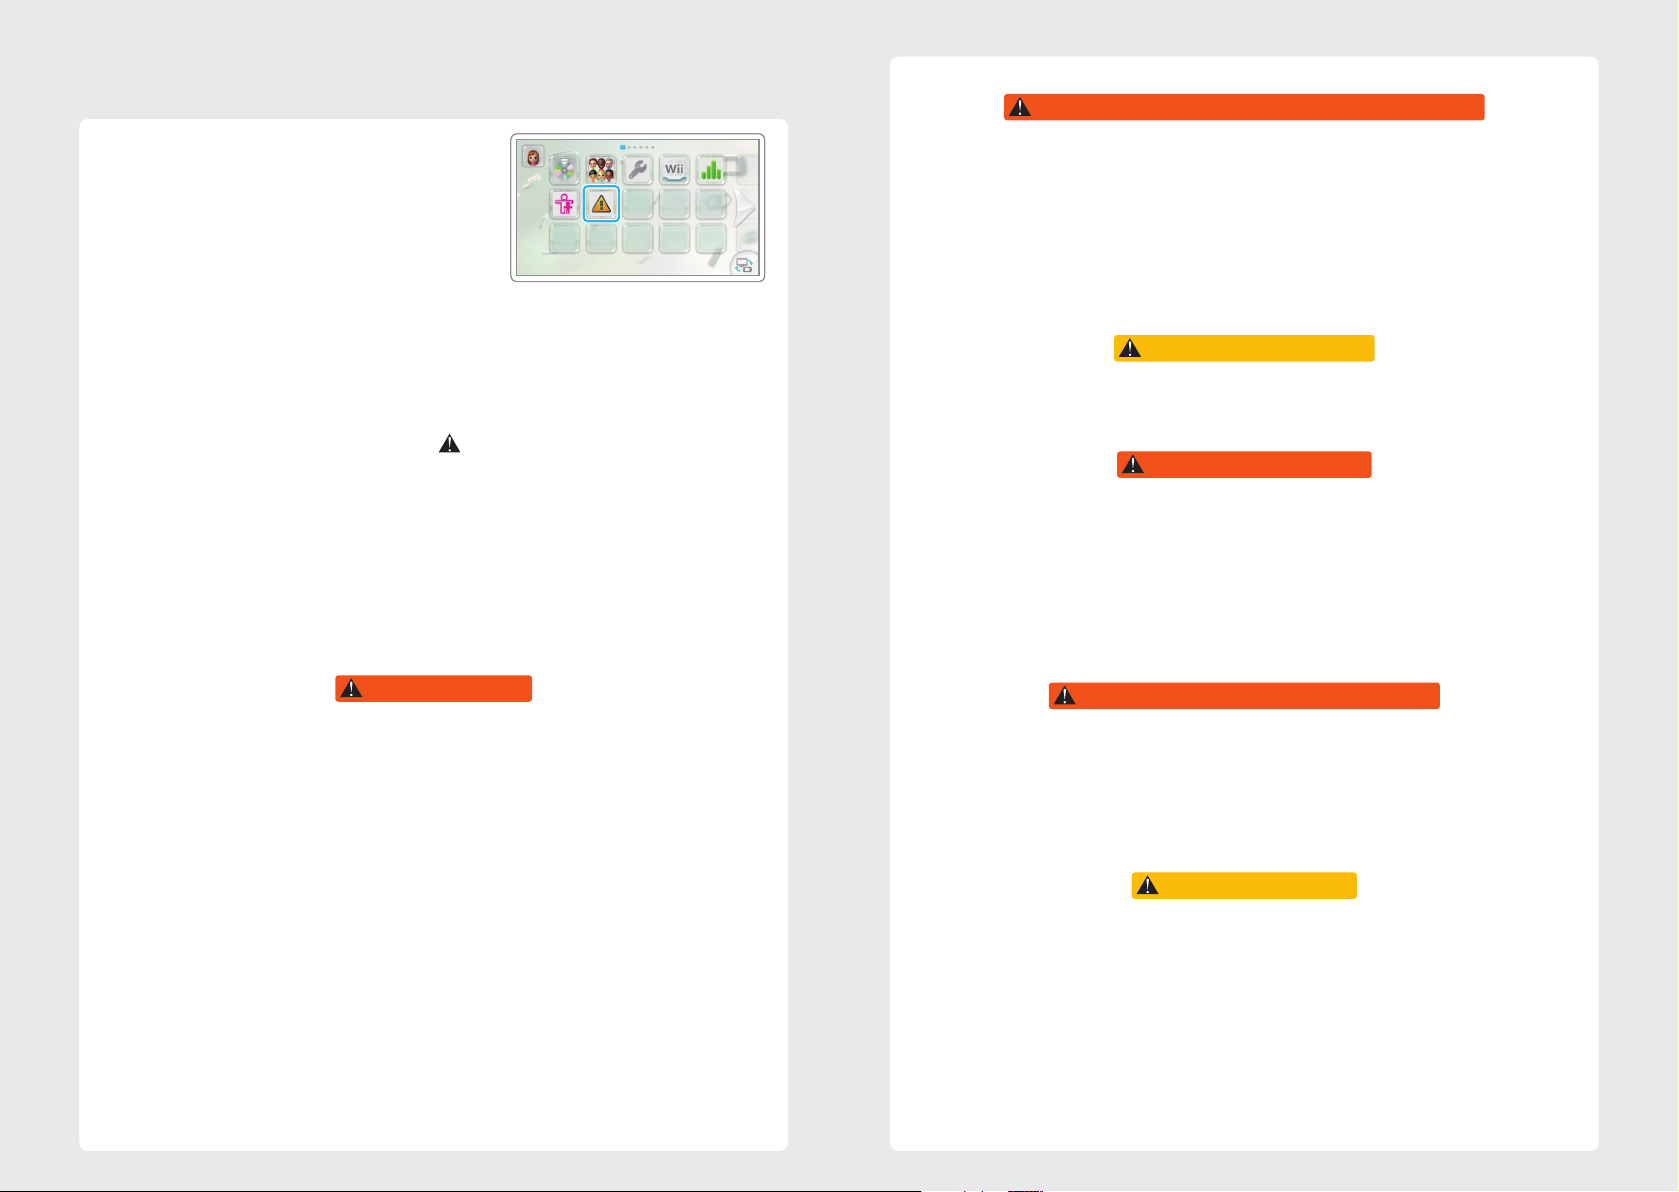
Health and Safety Information
Before using the Wii U system read the following important health and safety information, and be sure to read
the information in the Health and Safety application
available on the Wii U Menu screen. This application also
contains important usage guidelines for Wii U components and accessories.
Important Safety Information
Read the following warnings before setup or use of the WiiU system. If this product will be
used by young children, this manual should be read and explained to them by an adult.
Failing to do so may cause injury. Please carefully review the instructions for the game you
are playing for additional health and safety information.
Throughout this manual, you will see this symbol followed by WARNING or CAUTION, or you
may see the term IMPORTANT. These terms have different levels of meaning as outlined below.
Please read and understand these terms and the information that appears after them before
using your WiiU system.
WARNING: Warns you about incorrect use of this system that could result in serious personal injury.
CAUTION: Cautions you about incorrect use of this system that could result in personal
injury or damage to the system, components, games, or accessories.
IMPORTANT: Informs you about incorrect use of the system that could result in damage to
the system, components, games, or accessories.
WARNING - REPETITIVE MOTION INJURIES AND EYESTRAIN
Playing video games can make your muscles, joints, skin or eyes hurt. Follow these instructions
to avoid problems such as tendinitis, carpal tunnel syndrome, skin irritation or eyestrain:
• Avoid excessive play. Parents should monitor their children for appropriate play.
• Take a 10 to 15 minute break every hour, even if you don’t think you need it.
• If your hands, wrists, arms or eyes become tired or sore while playing, or if you feel symptoms
such as tingling, numbness, burning or stiffness, stop and rest for several hours before playing
again.
• If you continue to have any of the above symptoms or other discomfort during or after play,
stop playing and see a doctor.
CAUTION - MOTION SICKNESS
Playing video games can cause motion sickness in some players. If you or your child feels dizzy
or nauseous when playing video games, stop playing and rest. Do not drive or engage in other
demanding activity until you feel better.
WARNING - ELECTRIC SHOCK
To avoid electric shock when you use this system:
• Do not use the Wii U system during a lightning storm. There may be a risk of electric shock
from lightning.
• Use only the AC adapter that comes with your system.
• Do not use the AC adapter if it has damaged, split or broken cords or wires.
• Make sure that the AC adapter cord is fully inserted into the wall outlet or extension cord.
• Always carefully disconnect all plugs by pulling on the plug and not on the cord. Make sure
the Wii U power button is turned OFF before removing the AC adapter cord from an outlet.
WARNING - SEIZURES
• Some people (about 1 in 4000) may have seizures or blackouts triggered by light flashes or
patterns, and this may occur while they are watching TV or playing video games, even if they
have never had a seizure before.
• Anyone who has had a seizure, loss of awareness, or other symptom linked to an epileptic
condition should consult a doctor before playing a video game.
• Parents should watch their children play video games. Stop playing and consult a doctor if you
or your child has any of the following symptoms:
Convulsions Eye or muscle twitching Loss of awareness
Altered vision Involuntary movements Disorientation
To reduce the likelihood of a seizure when playing video games:
1. Sit or stand as far from the screen as possible.
2. Play video games on the smallest available television screen.
3. Do not play if you are tired or need sleep.
4. Play in a well-lit room.
5. Take a 10 to 15 minute break every hour.
The Wii U console and accessories, including the Wii U GamePad, Wii U Pro Controller, and Wii
Remote controllers, can emit radio waves that can affect the operation of nearby electronics,
including cardiac pacemakers.
• Do not operate the Wii U console and accessories within 9 inches of a pacemaker.
• If you have a pacemaker or other implanted medical device, do not use the Wii U console and
accessories without first consulting your doctor or the manufacturer of your medical device.
The Wii U console is a Class I laser product. Do not attempt to disassemble the Wii U console.
Refer servicing to qualified personnel only.
CAUTION: Use of controls or adjustments or procedures other than those specified herein may
result in hazardous radiation exposure.
Specifications: Laser Type: Semiconductor laser Laser Wavelength: 405nm, 660nm
Laser Power: Max. 0.6mW, Max. 0.9mW Numeric aperture: 0.85, 0.6
WARNING - RADIO FREQUENCY INTERFERENCE
CAUTION - LASER DEVICE
4 5
Page 5
WARNING - BATTERY LEAKAGE
The Wii U GamePad and Wii U Pro Controller contain a rechargeable lithium ion battery.
Leakage of ingredients contained within the battery, or the combustion products of the ingredients, can cause personal injury as well as damage to your Wii U system. If battery leakage occurs,
avoid contact with skin. If contact occurs, immediately wash thoroughly with soap and water. If
liquid leaking from a battery comes into contact with your eyes, immediately flush thoroughly
with water and see a doctor.
To avoid battery leakage:
• Do not expose battery to excessive physical shock, vibration, or liquids.
• Do not disassemble, attempt to repair, or deform the battery.
• Do not dispose of battery in a fire.
• Do not touch the terminals of the battery or cause a short between the terminals with a metal
object.
• Do not peel or damage the battery label.
Some accessories may use AA batteries. Nintendo recommends high quality alkaline batteries
for best performance and longevity of battery life. If you use rechargeable nickel metal hydride
(NiMH) batteries, be sure to follow the manufacturer’s guidelines for safety and proper usage.
Leakage of battery fluid can cause personal injury as well as damage to your system and accessories. If battery leakage occurs, thoroughly wash the affected skin and clothes. Keep battery
fluid away from your eyes and mouth. Leaking batteries may make popping sounds.
To avoid battery leakage:
• Do not mix used and new batteries (replace all batteries at the same time).
• Do not mix different brands of batteries.
• Nintendo recommends alkaline batteries. Do not use Lithium ion, nickel cadmium (NiCd), or
carbon zinc batteries.
• Do not leave batteries in the remote for long periods of non-use.
• Do not recharge alkaline or non-rechargeable batteries.
• Do not put the batteries in backwards. Make sure that the positive (+) and negative (-) ends
are facing in the correct directions. Insert the negative end first. When removing batteries,
remove the positive end first.
• Do not use damaged, deformed or leaking batteries.
• Do not dispose of batteries in a fire.
The Wii U console contains a lithium coin cell battery. Contains perchlorate material - special handling may apply. For more information visit www.dtsc.ca.gov/hazardouswaste/perchlo-
rate/. Do not remove the battery from the Wii U console unless it needs to be replaced.
PRECAUTIONS WHEN USING AC ADAPTERS
Please read and follow the precautions listed below when setting up and using the Wii U system.
Failure to do so may result in damage to your Wii U system or accessories.
• Plug the AC adapter into an easily accessible standard wall outlet near your Wii U system.
• Make sure there is adequate ventilation around the AC adapter and Wii U system, and that any
air vents are unobstructed.
• Do not expose the AC adapter or Wii U system to extremes of heat.
• Do not expose the AC adapter or Wii U system to any type of moisture.
• Do not place objects filled with liquids on or near the AC adapter or Wii U system.
See the bottom of the AC adapter for additional information.
6
Page 6

System Setup
System Components � � � � � � � � � � � � � � � � � � � � � � � � � � � � � 8
Charging the WiiU GamePad � � � � � � � � � � � � � � � � � � � � 18
Charging Options � � � � � � � � � � � � � � � � � � � � � � � � � � � � � � � � � � � � � � � � � � � � � 18
Battery LED Status � � � � � � � � � � � � � � � � � � � � � � � � � � � � � � � � � � � � � � � � � � � � �19
Charging the WiiU Pro Controller� � � � � � � � � � � � � � � � � 20
Charging Procedure � � � � � � � � � � � � � � � � � � � � � � � � � � � � � � � � � � � � � � � � � � �20
Battery LED Status � � � � � � � � � � � � � � � � � � � � � � � � � � � � � � � � � � � � � � � � � � � � �21
Turning the Power On/Off� � � � � � � � � � � � � � � � � � � � � � � � 22
Options for Turning the Power On � � � � � � � � � � � � � � � � � � � � � � � � � � � � � � � 22
Turning the Power Off� � � � � � � � � � � � � � � � � � � � � � � � � � � � � � � � � � � � � � � � � � 23
Turning Only the Wii U GamePad Screen Off� � � � � � � � � � � � � � � � � � � � � � 23
Pairing Controllers � � � � � � � � � � � � � � � � � � � � � � � � � � � � � � 24
Pairing Procedure for Controllers � � � � � � � � � � � � � � � � � � � � � � � � � � � � � � � � 24
Pairing Procedure for the Wii U GamePad � � � � � � � � � � � � � � � � � � � � � � � � 24
Using Wii Remote Controllers � � � � � � � � � � � � � � � � � � � � 25
Installing the Sensor Bar� � � � � � � � � � � � � � � � � � � � � � � � � � � � � � � � � � � � � � � � 25
Recommended Play Environment � � � � � � � � � � � � � � � � � � � � � � � � � � � � � � �26
Using the Wii Remote Jacket� � � � � � � � � � � � � � � � � � � � � � � � � � � � � � � � � � � � 27
Installing Batteries in the Wii Remote � � � � � � � � � � � � � � � � � � � � � � � � � � � � 27
Wearing the Wii Remote Wrist Strap � � � � � � � � � � � � � � � � � � � � � � � � � � � � � 28
Using the Nunchuk � � � � � � � � � � � � � � � � � � � � � � � � � � � � � � � � � � � � � � � � � � � � 29
Disconnecting the Nunchuk� � � � � � � � � � � � � � � � � � � � � � � � � � � � � � � � � � � � � 30
Page 7
Wii U Console
System Components
System Components
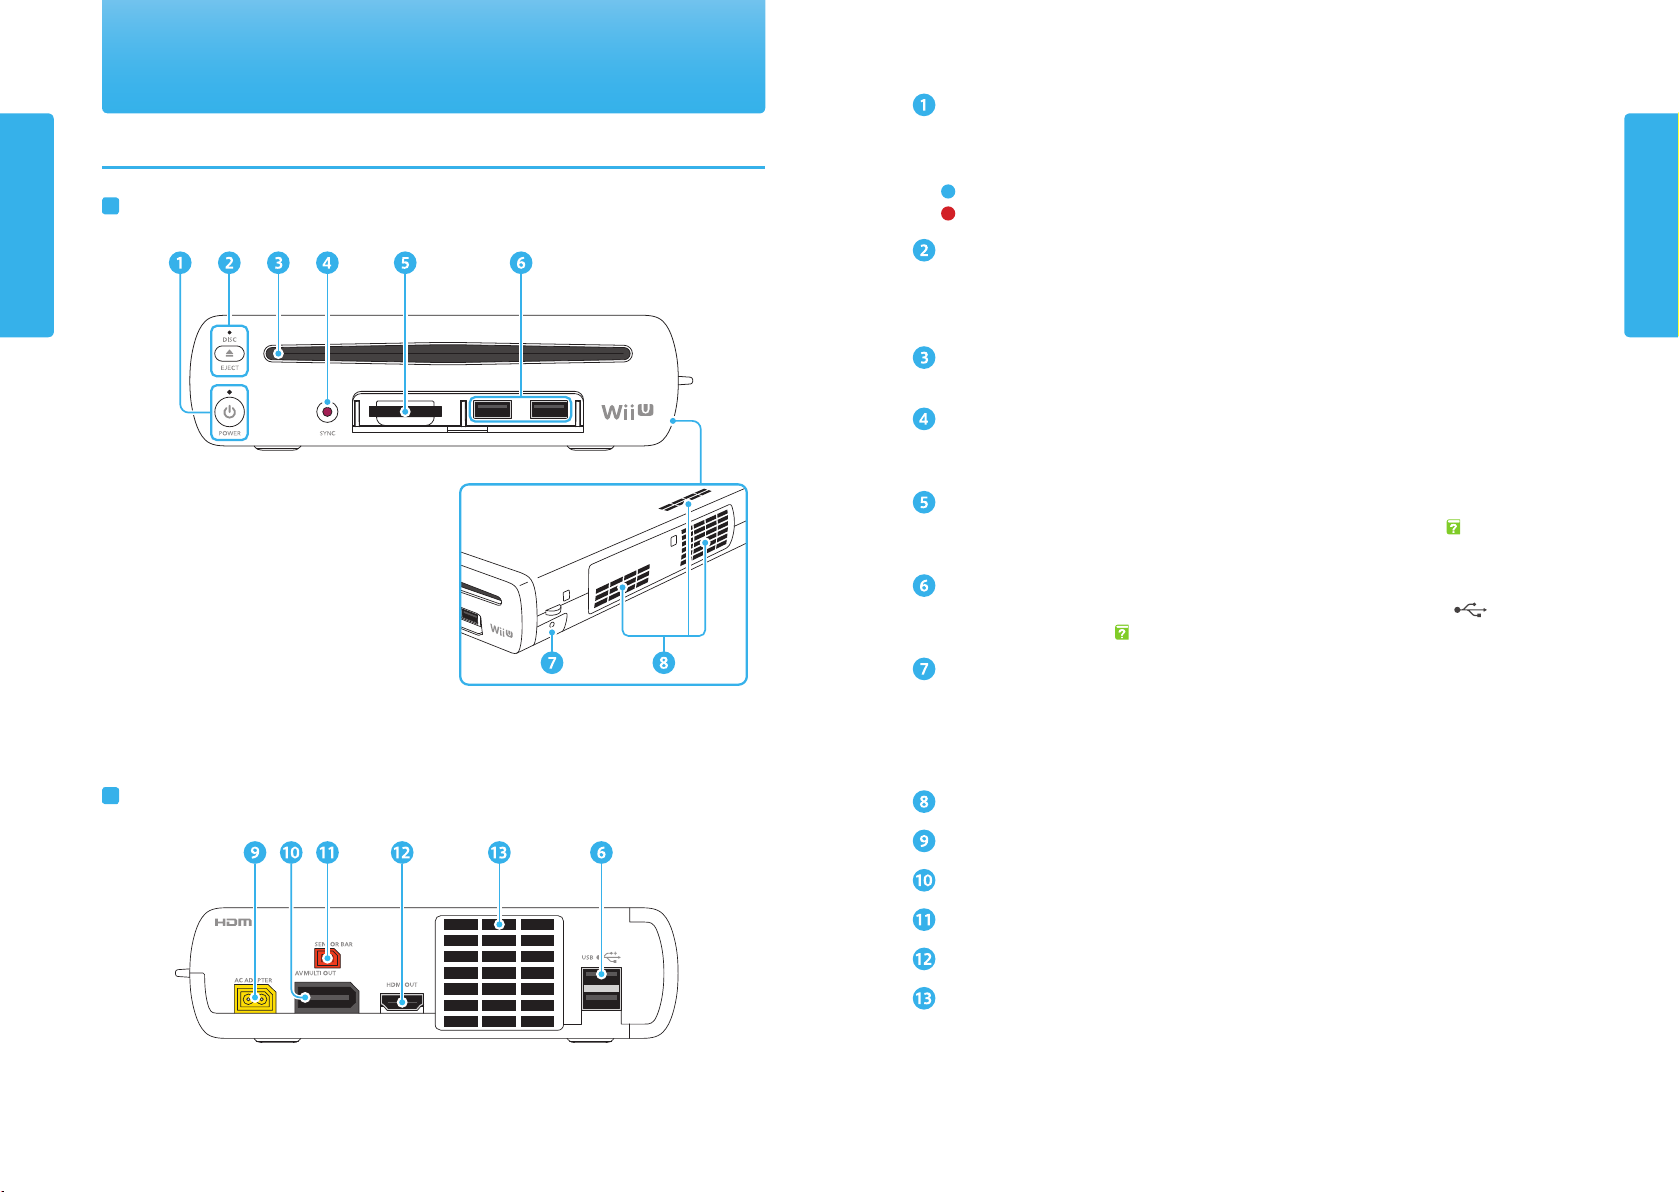
Front View
(showing the slot cover open)
POWER Button
Press to turn the Wii U console on or off�
Power LED
Indicates the status of the console (p� 22)�
(Blue): Power is on
(Red): Power is off
EJECT Button
Press this button to eject discs�
Disc LED
Lights up when a disc is inserted into the console�
Disc Slot
For inserting a Wii U or Wii Game Disc�
SYNC Button
Press this to pair (synchronize) the WiiU GamePad, Wii U Pro Controller (sold separately), or
Wii Remote™ Plus controller (sold separately) with the console (p� 24)�
SD Card Slot
For inserting SD Cards (sold separately), see the Wii U Electronic Manual ( ), Using SD
Cards�
USB Ports
For connecting USB devices (sold separately; devices may be marked with ; see the
WiiU Electronic Manual ( ), Using USB Devices)�
System Components
Back View
Right side view
Battery Cover
A coin cell battery (CR2032) is included�
• See the Battery Leakage warning in Health and Safety Information (p� 4) for important
information about this battery�
• Do not remove the battery from the Wii U console unless it needs to be replaced�
Air Intake
AC Adapter Connector
AV Multi Out Connector
Sensor Bar Connector
HDMI™ Port
Air Vent
98
Page 8
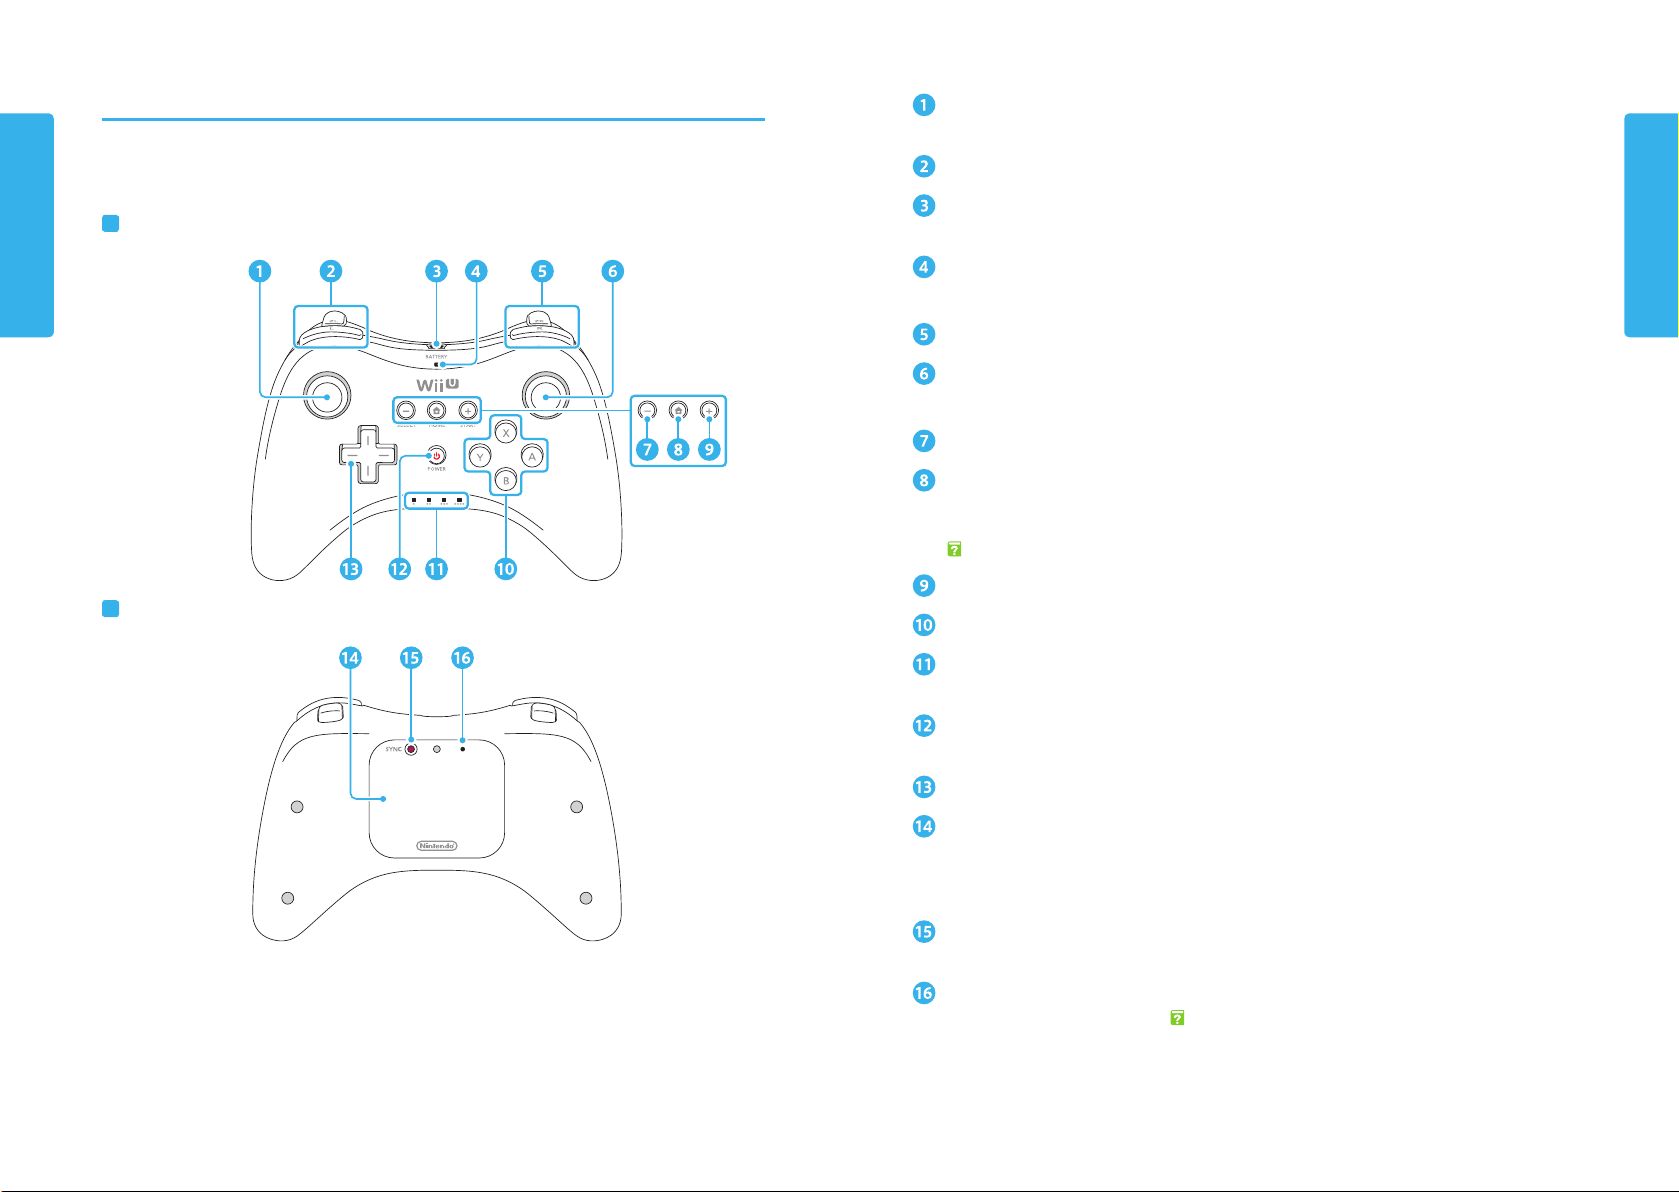
WiiU™ GamePad
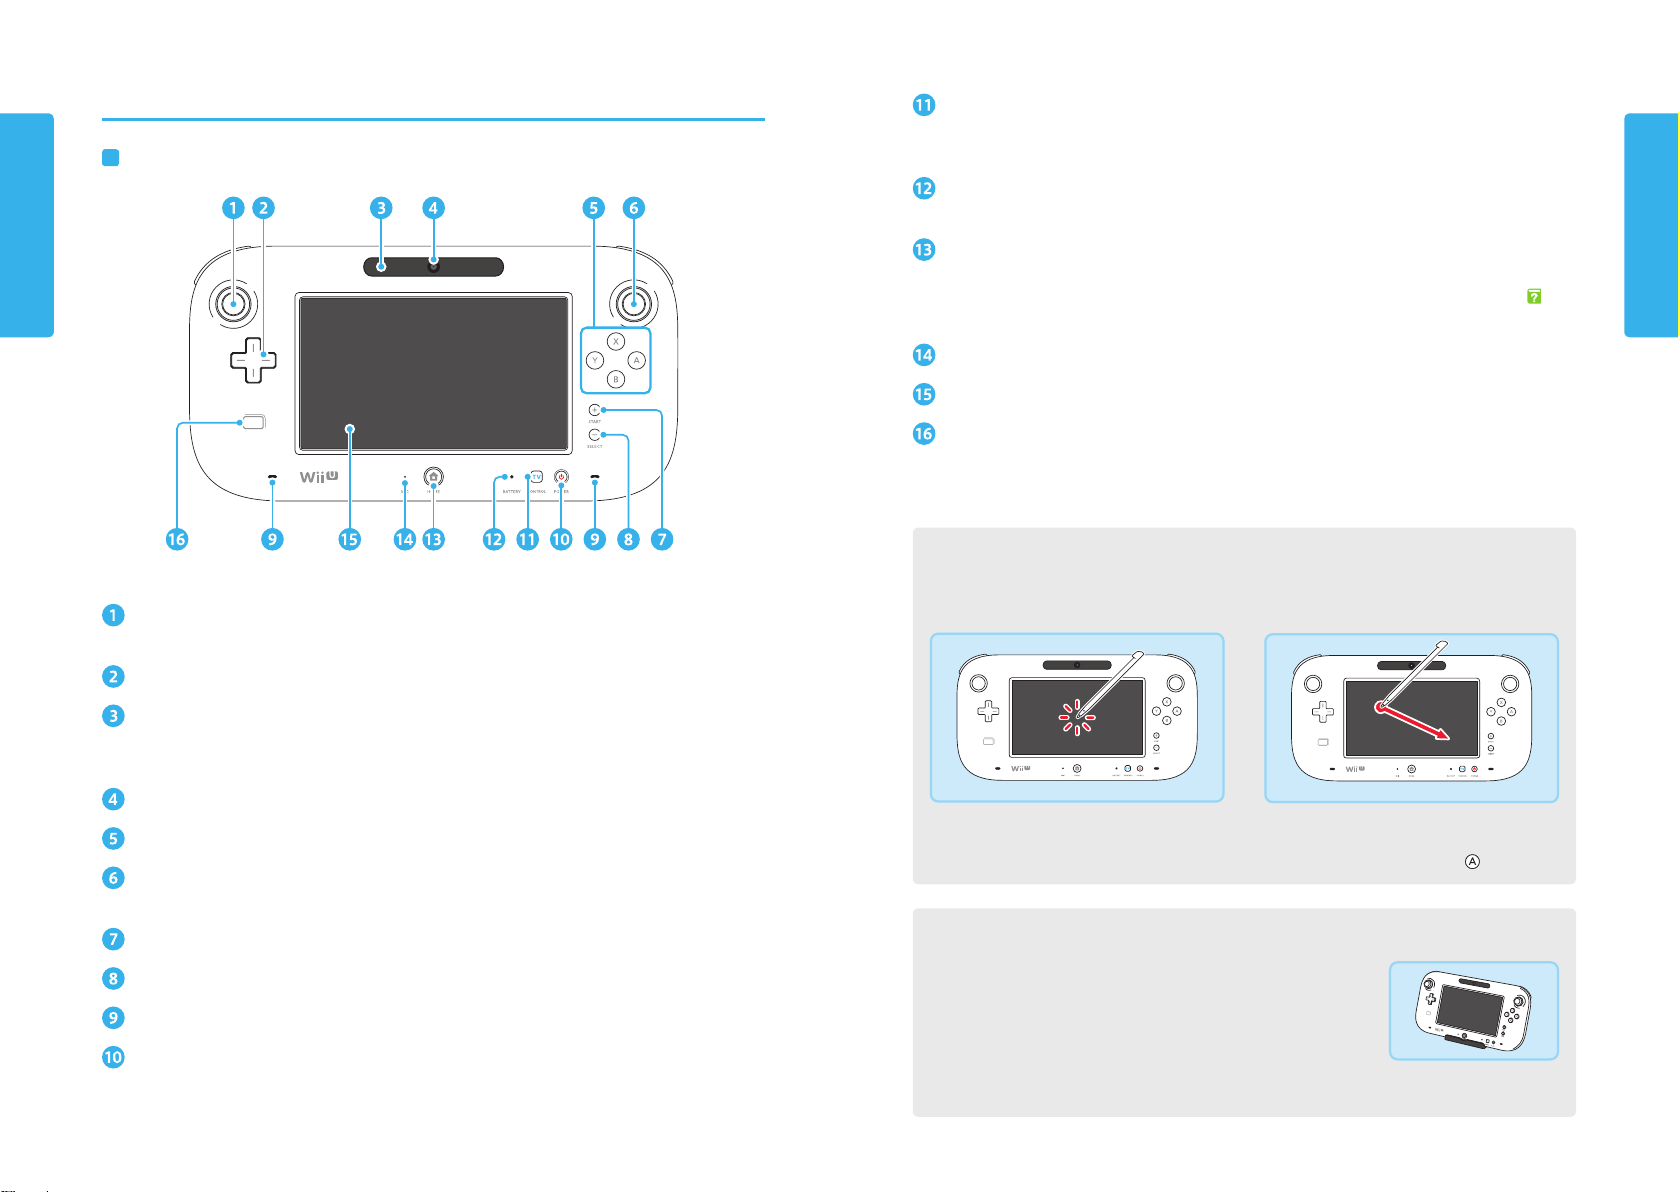
Front View
TV Control Button
Press to switch to the TV Remote Features screen� Allows input to your TV, DVD recorder, or
cable or satellite TV tuner (p� 22)�
Battery LED
Indicates charging status and remaining battery life (p� 19)�
HOME Button
Displays the HOME Menu, where you can configure the Wii U GamePad and Wii Remote
controllers or view pre-installed electronic manuals� See the Wii U Electronic Manual ( ), on
the HOME Menu�
System Components
L Stick
• Can also function as a button when pressed�
+Control Pad
Sensor Bar
Works with a Wii Remote controller (sold separately) when used to interact with the WiiU
GamePad (this feature works with compatible software only)�
Camera
A/B/X/Y Buttons
R Stick
• Can also function as a button when pressed�
+ Button/START
— Button/SELECT
Speakers
POWER Button
Press to turn the Wii U console and WiiU GamePad on or off (p� 22)�
Microphone
Touch Screen
NFC (near-field communication) location
Built-in NFC feature allows the system to read or write to an enabled card or other device�
This works with Wii U software exclusively designed to use this feature (see game packaging for compatibility information)�
Using the Touch Screen
You can use the stylus or your fingertip to
lightly tap or touch the screen�
• If the Touch Screen does not seem to respond correctly to stylus input, you can calibrate
it on the GamePad from System Settings on the Wii U Menu� If you are unable to operate
the Wii U Menu properly using the Touch Screen, use the +Control Pad and
You can touch the screen and lightly slide
the tip across the surface�
�
Using the Wii U GamePad with a stand or cradle
Place the Wii U GamePad stand or Wii U GamePad cradle (both
included in the Deluxe Set only) on a flat, horizontal surface, and
place the Wii U GamePad on the stand or cradle horizontally�
• Do not place the Wii U GamePad vertically�
• When using the Touch Screen or buttons, hold the Wii U
GamePad in your hands (not the stand or cradle)�
System Components
10 11
Page 9
System Components
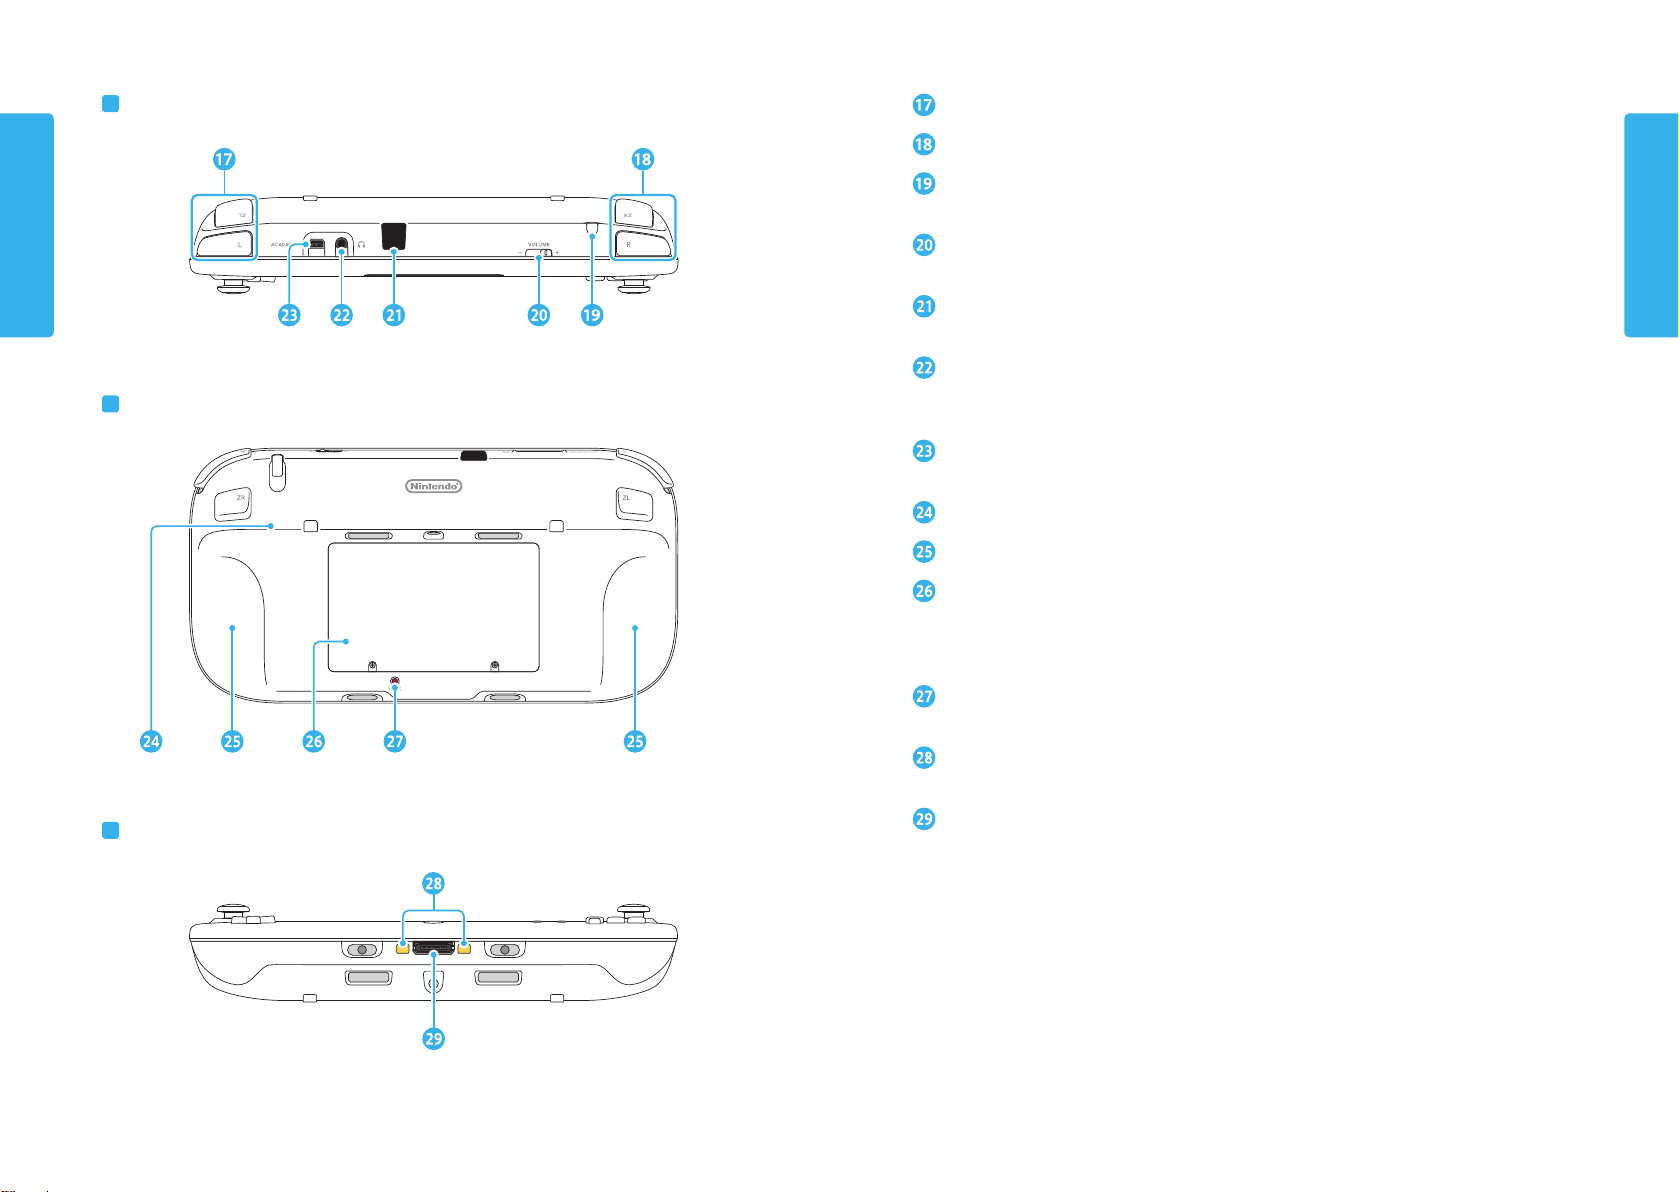
Top View
Back View
L & ZL Buttons
R & ZR Buttons
Stylus Holder
• Always replace the stylus in the stylus holder when not in use�
Volume
Slide to adjust the volume level of the Wii U GamePad speakers�
Infrared Transceiver
Sends and receives information when using infrared communication�
System Components
Audio Jack
For connection of stereo headphones (sold separately)�
• If headphones are connected, no sound will play through the speakers�
AC Adapter Connector
For connecting the WiiU GamePad AC adapter (p� 18)�
GamePad Support
Hand Grips
Battery Cover
You can remove the cover if you need to replace the rechargeable battery (p� 42)�
• Do not remove the cover unless you need to replace the battery or check battery
installation�
SYNC Button
Press this to pair the WiiU GamePad with the console (p� 24)�
Charging Terminals
These contact the terminals on the cradle when charging�
Bottom View
Accessory Connector
For connecting external accessories to the Wii U GamePad�
12 13
Page 10
WiiRemote™ Plus Controller (optional accessory)
+ Button
The WiiRemote Plus Controller is sold separately. This controller only works with Wii
software, as well as Wii U software that supports WiiRemote gameplay (see game packaging
for compatibility information)� This controller can be used with the Wii Menu feature of your
console�
System Components
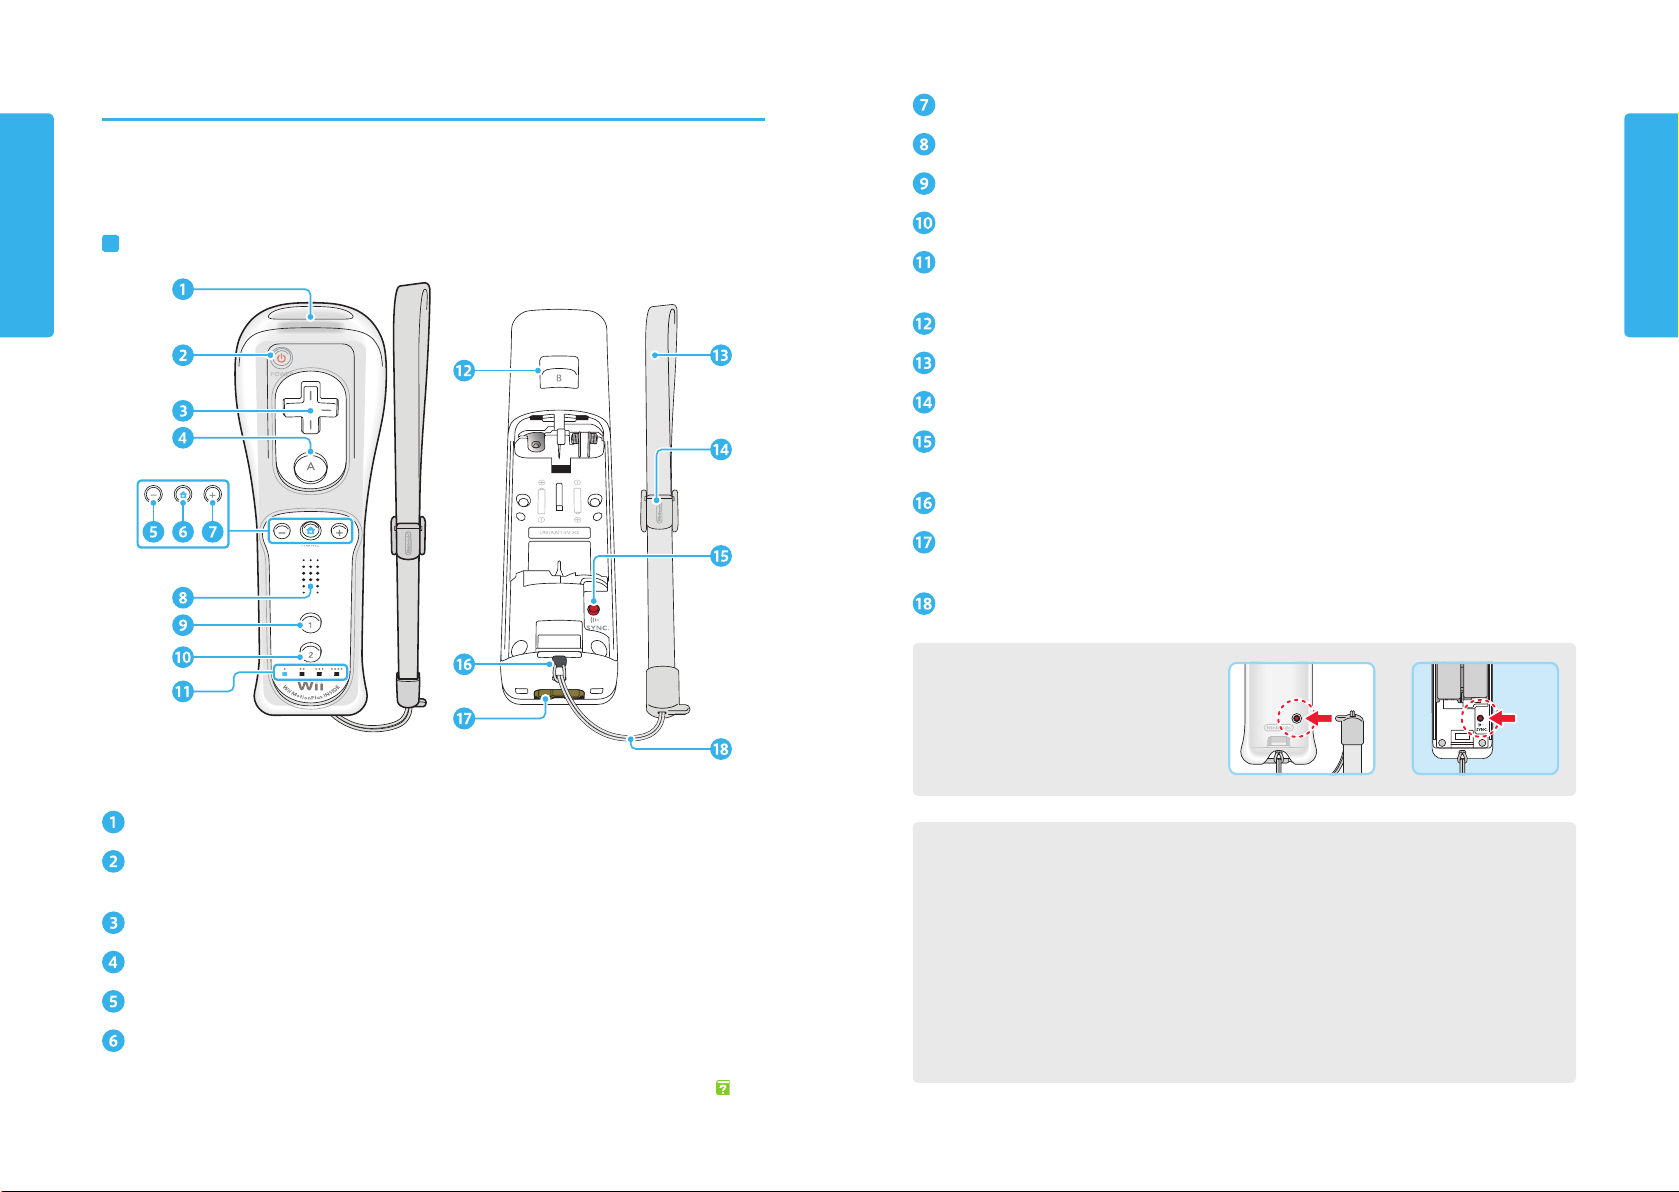
Front and Back View
This view shows the battery
cover removed�
Speaker
1 Button
2 Button
Player LEDs
Indicates the player number assigned to the controller currently in use�
B Button
Wii Remote Wrist Strap
Strap Lock
SYNC Button
Press this to pair (synchronize) the Wii Remote Plus with the console (see illustration below)�
Wrist Strap Attachment
External Extension Connector
Allows connection of external accessories such as the Nunchuk™�
Wrist Strap Cord
Using the SYNC Button
Some Wii Remote models require you
to remove the battery cover to press
the SYNC Button�
System Components
Pointer Lens
POWER Button
Press to turn the Wii U console on or off�
+Control Pad
A Button
— Button
HOME Button
Displays the HOME Menu, where you can configure the Wii U GamePad and Wii Remote
controllers or view pre-installed electronic manuals� See the Wii U Electronic Manual ( ), on
the HOME Menu�
Recalibrating the Wii Remote Plus
If the cursor on the TV screen moves even if the Wii Remote Plus is not being moved, or
moves differently than when the Wii Remote Plus is moved, the remote may need to be
recalibrated due to the following:
• Changing batteries in the Wii Remote Plus during gameplay�
• Moving the Wii Remote Plus from a cold environment into a warm environment�
To recalibrate the Wii Remote Plus, place it on a flat horizontal surface with the buttons
facing down� Wait for a few seconds and check the operation� Also, review the instruction
manual for the game you are playing for more information�
NOTE: This procedure must be done during gameplay�
14 15
Page 11
WiiU™ Pro Controller (optional accessory)
The WiiU Pro Controller is sold separately. This controller only works with Wii U software
that supports WiiU Pro Controller gameplay (see game packaging for compatibility information)� This controller can be used with the Wii U Menu and for Wii U system operations�
Front View
L Stick
• Can also function as a button when pressed�
L & ZL Buttons
USB Port
Connects to the USB cable for charging the controller (p� 20)�
Battery LED
Indicates charging status and remaining battery life (p� 21)�
System Components
Back View
R & ZR Buttons
System Components
R Stick
• Can also function as a button when pressed�
— Button/SELECT
HOME Button
Displays the HOME Menu, where you can configure or check the battery life of the WiiU
Pro Controller or view pre-installed electronic manuals� See the Wii U Electronic Manual
( ), on the HOME Menu�
+ Button/START
A/B/X/Y Buttons
Player LEDs
Indicates the player number assigned to the controller currently in use�
POWER Button
Press to turn the Wii U console on or off (p� 22)�
+Control Pad
Battery Cover
You can remove the cover if you need to replace the rechargeable battery (p� 42)�
• Do not remove the cover unless you need to replace the battery or check battery
installation�
SYNC Button
Press this to pair the WiiU Pro Controller with the console (p� 24)�
RESET Button
See the Wii U Electronic Manual ( ), Troubleshooting, “The Wii U Pro Controller does not
respond,” for more information�
16 17
Page 12

Charging the WiiU GamePad
Charging the WiiU GamePad
The Wii U GamePad can be charged with either the AC
adapter or with the AC adapter and Wii U GamePad
cradle (included in the Deluxe Set only)� See the illustrations below for connection details�
The battery LED will light orange when the battery is
charging and turn off when charging is complete�
• Optimal charging temperature is between 50°-95°F
(10°-35°C)�
• Be sure to fully charge the battery before use for the first time, or if the system has not been
used for a long time�
• If you play a game while charging, the battery LED may not always turn off once charging has
completed�
Charging Options
Using the AC Adapter
When charging is complete, first unplug the AC adapter from the outlet, then unplug it from the
GamePad by pulling the AC plug straight out from the controller�
IMPORTANT:
• The WiiU GamePad AC adapter, Model No� WUP-011(USA), is only for use with the WiiU
GamePad or cradle� It is not compatible with any other Nintendo product� Do not use the AC
adapter with voltage transformers, dimmer switches, or any other equipment� It is only for use
in a standard household AC outlet�
• Be sure the AC adapter connector plug is facing in the correct direction before inserting it into
the AC adapter connector on the controller�
• Insert the AC adapter connector plug straight all the way into the AC adapter connector�
• When disconnecting any plugs from the controller, charging cradle, or wall outlet, carefully
pull by the plug itself rather than by the cord�
Estimated Charging Time and Battery Life
Charging Time: approx� 2�5 hours
•
Charging time will vary depending on how the system is being used and how much
charge is left in the battery�
Battery Life: approx� 3–5 hours
•
Actual battery life depends on the screen brightness, the features used (such as the camera
or microphone), wireless communication use, ambient temperature, and other factors�
• The screen brightness is set to 4 by the manufacturer� You can change the screen
brightness from the HOME Menu in Controller Settings�
Power-Saving Mode
Power-saving mode increases battery life by automatically adjusting screen brightness and
color based on what is being displayed at the time� You can enable power-saving mode
from the HOME Menu in Controller Settings, WiiU GamePad�
Charging the WiiU GamePad
Battery LED Status
Using the AC Adapter and Wii U GamePad Cradle (Deluxe Set only)
• Place the cradle on a flat, stable surface during use�
18 19
The color and status of the LED changes depending on the remaining battery charge�
• If you run out of battery life while playing a game, you will not be able to use the WiiU
GamePad� If the battery LED turns red, charge the WiiU GamePad.
Full charge
Remaining battery life
Battery LED status
Low
(Off) (Blinking
(Steady
red)
Very low
red)
Page 13

Charging the WiiU Pro Controller
Charging the WiiU Pro Controller
The Wii U Pro Controller is a dedicated wireless
controller for the Wii U system� This accessory is sold
separately.
The battery LED will light orange when the battery is
charging and turn off when charging is complete�
• Be sure to fully charge the battery before use for the
first time, or if the system has not been used for a
long time�
• The Wii U console must be turned on to charge the
controller
• Optimal charging temperature is between 50°-95°F (10°-35°C)�
• Before use with the Wii U system, wireless controllers must be charged and paired with the
console (p� 24)�
Battery LED Status
The color and status of the LED changes depending on the remaining battery charge�
• If you run out of battery life while playing a game, you will not be able to use the controller�
If the battery LED turns red, charge the WiiU Pro Controller.
Full charge
Remaining battery life
Low
Battery LED status
Very low
Charging the WiiU Pro Controller
Charging Procedure
Connect the Wii U Pro Controller USB cable, included with the Wii U Pro Controller, as shown
below� Make sure all plugs are inserted straight all the way into the connectors�
Estimated Charging Time and Battery Life
Charging Time: approx� 4�5 hours
•
Charging time will vary depending on how the system is being used and how much
charge is left in the battery�
Battery Life: approx� 80 hours
•
Actual battery life depends on the features used, such as the rumble feature or wireless
communication use, ambient temperature, and other factors�
(Steady red)(Off) (Blinking red)
20 21
Page 14

Turning the Power On/Off
Turning the Power Off
You can turn the power on and off using either the WiiU console or the WiiU GamePad� Make
sure the included Wii U GamePad has been paired with the console before use (p� 24).
Options for Turning the Power On
Using (POWER Button) on the Wii U GamePad
Press on the WiiU GamePad to turn the Wii U console
Turning the Power On/Off
power on and display the WiiU GamePad screen�
• You can also turn the Wii U console power on by
pressing on a Wii Remote or Wii U Pro Controller�
Using (TV Control Button) on the WiiU GamePad
Press and hold the POWER Button on the console or controller for at least one second�
The WiiU console will turn off, the power LED will turn from blue to red, and the GamePad
screen will turn off�
• The power LED does not turn off when the console turns off unless the console is unplugged
from the wall outlet�
• You cannot turn off the power using the GamePad if you are using the Wii Menu or a Wii
Game Disc�
Automatic Power Off Feature
The Wii U console can be set to automatically turn off if it is unused for a certain amount of
time� You can configure this feature in System Settings on the Wii U Menu, Automatic
Power Off�
• This feature has been set by the manufacturer to turn off the system after one hour�
Turning the Power On/Off
Press on the GamePad to display the TV Remote Features Screen� Tap Play WiiU�
• The TV Remote feature allows you to control the TV using the GamePad� See the Wii U Elec-
tronic Manual ( ), TV Remote�
User Selection Screen
After you turn the power on, the user-selection screen appears� After a user is selected, the
WiiU Menu will be displayed on the WiiU GamePad screen�
Turning Only the Wii U GamePad Screen Off
If you are not using the GamePad screen, you can temporarily turn it off to save battery life� To
turn off the screen, go to the HOME Menu and tap Controller Settings�
22 23
Page 15

Pairing Controllers Using Wii Remote Controllers
Pairing Controllers
Before using a Wii U GamePad, Wii U Pro Controller, or Wii Remote controllers, they must first be
paired with the Wii U console� After pairing, you will be able to turn the console power on and
off by pressing on the controller� See the information at the bottom of the page for specific
information on pairing a Wii U GamePad�
• If you will be using WiiRemote controllers, you must first install the included sensor bar (p� 25)�
Some software titles do not require a Sensor bar�
• A controller must always be paired to the console you wish to use it with� If a controller has
been paired to a different console, it will need to be paired again to any new console you wish
to use it with�
• For the Wii Balance Board™, please see the instruction manual included with compatible
software for pairing instructions�
Pairing Procedure for Controllers
To pair a Wii Remote, Wii U Pro Controller, or other
compatible accessory, first open the Wii U Menu, then
press SYNC on the front of the Wii U console�
Follow the on-screen instructions and press SYNC on the
controller to finish the pairing procedure�
You can pair up to 10 controllers with the console� If you
pair additional controllers, the oldest controller pairing
data is deleted and replaced by the newest data�
The Player LED on the controller will light up when
pairing is complete� The Player LED indicates the
player number of the controller currently in use�
1P 2P 3P 4P
Player LEDs on a Wii Remote
IMPORTANT: Before using Wii Remote or Wii Remote Plus controllers, be sure to review
Health and Safety Information on the WiiU Menu.
To use software that is compatible with WiiRemote controllers, you must first install the included
sensor bar as described below� (Some software titles do not require a sensor bar�)
Installing the Sensor Bar
Connect the sensor bar to the Wii U
console�
NOTE: If you already have a sensor bar installed for
a Wii console, you can switch it to the Wii U console,
rather than installing an additional one�
Remove the protective film from the
foam pads on the bottom of the
sensor bar�
Place the sensor bar above or below the TV screen�
See sensor bar Placement Guidelines on the next page for reference�
Using Wii Remote Controllers
Pairing Procedure for the Wii U GamePad
To pair a Wii U GamePad, first open the Wii U Menu�
Press SYNC on the front of the Wii U console TWICE,
then press SYNC on the Wii U GamePad�
Follow the on-screen instructions, entering the graphic
symbols as described�
If you place your sensor bar under the TV screen:
On the Wii U Menu in System Settings, select Wii Remote and Sensor Bar, Set Sensor Bar
Position, and set the position of the sensor bar to Below the TV� (This is necessary for
proper operation of the Wii Remote controllers�)
2524
Page 16

Sensor Bar Placement Guidelines
Using the Wii Remote Jacket
Using Wii Remote Controllers
Center the sensor bar with the
TV screen, facing straight ahead�
• Do not place the sensor bar over air
vents on the TV�
Place the sensor bar to slightly
overhang the front surface of
the TV screen�
Place the sensor bar on the
same surface as the TV�
Recommended Play Environment
For the best results when using the Wii Remote controller:
• Be sure that the Wii Remote Jacket is installed prior to gameplay to reduce the risk of harm to
the remote, surrounding objects, or people�
It might be necessary to remove the Wii Remote Jacket - for example, to replace the batteries in
the Wii Remote controller� If you do remove the Wii Remote Jacket, be sure to put it back on
before further play�
Installing Batteries in the Wii Remote
Pull the jacket from the base of
the controller and pull the wrist
strap out�
Pull the jacket up to expose the entire
battery cover and remove the cover�
Using Wii Remote Controllers
• The front of the sensor bar should be directly in front
of you and clearly visible
• Avoid blocking the signal between the remote and the
console or sensor bar
• Sit (or stand) directly in front of the TV, between 3 and
10 feet (1-3m) away
• Avoid bright light sources behind or near the TV
If the Wii Remote is not operating properly, see Wii
Remote and Sensor Bar in System Settings on the Wii U
Menu to make adjustments, or review “Wii Remote
Controllers” in Troubleshooting (p� 53)�
Insert the batteries, negative (–) end
first� When removing batteries, remove
the positive (+) end first�
Replace the battery cover and pull the
wrist strap back through the hole in the
bottom of the jacket� Pull the jacket
back over the base of the controller�
2726
Page 17

Using Wii Remote Controllers
If you completely remove the jacket,
replace it by inserting the controller
as shown - pushing it all the way
into the top of the jacket�
• Be sure to thread the wrist strap back
through the hole in the bottom of the
jacket, as shown in step 4�
Insert the connector cover into the
external extension connector on the
bottom of the controller�
Wearing the Wii Remote Wrist Strap
Open the lever on the strap lock and place your hand through the
wrist strap� Hold the remote firmly during use�
Using the Nunchuk
(The Nunchuk is an optional accessory for the Wii Remote, sold separately�)
IMPORTANT: Before using the Nunchuk™ accessory, be
sure to review Health and Safety Information on the
WiiU Menu.
• The Nunchuk can only be used with a Wii Remote control-
ler and with games that include compatible features�
Review the instructions for the game you are playing for
more information�
Be sure to install the Nunchuk as described� Use the connector hook on the Nunchuk plug with
the wrist strap cord to prevent the Nunchuk plug from becoming separated from the external
extension connector on the remote and striking objects or people�
Feed the cord on the wrist strap
through the connector hook on the
Nunchuk plug, as shown�
Insert the Nunchuk plug into the
connector on the bottom of the
remote until it snaps into place�
Using Wii Remote Controllers
Slide the strap lock up so that the strap will not fall off your wrist�
Close the lever to hold the lock in place�
2928
Page 18

Using Wii Remote Controllers
Open the lever on the strap lock and place your hand through the
wrist strap� Slide the strap lock up so that the strap will not fall off
your wrist� Close the lever to hold the lock in place� Hold the Wii
Remote controller firmly during use�
Disconnecting the Nunchuk
Press the lock/release levers on the sides of the
Nunchuk plug as shown� Pull the plug straight out
of the connector on the bottom of the controller�
30
Page 19

System Configuration
System Settings. . . . . . . . . . . . . . . . . . . . . . . . . . . . . . . . . 32
Configuring Settings . . . . . . . . . . . . . . . . . . . . . . . . . . . . . . . . . . . . . . . . . . . 32
User Settings . . . . . . . . . . . . . . . . . . . . . . . . . . . . . . . . . . . 33
Adding Users . . . . . . . . . . . . . . . . . . . . . . . . . . . . . . . . . . . . . . . . . . . . . . . . . 33
Switching Users . . . . . . . . . . . . . . . . . . . . . . . . . . . . . . . . . . . . . . . . . . . . . . . 33
Internet Settings . . . . . . . . . . . . . . . . . . . . . . . . . . . . . . . . 34
Internet Connection Requirements . . . . . . . . . . . . . . . . . . . . . . . . . . . . . .34
Parental Controls. . . . . . . . . . . . . . . . . . . . . . . . . . . . . . . . 36
Restriction Options . . . . . . . . . . . . . . . . . . . . . . . . . . . . . . . . . . . . . . . . . . . . 36
Page 20

System Settings
User Settings
System Settings
In System Settings, you can configure many of the
features of your Wii U system, including connecting to the
Internet or managing data, or you can view information
such as the system version of the Wii U console.
• System settings apply to all users. You cannot set up
different settings for each user.
Configuring Settings
See the Wii U Electronic Manual ( ), System Settings, for more information on the settings that
you can configure.
Settings category
Tap to configure options for this category.
List of settings options within a category
System version of console
Icon list of settings categories
Tap an icon to select a category, or scroll
between pages by sliding the stylus or
tapping the page scroll arrow.
On the Wii U system, game save data, gameplay times, and other player information can be
saved and managed for each person using the system.
If more than one person will be using the Wii U system, see the information below for adding
multiple users or switching users.
Adding Users
To add a user, tap New User on the user-selection screen
that appears after turning on the Wii U console, then
follow the on-screen instructions.
To use network-based services or features, you must first
configure various settings, including those for your
Internet connection. See the Wii U Electronic Manual ( ),
User Settings, for additional information.
• You can have a maximum of 12 users on a single Wii U console.
• You can also add a user by touching the Mii™ character in the upper-left corner of the
WiiU Menu.
Switching Users
User Settings
You can display the user-selection screen by touching the Mii character in the upper-left corner
of the Wii U Menu. Touch a Mii character to switch to that user.
Touch User Settings to change the Mii character used for a particular user, or to delete a user.
Descriptions of Settings
The TV screen will display information about configuring the
specific setting during the process.
Use the R Stick on the Wii U GamePad to scroll through the information on the TV screen.
3232 33
Page 21

Internet Settings
Connect to the Internet to download software not
available in stores and play online with people around
the world.
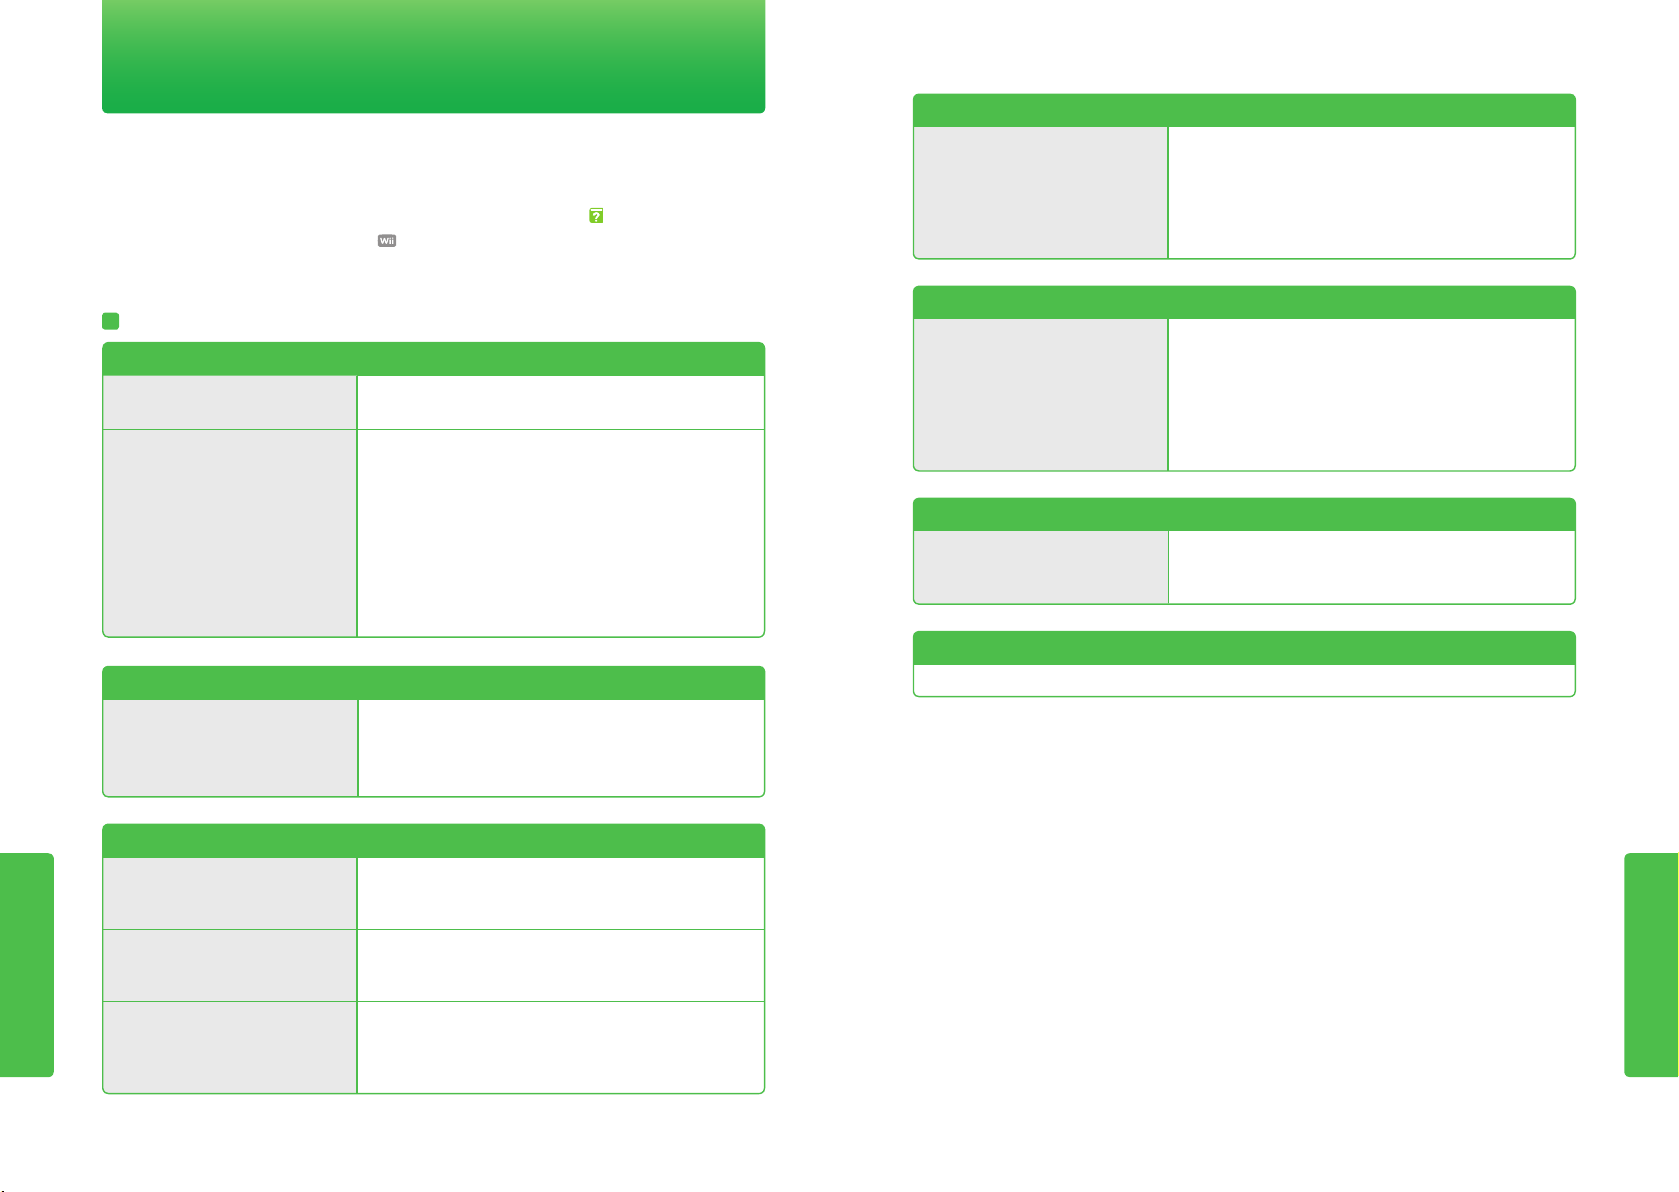
Internet Connection Requirements
What you will need depends on your household environment.
Broadband Internet Environment
There may be several options to get a broadband connection to your home. Cable, DSL, and
optical-fiber networks are among the most common. Check with your local broadband providers
for more information.
Communication Device (Wired or Wireless)
You will need one of the following.
Wii LAN Adapter (sold separately)
This connects to the Internet using a cable connection. See the LAN adapter
manual for information on how to connect the LAN adapter.
Internet Settings
Do you have a high-speed broadband
Internet connection, such as cable or
DSL?
Yes
Do you have a wireless network environment (a wireless LAN access point)?
Yes
Does your wireless LAN access point
support the 802.11n, 802.11g, or
802.11b standards?
Yes
Configure your Internet connection
settings under Internet in System
Settings on the WiiU Menu.
No
Set up a broadband Internet connection
environment (see next page).
No
Install a Wii LAN Adapter [RVL-015] (see
next page).
No
Install an access point that supports the
802.11n, 802.11g, or 802.11b standards
(see next page).
Wireless LAN Access Point (sold separately)
Use an access point that supports the 802.11n, 802.11g, or 802.11b standard to connect to the Internet wirelessly.
Setup can be simplified if you use an access point that includes one of the
following features:
AOSS™ Wi-Fi Protected Setup™
Internet Settings
• If you are using a bridge modem that does not include any router functionality, you will also
need a separate broadband router.
• Visit support.nintendo.com for a list of wireless access points (routers) confirmed to work with
the Wii U console. You cannot use access points that only support the 802.11a standard.
When your network environment is ready...
Configure your connection settings in System Settings, Internet, on the WiiU Menu.
3434 35
Page 22
Parental Controls
Game Rating Restricts all usage (as well as purchase through Nintendo
eShop) of software exceeding the selected rating.
Online Interaction in Games Restricts online features and exchange of content through
games.
Internet Browser Restricts the use of the Internet browser.
Wii U Shopping Services Restricts the use of credit cards or the purchase of software
through services such as Nintendo eShop.
Miiverse Restricts users from viewing or posting content on Miiverse.
Friend Registration Prevents the registration of additional friends.
Entertainment Excluding Games Restricts the viewing of video content, both streaming and
stored on physical media such as discs. This setting may also
restrict software with video-playback functions.
Data Management Restricts the deletion or moving of software or save data using
Data Management
Internet Settings Restricts the addition, modification, or deletion of Internet
settings
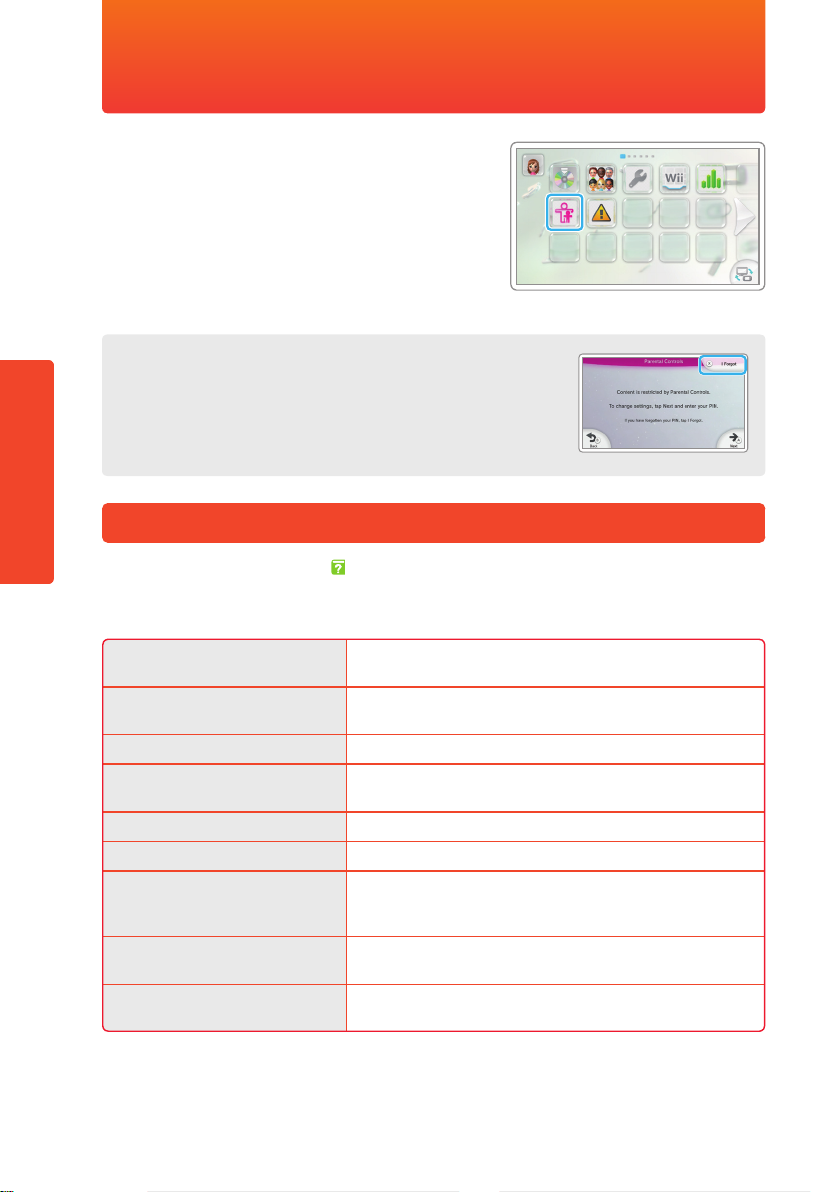
Parental Controls
Parental Controls can limit the download and use of
certain content on the Wii U system. Parental Controls
can also limit the use of certain Wii U system features.
• When Parental Controls are enabled, some System
Settings, such as Internet Settings, System Transfer,
and Format System Memory, cannot be accessed. You
will need to enter the PIN to access these features.
IMPORTANT: A parent or guardian should configure the Parental Controls settings.
PIN for Identification
Make sure to not forget the PIN and answer to the secret
question that you create when setting Parental Controls. If you
do forget these, tap "I Forgot" in the upper right corner of the
screen and follow the instructions displayed.
Restriction Options
See the Wii U Electronic Manual ( ), Parental Controls, for more information.
IMPORTANT: Restriction options are dependent on the availability of system features. A
System Update may be required for a complete list of options.
• Some features, such as Adding Users (p. 33) and Format System Memory, are restricted
automatically.
• The Wii U Menu and the Wii Menu have different restriction options.
3636
Page 23

System Operations
Transferring System Data � � � � � � � � � � � � � � � � � � � � � � 38
Data You Can Transfer. . . . . . . . . . . . . . . . . . . . . . . . . . . . . . . . . . . . . . . .38
Transfer Procedure. . . . . . . . . . . . . . . . . . . . . . . . . . . . . . . . . . . . . . . . . . .39
On-Screen Keyboard � � � � � � � � � � � � � � � � � � � � � � � � � � 40
Wii U On-Screen Keyboard . . . . . . . . . . . . . . . . . . . . . . . . . . . . . . . . . . .40
Input Modes . . . . . . . . . . . . . . . . . . . . . . . . . . . . . . . . . . . . . . . . . . . . . . . .40
Controller Calibration � � � � � � � � � � � � � � � � � � � � � � � � � 41
Calibrating the Touch Screen. . . . . . . . . . . . . . . . . . . . . . . . . . . . . . . . . .41
Resetting the L and R Control Sticks. . . . . . . . . . . . . . . . . . . . . . . . . . . .41
Battery Replacement � � � � � � � � � � � � � � � � � � � � � � � � � � 42
Wii U GamePad . . . . . . . . . . . . . . . . . . . . . . . . . . . . . . . . . . . . . . . . . . . . . 42
Wii U Pro Controller. . . . . . . . . . . . . . . . . . . . . . . . . . . . . . . . . . . . . . . . . .44
Wii U Console. . . . . . . . . . . . . . . . . . . . . . . . . . . . . . . . . . . . . . . . . . . . . . . 46
Page 24

Transferring System Data
Wii Software
•
Wii Software Save Data
1
•
WiiWare and Save Data
1, 2
•
Virtual Console titles and Save Data
1, 2
•
Add-on Content
Wii Shop
Channel
•
Wii Points
3
•
Wii Shop Channel Account Activity
Other
•
Mii Characters
4
Transfer Procedure
You can transfer software, saved game data, and other
data from your Wii console to your Wii U console.
In addition to the Wii U system, you will need the
following items before transferring:
An operational Wii system and two Wii Remote
•
controllers—one paired with the Wii console and one
paired with the Wii U console (p� 24).
An SD or SDHC Memory Card (with at least 512 MB of
•
free space)
A broadband Internet connection (both systems must be connected to the Internet)
Transferring System Data
•
• See the Wii Operations Manual - Channels & Settings for details on Internet connections
for the Wii console.
IMPORTANT: Transferred data is permanently deleted from the Wii console. Once you have
transferred data to the Wii U console, it cannot be transferred back to a Wii console. Data
cannot be transferred from your Wii U console to a Wii console.
Data You Can Transfer
You can transfer the following data only. All data that can be transferred will be transferred at
one time, so you are unable to select which data to transfer.
Visit support.nintendo.com/wiiu/transferdata for more information.
IMPORTANT: To avoid loss of data or damage to your
system or components, do not remove the SD Card,
turn off the console, or unplug the AC adapter during
the transfer process.
Both systems must be connected to a TV. If both systems
are connected to the same TV, you will need to switch
between the two systems as you go through the transfer
steps. There are two ways this can be done:
• Use the input select of the TV to switch between the two systems; or
• Plug the standard AV cable that came with your Wii console into your TV and swap the cable
between the two systems during the transfer process. (Swap the cables at the same time you
are swapping the SD Card.)
See the illustration below for the transfer procedure and follow the on-screen instructions. Use
the Wii Remote controller for navigating the screen and making selections.
Transferring System Data
1
When transferring save data on an SD Card, transfer data after returning it to the Wii console.
2
Preinstalled software cannot be transferred. Visit support.nintendo.com for more information.
3
Any Wii Points you have purchased will be added to the balance in the Wii Shop Channel, accessed from the
Wii Menu application on the Wii U console. Transfer is not possible if the combined point total would exceed 10,000
Wii Points.
4
Mii characters are moved to the Mii Channel, accessed from the Wii Menu application on the Wii U console.
When Deleting Software or Moving to an SD Card from a Wii U console
If you delete software purchased from the Wii Shop Channel, or move it to an SD Card, the
software will appear in the Wii Shop Channel on the Wii Menu of Wii U. You can download
it again from the Wii Shop Channel at no cost.
38
1. Insert the SD Card into the Wii U console.
2. On the Wii U system, start the Wii Menu
application and select Wii System
Transfer.
3. Follow the on-screen instructions.
4. Remove the SD Card from the Wii U
console and insert the same SD Card into
the Wii console.
1. To begin transferring data, insert the SD
Card into the Wii U console.
2. Confirm the message and select Transfer.
3. The data on the SD Card is saved on to
the Wii U console and deleted from the
SD Card.
1. With the SD Card inserted in the Wii
console, open Wii Shop Channel and
download the transfer application.
2. After the download is complete, select
the transfer application to begin retrieving the data.
3. When the data transfer is complete,
remove the SD Card from the Wii console
and insert it into the Wii U console.
NOTE: The data you are able to transfer is
saved to the SD Card that was used with
the Wii U console.
39
Page 25

On-Screen Keyboard
PC style A keyboard with the same alphabetic layout as a computer.
Numbers and
accented
characters
A keyboard with numbers, letters with accents, and a few symbols.
Special
symbols
A keyboard with various symbols.
Controller Calibration
You can use the on-screen keyboard when you need to enter text.
Use the following instructions to recalibrate the Touch Screen or reset the L and R control sticks if
they do not seem to be operating correctly.
Wii U On-Screen Keyboard
Calibrating the Touch Screen
Tap the keys on the keyboard to enter text or to switch input modes (PC-style keyboard shown).
Shows the input text.
Shows predicted word suggestions as you
enter text.
Tap
options.
On-Screen Keyboard
Enter a space.
Tap the letters to input them.
Switch the character set based on language, or to other
special character sets.
Delete the last character before the cursor.
Enter a new line (return).
Tap OK when you are finished entering text.
to display additional word
Input Modes
There are three input modes (all modes may not be available in some software titles).
Open the Wii U Menu and select System Settings. Select the option for calibrating the Wii U
GamePad Touch Screen and follow the on-screen instructions. If you are unable to use the Touch
Screen properly, use the +Control Pad and .
Resetting the L and R Control Sticks
The neutral position of the control sticks can be incorrectly set if you move them during the
following actions:
• turning the console on
• launching software
• quitting software and returning to the
Wii U Menu
This can cause erratic gameplay control or cause
objects on the screen to move when you are not
using the controller.
Wii U GamePad L Stick
Controller Calibration
40
Reset Procedure
To reset the control sticks, allow them to return to a neutral untouched position and simultaneously hold down , , , and for at least three seconds.
41
Page 26

Rechargeable batteries become worn with repeated charge/discharge cycles, and the amount of
time they can be used when fully charged will decrease gradually over time (after 500 charges,
usage time may be reduced to 70%). If you feel the usage time has dropped off noticeably,
replace the battery.
IMPORTANT: Batteries should always be replaced by an adult.
Do not use any battery other than the Wii U GamePad Battery, Model No. WUP-012.
A replacement battery can be ordered from the Nintendo website at store.nintendo.com (USA/
Canada only) or by calling Customer Service at 1-800-255-3700.
Battery Replacement
• To avoid damage to the screw or threads, use a screwdriver that is appropriate for the screw
• Before replacing the battery, turn the power off and disconnect the AC adapter if it is con-
Press and hold for at least one
Battery Replacement
Wii U GamePad
(crosshead style, size 0).
nected to the controller.
second to turn off the power�
Remove the battery�
Unplug the connector first, and then remove the battery, as shown below.
• When disconnecting the battery cable, pull by the plug, not the cable.
• Please recycle the used battery (p� 45).
Battery Replacement
Wait at least 10 seconds before inserting the new battery�
Make sure the battery is oriented correctly, as shown below.
• Waiting 10 seconds will allow the power LED to reset correctly.
Loosen the battery cover screws�
The battery cover is designed so the screws can
be loosened, but not fully removed.
Replace the battery cover�
After replacing the battery cover, tighten the two screws, being careful not to
overtighten them.
IMPORTANT: Always be sure to replace the battery cover and tighten the screws
before resuming use.
Remove the battery cover�
Lift the edge of the battery cover slightly and then remove it as shown below.
42 43
Page 27

Do not use any battery other than the Wii U Pro Controller rechargeable battery,
Model No. CTR-003.
A replacement battery can be ordered from the Nintendo website at store.nintendo.com (USA/
Canada only) or by calling Customer Service at 1-800-255-3700.
• Before replacing the battery, turn the Wii U console power off and disconnect the USB cable if
• To avoid damage to the screw or threads, use a screwdriver that is appropriate for the screw
Battery Replacement
Wii U Pro Controller
it is connected to the controller.
(crosshead style, size 0).
Loosen the screw and remove the battery cover�
The battery cover is designed so the screw can be loosened, but not fully removed.
Remove the battery�
Insert the stylus from the Wii U GamePad under the battery, as shown below, and gently
lift the edge, allowing you to remove the battery.
• Please recycle the used battery (p� 45).
Replace the battery cover�
After replacing the battery cover, tighten the screw, being careful not to overtighten it.
IMPORTANT: Always be sure to replace the battery cover and tighten the screw
before resuming use.
PLEASE RECYCLE YOUR USED BATTERIES
When disposing of a rechargeable battery, take care to
follow appropriate local guidelines and regulations.
Cover the terminals with tape before recycling.
• Do not disassemble, attempt to repair, or deform the
battery pack.
• Do not dispose of rechargeable batteries in a fire.
To find a collection site near you, contact your local solid
waste authority or, in the United States, visit:
http://www.epa.gov/osw/conserve/materials/battery.htm
For more information or for assistance from Nintendo, visit:
recycle.nintendo.com
Battery for the
Wii U GamePad
Battery for the
Wii U Pro Controller
Battery Replacement
44
Wait at least 10 seconds before inserting the new battery�
Make sure the battery is oriented correctly, as
show in the illustration.
• Waiting 10 seconds will allow the power LED
to reset correctly.
45
Page 28

Wii U Console
The Wii U console uses a lithium coin cell battery. Contains perchlorate material - special
handling may apply. For more information visit www.dtsc.ca.gov/hazardouswaste/perchlorate/.
• Do not remove the battery from the Wii U console unless it needs to be replaced (if the
console clock stops functioning).
• To avoid damage to the screw or threads, use a screwdriver that is appropriate for the screw
(crosshead style, size 0).
Make sure that the disc LED is not on�
If the disc LED is illuminated, press on the front of the console to eject the
Game Disc.
Battery Replacement
Turn the power off and unplug the AC adapter�
Turn the console over, and remove the battery cover�
Remove the button cell battery, and
Make sure the power LED is off, and then unplug the AC adapter from the wall outlet.
The battery cover is designed so the screw can be loosened, but not fully removed.
replace the battery cover�
Insert a new battery (type CR2032) so that the
+ (positive) side is up, and then replace the
battery cover.
After replacing the battery cover, tighten the screw,
being careful not to overtighten it.
IMPORTANT: Always be sure to replace the battery cover and tighten the screw
before resuming use.
46
Handling Used Button Cell Batteries
• Cover the + (positive) and - (negative) sides with tape.
• Dispose of following local laws and regulations.
• For more information visit www.dtsc.ca.gov/hazardouswaste/
perchlorate/.
Page 29

Consumer Information
Troubleshooting � � � � � � � � � � � � � � � � � � � � � � � � � � � � � � � � 48
Warranty and Service Information� � � � � � � � � � � � � � � � � 54
Regulations for Equipment Use � � � � � � � � � � � � � � � � � � � 55
47
Page 30
Troubleshooting
The Wii U console won’t turn on.
Are the DC and AC plugs of the
AC adapter fully inserted?
Check the connections to make sure they are fully
inserted (see the Wii U Quick Start Guide).
Is the Power LED of the Wii U console lit?
If the Wii U console’s power LED does not turn on even
after pressing the Power Button, unplug the AC adapter
from the wall, wait two minutes, and plug it in again.
If the power LED is blinking red, unplug the AC adapter
from the wall. Make sure that the console is not in a location where it is exposed to high temperatures and that it
has proper ventilation (at least 4”/10 cm). Wait about two
minutes, then plug the AC adapter back into the outlet
and turn the console power on.
The Wii U GamePad won't turn on.
Is the battery depleted? Recharge the Wii U GamePad (p� 18).
If the battery LED blinks orange when charging, check
the battery replacement information to make sure that
the battery pack is installed correctly (p� 42).
The Wii U console suddenly shuts off.
Is there dust or other material
clogging or blocking the console
vents?
Unplug the AC adapter for the Wii U console from the
wall outlet, and remove any dust, dirt, or other foreign
material from the vents.
Is the console located where it can
be exposed to high temperatures?
Move the console away from sources of heat and make
sure there is at least 4” (10 cm) between the console
vents and any walls or other objects.
Is the Wii U console's automatic
shutoff feature enabled?
If the automatic shutoff feature is enabled, the system
will automatically turn off if there has been no input for a
set period of time. You can adjust the period of time in
System Settings on the Wii U Menu, Automatic Shutoff.
The Wii U console or Wii U GamePad feel hot to the touch.
Is the system or controller exposed
to high temperatures, or is the
controller being used for long periods while charging it?
Such use can cause the system to become hot. Use the
system and components within the following temperature recommendations:
Wii U console: 50°-104°F (10°-40°C)
Wii U GamePad: 50°-95°F (10°-35°C)
Wii U Pro Controller: 50°-95°F (10°-35°C)
The Wii U console will not turn off (the power LED won't turn red).
Did you press and hold down the
POWER Button for at least one
second?
If the power does not turn off after holding down the
POWER Button for at least one second (the power LED
should turn from blue to red), unplug the Wii U AC
adapter from the wall outlet.
• You cannot use the Wii U GamePad to turn off the
console power if you are using the Wii Menu or
playing a Wii Game Disc.
The WiiU GamePad won't turn off.
Did you press and hold down the
GamePad POWER Button for at
least one second?
If the power does not turn off after holding down the
GamePad POWER Button for at least one second, then
hold the POWER Button down for at least four seconds.
The Wii U GamePad battery LED does not turn on
The battery LED will only turn on when charging the battery or when the battery level is low.
Before seeking assistance, please review the following problems and solutions. You can also visit
support.nintendo.com for assistance and additional troubleshooting and repair options, or call
1-800-255-3700.
• Additional information can be found in the WiiU Electronic Manual ( ), Troubleshooting.
• See the Wii Menu Electronic Manual ( ) for more information about using the Wii Menu.
• Review instruction manuals for any games or accessories you are using.
Power supply and operating temperature
Troubleshooting
Troubleshooting
4948
Page 31

Batteries and battery charging
Cannot charge or recharging takes a long time.
Are you using the correct charging
equipment?
• Wii U GamePad – use the Wii U GamePad AC adapter,
Model No. WUP-011(USA).
• WiiU Pro Controller - use the WiiU Pro Controller
USB Cable, Model No. WUP-018.
Is the AC adapter plug or USB
cable fully inserted?
NOTE: You can only charge the
Wii U Pro Controller when the
Wii U console is turned on.
• Wii U GamePad – remove the AC adapter for two min-
utes, then reinsert it into the AC adapter connector on
the controller or charging stand and into the power
outlet, and try recharging again (p� 18).
• WiiU Pro Controller – remove the USB cable, wait a
few seconds, then reinsert it and try recharging again
(p� 20).
Are you charging at an ambient
temperature of 50°-95°F (10°35°C)?
Charge within the recommended temperature range of
50°-95°F (10°-35°C). Battery charging can be adversely
affected by extremes of temperature.
Is the battery LED blinking orange?
Make sure that the battery is properly connected - see
the section on Battery Replacement (p� 42). If the LED
is still blinking during the charging procedure, contact
Nintendo Customer Service.
Battery charge doesn't last long and/or recharging takes a long time.
Are you playing or charging at an
ambient temperature below 50°F
(10°C)?
Usage time may be reduced and recharge time may be
increased when temperatures are below 50°F (10°C). For
best results, use the system within the recommended
temperature range of 50°-95°F (10°-35°C).
Are you using an old battery? Over time and repeated charging, battery performance
will gradually decrease. If the usage time has gotten
noticeably shorter, the battery may need to be replaced
(p� 42).
The battery appears slightly swollen.
Due to the nature of lithium-ion batteries, repeated charging and use over time can cause the
battery pack to swell. If the battery pack is swollen and battery duration doesn’t last very long,
it should be replaced (p� 42).
If the battery leaks fluid or is exposed to moisture, see the Battery Leakage warning in Health
and Safety Information (p� 4) and contact Nintendo Customer Service for repair information.
The TV screen doesn't display anything, or there is no sound.
Has the TV input been
correctly set?
Press the input button on the TV several times to switch
between inputs until the WiiU screen appears.
• If you are using an HDMI cable, it might take some
time until an image is displayed on the TV screen,
depending on your TV model. Wait a short time after
switching the input.
Are the connection method and
resolution configured correctly?
Check the configuration in System Settings on the
WiiU Menu, TV, for your cable and TV combination.
Are you using any accessories not
licensed by Nintendo or not designed for use with the Wii U system?
Remove any unlicensed or incompatible components or
accessories from your system.
The Wii U GamePad screen doesn’t display anything.
Is the Wii U GamePad battery LED
slowly blinking blue?
If the LED is blinking blue, the screen has been turned
off. Press one of the buttons (other than the POWER Button) to turn the screen back on.
If you press the POWER Button
with the AC adapter connected,
does the screen display turn on after a few seconds?
If the screen turns on, the Wii U GamePad's battery level
is low. Recharge the battery.
If the screen still does not display anything, contact
Nintendo Customer Service for repair information.
TV screen display and audio
Wii U GamePad screen
Troubleshooting
50 51
Troubleshooting
Page 32

Wii U GamePad screen (continued)
I can't use the Touch Screen or the Touch Screen does not respond properly.
Is there anything near the Wii U
console or controller that could interfere with the signal between
the two components?
Avoid using the Wii U system near large metal objects or
TV stands or devices that might cause electromagnetic
interference (such as AV devices, microwave ovens, or
cordless devices).
Does the Touch Screen need to be
calibrated?
If the Touch Screen positioning appears to be off, calibrate the Touch Screen in System Settings on the Wii U
Menu, Wii U GamePad.
If you are unable to operate the Wii U Menu properly us-
ing the Touch Screen, use the +Control Pad and
.
Have you attached a screen protector to the Touch Screen?
The Touch Screen can react to a screen protector that is
out of alignment, or to air bubbles or foreign particles
trapped between the sheet and the screen, causing improper operation. Try removing it and using the screen
again. If it operates correctly, reattach the screen protector, carefully following the instructions included with it,
or avoid using one.
• Please use screen protectors officially licensed by
Nintendo.
The Wii U GamePad screen appears irregular or erratic/sound is intermittent.
Is anything blocking or interfering
with the signal between the console and the GamePad?
Remove possible causes of interference, such as metal
racks or shelves, or wireless devices, microwave ovens,
or AV equipment.
The video or sound may cut off at times. This is due to the nature of wireless communication
and does not indicate a defective product.
The Wii U GamePad screen color changes, the screen brightness changes erratically, or
bright colors cannot be seen.
Is power-saving mode on? When the power-saving mode is on, the system automat-
ically adjusts the screen brightness and color to match
the displayed image, in order to reduce battery power
use. Depending on the image, faint colors may look
washed out, or the color may appear to change. For uniform brightness and hue, open the HOME Menu off and
turn power-saving mode off (p� 19).
Some pixels on the Wii U GamePad screen are always dark or lit.
Due to the characteristics of liquid crystal displays, a small number of pixels may not illuminate
or may always stay lit. This is normal and not considered a defect unless the number of pixels
that don’t function normally increases over time.
I can't use the Wii Remote, or the Wii Remote does not respond properly.
Is the Player LED on the Wii Remote lit?
Press one of the buttons on the Wii Remote (not the
POWER Button).
If the Player LED does not turn on, make sure that the
batteries are inserted correctly. If the LED still won't turn
on, replace both of the batteries.
Have you synchronized the Wii
Remote with this Wii U console?
Press the SYNC Button on the Wii U console and follow
the instructions on the screen.
Are you either too close or too far
from the sensor bar?
Always play from 3-10’ (1-3 m) from the sensor bar. If this
does not resolve the issue, adjust the sensor bar sensitivity in System Settings on the Wii U menu, Adjust Sensi-
tivity.
Is there any obstruction in front of
the sensor bar?
Remove any objects that might be blocking the signals
between the Wii Remote and the sensor bar.
Is the sensor bar installed
correctly?
Make sure that the sensor bar is placed correctly (p� 25).
Make sure the sensor bar plug is fully inserted into the
connector on the console.
Are there any play conditions that
could interfere with the operation
of the remote?
If you think any of the following conditions are affecting
the operation of the remote, try removing or reducing
the source of interference:
• Bright light sources, including sunlight, behind or near
the TV, shining toward the remote or reflecting off the
TV screen
• Highly reflective surfaces near the sensor bar
• Sources of infrared light in the gameplay area such as
electric, propane, or kerosene heaters, flames from
fireplaces or candles, and stoves or other sources of
heat
• Radio frequency interference may cause the Wii
Remote to work erratically. Check for and move or turn
off wireless devices such as cordless phones, wireless
computer keyboards or mice, or other similar devices
Is the Wii Remote pointed at the
sensor bar?
Point the Wii Remote at the front of the sensor bar when
using.
If the remote does not operate normally after checking all of the above, press the POWER
button on the Wii U console and make sure the Power LED is red, and then unplug the Wii U AC
adapter from the wall outlet. Wait two minutes, then plug the AC adapter back into the wall
outlet, turn the Wii U console power on, and try using the remote again.
Wii Remote controllers
Troubleshooting
52 53
If your Wii U system still does not operate correctly after trying the troubleshooting steps, DO
NOT return the console to the store. You may lose saved game data, Nintendo eShop downloads, and any balance left in your Nintendo eShop account. For assistance and additional
troubleshooting and repair options visit support.nintendo.com, or call 1-800-255-3700.
Troubleshooting
Page 33

Warranty and Service Information Regulations for Equipment Use
Warranty and Service Information
You may need only simple instructions to correct a problem with your product. Try our website at
support.nintendo.com or call our Consumer Assistance Hotline at 1-800-255-3700, rather than
going to your retailer. Hours of operation are 6 a.m. to 7 p.m., Pacific Time, Monday - Sunday (times
subject to change). If the problem cannot be solved with the troubleshooting information available
online or over the telephone, you will be offered express factory service through Nintendo. Please do
not send any products to Nintendo without contacting us first.
HARDWARE WARRANTY
Nintendo of America Inc. (“Nintendo”) warrants to the original purchaser that the hardware product
shall be free from defects in material and workmanship for twelve (12) months from the date of
purchase. If a defect covered by this warranty occurs during this warranty period, Nintendo will repair
or replace the defective hardware product or component, free of charge.* The original purchaser is
entitled to this warranty only if the date of purchase is registered at point of sale or the consumer can
demonstrate, to Nintendo’s satisfaction, that the product was purchased within the last 12 months.
GAME & ACCESSORY WARRANTY
Nintendo warrants to the original purchaser that the product (games and accessories) shall be free from
defects in material and workmanship for a period of three (3) months from the date of purchase. If a
defect covered by this warranty occurs during this three (3) month warranty period, Nintendo will repair
or replace the defective product, free of charge.*
SERVICE AFTER EXPIRATION OF WARRANTY
Please try our website at support.nintendo.com or call the Consumer Assistance Hotline at
1-800-255-3700 for troubleshooting information and repair or replacement options and pricing.*
* In some instances, it may be necessary for you to ship the complete product, FREIGHT PREPAID AND
INSURED FOR LOSS OR DAMAGE, to Nintendo. Please do not send any products to Nintendo without
contacting us first.
WARRANTY LIMITATIONS
THIS WARRANTY SHALL NOT APPLY IF THIS PRODUCT: (a) IS USED WITH PRODUCTS NOT SOLD OR
LICENSED BY NINTENDO (INCLUDING, BUT NOT LIMITED TO, NON-LICENSED GAME ENHANCEMENT AND COPIER DEVICES, ADAPTERS, SOFTWARE, AND POWER SUPPLIES); (b) IS USED FOR
COMMERCIAL PURPOSES (INCLUDING RENTAL); (c) IS MODIFIED OR TAMPERED WITH; (d) IS
DAMAGED BY NEGLIGENCE, ACCIDENT, UNREASONABLE USE, OR BY OTHER CAUSES UNRELATED
TO DEFECTIVE MATERIALS OR WORKMANSHIP; OR (e) HAS HAD THE SERIAL NUMBER ALTERED,
DEFACED OR REMOVED.
ANY APPLICABLE IMPLIED WARRANTIES, INCLUDING WARRANTIES OF MERCHANTABILITY AND
FITNESS FOR A PARTICULAR PURPOSE, ARE HEREBY LIMITED IN DURATION TO THE WARRANTY
PERIODS DESCRIBED ABOVE (12 MONTHS OR 3 MONTHS, AS APPLICABLE). IN NO EVENT SHALL
NINTENDO BE LIABLE FOR CONSEQUENTIAL OR INCIDENTAL DAMAGES RESULTING FROM THE
BREACH OF ANY IMPLIED OR EXPRESS WARRANTIES. SOME STATES DO NOT ALLOW LIMITATIONS
ON HOW LONG AN IMPLIED WARRANTY LASTS OR EXCLUSION OF CONSEQUENTIAL OR INCIDENTAL DAMAGES, SO THE ABOVE LIMITATIONS MAY NOT APPLY TO YOU.
This warranty gives you specific legal rights. You may also have other rights which vary from state to
state or province to province.
Nintendo’s address is: Nintendo of America Inc., P.O. Box 957, Redmond, WA 98073-0957 U.S.A.
This warranty is only valid in the United States and Canada.
Regulations for Equipment Use in U�S�A� and Canada
FCC and Industry Canada Information
In order to comply with FCC radio-frequency radiation exposure guidelines for an uncontrolled
exposure, this device and its antenna must not be co-located or operating in conjunction with any other
antenna or transmitter.
This device complies with Part 15 of the FCC Rules and RSS-210 of Industry Canada. Operation is
subject to the following two conditions: (1) This device may not cause harmful interference, and (2) this
device must accept interference received, including interference that may cause undesired operation.
Changes or modifications not expressly approved by the manufacturer could void the user’s authority
to operate this device.
This equipment has been tested and found to comply with the limits of a Class B digital device,
pursuant to part 15 of the FCC Rules and the Canadian ICES-003 Class B specifications. These limits are
designed to provide reasonable protection against harmful interference in a residential installation. This
equipment generates, uses and can radiate radio frequency energy and, if not installed and used in
accordance with the instructions, may cause harmful interference to radio communications. However,
there is no guarantee that interference will not occur in a particular installation. If this equipment does
cause harmful interference to radio or television reception, which can be determined by turning the
equipment off and on, the user is encouraged to try to correct the interference by one or more of the
following measures:
• Reorient or relocate the receiving antenna.
• Increase the separation between the equipment and receiver.
• Connect the equipment into an outlet on a circuit different from that to which the receiver is
connected.
• Consult the dealer or an experienced radio/TV technician or call Nintendo Consumer Service
at 1-800-255-3700 for assistance.
The user may find the following booklet prepared by the Federal Communications Commission helpful:
How to Identify and Resolve Radio-TV Interference Problems. This booklet is available from the U.S.
Government Printing Office, Washington, D.C., 20402, Stock No. 004-000-00345-4.
Usage restrictions for the Wii U console and Wii U GamePad:
This product is restricted to indoor use only to reduce any potential for harmful interference with
licensed operation in the 5.15–5.25 GHz range.
WARNING - RADIO FREQUENCY EXPOSURE
To comply with FCC and IC RF exposure compliance requirements when using the Wii U console, a
separation distance of at least eight inches (20 cm) must be maintained between the antenna of this
device and all persons.
Regulations for Equipment Use
Revision R1
5554
Page 34

MEMO
56
 Loading...