

Page 1
NEED HELP WITH INSTALLATION,
71175A
MAINTENANCE OR SERVICE?
Nintendo Customer Service
SUPPORT.NINTENDO.COM
or call 1-800-255-3700
NEED HELP PLAYING A GAME?
Recorded tips for many titles are available on
Nintendo’s Power Line at (425) 885-7529.
This may be a long-distance call, so please ask
permission from whoever pays the phone bill.
If the information you need is not on the Power
Line, you may want to try using your favorite
Internet search engine to find tips for the game
you are playing. Some helpful words to include in
the search, along with the game’s title, are: “walk
through,” “FAQ,” “codes,” and “tips.”
BESOIN D’AIDE POUR L’INSTALLATION,
L’ENTRETIEN OU LA RÉPARATION?
Service à la clientèle de Nintendo
SUPPORT.NINTENDO.COM
ou composez le 1 800 255-3700
BESOIN D’AIDE DANS UN JEU?
Des astuces préenregistrées pour de nombreux
titres sont disponibles sur la Power Line de
Nintendo au (425) 885-7529 (en anglais
seulement). Puisque l’appel pourrait être
interurbain, demandez la permission à la
personne qui paie les factures de téléphone
avant d’appeler. Vous pouvez aussi utiliser
votre moteur de recherche préféré pour
trouver des astuces sur Internet. Essayez
quelques-uns de ces mots clés dans votre
recherche : « solution complète », « FAQ »,
« codes », « trucs » et « astuces ».
¿NECESITAS AYUDA DE INSTALACIÓN,
MANTENIMIENTO O SERVICIO?
Servicio al Cliente de Nintendo
SUPPORT.NINTENDO.COM
o llama al 1-800-255-3700
¿NECESITAS AYUDA CON UN JUEGO?
Puedes escuchar consejos grabados para
muchos títulos a través del servicio Power Line
de Nintendo, llamando al (425) 885-7529. Esta
puede ser una llamada de larga distancia, así
que asegúrate de pedir permiso a la persona que
paga la factura del teléfono. Si el servicio Power
Line no tiene la información que necesitas, te
recomendamos que uses el motor de búsqueda
que prefieras para encontrar consejos para el
juego. Algunas de las palabras que te ayudarán en
tu búsqueda, además del título, son “instrucciones
paso a paso”, “preguntas frecuentes”, “códigos”
y “consejos”.
The Official Seal is your assurance
that this product is licensed or
manufactured by Nintendo. Always
look for this seal when buying
video game systems, accessories,
games and related products.
NINTENDO OF AMERICA INC.
P.O. BOX 957, REDMOND, WA
98073-0957 U.S.A.
www.nintendo.com
Ce sceau officiel est votre garantie que le
présent produit est agréé ou manufacturé
par Nintendo. Cherchez-le toujours sur
les boîtes lorsque vous achetez des
consoles de jeux vidéo, des accessoires,
des jeux et d’autres produits apparentés.
El sello oficial es tu ratificación de que
este producto está autorizado o ha sido
fabricado por Nintendo. Busca siempre
este sello al comprar sistemas de
videojuegos, accesorios, juegos y otros
productos relacionados.
PRINTED IN USA
INSTRUCTION BOOKLET FOLLETO DE INSTRUCCIONESMODE D’EMPLOI
Page 2
PLEASE CAREFULLY READ THE Wii™ OPERATIONS MANUAL COMPLETELY BEFORE USING YOUR
Wii HARDWARE SYSTEM, GAME DISC OR ACCESSORY. THIS MANUAL CONTAINS IMPORTANT
HEALTH AND SAFETY INFORMATION.
IMPORTANT SAFETY INFORMATION: READ THE FOLLOWING WARNINGS BEFORE YOU OR YOUR
CHILD PLAY VIDEO GAMES.
WARNING – Seizures
•Somepeople(about1in4000)mayhaveseizuresorblackoutstriggeredbylightashesor
patterns, and this may occur while they are watching TV or playing video games, even if they have
never had a seizure before.
•Anyonewhohashadaseizure,lossofawareness,orothersymptomlinkedtoanepileptic
condition should consult a doctor before playing a video game.
•Parentsshouldwatchtheirchildrenplayvideogames.Stopplayingandconsultadoctorifyouor
your child has any of the following symptoms:
Convulsions Eye or muscle twitching Altered vision
Loss of awareness Involuntary movements Disorientation
•Toreducethelikelihoodofaseizurewhenplayingvideogames:
1. Sit or stand as far from the screen as possible.
2. Play video games on the smallest available television screen.
3. Do not play if you are tired or need sleep.
4. Play in a well-lit room.
5. Take a 10 to 15 minute break every hour.
WARNING –
Playing video games can make your muscles, joints, skin or eyes hurt. Follow these instructions to
avoid problems such as tendinitis, carpal tunnel syndrome, skin irritation or eyestrain:
•Avoidexcessiveplay.Parentsshouldmonitortheirchildrenforappropriateplay.
•Takea10to15minutebreakeveryhour,evenifyoudon’tthinkyouneedit.
•Ifyourhands,wrists,armsoreyesbecometiredorsorewhileplaying,orifyoufeelsymptomssuch
as tingling, numbness, burning or stiffness, stop and rest for several hours before playing again.
•Ifyoucontinuetohaveanyoftheabovesymptomsorotherdiscomfortduringorafter
play, stop playing and see a doctor.
CAUTION –
Playing video games can cause motion sickness in some players. If you or your child feel dizzy
or nauseous when playing video games, stop playing and rest. Do not drive or engage in other
demanding activity until you feel better.
IMPORTANT LEGAL INFORMATION
any unauthorized device. Use of any such device will invalidate your Nintendo product warranty.
Copying of any Nintendo game is illegal and is strictly prohibited by domestic and international
intellectual property laws. “Back-up” or “archival” copies are not authorized and are not necessary to
protect your software. Violators will be prosecuted.
Repetitive Motion Injuries and Eyestrain
Motion Sickness
This Nintendo game is not designed for use with
REV–E
WARRANTY & SERVICE INFORMATION
You may need only simple instructions to correct a problem with your product. Try our website at
support.nintendo.com or call our Consumer Assistance Hotline at 1-800-255-3700, rather than going
to your retailer. Hours of operation are 6 a.m. to 7 p.m., Pacific Time, Monday - Sunday (times subject to change).
If the problem cannot be solved with the troubleshooting information available online or over the telephone, you
will be offered express factory service through Nintendo. Please do not send any products to Nintendo without
contacting us first.
HARDWARE WARRANTY
Nintendo of America Inc. (“Nintendo”) warrants to the original purchaser that the hardware product shall be free
from defects in material and workmanship for twelve (12) months from the date of purchase. If a defect covered
by this warranty occurs during this warranty period, Nintendo will repair or replace the defective hardware product
or component, free of charge.* The original purchaser is entitled to this warranty only if the date of purchase
is registered at point of sale or the consumer can demonstrate, to Nintendo’s satisfaction, that the product was
purchased within the last 12 months.
GAME & ACCESSORY WARRANTY
Nintendo warrants to the original purchaser that the product (games and accessories) shall be free from defects in
material and workmanship for a period of three (3) months from the date of purchase. If a defect covered by this
warranty occurs during this three (3) month warranty period, Nintendo will repair or replace the defective product,
free of charge.*
SERVICE AFTER EXPIRATION OF WARRANTY
Please try our website at support.nintendo.com or call the Consumer Assistance Hotline at 1-800-255-3700 for
troubleshooting information and repair or replacement options and pricing.*
*In some instances, it may be necessary for you to ship the complete product, FREIGHT PREPAID AND INSURED FOR
LOSS OR DAMAGE, to Nintendo. Please do not send any products to Nintendo without contacting us first.
REV-R
WARRANTY LIMITATIONS
THIS WARRANTY SHALL NOT APPLY IF THIS PRODUCT: (a) IS USED WITH PRODUCTS NOT SOLD OR LICENSED BY
NINTENDO (INCLUDING, BUT NOT LIMITED TO, NON-LICENSED GAME ENHANCEMENT AND COPIER DEVICES,
ADAPTERS, SOFTWARE, AND POWER SUPPLIES); (b) IS USED FOR COMMERCIAL PURPOSES (INCLUDING RENTAL);
(c) IS MODIFIED OR TAMPERED WITH; (d) IS DAMAGED BY NEGLIGENCE, ACCIDENT, UNREASONABLE USE, OR BY
OTHER CAUSES UNRELATED TO DEFECTIVE MATERIALS OR WORKMANSHIP; OR (e) HAS HAD THE SERIAL NUMBER
ALTERED, DEFACED OR REMOVED.
ANY APPLICABLE IMPLIED WARRANTIES, INCLUDING WARRANTIES OF MERCHANTABILITY AND FITNESS FOR A
PARTICULAR PURPOSE, ARE HEREBY LIMITED IN DURATION TO THE WARRANTY PERIODS DESCRIBED ABOVE (12
MONTHS OR 3 MONTHS, AS APPLICABLE). IN NO EVENT SHALL NINTENDO BE LIABLE FOR CONSEQUENTIAL OR
INCIDENTAL DAMAGES RESULTING FROM THE BREACH OF ANY IMPLIED OR EXPRESS WARRANTIES. SOME STATES
DO NOT ALLOW LIMITATIONS ON HOW LONG AN IMPLIED WARRANTY LASTS OR EXCLUSION OF CONSEQUENTIAL OR
INCIDENTAL DAMAGES, SO THE ABOVE LIMITATIONS MAY NOT APPLY TO YOU.
This warranty gives you specific legal rights. You may also have other rights which vary from state to state or
province to province.
Nintendo’s address is: Nintendo of America Inc., P.O. Box 957, Redmond, WA 98073-0957 U.S.A.
This warranty is only valid in the United States and Canada.
Dolby, Pro Logic, and the double-D symbol are trademarks of Dolby Laboratories. Manufactured under
license from Dolby Laboratories.
This game is presented in Dolby® Pro Logic® II surround sound. Connect your game console to a sound
system with Dolby Pro Logic, Dolby Pro Logic II, or Dolby Pro Logic IIx decoding to experience the
excitement of surround sound. You need to enable “Surround” in the sound settings of the game console.
© 2010 Nintendo. TM, ® and the Wii logo are trademarks of Nintendo. © 2010 Nintendo.
Page 3
3
4
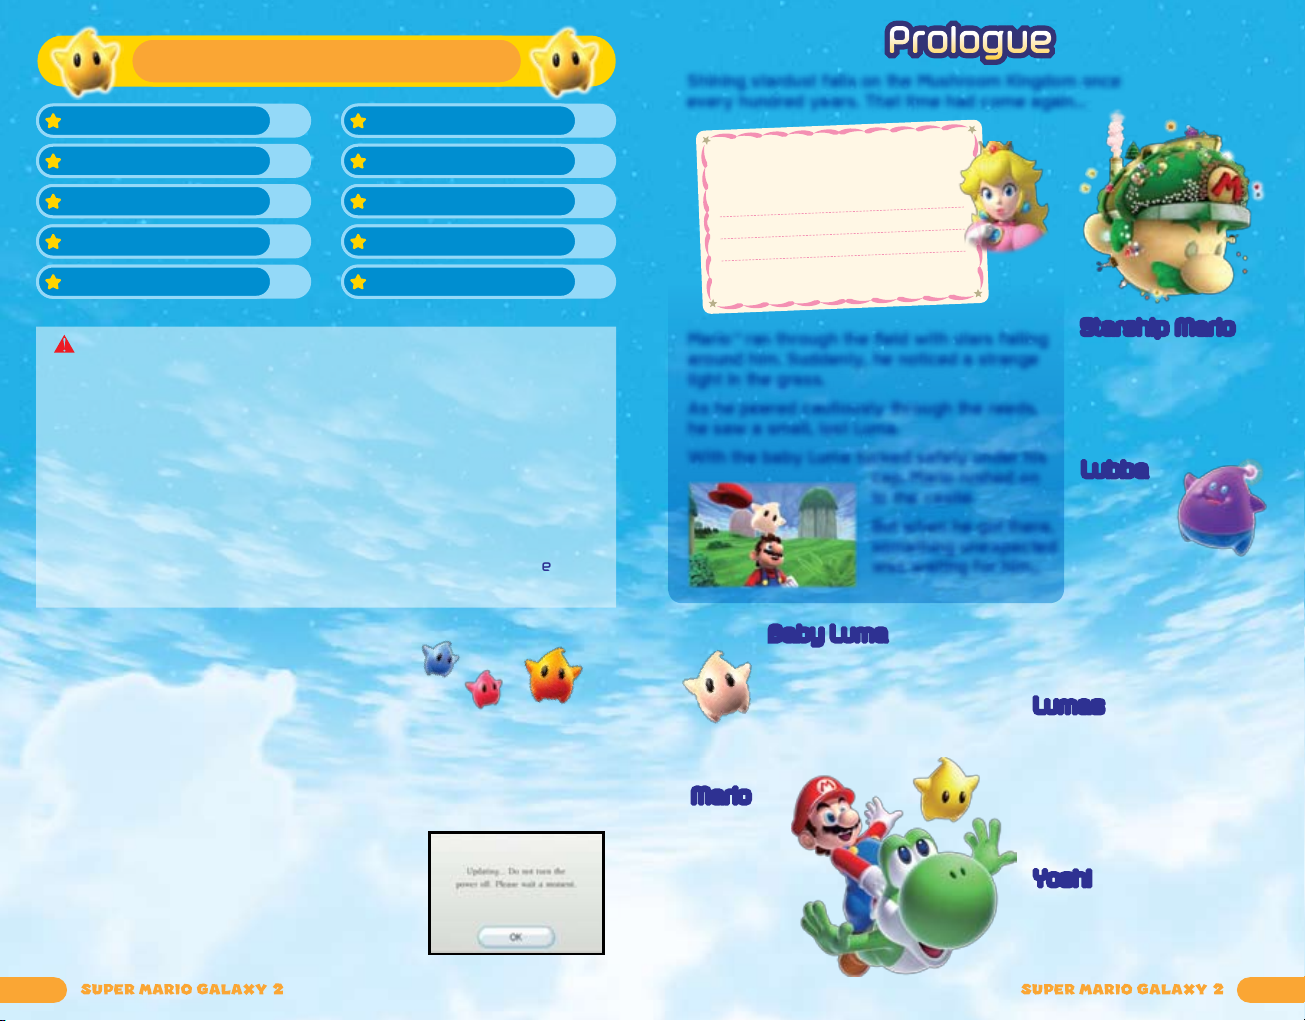
Contents
Prologue 4
Prologue
Shining stardust falls on the Mushroom Kingdom once
every hundred years. That time had come again...
Mario’s Special Moves 14
Controls 5
Starting the Game 7
Traveling the Galaxies 8
Mario’s Moves 11
CAUTION: WRIST STRAP USE
Please use the Wii Remote™ wrist strap to help prevent injury to other
people or damage to surrounding objects or the Wii Remote in case you
accidentally let go of the Wii Remote during game play.
Also remember the following:
• Make sure all players put on the wrist
strap properly when it is their turn.
• Do not let go of the Wii Remote
during game play.
• Dry your hands if they become moist.
• Allow adequate room around you
during game play, and make sure
SYSTEM MENU UPDATE
Please note that when rst loading the Game Disc
into the Wii console, the system will check if you
have the latest version of the system menu, and, if
necessary, a Wii system menu update screen will appear.
Select OK to proceed with the update. Please note that the Wii console must
have the latest version of the Wii system menu in order to play the Game Disc.
When the system menu is updated, unauthorized hardware and/or software
modications may be detected and unauthorized content may be removed,
causing the immediate or delayed inoperability of
your console. Failure to accept the update may
render this game, and future games, unplayable.
Please note that Nintendo cannot guarantee that
unauthorized software or accessories will continue
to function with the Wii console after this or future
updates of the Wii system menu.
Yoshi’s Moves 16
Yoshi’s Special Moves 18
Objects 19
Items 22
that all areas you might move
into are clear of other people
and objects.
• Stay at least three feet from
the television.
• Use the Wii Remote Jacket.
Dear Mario
Would you like to share some cake
while we watch the shooting stars?
Meet me at the castle!
,
Peach
Mario™ ran through the eld with stars falling
around him. Suddenly, he noticed a strange
light in the grass.
As he peered cautiously through the reeds,
he saw a small, lost Luma.
With the baby Luma tucked safely under his
cap, Mario rushed on
to the castle.
But when he got there,
something unexpected
was waiting for him
Baby Luma
Mario found this lost little Luma.
He grants Mario a mysterious
power of the stars, which
comes in handy as they
explore the cosmos together!
Mario
Peach
has been
kidnapped
by Bowser,
so Mario
leaps into a
deep-space
adventure
to save her…
Starship Mario
This strange, Marioshaped spaceship was
built by Lubba. You can
use it to travel through
the universe!
Lubba
Lubba is
a spirited
spaceship
mechanic
…
who travels the
cosmos. After Bowser
kidnapped Peach
built Starship Mario to
help Mario chase down
the big villain.
, Lubba
™
™
Lumas
These star-shaped creatures
live throughout the universe.
They especially love eating
Star Bits. There are many
different types. The orange one
is a Co-Star Luma that will help
Mario during his adventures.
Yoshi
After Mario bumps into Yoshi™
in a certain galaxy, Yoshi will
show up from time to time
and help Mario in his quest.
Page 4
5
6
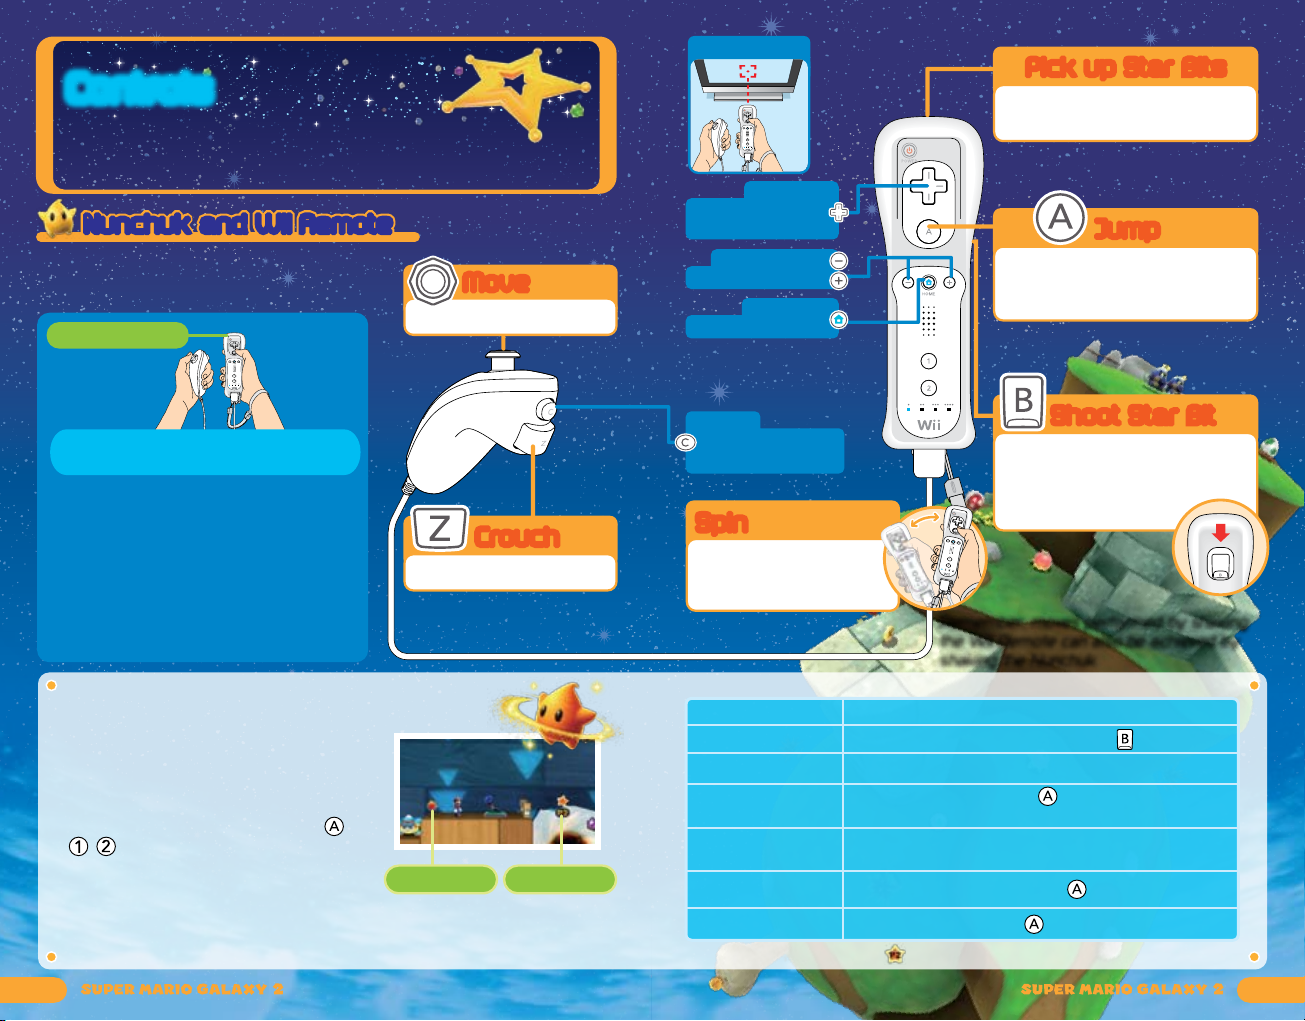
Controls
This game is played using both the Wii Remote™ controller and
Nunchuk controller, so you will need to connect a Nunchuk to your Wii Remote.
Point like this
Wii Remote
Pointer
Pick up Star Bits
Move pointer, Point at a Pull Star
Aim at enemies or fruit (p. 16)
Nunchuk and Wii Remote
Nunchuk™and Wii Remote
Use these controls to play as Mario and his friends.
The green text refers to the controls for when you
are riding on Yoshi only.
Wii Remote Jacket
™
Move
Move (p. 11)
How to Hold the Wii Remote
and Nunchuk
Please check the Wii Operations Manual
and the Wii Remote Jacket manual for
more information on how to attach the
Wii Remote Jacket and Wii Remote
wrist strap.
When using the Nunchuk
Please be sure to refer to the Wii
Operations Manual and Nunchuk manual.
Crouch
Dive (p. 13)
Co-Star Mode
This game is normally played with one
player, but if you have two Wii Remote
controllers, you can play with two players.
The Co-Star Luma cannot move on his
own, so it will follow Mario. Player 2
needs only the Wii Remote. Press
, , or the +Control Pad to display the
P2 pointer. Move the P2 pointer around
and see what you can do with it!
Check the Wii Operations Manual for more information on how to sync
a Wii Remote.
,
Co-Star Luma P2’s Pointer
Control Stick
Nunchuk
Z Button
+Control Pad
Change camera view
Select options
- Button /+ Button
Display pause menu
HOME Button
Display HOME Menu
If you turn off the sound
on your Wii Remote,
that sound will come
out of your television.
C Button
Camera reset (Return
to normal view)
Spin
Activate an object
Head Shake (p. 17)
Get on Yoshi (p. 16)
Shake
Select, Speak/Read, Swim, Grab
a Pull Star
Flutter Jump (p. 17)
Shoot Star Bit
Cancel a command
Gulp/Spit Out (p. 16)
Grab (p. 17)
Pull (p. 16)
Remember, moves performed by shaking
the Wii Remote can also be achieved by
shaking the Nunchuk.
Co-Star Luma Controls
Collect Star Bits
Shoot Star Bits
Spin
Stop an Enemy
Defeat an Enemy
Activate a checkpoint
Grab a coin
You can check controls for on the le-selection screen.
Point at Star Bits.
Point where you want to shoot and press
Shake the Wii Remote.
Point at an enemy and press
This may not work on some enemies.
Shake the Wii Remote while an enemy is stopped.
This may not work on some enemies.
Point at the checkpoint and press
Point at the coin and press
.
.
.
A Button
Jump
B Button
.
Page 5

7
8
Starting the Game
Traveling the Galaxies
Insert the Super Mario Galaxy 2 Game Disc in the Wii
console and follow the on-screen instructions.
Playing from the Beginning and Creating a Save File
Playing from the Beginning and Creating a Save File
When playing for the rst time, choose a planet where you want to create
your save le. Creating a le requires one free block of space in your Wii
system memory.
You can also mark your save le with a Mii™character stored in your Wii system
memory. For more information about creating Mii characters, refer to the Wii
Operations Manual.
File Selection Screen
File Selection Screen
Choose a save le (planet) to play, and choose Start to continue from a
previous save. Also, you can point at
two-player controls (p. 6).
File Selection Menu
Icon Change the icon
associated with a
save le.
Erase Erase a saved le.
Once you’ve
erased a save le,
it can’t be recovered.
Please be careful!
Back Button
Press
to return to the previous screen.
or point here and press
and press to display
Power Stars You’ve Obtained
Current World
Saving
Your progress will be saved automatically
after you complete a challenge. Data cannot
be restored once it is erased, so be careful.
Check your Wii Operations Manual for more
information about how to erase les from
Wii system memory.
You’ll control Mario as he launches into a new universe of
adventure aboard the Starship Mario, chasing after Bowser
and collecting Power Stars.
Look for Power Stars
Look for Power Stars
Mario will adventure through many galaxies.
In most galaxies, you will need to complete
several objectives to obtain a Power Star.
When you obtain the star at the end of a
mission, you will open up the next mission
in that galaxy, if there are any.
Starship Mario
Starship Mario
This is the starting point for many of your
adventures throughout the galaxies. You can
pilot Starship Mario to distant galaxies, and
you can also collect information from Lumas
on the ship. When you collect the Grand Star
in the last galaxy of a World, the path to the
next World will open up.
Star List
This shows which
Power Stars you
have collected on
your journey through
the galaxies.
Star Bits
Power Star Grand Star
Grand World Map
If you zoom out from a galaxy on the World
Map, you will go to the Grand World Map.
From this map, you can only travel to Worlds
you have already visited. Select a World and
press
travel to it.
or zoom in on a selected World to
Wheel
Stand here to go to
the World Map.
Coins
Page 6

9
10
World Map Screen
Stand near the steering wheel on Starship Mario to access the World Map.
Zoom Out
Point and press or press down on the
+Control Pad. You will zoom the camera back
away from the galaxy you have selected.
Star Barrier
Discovered Galaxy
Point and press
to move to a galaxy.
Collect a specied number of stars to advance
beyond a Star Barrier.
Mission Selection Screen
Point at a mission and press to y to the galaxy. If you point at a mission
you have already cleared, you can see your clear time.
Checkpoint Flag
As you progress through a galaxy, you will eventually
see a ag like the one to the right. Touching this ag
changes it from a Bowser icon to a Mario icon, and if
you lose a life, you will restart from this point until you
nish or clear the level.
Returning to the map or getting a game over will force
you to restart the mission from the beginning.
Too Bad! and Game Over
Too Bad! and Game Over
When your life meter reaches zero from touching
enemies, thorns, or other dangerous things, or if you
fall into a black hole, the number of your remaining
lives will go down by one. If you lose your life while
you have zero remaining lives, the game will end
and you will return to Starship Mario.
Checkpoint Flag
Mission You Have Already Completed
Mission You Have Not Yet Completed
Banktoad
As you advance in the game, a Banktoad will
appear near the wheel to hold on to Star Bits
you’ve collected and return them to you as
needed. Players using other save les can also
access banked Star Bits.
Galaxy Screen
Galaxy Screen
As you go through galaxies, defeat enemies, and collect Power Stars, you’ll
be looking at this screen. Most of the time the on-screen information will only
appear when Mario is standing still, but when your life meter is down to two or
less, some of this information will stay on the screen.
Power Stars You’ve
Obtained
Comet Medal
Remaining Lives
Coins
Life Meter
This will go down by one
each time you touch an
enemy or hazard.
Star Bits
The number of Star Bits
you have collected in
the current galaxy.
Changing the Camera Angle
When you’re moving Mario around on the screen, there
may be some places where you can change the camera
angle. Press
press on the direction highlighted in blue to change the
camera angle. Press
normal. In some situations, pressing up or down on
between a rst-person view from Mario and the normal view.
There are some places where you cannot change the camera angle.
to make the Camera icon appear, then
Camera Icon
to return the camera view to
will change
Pause Screen
Press or during game play to pause the
game. On the pause screen, you can conrm
your current coin total and the name of the
galaxy you’re exploring. When you want to
get back to the game, choose Back, or choose
Return to Map to return to the World Map.
Checking the Star List
Choose Star List on the pause
screen to see which Power Stars,
Grand Stars, and Comet Medals
you’ve obtained in each World.
Press
which World is being shown. Choose Back
or press
or left and right on to change
to return to the pause screen.
Comet Medals You’ve Obtained
Galaxy Name
Galaxies you
haven’t yet
discovered will
look like this: ----.
Power Stars (and Grand Stars)
You’ve Obtained
Page 7

11
12
Mario’s Moves / Basic
These are Mario’s basic moves. Each one has its uses,
depending on the situation, so try experimenting!
Move
Move
Move using . Tilt a little to walk and a lot to run.
Spin
Spin
As you progress in the game, you
will learn how to spin. Spinning
allows you to shake the Wii
Remote to destroy obstacles or
stun enemies. You may also need
to spin to activate certain kinds of
objects, so try spinning in different
places to see what happens.
Shake
Jump
Jump
You can jump in many different ways, depending on how you combine the
jump with other actions. Try to nd the best jump for every situation.
Multiple Jumps/Triple Jump
After jumping while you run, press right as you land
for up to three consecutive jumps. On your third jump,
you may be able to pull off an especially high jump.
Press to jump
Press right when you land
Backward
Somersault
If you jump while crouching, you will leap high into
the sky and slightly backward.
Wall Jump
Face a wall and jump toward it, then continue to jump
off the wall with good timing by pressing
off the wall. In areas where two walls face each other
with a small gap, you can use this method to climb to
the top.
Long Jump
Press and then while running to jump a
long distance.
Hold and press
Face a wall and press
Press and then while running
to kick
Destroy Obstacles Stun Enemies Use Objects
Spin Jump
Spin in midair to perform a spin jump. Jumping and then
spinning at the peak of your jump allows you to go higher
than in a normal jump.
Shake while in midair
Defeating Enemies
You can defeat most enemies by stomping on them with a jump,
stunning them with a spin, or shooting them with a Star Bit and then
running into them. However, there are some enemies you can’t defeat
in these ways. To defeat some enemies, you may need to spin to
return an attack or use an item or object.
Side
Somersault
While tilting in the opposite direction Mario is
running, press
with a turn.
activate a ground-pound switch (p. 20).
Tilt in the opposite direction while running, then press
to perform a high jump
Ground Pound
Press while in midair
to perform a ground
pound. You can use
a ground pound to
Press while in midair
Something will
happen if you
ground-pound
on an area with
this symbol.
Page 8

13
14
Speak/Read
Speak/Read
When standing in front of certain characters or signs, you can
press
Grab a Pole
Press
the pole by tilting up, down, left, or right on
Crouch
Press and hold to crouch. You can also move around while
crouched by tilting
You can pick up shells and other objects by shaking the Wii Remote when
standing near them. Shake the Wii Remote again to throw the object in the
direction you are facing.
Pick up a shell… Throw it at
Pick up a shell… Throw it at
your target!
your target!
to speak or read.
Grab a Pole
to jump near a pole and grab on. You can move around
Crouch
.
Hold or Catch/Throw
Hold or Catch/Throw
Press
Press
. Press to jump off.
Press
Shake
Mario’s Special Moves / Power-Ups
Grabbing certain power-ups will transform you
and give you new abilities. Here’s how to use all of
your new abilities!
Cloud Mario
Cloud Mario
With this power-up, you can walk on clouds! You can
also spin in the air to create a cloud platform. Each
Cloud Flower will allow you to create up to three
cloud platforms. But be careful—clouds disappear
after a short time.
How to return to
regular Mario:
Touch an enemy, take
damage, or touch water.
Grab a Cloud Flower
Swim
Swim
Use
to change your direction underwater, and tap
If you press and hold
the Wii Remote while swimming to swim faster. Grab a shell to travel
quickly through the water. To jump out of the water, press and hold
or shake the Wii Remote at the surface of the water.
, you can swim by kicking your feet. Shake
Dive
Press to dive. While you are underwater, an will appear.
If this meter goes empty, you will quickly lose life,
so be careful. You can rell your air meter by surfacing
or running into an air bubble.
Skate
Skate
Shake the Wii Remote while standing on ice to skate.
You can change your direction while skating with
Luigi Joins the Adventure?!
You will nd Luigi™in some galaxies. If you talk to him,
you’ll have the option to play as Luigi!
Press
to swim.
Press
Bubble Air Meter
Shake
.
Rock Mario
Rock Mario
Shake the Wii Remote to
scrunch into a ball and roll like
a boulder. While rolling, you
can break some objects that
you can’t break with a spin.
How to return to
regular Mario:
Fire Mario
Fire Mario
Shake the Wii Remote to throw reballs.
How to return to
regular Mario:
Take damage or use a Launch Star.
Just wait until the Fire Flower
wears off.
Grab a Rock Mushroom
Grab a Fire Flower
Page 9

15
16
Bee Mario
Bee Mario
Press and hold to hover, and control
your movement by tilting
meter will continue to go down while
you press
you will begin to fall, so be careful. You
can also stick to honeycomb walls as
Bee Mario.
How to return to
regular Mario:
Rainbow Mario
You’re invincible! You can also instantly defeat
any enemy you touch. After you run for a little
while, your run speed will increase.
. If your reaches zero,
Touch an enemy, take damage, or touch water.
Rainbow Mario
. Your ying
Grab a Bee Mushroom
Honeycomb Wall
Grab a Rainbow Star
Yoshi’s Moves / Basic
In some galaxies, you can ride on Yoshi! Moving is the same
as with Mario, but Yoshi has some other moves too.
Get On/Off Yoshi
Get On/Off Yoshi
Get on: Jump on/spin near Yoshi Get off: Hold and press
Spin or jump on a Yoshi egg to make Yoshi appear.
Jump on Yoshi or spin near Yoshi to get on.
Do a backward somersault to dismount.
How to return to
regular Mario:
Boo Mario
Boo Mario
Shake the Wii Remote to turn transparent—that way,
you can pass through certain types of walls. You can also
press
Spring Mario
Bounce around with your springy
body. Press
when you hit the ground to bounce
especially high. You will also wall-jump
automatically when you hit a wall.
repeatedly to oat.
How to return to
regular Mario:
Spring Mario
How to return to
regular Mario:
Just wait until the Rainbow Star wears off.
Grab a Boo Mushroom
Touch an enemy or take damage.
Grab a Spring Mushroom
with good timing
Touch an enemy, take damage, or use a Launch Star.
Stick Out TongueDGulp/Spit Out
Stick Out Tongue
You can point at enemies or fruit and
press
something. Some enemies can be spit out
again after you’ve gulped them down.
Point in the direction you want to spit
something, then press
Some enemies cannot be eaten.
to stick out Yoshi’s tongue and eat
D
Gulp/Spit Out
.
Eat an Enemy Aim the cursor
Pull
Yoshi can pull some obstacles and larger fruit by
attaching his tongue to them. Point at the thing you
want to pull, then press and hold
tongue to it. Then just back away to pull the enemy
or object with your tongue.
Press and hold , then back away
to stick Yoshi’s
Point with and press
Fire with
Page 10

17
18
Grab
You can point at some objects and press
tongue, then release for a big jump.
Point with and press
to swing from them by your
Yoshi’s Special Moves / Power-Ups
Yoshi will transform when he eats certain things!
While transformed, he can use certain special powers with
their own controls. After a short time, the effects will wear off.
Flutter Jump
Flutter Jump
Press and hold during a jump to hover in the air
with Yoshi’s uttering feet. You can go higher and
farther with this kind of jump!
Head Shake
Head Shake
Shake the Wii Remote to make Yoshi batter obstacles,
activate objects, or knock out enemies with his head.
Press and hold in the air
Taking Damage
When you take damage while riding
Yoshi, you will fall off Yoshi and he
will run away. Yoshi will run around
for a short amount of time or until he
falls down a hole, then he will retreat
into his egg. If you can reach him
before he disappears, you can hop
back on again.
Sometimes he will retreat into his egg immediately after taking damage.
Shake
Dash Yoshi
Dash Yoshi
Yoshi will move at blazing-fast
speeds after chomping this
super-spicy pepper. As Dash
Yoshi, you can climb up steep
slopes or run on water and
reach places you normally can’t.
Blimp Yoshi
Blimp Yoshi
Yoshi will inate like a balloon
and blow air, rising slowly
for a short amount of time.
You can change the direction
you oat using
to hold your breath and stop
rising. While rising, your
will slowly deplete. Yoshi will
stop oating when the meter
runs out.
Bulb Yoshi
Bulb Yoshi
Yoshi will turn bright and emit a mysterious golden
light for a short time. This light can reveal hidden
platforms you can walk on.
. Press
Eat a Dash Pepper
Eat a Blimp Fruit
Meter
Eat a Bulb Berry
Page 11

19
20
Objects
To make your way through the galaxies, you’ll need to know
how to use all kinds of objects.
Blocks/Switches
Blocks/Switches
? Block
Brick Block
Jump and hit this from below to release coins or
Star Bits.
Jump to hit this from below, or spin into it to break it.
Jump, Spin, etc.
Launch Star
Launch Star
Shake the Wii Remote near a Launch Star to catapult
yourself on a path through the sky to another planet.
Sometimes you may need to gather Yellow Star Chips
to reassemble a broken Launch Star
before you can use it.
Pieces of a Broken Launch Star
Collect all the Yellow Star Chips to
reassemble a broken Launch Star.
Yellow Star Chip
Spin Drill
Spin Drill
Touch a Spin Drill to pick it up. While holding
a Spin Drill, you can shake the Wii Remote to
drill through the ground—even to the other
side of a planet! You can also use the drill to
defeat enemies.
The drill can’t penetrate some surfaces.
Pipe
Pipe
When you enter a pipe, it will warp you to
another location.
Launch Star
Shake
Shake
Enter the Pipe
Block
Flipswitch
Panel
Lever
Switch
GroundPound
Switch
There are many other blocks and switches.
Teleporter
Teleporter
Shake the Wii Remote while standing on top of a
teleporter to warp to a bonus stage. You will have a
short time to defeat all enemies on a bonus stage to
receive an item before you automatically warp back.
Sproutle Vine
Sproutle Vine
Shake the Wii Remote near a vine growing from a
Sproutle to swing up the vine. When you reach the end,
you can jump far off of it. Just keep shaking the Wii
Remote until you’ve jumped off the vine.
Star Ball
Star Ball
Jump to get on top of the Star Ball,
then hold your Wii Remote with the
top pointing up. To move, tilt the Wii
Remote in the direction you want to
go. Press
to jump.
You can’t break this block.
Walk over this to change its color.
Spin near this switch to change its position.
Get on top of this switch, then ground-pound over
it to activate it.
Shake
Shake
Tilt
Tilt forward to move
Tilt forward to move
forward.
forward.
Tilt right to move right.
Tilt right to move right.
Teleporter
Tilt left to move left.
Tilt left to move left.
Tilt back to go backward.
Tilt back to go backward.
Page 12

21
22
Leaf Raft
Leaf Raft
The Leaf Raft will move based on which side of it you stand on. Stand on the
edge of the raft toward the direction you want to go. Stand in the middle to
make it stop.
Stand on the
Stand on the
left side to go left.
left side to go left.
Get on the raft
Stand on the
Stand on the
right side to go right.
right side to go right.
Items
Some items will help you right away. Some items
need to be collected before they have an effect.
Either way, you want them!
Pull Stars
Pull Stars
Point at a Pull Star until you see appear,
then press and hold
that Pull Star. Press
yourself from a Pull Star’s grasp, or
press
or spin to release yourself quickly.
to draw yourself to
to gently release
Point and press
Pull Star
Grab a Pull Star
Grab a Pull Star
with
with
Fluzzard
Fluzzard
Grab on to this giant bird, then hold the Wii Remote level to
y straight. Dip the remote forward to dive, and tilt the remote
back to slow down. Tilt left or right to move in that direction.
You can also hear about how to control Fluzzard from the
Jibberjay at the start of the level.
Tilt back or forward
Tilt back or forward
to control speed.
to control speed.
!
!
Tilt
Tilt to change direction.Tilt to change direction.
Jibberjay
Coin
These shiny treasures restore one
slice of Mario’s health meter. Bring
100 coins back to Starship Mario to
earn an extra life.
Green Shell
Throw these to break open treasure
chests or attack enemies. You can
also hold on to one while swimming
for a nice speed boost.
Comet Medal
Collect Comet Medals to make
special Prankster Comets appear
in some galaxies.
? Coin
When you grab this,
things like coins will appear.
Grab these to earn Mario extra lives.
Life Mushroom
Grab one of these to temporarily increase
Mario’s max health to six. But if Mario’s life
falls to three or lower, his max health will
revert to three.
Spin these to roll them and receive the item
on the side facing up. Some may also make
enemies appear, so be careful.
Collecting Star Bits
Grab 100 Star Bits to earn an extra life. You can shoot
Star Bits you have collected by pointing at your target
and pressing
Hungry Lumas.
. Use them to attack enemies or feed
1-Up Mushroom
Chance Cube
Tip Network
In some galaxies, you’ll nd TVs showing the Tip
Network that can help explain how to perform
certain moves or advance through a tough area. If
you need a hint, try talking to the TV to see what it
has to show you.
Cosmic Guide
In some galaxies, if you lose enough
lives, the Cosmic Spirit will appear
somewhere. Speak to her and ask for
her help to activate Cosmic Guide. It will
show you the way to the Power Star.
But remember, any Power Stars you
earn this way will be Bronze Stars.
Bronze Star
Cosmic Spirit
 Loading...