

NINTENDO Wii Lens Cleaning Kit User Manual [en, fr, es]
PRINTED IN CHINA
NEED HELP WITH INSTALLATION,
MAINTENANCE OR SERVICE?
Nintendo Customer Service
SUPPORT.NINTENDO.COM
or call 1-800-255-3700
BESOIN D’AIDE POUR L’INSTALLATION,
L’ENTRETIEN OU LA RÉPARATION?
Servi ce à la clientè le de Ni ntendo
SUPPORT.NINTENDO.COM
ou appelez le
¿
NECESITAS AYUDA DE INSTALACION,
1 800 255-3700
MANTENIMIENTO O SERVICIO?
Servicio al Cliente de Nintendo
SUPPORT.NINTENDO.COM
o llame al 1-800-255-3700
NINTENDO OF AMERICA INC.
P.O. BOX 957, REDMOND, WA
98073-0957 U.S.A.
C/RVL–A–LS–USZ
Wii Lens Cleaning Kit Operations manual
Ensemble de nettoyage pour lentille Wii Mode d’emploi - p. 6
Kit de limpieza para lentes de Wii Manual de Operaciones - p. 12
66637A
The Wii Lens Cleaning Kit cleans the Wii console disc reader lens, which reduces disc read errors caused
by lens contamination. Please read and follow these instructions carefully.
IMPORTANT: For use with Wii consoles ONLY.
WARNING - Chemical Irritant
• For use by adults only – store out of reach of children.
• The cleaning fluid contains chemicals – avoid contact with skin or eyes. In the event of skin or eye
contact, flush with water, and consult your doctor if discomfort persists.
CAUTION - Damage to the Wii Console
• Do not use the lens cleaner if it is damaged in any way.
• Use only the cleaning fluid that is supplied with this cleaning kit.
• If the lens cleaner gets dirty or dusty, clean it with a soft cloth before use. Store it in the packaging
box when not in use.
• To avoid damage to the Wii console or the Wii lens cleaner, carefully follow the instructions in this
manual.
TM, ®, and the Wii logo are trademarks of Nintendo. © 2008 Nintendo
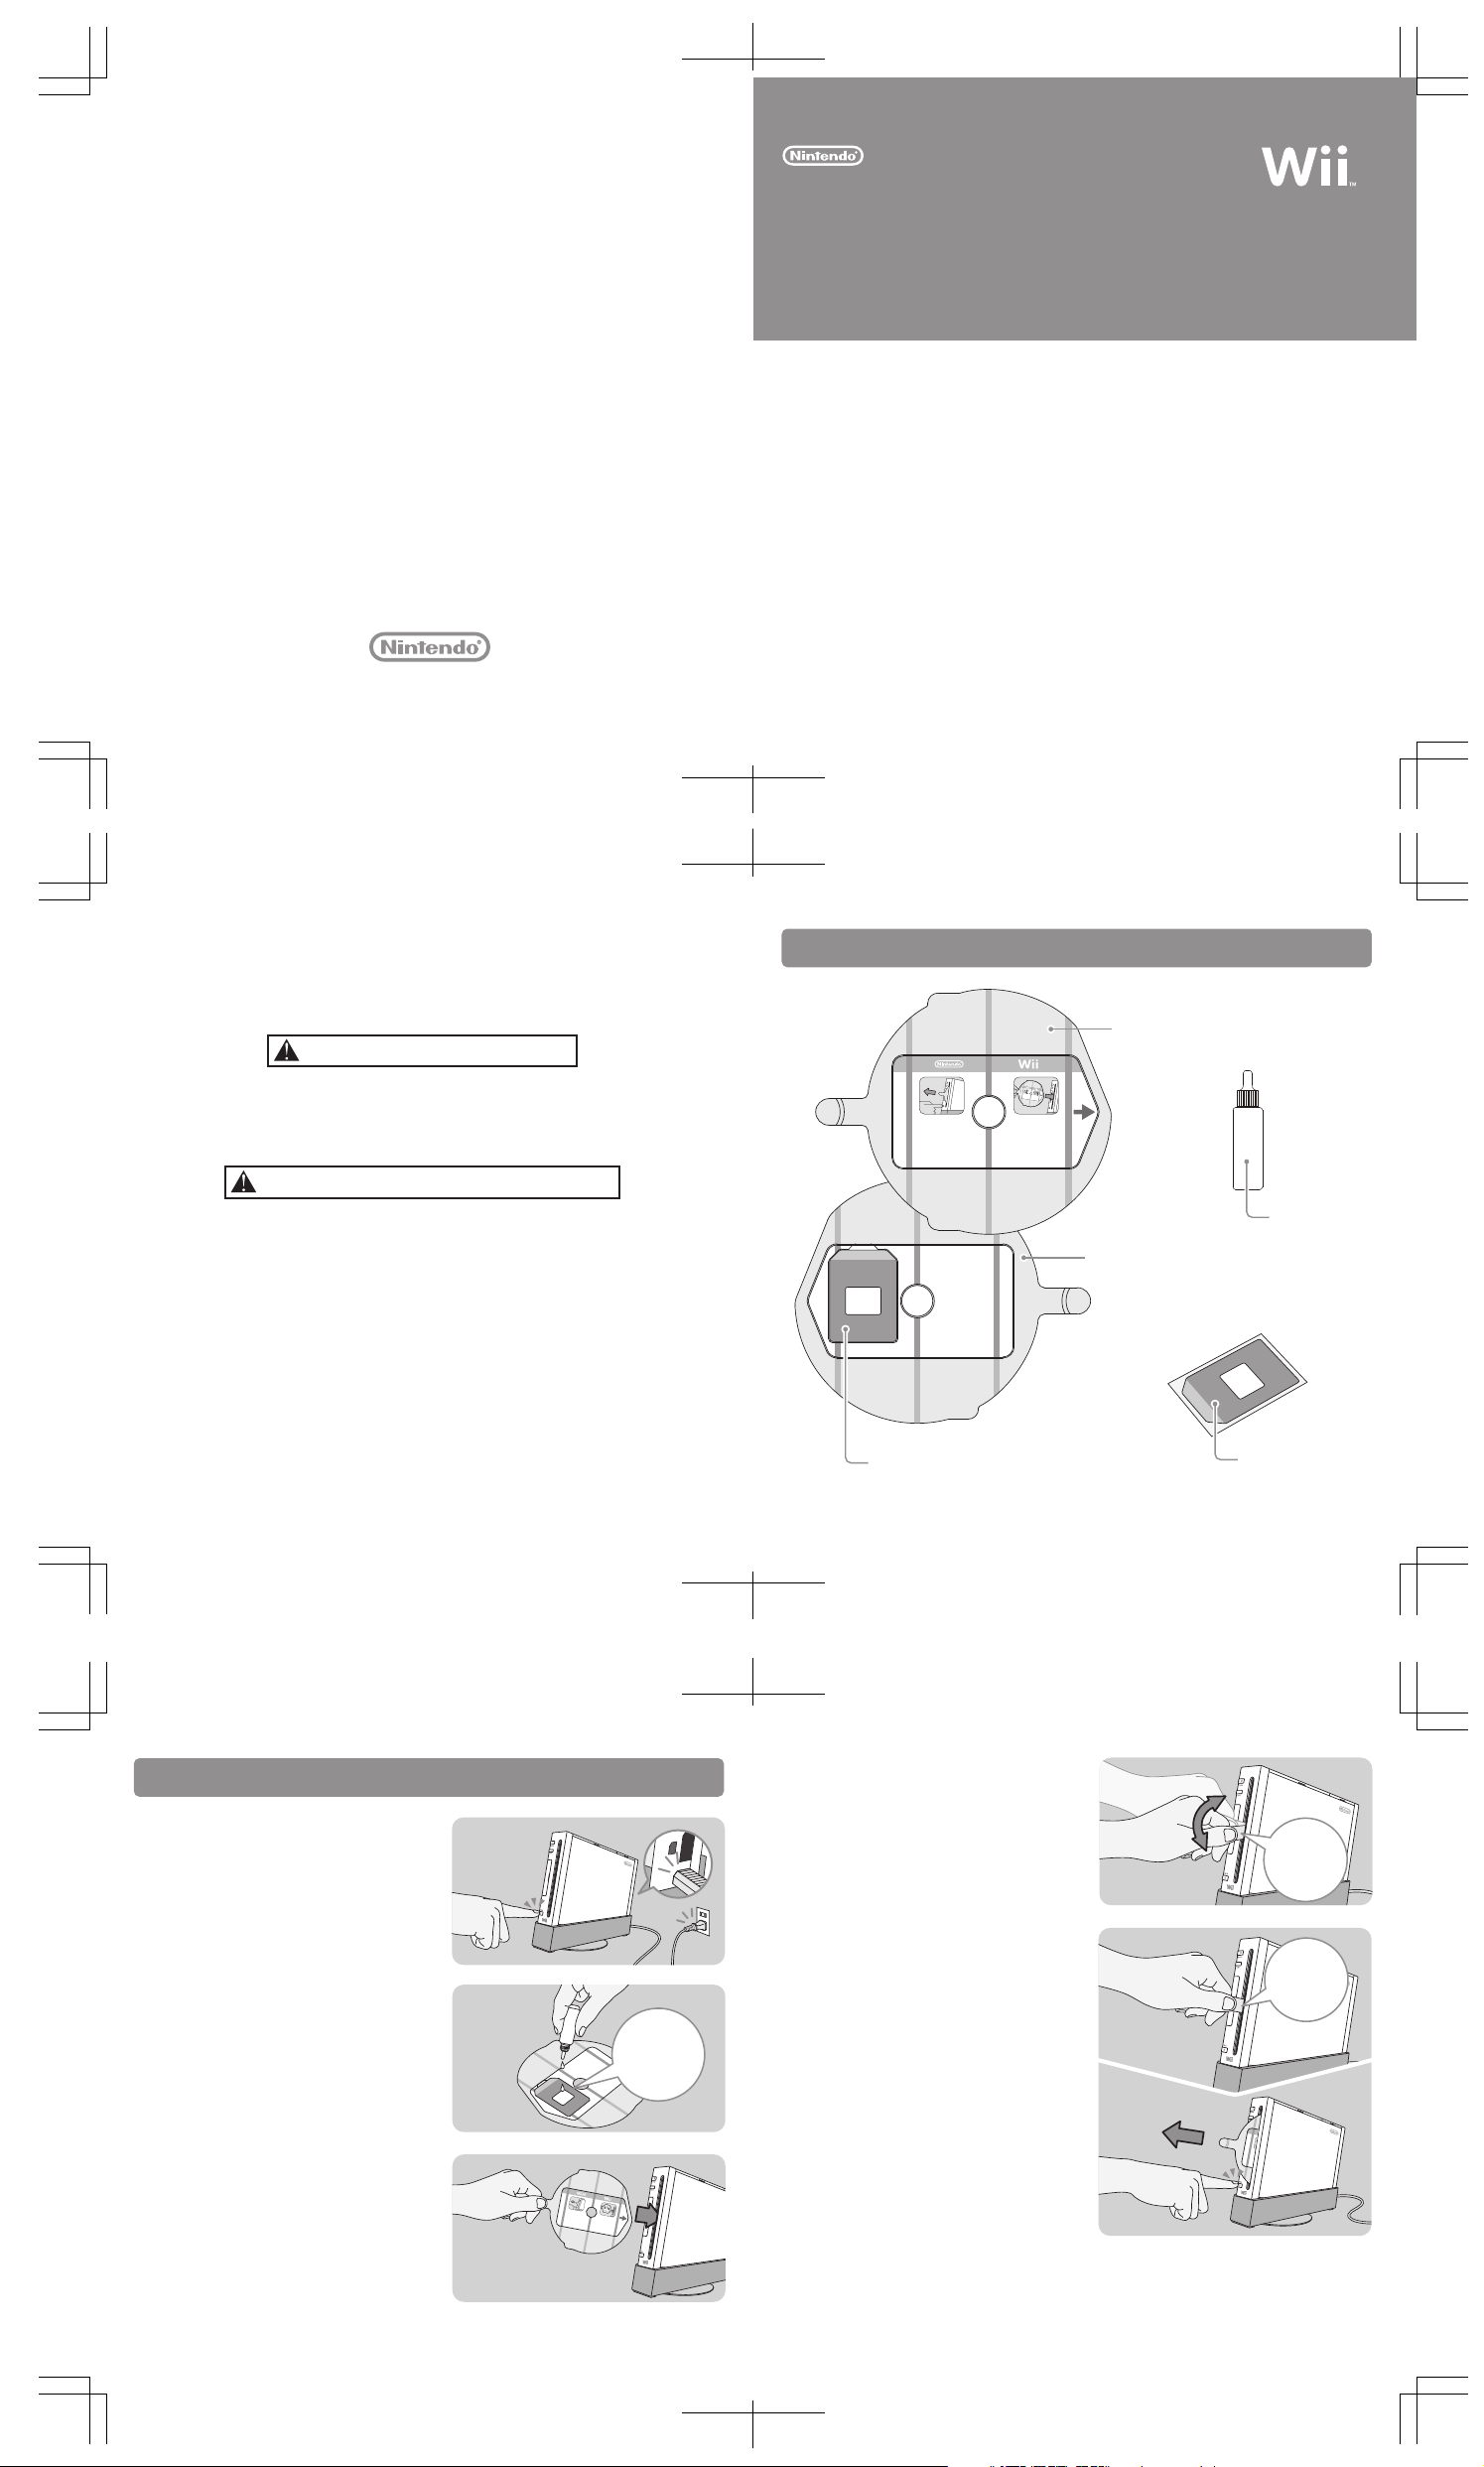
Components
Cleaning pad
(The lens cleaner comes with a cleaning
pad already installed on it.)
Lens cleaner top side
Cleaning fluid
Lens cleaner bottom side
Cleaning pads
(5 extra pads included
on cardboard carrier.)
1
Cleaning Procedure
1. Make sure the Wii console is plugged into a standard
household wall outlet. Press the EJECT Button on the
front of the Wii console to remove any disc that might be
loaded into the console.
2. Apply 2-3 drops of cleaning fluid to the exposed portion
of the cleaning pad. Be sure to replace the cap on the
cleaning fluid bottle after use.
Do not use more than the recommended amount of fluid;
doing so will not improve the cleaner’s effectiveness and
could cause the cleaning pad to detach inside the Wii
console.
3. Insert the lens cleaner straight into the Wii console disc
slot. The blue lines should be parellel to the disc
slot. Do not force the cleaner into the console – it should
slide into the disc slot easily.
NOTE: A “?” symbol will appear in the disc Channel icon on
the Wii Menu screen. This is normal.
If the console is in a vertical (or upright) position, insert
the lens cleaner with the top facing towards the right side
of the console and the cleaning pad facing to the left (see
illustration).
If the console is in a horizontal (laying flat) position, insert the lens cleaner with the top facing up and the cleaning
pad facing down.
2
Apply 2-3
drops of
cleaning fluid
to white area.
4. Wait 5 seconds and then move the handle of the lens
cleaner back and forth no more than 3/4" (2 cm) 10 20 times. Do not move the handle from end to end of
the disc slot.
If the console is in a vertical position, the lens cleaner
should move in an up and down motion.
If the console is in a horizontal position, the lens cleaner
should move in a side to side motion.
5. Return the handle of the lens cleaner to the center of
the disc slot and let go of it.
Press the EJECT Button to remove the lens cleaner from
the Wii console. Do not forcefully pull the lens
cleaner out of the Wii console.
Move 10-20
times - do not
move more than
3/4” (2 cm).
Return handle
to center - then
let go of it.
3
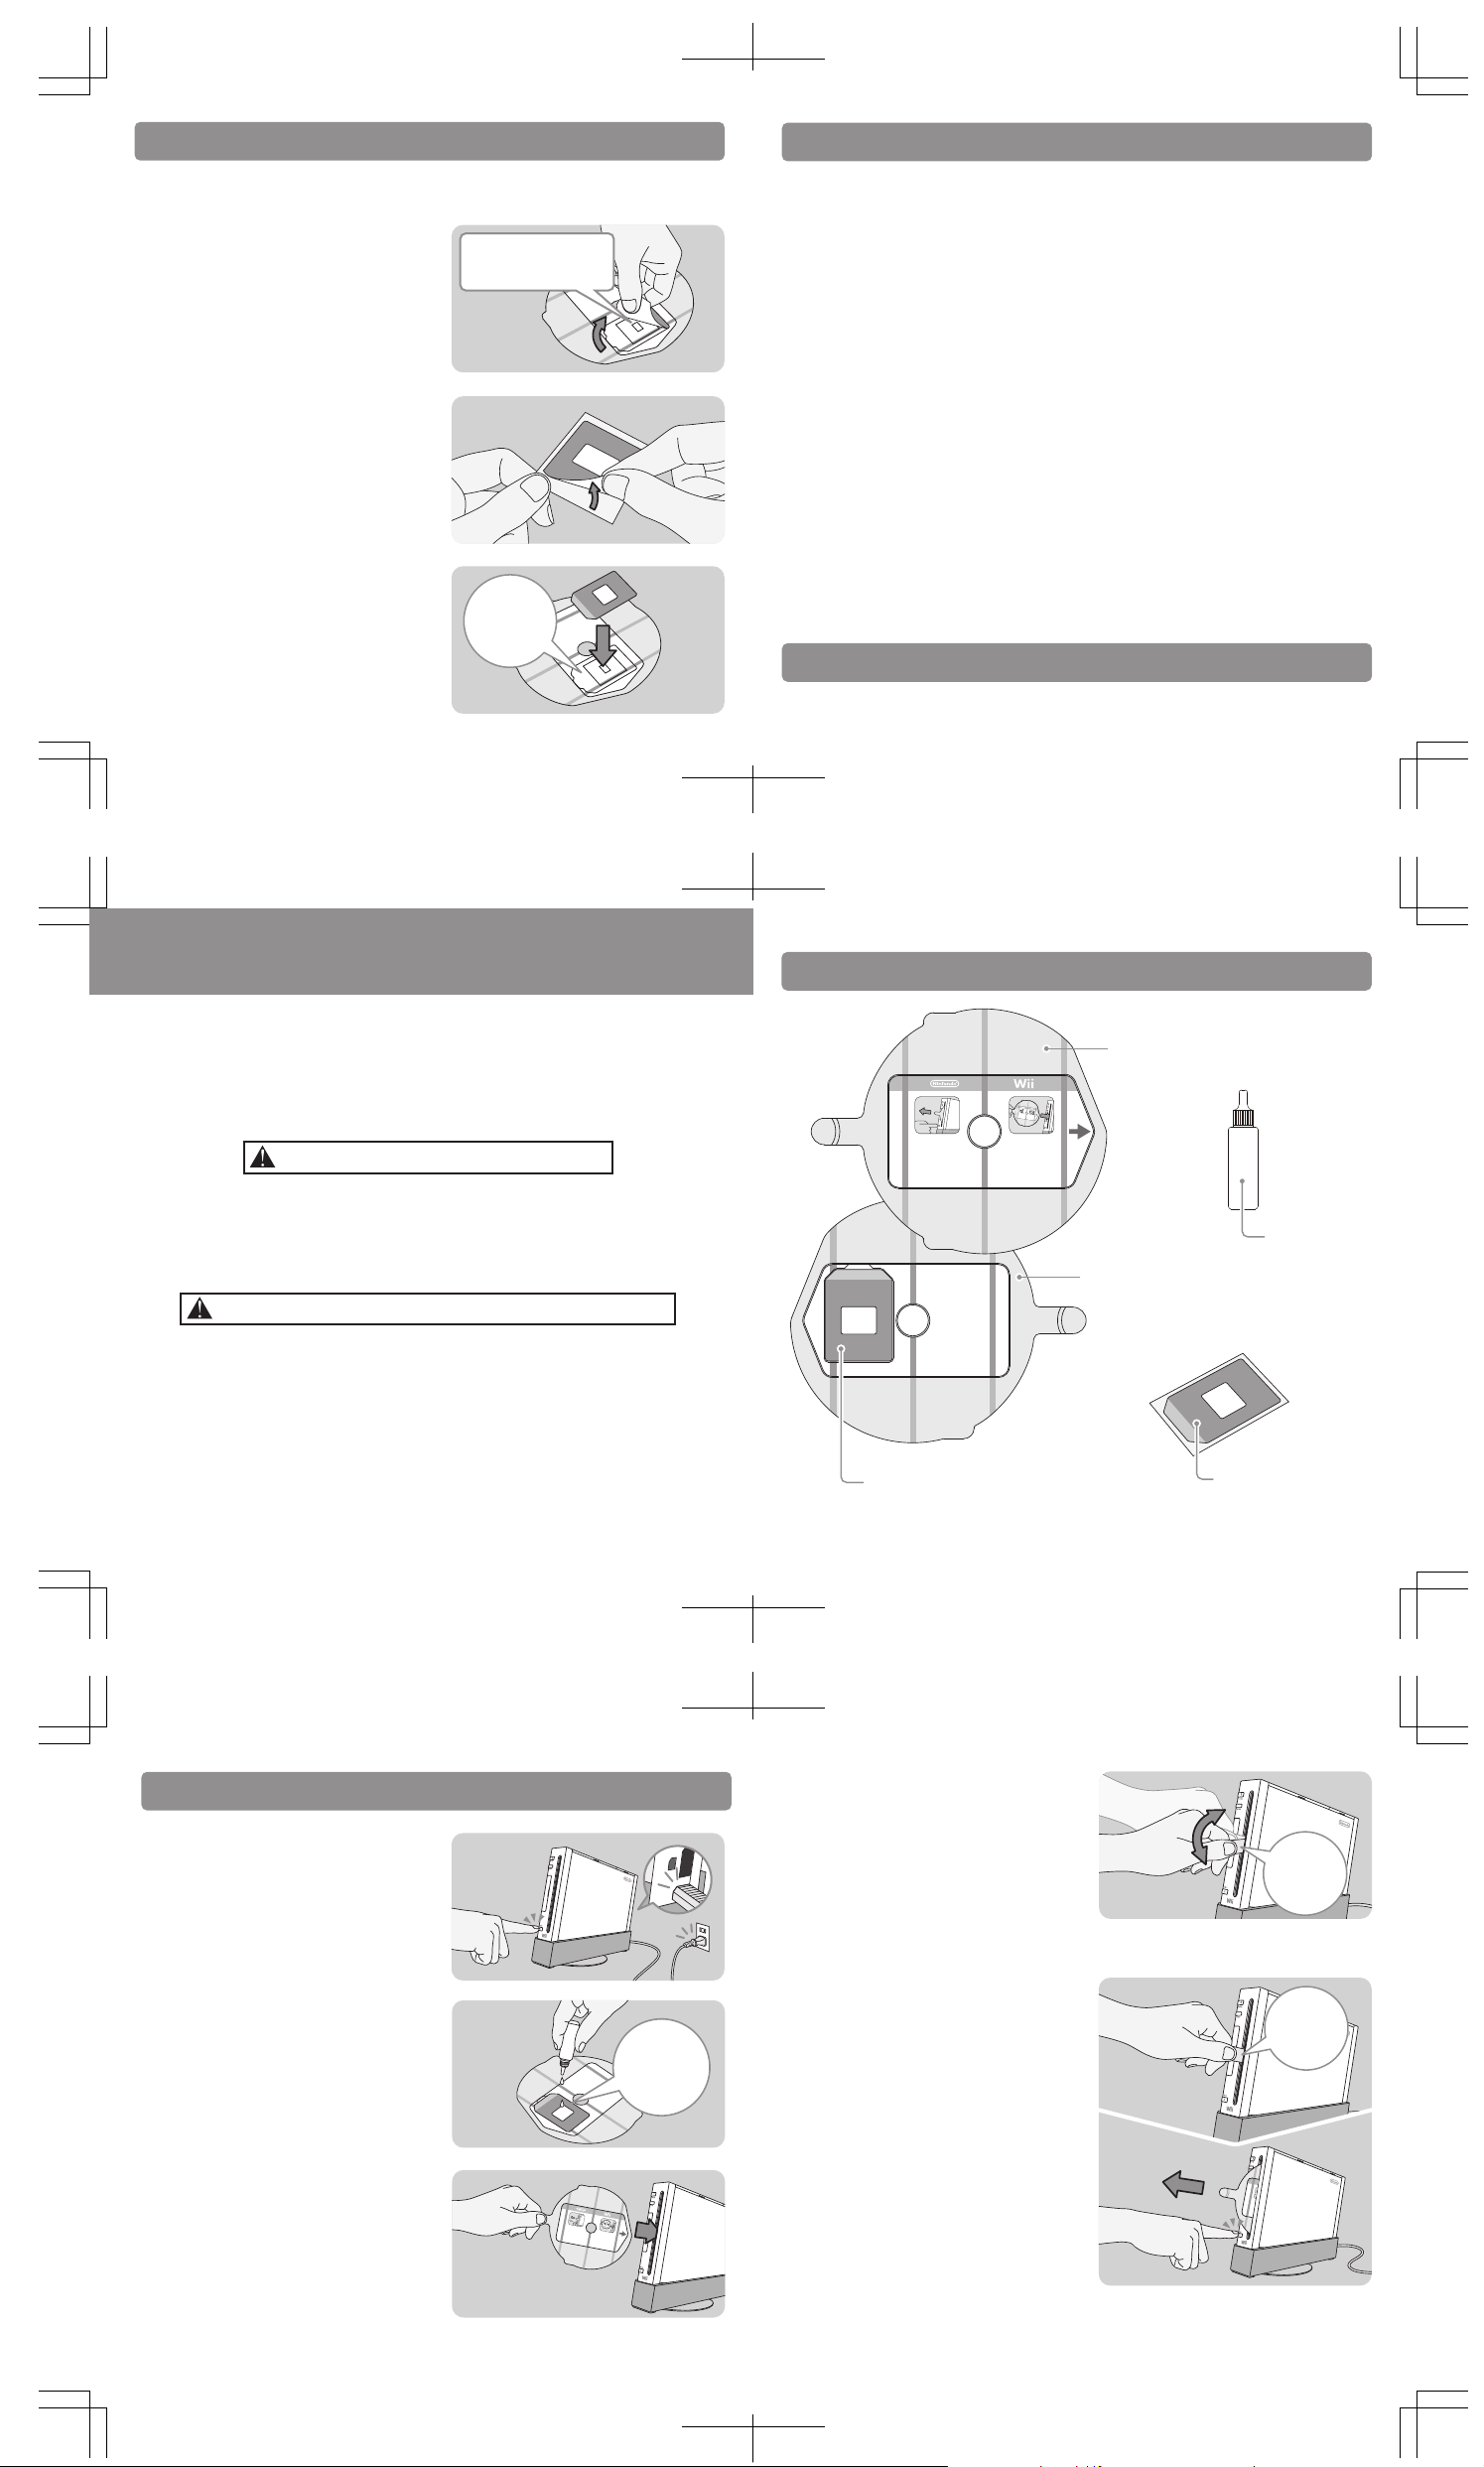
Replacing the cleaning pad
Troubleshooting
Examine the cleaning pad regularly for noticeable accumulation of dirt or other contaminants. If the pad becomes
dirty, replace it. If the cleaning pad begins to peel away from the lens cleaner and does not stay attached to the
plastic, replace it with a new pad.
1. Remove and discard the dirty cleaning pad by peeling it
away from the lens cleaner.
2. Peel a new cleaning pad off of its card. Avoid touching
the adhesive surface as much as possible.
3. Apply the new cleaning pad to the lens cleaner,
aligning the angled corners to the shape of the frame.
Make sure the edges of the cleaning pad adhere
securely to the lens cleaner.
IMPORTANT: Do not remove the
white foam rubber pad attached
to the lens cleaner.
Be sure to
correctly align
cleaning pad
with the
frame.
4
Before seeking assistance, review the following problems and solutions.
1. The lens cleaner won’t insert into the Wii console disc slot.
• Press the EJECT Button to be sure there is not a disc already loaded into the Wii console
• Make sure the lens cleaner is oriented the correct way – review step 3 in the Cleaning Procedure.
• Be sure to insert the lens cleaner straight into the disc slot – the handle should be perpendicular to the slot, not
angled to one side or the other.
NOTE: If the lens cleaner is inserted into the Wii console disc slot facing the wrong way (see page 2, step 3, for the
correct procedure), the Wii console will load and eject the lens cleaner several times and then eject it a final time.
2. The lens cleaner won’t come out of the Wii console.
• Do not remove the lens cleaner by pulling on the handle. Return the handle of the lens cleaner to the center of
the disc slot and let go of it. Press the EJECT Button to remove.
3. The Wii console still won’t read a disc correctly after the cleaning procedure.
• If the disc reader lens is very dirty, you may need to perform the cleaning procedure a second time.
• Check the condition of the cleaning pad and replace if it appears dirty and perform the cleaning procedure again.
If your Wii system does not operate correctly after trying the troubleshooting steps, DO NOT return the console to the
store. You will lose saved game data and all Wii Shop Channel downloads and Wii Points. Visit support.nintendo.com
for assistance and additional troubleshooting and repair options or call 1-800-255-3700.
Cleaning fluid ingredients
Purified water, ethanol, cation AB, surfactant, sodium salicylate.
5
Français
L'ensemble de nettoyage pour lentille Wii nettoie la lentille du lecteur de disque de la console Wii,
ce qui réduit le nombre d'erreurs de lecture causées par la contamination de la lentille. Veuillez
lire et suivre soigneusement les instructions suivantes.
IMPORTANT : Utiliser avec les consoles Wii SEULEMENT.
AVERTISSEMENT - Irritant chimique
• Utilisation réservée aux adultes seulement. Gardez hors de la portée des enfants.
• Le liquide de nettoyage contient des produits chimiques. Évitez tout contact avec la peau ou les
yeux. Si le liquide entre en contact avec la peau ou les yeux, rincez à grande eau. Consultez un
médecin si le malaise persiste.
ATTENTION - Endommagement de la console Wii
• N'utilisez pas le nettoyeur de lentille s'il est endommagé d'une quelconque façon.
• Utilisez seulement le liquide de nettoyage inclus dans cet ensemble de nettoyage.
• Si le nettoyeur de lentille devient sale ou poussiéreux, nettoyez-le avec un chiffon doux avant de
l'utiliser. Gardez-le dans la boîte d'emballage lorsque vous ne l'utilisez pas.
• Pour éviter d'endommager la console Wii ou le nettoyeur de lentille, suivez attentivement les
instructions dans ce mode d'emploi.
Composantes
Tampon de nettoyage
(Le nettoyeur de lentille comprend un
tampon de nettoyage déjà installé.)
Nettoyeur de lentille dessus
Liquide de
nettoyage
Nettoyeur de lentille dessous
Tampons de nettoyage
(5 tampons supplémentaires
inclus sur le porteur en carton)
6
Procédé de nettoyage
1. Assurez-vous que la console Wii est branchée dans une
prise de courant standard. Appuyez sur le bouton EJECT
sur le devant de la console Wii pour retirer tout disque
qui se trouve dans la console.
2. Appliquez 2 ou 3 gouttes de liquide nettoyant sur la
partie exposée du tampon de nettoyage. Assurez-vous de
bien replacer le bouchon sur la bouteille de liquide de
nettoyage après l'avoir utilisée.
N'utilisez pas plus de liquide que la quantité
recommandée. En utiliser plus n'améliorera pas
l'efficacité du nettoyant et risque de provoquer le
décollage du tampon de nettoyage alors qu'il se trouve à
l'intérieur de la console Wii.
3. Insérez le nettoyeur de lentille tout droit dans la fente de
chargement de la console Wii. Les lignes bleues
devraient être parallèles à la fente de chargement.
Ne forcez pas le nettoyeur dans la console : il devrait
glisser facilement dans la fente de disque.
NOTE : Un symbole « ? » apparaîtra sur l'icône de la Chaîne
Disques de l'écran de Menu Wii. Cette réaction est normale.
Si la console est placée à la verticale (debout), insérez le
nettoyeur de lentille en orientant le dessus vers le côté
droit de la console et le tampon de nettoyage vers la
gauche (voir l'illustration).
Si la console est placée à l'horizontale (couchée), insérez le nettoyeur de lentille en orientant le dessus vers le haut
et le tampon de nettoyage vers le bas.
8
Appliquez 2
ou 3 trois gouttes
de liquide nettoyant
sur le rectangle
blanc.
4. Attendez 5 secondes, puis remuez le manche du
nettoyeur de lentille de 10 à 20 fois en un mouvement
de va-et-vient qui ne dépasse pas 2 cm (3/4") de
largeur. Ne déplacez pas le manche d'une extrémité à
l'autre de la fente de chargement.
Si la console est placée à la verticale (debout), le
nettoyeur de lentille doit être remué de haut en bas.
Si la console est placée à l'horizontale (couchée), le
nettoyeur de lentille doit être remué de gauche à
droite.
5. Replacez le manche du nettoyeur de lentille au centre
de la fente de chargement et relâchez-le.
Appuyez sur le bouton EJECT pour retirer le nettoyeur
de la console Wii. Ne tirez pas sur le nettoyeur de
lentille pour le forcer à sortir de la console Wii.
Remuez
10 à 20 fois.
Ne dépassez pas
2 cm (3/4") de
largeur.
Replacez
le manche au
centre de la
fente, puis
relâchez-le.
7
9
 Loading...