

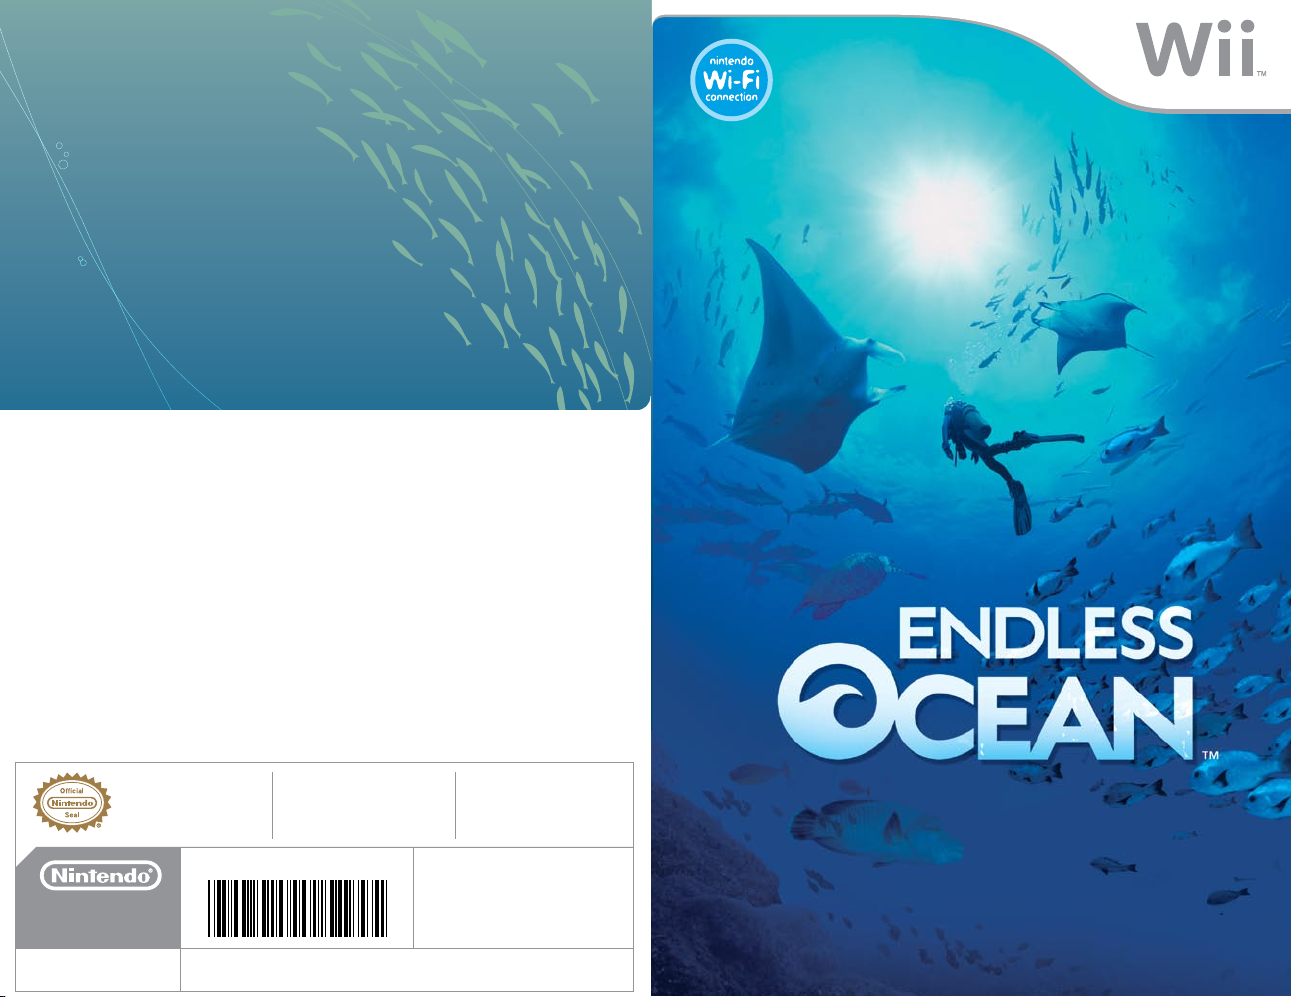
Page 1
NEED HELP WITH INSTALLATION,
64294A
MAINTENANCE OR SERVICE?
Nintendo Cus tomer Service
SUPPORT.NINTENDO.COM
or call 1-80 0-255-3700
NEED HELP PLAYING A GAME?
Recorded tips for many titles are available on
Nintendo’s Power Line at (425) 885-7529.
This may be a long-distance call, so please ask
permission from whoever pays the phone bill.
If the information you need is not on the Power
Line, you may want to try using your favorite
Internet search engine to find tips for the game
you are playing. Some helpful words to include
in the search, along with the game’s title, are:
“walk through,” “FAQ,” “codes,” and “tips.”
BESOIN D’AIDE POUR L’INSTALLATION,
L’ENTRETIEN OU LA RÉPARATION?
Service à la Clientèle de Ninte ndo
SUPPORT.NINTENDO.COM
ou appelez l e 1-800-255-3700
BESOIN D’AIDE DANS UN JEU?
Un nombre d’astuces pré-enregistrées sont
disponibles pour de nombreux titres sur la
Power Line de Nintendo au (425) 885-7529.
Il est possible que l’appel pour vous soit longue
distance, alors veuillez demander la permission
de la personne qui paie les factures de
téléphone. Si les informations dont vousavez
besoin ne se trouvent pas sur la Power Line,
vous pouvez utiliser votre Moteur de Recherche
préféré pour trouver de l’aide de jeu. Certains
termes utiles que vous pouvez inclure dans
votre recherche sont “walk through” (“étape par
étape”), “FAQ” (“Foire Aux Questions), “codes”
et “tips” (“astuces”).
¿NECESITAS AYUDA DE INSTALACIÓN,
MANTENIMIENTO O SERVICIO?
Servicio al Cliente de Nintendo
SUPPORT.NINTENDO.COM
o llama al 1 -800-255-3700
¿NECESITAS AYUDA CON UN JUEGO?
Consejos grabados para muchos títulos
están disponibles a través del Power Line
de Nintendo al (425) 885-7529. Esta puede
ser una llamada de larga distancia, así que
por favor píde permiso a la persona que
paga la factura del teléfono. Si el servicio
de Power Line no tiene la información que
necesitas, recomendamos que uses el Motor
de Búsqueda de tu preferencia para encontrar
consejos para el juego que estás jugando.
Algunas de las palabras que te ayudarán en
tu búsqueda además del titulo, son: “walk
through” (“instrucciones paso a paso”), “FAQ”
(“Preguntas Frecuentes”), “codes” (“códigos”),
y “tips” (“consejos”).
The Official Sea l is your assurance
that this pro duct is licensed or
manufactured by Nintendo. Always
look for this seal when buying v ideo
game systems, ac cessories, games
and related p roducts.
NINTENDO OF AM ERICA INC.
P.O. BOX 957, REDMOND, WA
98073-0957 U.S.A.
www.nintendo.com
Ce Sceau Officiel est votre garantie que le
présent produi t est agréé ou manu facturé
par Nintendo. Rec herchez-le toujours
quand vous ac hetez des appareils de
jeu vidéo, des ac cessoires, des jeux et
d’autres produits ap parentés.
El Sello Ofici al es su ratificació n de
que este prod ucto tiene licencia o es
manufacturado por Nintendo. Busque
siempre este sello al comprar sis temas de
vídeojuegos, acc esorios, vídeojuegos, y
productos rela cionados.
PRINTED IN US A
INSTRUCTION BOOKLET FOLLETO DE INSTRUCCIONESMODE D’EMPLOI
Page 2
PLEASE CAREFULLY READ THE Wii™ OPERATIONS MANUAL COMPLETELY BEFORE USING YOUR
Wii HARDWARE SYSTEM, GAME DISC OR ACCESSORY. THIS MANUAL CONTAINS IMPORTANT
HEALTH AND SAFETY INFORMATION.
IMPORTANT SAFETY INFORMATION: READ THE FOLLOWING WARNINGS BEFORE YOU OR YOUR
CHILD PLAY VIDEO GAMES.
WARNING – Seizures
• Some people (about 1 in 4000) may have seizures or blackouts triggered by light flashes or
patterns, and this may occur while they are watching TV or playing video games, even if they
have never had a seizure before.
• Anyone who has had a seizure, loss of awareness, or other symptom linked to an epileptic condition should consult a doctor before playing a video game.
• Parents should watch their children play video games. Stop playing and consult a doctor if you or
your child has any of the following symptoms:
Convulsions Eye or muscle twitching Altered vision
Loss of awareness Involuntary movements Disorientation
• To reduce the likelihood of a seizure when playing video games:
1. Sit or stand as far from the screen as possible.
2. Play video games on the smallest available television screen.
3. Do not play if you are tired or need sleep.
4. Play in a well-lit room.
5. Take a 10 to 15 minute break every hour.
WARNING – Repetitive Motion Injuries and Eyestrain
Playing video games can make your muscles, joints, skin or eyes hurt. Follow these instructions to
avoid problems such as tendinitis, carpal tunnel syndrome, skin irritation or eyestrain:
• Avoid excessive play. Parents should monitor their children for appropriate play.
• Take a 10 to 15 minute break every hour, even if you don’t think you need it.
• If your hands, wrists, arms or eyes become tired or sore while playing, or if you feel symptoms such
as tingling, numbness, burning or stiffness, stop and rest for several hours before playing again.
• If you continue to have any of the above symptoms or other discomfort during or after
play, stop playing and see a doctor.
CAUTION – Motion Sickness
Playing video games can cause motion sickness in some players. If you or your child feel dizzy
or nauseous when playing video games, stop playing and rest. Do not drive or engage in other
demanding activity until you feel better.
WARRANTY & SERVICE INFORMATION
You may need only simple instructions to corre ct a problem with your product. Try our website
at support.nintendo.com or call our Consumer Assistance Hotline at 1-800-255-3700, rather than
goingto your retailer.
to change) . If the problem cannot be s olved with the trou bleshooting informa tion available onli ne or over the
telephone, yo u will be offered exp ress factory service through Nintendo. Pleas e do not send any p roducts to
Nintendo w ithout contacting u s first.
HARDWARE WARRANTY
Nintendo o f America Inc. (“Nint endo”) warrants to t he original purchase r that the hardware product shall be
free from d efects in material and workmanship for twelve (12) months from the date of purchase. If a defe ct
coveredby t his warranty occurs during this warrant y period, Nintendo wil l repair or replace the defective hard
ware produc t or component, free of charge.* The origi nal purchaser is ent itled to this warra nty only if the d ate
of purch ase is registered at point of sale or the consumer can d emonstrate, to Nintendo ’s satisfact ion, that the
product was purchased within t he last 12 months.
GAME & ACCESSORY WARRANTY
Nintendo w arrants to the origi nal purchaser that the product (games a nd accessories) sha ll be free from defec ts
in materia l and workmanship f or a period of th ree (3) months from the date of purch ase. If a defect co vered by
this warran ty occurs during th is three (3) month warranty period, Ninten do will repair or re place the defective
product, free of charge.*
SERVICE AFTER EXPIRATION OF WARRANTY
Please try our website at supp ort.nintendo.com or call the Consumer Assi stance Hotline at 1 -800-255-3700 for
troubleshoo ting information an d repair or replacem ent options and pri cing.*
*In some i nstances, it may be ne cessary for you to s hip the complete pr oduct, FREIGHT PREPAID AND INSU RED
FOR LOSS OR DAM AGE, to Nintendo. Please do not send any produ cts to Nintendo wit hout contacting us first.
Hours of operation are 6 a. m. to 7 p.m. , Pacific Time, Monday - Sunday (times su bject
REV-Q
WARRANTY LIMITATIONS
THIS WARRANTY SH ALL NOT APPLY IF THIS PROD UCT: (a) IS US ED WITH PRODUCTS NOT SOLD OR LICENSED BY
NINTENDO ( INCLUDING, BUT NOT LIMITED TO, NON-LICENSED GAME ENHANCEMENT AND COP IER DEVICES,
ADAPTERS, AND POWE R SUPPLIES); (b) IS USED FOR COMMERCIAL P URPOSES (INCLUDING REN TAL); (c) IS
MODIFIED O R TAMPERED WIT H; (d) IS DAMAGED BY NEGL IGENCE, ACCIDENT, UNREASONABLE US E, OR BY
OTHER CAUSES UN RELATED TO DEFECTIVE MATERI ALS OR WORKMANSHIP; OR (e) HAS HAD THE SERIA L NUMBER
ALTERED, DEFACED OR REMOV ED.
ANY APPLICABLE IMPLIED WARRANTIES, INCLUDIN G WARRANTIES OF MERCHANTABILITY AND FITNESS FOR
A PARTICULAR PURP OSE, ARE HEREBY LIMITED IN DURATION TO THE WARRANTY PERIODS DESCRIBED ABOVE
(12 MONTHS OR 3 MONTHS, AS APPLICABLE ). IN NO E VENT SHALL NINTENDO BE L IABLE FOR CONSEQUENT IAL
OR INCIDEN TAL DAMAGES RESU LTING FROM THE BREACH OF ANY IMPLIED OR EXPR ESS WARRANTIES. SOME
STATES DO NOT ALLOW LIMITATIO NS ON HOW LONG AN IMPLIED WARRANTY LASTS OR EXCLUSION OF CONSEQUENTIAL OR INCIDENTAL DAMAGES, SO THE ABOVE L IMITATIONS MAY NOT APPLY TO YOU.
This warran ty gives you specifi c legal rights. You may also h ave other rights wh ich vary from state to state or
province to province.
Nintendo’s add ress is: Nintendo of America Inc., P.O. Box 957, Redmon d, WA 98073-0957 U.S.A.
This warran ty is only valid in the United States a nd Canada.
© 2007-2008 Ni ntendo/ARIKA. TM, ® and the Wi i logo are trademark s of Nintendo. MPEG L ayer-3 audio coding
technology lic ensed from Fraunhofer IIS and Thomson. © 2008 N intendo. All rights reserv ed.
-
IMPORTANT LEGAL INFORMATION
This Nintendo game is not designed for use with
any unauthorized device. Use of any such device will invalidate your Nintendo product warranty.
Copying of any Nintendo game is illegal and is strictly prohibited by domestic and international
intellectual property laws. “Back-up” or “archival” copies are not authorized and are not necessary
to protect your software. Violators will be prosecuted.
REV–E
Page 3
Table of Contents
Controls
Getting Started
Diving
Tool Menu
On Board the Boat
12
13
Controls
Using the Wii Remote
™
7
8
9
Button
Choose Tool menu options
Check/Use (while pointing)
Grab
(press together with )
Button
Display HOME Menu
Button
Autoswim
Zoom out
Pointer
Point
Turn
+Control Pad
Display Tool menu
Scroll through Tool menu
(left/right)
Close Tool menu (down)
Chat (during Nintendo
WFC play)
Button
Swim
Walk
Cancel
CAUTION: WRIST STRAP USE
Please use the wrist strap to help prevent injury to other people or damage to surrounding
objects or the Wii Remote in case you accidentally let go of the Wii Remote during game play.
Also remember the following:
• Make sure all players put on the wrist strap properly when it is their turn.
• Do not let go of the Wii Remote during game play.
• Dry your hands if they become moist.
• Allow adequate room around you during game play and make sure that all areas you
might move into are clear of other people and objects.
• Stay at least three feet from the television.
• Use the Wii Remote Jacket.
Button
Change view
Access detailed camera
settings
Note:
When diving, quickly ick
the Wii Remote up, down, or
sideways to perform a fast turn.
Menu Screen Controls
To select a menu or icon on a menu screen, point at it, then press .
Cursor
This shows where the
Wii Remote is pointing.
Button
Enter Zoom mode
(while pointing)
Button
Display map
Place sh in aquarium
6 7
Page 4
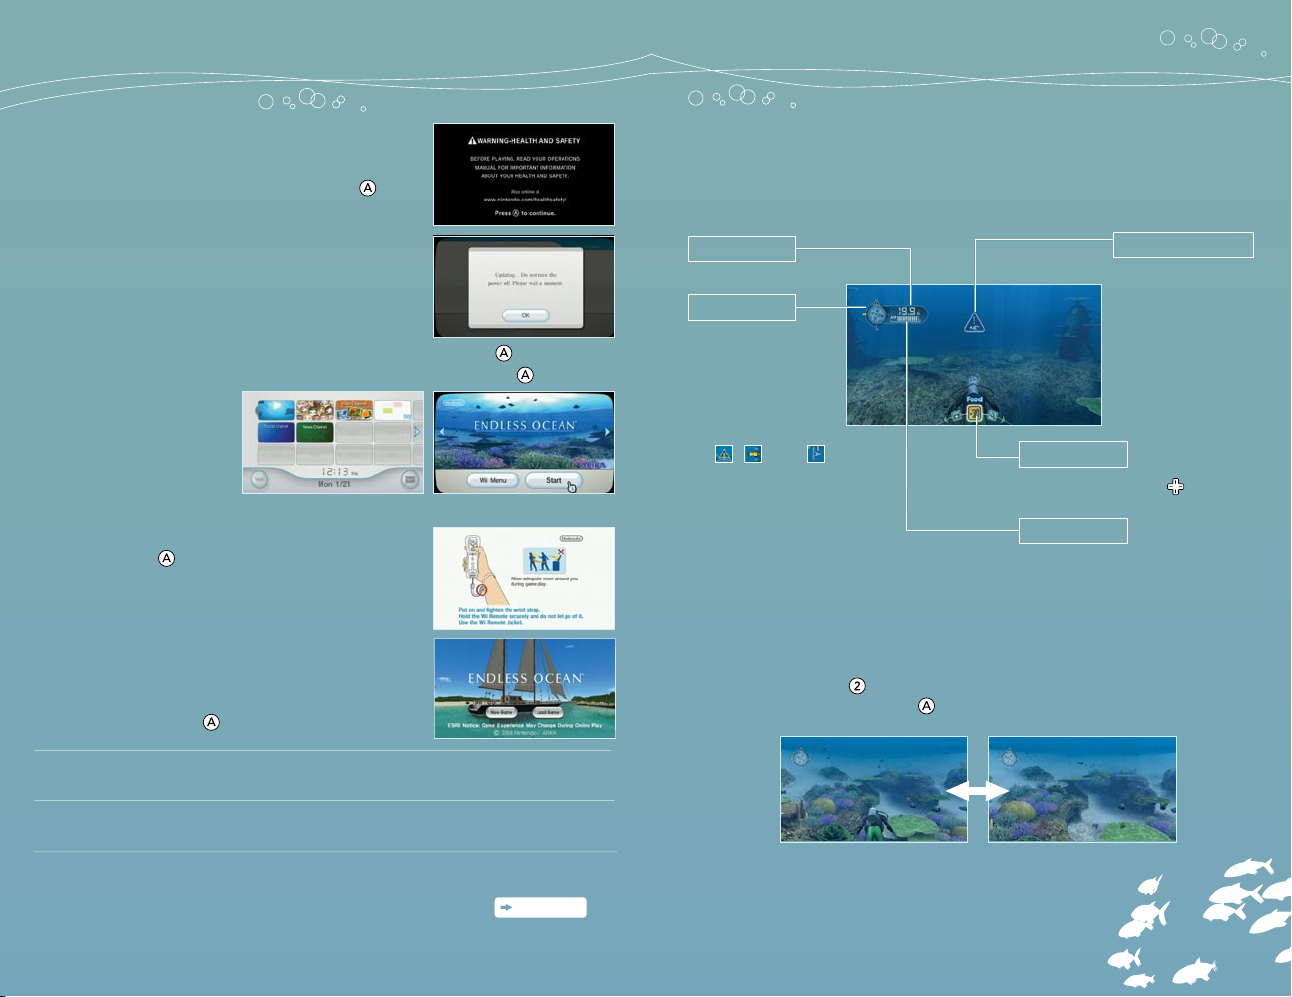
Getting Started
Correctly insert the Endless Ocean Game
1.
Disc into the disc slot on the Wii console
to turn the power on. When the screen to
the right appears, read it and press .
Note: This screen will also display if you insert the
disc after turning the power on.
SYSTEM MENU UPDATE
Please note that when rst loading the Game Disc into
the Wii console, the Wii will check if you have the latest
system menu, and if necessary a Wii system update
screen will appear. Press OK to proceed.
Point to the Disc Channel on the Wii Menu and press . When you
2.
see the Channel Preview Screen, select Start and press .
Wii Menu Channel Preview Screen
Read the Wrist Strap Reminder screen,
3.
then press
Title Screen
The following two options are displayed
on the title screen. To select an option,
point at it and press .
to go to the title screen.
Diving
Diving Screen
You can dive until your air supply runs out, at which point you will be
taken back to your boat.
Note: Depth and air level are displayed when you open the Tool menu.
Depth
Compass
Your direction,
vertical
orientation,
and position in
relation to your
boat are indicated
by , , and ,
respectively. Also, the
red compass marker
points north.
Tool Menu
Open by pressing .
This gauge gradually
drops during your dive.
Once empty, your dive will
automatically end.
View
While diving, press to switch between rst-person and third-person
perspectives. You can press at the surface to look around.
Caution Marker
This appears
when you wander
too far from your
dive location.
Air
New Game
Load Game
Create a character and play from the beginning. You can
choose the gender and look of your character here.
Continue a game from where you last left off.
This option is only available if you have saved data.
Ending Your Game
page
To save your progress, select Save from the Cabin menu
You need at least 34 blocks of free memory on the Wii console to save.
Note: If you save a le over previously saved data, the old data will be overwritten. There is
no way to recover data that has been overwritten, so please be careful.
14
.
First-personThird-person
98
Page 5
Zoom Mode
Press
historical artifacts, and other items. Whenever you hear a beeping
from the Wii Remote, it’s a sign there’s something nearby that can be
found with Zoom mode.
to enter Zoom mode, where you can observe tiny sea life,
Picking Up Items
Point at an item and press
on it , then hold and together to
pick it up.
to focus
Map
Press to view the map. Any area that you’ve visited at least once will
be lled in. You can press to change the size of the map.
Ship Position
The red arrow indicates your
position and orientation. The
dotted line shows your path.
Diving Boundary
Location Marker
Point at this to display the
location’s name.
This shows how far you can
explore based on your boat’s
current position.
Gaining Familiarity
You can gain familiarity with sea life
by interacting with it. As you achieve
familiarity with a creature, you will unlock
information about it. Some creatures may
even be more inclined to swim with you.
Note: Once you are familiar with a creature, it will be
available in the aquarium. It will also be registered in
the Encyclopedia
it at any time.
page 14
Types of Familiarization and Controls
Pet
Touch
Grab
Note: Use Grab to hold on to and swim with large sea creatures.
Wiggle the Wii Remote left and right while holding .
Press repeatedly.
Hold and .
Get to know your sea friends!
The best way to befriend the
creatures of the ocean is through
interaction—petting and playing
will yield the best results. However,
you may also nd that sea life
responds to food, whistles, or even
underwater pens. Try them all out!
where you can read about
,
Interaction Icon
Focusing
Point at sea life and press
on it. Focusing on a creature will
frame it in the center of the screen,
allowing for convenient interaction.
to focus
Partners
As you progress through
the game, you will get to
know various dolphins who
may become your partner.
Besides accompanying you
Name Button
Point at this and press
to display information on
the creature.
Tool Icon
This indicates the tool
or action currently
on dives, your partners can
also learn how to perform
tricks .
page 15
available.
10 11
Page 6
Tool Menu
On Board the Boat
Press to display the tool menu. Use left and right on to toggle
through menu options, and to select.
Feeding
Press to sprinkle food at the location of the pointer. When nished,
point at and press .
Underwater Pen
Hold down and move the pointer to draw.
Camera
Press to take a picture. You can also use and to zoom in and out.
Press to access the advanced settings menu.
Underwater Whistle
Press to call your partner. Some sh also like the sound of the whistle.
Options
You can change various settings in
the Options portion of the Tool menu.
To revert to your original settings,
point to Restore Default Settings and
press .
Options Menu
Change Controls
Compass Display
Tool Icon Display
MP3 Playback
Cursor Transparency
Volume Settings
Switch between two control types.
Toggle the compass on and off.
Toggle the tool icon display on and off.
Toggle MP3 music on and off.
Adjust the brightness of the cursor.
Adjust the music and sound effects volume.
The Deck
Point to a location on the deck and
press to move there. You can also
press to display the Tool menu.
Action Message
Press to perform the action listed.
Available Tool Menu Items
Options
Dive
Note: The menu items will vary depending on your location.
Change your settings.
Enter the water and enjoy diving.
View Collection
Point at the footlocker and press to view any items you have
scavenged from the ocean.
Message Board
Point at the message board and press to view various information
and hints.
Play MP3 Files
Use this option to play songs from an SD Card as your background
music. This feature requires you to have an SD Card containing MP3
data inserted into the SD Card slot on the front of your Wii console.
Note: Only les in the MP3 format can be used.
Note: For instructions on how to use SD Cards with your Wii console, refer to your Wii
Operations Manual.
Once you choose to dive and are at the load screen, press left or right
on to select your background music.
Return to Boat
Quit diving and return to the boat.
Talk to Katherine
You can talk to Katherine, your boat
mate, if you’re stuck or need advice.
She also just likes to chat,
so make sure to speak
with her often!
1312
Page 7
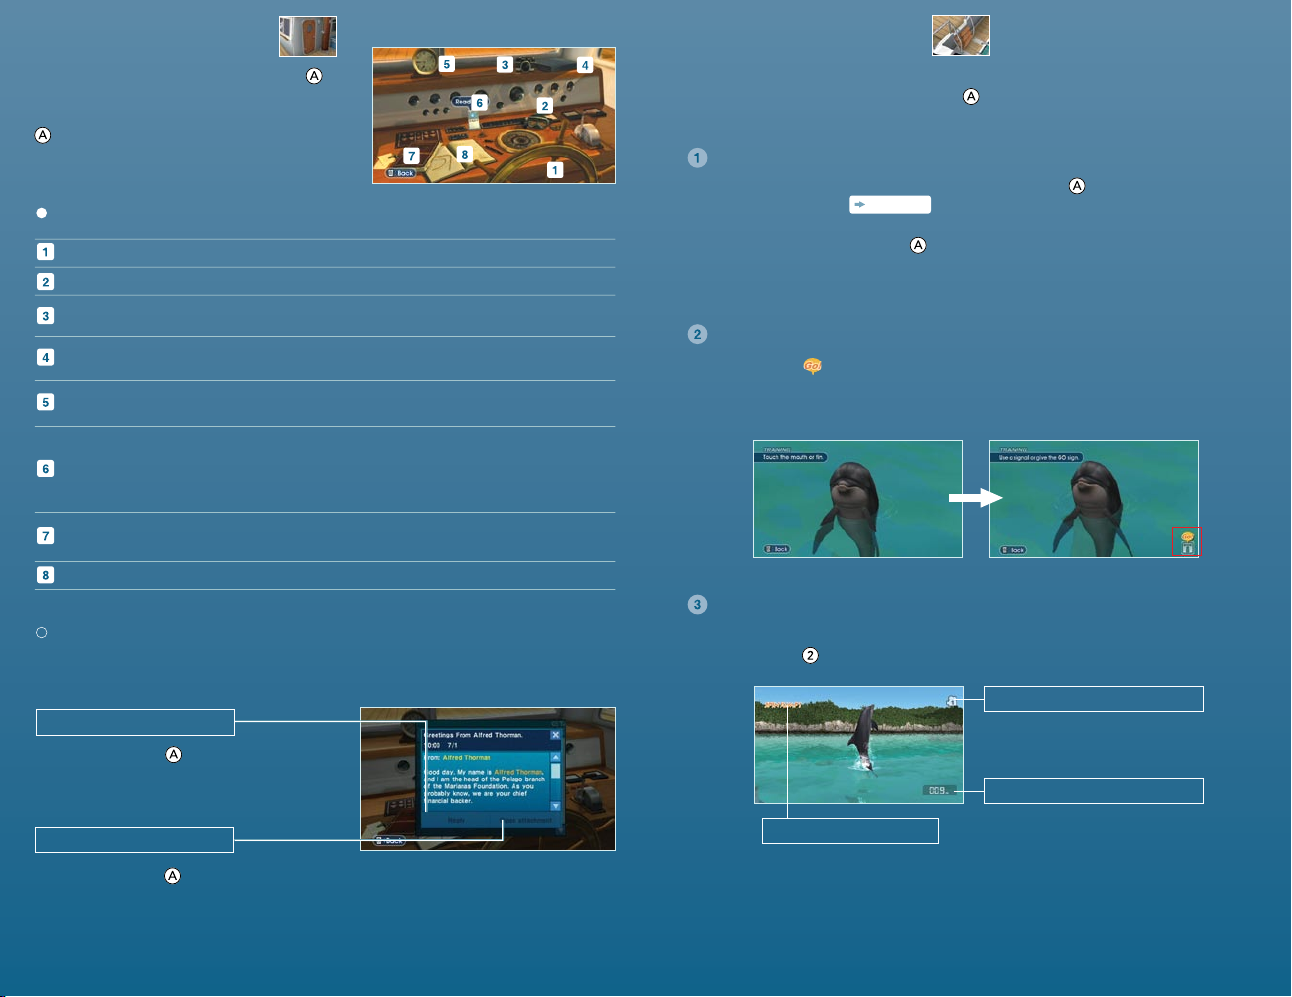
Entering the Cabin
Training a Partner
Point at the cabin door and press to
display the screen to the right. Point at
any of the objects in the cabin and press
to use the corresponding function.
Note: Your available items will gradually increase
as you progress through the game.
Cabin Menu
Pilot the Boat (Steering Wheel)
Change Gear (Snorkel Mask)
Develop Photographs (Camera)
View Pictures (Album)
Advance Time (Clock)
Read Mail (Mobile Device)
View Encyclopedia
(Encyclopedia of Marine Biology)
Save (Diving Log) Save your progress.
Change your current location.
Change your look.
Develop and save photos that you
have taken.
View photographs that you have
developed.
Advance time to the morning or
evening.
Read your e-mail and open
attached les. You can also send
photo attachments with the
Reply feature.
View information on sea life with
which you have gained familiarity.
Mail
You will receive various kinds of e-mail during your journey, including
job offers and location information. Check it often!
Reply
Point and press to reply to e-mails.
(Some e-mails cannot be replied to.)
Once you have a partner, you can train it to do tricks. Point to the steps
on the back of the boat and press to open the partner-selection
screen, then select the partner you want to train.
Giving Commands
Point to your partner’s mouth or n and press , then execute a
Pet, Touch, or Grab . The trick performed depends on
the combination of location and action. For example, point to your
partner’s mouth and press , then execute a Grab to have your
partner perform a backip. If you give multiple commands to your
partner, it will perform the tricks consecutively.
page 11
Giving the Go! Sign
When you see , your partner is ready to perform! Simply shake the
Wii Remote to give the Go! sign. The faster you shake the Wii Remote,
the stronger the command.
Trick Time!
While your partner is doing tricks, you can change the camera
position with .
Camera Position Number
Trick Height/Duration
Open Attachment
Point and press to open attachments and receive new equipment.
(Not all e-mails include attachments.)
Trick Name
1514
Page 8

Using the Nintendo WFC Gate
In Endless Ocean, you can use Nintendo Wi-Fi Connection to visit
friends’ boats or invite friends to visit yours. Point to the ladder on the
bow of the boat and press to display the Nintendo WFC Gate menu.
Opening the Nintendo WFC Gate
If you are hosting a visitor, select “Open the Nintendo WFC Gate.”
Note: Once you have nished connecting via the Nintendo WFC, your game progress up to
that point will be saved.
Nintendo WFC Gate Menu
Open or Close the
Nintendo WFC Gate
Travel/Quit
Conrm Friend Code
Friend Roster
Open the Nintendo WFC Gate to let friends
come to your boat. To close your boat off,
select “Close the Nintendo WFC Gate.”
Select Travel to visit a friend’s boat. Select
Quit to return to your own boat.
Check your own friend code.
View a list of registered friends or register
new friends.
Friend Code
In order to play via Nintendo WFC, you must rst exchange and
register each other’s friend code. Verify your friend code using the
Conrm Friend Code option, then give it to your friends.
Note: Your friend code is a 12-digit number that is created the rst time you connect to
Nintendo WFC. This is different from your Wii Number.
Note: To protect your privacy, do not give out personal information such as last name, phone
number, birth date, age, school, e-mail or home address when communicating with others.
The End User License Agreement which governs Wii online game play and sets forth the Wii
Privacy Policy is available in the Wii console’s System Settings and online at support.nintendo.
com/wiiprivacy.jsp.
Registering Friends
You can register friend codes in the friend roster portion of the
Nintendo WFC Gate menu. Once you see the screen below, select
“Register a new friend” from the list, then input the friend code and
name—in that order.
Note: You can register a maximum of 42 friends in your friend roster. If you need to
register more than that, you must erase data from the list.
Traveling by Personal Watercraft
If you are visiting a friend, select Travel from the Nintendo WFC Gate
menu to display a list of hosts, then choose the friend you want to visit
and select Travel. Select Quit to return to your own boat.
Note: Once you have successfully connected with a friend, your game progress up to that
point will be saved.
Simplified Chat
When diving with a friend, you can use a series of preset messages
to communicate. Press up on to open the chat options, then any
direction on for a corresponding category, then again for the
corresponding message.
Player
Message
Message Choice
Friend’s Position
Information on Selected Friend
List of Friends
Select a registered name to
change it.
1716
Page 9

VEUILLEZ LIRE ATTENTIVEMENT L’INTÉGRALITÉ DU MODE D’EMPLOI DE LA Wii AVANT
D’UTILISER VOTRE SYSTÈME, VOTRE DISQUE DE JEU, OU VOS ACCESSOIRES Wii. CE MODE
D’EMPLOI COMPREND D’IMPORTANTES INFORMATIONS SUR VOTRE SANTÉ ET VOTRE SÉCURITÉ.
INFORMATIONS IMPORTANTES CONCERNANT VOTRE SÉCURITÉ: VEUILLEZ LIRE LES
PRÉCAUTIONS SUIVANTES AVANT QUE VOUS OU VOTRE ENFANT NE JOUIEZ À VOS JEUX VIDÉO.
AVERTISSEMENT – Danger d’attaque
• Même si elles n’ont jamais connu de tels problèmes auparavant, certaines personnes (environ 1
sur 4 000) peuvent être victimes d’une attaque ou d’un évanouissement déclenché par des
lumières ou motifs clignotants, et ceci peut se produire pendant qu’elles regardent la télévision
ou s’amusent avec des jeux vidéo.
• Toute personne qui a été victime d’une telle attaque, d’une perte de conscience ou de symptômes
reliés à l’épilepsie doit consulter un médecin avant de jouer à des jeux vidéo.
• Les parents doivent surveiller leurs enfants pendant que ces derniers jouent avec des jeux vidéo.
Arrêtez de jouer et consultez un médecin, si vous ou votre enfant présentez les symptômes suivants:
Convulsions Tics oculaires ou musculaires Perte de conscience
Troubles de la vue Mouvements involontaires Désorientation
• Pour diminuer les possibilités d’une attaque pendant le jeu :
1. Tenez-vous aussi loin que possible de l’écran.
2. Jouez sur l’écran de télévision le plus petit disponible.
3. Ne jouez pas si vous êtes fatigué ou avez besoin de sommeil.
4. Jouez dans une pièce bien éclairée.
5. Interrompez chaque heure de jeu par une pause de 10 à 15 minutes.
AVERTISSEMENT
–
Blessures dues aux mouvements répétitifs et tension oculaire
Les jeux vidéo peuvent irriter les muscles, les poignets, la peau ou les yeux. Veuillez suivre les
instructions suivantes afin d’éviter des problèmes tels que la tendinite, le syndrome du tunnel
carpien, l’irritation de la peau ou la tension oculaire :
• Évitez les périodes trop longues de jeu. Les parents devront s’assurer que leurs enfants jouent
pendant des périodes adéquates.
• Même si vous ne croyez pas en avoir besoin, faites une pause de 10 à 15 minutes à chaque heure de jeu.
• Si vous éprouvez fatigue ou douleur au niveau des mains, des poignets, des bras ou des yeux, ou si
vous ressentez des symptômes tels que fourmillements, engourdissements, brûlures ou
courbatures, cessez de jouer et reposez-vous pendant plusieurs heures avant de jouer de nouveau.
• Si vous ressentez l’un des symptômes mentionnés ci-dessus ou toute autre gêne pendant que vous
jouez ou après avoir joué, cessez de jouer et consultez un médecin.
ATTENTION – Nausée
Jouer à des jeux vidéo peut causer étourdissement et nausée. Si vous ou votre enfant vous sentez
étourdi ou nauséeux pendant le jeu, cessez de jouer immédiatement et reposez-vous. Ne conduisez
pas et n’entreprenez pas d’autres activités exigeantes avant de vous sentir mieux.
INFORMATIONS LÉGALES IMPORTANTES
Ce jeu Nintendo n’est pas conçu pour s’utiliser
avec un appareil non-autorisé. L’utilisation d’un tel appareil invalidera votre garantie de produit Nintendo.
Toute copie d’un jeu Nintendo est illégale et strictement interdite par les lois domestiques et internationales
régissant la propriété intellectuelle. Les copies de “sauvegarde” ou d’“archivage” ne sont pas autorisées
et ne sont pas nécessaires à la protection de vos logiciels. Tout contrevenant sera poursuivi.
REV–E
RENSEIGNEMENTS SUR L’ENTRETIEN ET LA GARANTIE
Vous pourriez n’avoir besoin que de simples instructions pour corriger un problème. Vous pouvez visiter
notre site Web à support.nintendo.com ou appeler notre Ligne sans frais d’assistance aux consommateurs,
au 1 (800) 255-3700, plutôt que de retourner chez votre détaillant. Nos h eures d’ouverture sont de 6 h 00 à
19 h 00, heure du Pacifique, du lundi au dimanche (heures su jettes à changement) . Si le prob lème ne peut pas êt re
résolu en c onsultant les rense ignements sur les p roblèmes et leurs so lutions en ligne, ni a u téléphone, on vous o ffrira
un service usine exprès chez N intendo. Veuillez n’expédier aucun produit sans avoir appelé Nintendo au préalable.
GARANTIE SUR LES APPAREILS
Nintendo o f America Inc. (« Ninten do ») garantit à l’acheteur o riginal que l’appareil ne connaîtra aucun déf aut de
matériaux ou de main-d’œuvre pour un e période de douze (12) mois suivant l a date d’achat. Si un tel dé faut couvert
par la prés ente garantie se pro duit pendant cette p ériode de garantie, Nin tendo réparera ou rem placera sans frais
le produit défectueux.* L’acheteur origi nal peut être couver t par cette garantie seulement si la dat e d’achat est
enregistrée à un point de vent e ou que le client peut démontrer, à la sati sfaction de Nintend o, que le pro duit a été
acheté au cours des 12 dernie rs mois.
GARANTIE SUR LES JEUX ET ACCESSOIRES
Nintendo garantit à l’acheteur original que le produit (jeu ou accessoire) ne connaîtra aucun défaut de matériaux ou de maind’oeuvre pour une période de trois (3) mois suivant sa date d’achat. Si un tel défaut couvert par la présente garantiese produit
pendant cette période de trois (3) mois, Nintendo réparera ou remplacera sans frais le produit défectueux.*
ENTRETIEN APRÈS ÉCHÉANCE DE LA GARANTIE
Veuillez vis iter notre site Web, suppor t.nintendo.com ou ap peler la Ligne d’assistan ce aux consommateur s au1 (800)
255-3700 p our trouver des rens eignements sur les problèmes et solutio ns, sur les options de réparation ou de
remplacemen t et les prix.*
*Dans cert ains cas, il peut s’avérer né cessaire d’expédier le prod uit, PORT PAYÉ ET ASSURÉ CONTRE DOMMAGES ET
PERTE, chez Ni ntendo. Veuillez n’expédier aucun produit sans appele r Nintendo au préala ble.
REV-Q
LIMITES DE LA GARANTIE
LA PRÉSENTE GARANTIE SERA NULLE SI LE PRODUIT : (a) A ÉTÉ UTILISÉ AVEC D’AUTRES PRODUITS QUI NE SONT NI
VENDUS, NI BREVETÉS PAR NINTENDO (Y COMPRIS, SANS S’Y LIMITER, LES MÉCANISMES D’AMÉLIORATION ET DE COPIE
DES JEUX, LES ADAPTATEURS ET LES MÉCANISMES D’APPROVISIONNEMENT EN ÉLECTRICITÉ); (b) A ÉTÉ UTILISÉ À DES
FINS COMMERCIALES (Y COMPRIS LA LOCATION); (c) S’IL A ÉTÉ MODIFIÉ OU ALTÉRÉ; (d) EST ENDOMMAGÉ À CAUSE DE
NÉGLIGENCE, ACCIDENT, UTILISATION ABUSIVE OU DE TOUTES AUTRES CAUSES QUI NE SERAIENT PAS RELIÉES À DES VICES
DE MATÉRIAUX OU DE MAIN-D’OEUVRE; OU (e) SI SON NUMÉRO DE SÉRIE A ÉTÉ MODIFIÉ, EFFACÉ OU RENDU ILLISIBLE.
TOUTES LES GARANTIES SOUS-ENTE NDUES, Y COMPRIS LES GARANTIES DE VALEUR MARCHANDE ET D’UNE
CONDITION P ROPRE À SON UTILISATION DAN S UN BUT PRÉCIS SONT, PAR LES PRÉ SENTES, LIMITÉES AUX PÉRIOD ES
DE GARANTI E DÉCRITES CI-DESSU S (12 MOIS OU 3 MOI S SELON LE CAS). NINTENDO NE SERA EN AUCUN CAS TENUE
RESPONSABL E DE DOMMAGES ACCIDENTE LS OU INDIRECTS RÉSU LTANT D’UNE INF RACTION À TOUTE STIPULATION
EXPLICITE OU IMPLICITE DES GA RANTIES. CERTAINS ÉTATS OU P ROVINCES NE PERMETTE NT PAS LA LIMITATION DE LA
DURÉE D’UN E GARANTIE SOUS-ENT ENDUE, NI L’EXCLUSION DES DOMMAG ES ACCIDENTELS OU INDI RECTS. DANS CES
CAS, LES LIMIT ES ET EXCLUSIONS CI-DESSUS MENTIONNÉES NE S’APPLIQ UENT PAS.
La présente garantie vous donn e des droits légaux précis. Vous pouvez jouir d ’au tres droits qui vari ent d’un État ou
d’une provi nce à l’autre.
L’adresse de Nintendo est : Nintendo of America Inc., P.O. Bo x 957, Redmond, WA 98073-0957 U.S.A.
La présente garantie n’est valide qu ’aux États-Unis et au Ca nada.
© 2007-2008 Ni ntendo/ARIKA. TM, ® and the Wi i logo are trademark s of Nintendo. MPEG L ayer-3 audio coding
technology lic ensed from Fraunhofer IIS and Thomson. © 2008 N intendo. All rights reserv ed.
Page 10

Table des matières
Commandes
Commandes
Commencer
Plongée
Menu d’actions
À bord du bateau
AVERTISSEMENT: UTILISATION DE LA DRAGONNE
Veuillez utiliser la dragonne pour éviter de blesser quiconque ou d’endommager les
objets se trouvant à proximité ou la télécommande Wii au cas où vous lâcheriez celle-ci
accidentellement au cours d’une partie.
Suivez aussi les recommandations suivantes:
• Assurez-vous que chaque joueur attache la dragonne correctement lorsque c’est à son
tour de jouer.
• Ne lâchez pas la télécommande Wii au cours d’une partie.
• Essuyez-vous les mains si celles-ci transpirent.
• Faites assez de place autour de vous, dans la pièce où vous jouez, et assurez-vous qu’il n’y
a pas d’autres personnes ou d’objets dans les zones où vous vous déplacez.
• Tenez-vous à au moins un mètre de la télévision.
• Utilisez l’étui pour télécommande Wii.
21
22
23
26
27
En utilisant la
télécommande Wii
Bouton
Choisir les options du menu
d’actions
Vérier/Utiliser (en pointant)
Prendre (en appuyant sur
en même temps)
Bouton
Afcher le Menu HOME
Bouton
Nage automatique
Zoomer loin
Bouton
Changer la vue
Accéder aux paramètres
détaillés de la caméra
N.B.:
Quand vous faites de la plongée,
bougez rapidement la télécommande
Wii vers le haut, le bas ou les côtés
pour tourner vite.
Commandes de l’écran du menu
Pour sélectionner un menu ou une icône sur l’écran du menu, pointez
dessus, puis appuyez sur .
Curseur
Ceci illustre l’endroit
pointé par la
télécommande Wii.
Pointeur
Pointer
Tourner
Croix directionnelle +
Afcher le menu d’actions
Faire déler le menu d’actions
(gauche/droite)
Fermer le menu d’actions (bas)
Discuter (pendant une partie
avec la CWF Nintendo)
Bouton
Nager
Marcher
Annuler
Bouton
Entrer en mode zoom
(tout en pointant)
Bouton
Afcher la carte
Placer les poissons dans
l’aquarium
20 21
Page 11

Commencer
Insérez correctement le disque de jeu
1.
Endless Ocean dans la fente pour disque
de jeu de la console Wii pour l’allumer.
Quand l’écran à droite s’afche, lisez
l’information et appuyez sur .
N.B. : Cet écran s’afchera aussi si vous insérez le
disque après avoir allumé la console.
MISE À JOUR DU MENU DU SYSTÈME
Notez bien que lorsque vous insérerez le Disque de Jeu
dans la console Wii pour la première fois, la Wii vériera
automatiquement que vous avez le menu du système le
plus récent et, si nécessaire, un écran de Mise à Jour du
système Wii s’afchera. Appuyez sur OK pour continuer.
Pointez sur la Chaîne Disques sur le Menu Wii et appuyez sur .
2.
Quand vous
voyez l’écran de
prévisionnage de la
chaîne, sélectionnez
Start et appuyez sur .
Menu Wii Écran de prévisionnage
Lisez l’écran de rappel de la dragonne,
3.
puis appuyez sur pour vous rendre à
l’écran titre.
Écran titre
Les deux options suivantes s’afchent sur
l’écran titre. Pour sélectionner une option,
pointez-la et appuyez sur .
Nouvelle
partie
Charger
le jeu
Créer un personnage et jouer depuis le début. Ici, vous pouvez
choisir le sexe et l’apparence de votre personnage.
Continuer une partie depuis l’endroit où vous aviez laissé. Cette option
est seulement disponible si vous avez des données sauvegardées.
de la chaîne
Plongée
Écran de plongée
Vous pouvez faire de la plongée jusqu’à ce que votre réserve d’air se
vide. Lorsqu’elle est vide, vous retournerez à votre bateau.
N.B. : Les niveaux de profondeur et d’oxygène sont afchés quand vous ouvrez le menu
d’outils.
Profondeur
Boussole
Votre direction,
votre orientation
verticale et
votre position
par rapport à
votre bateau
sont indiquées
respectivement par ,
et . De plus, le
marqueur de boussole
rouge pointe vers le nord.
Cette jauge se vide
graduellement pendant votre
plongée. Quand elle est vide,
votre plongée se termine
Vue
Quand vous faites de la plongée, appuyez sur pour changer entre la
perspective à la première personne et celle à la troisième personne.
Vous pouvez appuyer sur à la surface pour observer les alentours.
aussitôt.
Marqueur d’avertissement
Ceci s’afche
quand vous vous
aventurez trop
loin de votre zone
de plongée.
Menu d’actions
Ouvrir en appuyant sur .
Oxygène
Terminer votre partie
Pour sauvegarder vos progrès, sélectionnez Sauvegarder depuis le
menu de la cabine
blocs de mémoire libre sur votre console Wii pour sauvegarder.
N.B. : Si vous sauvegardez un chier par-dessus des données déjà sauvegardées, les
anciennes données seront écrasées. Une fois écrasées, ces données sont irrécupérables,
alors faites attention.
22 23
page
Vous aurez besoin d’un minimum de 34
28
.
Première personneTroisième personne
Page 12

Mode Zoom
Appuyez sur pour entrer en mode zoom, où vous pourrez observer la
vie sous-marine minuscule, les artefacts historiques et d’autres objets.
Quand la télécommande Wii émet un signal sonore, c’est que vous
pouvez trouver quelque chose dans les alentours avec le mode zoom.
Ramasser des objets
Pointez sur un objet et appuyez sur
pour centrer votre attention dessus, puis
appuyez en maintenant la pression sur
et ensemble pour le ramasser.
Carte
Appuyez sur pour voir la carte. Tout endroit que vous aurez visité au
moins une fois sera rempli. Vous pouvez appuyer sur pour changer
la grosseur de la carte.
Position du bateau
La èche rouge indique votre
position et votre orientation.
La ligne pointillée illustre votre
sentier.
Limite de plongée
Marqueur d’endroit
Pointez sur ceci pour
afcher le nom de l’endroit.
Ceci afche la distance
maximale que vous pouvez
franchir selon la position
actuelle de votre bateau.
Devenir plus familier
Vous pouvez gagner la conance de la vie
sous-marine en interagissant avec elle. En
devenant plus familier avec une créature,
vous déverrouillerez de l’information sur
elle. Certaines créatures pourraient même
être plus susceptibles de nager avec vous.
N.B. : Quand vous devenez plus familier
avec une créature, elle sera disponible dans
l’aquarium. Elle sera aussi ajoutée à l’encyclopédie , où vous
pouvez lire de l’information à son sujet en tout temps.
Types de familiarisation et de commandes
Caresser
Toucher
Prendre
N.B. : Utilisez Prendre pour vous accrocher aux grosses créatures de la mer et nager avec elles.
Apprenez à connaître vos amis sous-marins!
La meilleure façon de vous lier
d’amitié avec des créatures
océaniques est en interagissant - les
caresser et jouer avec elles vous
donneront les meilleurs résultats.
Toutefois, vous découvrirez aussi
peut-être que la vie sous-marine
réagit bien à la nourriture, aux
sifets ou même aux stylos sousmarins. Essayez-les tous!
Bouger la télécommande Wii à gauche et à droite tout
en appuyant et en maintenant la pression sur .
Appuyer à répétition sur .
Appuyer en maintenant la pression sur et .
Icône d’interaction
page
28
Observer
Pointez sur une vie sous-marine
et appuyez sur pour l’observer.
Observer une créature l’encadrera
au centre de l’écran, permettant une
interaction pratique.
Bouton de nom
Pointez sur ceci et
appuyez sur pour
afcher de l’information
sur la créature.
Icônes d’outil
Ceci indique que
l’outil ou l’action est
actuellement disponible.
Partenaires
En progressant dans le jeu,
vous connaîtrez plusieurs
dauphins qui pourraient
bien devenir votre
partenaire. En plus de vous
accompagner lors de vos
plongées, vos partenaires
peuvent aussi apprendre à
faire des gures .
page 29
24 25
Page 13

Menu d’Actions
À bord du bateau
Appuyez sur pour afcher le
droite pour interchanger les options du menu et pour les sélectionner.
Menu d’Actions.
Utilisez la gauche et la
Nourrir
Appuyez sur pour saupoudrer de la nourriture à l’endroit où le pointeur
est placé. Quand c’est terminé, pointer sur et appuyer sur .
Stylo sous-marin
Pour dessiner,
pointeur.
appuyez
et maintenir la pression sur et déplacez le
Appareil-photo
Appuyez sur pour prendre une photo. Vous pouvez aussi utiliser et
pour zoomer près et loin. Appuyez sur pour accéder au menu des
paramètres avancés.
Sifflet marin
Appuyez sur pour appeler votre partenaire. Certains poissons aiment
aussi le son du sifet.
Options
Vous pouvez changer de nombreux
paramètres dans la portion Options du menu
d’actions. Pour revenir à vos paramètres
originaux, pointer sur Paramètres par défaut
et appuyez sur .
Menu d’actions
Modification des contrôles
Affichage de la boussole
Affichage des icônes
Lecture des fichiers MP3
Changer entre deux types de commandes.
Activer ou désactiver la boussole.
Activer ou désactiver l’afchage des icônes.
Démarrer ou arrêter la musique MP3.
Le pont
Pointez sur un endroit du pont et
appuyez sur pour vous y rendre.
Vous pouvez aussi appuyer sur
pour afcher le Menu d’actions.
Message d’action
Appuyez sur pour faire l’action afchée.
Items du menu d’actions
Options
Plongée
N.B. : Les items du menu varieront selon votre emplacement.
Changer vos paramètres.
Aller dans l’eau et faire de la plongée.
Voir la collection
Pointez sur le coffre et appuyez sur pour voir les objets que vous
avez récupérés dans l’océan.
Tableau d’Affichage
Pointez sur le tableau d’afchage et appuyez sur pour voir une
variété d’informations et d’indices.
Lire les fichiers MP3
Utilisez cette option pour faire jouer des chansons depuis une carte
SD comme musique de fond. Cette option nécessite que vous ayez une
carte SD, contenant des données MP3, insérée dans la fente pour carte
SD sur le devant de votre console Wii.
N.B. : Seuls les chiers de format MP3 peuvent être utilisés.
N.B. : Pour des instructions sur comment utiliser des cartes SD avec votre console Wii,
veuillez vous référer au Mode d’emploi Wii.
Une fois que vous avez choisi de faire de la plongée et que vous êtes
sur l’écran de chargement, appuyez sur gauche ou droite sur pour
sélectionner votre musique de fond.
Luminosité du pointeur
Ajuster la luminosité du pointeur.
Parler à Catherine
Paramètres sonores
Ajuster le volume des effets sonores et de
la musique.
Remonter sur le bateau
Abandonner la plongée et retourner au bateau.
Vous pouvez parler à Catherine, votre
camarade de bateau, si vous êtes coincé ou
que vous avez besoin d’un conseil. Elle aime
aussi discuter, alors n’ayez pas peur
de lui parler souvent!
26 27
Page 14

Entrer dans la cabine
Pointez sur la porte de la cabine et
appuyez sur pour afcher l’écran
de droite. Pointez sur n’importe quel
objet et appuyez sur pour utiliser la
fonction correspondante.
N.B. : Vos objets disponibles augmentent à
mesure que vous progressez dans le jeu.
Menu de la cabine
Déplacer le bateau (Volant) Changer votre emplacement actuel.
Se changer (Masque de plongée) Changer votre apparence.
Développer les photos
(Appareil-photo)
Voir l’Album Photos (Album)
Se reposer (Horloge) Avancer le temps au matin ou
Lire vos e-mails
(Appareil mobile)
Encyclopédie Marine
(Encyclopédie de la
biologie marine)
Sauvegarder (Carnet de plongée) Sauvegarder vos progrès.
E-mail
Vous recevrez plusieurs sortes d’e-mails au cours de votre aventure,
notamment des offres d’emploi et de l’information sur les endroits.
Vériez-les souvent!
Répondre
Pointez et appuyez sur pour
répondre aux e-mails. (Il se pourrait
que vous ne puissiez pas répondre à
certains e-mails.)
Ouvrir une pièce jointe
Pointez et appuyez sur pour ouvrir les pièces jointes et recevoir
de l’équipement nouveau. (Ce ne sont pas tous les e-mails qui
comprennent des pièces jointes.)
Développer et sauvegarder les
photos que vous avez prises.
Voir les photos que vous avez
développées.
au soir.
Lire vos e-mails et ouvrir les chiers
annexés. Vous pouvez aussi envoyer
des photos en pièce jointe avec la
fonction Répondre.
Voir l’information sur la vie sousmarine avec laquelle vous êtes
devenu familier.
Entraîner un partenaire
Une fois que vous avez un partenaire, vous pouvez l’entraîner à
faire des gures. Pointez sur les marches à l’arrière du bateau et
appuyez sur pour ouvrir un écran de sélection de partenaire, puis
sélectionnez le partenaire que vous voulez entraîner.
Signes de la main
Pointez sur la bouche de votre partenaire et appuyez sur , puis faites
une des actions suivantes : Caresser, Toucher ou Prendre .
La gure réalisée dépend de la combinaison de l’endroit et de
l’action. Par exemple, pointez sur la bouche de votre partenaire et
appuyez sur , puis Prendre pour que votre partenaire fasse un saut
périlleux arrière. Si vous faites de nombreux signes de la main à votre
partenaire, il fera les gures de façon consécutive.
Donner le feu vert
Quand vous voyez , votre partenaire est prêt à agir! Secouez
simplement la télécommande Wii et donnez le signal Vas-y!. Plus vous
secouez la télécommande Wii, plus le commandement aura de poids.
L’heure des figures!
Pendant que votre partenaire fait des gures, vous pouvez changer la
position de la caméra avec .
Numéro de la position
de la caméra
Hauteur/Durée de la gure
Nom de la gure
page
25
28 29
Page 15

Utiliser la coupée CWF
Dans Endless Ocean, vous pouvez utiliser la Connexion Wi-Fi Nintendo
pour visiter les bateaux de vos amis ou pour inviter des amis à visiter
le vôtre. Pointez sur l’échelle sur l’étrave du bateau et appuyez sur
pour afcher le menu de la coupée CWF Nintendo.
Menu de la coupée CWF Nintendo
Ouvrir ou fermer la
coupée CWF Nintendo
Retrouver un ami/
Chacun chez soi
Vérier votre code ami Vérier votre propre code d’ami.
Ouvrez la coupée CWF Nintendo pour laisser
vos amis venir sur votre bateau. Pour fermer
votre bateau au public, sélectionnez « Fermer
la coupée CWF Nintendo ».
Sélectionnez « Retrouver un ami » pour visiter le
bateau d’un ami. Sélectionnez « Chacun chez soi
pour retourner sur votre propre bateau.
»
Ouvrir la coupée CWF Nintendo
Si vous accueillez un visiteur, sélectionnez Ouvrir la coupée
CWF Nintendo.
N.B. : Une fois que vous avez ni de vous connecter via la CWF Nintendo, vos progrès de jeu
jusqu’à ce point seront sauvegardés.
Voyager en motomarine
Si vous visitez un ami, sélectionnez Retrouver un ami depuis le menu de
la coupée CWF Nintendo pour afcher la liste des hôtes, puis choisissez
l’ami que vous voulez visiter et sélectionnez Retrouver un ami.
Sélectionnez Chacun chez soi pour retourner sur votre propre bateau.
N.B. : Une fois que vous vous êtes bien connecté avec un ami, vos
progrès de jeu jusqu’à ce point seront sauvegardés.
Liste d’amis
Voir la liste des amis enregistrés ou
enregistrer des nouveaux amis.
Code d’ami
An de jouer via la CWF Nintendo, vous devez d’abord échanger ou
enregistrer le code d’ami de chacun. Vériez votre code d’ami en
utilisant l’option Vérier votre code ami, puis donnez-le à vos amis.
N.B. : Votre code d’ami est un numéro de 12 chiffres qui est créé la première fois que
vous vous connectez à la CWF Nintendo. Ceci est différent de votre Numéro Wii.
N.B. : Pour protéger votre condentialité, ne donnez pas vos informations personnelles
telles que votre nom de famille, numéro de téléphone, date de naissance, âge, adresse
courriel ou votre adresse à domicile lorsque vous communiquez avec d’autres joueurs.
Le Contrat de Licence d’Utilisateur Wii qui gouverne les jeux en ligne de la Wii et présente
la politique de condentialité Wii est disponible dans les paramètres de la console Wii et en
ligne au support.nintendo.com/wiiprivacy.jsp.
Enregistrer des amis
Vous pouvez enregistrer les codes d’amis dans la portion de la liste
d’amis du menu de la coupée CWF Nintendo. Quand vous voyez l’écran
ci-bas, sélectionnez « Enregistrer un nouvel ami » depuis la liste, puis
entrez le code d’ami et le nom; dans cet ordre.
N.B. : Vous pouvez enregistrer un maximum de 42 amis sur votre liste
d’amis. Si vous voulez en enregistrer plus, vous devez effacer des
données sur la liste.
Information sur l’ami sélectionné
Liste des amis
Sélectionnez un nom
enregistré pour le changer.
Discussion simplifiée
Quand vous faites de la plongée avec un ami, vous pouvez utiliser une
série de messages pré-réglés pour communiquer. Appuyez sur pour
ouvrir les options de discussion, puis sur n’importe quelle direction
sur pour une catégorie correspondante, puis de nouveau sur le
message correspondant.
Joueur
Message
Choix des messages
Position de l’ami
3130
Page 16

POR FAVOR LEA CUIDADOSAMENTE TODO EL MANUAL DE OPERACIONES DEL Wii™ ANTES DE
USAR SU SISTEMA, DISCO DE JUEGO O ACCESORIO. ESTE MANUAL CONTIENE INFORMACIÓN
DE SALUD Y SEGURIDAD IMPORTANTE.
INFORMACIÓN DE SEGURIDAD IMPORTANTE: LEA LAS SIGUIENTES ADVERTENCIAS ANTES DE
QUE USTED O SUS HIJOS JUEGUEN VIDEOJUEGOS.
AVISO – Ataques
• Algunas personas (aproximadamente 1 de cada 4000) pueden tener ataques o desmayos a causa
de destellos o patrones de luz, y esto puede suceder cuando ven televisión o juegan videojuegos,
aunque no hayan tenido un ataque previamente.
• Cualquier persona que haya tenido un ataque, pérdida de conocimiento u otro síntoma asociado a
una condición epiléptica, debe consultar con un médico antes de jugar un videojuego.
• Los padres deberían observar a sus hijos mientras que estos jueguen videojuegos. Deje de jugar
y consulte con un médico si usted o sus hijos tienen alguno de los siguientes síntomas:
Convulsiones Contorsión de ojos o músculos Pérdida de consciencia
Alteración en la visión Movimientos involuntarios Desorientación
• Para evitar la posibilidad de un ataque mientras juegue con los videojuegos:
1. Siéntese o párese lo más lejos posible de la pantalla.
2. Juegue videojuegos en la pantalla más pequeña que tenga disponible.
3. No juegue si siente cansancio o necesita dormir.
4. Juegue en una habitación bien iluminada.
5. Descanse de 10 a 15 minutos por cada hora.
AVISO – Lesiones por movimiento repetitivo y vista cansada
Jugar videojuegos puede causar dolor en sus músculos, articulaciones, piel u ojos. Siga estas instrucciones
para evitar problemas como tendinitis, síndrome del túnel carpiano, irritación de piel o vista cansada:
• Evite el juego excesivo. Los padres deben controlar que el modo de juego de los niños sea
apropiado.
• Descanse de 10 a 15 minutos por cada hora de juego, aun cuando piense que no es necesario.
• Si al jugar siente cansancio en las manos, muñecas, ojos o brazos, o si tiene síntomas como
hormigueo, adormecimiento, irritación o tensión, deje de jugar y descanse por varias horas antes
de empezar de nuevo.
• Si continúa teniendo alguno de estos síntomas o si siente otro malestar mientras o después de
estar jugando, deje de jugar y consulte con un médico.
ATENCIÓN – Enfermedad de movimiento
Jugar videojuegos puede causar enfermedad de movimiento en algunos jugadores. Si usted o sus hijos se sienten mareados o con náusea al jugar videojuegos, dejen de jugar y descansen. No conduzca
ni realice otra actividad pesada hasta sentirse mejor.
INFORMACIÓN LEGAL IMPORTANTE
Este juego de Nintendo no ha sido diseñado para
uso con ningún aparato no autorizado. El uso de dicho aparato invalidará la garantía de su producto
Nintendo. La duplicación de cualquier juego de Nintendo es ilegal y está terminantemente prohibida
por las leyes de propiedad intelectual domésticas e internacionales. “Copias de respaldo” o “copias
archivadas” no están autorizadas y no son necesarias para proteger su programa (software). Los
transgresores serán enjuiciados.
REV–E
INFORMACIÓN SOBRE GARANTÍA Y
REV-Q
SERVICIO DE REPARACIÓN
Es posible que sólo necesite instruccion es sencillas para corregir un p roblema con su producto. En lugar
de ir a su comerciante, trate nuestra página de Internet support.nintendo.com, o llame a nuestra línea
de Servicio al Cliente al 1-800-255-3700 .
p.m., Horario Pacífico (las horas pueden cambiar). Si el problema no se puede resolver con la información para
localización de averías disponible por Internet o teléfono, se le ofrecerá servicio expreso de fábrica a través de
Nintendo. Favor de no enviar ningún producto a Nintendo sin comunicarse primero con nosotros.
GARANTÍA DE SISTEMAS (HARDWARE)
Nintendo of America Inc. (“Nintendo”) garantiza al comprador original que el sistema será libre de defectos de
material y fabricación por un período de doce (12) meses desde la fecha de compra. Si durante este período de
garantía ocurre un defecto cubierto bajo esta garantía, Nintendo reparará o reemplazará libre de costo el sistema
o componente defectuoso.* El comprador original tiene derecho a esta garantía solamente si la fecha de compra
se registra al momento de la venta o si el consumidor puede demostrar, a la satisfacción de Nintendo, que el
producto fue comprado dentro de los últimos 12 meses.
GARANTÍA DE JUEGOS Y ACCESORIOS
Nintendo garantiza al comprador original que el producto (juegos y accesorios) será libre de defectos de
materialy fabricación por un período de tres (3) meses desde la fecha de compra. Si un defecto cubierto bajo esta
garantía ocurre durante este período de tres (3) meses de garantía, Nintendo reparará o reemplazará el producto
defectuoso libre de costo.*
SERVICIO DESPUÉS DEL VENCIMIENTO DE LA GARANTÍA
Por favor trate nuestra página de Internet support.nintendo.com, o llame a nuestra línea de Servicio al
Consumidor al 1-800-255-3700 para obtener información sobre localización de averías y reparación, u opciones
para reemplazo y costos.*
*En ciertos casos, puede ser necesario que nos envíe el producto completo, CON ENVÍO PREPAGADO Y
ASEGURADO CONTRA PÉRDIDA O DAÑO. Favor de no enviar ningún producto a Nintendo sin comunicarse primero
con nosotros.
LIMITACIONES DE LA GARANTÍA
ESTA GARANTÍA NO SE APLICARÁ SI ESTE PRODUCTO: (A) ES USADO CON PRODUCTOS QUE NO SEAN VENDIDOS
NI AUTORIZADOS POR NINTENDO (INCLUYENDO, PERO NO LIMITADO A, APARATOS PARA AUMENTAR O COPIAR
LOS JUEGOS, ADAPTADORES, Y FUENTES DE ENERGÍA ELÉCTRICA); (B) ES USADO CON PROPÓSITOS COMERCIALES
(INCLUYENDO ALQUILERES); (C) ES MODIFICADO O FORZADO; (D) SE HA DAÑADO POR DESCUIDO, ACCIDENTE,
USO IRRAZONABLE, O POR OTRAS CAUSAS NO RELACIONADAS A MATERIALES DEFECTUOSOS O ARTESANÍA; O (E)
TIENE EL NÚMERO DE SERIE ALTERADO, BORRADO O HA SIDO REMOVIDO.
CUALQUIERA DE LAS GARANTÍAS IMPLÍCITAS APLICABLES (INCLUYENDO,
Y LA CONVENIENCIA PARA UN OBJETIVO CONCRETO, SON POR ESTE MEDIO LIMITADAS EN DURACIÓN A LOS
PERÍODOS DE GARANTÍA DESCRITOS ANTERIORMENTE (12 MESES O 3 MESES, COMO APLIQUE). NINTENDO NO
SERÁ RESPONSABLE EN NINGUNA OCASIÓN POR DAÑOS CONSEQUENTES O INCIDENTALES DEBIDO A INFRINGIOS
DE GARANTÍAS IMPLICADAS O EXPLÍCITAS. UNOS ESTADOS NO PERMITEN LIMITACIONES EN CUANTO DURA UNA
GARANTÍA IMPLÍCITA, O LA EXCLUSIÓN DE DAÑOS CONSEQUENTES O INCIDENTALES, POR LO TANTO, ES POSIBLE
QUE LAS LIMITACIONES ANTES CITADAS NO LE SEAN APLICABLES.
Esta garantía le da derechos legales específicos. Usted también puede tener otros derechos, los cuales pueden
variar de un estado a otro o de una provincia a otra.
La dirección de Nintendo es: Nintendo of America Inc., P.O. Box 957, Redmond, WA, 98073-0957, U.S.A.
Esta garantía es válida solamente en los Estados Unidos y Canadá.
El horario de operación es: Lunes a Domingo, de 6:00 a.m. a 7:00
LAS GARANTÍAS DE COMERCIABILIDAD
Page 17

Contenido
Controles
Cómo Empezar
Bucear
Menú de Herramientas
A Bordo del Barco
35
36
37
40
41
Controles
Cómo Usar el Control
Remoto Wii™
Botón
Elige opciones del menú de
Herramientas
Revisa/ Usa (al apuntar)
Agarrar
(oprime junto con )
Botón
Muestra el Menú HOME
Botón
Autoswim (Nadar Automáticamente)
Alejarse
Puntero
Apunta
Vuelta
+Mando de Control
Muestra el menú de
Herramientas
Desplaza a través del
menú de Herramientas
(izquierda/derecha)
Charla (al jugar a través de
la CWF de Nintendo)
Botón
Nadar
Caminar
Cancelar
ATENCIÓN: USO DE LA CORREA DE MUÑECA
Utiliza por favor la correa de muñeca para ayudar a prevenir la herida a otras
personas o dañar a objetos circundantes o el Control Remoto Wii en caso de que sueltes
accidentalmente el Control Remoto Wii durante el juego.
Recuerda también lo siguiente:
• Asegúrate de que todos los jugadores se pongan la correa de muñeca
correctamente cuando sea su turno.
• No sueltes el Control Remoto Wii mientras juegues.
• Sécate las manos si empiezan a sudar.
• Asegúrate de tener el espacio necesario a tu alrededor durante el juego y asegúrate de que
todas las áreas a donde te puedas mover estén libres de otras personas y objetos.
• Mantente por lo menos a tres pies del televisor.
• Usa la Funda del Control Remoto Wii.
Botón
Cambiar el Panorama
Entra a los ajustes
detallados de la cámara
Nota: Al bucear, rápidamente
mueve el Control Remoto Wii
hacia arriba, abajo, o a los lados
para dar una vuelta rápida.
Controles de la Pantalla de Menú
Para seleccionar un menú o ícono en la pantalla de menú, apuntalo,
luego oprime .
Cursor
Esto muestra a donde
estás señalando el
Control Remoto Wii.
Botón
Entrar al Modo de
Zoom (al apuntar)
Botón
Mostrar el mapa
Colocar a los pescados
en el acuario
34 35
Page 18

Cómo Empezar
Correctamente inserta el Disco de Juegos
1.
de Endless Ocean dentro de la ranura de
discos en la consola Wii para encender el
poder. Cuando la pantalla que se muestra a
la derecha aparezca, léela y oprime .
Nota: Esta pantalla también se mostrará si insertas el
disco después de encender el poder de la consola.
ACTUALIZACIÓN DEL MENÚ DEL SISTEMA
Por favor ten en cuenta que al colocar primero el Disco
de Juego en la consola Wii, el sistema vericará si tienes
el menú del sistema más reciente, y de ser necesario,
aparecerá una pantalla de actualización del sistema Wii.
Para continuar presiona ACEPTAR.
Apunta hacia el Canal Disco en el Menú de Wii y oprime .
2.
Cuando veas la Pantalla
Preliminar del Canal ,
selecciona Comenzar y
oprime .
Menú Wii
Lee la Pantalla Recordatoria del Uso de
3.
la Correa de Muñeca, luego oprime
para ir a la pantalla de título.
Pantalla de título
Las siguientes dos opciones se muestran en la
pantalla de título. Para seleccionar una de la
opciones, señálala y oprime .
Juego Nuevo
Continuar
el Juego
Crea a un personaje y juega desde el principio. Aquí
puedes elegir el género y apariencia de tu personaje.
Continua el juego desde el punto donde lo dejaste. Esta opción
solamente es disponible si tienes datos guardados del juego.
Pantalla Preliminar
del Canal
Bucear
Pantalla de Buceo
Puedes bucear hasta que tu suministro de aire se agote, y cuando esto
suceda regresaras a tu barco.
Nota: Los niveles de aire y profundidad se muestran cuando abres el menú de Herramientas.
Profundidad
Brújula
Tu dirección,
orientación
vertical, y
posición en
relación a
tu barco son
indicados por , , y
, respectivamente.
Además, el indicador
de la brújula roja
apunta hacia el norte.
Panorama
Al bucear, oprime para cambiar entre perspectiva de primera
persona y tercera persona. Puedes oprimir cuando estés en la
supercie para ver a tu alrededor.
Menú de Herramientas
Abre el menú al
oprimir .
Aire
Este medidor se agota
gradualmente al bucear.
Una vez que se agote,
automáticamente dejarás
de bucear.
Indicador de
Advertencia
Esto aparece
cuando te
alejas de tu
área de buceo.
Cómo Guardar el Progreso
Para guardar tu progreso, selecciona Save (Guardar) desde el menú de
Cabin (Cabina)
memoria libre en la consola Wii para guardar el progreso.
Nota: Si guardas un archivo sobre otro archivo de datos guardados existentes, los datos viejos serán
reemplazados. No hay manera de recuperar datos que se hayan reemplazado, así que ten cuidado.
Página
Necesitarás por lo menos 34 bloques de
.
42
Primera personaTercera persona
3736
Page 19

Modo Zoom
Oprime para entrar al modo de Zoom, donde puedes observar
diminutas especies acuáticas, artefactos históricos, y otros objetos. Cada
vez que escuches un pitido proveniente del Control Remoto Wii, será una
señal que hay algo cercano que se puede encontrar en el modo de Zoom.
Cómo Recoger Objetos
Señala hacia un objeto y oprime para
enfocarte en el, luego mantén oprimiendo
los botones y para recogerlo.
Mapa
Oprime para ver el mapa. Cualquier área que hayas visitado
anteriormente por lo menos una vez estará rellenada. Podrás oprimir
para cambiar el tamaño del mapa.
Posición del Barco
La echa roja indica tu posición
y orientación. La línea punteada
te muestra el camino.
Limites del Area de Buceo
Indicador de Ubicación
Señala este indicador para
mostrar el nombre de la
ubicación.
Esto muestra que tan lejos
puedes explorar basado en tu
posición actual.
Cómo Familiarizarte
Podrás familiarizarte con los seres
acuáticoss al interactuar con ellos. Cuando
ya te familiarices con una criatura, podrás
descubrir información acerca de esta. Es
posible que algunas criaturas estén más
inclinadas a nadar contigo.
Nota: Criaturas aparecerán en el acuario cuando ya te
hayas familiarizado con estas. También serán registradas
en la Encyclopedia (Enciclopedia) , donde
podrás leer acerca de estas en cualquier momento.
Página
42
Tipos de Familiarización y Controles
Pet (Acariciar)
Mueve el Control Remoto Wii hacia la izquierda y
derecha mientras oprimes .
Touch (Tocar) Oprime repetitivamente.
Grab
(Agarrar)
Nota: Usa Grab para agarrarte de las criaturas grandes y nadar con ellas.
Oprime y .
¡Familiarízate con tus amigos acuáticos!
La mejor manera de hacerte amigo(a)
con las criaturas del océano es a través
de interacción – acariciar y jugar te darán
los mejores resultados. Sin embargo,
descubrirás que las criaturas acuáticas
también responden a comida, silbidos, o
hasta plumas acuáticas. ¡Pruébalas todas!
Ícono de Interacción
Enfoque
Apunta hacia los seres
acuáticoss y oprime para
enfocarte en ellos. Enfocarte en
una criatura la enmarcará en el
centro de la pantalla, resultando
en mejor interacción.
Botón de Nombre
Señala hacia este y
oprime para mostrar
información acerca de
la criatura.
Ícono de Herramientas
Esto indica la herramienta o
la acción que se encuentra
disponible actualmente.
Compañeros
A través de tu progreso
en el juego, conocerás a
varios delnes quienes
se convertirán en tus
compañeros. Además de
acompañarte al bucear,
tus compañeros también
aprenderán a hacer trucos
Página
43
.
38 39
Page 20

Menú de Herramientas
A Bordo del Barco
Oprime para mostrar el menú de herramientas. Usa izquierda y derecha
en para elegir las diferentes opciones del menú, y para seleccionar.
Alimentar
Oprime para dispersar comida en la ubicación donde esté el puntero.
Cuando termines, apunta hacia y oprime .
Pluma Acuática
Oprime y mantén oprimiendo y mueve el puntero para dibujar.
Cámara
Oprime para tomar una fotografía. También puedes usar y
para acercarte y alejarte. Oprime para entrar al menú de ajustes
avanzados.
Silbato Acuático
Oprime para llamarle a tu compañero. Algunos peces les gusta el
sonido del silbato.
Opciones
Puedes cambiar varios ajustes en la sección
de Options (Opciones) en el menú de Tool
(Herramientas). Para regresar a tus ajustes
originales, apunta hacia Restore Default
Settings (Restaurar Conguración Por
Defecto) y oprime .
Menú de Opciones
Cambiar los Controles
Exhibición de la Brújula
Exhibición del Ícono
de Herramienta
Reproducción de MP3
Transparencia del Cursor
Ajustes de Volumen
Elige entre dos tipos de controles.
Elige entre mostrar (on) o no mostrar
(off) la brújula.
Alterna entre mostrar (on) y no
mostrar (off) el ícono de herramienta.
Alterna entre prender (on) o apagar
(off) música de MP3.
Ajusta la claridad del cursor.
Ajusta el volumen de la música y de los
efectos de sonido.
Regresar al Barco
Deja de bucear y regresa al barco.
La Cubierta
Señala hacia un lugar en la cubierta y
oprime para ubicarte ahí. También
puedes oprimir para mostrar el menú
de Tool (Herramientas).
Mensaje de Acción
Oprime para efectuar la acción mencionada.
Objetos Disponibles del Menú de Herramientas
Opciones
Bucea
Nota: Los objetos del menú variarán dependiendo en tu ubicación.
Cambia tus ajustes.
Entra al agua y disfruta bucear.
Ve tu Colección
Apunta hacia el baúl y oprime para ver cualquiera de los objetos que
haz recogido del océano.
Tablero de Mensajes
Apunta hacia el tablero de mensajes y oprime para ver una serie de
información y pistas.
Toca Archivos de MP3
Utiliza esta opción para tocar canciones de una Tarjeta SD como tu
música de fondo. Esta función requiere que tengas una Tarjeta SD que
contenga datos de MP3 insertada dentro de la Ranura para Tarjeta SD
al frente de tu consola Wii.
Nota: Solamente podrás usar archivos en el formato MP3.
Nota: Para instrucciones de cómo usar Tarjetas SD con tu consola Wii, por favor consulta
el Manual de Operaciones del Wii.
Habla con Katherine
Puedes hablar con Katherine, tu
compañera en el barco, si estás
atorado(a) o necesitas consejos. ¡A ella
también le gusta platicar, así que
asegúrate de platicar con
ella a menudo!
4140
Page 21

Cómo Entrar a la Cabina
Apunta hacia la puerta de la cabina y
oprime para mostrar la pantalla que
se muestra a la derecha. Apunta hacia
cualquier objeto en la cabina y oprime
para usar la función correspondiente.
Nota: Tus objetos disponibles aumentarán
gradualmente mientras que avanzas en el juego.
Menú de la Cabina
Pilotea el Barco (Volante)
Cambia de Equipo
(Máscara de Tuba de Buceo)
Revela Fotografías
Ver Fotos (Album)
Adelanta el Tiempo (Reloj)
Leer el Correo
(Mecanismo Portátil)
Cambia tu ubicación actual.
Cambia tu apariencia.
Revela y guarda las fotos que has tomado.
Ve las fotografías que has revelado.
Adelanta el tiempo a la mañana o noche.
Lee tu correo electrónico y abre
archivos adjuntos. También podrás
enviar archivos adjuntos con fotos
con la función de Reply (Responder).
Cómo Entrenar a un Compañero
Una vez que tengas a un compañero, lo podrás entrenar para que haga
trucos. Apunta hacia los pasos en la parte trasera del barco y oprime
para abrir la pantalla de selección de compañero, luego elige al
compañero que quieras entrenar.
Cómo Dar Ordenes
Apunta hacia la boca o aleta de tu compañero y oprime , luego
ejecuta un Pet (Acaricia), Touch (Toca), o Grab (Agarra) .
El truco ejecutado dependerá en la combinación de ubicación y acción.
Por ejemplo, apunta hacia la boca de tu compañero y oprime , luego
efectúa un Grab para que tu compañero se de una voltereta hacia
atrás. Si le das múltiples ordenes a tu compañero, ejecutará los trucos
consecutivamente.
Mostrar el Signo de Go!
¡Cuando veas , tu compañero estará listo para empezar!
Simplemente agita el Control Remoto Wii para mostrar la señal de
Go! Entre más rápido agites el Control Remoto Wii, más poderosa
será tu orden.
Página
42
Ver la Enciclopedia
(Enciclopedia de Biología Marina)
Guardar (Registro de Buceo) Guarda tu progreso.
Ve información acerca de los
seres acuáticos la cual te ayudará
a familiarizarte con ellos.
Correo
Recibirás una variedad de tipos de correos electrónicos durante
tu viaje, estos incluirán ofrecimientos de empleo e información de
ubicaciones. ¡Revísalo con frecuencia!
Responder
Apunta y oprime para responder
a los correos electrónicos y recibir
nuevo equipo. (No todos los correos
electrónicos incluyen archivos adjuntos.)
Cómo Abrir un Archivo Adjunto
Apunta y oprime para abrir el archivo adjunto y recibir equipo
nuevo. (No todos los correos electrónicos incluyen archivos adjuntos.)
¡Trucos!
Podrás cambiar la posición de la cámara con mientras que tu
compañero esté haciendo trucos.
Número de la Posición
de la Cámara
Altura/ Duración del Truco
Nombre del Truco
4342
Page 22

Cómo usar el Portal de la CWF de Nintendo
En el juego de Endless Ocean, puedes usar la Conexión Wi-Fi de
Nintendo para visitar los barcos de tus amigos o invitar a tus amigos
para que visiten el tuyo. Apunta hacia la escalera en la proa del barco y
oprime para mostrar el menú del Portal de la CWF de Nintendo.
Menú del Portal de la CWF de Nintendo.
Abre el Portal de la CFW de Nintendo para
Abre o Cierra el Portal
de la CWF de Nintendo
Travel/Quit
(Viajar/Abandonar)
Conrmar un Código
de Amigo
Lista de Amigos
Código de Amigo
Para poder jugar a través de la CWF de Nintendo, primero tendrás que
intercambiar y registrar los códigos de amigo de cada uno. Verica tu
código de amigo usando la opción de Conrm Friend Code (Conrmar
Código de Amigo), luego compártelo con tus amigos.
Nota: Tu código de amigo es un número de 12 dígitos que se genera durante la primera
vez que te conectas a la CWF de Nintendo. Este es un número diferente a tu Número Wii.
Nota: Para proteger tu privacidad, no des tu información personal como tu apellido, número
de teléfono, fecha de nacimiento, edad, dirección de correo electrónico o la dirección de tu
casa cuando te comuniques con otros.
El Acuerdo de Usuario, el cual gobierna el juego por línea del Wii y establece la Política de
Privacidad Wii se encuentra disponible a través de la sección de Conguración de Wii en la
consola Wii y en línea en support.nintendo.com/wiiprivacy.jsp.
Cómo Registrar Amigos
Puedes registrar códigos de amigo a lista de amigos en el menú de
Nintendo WFC Gate (Portal de la CWF de Nintendo). Cuando veas la
pantalla que se muestra abajo, selecciona “Register a new friend”
“(“Registra a un amigo nuevo”) en la lista, luego ingresa el código de
amigo y nombre – en esta misma orden.
Nota: Puedes registrar un máximo de 42 amigos en tu lista de amigos. Si necesitas
registrar más que esa cantidad, tendrás que borrar datos de la lista.
Información del Amigo Seleccionado
permitir que tus amigos visiten tu barco.
Para cerrar el acceso a tu barco, selecciona
“Close the Nintendo WFC Gate” (“Cierra el
Portal de la CWF de Nintendo”).
Selecciona Travel (Viajar) para visitar
el barco de un amigo. Selecciona Quit
(Abandonar) para regresar a tu propio barco.
Revisa tu propio Código de Amigo
Ve una lista de amigos registrados o registra
a nuevos amigos.
Cómo Abrir el Portal de la CWF de Nintendo
Si vas a recibir visita, selecciona “Open the Nintendo WFC Gate”
(“Abrir el Portal de la CWF de Nintendo).
Nota: Una vez que hayas terminado de conectarte a través de la CWF de Nintendo, tu
progreso hasta ese momento será guardado.
Cómo Viajar por Medio de un Vehículo Acuático
Si estás visitando a un amigo, selecciona Travel (Viajar) desde el menú
del Portal de la CWF de Nintendo para mostrar una lista de antriones,
luego elige al amigo que quieras visitar y selecciona Travel (Viajar).
Selecciona Quit (Abandonar) para regresar a tu propio barco.
Nota: Una vez que te hayas conectado con un amigo exitosamente, tu progreso en el juego
hasta ese punto será guardado.
Charla Simplificada
Al bucear con un amigo, puedes usar una serie de mensajes
preseleccionados para poder comunicarte. Oprime hacia arriba en
para abrir las opciones de charla, luego hacia cualquier otra dirección
en para la categoría correspondiente, y de nuevo para el mensaje
correspondiente.
Jugador
Mensaje
Elección de Mensajes
Ubicación de tu Amigo
Lista de Amigos
Selecciona un nombre
registrado para cambiarlo.
4544
 Loading...