

Page 1

IM-DOL-A-GP-USA-1
GAME BOY®PLAYER
INSTRUCTION BOOKLET
MODE D’EMPLOI DU
GAME BOY®PLAYER (P.14)
FOLLETO DE INSTRUCCIONES
DEL GAME BOY®PLAYER (P.29)
P.O. Box 957, Redmond, WA 98073-0957 U.S.A.
Nintendo of America Inc.
PRINTED IN CHINA
53849A
IMPRIMÉ AU CHINE
IMPRESO EN CHINA
WARNING
PLEASE CAREFULLY READ THE HEALTH AND SAFETY PRECAUTIONS BOOKLET INCLUDED
WITH THE NINTENDO GAMECUBE SYSTEM OR GAMES BEFORE USING THIS ACCESSORY.
THIS BOOKLET CONTAINS IMPORTANT HEALTH AND SAFETY INFORMATION.
T
he official seal is your assurance that
this product is licensed or manufactured
by Nintendo. Always look for this seal
when buying video game systems,
accessories, games and related products.
Nintendo does not license the sale or use of products without the Official Nintendo Seal.
Thank you very much for purchasing the Nintendo GameCube
Game Boy Player. This accessory connects to the Nintendo
GameCube and allows you to play Game Boy Game Paks on
your TV, using a Nintendo GameCube Controller or Game Boy
Advance system as your game controller.
Before setting up or using this accessory, please read this
Instruction Booklet, and the separate Health and Safety
Precautions Booklet and Nintendo GameCube Instruction
Booklet that comes with the hardware system.
®
CONTENTS
Components
Game Boy Player .........................1
Start-up Disc.............................2
System Setup
Installing the Game Boy Player..............3
System Operation
Start-up Disc and Game Boy Game Paks.....4-5
Using Game Boy Game Paks ...............6
Using the Nintendo GameCube Controller..... 7
Game Boy Player Menu Screen ........... 7-8
Using Game Boy Systems............... 9-10
Using the e-Reader Accessory .............10
Troubleshooting.........................11
Warranty and Service ....................12
TM, ® and the Nintendo GameCube logo are trademarks of Nintendo.
© 2003, 2004 Nintendo. All rights reserved.
CAUTION - TV Screen Damage
Some televisions can be damaged by the display of a stationary
image, because the image may be permanently "burned" into the
screen. Playing video games with stationary images or patterns, or
leaving video games on hold or pause, may lead to this type of
damage. When taking a break, place the game on pause and turn the
TV off until you are ready to play again.
Before using your Nintendo system with any TV, especially front
and rear projection, be sure to review all documentation included
with your TV to find out whether video games can be played on
the TV without damaging it.
If in doubt, contact the manufacturer of the TV. Neither Nintendo nor
any of Nintendo's licensees will be liable for any damage to your TV.
Page 2
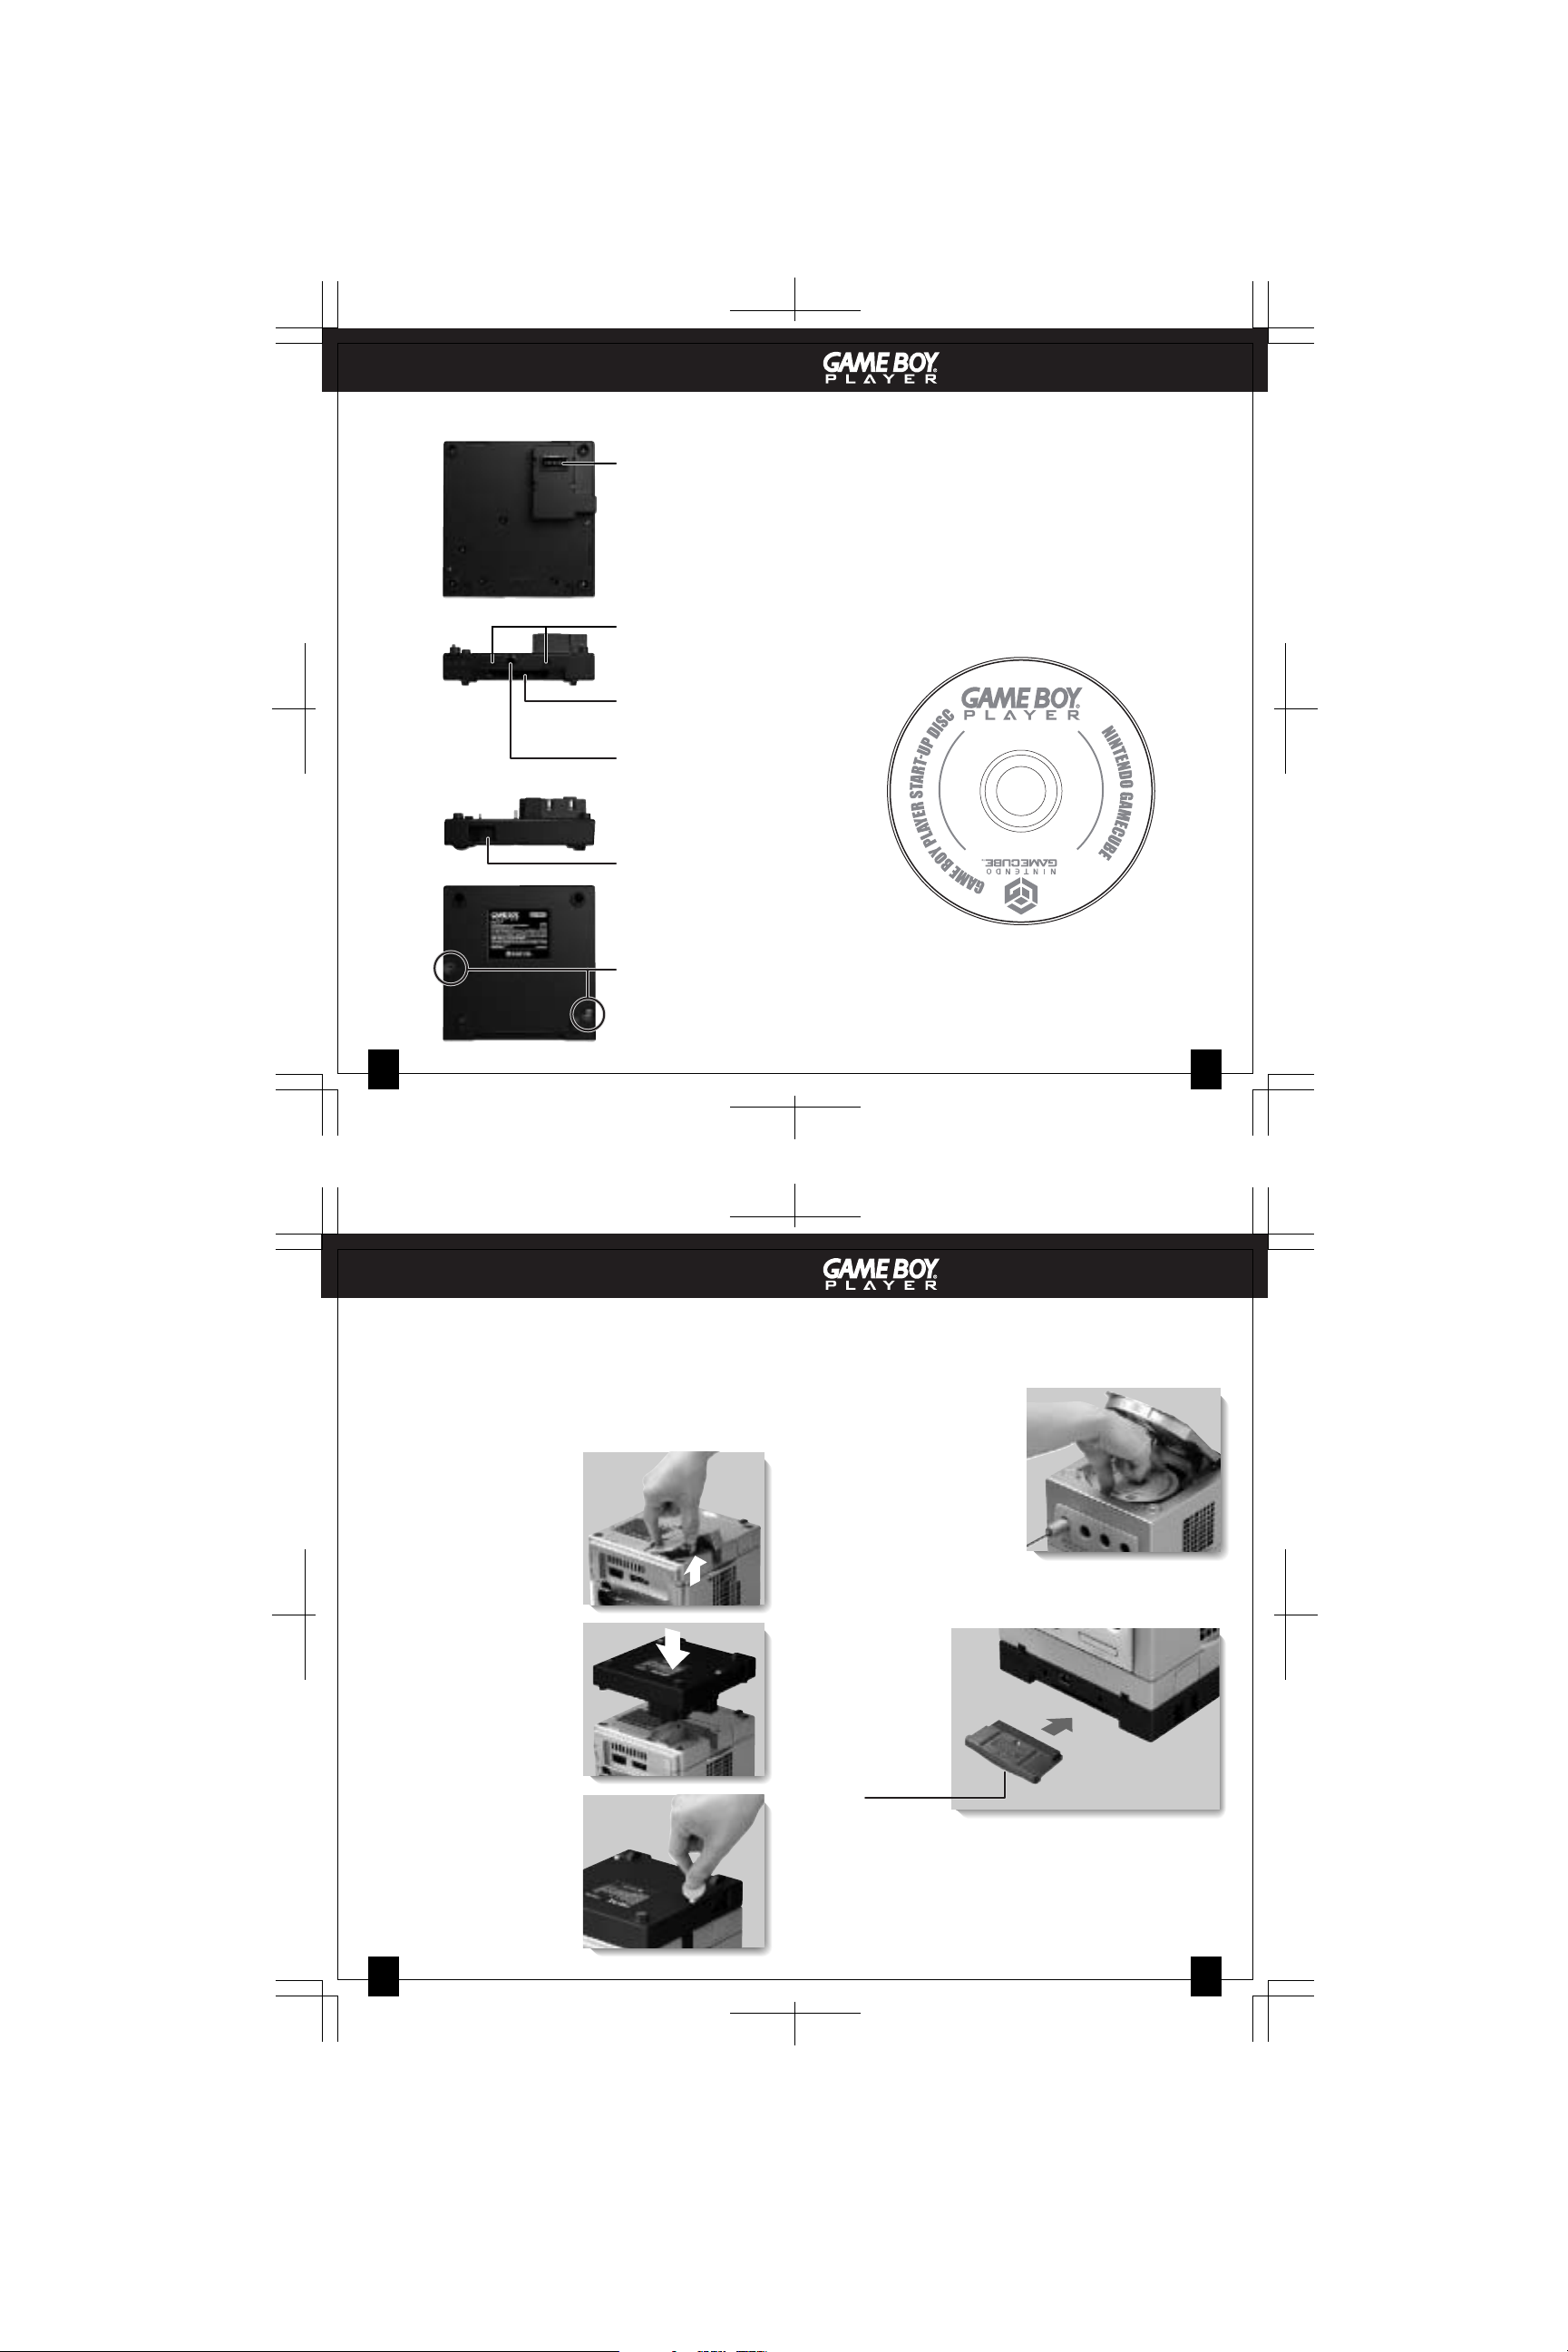
Game Boy Player Game Boy Player Start-up Disc
COMPONENTSCOMPONENTS
To p
View
High Speed Port
Connector
Connects to High
Speed Port on the
IMPORTANT: Please review the Game Disc
Precautions/Maintenance sections of the separate Health
and Safety Precautions Booklet included with the
Nintendo GameCube and games before using this
Start-up Disc.
bottom of the
Nintendo GameCube
This Start-up Disc must be loaded into the Nintendo
GameCube for the Game Boy Player to work properly.
When not using this disc, be sure to keep it safely stored
and protected from loss or damage.
Accessory Slots
For attachment of
Front
View
Game Boy
Accessories
Game Pak Slot
For loading a
Right
Side
View
Bottom
View
Game Pak
External Extension
Connector
For connection of
Game Boy
Accessories
Game Pak Ejector
For ejecting a Game
Pak from the Game
Boy Player.
C
A
N
,
A
A
S
D
U
A
,
N
M
I
E
Y
L
N
O
E
S
U
R
O
F
)
º
.
O
N
L
E
X
I
C
O
A
N
D
L
A
T
I
N
A
M
E
R
I
C
A
D
L
-
D
O
L
-
U
G
D
P
E
O
-
U
M
S
A
Attachment Screws
To attach the Game
Boy Player to the
bottom of the
Nintendo GameCube
1 2
INSTALLING THE GAME BOY PLAYER
IMPORTANT: Please review the separate Health and Safety
Precautions Booklet included with the Nintendo GameCube
and Game Discs before installing the Game Boy Player.
1. Remove any Game Discs from the Nintendo GameCube
and make sure the power is turned OFF.
2. Remove the High Speed
Port cover from the bottom
of the Nintendo GameCube
and put this in a safe place
for future use if the Game
Boy Player is removed.
3. Install the Game Boy
Player on the bottom of the
Nintendo GameCube,
inserting the High Speed
Port Connector into the
High Speed Port.
4. Tighten the attachment
screws clockwise using a
flat-bladed screwdriver or
coin. Do not over tighten.
SYSTEM OPERATIONSYSTEM SETUP
INSTALLING THE START-UP DISC AND GAME
BOY GAME PAKS
1. Make sure the power is OFF on the Nintendo GameCube.
2. Open the Disc Cover on
the Nintendo GameCube
and insert the Start-up
Disc. Close the Disc
Cover.
3. With the label facing down, insert a Game Boy Game Pak
into the Game Pak Slot in the front of the Game Boy Player.
NOTE: Make sure
the Game Pak
label is facing
down.
4. Turn ON the power of the Nintendo GameCube. The TV
screen will first display the Game Boy Logo and then the
title screen for the game you are playing.
3
4
Page 3

SYSTEM OPERATIONSYSTEM OPERATION
REMOVING THE START-UP DISC AND
GAME BOY GAME PAK
1. While the power is ON,
push the Open Button to
open the Disc Cover of
the Nintendo GameCube.
NOTE: If the Disc Cover is
opened after the power is
turned OFF, the Start-up Disc
may still be spinning. If this
happens, wait until the disc
stops spinning before
removing it from the console.
2. Push the Disc Release
Button and remove the
Start-up Disc from the
console.
3. Close the Disc Cover and
turn OFF the power.
4. Slide the Game Pak
Ejector towards the front
of the Nintendo GameCube
to eject the Game Pak.
NOTE: To keep out dirt, dust
or other foreign material,
keep a Game Pak plugged
into the Game Boy Player
when not being used.
USING GAME BOY GAME PAKS WITH THE
GAME BOY PLAYER
IMPORTANT:
• A few original Game Boy Game Paks may have
display
or sound problems if used with the Game Boy
Player.
• Motion sensor (tilt feature), rumble feature and
infrared feature Game Paks will not work with in the
Game Boy Player.
1. You can adjust the screen size for original Game Boy and
Game Boy Color Game Paks by pressing the L and R
Buttons on your GameCube Controller or Game Boy
Advance system. (This may make some of the images
distorted or hard to see.) The screen size is not
adjustable with Game Boy Advance Game Paks.
2. There are 12 different color palettes that can be used with
original monochrome Game Boy games. To set the color,
you must press up, down, left or right with the Control
Stick or + Control Pad and the A or B Button (see table
below). This must be done while the Game Boy
logo appears on the TV screen right after you turn the
power ON.
PRESS
UP BROWN
UP + A RED
UP + B DARK BROWN
DOWN PASTEL MIX
DOWN + A ORANGE
DOWN + B YELLOW
COLOR PRESS COLOR
LEFT BLUE
LEFT + A DARK BLUE
LEFT + B GRAY
RIGHT GREEN
RIGHT + A DARK GREEN
RIGHT + B REVERSE
5 6
SYSTEM OPERATIONSYSTEM OPERATION
USING A NINTENDO GAMECUBE CONTROLLER
When using a Nintendo GameCube Controller to play your
Game Boy Game Paks, it can be plugged into any of the
Controller Sockets on the front of the console. See the table
below for equivalent Game Boy game control functions.
Nintendo GameCube Controller Game Boy Advance
Control Stick or + Control Pad + Control Pad
A Button A Button
B Button B Button
START/PAUSE START
Other Controller Button Functions
Z Button Menu Screen
X Button These buttons are
Y Button programmable, see
L Button the Menu Screen
R Button section on page 8.
C Stick (Controller option)
Z Button and START/PAUSE Change Game Paks
(Press and hold simultaneously) (Follow the on-screen
instructions)
Game Boy Player Menu Screen
(See descriptions of menu items on Page 8)
GAME BOY PLAYER MENU SCREEN
The Menu Screen can only be accessed by pressing the
Z Button on the Nintendo GameCube Controller.
Frame Select from 20 different frame designs that
border the game play area of the screen.
Screen Size
Select Normal or Full display screen size.
Controller Select between two sets of button functions for
the X, Y, L and R Buttons and the C Stick. See
the table below for the equivalent Game Boy
game control functions:
Setting 1 Setting 2
Controller Game Boy Controller Game Boy
Advance Advance
X/Y Buttons SELECT X Button R Button
L Button L Button Y Button L Button
R Button R Button L/R Buttons SELECT
C Stick Not used C Stick + Control Pad
Screen Filter Select Soft, Normal or Sharp display quality.
On some games, images may flicker, shake, or appear
doubled when scrolled across the screen. Try adjusting the
display quality settings to correct this. More information is
available at http://www.nintendo.com/gameboyplayer.jsp.
Timer You can set a timer to notify you with a sound
and message on the TV screen. The timer can
be canceled by pressing the B Button.
Change Select this option to change Game Paks without
Game Pak having to turn the power off.
You can also change Game Paks by pressing
and holding the Z Button and START/PAUSE on
the GameCube Controller.
FRAME
7
SCREEN
SIZE
CONTROLLER
SCREEN
FILTER
TIMER
CHANGE
GAME PAK
IMPORTANT: Before changing a Game Pak, be sure to
save your game data if it has a save function.
8
Page 4

SYSTEM OPERATIONSYSTEM OPERATION
USING A GAME BOY SYSTEM WITH THE
GAME BOY PLAYER
SINGLE PLAYER GAMES
The Game Boy Advance system can be used as a controller with
the Game Boy Player by connecting it to the Nintendo GameCube
with the Nintendo GameCube Game Boy Advance cable.* This
Player 3
cable can be plugged into any of the Controller Sockets on the
front of the Nintendo GameCube.
The Game Boy Advance system will not work as a controller if a
Player 2
Game Pak is inserted into its Game Pak slot.
NOTE: The External Extension Connector on the front of the
Game Boy Player is not used for single player games.
Player 1
Player 4
A Nintendo GameCube Controller can be plugged into any other
Controller Socket to access the Menu Screen (see Pages 7-8).
NOTE: All Controller Sockets are active, so plugging
additional controllers in and pressing the buttons while
someone is already playing can interfere with game play.
MULTIPLAYER GAMES
For multiplayer games, the Game Boy Player can be treated like
another Game Boy system. It can be connected to other Game
Boy systems by using the External Extension Connector (EXT) on
the front of the Game Boy Player with the appropriate cable.
NOTE: This method is only for connecting Game Boy
systems to the Game Boy Player. Do not connect multiple
The illustration above is an example of how to connect Game
Boy Advance systems for four player games using the Game
Boy Advance Game Link Cable. The purple plug can
connect to whichever system will be Player 1.
Similar connections can be made with other Game Boy
systems using the correct accessories (see Page 9).
USING AN e-READER
A Nintendo e-Reader can be plugged into the Game Pak Slot
on the front of the Game Boy Player. Please review the
e-Reader Instruction Booklet before using this accessory.
Game Boy Players together using this method.
Please review the Instruction Booklets included with your Game
Boy system and Game Paks for multiplayer game features and
connection methods. Multiplayer game set-up may require
additional accessories or cables.*
IMPORTANT: Be sure to disconnect systems and cables
when they are not being used.
Accessories sold separately. See your local Nintendo
*
retailer, visit our on-line store at http://store.nintendo.com
or call 1-800-255-3700.
9 10
If you are having problems with the picture or sound, or the
Nintendo GameCube Controller or Game Boy system are not
responding, turn the power OFF and check the following:
• Some games may appear shaky when scrolled across
the TV screen. This is caused by differences in how LCD
and TV screens display images. This is not a defect and
can sometimes be corrected by adjusting the display
quality. (See page 8, the "Display" menu item.)
• Make sure cable connections are correct and secure.
• Make sure Game Pak is correctly and fully inserted into
the Game Pak Slot on the front of the Game Boy Player.
• Check the Game Pak connectors for contamination or
other foreign material.
• If you are using a Game Boy Advance system as a
controller, make sure there is not a Game Pak inser ted
into its Game Pak Slot.
• For multiplayer games, review the Instruction Booklet for
the game you are playing for information on multiplayer
features and the number of Game Paks needed, and
what cable connections to use.
• For multiplayer games, check the compatibility of the
components you are using. For example, a Game Boy
Advance Game Pak is not compatible with a Game Boy
Color system.
• If an error message appears on the TV screen, please
review the Troubleshooting Section in the
Nintendo GameCube Instruction Booklet.
Note: When using any Game Boy Advance system as a
controller, a Game Boy Player logo will appear on the
Game Boy Advance screen after you turn the power ON.
If this logo does not appear, turn the power of the
Nintendo GameCube OFF, check the cable connections,
then try turning the power ON again.
If the Game Boy Player still does not operate correctly after trying
the above remedies, please visit the customer service area of our
web site at www.nintendo.com or call 1-800-255-3700.
11
WARRANTY AND SERVICETROUBLESHOOTING
You may need only simple instructions to correct a problem with your product. Try our
web site at www.nintendo.com or call our Consumer Assistance Hotline at 1-800-2553700, rather than going to your retailer. Hours of operation are 6 a.m. to 7 p.m., Pacific
Time, Monday - Sunday (times subject to change). If the problem cannot be solved with the
troubleshooting information available on-line or over the telephone, you will be offered
express factory service through Nintendo or referred to the nearest NINTENDO AUTHORIZED
REPAIR CENTER. Please do not send any products to Nintendo without contacting us first.
HARDWARE WARRANTY
Nintendo of America Inc. ("Nintendo") warrants to the original purchaser that the hardware
product shall be free from defects in material and workmanship for twelve (12) months from
the date of purchase. If a defect covered by this warranty occurs during this warranty period,
Nintendo or a NINTENDO AUTHORIZED REPAIR CENTER will repair the defective hardware
product or component, free of charge. The original purchaser is entitled to this warranty only if
the date of purchase is registered at point of sale or the consumer can demonstrate, to
Nintendo's satisfaction, that the product was purchased within the last 12 months.
GAME PAK & ACCESSORY WARRANTY
Nintendo warrants to the original purchaser that the product (Game Paks and accessories)
shall be free from defects in material and workmanship for a period of three (3) months from
the date of purchase. If a defect covered by this warranty occurs during this three (3) month
warranty period, Nintendo or a NINTENDO AUTHORIZED REPAIR CENTER will repair the
defective product, free of charge.
SERVICE AFTER EXPIRATION OF WARRANTY
Please try our web site at www.nintendo.com or call the Consumer Assistance Hotline at 1800-255-3700 for troubleshooting information and/or referral to the nearest NINTENDO
AUTHORIZED REPAIR CENTER. In some instances, it may be necessary for you to ship the
complete product, FREIGHT PREPAID AND INSURED FOR LOSS OR DAMAGE, to the
nearest service location. Please do not send any products to Nintendo without contacting us
first.
THIS WARRANTY SHALL NOT APPLY IF THIS PRODUCT: (a) IS USED WITH PRODUCTS
NOT SOLD OR LICENSED BY NINTENDO (INCLUDING, BUT NOT LIMITED TO, NONLICENSED GAME ENHANCEMENT AND COPIER DEVICES, ADAPTERS, AND POWER
SUPPLIES); (b) IS USED FOR COMMERCIAL PURPOSES (INCLUDING RENTAL); (c) IS
MODIFIED OR TAMPERED WITH; (d) IS DAMAGED BY NEGLIGENCE, ACCIDENT,
UNREASONABLE USE, OR BY OTHER CAUSES UNRELATED TO DEFECTIVE
MATERIALS OR WORKMANSHIP; OR (e) HAS HAD THE SERIAL NUMBER ALTERED,
DEFACED OR REMOVED.
ANY APPLICABLE IMPLIED WARRANTIES, INCLUDING WARRANTIES OF
MERCHANTABILITY AND FITNESS FOR A PARTICULAR PURPOSE, ARE HEREBY
LIMITED IN DURATION TO THE WARRANTY PERIODS DESCRIBED ABOVE (12 MONTHS
OR 3 MONTHS, AS APPLICABLE). IN NO EVENT SHALL NINTENDO BE LIABLE FOR
CONSEQUENTIAL OR INCIDENTAL DAMAGES RESULTING FROM THE BREACH OF
ANY IMPLIED OR EXPRESS WARRANTIES. SOME STATES DO NOT ALLOW
LIMITATIONS ON HOW LONG AN IMPLIED WARRANTY LASTS OR EXCLUSION OF
CONSEQUENTIAL OR INCIDENTAL DAMAGES, SO THE ABOVE LIMITATIONS MAY NOT
APPLY TO YOU.
This warranty gives you specific legal rights. You may also have other rights which vary from
state to state or province to province.
Nintendo's address is: Nintendo of America Inc., P.O. Box 957, Redmond, WA 98073-0957 U.S.A
This warranty is only valid in the United States and Canada.
WARRANTY LIMITATIONS
Rev. O
12
.
Page 5

NEED HELP WITH INSTALLATION,
MAINTENANCE OR SERVICE?
NINTENDO CUSTOMER SERVICE
WWW.NINTENDO.COM
or call 1-800-255-3700, MON.-SUN.,
6:00 a.m. to 7:00 p.m, Pacific Time
(Times subject to change)
MODE D’EMPLOI DU
GAME BOY PLAYER
AVANT L'UTILISATION DE CET ACCESSOIRE, VEUILLEZ LIRE ATTENTIVEMENT LE
MANUEL DE PRÉCAUTIONS CONCERNANT LA SANTÉ ET LA SÉCURITÉ INCLUS AVEC
L'APPAREIL NINTENDO GAMECUBE OU LES JEUX. CE MANUEL CONTIENT DES
RENSEIGNEMENTS IMPORTANTES SUR LA SANTÉ ET LA SÉCURITÉ.
AVERTISSEMENT
TTY Consumer Service: 800-422-4281
NEED HELP PLAYING A GAME?
You can visit our web site at www.nintendo.com for game
play information. For automated game play tips and news,
call Nintendo's Power Line at: 1-425-885-7529.
This may be a long distance call, so please ask permission
from whomever pays the phone bill.
Rather talk with a game counselor?
1-800-521-0900
Available in U.S. and Canada - $1.50 Per Minute (In U.S. Funds)
Please have Visa or MasterCard Ready
MON. - SUN., 6:00 a.m. to 7:00 p.m.; Pacific Time
Callers under 18 need to obtain parental permission to call.
Prices subject to change.
TTY Game Play Assistance: 425-883-9714
Note: This Nintendo product is not designed for use
with any unauthorized accessories.
Ce sceau officiel est votre garantie que le
présent produit est breveté ou manufacturé
par Nintendo. Recherchez-le toujours
quand vous achetez des appareils de jeu
vidéo, des accessories, des jeux et d'autres
produits connexes.
Nintendo n'autorise pas la vente ou l'utilisation de produits ne portant pas le Sceau officiel de Nintendo.
Félicitations ! Vous êtes maintenant propriétaire du Game Boy
Player pour le Nintendo GameCube. Cet accessoire s’ajuste au
Nintendo GameCube et vous permet d’utiliser des logiciels pour
Game Boy sur votre téléviseur, en utilisant un contrôle manuel de
Nintendo GameCube ou un appareil Game Boy Advance comme
contrôle manuel.
Veuillez lire le mode d'emploi à l'intérieur, ainsi que le manuel
spécifique de précautions concernant la santé et la sécurité
(compris avec l'appareil Nintendo GameCube ou les logiciels de
jeu) avant de régler ou d'utiliser votre appareil.
MC, ® et le logo du Nintendo GameCube sont des marques de commerce
de Nintendo. © 2003, 2004 Nintendo. Tous droits réservés.
Nintendo of Canada Ltd., usager autorisé.
1413
®
TABLE DES MATIÈRES
Composants
Game Boy Player
...........................16
Disque de démarrage........................17
Réglage de l’appareil
Installation du Game Boy Player ................18
Fonctionnement de l’appareil
Disque de démarrage et logiciels
pour le Game Boy
Utilisation des logiciels pour Game Boy
.....................19-20
.........21
Utilisation du contrôle manuel
du Nintendo GameCube
Écran du menu du Game Boy Player
Utilisation des appareils Game Boy
Utilisation de l’accessoire e-Reader
Problèmes et solutions
Garantie et entretien
...................22
.........23-24
..........24-26
............25
......................26
........................28
ATTENTION!–Dommage à l’écran du téléviseur
Certains téléviseurs peuvent être endommagés par l’affichage
d’images stationnaires, car celles-ci peuvent créer une empreinte
permanente sur l’écran. Le fait de jouer des jeux vidéo présentant des
images ou motifs stationnaires, ou de laisser l’appareil en mode
d’attente ou de pause, peuvent causer ce type de dommage. Quand
vous faites une pause, placez l’appareil en mode pause et éteignez le
téléviseur jusqu’à ce que vous reveniez au jeu.
Avant d’utiliser votre appareil Nintendo avec le téléviseur,
particulièrement ceux à projection avant et arrière, assurez-vous
de consulter tous les renseignements compris avec votre
téléviseur accompagnant votre appareil pour savoir si les jeux
vidéo peuvent être joués sur le téléviseur, sans l’endommager.
Dans le doute, contactez le manufacturier du téléviseur. Ni Nintendo,
ni aucun de ses détenteurs de brevets ne seront responsables de
dommages pouvant être causés à votre téléviseur.
15
Game Boy Player
Vue d u
haut
Vue d e
l’avant
Vue d u
côté
droit
Vue d u
dessous
COMPOSANTS
Prise de connexion
du port haute vitesse
Se branche au port
haute vitesse à la
base du Nintendo
GameCube
Fentes pour
accessoires
Pour brancher les
accessoires pour
Game Boy
Fente pour logiciel
Pour insérer un
logiciel
Prise de connexion
EXT
Pour connecter des
accessoires pour
Game Boy
Éjecteur du logiciel
Pour éjecter un
logiciel de jeu du
Game Boy Player
Vis d’assemblage
Pour retenir le
Game Boy Player
à la base du Nintendo
GameCube
16
Page 6

COMPOSANTS
RÉGLAGE DE L’APPAREIL
Disque de démarrage du Game Boy Player
IMPORTANT : Veuillez consulter les sections sur les
précautions à prendre et l'entretien du disque de jeu du
manuel Précautions concernant la santé et la sécurité
compris avec votre apareil Nintendo GameCube et vox jeux,
avant d'utiliser ce disque de démarrage.
Ce disque de démarrage doit être inséré dans l’appareil
Nintendo GameCube pour que le Game Boy Player
fonctionne correctement. Quand vous n’utilisez pas ce
disque, assurez-vous de bien le ranger et de le protéger
contre la perte ou les dommages.
A
,
D
M
A
E
N
X
A
I
C
C
,
O
A
A
S
U
N
I
Y
L
N
O
E
S
U
R
O
F
)
A
S
U
(
6
0
0
-
L
O
D
N
D
L
A
T
I
N
A
M
E
R
I
C
A
D
L
-
D
O
L
-
U
G
P
E
-
U
S
.
A
O
N
L
E
D
O
M
INSTALLATION DU GAME BOY PLAYER
IMPORTANT : Veuillez consulter le manuel de précautions
concernant la santé et la sécurité accompagnant le Nintendo
GameCube et les disques de jeu avant d’installer le Game
Boy Player.
1. Retirez tout disque de jeu de l’appareil Nintendo GameCube
et assurez-vous que l’appareil est éteint.
2. Retirez le couvercle du
port haute vitesse situé
à la base du Nintendo
GameCube et rangez-le
dans un endroit sûr pour
utilisation ultérieure, si
le Game Boy Player
est retiré.
3. Installez le Game Boy
Player sur la base
du Nintendo GameCube,
en insérant la connexion
haute vitesse dans le
port haute vitesse.
4. Resserrez les vis
d’assemblage en tournant
vers la droite, à l’aide d’un
tournevis à tête plate ou
d’une pièce de monnaie.
Ne serrez pas exagérément.
17 18
FONCTIONNEMENT
DE L’APPAREIL
INSTALLATION DU DISQUE DE DÉMARRAGE
ET DES LOGICIELS POUR LE GAME BOY.
1. Assurez-vous que le Nintendo GameCube est éteint.
RETRAIT DU DISQUE DE DÉMARRAGE ET
DU LOGICIEL DE JEU POUR GAME BOY
1. Pendant que l’appareil
FONCTIONNEMENT
DE L’APPAREIL
est allumé, appuyez sur
2. Ouvrez le couvercle du
logement du disque du
Nintendo GameCube
et insérez le disque de
le bouton d’ouverture
(Open) du couvercle du
logement du disque du
Nintendo GameCube.
démarrage. Refermez
le couvercle.
N. B. : Si le couvercle du
logement du disque demeure
ouvert après avoir éteint
l’appareil, le disque de
démarrage pourrait encore
t
ourner. Dans ce cas, attendez
3. L’étiquette placée vers le dessous, insérez un logiciel de
jeu pour Game Boy dans la fente à cet effet qui est située
à l’avant du Game Boy Player.
que le disque s’arrête avant
de le retirer du module.
2. Appuyez sur le bouton
d’éjection du disque et
retirez le disque de
démarrage du module.
N. B. :
Assurez-vous
que l’étiquette du
logiciel se trouve
dessous.
4. Allumez l’appareil Nintendo GameCube. L’écran du
téléviseur affichera d’abord le logo Game Boy, puis l’écran
titre du jeu utilisé.
19
3. Refermez le couvercle
du logement du disque
et éteignez l’appareil.
4. Faites glisser le bouton
d’éjection du logiciel de
jeu vers le devant du
Nintendo GameCube
pour en sortir le logiciel.
N. B. : Pour protéger contre
la poussière, les saletés et
d’autres corps étrangers,
laissez un disque de jeu dans
le Game Boy Player quand
ce dernier n’est pas utilisé.
20
Page 7

FONCTIONNEMENT
DE L’APPAREIL
FONCTIONNEMENT
DE L’APPAREIL
UTILISATION DES LOGICIELS POUR GAME BOY
AVEC LE GAME BOY PLAYER
IMPORTANT :
• Certains logiciels de jeu pour Game Boy peuvent
présenter des problèmes d’affichage et de son lors
de leur utilisation avec le Game Boy Player.
• Les logiciels présentant les caractéristiques de
détecteur de mouvement (caractéristique
d’angulation), de réactions virtuelles et de
communication à l’infrarouge ne fonctionneront
pas avec le Game Boy Player.
1. Vous pouvez ajuster la dimension de l’écran en fonction
des logiciels pour Game Boy original et Game Boy
couleur en appuyant sur les boutons L et R de votre
contrôle manuel pour GameCube ou sur l’appareil Game
Boy Advance. (Ceci peut provoquer la distorsion des
images ou les rendre difficiles à voir.) La taille de l’écran
n’est pas réglable avec les logiciels pour Game Boy
Advance.
2. Il existe 12 différentes palettes de couleurs qu’on peut
utiliser avec les jeux pour le Game Boy original
monochrome. Pour régler la couleur, vous devez pousser
la manette vers le haut, le bas, la gauche ou la droite ou
appuyer sur le + coussinet de contrôle et le bouton A ou
B (voir le tableau ci-dessous). Vous devez le faire
pendant que le logo Game Boy apparaît sur l’écran
du téléviseur, tout de suite après avoir allumé l’appareil.
APPUYEZ
HAUT BRUN
HAUT + A ROUGE
HAUT + B BRUN FONCÉ
BAS TONS PASTEL
BAS + A ORANGE
BAS + B JAUNE
COULEUR APPUYEZ COULEUR
GAUCHE BLEU
GAUCHE + A BLEU FONCÉ
GAUCHE + B GRIS
DROITE VERT
DROITE + A VERT FONCÉ
DROITE + B TONS RENVERSÉS
UTILISATION DU CONTRÔLE MANUEL
DU NINTENDO GAMECUBE
Quand vous utilisez un contrôle manuel du Nintendo GameCube
pour jouer avec des logiciels pour Game Boy, vous pouvez le
brancher dans n’importe quelle prise pour contrôle manuel située
à l’avant du module. Consultez le tableau ci-dessous pour
connaître les équivalences de commandes de jeu du Game Boy.
Contrôle manuel du
Nintendo GameCube Game Boy Advance
Manette ou
Bouton A Bouton A
Bouton B Bouton B
Mise en marche/pause (START/PAUSE) Mise en marche (START)
Bouton Z Écran du menu
Bouton X, Bouton Y Ces boutons sont
Bouton L, Bouton R programmables, voir
Commande C (Options pour le
Bouton Z et de mise en Pour passer d’un logiciel
marche/pause (Maintenez à l’autre (Suivez les
la pression simultanément) instructions à l’écran)
CONTRÔLE
MANUEL
TAILLE
CADRAGE
+ coussinet de contrôle + Coussinet de contrôle
Autres fonctions des boutons du contrôle manuel
Écran du menu, p. 23
contrôle manuel)
Écran du menu de Game Boy Player
(Voir les descriptions des articles du menu en p. 23)
AFFICHAGE
MINUTERIE
CHANGEMENT
DE LOGICIEL
21 22
FONCTIONNEMENT
DE L’APPAREIL
ÉCRAN DU MENU DU GAME BOY PLAYER
On ne peut accéder à l’écran du menu qu’en appuyant
sur le bouton Z sur le contrôle manuel du Nintendo
GameCube.
Cadrage Choisissez parmi 20 différents motifs pour
Taille Choisissez normal ou plein écran (Full).
Contrôle Choisissez entre deux groupes de fonctions
manuel pour les boutons X, Y, L et R et la commande C.
Contrôle Game Boy Contrôle Game Boy
manuel Advance manuel Advance
Boutons X et Y Bouton de Bouton X Bouton R
Bouton L Bouton L Bouton Y Bouton L
Bouton R Bouton R Boutons L et R Bouton de
Commande C Non utilisé Commande C
Affichage Choisissez Soft (Doux), Normal ou Sharp
(Display) (Contrasté).
Minuterie Vous pouvez régler la minuterie qui vous notifiera
Change- Choisissez cette option pour passer d’un logiciel à un
ment de autre sans avoir à éteindre l’appareil. Vous pouvez
logiciel aussi passer d’un logiciel à l’autre en maintenant la
IMPORTANT : Avant de passer d’un logiciel à l’autre,
assurez-vous de sauvegarder vos données si vous avez
l’utilisation d’une telle fonction de sauvegarde.
tracer une bordure autour de l’écran de jeu.
Consultez le tableau ci-dessous pour voir les
commandes équivalentes entre un contrôle
et l’autre.
Réglage 1 Réglage 2
sélection
sélection
+ coussinet
de contrôle
avec un son et un message à l’écran. On peut
annuler la minuterie en appuyant sur le bouton B.
pression sur le bouton Z et celui de mise en marche
(START) du contrôle manuel du GameCube.
UTILISATION D’UN APPAREIL GAME BOY
AVEC LE GAME BOY PLAYER
JEUX EN SOLO
L’appareil Game Boy Advance peut être utilisé comme contrôle
manuel pour le Game Boy Player, en le raccordant au Nintendo
GameCube à l’aide du câble de raccord pour Nintendo
GameCube et le Game Boy Advance*. Ce câble peut être branché
dans n’importe quelle prise pour contrôle manuel du panneau
avant du Nintendo GameCube. L’appareil Game Boy Advance ne
fonctionnera pas comme contrôle manuel si un logiciel est inséré
dans la fente à cet effet.
N.B. : Le point de connexion EXT situé à l’avant de votre
Game Boy Player n’est pas utilisé pour les jeux joués en
solo.
Un contrôle manuel de Nintendo GameCube peut être branché
dans n’importe quelle prise pour contrôle manuel, afin d’accéder
à l’écran du menu (voir p. 22 et 23).
N. B. : Toutes les prises pour contrôle manuel sont actives,
raccorder des contrôles manuels additionnels et appuyer sur
les boutons pendant qu’un joueur est en train de jouer peut
interférer avec le déroulement du jeu.
JEUX POUR JOUEURS MULTIPLES
Pour les jeux à joueurs multiples, le Game Boy Player peut être
traité comme tout autre appareil Game Boy. Il peut être connecté
à d’autres appareils Game Boy en utilisant la prise de connexion
EXT située à l’avant du Game Boy Player et le câble approprié.
N. B. : Cette méthode ne convient qu'au raccord d'appareils
Game Boy avec le Game Boy Player. Ne raccordez pas
plusieurs Game Boy Player en utilisant cette méthode.
Veuillez relire les modes d’emploi compris avec votre appareil
Game Boy et vos logiciels de jeu pour joueurs multiples, ainsi que
les méthodes de raccord. Le réglage d’un jeu pour joueurs
multiples peut exiger l’utilisation d’accessoires ou de câbles
additionnels.*
IMPORTANT : Assurez-vous de débrancher les appareils et
les câbles quand ils ne sont pas utilisés.
*Accessoires vendus séparément. Consultez votre détaillant
régional, ou appelez le 1 (800) 255-3700.
FONCTIONNEMENT
DE L’APPAREIL
23
24
Page 8

FONCTIONNEMENT
DE L’APPAREIL
Joueur 3
Joueur 2
Joueur 1
Joueur 4
L’illustration ci-dessus donne un exemple de la façon de
raccorder des appareils Game Boy Advance pour quatre joueurs
utilisant des câbles de raccord Game Link pour Game Boy
Advance. La fiche violette se raccorde à n’importe quel
appareil qui deviendra celui du joueur 1.
On peut effectuer des raccords similaires avec d'autres appareils
Game Boy en utilisant les accessoires appropriés (voir p. 9).
UTILISATION DU e-READER
L’accessoire e-Reader peut être inséré dans la fente pour logiciel
située à l’avant du Game Boy
Player
. Veuillez réviser le mode
d’emploi du e-Reader avant d’utiliser cet accessoire.
PROBLÈMES ET SOLUTIONS
Si vous avez des problèmes avec l’image ou le son, ou si le
contrôle manuel du Nintendo GameCube ou l’appareil Game Boy
Advance ne fonctionne pas, éteignez les appareils et vérifiez les
conditions suivantes :
• Assurez-vous que les connexions sont toutes bien
effectuées.
•
Assurez-vous que le logiciel est parfaitement inséré dans
la fente à cet effet située à l’avant du Game Boy Player.
• Vérifiez les connecteurs du logiciel pour en retirer tout
corps étranger.
• Si vous utilisez un appareil Game Boy Advance en tant
que contrôle manuel, assurez-vous qu’il n’y a pas de
logiciel inséré dans la fente.
• Pour les jeux à joueurs multiples, révisez le mode
d’emploi du jeu pour relire les renseignements sur les
caractéristiques du jeu à plusieurs, le nombre de
logiciels requis et les connexions à effectuer.
• Pour les jeux à joueurs multiples, vérifiez la compatibilité
des composants que vous utilisez. Par exemple, un
logiciel de jeu pour Game Boy Advance n’est pas
compatible avec un appareil Game Boy Color.
• Si un message d’erreur apparaît à l’écran du téléviseur,
veuillez relire le chapitre des Problèmes et solutions du
mode d’emploi du Nintendo GameCube.
N. B. : Quand vous utilisez un appareil Game Boy Advance
comme contrôle manuel, un logo du lecteur Game Boy
apparaît sur l’écran du Game Boy Advance quand vous
l’allumez. Si ce logo n’apparaît pas, éteignez l’appareil
Nintendo GameCube, vérifiez les connections et essayez
de le rallumer.
Si le lecteur Game Boy ne fonctionne toujours pas bien après
avoir essayé les solutions proposées ci-dessus, veuillez consulter
l’aire du Service à la clientèle de notre site Web à
www.nintendo.ca ou appelez le 1 (800) 255-3700.
N.B. : Ce produit Nintendo n’est pas conçu pour son
utilisation avec des accessoires non autorisés.
25 26
RENSEIGNEMENTS SUR L'ENTRETIEN
ET LA GARANTIE
Vous pourriez n’avoir besoin que de simples instructions pour corriger un problème. Vous
pouvez visiter notre site Internet à www.nintendo.com ou appeler notre Ligne sans frais
d’assistance aux consommateurs au 1 (800) 255-3700, plutôt que de retourner chez votre
détaillant. Nosheuresd’ouverturesontde6h00à19h00,heureduPacifique, sept jours sur sept
(heures sujettes à changement). Si le problème ne peut pas être résolu en consultant les
renseignements sur les problèmes et leurs solutions en ligne, ni au téléphone, on vous offrira un
service usine exprès chez Nintendo ou vous serez référé au CENTRE DE RÉPARATION AUTORISÉ
DE NINTENDO le plus près de chez vous. Veuillez n’expédier aucun produit sans avoir appelé
Nintendo au préalable.
GARANTIE SUR LES APPAREILS
Nintendo of America Inc.
défaut de matériaux ou de main-d’oeuvre pour une période de douze (12) mois suivant sa date d’achat.
Si un tel défaut couvert par la présente garantie se produit pendant cette période de garantie, Nintendo
ou un CENTRE DE RÉPARATION AUTORISÉ DE NINTENDO réparera sans frais la pièce ou le produit
défectueux. Le propriétaire or iginal ne peut profiter de la présente garantie que si la date d’achat du
produit a été enregistrée au point de vente ou si le consommateur peut prouver, à la satisfaction de
Nintendo, que le produit a été acheté dans les douze (12) derniers mois.
GARANTIE SUR LES LOGICIELS ET ACCESSOIRES
Nintendo garantit à l’acheteur original que le produit (logiciel ou accessoire) ne connaîtra aucun défaut
de matériaux ou de main-d’oeuvre pour une période de trois (3) mois suivant sa date d’achat. Si un tel
défaut couvert par la présente garantie se produit pendant cette période de trois (3) mois, Nintendo ou
un CENTRE DE RÉPARATION AUTORISÉ DE NINTENDO réparera sans frais le produit défectueux.
ENTRETIEN APRÈS ÉCHÉANCE DE LA GARANTIE
Veuillez visiter notre site internet www.nintendo.com ou appelez la Ligne d’assistance aux
consommateurs au 1 (800) 255-3700 pour trouver des renseignements sur les problèmes et solutions
ou pour trouver le CENTRE DE RÉPARATION AUTORISÉ NINTENDO le plus près de chez vous. Dans
certains cas, il peut s’avérer nécessaire d’expédier le produit, PORT PAYÉ ET ASSURÉ CONTRE
DOMMAGES ET PERTE, au centre d’entretien le plus près de chez vous. Veuillez n’expédier aucun
produit sans appeler Nintendo au préalable.
LA PRÉSENTE GARANTIE SERA NULLE SI LE PRODUIT : (a) A ÉTÉ UTILISÉ AVEC D’AUTRES
PRODUITS QUI NE SONT NI VENDUS, NI BREVETÉS PAR NINTENDO (Y COMPRIS, SANS S’Y
LIMITER, LES MÉCANISMES D’AMÉLIORATION ET DE COPIE DES JEUX, LES ADAPTATEURS ET
LES MÉCANISMES D’APPROVISIONNEMENT EN ÉLECTRICITÉ); (b) A ÉTÉ UTILISÉ À DES FINS
COMMERCIALES (Y COMPRIS LA LOCATION); (c) S’IL A ÉTÉ MODIFIÉ OU ALTÉRÉ; (d) EST
ENDOMMAGÉ À CAUSE DE NÉGLIGENCE, ACCIDENT, UTILISATION ABUSIVE OU DE TOUTES
AUTRES CAUSES QUI NE SERAIENT PAS RELIÉES À DES VICES DE MATÉRIAUX OU DE MAIND’OEUVRE; OU (e) SI SON NUMÉRO DE SÉRIE A ÉTÉ MODIFIÉ, EFFACÉ OU RENDU ILLISIBLE.
TOUTES LES GARANTIES SOUS-ENTENDUES, Y COMPRIS LES GARANTIES DE VALEUR
MARCHANDE ET D’UNE CONDITION PROPRE À SON UTILISATION DANS UN BUT PRÉCIS SONT,
PAR LES PRÉSENTES, LIMITÉES AUX PÉRIODES DE GARANTIE DÉCRITES CI-DESSUS (12
MOIS OU 3 MOIS SELON LE CAS). NINTENDO NE SERA EN AUCUN CAS TENUE RESPONSABLE
DE DOMMAGES ACCIDENTELS OU INDIRECTS RÉSULTANTD’UNE INFRACTION À TOUTE
STIPULATION EXPLICITE OU IMPLICITE DES GARANTIES. CERTAINS ÉTATS OU PROVINCES NE
PERMETTENT PAS LA LIMITATION DE LA DURÉE D’UNE GARANTIE SOUS-ENTENDUE, NI
L’EXCLUSION DES DOMMAGES ACCIDENTELS OU INDIRECTS. DANS CES CAS, LES LIMITES ET
EXCLUSIONS CI-DESSUS MENTIONNÉES NE S’APPLIQUENT PAS.
La présente garantie vous donne des droits légaux précis. Vous pouvez jouir d’autres droits qui varient
d’un État ou d’une province à l’autre.
L’adresse de Nintendo est : Nintendo of America Inc., P.O. Box 957, Redmond, WA, 98073-0957, U.S.A.
La présente garantie n’est valide qu’aux États-Unis et au Canada.
(Nintendo) garantit à l’acheteur original que l’appareil ne connaîtra aucun
LIMITES DE LA GARANTIE
REV-O
BESOIN D'AIDE AVEC L'INSTALLATION,
L'ENTRETIEN OU LE SERVICE ?
SERVICE À LA CLIENTÈLE DE NINTENDO
www.nintendo.ca
Ou appelez le 1 (800) 255-3700 LUN.-DIM.,
entre6h00et19h00,heure du Pacifique.
(Heures sujettes à changement)
Service à la clientèle ATS : 1 (800) 422-4281
BESOIN D'AIDE POUR JOUER ?
Vous pouvez visiter notre site Web à www.nintendo.com pour
obtenir de l'aide. Pour contacter la ligne informatisée d'indices et de
nouvelles, appelez la ligne de puissance de Nintendo au 1 (425) 885-
7529. Il pourrait s'agir d'un interurbain, veuillez demander la
permission à la personne responsable du compte de téléphone.
Vous préférez parler à un conseiller en jeux ?
1 (800) 521-0900
Disponible aux É.-U. et au Canada. 1,50 $ US la minute.
Veuillez avoir en main votre carte Visa ou MasterCard.
LUN.-DIM., entre6h00et19h00,heure du Pacifique.
(Heures sujettes à changement)
Les personnes âgées de moins de 18 ans doivent obtenir la
permission d'un parent avant d'appeler. (Prix sujets à changement.)
Service ATS d'assistance aux joueurs : (425) 883-9714
Ce produit de Nintendo n'est pas conçu pour son
utilisation avec des accessoires non autorisés.
27
28
Page 9

CONTENIDO
FOLLETO DE INSTRUCCIONES
DEL GAME BOY PLAYER
LEA CUIDADOSAMENTE EL FOLLETO DE PRECAUCIONES DE SALUD Y SEGURIDAD
INCLUIDO CON EL EQUIPO NINTENDO GAMECUBE Y LOS VIDEOJUEGOS ANTES DE
USAR ESTE ACCESORIO. ESTE FOLLETO CONTIENE INFORMACION DE SALUD Y
SEGURIDAD IMPORTANTE.
El sello le garantiza que este producto es
licenciado o fabricado por Nintendo.
Busque siempre este sello al comprar
sistemas de videojuego, accesorios,
juegos, y productos relacionados.
Nintendo no licencia la venta o uso de productos sin el Sello Oficial de Nintendo®.
Gracias por haber comprado el Nintendo GameCube Game
Boy Player. Este accesorio se conecta en el Nintendo
GameCube y le permite jugar cartuchos de juegos de los
sistemas Game Boy en la pantalla de su televisión, usando un
Control del Nintendo GameCube o un equipo de Game Boy
Advance como control del juego.
Antes de armar o usar este accesorio, favor de leer este
Folleto de Instrucciones, el Folleto de Precauciones de Salud
y Seguridad que viene aparte, al igual que el Folleto de
Instrucciones del Nintendo GameCube que viene incluido
con tal sistema.
TM,®yellogotipo Nintendo GameCube son marcas registradas de Nintendo.
© 2003, 2004 Nintendo. Todos Derechos Reservados.
AVISO:
Componentes
GameBoyPlayer........................... 31
Disco para Empezar (Start-Up Disc)............ 32
Armando el Sistema
Instalación del Game Boy Player...............33
Operación del Sistema
Disco para Empezar (Start-Up Disc) y Cartuchos
de Juegos de Game Boy...............34-35
Usando los Cartuchos de Juegos de Game Boy. . . . 36
Usando el Control del Nintendo GameCube...... 37
Pantalla de Menú del Game Boy Player.......37-38
Usando los Sistemas de Game Boy..........39-40
UsandoelAccesorioe-Reader.................40
ReparacióndeAverías.......................41
Información de Garantía y Servicio de
Reparación .............................42
AVISO - DAÑO A LA PANTALLA
DE TELEVISION
Unos televisores pueden ser dañados por la exposición de imágenes fijas,
debido a que la imagen podría quedarse marcada permanentemente en
la pantalla. Jugar vídeo juegos con imágenes estacionarias o diseños
fijos, o dejar los vídeo juegos en pausa, podría resultar en este tipo de
daño. Al tomar un descanso, ponga el juego en pausa y apague el
televisor hasta que esté listo para jugar nuevamente.
Antes de usar su sistema de Nintendo en cualquier televisor,
especialmente en televisores de proyección frontal o trasera,
asegúrese de revisar toda la documentación incluida con su
televisor para saber si se puede jugar vídeo juegos en este televisor
sin dañarlo.
Si tiene dudas, contacte al manufacturador del televisor. Ni Nintendo ni
sus compañías asociadas serón responsables por cualquier daño que
ocurra a su televisor.
3029
COMPONENTES
Game Boy Player
Vista
Superior
Vista
Frontal
Vista de
Lado
Derecho
Vista
Inferior
Conector al Puerto
de Velocidad Alta
(High Speed Port
Connector)
Para conectar al
Puerto de Velocidad
Alta (High Speed Port)
ubicado en la parte
inferior del
Nintendo GameCube.
Ranuras de Accesorios
Para colocar los
Accesorios de
Game Boy
Ranura de Cartuchos
de Juegos
Para introducir los
cartuchos de juegos
Conector de Extensión
Externa (EXT.)
Para conectar los
Accesorios de
Game Boy
Botón de Expulsión
de Cartuchos de
Juegos (EJECT)
Para expulsar un
cartucho de juegos del
Game Boy Player.
COMPONENTES
Game Boy Player Disco Para Empezar
(Start-up Disc)
IMPORTANTE: Favor de revisar las secciones de
Precauciones y Mantenimiento de Discos de Juego
ubicado en los Folletos de Precauciones de Salud y
Seguridad incluidos con el Nintendo GameCube y con
los juegos antes de usar este Start-Up Disc.
Tiene que insertar este Disco para Empezar (Start-up
disc) en el Nintendo GameCube para que el Game Boy
Player funcione apropiadamente. Asegúrese de
mantener este disco guardado y protegido de daño o
pérdida cuando no lo esté usando.
A
,
D
M
A
E
N
X
A
I
C
C
,
O
A
A
S
U
N
I
Y
L
N
O
E
S
U
R
O
F
)
A
S
U
(
6
0
0
-
L
O
D
N
D
L
A
T
I
N
A
M
E
R
I
C
A
D
L
-
D
O
L
-
U
G
P
E
-
U
S
.
A
O
N
L
E
D
O
M
31
Tornillos de Fijación
Para sujetar el
Game Boy Player a la
parte inferior del
Nintendo GameCube.
32
Page 10

ARMANDO EL SISTEMA OPERACIÓN DEL SISTEMA
INSTALACIÓN DEL GAME BOY PLAYER
IMPORTANTE: Favor de revisar los Folleto de Precauciones
de Salud y Seguridad incluidos por separado con el
Nintendo GameCube y con los Cartuchos de Juegos antes
de instalar al Game Boy Player.
1. Remueva cualquier Disco de Juego que esté insertado en
el Nintendo GameCube y asegúrese de que el sistema
esté apagado.
2. Remueva la cober tura del
Puerto de Alta Velocidad
(High Speed Port) ubicado
en la parte inferior del
Nintendo GameCube y
guárdela en un sitio seguro
en caso de que la necesite
en el futuro al remover el
Game Boy Player.
3. Instale el Game Boy Player
en la parte inferior del
Nintendo GameCube
insertando el Conector al
Puerto de Velocidad Alta
(High Speed Port Connector)
en el Puerto de Alta
Velocidad (High Speed Port).
4. Apriete los Tornillos de
Fijación hacia la derecha
usando un destornillador de
cabeza plana o una
moneda. No los sobre
esfuerce.
INSTALACIÓN DEL DISCO PARA EMPEZAR
(START-UP DISC) Y LOS CARTUCHOS DE
JUEGOS DE GAME BOY
1. Asegúrese de que el Nintendo GameCube esté apagado.
2. Abra la Tapa del Disco
(Disc Cover) en la parte
superior del Nintendo
GameCube e inserte el
Disco para Empezar
(Start-Up Disc). Cierre la
Tapa del Disco.
3. Con la etiqueta hacia abajo, inserte un Cartucho de
Juego de tipo Game Boy en la Ranura de Juegos en la
parte frontal del Game Boy Player.
NOTA:
Asegúrese de que
la etiqueta del
juego quede hacia
abajo.
4. Prenda el Nintendo GameCube. El televisor debe
enseñar primeramente al logotipo de Game Boy y
después a la pantalla del titulo del juego que está
jugando.
33
DESMONTAJE DEL DISCO PARA EMPEZAR
(START-UP DISC) Y EL CARTUCHO DE JUEGO
DE GAME BOY
1. Mientras el Nintendo
GameCube esté prendido,
presione el botón para Abrir
(Open) la Tapa del Disco.
NOTA: Si la Tapa del Disco se abre
después de que el Nintendo
GameCube se apague, es posible
que el Disco para Empezar (Start-Up
Disc) continúe girando. Si esto
sucede, espere hasta que el disco
pare de girar antes de removerlo de
la consola.
2. Presione el botón para soltar el
Disco (Disc Release Button) y
remueva el Disco para
Empezar (Star t-Up Disc) de la
consola.
3. Cierre la Tapa del Disco (Disc
Cover) y apague su Nintendo
GameCube.
4. Deslice el Botón de Expulsión
de Car tuchos (EJECT) hacia el
frente del Nintendo GameCube
para expulsar el Cartucho de
Juego.
NOTA: Cuando no esté usando su
Game Boy Player, mantenga
insertado un Cartucho de Juego.
Esto mantendrá su Game Boy
Player limpio y evitará
contaminación con polvo, tierra u
otra materia extraña.
34
OPERACIÓN DEL SISTEMAOPERACIÓN DEL SISTEMA
USO DE LOS CARTUCHOS DE JUEGOS DE
GAME BOY CON EL GAME BOY PLAYER
IMPORTANTE:
• Unos pocos Cartuchos de Juegos para el Game Boy
original pueden tener problemas de imagen y
sonido al jugarlos en el Game Boy Player.
• Los Cartuchos de Juegos con opciones de
inclinación (tilt), vibración (rumble) y transmisión
infrarroja (infrared transmission) no funcionarán
con el Game Boy Player.
1. Usted puede ajustar el tamaño de la pantalla en los
juegos para Game Boy y Game Boy Color al presionar los
botonesLyRenelControl de su Nintendo GameCube o
su Sistema Game Boy Advance. (Esto puede resultar en
imágenes distorsionadas o difíciles de ver). No se puede
ajustar el tamaño de la pantalla en los Cartuchos de
Juegos de Game Boy Advance.
2. Hay doce tonalidades de colores diferentes que se pueden
seleccionar con los juegos originales monocromatizados
de Game Boy. Para cambiar la paleta de colores, debe
presionar arriba, abajo, izquierda o derecha en la Palanca
de Control (Control Stick) o el Mando de Control (Control
Pad) junto con el BotónAoelBotón B (ver el tablero
abajo). Esto se debe hacer cuando el logotipo de Game
Boy aparezca en la pantalla del televisor justamente
después de prender el equipo.
PRESIONE
ARRIBA
ARRIBA + A
ARRIBA + B
ABAJO
ABAJO + A
ABAJO + B
COLOR PRESIONE COLOR
CAFE
ROJO
CAFE OSCURO
PASTEL
ANARANJADO
AMARILLO
IZQUIERDA
IZQUIERDA + A
DERECHA + B
DERECHA
DERECHA + A
DERECHA + B
AZUL
AZUL OSCURO
GRIS
VERDE
VERDE OSCURO
REVERSO
35 36
Page 11

OPERACIÓN DEL SISTEMAOPERACIÓN DEL SISTEMA
USO DEL CONTROL DEL NINTENDO GAMECUBE
Al utilizar el Control del Nintendo GameCube para jugar sus
Cartuchos de Juegos de Game Boy, lo puede colocar en cualquiera
de las Entradas para los Controles ubicadas al frente de la consola.
Mire el tablero abajo para encontrar los botones equivalentes para
controlar las funciones de los juegos de Game Boy.
Control de Nintendo GameCube
Palanca de Control (Control Stick) o
Mando de Control (Control Pad)
Botón A
Botón B
START/PAUSE (Empezar/Pausar)
Game Boy Advance
Mando de Control
(Control Pad)
Botón A
Botón B
START (Empezar)
Funciones de Otros Botones de Control
Botón Z Pantalla de Menú
Botón X
Botón Y
Botón L
Botón R
Palanca C (C Stick)
Botón Z con START/PAUSE
(Empezar/Pausar) (Presione y
manténgalos presionados juntos)
Estos botones son
programables. Vea la
sección Pantalla de
Menú en la página 38.
(opción de "Control")
Cambiar de Cartucho
de Juego (Siga las
instrucciones en la
pantalla)
Pantalla de Menú del Game Boy Player
(Vea la descripción de las opciones del menú en la página 38.)
CUADRO
TAMAÑO
CONTROL
VISUALIZACIÓN
RELOJ
AUTO-
MÁTICO
CAMBIO DE
CARTUCHO DE
JUEGO
37
PANTALLA DE MENÚ DEL GAME BOY PLAYER
Sólo puede conseguir acceso a la Pantalla de Menú al
presionar el Botón Z en el Control del Nintendo GameCube.
Cuadro Escoja de unos 20 diseños de bordes para el
(Frame) área de jugar en la pantalla.
Tam año Seleccione entre tamaño Normal y tamaño Full
(Size) (Completo) para la presentación.
Control Seleccione entre dos modos de funcionamiento
(Controller) para los botones X, Y,LyRylaPalanca C. Vea el
tablero abajo para encontrar las funciones de los
controles de juego equivalentes de Game Boy:
Arreglo 1
Arreglo 2
Control Game Boy Control Game Boy
Advance Advance
Botón
Botones X, Y
Botones X, Y
Botones X, Y
Botones X, Y
Visual- Seleccione entre Soft (suave), Normal, y Sharp
ización (definido) para calidad de presentación.
(Screen Filter)
Reloj Usted puede poner un medidor de tiempo para
Automático que le notifique con un sonido y un mensaje en
(Timer) la pantalla del televisor. Puede cancelar el medidor
Cambio de Seleccione esta opción para cambiar Cartuchos
Cartucho de Juego sin tener que apagar la consola.
de Juego También puede cambiar los Cartuchos de
(Game Pak Juegos al presionar y mantener presionados
Switch) los Botones Z y START/PAUSE (Empezar/Pausar)
IMPORTANTE: Antes de cambiar de Cartucho de Juego,
asegúrese de grabar el avance del juego, si éste tiene la
opción para hacerlo.
SELECT Botón X
Botón L
Botón R
Fuera de
Botón Y
Botones L, R
Palanca C
de tiempo al presionar el Botón B.
en el Control del GameCube.
Botón R
Botón L
Botón
SELECT
Mando de Control
38
USO DE UN SISTEMA DE GAME BOY CON
EL GAME BOY PLAYER
JUEGOS PARA UN SOLO JUGADOR
Un sistema de Game Boy Advance se puede usar como control de
juegos con el Game Boy Player al conectarlo al Nintendo GameCube
usando un cable de Nintendo GameCube Game Boy Advance. Este
cable se puede conectar a cualquier Entrada para Controles
(Controller Socket) al frente del Nintendo GameCube. El Game Boy
Advance no funcionará como Control si tiene un car tucho de juego
insertado en la ranura de juegos.
NOTA: El Conector de Extensión Externa (Ext.) ubicado al frente
del Game Boy Player no se usa con juegos para un sólo jugador.
Puede conectar un Control de Nintendo GameCube en cualquier
Entrada para Controles (Controller Socket) para conseguir acceso a la
Pantalla de Menú (ver las páginas 37-38).
NOTA: Conectar Controles adicionales y presionar botones
durante el juego puede causar interferencia debido a que todas
las Entradas para los Controles (Controller Sockets) son activas.
JUEGOS PARA VARIOS JUGADORES (MULTIPLAYER)
Con los juegos para varios jugadores (multiplayer), el Game Boy
Player se puede tratar igual que a otro sistema de Game Boy. Se
puede conectar a otros sistemas de Game Boy al usar el Conector de
Extensión Externa (Ext.), ubicado al frente del Game Boy Player, y el
cable apropiado para la conexión a otros sistemas de Game Boy.
NOTA: Este método se usa solamente para conectar sistemas de
Game Boy al Game Boy Player. No conecte sistemas Game Boy
Players múltiples utilzando dicho método.
Favor de revisar el Folleto de Instrucciones incluido con su sistema
Game Boy, y los folletos de los Cartuchos de Juegos para obtener
información sobre las opciones de juegos para varios jugadores
(multiplayer) y métodos de conexión. Puede requerir otros cables y
accesorios para empezar los juegos para varios jugadores
(multiplayer).*
IMPORTANTE: Asegúrese de desconectar los sistemas y cables
cuando no los esté usando.
* Los accesorios se venden por separado. Refiérase a su
detallista local de Nintendo, visite nuestro tienda en la red de
http://store.nintendo.com o llame al 1-800-255-3700.
OPERACIÓN DEL SISTEMAOPERACIÓN DEL SISTEMA
Player 3
Player 2
Player 1
La ilustración arriba es un ejemplo de como conectar los sistemas de
Game Boy para juegos de cuatro jugadores usando el Game Boy
Advance Link Cable. Puede conectar el enchufe morado a cualquier
sistema, y entonces tal sistema será Primer Jugador (Player 1).
Se puede hacer conexiones parecidas con otros equipos Game Boy
usando los accesorios apropiados (Ver página 39).
Player 4
USO DEL ACCESORIO E-READER
Puede insertar un Nintendo e-Reader en la Ranura de Juegos
ubicada al frente del Game Boy Player. Favor de revisar el Folleto de
Instrucciones del e-Reader antes de usar este accesorio.
39 40
Page 12

REPARACIÓN DE AVERÍAS
Si tiene problemas de imagen o sonido, o si el Control de
Nintendo GameCube o sistema Game Boy no responden,
apague el Nintendo GameCube y chequee lo siguiente:
•
Algunos juegos pueden aparecer agitados al pasar por la
pantalla del televisor. Esto se causa por una diferencia en como
presentan imágenes las pantallas de cristal líquido (LCD) y las
pantallas de televisores. Esto no es un defectoyaveces puede
ser corregido por ajustar la calidad de la imagen. (Ver página 38,
opción de "Display".)
• Asegúrese de que los enchufes estén puestos correctamente y
que queden bien apretados.
• Asegúrese de que el Cartucho de Juego esté insertado
correctamente y completamente en la Ranura de Juegos al
frente del Game Boy Player.
• Revise que los contactos del Cartucho de Juego no tienen
contaminación ni ninguna otra materia extraña.
• Si está usando un Game Boy Advance como Control para jugar,
asegúrese de no tener un cartucho de juego insertado en la
Ranura de Juegos del Game Boy Advance.
• Revise el Folleto de Instrucciones del juego que quiere jugar con
varios jugadores (multiplayer) para obtener información sobre
opciones para varios jugadores (multiplayer), número de
Cartuchos de Juegos requerido, y los cables que necesita usar.
• Para jugar con varios jugadores (multiplayer), verifique que los
componentes que va a usar son compatibles uno con el otro.
Por ejemplo, un Cartucho de Juegos de tipo Game Boy Advance
no es compatible con un sistema de Game Boy Color.
• Si un mensaje de error aparece en la pantalla de su televisor,
favor de revisar la sección de Reparación de Averías en el
Folleto de Instrucciones del Nintendo GameCube.
Nota: Al usar un sistema de Game Boy Advance como un control
de juego, aparecerá un logotipo de Game Boy Player en la
pantalla del Game Boy Advance al prenderlo (ON). Si este
logotipo no aparece, apague el Nintendo GameCube y verifique
que los cables de conexión estén bien insertados y luego
vuélvalo a prender.
Si el Game Boy Player todavía no opera correctamente después de
probar los remedios arriba listados, favor de visitar a la sección de
Customer Service en nuestro domicilio en la red de
www.nintendo.com o llame al 1-800-255-3700.
41
INFORMACIÓN SOBRE GARANTÍA
Y SERVICIO DE REPARACIÓN
Es posible que solamente necesite instrucciones sencillas para corregir un problema con su
producto. En lugar de ir a su comerciante local, visite nuestra página de Internet a
www.nintendo.com, o llame nuestra línea de Servicio al Consumidor al 1-800-255-3700. Las horas de
operación son Lunes a Domingo, de 6:00 a.m. a 7:00 p.m., Tiempo Pacífico (las horas pueden cambiar). Si
no se puede resolver el problema con la información de localización de averías disponible en el Internet o
por teléfono, le será ofrecido nuestro servicio de fábrica expreso o será dirigido a un CENTRO DE
SERVICIO AUTORIZADO DE NINTENDO más cercano. Favor de no enviar ningún producto a Nintendo sin
comunicarse con nosotros primero.
GARANTIA DEL HARDWARE
Nintendo of America Inc. ("Nintendo") garantiza al comprador original que el producto de hardware será libre
de defectos de material y fabricación por un período de doce (12) meses desde la fecha de compra. Si un
defecto cubierto bajo esta garantía ocurre durante este periodo de garantía, Nintendo o CENTRO DE
SERVICIO AUTORIZADO DE NINTENDO reparará el producto de hardware o componente defectuoso, libre
de costo. El comprador original tiene derecho a esta garantía solamente si la fecha de compra se registra al
momento de la compra o el consumidor puede demostrar, a la satisfacción de Nintendo, que el producto fue
comprado dentro de los últimos 12 meses.
GARANTIA DEL JUEGO Y ACCESORIO
Nintendo garantiza al comprador original que el producto (juegos y accesorios) será libre de defectos de
material y fabricación por un período de tres (3) meses desde la fecha de compra. Si un defecto cubierto
bajo esta garantía ocurre durante este período de tres (3) meses de garantía, Nintendo o CENTRO DE
SERVICIO AUTORIZADO DE NINTENDO reparará el componente defectuoso, libre de costo.
SERVICIO DESPUES DE LA EXPIRACION DE LA GARANTIA
Visite nuestra página de Internet a www.nintendo.com, o llame a nuestra línea de Servicio al Consumidor al
1-800-255-3700 para información de la localización de averías y/o el CENTRO DE SERVICIO
AUTORIZADO DE NINTENDO más cercano. En algunos casos, puede ser necesario que nos mande el
producto completo, EL TRANSPORTE PREPAGADO Y ASEGURADO PARA PERDIDA O DAÑO, al centro
de servicio más cercano. Favor de no mandar ningún producto a Nintendo sin comunicarse con nosotros
primero.
ESTA GARANTIA NO SE APLICARÁ SI EL PRODUCTO: (a) ESTÁ UTILIZADO CON PRODUCTOS QUE
NO SEAN VENDIDOS NI AUTORIZADO POR NINTENDO (INCLUSO, PERO NO LIMITADO A LOS
APARATOS PARA ACRECENTAR O COPIAR LOS JUEGOS, ADAPTADORES, Y ADAPTADORES DE
ELECTRICIDAD); (b) ESTÁ UTILIZADO PARA USO COMERCIAL (INCLUSO PARA ALQUILER); (c) SE
ENCUENTRA MODIFICADO O ESTROPEADO; (d) SE ENCUENTRA DAÑADO POR NEGLIGENCIA,
ACCIDENTE, USO IRRAZONABLE, O POR OTRAS CAUSAS QUE NO ESTÁN RELACIONADAS CON
MATERIALES DEFECTUOSOS O LA FABRICACION; (e) EL NUMERO DE SERIE HA SIDO MODIFICADO,
DESFIGURADO O QUITADO.
CUALQUIER GARANTIAS APLICABLES IMPLICITOS (INCLUSO, LAS GARANTÍAS DE
COMERCIABILIDAD Y LA CONVENIENCIA PARA UN OBJETIVO CONCRETO, SON POR ESTE MEDIO
LIMITADOS EN LA DURACION A LOS PERIODOS DE LA GARANTIA COMO DESCRIBEN
ANTERIORMENTE (12 MESES O 3 MESES, COMO SEA APLICABLE). EN NINGUN CASO SE
ENCUENTRA RESPONSABLE NINTENDO POR DAÑOS INDIRECTOS O ACCIDENTALES
RESULTANDO DE LA VIOLACION DE CUALQUIER GARANTIAS IMPLICITAS O EXPRESAS. ALGUNOS
ESTADOS NO PERMITEN LIMITACIONES SOBRE LA DURACION DE UNA GARANTIA IMPLICITA O LA
EXCLUSION DE LOS DAÑOS INDIRECTOS O INCIDENTALES, DE MODO QUE ES POSIBLE QUE LA
GARANTIA ANTERIORMENTE CITADA NO LE SEA APLICABLE.
Esta garantía le otorga derechos legales específicos, y es posible que tenga otros derechos los cuales
difieren de un estado a otro o de una provincia a otra.
La dirección de Nintendo es: Nintendo of America, P.O. Box 957, Redmond, WA, 98073-0957, U.S.A.
Esta garantía es valida solamente en los Estados Unidos y Canadá.
LIMITACIONES DE LA GARANTIA
42
Rev O
¿NECESITA AYUDA CON INSTALACION O SERVICIO?
¿NECESITA ORDENAR UNA PARTE O ACCESORIO?
SERVICIO AL CONSUMIDOR:
WWW.NINTENDO.COM
o llame al 1-800-255-3700
LUN. - DOM., 6:00 a.m. a 7:00 p.m.;
hora del PacÌfico
(Las horas pueden cambiar)
Número de TTY para individuos con impedimento auditivo
para Servicio al Consumidor: 800-422-4281
¿NECESITA AYUDA CON UN JUEGO?
Para ayuda con juegos, puede visitar nuestro domicilio en la
red de www.nintendo.com. Para ayuda automatizada para juegos
o para noticias, llame a la línea Power Line de Nintendo al:
Puede que este número sea para usted un número de
larga distancia. Asegúrese de tener el permiso de la persona que
Prefiere Hablar con un Consejero?
Disponible en U.S. y Canadá - $1.50 por minuto (Fondos U.S.)
Por favor tener una tarjeta de crédito Visa o MasterCard disponible
LUN. - DOM., 6:00 a.m. a 7:00 p.m.;
Menores de 18 años necesitan obtener el permiso de los padres
antes de llamar. Los precios pueden cambiar.
Número de TTY para individuos con impedimento auditivo para
recibir ayuda con los juegos: 425-883-9714
Nota: Este producto no está diseñado por uso
con accesorios no autorizados.
1-425-885-7529
paga el recibo telefónico.
1-800-521-0900
hora del Pacífico.
43
44
 Loading...