

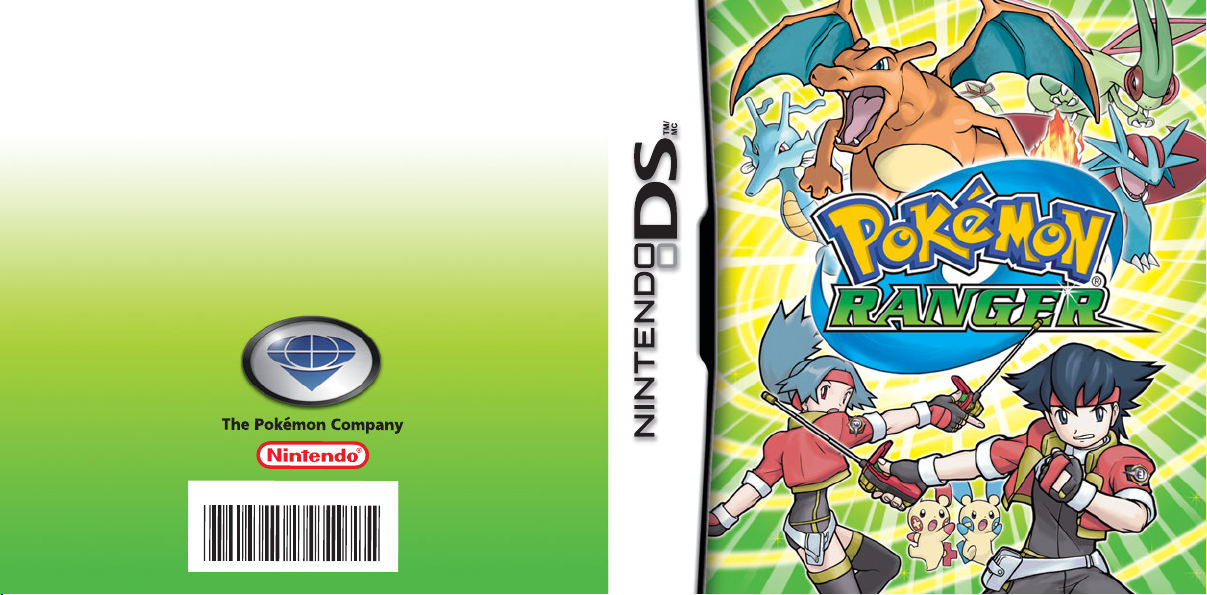
Page 1
BESOIN D’AIDE POUR L’INSTALLATION,
61317A
SERVICE À LA CLIENTÈLE DE NINTENDO
LUN.-DIM., entre 6 h 00 et 19 h 00, heure du Pacifique
Nintendo of Canada Ltd.
110 - 13480 Crestwood Place
Richmond, B.C. V6V 2J9
Canada
www.nintendo.ca
NEED HELP WITH INSTALLATION,
MAINTENANCE OR SERVICE?
NINTENDO CUSTOMER SERVICE
WWW.NINTENDO.COM
MON.-SUN., 6:00 a.m. to 7:00 p.m., Pacific Time
or call 1-800-255-3700
( Times subject to change)
L’ENTRETIEN OU LA RÉPARATION?
WWW.NINTENDO.COM
ou appelez le 1 (800) 255-3700
(Heures sujettes à changement)
PRINTED IN U.S.A. /
IMPRIMÉ AUX É.-U.
INSTRUCTION BOOKLET INSTRUCTION BOOKLET / / MODE DMODE D’EMPLOIEMPLOIINSTRUCTION BOOKLET / MODE D’EMPLOI
Page 2
AVERTISSEMENT : VEUILLEZ LIRE ATTENTIVEMENT LE MANUEL
SPÉCIFIQUE DE PRÉCAUTIONS COMPRIS AVEC CE PRODUIT, AVANT
D’UTILISER VOTRE APPAREIL NINTENDO
®
, UNE CARTE DE JEU OU
UN ACCESSOIRE. IL CONTIENT DES RENSEIGNEMENTS IMPORTANTS
CONCERNANT LA SANTÉ ET LA SÉCURITÉ.
RENSEIGNEMENTS IMPORTANTS SUR LA SÉCURITÉ – VEUILLEZ LIRE
ATTENTIVEMENT LES AVERTISSEMENTS SUIVANTS AVANT QUE
VOUS OU VOTRE ENFANT NE JOUIEZ À DES JEUX VIDÉO.
AVERTISSEMENT - Danger d’attaque
• Même si elles n’ont jamais connu de tels problèmes auparavant, certaines personnes (environ 1 sur 4 000)
peuvent, pendant qu’elles regardent la télévision ou s’amusent avec des jeux vidéo, être victimes d’une attaque
ou d’un évanouissement déclenché par des lumières ou motifs clignotants.
• Si vous avez été victime d’une telle attaque, d’une perte de conscience ou de symptômes reliés à l’épilepsie,
consultez votre médecin avant de jouer avec des jeux vidéo.
• Les parents doivent surveiller leurs enfants pendant que ces derniers jouent avec des jeux vidéo. Arrêtez de jouer
et consultez un médecin, si vous ou votre enfant présentez les symptômes suivants :
convulsions tics oculaires ou musculaires
troubles de la vue mouvements involontaires désorientation
• Pour diminuer les possibilités d’une attaque pendant le jeu :
1. Tenez-vous aussi loin que possible de l’écran.
2. Jouez sur l’écran de télévision le plus petit disponible.
3. Ne jouez pas si vous êtes fatigué ou avez besoin de sommeil.
4. Jouez dans une pièce bien éclairée.
5. Interrompez chaque heure de jeu par une pause de 10 à 15 minutes.
perte de conscience
AVERTISSEMENT - Blessures dues aux mouvements
répétitifs et tension oculaire
Après quelques heures, les jeux vidéo peuvent irriter les muscles, les poignets, la peau ou les yeux. Veuillez suivre
les instructions suivantes afin d’éviter des problèmes tels que la tendinite, le syndrome du tunnel carpien,
l’irritation de la peau ou la tension oculaire :
• Évitez les périodes trop longues de jeu. Il est recommandé aux parents de s’assurer que leurs
enfants jouent pendant des périodes adéquates.
• Même si vous ne croyez pas en avoir besoin, faites une pause de 10 à 15 minutes à chaque heure de jeu.
• Quand vous utilisez le stylus, ne le serrez pas trop fort et n’appuyez pas excessivement sur l’écran, ce qui
peut causer fatigue et inconfort.
• Si vous éprouvez fatigue ou douleur au niveau des mains, des poignets, des bras ou des yeux,
cessez de jouer et reposez-vous pendant quelques heures avant de jouer de nouveau.
• Si la douleur persiste lorsque vous reprenez le jeu, arrêtez de jouer et consultez votre médecin.
AVERTISSEMENT - Écoulement de l’acide de la batterie
Le Nintendo DS contient une batterie au lithium-ion. L’écoulement d’ingrédients contenus dans la batterie ou les
éléments combustibles des ingrédients peuvent causer des blessures personnelles et endommager votre Nintendo
DS. Dans le cas d’un écoulement de la batterie, éviter tout contact avec la peau. Dans un cas de contact, lavez
l’aire contaminée avec de l’eau savonneuse. Dans le cas de contact avec les yeux, rincez abondamment à l’eau
claire et voyez un médecin. Pour éviter l’écoulement de la batterie :
• N’exposez pas la batterie à des vibrations ou à des chocs excessifs; tenez-la au sec.
• Ne tentez pas de démonter, de réparer, ni de déformer la batterie.
• Ne disposez jamais d’une batterie dans les flammes.
• Ne touchez pas aux points de contact de la batterie, ne causez pas de court circuit en y touchant
avec un objet métallique.
• Ne retirez pas, ni n’endommagez, l’étiquette de la batterie.
AVERTISSEMENT - Interférence avec les fréquences radio
Le Nintendo DS peut émettre des ondes radio pouvant affecter le fonctionnement d’appareils électroniques
rapprochés, incluant les stimulateurs cardiaques.
• Ne pas jouer avec le Nintendo DS à moins de 9 pouces (22,9 cm) d’un stimulateur cardiaque, quand vous
utilisez sa caractéristique de jeu sans fil.
• Si vous portez un stimulateur cardiaque ou tout autre mécanisme médical implanté, ne pas utiliser
la caractéristique de jeu sans fil du Nintendo DS, avant d’avoir d’abord consulté votre médecin ou
le manufacturier du mécanisme implanté.
• Observez tous les règlements concernant l’utilisation des mécanismes sans fil dans des endroits tels
que les hôpitaux, les aéroports et à bord des avions. Leur fonctionnement dans ces endroits peut interférer
avec l’équipement ou en causer le mauvais fonctionnement, ayant pour résultat des blessures corporelles
ou des dommages matériels.
Page 3
Le sceau officiel vous assure que
ce produit est autorisé sous licence
ou fabriqué par Nintendo. Vérifiez
toujours la présence du sceau
lorsque vous achetez
des systèmes, des
accessoires, des
jeux ou tout autre
produit connexe.
Nintendo n’agrée pas la vente ou l’utilisation
de produits ne portant pas le Sceau officiel de Nintendo.
CETTE CARTE DE JEU N’EST
COMPATIBLE QU’AVEC L’APPAREIL
DE JEU VIDÉO NINTENDO DS
MC
.
Table des matièresTable des matièresTable des matières
Sur le site www.nintendo.com/games, des pages sur les jeux de Nintendo
BESOIN D’AIDE POUR JOUER?
présentent le déroulement des jeux, des foires aux questions et des codes pour
plusieurs de nos jeux. Si la réponse que vous cherchez n’y est pas, consultez nos
forums où vous pouvez échanger, en ligne, des indices avec d’autres joueurs.
Pour obtenir plus d’information sur nos forums en ligne,
visitez www.nintendo.com/community.
Si vous n’avez pas accès au site Web, vous pouvez obtenir des conseils
enregistrés pour de nombreux jeux, en utilisant la ligne de puissance
de Nintendo au (425) 885-7529. Il peut s’agir d’un interurbain, demandez donc
la permission à la personne responsable du compte de téléphone.
©2006 Pokémon. © 1995-2006 Nintendo/Creatures Inc. /GAME FREAK inc.
MC, ® ET LE LOGO DU NINTENDO DS SONT DES MARQUES DE COMMERCE DE NINTENDO. ©2006 NINTENDO.
TOUS DROITS RÉSERVÉS.
©2006 HAL Laboratory, Inc.
Commandes de base
Commencer une partie et options
L’écran du styleur de capture
Sauvegarder une partie
Capturer des Pokémon
Capturer avec l’aide de Pokémon
Compléter des cibles avec les Pokémon
Ce jeu ne peut pas être raccordé avec d’autres jeux Pokémon.
44
48
52
58
60
66
72
Page 4
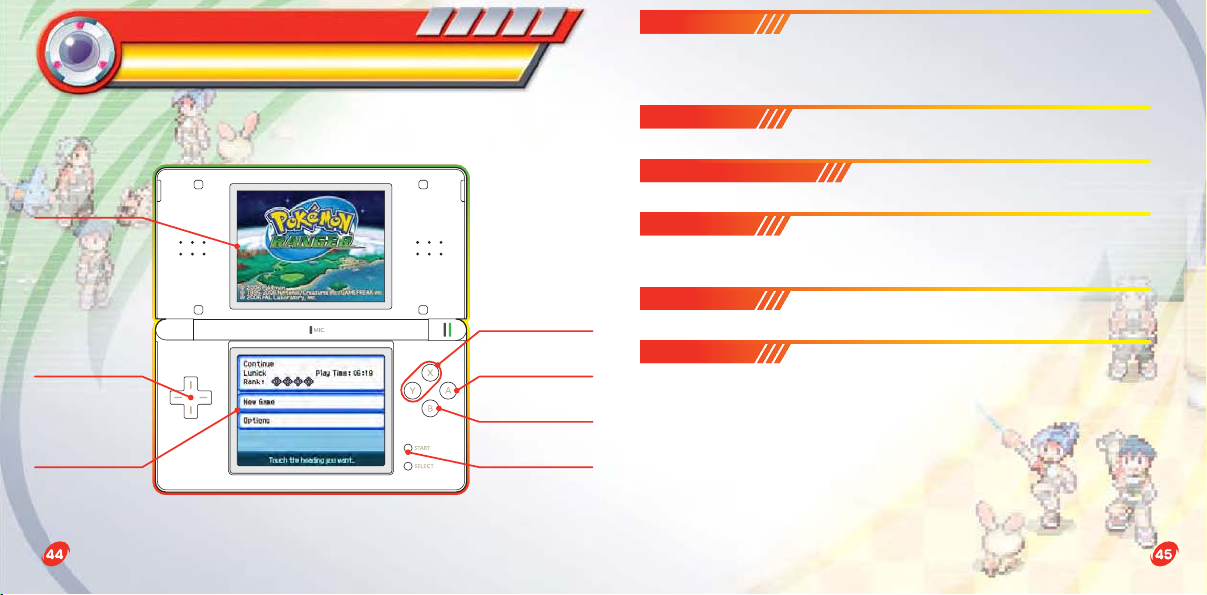
COMMANDES DE BASECOMMANDES DE BASECOMMANDES DE BASE
Des opérations de base sont faites en touchant et/ou en
glissant le stylus sur l’écran tactile.
Écran du haut
Bouton
directionnel
Écran tactile
✚
Boutons X et Y
Bouton A
Bouton B
START
Écran tactile
Touche l’écran tactile avec le stylus afin de faire marcher le héros
vers l’emplacement touché. Ceci est aussi utilisé pour parler aux
gens et pour vérifier des choses.
Boutons X et Y
Appuie pour indiquer quel Pokémon accompagne le héros.
Bouton directionnel
Appuie pour déplacer le héros.
Bouton A
Appuie pour choisir «Yes », vérifier quelque chose, parler à
quelqu’un faisant face au héros ou faire avancer le texte.
Bouton B
Appuie pour choisir « No » ou pour retourner à l’écran précédent.
START
Appuie pour accéder au menu «Capture Styler» (styleur de
capture). Appuie à nouveau afin de retourner à l’écran du terrain.
* Appuie sur START + SELECT + bouton L + bouton R afin de recommencer la
partie et de retourner à l’écran titre.
* Fermer la Nintendo DS pendant une partie la placera automatiquement en
mode de veille. Ouvrir la Nintendo DS reprendra la partie.
* SELECT, le bouton L et le bouton R ne sont pas utilisés.
* Souviens-toi de prendre une pause si tes mains deviennent fatiguées.
✚
Page 5
OPÉRATIONS DE BASE
Se déplacer
Touche le stylus sur l’écran tactile pour
déplacer le héros sur l’emplacement désiré.
Le héros peut aussi se déplacer en appuyant
sur le bouton directionnel ✚.
Faire un choix
Lorsque tu discutes avec des gens, tu
pourrais avoir à faire des choix en
répondant oui ou non. Touche l’icône «Yes»
ou «No» sur l’écran tactile pour faire ton
choix. Tu peux aussi choisir «Yes» en
appuyant sur le bouton A ou choisir «No»
en appuyant sur le bouton B.
Parler
Touche n’importe qui avec le stylus pour lui
parler (la personne peut être n’importe où à
l’écran). Tu peux aussi parler à une personne
en appuyant sur le bouton A lorsque le héros
lui fait face.
Vérifier
Touche n’importe quel Pokémon ou cible
avec le stylus pour obtenir de l’information.
(L’information accédée est illustrée sur
l’écran du haut.) Tu pourrais aussi obtenir
de l’information sur un Pokémon ou une
cible en appuyant sur le bouton A lorsque
le héros lui fait face.
Page 6
COMMENCERCOMMENCER
UNE PARTIE ET OPTIONS
UNE PARTIE ET OPTIONS
UNE PARTIE ET OPTIONS
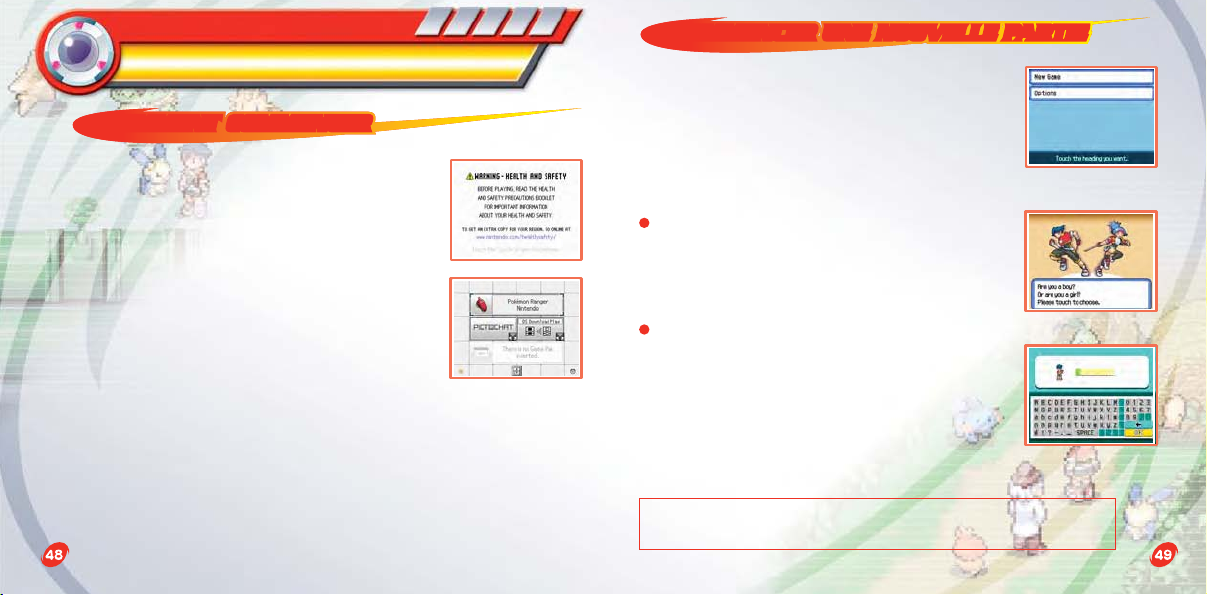
COMMENT COMMENCER
1. Assure-toi que ton appareil Nintendo DS est
éteint. Insère la carte de jeu Pokémon
Ranger dans la fente pour carte de jeu à
l’arrière de l’appareil et pousse jusqu’à ce
qu’il y ait un déclic. Allume l’appareil et
l’écran sur la santé et la sécurité apparaîtra
(tel qu’illustré à droite). Une fois que tu as lu
les informations, touche l’écran tactile.
2. Touche le panneau «Pokémon Ranger» à
l’écran de menu DS pour commencer une
partie.
* Si tu règles ton appareil DS au mode Auto, la partie débutera
automatiquement après que l’écran sur la santé et la sécurité est
illustré. Pour plus d’informations, consulte le manuel d’instructions de
ta Nintendo DS.
* Dans ce manuel d’instructions, une bordure verte entourera l’écran
du haut, alors qu’une bordure orange entourera l’écran tactile.
COMMENCER UNE NOUVELLE PARTIE
Pour commencer
* Si tu commences une nouvelle partie (New Game)
et que tu sauvegardes (Save), toutes les
données sauvegardées auparavant seront
effacées. (Tu ne seras plus capable de continuer
(Continue) en utilisant les données sauvegardées auparavant.)
Le sexe du héros
Tout d’abord, choisis le sexe du héros. Touche
le garçon ou la fille avec le stylus pour faire ta
sélection.
Nommer le héros
Une fois que l’histoire commence, on te
demandera d’entrer le nom du héros. Touche le
clavier pour entrer le nom, une lettre à la fois.
Si tu fais une erreur, touche l’icône de la flèche
à gauche pour effacer une lettre. Lorsque tu
as entré le nom, touche «OK» pour enregistrer le nom du héros.
Le sexe et le nom du héros ne peuvent pas être changés une
fois enregistrés.
Page 7

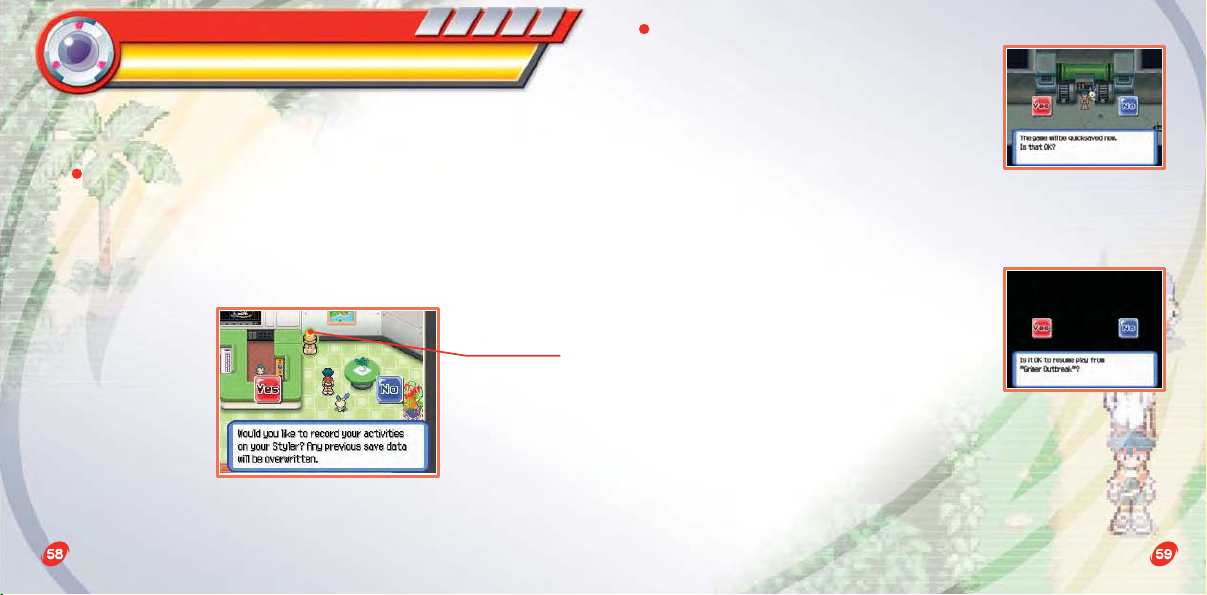
CONTINUER UNE PARTIE SAUVEGARDÉE
Touche «Continue» pour recommencer une partie
à partir du dernier endroit où tu as sauvegardé.
Lorsque tu recommences la partie de jeu en
utilisant les données sauvegardées rapidement
(Quicksave), on te donnera le choix oui ou non.
Comment sauvegarder la partie : Page 58
Comment sauvegarder rapidement la partie (Quicksave) : Page 59
CHANGER LES OPTIONS
Tu peux changer les réglages de jeu
comme la vitesse de défilement des textes.
Lorsque tu as changé les réglages aux
types désirés, touche l’icône «Back».
Vitesse de défilement du texte
Règle la vitesse de défilement du texte à
«Slow» (lent), «Mid » (moyen ) et «Fast»
(rapide).
Fenêtres
Le design des bordures autour des fenêtres
de texte peut être changé.
* Ces réglages de jeu peuvent être changés
en accédant à «Options» à l’écran de menu
avant de commencer une partie ou en
accédant «Options» à l’écran du styleur de
capture pendant une partie de jeu.
RANGER NETRANGER NETRANGER NET
Une fois que la partie est terminée, une
nouvelle sélection, appelée Ranger Net,
apparaîtra sur l’écran du menu.
Ici, tu peux jouer dans des missions
spéciales.
Page 8

L’ÉCRANL’ÉCRAN
DU STYLEUR DE CAPTURE
DU STYLEDU STYLEUR DE CAPTUREDE CAPTURE
DU STYLEUR DE CAPTURE
Lorsque le héros est sur le terrain, toucher le styleur de capture
(Capture Styler) en haut à gauche sur l’écran tactile ou appuyer
sur START, ouvre l’écran du styleur de capture. Sur cet écran, les
différentes fonctions des icônes du styleur de capture sont
illustrées. Touche l’icône de la fonction désirée pour y accéder.
Pour retourner à ta partie
de jeu, touche l’icône «Exit».
Styleur de capture
Les deux nombres sur le styleur de capture indiquent le niveau
d’énergie : le nombre du haut indique le niveau maximal d’énergie du
styleur, et le nombre du bas indique le niveau d’énergie restant.
Mission : Page 56
Carte
(Map) : Page 56
Options : Page 57
Sortie (Exit)
Libération
(Release) : Page 56
Glossaire
(Glossary) : Page 57
Navigateur
(Browser) : Page 54
Sauvegarde rapide
(Quicksave) : Page 57
L’ÉTAT DU HÉROS
Toucher le styleur de capture illustre le nom du héros et d’autres
données à l’écran du haut.
Le nom du héros
État
Le niveau du
styleur de capture
est illustré avec les
points d’exp. requis
pour augmenter
d’un niveau et le
total de points
d’exp. ramassés
sur ce niveau.
L’identification
du héros Ranger
La longueur maximale
de la ligne de capture
(Capture Line) qui peut
être dessinée pendant
une capture. (Voir Page
60 pour plus de détails
sur les captures.)
La classification
actuelle du Ranger
Page 9
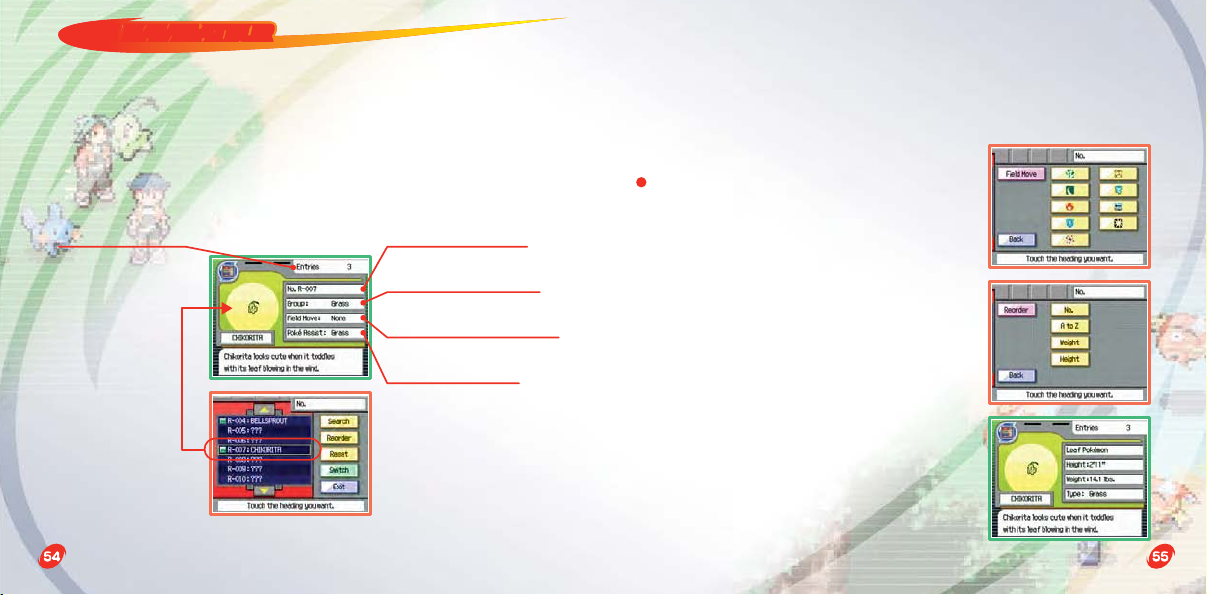
LE NAVIGATEUR
Le navigateur prend note des Pokémon capturés. Chaque genre de
Pokémon est listé avec des données comme le groupe et le mouvement
du terrain (Field Move). Les Pokémon capturés sont listés selon un
système spécial de numérotation utilisé seulement par les Rangers.
Le navigateur est mis à jour à chaque fois que de nouvelles espèces
dePokémon sont capturées. Essaie de capturer toutes les sortes de
Pokémon dans la région de Fiore pour compléter le navigateur.
Nombre d’entrées Numéro du Pokémon
Le groupe de Pokémon
Le mouvement du terrain
(Field Move) du Pokémon
L’aide Poké de
Pokémon (Page 67)
L’écran du haut illustre les données des Pokémon sélectionnés
sur l’écran tactile.
Le navigateur possède une variété de fonctions. Par exemple, il peut
illustrer deux ensembles de données sur le Pokémon sélectionné, y
compris sa grandeur, son poids et son type. Touche l’icône «Switch »
pour voir l’autre ensemble de données.
Si la liste de Pokémon a été réorganisée, elle peut revenir à sont état
original en touchant l’icône «Reset».
Fonctions du navigateur
Rechercher : Touche l’icône «Search» pour
rechercher un Pokémon avec le nom (name),
l’aide Poké (Poké Assist) ou par son
mouvement du terrain (Field Move).
Réorganiser : Touche l’icône «Reorder» afin
de réorganiser la liste de Pokémon sur
l’écran tactile par numéro du Pokémon, nom
(name ), grandeur (height) ou poids (weight ).
Pour changer la liste réorganisée à son état
original, touche l’icône «Reset».
Changer : Touche l’icône «Switch» afin de
tourner les pages des données de Pokémon
sur l’écran du haut, y compris la grandeur
et le poids.
Page 10
LIBÉRATION ( RELEASE)
Glossaire (Glossary)
Les Pokémon capturés peuvent être libérés même s’ils
n’ont pas aidé le héros avec de l’aide Poké ou un mouvement du terrain (Field Move). Un Ranger peut avoir un
nombre limite de Pokémon capturés avec lui. (Le nombre
maximal dépend de la classification du héros Ranger.) Si ce maximum est
dépassé ou si tu décides que tu n’as pas besoin de l’aide de certains
Pokémon, tu peux les libérer.
Si un Pokémon sauvage aide le héros avec de l’aide Poké ou avec un
mouvement du terrain, il sera libéré automatiquement.
Des informations sur la mission du héros sont illustrées
sur l’écran du haut. Il est possible de quitter la mission
actuelle et de retourner à la mission de la Base Ranger
en touchant l’icône «Retire»
sur l’écran tactile. (Selon la
mission, le héros pourrait ne
pas retourner à la Base
Ranger.)
Carte (Map)
Une carte de la région entière de Fiore est illustrée,
y compris les endroits que tu as visités. L’emplacement actuel du héros est indiqué par une icône.
Le glossaire fournit des détails sur les descriptions
de termes spéciaux et de phrases utilisés dans
Pokémon Ranger. On y retrouve aussi des
descriptions sur les techniques spéciales. Touche
le titre que tu veux consulter afin d’accéder à
l’information. Lorsqu’une entrée est ouverte, touche
les flèches sur l’écran tactile afin de tourner les
pages pour voir d’autres entrées du glossaire. Le
glossaire est mis à jour automatiquement à mesure
que tu progresses dans le jeu.
Sauvegarde rapide (Quicksave)
Tu peux sauvegarder rapidement ta partie
et reprendre ta partie à cet endroit.
Utiliser la sauvegarde rapide : Page 59
Les réglages du jeu peuvent être changés
de la même manière que changer les options
à la Page 50.
Page 11
SAUVEGARDER UNE PARTIESAUVEGARDER UNE PARTIE
Tu peux sauvegarder ton aventure afin de reprendre ta partie
là où tu l’as laissée.
Machine de sauvegarde
Tu peux sauvegarder ta partie en touchant n’importe quelle machine
de sauvegarde dans la Base Ranger ou sur le terrain. Tu peux
reprendre ta partie à partir de l’endroit de sauvegarde en choisissant
«Continue» la prochaine fois que tu joues.
* N’éteins pas ton appareil pendant que tu effectues la sauvegarde.
Machine de
sauvegarde
Si tu commences une nouvelle partie (New Game) et ensuite
sauvegardes, toutes les données de jeu précédentes
seront effacées et les nouvelles données les remplaceront.
(Les vieilles données «Continue» seront perdues.)
Sauvegarde rapide (Quicksave)
Touche « Quicksave » sur l'écran du styleur de
capture pour sauvegarder la partie sur-lechamp et éteindre ton appareil Nintendo DS.
Lorsque la Nintendo DS est rallumée plus tard, il
est possible de reprendre la partie en utilisant
les données sauvegardées rapidement.
* Les données sauvegardées rapidement (quicksave) ne sont pas
enregistrées par-dessus les données «Continue».
* N’éteins pas ton appareil pendant que tu effectues la sauvegarde.
La prochaine fois que tu commences à jouer à
Pokémon Ranger, on te demandera si tu veux
reprendre ta partie à partir du point où tu as
sauvegardé rapidement (quicksave). Tu peux
reprendre la partie à partir du point ou tu as
sauvegardé rapidement en touchant «Yes».
Si tu touches «No», on te demandera «The quicksave data will be
deleted. Is that OK?» (Les données de sauvegarde rapide seront
effacées. Est-ce correct?) Répondre «Yes» à cette question effacera
toutes les données sauvegardées rapidement. Les données
sauvegardées rapidement seront aussi effacées si elles sont utilisées
pour reprendre la partie de jeu.
Page 12
CAPTURER DES POKéMONCAPTURER DES POKéMON
Pokémon
CAPTURONS LES POKéMON !
«Une capture» est le processus d’apprivoiser un Pokémon sauvage
en établissant un contact émotionnel. Une fois capturé, le Pokémon
sauvage voyagera avec le héros jusqu’à ce qu’il fournisse de l’aide.
Une capture est faite en utilisant le stylus (le styleur de capture).
L’écran du bas change pour l’écran de capture lorsque le héros
entre en contact avec un Pokémon sauvage sur le terrain.
ATTENTION - Utilisation du stylus
Afin d’éviter la fatigue et des douleurs lorsque tu utilises le stylus, ne tiens pas
le stylus fermement ou n’appuie pas fortement sur l’écran. Garde tes doigts, ta
main, ton poignet et ton bras relaxes. Des coups longs, doux et réguliers
fonctionnent aussi bien que des coups courts et forts.
Disque de capture
Lorsque l’écran de capture apparaît, touche ton stylus sur le sol à
l’écran. Le disque de capture apparaîtra ; il disparaît si le stylus est
soulevé de l’écran.
Pokémon
Ligne de capture
Disque de capture
Tout en t’assurant que le stylus touche l’écran, glisse-le pour
déplacer le disque de capture. Ceci laissera une ligne de capture.
Utilise cette ligne de capture pour dessiner des cercles autour du
Pokémon sauvage que tu veux capturer.
Page 13

La ligne de capture doit former un cercle complet autour du Pokémon visé.
Nombre
Si le stylus est soulevé avant que le nombre requis de cercles ne
soient dessinés, la ligne de capture disparaîtra. Si cela se produit,
tu dois recommencer à dessiner les cercles à partir du début,
peu importe le nombre de cercles dessinés auparavant.
Lorsque le cercle est dessiné autour du Pokémon, un nombre bleu
apparaîtra au-dessus. Ce nombre indiquera combien de cercles doivent
être dessinés autour du Pokémon. Continue de dessiner des cercles sans
soulever le stylus jusqu’à ce que le nombre bleu disparaisse. Lorsque le
nombre bleu est remplacé par un nombre orange avec un « + » devant,
soulève le stylus de l’écran tactile pour compléter la capture.
Dessine le même
nombre de cercles
que le nombre bleu.
Lorsque le nombre
devient orange avec
un « + » devant,
soulève le stylus.
La capture est
complétée !
Le nombre de cercles requis pour faire une capture varie de
Pokémon en Pokémon.
Page 14

TRUCS DE CAPTURE
Lorsqu’un Ranger essaie de faire une capture, le Pokémon ciblé peut
agir de plusieurs façons différentes selon son espèce. Certains
seront effarouchés et courront partout alors que d’autres agiront
de manière agressive. Si un Pokémon ciblé touche la ligne de capture,
celle-ci se brisera. Si cela se produit, tu dois dessiner des cercles à
nouveau à partir du début même si certains cercles étaient complets.
Certains Pokémon s’enfuiront même lors d’attentats de capture.
Si un Pokémon touche la ligne de capture, la
ligne disparaît.
Si la ligne de capture touche une attaque de Pokémon, le styleur de
capture perdra de l’énergie. Si l’énergie du styleur de capture
tombe à zero, il brisera, rendant la capture de Pokémon impossible.
Dans ce cas-ci, le héros est retourné à la dernière machine de
sauvegarde ou à l’écran titre. Si l’énergie du styleur de capture est
basse, elle peut être rechargée à n’importe quelle Base Ranger ou
en utilisant certains mouvements du terrain ou des aides Poké de
Pokémon capturés.
Si une attaque de Pokémon touche la ligne de
capture, la ligne sera non seulement brisée,
mais le styleur de capture perdra de l’énergie.
Certains Pokémon s’enfuiront après un
certain temps.
Lors des captures, il ne sert à rien d'utiliser la force. Le truc
est de dessiner des cercles délicatement et rapidement. Si tes
mains deviennent fatiguées, sauvegarde rapidement la partie
et prends une pause.
Page 15

CAPTURER AVEC L’AIDE DE POKÉMONCAPTURER AVEC L’AIDE DE POKÉMONCAPTURER AVEC L’AIDE DE POKÉMON
Un Pokémon capturé voyageant avec le héros est appelé un ami
Pokémon. Il est possible d’utiliser les habiletés de ton ami Pokémon
afin de capturer un autre Pokémon. Un ami Pokémon peut utiliser
ses habiletés pour améliorer la performance du disque de capture
(une aide Poké), dotant la ligne de capture d’un pouvoir spécial.
D’autres sortes de Pokémon, comme le partenaire Pokémon (Plusle
ou Minun), peuvent vous aider de plusieurs façons. Il y a une grande
variété d’aides Poké qui changent selon les groupes de Pokémon.
Par exemple, Chikorita fait pousser l’herbe à partir de la ligne de
capture, piégeant ainsi le Pokémon ciblé.
PARTENAIRE POKéMON
Plusle et Minun peuvent utiliser leur habileté d’aide Poké de décharge pour
figer temporairement un Pokémon ciblé. Tout comme les promotions du
héros, le pouvoir de décharge de Plusle et de Minun augmentera afin de
pouvoir bien aider le héros à capturer.
Ceci indique la puissance de l’aide Poké de décharge
de Plusle ou Minun. L’énergie augmente à chaque
fois qu’un cercle est dessiné
autour d’un Pokémon ciblé.
Touche cette icône afin d’utiliser l’habileté d’aide
Poké d’un partenaire Pokémon (Plusle ou Minun)
ou d’un ami Pokémon.
Jauge de partenaire
Icône d’aide Poké
Après avoir touché Plusle ou Minun, touche l’icône
«Poké Assist» (aide Poké ). Plusle ou Minun utilisera
l’aide Poké de décharge sur le Pokémon ciblé pour
le capturer. Pour annuler l’utilisation de l’aide Poké,
touche n’importe quelle pièce au sol loin du
Pokémon sur l’écran tactile. Ensuite, touche la
flèche au coin inférieur droit de l’écran tactile
.
AIDES POKé
Tout comme Plusle ou Minun, un ami Pokémon
capturé pourrait être capable d’augmenter le
pouvoir du disque de capture. Il existe une variété
d’aides Poké. Pour utiliser une aide Poké, touche
l’icône «Poké Assist» pendant la capture. Ensuite,
touche et sélectionne l’ami Pokémon que tu veux
utiliser. Touche l’icône «Poké Assist» pour obtenir
l’aide du Pokémon choisi. Si tu choisis le mauvais
Pokémon, touche un autre Pokémon ou une autre partie du sol.
* Certains Pokémon n’ont pas l’habileté d’aide Poké.
Le Pokémon
qui t’aide
Truc d’utilisation
du stylus
Temps d’aide
Poké restant
Page 16

LES TYPES D’AIDE POKé
Herbe (Grass)
L’herbe pousse à partir de la ligne de capture.
L’herbe pourrait piéger le Pokémon ciblé.
Eau (Water)
Des bulles peuvent se former afin de piéger le
Pokémon ciblé. Pour former une bulle, touche
l’écran tactile. Plus tu touches l’écran tactile
longtemps, plus les bulles deviendront grosses.
Glisse le stylus, ensuite soulève-le pour faire
flotter un bulle dans la même direction.
Feu ( Fire)
Le feu flambe sur la ligne de capture. Lorsqu’un
cercle est dessiné, le feu fait éruption au centre,
pouvant ainsi surprendre le Pokémon ciblé, en lui
sautant dessus.
Électricité (Electric)
Le pouvoir électrique est libéré pour recharger
l’énergie du styleur de capture.
Combat (Fighting)
L’aide Poké double la performance de la ligne de
capture, alors chaque cercle en vaut deux.
Poison
Une brume empoisonnée se lève sur la ligne de
capture. La brume peut diminuer les mouvements
des Pokémon.
Psychique (Psychic)
L’aide Poké lévite le Pokémon ciblé sur-le-champ,
rendant la capture plus facile.
Microbe (Bug)
Touche l’écran, glisse le stylus, soulève-le pour
donner un petit coup sur la goutte collante. Si le
Pokémon ciblé est touché, il pourrait s’immobiliser.
Sol (Ground)
La ligne de capture remue le sol. Le Pokémon ciblé
a donc de la difficulté à marcher.
Page 17

Roche (Rock)
Touche l’écran, glisse le stylus, ensuite soulève-le
pour faire revoler les roches. Si le Pokémon ciblé
est atteint, il pourrait être immobilisé par un nuage
de poussière.
Vol (Flying )
Touche l’écran, glisse le stylus, ensuite soulève-le
pour envoyer une tornade. Si le Pokémon ciblé est
atteint, il sera lévité sur-le-champ.
Noirceur (Dark)
En retour de l’énergie du styleur de capture, la
longueur maximale de la ligne de capture est
doublée. La quantité d’énergie puisée dépend de
la quantité restante.
Fantôme (Ghost )
Lorsqu’un cercle est dessiné, un fantôme
apparaît au centre. Le fantôme peut s’accrocher
au Pokémon ciblé et l’immobiliser.
Glace (Ice)
Lorsqu’un cercle est dessiné, un morceau de
glace apparaîtra au centre. La glace peut geler
un Pokémon ciblé sur-le-champ.
UTILISER DES AIDES POKé
DE FAÇON INTELLIGENTE !
Il existe plusieurs sortes d’aide Poké.
Apprends comment elles fonctionnent dans
différentes situations. En les apprenant et
les utilisant de manière à t’avantager, ta
performance de capture sera grandement
améliorée. Assure-toi d’essayer les aides
Poké de ton Pokémon capturé !
De plus, souviens-toi que les Pokémon sont
classés par groupe. Selon le type d’aide
Poké et le groupe du Pokémon ciblé,
l’efficacité pourrait être améliorée ou
diminuée. Tu peux confirmer si une aide Poké
est plus puissante ou faible en vérifiant les
flèches qui apparaissent au-dessus du
Pokémon ciblé lorsque l’aide Poké est utilisée.
Si une flèche pointant vers le haut apparaît, la
performance de l’aide Poké sera améliorée. Si
une flèche pointant vers le bas apparaît, la
performance de l’aide Pokémon sera affaiblie.
Page 18

COMPLÉTERCOMPLÉTER
DES CIBLES AVEC LES POKéMON
DES CIBLES AVEC LES POKéMON
DES CIBLES AVEC LES POKéMON
QU’EST-CE QUE COMPLÉTER
UNE CIBLE (TARGET CLEAR ) ?
Lorsque tu fais tes tâches de Pokémon Ranger, tu pourrais rencontrer
des obstacles comme tomber d’un arbre ou un rocher géant pourrait
bloquer ton chemin. On appelle ces obstacles des cibles (targets).
Touche une cible avec ton stylus et ses données seront illustrées à
l’écran du haut.
Information
sur la cible
Cible
Ces cibles peuvent être éliminées en utilisant les
mouvements des amis Pokémon capturés. Les
mouvements des Pokémon utilisés pour enlever
des obstacles sont appelés «Field Moves»
(mouvements du terrain).
Pour enlever un obstacle, touche ton ami
Pokémon avec le stylus, ensuite, dessine une
ligne vers la cible. Si le Pokémon sélectionné et la
cible brillent de la même couleur, la cible peut
être enlevée. On te demandera si tu as besoin de
l’aide d’un Pokémon. Touche «Yes» si tu veux que
l’ami Pokémon utilise ses mouvements du terrain
pour éliminer la cible.
Le processus d’enlever un obstacle en utilisant
un mouvement du terrain d’un Pokémon est
appelé «Target Clear» (compléter des cibles).
Aussi, en plus d’éliminer des obstacles, compléter
des cibles peut aussi signifier déplacer un
obstacle en utilisant le mouvement du terrain
d’un Pokémon. Lorsqu’un ami Pokémon utilise un
mouvement du terrain pour aider le Ranger, il est
libéré automatiquement selon les règles Ranger.
Page 19

LES TYPES DE
MOUVEMENTS DU TERRAIN
Couper
(Cut)
Agripper
(Tackle )
Brûler
(Burn)
Les arbustes, clôtures et cibles similaires sont coupés.
S’agripper afin de faire bouger les arbres et déplacer
des objets lourds.
Un souffle enflammé incinère des obstacles comme une
bûche par terre ou une balle de foin.
Les sortes de mouvements du terrain et leurs pouvoirs varient selon
les espèces de Pokémon. Par exemple, alors que Torchic et Combusken
utilisent tous les deux le mouvement du terrain «Burn» (Brûler), le
mouvement du terrain de Combusken est beaucoup plus puissant que
celui de Torchic. Le pouvoir de leurs mouvements du terrain est indiqué
par une icône de feu : Torchic a une icône alors que Combusken en a deux.
Plus le Pokémon a d’icônes, plus son mouvement du terrain est puissant.
Tremper
(Soak)
Écraser
(Crush)
Recharger
(Recharge)
Rafale
(Gust)
Traverser
( Cross)
Éblouir
(Flash)
Un jet d’eau est envoyé pour éteindre un feu ou faire
pousser les vignes.
Une explosion physique qui détruit les murs et les rochers.
L’électricité est déchargée afin de recharger l’énergie
du styleur de capture.
Une rafale de vent est lancée vers la cible.
Le Pokémon attrape un poteau au lasso avec une vigne
afin de traverser des ruisseaux et des abîmes.
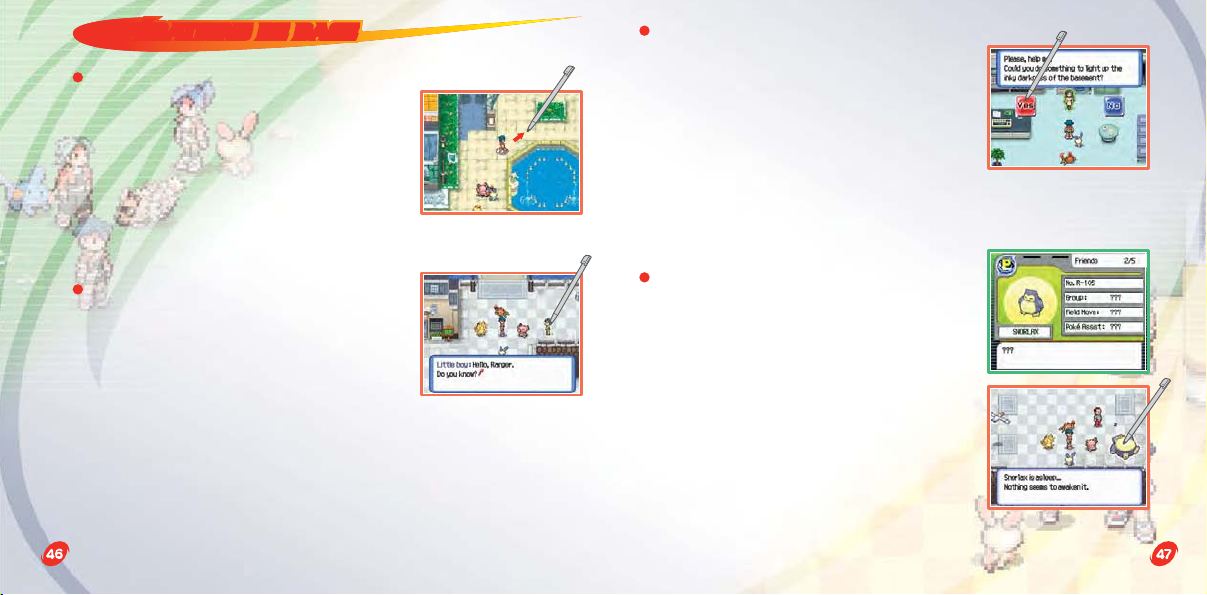
Un mouvement illuminé utilisé pour illuminer les endroits
sombres comme les sous-sols.
* Certains Pokémon n'ont pas de mouvements du terrain.
La cible a deux icônes de feu qui indiquent
le mouvement du terrain requis pour le
compléter. Dans cet exemple, seulement le
mouvement du terrain «Burn» (Brûler) de
Combusken peut compléter cette cible.
Page 20

NotesNotes
Page 21

Renseignements légaux importants
REV–D
La copie de jeux vidéo pour tous les appareils de Nintendo est un acte illégal et strictement interdit par
les lois nationales et internationales sur la propriété intellectuelle. Les copies de secours ou d’archives ne
sont pas autorisées et ne sont pas nécessaires à la protection de votre jeu. Les contrevenants seront
poursuivis en justice.
Ce jeu Nintendo n’est pas conçu pour son utilisation avec des mécanismes de copie non autorisés, ni des
accessoires non brevetés. L’utilisation de tels mécanismes annulera votre garantie de produit Nintendo.
Nintendo (et/ou tout distributeur ou agent autorisé de Nintendo) n’est pas responsable de dommages
ou perte causés par l’utilisation de tels mécanismes. Si l’utilisation d’un tel mécanisme causait le bris de
votre jeu, débranchez soigneusement l’appareil pour éviter tout dommage et initiez de nouveau le mode
normal de jeu. Si votre jeu ne fonctionne pas sans utilisation d’un tel mécanisme, veuillez contacter
votre distributeur régional autorisé de Nintendo (voir ci-dessous).
Le contenu du présent avertissement n’interfère pas avec vos droits légaux.
Le présent manuel et tout autre document imprimé accompagnant ce jeu sont également protégés au
terme des lois nationales et internationales sur la propriété intellectuelle.
Pour obtenir de plus amples renseignements ou de l’aide, veuillez contacter :
Le Service à la clientèle de Nintendo à
www.nintendo.com
ou au 1 (800) 255-3700
(aux É.-U. et au Canada)
Renseignements sur l’entretien et la garantie
Vous pourriez n’avoir besoin que de simples instructions pour corriger un problème. Vous pouvez visiter notre site Web à
www.nintendo.com ou appeler notre Ligne sans frais d’assistance aux consommateurs, au 1 (800) 255-3700, plutôt que de retourner
chez votre détaillant. Nos heures d’ouverture sont de 6 h 00 à 19 h 00, heure du Pacifique, du lundi au dimanche (heures sujettes à changement). Si le
problème ne peut pas être résolu en consultant les renseignements sur les problèmes et leurs solutions en ligne, ni au téléphone, on vous offrira un service
usine exprès chez Nintendo. Veuillez n’expédier aucun produit sans avoir appelé Nintendo au préalable.
GARANTIE SUR LES APPAREILS
Nintendo of America Inc. (Nintendo) garantit à l’acheteur original que l’appareil ne connaîtra aucun défaut de matériaux ou de main-d’oeuvre pour une
période de douze (12) mois suivant sa date d’achat. Si un tel défaut couvert par la présente garantie se produit pendant cette période de garantie, Nintendo
réparera ou remplacera sans frais la pièce ou le produit défectueux. Le propriétaire original ne peut profiter de la présente garantie que si la date d’achat du
produit a été enregistrée au point de vente ou si le consommateur peut prouver, à la satisfaction de Nintendo, que le produit a été acheté dans les douze
(12) derniers mois.
GARANTIE SUR LES JEUX ET ACCESSOIRES
Nintendo garantit à l’acheteur original que le produit (jeu ou accessoire) ne connaîtra aucun défaut de matériaux ou de main-d’oeuvre pour une période de
trois (3) mois suivant sa date d’achat. Si un tel défaut couvert par la présente garantie se produit pendant cette période de trois (3) mois, Nintendo réparera
ou remplacera sans frais le produit défectueux.
ENTRETIEN APRÈS ÉCHÉANCE DE LA GARANTIE
Veuillez visiter notre site Web, www.nintendo.com ou appeler la Ligne d’assistance aux consommateurs au 1 (800) 255-3700 pour trouver des
renseignements sur les problèmes et solutions, sur les options de réparation ou de remplacement et les prix. Dans certains cas, il peut s’avérer nécessaire
d’expédier le produit, PORT PAYÉ ET ASSURÉ CONTRE DOMMAGES ET PERTE, chez Nintendo. Veuillez n’expédier aucun produit sans appeler Nintendo au
préalable.
LIMITES DE LA GARANTIE
LA PRÉSENTE GARANTIE SERA NULLE SI LE PRODUIT : (a) A ÉTÉ UTILISÉ AVEC D’AUTRES PRODUITS QUI NE SONT NI VENDUS, NI BREVETÉS PAR NINTENDO
(Y COMPRIS, SANS S’Y LIMITER, LES MÉCANISMES D’AMÉLIORATION ET DE COPIE DES JEUX, LES ADAPTATEURS ET LES MÉCANISMES D’APPROVISIONNEMENT
EN ÉLECTRICITÉ); (b) A ÉTÉ UTILISÉ À DES FINS COMMERCIALES (Y COMPRIS LA LOCATION); (c) S’IL A ÉTÉ MODIFIÉ OU ALTÉRÉ; (d) EST ENDOMMAGÉ À CAUSE
DE NÉGLIGENCE, ACCIDENT, UTILISATION ABUSIVE OU DE TOUTES AUTRES CAUSES QUI NE SERAIENT PAS RELIÉES À DES VICES DE MATÉRIAUX OU DE MAIND’OEUVRE; OU (e) SI SON NUMÉRO DE SÉRIE A ÉTÉ MODIFIÉ, EFFACÉ OU RENDU ILLISIBLE.
TOUTES LES GARANTIES SOUS-ENTENDUES, Y COMPRIS LES GARANTIES DE VALEUR MARCHANDE ET D’UNE CONDITION PROPRE À SON UTILISATION
DANS UN BUT PRÉCIS SONT, PAR LES PRÉSENTES, LIMITÉES AUX PÉRIODES DE GARANTIE DÉCRITES CI-DESSUS (12 MOIS OU 3 MOIS SELON LE CAS). NINTENDO
NE SERA EN AUCUN CAS TENUE RESPONSABLE DE DOMMAGES ACCIDENTELS OU INDIRECTS RÉSULTANT D’UNE INFRACTION À TOUTE STIPULATION EXPLICITE
OU IMPLICITE DES GARANTIES. CERTAINS ÉTATS OU PROVINCES NE PERMETTENT PAS LA LIMITATION DE LA DURÉE D’UNE GARANTIE SOUS-ENTENDUE, NI
L’EXCLUSION DES DOMMAGES ACCIDENTELS OU INDIRECTS. DANS CES CAS, LES LIMITES ET EXCLUSIONS CI-DESSUS MENTIONNÉES NE S’APPLIQUENT PAS.
La présente garantie vous donne des droits légaux précis. Vous pouvez jouir d’autres droits qui varient d’un État ou d’une province à l’autre.
L’adresse de Nintendo est : Nintendo of America Inc., P.O. Box 957, Redmond, WA 98073-0957 U.S.A.
La présente garantie n’est valide qu’aux États-Unis et au Canada.
REV–P
Page 22

PLEASE CAREFULLY READ THE SEPARATE HEALTH AND SAFETY
PRECAUTIONS BOOKLET INCLUDED WITH THIS PRODUCT BEFORE
USING YOUR NINTENDO
®
HARDWARE SYSTEM, GAME CARD OR
ACCESSORY. THIS BOOKLET CONTAINS IMPORTANT HEALTH AND
SAFETY INFORMATION.
IMPORTANT SAFETY INFORMATION: READ THE FOLLOWING
WARNINGS BEFORE YOU OR YOUR CHILD PLAY VIDEO GAMES.
WARNING - Seizures
• Some people (about 1 in 4000) may have seizures or blackouts triggered by light flashes or patterns,
such as while watching TV or playing video games, even if they have never had a seizure before.
• Anyone who has had a seizure, loss of awareness, or other symptom linked to an epileptic condition
should consult a doctor before playing a video game.
• Parents should watch when their children play video games. Stop playing and consult a doctor if you
or your child have any of the following symptoms:
Convulsions Eye or muscle twitching Loss of awareness
Altered vision Involuntary movements Disorientation
• To reduce the likelihood of a seizure when playing video games:
1. Sit or stand as far from the screen as possible.
2. Play video games on the smallest available television screen.
3. Do not play if you are tired or need sleep.
4. Play in a well-lit room.
5. Take a 10 to 15 minute break every hour.
W
ARNING - Repetitive Motion Injuries and Eyestrain
Playing video games can make your muscles, joints, skin or eyes hurt after a few hours. Follow these
instructions to avoid problems such as tendinitis, carpal tunnel syndrome, skin irritation or eyestrain:
• Avoid excessive play. It is recommended that parents monitor their children for appropriate play.
• Take a 10 to 15 minute break every hour, even if you don't think you need it.
• When using the stylus, you do not need to grip it tightly or press it hard against the screen.
Doing so may cause fatigue or discomfort.
• If your hands, wrists, arms or eyes become tired or sore while playing, stop and rest them for
several hours before playing again.
•
If you continue to have sore hands, wrists, arms or eyes during or after play, stop playing and see
a doctor.
W
ARNING - Battery Leakage
The Nintendo DS contains a rechargeable lithium ion battery pack. Leakage of ingredients contained within
the battery pack, or the combustion products of the ingredients, can cause personal injury as well as
damage to your Nintendo DS.
If battery leakage occurs, avoid contact with skin. If contact occurs, immediately wash thoroughly with
soap and water. If liquid leaking from a battery pack comes into contact with your eyes, immediately flush
thoroughly with water and see a doctor.
To avoid battery leakage:
• Do not expose battery to excessive physical shock, vibration, or liquids.
• Do not disassemble, attempt to repair or deform the battery.
• Do not dispose of battery pack in a fire.
• Do not touch the terminals of the battery, or cause a short between the terminals with
a metal object.
• Do not peel or damage the battery label.
WARNING - Radio Frequency Interference
The Nintendo DS can emit radio waves that can affect the operation of nearby electronics, including
cardiac pacemakers.
• Do not operate the Nintendo DS within 9 inches of a pacemaker while using the wireless feature.
• If you have a pacemaker or other implanted medical device, do not use the wireless feature of the
Nintendo DS without first consulting your doctor or the manufacturer of your medical device.
• Observe and follow all regulations and rules regarding use of wireless devices in locations such as
hospitals, airports, and on board aircraft. Operation in those locations may interfere with or cause
malfunctions of equipment, with resulting injuries to persons or damage to property.
Page 23

The official seal is your assurance
that this product is licensed or
manufactured by Nintendo. Always
look for this seal when buying
video game systems,
accessories, games
and related
products.
Nintendo does not license the sale or use of products
without the Official Nintendo Seal.
THIS GAME CARD WILL WORK
ONLY WITH THE NINTENDO DS
VIDEO GAME SYSTEM.
TM
ContentsContentsContents
NEED HELP PLAYING A GAME?
Nintendo’s game pages, at www.nintendo.com/games, feature
walkthroughs, frequently-asked questions, and codes for many
of our games. If your answer isn’t there, check out our forums
where you can exchange tips with other gamers on-line.
For more information about our on-line forums,
visit www.nintendo.com/community.
If you don’t have access to the website, recorded tips for many titles
are available on Nintendo’s Power Line at (425) 885-7529.
so please ask permission from whoever pays the phone bill.
©2006 Pokémon. © 1995-2006 Nintendo/Creatures Inc. /GAME FREAK inc.
TM, ® AND THE NINTENDO DS LOGO ARE TRADEMARKS OF NINTENDO. ©2006 NINTENDO. ALL RIGHTS RESERVED.
This may be a long distance call,
©2006 HAL Laboratory, Inc.
Basic Controls
Starting the Game & Options
The Capture Styler Screen
Saving the Game
Capturing Pokémon
Capturing with a Pokémon’s Help
Clearing Targets with Pokémon
Manuel en français
This game cannot be linked with other Pokémon games.
06
10
14
20
22
28
34
40
Page 24

BASIC CONTROLSBASIC CONTROLSBASIC CONTROLS
Basic operations are performed by touching and/or sliding
the stylus on the lower Touch Screen.
Top screen
X and Y Buttons
✚
Control Pad
Touch Screen
A Button
B Button
START
Touch Screen
Touch the stylus on the Touch Screen to make the hero walk toward
the touched location. This is also used for talking to people and
checking things.
X and Y Buttons
Press to indicate which Pokémon are accompanying the hero.
✚
Control Pad
Press to move the hero.
A Button
Press to choose "Yes," check something, talk to someone in front of
the hero, or advance text.
B Button
Press to choose "No," or go back one screen.
START
Press to access the Capture Styler Menu. Press it again to return
to the field screen.
* Press START + SELECT + L + R Buttons to reset the game and return to the
title screen.
* Folding the Nintendo DS while playing will automatically put it into Sleep
Mode. Opening the Nintendo DS will resume the game.
* SELECT, L Button, and R Button are not used.
* Remember to take a break if your hands get tired.
Page 25

Moving
Touch the stylus on the Touch Screen to
make the hero move to the touched location.
The hero can also be moved by pressing the
✚ Control Pad.
Making a Choice
While conversing with people, you may be
presented with "Yes/No" choices. Touch the
“Yes” or “No” icon on the Touch Screen to
make your choice. You can also choose “Yes”
by pressing the A Button, or choose “No” by
pressing the B Button.
Talking
Touch any person with the stylus to talk with
them (the person can be anywhere on the
screen). You can also talk to a person by
pressing the A Button when the hero is
facing them.
Checking
Touch any Pokémon or a target with the
stylus to obtain information. (The accessed
information is shown on the top screen.) You
may also obtain information on a Pokémon or
a target by pressing the A Button when the
hero is facing it.
Page 26

STARTING THE GAME & OPTIONSSTARTING THE GAME & OPTIONSSTARTING THE GAME & OPTIONS
1. Make sure that the Nintendo DS system is
turned off. Insert the Pokémon Ranger Game
Card into the Game Card slot on the back of
the system and push until it clicks into place.
Turn the power on, and the Health and
Safety Screen is displayed (shown to the
right). Once you have read over the
information, touch the Touch Screen.
2. Touch the Pokémon Ranger panel on the DS
Menu Screen to start the game.
* If you set the DS system to Auto Mode, the game will automatically
start after the Health and Safety Screen is displayed. For more
information, please check the Instruction Booklet of your Nintendo DS.
* In this Instruction Booklet, a green frame surrounds the top screen
and an orange frame surrounds the Touch (lower) Screen.
Getting Started
* If you start playing a “New Game” and you
“Save,” any previously recorded game data
will be deleted. (You will no longer be able to
“Continue” using the previously saved data.)
The Hero’s Gender
First, choose the hero's gender. Touch either
the boy or the girl with the stylus to choose.
Name the Hero
Once the story starts, you will be required to
enter the hero’s name. Touch the keyboard to
enter the name one letter at a time. If you make a
mistake, touch the left arrow icon to go back one
letter. When you have entered the name, touch
“OK” to register the hero’s name.
The hero’s gender and name cannot be changed once they have
been registered.
Page 27

Touch “Continue” to resume game play from the
last place you saved the game.
When resuming game play using quicksave data,
you will be given a “Yes/No” choice.
How to save the game: Page 20
How to quicksave the game: Page 21
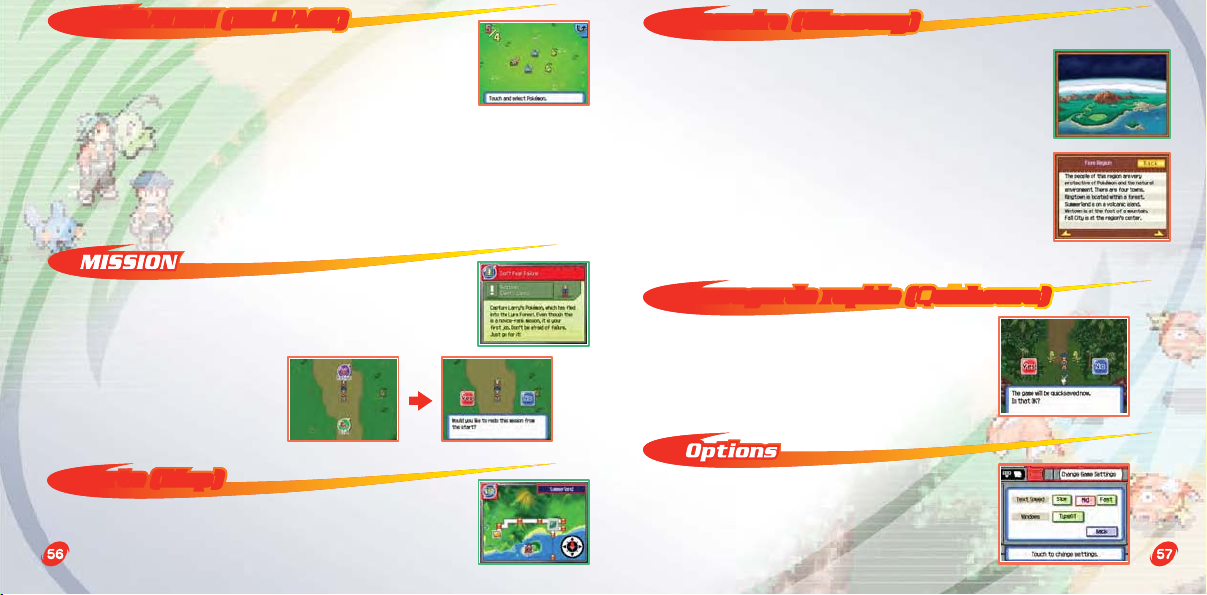
You can change game settings such as the
text speed. When you have changed the
settings to the desired types, touch the
“Back” icon.
Text Speed
Choose the text message display speed
between “Slow,” “Mid,” and “Fast.”
Windows
The design of the frames around text
windows can be changed.
* These game settings can be changed by
accessing “Options” on the menu screen
before starting the game, or by accessing
“Options” on the Capture Styler Screen
during game play.
After the game’s ending, a new selection
will appear on the menu screen called
Ranger Net.
You can play special missions here.
Page 28

THE CAPTURE STYLER SCREENTHE CAPTURE STYLER SCREENTHE CAPTURE STYLER SCREENTHE CAPTURE STYLER SCREEN
When the hero is in the field, touching the Capture Styler at the top
left of the Touch Screen or pressing START opens the Capture Styler
Screen. On this screen, icons for the Capture Styler’s various
functions are shown. Touch the desired function's icon to access it.
To return to regular game play, touch the ”Exit“ icon.
Capture Styler
The two numbers on the Capture Styler indicate its energy level:
The bottom number indicates the Styler’s maximum energy level,
and the top number shows how much energy remains.
Mission: Page 18
Release: Page 18
Touching the Capture Styler displays the hero’s name and other
related data on the top screen.
The hero’s name
The hero’s Ranger ID
Status
The Capture
Styler’s level is
shown along with
the Exp. Points
needed to level
up, and the total
Exp. Points
earned this level.
The maximum Capture
Line length that can be
drawn during a
capture (See Page 22
for more on captures.)
The current
Ranger Rank
Map: Page 18
Options: Page 19
Exit
Glossary: Page 19
Browser: Page 16
Quicksave: Page 19
Page 29

The Browser keeps records of captured Pokémon. Each kind of
Pokémon is listed with such data as its group and Field Move. The
captured Pokémon are listed according to a special numbered
system used only by Rangers.
The Browser is updated every time a new species of Pokémon is
captured. Try capturing every kind of Pokémon in the Fiore region to
complete the Browser.
Number of entries
Pokémon Number
The Browser has a variety of functions. For example, it can display
two sets of data on any selected Pokémon including its height, weight,
and type. Touch the “Switch” icon to flip between these sets of data.
If the list of Pokémon has been reordered, it can be returned to its
original state by touching the “Reset” icon.
Browser Functions
Search: Touch the “Search” icon to search
for Pokémon by name, Poké Assist, or by
their Field Move.
The Pokémon’s group
The Pokémon’s
Field Move
The Pokémon’s Poké
Assist (Page 29)
The top screen displays the data of the Pokémon selected on the
lower Touch Screen.
Reorder: Touch the “Reorder” icon to reorder
the lower screen’s list of Pokémon by their
Pokémon Number, name, height, or weight.
To return a reordered list to its original
state, touch the “Reset” icon.
Switch: Touch the “Switch” icon to flip the
pages on the upper screen’s Pokémon data
including its height and weight.
Page 30

Captured Pokémon can be released even if they have
not helped the hero with a Poké Assist or a Field Move.
A Ranger is allowed to have only so many captured
Pokémon with them. (The maximum number depends on the hero’s
Ranger Rank.) If that maximum is exceeded, or if you decide that you don’t
need the help of certain Pokémon, you may release Pokémon into the wild.
If a wild Pokémon helps the hero with a Poké Assist or a Field Move, it is
automatically released.
The hero’s ongoing mission information is shown on the
top screen. It is possible to retire from the current
mission and return to the mission’s Ranger Base by
touching the “Retire” icon on
the lower Touch Screen.
(Depending on the mission,
the hero may not be returned
to the Ranger Base.)
A map of the entire Fiore region is displayed,
including the places you have visited. The hero's
present location is indicated with an icon.
The Glossary provides detailed descriptions of
special terms and phrases used in Pokémon
Ranger. There are also descriptions of special
techniques. Touch the heading you want to check
to access information on it. When an entry is
opened, touch the arrows on the lower Touch
Screen to flip pages to other Glossary entries.
The Glossary is automatically updated as you
progress through the game.
You can quicksave your game and resume
play from that point.
Using Quicksave: Page 21
The game settings can be changed in the
same way as “Changing Options” on Page 12.
Page 31

SAVING THE GAMESAVING THE GAME
You can save your adventure so you can resume play later.
Save Machine
You can save your game by touching any Save Machine in a Ranger
Base or in the field. You can resume play from the saved spot by
choosing “Continue” the next time you play.
* Don’t turn off the power while you are saving.
Save Machine
If you start playing a “New Game” and then save, any previous game
data will be overwritten. (The old “Continue” data will be lost.)
Quicksave
Touch “Quicksave” on the Capture Styler
Screen to save the game on the spot and
shut off the Nintendo DS. When the Nintendo
DS is turned on later, it is possible to resume
play using the quicksave data.
* The quicksave data does not overwrite the
“Continue” data.
* Don’t turn off the power while you are saving.
The next time you launch Pokémon Ranger,
you will be asked if you would you like to
resume play from where you quicksaved.
You may resume play from where you last
quicksaved data by touching “Yes.” If you
were to touch “No,” you will be asked, “The
quicksave data will be deleted. Is that OK?”
Replying “Yes” to this query will delete the
quicksaved data. The quicksaved data will
also be deleted if it is used to resume
game play.
Page 32

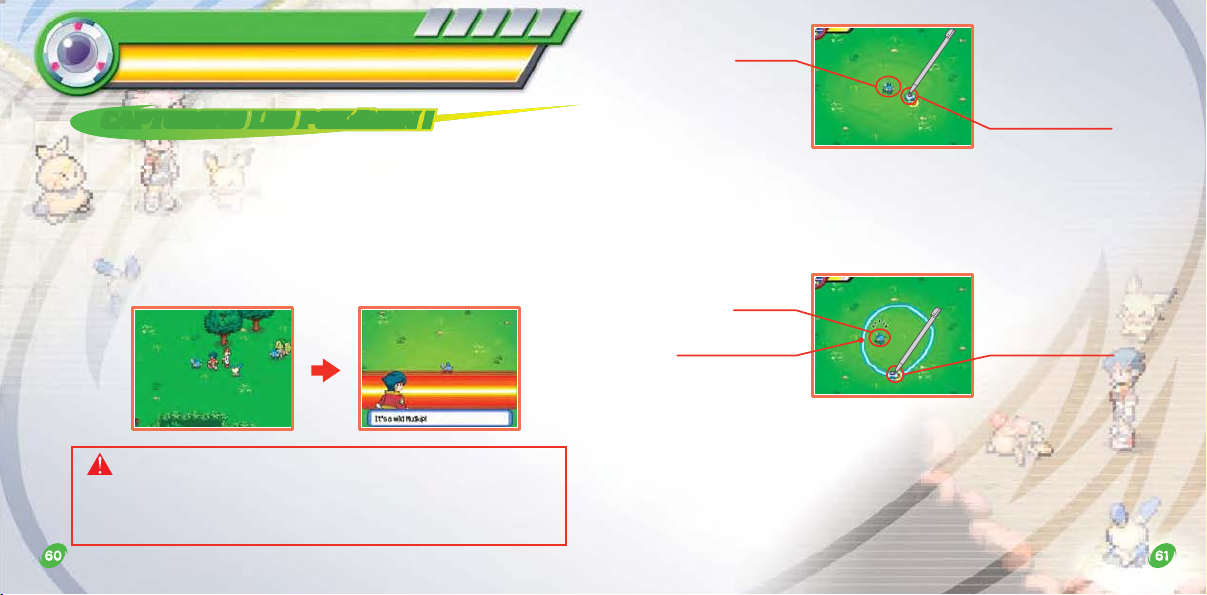
CAPTURING POKéMONCAPTURING POKéMON
“A capture” is the process of befriending a wild Pokémon by
establishing an emotional bond. Once captured, a wild Pokémon will
travel with the hero until it provides help. A capture is performed
using the stylus (the Capture Styler).
The lower screen switches to the Capture Screen when the hero
makes contact with a wild Pokémon in the field.
Pokémon
Capture Disc
When the Capture Screen appears, touch your stylus to the ground
on-screen. The Capture Disc will appear; it disappears if the stylus
is lifted from the screen.
Pokémon
CAUTION - Stylus Use
To avoid fatigue and discomfort when using the stylus, do not grip it tightly or press
it hard against the screen. Keep your fingers, hand, wrist and arm relaxed. Long,
steady, gentle strokes work just as well as many short, hard strokes.
Capture Line
Capture Disc
Keeping the stylus touching the screen, slide it to move the Capture
Disc. It will leave the Capture Line in its wake. Use the Capture Line to
draw loops around the wild Pokémon you want to capture.
Page 33

The Capture Line must form a complete loop around the targeted Pokémon.
Number
When a loop is drawn around the Pokémon, a blue number appears above
it. This number indicates how many loops must be drawn around the
Pokémon. Keep drawing loops without lifting the stylus until the blue
number disappears. When the blue number is replaced by an orange
number with “+” in front, lift the stylus from the Touch Screen to complete
the capture.
If the stylus is lifted before the required number of loops are drawn,
the Capture Line disappears. If that happens, you must begin
drawing loops from the start regardless of how many loops were
drawn before.
The number of loops required to make a capture varies from
Pokémon to Pokémon.
Draw the same number of
loops as the blue number.
When the number turns
orange with “+” in front,
lift the stylus.
Capture complete!
Page 34

When a Ranger is trying to make a capture, the targeted Pokémon
will behave in a variety of ways depending on the species. Some will
become startled and run around while others may act aggressively.
If a targeted Pokémon touches the Capture Line, the Line is broken.
If that happens, you must draw loops again from the start even if
there were completed loops. Some Pokémon will even flee during
capture attempts.
If a Pokémon touches the Capture Line, the
Line disappears.
If a Pokémon’s attack hits the Capture Line,
not only is the Line broken, the Capture Styler
loses some of its energy.
Some Pokémon will flee after a certain
amount of time.
If the Capture Line touches a Pokémon’s attack, the Capture Styler
loses some energy. If the Capture Styler’s energy drops to zero, it
will break, making it impossible to capture Pokémon. In that event,
the hero is returned to the last Save Machine used, or to the title
screen. If the Capture Styler’s energy is running low, it can be
recharged at any Ranger Base, or by using certain Field Moves or
Poké Assists of captured Pokémon.
During captures there is no need to use force. The trick is to
draw loops lightly and quickly. If your hands become tired,
quicksave the game and take a break.
Page 35

CAPTURING WITH A POKéMON’S HELPCAPTURING WITH A POKéMON’S HELPCAPTURING WITH A POKéMON’S HELP
A captured Pokémon traveling with the hero is called a friend
Pokémon. It is possible to use the abilities of friend Pokémon to
capture other Pokémon. A friend Pokémon can use its ability to
boost the performance of the Capture Disc (a Poké Assist),
endowing the Capture Line with a special power. Other kinds of
Pokémon, such as the partner Pokémon (Plusle or Minun), can
provide support in different ways. There is a large variety of Poké
Assists that vary among different Pokémon groups. For example,
Chikorita makes tall grass sprout from the Capture Line,
ensnaring the targeted Pokémon.
Plusle and Minun can use the Poké Assist ability Discharge to temporarily
stun the targeted Pokémon. In step with the hero’s promotions, the
Discharge power of Plusle and Minun will grow to support the hero in
making captures.
Partner Gauge
This indicates the power of Plusle or Minun’s
Discharge Poké Assist. It gains energy every time
a loop is drawn around a targeted Pokémon.
Poké Assist icon
Touch this icon to use the Poké Assist ability
of a partner Pokémon (Plusle or Minun) or a
friend Pokémon.
After touching Plusle or Minun, touch the
“Poké Assist” icon. Plusle or Minun will use the
Discharge Poké Assist on the Pokémon
targeted for capture. To cancel using the Poké
Assist, touch any piece of ground away from
Pokémon on the Touch Screen, then touch the
arrow at the top right of the Touch Screen.
Like Plusle or Minun, a captured friend
Pokémon may also be able to perform a Poké
Assist to boost the power of the Capture Disc.
There are a variety of Poké Assists. To use a
Poké Assist, touch the Poké Assist icon during
a capture. Then, touch and select the friend
Pokémon you want to use. Touch the “Poké
Assist” icon to get the chosen Pokémon’s help. If you choose the
wrong Pokémon, touch another Pokémon or any part of the ground.
* Some Pokémon do not have Poké Assist abilities.
The Pokémon
helping you
Stylus use tip
Remaining Poké
Assist time
Page 36

Grass
Grass sprouts from the Capture Line. The grass
may ensnare the targeted Pokémon.
Water
Bubbles can be formed to trap targeted Pokémon.
To form a bubble, touch the Touch Screen. The
longer the screen is touched, the larger the
bubble grows. Slide the stylus, then lift it to make
the bubble float in the same direction.
Fighting
This Poké Assist doubles the Capture Line’s
performance so each loop is worth two.
Poison
A poisonous mist rises from the Capture Line. The
mist can slow the movement of Pokémon.
Psychic
This Poké Assist levitates targeted Pokémon on
the spot, making them easier to capture.
Fire
Fire blazes from the Capture Line. When a loop is
drawn, fire erupts at the center that can startle
the targeted Pokémon into leaping up.
Electric
Electric power is released to recharge the
Capture Styler’s energy.
Bug
Touch the screen, slide the stylus, then lift it to
flick a sticky blob. If the targeted Pokémon is hit, it
could become immobilized.
Ground
The Capture Line churns up the ground, making it
difficult for the targeted Pokémon to walk.
Page 37

Rock
Touch the screen, slide the stylus, then lift it to
flick gravel. If the targeted Pokémon is hit, it could
become immobilized by a cloud of dust.
Flying
Touch the screen, slide the stylus, then lift it to
send out a twister. If the targeted Pokémon is hit,
it is levitated on the spot.
Dark
In return for some of the Capture Styler’s
energy, the Capture Line’s maximum length is
doubled. The amount of energy taken depends on
how much energy is remaining.
Ghost
When a loop is drawn, a ghost appears in the
center. The ghost can cling to the targeted
Pokémon and immobilize it.
Ice
When a loop is drawn, a patch of ice appears in
the center. The ice can freeze targeted Pokémon
on the spot.
There are many kinds of Poké Assists. Learn
how they work in various situations. By
doing so and using them to your best
advantage, your capturing performance will
be vastly enhanced. Be sure to try out the
Poké Assists of your captured Pokémon!
Also, remember that Pokémon are classified
in groups. Depending on the Poké Assist’s
type and the targeted Pokémon’s group, its
effectiveness could be boosted or
diminished. You can confirm if a Poké Assist is
more powerful or weaker by checking an
arrow that may appear above the targeted
Pokémon when the Poké Assist is used. If an
upward-pointing arrow appears, the Poké
Assist’s performance is boosted. If a
downward-pointing arrow appears, the
Poké Assist’s performance is weakened.
Page 38

CLEARING TARGETS WITH POKéMONCLEARING TARGETS WITH POKéMONCLEARING TARGETS WITH POKéMON
While performing your duties as a Pokémon Ranger, you may come
across obstacles such as fallen trees and giant boulders that block
your path. Such obstacles are referred to as “targets.” Touch a target
with the stylus, and its data is displayed on the upper screen.
Target info
Target
These targets can be eliminated using the moves
of captured friend Pokémon. The moves of
Pokémon used to remove obstacles are called
“Field Moves.”
To remove an obstacle, touch a friend Pokémon
with the stylus, then draw a line to the target. If
the selected Pokémon and the target glow in the
same colour, the target can be removed. You will
be asked if you require the chosen Pokémon’s
help. Touch “Yes” if you want the friend Pokémon
to use its Field Move to eliminate the target.
The process of removing an obstacle using a
Pokémon’s Field Move is called a “Target Clear.”
Also, in addition to eliminating obstacles, a Target
Clear can also involve moving an obstacle using a
Pokémon’s Field Move. When a friend Pokémon
uses a Field Move to help the Ranger, it is
automatically released into the wild in
accordance with Ranger rules.
Page 39

Cut
Tackle
Shrubs, fences, and similar targets are cut down.
A tackle is thrown to shake trees and move heavy objects.
The kinds of Field Moves and their power vary between Pokémon
species. For example, while Torchic and Combusken both use the Field
Move Burn, Combusken’s Field Move is much more powerful than
Torchic’s. The power of their Field Moves is indicated by a fire icon:
Torchic has one icon, and Combusken has two. The more fire icons a
Pokémon has, the more powerful its Burn Field Move.
Burn
Soak
Crush
Recharge
Gust
Cross
Flash
A fiery breath incinerates an obstacle like a fallen log or
bundled hay.
A spray of water is loosed to put out a fire or make
vines grow.
A physical blow for destroying walls and smashing boulders.
Electricity is discharged to recharge the Capture
Styler’s energy.
A gust of wind is directed at the target.
The Pokémon lassos a post with a vine to get across
streams and chasms.
An illuminating move used for lighting up dark places
like basements.
* Some Pokémon do not have any Field Moves.
This target has two fire icons that indicate
the power of the Field Move needed to clear
it. In this example, only Combusken’s Burn
Field Move can clear this target.
Page 40

Important Legal Information
REV–D
Copying of any video game for any Nintendo system is illegal and is strictly prohibited by domestic
and international intellectual property laws. “Back-up” or “archival” copies are not authorized and
are not necessary to protect your software. Violators will be prosecuted.
This video game is not designed for use with any unauthorized copying device or any unlicensed
accessory. Use of any such device will invalidate your Nintendo product warranty. Nintendo (and/or
any Nintendo licensee or distributor) is not responsible for any damage or loss caused by the use of
any such device. If use of such device causes your game to stop operating, disconnect the device
carefully to avoid damage and resume normal game play.
If your game ceases to operate and you have no device attached to it, please contact Nintendo
Customer Service (see below).
The contents of this notice do not interfere with your statutory rights.
This booklet and other printed materials accompanying this game are protected by domestic and
international intellectual property laws.
For further information or assistance, please contact:
Nintendo Consumer Service
www.nintendo.com
or call 1-800-255-3700
(U.S. and Canada)
Warranty & Service Information
You may need only simple instructions to correct a problem with your product. Try our website at www.nintendo.com or call
our Consumer Assistance Hotline at 1-800-255-3700, rather than going to your retailer. Hours of operation are 6 a.m. to 7 p.m.,
Pacific Time, Monday - Sunday (times subject to change). If the problem cannot be solved with the troubleshooting information available online or
over the telephone, you will be offered express factory service through Nintendo. Please do not send any products to Nintendo without contacting
us first.
HARDWARE WARRANTY
Nintendo of America Inc. ("Nintendo") warrants to the original purchaser that the hardware product shall be free from defects in material and
workmanship for twelve (12) months from the date of purchase. If a defect covered by this warranty occurs during this warranty period, Nintendo
will repair or replace the defective hardware product or component, free of charge. The original purchaser is entitled to this warranty only if the date
of purchase is registered at point of sale or the consumer can demonstrate, to Nintendo's satisfaction, that the product was purchased within the last
12 months.
GAME & ACCESSORY WARRANTY
Nintendo warrants to the original purchaser that the product (games and accessories) shall be free from defects in material and workmanship for a
period of three (3) months from the date of purchase. If a defect covered by this warranty occurs during this three (3) month warranty period,
Nintendo will repair or replace the defective product, free of charge.
SERVICE AFTER EXPIRATION OF WARRANTY
Please try our website at www.nintendo.com or call the Consumer Assistance Hotline at 1-800-255-3700 for troubleshooting information and repair or
replacement options and pricing. In some instances, it may be necessary for you to ship the complete product, FREIGHT PREPAID AND INSURED FOR
LOSS OR DAMAGE, to Nintendo. Please do not send any products to Nintendo without contacting us first.
WARRANTY LIMITATIONS
THIS WARRANTY SHALL NOT APPLY IF THIS PRODUCT: (a) IS USED WITH PRODUCTS NOT SOLD OR LICENSED BY NINTENDO (INCLUDING, BUT NOT
LIMITED TO, NON-LICENSED GAME ENHANCEMENT AND COPIER DEVICES, ADAPTERS, AND POWER SUPPLIES); (b) IS USED FOR COMMERCIAL PURPOSES
(INCLUDING RENTAL); (c) IS MODIFIED OR TAMPERED WITH; (d) IS DAMAGED BY NEGLIGENCE, ACCIDENT, UNREASONABLE USE, OR BY OTHER CAUSES
UNRELATED TO DEFECTIVE MATERIALS OR WORKMANSHIP; OR (e) HAS HAD THE SERIAL NUMBER ALTERED, DEFACED OR REMOVED.
ANY APPLICABLE IMPLIED WARRANTIES, INCLUDING WARRANTIES OF MERCHANTABILITY AND FITNESS FOR A PARTICULAR PURPOSE, ARE
HEREBY LIMITED IN DURATION TO THE WARRANTY PERIODS DESCRIBED ABOVE (12 MONTHS OR 3 MONTHS, AS APPLICABLE). IN NO EVENT SHALL
NINTENDO BE LIABLE FOR CONSEQUENTIAL OR INCIDENTAL DAMAGES RESULTING FROM THE BREACH OF ANY IMPLIED OR EXPRESS WARRANTIES.
SOME STATES DO NOT ALLOW LIMITATIONS ON HOW LONG AN IMPLIED WARRANTY LASTS OR EXCLUSION OF CONSEQUENTIAL OR INCIDENTAL
DAMAGES, SO THE ABOVE LIMITATIONS MAY NOT APPLY TO YOU.
This warranty gives you specific legal rights. You may also have other rights which vary from state to state or province to province.
Nintendo's address is: Nintendo of America Inc., P.O. Box 957, Redmond, WA 98073-0957 U.S.A.
This warranty is only valid in the United States and Canada.
REV–P
 Loading...