

Page 1
Thank you for selecting the Nintendo DS™ Lite system.
Merci d’avoir choisi la Nintendo DS™ Lite.
TM, ® AND THE NINTENDO DS LOGO ARE TRADEMARKS OF NINTENDO. ALL RIGHTS RESERVED.
TM, ® ET LE LOGO NINTENDO DS SONT DES MARQUES DE NINTENDO. TOUS DROITS RESERVES.
© 2007 NINTENDO.
WARNING: PLEASE CAREFULLY READ THE SEPARATE HEALTH AND SAFETY PRECAUTIONS BOOKLET
INCLUDED WITH THIS PRODUCT BEFORE USING YOUR NINTENDO
®
HARDWARE SYSTEM, GAME CARD OR
ACCESSORY. THIS BOOKLET CONTAINS IMPORTANT HEALTH AND SAFETY INFORMATION. PLEASE KEEP
THIS BOOK FOR FUTURE REFERENCE.
WARNUNG: BITTE LIES VOR INBETRIEBNAHME DIESES PRODUKTES UNBEDINGT DIE GESUNDHEITS- UND
SICHERHEITSHINWEISE, DIE DEM NINTENDO DS LITE SOWIE DER NINTENDO DS-KARTE UND DEM ZUBEHÖR
BEIGELEGT SIND, SEHR SORGFÄLTIG DURCH. DIESE ANLEITUNG ENTHÄLT WICHTIGE GESUNDHEITS- UND
SICHERHEITSVORSCHRIFTEN. HEBE DIESE ANLEITUNG ZUM NACHSCHLAGEN GUT AUF.
ATTENTION: VEUILLEZ LIRE ATTENTIVEMENT LE LIVRET DE PRECAUTIONS SUR LA SANTE ET LA SECURITE
SEPARE QUI ACCOMPAGNE LE PRODUIT NINTENDO
®
, LA CARTE DE JEU OU LES ACCESSOIRES AVANT DE
LES UTILISER. IL CONTIENT DES INFORMATIONS IMPORTANTES SUR LA SANTE ET LA SECURITE. GARDEZ
ENSUITE CE MANUEL POUR VOUS Y REFERER PLUS TARD.
English . . . . . . . . . . . . . . . . . . . . . . . . . . 4
Deutsch . . . . . . . . . . . . . . . . . . . . . . . . . 32
Français . . . . . . . . . . . . . . . . . . . . . . . . . 62
CONTENTS / SOMMAIRE
[0206/FUG/USG-HW]
This seal is your assurance that
Nintendo has reviewed this
product and that it has
met our standards for
excellence in workmanship, reliability and
entertainment value.
Always look for this
seal when buying games
and accessories to ensure
complete compatibility
with your Nintendo Product.
Ce sceau est votre assurance
que Nintendo a approuvé
ce produit et qu’il est
conforme aux normes
d’excellence en matière
de fabrication, de
fiabilité et surtout,
de qualité. Recherchez
ce sceau lorsque vous
achetez des jeux ou des
accessoires pour assurer
une totale compatibilité
avec vos produits Nintendo.
THIS PRODUCT USES THE LC FONT BY SHARP CORPORATION, EXCEPT SOME CHARACTERS.
LCFONT, LC FONT AND THE LC LOGO MARK ARE TRADEMARKS OF SHARP CORPORATION.
CE PRODUIT UTILISE LA FONTE LC DE SHARP CORPORATION, A L’EXCEPTION DE CERTAINS
CARACTERES. LCFONT, LC FONTET LE LOGO LC SONTDES MARQUES DE SHARP CORPORATION.
NINTENDO DS LITE INCLUDES RSA BSAFE CRYPTOGRAPHIC SOFTWARE FROM RSA SECURITY
INC. RSA IS A REGISTERED TRADEMARK OF RSA SECURITY INC. BSAFE IS A REGISTERED
TRADEMARK OF RSA SECURITY INC. IN THE UNITED STATES AND /OR OTHER COUNTRIES.
© 2005 RSA SECURITY INC. ALL RIGHTS RESERVED.
LA NINTENDO DS LITE INCLUT LE LOGICIEL RSA BSAFE CRYPTOGRAPHIC DE RSA SECURITY
INC. RSA EST UNE MARQUE DÉPOSÉE DE RSA SECURITY INC. BSAFE EST UNE MARQUE
DÉPOSÉE DE RSA SECURITY INC. AUX E.U. ET/ OU AUTRES PAYS. © 2005 RSA SECURITY INC.
TOUS DROITS RÉSERVÉS.
USG_HW_Man_EUR_A3 30.07.2007 17:05 Uhr Seite 2
COPY
Page 2
1
Health and Safety Precautions
54
Table of Contents
1 Health and Safety Precautions . . . . . . . . . . . . . . . . . . . . . . . . . . . . . . . . . . . . . . . . . . . . . . . 5
2 Nintendo DS Lite Components . . . . . . . . . . . . . . . . . . . . . . . . . . . . . . . . . . . . . . . . . . . . . . 8
3 Charging the Nintendo DS Lite Rechargeable Battery Pak (USG-003) . . . . . . . . . . . . . . 10
4 Replacing and Disposing of the Nintendo DS Lite Rechargeable Battery Pak . . . . . . . . 12
5 Using the Nintendo DS Lite Stylus (USG-004) and Touch Screen . . . . . . . . . . . . . . . . . . . 13
6 Privacy Information . . . . . . . . . . . . . . . . . . . . . . . . . . . . . . . . . . . . . . . . . . . . . . . . . . . . . . . . 14
7 System Setup . . . . . . . . . . . . . . . . . . . . . . . . . . . . . . . . . . . . . . . . . . . . . . . . . . . . . . . . . . . . . 15
8 Nintendo DS Menu Screen . . . . . . . . . . . . . . . . . . . . . . . . . . . . . . . . . . . . . . . . . . . . . . . . . . 16
9 Using Nintendo DS Game Cards (NTR-005) . . . . . . . . . . . . . . . . . . . . . . . . . . . . . . . . . . . . 17
10 Using Game Boy Advance Game Paks (AGB-002) . . . . . . . . . . . . . . . . . . . . . . . . . . . . . . . 18
11 Wireless Communication and Game Play Modes . . . . . . . . . . . . . . . . . . . . . . . . . . . . . . . 19
12 PictoChat™ . . . . . . . . . . . . . . . . . . . . . . . . . . . . . . . . . . . . . . . . . . . . . . . . . . . . . . . . . . . . . . 21
13 Using the On-Screen Keyboard . . . . . . . . . . . . . . . . . . . . . . . . . . . . . . . . . . . . . . . . . . . . . . 23
14 Settings Menu – Changing System Settings . . . . . . . . . . . . . . . . . . . . . . . . . . . . . . . . . . . . 24
15 Nintendo Wi-Fi Connection . . . . . . . . . . . . . . . . . . . . . . . . . . . . . . . . . . . . . . . . . . . . . . . . . 28
16 Troubleshooting . . . . . . . . . . . . . . . . . . . . . . . . . . . . . . . . . . . . . . . . . . . . . . . . . . . . . . . . . . . 29
17 Disposal of this Product at the End of its Life . . . . . . . . . . . . . . . . . . . . . . . . . . . . . . . . . . 31
IMPORTANT SAFETY INFORMATION – READ THE FOLLOWING WARNINGS BEFORE YOU OR
YOUR CHILD PLAY VIDEO GAMES. IF THIS PRODUCT IS TO BE USED BY YOUNG CHILDREN,
THIS MANUAL SHOULD BE READ AND EXPLAINED TO THEM BY AN ADULT. FAILING TO DO
SO MAY CAUSE INJURY.
Some people (about 1 in 4000) may have seizures or blackouts triggered by light flashes or patterns,
such as while watching TV or playing video games, even if they have never had a seizure before.
Anyone who has had a seizure, loss of awareness, or other symptom linked to an epileptic condition
should consult a doctor before playing a video game.
Parents should watch when their children play video games. Stop playing and consult a doctor if you
or your child have any of the following symptoms: Convulsions, Eye or muscle twitching, Loss of
awareness, Altered vision, Involuntary movements, Disorientation.
To reduce the likelihood of a seizure when playing video games:
1. Sit or stand as far from the screen as possible.
2. Play video games on the smallest available television screen.
3. Do not play if you are tired or need sleep.
4. Play in a well-lit room.
5. Take a 10 to 15 minute break every hour.
Playing video games can make your muscles, joints, skin or eyes hurt after a few hours. Follow
these instructions to avoid problems such as tendinitis, carpal tunnel syndrome, skin irritation or
eyestrain:
• Avoid excessive play. It is recommended that parents monitor their children for appropriate play.
• Take a 10 to 15 minute break every hour, even if you don’t think you need it.
• When using the Nintendo DS Lite Stylus, you do not need to grip it tightly or press it hard against
the screen. Doing so may cause fatigue or discomfort.
• If your hands, wrists, arms or eyes become tired or sore while playing, stop and rest them for
several hours before playing again.
• If you continue to have sore hands, wrists, arms or eyes during or after play, stop playing and
see a doctor.
▲
! WARNING – REPETITIVE MOTION INJURIES AND EYESTRAIN
▲
! WARNING – SEIZURES
IMPORTANT: Compatibility with Game Boy Games & Accessories
The Nintendo DS Lite (USG-001) will NOT work with the following games or accessories:
• Original Game Boy™ Game Paks (DMG-09)
• Game Boy™ Color Game Paks (CGB-002)
• Universal Game Link™ cable (CGB-003) andGame BoyAdvance Game Link™ cable (AGB-005)
• Game Boy Advance™ Wireless Adapter (AGB-015)
• Game Boy™ micro Wireless Adapter (OXY-004)
• Game Boy™ micro Game Link™ cable (OXY-008(EUR))
• NINTENDO GAMECUBE™ Game Boy Advance™ cable (DOL-011)
• Game Boy™ camera (MGB-006)
• Game Boy™ printer (MGB-007)
The Nintendo DS Lite is compatible with Game Boy Advance Game Paks (AGB-002) in
Single-Player Mode.
USG_HW_Man_EUR_A3 30.07.2007 17:05 Uhr Seite 4
COPY
Page 3

76
The Nintendo DS Lite contains a Lithium Ion Rechargeable Battery Pak. Leakage of ingredients
contained within or combustion of the Lithium Ion Battery can cause personal injury as well as
damage to your Nintendo DS Lite.
If battery leakage occurs, avoid contact with skin. If contact occurs, immediately wash thoroughly
with soap and water. If liquid leaking from a battery comes into contact with your eyes, immediately
flush thoroughly with water and see a doctor.
To avoid battery leakage, combustion and explosion:
• Do not expose the battery to excessive physical shock or vibration.
• Do not disassemble, attempt to repair or deform the battery.
• The Lithium Ion Battery must not be short circuited. Do not touch the terminals of the battery
with any foreign materials or a metal object.
• Do not expose the battery to heat or dispose of in a fire.
• Do not peel or damage the battery label.
• Do not use a battery if the plastic cover has been torn or compromised in any way.
• Do not insert or remove battery while the power is on.
• The Nintendo DS Lite Rechargeable Battery Pak is only to be recharged under adult supervision.
• When recharging the Nintendo DS Lite Battery Pak, only use the Nintendo DS Lite Power Supply
included with this system.
• Use the Nintendo DS Lite Rechargeable Battery Pak only for the Nintendo DS Lite system.
• The battery is to be removed from the Nintendo DS Lite before disposing of the unit.
• Do not submerge the battery, wet it with water or any other liquid.
• In case of inappropriate handling of the Lithium Ion Battery (e.g. during replacement of the battery)
there could be a risk of combustion or explosion. The battery must not be deformed, crushed,
pierced or exposed to temperatures above 60 degrees Celsius. Furthermore, do not allow a metal
object to touch the terminals of the battery. Do not use any battery other than the Nintendo DS
Lite Rechargeable Battery Pak (USG-003). There could be a risk of fire or explosion if you use
another type of battery.
Do not remove the Rechargeable Battery Pak from the Nintendo DS Lite unless it needs to be
replaced.
For information on how to remove the Battery Pak please refer to the instructions on page 12. When
disposing of the Battery Pak, please refer to the “Battery Disposal” information on page 12.
If liquid comes into contact with the Battery Pak, do not reuse it.
Replacement Battery Paks are sold separately. Please contact your Nintendo Service Centre for further
information on where to purchase a replacement. If you do not want to replace the Battery Pak on
your own, you may send your Nintendo DS Lite to the Nintendo Service Centre to have the Battery
Pak exchanged by an authorised technician.
▲
! WARNING – BATTERY LEAKAGE
The Nintendo DS Lite can emitradio waves that can affect the operation of nearbyelectronics, including
cardiac pacemakers.
• Do not operate the Nintendo DS Lite within 25 centimetres (10 inches) of a pacemaker while using
the wireless feature.
• If you have a pacemaker or other implanted medical device, do not use the wireless feature of the
Nintendo DS Lite without first consulting your doctor or the manufacturer of your medical device.
Operation of the Nintendo DS Lite when it is NOT in Wireless Mode, may be allowed on board aeroplane, in hospitals, and in airports just like any other non-wireless device would be. You will know
when your Nintendo DS Lite is in Wireless Mode when the Power Indicator LED (green or red) rapidly
blinks to indicate that wireless communication is in progress. The Power Indicator LED will blink
rapidly when you are in PictoChat™, playing any game in Multi-player Mode, or downloading a
game to another unit.
Observe and follow all regulations and rules regarding the use of wireless devices in locations such
as hospitals, airports, or on board aeroplane. In order to comply with airline regulations, do not use
PictoChat, or play the Multi-player Modes of Nintendo DS games while on board an aeroplane.
Operation in these locations may interfere with or cause malfunctions of equipment, with resulting
injuries to persons or damage to property.
This product is a complex electronic device that can be damaged by direct physical impact.
A protective carrying case (sold separately) may help prevent problems related to impact damage.
Refer to the separate Nintendo DS Health and Safety Precautions Booklet for additional information on hardware and software precautions and maintenance.
Please carefully read the following instructions before setup or use of the Nintendo DS Lite.
If, after reading all of the instructions, you still have questions, please contact the Nintendo
Service Centre.
NOTE: This product does not contain latex, lead, mercury, cadmium, hexavalent chromium, PBB or
PBDE.
▲
! WARNING – THE USE OF NINTENDO DS LITE ON BOARD
AEROPLANE, IN HOSPITALS AND AIRPORTS
▲
! WARNING – RADIO FREQUENCY INTERFERENCE
USG_HW_Man_EUR_A3 30.07.2007 17:05 Uhr Seite 6
COPY
Page 4

98
2
Nintendo DS Lite Components
15. Battery Cover
14. Nintendo DS Lite Stylus
and Stylus Holder
4. Control Buttons
11. External Extension
Connector (5.2V IN)
12. DS Game Card Slot (SLOT-1)
13. Wrist Strap Attachment
10. Headphone /Microphone Connectors – For connection of stereo headphones, external
microphone or headset (each sold separately).
11. External Extension Connector (5.2V IN) – Allows connection of Nintendo DS Lite Power
Supply (included) for recharging the battery or operation of the Nintendo DS Lite using household mains power.
12. DS Game Card Slot (SLOT-1) – For loading a Nintendo DS Game Card (sold separately).
13. Wrist Strap Attachment – For attachment of a wrist strap (not included).
14. Nintendo DS Lite Stylus and Stylus Holder – Always replace the Nintendo DS Lite Stylus into
the stylus holder after use.
15. Battery Cover – Can be removed to replace the Rechargeable Battery Pak.
See page 12 for more information on battery replacement.
16. DC Connector Plug – Connects to External Extension Connector (5.2V IN) for recharging
the Battery Pak or when using household current.
17. AC Connector Pins – Pins for use in a standard 230-volt household electrical socket.
16. DC Connector Plug
17. AC Connector Pins
Nintendo DS Lite Power Supply (USG-002(EUR))
1. LCD screens
2. Stereo Speakers
2. Stereo Speakers
5. Microphone (MIC.)
3. POWER Button
9. Power Indicator LED
8. Recharge Indicator LED
6. Volume Control (VOL.)
7. Nintendo DS Lite Game Pak Slot
Cover and Game Pak Slot (SLOT-2)
4. Control Buttons
10. Headphone/ Microphone Connectors
1. LCD screens – Twin backlit colour liquid crystal displays. The lower display (the TouchScreen)
is touch sensitive and should only be operated with a Nintendo-licensed stylus.
CAUTION: When opening the Nintendo DS Lite, keep your fingers away from the hinge to
avoid pinching them.
2. Stereo Speakers
3. POWER Button – Turns system on or off. To prevent turning the system off accidentally during
game play, you must hold the POWER Button in the Up position for a few moments before it will
turn off.
4. Control Buttons – The ✚ Control Pad, A, B, X, and Y Buttons, L and R Buttons, and START and
SELECT. Used for game play control. See the instruction booklet for the game you are playing
for specific game control information.
5. Microphone (MIC.) – Can only be used with specially designed games that incorporate
the microphone feature.
6. Volume Control (VOL.) – Slide to the right to increase volume and left to decrease.
7. Nintendo DS Lite Game Pak Slot Cover (USG-005) and Game Pak Slot (SLOT-2) – Remove
the cover when using Game Boy Advance Game Paks or Nintendo DS accessories (sold separately). Keep the cover in place when not using SLOT-2 to prevent contamination from dust or
other foreign material. Not compatible with Game Boy or Game Boy Color Game Paks.
8. Recharge Indicator LED – Lights orange while the battery is being recharged and turns off
when charging is complete.
9. Power Indicator LED – Indicates power is on or off and battery life. The green colour will
change to red when battery charge becomes low. When the LED turns red, save your game
and recharge the battery to prevent loss of game data.
• Rapid blinking of the LED shows that wireless communication is in progress.
• Slow blinking shows that the Nintendo DS Lite is in Sleep Mode.
NOTE: If you close the Nintendo DS Lite while the power is on, it will automatically switch to
power-saving Sleep Mode. It will resume normal mode when opened again.
USG_HW_Man_EUR_A3 30.07.2007 17:05 Uhr Seite 8
COPY
Page 5
1110
3
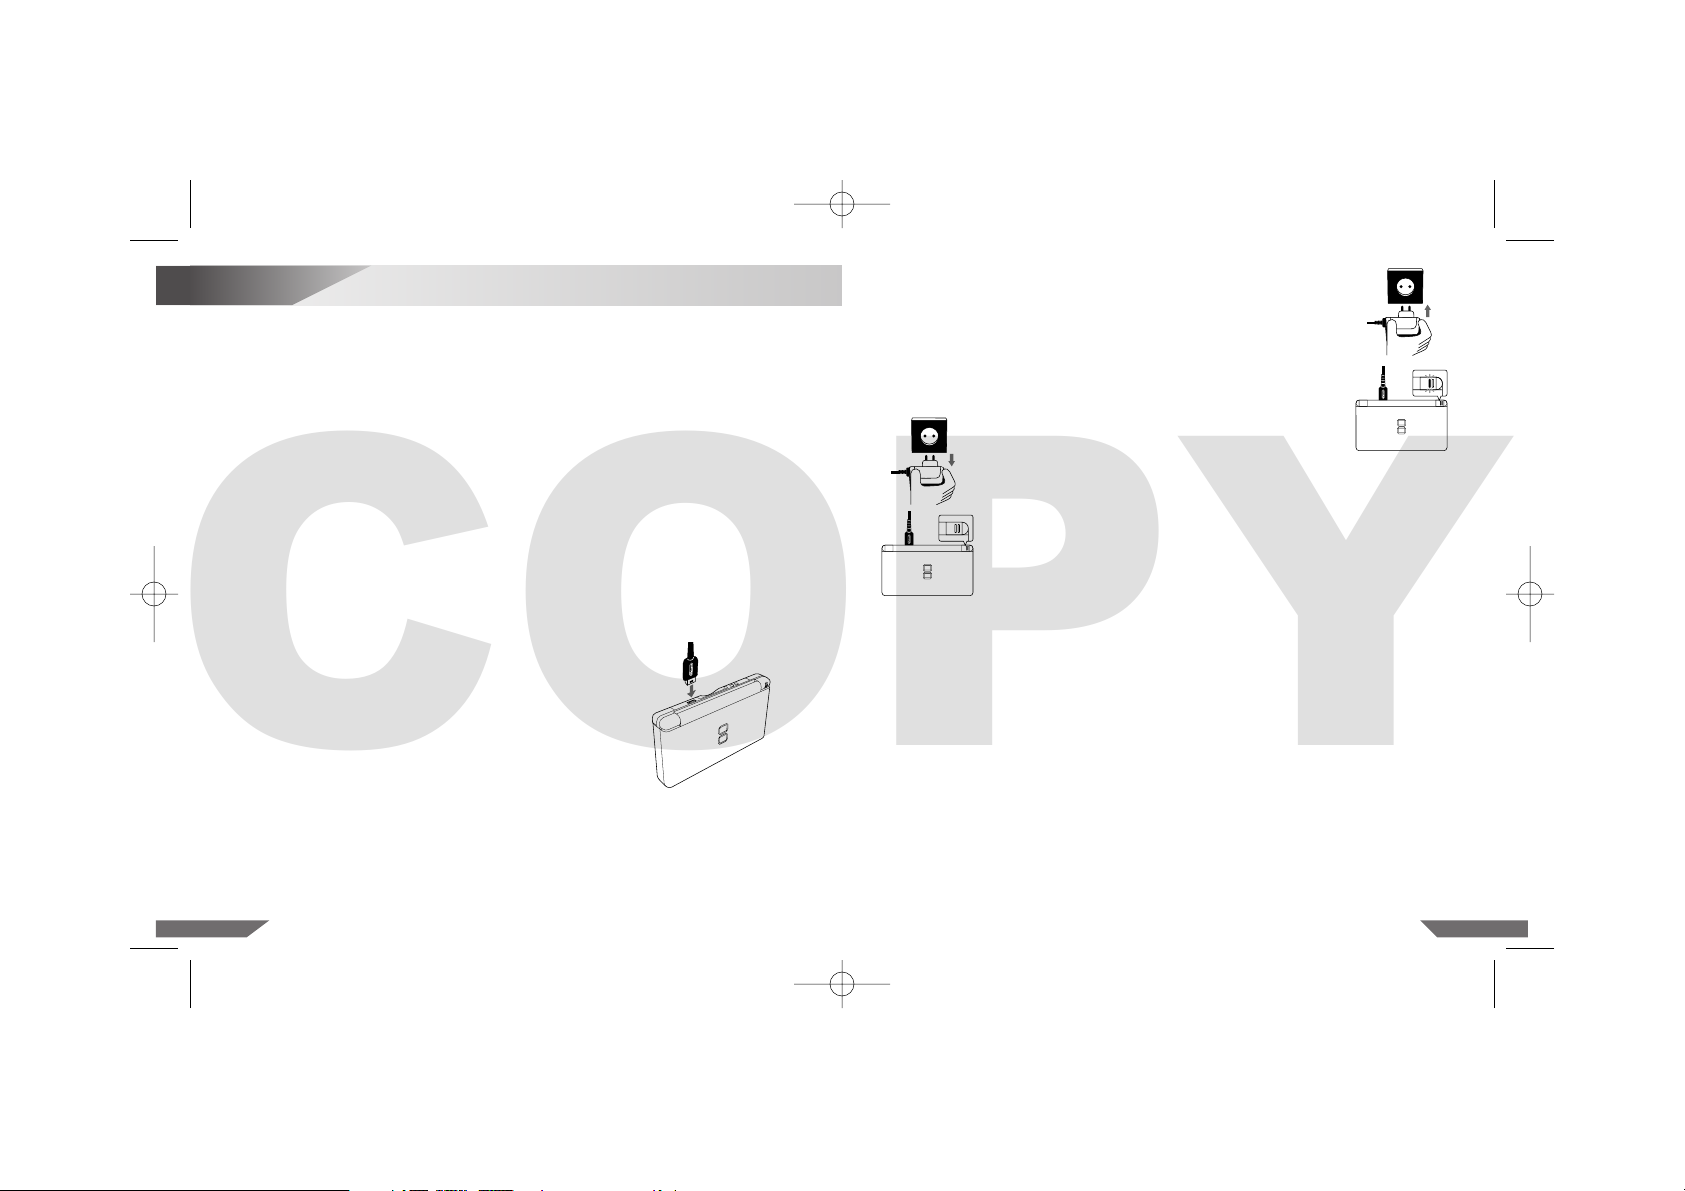
Charging the Nintendo DS Lite
Rechargeable Battery Pak (USG-003)
2. Insert the pins of the Power Supply into a standard 230-volt AC
wall socket. Be sure that the pins are fully inserted into the socket.
The Recharge Indicator LED will light orange until the battery is
fully charged. You can use the Nintendo DS Lite while recharging;
however, it will take longer to recharge the battery. (Illustration 2)
When you use the Nintendo DS Lite while recharging, the Recharge
Indicator LED may remain on even when charging is complete.
• The Nintendo DS Lite must only be used with the Nintendo DS Lite Power Supply.
• The exclusive Power Supply conforms to Low Voltage Directive (2006/95/EC).
• Power Supplies used with the Nintendo DS Lite should be regularly examined for damage to the
cord, plug enclosure and other parts.
• In the event of damage the Power Supply must not be used until the damage has been repaired.
• The Nintendo DS Lite is not intended for children under 3 years old.
• The Power Supply is not a toy.
• The Nintendo DS Lite Power Supply is for indoor use only.
• If the external flexible cable or cord of the Power Supply becomes damaged, it should be replaced
by the Nintendo Service Centre in order to avoid any potential hazards.
• The Nintendo DS Lite should be disconnected from the Power Supply before cleaning.
• Please note that the device and, in particular, the battery must be kept out of reach
of very young children.
• Do not use the Power Supply in places where it may be splashed with water or any other liquids,
i.e. juice, pet urine or oil, or in extremely humid places.
• Do not use travel transformers or incandescent-specific light dimmers because it may change the
power voltage.
3. When fully charged, the Recharge Indicator LED will turn
off. Remove the Power Supply from the wall socket.
Then remove the DC Connector Plug from the External
Extension Connector. (Illustration 3)
IMPORTANT: When disconnecting any plugs from
the Nintendo DS Lite or wall socket, carefully pull by
the plug itself rather than by the cord. Do not wrap
the Power Supply cord around the Nintendo DS Lite.
CAUTION: Do not use the Nintendo DS Lite Power Supply during a lightning storm, as there
may be a risk of electric shock from lightning.
Before you use the Nintendo DS Lite for the first time, or after you have not used it for a long time,
you must charge the battery. (If the Nintendo DS Lite is not used for long periods of time, the battery
should still be recharged at least once every six months.)
When fully charged, the battery will last from 15–19 hours on the lowest screen brightness setting,
depending on the type of game activity. (See page 16, for information on adjusting the screen brightness.) On the brightest setting, the battery life is 5 – 8 hours.
The battery can be recharged approximately 500 times,but performance may decrease after repeated
recharges, depending on usage conditions such as temperature. (Optimal charging temperature is
between 10 and 40 degrees Celsius.) Battery life may also decrease over time. After 500 recharges,
battery life may be only 70 % of the battery life at the time of purchase.
It takes approximately three hours to recharge the battery. (The actual time varies depending on how
much battery life you have left.) When the Power Indicator LED turns red, save your game and
recharge the battery to prevent loss of game data.You can play games while recharging the battery,
but the recharge time will be longer.
IMPORTANT: The Nintendo DS Lite Power Supply (USG-002(EUR)) is only for use with the
Nintendo DS Lite portable video game system. It is not compatible with any other Nintendo
system.
Illustration 1
1. Insert the DC Connector Plug from the Power Supply into
the External Extension Connector (5.2V IN) on the back of
the Nintendo DS Lite. (Illustration 1)
IMPORTANT: Be sure the DC Connector Plug is facing
in the correct direction before inserting into the External
Extension Connector to avoid damaging either the
DC Connector Plug or External Extension Connector.
Illustration 2
Illustration 3
USG_HW_Man_EUR_A3 30.07.2007 17:05 Uhr Seite 10
COPY
Page 6
5
Using the Nintendo DS Lite Stylus (USG-004)
and Touch Screen
1312
4
Replacing and Disposing of the Nintendo DS Lite
Rechargeable Battery Pak
If it becomes necessary to replace the Rechargeable Battery Pak, use the following procedure. This
procedure should be performed by an adult. Replacement Battery Paks are sold separately. Please
contact your Nintendo Service Centre for further information on where to purchase a replacement. If
you do not want to replace the Battery Pak on your own, you may send your Nintendo DS Lite to the
Nintendo Service Centre to have the Battery Pak exchanged by an authorised technician.
1. Always turn the power off and disconnect the Power Supply before replacing the Battery Pak.
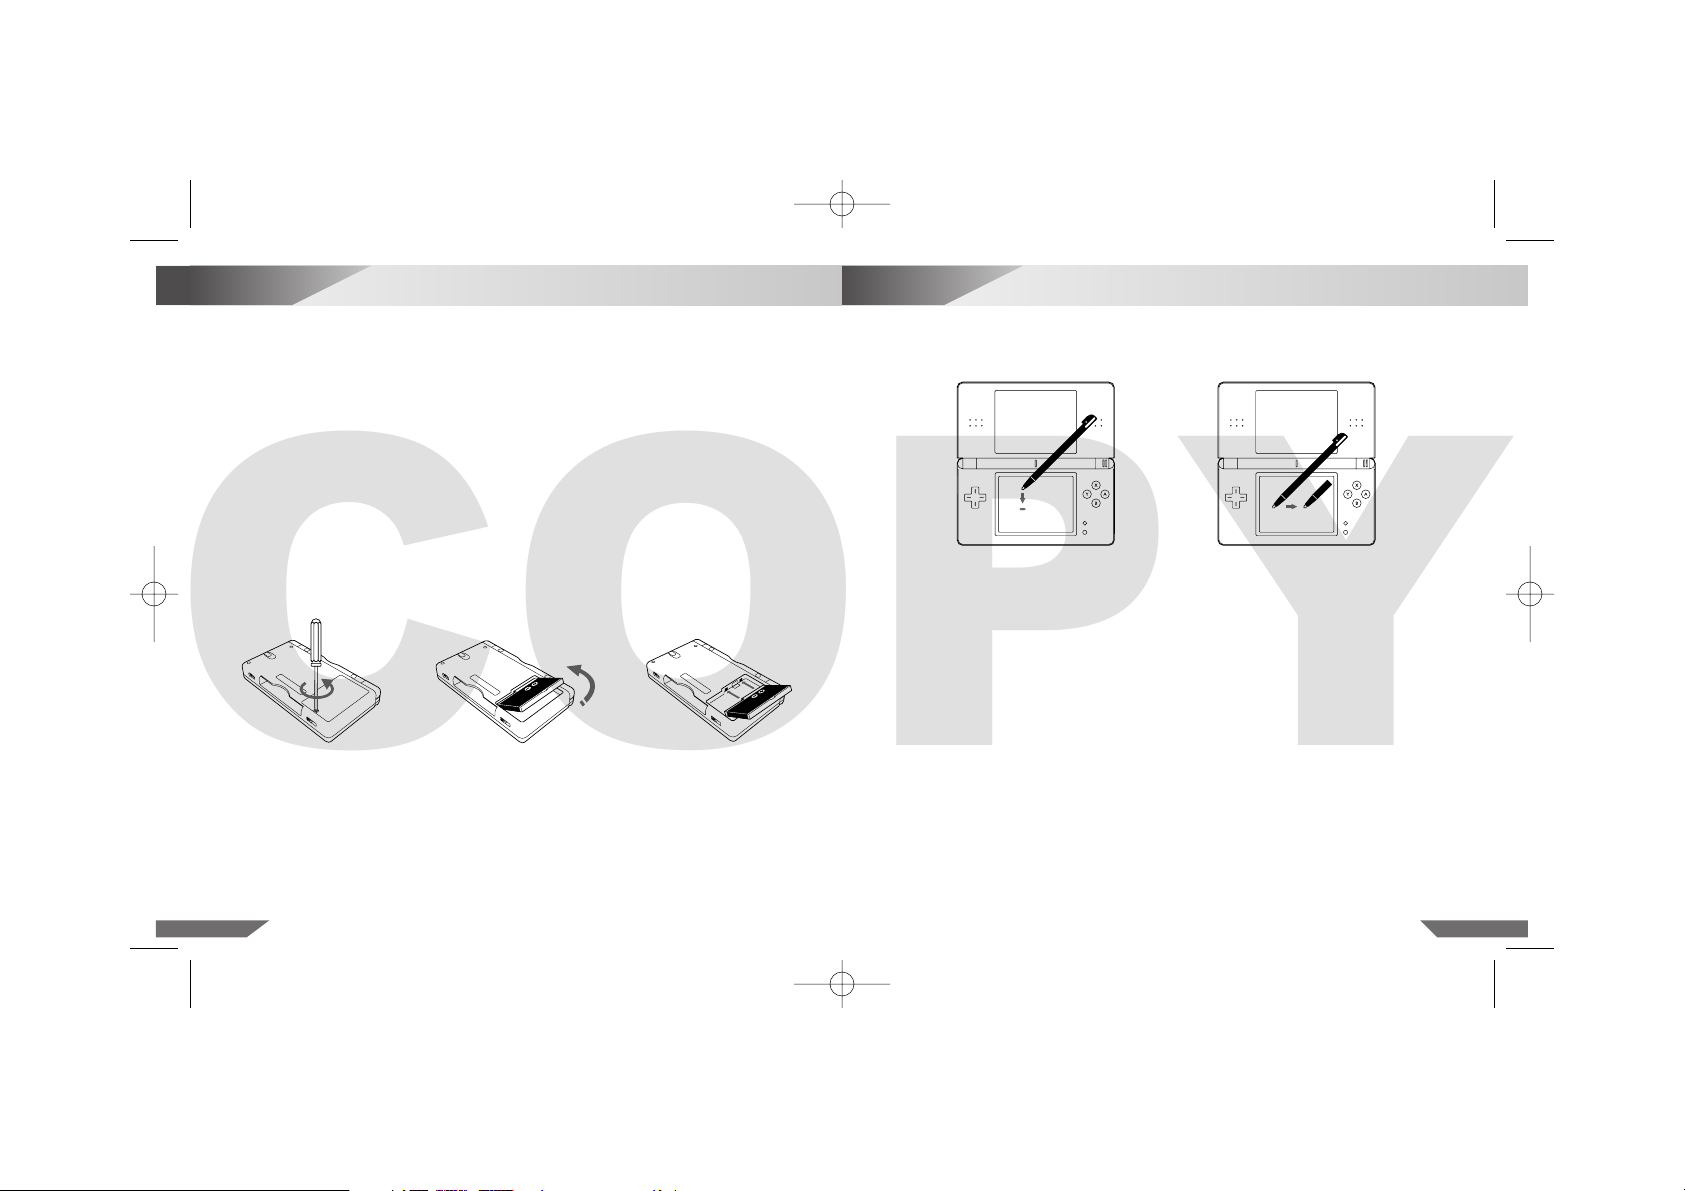
2. Using a screwdriver, loosen the screw on the Battery Cover (Illustration 4). Remove the Battery
Cover and retain. Always use an appropriate screwdriver for the screw. Using the wrong screwdriver may damage the head of the screw and you will not be able to remove the Battery Cover.
3. Use the protruding tab at the end of the Battery Pak to remove it from the Nintendo DS Lite.
(Illustration 5)
4. Insert a new Rechargeable Battery Pak into the Nintendo DS Lite. Use only a new Nintendo DS
Lite Rechargeable Battery Pak (USG-003). Make sure to insert the new Rechargeable Battery Pak
correctly, as shown in Illustration 6.
5. Replace the Battery Cover in its original position and carefully tighten the screw.
6. When disposing of the Rechargeable Battery Pak, please refer to the “Battery Disposal”
information below.
Illustration 7 Illustration 8
The lower LCD screen, or Touch Screen, is touch sensitive. For Nintendo DS games that include this
game control feature, operate the screen by using the included Nintendo DS Lite Stylus.
Lightly touch or slide the Nintendo DS Lite Stylus across the Touch Screen. (Illustrations 7 and 8)
IMPORTANT NINTENDO DS LITE STYLUS AND SCREEN GUIDELINES:
• ONLY use the Nintendo DS Lite Stylus on the LOWER Touch Screen.
• Use only enough pressure to operate the game. Excessive pressure may damage
the Touch Screen.
• Do not use the Nintendo DS Lite Stylus if it is broken.
• Use only a Nintendo-licensed stylus on the Touch Screen.
• Replace the Nintendo DS Lite Stylus in the stylus holder when not in use.
• If you use a screen protector on your Nintendo DS Lite, use only a Nintendo-licensed screen
protector, and use it only on the Touch Screen.
SCREEN CLEANING PROCEDURE:
If the screens on your Nintendo DS Lite have visible smudges, fingerprints on them or are contaminated with foreign material, they may not work properly and can become more damaged. You can
clean them by using a soft clean cloth such as a lens or eyeglass cleaning cloth.
1. Slightly dampen the cloth with water ONLY and wipe off the screens to loosen any dirt or foreign
material.
2. Using a dry cloth, wipe the screens to dry them and finish the cleaning process. If needed, repeat
the process.
If the Touch Screen still does not work after cleaning, please contact the Nintendo Service Centre.
Illustration 4
Illustration 5
Illustration 6
BATTERY DISPOSAL
• Discarding batteries in your general household waste can be harmful to the environment. When
disposing of the Battery Pak, follow appropriate local guidelines and regulations.
• In accordance with the Directive on Batteries and Accumulators and Waste Batteries and Accumulators (2006/66/EC), battery collection and recycling schemes should be in place in all EU
Member States by 26 September 2008. Such schemes may already be available in your country,
in which case the Battery Pak should not be disposed of in your general household waste.
For further information contact your local solid waste authority.
USG_HW_Man_EUR_A3 30.07.2007 17:05 Uhr Seite 12
COPY
Page 7
1514
7
System Setup
6
Privacy Information
The first time the Nintendo DS Lite is turned on, you will be asked to select the screen language.
Use the ✚ Control Pad or Nintendo DS Lite Stylus to select a language, then touch YES or press the
A Button.
Follow the on-screen instructions to input your nickname, screen colour, date, time, and month and
day of birth (not the year). Press the B Button to step backward through this process if you would
like to change the settings. You will be able to change these settings later from the Settings Menu,
please see pages 24 – 28. For help using the on-screen keyboard, see page 23.
Once you have finished with the system settings, touch QUIT. A confirmation message will then
appear. If you touch YES, the Nintendo DS Lite will be turned off automatically. Turn the power on to
go to the Nintendo DS Menu Screen shown on the following page.
As with all new Touch Screen products, a small percentage of Nintendo DS Lite systems may require
recalibration after their initial shipment, so as to realign the stylus with the Touch Screen. If you
suspect that your Nintendo DS Lite needs to be recalibrated, please refer to page 28 for a description
and instructions on how to adjust the TOUCH SCREEN option in the Settings Menu.
PictoChat™ is not an internet application. However, when using PictoChat, you can communicate with up to 15other Nintendo DS Lite or Nintendo DS users within range of your Nintendo DS
Lite (approximately 20 metres). Such users will be able to see your nickname and messages.
To protect your privacy, do not give out personal information such as last name, phone number,
age, e-mail or home address when communicating with others.
An adult should assist children with system setup and instruct them not to use personal information. PictoChat does not block messages from strangers. Similar to unmonitored internet
chat rooms, children should be warned about receiving messages from, or communicating with,
strangers.
Whatever date you choose to enter as your month/day of birth (the year is not asked for)
during system setup, an “It’s your birthday” message will be communicated in the chat room
on that date.
For more information, visit http://dsprivacy.nintendo-europe.com
USG_HW_Man_EUR_A3 30.07.2007 17:05 Uhr Seite 14
COPY
Page 8
1716
8
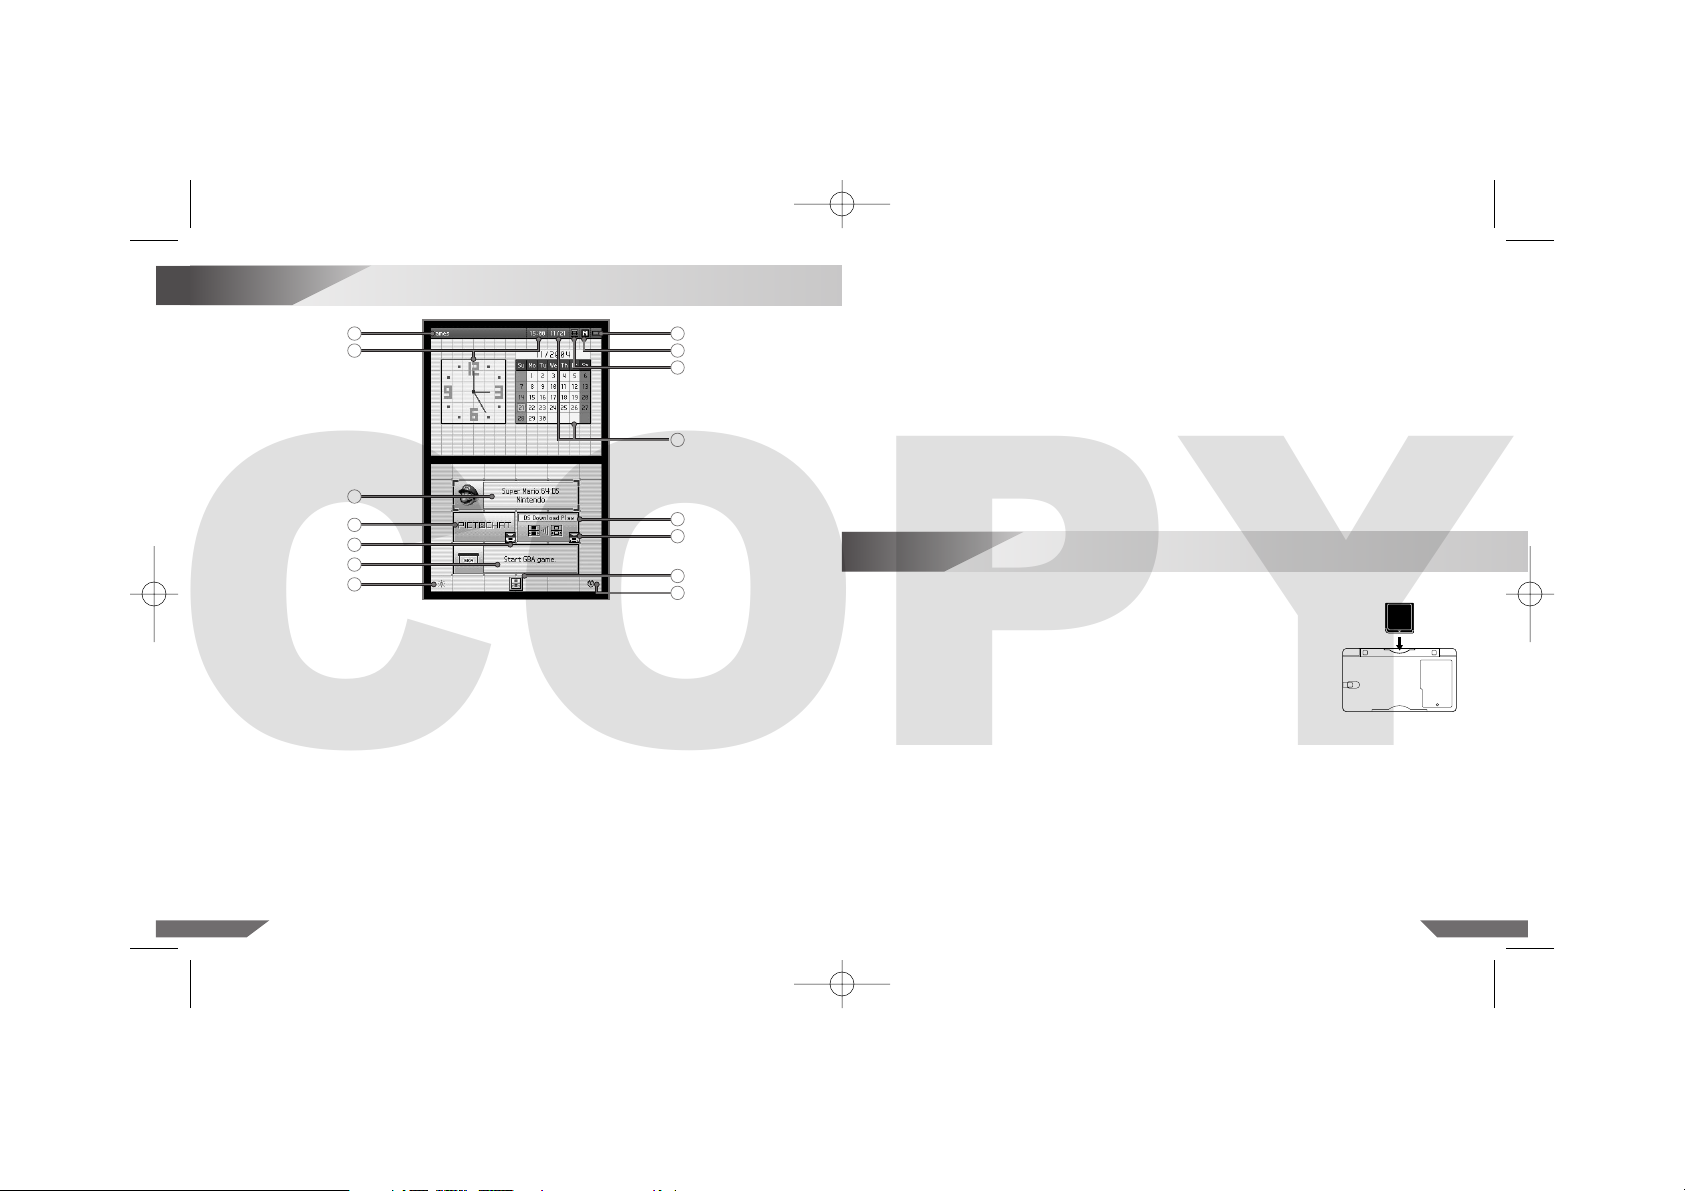
Nintendo DS Menu Screen
9. Screen Start-up Mode Icon – This icon shows which Start-up Mode the Nintendo DS Lite will
use when turned on.
• In Auto Mode, the Nintendo DS Lite will automatically load a game if there is one in SLOT-1 or
SLOT-2. The Nintendo DS Lite will load a Nintendo DS Game Card automatically if both slots
have games loaded.
• In Manual Mode, the Nintendo DS Menu Screen will appear.
You can switch mode from the Settings Menu. (Page 25)
10. Game Boy Advance Display Screen Icon – This icon indicates which screen will display
Game Boy Advance games. Can be adjusted from the Settings Menu. (Page 25)
11. Calendar and Current Date – Can be adjusted from the Settings Menu. (Page 26)
12. DS DOWNLOAD PLAY Selection Panel – Select to use Single-Card Download Play Mode.
(See “Wireless Communication and Game Play Modes” on pages 19 –21.)
13. Wireless Communication Icon – Indicates that wireless communication will begin if this panel
is selected. (Page 20) NOTE: Use of wireless devices are prohibited in some locations.
14. Alarm ON /OFF Panel – Touch to turn the alarm on. Can be adjusted from the Settings Menu.
(Page 26)
1. User Name – Can be adjusted from the Settings Menu. (Page 27)
2. Clock /Alarm and Current Time – Can be adjusted from the Settings Menu. (Page 26)
3. DS Game Selection Panel – Select to play a Nintendo DS Game Card inserted into SLOT-1.
(See “Using Nintendo DS Game Cards (NTR-005)” on the following page.)
4. PictoChat Selection Panel – Select to begin a PictoChat session. (See “PictoChat”
on pages 21– 22.)
5. Game Boy Advance Game Pak Selection Panel – Select to play a Game Boy Advance
Game Pak inserted into SLOT-2. (See “Using Game Boy Advance Game Paks (AGB-002)”
on page 18.)
6. Settings Menu Panel – Select this panel to go to the Settings Menu to change initial setup
information and other settings. (Pages 24 – 28)
7. Display Brightness – Touch to select from four levels of screen brightness. NOTE: The battery
will discharge faster on brighter settings.
8. Power Indicator Icon – Shows battery charge. This is green while the battery has a normal
charge and will change to red when the battery charge gets low.
9
Using Nintendo DS Game Cards (NTR-005)
1
2
3
4
13
5
7
8
9
10
11
12
13
6
14
1. Make sure that the Nintendo DS Lite is turned off.
2. Insert the Nintendo DS Game Card into the DS Game Card Slot (SLOT-1)
on the back of the system and push it gently but firmly until it clicks
into place. The label should face towards the bottom of the Nintendo DS
Lite. (Illustration 9)
3. Turn the power on. After the Health and Safety Screen, the game title will
appear. Touch the game title with the Nintendo DS Lite Stylus to start
the game (in Auto Mode the game will start automatically). Refer to the
instruction booklet for the game you are playing for game instructions.
4. To remove a Game Card, first turn the power off. Push the Nintendo DS
Game Card into the DS Game Card Slot until it clicks. It will then automatically eject part of the way out of the slot.
Illustration 9
USG_HW_Man_EUR_A3 30.07.2007 17:05 Uhr Seite 16
COPY
Page 9
1918
10
Using Game Boy Advance Game Paks (AGB-002)
11
Wireless Communication and Game Play Modes
NOTE: Use of wireless devices are prohibited in some locations. Please see page 7 for
further information.
The Nintendo DS wireless feature allows you to communicate or play games with other people
without the use of cables. There are two types of wireless compatible Nintendo DS games.
Wireless DS Multi-Card Play requires one Game Card for each Nintendo DS
system used. The number of players that can participate will be indicated under
the icon.
Wireless DS Single-Card Download Play requires only one Game Card for
one system (Host System). The other players download the game information
into their systems (Client Systems) using the wireless feature. The number of
players that can participate will be indicated under the icon.
Look for these icons on Nintendo DS game packaging for the type of wireless game play used
on specific games and how many players can play simultaneously.
DS Multi-Card Play
1. Make sure that all Nintendo DS systems are turned off, then insert a Game Card into each system.
Turn all Nintendo DS systems on.
2. Use the Nintendo DS Lite Stylus to touch the game title on the display to start the game. Refer to
the instruction booklet for the game you are playing for game play information.
IMPORTANT: The Nintendo DS Lite will only work with Game Boy Advance Game Paks. The
Nintendo DS Lite is NOT compatible with original Game Boy or Game Boy Color Game Paks.
1. Make sure that the Nintendo DS Lite is turned off.
2. Insert the Game Boy Advance Game Pak into the Game Pak Slot (SLOT-2)
on the front of the Nintendo DS Lite. Make sure it is fully inserted into
the Game Pak Slot. The label should face towards the bottom of the
Nintendo DS Lite. (Illustration 10)
3. Turn the power on. The game title will appear. Touch the game title with the
Nintendo DS Lite Stylus to start the game (in Auto Mode the game will
start automatically). Refer to the instruction booklet for the game you are
playing for game instructions.
4. To remove a Game Pak, first turn the power off. Gently slide the Game Pak
out of the Game Pak Slot with your thumb.
When you are finished playing, always turn your system off and unplug the Power Supply (if you are
using it) from both the wall socket and the Nintendo DS Lite.
Do not wrap the Power Supply cord around the Nintendo DS Lite.
When not in use, close the Nintendo DS Lite to protect the screens from dust or damage.
NOTE: The power will NOT automatically turn off when the system is closed. If you close the
Nintendo DS Lite while the power is on, it will automatically switch to power-saving Sleep Mode,
which still consumes power but at a slower rate. It will resume normal mode when opened again.
IMPORTANT GAME CARD/GAME PAK GUIDELINES:
• Always check the Game Card or Game Pak edge connector for foreign material before inserting
it into the Nintendo DS Lite.
• Be sure to orient the Game Card or Game Pak correctly before inserting into the Nintendo DS Lite.
• Do not turn the power off or remove the Game Card or Game Pak while saving game data,
as your saved data may be destroyed.
• Do not blow on the Nintendo DS Lite connectors or on the Game Card or Game Boy Advance
Game Pak connectors. Moisture in your breath can cause the connectors to malfunction.
Illustration 10
USG_HW_Man_EUR_A3 30.07.2007 17:05 Uhr Seite 18
COPY
2–16
2–16
Page 10
2120
• Avoid having people or other obstructions between the Nintendo DS systems.
• Avoid interference from other devices. If communication seems to be affected by other devices
(wireless LAN, microwave ovens, cordless devices, computers), move to another location or turn
off the interfering device.
Nintendo DS Lite is equipped with RF module (802.11), which has a radiated output power of less
than 10 mW e.i.r.p. and a maximum spectrum power density of less than –30 dBW/1MHz e.i.r.p.
These parameters can be maintained when operated within a temperature range of 0 to 40 degrees
Celsius. In accordance with this, Nintendo DS Lite is categorized as Class 1 equipment according
to Commission Decision 2000/299/EC.
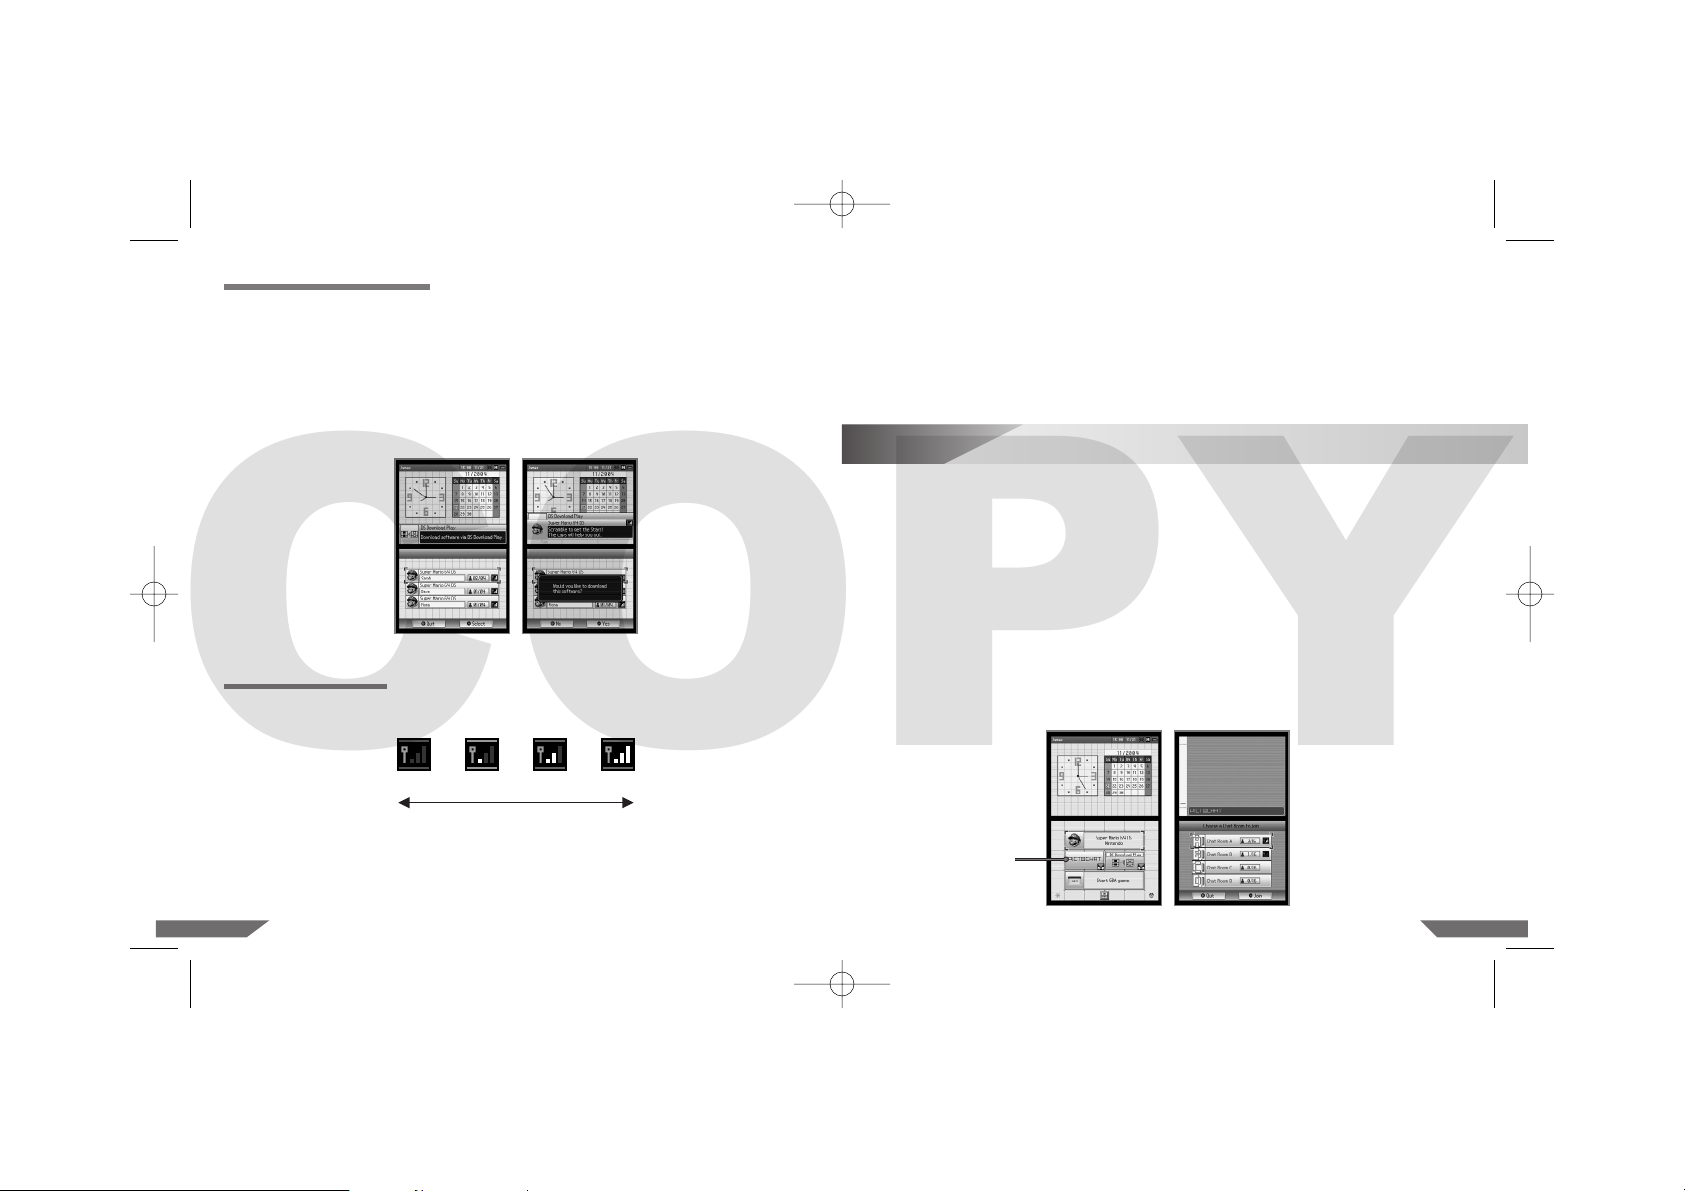
0 1 2 3
WEAKER STRONGER
Wireless Signal Strength
During wireless game play, an icon will appear on either the upper or lower displays showing the
signal strength of the wireless signal. The icon has four modes depending on the signal strength,
as shown below.
12
PictoChat™
PictoChat allows you to use the Nintendo DS Lite to send and receive wireless messages and pictures
from other Nintendo DS system users (Nintendo DS Lite and Nintendo DS). PictoChat is not an internet
application. You can communicate with up to 15 other Nintendo DS system users within the range of
your Nintendo DS Lite. Please see page 14 for important Privacy Information.
1. Turn the power on. Select the PICTOCHAT panel from the Nintendo DS Menu Screen.
(Illustration 13)
2. The Chat Room Selection Screen will appear. Select one of the chat rooms to join.
(Illustration 14)
The number in each panel indicates how many people are currently in that chat room. If the total
number of participants is already at maximum (16/16), you cannot join that chat room.
The icon on the right side of the box indicates the signal strength for communicating with that
chat room. See page 20 for information about this icon.
NOTE: If you have problems communicating with other members of a chat room, have
everyone switch to a different chat room. Also, review the communication guidelines on
the previous page and check for interference.
3. The PictoChat Screen will appear for the chat room you have selected. (Illustration 15)
Illustration 14Illustration 13
PICTOCHAT panel
DS Single-Card Download Play
1. Make sure that all Nintendo DS systems are turned off, then insert a Game Card into the system
that will be the Host System. Turn all Nintendo DS systems on.
2. Use the Nintendo DS Lite Stylus to touch the game title on the display of the Host System to start
the game.
3. On the Client Systems, touch the DS DOWNLOAD PLAY panel on the Nintendo DS Menu
Screen.
4. On the Game Selection Screen, touch the game title you wish to download (Illustration 11).
You will be asked to confirm your choice (Illustration 12). Touch YES to download game
information from the Host System. Refer to the instruction booklet for the game you are
playing for game play information.
Illustration 12Illustration 11
IMPORTANT WIRELESS COMMUNICATION GUIDELINES:
• Begin with the distance between systems at about 10 metres (30 feet) or less and move closer or
farther apart as desired, keeping the signal strength at two or more bars for best results.
• Keep the maximum distance between systems at 20 metres (65 feet) or less.
• The systems should face each other as directly as possible.
USG_HW_Man_EUR_A3 30.07.2007 17:05 Uhr Seite 20
COPY
Page 11
13
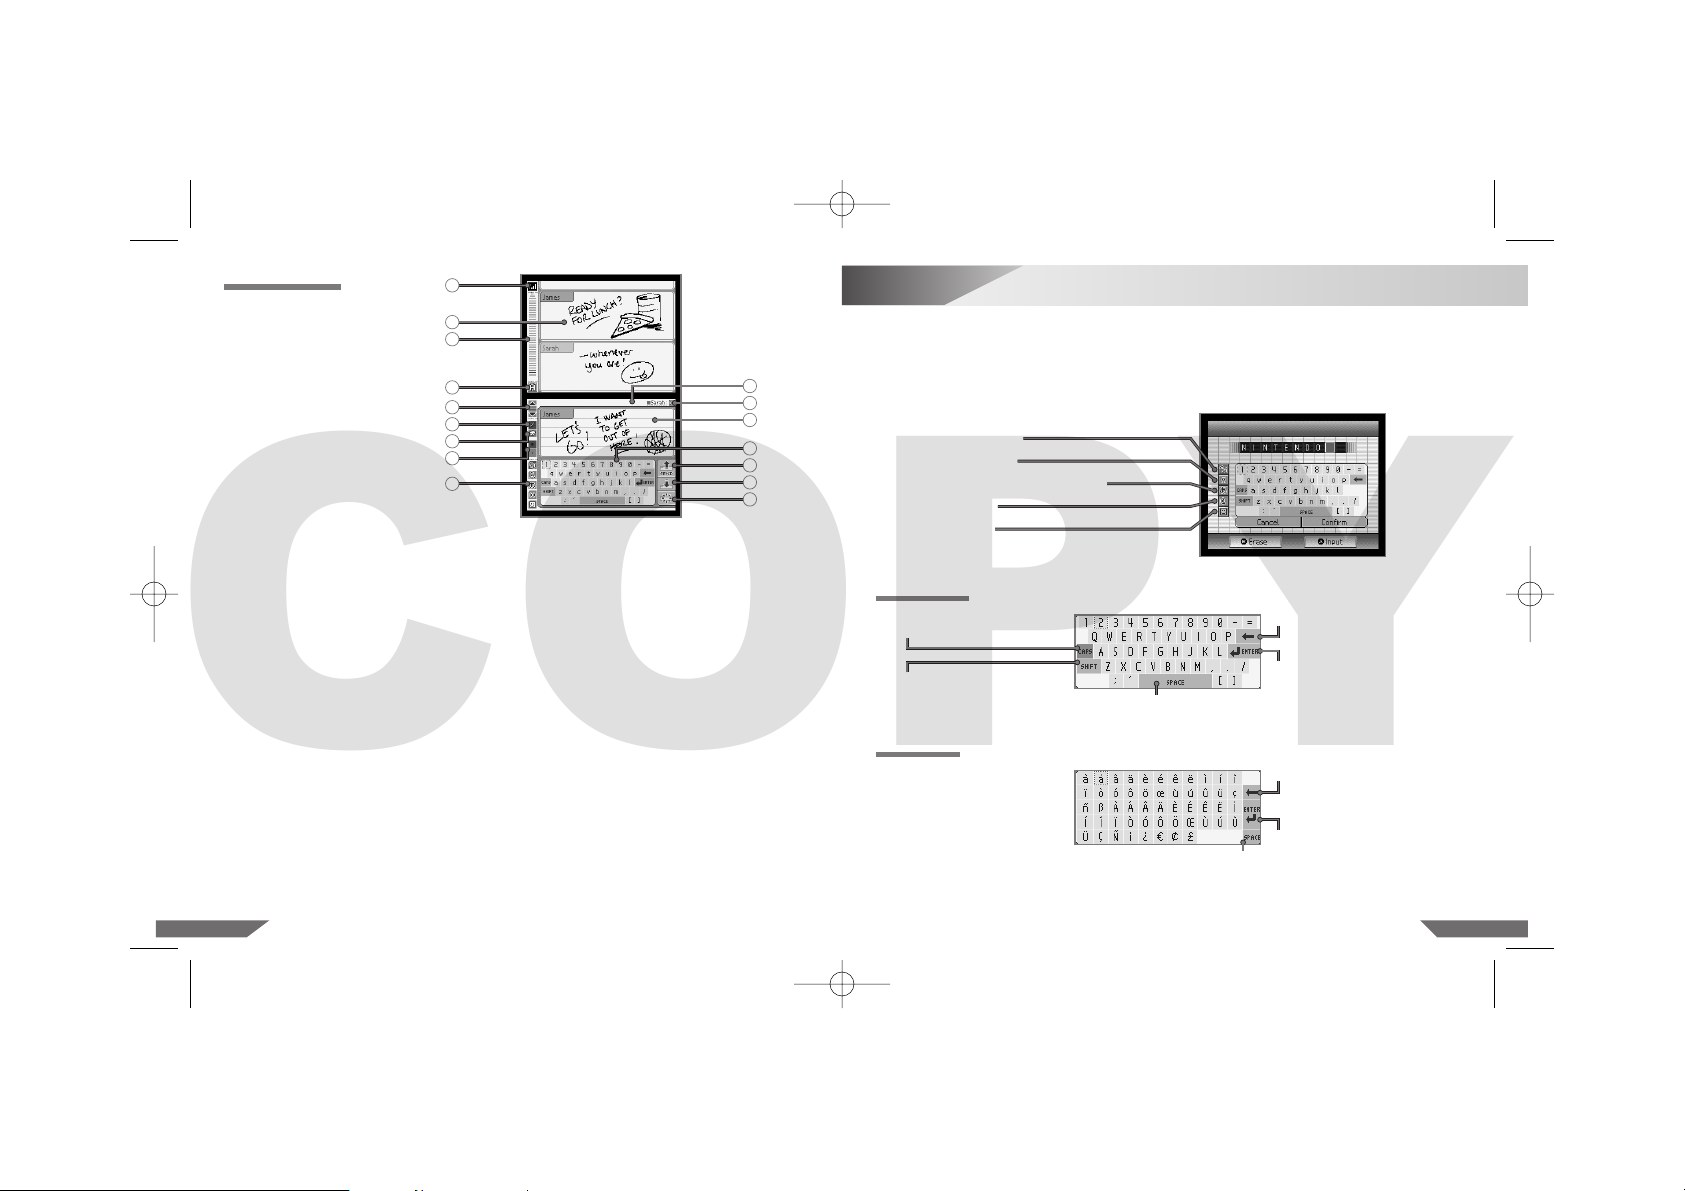
Using the On-Screen Keyboard
2322
1. Signal Strength Icon – Indicates signal strength for your chat room.
2. Message Display – Displays messages or pictures sent or received.
3. Scroll Bar – Displays messages or pictures by user colour. Each line represents one message.
4. Chat Room Letter – Shows which of the four chat rooms you are in.
5. Chat Member Bar – Lists the nicknames of participants in the chat room. Touch the nickname
to see that participant’s message. (See page 27 on how to create a message.)
6. Scroll Button – Scroll up or down through message history.
7. Pen Tool – Use for drawing pictures on the Input Board.
8. Eraser Tool – Use to erase lines from the Input Board.
9. Input Board – Text or lines appear here before selecting SEND.
10. Pen Thickness – Select either a thick or thin line for drawing pictures or erasing.
11. Keyboard Style – Select from the different keyboard styles. (See “Using the On-Screen
Keyboard” on the following page.)
12. Keyboard Panel – Use the Nintendo DS Lite Stylus or the ✚ Control Pad, A Button and B Button
to select letters for your messages.
13. Exit Button – Touch to leave the current chat room.
14. SEND Button – Touch to send your message or picture.
15. Copy Button – Touch to copy the last message or picture from the Message Display to your
Input Board.
16. Clear Button – Touch to clear your Input Board of all information.
The on-screen keyboard functions like a simple computer keyboard. The keyboard style can be
selected from the menu on the left side of the keyboard. There are five styles of keyboards, as
shown below. (Illustration 16)
Two styles are shown; however, they all work the same way.
Select letters by using either the Nintendo DS Lite Stylus or the ✚ Control Pad, A Button and B Button.
Illustration 16
Illustration 15
14
9
13
15
16
12
5
1
3
2
4
6
7
11
8
10
Alphanumeric
International
Japanese Hiragana/ Katakana
Symbols
Pictures
Alphanumeric
Shift between capital and
lowercase letters.
Backspace or erase character.
Skip to next line.
Add a space.
Shift between capitals/ symbols and
lowercase letters/ numbers.
International
Backspace or erase character.
Skip to next line.
Add a space.
PictoChat Screen
USG_HW_Man_EUR_A3 30.07.2007 17:05 Uhr Seite 22
COPY
Page 12
2524
14
Settings Menu – Changing System Settings
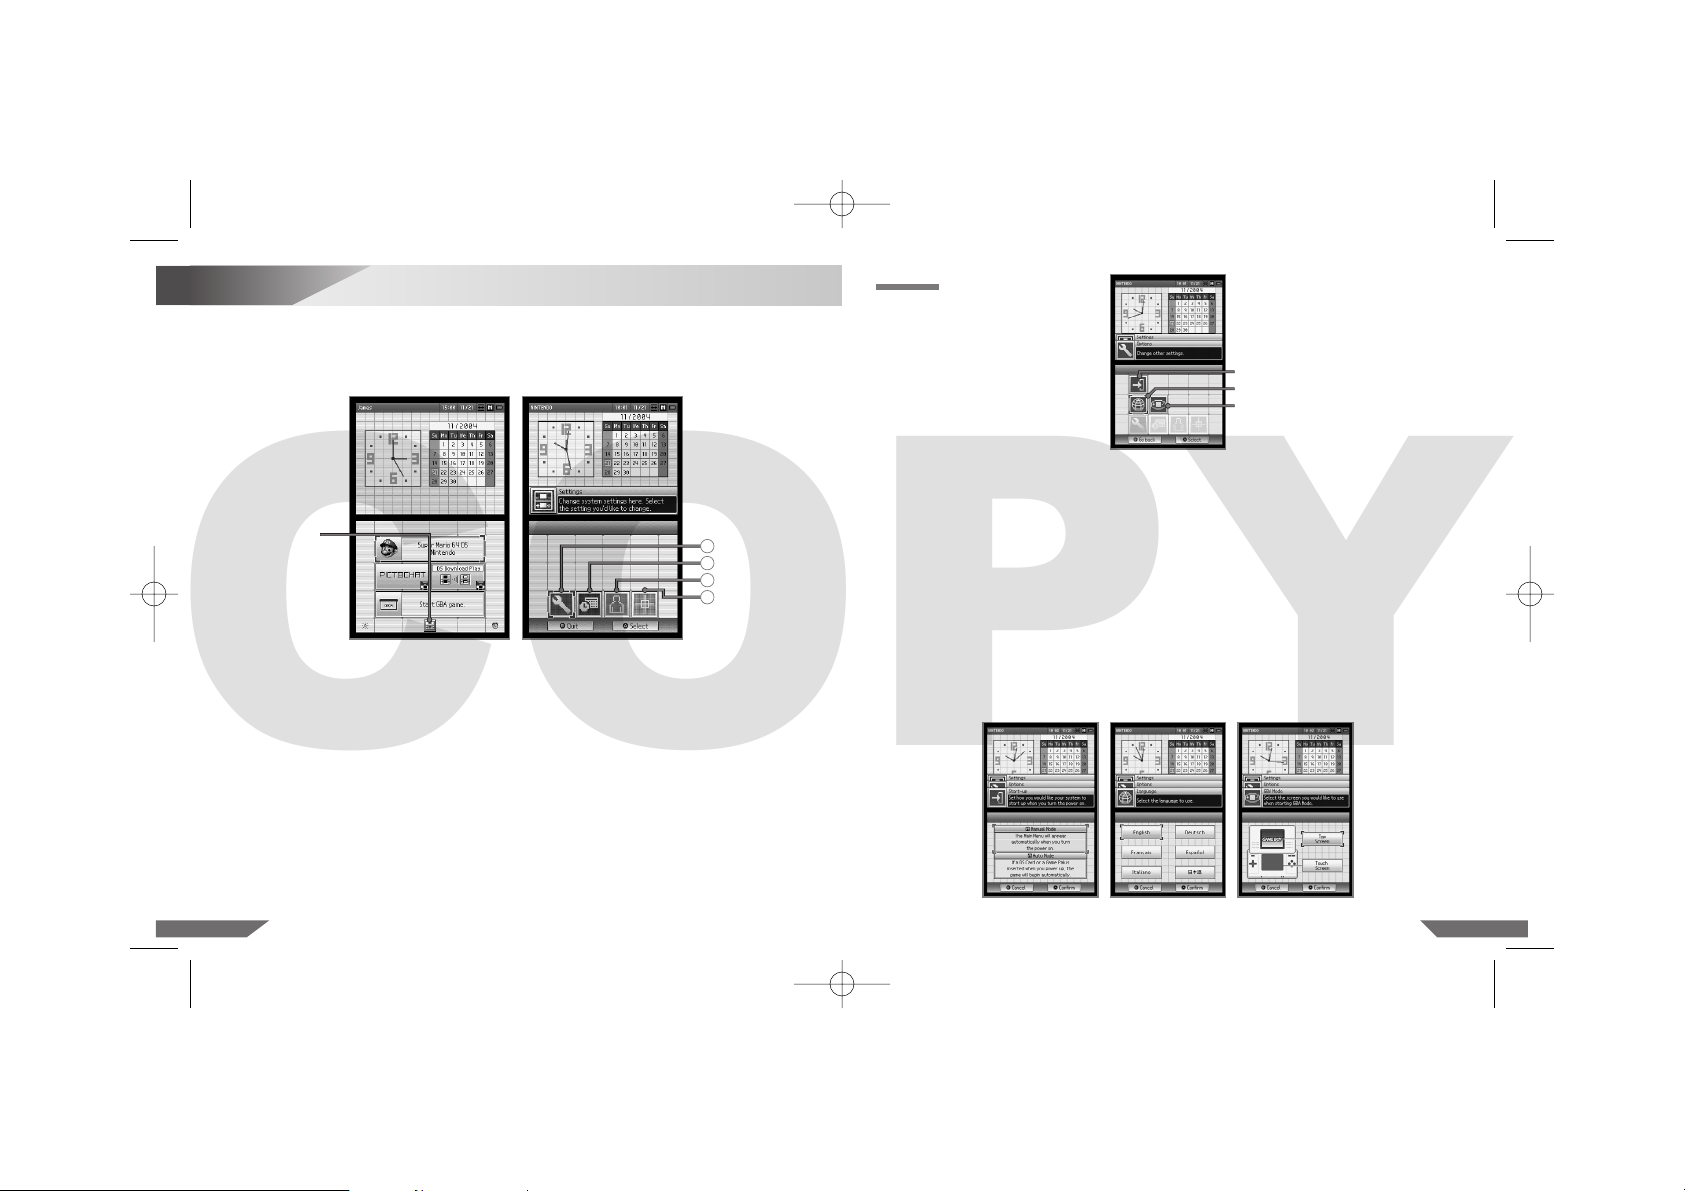
Various items can be adjusted from the Settings Menu. To access the Settings Menu, touch the
Settings Panel on the Nintendo DS Menu Screen. (Illustration 17)
The Settings Menu will appear. Each of the four menu panels will open a different set of options you
can adjust. (Illustration 18)
Illustration 19
Select the menu panel for the options you would like to adjust.
1. OPTIONS: Start-up Mode, Screen Language, Game Boy Advance Display
2. CLOCK: Date, Alarm, Time
3. USER: Colour, Birthday, User Name, Message
4. TOUCH SCREEN
See the following pages for a description and instructions for each option.
NOTE: Once you have finished with the system settings, touch QUIT. A confirmation message
will then appear. If you touch YES, the Nintendo DS Lite will be turned off automatically. Turn
the power on to see the new settings take effect and resume using the Nintendo DS Lite.
OPTIONS
Start-up Mode
Screen Language
Game Boy Advance
Display
• Start-up Mode (START-UP)
This option sets the mode the Nintendo DS Lite will start in when the power is turned on. Select
from A AUTO MODE or M MANUAL MODE.
In Auto Mode, the Nintendo DS Lite will load a game if there is a Game Card or Game Pak in
either slot. The Nintendo DS Lite will load the Game Card first if both slots have games in them.
If no game is loaded, the Nintendo DS Menu Screen will appear.
In Manual Mode, the Nintendo DS Menu Screen will appear. (Illustration 20)
• Screen Language (LANGUAGE)
This option sets the language used for non-game functions like menus. (Illustration 21)
• Game Boy Advance Display (GBA MODE)
This option allows you to set which screen (upper or lower) you would like to use as the game
screen when a Game Boy Advance game is played on the Nintendo DS Lite. (Illustration 22)
Illustration 20 Illustration 21 Illustration 22
Illustration 17 Illustration 18
Settings Panel
1
2
3
4
Menu Panels
USG_HW_Man_EUR_A3 30.07.2007 17:05 Uhr Seite 24
COPY
Page 13
2726
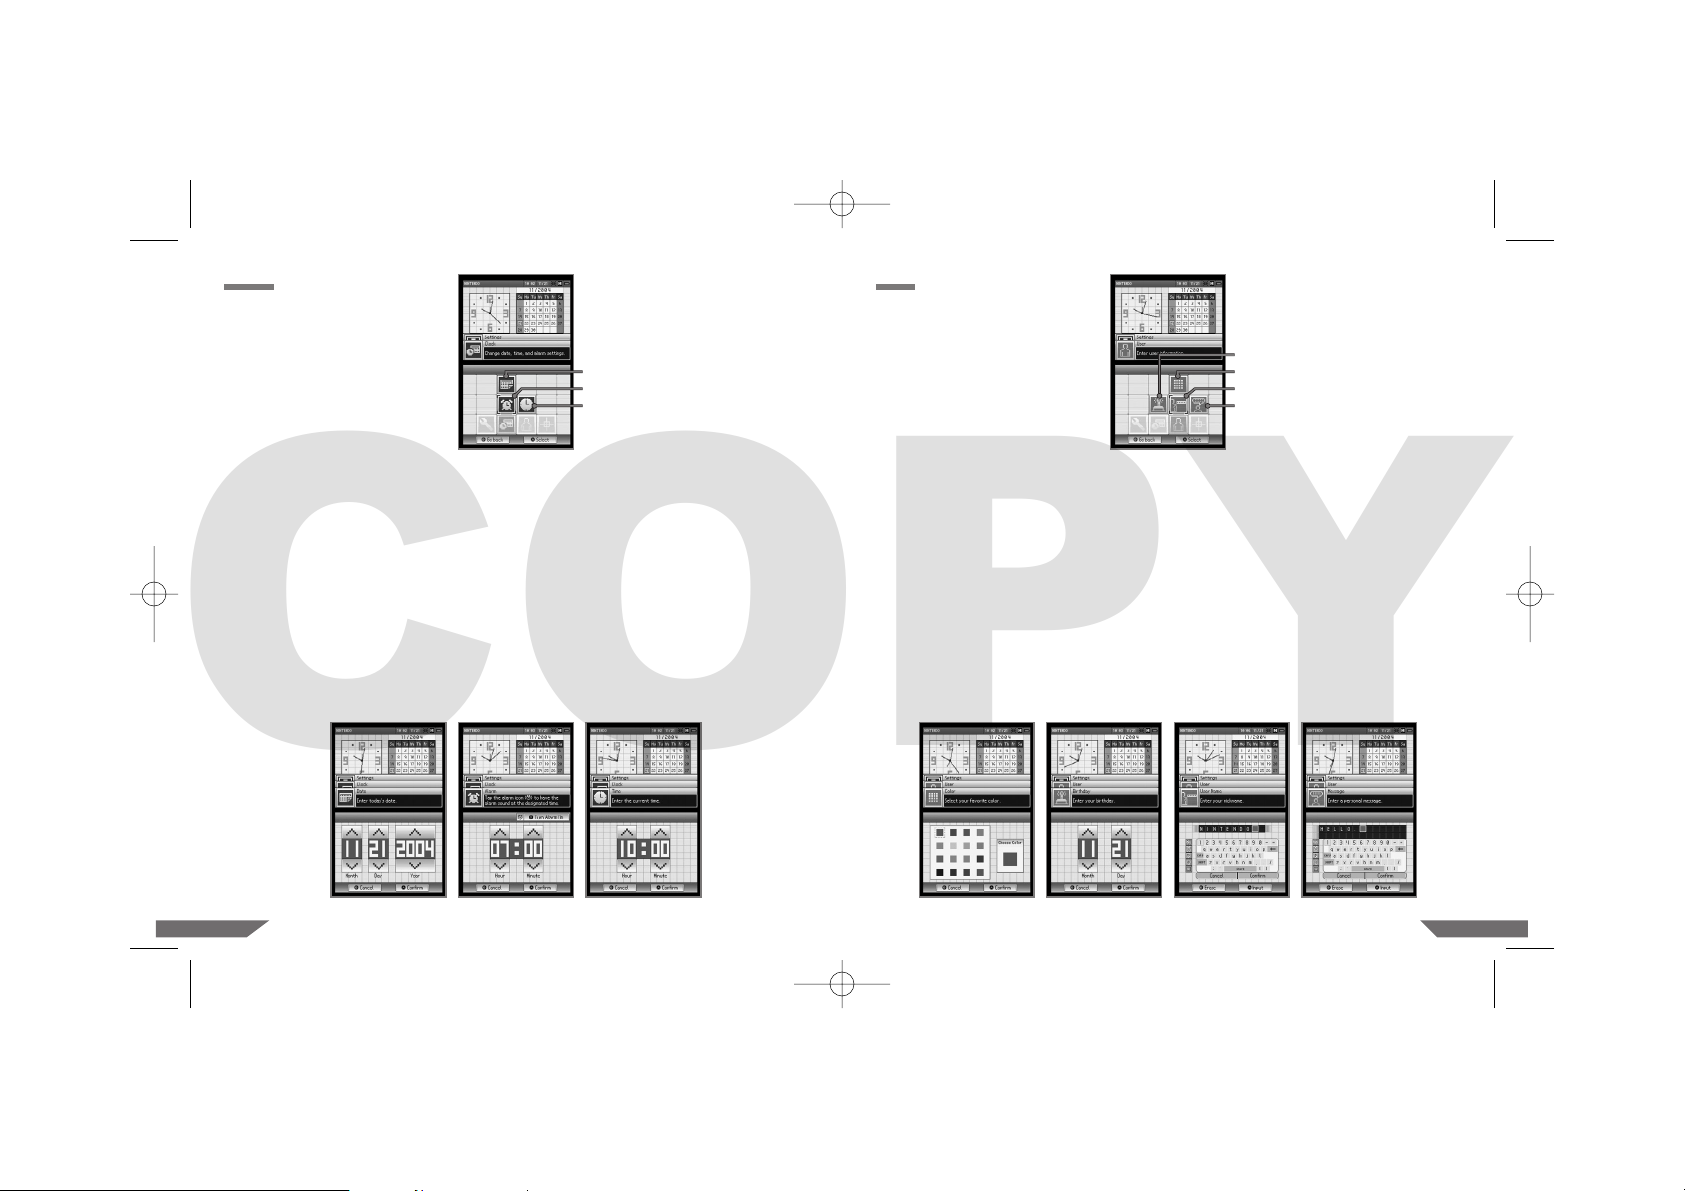
CLOCK
• DATE
This option sets the MONTH, DAY, and YEAR for the system calendar. Touch the up /down arrows
to adjust the numbers. Select CONFIRM when you are finished setting the date. (Illustration 24)
• ALARM
This option allows you to use the Nintendo DS Lite as an alarm. When the alarm is turned on,
you will not be able to use the Nintendo DS Lite in any other mode until the alarm is turned off.
The alarm can be turned off by pressing any button (except the L and R Buttons) or by touching
the Touch Screen.
Touch the up /down arrows to adjust the numerals. Select CONFIRM when you are finished setting
the time. (Illustration 25)
• TIME
This option sets the time for the system clock. Touch the up /down arrows to adjust the numbers.
Select CONFIRM when you are finished setting the time. (Illustration 26)
Illustration 23
Date
Alarm
Time
Illustration 24 Illustration 25 Illustration 26
USER
• COLOR
Touch the colour sample to set the background screen colour. Select CONFIRM when you are
finished selecting your colour. (Illustration 28)
• BIRTHDAY
Touch the up /down arrows to adjust the numbers. Select CONFIRM when you are finished setting
the date. (Illustration 29)
• USER NAME
This option allows you to enter your nickname. Your nickname may appear during PictoChat
on other participants screens. We recommend selecting a gender neutral nickname. (See page14
for important Privacy Information.)
Use the on-screen keyboard to enter up to ten characters. (Illustration 30)
• MESSAGE
This option allows you to enter a message. Your message may appear during PictoChat on other
participants screens. (See page 14 for important Privacy Information.)
Use the on-screen keyboard to enter up to 18 characters. (Illustration 31)
See page 23 for information on how to use the on-screen keyboard.
Illustration 27
Colour
Birthday
Nickname
Message
Illustration 28 Illustration 29 Illustration 30 Illustration 31
USG_HW_Man_EUR_A3 30.07.2007 17:06 Uhr Seite 26
COPY
Page 14
16
Troubleshooting
2928
TOUCH SCREEN
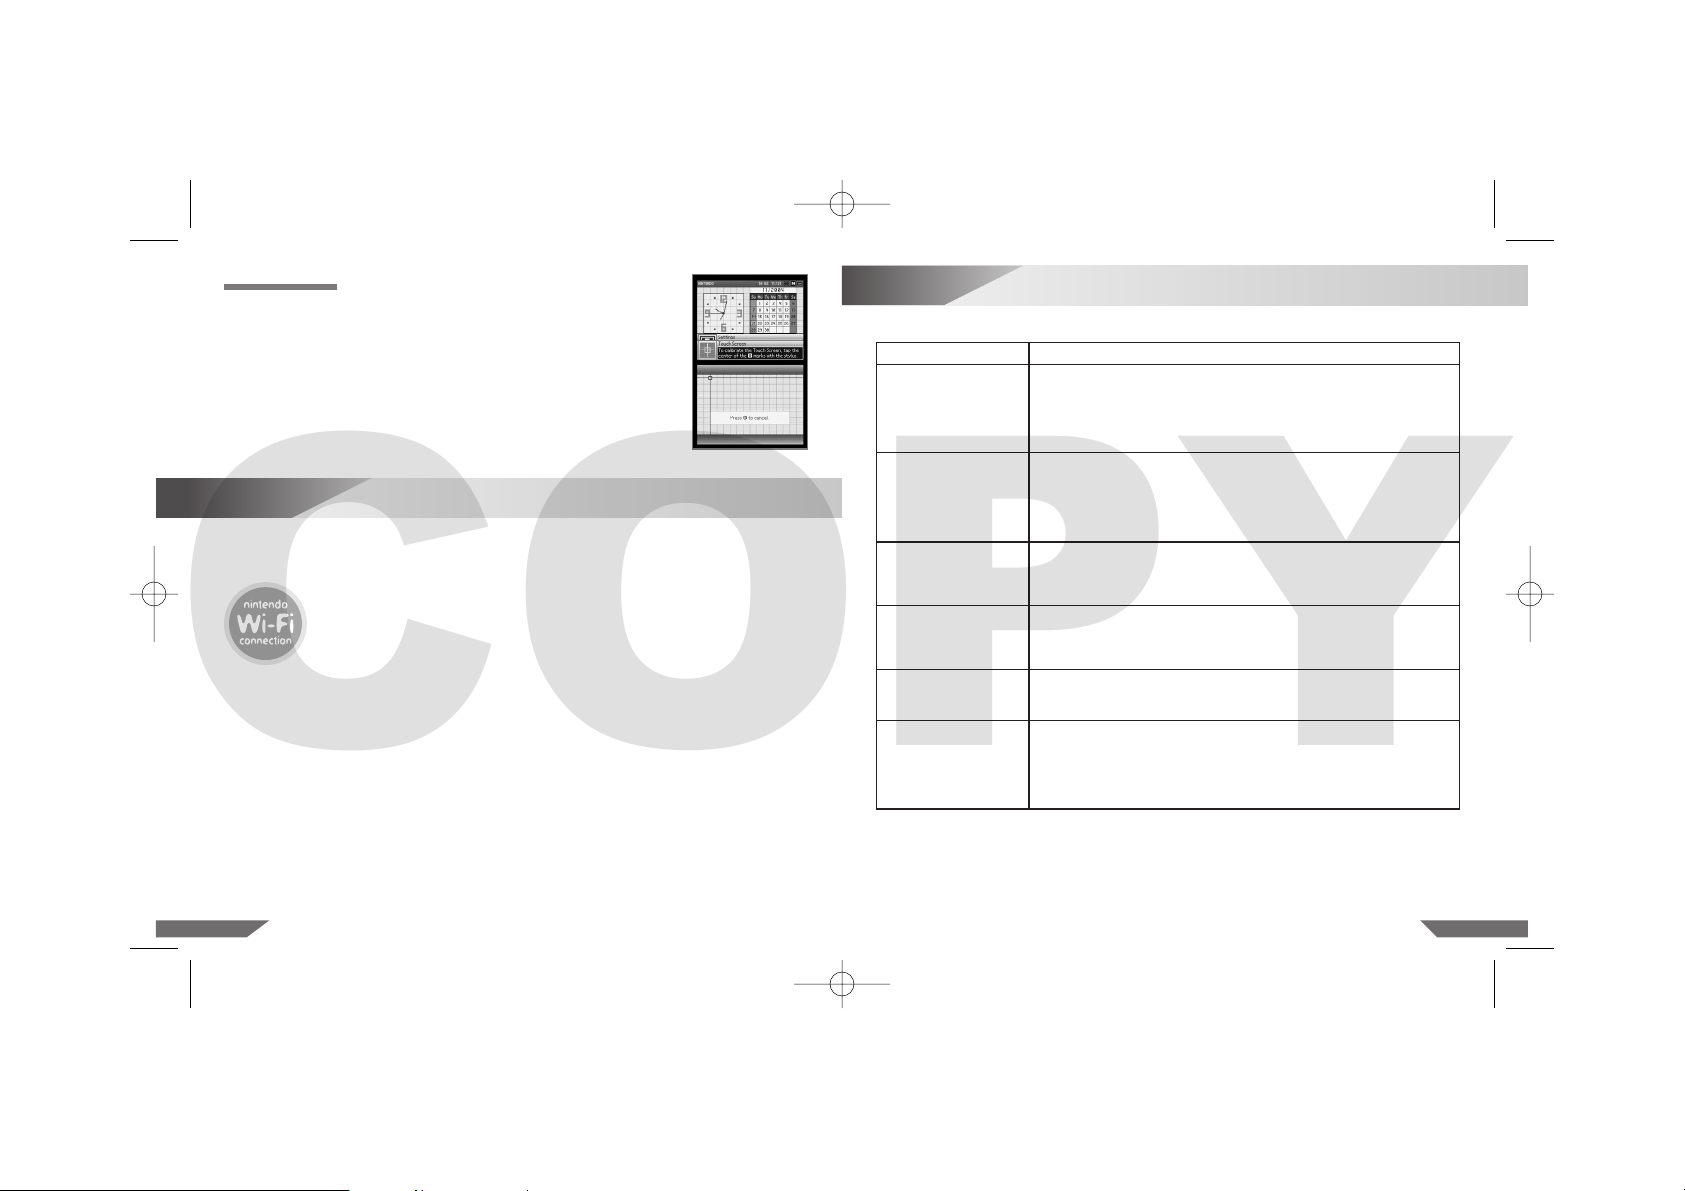
Select this option to realign the Nintendo DS Lite Stylus with the Touch Screen.
Follow the on-screen instructions and carefully touch the indicated marks on
the Touch Screen. (Illustration 32)
Illustration 32
The Nintendo Wi-Fi Connection (Nintendo WFC) allows you to play games over the internet, either
at home or at an internet hotspot, using a Nintendo DS system and a Nintendo WFC compatible
Nintendo DS game.
Always look for this icon on the packaging of Nintendo DS Game Cards
designed to use the Nintendo WFC feature.
15
Nintendo Wi-Fi Connection
To play games over the internet at home, you will need:
• An active broadband internet account.
AND
• A wireless access point, such as a wireless router or the Nintendo Wi-Fi USB Connector.
Please see theseparate NintendoWi-Fi ConnectionInstruction Bookletincluded withall NintendoWFC
compatible games for more information on playing Nintendo DS games over the internet, and visit
www.nintendowifi.com
Before seeking assistance, check the following information.
Problem
The screen stays blank
even though the power
is on.
Image appears but there is
no sound.
Image appears but system
is locked up.
Battery life seems short
and charging takes a long
time.
Game Boy Game Pak
does not fit into the
Nintendo DS Lite.
Wireless game play
or communication does
not work.
Solution
• Make sure the Battery Pak is charged. The Power Indicator LED should light red
or green depending on how much charge is in the battery.
• Turn the power off. Wait a few moments, then turn the power on.
• Turn the power off. Remove game and reinsert it, then turn the power on.
• If you are using the Power Supply, make sure it is securely connected to both
the Nintendo DS Lite and the wall socket.
• Try adjusting the volume control.
• If headphones are attached to the Nintendo DS Lite, sound will not come
through the speakers.
• If you are using headphones, make sure they are securely plugged into
the audio jack.
• Some games may have no sound during parts of the game.
• Make sure the game is inserted completely into the appropriate slot.
• Turn the power off. Remove game and reinsert it, then turn the power on.
• Make sure the game edge connector and game slots are clean and free
of foreign material.
• Make sure the surrounding temperature is above 10 degrees Celsius.
Low temperatures will adversely affect battery performance.
• Battery life may also decrease over time. After 500 recharges, battery life may
be only 70 % of the battery life at the time of purchase.
• Make sure you are using a Game Boy Advance Game Pak (AGB-002).
SLOT-2 on the Nintendo DS Lite will only work with Nintendo DS accessories
and Game Boy Advance Game Paks.
• Make sure the game supports wireless game play.
• For Multi-Card Play, each Nintendo DS systemmust have aGame Card inserted.
• Make sure all Nintendo DS systems are within 10 metres (30 feet) or less of
each other to begin with. The signal strength should be at least two bars.
• Review the instruction booklet for the game you are playing for correct setup
instructions.
USG_HW_Man_EUR_A3 30.07.2007 17:06 Uhr Seite 28
COPY
Page 15
17
Disposal of this Product at the End of its Life
3130
Problem
Wireless game play or
communication seems
interrupted or unstable.
PictoChat doesn’t work.
The Touch Screen doesn’t
work.
The microphone doesn’t
work.
When the power is turned
off there is an after-image
left on the screen.
When playing Game Boy
Advance games, the Multiplayer features don’t work.
Voice recognition is not
working.
Solution
• Make sure all Nintendo DS systems are within 10 metres (30 feet) or less of
each other to begin with. The signal strength should be at least two bars.
• Make sure there are no obstructions between the systems.
• Make sure the systems are facing each other.
• Make sure the batteries are charged.
• Check for interference from other devices (wireless LAN, microwave ovens,
cordless devices, computers), and move to another location or turn off the
interfering device if necessary.
• Make sure there are not more than 16 participants in one chat room.
• Try switching all participants to a different chat room.
• Review the Wireless Signal Strength and PictoChat sections on pages 20 –21.
• Make sure you are using the Nintendo DS Lite Stylus on the correct area of
the Touch Screen.
• Check the alignment of the Nintendo DS Lite Stylus contact point using the
Touch Screen adjustment (see page 28).
• Review the instruction booklet for the game you are playing for correct
operation of the Nintendo DS Lite Stylus.
• If your Touch Screen is scratched, dirty or contaminated with foreign material,
follow the screen cleaning procedure on page 13.
• Only games designed to use the microphone feature will work with the microphone. Make sure the game you are playing includes this feature.
• If using an external microphone, make sure it is plugged securely into the
appropriate audio jack.
• An after-image may appear on the screen after turning the power off.
This after-image will not damage the Nintendo DS Lite and will disappear
after a short time.
• Multi-player features on Game Boy Advance games don’t work on the
Nintendo DS Lite.
• Voice recognition will vary between individuals, and some voices might be
unrecognisable. Please refer to the instruction booklet for the game you are
using for further details.
If your Nintendo DS Lite still does not operate correctly after trying the above remedies,
please call the Nintendo Service Centre.
At the end of this product’s life, please do not dispose of this product in your general household
waste. Instead, please dispose of this product separately in accordance with your local recycling
laws and regulations. For more information on the separate collection systems for waste electrical
and electronic equipment that are available for consumers, free of charge, near your home, please
contact your local municipal authority.
As an alternative and if you plan to buy an equivalent new product, you may be able to bring this
product to your local retailer who, in exchange for your buying an equivalent new product, may take
back this product and arrange for its recycling. However, we would suggest that you first doublecheck with your local retailer whether they will offer you this service.
Either way, this product will then be treated in an environmentally sound manner at a licensed recycling
plant and its components will be recovered, recycled or reused in the most efficient way possible, in
compliance with the requirements of the Directive on Waste Electrical and Electronic Equipment
(2002/96/EC) of 27 January 2003.
Under applicable environmental laws, you should always use the available separate collection
systems for waste electrical and electronic equipment. In some countries, failure to use these
systems may even result in sanctions being taken against you.
Notes:
1. Waste electrical and electronic equipment may contain hazardous substances, which, if not
treated properly, can be harmful to the environment and human health. Specific treatment of
waste electrical and electronic equipment is therefore indispensable.
2. All Nintendo electrical and electronic equipment that is subject to the above Directive is
designed in a way which takes full account of, and facilitates, its possible repair, upgrading,
reuse, dismantling and recycling.
3. Nintendo and its official distributors support recycling schemes in each European country and
are committed to using the best available treatment, recovery and recycling techniques in order
to ensure both human health and high environmental protection.
4. The crossed-out wheeled bin symbol (see below) is affixed to all relevant Nintendo electrical and
electronic equipment that has been put onto the market by Nintendo or its official distributors on
or after 13 August 2005. The symbol means that these products must be collected separately
from other waste at the endof theirlife, in order to ensuremaximum recovery and environmentally
sound disposal.
When disposing of the Battery Pak, please refer to the “Battery Disposal” information
on page 12.
USG_HW_Man_EUR_A3 30.07.2007 17:06 Uhr Seite 30
COPY
Page 16

1
Gesundheits- und Sicherheitshinweise
3332
Inhalt
1 Gesundheits- und Sicherheitshinweise . . . . . . . . . . . . . . . . . . . . . . . . . . . . . . . . . . . . . . . . 33
2 Nintendo DS Lite-Komponenten . . . . . . . . . . . . . . . . . . . . . . . . . . . . . . . . . . . . . . . . . . . . . 36
3 Aufladen des wiederaufladbaren Nintendo DS Lite-Batteriepacks (USG-003) . . . . . . . . 38
4 Austausch und Entsorgung des wiederaufladbaren Nintendo DS Lite-Batteriepacks . . 40
5 Der Nintendo DS Lite-Touchpen (USG-004) und Touchscreen . . . . . . . . . . . . . . . . . . . . . 41
6 Informationen zum Datenschutz . . . . . . . . . . . . . . . . . . . . . . . . . . . . . . . . . . . . . . . . . . . . . 42
7 System-Setup . . . . . . . . . . . . . . . . . . . . . . . . . . . . . . . . . . . . . . . . . . . . . . . . . . . . . . . . . . . . . 43
8 Nintendo DS-Menübildschirm . . . . . . . . . . . . . . . . . . . . . . . . . . . . . . . . . . . . . . . . . . . . . . . 44
9 Der Gebrauch einer Nintendo DS-Karte (NTR-005) . . . . . . . . . . . . . . . . . . . . . . . . . . . . . . 45
10 Der Gebrauch von Game Boy Advance-Modulen (AGB-002) . . . . . . . . . . . . . . . . . . . . . . 46
11 Die Drahtlose DS-Datenübertragung und Spielmodi . . . . . . . . . . . . . . . . . . . . . . . . . . . . . 47
12 PictoChat™ . . . . . . . . . . . . . . . . . . . . . . . . . . . . . . . . . . . . . . . . . . . . . . . . . . . . . . . . . . . . . . 49
13 Die Bildschirm-Tastatur . . . . . . . . . . . . . . . . . . . . . . . . . . . . . . . . . . . . . . . . . . . . . . . . . . . .51
14 Das Einstellungsmenü – Systemeinstellungen bestimmen . . . . . . . . . . . . . . . . . . . . . . . . 52
15 Die Nintendo Wi-Fi Connection . . . . . . . . . . . . . . . . . . . . . . . . . . . . . . . . . . . . . . . . . . . . . . 56
16 Problemlösungen . . . . . . . . . . . . . . . . . . . . . . . . . . . . . . . . . . . . . . . . . . . . . . . . . . . . . . . . . 57
17 Entsorgen dieses Produkts . . . . . . . . . . . . . . . . . . . . . . . . . . . . . . . . . . . . . . . . . . . . . . . . . 59
HINWEIS AN ALLE ELTERN: BITTE DIESE WARNHINWEISE SORGFÄLTIG LESEN, BEVOR SIE
ODER IHR KIND ZU SPIELEN BEGINNEN! DA DIESES SYSTEM VON KINDERN VERWENDET
WIRD, SOLLTE EIN ERWACHSENER DIESE ANLEITUNG SORGFÄLTIG DURCHLESEN UND
DEM KIND DEN UMGANG MIT DEM SYSTEM ERKLÄREN. ANDERNFALLS KANN ES ZU
VERLETZUNGEN KOMMEN.
Bei einem kleinen Prozentsatz (ca. 1 Person von 4.000) der Bevölkerung können während des
Betrachtens blinkender Lichter und Muster, die in unserer Umgebung täglich vorkommen, epileptische Erscheinungen auftreten. Solche Reaktionen können auch auftreten, wenn diese Personen
bestimmte Fernsehbilder anschauen oder bestimmte Videospiele spielen. Auch bei Spielern, die
bislang nicht mit epileptischen Symptomen auf Lichtreize reagiert haben, ist eine bisher unentdeckte
epileptische Veranlagung nicht ausgeschlossen.
Befrage einen Arzt, bevor du ein Videospiel benutzt, wenn bei dir oder einem Mitglied deiner Familie
Epilepsie vorliegt.
Wir empfehlen allen Eltern, ihre Kinder während des Spielens von Videospielen zu beobachten.
Unterbrechen Sie das Spiel, wenn bei Ihnen oder Ihrem Kind folgende Symptome auftreten sollten:
Schwindelgefühle und/oder Krämpfe, Augen- und Muskelzuckungen, Wahrnehmungsverlust
der Umgebung, verändertes Sehvermögen, unwillkürliche Bewegungen, Desorientierung.
Beachte beim Spielen stets folgende Hinweise:
1. Halte den größtmöglichen Abstand zum Bildschirm!
2. Videospiele, die auf einem TV-Gerät dargestellt werden, immer auf einem möglichst
kleinen Bildschirm spielen.
3. Verzichte auf das Spielen, wenn du erschöpft bist oder Schlaf benötigst.
4. Spiele stets in einem gut beleuchteten Raum.
5. Achte darauf, pro Stunde etwa 10 bis 15 Minuten Pause zu machen.
Bei einigen Personen kann es nach längerer Spieldauer zu Ermüdungserscheinungen oder Unbehagen
kommen. Beachte folgende Hinweise, um solche Erscheinungen zu vermeiden.
• Vermeide exzessives Spielen. Es wird den Eltern empfohlen, darauf zu achten, dass ihre Kinder
eine angemessene Spieldauer nicht überschreiten.
• Unabhängig davon, wie du dich fühlst, solltest du in jedem Fall stündlich eine Pause von 10 bis
15 Minuten einlegen.
• Der Nintendo DS Lite-Touchpen sollte nicht zu fest gehalten oder mit zu viel Kraft verwendet
werden, da dies zu Müdigkeit und Unbehagen führen kann.
• Sollten deine Hände, Arme oder Augen ermüden oder fühlst du dich unwohl, lege eine mehr-
stündige Erholungspause ein, bevor du weiterspielst.
• Sollten die Beschwerden auch dann nicht abklingen, achte auf die Signale deines Körpers und
suche einen Arzt auf. Ansonsten könnten dauerhafte Schädigungen auftreten.
▲
! WARNUNG – ÜBERANSTRENGUNGSHINWEIS/ ERMÜDUNG DER AUGEN
▲
! WARNUNG – EPILEPSIEHINWEIS
WICHTIG: Kompatibilität mit Spielen für den Game Boy und Zubehör
Der Nintendo DS Lite (USG-001) ist NICHT kompatibel mit den folgenden Spielen und
folgendem Zubehör:
• Original Game Boy™-Module (DMG-09)
• Game Boy™ Color-Module (CGB-002)
• Universal Game Link™-Kabel (CGB-003) und GameBoy AdvanceGame Link™-Kabel (AGB-005)
• Game Boy Advance™ Wireless Adapter (Drahtloser Adapter) (AGB-015)
• Game Boy™ micro Wireless Adapter (Drahtloser Adapter) (OXY-004)
• Game Boy™ micro Game Link™-Kabel (OXY-008(EUR))
• NINTENDO GAMECUBE™ Game Boy Advance™-Kabel (DOL-011)
• Game Boy™ camera (MGB-006)
• Game Boy™ printer (MGB-007)
Der Nintendo DS Lite ist im Einspieler-Modus kompatibel mit Game Boy Advance-Modulen
(AGB-002).
MANUAL_USG_NOE_260707 CONFIDENTIAL
As for other languages the English or German text is translated faithfully without any change.
USG_HW_Man_EUR_A3 30.07.2007 17:06 Uhr Seite 32
COPY
Page 17

3534
Der Nintendo DS Lite enthält ein wiederaufladbares Lithium-Ionen-Batteriepack. Der Austritt von Substanzen aus der Lithium-Ionen-Batterie oder deren Verbrennungsrückstände können Verletzungen
verursachen sowie den Nintendo DS Lite beschädigen und unbrauchbar machen. Sollte Batteriesäure
austreten und in Kontakt mit den Augen kommen, spüle sie sofort gründlich mit viel Wasser aus und
suche einen Arzt auf. Falls austretende Batteriesäure in Kontakt mit Hautpartien oder Kleidungsstücken kommen sollte, so wasche diese gründlich mit Wasser und Seife.
Halte dich bitte an diese Anweisungen, um den Austritt von Batteriesäure, Verbrennungen und
Explosionen zu vermeiden.
• Setze das Batteriepack nicht extremen Stößen oder Erschütterungen aus.
• Versuche nicht, das Batteriepack zu zerlegen, zu reparieren oder es in sonstiger Weise
zu manipulieren.
• Die Lithium-Ionen-Batterie darf unter keinen Umständen kurzgeschlossen werden. Berühre die
Kontakte des Batteriepacks nicht mit einem metallenen oder anderen Gegenständen.
• Setze das Batteriepack keiner großen Hitze aus und wirf es nicht ins Feuer.
• Das Label des Batteriepacks darf nicht beschädigt werden.
• Ein Batteriepack, dessen äußere Hülle in irgendeiner Weise beschädigt ist, darfst du unter keinen
Umständen benutzen!
• Lege kein Batteriepack ein bzw. entferne kein Batteriepack, während das System eingeschaltet ist.
• Das Aufladen des wiederaufladbaren Batteriepacks darf nur unter der Aufsicht eines Erwachsenen
erfolgen.
• Verwende zum Aufladen des wiederaufladbaren Nintendo DS Lite-Batteriepacks ausschließlich
das Nintendo DS Lite-Netzteil, das diesem Set beiliegt.
• Verwende das wiederaufladbare Nintendo DS Lite-Batteriepack ausschließlich mit dem
Nintendo DS Lite.
• Das Batteriepack muss aus dem Nintendo DS Lite entfernt werden, wenn dieser entsorgt werden
soll.
• Setze das Batteriepack weder Wasser noch anderen Flüssigkeiten aus.
• Im Falle einer unsachgemäßen Handhabung der Lithium-Ionen-Batterie (z. B. beim Austausch
des Batteriepacks) kann es zu Verbrennungen und Explosionen kommen. Das Batteriepack darf
nicht deformiert, zerquetscht, durchbohrt oder Temperaturen von über 60 °C ausgesetzt werden.
Die Kontakte des Batteriepacks dürfen nicht mit metallenen Gegenständen in Berührung kommen.
Verwende ausschließlich das offizielle wiederaufladbare Nintendo DS Lite-Batteriepack (USG-003)
für den Nintendo DS Lite. Die Verwendung eines anderen Batteriepacks kann zu Feuer und
Explosionen führen.
Entferne das wiederaufladbareBatteriepack nichtaus demNintendo DSLite, bevores komplett
erschöpft ist und ersetzt werden muss.
▲
! WARNUNG – BATTERIEHINWEIS
Weitere Informationen zum Entfernen des Batteriepacks erhältst du auf Seite 40. Informationen zur
Entsorgung des Batteriepacks erhältst du im Abschnitt „Entsorgung der Batterien“ auf Seite 40.
Sollte das Batteriepack feucht geworden sein, so darfst du es nicht weiter verwenden.
Wiederaufladbare Nintendo DS Lite-Batteriepacks sind separat erhältlich. Bei der Konsumenten-
beratung der Nintendo of Europe GmbH erhältst du weitere Informationen und Adressen. Wenn du
das Batteriepack nicht selbst austauschen möchtest, kannst du deinen Nintendo DS Lite auch an
die Reparaturabteilung schicken. Ein autorisierter Techniker wird dort die Batterie austauschen.
Der Nintendo DS Lite sendet Funkwellen aus, die das einwandfreie Funktionieren benachbarter
Elektrogeräte beeinträchtigen können, insbesondere Herzschrittmacher.
• Achte bei der Drahtlosen DS-Datenübertragung darauf, dass der Abstand zu einem Herzschrittmacher mindestens 25 Zentimeter beträgt.
• Solltest du einen Herzschrittmacher oder Ähnliches besitzen, so konsultiere zunächst deinen Arzt
oder den Hersteller des medizinischen Gerätes, bevor du den Nintendo DS Lite verwendest.
Der Gebrauch des Nintendo DS Lite in Flugzeugen, Krankenhäusern und Flughäfen kann – ähnlich
wie bei anderen nichtdrahtlosen Geräten – erlaubt sein, wenn die Drahtlose DS-Datenübertragung
nicht aktiv ist. Blinkt die Betriebsanzeige (grün oder rot), findet eine Drahtlose Datenübertragung
statt, zum Beispiel über den PictoChat™, im Mehrspieler-Modus oder bei der Übertragung eines
Spiels von einem anderen Nintendo DS-System.
Verwende die Drahtlose DS-Datenübertragung nicht in Krankenhäusern, Flughäfen, Flugzeugen oder
an anderen Orten, an denen der Einsatz von Geräten mit Funkübertragung generell untersagt ist. An
Bord eines Flugzeuges ist die Aktivierung des PictoChats und des Mehrspieler-Modus verboten.
Durch die Aktivierung dieser Funktionen kann es zu schweren Frequenzstörungen kommen, die das
elektronische System des Flugzeugs beeinflussen und so zu Schäden an Personen und Gegenständen
führen können.
Dieses Produkt enthält komplexe Elektronik, die durch direkte physische Einwirkung von außen
beschädigt werden kann. Ein schützendes Etui (separat erhältlich) hilft Beschädigungen zu
vermeiden.
In dem Handbuch der Gesundheits- und Sicherheitshinweise für den Nintendo DS finden sich
weitere Information zu der Hardware und Software.
Bitte lies dirdie folgendenAnweisungen genaudurch, bevor du den Nintendo DS Lite verwendest.
Solltest du weitere Fragen haben, kannst du dich an die Konsumentenberatung der Nintendo
of Europe GmbH wenden.
HINWEIS: Dieses Produkt enthält kein Latex, Blei, Quecksilber, Cadmium, Chrom VI, PBB und PBDE.
▲
! WARNUNG – DER GEBRAUCH DES NINTENDO DS LITE
IN FLUGZEUGEN, KRANKENHÄUSERN UND FLUGHÄFEN
▲
! WARNUNG – FUNKWELLEN
USG_HW_Man_EUR_A3 30.07.2007 17:06 Uhr Seite 34
COPY
Page 18

3736
2
Nintendo DS Lite-Komponenten
1. LC-Bildschirme
2. Stereo-Lautsprecher
2. Stereo-Lautsprecher
5. Mikrofon (MIC.)
3. POWER-Schalter
9. Betriebsanzeige
8. Ladeanzeige
6. Lautstärkeregler (VOL.)
7. Nintendo DS Lite-Modulschachtabdeckung und Modulschacht (SLOT-2)
4. Steuerelemente
10. Audiobuchse
1. LC-Bildschirme – Zwei Farb-LC-Bildschirme mit Beleuchtung. Der untere Bildschirm
(der Touchscreen) reagiert auf Berührung und sollte ausschließlich mit dem lizenzierten
Nintendo DS Lite-Touchpen bedient werden.
VORSICHT: Halte beim Öffnen des Nintendo DS Lite deine Finger vom Scharnier fern,
um sie nicht darin einzuklemmen.
2. Stereo-Lautsprecher
3. POWER-Schalter – Hier wird das System ein- und ausgeschaltet. Um zu vermeiden, dass das
System aus Versehen während eines Spiels ausgeschaltet wird, muss der POWER-Schalter ein
paar Sekunden lang nach oben gedrückt werden, damit sich das System ausschaltet.
4. Steuerelemente – Steuerkreuz, A-, B-, X- und Y-Knopf, L- und R-Taste, START und SELECT.
Mit diesen Elementen wird das Spiel gesteuert. In der Spielanleitung des jeweiligen Spiels finden
sich detaillierte Beschreibungen zur Spielsteuerung.
5. Mikrofon (MIC.) – Für bestimmte Spiele, bei denen als Besonderheitein Mikrofon eingesetzt wird.
6. Lautstärkeregler (VOL.) – Bewege ihn nach rechts, um die Lautstärke zu erhöhen und nach
links, um die Lautstärke zu mindern.
7. Nintendo DS Lite-Modulschachtabdeckung (USG-005) und Modulschacht (SLOT-2) – Bitte
Abdeckung entfernen, wenn Game Boy Advance-Module oder Nintendo DS-Zubehör (separat
erhältlich) verwendet werden. Die Abdeckung sollte eingesetzt werden, wenn der Modulschacht
nicht verwendet wird, um das Eindringen von Staub oder anderer Fremdkörper zu verhindern.
Nicht kompatibel mit Game Boy- oder Game Boy Color-Modulen.
8. Ladeanzeige – Während die Batterie aufgeladen wird, leuchtet diese Anzeige orange.
Sobald der Ladevorgang abgeschlossen ist, schaltet sich die Anzeige aus.
9. Betriebsanzeige – Zeigt an, ob das System ein- oder ausgeschaltet ist. Ebenso lässt sich die
restliche Kapazität der Batterie erkennen. Die grüne Anzeige wird rot, wenn die Batterie
schwächer wird. Sobald die Anzeige rot geworden ist, sollte das Spiel gespeichert werden,
damit keine Spieldaten verloren gehen, und die Batterie aufgeladen werden.
15. Batteriefachabdeckung
14. Nintendo DS Lite-Touchpen
und Touchpen-Halterung
4. Steuerelemente
11. Anschlussbuchse (5.2V IN)
12. DS Kartenschlitz (SLOT-1)
13. Tragebandhalterung
10. Audiobuchse – Hier können Stereo-Kopfhörer, ein externes Mikrofon oder ein Headset
(jeweils separat erhältlich) angeschlossen werden.
11. Anschlussbuchse (5.2V IN) – Hier wird das Nintendo DS Lite-Netzteil (im Set enthalten) ange-
schlossen, um die Batterie aufzuladen oder den Nintendo DS Lite mit normalem Haushaltsstrom
in Betrieb zu nehmen.
12. DS Kartenschlitz (SLOT-1) – Hier wird die Nintendo DS-Karte (separat erhältlich) eingesteckt.
13. Tragebandhalterung – Hier wird das Trageband (nicht enthalten) befestigt.
14. Nintendo DS Lite-Touchpen und Touchpen-Halterung – Nach dem Gebrauch sollte der
Touchpen stets in die dafür vorgesehene Halterung zurückgesteckt werden.
15. Batteriefachabdeckung – Diese Abdeckung lässt sich entfernen, um das wiederaufladbare
Nintendo DS Lite-Batteriepack auszutauschen. Auf Seite 40 findest du weitere Informationen
zum Austausch des Batteriepacks.
16. Gleichstromstecker – Dieser wird an die Anschlussbuchse (5.2V IN) angeschlossen, um das
Batteriepack aufzuladen oder um normalen Haushaltsstrom zu nutzen.
17. Netzteilstecker – Normaler Stecker, für Wechselstrom von 230 Volt.
16. Gleichstromstecker
17. Netzteilstecker
Nintendo DS Lite-Netzteil (USG-002(EUR))
• Schnelles Blinken bedeutet, dass die drahtlose Kommunikation ausgeführt wird.
• Langsames Blinken zeigt an, dass der Nintendo DS Lite sich im Standby-Modus befindet.
HINWEIS: Wird der Nintendo DS Lite geschlossen, während er eingeschaltet ist, wird automatisch der Energie sparende Standby-Modus eingeschaltet. Wird das System wieder geöffnet,
wird der normale Modus aktiviert.
USG_HW_Man_EUR_A3 30.07.2007 17:06 Uhr Seite 36
COPY
Page 19

3938
3
Aufladen des wiederaufladbaren
Nintendo DS Lite-Batteriepacks (USG-003)
VORSICHT: Während eines Gewitters sollte das Nintendo DS Lite-Netzteil nicht verwendet
werden, da im Falle eines Blitzschlags die Gefahr besteht, einen Stromschlag zu erhalten.
Bevor der Nintendo DS Lite zum ersten Mal in Betrieb genommen wird oder wenn er eine längere
Zeit nicht genutzt wurde, muss das Batteriepack aufgeladen werden. (Selbst wenn der Nintendo DS
Lite über einen längeren Zeitraum nicht genutzt wird, sollte das Batteriepack jedes halbe Jahr
mindestens einmal aufgeladen werden.)
Ein frisch aufgeladenes Batteriepack muss bei niedrigster Bildschirmhelligkeit und je nach Art des
Spieles, nach 15 bis 19 Stunden erneut aufgeladen werden. (Siehe Seite 44 für mehr Informationen
über die Einstellung der Bildschirmhelligkeit.) Bei maximaler Bildschirmhelligkeit muss das Batteriepack nach fünf bis acht Stunden wieder aufgeladen werden.
Die Batterie kann bis zu 500-mal aufgeladen werden, aber nach wiederholtem Aufladen kann es,
abhängig von der Umgebung (Temperatur), in der die Batterie aufgeladen wird, zu einem Leistungsabfall kommen. (Die optimale Temperatur liegt zwischen 10°C und 40 °C.) Auch der Zeitraum bis zur
nächsten notwendigen Aufladung der Batterie kann sich verkürzen. Nach 500 Aufladungen kann der
Zeitraum nur noch 70 % im Vergleich zu einer neuen Batterie betragen.
Das Aufladen des Batteriepacks dauert im Schnitt drei Stunden. (Die Dauer ist abhängig von der
Menge der Restenergie, die zum Zeitpunkt des Aufladens noch vorhanden ist.) Leuchtet die Betriebsanzeige rot, sollte das Spiel gespeichert und die Batterie aufgeladen werden. Ansonsten besteht die
Gefahr eines Datenverlustes. Während des Aufladevorganges kann weitergespielt werden, allerdings
verlängert sich dadurch die Aufladezeit.
WICHTIG: Das Nintendo DS Lite-Netzteil (USG-002(EUR)) ist nur für den Gebrauch mit den
Nintendo DS Lite-Systemenvorgesehen. Esist nichtkompatibel mit anderen Nintendo-Systemen.
1. Stecke den Gleichstromstecker des Netzteils in die Anschlussbuchse (5.2V IN), die sich auf der Rückseite des Nintendo DS Lite
befindet (Abbildung 1).
WICHTIG: Vergewissere dich, dass der Gleichstromstecker
in die richtige Richtung zeigt, bevor du ihn in die Anschlussbuchse steckst. Ansonsten kann es zu Beschädigungen
des Gleichstromsteckers und der Anschlussbuchse kommen.
2. Stecke den Netzteilstecker in eine Standardsteckdose, die 230 Volt
Haushaltsstrom führt. Vergewissere dich, dass dieser richtig eingesteckt
ist. Die Ladeanzeige bleibt orange, bis das Batteriepack vollständig
aufgeladen ist. Während des Aufladens kannst du den Nintendo DS Lite
benutzen, aber dadurch verlängert sich die Aufladezeit (Abbildung 2).
Wird der Nintendo DS Lite während des Aufladens benutzt, leuchtet
die Ladeanzeige möglicherweise auch nach dem abgeschlossenen
Ladevorgang weiterhin auf.
• Der Nintendo DS Lite darf ausschließlich mit dem offiziellen Nintendo DS Lite-Netzteil betrieben
werden.
• Das spezielle Netzteil entspricht der Niederspannungsrichtlinie (2006/95/EG) für elektrische
Betriebsmittel.
• Das Netzteil muss regelmäßig auf Schäden am Kabel, der Ummantelung des Netzteilsteckers
und an allen anderen Bestandteilen untersucht werden.
• Sollten Beschädigungen vorliegen, darf das Netzteil auf keinen Fall weiter betrieben werden,
bis es repariert wurde.
• Der Nintendo DS Lite ist nicht geeignet für Kinder unter 3 Jahren!
• Das Netzteil ist kein Spielzeug.
• Das Netzteil des Nintendo DS Lite ist ausschließlich zum Gebrauch in Räumen vorgesehen.
• Ist ein Kabel des Netzteils beschädigt, muss es ausgetauscht werden. Wende dich diesbezüglich
bitte an die Konsumentenberatung der Nintendoof Europe GmbH,um eineGefährdungzu vermeiden.
• Der Nintendo DS Lite muss vom Netzteil getrennt werden, bevor er gereinigt wird.
• Es ist darauf zu achten, dass das Gerät und insbesondere die Batterie außer Reichweite von
Kleinkindern gehalten werden muss.
• Platziere das Netzteil nicht an Orten, an denen es mit Wasser und anderen Flüssigkeiten, wie zum
Beispiel Fruchtsaft, Tierurin oder Öl in Berührung kommen kann, oder in denen eine sehr hohe
Luftfeuchtigkeit herrscht.
• Verwende keine Steckdosenadapter oder Dimmervorrichtungen für Glühbirnen, da dies möglicher-
weise zu einer Veränderung der Netzspannung führen kann.
3. Sobald das Batteriepack vollständig aufgeladen ist, geht die Ladeanzeige
aus. Entferne nun den Netzteilstecker aus der Wandsteckdose. Danach
entferne den Gleichstromstecker aus der Anschlussbuchse (Abbildung 3).
WICHTIG: Entfernst du die Stecker aus dem Nintendo DS Lite oder
aus der Wandsteckdose, ziehe direkt am Stecker und nicht am Kabel.
Wickle das Kabel des Netzteils nicht um den Nintendo DS Lite.
Abbildung 1
Abbildung 2
Abbildung 3
USG_HW_Man_EUR_A3 30.07.2007 17:06 Uhr Seite 38
COPY
Page 20

5
Der Nintendo DS Lite-Touchpen (USG-004)
und Touchscreen
4140
4
Austausch und Entsorgung des wiederaufladbaren
Nintendo DS Lite-Batteriepacks
Folge den unten stehenden Anweisungen, falls das wiederaufladbare Batteriepack ausgetauscht
werden muss. Der Austausch sollte von einem Erwachsenen vorgenommen werden! Wiederaufladbare
Nintendo DS Lite-Batteriepacks sind separat erhältlich. Bei der Konsumentenberatung der Nintendo
of Europe GmbH erhältst du weitere Informationen und Adressen. Wenn du das Batteriepack nicht
selbst austauschen möchtest, kannst du deinen Nintendo DS Lite auch an die Reparaturabteilung
schicken. Ein autorisierter Techniker wird dort die Batterie austauschen.
1. Bevor du das Batteriepack austauschst, musst du den Nintendo DS Lite ausschalten bzw.
den Netzteilstecker ziehen.
2. Löse nun mit einem Schraubendreher die Schraube der Batteriefachabdeckung (Abbildung 4).
Entferne die Batteriefachabdeckung und hebe sie gut auf. Wichtig ist, dass der Schraubendreher
perfekt passt. Ansonsten beschädigst du den Schraubenkopf und kannst die Abdeckung nicht
mehr entfernen.
3. Entferne nun das Batteriepack aus dem Nintendo DS Lite (Abbildung 5).
4. Lege das neue wiederaufladbare Batteriepack in den Nintendo DS Lite ein. Verwende ausschließlich ein neues wiederaufladbares Nintendo DS Lite-Batteriepack (USG-003). Vergewissere dich,
dass du die Batterie richtig herum einlegst – sieh dir hierzu Abbildung 6 an.
5. Lege nun die Batteriefachabdeckung wieder auf und schraube sie vorsichtig fest.
6. Informationen zur Entsorgung des wiederaufladbaren Batteriepacks erhältst du im folgenden
Abschnitt „Entsorgung der Batterien“.
Abbildung 4
Abbildung 5
Abbildung 6
Der untere LC-Bildschirm, also der Touchscreen, reagiert auf Berührungen. Es gibt Spiele für den
Nintendo DS Lite, die dieses Feature unterstützen. Verwende bei diesen Spielen ausschließlich den
beiliegenden Nintendo DS Lite-Touchpen.
Berühre oder bewege den Touchpen leicht über die Oberfläche des Touchscreens (Abbildungen 7
und 8).
WICHTIGE RICHTLINIEN ZUM UMGANG MIT TOUCHPEN UND BILDSCHIRM:
• Verwende den Touchpen AUSSCHLIESSLICH auf dem UNTEREN Touchscreen.
• Berühre den Touchscreen leicht – mit gerade so viel Druck, dass es zum Spielen reicht.
Zuviel Druck kann den Touchscreen beschädigen.
• Verwende den Touchpen nicht, wenn er abgebrochen ist.
• Verwende nur einen von Nintendo lizenzierten Touchpen.
• Stecke den Touchpen zurück in die Touchpen-Halterung, wenn du ihn nicht mehr brauchst.
• Möchtest du eine Schutzfolie für den Bildschirm deines Nintendo DS Lite verwenden, verwende
ausschließlich von Nintendo lizenzierte Schutzfolien. Verwende diese nur mit dem Touchscreen.
DIE REINIGUNG DER BILDSCHIRME:
Sollten die Bildschirme deines Nintendo DS Lite Schmutzflecken oder Fingerabdrücke aufweisen
oder mit Fremdkörpern behaftet sein, könnte das ihre Leistungskraft beeinträchtigen und sie könnten
sogar dauerhaft beschädigt werden. Verwende für die Reinigung ein weiches, sauberes Tuch, welches
sich zum Beispiel auch zum Reinigen von Brillengläsern eignet.
1. Feuchte das Tuch leicht an. Verwende hierzu AUSSCHLIESSLICH Wasser und reibe damit
vorsichtig über die Bildschirme, um die Verschmutzungen zu entfernen.
2. Anschließend trockne die Bildschirme ebenfalls mit einem trockenen, weichen Tuch. Sollten sich
danach noch Schmutzpartikel auf den Bildschirmen befinden, wiederhole die Punkte 1 und 2.
Sollte der Touchscreen nach dem Reinigen immer noch nicht einwandfrei funktionieren, dann wende
dich bitte an die Konsumentenberatung der Nintendo of Europe GmbH.
Abbildung 7 Abbildung 8
ENTSORGUNG DER BATTERIEN
• Leere Batterien in den Hausmüll zu entsorgen schadet der Umwelt. Auskünfte über entsprechende
Sammelstellen für leere Batterien erteilt deine Stadt bzw. Gemeinde.
• In Übereinstimmung mit der Richtlinie 2006/66/EG des Europäischen Parlaments und des Rates
vom 6. September 2006 über Batterien und Akkumulatoren sowie Altbatterien und Altakkumulatoren sollten bis zum 26. September 2008 in allen EU-Mitgliedsstaaten Bestimmungen zum Einsammeln und zur Wiederverwertung von Batterien und Akkumulatoren bestehen. Sollten diese
Bestimmungen in deinem Land bereits gültig sein, darf das Batteriepack auf keinen Fall im Hausmüll entsorgt werden. Weitere Informationen erhältst du bei deinem örtlichen Entsorgungsträger.
USG_HW_Man_EUR_A3 30.07.2007 17:06 Uhr Seite 40
COPY
Page 21

7
System-Setup
4342
6
Informationen zum Datenschutz
Sobald du deinen Nintendo DS Lite zum ersten Mal einschaltest, wirst du aufgefordert, die Sprache
auszuwählen. Verwende das Steuerkreuz oder den Touchpen, um eine Sprache auszuwählen, dann
drücke JA oder drücke den A-Knopf.
Folge den Anweisungen auf dem Bildschirm, um deinen Spitznamen einzugeben, die Bildschirmfarbe zu bestimmen, das Datum und die Zeit sowie den Monat und den Tag deiner Geburt (nicht das
Geburtsjahr) einzugeben. Drücke den B-Knopf, um jeweils einen Schritt zurückzugehen, wenn du
Änderungen vornehmen willst. Später kannst du dies alles über das Einstellungsmenü ändern
(s. S. 52 – 56). Auf Seite 51 findest du Informationen zur Verwendung der Bildschirm-Tastatur.
Sobald du alle Einstellungen vorgenommen hast, berühre die Option ENDE. Berühre JA, um die
Einstellungen zu bestätigen. Der Nintendo DS Lite schaltet sich daraufhin automatisch aus. Schalte
das System wieder ein, um den Nintendo DS-Menübildschirm aufzurufen, welcher dir auf der
folgenden Seite erklärt wird.
Wie bei jedemProdukt, welches mit einem Bildschirm mit Berührungseingabe ausgerüstetist, kannes
bei einem kleinen Prozentsatz von Nintendo DS Lite-Systemen notwendig sein, eine Neukalibrierung
nach dem Versand vorzunehmen, so dass die Eingabe durch den Touchpen wieder mit dem Touchscreen abgestimmt ist. Sollte bei deinem Nintendo DS Lite-System eine Neukalibrierung notwendig
sein, findest du auf Seite 56 unter dem Absatz „Touchscreen“ genaue Informationen hierzu.
PictoChat™ ist keine Internet-Anwendung. Trotzdem kannst du via PictoChat mit bis zu
15 weiteren Nintendo DS Lite- oder Nintendo DS-Usern innerhalb der Reichweite deines
Nintendo DS Lite (ungefähr 20 Meter) kommunizieren. Diese sind in der Lage, deinen Spitznamen und deine Mitteilungen einzusehen. Daher solltest du keine persönlichen Informationen,
wie deinen Nachnamen, deine Telefonnummer, dein Alter oder deine Adresse bzw. E-MailAdresse weitergeben, wenn du mit anderen kommunizierst.
Das System-Setup sollte zusammen mit einem Erwachsenen ausgeführt werden, der dafür
sorgt, dass keine persönlichen Informationen verwendet und weitergegeben werden. PictoChat
blockiert Mitteilungen Dritter nicht. Kinder sollten darüber aufgeklärt werden, dass Fremde
ihnen Mitteilungen schicken oder mit ihnen kommunizieren können, ähnlich wie in InternetChat-Räumen ohne überwachenden Moderator.
Egal, welches Geburtsdatum – Monat/Tag (das Geburtsjahr wird nicht angegeben) – du angibst,
dieses wird an dem entsprechenden Tag im Chat-Raum als dein Geburtstag bekanntgegeben.
Weitere Informationen hierzu kannst duim Internet unter derAdresse
http://dsprivacy.nintendo-europe.com nachlesen.
USG_HW_Man_EUR_A3 30.07.2007 17:06 Uhr Seite 42
COPY
Page 22

4544
8
Nintendo DS-Menübildschirm
9. Start-up-Modus – Dieses Symbol zeigt dir an, in welchem Modus der Nintendo DS Lite startet,
wenn er eingeschaltet wird.
• Im Auto-Modus lädt der Nintendo DS Lite automatisch das Spiel, welches sich in SLOT-1 oder
SLOT-2 befindet. Befinden sich in beiden Slots des Nintendo DS Lite Spiele, so wird das Spiel
von der Nintendo DS-Karte geladen.
• Im manuellen Modus erscheint der Nintendo DS-Menübildschirm.
Der Modus kann im Einstellungsmenü eingestellt werden (siehe Seite 53).
10. Game Boy Advance-Anzeige – Dieses Symbol zeigt an, auf welchem Screen Game Boy
Advance-Spiele angezeigt werden. Dies kann im Einstellungsmenü eingestellt werden (siehe
Seite 53).
11. Kalender und Datum – Dies kann im Einstellungsmenü eingestellt werden (siehe Seite 54).
12. DS-DOWNLOAD-SPIEL – Wähle diese Option aus, um ein Spiel mit einer Nintendo DS-Karte zu
starten. (Im Kapitel „Die Drahtlose DS-Datenübertragung und Spielmodi“ auf den Seiten 47 – 49
findest du weitere Informationen hierzu.)
13. Drahtlose DS-Datenübertragung – Wenn du diese Option anwählst, wird die Drahtlose DS-
Datenübertragung aktiviert (siehe Seite 48). HINWEIS:Der Einsatzdrahtloser Kommunikations-
techniken ist an einigen Orten und in bestimmten Situationen nicht erlaubt.
14. Alarm an /aus – Berühre dieses Symbol, um den Alarm zu aktivieren. Im Einstellungsmenü
kannst du weitere Einstellungen hierzu vornehmen (siehe Seite 54).
1. USER-NAME – Kann im Einstellungsmenü eingegeben werden (siehe Seite 55).
2. UHR /ALARM /ZEIT – Kann im Einstellungsmenü eingestellt werden (siehe Seite 54).
3. DS Spiel-Auswahl – Hierüber hast du Zugriff auf die Nintendo DS-Karte, welche sich in SLOT-1
befindet. (Im Kapitel „Der Gebrauch einer Nintendo DS-Karte (NTR-005)“ auf der folgenden Seite
findest du weitere Informationen hierzu.)
4. PICTOCHAT-Auswahl – Wähle diese Option an, um einen PictoChat zu starten. (Siehe auch
„PictoChat“ auf den Seiten 49 – 50.)
5. Game Boy Advance-Modul-Auswahl – Hierüber hast du Zugriff auf das Game Boy Advance-
Modul, welches sich in SLOT-2 befindet. (Im Kapitel „Der Gebrauch von Game Boy AdvanceModulen (AGB-002)“ auf Seite 46 finden sich weitere Informationen.)
6. Einstellungsmenü – Hier kannst du das Einstellungsmenü aufrufen, um die vorhandenen
Einstellungen zu ändern (s. S. 52 –56).
7. Bildschirmhelligkeit – Berühre das Symbol, um eine von vier Helligkeitsstufen für die
Bildschirmbeleuchtung auszuwählen. HINWEIS: Je heller der Bildschirm eingestellt ist,
desto schneller entlädt sich die Batterie.
8. Betriebsanzeige – Zeigt an, ob die Batterie geladen ist. Ist das Batteriepack geladen, so
erscheint sie grün; sie erscheint rot, wenn die Batterie schwächer wird und geladen werden
muss.
9
Der Gebrauch einer Nintendo DS-Karte (NTR-005)
1. Vergewissere dich, dass der Nintendo DS Lite ausgeschaltet ist.
2. Stecke die Nintendo DS-Karte in den Kartenschlitz (SLOT-1) auf der
Rückseite des Systems. Stecke die DS-Karte vorsichtig so weit
hinein, bis es ‘klickt’. Das Label der Nintendo DS-Karte muss dabei
nach unten zeigen (Abbildung 9).
3. Schalte das System ein. Nach der Warnung zu Gesundheit und Sicherheit
erscheint der Titel des Spiels auf dem Bildschirm. Berühre den Titel mit
dem Touchpen, um mit dem Spiel zu beginnen (im Auto-Modus startet das
Spiel automatisch). In der Spielanleitung des jeweiligen Spiels findest du
weitere Informationen zum Umgang mit dem Spiel.
4. Bevor die DS-Karte wieder entfernt wird, muss das System ausgeschaltet
werden. Drücke die Nintendo DS-Karte weiter in den Kartenschlitz hinein,
bis ein ‘Klick’ zu hören ist. Die Karte wird nun automatisch ausgeworfen.
1
2
3
4
13
5
7
8
9
10
11
12
13
6
14
Abbildung 9
USG_HW_Man_EUR_A3 30.07.2007 17:06 Uhr Seite 44
COPY
Page 23

11
Die Drahtlose DS-Datenübertragung und Spielmodi
4746
10
Der Gebrauch von Game Boy Advance-Modulen (AGB-002)
WICHTIG: Der Nintendo DS Lite ist nur mit Game Boy Advance-Modulen kompatibel. Der
Nintendo DS Lite ist NICHT kompatibel mit Game Boy- oder Game Boy Color-Modulen.
1. Vergewissere dich, dass der Nintendo DS Lite ausgeschaltet ist.
2. Stecke das Game Boy Advance-Modul in den Modulschacht (SLOT-2)
auf der Vorderseite des Nintendo DS Lite. Vergewissere dich, dass es
richtig im Modulschacht eingesteckt ist. Das Label des Moduls muss
nach unten zeigen (Abbildung 10).
3. Schalte das System ein. Der Titel des Spiels erscheint. Berühre den Titel
mit dem Touchpen, um mit dem Spiel zu beginnen (im Auto-Modus
startet das Spiel automatisch). In der Spielanleitung des jeweiligen Spiels
findest du weitere Informationen zum Umgang mit dem Spiel.
4. Bevor du das Spielmodul wieder entfernst, schalte das System aus.
Nun ziehe das Modul vorsichtig aus dem Modulschacht heraus.
Wenn du nicht mehr weiterspielen möchtest, schalte den Nintendo DS Lite aus und ziehe den Netzteilstecker (solltest du diesen benutzen) aus der Wandsteckdose und dem Nintendo DS Lite.
Wickle das Netzkabel nicht um deinen Nintendo DS Lite.
Schließe den Nintendo DS Lite, um die Bildschirme vor Staub und Kratzern zu schützen.
HINWEIS: Das System schaltet sich NICHT automatisch aus, wenn es geschlossen wird!
Schließt du den Nintendo DS Lite, während er noch an ist, schaltet sich das System automatisch in
den Standby-Modus, in dem weniger Energie als im normalen Modus verbraucht wird. Sobald du
das System wieder öffnest, kann der normale Modus wieder aktiviert werden.
WICHTIGE HINWEISE ZUM GEBRAUCH DER DS-KARTEN/ SPIELMODULE:
• Stelle vor dem Einstecken der DS-Karte oder des Spielmoduls sicher, dass sich keine Fremd-
körper im Kartenschlitz oder Modulschacht des Nintendo DS Lite befinden.
• Vergewissere dich, dass die Nintendo DS-Karte oder das Spielmodul richtig herum in den
Nintendo DS Lite eingesteckt wird.
• Schalte den Nintendo DS Lite nicht aus und entferne nicht die Nintendo DS-Karte oder das Spiel-
modul, während du dein Spiel speicherst, sonst können Spieldaten verloren gehen.
• Puste nicht auf die Kontaktleisten desNintendo DSLite, derDS-Karte oder des Game Boy Advance-
Moduls. Die im Atem enthaltene Feuchtigkeit kann eineFehlfunktion derKontaktleisten verursachen.
HINWEIS: Der Einsatz drahtloser Kommunikationstechniken ist an einigen Orten und in bestimmten Situationen nicht erlaubt – auf Seite 35 finden sich hierzu nähere Informationen.
Die Drahtlose DS-Datenübertragung erlaubt die Kommunikation und das Spiel mit anderen Spielern
ohne den Einsatz von Kabeln. Es gibt zwei Arten von Nintendo DS-Spielen, welche die Drahtlose
DS-Datenübertragung unterstützen.
Das Drahtlose Multi-Karten-Spiel erfordert eine DS-Karte für jedes Nintendo DS-
System, das verwendet wird. Die Anzahl der Spieler, die an dem Spiel teilnehmen
können, wird unter dem Symbol angezeigt.
Das Drahtlose Einzelkarte-Spiel, oder DS-DOWNLOAD-SPIEL, erfordert eine DS-
Karte für ein Nintendo DS-System (Gastgeber-System). Die anderen Spieler übertragen
mithilfe der Drahtlosen DS-Datenübertragung die notwendigen Informationen auf ihr
System (Gäste-System). Die Anzahl der Spieler, die an dem Spiel teilnehmen können,
wird unter dem Symbol angezeigt.
Achte beim Kauf eines Nintendo DS-Spiels auf diese Symbole auf der Verpackung. Sie zeigen
dir, welche Art von Drahtloser DS-Datenübertragung von dem jeweiligen Spiel unterstützt wird
und wie viele Spieler sich dem Spiel anschließen können.
Multi-Karten-Spiel
1. Vergewissere dich, dass alle Nintendo DS-Systeme ausgeschaltet sind. Dann stecke eine
DS-Karte in jedes Nintendo DS-System. Nun können alle Nintendo DS-Systeme eingeschaltet
werden.
2. Berühre den Spieletitel mit dem Touchpen, um das Spiel zu starten. In der Spielanleitung
des jeweiligen Spiels findest du weitere Informationen zum Umgang mit dem Spiel.
Abbildung 10
USG_HW_Man_EUR_A3 30.07.2007 17:06 Uhr Seite 46
COPY
2–16
2–16
Page 24

4948
• Vergewissere dich, dass die Verbindung nicht durch Personen, Wände, Möbelstücke oder andere
große Gegenstände beeinträchtigt wird.
• Vermeide die Verwendung der Drahtlosen DS-Datenübertragung in der Nähe von Geräten, deren
Funkfrequenzen stören könnten, wie beispielsweise schnurlose Telefone, Mikrowellenherde
oder drahtlose Netzwerke (Wireless LANs). Suche dir eventuell einen anderen Ort oder schalte
die störenden Geräte aus.
Der Nintendo DS Lite ist mit einem RF-Modul (802.11) ausgestattet. Die Strahlung liegt bei weniger
als 10 mW EIRP, die maximale Spektraldichte liegt bei weniger als –30 dBW/1MHz EIRP. Diese
Werte beziehen sich auf eine Umgebungstemperatur von 0°C bis 40°C. Der Nintendo DS Lite ist
gemäß der Kommissions-Entscheidung 2000/299/EC als Klasse 1 klassifiziert.
WICHTIGE HINWEISE ZUR DRAHTLOSEN DS-DATENÜBERTRAGUNG:
• Zu Beginn der Drahtlosen DS-Datenübertragung halte einen Abstand von ca. 10 Metern oder
weniger zwischen den Systemen, danach kann der Abstand verringert oder vergrößert werden.
Die Signalstärke sollte bei mindestens 2 Einheiten liegen, um die besten Resultate zu erzielen.
• Die maximale Distanz zwischen den Nintendo DS-Systemen sollte 20 Meter nicht überschreiten.
• Die Systeme sollten, falls möglich, einander zugewandt sein.
0 1 2 3
SCHWÄCHER STÄRKER
Quellstärkensignal
Während eines drahtlosen Spiels erscheint ein Quellstärkensymbol – entweder auf dem oberen oder
unteren Bildschirm-, welches die Stärke des Signals bei der Drahtlosen DS-Datenübertragung
anzeigt. Es gibt vier verschiedene Symbole, abhängig von der Stärke des Signals:
12
PictoChat™
Mit dem PictoChat kannst du auf dem Nintendo DS Lite drahtlos Mitteilungen und Bilder anderer DSUser (Nintendo DS Lite- oder Nintendo DS-Systeme) empfangen und auch selbst senden. PictoChat
ist keine Internet-Anwendung. Du kannst via PictoChat mit bis zu 15 weiteren Nintendo DS-Usern
innerhalb der Reichweite deines Nintendo DS Lite kommunizieren. Auf Seite 42 findest du wichtige
Informationen zum Thema Datenschutz.
1. Schalte das Systemein. WählePICTOCHAT im Nintendo DS-Menübildschirm aus (Abbildung 13).
2. Der Auswahlbildschirm für den Chat-Raum erscheint. Wähle aus den vier Chat-Räumen
denjenigen aus, den du betreten möchtest (Abbildung 14).
Die Nummer auf der Anzeige zeigtdir, wie vielePersonen sichbereits im Chat-Raumbefinden. Wenn
die Zahl der Personen das Maximum erreicht hat (16/16), kannst du den Chat-Raum nicht betreten.
Das Quellstärken-Symbol auf der rechten Seite zeigt die Stärke des Signals der DS-Datenübertragung in diesem Chat-Raum an. Auf Seite 48 erfährst du mehr über dieses Symbol.
HINWEIS: Sollte es Probleme bei der Kommunikation im Chat-Raum geben, sollten die Teilnehmer den Chat-Raum wechseln. Lies dirdie Anleitungzur Drahtlosen DS-Datenübertragung
auf den Seiten 48 – 49 nochmals durch und überprüfe, ob es störende Funkwellen gibt.
3. Der PictoChat-Bildschirm erscheint für den Chat-Raum, den du ausgewählt hast (Abbildung 15).
Abbildung 14Abbildung 13
PICTOCHAT
DS-Download-Spiel
1. Vergewissere dich, dass alle Nintendo DS-Systeme ausgeschaltet sind. Nun stecke eine DS-
Karte in den Nintendo DS, der als Gastgeber-System verwendet werden soll. Danach schalte
alle Nintendo DS-Systeme ein.
2. Berühre den Spieletitel auf dem Gastgeber-System mit dem Touchpen, um das Spiel zu starten.
3. Auf dem Gäste-System wird danach im Nintendo DS-Menübildschirm die Option
DS-DOWNLOAD-SPIEL aktiviert. Berühre dazu diese Option mit dem Touchpen.
4. Wähle mit dem Touchpen auf dem Spielauswahl-Bildschirm das Spiel aus, welches du über-
tragen möchtest (Abbildung 11). Du musst nun deine Auswahl bestätigen (Abbildung 12).
Berühre JA, um die Daten des Spiels vom Gastgeber-System zu übertragen. In der Spielanleitung
des jeweiligen Spiels findest du weitere Informationen zum Umgang mit dem Spiel.
Abbildung 12Abbildung 11
USG_HW_Man_EUR_A3 30.07.2007 17:06 Uhr Seite 48
COPY
Page 25

13
Die Bildschirm-Tastatur
5150
1. Quellstärken-Symbol – Zeigt dir die Stärke des Übertragungssignals in deinem Chat-Raum an.
2. Mitteilungen – Hier kannst du die Mitteilungen und Bilder sehen, die du gesendet und
empfangen hast.
3. Scroll Bar – Mitteilungen und Bilder werden angezeigt, die Farben stehen für die jeweiligen User.
Jede Zeile steht für eine Mitteilung.
4. Chat-Raum-Buchstabe – Zeigt dir an, in welchem Chat-Raum du dich befindest.
5. Chat-Teilnehmer– Hier kannst du die Spitznamen derjenigen sehen, die sich im Chat-Raum
befinden. Berühre einen Namen, um die Mitteilung des Teilnehmers zu lesen (auf Seite 55 findest
du Informationen, wie du Mitteilungen erstellst).
6. Scroll Button – Bewege dich durch das Protokoll aller Mitteilungen.
7. Stift – Male Bilder auf dem Eingabefeld.
8. Radiergummi – Lösche gezeichnete Elemente auf dem Eingabefeld.
9. Eingabefeld – Der Text oder die gezeichneten Elemente erscheinen hier, bevor du deine Mit-
teilungen sendest.
10. Minenstärke – Du kannst zwischen einer dicken und einer dünnen Linie beim Zeichnen und
Radieren wählen.
11. Tastaturtypen – Du kannst unterschiedliche Tastaturtypen wählen. (Im folgenden Kapitel
„Die Bildschirm-Tastatur“ findest du weitere Informationen zur Tastatur.)
12. Tastatur – Mit dem Touchpen, dem Steuerkreuz oder dem A- und B-Knopf kannst du Buch-
staben eingeben.
13. Beenden – Berühre das X oben rechts, um den Chat-Raum zu verlassen.
14. SEND – Berühre diese Option, um deine Mitteilungen zu senden.
15. Kopieren – Berühre dieses Symbol, um deine letzte Mitteilung oder dein letztes Bild in das
Eingabefeld zu kopieren.
16. Löschen – Berühre dieses Symbol, um alle Informationen auf dem Eingabefeld zu löschen.
Die Bildschirm-Tastatur funktioniert genauso wie eine herkömmliche Computer-Tastatur. Auf der linken
Seite befindet sich ein Menü, mit dem der Tastatur-Typ festgelegt werden kann. Abbildung 16 zeigt
dir die fünf verschiedenen Auswahlmöglichkeiten.
Unten sind zwei Typen abgebildet; sie funktionieren auf die gleiche Art und Weise.
Wähle die Buchstaben mit dem Touchpen, dem Steuerkreuz oder dem A- und B-Knopf aus.
Abbildung 16
Abbildung 15
14
9
13
15
16
12
5
1
3
2
4
6
7
11
8
10
Alphanumerisch
Sonderzeichen
Japanisch: Hiragana/ Katakana
Symbole
Bilder
Alphanumerisch
Groß- und Kleinschreibung Rückschritt/ einen Buchstaben löschen
Zur nächsten Zeile gehen
Leerschritt einfügen
Wechsel zwischen Großschreibung/
Symbolen und Kleinschreibung/ Zahlen
Sonderzeichen
Rückschritt/ einen Buchstaben löschen
Zur nächsten Zeile gehen
Leerschritt einfügen
PictoChat-Bildschirm
USG_HW_Man_EUR_A3 30.07.2007 17:06 Uhr Seite 50
COPY
Page 26

5352
14
Das Einstellungsmenü – Systemeinstellungen bestimmen
Im Einstellungsmenü können die verschiedensten Optionen eingestellt werden.Um das Einstellungsmenü aufzurufen, musst du das Symbol für dieses Menü mit dem Touchpen im Nintendo DS-
Menübildschirm (Abbildung 17) berühren.
Jedes der vier Menü-Symbole öffnet andere Optionen, die du einstellen und verändern kannst
(Abbildung 18).
Abbildung 19
Wähle eines der Symbole aus, dessen Optionen du bearbeiten möchtest.
1. OPTIONEN: Start-up-Modus, Sprache, Game Boy Advance-Anzeige
2. UHR: Datum, Alarm, Zeit
3. USER: Farbe, Geburtsdatum, User-Name, Kommentar
4. TOUCHSCREEN
Auf den folgenden Seiten findest du nähere Informationen zu den Optionen.
HINWEIS: Sobald du alle Einstellungen vorgenommen hast, berühre die Option ENDE. Berühre
JA, um die Einstellungen zu bestätigen. Der Nintendo DS Lite schaltet sich daraufhin automatisch aus. Schalte das System danach wieder ein und die Änderungen sind übernommen.
OPTIONEN
Start-up-Modus
Sprache
Game Boy Advance-
Anzeige
• START-UP (Systemstart)
Hier kannst du festlegen, in welchem Modus der Nintendo DS Lite hochfährt, wenn er eingeschaltet
wird. Wähle zwischen A AUTO-MODUS oder M MANUELLER MODUS.
Im Auto-Modus lädt der Nintendo DS Lite automatisch das Spiel, welches sich im Modulschacht
oder im Kartenschlitz befindet. Der Nintendo DS Lite lädt das Spiel auf der DS-Karte, wenn
sich in beiden Slots ein Spiel befindet. Befindet sich kein Spiel im Nintendo DS Lite, erscheint
der Nintendo DS-Menübildschirm.
Im manuellen Modus erscheint der Nintendo DS-Menübildschirm (Abbildung 20).
• SPRACHE
Mit dieser Option kannst du die Sprache für alle spielunabhängigen Bereiche, wie z. B. Menüs,
festlegen (Abbildung 21).
• GBA-MODUS (Game Boy Advance-Anzeige)
Hier kannst du festlegen, auf welchem Bildschirm (dem oberen oder unteren) du die Spiele aufrufen
willst, wenn du ein Game Boy Advance-Spiel auf deinem Nintendo DS Lite spielst (Abbildung 22).
Abbildung 20 Abbildung 21 Abbildung 22
Abbildung 17 Abbildung 18
Symbol
Einstellungsmenü
1
2
3
4
Menü-Symbole
USG_HW_Man_EUR_A3 30.07.2007 17:06 Uhr Seite 52
COPY
Page 27

5554
UHR
• DATUM
Lege das Datum – den TAG, den MONAT und das JAHR – für den Systemkalender fest.
Berühre die Pfeile oberhalb/ unterhalb der Zahlen, um diese einzustellen. Nun musst du
deine Eingabe BESTÄTIGEN und das Datum ist festgelegt (Abbildung 24).
• ALARM
Der Nintendo DS Lite kann auch als Wecker eingesetzt werden. Hast du diese Funktion aktiviert,
kannst du den Nintendo DS Lite erst dann wieder für Spiele und anderes verwenden, wenn
du den Alarm deaktiviert hast. Um den Alarm zu deaktivieren, musst du einfach den Touchscreen
berühren oder eine beliebige Taste drücken (L- und R-Taste heben den Alarm nicht auf).
Berühre die Pfeile oberhalb/ unterhalb der Zahlen, um diese einzustellen. Nun musst du deine
Eingabe BESTÄTIGEN und die Alarm-Zeit ist festgelegt (Abbildung 25).
• ZEIT
Mit dieser Option kannst du die Uhr des Nintendo DS Lite auf die aktuelle Zeit setzen. Berühre
die Pfeile oberhalb /unterhalb der Zahlen, um diese einzustellen. Nun musst du deine Eingabe
BESTÄTIGEN und die Zeit ist festgelegt (Abbildung 26).
Abbildung 23
Datum
Alarm
Zeit
Abbildung 24 Abbildung 25 Abbildung 26
USER
• FARBE
Wähle deine Lieblingsfarbe aus der Farbpalette aus. Danach musst du deine Auswahl
BESTÄTIGEN (Abbildung 28).
• GEBURTSDATUM
Berühre die Pfeile oberhalb/ unterhalb der Zahlen, um diese einzustellen. Danach musst du deine
Eingabe BESTÄTIGEN (Abbildung 29).
• USER-NAME
Hier kannst du deinen Spitznamen eingeben. Dieser kann im PictoChat auf den Bildschirmen
der anderen User erscheinen. Wir empfehlen daher, einen Spitznamen zu wählen, der keine
Aussage über das Geschlecht des Users macht. (Bitte beachte die Informationen zum Datenschutz auf Seite 42.)
Mit der Bildschirm-Tastatur kannst dueinen Namenmit max.10 Buchstaben eingeben (Abbildung 30).
• KOMMENTAR
Diese Option ermöglicht es dir, Mitteilungen für andere User zu schreiben. Deine Mitteilung kann
im PictoChat auf den Bildschirmen anderer User erscheinen. (Bitte beachte die Informationen
zum Datenschutz auf Seite 42.) Mit der Bildschirm-Tastatur kannst du eine Mitteilung mit max.
18 Buchstaben schreiben (Abbildung 31).
Auf Seite 51 findest du nähere Informationen zur Bildschirm-Tastatur.
Abbildung 27
Farbe
Geburtsdatum
Spitzname
Kommentar
Abbildung 28 Abbildung 29 Abbildung 30 Abbildung 31
USG_HW_Man_EUR_A3 30.07.2007 17:06 Uhr Seite 54
COPY
Page 28

16
Problemlösungen
5756
TOUCHSCREEN
Über diese Option kannst du die Einstellungen des Touchscreen vornehmen.
Verwende hierzu den Touchpen! Folge den Anweisungen auf dem Bildschirm
und berühre vorsichtig die angezeigten Symbole auf dem Touchscreen
(Abbildung 32).
Abbildung 32
Über die Nintendo Wi-Fi Connection (Nintendo WFC) kannst du unter Verwendung eines Nintendo DSSystems und einer Nintendo WFC-kompatiblen DS-Karte Spiele über das Internet entweder zu
Hause oder über einen öffentlichen HotSpot spielen.
Anhand dieses Symbols auf der Verpackung von Nintendo DS-Karten erkennst du,
dass der Nintendo Wi-Fi Connection Service unterstützt wird.
15
Die Nintendo Wi-Fi Connection
Zum Spiel über das Internet zu Hause ist Folgendes erforderlich:
• Eine aktive Breitband-Internet-Verbindung.
UND
• Ein drahtloser Access Point, wie zum Beispiel ein WLAN-Router oder der Nintendo Wi-Fi
USB Connector.
Lies bitte auch die separate Nintendo Wi-Fi Connection-Bedienungsanleitung, die jedem WFCkompatiblen Nintendo DS-Spiel beiliegt, um mehr Informationen über das Wi-Fi-Spiel über Internet
zu erhalten. Besuche dazu auch die Internet-Adresse www.nintendowifi.de
Im Falle eines Problems, überprüfe bitte die unten beschriebenen Situationen
und die dazugehörenden Lösungen.
Problem
Der Bildschirm bleibt
schwarz, obwohl das
System eingeschaltet ist.
Es erscheint ein Bild, aber
der Ton ist nicht zu hören.
Es erscheint ein Bild, aber
das System reagiert nicht.
Das Batteriepack muss
häufiger als sonst aufgeladen werden und die
Ladezeit ist länger als
üblich.
Das Game Boy-Modulpasst
nicht in den Nintendo DS
Lite.
Die Drahtlose DS-Datenübertragung oder das
drahtlose Spielen funktioniert nicht.
Lösung
• Vergewissere dich,dass das Batteriepackaufgeladen ist. Die Betriebsanzeige sollte
rot oder grün leuchten, abhängig von der vorhandenen Kapazität der Batterie.
• Schalte das System aus.Warteeinige Sekunden und schalte esdann wieder ein.
• Schalte das System aus. Entferne das Spiel und stecke es erneut ein. Schalte
das System wieder ein.
• Solltest du das Netzteil verwenden, vergewissere dich, dass es korrekt mit dem
Nintendo DS Lite und der Wandsteckdose verbunden ist.
• Versuche als Erstes die Lautstärke zu regulieren.
• Wenn Kopfhörer mit dem Nintendo DS Lite verbunden sind, kommt der Sound
nicht durch die Lautsprecher des Systems.
• Vergewissere dich, dass deine Kopfhörer richtig mit dem Ausgang des Systems
verbunden sind. Sie müssen korrekt in die Audiobuchse eingesteckt sein.
• Manche Spiele unterstützen bei einigen Sequenzen keine Audioausgabe.
• Vergewissere dich, dass das Spiel korrekt in das System eingesteckt wurde.
• Schalte das System aus. Entferne das Spiel und stecke es erneut ein.
Nun schalte das System wieder ein.
• Vergewissere dich, dass das Spielmodul bzw. die DS-Karte und auch der
Kartenschlitz bzw. der Modulschacht frei von Fremdkörpern sind.
• Die Umgebungstemperatur muss über 10°C betragen. Eine niedrigere
Temperatur beeinflusst die Leistungsfähigkeit der Batterie.
• Die Kapazität der Batterie kann mit der Zeit nachlassen. Nach 500 Wiederaufladungen beträgt die Kapazität des Batteriepacks 70 % gegenüber einer
neuen Batterie.
• Vergewissere dich, dass du ein Game Boy Advance-Modul (AGB-002)
verwendest. SLOT-2 des Nintendo DS Lite ist ausschließlich kompatibel
mit Nintendo DS-Zubehör und Game Boy Advance-Modulen.
• Vergewissere dich,dass das Spieleine Drahtlose Datenübertragungunterstützt.
• Für ein Multi-Karten-Spiel muss jedes Nintendo DS-System eine DS-Karte
enthalten.
• Vergewissere dich,dass die NintendoDS-Systeme nicht weiterals 10Meter
voneinander entfernt sind.DieQuellstärke solltemindestens 2 Einheiten betragen.
• Schaue in der Spielanleitung deines Spiels nach, um zu erfahren, wie das Spiel
eingerichtet wird.
USG_HW_Man_EUR_A3 30.07.2007 17:06 Uhr Seite 56
COPY
Page 29

17
Entsorgen dieses Produkts
5958
Bitte wirf Altgerätenicht in den normalen Hausmüll. Folge stattdessenbitte beider separatenEntsorgung
dieses Produkts den in deinem Land vorgeschriebenen Richtlinien. Um mehr Informationen über die
jeweiligen Rücknahmestellen fürElektro- undElektronik-Altgeräte in deiner Nähe zu erhalten,die jedem
Verbraucher kostenfrei zur Verfügung stehen, kontaktiere bitte die zuständige städtische Behörde.
Falls du beabsichtigst, das Altgerät durch ein entsprechendes neues Produkt zu ersetzen, kannst dues
eventuell bei deinem ansässigen Händler abgeben, der das Altgerät beim Kauf des entsprechenden
Neuprodukts annimmt und sich um die sachgerechte Wiederverwertung kümmert. Wir empfehlen,
den ansässigen Händler zu kontaktieren, um in Erfahrung zu bringen, ob er eine solche Leistung
anbietet.
In beiden Fällen wird dieses Produkt in einer zugelassenen Recyclinganlage umweltverträglich entsorgt
und seine Bestandteile werden unter Einhaltung der Auflagen durch die Richtlinie 2002/96/EG des
Europäischen Parlaments und des Rates vom 27. Januar 2003 über Elektro- und Elektronik-Altgeräte
auf die bestmögliche Weise wiederhergestellt, wiederverwertet oder wiederverwendet.
Im Sinne der geltenden Umweltgesetze solltest du immer die jeweils verfügbaren Rücknahmestellen für Elektro- und Elektronik-Altgeräte aufsuchen. In manchen Ländern kann ein Zuwiderhandeln sogar zu Strafmaßnahmen führen.
Anmerkungen:
1. Elektro- und Elektronik-Altgeräte können gefährliche Substanzen enthalten, die, sofern sie nicht
sachgemäß behandelt werden, schädlich für die Umwelt und die menschliche Gesundheit
sein können. Eine spezifische Behandlung von Elektro- und Elektronik-Altgeräten ist deshalb
unabdingbar.
2. Alle Nintendo-Elektro- und Elektronikgeräte, die unter die obenstehende Richtlinie fallen, sind
derart konzipiert, dass sie ihre Reparatur, mögliche Nachrüstung, Wiederverwendung, Zerlegung
und Recycling umfassend berücksichtigen und erleichtern.
3. Nintendo und ihre offiziellen Vertreiber unterstützen die Recyclingsysteme jedes europäischen
Mitgliedstaates und engagieren sich für die besten verfügbaren Behandlungs-, Verwertungsund Recyclingtechniken, um den Gesundheitsschutz und ein hohes Umweltschutzniveau zu
gewährleisten.
4. Alle betroffenen Nintendo-Elektro- und Elektronikgeräte, die an oder nach dem 13. August 2005
von Nintendo oder ihren offiziellen Vertreibern in Verkehr gebracht wurden, sind mit dem Symbol
einer durchgestrichenen Mülltonne mit Rädern (siehe Abbildung) gekennzeichnet. Das Symbol
weist darauf hin, dass dieses Produkt vom normalen Hausmüll getrennt zu entsorgen ist, um die
bestmögliche Wiederverwertung und umweltschonendste Beseitigung sicherzustellen.
Informationen zur Entsorgung des Batteriepacks erhältst du im Abschnitt „Entsorgung
der Batterien“ auf Seite 40.
Problem
Bei der Drahtlosen DSDatenübertragung oder dem
drahtlosen Spielen treten
Unterbrechungen auf bzw.
die Verbindung scheint
instabil zu sein.
Der PictoChat funktioniert
nicht.
Der Touchscreen reagiert
nicht.
Das Mikrofon funktioniert
nicht.
Nachdem das System
ausgeschaltet wurde, ist
ein Nachbild erkennbar.
Bei Game Boy AdvanceSpielen funktioniert der
Mehrspieler-Modus nicht.
Die Spracherkennung
funktioniert nicht.
Lösung
• Vergewissere dich, dass die Nintendo DS-Systeme zu Beginn nicht weiter
als 10 Meter voneinander entfernt sind. Die Quellstärke sollte mindestens
2 Einheiten betragen.
• Vergewissere dich, dass die Datenübertragung nicht durch Hindernisse gestört
wird.
• Die Systeme sollten, falls möglich, einander zugewandt sein.
• Vergewissere dich, dass das Batteriepack aufgeladen ist.
• Überprüfe, ob Geräte, deren Funkfrequenzen störenkönnten, wie beispielsweise
schnurlose Telefone, Mikrowellenherde oder drahtlose Netzwerke (Wireless
LANs) in der Nähe sind. Suche dir eventuell einen anderen Ort oder schalte die
störenden Geräte aus.
• Vergewissere dich,dass nicht mehrals 16User den Chat-Raumbetretenhaben.
• Versuche, mit deinen Chat-Partnern einen anderen Chat-Raum zu betreten.
• Lies dir die Informationen zum Quellstärkensignal und dem PictoChat auf den
Seiten 48 –49 noch einmal genau durch.
• Vergewissere dich, dass du die richtigen Bereiche des Touchscreens mit dem
Touchpen berührst.
• Überprüfe, ob der Touchscreen mit dem richtigen Kontaktpunkt des Touchpen
berührt wird, indem du ihn gegebenenfalls neu justierst (siehe Seite 56).
• Schaue in der Spielanleitung deines Spiels nach, um zu erfahren, wie das Spiel
mithilfe des Touchpen gespielt wird.
• Sollte dein Touchscreen zerkratzt, verschmutzt oder mit Fremdkörpern behaftet
sein, folge bitte den Hinweisen zur Reinigung des Bildschirms auf Seite 41.
• Manche Spiele unterstützen die Verwendung des Mikrofons nicht. Vergewissere
dich, dass dein Spiel dieses Feature unterstützt.
• Wenn du ein externes Mikrofon verwendest, vergewissere dich, dass es korrekt
in die Audiobuchse eingesteckt ist.
• Nach dem Ausschalten des Nintendo DS Lite kann ein Nachbild auf dem
Bildschirm zu sehen sein. Das bedeutet nicht, dass der Nintendo DS Lite
defekt ist! Das Bild verschwindet nach einer kurzen Zeit von selbst.
• Mehrspieler-Modi der Game Boy Advance-Spiele werden vom Nintendo DS
Lite nicht unterstützt.
• Die Spracherkennung variiert von Person zu Person, bei manchen Stimmen
versagt die Spracherkennung möglicherweise gänzlich. Bitte schlage
in der jeweiligen Spielanleitung nach, um weitere Informationen darüber
zu erhalten.
Funktioniert der Nintendo DS Lite trotz dieser Lösungshilfen nicht einwandfrei
oder solltest du noch Fragen haben, wende dich bitte an die Konsumentenberatung
der Nintendo of Europe GmbH.
USG_HW_Man_EUR_A3 30.07.2007 17:06 Uhr Seite 58
COPY
Page 30

12-MONATIGE GEWÄHRLEISTUNG – NINTENDO DS LITE HARDWARE
Für einen Zeitraum von 12 Monaten ab dem Datum des Kaufs des neuen und originalverpackten Produkts durch
einen Verbraucher von einem Händler gewährleistet die Nintendo of Europe GmbH („Nintendo“) dem Käufer, dass
dieses Produkt zum Zeitpunkt des Kaufs frei von Mängeln in Material und Verarbeitung ist, es sei denn, es liegt
eine der unten aufgezählten Einschränkungen vor. Anderenfalls wird Nintendo das mangelhafte Produkt nach
eigener Wahl – jeweils kostenfrei für den Käufer – entweder reparieren oder, sollte eine Reparatur wirtschaftlich
nicht sinnvoll sein, das Teil, das den Defekt verursacht, oder das gesamte Produkt austauschen. Andere
Ansprüche gegen Nintendo bestehen aufgrund dieser Gewährleistung nicht, insbesondere ergibt sich aus dieser
Gewährleistung kein Anspruch auf Schadensersatz. Zur Inanspruchnahme der Gewährleistung muss der Käufer
(a) Nintendo den Mangel innerhalb von 12 Monaten nach dem Kaufdatum anzeigen und (b) das Produkt zusammen
mit der Anzeige oder innerhalb von 30 Tagen nach der Anzeige zusammen mit dem Kaufnachweis (Kassenbeleg
oder Quittung) an Nintendo absenden.
• Die Gewährleistung ist nicht anwendbarauf Produkte, die außerhalb des Europäischen Wirtschaftsraums erworben
wurden.
• Geräte, die zuvor Mietgeräte waren oder die gebraucht gekauft wurden, sind von der Gewährleistung nicht
umfasst. Dasselbe gilt für Produkte, die gewerblich eingesetzt werden.
• Diese Gewährleistung tritt nicht ein, wenn der Mangel dadurch entstanden ist, dass der Käufer und/oder ein
Dritter nachlässig mit dem Produkt umgegangen sind, es in unvernünftiger Weise oder zusammen mit Produkten,
die nicht von Nintendo hergestellt oder von Nintendo lizenziert wurden (unter anderem nicht-lizenzierte SpielZusätze, Kopiergeräte, Adapteroder Netzgeräte),genutzt haben,es verändertoder nichtordnungsgemäß repariert
oder es anders als in Übereinstimmung mit der von Nintendo herausgegebenen Bedienungsanleitung genutzt
haben. Die Gewährleistung tritt ferner nicht ein, wenn der Mangel durch eine Beschädigung des Produktes nach
dem Kauf entstanden ist oder der Defekt in sonstiger Weise entstanden ist, ohne dass er auf Mängel der verwendeten Werkstoffe oder der Konstruktion zurückzuführen ist.
• Eine sich im Laufe der Zeit allmählich einstellende Abnahme der Leistung des wiederaufladbaren Nintendo DS
Lite Lithium-Ionen-Batteriepacks (USG-003) ist kein Mangel in Material und Verarbeitung und wird daher von
dieser Gewährleistung nicht erfasst.
Es wird ausdrücklich darauf hingewiesen, dass diese Gewährleistung zusätzlich zu etwaigen gesetzlichen
Gewährleistungsansprüchen gewährt wird, die dem Käufer als Verbraucher gegenüber demjenigen Einzelhändler
zustehen können, von dem er das Produkt gekauft hat. Diese gesetzlichen Ansprüche werden durch die vorliegende Nintendo-Gewährleistung in keiner Weise eingeschränkt.
Sollte ein Mangel vorliegen, der von dieser Gewährleistung erfasst wird, wenden Sie sich bitte an:
Nintendo of Europe GmbH
Reparaturabteilung, Nintendo Center, 63760 Großostheim
Wenn Sie das Produkt an die Nintendo of Europe GmbH einschicken,
1. verwenden Sie bitte, wenn möglich, die Originalverpackung und
2. fügen Sie eine Beschreibung des aufgetretenen Mangels sowie
3. eine Kopie Ihres Kaufnachweises bei, aus dem das Kaufdatum für das betreffende Produkt ersichtlich ist;
4. stellen Sie bitte sicher, dass das Produkt spätestens 30 Tage nach Eingang der Anzeige Mangelanzeige (s. o.)
bei Nintendo eingeht.
Falls die 12-monatige Gewährleistung bereits abgelaufen ist oder der Mangel nicht von dieser Gewährleistung
erfasst wird, wird die Nintendo of Europe GmbH möglicherweise dennoch bereit sein, das Produkt zu reparieren
oder das den Mangel verursachende Teil oder das gesamte Produkt auszutauschen. Für weitere Informationen
hierzu und insbesondere zu den Einzelheiten etwaiger Kosten für diesen Service wenden Sie sich bitte an:
Nintendo of Europe GmbH
Konsumentenberatung, Tel.: 01803 –1818 00 (0,09€ pro Minute aus dem deutschen Festnetz.
Für Anrufe aus Mobilfunknetzen können abweichende Tarife gelten.)
[0607/NOE/USG-HW] [0607/NOE/US G-HW]
SERVICE
Bei der Nintendo Konsumentenberatung gibt es unter der Rufnummer 01803 – 1818 00
(0,09 € pro Minute aus dem deutschen Festnetz. Für Anrufe aus Mobilfunknetzen können
abweichende Tarife gelten.) Antworten zu allgemeinen und technischen Fragen rund um
Nintendo.
Bei Spielefragen hilft die Nintendo Spieleberatung unter der Rufnummer 09001 – 000 000
(1,993 pro Anruf aus dem deutschen Festnetz. Für Anrufe aus Mobilfunknetzen können
abweichende Tarife gelten.) gerne weiter.
Beide Hotlines sind montags bis freitags von 13 bis 17 Uhr erreichbar.
SERVICE 24:7
Zusätzlich zu den beiden Live-Hotlines haben wir noch weitere Service-Angebote, die
24 Stunden täglich genutzt werden können:
Consumer Service Online: Ob technische Daten, Infos zu original Nintendo-Zubehör
und Ersatzteilen, Erklärung der diversen Anschlussmöglichkeiten der Nintendo-Geräte und
Hilfe bei der Durchführung einer Fehlersuche – Informationen dazu und selbstverständlich
vieles mehr erfährt man unter www.nintendo.de.
Nintendo Helpline: Auch unter der Rufnummer 09001– 111000 (0,99 3 pro Minute aus
dem deutschen Festnetz. Für Anrufe aus Mobilfunknetzen können abweichende Tarife gelten.)
erhält man Tipps und Spielehilfen zu zahlreichen Nintendo-Titeln.
Nintendo Fax-Abruf: Mit einem Faxgerät können hier schriftliche Tipps und Spielehilfen
zu vielen Nintendo-Titeln abgerufen werden.
Genauere Informationen zu dem Fax-Abruf gibt es auf den Consumer Service-Seiten von
www.nintendo.de oder bei der Nintendo Konsumentenberatung.
[1100/NOE/USG-HW]
Leiste einen Beitrag zum Umweltschutz:
VerbrauchteBatterienundAkkumulatoren(Akkus) gehörennichtin denHausmüll.Wirf verbrauchte
Batterien und Akkus nur in einen Sondermüllbehälter bzw. gib diese bei einer Sammelstelle ab.
Über Standorte der Sondermüllbehälter bzw.Sammelstellen informiert dich deine Gemeinde.
USG_HW_Man_EUR_A3 30.07.2007 17:06 Uhr Seite 60
COPY
Page 31

1
Précautions sur la santé et la sécurité
6362
Sommaire
1 Précautions sur la santé et la sécurité . . . . . . . . . . . . . . . . . . . . . . . . . . . . . . . . . . . . . . . . 63
2 Composants de la Nintendo DS Lite . . . . . . . . . . . . . . . . . . . . . . . . . . . . . . . . . . . . . . . . . . 66
3 Recharger la batterie rechargeable Nintendo DS Lite (USG-003) . . . . . . . . . . . . . . . . . . 68
4 Remplacer et jeter la batterie rechargeable Nintendo DS Lite . . . . . . . . . . . . . . . . . . . . . 70
5 Utiliser le stylet Nintendo DS Lite (USG-004) et l’écran tactile . . . . . . . . . . . . . . . . . . . . . 71
6 Informations personnelles . . . . . . . . . . . . . . . . . . . . . . . . . . . . . . . . . . . . . . . . . . . . . . . . . . 72
7 Régler les paramètres . . . . . . . . . . . . . . . . . . . . . . . . . . . . . . . . . . . . . . . . . . . . . . . . . . . . . . 73
8 Menu principal Nintendo DS . . . . . . . . . . . . . . . . . . . . . . . . . . . . . . . . . . . . . . . . . . . . . . . . 74
9 Utiliser les cartes de jeu Nintendo DS (NTR-005) . . . . . . . . . . . . . . . . . . . . . . . . . . . . . . . 75
10 Utiliser les cartouches de jeu Game Boy Advance (AGB-002) . . . . . . . . . . . . . . . . . . . . . 76
11 Communications et modes de jeu sans fil . . . . . . . . . . . . . . . . . . . . . . . . . . . . . . . . . . . . . 77
12 PictoChat™ . . . . . . . . . . . . . . . . . . . . . . . . . . . . . . . . . . . . . . . . . . . . . . . . . . . . . . . . . . . . . . 79
13 Utiliser le clavier virtuel . . . . . . . . . . . . . . . . . . . . . . . . . . . . . . . . . . . . . . . . . . . . . . . . . . . . 81
14 Menu d’options – Modifier les paramètres . . . . . . . . . . . . . . . . . . . . . . . . . . . . . . . . . . . . . 82
15 Connexion Wi-Fi Nintendo . . . . . . . . . . . . . . . . . . . . . . . . . . . . . . . . . . . . . . . . . . . . . . . . . . 86
16 En cas de problèmes . . . . . . . . . . . . . . . . . . . . . . . . . . . . . . . . . . . . . . . . . . . . . . . . . . . . . .87
17 Comment jeter ce produit lorsqu’il est arrivé en fin de vie . . . . . . . . . . . . . . . . . . . . . . . . 89
INFORMATIONS IMPORTANTES SUR LA SECURITE – A LIRE AVANT TOUTE UTILISATION
D’UN JEU VIDEO PAR VOUS-MEME OU PAR VOTRE ENFANT. SI CE PRODUIT EST UTILISE
PAR DE JEUNES ENFANTS, CE MANUEL DOIT LEUR ETRE LU ET EXPLIQUE PAR UN ADULTE.
LE NON-RESPECT DE CES CONSIGNES PEUT ENTRAINER DES BLESSURES.
I – Précautions à prendre dans tous les cas pour l’utilisation d’un jeu vidéo
• Evitez de jouer si vous êtes fatigué ou si vous manquez de sommeil.
• Assurez-vous que vous jouezdans unepièce bien éclairée en modérantla luminositéde votre écran.
• Lorsque vous utilisez un jeu vidéo susceptible d’être connecté à un écran, jouez à bonne distance
de cet écran de télévision et aussi loin que le permet le cordon de raccordement.
• En cours d’utilisation, faites des pauses de dix à quinze minutes toutes les heures.
II – Avertissement sur l’épilepsie
Certaines personnes sont susceptibles de faire des crises d’épilepsie comportant, le cas échéant,
des pertes de conscience à la vue, notamment, de certains types de stimulations lumineuses fortes :
succession rapide d’images ou répétition de figures géométriques simples, d’éclairs ou d’explosions.
Ces personnes s’exposent à des crises lorsqu’elles jouent à certains jeux vidéo comportant de telles
stimulations, alors même qu’elles n’ont pas d’antécédent médical ou n’ont jamais été sujettes
elles-mêmes à des crises d’épilepsie.
Si vous-même ou un membre de votre famille avez déjà présenté des symptômes liés à l’épilepsie
(crise ou perte de conscience) en présence de stimulations lumineuses, consultez votre médecin
avant toute utilisation.
Les parents se doivent également d’être particulièrement attentifs à leurs enfants lorsqu’ils jouent
avec des jeux vidéo. Si vous-même ou votre enfant présentez un des symptômes suivants : vertige,
trouble de la vision, contraction des yeux ou des muscles, trouble de l’orientation, mouvement
involontaire ou convulsion, perte momentanée de conscience, il faut cesser immédiatement de
jouer et consulter un médecin.
Jouer aux jeux vidéo pendant plusieurs heures peut fatiguer vos muscles et articulations, vos yeux
ou même irriter votre peau. Suivez les instructions suivantes pour éviter des problèmes de tendinite,
le syndrome du canal carpien, une fatigue oculaire ou des irritations de l’épiderme:
• Evitez de jouer de manière excessive. Il est recommandé aux parents de vérifier que leurs enfants
jouent de manière appropriée.
• Faites une pause de 10 à 15 minutes toutes les heures, même si vous vous sentez bien.
• Il est inutile de serrer le stylet Nintendo DS Lite ou de l’appuyer trop fort sur l’écran sous peine
de provoquer gêne ou fatigue.
• Si vos mains, poignets, bras ou yeux sont fatigués ou douloureux quand vous jouez, reposez-vous
plusieurs heures avant de recommencer à jouer.
• Si la fatigue ou la douleur persistent, consultez un médecin.
▲
! AVERTISSEMENT – TRAUMATISMES DUS A
DES MOUVEMENTS REPETES ET FATIGUE OCULAIRE
▲
! AVERTISSEMENT SUR L’EPILEPSIE
IMPORTANT: compatibilité avec les jeux et accessoires Game Boy Advance
La Nintendo DS Lite (USG-001) ne fonctionnera PAS avec les jeux ou accessoires suivants :
• Cartouches de jeu Game Boy™ originelle (DMG-09)
• Cartouches de jeu Game Boy™ Color (CGB-002)
• Câbles Universal Game Link™ (CGB-003) et Game Boy Advance Game Link™ (AGB-005)
• Adaptateur sans fil Game Boy Advance™ (AGB-015)
• Adaptateur sans fil Game Boy™ micro (OXY-004)
• Câble Game Boy™ micro Game Link™ (OXY-008(EUR))
• Câble Game Boy Advance™ NINTENDO GAMECUBE™ (DOL-011)
• Camera Game Boy™ (MGB-006)
• Imprimante Game Boy™ (MGB-007)
La Nintendo DS Lite est compatible avec les cartouches de jeu Game Boy Advance (AGB-002)
en mode un joueur.
USG_HW_Man_EUR_A3 30.07.2007 17:06 Uhr Seite 62
COPY
Page 32

6564
La Nintendo DS Lite contient une batterie rechargeable Lithium Ion. Une fuite du contenu de la
batterie Lithium Ionou sacombustion peut causer des blessures corporelles ainsi que desdommages
à votre Nintendo DS Lite.
Si une fuite de la batterie se produit, évitez tout contact avec la peau. Si du liquide provenant de la
batterie entre en contact avec vos yeux, rincez-les immédiatement et abondamment avec de l’eau et
consultez un médecin. En cas de contact avec votre peau, nettoyez immédiatement avec du savon
et de l’eau.
Pour éviter une fuite de la batterie, sa combustion ou son explosion :
• N’exposez pas la batterie à des chocs physiques ou vibrations excessives.
• Ne démontez pas, ne réparez pas ou ne déformez pas la batterie.
• La batterie Lithium Ion ne doit pas être court-circuitée. Ne touchez pas les bornes de la batterie
et ne causez pas de court-circuit avec un objet métallique entre les bornes de la batterie.
• La batterie Lithium Ion ne doit pas être exposée à la chaleur. Ne jetez pas la batterie au feu.
• Veillez à ne pas endommager ou enlever l’étiquette de la batterie.
• N’utilisez pas la batterie si sa coque en plastique a été endommagée de quelque façon.
• N’insérez pas et ne retirez pas la batterie si la console est sous tension.
• La batterie rechargeable Nintendo DS Lite doit être rechargée sous la surveillance d’un adulte.
• Utilisez seulement lebloc d’alimentation NintendoDS Litepour recharger la batterie Nintendo DSLite.
• N’utilisez la batterie rechargeable Nintendo DS Lite qu’avec la console Nintendo DS Lite.
• La batterie épuisée doit être retirée de la console quand vous vous débarrassez de celle-ci.
• N’immergez pas la batterie dans l’eau (ou autre liquide) et ne la mouillez pas.
• Une manipulation inappropriée de la batterie Lithium Ion (par exemple lors du remplacement de
celle-ci) peut faire courir un risque de combustion ou d’explosion. Ne déformez pas, n’écrasez
pas, ne percez pasou n’exposezpas labatterie à des températures supérieures à 60 degrés Celsius.
De plus, ne causez pas de court-circuit avec un objet métallique entre les bornes de la batterie.
N’utilisez aucune batterie autreque labatterie rechargeable Nintendo DS Lite (USG-003).L’utilisation
de tout autre type de batterie risque de provoquer sa combustion ou son explosion.
Ne retirez la batterie rechargeable de la Nintendo DS Lite que si elle doit être remplacée.
Pour savoir comment retirer la batterie, veuillez vous reporter aux instructions de la page 70. Avant
de jeter la batterie, veuillez consulter le paragraphe “COMMENT JETER LA BATTERIE” à la page 70.
Ne réutilisez pas la batterie si elle est rentrée en contact avec un liquide.
Les batteries de remplacement sont vendues séparément. Veuillez contacter le service consommateurs
Nintendo pour l’adresse d’un revendeur. Si vous ne désirez pas remplacer la batterie par vousmême, vous pouvez envoyer votre Nintendo DS Lite au service consommateurs pour que la batterie
soit remplacée par un technicien agréé.
▲
! AVERTISSEMENT – FUITE DE LA BATTERIE
La Nintendo DS Lite peut émettre des ondes radio susceptibles de perturber le fonctionnement de
certains appareils électroniques situés à proximité, comme les stimulateurs cardiaques (pacemakers).
• N’utilisez pas la Nintendo DS Lite à moins de 25 centimètres d’un stimulateur cardiaque pendant
les opérations de communication sans fil.
• Si vous avez un stimulateur cardiaque ou tout autre implant médical, n’utilisez pas les fonctions
de communication sans fil de la Nintendo DS Lite sans avoir au préalable consulté votre médecin
ou le fabricant de votre implant médical.
L’utilisation de la Nintendo DS Lite dans un mode AUTRE que le mode de communication sans fil
peut être autorisée dans les aéroports, dans les hôpitaux et à bord des avions de la même manière
que n’importe quel autre appareil électronique sans fonction de communication sans fil. Vous savez
que votre Nintendo DS Lite est en mode de communication sans fil quand le témoin d’alimentation
(vert ou rouge) clignote rapidement pour indiquer qu’une communication sans fil est en cours. Le
témoin d’alimentation clignote rapidement quand vous utilisez PictoChat™, quand vous jouez à un
jeu en mode multijoueur ou quand vous téléchargez un jeu à partir d’une autre console.
Veuillez observer les règles concernant l’usage d’appareils de communication sans fil dans les
endroits tels que les hôpitaux, les aéroports et à bord des avions. Afin de respecter les règlements
des compagnies aériennes, n’utilisez pas PictoChat ou les modes de jeu sans fil Nintendo DS à bord
d’un avion. L’utilisation de ces fonctions peut interférer ou causer des défaillances d’équipements
électroniques pouvant entraîner des blessures ou des dommages au matériel.
Ce produit est un appareil électronique complexe susceptible d’être endommagé par les
chocs physiques directs. Un étui de protection (vendu séparément) peut permettre d’éviter les
problèmes liés aux chocs.
Veuillez vous référer au livret de précautions sur la santé et la sécurité Nintendo DS séparé
pour des informations supplémentaires sur les précautions et la maintenance du matériel
et des logiciels.
Veuillez lire attentivement les instructions suivantes avant d’utiliser ou de paramétrer la
Nintendo DS Lite. S’il vous reste des questions après la lecture de ces instructions, veuillez
contacter le service consommateurs Nintendo.
NOTE : ce produit ne contientpas delatex, deplomb, de mercure,de cadmium,de chrome hexavalent,
de PBB ou de PBDE.
▲
! AVERTISSEMENT – UTILISATION DE LA NINTENDO DS LITE
DANS LES AEROPORTS, DANS LES HOPITAUX ET A BORD D’AVIONS
▲
! AVERTISSEMENT – INTERFERENCES AVEC LES RADIOFREQUENCES
USG_HW_Man_EUR_A3 30.07.2007 17:06 Uhr Seite 64
COPY
Page 33

6766
2
Composants de la Nintendo DS Lite
1. Ecrans LCD – Deux écrans couleurs à cristaux liquides. L’écran inférieur est un écran tactile et
ne devrait être utilisé qu’avec un stylet officiel Nintendo.
AVERTISSEMENT: ne placez pas vos doigts sur la charnière de la Nintendo DS Lite lorsque
vous l’ouvrez pour éviter de vous pincer.
2. Haut-parleurs stéréo
3. Bouton POWER – Pour allumer ou éteindre la console. Pour éviter d’éteindre accidentellement
la console durant l’utilisation, vous devez maintenir le bouton POWER en position haute pendant
un petit moment avant qu’elle ne s’éteigne.
4. Commandes de jeu – La manette ✚, les boutons A, B, X et Y, les boutons L et R ainsi que
START et SELECT sont utilisés pour les jeux. Consultez le mode d’emploi du jeu que vous
utilisez pour des fonctions spécifiques.
5. Microphone (MIC.) – Utilisé pour des jeux spécialement conçus.
6. Contrôle du volume (VOL.) – Faites-le glisser sur la droite pour augmenter le volume sonore
et sur la gauche pour le diminuer.
7. Cache port cartouche Nintendo DS Lite (USG-005) et port cartouche (SLOT-2) – Enlevez le
cache quand vous utilisez une cartouchede jeuGame Boy Advance ou un accessoire NintendoDS
(chacun vendu séparément). Gardez le cache en place lorsque vous n’utilisez pas le SLOT-2
pour le protéger de la poussière ou d’autres corps étrangers. Ce port n’est pas compatible
avec les cartouches de jeu Game Boy ou Game Boy Color.
8. Témoin de charge – Lorsque vous utilisez le bloc d’alimentation Nintendo DS Lite, ce témoin
devient orange. Il s’éteint complètement lorsque la charge est terminée.
9. Témoin d’alimentation – Indique si la console est allumée ou éteinte et le niveau de charge de
la batterie. Le témoin passe du vert au rouge quand la charge de la batterie devient faible.
Quand le témoin devient rouge, sauvegardez votre partie et rechargez la batterie pour prévenir
la perte de vos données de jeu.
10. Connecteurs audio (Ecouteurs /Microphone) – Pour connecter des écouteurs stéréo,
un microphone externe ou un casque avec micro (chacun vendu séparément).
11. Connecteur d’extension externe (5.2V IN) – Permet de connecter le bloc d’alimentation
Nintendo DS Lite (inclus) pour recharger la batterie ou d’utiliser la NintendoDS Litesur le secteur.
12. Port carte DS (SLOT-1) – Pour charger un jeu Nintendo DS (vendu séparément).
13. Emplacement pour courroie – Pour attacher la courroie (non incluse).
14. Stylet et porte-stylet – Rangez toujours le stylet dans le porte-stylet après utilisation.
15. Couvercle de la batterie – Peut être ôté pour remplacer la batterie rechargeable. Voir page 70
pour plus d’informations sur le remplacement de la batterie.
16. Prise CC – Se connecte au connecteur d’extension externe (5.2V IN) pour recharger la batterie
ou utiliser la console sur le secteur.
17. Broches de prise CA – Se connectent dans une prise électrique standard de 230 volts.
15. Couvercle de la batterie
14. Stylet et porte-stylet
4. Commandes de jeu
11. Connecteur d’extension
externe (5.2V IN)
12. Port carte DS (SLOT-1)
13. Emplacement pour courroie
16. Prise CC
17. Broches de prise CA
Bloc d’alimentation Nintendo DS Lite (USG-002(EUR))
1. Ecrans LCD
2. Haut-parleurs stéréo
2. Haut-parleurs stéréo
5. Microphone (MIC.)
3. Bouton POWER
9. Témoin d’alimentation
8. Témoin de charge
6. Contrôle du volume (VOL.)
7. Cache port cartoucheNintendo DS Lite
et port cartouche (SLOT-2)
4. Commandes de jeu
10. Connecteurs audio (Ecouteurs/ Microphone)
• Un clignotement rapide indique qu’une communication sans fil est en cours.
• Un clignotement lent indique que la Nintendo DS Lite est en mode veille.
NOTE : si vous refermez la Nintendo DS Lite alors qu’elle est allumée, la console se mettra automatiquement en mode veille. En mode veille, la console consomme nettement moins d’énergie
qu’en étant allumée. Elle quittera le mode veille quand vous l’ouvrirez à nouveau.
USG_HW_Man_EUR_A3 30.07.2007 17:06 Uhr Seite 66
COPY
Page 34

6968
3
Recharger la batterie rechargeable
Nintendo DS Lite (USG-003)
AVERTISSEMENT: n’utilisez pas le bloc d’alimentation Nintendo DS Lite pendant un orage. Il y
a un risque de choc électrique dû à la foudre.
Vous devez recharger la batterie avant d’utiliser la Nintendo DS Lite pour la première fois, ou après
une longue période d’inactivité. (Si vous n’utilisez pas la Nintendo DS Lite pendant une longue
période, veillez à recharger la batterie au moins une fois tous les six mois.)
Une fois chargée complètement, la batterie tient entre quinze et dix-neuf heures avec la luminosité
d’écran la plus faible et en fonction du type d’activité (voir page 74 pour des informations sur comment
régler la luminosité d’écran). Sur la luminosité maximale, la durée de vie de la batterie est de cinq à
huit heures.
La batterie rechargeable peut être rechargée environ 500 fois, mais ses performances peuvent
diminuer après des recharges répétées, en fonction de conditions d’utilisation telles que la température. (La température optimale de recharge se situe entre10 et 40 degrés Celsius.)
La durée d’utilisation de la batterie peut également diminuer avec le temps. Après 500 recharges,
la durée d’utilisation de la batterie peut diminuer de 30 % par rapport à sa capacité initiale.
Une recharge complète de la batterie dure approximativement trois heures. (Le temps réel de la
recharge dépend de la quantité d’énergie restante.) Quand le témoin devient rouge, sauvegardez
votre partie et rechargez la batterie pour prévenir la perte de vos données de jeu. Vous pouvez utiliser
votre console tout en rechargeant la batterie, mais le temps de recharge sera plus long.
IMPORTANT: le bloc d’alimentation Nintendo DS Lite (USG-002(EUR)) ne doit être utilisé qu’avec
une console de jeu portable Nintendo DS Lite. Il n’est compatible avec aucune autre console
de jeu Nintendo.
1. Insérez la prise de courant continu (CC) du bloc d’alimentation
dans le connecteur d’extension externe (5.2V IN) au dos de la
Nintendo DS Lite (illustration 1).
IMPORTANT: assurez-vous que la prise CC est orientée
dans la bonne direction avant de l’insérer dans le connecteur d’extension externe pour éviter d’endommager la
prise et/ou le connecteur.
2. Insérez les broches du bloc d’alimentation dans une prise électrique de
230 volts. Assurez-vous que les broches sont correctement insérées dans
la prise. La diode du témoin de recharge s’allume alors en orange jusqu’à
ce que la batterie soit complètement chargée. Vous pouvez utiliser votre
console tout en rechargeant la batterie, mais le processus sera plus long
(illustration 2).
Si vous utilisez votre Nintendo DS Lite tout en la rechargeant,
il se peut que le témoin de charge reste allumé une fois la recharge
terminée.
• La Nintendo DS Lite doit toujours être utilisée avec le bloc d’alimentation Nintendo DS Lite.
• Le bloc d’alimentation exclusif est conforme à la directive « basse tension» (2006/95/CE).
• Inspectez régulièrement les éléments du bloc d’alimentation (cordon, prise et bloc) utilisés avec
la Nintendo DS Lite pour déceler tout dommage éventuel.
• Si l’un des éléments est endommagé, l’ensemble ne doit pas être utilisé avant d’avoir été réparé
par une personne compétente ou agréée.
• La Nintendo DS Lite n’est pas destinée aux enfants de moins de 3 ans.
• Le bloc d’alimentation n’est pas un jouet.
• Le bloc d’alimentation Nintendo DS Lite n’est à utiliser qu’en intérieur.
• Si le cordon d’alimentation est endommagé, il doit être remplacé par le service consommateurs
Nintendo pour éviter tout accident.
• La Nintendo DS Lite doit être débranchée du bloc d’alimentation avant d’être nettoyée.
• Veuillez prendre note que l’appareil, et en particulier la batterie, doit être conservé hors
de la portée des très jeunes enfants.
• N’utilisez pas le bloc d’alimentation dans un endroit où il pourrait être éclaboussé avec de l’eau ou
un autre liquide, comme par exemple du jus de fruits, l’urine d’un animal domestique, de l’huile, et
ne l’utilisez pas dans des endroits extrêmement humides.
• N’utilisez pas d’adaptateur électrique de voyage ni de variateur d’intensité pour lampes à
incandescence car cela peut changer la tension électrique.
3. Lorsque la batterie est complètement rechargée, le témoin
de charge s’éteint. Débranchez alors le bloc d’alimentation
de la prise secteur. Retirez ensuite la prise CC du connecteur
d’extension externe (illustration 3).
IMPORTANT: lorsque vous débranchez n’importe quelle
prise de la Nintendo DS Lite ou de la prise secteur, tirez
toujours la prise en la saisissant par la fiche et non par le
cordon. N’enroulez pas le cordon d’alimentation autour
de la Nintendo DS Lite.
Illustration 1
Illustration 2
Illustration 3
USG_HW_Man_EUR_A3 30.07.2007 17:06 Uhr Seite 68
COPY
Page 35

5
Utiliser le stylet Nintendo DS Lite (USG-004)
et l’écran tactile
7170
4
Remplacer et jeter la batterie rechargeable
Nintendo DS Lite
S’il est nécessaire de remplacer la batterie rechargeable, veuillez suivre la procédure suivante. Cette
procédure doit être effectuée par un adulte. Des batteries rechargeables de remplacement sont
vendues séparément dans les magasins spécialisés. Vous pouvez aussi les commander par le biais
du service consommateurs Nintendo. Si vous ne désirez pas remplacer la batterie par vous-même,
vous pouvez envoyer votre Nintendo DS Lite au service consommateurs pour que la batterie soit
remplacée par un technicien agréé.
1. La console doit toujours être éteinte et le bloc d’alimentation déconnecté avant de remplacer
la batterie.
2. A l’aide d’un tournevis, desserrez les vis du couvercle de la batterie (illustration 4). Otez le
couvercle de la batterie et conservez-le précieusement. Utilisez toujours un tournevis approprié
aux vis. Utiliser un tournevis inapproprié pourrait endommager la tête des vis et vous pourriez ne
plus pouvoir ôter le couvercle de la batterie.
3. Utilisez la protubérance au bout de la batterie pour l’extraire de la Nintendo DS Lite (illustration 5).
4. Insérez une nouvelle batterie rechargeable dans la Nintendo DS Lite. Utilisez une nouvelle batterie
rechargeable Nintendo DS Lite (USG-003) uniquement. Veillez à insérer la nouvelle batterie rechargeable correctement tel qu’indiqué dans l’illustration 6.
5. Remettre en place le couvercle de la batterie et serrez les vis avec précaution.
6. Avant de jeter la batterie rechargeable, veuillez consulter le paragraphe “COMMENT JETER LA
BATTERIE” plus bas.
Illustration 4
Illustration 5
Illustration 6
Illustration 7 Illustration 8
L’écran inférieur, ou écran tactile, est sensible au toucher. Pour les jeux Nintendo DS utilisant cette
fonction, servez-vous du stylet Nintendo DS Lite fourni avec la console pour activer l’écran.
Touchez ou faites glisser légèrement le stylet sur la surface de l’écran tactile (illustrations 7 et 8).
CONSIGNES D’UTILISATION DU STYLET ET DES ECRANS:
• N’utilisez le stylet QUE sur l’écran TACTILE.
• N’exercez pas une pression excessive sur l’écran tactile, cela pourrait l’endommager.
• N’utilisez pas le stylet si celui-ci est cassé.
• N’utilisez sur l’écran tactile que des stylets officiels Nintendo.
• Rangez le stylet dans le porte-stylet quand vous ne vous en servez pas.
• Si vous utilisez une protection d’écran pour votre Nintendo DS Lite, n’utilisez que les protections
d’écran vendues sous licence Nintendo et uniquement sur l’écran tactile.
NETTOYAGE DES ECRANS:
Si les écrans de votre Nintendo DS Lite présentent des traces de saleté, de doigts ou d’autres corps
étrangers, ils peuvent ne pas fonctionner correctement et risquent de s’endommager davantage.
Vous pouvez les nettoyer en utilisant un chiffon propre et doux comme ceux utilisés pour nettoyer
les lunettes et les lentilles.
1. Utilisez un chiffon doux et légèrement humide (n’utilisez QUE de l’eau) pour nettoyer les écrans.
2. Séchez ensuite les écrans à l’aide d’un chiffon sec. Si nécessaire, répétez l’opération.
Si l’écran tactile ne fonctionne toujours pas après le nettoyage, veuillez contacter le service
consommateurs Nintendo.
COMMENT JETER LA BATTERIE
• Jeter une batterie avec les ordures ménagères peut nuire à l’environnement. Lorsque vous jetez la
batterie, conformez-vous à la réglementation locale appropriée.
• Conformément à la directive relative aux piles et accumulateurs ainsi qu'aux déchets de piles et
d'accumulateurs (2006/66/EC), des programmes de collecte des piles et de recyclage devraient
être mis en place dans tous les pays membres de l’Union européenne avant le 26 septembre
2008. Si ce programme est déjà en place dans votre pays, vous ne devez pas jeter de batterie
dans vos ordures ménagères. Pour des informations sur la manière de jeter les batteries, contactez les autorités locales en charge de la collecte des déchets.
USG_HW_Man_EUR_A3 30.07.2007 17:06 Uhr Seite 70
COPY
Page 36

7
Régler les paramètres
7372
6
Informations personnelles
La première fois que la Nintendo DS Lite est allumée, il vous sera demandé de sélectionner la langue
du système. Utilisez la manette ✚ ou le stylet pour sélectionner une langue, puis touchez OUI ou
appuyez sur le bouton A.
Suivez les instructions à l’écran pour entrer votre surnom, la couleur de l’écran, la date, l’heure, le
mois et le jour de votre naissance (pas l’année). Appuyez sur le bouton B pour revenir en arrière si
vous désirez modifier les paramètres. Vous pourrez modifier ces paramètres ultérieurement à partir
du menu d’options, voir pages 82 à 86. Pour savoir comment utiliser le clavier virtuel, voir page 81.
Touchez QUITTER pour achever les modifications des paramètres du système. Un message de confirmation s’affichera à l’écran. Si vous touchez OUI, la Nintendo DS Lite s’éteindra automatiquement.
Allumez la console pour accéder au menu principal Nintendo DS affiché sur la page suivante.
Comme pour tous les nouveaux produits comprenant un écran tactile, un faible pourcentage de
consoles Nintendo DS Lite peut, après expédition, nécessiter un réalignement du stylet avec l’écran
tactile. Si vous jugez que votre Nintendo DS Lite a besoin d’être recalibrée, consultez le paragraphe
« Ecran tactile » page 86 pour des instructions sur la modification des paramètres de l’écran tactile.
PictoChat™ n’est pas une application Internet. Toutefois, PictoChat permet à jusqu’à 16 utilisateurs de Nintendo DS Lite ou de Nintendo DS de communiquer entre eux dans un rayon donné
(environ 20 mètres). Ces utilisateurs pourront ainsi voir votre surnom et vos messages. Pour
protéger votre vie privée, ne divulguez pas d’informations personnelles, comme votre nom de
famille, votre numéro de téléphone, votre âge, votre adresse physique ou informatique, qui
pourraient être lues par une personne inconnue.
Un adulte devrait assister les enfants lors du paramétrage de la console et leur expliquer de
ne pas utiliser d’informations personnelles. PictoChat ne bloque pas les messages provenant
de personnes inconnues. Comme pour les salles de « chat » sans modérateurs, les enfants
doivent être prévenus des risques inhérents à communiquer avec ou à recevoir des messages
de la part de personnes inconnues.
Lors du paramétrage de la console, quels que soient le jour et le mois que vous choisissez
d’entrer pour votre anniversaire (l’année ne fait pas partie des paramètres demandés), un
message « Joyeux anniversaire! » sera diffusé dans la salle de chat à cette date.
Pour plus d’informations, visitez le site http://dsprivacy.nintendo-europe.com
USG_HW_Man_EUR_A3 30.07.2007 17:06 Uhr Seite 72
COPY
Page 37

7574
8
Menu principal Nintendo DS
9. Icône de mode de démarrage – Cette icône montre quel mode de démarrage la Nintendo DS
Lite utilisera quand vous l’allumez.
• En MODE AUTOMATIQUE, la Nintendo DS Lite lancera automatiquement un jeu s’il y en a un
dans le SLOT-1 ou le SLOT-2. La Nintendo DS Lite démarrera automatiquement la carte de jeu
Nintendo DS si les deux ports ont un jeu inséré.
• En MODE MANUEL, le menu principal Nintendo DS apparaîtra.
Vous pouvez passer d’un mode à l’autre à partir du menu d’options (page 83).
10. Icône d’écran Game Boy Advance – Cette icône indique quel écran est utilisé pour l’affichage
des jeux Game Boy Advance. Peut être modifié à partir du menu d’options (page 83).
11. Calendrier et date actuelle – Peuvent être modifiés à partir du menu d’options (page 84).
12. Panneau de sélection de téléchargement DS –Sélectionnez-le pourutiliser le téléchargementDS
(voir « Communications et modes de jeu sans fil » pages 77 à 79).
13. Icône de communication sans fil – Indique qu’une communication sans fil commencera si ce
panneau est sélectionné (page 78). NOTE : l’utilisation de matériel de communication sans fil
est prohibée dans certainsendroits.
14. Panneau d’activation de l’alarme – Touchez ce panneau pour activer ou désactiver l’alarme.
Peut être modifié à partir du menu d’options (page 84).
1. Nom de l’utilisateur – Peut être modifié à partir du menu d’options (page 85).
2. Date, heure et alarme – Peuvent être modifiées à partir du menu d’options (page 84).
3. Panneau de sélection du jeu Nintendo DS – Sélectionnez-le pour démarrer la carte de
jeu DS insérée dans le SLOT-1 (voir « Utiliser les cartes de jeu Nintendo DS (NTR-005)»
sur la page suivante).
4. Panneau de sélection de PictoChat – Sélectionnez-le pour démarrer une session de PictoChat
(voir « PictoChat » pages 79 et 80).
5. Panneau de sélection de la cartouche de jeu Game Boy Advance – Sélectionnez-le pour
démarrer la cartouche de jeu insérée dans le SLOT-2 (voir « Utiliser les cartouches de jeu
Game Boy Advance (AGB-002) » page 76).
6. Panneau du menu d’options – Sélectionnez ce panneau pour accéder au menu d’options
et changer les paramètres, initiaux ou autres, de la console (pages 82 à 86).
7. Luminosité – Touchez pour choisir entre quatre niveaux de luminosité d’écran. NOTE: la batterie
se déchargera plus vite sur les luminosités les plus fortes.
8. Indicateur de puissance de batterie – Indique la charge de la batterie. Cette icône est verte
quand la batterie a une charge suffisante et passe au rouge quand la batterie a une charge faible.
9
Utiliser les cartes de jeu Nintendo DS (NTR-005)
1
2
3
4
13
5
7
8
9
10
11
12
13
6
14
1. Vérifiez que la Nintendo DS Lite est bien éteinte.
2. Insérez la carte de jeu Nintendo DS dans le port carte DS (SLOT-1) à
l’arrière de la console et poussez-la doucement mais fermement en
position jusqu’à ce que vous entendiez un clic. L’étiquette du jeu doit
être orientée vers le dessous de la Nintendo DS Lite (illustration 9).
3. Allumez la console. Après l’écran d’avertissement sur la santé et
la sécurité, le titre du jeu apparaîtra. Touchez le titre du jeu avec le
stylet pour le démarrer (en mode automatique, le jeu démarrera automatiquement). Avant de commencer à jouer, lisez attentivement le
manuel d’instructions de votre jeu.
4. Pour ôter une carte de jeu Nintendo DS, veuillez d’abord éteindre la
console. Poussez la carte de jeu Nintendo DS dans le port carte DS
jusqu’à ce que vous entendiez un clic. Relâchez et, automatiquement,
la carte s’éjectera partiellement du port.
Illustration 9
USG_HW_Man_EUR_A3 30.07.2007 17:06 Uhr Seite 74
COPY
Page 38

11
Communications et modes de jeu sans fil
7776
10
Utiliser les cartouches de jeu Game Boy Advance (AGB-002)
NOTE : l’utilisation de matériel de communication sans fil est prohibée dans certains endroits.
Veuillez vous reporter à la page 65 pour de plus amples informations.
La fonction de communication sans fil Nintendo DS vous permet de communiquer ou de jouer avec
d’autres personnes sans faire usage de câbles. Il y a deux types de jeux Nintendo DS compatibles
avec la fonction de communication sans fil.
Le jeu multi-cartes sans fil requiert une carte de jeu DS pour chaque console utilisée.
Le nombre de joueurs qui peuvent participer à la partie sera indiqué sous l’icône.
Le téléchargement DS sans fil requiertseulement unecarte de jeu DS pour une console
(console hôte). Les autres joueurs téléchargent les informations nécessaires au jeu
dans leurs consoles (console cliente) à l’aide de la fonction de communication sans fil.
Le nombre de joueurs qui peuvent participer à la partie sera indiqué sous l’icône.
Cherchez ces icônes sur l’emballage des jeux Nintendo DS pour connaître le mode de jeu
sans fil disponible pour chaque jeu et le nombre de joueurs maximum pouvant jouer simultanément.
Jeu multi-cartes
1. Vérifiez bien que les consoles sont éteintes, puis insérez une carte de jeu dans chacune
d’entre elle. Allumez toutes les consoles.
2. Touchez le titre du jeu avec le stylet pour le démarrer. Avant de commencer à jouer,
lisez attentivement le manuel d’instructions de votre jeu.
IMPORTANT: la Nintendo DS Lite ne fonctionnera qu’avec des cartouches de jeu Game Boy
Advance. La Nintendo DS Lite n’est PAS compatible avec les cartouches de jeu Game Boy
originelle ou Game Boy Color.
1. Vérifiez que la Nintendo DS Lite est bien éteinte.
2. Insérez la cartouche de jeu Game Boy Advance dans le port cartouche
(SLOT-2) en façade de la Nintendo DS Lite. Vérifiez que la cartouche
est bien enfoncée dans le port cartouche. L’étiquette du jeu doit être
orientée vers le dessous de la Nintendo DS Lite (illustration 10).
3. Allumez la console pour faire apparaître le titre du jeu. Touchez le titre du
jeu avec le stylet pour le démarrer (en mode automatique, le jeu démarrera
automatiquement). Avant de commencer à jouer, lisez attentivement le
manuel d’instructions de votre jeu.
4. Pour ôter une cartouche de jeu, veuillez d’abord éteindre la console.
En utilisant votre pouce, retirez avec précaution la cartouche de jeu du
port cartouche.
Eteignez toujours votre console quand vous avez fini de jouer et débranchez le bloc d’alimentation
(si vous l’utilisez) de la prise électrique et de la Nintendo DS Lite.
N’enroulez pas le cordon d’alimentation autour de la Nintendo DS Lite.
Quand vous ne l’utilisez pas, fermez la Nintendo DS Lite afin de protéger les écrans de la poussière
et d’éventuels dommages.
NOTE : la console ne s’éteindra pas automatiquement quand vous la fermez. Si vous la fermez
alors qu’elle est allumée, la console se mettra automatiquement en mode veille. En mode veille,
la console consomme nettement moins d’énergie qu’en étant allumée. Elle quittera le mode veille
quand vous l’ouvrirez à nouveau.
CONSEILS D’UTILISATION DES CARTES ET CARTOUCHES DE JEU :
• Vérifiez toujours que les connecteurs de la carte ou cartouche de jeu ne sont pas recouverts
de corps étrangers avant de l’insérer dans la Nintendo DS Lite.
• Vérifiez que vous avez correctement orienté la carte ou la cartouche de jeu avant de l’insérer
dans la Nintendo DS Lite.
• N’éteignez pas la console et ne retirez pas la carte ou la cartouche de jeu pendant une
sauvegarde, vous risqueriez de perdre les données sauvegardées.
• Ne soufflez ni sur les connecteurs de la Nintendo DS Lite, ni sur les connecteurs des cartes ou
des cartouches de jeu. L’humidité expirée peut causer un dysfonctionnement des connecteurs.
Illustration 10
USG_HW_Man_EUR_A3 30.07.2007 17:06 Uhr Seite 76
COPY
2–16
2–16
Page 39

7978
• Evitez que des personnes ou des obstacles se trouvent entre les consoles Nintendo DS.
• Evitez les interférences créées par d’autres appareils. Si les communications semblent affectées
par d’autres appareils (réseau sans fil, four à micro-ondes, appareils sans fil, ordinateurs),
déplacez-vous à un autre endroit ou éteignez l’appareil créant les interférences.
La Nintendo DS Lite est équipée d’un module RF (802.11), a une puissance rayonnée inférieure à
10mW e.i.r.p. et la puissance maximale de la densité du spectre est inférieure à 30dBW/1 MHz e.i.r.p.
Ces paramètres peuvent être maintenus dans une marge de température de 0 à 40 degrés Celsius.
En concordance avec ces données, la Nintendo DS Lite est classée équipement de catégorie 1 en
accord avec la Décision de la Commission 2000/299/CE.
0 1 2 3
PLUS FAIBLE PLUS FORT
Puissance du signal de réception
Pendant un jeu utilisant la communication sans fil, une icône apparaîtra sur l’écran supérieur ou
inférieur pour indiquer la puissance du signal. L’icône a quatre affichages différents, tels qu’indiqués
ci-dessous, en fonction de la puissance du signal.
12
PictoChat™
PictoChat vous permet d’utiliser la Nintendo DS Lite avec d’autres utilisateurs de consoles
Nintendo DS (Nintendo DS Lite et Nintendo DS) pour l’envoi et la réception sans fil de messages
ainsi que de dessins. PictoChat n’est pas une application Internet. Vous pouvez communiquer avec
jusqu’à 15 autres utilisateurs de consoles Nintendo DS dans le rayon de votre Nintendo DS Lite.
Consultez la section « Informations personnelles » page 72.
1. Allumez la console. Sélectionnez PICTOCHAT sur le menu principal Nintendo DS (illustration 13).
2. L’écran de sélection de la salle de chat s’affichera. Sélectionnez la salle de chat dans laquelle
vous désirez entrer (illustration 14).
Le nombre affiché dans chaque panneau indique combien de personnes sont dans la salle de
chat. Si le nombre total de participants a déjà atteint le maximum (16/16), vous ne pourrez
pas entrer dans cette salle de chat. L’icône sur le côté droit de la fenêtre indique la puissance
du signal pour communiquer avec cette salle (page 78).
NOTE : si vous rencontrez des problèmes pour communiquer avec les autres membres de
la salle de chat, faites en sorte que tout le monde se retrouve dans une autre salle de chat.
Consultez aussi les directives ci-dessus sur les communications sans fil et vérifiez qu’il n’y
a pas d’interférences.
3. L’écran de PictoChat s’affichera pour la salle que vous avez sélectionnée (illustration 15).
Illustration 14Illustration 13
Panneau PICTOCHAT
Téléchargement DS
1. Vérifiez bien que les consoles sont éteintes, puis insérez une carte de jeu dans la console qui sera
la console hôte. Allumez toutes les consoles.
2. Sur la console hôte, utilisez le stylet pour toucher le titre du jeu afin de le démarrer.
3. Sur les consoles clientes, touchez le panneau TELECHARGEMENT DS sur le menu principal
Nintendo DS.
4. A l’écran de sélection du jeu, touchez le titre du jeu que vous voulez télécharger (illustration 11).
Confirmez votre choix (illustration 12). Touchez OUI pour télécharger les données du jeu depuis
la console hôte. Avant de commencer à jouer, lisez attentivement le manuel d’instructions de
votre jeu.
Illustration 12Illustration 11
IMPORTANT: DIRECTIVES POUR LES COMMUNICATIONS SANS FIL
• Commencez avec une distance entre les consoles d’environ 10 mètres au plus et rapprochez-vous
ou éloignez-vous en fonction de vos désirs, tout en gardant la puissance du signal à deux barres
ou plus pour obtenir les meilleurs résultats.
• Gardez une distance inférieure à 20 mètres entre les consoles.
• Les consoles doivent être orientées les unes vers les autres de la manière la plus directe possible.
USG_HW_Man_EUR_A3 30.07.2007 17:06 Uhr Seite 78
COPY
Page 40

13
Utiliser le clavier virtuel
8180
1. Icône de puissance du signal – Indique la puissance du signal pour votre salle de chat.
2. Ecran d’affichage – Affiche les messages ou dessins envoyés ou reçus.
3. Barre de défilement – Affiche les messages ou dessins par couleur d’utilisateur. Chaque ligne
représente un message.
4. Lettre de salle de chat – Montre dans laquelle des quatre salles de chat vous vous trouvez.
5. Barre des membres de la salle de chat – Liste les surnoms des personnes participant à cette
salle de chat. Touchez un surnom pour voir les messages de ce membre (voir comment créer
un message page 85).
6. Boutons de défilement – Faites défiler vers le haut ou le bas les messages reçus ou envoyés.
7. Outil crayon – Pour dessiner des dessins sur l’écran de saisie.
8. Outil gomme – Pour effacer des lignes sur l’écran de saisie.
9. Ecran de saisie – Le texte ou les lignes sont affichés ici avant de sélectionner ENVOYER.
10. Epaisseur de trait – Sélectionnez un trait épais ou fin pour dessiner ou effacer.
11. Types de clavier – Sélectionnez un clavier parmi ceux proposés (Voir «Utiliser le clavier virtuel »
page suivante).
12. Panneau clavier – Utilisez le stylet ou la manette ✚, le bouton A et le bouton B pour sélectionner
les lettres pour vos messages.
13. Bouton Quitter – Touchez cette icône pour quitter la sallede chatdans laquellevous vous trouvez.
14. Bouton Envoyer – Touchez cette icône pour envoyer votre message ou votre dessin.
15. Bouton Copier – Touchez cette icône pour copier le dernier message ou le dernier dessin
de l’écran d’affichage vers votre écran de saisie.
16. Bouton Effacer – Touchez cette icônepour effacer tout ce qui se trouve survotre écran de saisie.
Le clavier virtuel fonctionne comme un clavier d’ordinateur. Le type de clavier peut être sélectionné
à partir du menu situé à gauche du clavier. Comme indiqué ci-dessous, il y a cinq types de clavier
(illustration 16).
Deux types sont indiqués ici ; cependant, ils fonctionnent tous de la même manière.
Utilisez le stylet ou la manette ✚, le bouton A et le bouton B pour sélectionner les lettres.
Illustration 16
Illustration 15
14
9
13
15
16
12
5
1
3
2
4
6
7
11
8
10
Alphanumérique
International (Caractères spéciaux)
Hiragana/ Katakana japonais
Symboles
Images
Alphanumérique
Passe des majuscules
aux minuscules.
Efface la lettre sélectionnée
ou à gauche du curseur.
Insère un retour à la ligne.
Ajoute un espace.
Passe des majuscules/ symboles
aux minuscules/ chiffres.
International (Caractères spéciaux)
Efface la lettre sélectionnée
ou à gauche du curseur.
Insère un retour à la ligne.
Ajoute un espace.
Ecran de PictoChat
USG_HW_Man_EUR_A3 30.07.2007 17:06 Uhr Seite 80
COPY
Page 41

8382
14
Menu d’options – Modifier les paramètres
Différents paramètres peuvent être ajustés depuis le menu d’options. Pour accéder au menu
d’options, touchez le panneau des paramètres sur le menu principal Nintendo DS (illustration 17).
Le menu d’options apparaîtra. Chacun des quatre panneaux de menu ouvrira un groupe de
paramètres que vous pourrez modifier (illustration 18).
Illustration 19
Sélectionnez le panneau de menu pour les paramètres que vous désirez modifier.
1. OPTIONS : mode de démarrage, langue du système, écran du mode Game Boy Advance
2. HORLOGE : date, alarme, heure
3. UTILISATEUR: couleur, anniversaire, surnom, message
4. ECRAN TACTILE
Reportez-vous aux pages suivantes pour une description et des instructions pour chaque option.
NOTE : touchez QUITTER pour achever les modifications des paramètres du système. Un
message de confirmation s’affichera à l’écran. Si vous touchez OUI, la Nintendo DS Lite
s’éteindra automatiquement. Rallumez la console pour voir les nouveaux paramètres sauvegardés et utiliser la Nintendo DS Lite.
OPTIONS
Mode de démarrage
Langue du système
Ecran Game Boy Advance
• Mode de démarrage (DEMARRAGE)
Cette option modifie le mode dans lequel démarre la Nintendo DS Lite quand vous l’allumez.
Choisissez entre A MODE AUTOMATIQUE et M MODE MANUEL.
En mode automatique, la Nintendo DS Lite chargera un jeu s’il y a une carte DS ou une cartouche
de jeu dans un des ports. La Nintendo DS Lite chargera la carte DS si les deux ports sont occupés
par un jeu. Si aucun jeu n’est chargé, le menu principal Nintendo DS s’affichera.
En mode manuel, le menu principal Nintendo DS s’affichera (illustration 20).
• Langue du système (LANGUE)
Cette option définie la langue utilisée pour les fonctions non ludiques, comme les menus
(illustration 21).
• Ecran Game Boy Advance (MODE GBA)
Cette option vous permet de définir quel écran (supérieur ou tactile) vous voulez utiliser
pour jouer à un jeu Game Boy Advance sur la Nintendo DS Lite (illustration 22).
Illustration 20 Illustration 21 Illustration 22
Illustration 17 Illustration 18
Panneau des
paramètres
1
2
3
4
Panneau
de menu
USG_HW_Man_EUR_A3 30.07.2007 17:06 Uhr Seite 82
COPY
Page 42

8584
HORLOGE
• DATE
Cette option définit le jour, le mois et l’année pour l’horloge du système. Touchez les flèches
haut/bas pour modifier les nombres. Sélectionnez CONFIRMER quand vous avez fini de régler
la date (illustration 24).
• ALARME
Cette option vous permet d’utiliser la Nintendo DS Lite comme un réveil. Quand l’alarme est
activée, vous ne pouvez pas utiliser la Nintendo DS Lite dans un autre mode jusqu’à ce que
l’alarme soit désactivée. L’alarme peut être désactivée en touchant n’importe quel bouton (sauf
les boutons L et R) ou en en touchant l’écran tactile.
Touchez les flèches haut /bas pour modifier les paramètres. Sélectionnez CONFIRMER quand
vous avez fini de régler l’alarme (illustration 25).
• HEURE
Cette option définit l’heure pour l’horloge du système. Touchez les flèches haut/bas pour modifier
les paramètres. Sélectionnez CONFIRMER quand vous avez fini de régler l’heure (illustration 26).
Illustration 23
Date
Alarme
Heure
Illustration 24 Illustration 25 Illustration 26
UTILISATEUR
• COULEUR
Touchez la case de la couleur que vous désirez utiliser comme couleur de fond. Sélectionnez
CONFIRMER quand vous avez fini de régler la couleur (illustration 28).
• ANNIVERSAIRE
Touchez les flèches haut /bas pour modifier les nombres. Sélectionnez CONFIRMER quand vous
avez fini de régler la date (illustration 29).
• NOM DE L’UTILISATEUR
Cette option vous permet de rentrer votre surnom dans la console. Votre surnom peut être affiché
sur les écrans des autres participants durant PictoChat. Il est conseillé de choisir un surnom sans
distinction de sexe (voir « Informations personnelles » page 72).
Utilisez l’écran tactile pour rentrer jusqu’à dix caractères (illustration 30).
• MESSAGE
Cette option vous permet de rentrer un message dans la console. Votre message peut être
affiché sur les écrans des autres participants durant PictoChat (voir «Informations personnelles»
page 72).
Utilisez l’écran tactile pour rentrer jusqu’à dix-huit caractères (illustration 31).
Voir page 81 pour des informations sur l’utilisation du clavier virtuel.
Illustration 27
Couleur
Anniversaire
Surnom
Message
Illustration 28 Illustration 29 Illustration 30 Illustration 31
USG_HW_Man_EUR_A3 30.07.2007 17:06 Uhr Seite 84
COPY
Page 43

16
En cas de problèmes
8786
ECRAN TACTILE
Sélectionnez cette option pour réaligner le stylet avec l’écran tactile. Suivez
les indications à l’écran et pointez délicatement les marques affichées sur
l’écran tactile (illustration 32).
Illustration 32
La connexion Wi-Fi Nintendo (CWF Nintendo) permet de jouer à des jeux par Internet, à la maison
ou avec une borne d’accès Internet, à l’aide d’une console Nintendo DS et d’un jeu Nintendo DS
compatible avec la CWF Nintendo.
Cherchez cette icône sur les boîtes de jeux Nintendo DS pour
identifier les jeux conçus pour utiliser la fonction CWF Nintendo.
15
Connexion Wi-Fi Nintendo
Pour jouer par le biais d’Internet à la maison, vous avez besoin de :
• Une connexion Internet haut débit valide.
ET
• Un point d’accès au réseau sans fil, comme un routeur sans fil ou le connecteur
Wi-Fi USB Nintendo.
Veuillez consulter le mode d’emploi séparé de la connexion Wi-Fi Nintendo (inclus avec tous les jeux
compatibles avec la connexion Wi-Fi Nintendo) pour plus d’informations sur comment jouer par
Internet, et visitez le site www.nintendowifi.fr ou www.nintendowifi.be
Avant de contacter une assistance, veuillez vérifier les points suivants.
Problème
La console est allumée
mais rien ne s’affiche.
L’image est correctement
affichée, mais il n’y a pas
de son.
L’image est correctement
affichée, mais le système
est bloqué.
La batterie ne semble pas
tenir très longtemps et la
recharge prend beaucoup
de temps.
La cartouche de jeu
Game Boy Advance
ne rentre pas dans
la Nintendo DS Lite.
Le jeu ou les communications sans fil
ne fonctionnent pas.
Solution
• Assurez-vous que la batterie est chargée. La diode du témoin d’alimentation
doit être verte ou rouge, en fonction de la charge de la batterie.
• Eteignez la console, patientez un moment et rallumez-la.
• Eteignez la console, retirez le jeu et réinsérez-le. Rallumez ensuite la console.
• Si vous utilisez le bloc d’alimentation, assurez-vous qu’il est bien branché
à la Nintendo DS Lite et à la prise secteur.
• Ajustez le volume.
• Si des écouteurs sont connectés à la Nintendo DS Lite, les haut-parleurs
sont désactivés.
• Si vous utilisez des écouteurs, assurez-vous qu’ils sont bien branchés dans
le jack audio.
• Certains jeux ne possèdent pas de bande sonore pendant certains moments
de la partie.
• Vérifiez que le jeu est complètement inséré dans le port approprié.
• Eteignez la console, retirez le jeu et réinsérez-le.
• Vérifiez toujours que les connecteurs de la carte ou cartouche de jeu ne sont
pas recouverts de corps étrangers.
• Vérifiez que la température ambiante est supérieure à 10 degrés Celsius.
Les basses températures diminuent les performances de la batterie.
• La durée de vie de la batterie peut également diminuer avec le temps.
Après 500 recharges, la durée de vie de la batterie peut diminuer de 30%
par rapport à sa capacité initiale.
• Vérifiez que vous utilisez une cartouche de jeu Game Boy Advance (AGB-002).
Le SLOT-2 de la Nintendo DS Lite ne fonctionne qu’avec les accessoires
Nintendo DS et les cartouches de jeu Game Boy Advance.
• Vérifiez que le jeu supporte le mode de communication sans fil.
• Pour le jeu multi-cartes,chaque Nintendo DSdoit avoir unecarte de jeu insérée.
• Vérifiez que toutes les consoles Nintendo DS sont à une distance inférieure
à 10 mètres quand vous commencez la partie. L’indicateur de puissance du
signal devrait avoir au moins deux barres.
• Consultez le manuel d’instructions du jeu que vous utilisez pour des instructions relatives aux paramétrages.
USG_HW_Man_EUR_A3 30.07.2007 17:06 Uhr Seite 86
COPY
Page 44

17
Comment jeter ce produit lorsqu’il
est arrivé en fin de vie
8988
Ne jetez jamais ce produit dans votre poubelle ou dans la nature lorsqu’il est arrivé en fin de vie. Il
appartient à chaque particulier de se conformer au mode de collecte mis en place dans sa commune
et de respecter les lois et règlements sur le recyclage. Pour des informations sur la collecte gratuite
et sélective des équipements électriques et électroniques disponible dans votre commune, veuillez
contacter les collectivités locales.
Vous pouvez d’autre part apporter votre produit en fin de vie à votre revendeur local, qui vous
proposera éventuellement la reprise gratuite de votre ancien produit pour l’achat d’un produit neuf
similaire. Toutefois, nous vous conseillons au préalable de vérifier auprès de votre revendeur local
s’il offre ce service.
Dans les deux cas, ce produit sera traité d’une manière respectueusede l’environnement dans une installation autorisée, et ses composants seront récupérés, recyclés ou réutilisés de la manière la plus
efficace possible, en accord avec les exigences de la directive2002/96/CE du parlement européen et du
conseil du 27 janvier 2003 relative aux déchets d’équipements électriques et électroniques (DEEE).
D’après les lois sur l’environnement en vigueur, l’utilisation des services de collecte séparés
pour les déchets d’équipements électriques et électroniques est obligatoire. Dans certains
pays, le non-respect de cette loi est passible de sanctions.
Notes :
1. Les déchets d’équipements électriques et électroniques peuvent contenir des substances
dangereuses qui, si elles ne sont pas traitées de manière appropriée, peuvent devenir nocives
pour l’environnement et nuire à la santé des personnes. Un traitement spécifique des déchets
d’équipements électriques et électroniques est donc indispensable.
2. Les équipements électriques et électroniques Nintendo sont fabriqués en accord avec
les directives européennes et de manière à faciliter leur réparation, mise à jour, réutilisation,
démontage ou recyclage.
3. Nintendo et ses distributeurs officiels adhèrent aux programmes de recyclage dans chaque état
membre et s’engagent à utiliser les meilleures techniques de traitement, de récupération et de
recyclage disponibles afin de garantir la protection de la santé humaine et de l’environnement.
4. Le symbole représentant une poubelle sur roues barrée d’une croix (voir ci-dessous) est apposé
sur tout équipement électrique et électronique Nintendo mis sur le marché par Nintendo et
ses distributeurs officiels depuis le 13 août 2005 inclus. Ce symbole indique que ces produits
font l’objet d’une collecte sélective à la fin de leur vie pour assurer une récupération optimale
et une élimination respectueuse de l’environnement.
Avant de jeter la batterie, veuillez consulter le paragraphe “COMMENT JETER LA
BATTERIE” à la page 70.
Problème
Le jeu ou les communications sans fil semblent
instables ou subissent
des interruptions.
PictoChat ne fonctionne
pas.
L’écran tactile ne fonctionne pas.
Le microphone ne fonctionne pas.
Quand la console s’éteint,
il y a une image résiduelle à
l’écran.
Lors des jeux Game Boy
Advance, il est impossible
d’utiliser la fonction multijoueur.
La reconnaissance vocale
ne fonctionne pas.
Solution
• Vérifiez que toutes les consoles Nintendo DS sont à une distance inférieure
à 10 mètres quand vous commencez la partie. L’indicateur de puissance du
signal devrait avoir au moins deux barres.
• Vérifiez qu’il n’y a aucun obstacle entre les consoles.
• Vérifiez que les consoles sont orientées les unes vers les autres.
• Vérifiez que la batterie est chargée.
• Vérifiez qu’aucune interférence n’est créée par d’autres objets (réseau sans fil,
four à micro-ondes, appareils sans fil, ordinateurs) et, si nécessaire, déplacezvous à un autre endroit ou éteignez l’objet créant les interférences.
• Vérifiez qu’il n’y a pas plus de 16 participants dans une salle de chat.
• Faites en sorte que tous les membres de la salle de chat se retrouvent
dans une autre salle de chat.
• Consultez les sections « Puissance du signal de réception» page 78 et
« PictoChat» page 79.
• Vérifiez que vous utilisez le stylet sur la zone appropriée de l’écran tactile.
• Vérifiez l’alignement du point de contact du stylet à l’aide du réalignement
du stylet (page 86).
• Consultez le manuel d’instructions du jeu que vous utilisez pour une utilisation
appropriée du stylet.
• Si votre écran tactile présente des griffures, des traces de saleté ou d’autres
corps étrangers, suivez la procédure de nettoyage page 71.
• Seuls les jeux conçus pour utiliser la fonction microphone fonctionneront
avec le microphone. Vérifiez que le jeu que vous utilisez est compatible avec
cette fonction.
• Si vous utilisez un microphone externe, vérifiez qu’il est correctement inséré
dans le connecteur approprié.
• Une image résiduelle peut apparaître à l’écran quand vous éteignez la
console. Cette image résiduelle n’endommage pas la Nintendo DS Lite et
disparaît après un court moment.
• La fonction multijoueur des jeux Game Boy Advance ne fonctionne pas sur
la Nintendo DS Lite.
• La reconnaissance vocale peut varier selon les individus et certaines voix
peuvent ne pas être reconnues. Pour plus de détails, référez-vous au mode
d’emploi du jeu que vous utilisez.
Si votre Nintendo DS Lite ne fonctionne toujours pas après avoir essayé les solutions
précédentes, contactez le service consommateurs Nintendo.
USG_HW_Man_EUR_A3 30.07.2007 17:06 Uhr Seite 88
COPY
Page 45

[0606/NFR/USG-HW][0606/NFR/USG-HW]
FRANCE SEULEMENT
GARANTIE DE 12 MOIS – CONSOLE NINTENDO DS LITE
Garantie consommateur
Pendant une durée de 12 mois à compter de la date d’achat initial effectué par le consommateur («l’acheteur »),
NINTENDO France Sarl (« Nintendo») garantit à l’acheteur que ce produit est exempt de tout défaut de matériaux
et de fabrication à la date d’achat, selon les termes et conditions des présentes.
Pour faire valoir la garantie, si le produit s’avère défectueux en raison d’un défaut de matériaux ou de fabrication
au cours de la période garantie, le consommateur doit retourner le produit au SAV Nintendo dans les 12 mois à
compter de la date d’achat initial. Après inspection du produit, Nintendo, à son entière discrétion, procédera
gratuitement à la réparation ou au remplacement de la pièce ou du produit défectueux et ne pourra être tenu
d’aucun autre dédommagement.
La présente garantie n’affecte pas les droits accordés par la loi à l’acheteur et notamment les droits en vertu
desquels le vendeur auprès duquel il a acheté le produit reste tenu des défauts de conformité du bien au contrat
et des vices rédhibitoires dans les conditions prévues aux articles L-211-4, L-211-5 et L-211-12 du code de la
consommation et 1641 à 1649 du code civil français.
Exclusions de garantie
La présente garantie ne couvre pas :
• les produits achetés en dehors de l’Espace Economique Européen,
• les produits loués ou d’occasion ou les produits utilisés à des fins commerciales,
• les défauts résultant d’un dommage accidentel, de la négligence de l’acheteur et/ou de tout tiers, de l’usage
déraisonnable, de la modification, de la réparation inappropriée, de l’utilisation de produits non distribués par
Nintendo ou non licenciés Nintendo (y compris non limitativement les appareils de copiage, adaptateurs ou blocs
d’alimentation non licenciés), de l’utilisation du produit autrement qu’en conformité avec celle spécifiée dans le
mode d’emploi ou avec toute autre instruction jointe au produit, ou pour toute autre cause sans aucun rapport
avec un défaut de matériaux ou de fabrication (y compris non limitativement les écrans endommagés ou cassés),
• un affaiblissement progressif dans le temps de la capacité de la batterie rechargeable Nintendo DS Lite
(USG-003) (lequel ne constitue pas un défaut de matériaux ou de fabrication du produit).
Procédure de demande
En cas de défaut couvert par la présente garantie, merci de contacter :
SAV Nintendo
ZI des Béthunes • 10 avenue du Fief • Bloc N°24 • Cité Artisanale de la Mare 2 • 95310 St Ouen l’Aumône
e mail : sav-administratif@nintendo.fr • sav-technique@nintendo.fr • site internet: www.nintendo.fr
tel : 0134 3546 00 • fax: 01 3424 90 85
Lors de l’envoi du produit au SAV Nintendo merci de suivre la procédure suivante :
1. utiliser l’emballage d’origine,
2. inclure une description du défaut,
3. joindre à votre envoi, une copie de votre preuve d’achat (ticket de caisse obligatoire) indiquant la date dudit
achat. [Frais d’envoi au SAV Nintendo à charge de l’acheteur].
Si les douze mois indiqués au premier paragraphe se sont déjà écoulés ou si le défaut n’est pas couvert par la
présente garantie, le SAV Nintendo pourra néanmoins être disposé à réparer ou remplacer la pièce ou le produit
défectueux, aux frais de l’acheteur (après acceptation d’un devis).
Pour plus d’informations à ce propos, en particulier en ce qui concerne les détails des coûts pour ces services,
merci de bien vouloir contacter :
SAV Nintendo
Coordonnées ci-dessus mentionnées
08.92 .68.77.55*
DES QUESTIONS
SUR UN JEU NINTENDO ?
APPELEZ-NOUS !
7/7 jours – 24/24 heures
Par courrier : NINTENDO France
Service Consommateurs
6 Bd de l’Oise
95031 Cergy Pontoise Cedex
* 0,34 Euro/mn – France Métropolitaine uniquement
Des problèmes d’installation ?
Support technique Suisse
En cas de problèmes d’installation et pour toute question technique,
notre équipe de support se tient volontiers à ta disposition. Tu peux joindre
l’équipe de support au numéro suivant :
062 /38798 18
Lu–Ve 08h30–12h00/13h00–17h00
[1006/WALD-NFR/USG-HW]
USG_HW_Man_EUR_A3 30.07.2007 17:06 Uhr Seite 90
COPY
Page 46

[0206/NBE-FR/USG-HW]
BELGIQUE ET LUXEMBOURG SEULEMENT
GARANTIE DE 12 MOIS – CONSOLE NINTENDO DS LITE
Pendant une durée de 12 mois à compter du premier achat (cette garantie ne s’applique pas aux locations,
aux produits achetés de seconde main et aux produits utilisés à des fins commerciales) de ce produit par un
consommateur dans son emballage Nintendo d’origine, chez un distributeur Nintendo officiel à l’intérieur de
l’Espace Economique européen, Nintendo Benelux B.V. garantit ce consommateur, à l’exclusion de toute autre
personne contre tout défaut de matériaux et/ou de fabrication de ce produit Nintendo existant à la date de
l’achat.
Cette garantie est soumise aux conditions suivantes:
• Nintendo à son entière discrétion et sans aucun frais pour le consommateur, réparera ou remplacera la partie
défectueuse du produit ou le produit défectueux lui-même, et ne pourra être tenu d’aucun autre dédommagement, en particulier au paiement de dommages et intérêts.
• Une baisse progressive de la capacité de la batterie rechargeable Nintendo DS Lite (USG-003) après un certain
laps de temps n’est pas un défaut matériel ni un défaut de fabrication et ne tombe, dès lors, pas sous la
présente garantie.
• Cette garantie ne s’appliquera pas si le défaut est dû à la négligence du consommateur et/ou de tout tiers,
l’usage déraisonnable, la modification, la réparation inappropriée, l’utilisation du produit, par l’acheteur et/ou
par tout tiers, non conforme au manuel d’utilisation de Nintendo ou combiné à des produits non vendus ou
concédés en licence par Nintendo (en ce compris, sans y être limité, les améliorations de jeux non autorisées,
le matériel de copie, les adaptateurs ou sources d’alimentation); la garantie ne s’appliquera pas non plus si le
défaut du produit est le résultat d’une quelconque forme d’endommagement par le consommateur ou un tiers
ou de toute autre cause non liée à un défaut matériel ou de fabrication.
• Le défaut doit être notifié par écrit à Nintendo à l’adresse mentionnée ci-dessous endéans un délai de 12 mois
après la date du premier achat.
• Après notification d’un défaut à Nintendo, le consommateur doit renvoyer le produit à Nintendo dans son
emballage d’origine, endéans 30 jours calendrier, accompagné d’une description du défaut et d’une copie de la
preuve d’achat démontrant la date d’achat.
Veuillez noter que cette garantie est consentie en sus de tous autres droits impératifs accordés par la loi que le
consommateur peut avoir à l’encontre de son distributeur Nintendo officiel. La garantie accordée en vertu de la
présente n’affecte pas ces droits de garantie impératifs.
En cas de défaut couvert par la présente garantie, merci de contacter :
Nintendo Benelux B.V.
Belgium Branch, Frankrijklei, 31 –33, B – 2000 Anvers
Tel. 03224 7683 (du lundi au vendredi entre 11.00 et 17.00 heures)
Si les 12 mois indiqués au premier paragraphe se sont déjà écoulés ou si le défaut n’est pas couvert par la
présente garantie, Nintendo Benelux B.V. pourra néanmoins, à sa seule discrétion, réparer ou remplacer la partie
défectueuse du produit ou le produit. Pour plus d’informations à ce propos, en particulier en ce qui concerne les
détails des coûts pour ces services, merci de bien vouloir contacter :
Nintendo Benelux B.V.
Belgium Branch, Frankrijklei, 31 –33, B – 2000 Anvers
Tel. 03224 7683 (du lundi au vendredi entre 11.00 et 17.00 heures)
DES QUESTIONS SUR UN JEU NINTENDO ?
APPELLE LE NINTENDO HELPDESK !
Aussi géant soit un jeu, c’est tout de suite un peu moins drôle quand
tu te retrouves bloqué. Pour t’éviter ce genre de mésaventure il n’y a qu’une
chose à faire: appelle le Nintendo Helpdesk!
Belgique :
0900-10800
(0,45 Euro par min.)
Les conseillers Nintendo sont disponibles du Lundi au Vendredi,
entre 10.00 et 17.30.
Les dernières informations sur Nintendo et ses produits
sont disponibles sur le site : www.nintendo.be
Luxembourg :
Vous pouvez contacter notre assistance par courrier.
Veuillez envoyer vos questions à l’adresse suivante:
Nintendo Benelux – Helpdesk
Frankrijklei 31– 33
B-2000 Anvers, Belgique
[1006/NBE-FR/USG-HW]
USG_HW_Man_EUR_A3 30.07.2007 17:06 Uhr Seite 92
COPY
Page 47

DECLARATION OF CONFORMITY/ DECLARATION DE CONFORMITE
Nintendo hereby declares that this “Nintendo DS Lite” is in compliance with the essential requirements and other relevant provisions of directive
1999/5/EC. This Declaration of Conformity is published on our website. Please visit http://doc.ds.nintendo-europe.com
Hiermit erklärtNintendo, dass sich dieser „NintendoDS Lite“ in Übereinstimmung mitden grundlegenden Anforderungen undden anderen relevanten Vorschriften
der Richtlinie 1999/5/EG befindet. Sie finden diese Konformitätserklärung auch auf unserer Internet-Seite: http://doc.ds.nintendo-europe.com
Par la présente, Nintendo déclare que la «Nintendo DS Lite » est conforme aux exigences essentielles et aux autres dispositions pertinentes
de la directive 1999/5/CE qui lui sont applicables. Cette déclaration de conformité est accessible sur notre site Internet. Veuillez visiter le site
http://doc.ds.nintendo-europe.com
Hiermee verklaart Nintendo dat deze „Nintendo DS Lite” voldoet aan de essentiële eisen en andere relevante bepalingen van richtlijn 1999/5/EC.
Deze verklaring is terug te vinden op onze website: http://doc.ds.nintendo-europe.com
Por medio de la presente, Nintendo declara que la “Nintendo DS Lite” cumple con los requisitos esenciales y cualesquiera otras disposiciones aplicables
o exigibles de la directiva 1999/5/CE. Esta declaración de conformidad está publicada en nuestro sitio web: http://doc.ds.nintendo-europe.com
A Nintendo declara que a “Nintendo DS Lite” está em conformidade com os requisitos essenciais e outras disposições da directiva 1999/5/CE.
Esta declaração de conformidade está publicada no nosso site de Internet. Por favor visite http://doc.ds.nintendo-europe.com
Con la presente Nintendo dichiara che questo “Nintendo DS Lite” è conforme ai requisiti essenziali ed alle altre disposizioni pertinenti stabilite dalla direttiva
1999/5/CE. Per prendere visione del testo della dichiarazione di conformità visitare il nostro sito Internet http://doc.ds.nintendo-europe.com
Härmed intygar Nintendoatt produkten ”Nintendo DSLite” överensstämmer med de väsentligaegenskapskrav och övriga relevantabestämmelser som ingår
i direktiv 1999/5/EG. Detta intygande om överensstämmelse med gällande föreskrifter finns på vår webbplats. Besök http://doc.ds.nintendo-europe.com
Undertegnede Nintendo erklærer herved, at følgende udstyr „Nintendo DS Lite“ overholder de væsentlige krav og øvrige relevante krav i direktiv 1999/5/EF.
Konformitetserklæringen er offentliggjort på vores website. Besøg den på http://doc.ds.nintendo-europe.com
Nintendo vakuuttaa täten, että ”Nintendo DS Lite” on direktiivin 1999/5/EY oleellisten vaatimusten ja sitä koskevien direktiivin muiden ehtojen mukainen.
Tämä määritystenmukaisuusvakuutus on julkaistu web-sivuillamme. Käy osoitteessa http://doc.ds.nintendo-europe.com
Nintendo erklærer at „Nintendo DS Lite“ er i samsvar med vesentlige krav og andre relevante regler i henhold til direktiv 1999/5/EF.
Denne samsvarserklæringen er publisert på vårt webområde. Gå til http://doc.ds.nintendo-europe.com
B’danil-mezz, Nintendo, jiddikjara lidan “Nintendo DS Lite” jikkonformamal-ћti ˙gijietessenzjali u mad-dispożizzjonijiet relevantil-oћrajn tad-Direttiva1999/5/KE.
Din id-dikjarazzjoni hija ppubblikata fuq il-website tagћna. Jekk jogћ˙gbok żur http://doc.ds.nintendo-europe.com
Käesolevaga kinnitab Nintendo seadme “Nintendo DS Lite” vastavust direktiivi 1999/5/EÜ põhinõuetele ja nimetatud direktiivist tulenevatele teistele
asjakohastele sätetele. Käesolev vastavusdeklaratsioon on avaldatud meie veebisaidil. Palun külastage http://doc.ds.nintendo-europe.com
Компания Nintendo настоящим заявляет, что “приставка Nintendo DS Lite” удовлетворяет всем основным требованиям и другим действующим
положениям Директивы 1999/5/EC. Настоящее Заявление о соответствии опубликовано на веб-сайте нашей компании. Посетите веб-сайт
http://doc.ds.nintendo-europe.com
Компанія Nintendo заявляє, що цей виріб “Nintendo DS Lite” відповідає обов’язковим вимогам та іншим важливим положенням директиви 1999/5/EC.
Повний текст заяви про відповідність опубліковано на нашому веб-сайті: http://doc.ds.nintendo-europe.com
Ar šo Nintendo deklarē, ka “Nintendo DS Lite” atbilst Direktīvas 1999/5/EK būtiskajām prasībām un citiem ar to saistītajiem noteikumiem. Šis atbilstības
apliecinājums ir publicēts mūsu tīmekļa vietnē. Lūdzu, apmeklējiet http://doc.ds.nintendo-europe.com
Šiuo Nintendo deklaruoja, kad gaminys “Nintendo DS Lite” atitinka esminius reikalavimus ir kitas 1999/5/EB Direktyvos nuostatas. Ši atitikties deklaracija
yra skelbiama bendrovės svetainėje. Apsilankykite adresu: http://doc.ds.nintendo-europe.com
Nintendo, burada yer alan “Nintendo DS Lite” ürününün, 1999/5/EC yönergesinin gereklililerine ve di¤er ilgili hükümlerine uygun oldu¤unu beyan eder.
Bu Uyum Beyan› ‹nternet sitemizde yay›nlanm›flt›r. Lütfen http://doc.ds.nintendo-europe.com sitesini ziyaret edin.
Η NINTENDO δηλώνει, με την παρούσα, τι το “Nintendo DS Lite”συμμορφώνεται με τις βασικές απαιτήσεις και τις άλλες σχετικές διατάξεις
της οδηγίας 1999/5/ΕΚ.Αυτή η Δήλωση Συμμρφωσης κοινοποιείται στη διαδικτυακή τοποθεσία μας. Επισκεφθείτε τη διεύθυνση
http://doc.ds.nintendo-europe.com.
Nintendo tímto prohlašuje, že tento “Nintendo DS Lite” je ve shodě se zakladními požadavky a dalšími příslušnými ustanoveními směrnice 1999/5/ES.
Toto prohlášení o shodě je uveřejněno na našich webových stránkách. Prosím navštivte http://doc.ds.nintendo-europe.com
Alulírott, Nintendo nyilatkozom, hogy a “Nintendo DS Lite” megfelel a vonatkozó alapvető követelményeknek és az 1999/5/EC irányelv egyéb előírásainak.
Ez a megfelelőségi nyilatkozat megtalálható a cég weboldalán. Tájékozódjon a http://doc.ds.nintendo-europe.com címen.
Niniejszym Nintendo oświadcza, że “konsola Nintendo DS Lite” jest zgodna z zasadniczymi wymogami oraz pozostałymi stosownymi po
stanowieniami
Dyrektywy 1999/5/WE. Niniejszą Deklarację zgodności można znaleźć na naszej stronie internetowej. Zachęcamy do odwiedzin:
http://doc.ds.nintendo-europe.com
Nintendo týmto vyhlasuje, že “Nintendo DS Lite” spĺňa základné požiadavky a všetky príslušné ustanovenia Smernice 1999/5/ES. Toto Vyhlásenie o zhode
nájdete na našej internetovej stránke. Navštívte prosím http://doc.ds.nintendo-europe.com
Nintendo izjavlja, da je ta “Nintendo DS Lite” v skladu z bistvenimi zahtevami in ostalimi relevantnimi določili direktive 1999/5/ES. Izjava o skladnosti je
objavljena na naši spletni strani. Obiščite http://doc.ds.nintendo-europe.com
Tvrtka Nintendo ovim izjavljuje kako je ovaj “Nintendo DS Lite” sukladan s osnovnim zahtjevima i drugim bitnim odredbama direktive 1999/5/EC. Ova Izjava
o sukladnosti objavljena je na našoj web-stranici. Posjetite http://doc.ds.nintendo-europe.com
Kompanija Nintendo ovim izjavljuje da je ovaj “Nintendo DS Lite” usklađen sa osnovnim zahtevima i drugim važnim odredbama direktive 1999/5/EC.
Ova Izjava o saglasnosti objavljena je na našoj web-stranici. Posetite http://doc.ds.nintendo-europe.com
Matumuuna Nintendo-p nalunaarutigaa una “Nintendo DS Lite” piumasaqaatit pingaaruteqartut inatsisillu allat malittarisassallu 1999/5/EC-mi atuuttut
malikkai. Nalunaarut una qarasaasiami quppernitsinni allanneqarsimavoq. Takuuk qupperneq http://doc.ds.nintendo-europe.com
Hér me› l´ysir Nintendo flví yfir a› “Nintendo DS Lite” sé í samræmi vi› grunnkröfur og a›rar kröfur, sem ger› ar eru í tilskipun 1999/5/EB. fiessi
samræmisyfirl´ysing er birt á vefsí›u okkar. Vinsamlegast heimsæki› http://doc.ds.nintendo-europe.com
NINTENDO DS™ Lite conforms to:
NINTENDO DS™ Lite geprüft nach:
NINTENDO DS™ Lite en conformité avec :
– TOY Directive /Directive JOUET (88/378/EEC)
– EMC Directive /Directive CEM (2004/108/EC)
– Low Voltage Directive (2006/95/EC) for Power Supply/
Directive basse tension (2006/95/CE) sur les blocs d’alimentation.
– Radio and Telecommunications Terminal Equipment Directive (1999/ 5/EC) /Directive concernant
les équipements hertziens et les équipements terminaux de télécommunications (1999/5/ EC)
PATENT INFORMATION/INFORMATION BREVET
European Patent Numbers: 437,630; 466,936; 470,615; 473,390; 473,392;
487,266; 487,267; 487,299; D235,601-1/4; D248,653-1/3; D551,379-1;
D551,387-1/4; D567,664-1; D567,680-1.
German Patent Numbers: 69,109,821; 69,114,400; 69,124,077; 69,125,661;
69,125,914; 69,131,172.
Spanish Patent Numbers: 2,079,529.
Other patents pending. /Autres brevets en cours.
USG_HW_Man_EUR_A3 30.07.2007 17:06 Uhr Seite 94
COPY
Page 48

INSTRUCTION BOOKLET
BEDIENUNGSANLEITUNG
MODE D’EMPLOI
USG-EUR(A)-3
Deutschland:
Nintendo of Europe GmbH
Nintendo Center, 63760 Großostheim
www.nintendo.de
Österreich:
Stadlbauer Marketing + Vertriebs Ges.m.b.H.
Handelszentrum 6, A-5101 Bergheim
Schweiz/Suisse:
Waldmeier AG
Neustrasse 50, CH-4623 Neuendorf
France:
Nintendo France SARL
Immeuble “Le Montaigne” 6 Bd de L’Oise
95031 Cergy Pontoise Cedex
www.nintendo.fr
Belgium, Luxembourg:
Nintendo Benelux B.V., Belgium Branch
Frankrijklei 31– 33, B-2000 Antwerpen
www.nintendo.be
USG_HW_Man_EUR_A3 30.07.2007 17:06 Uhr Seite 96
COPY
 Loading...