

Page 1

Intelli-Sense™ System
Système Intelli-Sense
Sistema Intelli-Sense
CT682SP
Series • Série • Serie
INSTRUCTIONS
MC
™
ninjakitchen.com
1-877-646-5288
Page 2

THANK YOU
for purchasing the Ninja® Intelli-Sense™ System
CONTENTS
TIP: You can find the
model and serial numbers
on the QR code label
located near the rating
label.
REGISTER YOUR PURCHASE
registeryourninja.com
1-877-646-5288
Scan QR code using mobile device
RECORD THIS INFORMATION
Model Number: ��������������������������������������
Serial Number: ��������������������������������������
Date of Purchase (Keep receipt): �����������������������
Store of Purchase: �����������������������������������
TECHNICAL SPECIFICATIONS
Voltage: 120V, 60Hz
Watts: 1200W
Important Safety Instructions � � � � � � � � � � � � � � � � � � � � � � � � � � � 3
Getting to Know Your Ninja®
Intelli-Sense™ System � � � � � � � � � � � � � � � � � � � � � � � � � � � � � � � � � � 7
Before First Use � � � � � � � � � � � � � � � � � � � � � � � � � � � � � � � � � � � � � � 9
Features � � � � � � � � � � � � � � � � � � � � � � � � � � � � � � � � � � � � � � � � � � � � � 10
Total Crushing® Blender Pitcher � � � � � � � � � � � � � � � � � � � � � � � � � � �10
Slim High-Speed Blender Cup � � � � � � � � � � � � � � � � � � � � � � � � � � � � � 11
Precision Processor™ Bowl � � � � � � � � � � � � � � � � � � � � � � � � � � � � � � � �12
Using Your Total Crushing Blender Pitcher � � � � � � � � � � � � � � 13
Using Your Slim High-Speed Blender Cup � � � � � � � � � � � � � � � 17
Using Your Precision Processor Bowl � � � � � � � � � � � � � � � � � � � 21
Assembling Your Auto-Spiralizer™ � � � � � � � � � � � � � � � � � � � � � � 25
Using Your Auto-Spiralizer � � � � � � � � � � � � � � � � � � � � � � � � � � � � 27
Care & Maintenance � � � � � � � � � � � � � � � � � � � � � � � � � � � � � � � � � � � 31
Cleaning � � � � � � � � � � � � � � � � � � � � � � � � � � � � � � � � � � � � � � � � � � � � � � � � 31
Storing � � � � � � � � � � � � � � � � � � � � � � � � � � � � � � � � � � � � � � � � � � � � � � � � � � 31
Resetting the Motor Thermostat � � � � � � � � � � � � � � � � � � � � � � � � � � �31
Ordering Replacement Parts � � � � � � � � � � � � � � � � � � � � � � � � � � � � � �31
Troubleshooting Guide � � � � � � � � � � � � � � � � � � � � � � � � � � � � � � � � 32
Warranty � � � � � � � � � � � � � � � � � � � � � � � � � � � � � � � � � � � � � � � � � � � � 34
PLEASE READ CAREFULLY AND KEEP FOR FUTURE
REFERENCE�
These instructions are designed to help youget a complete
understanding of your newNinja Intelli-Sense System.
If you have any questions, please call our customer service
line at 1-877-646-5288.
1 21- 877-646-5288 ninjakitchen.com
Page 3

IMPORTANT SAFETY INSTRUCTIONS
PLEASE READ CAREFULLY BEFORE USE • FOR HOUSEHOLD USE ONLY
WARNING
When using electrical appliances, basic safety precautions should always be
followed, including the following:
1 Read all instructions prior to using the
appliance and its accessories.
2 Carefully observe and follow all warnings
and instructions. This unit contains
electrical connections and moving parts
that potentially present risk to the user.
3 This product is provided with a Stacked
Blade Assembly and a Chopping Blade
Assembly. Always exercise care when
handling blade assemblies. The blade
assemblies are sharp and are NOT locked
in place in their containers. The blade
assemblies are designed to be removable
to facilitate cleaning and replacement if
needed. ONLY grasp the blade assembly
by the top of the shaft. Failure to use care
when handling the blade assemblies will
result in a risk of laceration.
4 ALWAYS exercise care when handling
the Pro Extractor Blades
blades are sharp. ONLY grasp the Pro
Extractor Blades Assembly by the outer
perimeter of the blade assembly base.
Failure to use care when handling the blade
assembly will result in a risk of laceration.
®
Assembly. The
5 Take your time and exercise care during
unpacking and appliance setup. This
appliance contains sharp, loose blades that
can cause injury if mishandled.
6 Take inventory of all contents to ensure that
you have all parts needed to properly and
safely operate your appliance.
7 Unplug the appliance from the outlet
when not in use, before assembling or
disassembling parts, and before cleaning.
To unplug, grasp the plug by the body and
pull from the outlet. NEVER unplug by
grasping and pulling the flexible cord.
8 Before use, wash all parts that may contact
food. Follow washing instructions covered
in this instructionmanual.
9 To protect against the risk of electric shock,
DO NOT submerge the appliance or allow
the power cord to contact any form of
liquid.
10 DO NOT use this appliance outdoors. It is
designed for indoor household use only.
11 This appliance has a polarized plug (one
prong is wider than the other). To reduce
the risk of electric shock, this plug will fit
in a polarized outlet only one way. If the
plug does not fit fully in the outlet, reverse
the plug. If it still does not fit, contact a
qualified electrician. DO NOT modify the
plug in any way.
12 DO NOT operate any appliance with
a damaged cord or plug, or after the
appliance malfunctions or is dropped or
damaged in any manner. This appliance
has no user-serviceable parts. If damaged,
contact SharkNinja for servicing.
13 This appliance has important information
on the plug prong. The power cord is not
suitable for replacement. If damaged,
contact SharkNinja for servicing in order to
avoid a hazard.
14 Extension cords should NOT be used with
this appliance.
15 DO NOT allow young children to operate
this appliance or use as a toy. Close
supervision is necessary when any
appliance is used near children.
16 This appliance is NOT intended to be used
by people (including children) with reduced
physical, sensory, or mental capabilities,
or lack of experience and knowledge,
unless they have been given supervision or
instruction concerning use of the appliance
by a person responsible for their safety.
17 Before each use, inspect blade assemblies
for damage. If a blade is bent or damage is
suspected, contact SharkNinja to arrange
for replacement.
18 DO NOT attempt to sharpen blades.
19 DO NOT allow the cord to hang over the
edges of tables or counters. The cord may
become snagged and pull the appliance off
the work surface.
20 DO NOT allow the unit or the cord to
contact hot surfaces, including stoves and
other heating appliances.
21 ALWAYS use the appliance on a dry and
level surface.
22 NEVER place a blade assembly on the
motor base without it first being attached
to its corresponding container (bowl,
pitcher, cup) and lid.
CONTINUED ON PAGE 5
SAVE THESE INSTRUCTIONS
3 41-877-646-5288 ninjakitchen.com
Page 4

IMPORTANT SAFETY INSTRUCTIONS
PLEASE READ CAREFULLY BEFORE USE • FOR HOUSEHOLD USE ONLY
WARNING
When using electrical appliances, basic safety precautions should always be
followed, including the following:
23 Keep hands, hair, and clothing out of the
container when loading and operating.
24 ONLY use attachments and accessories
that are provided with the product or are
recommended by SharkNinja. The use of
attachments not recommended or sold by
SharkNinja may cause fire, electric shock
or injury.
25 During operation and handling of the
appliance, avoid contact with moving parts.
26 DO NOT operate the appliance with an
empty container.
27 DO NOT fill containers past the MAX FILL
or MAX LIQUID lines.
28 DO NOT microwave any containers or
accessories provided with the appliance.
29 DO NOT perform grinding operations with
the Slim High-Speed Blender Cup and Pro
Extractor Blades® Assembly.
30 Before operation, ensure that all utensils
are removed from containers. Failure to
remove utensils can cause containers to
shatter and potentially result in personal
injury and property damage.
31 Keep hands and utensils out of containers
while chopping to reduce the risk of severe
personal injury or damage to the blender/
food chopper. A scraper may ONLY
be used when the food chopper is not
running. When using the chopper, always
use food pusher to add food. NEVER add
food by hand.
32 NEVER operate the appliance without lids
and caps in place. DO NOT attempt to
defeat the interlock mechanism. Ensure
that the container and lid are properly
installed before operation.
33 DO NOT expose the containers and
accessories to extreme temperature
changes. They may experience damage.
34 NEVER leave the appliance unattended
while in use.
35 DO NOT open pour spout cap while
blender is operating.
36 DO NOT blend hot liquids. Doing so
may result in pressure buildup and steam
exposure that can pose a risk of the user
being burned.
37 If you find unmixed ingredients sticking to
the sides of the pitcher, stop the appliance,
remove the lid, and use a spatula to
dislodge ingredients. NEVER insert your
hands into the pitcher, as you may contact
one of the blades and experience a
laceration.
38 DO NOT attempt to remove the container
and lids from the motor base while the
blade assembly is still spinning. Allow the
appliance to come to a complete stop
before removing lids and containers.
39 Upon completion of processing, ensure
that the blade assembly is removed
BEFORE emptying container’s contents.
Remove the blade assembly by carefully
grasping the top of the shaft and lifting
it from the container. Failure to remove
the blade assembly before emptying the
container results in a risk of laceration.
40 Remove the Pro Extractor Blades
Assembly from the Slim High-Speed
Blender Cup upon completion of blending.
DO NOT store ingredients before or after
blending them in the cup with the blade
assembly attached. Some foods may
contain active ingredients or release gases
that will expand if left in a sealed container,
resulting in excessive pressure buildup that
can pose a risk of injury. For ingredient
storage in the cup, use only Spout Lid to
cover.
41 If the appliance overheats, a thermal switch
will activate and temporarily disable the
motor. To reset, unplug the appliance
and allow it to cool for approximately 30
minutes before using again.
42 The maximum wattage rating for this
appliance is based on the configuration
of the Pro Extractor Blades Assembly
and Slim High-Speed Blender Cup. Other
configurations may draw less power.
43 DO NOT process dry ingredients without
®
adding liquid to the Slim High-Speed
Blender Cup. The Slim High-Speed Blender
Cup is not intended for dry blending.
44 The Blade Discs are sharp. Always use the
handles on the side of each Blade Disc
when placing it into the Bowl or removing
it. Follow all cleaning instructions. Failure to
do so will result in a risk of laceration.
45 When using the Spiralizer, ALWAYS use
the Food Pusher. NEVER feed ingredients
into the Spiralizer by hand or with other
utensils. Failure to use the Food Pusher
may cause personal injury.
46 If Blade Discs appear to be damaged or
broken, do not use or attempt to repair.
Call customer service for assistance.
47 DO NOT attempt to sharpen Blade Discs.
48 DO NOT remove Feed Chute Lid until
Blade Disc stops spinning.
49 DO NOT submerge the motor base or
touchscreen in water or other liquids. DO
NOT spray the motor base or touchscreen
with any liquids. Turn off and unplug the
blender before cleaning.
SAVE THESE INSTRUCTIONS
5 61-877- 64 6-528 8 ninjakitchen.com
Page 5

GETTING TO KNOW YOUR NINJA®
INTELLI-SENSE™ SYSTEM
WELCOME!
Congratulations on
your purchase. Use this
instruction manual to learn
about the great features
of your Ninja Intelli-Sense
System. From assembly
to use to maintenance,
you will find it all in here.
H L P
A
I
J
There are a variety of
accessories that are compatible
with this blenderseries.
NOTE:
The top flap of
your box shows the select
accessories that are
included with your model�
If you have any questions,
concerns or feedback, we’d
love to hear from you. Give us
a call at 1-877-646-5288 or
visit ninjakitchen.com
To find great recipes and
purchase more accessories
(including more Blade Discs
for creating different types
of noodles) please visit
ninjaaccessories.com
*64 oz. max liquid capacity.
** 3.5 cups max capacity/
15 oz. max liquid capacity.
MAIN UNIT
A Pitcher Lid
B 72 oz. Total Crushing® Blender Pitcher*
C Stacked Blade Assembly
D Motor Base with Smart Vessel Recognition
E 24 oz. Slim High-Speed Blender Cup
F Spout Lid
G Pro Extractor Blades® Assembly
H Precision Processor™ Bowl Lid
I Dough Blade Assembly
J Chopping Blade Assembly
K Precision Processor Bowl**
L Spiralizer Food Pusher
M Feed Chute Lid
N Collecting Bowl
O Spiralizer Bowl
P Spaghetti Blade Disc
Q Fettuccine Blade Disc
R Cleaning Brush
B
C K
D
E F
G
M
Q
N
R
O
7 81-877-646-5288 ninjakitchen.com
Page 6

BEFORE FIRST USE
FEATURES
IMPORTANT: Review all
warnings on pages 3–6
before proceeding.
DID YOU KNOW?
• You can take your drinks
on the go using the Spout
Lid.
• All containers, blade
assemblies, Blade Discs,
and lids are BPA free.
• Our containers, blade
assemblies, and lids are all
dishwasher safe.
1 Remove all packaging materials from the appliance.
Exercise care when unpacking blade assemblies and Blade
Discs. All blade assemblies and Blade Discs are sharp.
2 The Chopping Blade Assembly and Stacked Blade
Assembly are NOT locked in place in their containers.
Handle the Chopping Blade Assembly and Stacked Blade
Assembly by grasping the top of the shaft.
3 Handle the Pro Extractor Blades® Assembly by grasping
around the perimeter of the blade assembly base.
4 Wash containers, lids, Blade Discs, and blade assemblies
in warm, soapy, water using a dishwashing utensil with
a handle or the provided cleaning brush to avoid direct
contact with the blades. Exercise care when handling blade
assemblies, as the blades are sharp.
5 Thoroughly rinse and air-dry all parts.
6 All attachments are dishwasher safe. It is recommended
that the lids, Blade Discs, and blade assemblies be placed
on the top rack of the dishwasher. Ensure blade assemblies
and Blade Discs are removed from their containers before
placing in the dishwasher. Exercise care when handling
blade assemblies or Blade Discs.
7 Wipe touchscreen with a soft cloth. Allow it to dry
completely before using.
PRE-SET PROGRAMS FOR THE TOTAL CRUSHING® BLENDER PITCHER
Intelligent programs that combine unique blending and pausing patterns that do the work for
you. Once a pre-set program is selected, it will start immediately. Press STOP to end it.
The power symbol should be used to turn your appliance on or off.
SMOOTHIE
Make super-smooth, sippable drinks and
shakes from fresh or frozen fruit, liquids,
and ice.
ICE CREAM
Create delicious and scoop-able frozen
desserts like ice cream or sorbet.
FROZEN DRINK
Turn ice, juices, and fruit into expertly
blended frozen drinks.
SNOW CONE
Pulverize ice into frozen creations like snow
cones, slushies, or granitas.
LOW, HIGH, and PULSE
When selected, each of these programs runs continuously until turned off. They do not work
in conjunction with any pre-set programs.
9 101- 877-646-5288 ninjakitchen.com
Page 7

FEATURES - CONT�
PRE-SET PROGRAMS FOR THE SLIM HIGH-SPEED BLENDER CUP
Intelligent programs that combine unique blending and pausing patterns that do the work for you.
Once a pre-set program is selected, it will start immediately. Press STOP to end it.
The power symbol should be used to turn your appliance on or off.
SMOOTHIE
Make super-smooth, sippable drinks and
shakes from fresh or frozen fruit, liquids, and
ice
.
REFRESHER
Add natural veggie, fruit, and herb flavors
to your water.
EXTRACT
Ideal for tough, leafy, or fibrous whole
fruits and vegetables, including their skins,
seeds, andstems.
DRESSING
Create fresh marinades, dressings and
sauces.
PRE-SET PROGRAMS FOR THE PRECISION PROCESSOR™ BOWL
Intelligent programs that combine unique blending and pausing patterns that do the work for you.
Once a pre-set program is selected, it will start immediately. Press STOP to end it.
The power symbol should be used to turn your appliance on or off.
PUREE
Create anything from silky smooth sauces
to the perfect hummus.
DOUGH
Ideal for creating delicious dough for pizza,
bread, and baked goods like cookies.
CHOP
Timed pulses and pauses to give you
consistent chopping results.
DIPS
Use for dips and sides with more texture
like spinach and artichoke dip or mashed
potatoes.
LOW, HIGH, and PULSE
When selected, each of these programs runs continuously until turned off. They do not work
in conjunction with any pre-set programs.
11 121- 877-646-5288 ninjakitchen.com
LOW, HIGH, and PULSE
When selected, each of these programs runs continuously until turned off. They do not work
in conjunction with any pre-set programs.
Page 8
USING YOUR TOTAL CRUSHING®
BLENDER PITCHER
IMPORTANT: Review all
warnings on pages 3–6
before proceeding.
TIP: If the Stacked Blade
Assembly is not fully
seated, you will not be
able to install and lock the
lid into position.
TIP: To learn more about
the unit’s programs, refer
to page 10.
NOTE: Pre-set programs
have pauses and changes in
speed throughout the cycle.
NOTE: DO NOT add
ingredients before completing
installation of the Stacked
Blade Assembly.
1
NOTE: The pitcher can only
be installed in one orientation.
The handle must be
positioned on the front-right
corner of the motor base to
operate the appliance.
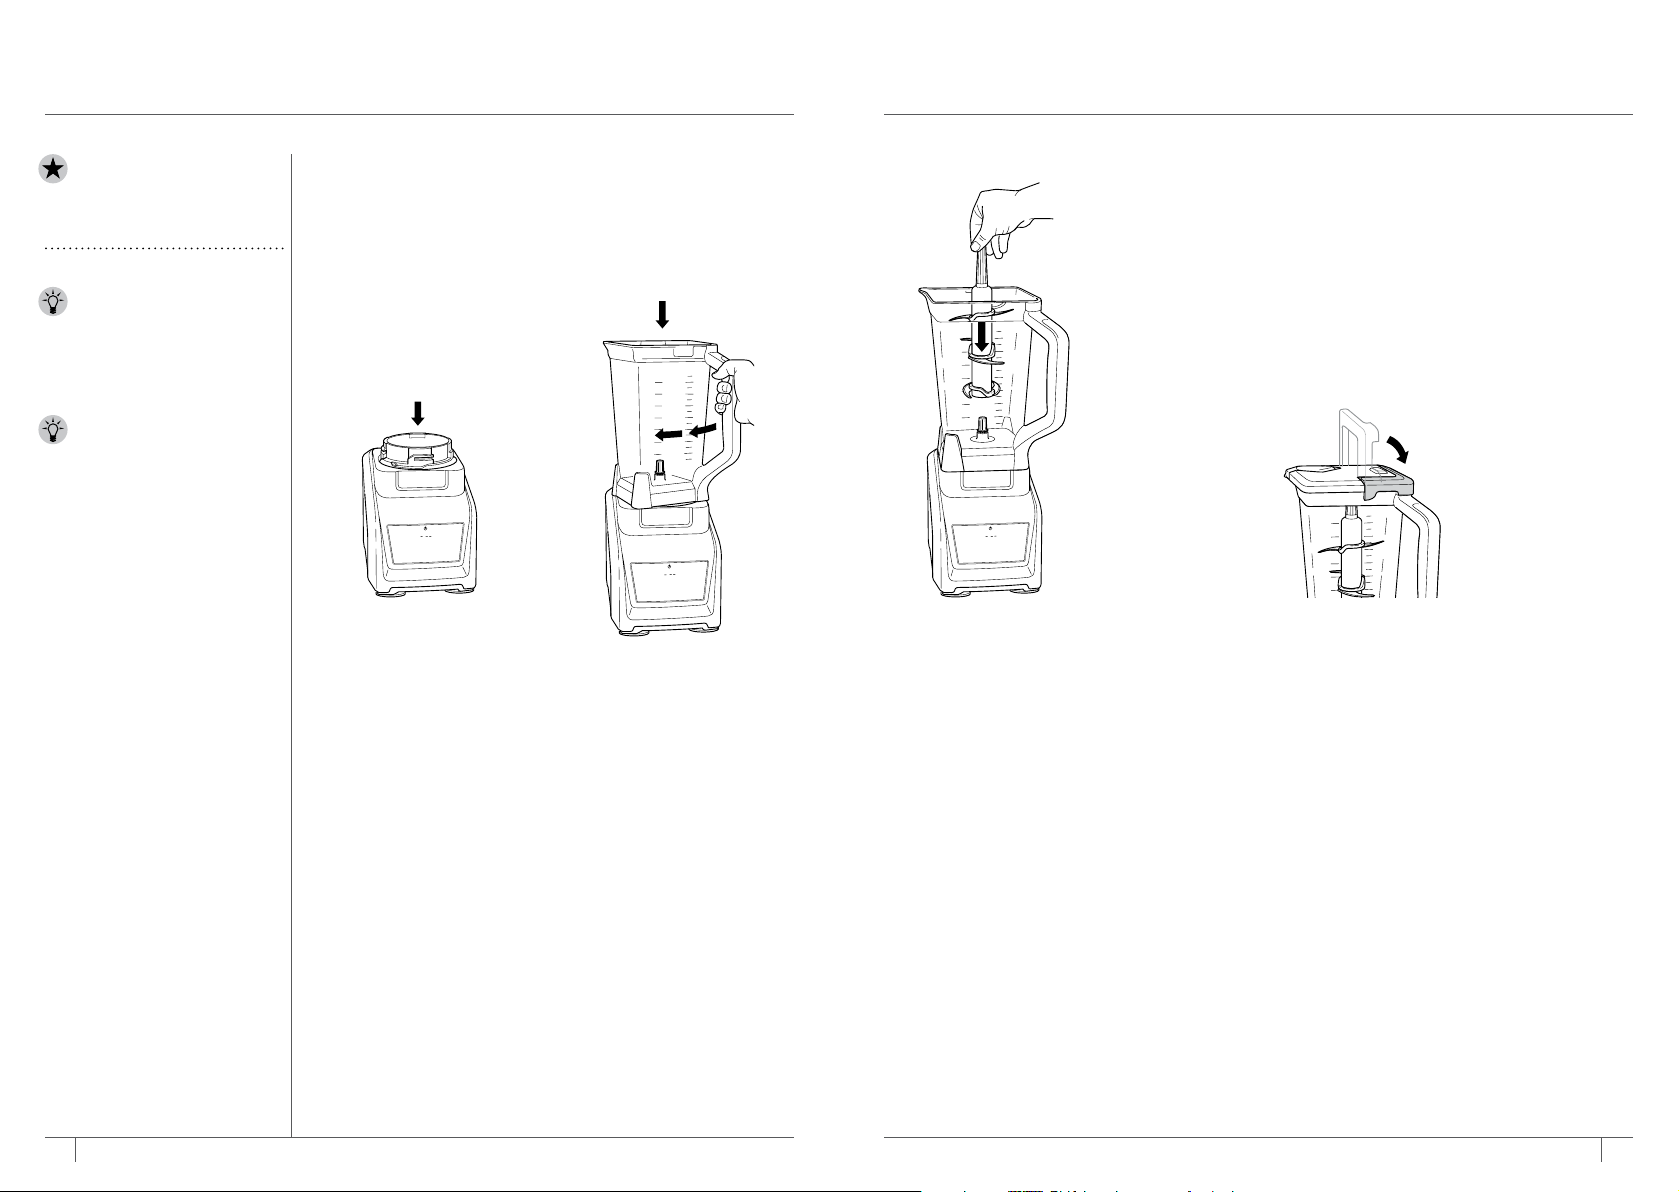
13 141-87 7-646 -5288 ninjakitchen.com
Place the unplugged motor
base on a clean, dry, and
level surface such as a
countertop or table. Press
downward on the motor
base to adhere the suction
cups to the work surface.
Ensure the motor base is
connected to power.
2
Lower the Total Crushing
Blender pitcher onto the
motor base. The handle
should be aligned slightly
to the right and the pitcher
should be oriented so the
LOCK symbols are visible
on the motor base. Then
rotate the pitcher clockwise
until it clicks into place.
3 Exercising care, grasp the
Stacked Blade Assembly
by the top of the shaft and
place it onto the drive gear
inside the pitcher. Note
that the blade assembly
will fit loosely onto the
drive gear.
4 Add ingredients, making
sure to not exceed the
Max Fill line marked on the
side of the pitcher.
5 Place the lid on the pitcher, aligning the triangle symbol
located on the lid with the triangle symbol located on the
pitcher’s handle. Press down on the handle until it clicks
into place. The triangle symbols MUST be aligned for the lid
to lock onto place and the unit to operate. When the unit is
connected to power and the container is correctly locked
into the motor base, press the Power symbol to turn unit
on. The available program buttons will illuminate and the
unit will be ready for use.
Page 9

USING YOUR TOTAL CRUSHING®
BLENDER PITCHER - CONT�
IMPORTANT: Review all
warnings on pages 3–6
before proceeding.
IMPORTANT: As a safety
feature, if the pitcher
and lid are not properly
installed, the timer will
display “- --” and the
motor will be disabled. If
this happens, repeat step
5 on page 14. When the
pitcher and lid are properly
installed, the program
buttons will illuminate
steadily, indicating the
appliance is ready for use.
NOTE: Smart Vessel
Recognition can detect which
container is on the motor
base. Only the functions
available for a particular
container will illuminate on the
touchscreen.
6 If using a pre-set program,
first select the program
that best suits your recipe.
The pre-set feature will
automatically stop the unit
at the end of the program.
To pause the appliance
at any time, press the
currently active button a
second time. Reference
page 10 for program
descriptions.
7 If not using a pre-set
program and ingredients
have reached your desired
consistency, stop the
appliance by releasing the
manual speed button, and
wait for the appliance to
come to a complete stop.
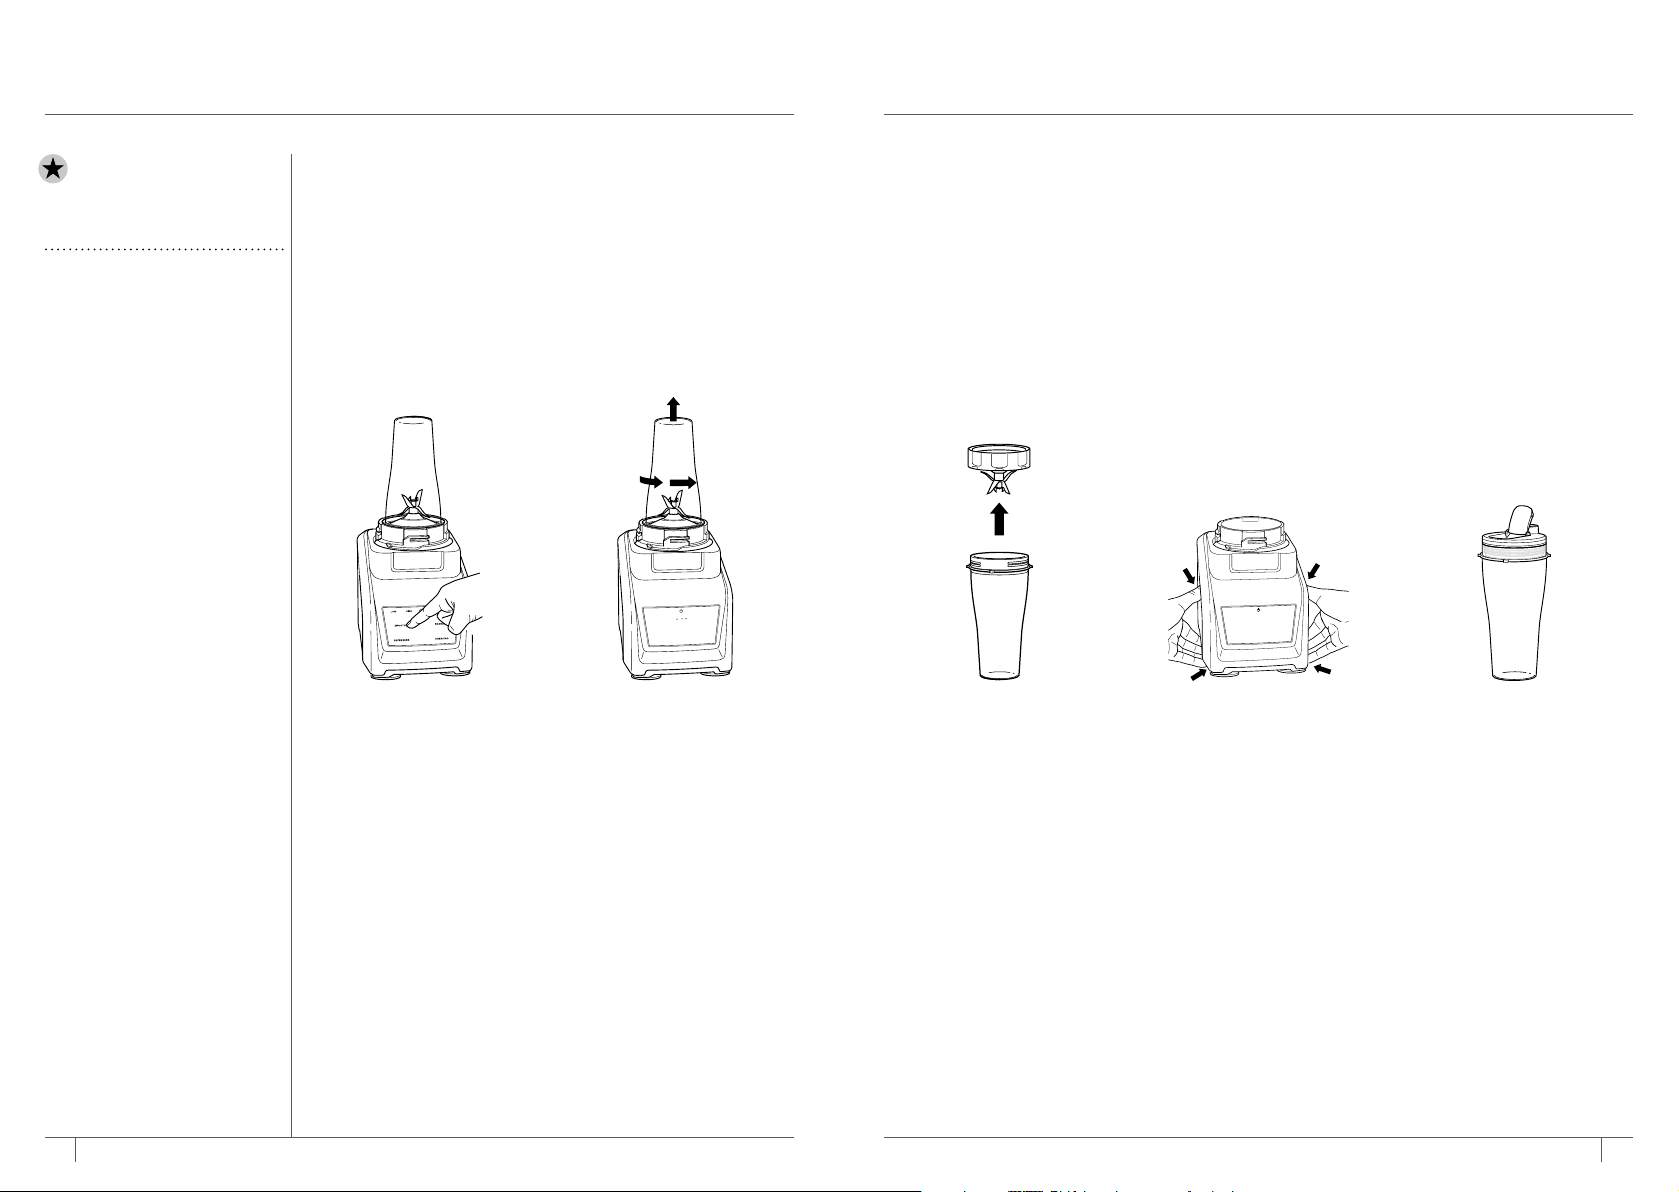
8 To remove the pitcher from
the motor base, turn the
pitcher counterclockwise
and lift it up.
9 To pour out thinner
mixtures, ensure the lid is
locked in place, then open
the pour spout cap.
10 For thicker mixtures
that cannot be emptied
through the pour spout,
remove the lid and
Stacked Blade Assembly
before pouring. To
remove the lid, press the
RELEASE button and lift
the handle. To remove the
blade assembly, carefully
grasp it by the top of the
shaft. The pitcher can then
be emptied.
11 Unplug the unit when
finished. To release the
motor base, place your
hands underneath both
sides of the motor base
and gently pull the unit up
and towards you. Refer
to page 31 for storing
instructions.
15 161 -877-646-528 8 ninjakitchen.com
Page 10

USING YOUR SLIM HIGH-SPEED
BLENDER CUP
IMPORTANT: Review all
warnings on pages 3–6
before proceeding.
NOTE: Pre-set programs
have pauses and changes in
speed throughout the cycle.
TIP: To learn more about
the unit’s programs, refer
to page 11.
NOTE: Pre-set programs
have pauses and changes in
speed throughout the cycle.
1 Place the unplugged motor
base on a clean, dry, and
level surface such as a
countertop or table. Press
downward on the motor
base to adhere the suction
cups to the work surface.
Plug the motor base into a
wall outlet.
17 181-877-646-5288 ninjakitchen.com
2 Add ingredients to the Slim
High-Speed Blender Cup.
DO NOT add ingredients
past the MAX LIQUID line
on the cup.
3 Install the Pro Extractor Blades® Assembly
onto the top of the cup. Twist the lid
clockwise until it’s sealed tightly.
4 Turn the Slim High-Speed Blender Cup
upside down and install onto the motor
base. Align the tabs on the cup with the
slots on the base, then twist until it clicks
into place. When the unit is connected
to power and the container is correctly
locked onto the motor base, press
the Power symbol to turn unit on. The
available program buttons will illuminate
and the unit will be ready for use.
Page 11
USING YOUR SLIM HIGH-SPEED
BLENDER CUP - CONT�
IMPORTANT: Review all
warnings on pages 3–6
before proceeding.
NOTE: Smart Vessel
Recognition can detect
which container is on
the motor base. Only
the functions available
for a particular container
will illuminate on the
touchscreen.
5 If using a pre-set program,
first select the program
that best suits your recipe.
The pre-set feature will
automatically stop the unit
at the end of the program.
To pause the appliance
at any time, press the
currently active program
a second time. Reference
page 11 for program
descriptions.
19 201- 877-646-5288 ninjakitchen.com
6 To remove the cup from the
motor base, turn the cup
counterclockwise and then
lift it.
7 Remove the Pro Extractor
Blades® Assembly by
twisting the cap counterclockwise. Do not store
blended contents with Pro
Extractor Blades Assembly
attached. Exercise care
when handling the blade
assembly, as the blades
are sharp.
8 Unplug the unit when
finished. To release the
motor base, place your
hands underneath both
sides of the motor base
and gently pull the unit up
and towards you. Refer
to page 31 for storing
instructions.
9 To enjoy your drink on
the go, place the Spout
Lid onto the Slim High-
Speed Blender Cup and
twist lid clockwise until
firmly sealed. For storing
ingredients in the cup, use
only the Spout Lid to cover.
Page 12

USING YOUR PRECISION
PROCESSOR™ BOWL
IMPORTANT: Review all
warnings on pages 3–6
before proceeding.
TIP: If the blade assembly
is not fully seated, you will
not be able to install and
lock the lid into position.
TIP: To learn more about
the unit’s programs, refer
to page 12.
NOTE: Pre-set programs
have pauses and changes in
speed throughout the cycle.
NOTE: DO NOT add
ingredients before installing
the blade assembly.
1
Place the unplugged motor
base on a clean, dry, and
level surface such as a
countertop or table. Press
downward on the motor
base to adhere the suction
cups to the work surface.
Plug the motor base into a
wall outlet.
21 221- 877-646-5288 ninjakitchen.com
2 Lower the Precision
Processor bowl onto the
motor base.
3
Rotate Precision
Processor™ bowl clockwise
until it clicks into place.
4 Exercising care, grasp the
Chopping Blade Assembly
by the top of the shaft
and place it onto the drive
gear inside the bowl. Note
that the Chopping Blade
Assembly will fit loosely
onto the drive gear.
5 Add ingredients to the
bowl, making sure not to
exceed the MAX LIQUID
and MAX FILL lines.
Page 13

USING YOUR PRECISION
PROCESSOR™ BOWL - CONT�
IMPORTANT: Review all
warnings on pages 3–6
before proceeding.
NOTE: Please follow the
same instructions to install the
Dough Blade Assembly.
NOTE: Smart Vessel
Recognition can detect which
container is on the motor
base. Only the functions
available for a particular
container will illuminate on the
touchscreen.
6 Place lid on Precision
Processor Bowl, with
black line on tab aligned
slightly to the right of tab
on front of bowl. Turn lid
clockwise to lock in place.
When properly locked,
the white line on lid will
line up with the black line
on bowl. When the unit is
connected to power and
the container is correctly
locked onto the motor
base, press and hold
Power symbol to turn unit
on. The available program
buttons will illuminate and
the unit will be ready for
use.
23 241 -877-646-528 8 ninjakitchen.com
7 If using a pre-set program,
first select the program
that best suits your recipe.
The pre-set feature will
automatically stop the
appliance at the end of
the program. To pause the
unit at any time, press the
currently active program
a second time. Reference
page 12 for program
descriptions.
8 To remove the bowl from
the motor base, turn the
bowl counterclockwise
and then lift it.
9 Remove the lid by pressing
the release button on the
front tab, twisting the lid
counterclockwise, and
lifting up. Always remove
the Chopping Blade
Assembly before emptying
any of the ingredients in
the bowl. To remove the
Chopping Blade Assembly,
carefully grasp it by the top
of the shaft and lift it out of
the bowl.
10 Unplug the unit when
finished. To release the
motor base, place your
hands underneath both
sides of the motor base
and gently pull the unit up
and towards you. Refer
to page 31 for storing
instructions.
Page 14

ASSEMBLING YOUR
AUTO-SPIRALIZER™
IMPORTANT: Review all
warnings on pages 3–6
before proceeding.
IMPORTANT: As a safety
feature, if the Spiralizer
Bowl and Feed Chute Lid
are not properly installed,
the timer will display “- --”
and the motor will be
disabled.
NOTE: To fit properly, the tabs
on the sides of the Blade Disc
must align with the gaps on
the top of the Collecting Bowl.
NOTE: The Spiralizer
accessory is only intended
for processing of fruit and
vegetables. Processing hard
ingredients such as cheese,
meats, and dried foods is not
recommended.
1
Place the unplugged motor
base on a clean, dry, and
level surface such as a
countertop or table. Press
downward on the motor
base to adhere the suction
cups to the work surface.
Plug the motor base into a
wall outlet.
2 Lower the Spiralizer Bowl
onto the motor base.
3 Rotate the Spiralizer Bowl
clockwise until it clicks into
place.
4 Place the Collecting Bowl inside the
Spiralizer Bowl, aligning it over the gear post.
5 Choose your Blade Disc, making sure to
handle it carefully.
6 Install the Blade Disc onto the top of the
Collecting Bowl. The rim of the Blade Disc
should sit flush against the top of the bowl,
and the tabs on the sides of the Blade
Discs must align with the slots on the top
of the Collecting Bowl.
7 Assemble the Feed Chute Lid on top of
the Spiralizer Bowl. Turn the lid clockwise
onto the Spiralizer Bowl, aligning the gray
tabs on the lid with the front of the bowl.
When the unit is connected to power and
the container is correctly assembled onto
the motor base, press the Power symbol to
turn unit on. The GO button will illuminate,
indicating that the unit is ready for use.
25 261 -877-646-528 8 ninjakitchen.com
Page 15

USING YOUR
AUTO-SPIRALIZER™
IMPORTANT: Review all
warnings on pages 3–6
before proceeding.
IMPORTANT: After
spiralizing an ingredient,
all leftover pieces must
be removed from the
Collecting Bowl and Blade
Disc before spiralizing
again.
NOTE: To find out how to
properly prep your ingredient,
refer to the Food Prep section
in your Quick Start Guide or
your Inspiration Guide.
NOTE: Never spiralize
multiple ingredients at one
time.
1 Before spiralizing, prepare
your ingredient by cutting
it so that it is no more than
3 inches wide. Place the
prepped ingredient into the
Feed Chute, through the
opening at the top.
27 281- 877-646-5288 ninjakitche n.com
2 Center the ingredient
on the pin in the center
of the Blade Disc, then
push down, securing the
ingredient onto the pin.
3 Place the Food Pusher on
top of the ingredient and
press down firmly to hold
in place.
4 Select GO to begin
spiralizing. Continue to
press firmly with Food
Pusher to guide ingredient
through Feed Chute.
5 Spiralizing is complete
when the Food Pusher sits
flat atop the Feed Chute
Lid. Press STOP to power
off the motor.
Page 16

USING YOUR
AUTO-SPIRALIZER™ - CONT�
IMPORTANT: Review all
warnings on pages 3–6
before proceeding.
6 To remove the Spiralizer
Bowl from the motor
base, turn the bowl
counterclockwise and lift.
29 301- 877-646-5288 ninjakitchen.com
7 To remove the Feed
Chute Lid, press the
release button on the
left side of the front
tab, then twist the lid
counterclockwise and lift.
8 Remove the Collecting
Bowl by lifting it out of the
Spiralizer Bowl. Remove
the Blade Disc by gripping
the handles on the side of
the disc and lifting.
9 Remove the noodles from
the Collecting Bowl and
prepare as desired.
10 Unplug the appliance
when finished. To release
the motor base, place
your hands underneath it
and gently pull it toward
you. Refer to page 31 for
storing instructions.
Page 17

CARE & MAINTENANCE
TROUBLESHOOTING GUIDE
CLEANING
1 Separate all parts.
2 Wash all containers in warm, soapy water
with a soft cloth.
3 Hand-Washing
Wash blade assemblies and Blade Discs
in warm, soapy water using a dishwashing
utensil with a handle or the provided
cleaning brush to avoid direct contact with
the blades. Exercise care when handling
blade assemblies as the blades are sharp.
Thoroughly rinse and air-dry all parts.
Dishwasher
All attachments are dishwasher safe. It is
recommended that the lids, containers,
Blade Discs, and blade assemblies be placed
on the top rack of the dishwasher ONLY.
Ensure the blade assemblies are removed
from their containers before placing in the
dishwasher. Exercise care when handling
blade assemblies.
Motor Base
Turn off the unit and unplug the motor base
before cleaning. Wipe motor base with a
clean, damp cloth.
Clean the touchscreen with a soft cloth,
such as microfiber, to prevent scratching. To
remove residue from the touchscreen, you
may use an all-purpose cleaner.
NEVER spray the base or touchscreen with
water or other liquids.
DO NOT use abrasive cloths/pads/brushes
to clean the base or touchscreen, as this
can dull or scratch the surface.
STORING
Wrap the power cord around the cord wrap
on the back of the motor base. Store the unit
upright and store all blade assemblies inside or
attached to their respective containers with their
lids locked into place.
DO NOT store blended or unblended
ingredients in the Slim High-Speed Blender
Cup with the Pro Extractor Blades® Assembly
attached.
DO NOT stack items on top of the containers.
Store any remaining attachments alongside
the
unit
or in a cabinet where they will not be
damaged or create a hazard.
RESETTING THE MOTOR THERMOSTAT
This unit features a unique safety system
that prevents damage to the motor and drive
system should you inadvertently overload
it. If the unit is overloaded, the motor will be
temporarily disabled. Should this occur, follow
the reset procedure below.
1 Unplug the unit from the electricaloutlet.
2 Allow the unit to cool for approximately 15
minutes.
3
Remove the container’s lid and blade
assembly. Empty the container and ensure no
ingredients are jamming the blade assemblies.
4 Reset the unit in accordance with the
applicable instructions for the container
and blade type.
IMPORTANT: Ensure that maximum
capacities are not exceeded. This is the
most typical cause of appliance overload.
If your unit needs servicing, please call
Customer Service at 1-877-646-5288.
ORDERING REPLACEMENT PARTS
To order additional parts and attachments,
please visit ninjaccessories.com or contact
customer service at 1-877-646-5288.
WARNING: To reduce the risk of shock and unintended operation, turn
power o and unplug unit before troubleshooting�
Unit doesn’t turn on�
• Make sure unit is plugged in.
• Display will read “- --” once connected to power.
• Place container on base and rotate it clockwise until it clicks into place. Press the Power symbol to turn
unit on, and the available programs will illuminate indicating the unit is ready for use. Available programs
will illuminate indicating that the unit is ready for use.
Unit doesn’t turn o�
• Remove container from base by rotating it counterclockwise and lifting it. Display should turn off. Unplug
the power cord from the outlet.
Lid/Pro Extractor Blades® Assembly is hard to install on the cup�
• Set the cup on a level surface. Carefully place the lid or Pro Extractor Blades Assembly on the top of the
cup and align the threads so the lid/Pro Extractor Blades Assembly sits flat on the cup. Twist clockwise
until you have a tight seal.
Food is not evenly chopped�
• For best results when chopping, cut pieces down to even sizes and do not overfill the Precision
Processor
Doesn’t mix well; ingredients get stuck�
• Using the pre-set programs is the easiest way to achieve great results. The pulses and pauses allow the
ingredients to settle toward the blade assembly. If ingredients are routinely getting stuck, adding some
liquid will usually help.
• When filling the cup, start with fresh fruit or veggies, then leafy greens or herbs. Next add liquids or
yogurt, then seeds, powders, or nut butters. Finally, add ice or frozen ingredients.
Motor base won’t stick to counter or tabletop�
• Make sure surface and suction feet are wiped clean. Suction feet will only stick to smooth surfaces.
• Suction feet
™
bowl.
WILL NOT stick on some surfaces such as wood, tile, and non-polished finishes.
• DO NOT attempt to use unit when the motor base is stuck to a surface that is not secure (cutting board,
platter, plates, etc.).
Unit is dicult to remove from counter for storage�
• Place your hands underneath both sides of the motor base and gently pull the unit up and towards you.
You get a blinking “- --” Message
• Smart Vessel Recognition can detect which container is on the motor base. You may be trying to use a
program that is not designed for the container you have installed. The programs will light up, indicating
which programs are available for each container.
You cannot create snow from solid ice�
• Do not use ice that has been sitting out or has started to melt. Use ice straight from the freezer.
• Start with a few pulses and then go to a continuous blending cycle.
You get semi-circular or shredded noodles�
• If the Collecting Bowl is overfilled, causing the Blade Disc to lift up after Spiralizing, your ingredient may
have been too large. Make sure to trim and prepare your ingredients properly before Spiralizing by
following the instructions in the Food Prep section in your Quick Start Guide or Inspiration Guide.
• For the most consistent results, be sure to center the ingredient onto the pin located in the center of the
Blade Disc. (Refer to page 27, step 2).
Ingredient is not fully processed and is spinning below the pusher�
• Remove remaining ingredient from Blade Disc pin and trim top and bottom so that both are flat. Make
sure you center ingredient on the Blade Disc pin and secure the Food Pusher firmly on top of the
ingredient. While maintaining pressure on food pusher, press the GO button to begin spiralizing.
31 321- 877-646-5288 ninjakitchen.com
Page 18

NOTES
ONE (1) YEAR
LIMITED WARRANTY
The 1-Year Limited Warranty applies to purchases made from authorized retailers of SharkNinja Operating LLC.
Warranty coverage applies to the original owner and to the original product only and is not transferable.
SharkNinja warrants that the unit shall be free from defects in material and workmanship for a period of 1 year
from the date of purchase when it is used under normal household conditions and maintained according to the
requirements outlined in this instruction manual, subject to the following conditions and exclusions.
What is covered by my warranty?
1. The original unit and/or non-wearable components deemed defective, in SharkNinja’s sole discretion,
will be repaired or replaced for up to 1 year from the original purchase date.
2. In the rare event that a replacement unit is issued, the warranty coverage ends six months after the
receipt date of the replacement unit or the remainder of the existing warranty, whichever is greater. If
the unit is replaced, SharkNinja reserves the right to replace the unit with one of equal or greater value.
What is not covered by my warranty?
Our Customer Service and Product Specialists are available to provide all the warranty service options available
to you, including the possibility of upgrading to our VIP Warranty Service Options for select product categories.
1. Normal wear and tear of wearable parts (including all blending vessels, lids, blades and blender base)
which require regular maintenance and/or replacement to ensure the proper functioning of your unit are
not covered by this warranty.
2. Any unit that has been tampered with or used for commercial purposes.
3. SharkNinja will cover the cost for the customer to send the unit to us for repair or replacement. A fee
of $19.95 for return shipping costs will be charged at the time of return shipment of the repaired or
replacement unit.
4. Damage caused by misuse, abuse, or negligent handling, or damage due to mishandling in transit.
5. Consequential and incidental damages.
6. Defects caused by or resulting from damages from shipping or from repairs, service, or alteration to the
product or any of its parts which have been performed by a repair person not authorized by SharkNinja.
7. Products purchased, used or operated outside of North America.
Problems with your unit/How to get service:
If your appliance fails to operate properly while in use under normal household conditions within the warranty
period, visit ninjakitchen.com for product care/maintenance self-help. Our Customer Service and Product
Specialists are also available at 1-877-646-5288 to assist with product support and warranty service options.
How to initiate a warranty claim:
You can call 1-877-646-5288 to have a Customer Service specialist assist you. Please note, you must call 1-877646-5288 to initiate a warranty claim. Return and packing instruction information will be provided at that time.
For Customer Service hours, visit ninjakitchen.com
Replacement parts are available for purchase at ninjaaccessories.com. For more information on what is
classified as wearable and non-wearable parts, please visit ninjakitchen.com/warranty
This warranty gives you specific legal rights, and you may also have other rights that vary from state to state.
Some states do not permit the exclusion or limitation of incidental or consequential damages, so the above
may not apply to you.
33 341-87 7-6 46 -5288 ninjakitchen.com
Page 19

MERCI
d’avoir acheté le système NinjaMD Intelli-Sense
MC
TABLE DES MATIÈRES
FRANÇAIS
CONSEIL: Le numéro
de modèle et le numéro
de série apparaissent sur
l’étiquette de code QR qui
est située près de la plaque
signalétique.
ENREGISTREZ VOTRE ACHAT
registeryourninja.com
1877646-5288
Numérisez le code QR avec votre appareil mobile
INDIQUEZ LES RENSEIGNEMENTS CI-DESSOUS
Numéro de modèle: ���������������������������������
Numéro de série: ������������������������������������
Date d’achat (conservez le reçu): ����������������������
Magasin où l’appareil a été acheté: ��������������������
CARACTÉRISTIQUES TECHNIQUES
Tension électrique: 120V, 60Hz
Watts: 1200W
Importantes consignes de sécurité � � � � � � � � � � � � � � � � � � � � � � 3
Familiarisez-vous avec votre système
NinjaMD Intelli-SenseMC � � � � � � � � � � � � � � � � � � � � � � � � � � � � � � � � � � 7
Avant la première utilisation � � � � � � � � � � � � � � � � � � � � � � � � � � � 9
Caractéristiques � � � � � � � � � � � � � � � � � � � � � � � � � � � � � � � � � � � � � � 10
Pichet du mélangeur Total Crushing
MD
� � � � � � � � � � � � � � � � � � � � �10
Gobelet mince de mélange haute vitesse � � � � � � � � � � � � � � � � � � � 11
Bol du Precision Processor
MC
� � � � � � � � � � � � � � � � � � � � � � � � � � � � � �12
Utilisation du pichet de votre mélangeur Total Crushing � � 13
Utilisation du gobelet mince de mélange haute vitesse � � � 17
Utilisation du bol de votre Precision Processor � � � � � � � � � � � 21
Assemblage de votre Auto-SpiralizerMC � � � � � � � � � � � � � � � � � 25
Utilisation de votre Auto-Spiralizer � � � � � � � � � � � � � � � � � � � � � 27
Soins et entretien � � � � � � � � � � � � � � � � � � � � � � � � � � � � � � � � � � � � 31
Nettoyage � � � � � � � � � � � � � � � � � � � � � � � � � � � � � � � � � � � � � � � � � � � � � � � 31
Rangement � � � � � � � � � � � � � � � � � � � � � � � � � � � � � � � � � � � � � � � � � � � � � �31
Réinitialisation du thermostat du moteur � � � � � � � � � � � � � � � � � � �31
Commande de pièces de rechange � � � � � � � � � � � � � � � � � � � � � � � � 31
Guide de dépannage � � � � � � � � � � � � � � � � � � � � � � � � � � � � � � � � � � 32
Garantie � � � � � � � � � � � � � � � � � � � � � � � � � � � � � � � � � � � � � � � � � � � � � 34
VEUILLEZ LIRE LE PRÉSENT MODE D’EMPLOI
SOIGNEUSEMENT ET LE CONSERVER À TITRE
INFORMATIF�
Ces instructions ont été conçues pour vous aider à bien
comprendre le fonctionnement de votre nouveau système
Ninja Intelli-Sense.
Pour toute question, veuillez communiquer avec le Service à
la clientèle au 1877646-5288.
35 361 -877-646-528 8 ninjakitchen.com
Page 20

IMPORTANTES CONSIGNES DE SÉCURITÉ
VEUILLEZ LES LIRE ATTENTIVEMENT AVANT D’UTILISER L’APPAREIL • POUR UN USAGE DOMESTIQUE SEULEMENT
FRANÇAIS
AVERTISSEMENT
Lors de l’utilisation d’appareils électriques, des mesures de sécurité de base
doivent toujours être suivies, y compris les suivantes:
1 Lisez toutes les instructions avant d’utiliser
l’appareil et ses accessoires.
2 Respectez et suivez attentivement tous les
avertissements et toutes les instructions.
Cet appareil comporte des raccordements
électriques et des pièces amovibles
pouvant exposer l’utilisateur à certains
risques.
3 Ce produit est vendu avec un jeu de
lames superposées et un jeu de lames
de hachage. Faites toujours preuve de
prudence lorsque vous manipulez des
jeux de lames. Les jeux de lames sont
tranchants et NE SONT PAS fixés à leurs
contenants. Les jeux de lames sont conçus
pour être amovibles afin de faciliter le
nettoyage et le remplacement au besoin.
Saisissez le jeu de lames UNIQUEMENT
par le haut de la tige. La manipulation des
jeux de lames avec négligence se traduira
par un risque de lacération.
4 Soyez TOUJOURS prudent lorsque vous
manipulez le jeu de lames Pro Extractor
BladesMD. Les lames sont tranchantes.
Saisissez le jeu de lames Pro Extractor
Blades UNIQUEMENT par le bord
extérieur de la base du jeu de lames. Ne
pas faire preuve de prudence lors de la
manipulation du jeu de lames se traduira
par un risque de lacération.
5 Prenez votre temps et faites preuve
de prudence pendant le déballage et
l’installation de l’appareil. Cet appareil
contient des lames tranchantes et lâches
qui peuvent causer des blessures en cas
de mauvaise manipulation.
6 Faites l’inventaire de tout le contenu pour
vous assurer que vous avez toutes les
pièces nécessaires pour faire fonctionner
votre appareil correctement et en toute
sécurité.
7 Débranchez l’appareil de la prise électrique
lorsqu’il n’est pas utilisé, avant de monter
ou de démonter des pièces ainsi qu’avant
le nettoyage. Pour le débrancher, saisissez
le corps de la fiche et retirez celle-ci de la
prise électrique. Ne débranchez JAMAIS
l’appareil en tirant sur le cordon souple.
8 Avant la première utilisation, lavez toutes
les pièces qui peuvent entrer en contact
avec les aliments. Suivez les instructions
de nettoyage fournies dans ce guide
d’utilisation.
9 Pour éviter le risque de décharge
électrique, NE SUBMERGEZ PAS
l’appareil ou ne laissez pas le cordon
d’alimentation entrer en contact avec tout
type de liquide.
10 N’UTILISEZ PAS cet appareil à l’extérieur.
Il est conçu pour un usage domestique
intérieur uniquement.
11 Cet appareil est muni d’une fiche polarisée
(une broche est plus large que l’autre).
Pour réduire le risque de décharge
électrique, cette fiche sera insérée dans
une prise polarisée dans un seul sens. Si
la fiche ne s’insère pas entièrement dans
la prise, inversez-la. Si elle ne s’insère
toujours pas, communiquez avec un
électricien qualifié. NE MODIFIEZ PAS la
prise d’aucune façon.
12 N’UTILISEZ PAS un appareil si son
cordon ou sa fiche est endommagé, s’il ne
fonctionne pas bien ou s’il a été échappé
ou endommagé de quelque façon que
ce soit. Cet appareil ne comporte aucune
pièce qui peut être réparée par l’utilisateur.
S’il est endommagé, communiquez avec
SharkNinja concernant la réparation.
13 Des renseignements importants figurent
sur les broches de la fiche de cet
appareil. Le cordon d’alimentation ne
peut être remplacé. S’il est endommagé,
communiquez avec SharkNinja pour la
réparation afin de prévenir les dangers.
14 N’UTILISEZ PAS de rallonges avec cet
appareil.
15 NE PERMETTEZ PAS aux jeunes enfants
d’utiliser l’appareil ou de s’en servir
comme jouet. Une surveillance étroite est
nécessaire lorsqu’un appareil est utilisé en
présence d’enfants.
16 Cet appareil N’EST PAS prévu pour
être utilisé par des personnes (y
compris les enfants) avec des capacités
physiques, sensorielles ou mentales
réduites ou manquant d’expérience et
de connaissances, à moins qu’elles
soient supervisées ou aient été instruites
concernant l’utilisation de l’appareil par une
personne responsable de leur sécurité.
17 Avant chaque utilisation, inspectez
les jeux de lames pour la présence de
dommages. Si une lame est tordue ou
que vous soupçonnez des dommages,
communiquez avec SharkNinja pour
organiser le remplacement.
18 NE TENTEZ PAS d’aiguiser les lames.
19 NE LAISSEZ PAS le cordon pendre du
rebord des tables ou des comptoirs. Le
cordon peut être accroché et faire tomber
l’appareil de la surface de travail.
20 NE LAISSEZ PAS l’appareil ni le cordon
d’entrer en contact avec des surfaces
chaudes, y compris les poêles et d’autres
appareils de chauffage.
21 Utilisez TOUJOURS l’appareil sur une
surface plane et sèche.
22 Ne posez JAMAIS un jeu de lames sur
le bloc moteur sans l’avoir d’abord fixé à
son récipient correspondant (bol, pichet,
gobelet) et son couvercle.
23 Gardez les mains, les cheveux et les
vêtements hors du contenant lors du
chargement et du fonctionnement.
24 Utilisez SEULEMENT les accessoires
qui sont fournis avec le produit ou qui sont
recommandés par SharkNinja. L’utilisation
d’accessoires non recommandés ou non
vendus par SharkNinja peut causer des
incendies, des décharges électriques ou
des blessures.
25 Pendant le fonctionnement et la
manipulation de l’appareil, évitez tout
contact avec des pièces mobiles.
26 N’UTILISEZ PAS l’appareil avec un
contenant vide.
27 NE REMPLISSEZ PAS les contenants
au-delà des lignes MAX FILL (remplissage
max.) ou MAX LIQUID (liquide max).
SUITE À LA PAGE39
CONSERVEZ CES INSTRUCTIONS
37 381- 877-6 46 -5 2 88 ninjakitchen.com
Page 21

IMPORTANTES CONSIGNES DE SÉCURITÉ
VEUILLEZ LES LIRE ATTENTIVEMENT AVANT D’UTILISER L’APPAREIL • POUR UN USAGE DOMESTIQUE SEULEMENT
AVERTISSEMENT
Lors de l’utilisation d’appareils électriques, des mesures de sécurité de base
doivent toujours être suivies, y compris les suivantes:
FRANÇAIS
28 NE METTEZ PAS au four micro-ondes les
contenants ou les accessoires fournis avec
l’appareil.
29 N’EFFECTUEZ PAS de broyage avec le
gobelet mince de mélange haute vitesse et
le jeu de lames Pro Extractor BladesMD.
30 Avant d’utiliser l’appareil, assurez-vous
que tous les ustensiles sont enlevés
des contenants. Omettre de retirer
des ustensiles peut mener au bris des
contenants et potentiellement causer des
blessures et des dommages matériels.
31 Veuillez garder les mains et les ustensiles
hors du contenant lors du hachage afin de
réduire tout risque de blessures graves ou
de dommage au mélangeur ou hachoir. Un
grattoir peut être utilisé UNIQUEMENT
lorsque l’appareil n’est pas en marche.
Lors de l’utilisation du hachoir, utilisez
toujours le pilon fourni pour ajouter des
aliments. N’ajoutez JAMAIS d’aliments à
la main.
32 N’utilisez JAMAIS l’appareil sans les
couvercles et les bouchons en place.
NE TENTEZ PAS de contourner le
mécanisme de verrouillage. Assurez-vous
que le contenant et le couvercle sont
correctement installés avant l’utilisation.
33 N’EXPOSEZ PAS les contenants et les
accessoires à des changements extrêmes
de température. Ils pourraient subir des
dommages.
34 Ne laissez JAMAIS l’appareil en marche
sans surveillance.
35 N’OUVREZ PAS le couvercle du bec
verseur lorsque vous utilisez l’appareil.
36 NE MÉLANGEZ PAS de liquides chauds.
Cela peut entraîner une accumulation de
pression et une exposition à la vapeur
qui peut poser un risque de brûlure pour
l’utilisateur.
37 Si vous trouvez des ingrédients non
mélangés collés aux parois du pichet,
arrêtez l’appareil, retirez le couvercle
et utilisez une spatule pour déloger les
ingrédients. N’INSÉREZ JAMAIS vos
mains dans le pichet, car vous pourriez
toucher une des lames et subir une
lacération.
38 NE TENTEZ PAS d’enlever le contenant
et les couvercles du bloc moteur pendant
que le moteur et le jeu de lames tournent
encore. Laissez l’appareil s’arrêter
complètement avant de retirer les
couvercles et les contenants.
39 À la fin de l’opération, veillez à ce que le
jeu de lames soit retiré AVANT de vider
le contenu du contenant. Retirez le jeu
de lames en saisissant soigneusement
la partie supérieure de la tige et en le
soulevant du contenant. Si vous ne
retirez pas le jeu de lames avant de vider
le contenant, vous courrez le risque de
provoquer des lacérations.
40 Retirez le jeu de lames Pro Extractor
BladesMD du gobelet mince de mélange
haute vitesse après avoir mélangé les
ingrédients. N’ENTREPOSEZ PAS
les ingrédients avant ou après les avoir
mélangés dans le gobelet fixé au jeu de
lames. Certains aliments peuvent contenir
des ingrédients actifs ou libérer des gaz qui
prendront de l’expansion s’ils sont laissés
dans un récipient fermé, entraînant une
accumulation excessive de pression qui
peut poser un risque de blessure. Utilisez
seulement le couvercle à bec verseur pour
couvrir les ingrédients à entreposer dans le
gobelet.
41 En cas de surchauffe de l’appareil, un
thermocontacteur sera activé et arrêtera
temporairement le moteur. Pour le
réinitialiser, débranchez l’appareil et laissezle refroidir pendant environ 30minutes
avant de l’utiliser de nouveau.
42 La puissance nominale maximale pour cet
appareil est basée sur la configuration du
jeu de lames Pro Extractor Blades et du
gobelet mince de mélange haute vitesse.
D’autres configurations peuvent tirer moins
de puissance ou de courant.
43 NE MÉLANGEZ PAS les ingrédients secs
avant d’avoir ajouté du liquide dans le
gobelet mince de mélange haute vitesse.
Le gobelet mince de mélange haute
vitesse n’est pas conçu pour mélanger des
ingrédients secs.
44 Les disques de coupe sont tranchants.
Utilisez toujours les poignées sur le côté
de chaque disque de coupe lorsque vous
le placez dans le bol ou l’en retirez. Suivez
toutes les instructions de nettoyage. Ne
pas procéder de la sorte augmente le
risque de lacération.
45 Lors de l’utilisation du spiraliseur, utilisez
TOUJOURS le pilon fourni. NE METTEZ
JAMAIS d’ingrédients manuellement
dans le spiraliseur ou en vous servant
d’autres ustensiles. L’omission d’utiliser
le pilon fourni peut causer des blessures
corporelles.
46 Si les disques de coupe semblent
endommagés ou brisés, ne les utilisez pas
ou ne tentez pas de les réparer. Appelez le
service à la clientèle pour obtenir de l’aide.
47 NE TENTEZ PAS d’aiguiser les disques
de coupe.
48 NE RETIREZ PAS le couvercle de la
trappe avant que le disque de coupe ait
cessé de tourner.
49 N’IMMERGEZ PAS le bloc moteur ou
l’écran tactile dans de l’eau ou dans un
autre liquide. NE PULVÉRISEZ PAS
de liquide sur le bloc moteur ou l’écran
tactile. Mettez le mélangeur hors tension et
débranchez-le avant de le nettoyer.
CONSERVEZ CES INSTRUCTIONS
39 401-877-646-528 8 ninjakitchen.com
Page 22

FAMILIARISEZ-VOUS AVEC VOTRE NINJAMD
SYSTÈME INTELLI-SENSE
BIENVENUE!
Félicitations pour votre
achat. Utilisez ce mode
d’emploi pour en
apprendre davantage
sur les excellentes
fonctionnalités de votre
système Ninja Intelli-
Sense. De l’assemblage à
l’utilisation, en passant par
l’entretien, vous trouverez
tous les renseignements
que vous cherchez ici.
MC
FRANÇAIS
H L P
A
I
J
Plusieurs accessoires sont
compatibles avec cette série de
mélangeurs.
REMARQUE:
de la boîte présente les
accessoires inclus avec ce
modèle�
Si vous avez des questions,
des préoccupations ou des
commentaires, nous serions
ravis de les entendre. Appeleznous au 1877646-5288 ou
visitez le www.ninjakitchen.com.
Pour trouver d’excellentes recettes
et acheter plus d’accessoires
(y compris les disques de
coupe pour créer différents
types de nouilles), veuillez visiter
ninjaaccessories.com
* Capacité liquide maximale de
1,9l (64oz)
** Capacité maximale de 830ml
(3,5tasses)/
capacité liquide maximale de
440ml (15oz)
Le rabat
UNITÉ PRINCIPALE
A Couvercle du pichet
B Pichet du mélangeur* Total CrushingMD de 2,1l (72oz)
C Jeu de lames superposées
D Bloc moteur avec Smart Vessel Recognition
E Gobelet mince de mélange haute vitesse de 710ml (24oz)
F Couvercle du bec verseur
G Jeu de lames Pro Extractor Blades
H Couvercle du bol du Precision Processor
I Jeu de lames à pâte
J Jeu de lames de hachage
K Bol du Precision Processor**
L Pilon du spiraliseur
M Couvercle de la trappe
N Bol de récupération
O Bol du spiraliseur
P Disque de coupe à spaghetti
Q Disque de coupe à fettucine
R Brosse de nettoyage
MD
MC
B
C K
D
E F
G
M
Q
N
R
O
41 421-877-646- 5 288 ninjakitchen.com
Page 23

AVANT LA PREMIÈRE UTILISATION
CARACTÉRISTIQUES
IMPORTANT: Examinez
tous les avertissements
des pages37à40 avant
de poursuivre.
LE SAVIEZ-VOUS?
• Vous pouvez emporter
vos boissons avec vous
en utilisant les couvercles
à bec verseur.
• Tous les contenants, jeux
de lames, disques de
coupe et couvercles sont
sans BPA.
• Nos contenants, jeux
de lames et couvercles
peuvent tous être mis au
lave-vaisselle.
1 Retirez tous les matériaux d’emballage de l’appareil.
Soyez prudent lors du déballage des jeux de lames et des
disques de coupe. Tous les jeux de lames et les disques
de coupe sont tranchants.
2 Le jeu de lames de hachage et le jeu de lames
superposées NE SONT PAS verrouillés en place dans
leurs contenants respectifs. Manipulez le jeu de lames de
hachage et le jeu de lames superposées en saisissant la
partie supérieure de leurs tiges respectives.
3 Manipulez le jeu de lames Pro Extractor BladesMD en le
tenant par la circonférence extérieure de la base du jeu de
lames.
4 Lavez les contenants, les couvercles, les disques de coupe
et les jeux de lames dans de l’eau chaude savonneuse
à l’aide d’une brosse à vaisselle avec poignée ou de
la brosse de nettoyage fournie afin d’éviter le contact
direct avec les lames. Manipulez les jeux de lames avec
précaution, car les lames sont tranchantes.
5 Rincez à fond toutes les pièces et laissez-les sécher à l’air.
6 Tous les accessoires vont au lave-vaisselle. Nous vous
recommandons de placer les couvercles, les disques
de coupe et les jeux de lames dans le panier supérieur
du lave-vaisselle. Veillez à retirer les jeux de lames et les
disques de coupe des contenants avant de les placer dans
le lave-vaisselle. Soyez prudent lorsque vous manipulez
des jeux de lames ou des disques de coupe.
7 Essuyez l’écran tactile avec un chiffon doux. Laissez-le
sécher complètement avant l’utilisation.
PRÉRÉGLEZ LES PROGRAMMES POUR LE PICHET DU MÉLANGEUR TOTAL
CRUSHINGMD
Des programmes intelligents qui combinent des modèles uniques de mélanges et d’arrêts
qui font le travail pour vous. Lorsqu’un programme préréglé est sélectionné, il démarrera
immédiatement. Appuyez sur «STOP» pour l’arrêter.
Le symbole d’alimentation doit être utilisé pour allumer ou éteindre votre appareil.
SMOOTHIE (BOISSON FRAPPÉE)
Préparez de délectables boissons et laits
frappés très onctueux à partir de fruits
frais ou congelés, de lait, de liquides et de
glace
.
FROZEN DRINK (BOISSON
GLACÉE)
Transformez de la glace et des fruits
en boissons glacées mélangées à la
perfection.
FRANÇAIS
ICE CREAM (CRÈME GLACÉE)
Préparez de délicieux desserts glacés
faciles à prendre à la cuillère comme de la
crème glacée ou du sorbet.
LOW, HIGH et PULSE (FAIBLE, ÉLEVÉ et IMPULSION)
Lorsque sélectionné, chacun de ces programmes fonctionne de manière continue jusqu’à
ce qu’il soit arrêté. Ces fonctions ne sont pas disponibles avec les programmes préréglés.
43 441-877- 646-5288 ninjakitchen.com
SNOW CONE (CÔNE DE NEIGE)
Pulvérisez de la glace et obtenez des
créations glacées comme des cônes de
neige, des barbotines ou des granités.
Page 24

CARACTÉRISTIQUES (SUITE)
FRANÇAIS
PRÉRÉGLEZ LES PROGRAMMES POUR
LE GOBELET DE MÉLANGE HAUTE VITESSE
Des programmes intelligents qui combinent des modèles uniques de mélanges et d’arrêts
qui font le travail pour vous. Lorsqu’un programme préréglé est sélectionné, il démarrera
immédiatement. Appuyez sur «STOP» pour l’arrêter.
Le symbole d’alimentation doit être utilisé pour allumer ou éteindre votre appareil.
SMOOTHIE (BOISSON FRAPPÉE)
Préparez de délectables boissons et laits
frappés très onctueux à partir de fruits
frais ou congelés, de lait, de liquides et de
glace
.
REFRESHER
(RAFRAÎCHISSEMENT)
Ajoutez des saveurs naturelles de
légumes, de fruits et d’herbes à votre eau.
EXTRACT (EXTRACTION)
Idéal pour les fruits et légumes entiers,
feuillus ou fibreux, y compris leurs peaux,
graines et tiges.
DRESSING (VINAIGRETTE)
Préparez des marinades, vinaigrettes et
sauces fraîches.
PRÉRÉGLEZ LES PROGRAMMES POUR LE BOL DU PRECISION PROCESSORMC
Des programmes intelligents qui combinent des modèles uniques de mélanges et d’arrêts
qui font le travail pour vous. Lorsqu’un programme préréglé est sélectionné, il démarrera
immédiatement. Appuyez sur «STOP» pour l’arrêter.
Le symbole d’alimentation doit être utilisé pour allumer ou éteindre votre appareil.
PUREE (RÉDUIRE EN PURÉE)
Préparez tout ce dont vous avez envie,
des sauces onctueuses et crémeuses au
houmous parfait.
DOUGH (PÂTE)
Idéal pour créer de délicieuses pâtes
à pizza, du pain, et des produits de
boulangerie-pâtisserie comme les biscuits.
CHOP (HACHER)
Impulsions et pauses chronométrées pour
un hachage uniforme.
DIPS (TREMPETTES)
Utilisez cette fonction pour des trempettes
et des plats d’accompagnement avec
plus de texture comme la trempette aux
épinards et aux artichauts ou une purée
de pommes de terre.
LOW, HIGH et PULSE (FAIBLE, ÉLEVÉ et IMPULSION)
Lorsque sélectionné, chacun de ces programmes fonctionne de manière continue jusqu’à
ce qu’il soit arrêté. Ces fonctions ne sont pas disponibles avec les programmes préréglés.
45 461- 877-646-5288 ninjakitchen.com
LOW, HIGH et PULSE (FAIBLE, ÉLEVÉ et IMPULSION)
Lorsque sélectionné, chacun de ces programmes fonctionne de manière continue jusqu’à
ce qu’il soit arrêté. Ces fonctions ne sont pas disponibles avec les programmes préréglés.
Page 25

UTILISATION DU PICHET DE VOTRE MÉLANGEUR
TOTAL CRUSHING
IMPORTANT: Examinez
tous les avertissements
des pages37à40 avant
de poursuivre.
CONSEIL: Si le jeu de
lames superposées n’est
pas bien enfoncé, vous
ne serez pas en mesure
d’installer et de verrouiller
le couvercle en place.
CONSEIL: Pour en
savoir davantage sur les
programmes de l’appareil,
consultez la page44.
REMARQUE: Les
programmes préréglés
effectuent des pauses et des
changements de vitesse tout
au long du cycle.
MD
FRANÇAIS
REMARQUE: N’AJOUTEZ
PAS les ingrédients avant
d’effectuer l’installation du jeu
de lames superposées.
REMARQUE: Le pichet peut
être installé dans une seule
orientation. La poignée doit
être positionnée dans le coin
avant droit du bloc moteur
pour que vous puissiez utiliser
l’appareil.
47 481 -877-646-528 8 ninjakitchen.com
1
Placez le bloc moteur
débranché sur une surface
plane, propre et sèche
comme un comptoir ou
une table. Pressez le bloc
moteur vers le bas pour
fixer les ventouses sur la
surface de travail. Assurezvous que le bloc moteur
est connecté à une source
d’alimentation.
2
Placez le pichet du
mélangeur Total Crushing
sur le bloc moteur. La
poignée doit être alignée
légèrement vers la droite,
et le pichet doit être
orienté de manière à ce
que les symboles LOCK
(VERROUILLAGE) soient
visibles sur le bloc moteur.
Puis, faites tourner le
pichet dans le sens des
aiguilles d’une montre
jusqu’à ce que vous
entendiez un déclic vous
indiquant qu’il est bien en
place.
3 Avec prudence, en
tenant le jeu de lames
superposées par le
haut de la tige, placezle sur l’engrenage
d’entraînement à
l’intérieur du pichet.
Notez que le jeu de lames
s’adaptera de manière
lâche sur l’engrenage
d’entraînement.
4 Ajoutez les ingrédients,
en vous assurant qu’ils
ne dépassent pas la ligne
Remplissage max. sur le
côté du pichet.
5 Placez le couvercle sur le
pichet, en alignant le symbole
de triangle situé sur le
couvercle avec le symbole de
triangle situé sur la poignée
du pichet. Appuyez sur la
poignée jusqu’à ce que
vous entendiez un déclic
vous indiquant qu’elle est
bien en place. Les symboles
de triangle DOIVENT être
alignés pour que le couvercle
se verrouille en place et
que l’appareil fonctionne.
Lorsque l’appareil est sous
tension et que le contenant
est correctement verrouillé
dans le bloc moteur, press
the Power symbol to turn
unit on. Les boutons de
programmes disponibles
s’allument et l’appareil est
prêt à être utilisé.
Page 26

UTILISATION DU PICHET DE VOTRE MÉLANGEUR
TOTAL CRUSHINGMD (SUITE)
IMPORTANT: Examinez
tous les avertissements
des pages37à40 avant
de poursuivre.
IMPORTANT: Par
mesure de sécurité,
la minuterie affichera
«- --» et le moteur ne
fonctionnera pas si le
pichet et le couvercle
ne sont pas installés
correctement. Dans ce
cas, répétez l’étape5 à
la page48. Lorsque le
pichet et le couvercle sont
correctement installés, les
boutons du programme
resteront allumés, vous
signalant que l’appareil est
prêt à être utilisé.
FRANÇAIS
REMARQUE: Smart Vessel
Recognition peut déterminer
quel contenant est sur le bloc
moteur. Seules les fonctions
disponibles pour un contenant
en particulier s’allumeront sur
l’écran tactile.
49 501- 877-646-5288 ninjakitchen.com
6 Si vous utilisez un
programme préréglé,
sélectionnez tout d’abord
celui qui convient le
mieux à votre recette. La
fonction préréglée arrêtera
l’appareil automatiquement
à la fin du programme.
Pour suspendre le
fonctionnement de
l’appareil à tout moment,
appuyez une seconde
fois sur la touche active.
Consultez la page44
pour les descriptions de
programmes.
7 Si vous n’utilisez pas de
programme préréglé et
que les ingrédients ont
atteint la consistance
souhaitée, arrêtez
l’appareil en relâchant
le bouton de vitesse
manuelle et attendez qu’il
s’arrête complètement.
8 Pour retirer le pichet du
bloc moteur, tournez-le
dans le sens antihoraire
et enlevez-le ensuite en le
soulevant.
9 Pour vider les mélanges
plus liquides, assurezvous que le couvercle est
verrouillé en place, puis
ouvrez le bec verseur.
10 Pour les mélanges plus
épais qui ne peuvent
pas être vidés par le
bec verseur, retirez le
couvercle et le jeu de
lames superposées avant
de verser. Pour retirer
le couvercle, appuyez
sur le bouton RELEASE
(DÉGAGEMENT) et
soulevez la poignée. Pour
retirer le jeu de lames,
tenez-le délicatement par
le haut de la tige. Le pichet
peut ensuite être vidé.
11 Débranchez l’appareil
lorsque vous avez
terminé. Pour dégager
le bloc moteur, placez
vos mains sous les deux
côtés du bloc moteur et
tirez doucement l’appareil
vers vous et vers le haut.
Consultez la page65
pour les instructions de
rangement.
Page 27

UTILISATION DU GOBELET MINCE DE
MÉLANGE HAUTE VITESSE
IMPORTANT: Examinez
tous les avertissements
des pages 37à40 avant
de poursuivre.
CONSEIL: Pour en
savoir davantage sur les
programmes de l’appareil,
référez-vous à la page45.
REMARQUE: Les
programmes préréglés
effectuent des pauses et des
changements de vitesse tout
au long du cycle.
FRANÇAIS
1 Placez le bloc moteur
débranché sur une surface
plane, propre et sèche
comme un comptoir ou
une table. Pressez le
bloc moteur vers le bas
pour fixer les ventouses
sur la surface de travail.
Branchez le bloc moteur
dans une prise électrique.
51 521- 877-646-52 88 ninjakitchen.com
2 Ajoutez les ingrédients
au gobelet mince de
mélange haute vitesse.
N’AJOUTEZ PAS
d’ingrédients au-delà de la
ligne MAX LIQUID (liquide
max.) sur le gobelet.
3 Installez le jeu de lames Pro Extractor
BladesMD sur le dessus du gobelet. Tournez
le couvercle dans le sens horaire jusqu’à ce
qu’il soit fermé hermétiquement.
4 Retournez le gobelet mince de mélange
haute vitesse et installez-le sur le bloc
moteur. Alignez les languettes du gobelet
avec les fentes du bloc moteur, puis
tournez le gobelet jusqu’à ce que vous
entendiez un déclic vous indiquant qu’il
est bien en place. Lorsque l’appareil est
sous tension et que le contenant est
correctement verrouillé sur le bloc moteur,
press the Power symbol to turn unit on.
Les boutons de programmes disponibles
s’allument et l’appareil est prêt à être
utilisé.
Page 28

UTILISATION DU MINCE GOBELET DE
MÉLANGE HAUTE VITESSE (SUITE)
IMPORTANT: Examinez
tous les avertissements
des pages37à40 avant
de poursuivre.
REMARQUE: Smart Vessel
Recognition peut déterminer
quel contenant est sur le
bloc moteur. Seules les
fonctions disponibles pour
un contenant en particulier
s’allumeront sur l’écran
tactile.
FRANÇAIS
5 Si vous utilisez un
programme préréglé,
sélectionnez tout d’abord
celui qui convient le
mieux à votre recette. La
fonction préréglée arrêtera
l’appareil automatiquement
à la fin du programme.
Pour suspendre le
fonctionnement de
l’appareil à tout moment,
appuyez une seconde fois
sur le programme actif.
Consultez la page 45
pour les descriptions de
programmes.
53 541-87 7- 6 46 -5288 ninjakitchen.com
6 Pour retirer le gobelet
du bloc moteur, tournez
le gobelet dans le sens
antihoraire, puis soulevezle.
7 Retirez le jeu de lames
Pro Extractor BladesMD
en tournant le couvercle
dans le sens antihoraire.
N’entreposez pas les
mélanges avec le jeu de
lames Pro Extractor Blades
fixé. Manipulez le jeu de
lames avec précaution, car
les lames sont tranchantes.
8 Débranchez l’appareil
lorsque vous avez
terminé. Pour dégager
le bloc moteur, placez
vos mains sous les deux
côtés du bloc moteur et
tirez doucement l’appareil
vers vous et vers le haut.
Consultez la page65
pour les instructions de
rangement.
9 Pour une boisson à
emporter, placez le
couvercle à bec verseur
sur le gobelet de mélange
haute vitesse et tournezle dans le sens horaire
jusqu’à ce qu’il soit fermé
hermétiquement. Utilisez
seulement le couvercle à
bec verseur pour couvrir
les ingrédients à entreposer
dans le gobelet.
Page 29

UTILISATION DU BOL DE VOTRE
PRECISION PROCESSORMC
IMPORTANT: Examinez
tous les avertissements
des pages37à40 avant
de poursuivre.
CONSEIL: Si le jeu de
lames n’est pas bien en
place, vous ne pourrez
pas installer et verrouiller le
couvercle en position.
CONSEIL: Pour en
savoir davantage sur les
programmes de l’appareil,
consultez la page46.
REMARQUE: Les
programmes préréglés
effectuent des pauses et des
changements de vitesse tout
au long du cycle.
FRANÇAIS
REMARQUE: N’AJOUTEZ
PAS les ingrédients avant
d’installer le jeu de lames.
55 561 -877-646-5288 ninjakitchen.com
1
Placez le bloc moteur
débranché sur une surface
plane, propre et sèche
comme un comptoir ou
une table. Pressez le
bloc moteur vers le bas
pour fixer les ventouses
sur la surface de travail.
Branchez le bloc moteur
dans une prise électrique.
2 Déposez le bol de votre
Precision Processor sur le
bloc moteur.
3
Tournez le bol du Precision
ProcessorMC dans le sens
horaire jusqu’à ce que vous
entendiez un déclic vous
indiquant qu’il est bien en
place.
4 En tenant le jeu de lames
de hachage par le haut
de la tige avec soin,
placez-le sur l’engrenage
d’entraînement à l’intérieur
du bol. Notez que le jeu
de lames de hachage
s’adaptera de manière
lâche sur l’engrenage
d’entraînement.
5 Ajoutez les ingrédients
dans le bol en vous
assurant de ne pas
dépasser les lignes MAX
FILL (remplissage max.) ou
MAX LIQUID (liquide max).
Page 30

UTILISATION DU BOL DE VOTRE
PRECISION PROCESSORMC (SUITE)
IMPORTANT: Examinez
tous les avertissements
des pages37à40 avant
de poursuivre.
REMARQUE: Veuillez suivre
les mêmes instructions que
pour installer le jeu de lames
à pâte.
REMARQUE: Smart Vessel
Recognition peut déterminer
quel contenant est sur le bloc
moteur. Seules les fonctions
disponibles pour un contenant
en particulier s’allumeront sur
l’écran tactile.
FRANÇAIS
6 Placez le couvercle sur le
bol du Precision Processor
en vous assurant que la
ligne noire de la languette
est alignée légèrement à
droite de la languette du
devant du bol. Tournez
le couvercle dans le sens
horaire pour le verrouiller en
place. Une fois qu’il est bien
en place, la ligne blanche
du couvercle s’alignera
avec la ligne noire du bol.
Lorsque l’appareil est sous
tension et que le contenant
est correctement verrouillé
sur le bloc moteur, les
boutons de programmes
disponibles s’allument et
l’appareil est prêt à être
utilisé.
57 581- 877-6 46 -5288 ninjakitchen.com
7 Si vous utilisez un
programme préréglé,
sélectionnez tout d’abord
celui qui convient le
mieux à votre recette. La
fonction préréglée arrêtera
automatiquement l’appareil
à la fin du programme.
Pour suspendre le
fonctionnement de
l’appareil à tout moment,
appuyez une seconde fois
sur le programme actif.
Consultez la page46
pour les descriptions de
programmes.
8 Pour retirer le bol du bloc
moteur, tournez le bol
dans le sens antihoraire,
puis soulevez-le.
9 Retirez le couvercle en
appuyant sur le bouton
de dégagement sur
la languette avant, en
tournant le couvercle
dans le sens antihoraire
et en le soulevant. Retirez
toujours le jeu de lames
de hachage avant de vider
le bol de ses ingrédients.
Pour retirer le jeu de lames
de hachage, saisissez-le
par le haut de la tige avec
précaution et soulevez-le
hors du bol.
10 Débranchez l’appareil
lorsque vous avez
terminé. Pour dégager
le bloc moteur, placez
vos mains sous les deux
côtés du bloc moteur et
tirez doucement l’appareil
vers vous et vers le haut.
Consultez la page65
pour les instructions de
rangement.
Page 31

ASSEMBLAGE DE VOTRE
AUTO-SPIRALIZER
IMPORTANT: Examinez
tous les avertissements
des pages37à40 avant
de poursuivre.
IMPORTANT: Par
mesure de sécurité,
la minuterie affichera
«- --» et le moteur ne
fonctionnera pas si le
bol du spiraliseur et le
couvercle de la trappe
ne sont pas installés
correctement.
REMARQUE: Pour s’adapter
correctement, les languettes
latérales du disque de coupe
doivent s’aligner avec les
espaces du dessus du bol de
récupération.
MC
FRANÇAIS
REMARQUE: L’accessoire
spiraliseur est réservé à la
transformation des fruits et
légumes. Il n’est pas conseillé
de transformer des ingrédients
durs comme le fromage,
les viandes et les aliments
séchés.
59 601-877- 64 6-52 8 8 ninjakitchen.com
1
Placez le bloc moteur
débranché sur une surface
plane, propre et sèche
comme un comptoir ou
une table. Pressez le
bloc moteur vers le bas
pour fixer les ventouses
sur la surface de travail.
Branchez le bloc moteur
dans une prise électrique.
2 Déposez le bol du
spiraliseur sur le bloc
moteur.
3 Faites tourner le bol du
spiraliseur dans le sens
horaire jusqu’à ce que
vous entendiez un déclic
vous indiquant qu’il est
bien en place.
4 Placez le bol de récupération dans le bol
du spiraliseur, en l’alignant sur l’engrenage
d’entraînement.
5 Choisissez votre disque de coupe, et
assurez-vous de le manipuler avec soin.
6 Installez le disque de coupe sur le dessus
du bol de récupération. Le bord du disque
de coupe devrait se poser directement
sur le dessus du bol, et les languettes
des côtés des disques de coupe doivent
s’aligner avec les fentes du dessus du bol
de récupération.
7 Assemblez le couvercle de la trappe sur
le dessus du bol du spiraliseur. Tournez le
couvercle dans le sens horaire sur le bol
du spiraliseur en alignant les languettes
grises du couvercle avec l’avant du bol.
Lorsque l’appareil est sous tension et que
le contenant est correctement assemblé
sur le bloc moteur, press the Power symbol
to turn unit on. Le bouton « GO » s’allume
et l’appareil est prêt à être utilisé.
Page 32

UTILISATION DE VOTRE
AUTO-SPIRALIZER
IMPORTANT: Examinez
tous les avertissements
des pages37à40 avant
de poursuivre.
IMPORTANT: Après
avoir spiralisé un
ingrédient, tous les restes
doivent être retirés du
bol de récupération et du
disque de coupe avant de
recommencer.
REMARQUE: Pour
savoir comment préparer
correctement votre ingrédient,
reportez-vous à la partie
«Préparation alimentaire»
dans votre guide de
démarrage rapide ou dans
votre guide d’inspiration.
MC
FRANÇAIS
REMARQUE: Ne spiralisez
jamais plusieurs ingrédients en
même temps.
1 Avant de spiraliser,
préparez votre ingrédient
en le coupant de manière
à ce que sa largeur ne soit
pas supérieure à 7,6cm
(3po). Placez l’ingrédient
préparé dans la trappe,
par l’ouverture sur le
dessus.
61 621 -877-646-528 8 ninjakitchen.com
2 Centrez l’ingrédient sur
l’axe du centre du disque
de coupe, puis poussez
pour fixer l’ingrédient sur
l’axe.
3 Placez le pilon fourni sur le
dessus de l’ingrédient et
appuyez fermement pour
le tenir en place.
4 Sélectionnez «GO» pour
commencer à spiraliser.
Continuer à appuyer
fermement avec le
pilon fourni pour guider
l’ingrédient dans la trappe.
5 La spiralisation est
terminée lorsque le pilon
repose à plat sur le
couvercle de la trappe.
Appuyez sur le bouton
«STOP» pour éteindre le
moteur.
Page 33

UTILISATION DE VOTRE
AUTO-SPIRALIZERMC (SUITE)
IMPORTANT: Examinez
tous les avertissements
des pages37à40 avant
de poursuivre.
FRANÇAIS
6 Pour retirer le bol du
spiraliseur du bloc moteur,
tournez le bol dans le sens
antihoraire, puis soulevez-le.
63 641- 877-646-52 88 ninjakitchen.com
7 Retirez le couvercle de la
trappe en appuyant sur le
bouton de dégagement
du côté gauche de la
languette avant, en
tournant le couvercle dans
le sens antihoraire et en le
soulevant.
8 Retirez le bol de
récupération en le
soulevant et en le sortant
du bol du spiraliseur.
Retirez le disque de
coupe en le tenant par les
poignées qui se trouvent
de chaque côté et en le
soulevant.
9 Retirez les nouilles du
bol de récupération et
préparez-les selon votre
goût.
10 Débranchez l’appareil
lorsque vous avez terminé.
Pour retirer le bloc
moteur, placez vos mains
au-dessous et tirez-le
doucement vers vous.
Consultez la page65
pour les instructions de
rangement.
Page 34

SOINS ET ENTRETIEN
GUIDE DE DÉPANNAGE
NETTOYAGE
1 Séparez toutes les pièces.
2 Lavez tous les contenants dans l’eau
chaude savonneuse avec un chiffon doux.
3 Nettoyage à la main
Lavez les jeux de lames et les disques de
coupe dans de l’eau chaude savonneuse
à l’aide d’une brosse à vaisselle avec
poignée ou de la brosse de nettoyage
fournie afin d’éviter le contact direct avec
les lames. Manipulez les jeux de lames
avec précaution, car les lames sont
tranchantes. Rincez à fond toutes les
pièces et laissez-les sécher à l’air.
Lave-vaisselle
Tous les accessoires vont au lave-vaisselle.
Nous vous recommandons de placer les
couvercles, les contenants, les disques de
coupe et les jeux de lames dans le panier
supérieur du lave-vaisselle SEULEMENT.
Veillez à retirer les jeux de lames des
contenants avant de les placer dans le
lave-vaisselle. Soyez prudent lorsque vous
manipulez des jeux de lames.
Bloc moteur
Arrêtez l’appareil et débranchez le bloc
moteur avant le nettoyage. Essuyer le bloc
moteur avec un chiffon propre et humide.
Nettoyez l’écran tactile avec un chiffon
doux, comme de la microfibre, afin de
prévenir les égratignures. Pour éliminer les
résidus déposés sur l’écran tactile, vous
pouvez utiliser un nettoyant tout usage.
NE PULVÉRISEZ JAMAIS de l’eau de
tout autre liquide sur le bloc moteur ou
l’écran tactile.
N’UTILISEZ PAS de chiffons/tampons/
brosses d’abrasifs pour nettoyer le bloc
moteur ou l’écran tactile, étant donné qu’ils
peuvent abîmer ou égratigner la surface.
RANGEMENT
Enroulez le cordon autour du rembobineur à
l’arrière du bloc moteur. Rangez l’appareil en
position verticale et rangez tous les jeux de
lames à l’intérieur ou fixez-les à leurs contenants
respectifs avec leurs couvercles verrouillés en
place.
NE RANGEZ PAS les ingrédients avant ou après
le mélange dans le gobelet mince de mélange
haute vitesse avec le jeu de lames Pro Extractor
MD
Blades
fixé.
N’EMPILEZ PAS d’articles sur les contenants.
Rangez tous les accessoires restants aux côtés
l’appareil
de
ou dans une armoire où ils ne seront
pas endommagés et ne poseront pas de danger.
RÉINITIALISATION DU THERMOSTAT DU
MOTEUR
Cet appareil est doté d’un système de sécurité
unique protégeant le moteur et le système
d’entraînement en cas de surcharge par
inadvertance. En cas de surcharge de l’appareil,
le moteur s’arrêtera temporairement. Dans ce
cas, suivez la procédure de réinitialisation cidessous.
1 Débranchez l’appareil de la prise électrique.
2 Laissez l’appareil refroidir pendant environ
15minutes.
Retirez le couvercle du contenant et le jeu de
3
lames. Videz le contenant et assurez-vous
qu’aucun aliment ne coince le jeu de lames.
IMPORTANT: Assurez-vous que les
capacités maximales ne sont pas dépassées.
C’est la cause la plus fréquente de surcharge
de l’appareil.
Si l’appareil a besoin d’être réparé, veuillez
communiquer avec le service à la clientèle en
composant le 1877646-5288.
COMMANDE DE PIÈCES DE RECHANGE
Pour commander des pièces et des
accessoires supplémentaires, veuillez visiter le
ninjaccessories.com ou communiquer avec le
service à la clientèle au 1877646-5288.
AVERTISSEMENT: Pour réduire les risques d’électrocution et de mise en
marche involontaire, éteignez et débranchez l’appareil avant tout dépannage�
L’appareil ne se met pas en marche�
• Assurez-vous qu’il est bien branché.
• L’affichage indique «- --» une fois connecté à l’alimentation électrique.
• Placez le contenant sur le bloc moteur et tournez-le dans le sens horaire jusqu’à ce que vous entendiez un
déclic vous indiquant qu’il est bien en place. Press the Power symbol to turn unit on, et les programmes
disponibles s’allumeront pour indiquer que l’appareil est prêt à l’emploi.
L’appareil ne s’éteint pas�
• Retirez le contenant du bloc moteur en le tournant dans le sens antihoraire et en le soulevant. L’écran devrait
s’éteindre. Débranchez le cordon d’alimentation de la prise.
Le couvercle/jeu de lames Pro Extractor Blades
• Déposez le gobelet sur une surface plane. Déposez délicatement le couvercle ou le jeu de lames Pro Extractor
Blades sur la partie supérieure du gobelet et alignez les filatures de sorte que le couvercle et le jeu de lames
Pro Extractor Blades reposent à plat sur le gobelet. Tournez-le dans le sens horaire jusqu’à ce que le couvercle
soit bien scellé.
La nourriture n’est pas hachée uniformément�
• Pour un meilleur hachage, coupez des morceaux de la même taille et ne surchargez pas le bol du Precision
Processor
Les ingrédients ne se mélangent pas bien; les ingrédients restent coincés�
• L’utilisation des programmes préréglés est la meilleure façon d’obtenir d’excellents résultats. Les impulsions
et les pauses permettent aux ingrédients de se déposer sur le jeu de lames. Si les ingrédients se coincent
régulièrement, l’ajout d’un peu de liquide aidera généralement.
• Lors du remplissage du gobelet, commencez avec des fruits ou des légumes frais, puis ajoutez des légumes
verts ou feuillus. Ensuite, ajoutez des liquides ou des yaourts, puis des graines, des poudres ou des beurres de
noix. Enfin, ajoutez de la glace ou des ingrédients congelés.
Le bloc moteur ne colle pas au comptoir ou à la table�
• Assurez-vous que la surface et les ventouses sont propres. Les ventouses n’adhèrent qu’aux surfaces lisses.
• Les ventouses
polies.
MC
.
N’ADHÈRENT PAS sur certaines surfaces telles que le bois, les tuiles et les finitions non
MD
est dicile à installer sur le gobelet�
• NE TENTEZ PAS d’utiliser l’appareil lorsque le bloc moteur est fixé à une surface non sécuritaire (planche à
découper, plateau, plaques, etc.).
L’appareil est dicile à retirer du comptoir pour le rangement�
• Placez vos mains sous les deuxcôtés du bloc moteur et tirez doucement l’appareil vers vous et vers le haut.
Un message «- --» clignotant s’achera�
• Smart Vessel Recognition peut déterminer quel contenant est sur le bloc moteur. Vous essayez peut-être
d’utiliser un programme qui n’a pas été conçu pour le contenant que vous avez installé. Les programmes
s’allument pour indiquer ceux qui sont offerts pour chaque contenant.
Les glaçons ne se transforment pas en neige�
• N’utilisez pas la glace qui a été laissée à la température de la pièce pendant un certain temps ou qui a
commencé à fondre. Utilisez de la glace provenant directement du congélateur.
• Commencez par quelques impulsions, puis passez à un cycle de mélange continu.
Vous obtenez des nouilles semi-circulaires ou râpées�
• Si le bol de récupération est trop rempli ayant pour conséquence de soulever le disque de coupe après avoir
coupé un ingrédient en spirales, il se peut que ce dernier ait été trop gros. Assurez-vous de préparer et de
couper les ingrédients adéquatement avant de les spiraliser selon les instructions de la section «Préparation
alimentaire» de votre guide de démarrage rapide ou du guide d’inspiration.
• Pour obtenir des résultats plus uniformes, assurez-vous de centrer l’ingrédient sur l’axe situé au centre du
disque de coupe. (Consultez la page61, étape2).
L’ingrédient n’est pas entièrement transformé et tourne sous le pilon�
• Retirez l’ingrédient restant de l’axe du disque de coupe et coupez les extrémités pour qu’elles soient plates.
Assurez-vous de centrer l’ingrédient sur l’axe du disque de coupe et placez le pilon fourni sur le dessus de
l’ingrédient. Tout en maintenant la pression sur le pilon, appuyez sur le bouton «GO» pour commencer à
spiraliser.
FRANÇAIS
65 661-87 7- 6 46 -5288 ninjakitchen.com
Page 35

REMARQUES
GARANTIE LIMITÉE
D’UN (1) AN
FRANÇAIS
La garantie limitée d’un an s’applique aux achats effectués auprès de détaillants autorisés de SharkNinja Operating
LLC. La garantie s’applique uniquement au premier propriétaire et au produit original et n’est pas transférable.
SharkNinja garantit ce produit contre toute défectuosité de matériau ou de main-d’œuvre pour une période de
1an à compter de la date d’achat, dans le cadre d’un usage domestique normal et si le produit est entretenu
conformément aux exigences décrites dans ce guide d’utilisation, sujet aux conditions, aux exclusions et aux
exceptions ci-dessous.
Que couvre ma garantie?
1. L’appareil d’origine ou les composants inusables considérés comme défectueux, à la seule discrétion de
SharkNinja, seront réparés ou remplacés pour 1an à compter de la date d’achat initiale.
2. Dans les rares cas où un appareil est remplacé, la garantie prendra fin sixmois après la date de réception
de l’appareil de remplacement ou le reste de la période de garantie existante, selon la période la plus
longue. Si l’appareil est remplacé, SharkNinja se réserve le droit de le remplacer par un appareil de valeur
égale ou supérieure.
Qu’est-ce qui n’est pas couvert par ma garantie?
Nos spécialistes de produits et du Service à la clientèle sont à votre disposition pour vous fournir toutes les options
du service de la garantie offertes, y compris la possibilité de l’améliorer et de choisir nos options de garantie de
service VIP disponibles pour certaines catégories de produits.
1. L’usure normale des pièces d’usure (y compris tous les contenants de mélange, les couvercles, les lames
et la base du mélangeur) qui nécessitent un entretien ou un remplacement périodique afin d’assurer le bon
fonctionnement de votre appareil n’est pas couverte par cette garantie.
2. La garantie ne s’applique pas aux appareils utilisés de façon abusive ou à des fins commerciales.
3. SharkNinja assumera les frais de retour de l’appareil à nos centres par le consommateur en vue de la
réparation ou du remplacement de l’appareil. Un montant de19,95USD pour les frais de retour de l’appareil
sera facturé au moment de l’expédition de l’appareil réparé ou remplacé.
4. Dommages causés par une mauvaise utilisation, des abus, de la négligence lors de la manipulation ou
dommages causés par une mauvaise manipulation pendant le transport.
5. Dommages indirects et accessoires.
6. Défectuosités causées par ou découlant de dommages lors de l’expédition ou des réparations, d’un
entretien ou d’une modification du produit ou de toute pièce de celui-ci, effectués par un réparateur non
autorisé par SharkNinja.
7. Produits achetés ou utilisés à l’extérieur de l’Amérique du Nord.
Problèmes avec l’appareil et réparations sous garantie:
Si votre appareil ne fonctionne pas comme il le devrait lors d’un usage domestique normal pendant la période de
garantie, visitez le ninjakitchen.com pour obtenir de l’information sur les soins et l’entretien du produit que vous
pouvez effectuer vous-même. Pour obtenir de l’assistance avec les options du service de la garantie ou avec le
produit, veuillez appeler notre Service à la clientèle et nos spécialistes de produits au 1877646-5288.
Comment présenter une demande de service sous garantie:
Vous pouvez composer le 1877646-5288 pour demander l’aide d’un spécialiste du Service à la clientèle. Veuillez
noter que vous devez composer le 1877646-5288 pour présenter une demande de service sous garantie. Les
directives d’emballage et de retour de l’appareil vous seront fournies à ce moment-là.
Pour connaître les heures d’ouverture du Service à la clientèle, visitez le ninjakitchen.com
Vous pouvez faire l’achat de pièces de rechange en visitant le ninjaaccessories.com. Pour obtenir plus de
renseignements sur ce qui est qualifié de pièces d’usure et de pièces inusables, veuillez visiter le ninjakitchen.com/
warranty.
Cette garantie vous confère des droits juridiques particuliers selon la loi; vous pouvez aussi bénéficier d’autres droits
qui varient d’une province ou d’un État à l’autre.
Certains États américains ou certaines provinces canadiennes n’acceptent pas l’exclusion ou la limitation de
dommages accessoires ou indirects; ce qui fait que cette disposition ne s’appliquerait peut-être pas.
67 681 -877-646-528 8 ninjakitchen.com
Page 36

GRACIAS
por comprar el sistema Ninja® Intelli-Sense™
ÍNDICE
ESPAÑOL
CONSEJO: Encontrará
el número de modelo y
de serie en la etiqueta
del código QR, ubicada
cerca de la etiqueta de
especificaciones.
REGISTRE SU COMPRA
registeryourninja.com
1-877-646-5288
Escanee el código QR con un dispositivo móvil
REGISTRE ESTA INFORMACIÓN
Número de modelo: ����������������������������������
Número de serie: ������������������������������������
Fecha de compra (conserve el recibo): ������������������
Tienda de compra: �����������������������������������
ESPECIFICACIONES TÉCNICAS
Voltaje: 120 V, 60 Hz
Vatios: 1200 W
Instrucciones importantes de seguridad �����������������3
Nociones básicas sobre su sistema Ninja® Intelli-Sense™ ���7
Antes del primer uso ����������������������������������9
Funciones ��������������������������������������������10
Jarra licuadora Total Crushing® ���������������������������� 10
Vaso licuador de alta velocidad ���������������������������� 11
Bol Precision Processor™� � � � � � � � � � � � � � � � � � � � � � � � � � � � � � � � � � 12
Cómo usar la jarra licuadora Total Crushing ��������������13
Cómo usar el vaso licuador de alta velocidad �������������17
Cómo usar el bol Precision Processor ��������������������21
Cómo ensamblar el Auto-Spiralizer™� � � � � � � � � � � � � � � � � � � � � 25
Cómo usar el Auto-Spiralizer ���������������������������27
Cuidado y mantenimiento ������������������������������31
Limpieza ������������������������������������������������ 31
Almacenamiento �����������������������������������������31
Cómo reiniciar el termostato del motor ��������������������31
Cómo solicitar piezas de repuesto �������������������������31
Guía de solución de problemas �������������������������� 32
Garantía ���������������������������������������������� 34
LEA ESTAS INSTRUCCIONES DETENIDAMENTE Y
CONSÉRVELAS PARA REFERENCIA FUTURA�
Estas instrucciones están diseñadas para ayudarle a
entender por completo el funcionamiento de su nuevo
sistema Ninja Intelli-Sense.
Si tiene alguna pregunta, llame a la línea de Servicio al Cliente
al 1-877-646-5288.
69 701 -877-646-528 8 ninjakitchen.com
Page 37

INSTRUCCIONES IMPORTANTES DE SEGURIDAD
LEA ESTAS INSTRUCCIONES DETENIDAMENTE ANTES DEL USO • PARA USO DOMÉSTICO SOLAMENTE
ADVERTENCIA
Al utilizar aparatos eléctricos, siempre se deben seguir las precauciones de
seguridad básicas, que incluyen las siguientes:
ESPAÑOL
1 Lea todas las instrucciones antes de usar
el aparato y sus accesorios.
2 Observe y siga con cuidado todas las
advertencias e instrucciones. Esta unidad
contiene conexiones eléctricas y piezas
móviles que presentan un riesgo potencial
para el usuario.
3 Este producto se proporciona con una
unidad de cuchillas apiladas y una unidad
de cuchillas de corte. Siempre debe tener
cuidado al manipular las unidades de
cuchillas. Las unidades de cuchillas están
afiladas y NO ESTÁN aseguradas en su
sitio en los recipientes. Las unidades de
cuchillas están diseñadas para que se
puedan desmontar a fin de facilitar la
limpieza y su reemplazo, de ser necesario.
Sujete la unidad de cuchillas SOLO desde
la parte superior del eje. Si no se tiene
cuidado al manipular las unidades de
cuchillas, correrá el riesgo de cortarse.
4 SIEMPRE tenga cuidado al manipular la
unidad Pro Extractor Blades®. Las cuchillas
son filosas. Sujete la unidad Pro Extractor
Blades SOLO desde el perímetro exterior
de la base de la unidad de cuchillas. Si no
se tiene cuidado al manipular la unidad de
cuchillas, correrá el riesgo de cortarse.
5 Tome el tiempo necesario y tenga cuidado
durante el desempaque y la instalación del
aparato. Este aparato contiene cuchillas
filosas y sueltas que pueden provocar
lesiones si se manejan de forma incorrecta.
6 Haga un inventario de todo el contenido
para asegurarse de que tiene todas las
piezas necesarias para que el aparato
funcione de manera adecuada y segura.
7 Desenchufe el aparato del tomacorriente
cuando no se vaya a usar, antes de
ensamblar o desensamblar las piezas, y
antes de limpiarlo. Para desenchufarlo,
sujete el cuerpo del enchufe y sáquelo del
tomacorriente. NUNCA lo desenchufe
sujetando el cable flexible y tirando de él.
8 Antes de usarlo, lave todas las piezas que
estén en contacto con alimentos. Siga las
instrucciones de lavado que se describen
en este manual de instrucciones.
9 A fin de protegerse del peligro de
descargas eléctricas, NO sumerja el
aparato ni permita que el cable de
alimentación entre en contacto con ningún
tipo de líquido.
10 NO use este aparato en exteriores. Está
diseñado de forma exclusiva para uso
doméstico en interiores.
11 Este aparato tiene un enchufe polarizado
(una clavija es más ancha que la otra). Para
reducir el riesgo de descargas eléctricas,
este enchufe calzará en un tomacorriente
polarizado solo de una manera. Si el
enchufe no calza por completo en el
tomacorriente, invierta el enchufe. Si
aún así no encaja, comuníquese con un
electricista calificado. NO modifique el
enchufe de ninguna manera.
12 NO opere ningún aparato cuyo cable o
enchufe estén dañados ni después de
que el aparato haya tenido fallas, se haya
caído o se haya dañado de alguna manera.
Este aparato no tiene piezas que el usuario
pueda reparar. Si se daña, comuníquese
con SharkNinja para realizar la reparación.
13 Este aparato incluye información
importante sobre el enchufe. El cable de
alimentación no puede reemplazarse. Si se
daña, comuníquese con SharkNinja para
realizar la reparación a fin de evitar algún
peligro.
14 NO deben usarse cables de extensión con
este aparato.
15 NO permita que los niños pequeños
operen este aparato ni que lo usen como
un juguete. Se necesita una supervisión
estricta cuando cualquier aparato se use
cerca de los niños.
16 Este aparato NO está diseñado para
que lo usen personas (incluidos niños)
con capacidades físicas, sensoriales o
mentales disminuidas, o que carezcan
de la experiencia y el conocimiento, a
menos que la persona responsable de
su seguridad les haya proporcionado
supervisión o instrucciones relacionadas
con el uso del aparato.
17 Antes de cada uso, inspeccione las
unidades de cuchillas en busca de daños.
Si una cuchilla está doblada o se sospecha
que tiene daños, comuníquese con
SharkNinja para solicitar un repuesto.
18 NO intente afilar las cuchillas.
19 NO permita que el cable cuelgue sobre el
borde de mesas o encimeras. El cable se
puede enganchar y hacer que el aparato
caiga de la superficie de trabajo.
20 NO permita que la unidad o el cable entre
en contacto con superficies calientes, lo
que incluye estufas y otros aparatos que
se calientan.
21 SIEMPRE utilice el aparato sobre una
superficie seca y nivelada.
22 NUNCA coloque la unidad de cuchillas
sobre la base del motor sin antes
conectarla al recipiente correspondiente
(bol, jarra, vaso) con tapa.
CONTINÚA EN LA PÁGINA 73
CONSERVE ESTAS INSTRUCCIONES
71 721-877-6 46 -5288 ninjakitchen.com
Page 38

INSTRUCCIONES IMPORTANTES DE SEGURIDAD
LEA ESTAS INSTRUCCIONES DETENIDAMENTE ANTES DEL USO • PARA USO DOMÉSTICO SOLAMENTE
ESPAÑOL
ADVERTENCIA
Al utilizar aparatos eléctricos, siempre se deben seguir las precauciones de
seguridad básicas, que incluyen las siguientes:
23 Mantenga las manos, el pelo y la ropa lejos
del recipiente al momento de llenarlo y
hacer funcionar el aparato.
24 Use ÚNICAMENTE los aditamentos y
accesorios que se proporcionan con el
producto o que están recomendados por
SharkNinja. El uso de aditamentos no
recomendados o vendidos por SharkNinja
puede resultar en incendios, descargas
eléctricas o lesiones.
25 Durante el funcionamiento y el manejo del
aparato, evite el contacto con las piezas en
movimiento.
26 NO opere el aparato con un recipiente
vacío.
27 NO llene los recipientes más arriba de
las líneas de MAX FILL (nivel máximo de
llenado) o MAX LIQUID (nivel máximo de
líquido).
28 NO coloque los recipientes o accesorios
que se incluyen con el aparato en el horno
de microondas.
29 NO realice operaciones de molido con el
vaso licuador de alta velocidad y la unidad
Pro Extractor Blades
30 Antes de operar el aparato, asegúrese
de que todos los utensilios hayan sido
retirados de los recipientes. Si no retira los
utensilios de los recipientes, puede que
estos se rompan, lo que podría provocar
lesiones personales y daños materiales.
®
.
31 Al picar, mantenga las manos y los
utensilios fuera del recipiente para reducir
el riesgo de lesiones personales graves
o de daños a la licuadora/picadora
de alimentos. Se puede utilizar una
espátula, pero ÚNICAMENTE cuando la
picadora de alimentos no se encuentre
en funcionamiento. Al usar la picadora,
siempre use el accesorio proporcionado
para empujar los alimentos. NUNCA
agregue los alimentos usando las manos.
32 NUNCA opere el aparato sin que las
tapas y los tapones estén colocados en su
lugar. NO intente forzar el mecanismo de
trabado. Asegúrese de que el recipiente
y la tapa estén instalados de manera
correcta antes de operar el aparato.
33 NO exponga los recipientes y accesorios
a cambios de temperatura extremos.
Podrían sufrir daños.
34 NUNCA deje el aparato sin supervisión
cuando se encuentre en uso.
35 NO abra la tapa del pico vertedor mientras
la licuadora esté funcionando.
36 NO mezcle líquidos calientes. Hacer
esto podría producir una acumulación
de presión y una exposición a vapor que
pueden generar un riesgo de quemaduras
para el usuario.
37 Si descubre ingredientes sin mezclarse
adheridos a los lados de la jarra, detenga
el aparato, retire la tapa y use una espátula
para despegar los ingredientes. NUNCA
meta las manos en la jarra, ya que podría
tocar una de las cuchillas y cortarse.
38 NO trate de retirar el recipiente y las tapas
de la base del motor mientras la unidad de
cuchillas aún están girando. Deje que el
aparato se detenga por completo antes de
retirar las tapas y los recipientes.
39 Al completar el procesamiento, asegúrese
de retirar la unidad de cuchillas ANTES
de vaciar el contenido del recipiente.
Retire la unidad de cuchillas sujetándola
con cuidado de la parte superior del eje y
levantándola del recipiente. Si no se retira
la unidad de cuchillas antes de vaciar el
recipiente, correrá el riesgo de cortarse.
40 Retire las unidad Pro Extractor Blades
vaso licuador de alta velocidad al terminar
de licuar. NO guarde ingredientes en el
vaso antes o después de licuarlos con las
cuchillas instaladas. Algunos alimentos
pueden contener ingredientes activos
o liberar gases que se expandirán si se
dejan en un recipiente hermético, lo que
producirá una acumulación excesiva de
presión que puede representar un riesgo
de lesiones. Para guardar alimentos en
el vaso, use solo la tapa con pico para
cubrirlos.
41 Si el aparato se sobrecalienta, se activará
un interruptor térmico y se desactivará el
motor de manera temporal. Para reiniciarlo,
desenchufe el aparato y déjelo enfriar
durante, aproximadamente, 15minutos
antes de volver a utilizarlo.
42 La potencia nominal máxima en vatios de
este aparato se basa en la configuración
de la unidad de cuchillas Pro Extractor
®
Blades
velocidad. Otras configuraciones pueden
consumir menos potencia o corriente.
y el vaso licuador de alta
®
del
43 NO procese ingredientes secos sin añadir
líquido al vaso en el vaso licuador de
alta velocidad. El vaso licuador de alta
velocidad no está diseñado para licuar en
seco.
44 Los discos de las cuchillas son filosos.
Siempre use las asas que se encuentran
a los lados de cada disco de la cuchilla
al colocar o retirar los discos. Siga las
instrucciones de limpieza. De lo contrario,
podría cortarse.
45 Cuando use el Spiralizer, SIEMPRE use
el accesorio para empujar los alimentos.
NUNCA coloque los ingredientes en el
Spiralizer utilizando las manos u otros
utensilios. No utilizar el accesorio para
empujar los alimentos puede causar
lesiones personales.
46 Si los discos de las cuchillas parecen estar
dañados o rotos, no los utilice ni intente
repararlos. Para obtener asistencia llame al
Servicio al Cliente.
47 NO intente afilar los discos de las cuchillas.
48 NO retire la tapa del conducto de
alimentos hasta que el disco de la cuchilla
deje de girar.
49 NO sumerja la base del motor o la pantalla
táctil en agua ni ningún otro líquido.
NO pulverice la base del motor o la
pantalla táctil con algún líquido. Apague y
desenchufe la licuadora antes de realizar la
limpieza.
CONSERVE ESTAS INSTRUCCIONES
73 741-87 7-6 46 -5288 ninjakitchen.com
Page 39

NOCIONES BÁSICAS SOBRE SU SISTEMA NINJA®
INTELLI-SENSE™
¡BIENVENIDO!
Felicitaciones por su
compra. Use este manual
de instrucciones para
conocer las excelentes
características de su
sistema Ninja Intelli-
Sense. Desde el
ensamblaje hasta el
uso y el mantenimiento,
encontrará todo aquí.
ESPAÑOL
H L P
A
I
J
Hay una variedad de
accesorios compatibles con
esta serie de licuadoras.
NOTA:
La pestaña
superior de la caja
muestra los accesorios
selectos que se incluyen
con su modelo�
Si tiene alguna pregunta,
inquietud o comentario,
nos encantaría conocerlos.
Llámenos al 1-877-646-5288
o visite ninjakitchen.com
Para encontrar recetas y adquirir
más accesorios (incluyendo más
discos de cuchillas para crear
distintos tipos de fideos) visite
ninjaaccessories.com
*Capacidad líquida máxima de
1,9 l (64 oz).
**830 ml (3,5 tazas) de
capacidad máxima/
Capacidad líquida máxima de
440 ml (15 oz).
UNIDAD PRINCIPAL
A Tapa del vaso
B Jarra licuadora Total Crushing® de 2,1 l (72 oz)*
C Cuchillas apiladas
D Base de motor con Smart Vessel Recognition
E Vaso licuador de alta velocidad de 710 ml (24 oz)
F Tapa con pico
G Unidad de cuchillas Pro Extractor Blades
H Tapa de bol Precision Processor™
I Unidad de cuchillas para masa
J Unidad de cuchillas de corte
K Bol Precision Processor**
L Accesorio para empujar los alimentos Spiralizer
M Tapa del conducto de alimentos
N Bol colector
O Bol Spiralizer
P Disco de cuchilla para espagueti
Q Disco de cuchilla para fetuchini
R Cepillo de limpieza
®
B
C K
D
E F
G
M
Q
N
R
O
75 761-87 7-6 46 -5288 ninjakitchen.com
Page 40

ANTES DEL PRIMER USO
FUNCIONES
IMPORTANTE: Revise
todas las advertencias de
las páginas 71 a 74 antes
de continuar.
¿SABÍA QUE���?
• Puede llevar sus bebidas
en el camino si usa las
tapas con pico.
• Los recipientes, las
cuchillas, los discos de
las cuchillas y las tapas
no contienen bisfenol A
(BPA).
• Los recipientes, las
cuchillas y las tapas son
aptos para lavaplatos.
1 Retire todos los materiales de empaque del aparato. Tenga
cuidado al desempacar las unidades de cuchillas y los
discos de las cuchillas. Todas las cuchillas y los discos de
las cuchillas son filosos.
2 La unidad de cuchillas de corte y la unidad de cuchillas
apiladas NO están aseguradas en su sitio dentro de los
recipientes. Sujete la unidad de cuchillas de corte y la
unidad de cuchillas apiladas por la parte superior del eje.
3 Para manipular la unidad Pro Extractor Blades® sujétela
por el perímetro exterior de la base de la unidad de
cuchillas.
4 Lave los recipientes, las tapas, los discos de las cuchillas
y las unidades de cuchillas en agua tibia con jabón con
un utensilio para lavar platos con asa o con el cepillo de
limpieza que se proporciona a fin de evitar el contacto
directo con las cuchillas. Tenga cuidado cuando manipule
las unidades de cuchillas, ya que son filosas.
5 Enjuague por completo y seque todas las piezas al aire.
6 Todos los aditamentos son aptos para lavaplatos. Se
recomienda colocar las tapas, los discos de las cuchillas
y las cuchillas en la bandeja superior del lavaplatos.
Asegúrese de retirar la unidad de cuchillas y los discos de
las cuchillas de los recipientes antes de colocarlos en el
lavaplatos. Tenga cuidado al manipular las unidades de
cuchillas o los discos de las cuchillas.
7 Limpie la pantalla táctil con un paño suave. Deje que se
seque por completo antes de volver a utilizarla.
PROGRAMAS PRECONFIGURADOS PARA LA JARRA LICUADORA TOTAL
CRUSHING®
Programas inteligentes que combinan patrones únicos de licuado y pausa que hacen todo
el trabajo por usted. Una vez que se seleccione el programa preconfigurado, este iniciará de
inmediato. Presione STOP (DETENER) para terminarlo.
Press and hold the power symbol to turn the unit on.
SMOOTHIE (BATIDO)
Prepare bebidas y batidos súper suaves
y bebibles a partir de fruta fresca o
congelada, leche y hielo
.
FROZEN DRINK (BEBIDAS HELADAS)
Convierta hielo, jugos y fruta en bebidas
heladas mezcladas a la perfección de
forma sencilla.
ESPAÑOL
ICE CREAM (HELADO)
Cree deliciosos y excelentes postres
congelados como helados o sorbetes.
LOW, HIGH y PULSE (BAJA, ALTA y PULSO)
Cuando se seleccionan, cada uno de estos programas funcionan de forma continua
hasta que se apagan. Los mismos no trabaja de forma conjunta con los programas
preconfigurados.
77 781-877-6 46 -5288 ninjakitchen.com
SNOW CONE (CONO DE RASPADO)
Pulverice hielo para obtener creaciones
congeladas como conos de raspado,
granizados o granitas.
Page 41

CARACTERÍSTICAS - CONT�
ESPAÑOL
PROGRAMAS PRECONFIGURADOS PARA EL VASO LICUADOR DE ALTA
VELOCIDAD
Programas inteligentes que combinan patrones únicos de licuado y pausa que hacen todo
el trabajo por usted. Una vez que se seleccione el programa preconfigurado, este iniciará de
inmediato. Presione STOP (DETENER) para terminarlo.
Press and hold the power symbol to turn the unit on.
SMOOTHIE (BATIDO)
Prepare bebidas y batidos súper suaves
y bebibles a partir de fruta fresca o
congelada, leche y hielo
REFRESHER (REFRESCO)
Agregue sabores de verduras, frutas y
hierbas naturales al agua que bebe.
LOW, HIGH y PULSE (BAJA, ALTA y PULSO)
Cuando se seleccionan, cada uno de estos programas funcionan de forma continua
hasta que se apagan. Los mismos no trabaja de forma conjunta con los programas
preconfigurados.
.
EXTRACT (EXTRATO)
Ideal para frutas y verduras enteras duras,
de hoja o fibrosas, incluidas la cáscara, las
semillas y el tallo.
DRESSING (MARINADAS)
Cree marinadas, aderezos y salsas
frescas.
PROGRAMAS PRECONFIGURADOS PARA EL BOL PRECISION PROCESSOR™
Programas inteligentes que combinan patrones únicos de licuado y pausa que hacen todo
el trabajo por usted. Una vez que se seleccione el programa preconfigurado, este iniciará de
inmediato. Presione STOP (DETENER) para terminarlo.
Press and hold the power symbol to turn the unit on.
PUREE (PURÉS)
Cree de todo, desde salsas suaves y
deliciosas hasta un humus perfecto.
DOUGH (MASA)
Ideal para crear masas deliciosas para
pizzas, pan y alimentos horneados como
galletas.
LOW, HIGH y PULSE (BAJA, ALTA y PULSO)
Cuando se seleccionan, cada uno de estos programas funcionan de forma continua
hasta que se apagan. Los mismos no trabaja de forma conjunta con los programas
preconfigurados.
CHOP (CORTAR)
Los pulsos y pausas medidos le
producirán resultados consistentes de
corte.
DIPS (SALSAS PARA UNTAR)
Use la unidad para crear salsas y
guarniciones con más textura como salsas
para untar de espinacas y alcachofas o
puré de papa.
79 801- 877-646-52 88 ninjakitchen.com
Page 42

CÓMO USAR LA JARRA LICUADORA
TOTAL CRUSHING®
IMPORTANTE: Revise
todas las advertencias de
las páginas 71 a 74 antes
de continuar.
CONSEJO: Si la unidad
de cuchillas apiladas no
está totalmente asentada,
no podrá instalar y
asegurar la tapa en su
lugar.
CONSEJO: Para conocer
más acerca de los
programas de la unidad,
consulte la página 78.
NOTA: Los programas
preconfigurados tienen pausas
y cambios de velocidad a lo
largo del ciclo.
ESPAÑOL
NOTA: NO agregue
ingredientes antes de
completar la instalación de la
unidad de cuchillas apiladas.
NOTA: La jarra solo puede
instalarse con una orientación.
Para operar el aparato, el asa
debe colocarse en el vértice
frontal derecho de la base del
motor.
81 821-877-646-5288 ninjakitchen.com
1
Coloque la base del motor
desenchufada en una
superficie nivelada, limpia y
seca, como una encimera
o una mesa. Presione la
base del motor hacia abajo
para adherir las ventosas
a la superficie de trabajo.
Asegúrese de que la base
del motor esté conectada
a la electricidad.
2
Baje la jarra licuadora Total
Crushing hasta la base
del motor. El asa debe
alinearse levemente a la
derecha y la jarra debe
orientarse de modo que los
símbolos LOCK (TRABA)
queden visibles en la base
del motor. Después, rote
la jarra en el sentido de las
manecillas del reloj hasta
que quede trabada en su
lugar con un clic.
3 Sujete con cuidado
la unidad de cuchillas
apiladas por la parte
superior del eje y
colóquela en el engranaje
de accionamiento dentro
de la jarra. Tenga en
cuenta que la unidad
de cuchillas calzará
de manera holgada
en el engranaje de
accionamiento.
4 Agregue los ingredientes,
asegúrese de que no
superen la línea de Max Fill
(nivel máximo de llenado)
en el lado de la jarra.
5 Coloque la tapa en la jarra
alineando el símbolo de
triángulo ubicado sobre
la tapa con el símbolo de
triángulo ubicado sobre el
asa de la jarra. Presione
el asa hacia abajo hasta
que haga clic en su
lugar. Los símbolos de
triángulo DEBEN quedar
alineados para que la
tapa se asegure en su
lugar y la unidad funcione.
Cuando la unidad está
conectada a la electricidad
y el recipiente está
correctamente asegurado
en la base del motor, los
botones de programas
disponibles se iluminarán y
la unidad estará lista para
usarse.
Page 43

CÓMO USAR LA JARRA LICUADORA
TOTAL CRUSHING® - CONT�
IMPORTANTE: Revise
todas las advertencias de
las páginas 71 a 74 antes
de continuar.
IMPORTANTE: Como
función de seguridad,
si la jarra y la tapa no
se instalaron de forma
adecuada, el temporizador
mostrará “- --” y el motor
se desactivará. Si sucede
esto, repita el paso 5 de la
página 82. Cuando la jarra
y la tapa estén instaladas
en forma adecuada, los
botones del programa
se iluminarán de forma
continua, lo que indica que
el aparato está listo para
utilizarse.
ESPAÑOL
NOTA: Smart Vessel
Recognition puede detectar
qué recipiente se encuentra
sobre la base del motor.
En la pantalla táctil, solo
se iluminarán las funciones
disponibles para un recipiente
en particular.
83 841-87 7-6 46 -5288 ninjakitchen.com
6 Si utiliza un programa
preconfigurado, primero
debe seleccionar el
programa que mejor se
adapte a su receta. La
función preconfigurada
detendrá la unidad de
manera automática al
finalizar el programa.
Para pausar el aparato
en cualquier momento,
presione por segunda vez
el botón que actualmente
está activo. Consulte la
página 78 para ver las
descripciones de los
programas.
7 Si no utiliza un programa
preconfigurado y los
ingredientes alcanzaron
la consistencia que
usted desea, detenga el
aparato liberando el botón
de velocidad manual y
espere a que el aparato se
detenga por completo.
8 Para retirar la jarra de la
base del motor, gire la jarra
en sentido contrario al de
las manecillas del reloj y
levántela.
9 Para servir mezclas más
líquidas, asegúrese de que
la tapa esté trabada en su
lugar y después levante la
tapa del pico vertedor.
10 Para las mezclas más
espesas que no pueden
vaciarse por el pico
vertedor, retire la tapa
y la unidad de cuchillas
apiladas antes de verter el
contenido de la jarra. Para
retirar la tapa, presione
el botón RELEASE
(LIBERACIÓN) y levante
el asa. Para quitar las
cuchillas, sujete con
cuidado la parte superior
del eje. Luego, puede
vaciarse la jarra.
11 Desenchufe la unidad
cuando termine. Para
liberar la base del motor,
ubique las manos debajo
de ambos lados de la
base del motor y tire
suavemente de la unidad
hacia arriba y hacia usted.
Consulte la página 99 para
ver las instrucciones de
almacenamiento.
Page 44

CÓMO USAR EL VASO LICUADOR
DE ALTA VELOCIDAD
IMPORTANTE: Revise
todas las advertencias de
las páginas 71 a 74 antes
de continuar.
CONSEJO: Para conocer
más acerca de los
programas de la unidad,
consulte la página 79.
NOTA: Los programas
preconfigurados tienen pausas
y cambios de velocidad a lo
largo del ciclo.
ESPAÑOL
1 Coloque la base del motor
desenchufada en una
superficie nivelada, limpia y
seca, como una encimera
o una mesa. Presione la
base del motor hacia abajo
para adherir las ventosas
a la superficie de trabajo.
Enchufe la base del motor
en el tomacorriente.
85 861 -877-646-5288 ninjakitchen.com
2 Agregue ingredientes en
el vaso licuador de alta
velocidad. NO agregue
ingredientes más arriba
de la línea de MAX LIQUID
(nivel máximo de líquido)
del vaso.
3 Instale la unidad Pro Extractor Blades® en
la parte superior del vaso. Gire la tapa en el
sentido de las manecillas del reloj hasta que
esté cerrada de manera ajustada.
4 Invierta el vaso licuador de alta velocidad
e instálelo en la base del motor. Alinee
las lengüetas del vaso con las ranuras
de la base; luego, gírelo hasta que haga
clic en su lugar. Cuando la unidad está
conectada a la electricidad y el recipiente
está correctamente asegurado en la base
del motor, los botones de programas
disponibles se iluminarán y la unidad
estará lista para usarse.
Page 45

CÓMO USAR EL VASO LICUADOR
DE ALTA VELOCIDAD - CONT�
IMPORTANTE: Revise
todas las advertencias de
las páginas 71 a 74 antes
de continuar.
NOTA: Smart Vessel
Recognition puede detectar
qué recipiente se encuentra
sobre la base del motor.
En la pantalla táctil, solo
se iluminarán las funciones
disponibles para un
recipiente en particular.
ESPAÑOL
5 Si utiliza un programa
preconfigurado, primero
debe seleccionar el
programa que mejor se
adapte a su receta. La
función preconfigurada
detendrá la unidad de
manera automática al
finalizar el programa.
Para pausar el aparato
en cualquier momento,
presione por segunda
vez el programa que
actualmente está activo.
Consulte la página 79 para
ver las descripciones de
los programas.
87 881- 877-646-5288 ninjakitchen.com
6 Para retirar el vaso de la
base del motor, gire el vaso
en sentido contrario al de
las manecillas del reloj y,
luego, levántelo.
7 Gire la tapa de la unidad
Pro Extractor Blades® en
sentido contrario al de las
manecillas del reloj para
retirar la unidad. No guarde
ningún contenido licuado
con la unidad Pro Extractor
Blades puesta. Tenga
cuidado cuando manipule
las unidades de cuchillas,
pues estas son filosas.
8 Desenchufe la unidad
cuando termine. Para
liberar la base del motor,
ubique las manos debajo
de ambos lados de la
base del motor y tire
suavemente de la unidad
hacia arriba y hacia usted.
Consulte la página 99 para
ver las instrucciones de
almacenamiento.
9 Para disfrutar su bebida
en el camino, coloque la
tapa con pico en el vaso
licuador de alta velocidad
y gírela en el sentido de las
manecillas del reloj hasta
sellarla de forma ajustada.
Para guardar alimentos en
el vaso, use solo la tapa
con pico para cubrirlos.
Page 46

CÓMO USAR EL BOL
PRECISION PROCESSOR™
IMPORTANTE: Revise
todas las advertencias de
las páginas 71 a 74 antes
de continuar.
CONSEJO: Si la unidad
de cuchillas no está
totalmente asentada, no
podrá instalar y asegurar
la tapa en su sitio.
CONSEJO: Para conocer
más acerca de los
programas de la unidad,
consulte la página 80.
NOTA: Los programas
preconfigurados tienen pausas
y cambios de velocidad a lo
largo del ciclo.
NOTA: NO agregue
ingredientes antes de instalar
la unidad de cuchillas.
1
Coloque la base del motor
desenchufada en una
superficie nivelada, limpia y
seca, como una encimera
o una mesa. Presione la
base del motor hacia abajo
para adherir las ventosas
a la superficie de trabajo.
Enchufe la base del motor
en el tomacorriente.
2 Baje el bol Precision
Processor sobre la base
del motor.
3
Rote el bol Precision
Processor™ en el sentido
de las manecillas del reloj
hasta que quede trabado
en su lugar con un clic.
4 Sujete con cuidado
la unidad de cuchillas
picadoras, por la parte
superior del eje, y
colóquela en el engranaje
de accionamiento dentro
del bol. Tenga en cuenta
que la unidad de cuchillas
de corte se acoplará
de manera holgada
en el engranaje de
accionamiento.
ESPAÑOL
5 Agregue los ingredientes al
bol y asegúrese de que no
superen las líneas de MAX
LIQUID (nivel máximo de
líquido) y MAX FILL (nivel
máximo de llenado)
89 901-877- 64 6-52 8 8 ninjakitchen.com
Page 47

CÓMO USAR EL BOL
PRECISION PROCESSOR™ - CONT�
IMPORTANTE: Revise
todas las advertencias de
las páginas 71 a 74 antes
de continuar.
NOTA: Siga las mismas
instrucciones para instalar la
unidad de cuchillas para masa.
NOTA: Smart Vessel
Recognition puede detectar
qué recipiente se encuentra
sobre la base del motor.
En la pantalla táctil, solo
se iluminarán las funciones
disponibles para un recipiente
en particular.
ESPAÑOL
6 Coloque la tapa del bol
Precision Processor, con la
línea negra de la lengüeta
alineada ligeramente hacia
la derecha de la lengüeta
que se encuentra en la
parte frontal del bol. Gire
la tapa en sentido horario
para trabarla en su lugar.
Cuando está trabada de
forma adecuada, la línea
blanca de la tapa se alinea
con la línea negra del bol.
Cuando la unidad está
conectada a la electricidad
y el recipiente está
correctamente asegurado
en la base del motor, los
botones de programas
disponibles se iluminarán y
la unidad estará lista para
usarse.
91 921-877- 646-5288 n injakitchen.com
7 Si utiliza un programa
preconfigurado, primero
debe seleccionar el
programa que mejor se
adapte a su receta. La
función preconfigurada
detendrá el aparato de
manera automática al
finalizar el programa.
Para pausar la unidad
en cualquier momento,
presione por segunda
vez el programa que
actualmente está activo.
Consulte la página 80 para
ver las descripciones de
los programas.
8 Para retirar el bol de la
base del motor, gire el bol
en sentido contrario al de
las manecillas del reloj y,
luego, levántelo.
9 Retire la tapa presionando
el botón de liberación en
la lengüeta frontal, gírela
en sentido contrario al de
las manecillas del reloj y
levántela. Quite siempre
la unidad de cuchillas de
corte antes de vaciar los
ingredientes que haya
en el bol. Para quitar la
unidad de cuchillas de
corte, sujete con cuidado
la parte superior del eje y
sáquela del bol.
10 Desenchufe la unidad
cuando termine. Para
liberar la base del motor,
ubique las manos debajo
de ambos lados de la
base del motor y tire
suavemente de la unidad
hacia arriba y hacia usted.
Consulte la página 99 para
ver las instrucciones de
almacenamiento.
Page 48

CÓMO ENSAMBLAR EL
AUTO-SPIRALIZER™
IMPORTANTE: Revise
todas las advertencias de
las páginas 71 a 74 antes
de continuar.
IMPORTANTE: Como
función de seguridad, si
el bol Spiralizer y la tapa
del conducto de alimentos
no se instalaron de forma
adecuada, el temporizador
mostrará “- --” y el motor
se desactivará.
NOTA: Para que se ajuste
de forma adecuada, las
lengüetas a los lados del
disco de la cuchilla deben
alinearse con los espacios
que se encuentran en la parte
superior del bol colector.
ESPAÑOL
NOTA: El accesorio Spiralizer
está destinado únicamente
para procesar frutas y
verduras. No se recomienda
procesar ingredientes duros
como queso, carnes y
alimentos secos.
93 941-877-6 46 -5288 ninjakitchen.com
1
Coloque la base del motor
desenchufada en una
superficie nivelada, limpia y
seca, como una encimera
o una mesa. Presione la
base del motor hacia abajo
para adherir las ventosas
a la superficie de trabajo.
Enchufe la base del motor
en el tomacorriente.
2 Coloque el bol Spiralizer
en la base del motor.
3 Rote el bol Spiralizer en el
sentido de las manecillas
del reloj hasta que quede
trabada en su lugar con un
clic.
4 Coloque el bol colector dentro del bol
Spiralizer, alineándolo con el poste del
engranaje.
5 Elija su disco de la cuchilla, asegurándose
de manipularlo con cuidado.
6 Instale el disco de la cuchilla en la parte
superior del bol colector. El borde del disco
de la cuchilla debe asentarse al ras con
respecto a la parte superior del bol y las
lengüetas a los lados de los discos de las
cuchillas deben alinearse con las ranuras
que se encuentran en la parte superior del
bol colector.
7 Ensamble la tapa del conducto de
alimentos en la parte superior del bol
Spiralizer. Gire la tapa en sentido horario
en el bol Spiralizer, alineando las lengüetas
grises de la tapa con la parte frontal del
bol. Cuando la unidad está conectada
a la electricidad y el recipiente está
correctamente asegurado en la base del
motor, el botón GO (INICIAR) se iluminará,
lo que indica que la unidad está lista para
usarse.
Page 49

CÓMO USAR EL
AUTO-SPIRALIZER™
IMPORTANTE: Revise
todas las advertencias de
las páginas 71 a 74 antes
de continuar.
IMPORTANTE: Después
de utilizar el Spiralizer en
un ingrediente, todas las
piezas que quedan deben
retirarse del bol colector
y del disco de la cuchilla
antes de volver a utilizar el
Spiralizer.
NOTA: Para averiguar cómo
preparar los ingredientes de
manera adecuada, consulte
la sección Preparación de
los alimentos de la Guía de
inicio rápido o de la Guía de
inspiración.
ESPAÑOL
NOTA: Nunca utilice
el Spiralizer en varios
ingredientes al mismo tiempo.
1 Antes de utilizar el
Spiralizer, prepare los
ingredientes cortándolos
de forma que no tengan
más de 7,6 cm (3 in)
de ancho. Coloque el
ingrediente preparado en
el conducto por alimentos,
a través de la abertura en
la parte superior.
95 961-87 7-6 46 -5288 ninjakitchen.com
2 Centre el ingrediente en el
pasador que se encuentra
en el centro del disco
de la cuchilla, después,
presione el ingrediente
hacia abajo, asegurándolo
sobre el pasador.
3 Coloque el accesorio para
empujar los alimentos
en la parte superior del
ingrediente y presione
firmemente para
mantenerlo en su lugar.
4 Seleccione la opción
GO (INICIAR) antes de
utilizar el Spiralizer. Siga
presionando firmemente
mediante el accesorio
para empujar alimentos
para guiar al ingrediente a
través del conducto para
alimentos.
5 Se termina de utilizar
el Spiralizer cuando el
accesorio para empujar
los alimentos permanece
plano en la parte superior
de la tapa del conducto
de alimentos. Presione el
botón STOP (DETENER)
para apagar el motor.
Page 50

CÓMO USAR EL
AUTO-SPIRALIZER™ - CONT�
IMPORTANTE: Revise
todas las advertencias de
las páginas 71 a 74 antes
de continuar.
ESPAÑOL
6 Para retirar el bol Spiralizer
de la base del motor, gire
el bol en sentido contrario
al de las manecillas del
reloj y levántelo.
97 981 -877-646-528 8 ninjakitchen.com
7 Para quitar la tapa del
conducto de alimentos,
presione el botón
de liberación que se
encuentra del lado
izquierdo de la lengüeta
frontal, después, gire la
tapa en sentido contrario
al de las manecillas del
reloj y levántela.
8 Retire el bol colector
levantándolo del bol
Spiralizer. Retire el
disco de las cuchillas
agarrando las asas que se
encuentran a los lados del
disco y levántelo.
9 Retire los fideos del bol
colector y prepárelos
según su preferencia.
10 Desenchufe el aparato
cuando termine. Para
liberar la base del motor,
coloque las manos por
debajo y tire de ella
suavemente hacia usted.
Consulte la página 99 para
ver las instrucciones de
almacenamiento.
Page 51

CUIDADO Y MANTENIMIENTO
GUÍA DE SOLUCIÓN DE PROBLEMAS
LIMPIEZA
1 Separe todas las piezas.
2 Lave todos los recipientes en agua tibia
con jabón con un paño suave.
3 Lavado a mano
Lave las unidades de cuchillas y los discos
de las cuchillas en agua tibia con jabón con
un utensilio para lavar platos con asa o con
el cepillo de limpieza que se proporciona
a fin de evitar el contacto directo con las
cuchillas. Tenga cuidado al manipular las
unidades de cuchillas, ya que son filosas.
Enjuague por completo y seque todas las
piezas al aire.
Lavaplatos
Todos los aditamentos son aptos para
lavaplatos. Se recomienda colocar las
tapas, los recipientes, los discos de las
cuchillas y las unidades de cuchillas
ÚNICAMENTE en la bandeja superior
del lavaplatos. Asegúrese de retirar las
unidades de cuchillas de los recipientes
antes de colocarlos en el lavaplatos. Tenga
cuidado al manipular las unidades de
cuchillas.
Base del motor
Apague la unidad y desenchufe la base del
motor antes de realizar la limpieza. Limpie
la base del motor con un paño limpio y
húmedo.
Limpie la pantalla táctil con un paño suave,
que puede ser de microfibra, para evitar
rayarla. Para eliminar los residuos de la
pantalla táctil, puede utilizar un limpiador
multiuso.
NUNCA pulverice la base o la pantalla
táctil con agua u otros líquidos.
NO utilice paños/almohadillas/cepillos
abrasivos para limpiar la base o la pantalla
táctil, ya que esto puede mellar o rayar la
superficie.
99 1001-877-6 46 -5288 ninjakitchen.com
ALMACENAMIENTO
Enrolle el cable de alimentación alrededor
del enrollacables que se encuentra en la
parte trasera de la base del motor. Guarde la
unidad en posición vertical y guarde todas las
unidades de cuchillas en el interior o unidas
a sus respectivos recipientes con las tapas
aseguradas en su lugar.
NO guarde ingredientes licuados o no licuados
en el vaso licuador de alta velocidad con la
unidad de cuchillas Pro Extractor Blades
®
puesta.
NO apile artículos sobre los recipientes. Guarde
unidad
los aditamentos restantes junto con la
o en un gabinete donde no resulten dañados ni
representen un peligro.
CÓMO REINICIAR EL TERMOSTATO DEL
MOTOR
Esta unidad tiene un sistema de seguridad
único que evita que el motor y el sistema de
accionamiento sufran daños en caso de que
usted sobrecargue la unidad sin darse cuenta.
Si la unidad se sobrecarga, se apagará el
motor temporalmente. Si esto llegara a ocurrir,
siga este procedimiento de reinicio.
1 Desenchufe la unidad del tomacorriente.
2 Deje que la unidad se enfríe durante,
aproximadamente, 15 minutos.
Retire la tapa del recipiente y la unidad de
3
cuchillas. Vacíe el recipiente y asegúrese de
que no haya ingredientes que obstruyan la
unidad de cuchillas.
IMPORTANTE: Asegúrese de no superar
las capacidades máximas. Esta es la causa
más común de sobrecarga del aparato.
Si su unidad necesita mantenimiento,
comuníquese con Servicio al Cliente
llamando al 1-877-646-5288.
CÓMO SOLICITAR PIEZAS DE
REPUESTO
Para solicitar piezas y aditamentos adicionales,
visite ninjaccessories.com o comuníquese con
nuestro servicio al cliente al 1-877-646-5288.
ADVERTENCIA: Para reducir el riesgo de descargas y de operación accidental,
apague y desenchufe la unidad antes de resolver el problema�
La unidad no enciende�
• Asegúrese de que la unidad esté enchufada.
• La pantalla mostrará “- --” cuando esté conectada a la electricidad.
• Coloque el recipiente en la base y gírelo en sentido de las manecillas del reloj hasta que quede trabado en su
lugar y se produzca un sonido de clic. Los programas disponibles se iluminarán, lo que indica que la unidad
está lista para usarse.
La unidad no se apaga�
• Retire el recipiente de la base girándolo en sentido contrario al de las manecillas del reloj y levantándolo. La
pantalla se deberá apagar. Desenchufe el cable de alimentación del tomacorriente.
Es difícil instalar la tapa o la unidad Pro Extractor Blades®�
• Coloque el vaso sobre una superficie plana. Coloque con cuidado la tapa o la unidad Pro Extractor Blades
sobre la parte superior del vaso y alinee las roscas de manera que la tapa o la unidad Pro Extractor Blades
se asiente de forma horizontal en el vaso. Gire en sentido de las manecillas del reloj hasta lograr un sellado
ajustado.
El corte de los alimentos no es parejo�
• Para obtener los mejores resultados al cortar, corte las piezas en tamaños parejos y no llene de forma excesiva
el bol Precision Processor
No se mezcla bien; los ingredientes se atascan�
• Usar los programas preconfigurados es la manera más fácil de obtener excelentes resultados. Los pulsos y las
pausas permiten que los ingredientes se asienten hacia las cuchillas. Si los ingredientes se atascan de forma
constante, agregar algo de líquido por lo general ayudará.
• Al llenar el vaso, comience por la fruta o verduras frescas; luego, las verduras de hoja verde o hierbas.
Después, agregue los líquidos o yogurt; luego, las semillas, los polvos o las cremas de nueces. Por último,
agregue el hielo o los ingredientes congelados.
La base del motor no se adhiere a la superficie de la encimera o de la mesa�
• Asegúrese de que la superficie y las ventosas estén limpias. Las ventosas solo se adherirán a superficies lisas.
• Las ventosas
NO se adherirán a ciertas superficies, como madera, baldosas y acabados no pulidos.
™
.
• NO intente usar la unidad cuando la base del motor esté adherida a una superficie que no esté asegurada
(tablas de cortar, fuentes, platos, etc.).
Es difícil quitar la unidad de la mesada para guardarla�
• Ubique las manos debajo de ambos lados de la base del motor y tire suavemente de la unidad hacia arriba y
hacia usted.
Recibe un mensaje parpadeante de “- --”
• Smart Vessel Recognition puede detectar qué recipiente se encuentra sobre la base del motor. Es posible que
esté intentando utilizar un programa que no está diseñado para el recipiente que ha instalado. Las luces de los
programas se encenderán e indicarán qué programas hay disponibles para cada recipiente.
No pueden hacerse raspados a partir de hielo sólido�
• No utilice hielo que haya estado fuera del congelador o que haya comenzado a derretirse. Utilice hielo recién
sacado del congelador.
• Comience con algunos pulsos y, luego, continúe con un ciclo de licuado continuo.
Obtiene fideos en tiras o semicirculares�
• Si el bol colector se llena demasiado, provocando que el disco de la cuchilla se levante después de utilizar
el Spiralizer, es posible que haya demasiada cantidad del ingrediente. Asegúrese de cortar y preparar
los ingredientes de manera adecuada antes de utilizar el Spiralizer y siga las instrucciones en la sección
Preparación de los alimentos de la Guía de inicio rápido o de la Guía de inspiración.
• Para obtener resultados más consistentes, asegúrese de centrar el ingrediente sobre el pasador ubicado en el
centro del disco de la cuchilla. (Consulte la página 95, paso 2).
El ingrediente no se procesó totalmente y está girando por debajo del accesorio para empujar�
• Retire el ingrediente restante del pasador del disco de la cuchilla corta la parte superior e inferior de forma
que ambas partes se encuentren planas. Asegúrese de centrar el ingrediente sobre el pasador del disco de
la cuchilla y sujete firmemente el accesorio para empujar los alimentos sobre el ingrediente. Mientras hace
presión sobre el accesorio para empujar los alimentos, presione el botón GO (INICIAR) para que se active el
Spiralizer.
ESPAÑOL
Page 52

NOTAS
UN (1) AÑO DE
GARANTÍA LIMITADA
ESPAÑOL
La garantía limitada de 1 año se aplica a las compras realizadas a los vendedores minoristas autorizados de
SharkNinja Operating LLC. La cobertura de garantía se aplica solo al propietario original y al producto original, y no
puede transferirse.
SharkNinja garantiza que la unidad estará libre de defectos de materiales y de mano de obra durante un período
de 1año desde la fecha de compra, siempre y cuando se use en condiciones domésticas normales y se efectúe
su mantenimiento de acuerdo con los requisitos descritos en este manual de instrucciones, sujeto a las siguientes
condiciones y exclusiones.
¿Qué cubre mi garantía?
1. La unidad original y/o los componentes que no se gastan que se consideren defectuosos, a criterio exclusivo
de SharkNinja, serán reparados o reemplazados durante un período máximo de 1 año a partir de la fecha de
compra original.
2. En el raro caso de que se entregue una unidad de reemplazo, la cobertura de la garantía terminará seis meses
después de la fecha de recepción de la unidad de reemplazo o cuando termine el plazo restante de la garantía
vigente, lo que sea mayor. Si se reemplaza la unidad, SharkNinja se reserva el derecho de reemplazarla con
una unidad de igual o mayor valor.
¿Qué no cubre mi garantía?
Nuestros especialistas del servicio al cliente y productos están a su disposición para proporcionar todas las opciones
de servicio de garantía disponibles para usted, incluida la posibilidad de mejorar su garantía a nuestras opciones de
servicio de garantía VIP para categorías de productos exclusivas.
1. Esta garantía no cubre el desgaste normal de las piezas que se gastan (lo que incluye todos los recipientes
de licuado, tapas, cuchillas y base de la licuadora), que requieren mantenimiento regular y/o reemplazo para
asegurar el funcionamiento adecuado de la unidad.
2. Cualquier unidad que haya sido alterada o usada con fines comerciales.
3. SharkNinja cubrirá el costo de envío de la unidad, por parte del cliente a nosotros, para ser reparada o
reemplazada. Se cobrará una tarifa de 19,95 USD para cubrir el costo de envío al momento de realizar el envío
para devolver la unidad reparada o reemplazada.
4. Daños causados por el uso incorrecto, el abuso, la manipulación negligente o el mal trato durante el
transporte.
5. Daños emergentes o incidentales.
6. Defectos causados por daños provocados en el transporte o las reparaciones, el servicio técnico, o
alteraciones al producto o a cualquiera de sus piezas que hayan sido realizados por un técnico no autorizado
por SharkNinja o que resulten de estos.
7. Productos comprados, usados u operados fuera de Norteamérica.
Problemas con su unidad/Cómo solicitar el servicio técnico:
Si su aparato no funciona de forma adecuada cuando se usa en condiciones domésticas normales dentro del período
de garantía, visite ninjakitchen.com para obtener instrucciones de cuidado/mantenimiento del producto que usted
mismo pueda llevar a cabo. Nuestros Especialistas de servicio al cliente/productos también están a su disposición
para brindarle asistencia para el producto y opciones de servicio de garantía si llama al 1-877-646-5288.
Cómo iniciar un reclamo de garantía:
Puede llamar al 1-877-646-5288 para que un Especialista de servicio al cliente lo ayude. Tenga en cuenta que debe
llamar al 1-877-646-5288 para iniciar un reclamo de garantía. Las instrucciones de devolución y embalaje se le
proporcionarán en ese momento.
Para conocer el horario del Servicio al Cliente, visite ninjakitchen.com
Se pueden comprar piezas de repuesto en ninjaaccessories.com. Para obtener más información sobre lo que se
clasifica como piezas que se gastan y piezas que no se gastan, visite ninjakitchen.com/warranty
Esta garantía le otorga derechos legales específicos, y usted también puede tener otros derechos que varían según el
estado.
Algunos estados no permiten la exclusión o limitación de los daños incidentales o consecuentes, de modo que lo
anterior podría no estar vigente en su caso.
101 1021-877- 646-5288 ninjakitchen.com
Page 53

SharkNinja Operating LLC
US: Newton, MA 02459
CAN: Ville St-Laurent, QC H4S 1A7
1-877-646-5288
ninjakitchen�com
Illustrations may differ from actual product. We are constantly striving to improve
our products; therefore the specifications contained herein are subject to change
withoutnotice.
NINJA, PRO EXTRACTOR BLADES,
trademarks of SharkNinja Operating LLC.
AUTO-SPIRALIZER, INTELLI-SENSE, PRECISION PROCESSOR, and SMART
STATION are trademarks of SharkNinja Operating LLC.
For SharkNinja U.S. Patent information, visit sharkninja.com/USPatents
and TOTAL CRUSHING are
registered
SharkNinja Operating LLC
États-Unis: Newton, MA 02459
Canada: Saint-Laurent (Qc)H4S 1A7
1-877-646-5288
ninjakitchen�com
Les illustrations peuvent différer du produit réel. Nous tentons constamment
d’améliorer nos produits; par conséquent, les caractéristiques indiquées dans le
présent guide peuvent être modifiées sans préavis.
NINJA, PRO EXTRACTOR BLADES
commerce déposées de SharkNinja Operating LLC.
AUTO-SPIRALIZER, INTELLI-SENSE, PRECISION PROCESSOR et SMART
STATION sont des marques de commerce de SharkNinja Operating LLC.
Pour obtenir de l’information sur les brevets de SharkNinja aux É.-U., visitez le
www.sharkninja.com/USPatents.
et TOTAL CRUSHING sont
des marques de
SharkNinja Operating LLC
EE�UU�: Newton, MA 02459
CAN: Ville St-Laurent, QC H4S 1A7
1-877-646-5288
ninjakitchen�com
Las ilustraciones pueden diferir del producto real. Nos esforzamos
constantemente por mejorar nuestros productos, por lo que las especificaciones
que se incluyen en el presente pueden cambiar sin previo aviso.
NINJA, PRO EXTRACTOR BLADES,
comerciales registradas de SharkNinja Operating LLC.
AUTO-SPIRALIZER, INTELLI-SENSE, PRECISION PROCESSOR y SMART STATION
son marcas comerciales registradas de SharkNinja Operating LLC.
Para obtener información sobre las patentes de SharkNinja en los EE.UU., visite
sharkninja.com/USPatents
y TOTAL CRUSHING son
marcas
© 2017 SharkNinja Operating LLC
CT682SP�IB�E�F�S�170620
PRINTED IN CHINA / IMPRIMÉ EN CHINE / IMPRESO EN CHINA
@ninjakitchen
 Loading...