

Page 1
®
BL700 series
Kitchen System 1200™
OWNER’S GUIDE
Euro-Pro Operating LLC
US: Newton, MA 02459
CAN: Ville St-Laurent, QC H4S 1A7
1-800-798-7398
www.ninjakitchen.com
Copyright © 2011 Euro-Pro Operating LLC
Printed in China
Illustrations may differ from actual product.
BL700.SERIES.E.110222.1
BL700_30_SERIES_IB_ENG_110222_1.indd 1-1 11-02-22 2:50 PM
Page 2

2
TOLL FREE: 1-800 -798-7 398
www .ninja kitche n.com
3
26. To reduce the risk of burns, always
allow the appliance to cool after
blending hot liquids before taking
off parts and before cleaning.
27. If the appliance overheats, a th ermal
switch will become activated and
shut off the motor. To reset, unplug
the appliance and let it cool down
for approximately 15 minutes before
using again.
28. In the event that the unit fl ashes
speeds 1, 2 and 3 from overloading ,
the unit will shut down. Unplug the
unit and wait 15 minutes to reset.
29. THIS PROD UCT IS INTE NDED FOR
HOUSEH OLD USE ON LY. Do not
use this appliance for anything other
than its intended use. Do not use
outdoors.
30. The maximum rating is based on
the 6-Blade Assembly (pitcher)
that drives the greatest power and
other recommended attachments
may draw significantly less power or
current.
NOTE: This unit has a short power
supply cord to reduce the risk resulting
from becoming entangled in or tripping
over a long cord. An extension cord
may be used if you are caref ul in its use.
1. If using an extension cord, the
electrical rating of the extension
cord should be rated at least 15
amperes. E xtension cords rated for
less amperage may overheat.
2. An extension cord must be arranged
so that it will not drape over the
countertop or tabletop where it can
be pulled on by children or tripped
over accidentally.
SAVE THESE
INSTRUCTIONS
IMPORTANT SAFETY INSTRUCTIONS
For Household Use Only
WHEN USING ELECTRICAL
APPLIANCES, BASIC SAFETY
PRECAUTIONS SHOULD ALWAYS
BE FOLLOWED, INCLUDING THE
FOLLOWING:
READ ALL INSTRUCTIONS
BEFORE USING YOUR NINJA®
KITCHEN SYSTEM 1200™.
POLARIZED PLUG
WARNING: To reduce the risk of
electric shock, this appliance has a
polarized plug (one blade is wider
than the other). This plug will fit into
a polarized outlet only one way. If
the plug does not fit fully into the
outlet, reverse the plug. If it still
does not fit, contact a qualified
electrician to install the proper
outlet. DO NOT modify the plug in
any way.
12. DO NOT at tempt to sharpen
blades.
13. DO NOT use the appliance if blade
assembly is bent or damaged .
14. To reduce risk of injury, never place
the blade assembly on base without
pitcher or bowl properly attached.
15. DO NOT operate this appliance on
or near any hot sur faces (such as
gas or electric burner or in a heated
oven).
16. The use of attachments or
accessories including canning
jars, not recommended by the
manufacturer may result in fire,
electric shock or personal injury.
17. DO NOT remove the container from
the motor base while the appliance
is in operation.
18. To reduce the risk of injury, NEV ER
operate the appliance without the lid
in place; DO NOT try to defeat the
interlock mechanism; make sure that
the attachment is properly installed
before operating the appliance.
19. DO NOT expose contain ers to
extreme temperature changes.
20. Exercise extreme caution whe n
blending hot liquids.
21. CAUTION : Do not process food or
liquid that is hotter than 180° F/82°C.
Allow very hot ingredients to cool
before processing.
22. DO NOT overfill.
23. Extreme caution must be used when
moving an appliance containing hot
food, water or other liquids.
24. When processing hot foods or
liquids, always open the pouring
spout cap to vent the steam. Keep
hands and other exposed skin
away from the opening to prevent
possible burns or scalding.
25. DO NOT operate the appliance
empty.
1. To protect against electrical shock,
do not submerge the appliance or
allow the power cord to come into
contact with water or any other
liquid.
2. Close supervision is necessar y when
any appliance is use d by or near
children.
3. Never leave an appliance
unattended when in use.
4. Turn the appliance Of f and remove
the power cord from the electrical
outlet when not in use , before
assembling or disassembling parts
and before cleaning. To unplug,
grasp the plug and pull from the
electrical outlet. Never pull from the
power cord.
5. DO NOT abuse the power cord.
Never carry the appliance by the
power cord or yank it to disconnect
from electrical outlet; instead grasp
the plug and pull to disconnect.
6. DO NOT operate any appliance with
a damaged cord or plug, or after the
appliance malfunctions , has been
dropped or damaged in any manner.
Return the appliance to EURO-PRO
Operating LLC for examination,
repair or adjustment.
7. DO NOT let the power cord hang
over the edge of table or counter or
touch hot surfaces such as the stove.
8. Always use appliance on a dry, level
surface.
9. Keep hands, hair, clothing, as well
as utensils out of container while
processing to reduce the risk of
severe injury to persons or damage
to the appliance. A scraper may be
used but only when the appliance is
not running.
10. CAUTION : Blade assembly is sharp,
handle with care. When handling the
blade assembly, always hold by the
shaft.
11. Avoid contact with moving part s.
BL700_30_SERIES_IB_ENG_110222_1.indd 2-3 11-02-22 2:50 PM
Page 3
4
TOLL FREE: 1-800 -798-7 398
www .ninja kitche n.com
5
Contents
Thank you for
purchasing
the Ninja
®
Kitchen
System 1200
™
.
Getting Started .................................................................................... 6
Using the Ninja
®
Kitchen System 1200™ ...................................... 8
Using the Pitcher ................................................................................. 11
Using the Bowl ..................................................................................... 12
Care & Maintenance ........................................................................... 14
Speed Setting & Uses ........................................................................15
Troubleshooting Guide ..................................................................... 16
Replacement Parts ............................................................................. 16
Recipes .................................................................................................... 17
Warranty & Registration ................................................................... 23
TH IS BOOK COVER S MODEL N UMBE RS:
BL700 30
BL700RC 30
TE CHNICAL S PECIFI CATIONS
Voltage: 120V., 60Hz.
Power: 110 0 Watts
Pitcher Cap acity: 72 o unces (9 cups) (2.15 L)
Bowl Capac ity: 40 oun ces (5 cups) (1.1 8 L)
BL700_30_SERIES_IB_ENG_110222_1.indd 4-5 11-02-22 2:50 PM
Page 4
6
TOLL FREE: 1-800 -798-7 398
www .ninja kitche n.com
7
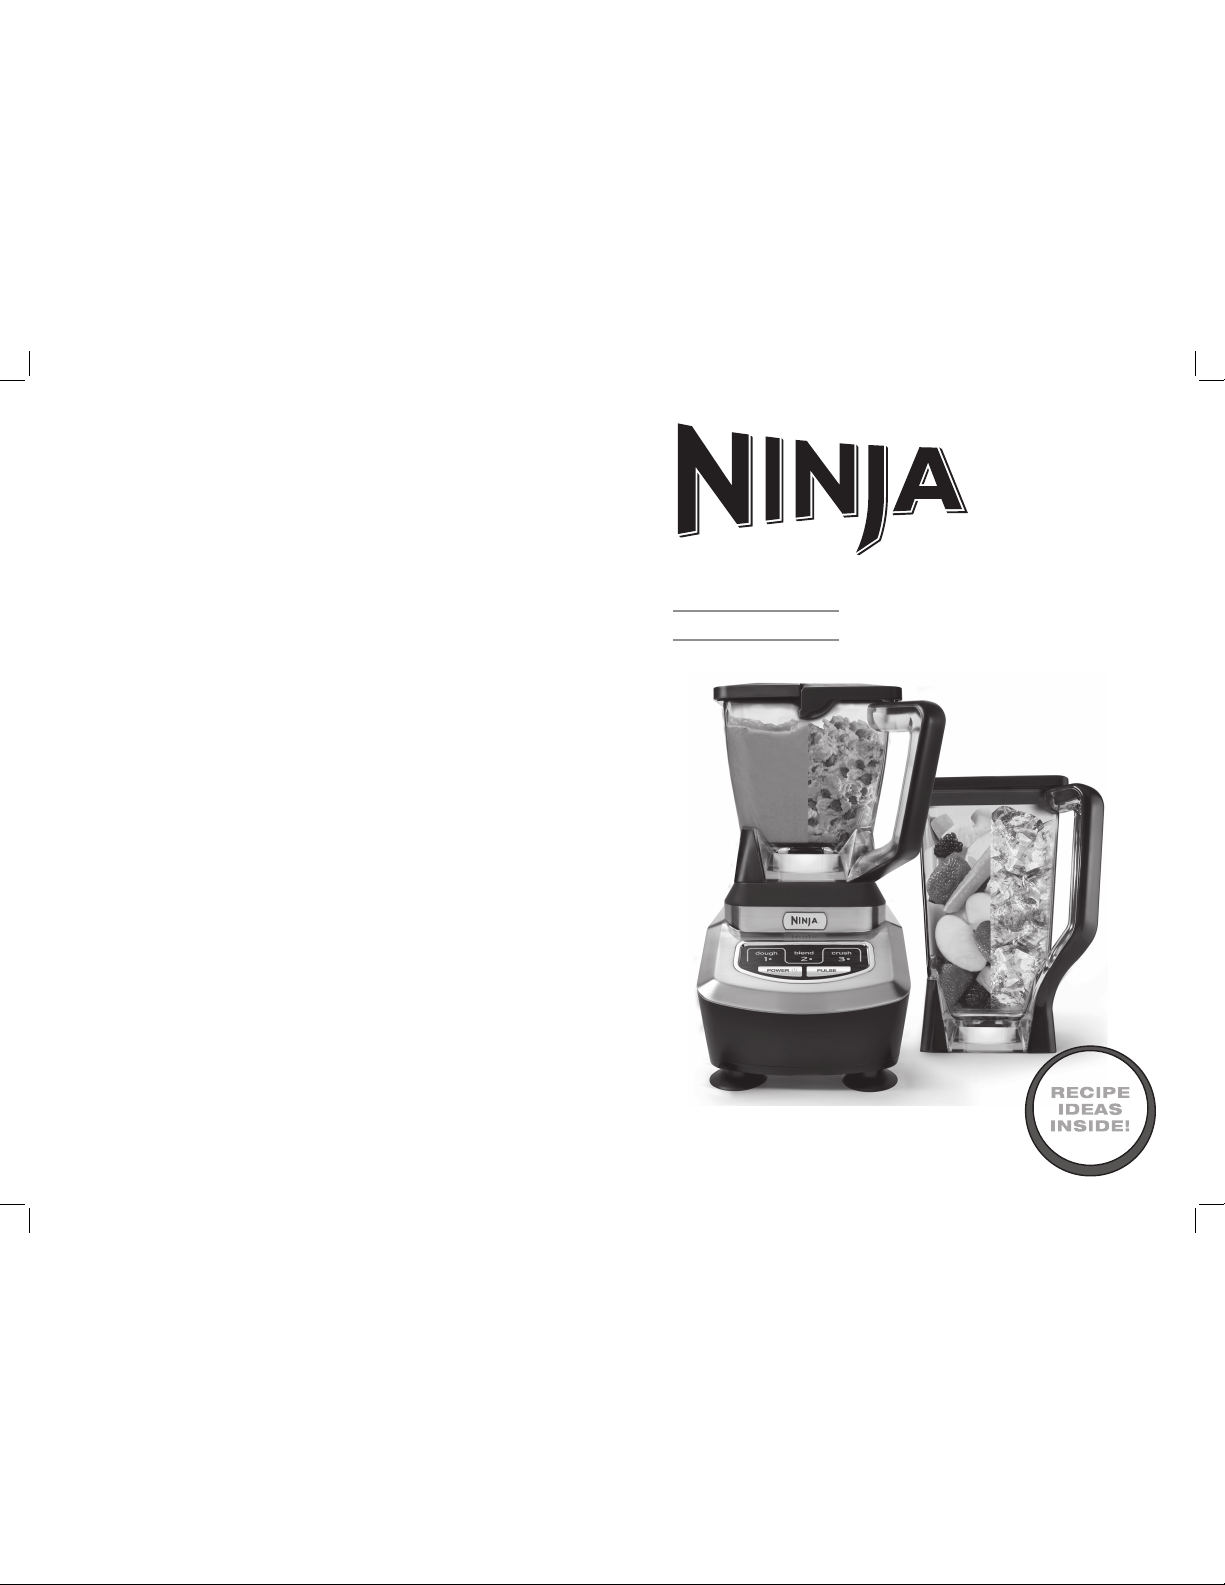
The Ninja® Kitchen System 120 0™ is a profession al, high powe red innovative tool with a
sleek desi gn and outs tanding p erforma nce, a true ass et to any kitchen. I t is perfe ct for
ice crushin g, blendi ng, pureei ng, and con trolled proces sing. The N inja
®
Kitchen System
1200
™
also feature s a unique ca pability to kn ead doug h for pizzas, b reads, pre tzels and
cookies! Cre ate all of your favorite re cipes fast a nd easy with ju st one touch of a b utton.
For best resul ts, be sure to c arefully rea d all the instr uctions con tained in th e manual
before using th is applian ce.
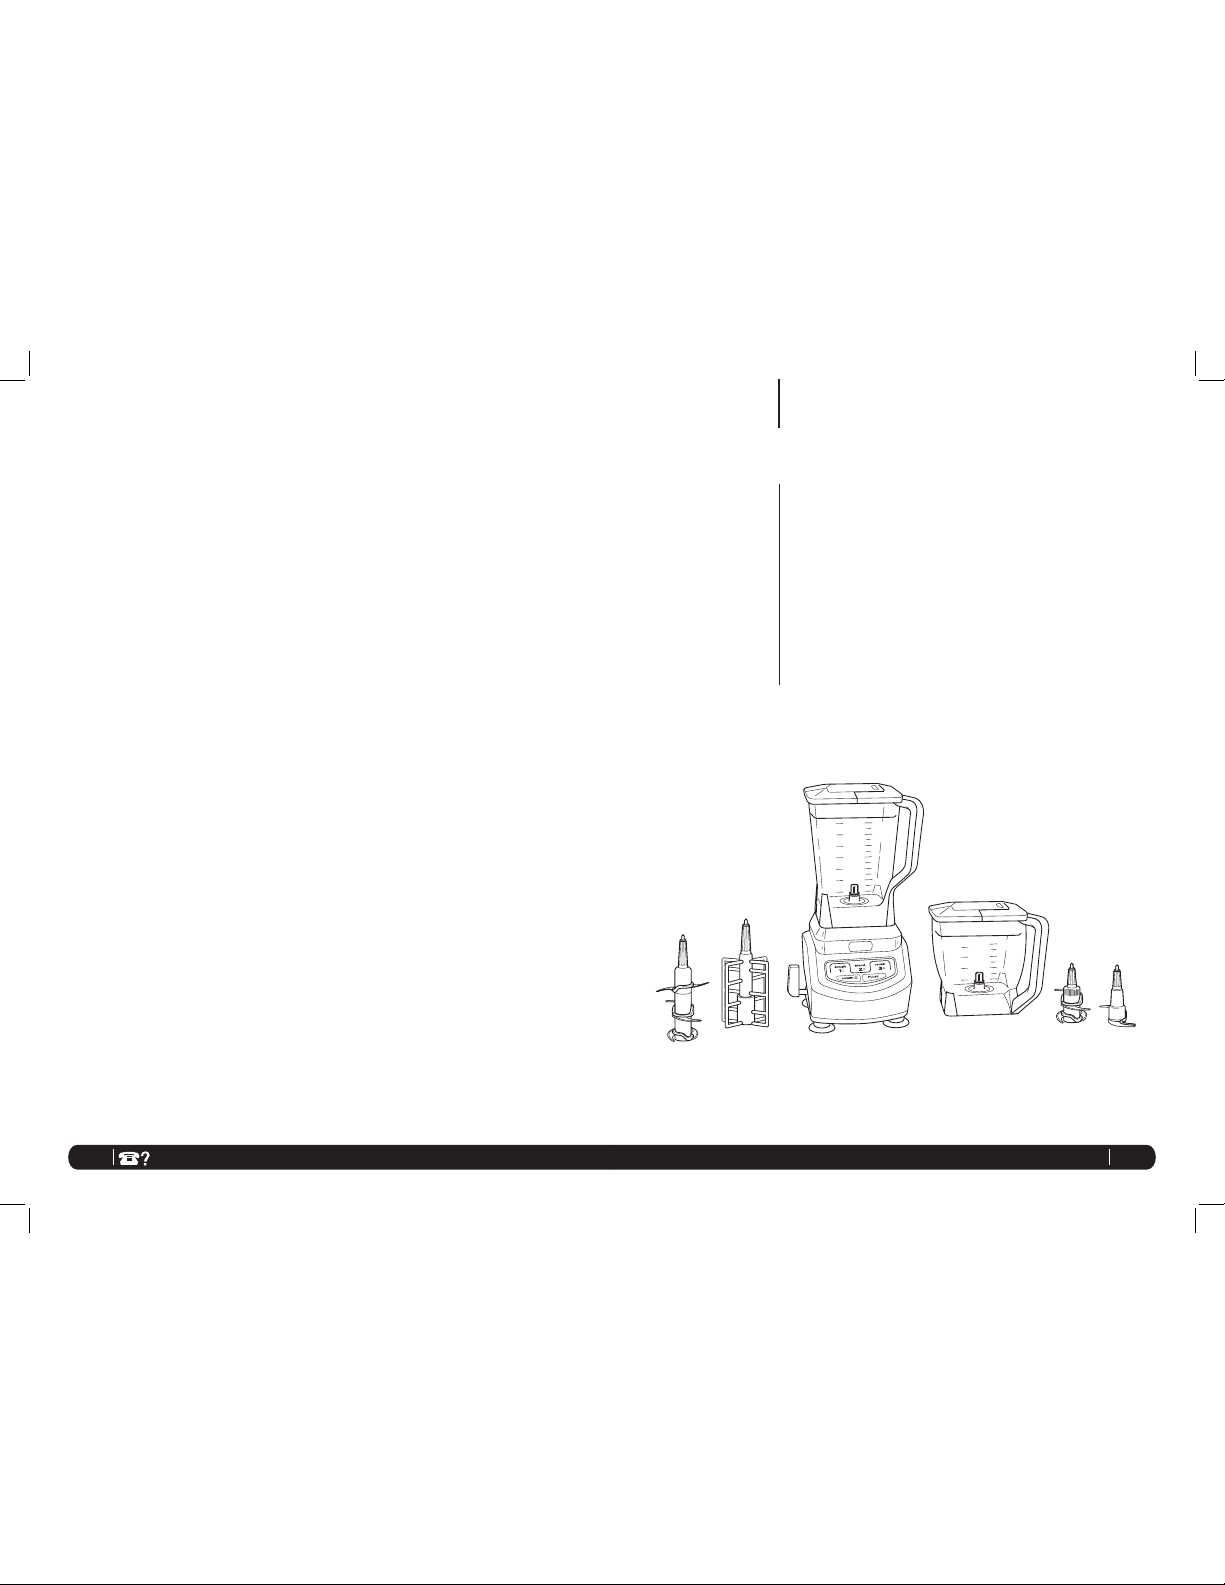
Getting Started
j Grated Fill S pout with Ca p
k 72 oz. Pitche r
l 40 oz. Bowl
m Gear Shaf t
n Motor Bas e
o Lock-In Lever
p Control Panel
q Suction Feet
r Power Cord (not shown)
a 6- Blade As sembly (pitch er)
b Whipping Atta chment (pitc her)
c 4- Blade As sembly (bow l)
d Dough Blad e (bowl)
e Dough Pa ddle (bowl)
f Pitcher Lid with Locking H andle
g Bowl Lid with Locking H andle
h Locking H andle Rele ase Button
i Pouring S pout with Ca p
FEATURES:
• Ninja® Blade Technology
• Extra Large, 72 oz . Pitcher - BPA Free
• 40 oz. Bowl - BPA Free
• Lock–In Lid, Featu ring Pour Spou t
• Easy to Clean Elect ronic Contro l Panel
• Lock-In Lever activates su ction feet for a dded stabil ity
• Hidden Drain Hol es - prevent water build up fr om dishwashe r
NOTE: Atta chments a re not intercha ngeable .
a
d
e
b
c
g
h
i
n
o
m
k
l
f
j
p
q
BL700_30_SERIES_IB_ENG_110222_1.indd 6-7 11-02-22 2:50 PM
Page 5

8
TOLL FREE: 1-800 -798-7 398
www .ninja kitche n.com
9
Shaft
Fig. 2
Using the Ninja® Kitchen System 1200
™
BEFORE F IRST USE
1 Remove all pa ckaging mate rial and la bels
from the appl iance.
2 Wash the li ds, pitche r, bowl and
attachm ents in warm , soapy water with
a soft cloth . Use caut ion when wa shing
the blad e assemb lies as th e blades a re
very shar p.
3 Rins e and dry th oroughly.
4 The pitcher, bowl, li ds and
attachm ents, are a ll dishwashe r safe.
It is recomme nded that th e lids and
attachm ents be plac ed on the top rack .
Ensure that the at tachme nts are removed
from the conta iners befo re placing in th e
dishwasher.
5 Wipe t he motor base an d the suctio n feet
clean with a dam p cloth.
HOW TO ASSEM BLE
CAUTION: Make sure t hat the motor bas e
is unplugg ed from the powe r source.
1 Place the m otor base on a cle an, dry,
level surfac e such as a counte r or table
top. (Fig. 1)
2 Lower the p itcher or the bow l onto the
motor base. (F ig. 1)
3 Rotate th e containe r to the left as f ar as
it will go. As the c ontainer rot ates, it will
lower and the sa fety tabs on th e bottom
of the contain er will slide un der the
safety tab s on the top of the motor b ase.
(Fig. 2)
4 The pitcher o r bowl can be pla ced on the
motor base two ways; th e handle ca n be
on the front rig ht corner or th e front lef t
corner. (Fig. 3a , Fig. 3b)
5 Hol ding the desi red attach ment by the
shaft, pl ace it onto the gea r shaft in side
the contain er. Ensure that the atta chment
fits around th e gear shaf t and that it is
standing s traight. (Fi g. 4a, Fig . 4b)
HOW TO USE
1 Place the p itcher or bowl on to the motor
base and ins ert the des ired attac hment.
(See HOW TO ASSEM BLE.)
2 Add the i ngredien ts to the contain er.
Make sure your tota l of ingredie nts don’t
exceed the high est measure d marking
line on the sid e of the contain ers.
MAXIM UM CAPACITY
40-o z Bowl
Dry - Do not excee d 2 1/2 cups (20 oz.)
Wet - Do not exceed 5 cups (40 oz.)
72-oz Pi tcher
Dry - Do not excee d 2 1/2 cups (20 oz.)
Wet - Do not exceed 9 cups ( 72 oz.)
Fig. 4b
PLEASE KE EP THESE IMPORTANT
SAFEGUARDS IN MIND WHE N
USING THE APPLIANCE :
IMPORTANT: Never add ingredien ts
into the contain er before pla cing
the attach ment in firs t.
IMPORTANT: Attachment s are not
interchang eable.
CAUTION: Blad es are sharp ! Use
extreme cau tion when ha ndling
the blade as semblies . Always hold
them by the shaf t.
I MPORTANT: When mak ing dough ,
always secure the b ase to the
countertop u sing the lock-in leve r.
IMPORTANT: Never run the
appliance e mpty.
CAUTION: Use extreme c aution
when proces sing hot food s
or liquids to avoid a ccidental
scalding o r burns. D o not process
food or liqui d that is hotter
than 180 °F/82°C. A llow very
hot ingredi ents to cool befo re
processing .
When proces sing hot food s or
liquids, a lways open the sp out cap
to vent the steam. Ke ep hands a nd
other expose d skin away from the
opening to preve nt possible b urns
or scaldin g.
CAUTION: Never attempt to
remove the contai ner while the
appliance i s still runni ng.
WARN ING: Never l eave the
appliance u nattende d while in use .
Fig. 1
Shaft
Fig. 4a
Fig. 3a
Fig. 3b
BL700_30_SERIES_IB_ENG_110222_1.indd 8-9 11-02-22 2:50 PM
Page 6

10
TOLL FREE: 1-800 -798-7 398
www .ninja kitche n.com
11
Locking
Handle
Fig. 5
6 Press the power button ( ) or the
selected b utton a secon d time to stop
the attach ment from tur ning or pres s a
differen t button to chan ge the spee d.
7 Whe n you have reache d your desired
consistenc y, stop the applian ce by
pressing the p ower button (
) and wait
for the attac hment to stop tur ning. The n
remove the lid by press ing the relea se
button, lif ting the ha ndle up and p ulling
straight up. ( Fig. 6)
CAUTION: A lways use a spatula to
dislodge fo od that has stu ck to the sides
of the pitcher. Never ins ert your han ds in
the pitcher as th e blades are s harp.
8 To remove the contai ner, press the power
button (
) to turn the applia nce Off. Wait
for the attac hment to stop movi ng before
removing. (F ig. 7)
9 Depen ding on the co nsistency of th e
contents in the co ntainer, ope n the
pouring sp out cap an d use the spout
to empty liqu id contents. F or thicker
consistenci es, or for re moving dough
from the bowl, re move the lid and
attachm ent carefu lly (by its shaf t), then
empty conten ts from the con tainer.
10 Unpl ug the applia nce after us e.
3 Pla ce the color co- ordinated li d onto the
correspon ding contai ner with the loc king
handle in th e upright posi tion and the
pouring sp out on the corn er opposite th e
container ’s handle. A lign the arrows (
)
located on th e lid and conta iner’s han dle.
Ensure that the l id is completel y seated
and press the l id down into the cont ainer.
Press the lock ing handl e down so that
the latches on th e lid fit unde r the tabs
on the contain er. (Fig. 5)
NOTE: If you ne ed to add add itional
ingredien ts while the ap pliance is
processing , open the po uring spo ut cap
and pour th e ingredien ts in through th e
opening .
4 Plug the power cord into the electrical
outlet and press on the power button (
).
NOTE: As a sa fety featu re, the power
button (
) will flash and t he motor will
not work if the co ntainer a nd lid are not
install ed correctl y. When the cont ainer
and lid are in stalled p roperly, the p ower
button (
) will be solid , indicati ng that
the appli ance is read y for use.
5 Sel ect the but ton that best su ites your
needs.
* See “Spe ed Setting s & Uses” cha rt.
Using the Ninja® Kitchen System 1200™ - cont'd
Fig. 6
Fig. 7
USING TH E 6-B LADE AS SEMB LY
1 Holdi ng the 6-B lade asse mbly by the
shaft, pl ace it onto the gea r shaft in side
the pitcher. Ensure tha t the attach ment
fits around th e gear shaf t and that it is
standing s traight.
2 Add the i ngredien ts and secu re the
pitcher lid onto th e pitcher. (Fig. 8)
3 Plug the power cord into the electrical
outlet and press on the power button (
).
NOTE: Plea se refer to “Sp eed Settin gs
& Uses” char t for sugge sted uses and
speeds .
Fig. 8
Using the Pitcher
USING TH E WHIPPI NG ATTACHMENT
1 Holdi ng the whippi ng attachm ent by the
shaft, pl ace it onto the gea r shaft in side
the pitcher. Ensure tha t the attach ment
fits around th e gear shaf t and that it is
standing s traight.
2 Add the i ngredien ts and secu re the
pitcher lid onto th e pitcher. (Fig. 9)
3 Plug the power cord into the electrical
outlet and press on the power button (
).
NOTE: Plea se refer to “Sp eed Settin gs
& Uses” char t for sugge sted uses and
speeds .
IMPORTANT: When using the w hipping
attachm ent for whippi ng egg whites ,
open the po uring spout c ap after 3 0
seconds to all ow the egg mixtu re to
aerate.
Fig. 9
NOTE: The h andle will rem ain locked in th e
upward position u ntil the lid is com pletely
seated on top of the co ntainer.
BL700_30_SERIES_IB_ENG_110222_1.indd 10-11 11-02-22 2:50 PM
Page 7

12
TOLL FREE: 1-800 -798-7 398
www .ninja kitche n.com
13
USING TH E DOUGH B LADE
IMPORTANT: Use only the “D OUGH ”
button when u sing this att achment .
IMPORTANT: DO NOT attempt to use th e
dough bla de without usin g the suctio n
lever to secure the a ppliance to the
counter or tab le top first.
1 Place the m otor base on a cle an, dry,
level surfac e such as a counte r or table
top. (Fig. 11) P ush the sucti on lever on
the side of the ba se down to secure th e
suction fee t to the surfac e. (Fig. 11 a) If
the suction f eet have not totally a dhered
to the surfac e, press down sli ghtly on
the base to give the su ction feet a b etter
grip.
2 Sec ure the bowl onto the m otor base.
3 Hol ding the dou gh blade by the s haft,
place it onto the g ear shaft i nside the
bowl. Ensure tha t the attach ment fits
around the g ear shaft a nd that it is
standing s traight.
USING TH E 4-B LADE AS SEMBLY
1 Holdi ng the 4-B lade asse mbly by the
shaft, pl ace it onto the gea r shaft in side
the bowl. Ensure th at the attac hment
fits around th e gear shaf t and that it is
standing s traight.
2 Add the i ngredien ts and secu re the bowl
lid onto the bowl. ( Fig. 10)
3 Plug the power cord into the electrical
outlet and press on the power button (
).
NOTE: Plea se refer to “Sp eed Settin gs
& Uses” char t for sugge sted uses and
speeds .
Fig. 10
Fig. 11
Using the Bowl
4 Add the ingre dients and s ecure the bowl
lid onto the bowl. ( Fig. 11)
NOTE: For be st results ad d wet
ingredien ts first an d then add dr y
ingredien ts.
5 Plug the power cord into the electrical
outlet and press on the power button (
).
NOTE: Plea se refer to “Sp eed Settin gs &
Uses” char t for sugge sted uses.
6 Once fin ished maki ng dough , remove the
bowl from the moto r base.
7 To remove the motor ba se from the
counter or tab le top, pull the su ction
lever up to release th e suction fe et.
(Fig. 11b)
WARN ING: Never l eave the applia nce
unattend ed while in use .
NOTE: Lock-in lever activates s uction
feet for add ed stabilit y.
Fig. 12
USING TH E DOUGH PADD LE
IMPORTANT: Use only the “D OUGH ”
button when u sing this att achment .
IMPORTANT: DO NOT attempt to use th e
dough pad dle without us ing the sucti on
lever to secure the a ppliance to the
counter or tab le top first.
1 Place the m otor base on a cle an, dry,
level surfac e such as a counte r or table
top. (Fig. 12) Pu sh the suctio n lever on
the side of the ba se down to secure th e
suction fee t to the surfac e. (Fig. 12a) If
the suction f eet have not totally a dhered
to the surfac e, press down sli ghtly on
the base to give the su ction feet a b etter
grip.
2 Sec ure the bowl onto the m otor base.
3 Hol ding the dou gh paddle by th e shaft,
place it onto the g ear shaft i nside the
bowl. Ensure tha t the attach ment fits
around the g ear shaft a nd that it is
standing s traight.
4 Add the ingre dients and s ecure the bowl
lid onto the bowl. ( Fig. 12)
NOTE: For be st results ad d wet
ingredien ts first an d then add dr y
ingredien ts.
5 Plug the power cord into the electrical
outlet and press on the power button (
).
NOTE: Plea se refer to “Sp eed Settin gs &
Uses” char t for sugge sted uses.
6 Once fin ished maki ng dough , remove the
bowl from the moto r base.
7 To remove the motor ba se from the
counter or tab le top, pull the su ction
lever up to release th e suction fe et.
(Fig. 12b)
WARN ING: Never l eave the applia nce
unattend ed while in use .
NOTE: Lock-in lever activates s uction
feet for add ed stabilit y.
Fig. 12a
Fig. 11a Fig. 11b
Fig. 12b
BL700_30_SERIES_IB_ENG_110222_1.indd 12-13 11-02-22 2:50 PM
Page 8

14
TOLL FREE: 1-800 -798-7 398
www .ninja kitche n.com
15
FUNCTION CONTAINER ATTACHMENT
SPEED
BUTTON
TYPE OF FOOD
Whipping Pitcher
Whipping
Attachme nt
1
Whipped cre am
Thin panc ake batter
Scramble d eggs
Mousse
Meringu e*
Mincing Bowl Blade As sembly Pulse
Onion
Garlic
Herbs
Kneadin g Bowl Dough Bla de
1
(DOUGH )
Bread dou gh
Pie dough
Pizza dough
Pretzel doug h
Dough Mixin g Bowl Dough P addle
1
(DOUGH )
Cookie do ugh
Blendin g Bowl Blade As sembly
2
(BLEND)
Pâtés
Stewed fruits
Dips
Apple sau ce
Spreads
Soups
Baby food
Grinding Bowl Blade As sembly 2 Meat
Grating Bowl Bla de Assemb ly 3 or Pulse
Grated chee se
Bread crum bs
Chopping
Pitcher or
Bowl
Blade As sembly Pulse
Salsa
Vegetables
Nuts
Mixing
Pitcher or
Bowl
Blade As sembly
2
(BLEND)
Light cake mixes
Batters
Ice Crushin g
Pitcher or
Bowl
Blade As sembly
3
(ICE CRUS H)
Ice
Pureeing
Pitcher or
Bowl
Blade As sembly 3
Smoothies
Smooth soup s
Milkshake s
Speed Setting & Uses
IMPORTANT: Use the suctio n lever to secure the un it to the counter or t able top when
using the dou gh blade or d ough padd le on SPEED 1 /DOUG H.
* Open the po uring spou t cap after 3 0 seconds to all ow egg mixture to a erate.
HOW TO STORE
1 Store the Nin ja
®
Kitchen System 120 0™
upright with the p itcher on the m otor
base, 6- Blade as sembly insi de the pitcher
and lid on the pi tcher. Do not place
anything on top . Store the bowl with the
4-Blad e assembl y inside and th e lid on
top. Keep the bowl a nd the rest of the
attachm ents along s ide the appl iance
where it will not b e damaged a nd won’t
cause haza rd.
RESET TING THE M OTOR THER MOSTAT
The Ninja
®
Kitchen System 120 0™ features
a unique saf ety system whic h prevents
damage to the u nit’s motor an d drive
system shoul d you inadver tently overload
your applia nce. If the ap pliance is be ing
overloaded , the motor will sto p and the
power light will re main lit and sp eeds 1,
2 and 3 will flash . To reset the applian ce,
follow the reset ting procedu re below:
1 Unplu g the applia nce from the el ectrical
outlet.
2 Rem ove and empty th e container a nd
ensure that no f ood is jammi ng the
cutting bla des or atta chments .
3 Allow th e applian ce to cool for
approximately 1 5 minutes.
4 Re-inst all the contai ner onto the ba se
and re-pl ug the applia nce into the
electric al outlet.
5 Proce ed to use the app liance as
before maki ng sure not to exceed th e
recommen ded maximu m capacitie s..
HOW TO CLEAN
CAUTION: Make sure th at the motor
base is unpl ugged from th e power
source before i nserting o r removing any
attachm ent and befor e cleaning .
CAUTION: DO NOT imm erse the motor
base into water or a ny other liquid .
1 Sepa rate/remove all part s from each
other.
2 Cle an the motor bas e with a damp cloth
and wipe dr y.
3 Pla ce the pitcher an d bowl in the
dishwasher. Place t he lids and
attachm ents on the top ra ck. Use ca ution
when han dling th e blade as sembli es as
the blad es are very s harp.
NOTE: You may also wash th e containe rs
by filling ¾ of the cont ainer with war m
water and a drop of di sh washing
detergent, p lacing the co rrespondi ng lid
on the contain er and pres sing the puls e
button a few time s. Once cle an, remove
the contain er from the motor b ase. Rinse
the contain er, attachmen t and lid und er
running wate r. Allow all the part s to dry
before storin g.
Please cal l customer se rvice if any
servicin g needs to be pe rforme d on the
appliance a t 1-80 0-798-7398.
Care & Maintenance
BL700_30_SERIES_IB_ENG_110222_1.indd 14-15 11-02-22 2:50 PM
Page 9

16
TOLL FREE: 1-800 -798-7 398
www .ninja kitche n.com
17
Orange Double -Up
Ingr edient s:
4 Cups Orange J uice, divid ed
1
/2 Cup Frozen Orange Jui ce Concentrate
2 Medium Fresh Orange s, peele d, seede d and cut into pie ces
16 oz. C arbonated Water
Dire ctions :
Pour 2 cu ps of orange ju ice into the pitche r. Add the juice concent rate and the
fresh orang es. Ble nd on 2 until unifo rmly smooth . Pour the mix ture into a large
serving p itcher and ad d the remaini ng orange ju ice and car bonated water. Stir
well to blend. P our over ice and se rve. Ser ves 4 to 6.
Pitcher
6-Bla de Assemb ly
Pitcher Lid
Middle Eastern Tabouli
Ingredi ents:
1 Cup Plain Bulg ur (cracked wheat), uncoo ked
1 Cup Water
1 Bunch Fres h Parsley, stemme d
6 Sprigs Fresh Mint, stemme d
1
/2 Small White Onion, peele d
2 Cloves Garlic, p eeled
1
/3 Cup Extra Virgi n Olive Oil
2 Lemon s, juiced (abou t 1/4 cup)
1
/2 tsp. Salt
1
/2 tsp. Freshly Groun d Black Pep per
2 Ripe Tomatoes , cored and d iced
3 Green O nions, cl eaned an d chopped
Direct ions:
In a large bowl , mix the bulgu r with the water. Cover and let s tand for 20 mi nutes,
until the water is ab sorbed an d the wheat is ten der.
Place the par sley, mint, onion a nd garlic into th e bowl and puls e on 1 to make a
small, roug h chop, clea ning the side s of the bowl with a spat ula as necess ary.
Transfer the mixtu re to the bowl of softe ned bulgu r.
Place the olive oi l, lemon jui ce, salt an d pepper in th e bowl and ble nd on 2 until
incorpora ted. Add the dre ssing to the bulg ur mixture a nd lightly toss to mix . Add
the choppe d tomatoes and g reen onion , again tossi ng gently to mix. Taste and
adjust the se asoning s. Serve wel l-chille d or at room temp erature. Se rve 6.
Bowl
4-Blad e Assemb ly
Bowl Lid
Recipes
PROBLEMS POSSIBLE REASONS & SOLUTIONS
Motor Doesn’t Start or
Attachment Doesn’t
Rotate.
Make sure the con tainer is se curely place d on motor
base.
Make sure the lid i s securely on co ntainer in t he correct
position (align arrows).
The applia nce is turne d Off. Press t he power but ton ( ) to
turn On.
Check that th e plug is secur ely inser ted into the elec trical
outlet.
Check the f use or circuit bre aker.
The unit has ove rloaded . The appli ance will stop a nd the
power light wil l remain on wh ile speed s 1, 2 and 3 will fl ash.
Unplug an d wait approxi mately 15 min utes before us ing
again.
The unit has ove rheated. U nplug the u nit and wait 1 5 minutes
to reset.
Make sure that th e power button ( ) is a solid red and
that the appli ance is asse mbled corre ctly.
Check to make su re the unit is not overl oaded.
Food is Unevenly
Chopped.
Either you are ch opping too mu ch food at one ti me, or
the pieces are n ot of even size and proce ssing small er
amounts p er batch.
Food is Chopped Too
Fine or is Too Watery.
The food has b een over proces sed. Use pu lse button for
controlled pro cessing.
You Cannot Achieve
Snow From Solid Ice.
Do not use ice that h as been sit ting out or ha s started to
melt. Use ice s traight from th e freezer.
Motor Base Won’t
Stick to Counter or
Table Top.
Make sure the su rface is wi ped clean . The suc tion feet will
only stick to sm ooth surfa ces.
DO NOT atte mpt to use a pplian ce when th e motor ba se is
stuck to a su rface th at is not se cure, (cutt ing boar d, plat ter,
plates , etc.).
Troubleshooting Guide
Replacement Parts
ORDER ING REP LACEME NT PARTS
To order additional p arts an d attachm ents, ple ase visit our we bsite:
www.ninja kitchen. com or feel fr ee to contact cu stomer ser vice: 1-8 00-798-739 8.
BL700_30_SERIES_IB_ENG_110222_1.indd 16-17 11-02-22 2:50 PM
Page 10

18
TOLL FREE: 1-800 -798-7 398
www .ninja kitche n.com
19
Recipes - cont’d
Sweet Strawberry Smoothie
Ingredi ents:
1/2 Cup H alf-and-H alf Cream
1
/2 Cup W hole Milk
1 Cup Ripe, Sweet Strawb erries, s temmed and w ashed
1
/2 Cup Lowfat Vanilla -Flavored Yogurt
2 Cups Ice Cub es
Direct ions:
Pour the milk a nd cream into the p itcher and a dd the strawber ries, yogu rt and ice
cubes. Bl end on 3 until th e mixture is ver y smooth and no f ruit pieces re main. Po ur
into glasses a nd serve righ t away. Serves 2 to 3.
Pitcher
6-Bla de Assemb ly
Pitcher Lid
Crisp & Rich Butter Cookies
Ingredi ents:
1 Cup Butter, soften ed
1
/2 Cup Sugar
Pinch Sa lt
1 Large Egg
1 tsp. Vanilla Ex tract (substitute l emon extrac t)
1
/2 tsp. Almond Ex tract
2 1/2 Cups All-Pur pose Flour
Direct ions:
Place the sof tened but ter, sugar, salt, egg an d extracts i n the bowl. Ble nd on 1 until
very light an d fluff y. Add the flour and p ulse until com bined. Re move the dough
paddle an d clean the sid es of the bowl with a sp atula, mixin g in any unblen ded
dough. C over with the lid and ch ill the doug h for about 20 m inutes.
Fill a cookie pre ss and pres s shapes onto u ngreased co okie sheet s. Bake at 40 0°F
for 8 to 10 minutes . Cookie s should be set , but not browne d, when do ne. Cool on
wire racks befo re servin g.
Makes abou t 6 dozen cookies .
Bowl
Dough Pad dle
Bowl Lid
Caramel Crème Parfait
Ingredi ents:
1 Cup Heavy Whip ping Cream
1 tsp. Sugar
4 Cups Premium Vanilla Ic e Cream
1
/2 Cup Premium C aramel S auce, divid ed
1
/2 Cup Low fat Milk
Direct ions:
Pour the crea m into the pitcher a nd whip on 3 until s tiff peak s form, abo ut 25
seconds . Gently fold in th e sugar and s et aside. Cl ean the pitche r and dry.
Place the ice cre am and 1/4 cup of caramel sa uce into the pitche r. Add the milk
and blend o n 3 until very sm ooth. Remove an d assembl e the parfa its. Drizzl e a
small amou nt of the remain ing caram el sauce down t he sides of 4 gla sses. Layer
the ice cream an d whipped c ream into each gl ass. Top each par fait with a drizzl e
of the remaini ng carame l sauce and s erve at once . Serves 4.
Pitcher
Whipping At tachment
6-Bla de Assemb ly
Pitcher Lid
Roasted Tomato & Olive Bruschetta
Ingredi ents:
4 Medium Tomatoes, core d and quar tered
2 Tbsp. Extra-Virg in Olive Oil
1 Clove Garlic, pe eled
1
/4 Cup B lack Olives , pitted
1 tsp. Fresh Bas il
Fresh B read Roun ds, lightly toa sted
Direct ions:
Place the tomato es on a baking s heet and toss wi th the oil. Spr inkle with sal t
and peppe r. Bake at 350°F f or 30 to 40 minute s, or until ver y soft and te nder.
Remove and cool s lightly.
Place the cool ed tomatoes in th e bowl and add th e garlic, o lives and basil . Add a
few drops of oil if the m ixture look s dry. Pulse on 1 fo r just a few seco nds, or lon g
enough to roug hly chop the ve getables tog ether. Don’t over-ble nd.
Spoon the br uschett a on the bread ro unds and se rve. Makes a bout 12 ser vings.
Bowl
4-Blad e Assemb ly
Bowl Lid
BL700_30_SERIES_IB_ENG_110222_1.indd 18-19 11-02-22 2:50 PM
Page 11

20
TOLL FREE: 1-800 -798-7 398
www .ninja kitche n.com
21
Recipes - cont’d
Pineapple Nut Crumb Cake
Ingr edient s:
1/2 Cup Butter, soften ed
3
/4 Cup Sugar
2 Eggs
1 1/2 tsp. Vanilla Extra ct
1 1/4 Cups A ll-Purp ose Flour
1 tsp. B aking Powder
1 Fresh Pine apple, p eeled, co red, quar tered leng thwise and slice d
Crum b Topping:
1
1
/4 Cups All Purpos e Flour
1
/2 Cup Sugar
1
/4 tsp. Groun d Cinnamon
1
/2 Cup Butter
1
/2 Cup Walnuts
Dire ctions :
Prehe at the oven to 350° F. Butter the bottom a nd sides of a 1 0-inch s pringform
pan. Place t he softten ed butter in t he bowl and ble nd on 1 until ver y fluff y. Add
the sugar an d blend aga in on 1 for 10 sec onds. Use a s patula to clea n the sides of
the bowl. Add the e ggs and van illa and ble nd on 1 until unifo rmly smooth .
Add the flo ur and baki ng powder and b lend on 1 jus t until all the ing redients a re
moistened . Pour the bat ter into the prep ared pan.
In the bowl , combine th e flour, sugar an d cinnamon f or the crumb to pping. Add
the butter an d walnuts an d pulse on 1 for 2 0 seconds . Remove and set as ide.
Place th e pineapp le slices on top of th e batter, leaving a
1
/2-inch ma rgin around
the outside e dge. Sca tter the crum b mixture over the to p. Bake for 50 to 60
minutes, or u ntil the cake is fi rm.
Remove the c ake and cool . Remove the pan rim a nd place on a se rving pla tter.
Ser ves 8 to 10.
Bowl
Dough Bla de
Bowl Lid
Easy Pizza Dough
Ingredi ents:
1
/4 oz. Pkg. Dry Active Yeast
1 tsp. Salt
1 Tbsp. Sug ar
2
/3 Cup Water, warmed to 110-1 15°F
1
/4 Cup C anola Oi l (substitute olive oil)
2 Cups All-P urpose Flo ur
Direct ions:
Place the yeast , salt, suga r and water in the b owl. Pulse on 1 fo r 10 second s. Add
the oil and flo ur and blen d on 1 until the do ugh is smooth a nd no lumps re main.
Transfer the doug h to a lightly-oile d bowl and cover. Let rise for ab out 1 hour.
If you are makin g high-ris e pizza dough , punch down t he dough an d let rise agai n
for 45 minutes . If not, elim inate the secon d rising and s pread the do ugh onto a
pizza pan or ba king sheet t hat has bee n lightly coated with co oking spray.
Add sauce an d toppings as pr eferred and b ake at 425°F for 2 5-30 minute s, or
until the crus t is lightly browne d and the toppi ngs and che ese are hot.
Makes 1 pizza cr ust.
Bowl
Dough Bla de
Bowl Lid
Golden Mashed Potato Puffs
Ingredi ents:
4 Medium Russet P otatoes, pe eled and d iced
1
/2 Cup Milk, warm ed
1 Egg, be aten
1
/2 tsp. Baking Powde r
2 tsp. W hite Flour
1
/2 Cup Parmesa n Cheese, g rated
1
/2 tsp. Salt
Direct ions:
In a large sau cepan fille d with water, bring the pot atoes to a boil, a nd then redu ce
the heat to medi um-low and s immer until te nder. Drain the po tatoes and pl ace into
the pitcher. Add the rem aining ing redients , Reservi ng 2 tables poons of Parm esan
cheese, a nd pulse on 1 un til blende d.
Preheat the oven to 3 50°F. Drop the po tato mixture by teas poons onto a no n-stick
baking she et. Sprin kle the potato pu ffs with the re maining Pa rmesan ch eese and
bake for 20 minu tes. Allow the p uffs to cool s lightly and se rve warm.
Pitcher
6-Bla de Assemb ly
Pitcher Lid
BL700_30_SERIES_IB_ENG_110222_1.indd 20-21 11-02-22 2:50 PM
Page 12

22
TOLL FREE: 1-800 -798-7 398
www .ninja kitche n.com
23
Product Registration
Please visit www.ninjakitchen.com or call 1-800-798-7398 to register your new Ninja® product
within ten (10) days of purchase. You will be asked to provide the store name, date of purchase
and model number along with your name and address.
The registration will enable us to contact you in the unlikely event of a product safety
notification. By registering you acknowledge to have read and understood the instructions for
use, and warnings set forth in the accompanying instructions.
ONE (1) YEAR LIMITED WARRANTY
EURO-PRO Operating LLC warrants this product to be free from material defects and
workmanship for a period of one (1) year from the date of purchase when utilized for normal
household use, subject to the following conditions, exclusions and exceptions.
The liability of EURO-PRO Operating LLC is limited solely to the cost of the repair or replacement
of the unit at our option. This Limited Warranty does not cover normal wear of parts and does
not apply to any unit that has been tampered with or used for commercial purposes. This Limited
Warranty does not cover damage caused by misuse, abuse, negligent handling or damage due
to faulty packaging or mishandling in transit. This Limited Warranty does not cover damage or
defects caused by or resulting from damages from shipping or repairs, service or alteration to
the product or any of its parts, which have been performed by a repair person not authorized by
EURO-PRO Operating LLC.
If your appliance fails to operate properly while in use under normal household conditions within
the Limited Warranty period, you may return the complete appliance and accessories with proof
of purchase and date, freight prepaid. For Customer Service support, call 1-800-798-7398 or visit
our website www.ninjakitchen.com.
If the appliance is found by EURO-PRO Operating LLC to be defective, in EURO-PRO Operating
LLC’s sole discretion, we will repair or replace it free of charge. Proof of purchase date and a check
made payable to EURO-PRO Operating LLC in the amount of $19.95 to cover the cost of return
shipping and handling must be included.*
This Limited Warranty is extended to the original purchaser of the unit and excludes all other
legal, implied and/or conventional warranties. The responsibility of EURO-PRO Operating LLC if
any, is limited to the specific obligations expressly assumed by it under the terms of this Limited
Warranty. In no event is EURO-PRO Operating LLC liable for incidental or consequential damages
to anyone of any nature whatsoever. Some states do not permit the exclusion or limitation of
incidental or consequential damages, so the above may not apply to you.
This Limited Warranty gives you specific legal rights, and you may also have other rights which
vary from state to state or from province to province.
*IMPORTANT: Carefully pack item to avoid damage in shipping. Be sure to include proof of
purchase date and to attach tag to item before packing with your name, complete address and
phone number with a note giving purchase information, model number and what you believe
is the problem with the item. We recommend you insure the package (as damage in shipping
is not covered by your Limited Warranty). Mark the outside of your package “ATTENTION
CUSTOMER SERVICE”. We are constantly striving to improve our products, therefore the
specifications contained herein are subject to change without notice.
English Toffee Cookies
Ingredi ents:
1 Cup Butter, soften ed
1
/2 Cup Dark Brown Suga r, packed
1
/2 Cup S ugar
1 tsp. Vanilla Ex tract
1 Egg Yolk
2 Cups Cake Fl our
Pinch Sa lt
10 oz. Milk Cho colate Cand y Bar, melted
1
/2 Cup Almonds, c hopped
Direct ions:
Place the sof tened but ter, sugars, extra ct and egg yo lk in the bowl and b lend on
1 until smooth an d creamy. Use a spatul a to clean the sid es of the bowl. Add th e
flour and sa lt. Blen d again until sm ooth. Spo on the cookie d ough onto a ba king
sheet that ha s been coated wi th cooking sp ray. Allow a 2-inch margi n, as the
dough will sp read.
Lightly sprea d the chocola te over the dough an d sprinkle th e nuts over all. B ake
at 350° for 1 5 to 20 minutes. C ool slightly a nd cut into small s quares. C ool on a
wire rack.
Makes abou t 24 cookies.
Bowl
Dough Pad dle
Bowl Lid
Banana Pineapple Smoothie
Ingredi ents:
2 Cups Pineapp le Juice
1 Cup Pi neapple C hunks, f resh or can ned
1 Small Ripe Bana na, cut into ch unks
1
/4 Cup Uns weetened Co conut Milk
1 Tbsp. Honey
3 Cups Ice Cube s
Direct ions:
Pour the juice i nto the pitcher an d add the pin eapple, b anana, co conut milk ,
honey and ice . Blend on 3 u ntil very smoo th. Pour into gl asses and se rve at once.
Serves 3 to 4.
Pitcher
6-Bla de Assemb ly
Pitcher Lid
Recipes - cont’d
BL700_30_SERIES_IB_ENG_110222_1.indd 22-23 11-02-22 2:50 PM
 Loading...