

Page 1
BL660W
®
OWNER’S GUIDE
ninjakitchen.com
1 877 646-5288
Page 2
IMPORTANT SAFETY INSTRUCTIONS
For Household Use Only
WHEN USING ELECTRICAL APPLIANCES,
BASIC SAFETY PRECAUTIONS SHOULD
ALWAYS BE FOLLOWED, INCLUDING THE
FOLLOWING:
READ ALL INSTRUCTIONS BEFORE USING
YOUR NINJA® KITCHEN SYSTEM.
POLARIZED PLUG
WARNING: To reduce the risk of
electric shock, this appliance has a polarized plug
(one blade is wider than the other). This plug will
fit into a polarized outlet only one way. If the plug
does not fit fully into the outlet, reverse the plug.
If it still does not fit, contact a qualified electrician
to install the proper outlet. DO NOT modify the
plug in any way.
WARNING: Extension cords are
not recommended for use with this product.
WARNING:
TO REDUCE THE RISK OF FIRE, ELECTRIC
SHOCK OR INJURY:
1 WARNING: Remove utensils prior to
processing. Failure to remove may
cause the jar to be damaged or to
shatter which may cause personal
injury.
2 WARNING: Stacked Blade Assembly
and Chopping Blade Assembly are
sharp, not locked in place and
removable, handle with care. When
handling the Stacked Blade Assembly
or Chopping Blade Assembly, always
hold by the shaft. Failure to do so will
result in a risk of laceration.
3 WARNING: Stacked Blade Assembly
4 WARNING: Chopping Blade Assembly
is sharp and not locked in place. Make
sure to carefully remove lid and
Chopping Blade Assembly, holding it by
the shaft, before emptying contents.
Failure to do so will result in a risk of
laceration.
5 CAUTION: Do not blend hot liquids,
doing so may cause excessive pressure
build-up, resulting in risk of the user
being burned.
6 CAUTION: We do not recommend
grinding in any of our Nutri Ninja
7 CAUTION: Remove the Nutri Ninja
Blade Assembly from the Nutri Ninja
cup upon completion of blending. Do
not store ingredients before or after
blending them in the cup with the blade
assembly attached. Some foods may
contain active ingredients or release
gases that will expand if left in a sealed
container, resulting in excessive
pressure buildup that can pose a risk of
injury. For ingredient storage in the cup,
use only To-Go Lid to cover.
8 To protect against electrical shock, do not
submerge the appliance or allow the power
cord to come into contact with water or any
other liquid.
is sharp and not locked in place. If
using the pour spout, ensure the lid is
fully locked onto the pitcher. If pouring
with the lid removed, carefully remove
the Stacked Blade Assembly first,
holding it by the shaft. Failure to do so
will result in a risk of laceration.
®
cups.
1
1-877-646-5288
Page 3

9 DO NOT allow young children to operate the
appliance or use as a toy. Close supervision
is necessary when any appliance is used
near children.
10 Never leave an appliance unattended when
inuse.
11 Appliance accessories are not intended to
be used in the microwave as it may result in
damage to the accessories.
12 Turn the appliance Off and remove the
power cord from the electrical outlet
when not in use, before assembling or
disassembling parts and before cleaning.
To unplug, grasp the plug and pull from the
electrical outlet. Never pull from the power
cord.
13 DO NOT abuse the power cord. Never carry
the appliance by the power cord or yank it
to disconnect from electrical outlet; instead
grasp the plug and pull to disconnect.
14 DO NOT operate any appliance with a
damaged cord or plug, or after the appliance
malfunctions, has been dropped or damaged
in any manner. This appliance has no
serviceable parts. Return the appliance to
SharkNinja Operating LLC for examination,
repair or adjustment.
15 DO NOT let the power cord hang over
the edge of table or counter or touch hot
surfaces such as the stove.
16 Always use appliance on a dry, level surface.
17 Keep hands, hair, clothing, as well as
utensils out of container while processing to
reduce the risk of severe injury to persons
or damage to the appliance. A scraper may
be used but only when the appliance is not
running.
18 Avoid contact with moving parts.
19 DO NOT attempt to sharpen blades.
20 DO NOT use the appliance if blade
assemblies are bent or damaged.
21 To reduce risk of injury, never place the
blade assemblies on the base without the
pitcher or Nutri Ninja® cup properly attached.
22 DO NOT operate this appliance on or near
any hot surfaces (such as gas or electric
burner or in a heated oven).
23 The use of attachments or accessories
including canning jars, not recommended by
the manufacturer may result in fire, electric
shock or personal injury.
24 DO NOT remove the container from the
motor base while the appliance is in
operation.
25 To reduce the risk of injury, NEVER operate
the appliance without the lid in place; DO
NOT try to defeat the interlock mechanism;
make sure that the attachment is properly
installed before operating the appliance.
26 DO NOT expose containers to extreme
temperature changes.
27 DO NOT overfill.
28 DO NOT operate the appliance empty.
29 If the appliance overheats, a thermal switch
will become activated and shut off the motor.
To reset, unplug the appliance and let it cool
down for approximately 15 minutes before
using again.
30 THIS PRODUCT IS INTENDED FOR
HOUSEHOLD USE ONLY. Do not use
this appliance for anything other than its
intended use. Do not use outdoors.
31 The maximum rating is based on the
Stacked Blade Assembly (pitcher) that drives
the greatest power and other recommended
attachments may draw significantly less
power or current.
INSTRUCTIONS
SAVE THESE
ninjakitchen.com
2
Page 4

THIS BOOK COVERS MODEL NUMBER:
BL660W
TECHNICAL SPECIFICATIONS
Voltage: 120V., 60Hz.
Power: 1100 Watts
Pitcher Capacity: 72 oz. (9 cups, 2.15 L)
MAX Liquid Capacity: 64 oz. (8 cups, 1.9 L)
Bowl Capacity: 40 oz. (5 cups, 1.18 L)
Nutri Ninja® Cup Capacity: 16 oz. (2 cups, 470 ml)
3
1-877-646-5288
Page 5
Contents
Thank you for
purchasing the
Ninja® Kitchen
System.
Getting to Know Your Ninja Kitchen System ........................................................................... 5
Before First Use .................................................................................................................. 7
Assembly & Use of the Pitcher ............................................................................................. 8
Assembly & Use of the Nutri Ninja® Cup ............................................................................ 10
Assembly & Use of the 40 oz. Bowl .................................................................................... 11
Using the 4-Blade Assembly ........................................................................................... 11
Using the Dough Paddle ................................................................................................. 12
Removing the Dough Station ........................................................................................... 12
Care & Maintenance ........................................................................................................ 13
Speed Chart .................................................................................................................... 14
Troubleshooting Guide ....................................................................................................... 15
Replacement Parts ............................................................................................................ 15
Warranty & Registration ..................................................................................................... 18
ninjakitchen.com
4
Page 6
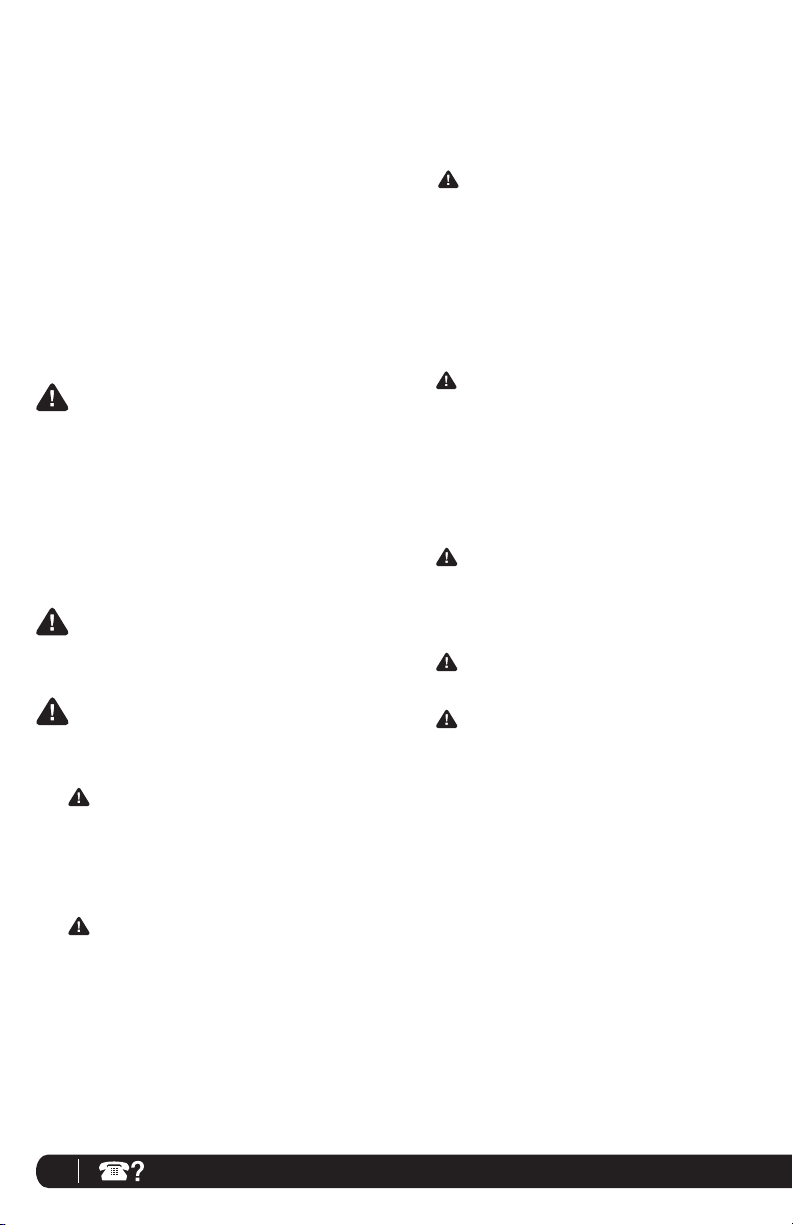
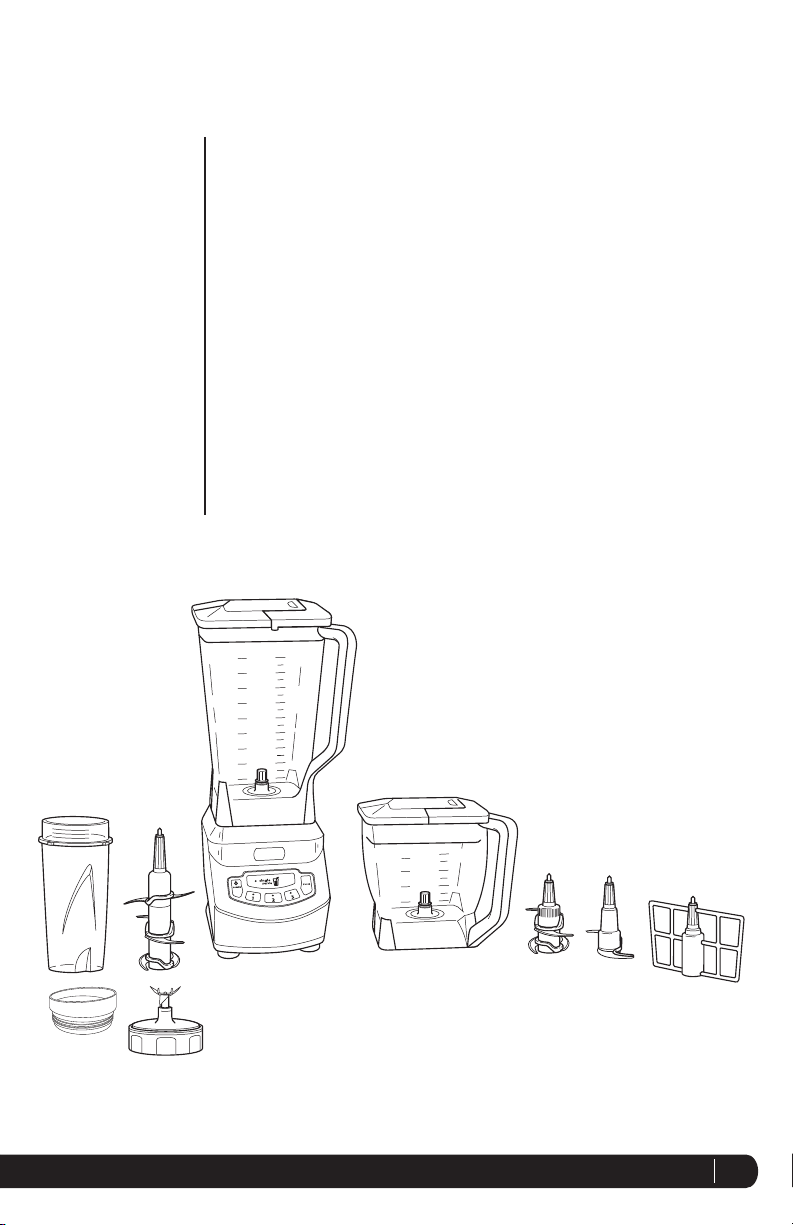
Getting To Know Your Ninja® Kitchen System
a
b
c
d
e
f
g
h
i
j
k
l
a To-Go Lid
b Chopping Blade Assembly (bowl)
c Dough Blade (bowl)
d Dough Paddle (bowl)
e Nutri Ninja® Cup
f Stacked Blade Assembly (pitcher)
g Pitcher Lid with Locking Handle
h Bowl Lid with Locking Handle
NOTE: Attachments are not interchangeable.
5
1-877-646-5288
m
n
i 72 oz. Pitcher
j 40 oz. Bowl
k Gear Shaft
l Nutri Ninja® Blade Assembly
m Motor Base
n Dough Station
o Power Cord (not shown)
p Cord Storage (in back) (not shown)
Page 7

The Ninja® Kitchen System is a professional, high powered innovative tool with a sleek design and outstanding
performance, a true asset to any kitchen. It is perfect for ice crushing, blending, pureeing, and controlled processing.
The Ninja® Kitchen System also features a unique capability to knead dough for pizzas, breads, pretzels and cookies!
Create all of your favorite recipes fast and easy with just one touch of a button. For best results, be sure to carefully read
all the instructions contained in the manual before using this appliance.
FEATURES:
• Patented Ninja® Technology
• Extra Large, 72 oz. Pitcher (MAX liquid Capacity: 64 oz.) - BPA Free
• 40 oz. Bowl - BPA Free
• Nutri Ninja® Cup - BPA Free
• Lock–In Lid, Featuring Pour Spout
• Easy to Clean Electronic Control Panel
• Sturdy, Non-Slip Base
• Cord Storage
ninjakitchen.com
6
Page 8

Before First Use
PLEASE KEEP THESE IMPORTANT
SAFEGUARDS IN MIND WHEN USING THE
APPLIANCE:
IMPORTANT: Make sure that the motor base
is plugged in for use.
IMPORTANT: Never add ingredients into the
container before placing the attachment in
first.
IMPORTANT: Attachments are not
interchangeable.
IMPORTANT: DO NOT attempt to operate the
appliance without the lid on.
IMPORTANT: Never run the appliance empt y.
IMPORTANT: Appliance accessories are not
intended to be used in the microwave as it
may result in damage to the accessories.
WARNING: Stacked
Blade Assembly is
sharp and not locked in
place. If using the pour
spout, ensure the lid
is fully locked onto the
blender pitcher. Failure
to do so will result in a
risk of laceration.
WARNING: Stacked
Blade Assembly
and Chopping Blade
Assembly are sharp
and not locked in
place. If pouring
with the lid removed
from the container,
carefully remove the
Blade Assembly first,
holding it by the shaft. Failure to do so
will result in a risk of laceration.
CAUTION: Do not immerse the motor base
into water or any other liquid.
1 Remove all packaging material and labels from the appliance.
2 Wash the lids, pitcher, bowl, Nutri Ninja cups and blade
assemblies in warm, soapy water. When washing the
blade assemblies, use a dish-washing utensil with a
handle to avoid direct hand contact with blades.
WARNING: Handle the Stacked Blade Assembly,
Chopping Blade Assembly and Nutri Ninja Blade
Assembly with care when washing, as the blades
are sharp.
3 Handle blade assemblies with care to avoid contact
with sharp edges. Rinse and air dry thoroughly.
4 The pitcher, bowl, Nutri Ninja cup, lids, Stacked Blade
Assembly, Chopping Blade Assembly and Nutri
Ninja Blade Assembly are all dishwasher safe. It is
recommended that the lids and blade assemblies be
placed on the top rack. Ensure the blade assembly is
removed from the cup or pitcher before placing in the
dishwasher.
5 Wipe the motor base clean with a damp cloth.
7
1-877-646-5288
Page 9

Assembly & Use of the Pitcher
WARNING: Handle the Stacked Blade Assembly with care, as the blades are sharp.
WARNING: Remove utensils prior to processing. Failure to remove may cause the pitcher to be damaged or
to shatter, which may cause personal injury.
WARNING: Never leave the appliance unattended while in use.
CAUTION: Do not blend hot liquids, doing so may cause excessive pressure buildup, resulting in risk of the
user being burned.
IMPORTANT: Make sure that the motor base is plugged in for use.
ASSEMBLY
Fig. 3a
OR
Fig. 2Fig. 1
It’s best to add the liquid ingredients first and then the dr y ingredients.
1 Review warning and caution statements above before
proceeding to number 2.
2 Place the motor base on a clean, dry, level surface such
as a counter or table top.
3 Align and lower the pitcher onto the motor
base. (Fig. 1) Handle should be aligned slightly to the
right of the “LOCK” symbol on the motor base.
4 Rotate the blender pitcher clockwise until it clicks in
place. As the pitcher rotates, it will lower and the safety
tabs on the bottom of the pitcher will slide under the
safety tabs on the top of the motor base. (Fig. 2)
5 The pitcher can be placed on the motor base two ways;
the handle can be on the front right corner or the front
left corner. (Fig. 3a, Fig. 3b)
6 Holding the Stacked Blade Assembly by the top of the
shaft, place it onto the drive gear inside the pitcher.
Ensure that the Stacked Blade Assembly is seated
properly and is standing upright. (Fig. 4)
NOTE: The Stacked Blade Assembly will fit loosely on
the drive gear.
Fig. 4
7 Add the ingredients to the pitcher, making sure that
they do not exceed the highest measured marking line
on the side of the pitcher.
NOTE: If you need to add additional ingredients while
the appliance is processing, open the pour spout cap
and pour the ingredients in through the opening.
NOTE: When blending any kind of liquids, such as
mixtures of any drinks or smoothies, do not exceed the
“Max liquid” mark (64 oz.) on the pitcher.
8 Plug the power cord into the electrical outlet and press
the power button ( ).
IMPORTANT: As a safety feature, the power
button ( ) will flash and the motor will not work
if the pitcher and lid are not installed correctly.
When the pitcher and lid are installed properly,
the power button ( ) will be solid, indicating that
the appliance is ready for use.
9 Holding the lid by the handle in the upright
position, place it on top of the pitcher aligning the
arrow ( ) located on the lid with the arrow ( ) located
on the pitcher’s handle. (Fig. 5)
Fig. 5Fig. 3b
ninjakitchen.com
8
Page 10

Assembly & Use of the Pitcher - cont.
USE REMOVAL
Fig. 6 Fig. 7 Fig. 8
10 Select the speed that best suits your needs. (Fig. 6)
NOTE: Pulse ingredients for even chopping by pressing
down in short intervals.
11 When you have reached your desired consistency, stop
the appliance by pressing the power button ( ) and
wait for the Stacked Blade Assembly to stop turning.
(Fig. 7)
12 To remove the lid, pull the lid handle up to a 90° angle.
Turn the blender pitcher counter-clockwise to lift off the
base. (Fig. 7, Fig. 8)
WARNING: Never insert your hands in the pitcher
as the Stacked Blade Assembly is sharp. Always
use a spatula to dislodge food that has stuck to
the sides of the pitcher.
9
1-877-646-5288
13 Open the pour spout cap and use the spout to empt y
liquid contents.
14 For thicker consistencies, first remove the lid by
pressing the release button and pulling the lid handle
up to a 90 degree angle to lift lid off the pitcher. Then,
carefully remove the Stacked Blade Assembly by the
top of the shaft. Place Stacked Blade Assembly away
from the work area to avoid accidental contact. Finally,
empty contents from the pitcher.
15 Make sure that the unit is unplugged when not in use.
MAXIMUM CAPACITY
72-oz Pitcher
Dry - Do not exceed 2 1/2 cups (20 oz.)
Wet - Do not exceed 9 cups (72 oz.)
Page 11

Assembly & Use of the Nutri Ninja® Cup
WARNING: Handle the Nutri Ninja Blade Assembly with care, as the blades are sharp.
WARNING: Remove utensils prior to processing. Failure to remove may cause the Nutri Ninja cup to be
damaged or to shatter, which may cause personal injury.
WARNING: Never leave the appliance unattended while in use.
CAUTION: Do not blend hot liquids, doing so may cause excessive pressure buildup, resulting in risk of the
user being burned.
CAUTION: Remove the Nutri Ninja Blade Assembly from the Nutri Ninja cup upon completion of blending. Do
not store ingredients before or after blending them in the cup with the blade assembly attached. Some foods
may contain active ingredients or release gases that will expand if left in a sealed container, resulting in
excessive pressure buildup that can pose a risk of injury. For ingredient storage in the cup, use only To-Go
Lid to cover.
IMPORTANT: Make sure that the motor base is plugged in for use.
ASSEMBLY USE REMOVAL
Fig. 1 Fig. 2 Fig. 3 Fig. 4 Fig. 6
For best results, use short “PULSES”... Practice makes perfect!!
1 Review warning and caution statements above before
proceeding to number 2.
2 Place the motor base on a clean, dry, level surface such
as a counter or table top.
3 Add ingredients to the Nutri Ninja cup.
NOTE: Do not overfill! To avoid spilling, do not add
ingredients past the “Max” fill line.
4 Place the Nutri Ninja Blade Assembly onto the cup and
screw it tightly until you have a good seal. (Fig. 1)
5 Turn the Nutri Ninja cup upside down and place it
onto the motor base, aligning the tabs on the cup with
the motor base. Turn the Nutri Ninja cup clockwise to
lock into place. You will hear a click when the lock is
engaged. (Fig. 2)
6 Press down on the Single Serve button in shor t
intervals to activate. (Fig. 3)
7 When you have reached your desired consistency, stop
the appliance by removing your hand from the Single
Serve button.
8 To remove the Nutri Ninja cup, ensure that the motor
has stopped running. Then turn it counter-clockwise
(Fig. 4) and pull straight up to remove. (Fig. 5)
9 Turn the cup upright and remove the Nutri Ninja Blade
Assembly by twisting the blade assembly counterclockwise. (Fig. 6)
10 Do not store blended contents with the Nutri Ninja
Blade Assembly attached.
11 Place the To-Go lid onto the Nutri Ninja cup, twist to
seal and enjoy!
12 For storage, only use the To-Go lid to cover.
13 Be sure to store the Nutri Ninja Blade Assembly
attached to an empty cup when not in use.
14 Make sure that the motor base is unplugged when not
in use.
Fig. 5
ninjakitchen.com
10
Page 12

Assembly and Use for the 40 oz. Bowl
WARNING: Chopping Blade Assembly is sharp and not locked in place. Make sure to carefully remove lid and
Chopping Blade Assembly, holding it by the shaft, before emptying contents. Failure to do so will result in a
risk of laceration.
WARNING: Remove utensils prior to processing. Failure to remove may cause the bowl to be damaged or to
shatter, which may cause personal injury.
WARNING: Never leave the appliance unattended while in use.
CAUTION: Do not blend hot liquids, doing so may cause excessive pressure buildup, resulting in risk of the
user being burned.
CAUTION: Remove the lid from the bowl upon completion of processing. Some ingredients have the potential
to expand after blending resulting in excessive pressure buildup that can pose a risk of injury.
IMPORTANT: Make sure that the motor base is plugged in for use.
CHOPPING BLADE
ASSEMBLY
Fig. 1
USING THE CHOPPING BLADE ASSEMBLY
1 Review warning and caution statements above before
proceeding to number 2.
2 Place the motor base on a clean, dry, level surface such
as a counter or table top.
3 Align and lower the bowl onto the motor base. Handle
should be aligned slightly to the right of the “LOCK”
symbol on the motor base.
4 Holding the Chopping Blade assembly by the top of
the shaft, place it onto the drive gear inside the bowl.
Ensure that the attachment is seated properly and that
it is standing straight.
NOTE: The blade will fit loosely on the drive gear.
5 Add the ingredients and secure the bowl lid onto the
bowl. (Fig. 1)
6 Plug the power cord into the electrical outlet and press
on the power button ( ).
NOTE: Please refer to “Speed Settings & Uses” chart
for suggested uses and speeds.
MAXIMUM CAPACITY
40-oz Bowl
Dry - Do not exceed 2 1/2 cups (20 oz.)
Wet - Do not exceed 5 cups (40 oz.)
11
1-877-646-5288
DOUGH BLADE
Locking
Tab
Fig. 3Fig. 2
USING THE DOUGH BLADE
IM PO RTAN T: Use only the “DOUGH” button when
using this attachment.
IM PO RTAN T: Use the dough station when using the
dough blade on SPEED 1/DOUGH.
1 Place the dough station on a clean, dry, level surface
such as a counter or table top with the locking tab in
the back. (Fig. 2) Press down to secure the suction feet
to the surface.
2 Place the motor base inside the dough station and push
down until you hear it click into place. (Fig. 2)
3 Secure the bowl onto the motor base.
4 Holding the dough blade by the shaft, place it onto the
drive gear inside the bowl. Ensure that the attachment
is seated properly and that it is standing straight.
5 Add the ingredients and secure the bowl lid onto the
bowl. (Fig. 3)
NOTE: For best results add wet ingredients first and
then add dry ingredients.
6 Plug the power cord into the electrical outlet and press
on the power button ( ).
NOTE: Please refer to “Speed Settings & Uses” chart
for suggested uses.
Page 13

DOUGH PADDLE
Fig. 4
REMOVAL
Fig. 5
USING THE DOUGH PADDLE
IM PO RTAN T: Use only the “DOUGH” button when
using this attachment.
IM PO RTAN T: Use the dough station when using the
dough paddle on SPEED 1/DOUGH.
1 Place the dough station on a clean, dry, level surface
such as a counter or table top with the locking tab in
the back. (Fig. 2) Press down to secure the suction feet
to the surface.
2 Place the motor base inside the dough station and push
down until you hear it click into place. (Fig. 2)
3 Secure the bowl onto the motor base.
4 Holding the dough paddle by the shaft, place it onto the
drive gear inside the bowl. Ensure that the attachment
is seated properly and that it is standing straight.
5 Add the ingredients and secure the bowl lid onto the
bowl. (Fig. 4)
NOTE: For best results add wet ingredients first and
then add dry ingredients.
6 Plug the power cord into the electrical outlet and press
on the power button ( ).
NOTE: Please refer to “Speed Settings & Uses” chart
for suggested uses.
REMOVING THE DOUGH STATION
1 Once finished using the dough blade or the dough
paddle, remove the bowl from the motor base.
2 To remove the motor base from inside the dough
station, pull the locking tab away from the back of the
motor base while you lift the motor base out of the
dough station. (Fig. 5)
3 To release the dough station from the counter or
tabletop, lift the tabs located on suction feet of the
dough station.
ninjakitchen.com
12
Page 14

Care & Maintenance
HOW TO CLEAN
CAUTION: Make sure that the motor base is
unplugged from the power source before inserting
or removing any attachment and before cleaning.
CAUTION: DO NOT immerse the motor base into
water or any other liquid.
1 Separate/remove all parts from each other.
2 Hand Washing: Wash the lids, pitcher, bowl, Nutri
Ninja® cup and blade assemblies in warm, soapy
water. When washing the blade assemblies, use a
dish-washing utensil with a handle to avoid direct hand
contact with blades. Handle blade assemblies with care
to avoid contact with sharp edges. Rinse and air dry
thoroughly.
Dishwasher: The pitcher, bowl, Nutri Ninja® cup, lids,
Stacked Blade Assembly, Chopping Blade Assembly
and Nutri Ninja Blade Assembly are all dishwasher safe.
It is recommended that the lids and blade assemblies
be placed on the top rack. Ensure the blade assembly is
removed from the cup, bowl or pitcher before placing in
the dishwasher.
WARNING: Handle the blade assemblies with care
when washing, as the blades are sharp. Contact
with the blades’ edges can result in laceration.
3 Wipe the motor base clean with a damp cloth
Please call customer service if any servicing needs to
be performed on the appliance at 1-877-646-5288.
.
HOW TO STORE
1 Store the Ninja® Kitchen System upright with the blade
assembly inside the corresponding container with the
lid secured on top. Do not place anything on top. Store
the rest of the at tachments in a safe place where they
will not be damaged and won’t cause harm. Insert the
power cord into the cord storage area located in the
back of the motor base.
NOTE: Do not store blended or unblended
ingredients in the Nutri Ninja cup with the blade
assembly attached.
Cord Storage
RESETTING THE MOTOR THERMOSTAT
The Ninja Professional Blender features a unique safety
system which prevents damage to the unit’s motor and drive
system should you inadvertently overload your appliance.
If the appliance is being overloaded, the motor will
stop. Allow the appliance to cool for approximately
15 minut es. To reset the appliance, follow the resetting
procedure below:
1 Unplug the appliance from the electrical outlet.
2 Remove and empty the container and ensure that no
food is jamming the blade assemblies.
3 Allow the appliance to cool for approximately 15
minutes.
4 Re-install the container onto the base and re-plug the
appliance into the electrical outlet.
5 Proceed to use the appliance as before making sure not
to exceed the recommended maximum capacities.
13
1-877-646-5288
Page 15

Speed Chart
FUNCTION CONTAINER ATTACHMENT
Single Serve
Blending
Mincing Bowl
Kneading Bowl Dough Blade 1
Dough Mixing Bowl Dough Paddle 1 Cookie dough
Blending
Grinding
Grating
Chopping
Mixing Pitcher or Bowl Blade Assembly 2
Ice Crushing
Pureeing
Nutri Ninja Cup
Pitcher
Nutri Ninja Cup
Bowl
Nutri Ninja Cup
Bowl
Nutri Ninja Cup
Bowl
Nutri Ninja Cup
Pitcher or Bowl
Nutri Ninja Cup
Pitcher
Nutri Ninja Cup
Nutri Ninja Blade
Assembly
Chopping Blade
Assembly
Stacked Blade Assembly
Nutri Ninja Blade
Assembly
Chopping Blade
Assembly
Nutri Ninja Blade
Chopping Blade
Assembly
Nutri Ninja Blade
Assembly
Chopping Blade
Assembly
Nutri Ninja Blade
Assembly
Blade Assembly
Nutri Ninja Blade
Assembly
Blade Assembly
Nutri Ninja Blade
Assembly
SPEED
BUTTON
Single Serve
Pulse
2
Single Serve
2
Single Serve
3 or Pulse
Single Serve
Pulse
Single Serve
3
Single Serve
3
Single Serve
TYPE OF FOOD
Smoothies
Frappes
Milk Shakes
Onion
Garlic
Herbs
Bread dough
Pie dough
Pizza dough
Pretzel dough
Pâtés
Stewed fruits
Dips
Apple sauce
Spreads
Soups*
Baby food
Meat
Grated cheese
Bread crumbs
Salsa
Vegetables
Nuts
Light cake mixes
Batters
Ice
Smoothies
Smooth soups*
Milkshakes
IM PO RTAN T: Do not run the appliance over 4 minutes at a time to prevent overheating of the appliance.
* When blending sauces and soups, make sure they’re cooled to room temperature first - Ninja® containers are not intended for
hot blending.
ninjakitchen.com
14
Page 16

Troubleshooting Guide
PROBLEMS POSSIBLE REASONS & SOLUTIONS
Motor Doesn’t Start or Blade
Assembly Doesn’t Rotate.
Food is Unevenly Chopped.
Make sure the container is securely placed on motor base.
Make sure the lid is securely on container in the correct position (align arrows).
The appliance is turned “Off”. Press the power button ( ) to turn “On”.
Check that the plug is securely inserted into the electrical outlet.
Check the fuse or circuit breaker.
The unit has overloaded. The appliance will stop and the power light will remain
on while speeds 1, 2 and 3 will flash. Unplug and wait approximately 15 minutes
before using again.
The unit has overheated. Unplug and wait approximately 15 minutes before
using again.
Check to make sure the unit is not overloaded.
Either you are chopping too much food at one time, you are chopping food with
different textures or the pieces are not of even size. Process smaller amounts per
batch.
Food is Chopped Too Fine or is
Too Watery.
Food Collects On
Lid or On the Sides of the
Container.
You Cannot Achieve Snow
From Solid Ice.
Dough Station Won’t Stick to
Counter or Table Top.
Motor Base Won’t Fit in
Dough Station.
Replacement Parts
The food has been over processed. Use pulse button for controlled processing.
The mixture is to thick. Add more liquid.
Do not use ice that has been sit ting out or has started to melt. Use ice straight
from the freezer.
Make sure sur face and suction feet are wiped clean. Suction feet will only stick
to smooth sur faces. Suction feet WILL NOT stick on some surfaces such as,
wood, tile and non-polished finishes.
DO NOT attempt to use appliance when the dough station is stuck to a
surface that is not secure, (cutting board, platter, plates, etc.).
Ensure that the cord is not in the way and there are no foreign objects, materials
or food inside the dough station.
To order additional parts and accessories, please visit our website: ninjaaccessories.com
or feel free to contact customer service: 1-877-646-5288.
15
1-877-646-5288
Page 17

Notes
ninjakitchen.com
16
Page 18

Notes
17
1-877-646-5288
Page 19

ONE (1) YEAR
LIMITED WARRANTY
The 1-Year Limited Warranty applies to purchases made from authorized retailers of SharkNinja Operating
LLC. Warranty coverage applies to the original owner and to the original product only and is not
transferable.
SharkNinja warrants that the unit shall be free from defects in material and workmanship for a period of
1 year from the date of purchase when it is used under normal household conditions and maintained
according to the requirements outlined in this Owner’s Guide, subject to the following conditions and
exclusions.
What is covered by my warranty?
1. The original unit and/or non-wearable components deemed defective, in SharkNinja’s sole discretion,
will be repaired or replaced for up to 1 year from the original purchase date.
2. In the rare event that a replacement unit is issued, the warranty coverage ends six months after the
receipt date of the replacement unit or the remainder of the existing warranty, whichever is greater. If
the unit is replaced, SharkNinja reserves the right to replace the unit with one of equal or greater value.
What is not covered by my warranty?
Our Customer Care/Product Specialists are available to provide all the warranty service options available
to you, including the possibility of upgrading to our VIP Warranty Service Options for select product
categories.
1. Normal wear and tear of wearable parts (including all blending vessels, lids, blades and blender base)
which require regular maintenance and/or replacement to ensure the proper functioning of your unit are
not covered by this warranty.
2. Any unit that has been tampered with or used for commercial purposes.
3. SharkNinja will cover the cost for the customer to send the unit to us for repair or replacement. A fee
of $19.95 for return shipping costs will be charged at the time of return shipment of the repaired or
replacement unit.
4. Damage caused by misuse, abuse, or negligent handling, or damage due to mishandling in transit.
5. Consequential and incidental damages.
6. Defects caused by or resulting from damages from shipping or from repairs, service, or alteration to the
product or any of its parts which have been performed by a repair person not authorized by SharkNinja.
7. Products purchased, used or operated outside of North America.
Problems with your unit/How to get service:
If your appliance fails to operate properly while in use under normal household conditions within the
warranty period, visit ninjakitchen.com for product care/maintenance self-help. Our customer care and
product specialists are also available at 1-877-646-5288 to assist with product support and warranty
service options.
How to initiate a warranty claim:
You can call 1-877-646-5288 to have a customer care specialist assist you. Please note, you must call
1-877-646-5288 to initiate a warranty claim. Return and Packing Instruction information will be provided at
that time.
Replacement parts are available for purchase at ninjakitchen.com. For more information on what is
classified as wearable and non-wearable parts, please visit ninjakitchen.com/warranty.
This warranty gives you specific legal rights, and you may also have other rights that vary from state to state.
Some states do not permit the exclusion or limitation of incidental or consequential damages, so the above
may not apply to you.
How to register your product:
Please visit registeryourninja.com or call 1-877-646-5288 to register your new Ninja® product. You will be
asked to provide the store name, date of purchase and model number along with your name and address.
The registration will enable us to contact you in the unlikely event of a product safety notification. By
registering you acknowledge to have read and understood the instructions for use, and warnings set forth in
the accompanying instructions.
ninjakitchen.com
18
Page 20

SharkNinja Operating LLC
US: Newton, MA 02459
CAN: Ville St-Laurent, QC H4S 1A7
1-877-646-5288
ninjakitchen.com
Ninja and Nutri Ninja are registered trademarks of SharkNinja Operating L LC.
Illustrations may differ from actual product. We are constantly striving to improve our
products, therefore the specifications contained herein are subject to change without notice.
For SharkNinja U.S. Patent information visit sharkninja.com/USPatents.
© 2017 SharkNinja Operating LLC
BL660W_30_IB_ENG_161212_3
PRINTED IN CHINA
 Loading...