

Page 1
OWNER’S GUIDE
BL490UK2
®
www.ninjakitchen.eu
08 00 8 62 0453
Page 2
3
®
080 0 862 045 3
2
®
www.ninjak itchen.eu
IMPORTANT SAFETY INSTRUCTIONS
FOR HOUSEHOLD USE ONLY
READ ALL INSTRUCTIONS BEFORE USE
SAVE THESE INSTRUCTIONS
Read all instructions before using your Ninja® product. When
using an electrical appliance, basic safety precautions should
always be observed, including the following:
IMPORTANT: This appliance is not intended for use by persons
with reduced physical, sensory or mental capabilities, or lack
of experience and knowledge, unless they have been given
supervision or instruction concerning use of the appliance by a
person responsible for their safety.
Children shall not use or play with this appliance. Close
supervision is necessary to keep appliance and cord out of reach
of children during use.
WARNING
TO REDUCE THE RISK OF FIR E, ELECTRIC SHOCK OR INJURY:
1 WARNING: Remove utensils prior to processing. Failure to
remove may cause the jar to be damaged or to shatter which
may cause personal injury.
2 WARNING: The blade assemblies are sharp, not locked in
place and removable, handle with care. When handling the
blade assemblies, always hold by the shaft. Failure to do so
will result in a risk of laceration.
3 WARNING: Stacked Blade Assembly is sharp and not
locked in place. If using the pour spout, ensure the lid is
fully locked onto the pitcher. If pouring with the lid removed,
carefully remove the Stacked Blade Assembly fir st, holding it
by the shaft. Failure to do so will result in a risk of laceration.
4 WARNING: Chopping Blade Assembly is sharp and not
locked in place. Before emptying contents carefully remove
lid and Chopping Blade Assembly, holding it by the shaft.
Failure to do will result in risk of laceration.
5 CAUTION: Do not blend hot liquids, doing so may cause
excessive pressure build-up, resulting in risk of the user
being burned.
6 CAUTION: We do not recommend grinding in any of our
Nutri Ninja® cups.
7 CAUTION: Remove the Pro Extractor Blades™ Assembly
from the Nutri Ninja Cup upon completion of blending. Do not
store ingredients before or after blending them in the cup with
the blade assembly attached. Some foods may contain active
ingredients or release gases that will expand if left in a sealed
container, resulting in excessive pressure buildup that can pose
a risk of injury. For ingredient storage in the cup, use Sip & Seal
®
Lid to cover.
8 WARNING: Extension cords are no t recommended for use
with this product.
9
CAUTION: ln order to avoid a hazard due to inadver tent
resetting of the thermal cut-out, this appliance must not be
supplied through an external switching device, such as a timer,
or connected to a circuit that is regularly switched on and of f by
the utili ty.
10 IMPORTANT: Attachments are not interchangeable.
11 IMPORTANT: Never add ingredients to the containers (processor
bowl, pitchers, etc.) before inser ting the blade assembly first.
12 IMPORTANT: Do not attempt to operate the container (processor
bowls, pitchers, etc.) without t he lid on.
13 IMPORTANT: Never run the appliance empty.
14 IMPORTANT: Make sure that the motor base is plugged in for use.
15 IMPORTANT: Make sure that the motor base is unplugged when
not in use.
16 To protect against electrical shock, do not submerge the appliance or
allow the power cord to come into contact with water or any other liquid.
17 DO NOT allow the appliance to be used by children. Close attention is
necessary when used near children. This is not a toy.
18 Never leave the appliance unattended when in use.
19 Turn the appliance off and remove the power cord from the electrical
outlet when not in use, before assembling or disassembling parts,
accessing parts that move while in use, and before cleaning. To unplug,
grasp the plug and pull from the electrical outlet. Never pull from the
power cord.
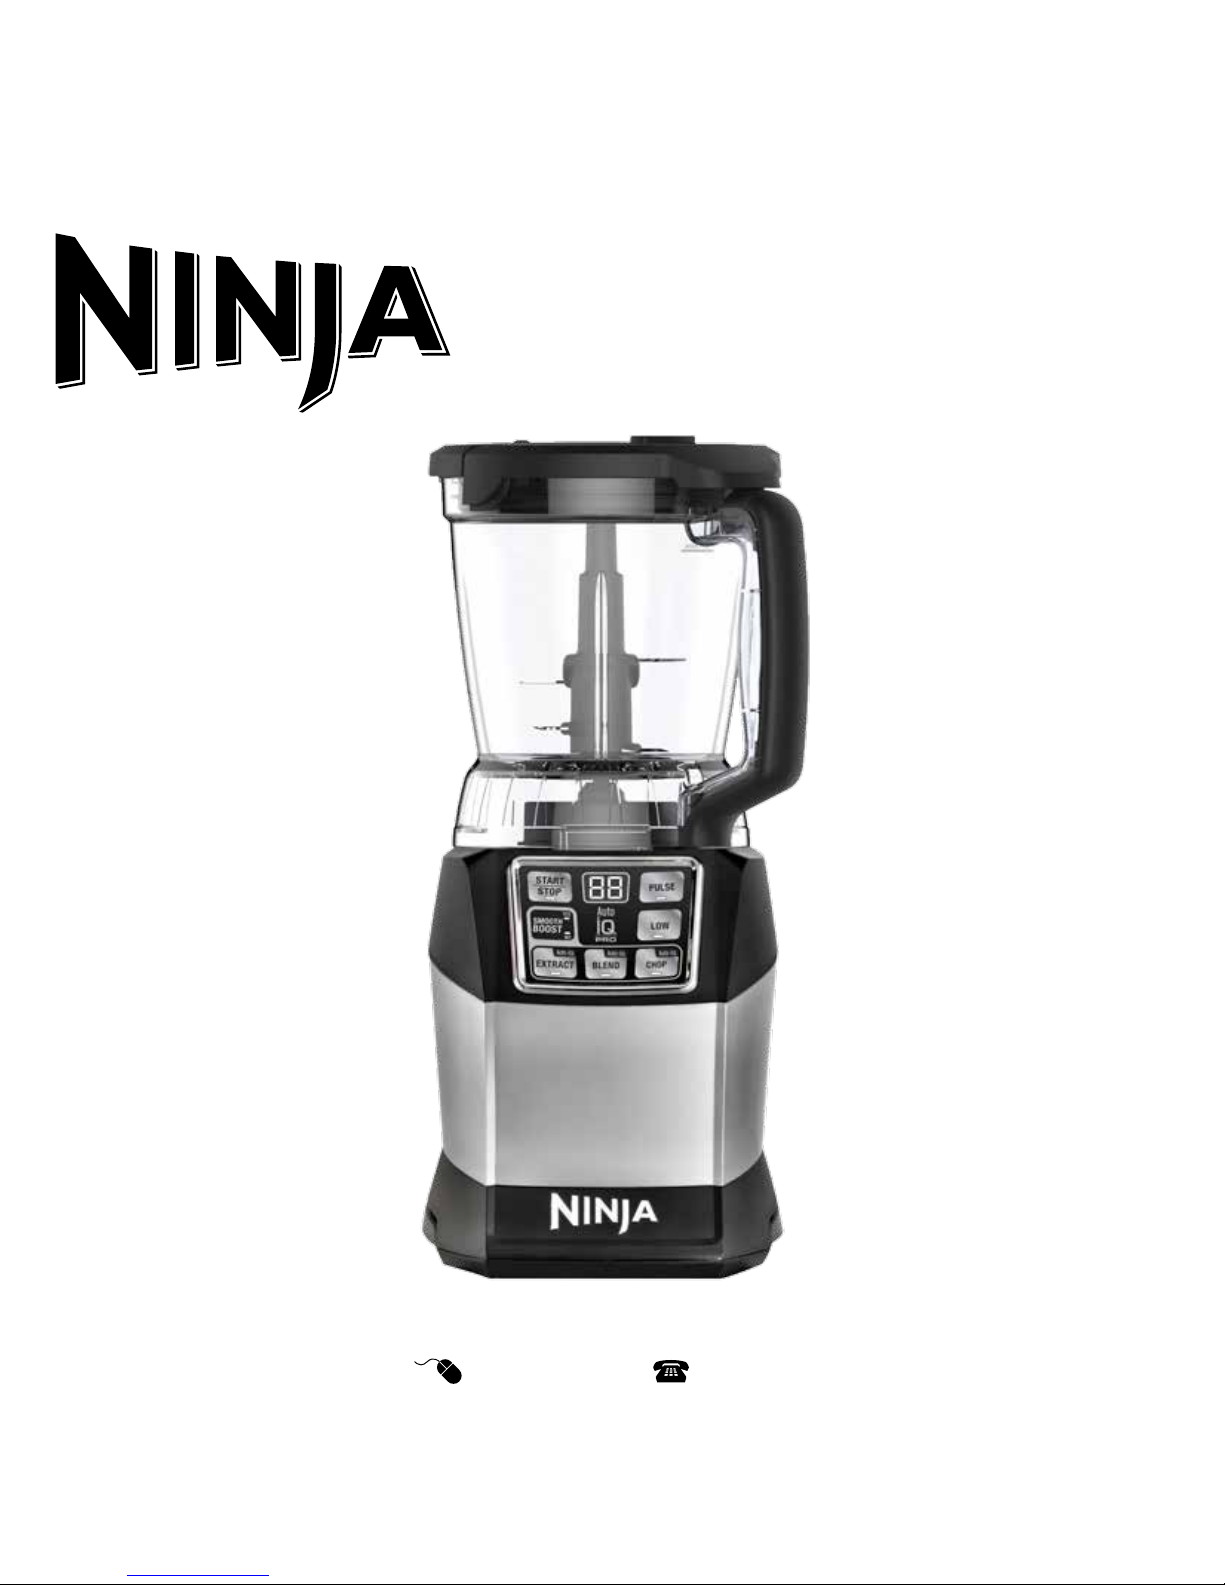
Welcome to the Ninja® Auto-iQ® Compact Kitchen System all-purpose,
customisable, everyday kitchen assistant. The Ninja Auto-iQ Compact Kitchen
System features pre-programmed settings that take the guesswork out of drink and
meal making. These programs are timed to deliver consistent, delicious results
that finish on their own so all you have to do is press a button and enjoy.
If you should have a question about your Ninja Auto-iQ Compact Kitchen System, please
call the Ninja Customer service line at 0800 862 0453.
THAN K YOU!
REGISTER YOUR PURCHASE:
www.ninjakitchen.eu
0800 862 0453
RECORD THIS INFORMATION:
Model Number: ���������������������������������������������
Date of Purchase (Keep receipt):
����������������������������������������������������������
THIS BOOK COVERS MODEL NUMBER:
BL490UK2 30
TECHNICAL SPECIFICATIONS:
Voltage: 220-240V~, 50/60Hz
Power: 1200W
Pitcher Capacity: 2.1 L
Max Liquid Capacity: 2.0 L
Processor Bowl Capacity: 1.2 L
Nutri Ninja
Cup Capacity: 500ml
650ml
This appliance co mplies with the WEE E-Directive 2 012/19/EU on the dispo sal of electrical and e lectronic equipme nt (WEEE).
This marking indi cates that this pr oduct should not be disp osed with other ho usehold wastes th roughout the EU. To prev ent possible harm to t he
environment o r human health from un controlled wast e disposal, recycle it r esponsibly to prom ote the sustainable r euse of material sour ces. To
return your us ed device, please us e the return and colle ction systems or c ontact the ret ailer where this produ ct was purchased. T hey can take
this product f or environmental s afe recycling.
This appliance co mplies with the Europ ean directives f or electromagne tic compatibility (E MC) 2014/30/E U and its revisions, as w ell as Low Voltage
Directive (LVD) 2 014/35/EU and i ts revisions.
Guarantee: This produ ct is unconditio nally guaranteed f or one year against a ll defects of wor kmanship and mate rials. This guaran tee does not aff ect your stat utory
rights. If th is product prov es unsatisfac tory please co ntact our cust omer service de partment on f reephone 08 00 862 045 3 or by e-mail ukse rvice@eur o-pro.com.
Page 3

5
®
080 0 862 045 3
4
®
www.ninjak itchen.eu
FEATURES:
• Nutrient & Vitami n Extracti on
*
• 1200 Watt Motor
• User Interface:
START/STOP
START/STOP is a m anual setting t hat runs at High spee d for 60 seconds . This button c an be pressed at an y time if you wish to st op a program.
SMOOTH BOOST
™
SMOOTH BOO ST YES/NO is a sp ecial feature av ailable when using the A uto-iQ® EXTR ACT and Auto -iQ BLEND. This se tting can be use d to control the co nsistency of you r beverage
recipes. Sele ct SMOOTH BO OST YES when sm oother, creamier re sults are desired . This is the default pr ogram for both A uto-iQ EX TRACT and Au to-iQ BLEND p rograms. Selec t
SMOOTH BO OST NO when more o f a textured con sistency is desir ed.
PULSE
Offers gre ater control to h elp prevent over- processing or ov er-blending. Simply h old down the PUL SE button and t he blades will run at a high s peed for a quick burs t of power to brea k
through ice or c hop vegetable s.
LOW
LOW is a manual set ting that runs fo r 30 seconds and will a utomatically sh ut off. On this set ting, blades rot ate at a slower spee d, allowing heavy r ecipes like doughs t o be mixed.
AUTO-i Q EXTR ACT
*
EXTR ACT should be use d when blending har d, leafy, or fibrous w hole fruits and ve getables, includ ing apples, kale, and c elery. This optimiz ed program allows y ou to blend fresh it ems
with their ski ns, seeds, and stem s into nutrient ex tractions. B efore using EX TRACT, selec t SMOOTH BOOS T YES or NO depen ding on your desired c onsistency.
AUTO-iQ BLEND
BLEND can be us ed to make a range of b everages that d o not include hard or fib rous fresh ingre dients, such as milks hakes, protein sm oothies, soft f resh-fruit sm oothies and froz en
cocktails. B efore using BLE ND, select SMOOT H BOOST YES or N O depending on your de sired consiste ncy.
AUTO-iQ CHOP
CHOP is a progra m composed of time d pulses and pause s to deliver consist ent chopping res ults for a range of re cipes including ingr edient prep, sals as, and ground meat . When
ingredients h ave reached yo ur desired consist ency, stop by selec ting AUTO-iQ C HOP or START/ST OP.
• Sip & Seal
®
Lids for drinks o n the go.
• Nutri Ninja
®
Cups and Sip & Seal L ids, BPA Free, and dish washersafe.
• 1.2 L Food Process or Bowl & lid, are BPA Fre e, and dishwasher sa fe.
• 2.1 L Pitcher (max liquid cap acity: 2 L) & lid, BPA F ree, and dishwashe r safe.
• Cord Wrap locate d on back of the moto r base.
Ice to Snow
Crushing Ice t o Snow is easy – take ic e cubes directly f rom your freez er, and put in a dry Ninja
®
Cup – use the pulse f eature in shor t quick bursts unt il it’s a snow-like consi stency.
*
Extra ct a nutritio us drink cont aining vitami ns and nutrien ts from frui ts and veget ables.
IMPORTANT SAFETY INSTRUCTIONS
FOR HOUSEHOLD USE ONLY
READ ALL INSTRUCTIONS BEFORE USE
SAVE THESE INSTRUCTIONS
20 DO NOT abuse the power cord. Never carry the appliance by the
power cord or yank it to disconnect from the electrical outlet; to
unplug, grasp the plug, not the cord.
21 DO NOT use with damaged cord or plug.
22 DO NOT USE if the appliance is not working, after it has been
dropped, dropped into water, damaged, or left outdoors.
23 NO SERVICEABLE PARTS. Incorrect re-assembly or repair can cause a
risk of electrical shock or injury to persons when the appliance is used.
24 DO NOT let the power cord hang over the edge of a table or counter
or touch hot surfaces such as the stove.
25 Always use the appliance on a dry, level surface. Make sure the
suction cup feet are wiped clean and no crumbs or residue are on the
bottom of them.
26 Keep hands, hair, clothing, and utensils out of container while
processing to reduce the risk of severe injury to persons or damage
to the appliance. A scraper may be used ONLY when the appliance is
not running.
27 Avoid contact with moving parts.
28 DO NOT attempt to sharpen blade assemblies.
29 DO NOT use the appliance if the blade assembly is bent or damaged.
30 To reduce risk of injury, never place the blade assembly on the motor
base without the proper container.
31 DO NOT operate this appliance on or near any hot surfaces (such as
on a gas or electric burner or in a heated oven).
32 T he use of attachments or accessories (including canning jars), that
are not recommended or sold by the manufacturer may cause fire,
electric shock, or personal injury.
33 DO NOT remove the cont ainer (cup, processor bowl, etc.) from the
motor base while the appliance is running.
34 To reduce the risk of injury, NEVER operate the appliance without
the blade assembly installed in a container. DO NOT try to defeat
the interlock mechanism; make sure the blade assembly is properly
installed before operating the appliance.
35 DO NOT expose containers (cups, processor bowls, etc.) to extreme
temperature changes.
36 DO NOT over fill.
37 Max ON time is 60 seconds under 1200W load. If the appliance
overheats, a thermal switch will become activated and shut off
the motor. To reset, unplug the appliance and let it cool down for
approximately 30 minut es before using again.
38 MAX CHOP program run is 2 full runs (30 pulses). After 2 consecutive
CHOP program runs allow 10 minutes to pass before running the
CHOP program again for up to an additional further 2 consecutive
runs (30 pulses).
39 To reduce the risk of burns, always allow the appliance to cool before
taking off parts and before cleaning.
40 To avoid injury, never attempt to place the Pro Extractor Blades™
Assembly onto the motor base without first assembling the blade
assembly to the Nutri Ninja® Cup.
41 THIS PRODUCT IS INTENDED FOR HOUSEHOLD USE ONLY. Do not
use this appliance for anything other than its intended use. Do not
use outdoors.
42 Appliance accessories are NOT intended to be used in the
microwave. DO NOT place the containers (cups, processor bowls, lids,
etc.) in the microwave as it may result in damage to the accessories.
43 The ma ximum power rating is based on the chopping blade
(processor bowl) that drives the greatest power; other recommended
attachments may draw significantly less power or current.
Page 4

6 7
® ®
080 0 862 045 3
www.ninjak itchen.eu
Motor Bas e
1.2 L
Processor Bowl
Chopping Blade
Assembly
Dough Blade
Assembly
Feed Chute
(food processor)
Spindle
(food processor)
Slicing/Shredding
Disc
(food processor)
Grating Dis c
(food processor)
ACCESSORIES
500 ml 650 ml
Nutri Ninj a
®
Cups
2.1 L
Max liquid capacity:
2 L
Pitcher/Lid
Stacked Bla de
Assembly
(pitcher)
NOTE: S ip & Seal Li d and Pro Ex tract or
Blades As sembly can b e used wit h all
Ninja® Cups.
Pro Ext ractor
Blades
™
Assembly
Sip &
Seal
®
Lid
NOTE: Ninja® Auto-iQ®
Technology can s ense
which jar is on the m otor
base. The fun ction lights
will illuminate de pending
on which cont ainer is
placed on the mo tor base.
IMPORTA NT: When proces sing soft
dry ingred ients such as day -old
bread or chee se use quick, sho rt 1
second pulse s. Do not over fill to avoid
overheating the appliance. Allow the
appliance to co ol after each us e.
1 Review warnin g and caution state ments
above befor e proceeding to numb er 2.
2
Place the moto r base on a clean, dry, level
surface suc h as a counter or tablet op. Press
down on the mot or base to make sure th at the
suction cups ad here to the counter o r tabletop.
3 Add ingredient s to the Nutri Ninja Cup.
NOTE: Do not overfill! To avoid spilling , do
not add ingredien ts past the “MAX” fill line.
4 Place the Pro E xtractor Bl ades Assembly
onto the cup and t ightly screw it on
clockwise un til you have a good seal. (F ig. 1)
5
Turn the Nutri Ninja Cup u pside down and place
it onto the mot or base, aligning the tabs o n the
cup with the mot or base. Rotate t he Nutri Ninja
Cup clockwis e until it locks in place, yo u will
hear a click when th e lock is engaged. (Fig . 2)
6 Once the cup is eng aged, the program s
available for that a ttachment will illumin ate.
Select the pr ogram desired base d on your
recipe. (Fig. 3)
7 To pause the appliance, p ress the select ed
speed or Auto -iQ program a seco nd time.
When the pro gram is paused, the ligh t on the
program but ton will flash until you pr ess it
again to resume th e rest of the progr am.
8 Once you have r eached your desired
consistenc y, press the START/STOP button
to turn the pro gram off. Turn the Nutr i Ninja
Cup anticlockwise (Fig. 4) and pull straight
up to remove. (Fig. 5)
9 Turn the cup uprigh t and remove the Pr o
Extrac tor Blades Assemb ly by twisting th e
Pro Ext ractor Blades Ass embly anticlock wise.
10 Do not st ore blended conten ts in the Nutri
Ninja Cup with the P ro Extrac tor Blades
Assembly attached. (Fig. 6)
11 Place t he Sip & Seal® Lid onto the Nut ri
Ninja® cup, twist to se al and enjoy!
12 Make sure that the mo tor base is unplugged
when not in use.
13 For storage in the cup, u se Sip & Seal Lid to
cover.
14 To release t he motor base from t he counter or
tabletop, plac e your fingers under th e sides of
the black paddle s on the sides of the bas e and
lift up to releas e suction cup feet. (F ig. 7)
15 Be sure to store the P ro Extrac tor Blades
Assembly at tached to an empt y cup when
not in use.
USE REMOVALASSEMBLY
fig. 2 fig. 3 fig. 4 fig. 5 fig. 7fig. 1
For best re sults, follow t he recipe/in gredient loading i nstructio ns found in your Ins piration Guide.
WARNING: H andle the Pro Ex tractor Blad es™ Assembly wi th care, as the blad es are sharp.
WARNING: R emove utensils p rior to process ing. Failure to r emove may cause th e Nutri Ninja Cup t o be damaged or to sha tter, which may c ause personal in jury.
WARNING: N ever leave the applia nce unattend ed while in use.
CAUTIO N: Do not blend hot li quids, doing so may c ause excessive pr essure buildu p, resulting in ri sk of the user bein g burned.
CAUTIO N: Remove the Pr o Extract or Blades™ Assembl y from the Nutr i Ninja Cup upon comp letion of blendin g. Do not store in gredients be fore or after
blending them i n the cup with the bl ade assembly at tached. Som e foods may cont ain active ingre dients or releas e gases that will ex pand if left in a se aled
container, r esulting in exces sive pressur e buildup that can po se a risk of injur y. For ingredient s torage in the cup , use Sip & Seal® Lid to cover.
ASSEMBLY AND USE
FOR THE NUTRI NINJA®
CUPS
fig. 6
Page 5

8 9
® ®
080 0 862 045 3
www.ninjak itchen.eu
For best re sults, follow t he recipe/in gredient loading i nstructio ns found in your Ins piration Guide.
WA RNING: Handle th e Stacked Blade As sembly with c are, as the blades ar e sharp.
WA RNING: Remove u tensils prior to p rocessing. F ailure to remove m ay cause the pitc her to be damaged or t o shatter, which m ay cause person al injury.
WA RNING: Never lea ve the appliance una ttended whil e in use.
C AUTION: Do no t blend hot liquids , doing so may cause exc essive press ure buildup, res ulting in risk of th e user being burne d.
IMPORTA NT: Make sure that t he motor base is plu gged in for use.
NOTE: Ninja® Auto-iQ®
Technology can s ense
which jar is on the m otor
base. The fun ction lights
will illuminate de pending
on which cont ainer is
placed on the mo tor base.
1 Review war ning and caution st atements
above befor e proceeding to numb er 2.
2 Place the m otor base on a clean, dr y, level
surface suc h as a counter or tablet op. Press
down on the mot or base to make sure th e
suction cups ad here to the counter o r tabletop.
3 Holding the Sta cked Blade Assembl y by the
top of the shaf t, place it onto the d rive gear
inside the pitch er. Ensure that the Sta cked
Blade Assembl y is seated proper ly and is
standing upright. ( Fig. 1)
NOTE: The Stacke d Blade Assembly will fit
loosely on the dr ive gear.
4 Align and lower th e pitcher onto the mo tor
base. (Fig. 2 ) Handle should be aligned
slightly to the rig ht of the “LOCK” symb ol on
the motor bas e.
5 Rotate the pi tcher clockwise u ntil it locks in
place, you will hear a clic k when the lock is
engaged. (Fig. 3)
NOTE: The pitcher c an be placed on the
motor base t wo ways; the handle c an be on
the front righ t corner or the fro nt left corner.
(Fig. 4, Fig . 5)
6 Add the ingr edients to the pitc her, making
sure that the y do not exceed the highe st
measured mar king line on the side of the
pitcher.
NOTE: When blending a ny kind of liquids,
such as mixtur es of any drinks or smoo thies,
do not exceed t he “MAX LIQUID” mark (2 L)
on the pitcher.
NOTE: If you need to a dd additional
ingredients w hile the appliance is
processing, t urn the unit off, ope n the
pour spout cap, a nd pour the ingredient s in
through the op ening.
7 Holding the lid by th e handle in the upright
position, place i t on top of the pitcher
aligning the triangl e located on the lid wit h
the triangle loc ated on the pitche r’s handle.
(Fig. 6) Press the ha ndle down until you
hear a click. The t riangles on the lid and th e
blender handle MUST be aligned in order for
the blender to tu rn on. (Fig. 7)
8 Plug the power c ord into the electr ical outlet.
The functio n lights will illuminate.
fig. 1 fig . 2 fig. 3 fig. 4 fig. 5 fig. 6
fig. 7
ASSEMBLY AND USE
FOR THE 2.1 L PITCHER
(Max Liquid Ca pacity: 2 L)
CAUTION: The
Stacked Bla de
Assembl y is sharp and
not locked in pla ce. If
using the pou r spout,
ensure the li d is fully
locked
onto the
blender
pitcher.
CAUTION: The
Stacked Bla de Assembly
is sharp and no t locked
in place. If po uring with
the lid remov ed, always
remove the S tacked
Blade
Assembl y
first.
ASSEMBLY
NOTE: Ninja® Auto-iQ®
Technology can s ense
which jar is on the m otor
base. The fun ction lights
will illuminate de pending
on which cont ainer is
placed on the mo tor base.
9 Review warnin g and caution state ments on
page 9 before p roceeding to numbe r 10.
10 Once th e pitcher is engaged, t he programs
available for that a ttachment will illumin ate.
Select the pr ogram desired base d on your
recipe. (Fig. 8) The Auto-iQ prog ram will
stop the applian ce automatically at t he end
of the progra m.
11 To pause the a ppliance, press the s elected
speed or Auto -iQ program a seco nd time.
When the pro gram is paused, the ligh t on the
program but ton will flash until you pr ess it
again to resume th e rest of the progr am.
NOTE: Puls e ingredients for ev en chopping
by holding the PU LSE button un til your
desired consistenc y is reached.
12 When you h ave reached your de sired
consistenc y, stop the appliance by pr essing
the START/STOP button and wait for the
Stacked Blade A ssembly to stop t urning.
13 Turn the pitch er anticlockwise t o remove and
then lift of f the base. (Fig. 9)
CAUTIO N: Never inser t your hands
in the pitche r as the blades are sh arp.
Always use a s patula to dislod ge food
that has st uck to the sides of t he pitcher.
14 Open th e pour spout cap and use t he spout to
empty liquid con tents. (Fig. 10)
15 For thicker consist encies, first remov e the
lid by pressing th e release button a nd pulling
the lid handle up to a 9 0 degree angle to lift
lid off the pitc her. Then, carefully re move
the Stacked B lade Assembly by th e top of
the shaft. P lace Stacked Blad e Assembly
away from the w ork area to avoid acc idental
contact. F inally, empty conten ts from the
pitcher.
16 Make sure t hat the motor base is u nplugged
when not in use.
17 To release th e motor base from th e counter
or tabletop, plac e your fingers under t he
sides of the black p addles on the sides of th e
base and lift up t o release suction cup f eet.
(Fig. 11)
USE REMOVAL
fig. 8 fig. 9 fig. 10 fi g. 11
ASSEMBLY AND USE
FOR THE 2.1 L PITCHER
(Max Liquid Ca pacity: 2 L)
Page 6

10 11
® ®
080 0 862 045 3
www.ninjak itchen.eu
CAUTION:
Chopping Blade
Assembly is sharp
and not locked
in place. Before
emptying contents,
carefully remove lid
and Chopping Blade
Assembly, holding it
by the shaft. Failure
to do so
will result
in risk of
laceration.
NOTE: Ninja® Auto-iQ®
Technology can s ense
which jar is on the m otor
base. The fun ction lights
will illuminate de pending
on which cont ainer is
placed on the mo tor base.
1 Review warnin g and caution state ments
above befor e proceeding to numb er 2.
2 Place the m otor base on a clean, dr y, level
surface suc h as a counter or tablet op. Press
down on the mot or base to make sure th e
suction cups ad here to the counter o r tabletop.
3 Holding the desire d blade assembly by th e
top of the shaf t, place it onto the d rive
gear inside the bo wl. Ensure that the b lade
assembly is sea ted properly and is s tanding
upright. (Fig. 1)
NOTE: The blade ass embly will fit loosely on
the drive gear.
4 Align and lower th e Processor Bow l onto
the motor bas e. (Fig. 2) Handle should be
aligned slightly to t he right of the “LOCK”
symbol on the m otor base.
5 Rotate the b owl clockwise unt il it locks in
place, you will hear a clic k when the lock is
engaged. (Fig. 3)
NOTE: The bowl can b e placed on the motor
base two wa ys; the handle can be on t he
front right co rner or the front le ft corner.
(Fig. 4, Fig . 5)
6 Add the ingr edients to the bow l, making sure
that they do no t exceed the “MAX” fill line
on the side of the bo wl.
NOTE: The 1.2 L Proces sor Bowl is not
intended for ble nding drinks. Do not ove rfill.
7 Holdin g the feed chute lid, plac e it on top of
the bowl and tu rn clockwise aligning t he arrow
located on th e lid with the arrow loc ated on
the bowl's handle. You will h ear a click when
the lid is locked in plac e. (Fig. 6) The triangles
on the lid and the Pr ocessor Bowl ha ndle
MUST
be aligned in order fo r the blender to
turn on. (Fig. 7)
8 Plug the pow er cord into the elec trical outlet.
The functio n lights will illuminate.
or
fig. 1 fig. 2 fig. 3 fig. 4 fig. 5 fig. 6
fig. 7
For best re sults, follow t he recipe/in gredient loading i nstructio ns found in your Ins piration Guide.
WA RNING: Handle th e Chopping Blade As sembly with c are, as the blades ar e sharp.
WA RNING: Remove u tensils prior to p rocessing. F ailure to remove m ay cause the bowl t o be damaged or to sha tter, which may ca use personal inj ury.
WA RNING: Never lea ve the appliance una ttended whil e in use.
C AUTION: Do no t blend hot liquids , doing so may cause exc essive press ure buildup, res ulting in risk of th e user being burne d.
IMPORTA NT: Make sure that t he motor base is plu gged in for use.
ASSEMBLY
USE REMOVAL USE
Chopping Blade
Assembly
Dough Blade
Assembly
fig. 8 fig. 9 fig. 10 fig. 11 fig. 12
ASSEM BLY
AND
USE FOR
THE 1.2 L
PROCESSOR
BOWL
ASSEM BLY
AND
USE FOR
THE 1.2 L
PROCESSOR
BOWL
NOTE: Ninja® Auto-iQ®
Technology can s ense
which jar is on the m otor
base. The fun ction lights
will illuminate de pending
on which cont ainer is
placed on the mo tor base.
USING THE CHOPPING BLADE ASSEMBLY
1 Review warnin g and caution state ments
on page 11 before pro ceeding to number 2.
2 Holding the Chop ping Blade Assembly b y
the shaft, p lace it onto the gear s haft inside
the bowl. Ensu re that the Choppin g Blade
Assembly fit s around the gear sha ft and that
it is standing st raight.
3 Add the ingredi ents and secure the b owl lid
onto the bowl. ( Fig. 8)
4 Plug the power c ord into the electr ical outlet.
Once the bow l is engaged, the progr ams
available for that a ttachment will illumin ate.
5 Select the pr ogram that best sui ts your
needs. Pulse ing redients for even ch opping
by holding the
PULSE
button unt il your
desired consis tency is reached.
NOTE: Max PULSE itera tion is 30 pulses.
After 30 puls es allow 10 minutes to pass
before runnin g the PULSE func tion up to an
additional 30 puls es.
6
When you have r eached your desire d
consistenc y, stop the appliance by pr essing the
START/STOP button or se lecting the progr am
twice. Wait fo r the blade to stop tur ning.
7 To remove the lid, pr ess the release but ton on
the lid and turn th e lid anticlockwise. (F ig. 9)
8 Turn the bowl anticl ockwise and lift i t to
remove it fro m the motor base. (Fi g. 10)
9
To release the motor b ase from the count er or
tabletop, plac e your fingers under th e sides of
the black paddle s on the sides of the bas e and
lift up to releas e suction cup feet. (F ig. 11)
USING THE DO UGH BLADE ASSE MBLY
1 Review warnin g and caution state ments
at the top of pag e 11 before proceeding to
number 2.
2 Holding the Dough B lade Assembly by th e
shaft, plac e it onto the gear shaf t inside the
bowl. Ensure t hat the Dough Blade As sembly
fits around th e gear shaft and tha t it is
standing straight. (Fig. 12)
3 Add the ingr edients and secur e the bowl lid
onto the bowl.
4
Plug the power c ord into the electr ical outlet.
Press the START/STOP button to turn o n the
unit. Once the b owl is engaged, the p rograms
available for that a ttachment will illumin ate.
Select LOW on the con trol panel and pro cess
until ingredient s come together t o form a mass.
5 Once finishe d make the dough, stop t he
appliance by pre ssing the
START/STOP
button again o r selecting the pro gram twice.
Wait for the blades t o stop turning.
6 To remove the lid, pres s the release but ton
on the lid and pull the lid ha ndle up to a 90°
angle. (Fig. 9)
7 Turn the bowl an ticlockwise and lif t it to
remove it fro m the motor base. (Fi g. 10)
8 To release the mot or base from the cou nter or
tabletop, plac e your fingers under th e sides of
the black paddle s on the sides of the bas e and
lift up to releas e suction cup feet. (F ig. 11)
Page 7

12 13
® ®
080 0 862 045 3
www.ninjak itchen.eu
fig. 2fig. 1
ASSEMBLY AND USE FOR
THE CUTTING DISCS
NOTE: Cu tting discs must be u sed with the
feed chute lid.
1 Review warnin g statements ab ove before
proceeding t o number 2.
2 Place the moto r base on a clean, dry, level
surface suc h as a counter or tablet op. Press
down on the mot or base to make sure th at
the suction cup s adhere to the count er or
tabletop.
3 Secure th e bowl onto the moto r base. Align
and lower the pr ocessor bowl on to the motor
base. Handle sho uld be aligned slightly to the
right of the
LOCK
symbol on the m otor base.
4 Rotate t he processor bo wl clockwise until i t
locks in place (yo u will hear a click when the
lock is engaged).
5 Holding the sp indle by the shaft, p lace it onto
the drive gear in side the bowl. Ensur e that it
is seated pro perly and is standing u pright.
6 Use the spind le hole to grasp the selec ted
disc and place it ov er the spindle.
7 The slicing/shre dding disc is reversible.
Use the side labele d "Slicer" for slicing.
Carefully flip th e disc over to the side label ed
"Shredder" for shredding.
8 Place the f eed chute lid on the bow l and turn
clockwise un til you hear a click indicatin g the
lid is locked in place.
9 Plug the pow er cord into the elec trical outlet.
Select
LOW
on the contro l panel. The disc
will begin spinning.
10 Add the f ood that you want to slic e, shred
or grate thro ugh the feed chute on t he lid.
(Use the two -part food pu sher to help guide
the food thro ugh the feed chute. T he middle
piece of the foo d pusher is removable to u se
for smaller ingredie nts.
11 The L OW setting will run f or 30 seconds,
or when finished, p ress the START/STOP
button and w ait for the disc to stop sp inning.
Press the bu tton on the feed ch ute lid
located nea r the handle to unlock and t urn
the lid anticlock wise. Lift to re move from
the proces sor bowl. Using the spin dle hole,
carefully lif t the disc out of the bow l and
remove the spin dle.
12 Make sure that the mot or base is unplugged
when not in use.
13 To release the motor bas e from the counter o r
tabletop, plac e your fingers under th e sides of
the black paddle s on the sides of the bas e and
lift up to releas e suction cup feet. (F ig. 2)
For best re sults, follow t he recipe/in gredient loading i nstructio ns found in your Ins piration Guide.
WA RNING: The Cu tting discs ar e sharp. When ha ndling the cutt ing discs, alway s hold by the rim of th e cutting disc s and keep fingers aw ay from cutti ng edges.
Failure to do s o will result in a risk o f laceration.
WA RNING: Remove u tensils prior to p rocessing. F ailure to remove m ay cause the bowl t o be damaged or to sha tter, which may ca use personal inj ury.
WA RNING: Never lea ve the appliance una ttended whil e in use.
IMPORTA NT: Make sure that t he motor base is plu gged in for use.
CARE &
MAINTENANCE
CLEANING:
C AUTION: Make s ure that the mo tor
base is unplug ged from the powe r
source bef ore insertin g or removing any
attach ment and befor e cleaning.
C AUTION: DO NO T immerse the m otor
base into wa ter or any other liq uid.
1
Separat e/remove all part s from each other.
2
Hand Washing: Wa sh the containers, lid s,
blade assemblies a nd attachment s in warm,
soapy water. Wh en washing the blade
assemblies, use a dis h-washing utensil wi th
a handle to avoid dire ct hand contact w ith
blades. Handle bla de assemblies with car e to
avoid contac t with sharp edges . Rinse and air
dry thorou ghly.
Dishwasher: T he containers, lids, bla de
assemblies and at tachments ar e all
dishwasher saf e. The lids and blade
assemblies are to p rack dishwasher sa fe.
Ensure that t he blade assemblies are
removed fro m the containers be fore placing
in the dishwasher.
WA RNING: Handle t he blade assembl ies
with care w hen washing, as th e blades
are sharp. C ontact with t he blades’
edges can res ult in laceratio n.
3
Wipe the mot or base clean with a dam p
cloth.
Please call cus tomer serv ice if any
servicing n eeds to be perf ormed on the
appliance at 0 800 86 2 0453.
STORING:
1 Store the N inja® Auto-iQ® Compact Ki tchen
System uprig ht with the blade ass embly
inside the corr esponding containe r with the
lid secured on top . Do not place anythi ng on
top. Store th e rest of the atta chments in a
safe place whe re they will not be damag ed
and won’t cause har m. Loosely wrap t he
power cord ar ound the motor base.
NOTE:
Do not store blen ded or unblended
ingredients in t he Nutri Ninja Cup with t he
blade assembly a ttached.
RESET TING THE MOT OR
THERMOSTAT:
The Ninja Auto -iQ Compact Kitc hen System
features a uniq ue safety syst em which prevent s
damage to the uni t’s motor and drive sys tem
should you inadv ertently over load your appliance.
If the appliance is b eing overloaded, t he motor
will stop. Allow th e appliance to cool for
approximately 15 minutes. To reset the appliance,
follow the rese tting procedur e below:
1 Unplug the applian ce from the elect rical
outlet.
2 Remove and emp ty the container a nd ensure
that no food is jam ming the blade assembl y.
3 Allow the applianc e to cool for approxim ately
15 minutes.
4 Re-install th e container onto th e base and re-
plug the applianc e into the electric al outlet.
5 Procee d with using the applian ce as before
while making sure n ot to exceed the
maximum reco mmended capacit ies.
Page 8

15
®
080 0 862 045 3
14
®
www.ninjak itchen.eu
Unit doesn’t turn on:
• Make sure the unit is plugged in and the START/STOP button is pressed.
• Insert and rotate the container or accessory clockwise in the base until it clicks into place. Display should illuminate.
Unit doesn’t turn off:
• Remove cup from base by rotating cup anticlockwise and lifting out. Display should turn off. Unplug the power cord from the outlet.
Lid/blade assembly hard to assemble:
• Set the cup on a level surface. Place the lid or blade assembly on the top of the cup and align the threads so that the lid/blades sit flat on the cup. Twist clockwise so
that the lid/blades evenly align to the cup until you have a tight seal.
Food is not evenly chopped:
• For best results when chopping, make sure all ingredients are as dry as possible. Cut pieces down to even sizes, and reduce the amount of food in the cup. Use the
Auto-iQ® CHOP button for b est results.
Doesn’t mix well, food gets stuck:
• Using the Auto-iQ programs is the easiest way to achieve great results. The pulses and pauses allow the food to settle towards the blade. If food is routinely getting
stuck adding some liquid will usually help.
• When packing the cups , start with f resh items, then a dd liquids, then pow ders/dry ingr edients, and finally f rozen items or ice .
Unit moves on the counter while blending:
• Make sure the surface, as well as the feet of the unit, are clean and dry.
Unit is difficult to remove from the counter for storage:
• To release the motor base fr om the counter or t abletop, place yo ur fingers under the s ides of the black pad dles on the sides of t he motor base and lif t up to release
suction cup fe et.
TROUBLESHOOTING
GUIDE
NOTES
Page 9

Euro-Pro Europe Limited
15 Mari ner Court
Calde r Park
Wakefield
WF 4 3FL
0800 862 0453
BL490UK2�30�160808�1
© 2016 Eur o-Pro Europe Limited
Illust rations may d iffer fro m actual pro duct. We are consta ntly striving to
impro ve our produ cts, there fore the spe cificatio ns containe d herein are
subject to change wit hout notice.
Printed in China
Auto -iQ, Nutr i-Ninja, Ninja and Sip & Seal a re registe red
trad emarks of Eur o-Pro Europe Li mited.
Pro E xtract or Blades and Sm ooth Boos t are tradem arks of Euro -Pro
Europe Limite d.
www.ninjakitchen.eu
0800 862 04 53
®
 Loading...