


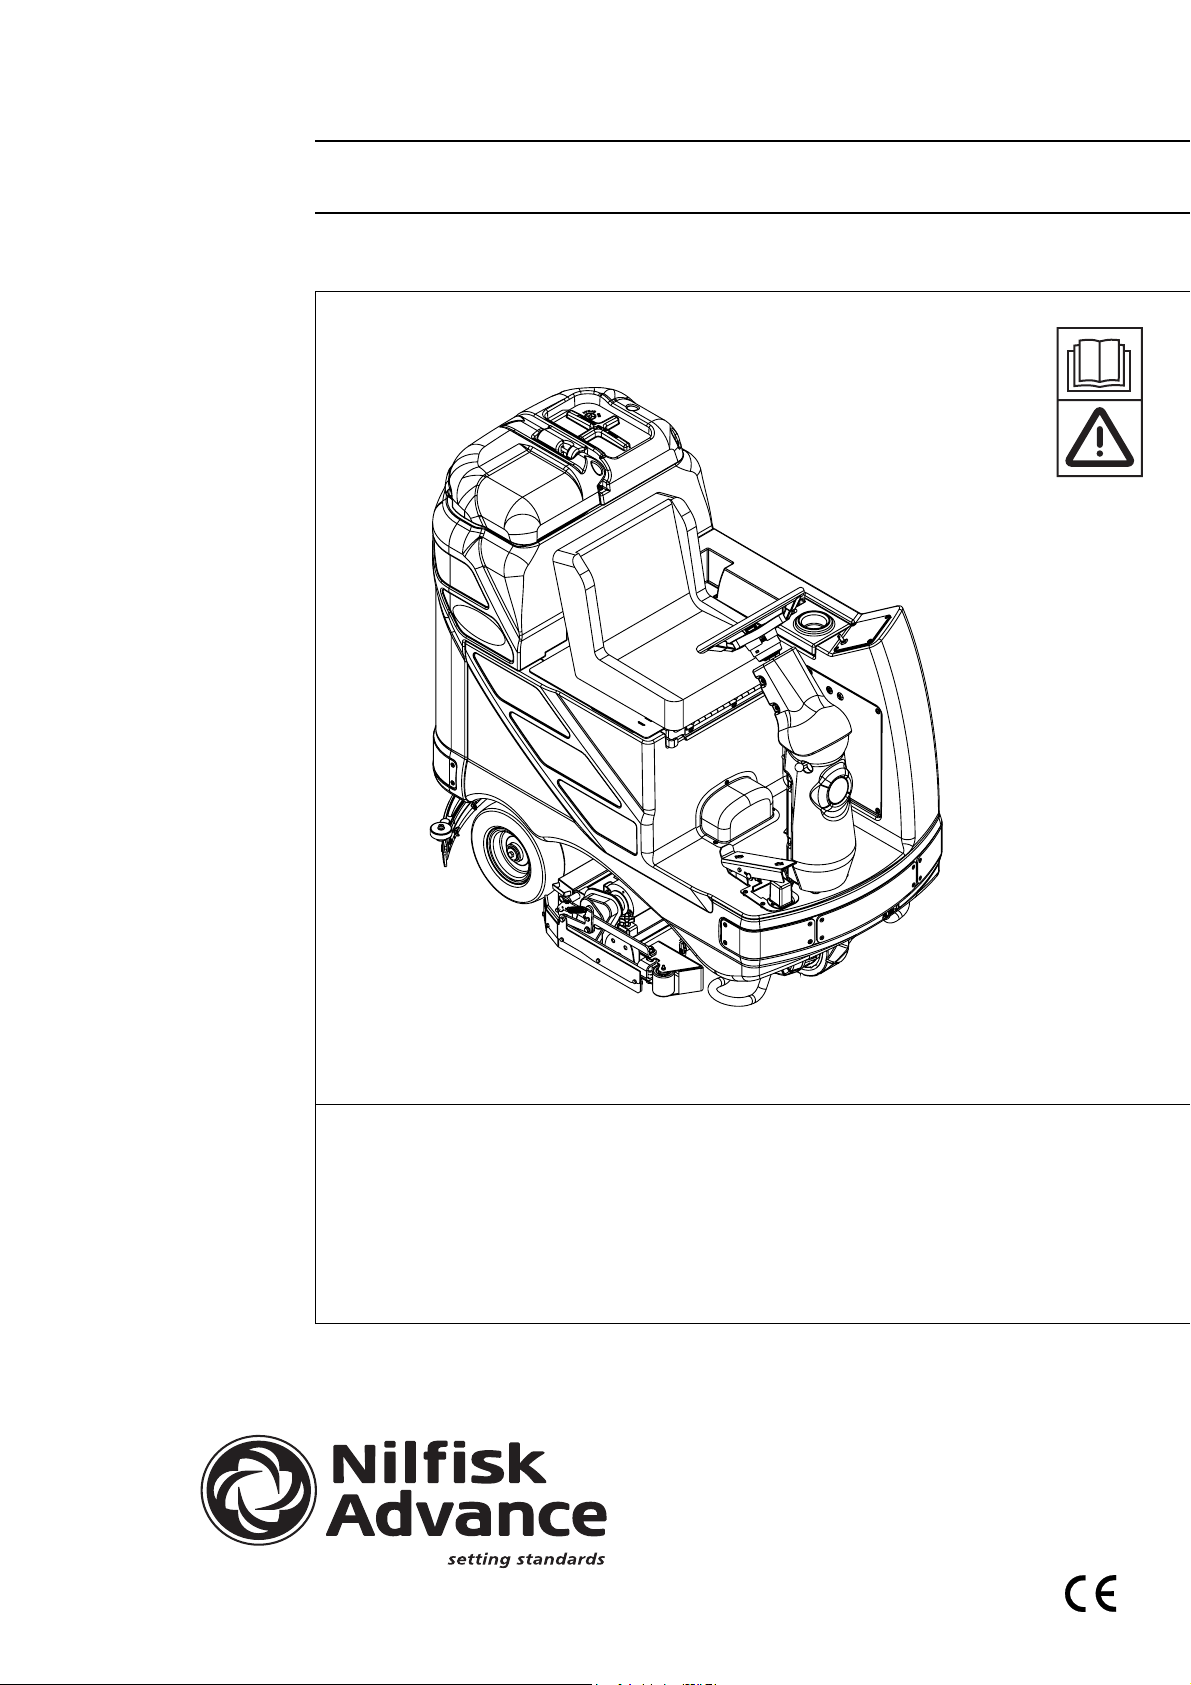
Adgressor BR950S
Nilfisk-Advance Adgressor BR950S, Adgressor BR1050CS, Adgressor BR850CS, 56314000, 56314002 Instructions For Use Manual
...
Electronic Service
Manuals
This electronic document is provided as a service to our customers. We do not create the contents of the information contained in
this document. Should you have detailed questions pertaining to
the information contained in this document, you may contact Michco,
or the manufacturer which provided the original information in this
electronic deliverable. Michco’s only part in this electronic deliverable was the electronic assembly process.
You may contact Michco through the following methods:
Phone (517) 484-9312 or (800) 331-3339 MI, OH, IN only
2011 N. High St. -- Lansing, Michigan -- 48906
Fax: (517) 484-9836
Email: CustServ@Michco.com
Web site: www.Michco.Com
Parts Web site: www.FloorMachineParts.Com
Order Parts on Line at:
www.FloorMachineParts.Com
Directly to Parts & Service:
By Email: Shop@Michco.com
By Fax: (517) 702-2041
By Voice: Use numbers above.
Serving the Cleaning Industry Since 1922
Notice: All copyrighted material remains property of original owners, all trademarks are property of respective
owners. Manuals are subject to Manufacturer’s reproduction limitations. Originals or reproductions were provided
by manufacturers through a request. We make no warranty as to the correctness of information provided in this
document and you assume all risk.
Adgressor
™
BR 850S, 850CS, 950S, 950CS
BR 1050S, 1050CS
Instructions For Use
Advance MODELS 56314661(2820D), 56314662(3220D), 56314663(2820C), 56314664(3220C)
56314826(3520D), 56314827(3820D), 56314828(3520C), 56314829(3820C)
Nilfi sk MODELS 56314674(850S), 56314675(850CS), 56314830(950S), 56314831(1050S),
56314832(950CS), 56314833(1050CS)
English
2/04 revised 8/04 Form Number 56041583


TABLE OF CONTENTS
page
Introduction ...............................................................................................3
Cautions and Warnings ............................................................................4
Consignes de prudence et de sécurité .....................................................5
Know Y our Machine ..................................................................................6
Control Panel ............................................................................................7
Know Your Machine Descriptions .............................................................8
Functional Description of Control Switches ..............................................9
Description of Indicators on the Control Panel .......................................10
Error Codes ............................................................................................11
Prepare the Machine for Use
Install the Batteries .................................................................................12
Install the Brushes ..................................................................................13
Install the Squeegee ...............................................................................14
Fill the Solution Tank ..............................................................................14
Operating the Machine ...........................................................................15
Scrubbing ...............................................................................................15
Wet Vacuuming ......................................................................................16
After Use .................................................................................................16
Maintenance Schedule ...........................................................................16
Lubricating the Machine .........................................................................16
Charging the Batteries ............................................................................17
Check the Battery Electrolyte Level ........................................................17
Squeegee Maintenance ..........................................................................18
Squeegee Adjustment ............................................................................18
Side Skirt Maintenance ......................................................................19-20
ENGLISH / 3
Troubleshooting ......................................................................................21
Technical Specifi cations .........................................................................22
INTRODUCTION
This manual will help you get the most from your Nilfi sk-Advance Rider Scrubber. Read it thoroughly before operating the machine.
Note: Bold numbers in parentheses indicate an item illustrated on pages 6-7.
This product is intended for commercial use only.
P ARTS AND SERVICE
Repairs, when required, should be performed by your Authorized Nilfi sk-Advance Service Center, who employs factory trained service personnel, and
maintains an inventory of Nilfi sk-Advance original replacement parts and accessories.
Call the NILFISK-ADVANCE DEALER named below for repair parts or service. Please specify the Model and Serial Number when discussing your machine.
(Dealer, affi x service sticker here.)
NAME PLATE
The Model Number and Serial Number of your machine are shown on the Nameplate on the machine. This information is needed when ordering repair parts
for the machine. Use the space below to note the Model Number and Serial Number of your machine for future reference.
MODEL NUMBER _______________________________________________________
SERIAL NUMBER ______________________________________________________
UNCRATE THE MACHINE
When the machine is delivered, carefully inspect the shipping carton and the machine for damage. If damage is evident, save the shipping carton so that it
can be inspected. Contact the Nilfi sk-Advance Customer Service Department immediately to fi le a freight damage claim.
After removing the carton, cut the plastic straps and remove the wooden blocks next to the wheels. Use a ramp to roll the machine from the pallet to the fl oor.
FORM NO. 56041583 - Adgressor™ / BR 850S, 850CS, 950S, 950CS, 1050S, 1050CS - 3

4 / ENGLISH
CAUTIONS AND WARNINGS
SYMBOLS
Nilfi sk-Advance uses the symbols below to signal potentially dangerous conditions. Always read this information carefully and
take the necessary steps to protect personnel and property.
DANGER!
Is used to warn of immediate hazards that will cause severe personal injury or death.
WARNING!
Is used to call attention to a situation that could cause severe personal injury.
CAUTION!
Is used to call attention to a situation that could cause minor personal injury or damage to the machine or other property.
GENERAL SAFETY INSTRUCTIONS
Specifi c Cautions and Warnings are included to warn you of potential danger of machine damage or bodily harm.
WARNING!
* This machine shall be used only by properly trained and authorized persons.
* While on ramps or inclines, avoid sudden stops when loaded. Avoid abrupt sharp turns. Use low speed down hills. Clean
only while ascending (driving up) the ramp.
* Keep sparks, fl ame and smoking materials away from batteries. Explosive gases are vented during normal operation.
* Charging the batteries produces highly explosive hydrogen gas. Charge batteries only in well-ventilated areas, away from
open fl ame. Do not smoke while charging the batteries.
* Remove all jewelry when working near electrical components.
* Turn the key switch off (O) and disconnect the batteries before servicing electrical components.
* Never work under a machine without safety blocks or stands to support the machine.
* Do not dispense fl ammable cleaning agents, operate the machine on or near these agents, or operate in areas where
fl ammable liquids exist.
* Do not clean this machine with a pressure washer.
* Only use the brushes provided with the appliance or those specifi ed in the instruction manual. The use of other brushes
may impair safety.
CAUTION!
* This machine is not approved for use on public paths or roads.
* This machine is not suitable for picking up hazardous dust.
* Do not use scarifi er discs and grinding stones. Nilfi sk-Advance will not be held responsible for any damage to fl oor surfaces
caused by scarifi ers or grinding stones (can also cause damage to the brush drive system).
* When operating this machine, ensure that third parties, particularly children, are not endangered.
* Before performing any service function, carefully read all instructions pertaining to that function.
* Do not leave the machine unattended without fi rst turning the key switch off (O), removing the key and applying the parking
brake.
* Turn the key switch off (O) and remove the key, before changing the brushes, and before opening any access panels.
* Take precautions to prevent hair, jewelry, or loose clothing from becoming caught in moving parts.
* Use caution when moving this machine in below freezing temperature conditions. Any water in the solution or recovery
tanks or in the hose lines could freeze, causing damage to valves and fi ttings. Flush with windshield washer fl uid.
* The batteries must be removed from the machine before the machine is scrapped. The disposal of the batteries should be
safely done in accordance with your local environmental regulations.
* Do not use on surfaces having a gradient exceeding that marked on the machine.
* All doors and covers are to be positioned as indicated in the instruction manual before using the machine.
SAVE THESE INSTRUCTIONS
4 - FORM NO. 56041583 - Adgressor™ / BR 850S, 850CS, 950S, 950CS, 1050S, 1050CS

ENGLISH / 5
CONSIGNES DE PRUDENCE ET DE SÉCURITÉ
SYMBOLES
Les symboles reproduits ci-dessous sont utilisés pour attirer l’attention de l’opérateur sur des situations dangereuses. Il est donc conseillé de lire
attentivement ces indications et de prendre les mesures adéquates en vue de protéger le personnel et le matériel.
DANGER!
Ce symbole est utilisé pour mettre l’opérateur en garde contre les risques immédiats pouvant provoquer des dommages corporels graves, voire entraîner la
mort.
ATTENTION!
Ce symbole est utilisé pour attirer l’attention sur une situation susceptible d’entraîner des dommages corporels graves.
PRUDENCE!
Ce symbole est utilisé pour attirer l’attention de l’opérateur sur une situation qui pourrait entraîner des dommages corporels minimes, ou des dommages à la
machine ou à d’autres équipements.
CONSIGNES GENERALES DE SECURITE
Les consignes spécifi ques de prudence et de sécurité mentionnées ici ont pour but de vous informer de la survenance de tout risque de dommages matériels
ou corporels.
ATTENTION!
* Cette machine ne pourra être utilisée que par du personnel parfaitement entraîné et dûment autorisé.
* Evitez les arrêts subits lorsque la machine est chargée et se trouve sur des rampes ou des plans inclinés. Evitez les virages serrés.
Adoptez une vitesse réduite lorsque la machine est en descente. Ne nettoyez que lorsque la machine monte la pente.
* Eloignez les batteries de toutes fl ammes, étincelles ou substance fumigène. Les gaz explosifs sont ventilés pendant le fonctionnement
normal.
* De plus, du gaz hydrogène explosif s’échappe des batteries lorsqu’elles sont en charge. Ne procédez au chargement des batteries que
dans une zone bien ventilée, loin de toute fl amme. Ne fumez pas à proximité des batteries lorsqu’elles sont en charge.
* Otez tous vos bijoux lorsque vous travaillez à proximité de composants électriques.
* Positionnez la clé de contact sur off (O) et déconnectez les batteries avant de procéder à l’entretien des composants électriques.
* Ne travaillez jamais sous une machine sans y avoir placé, au préalable, des blocs de sécurité ou des étais destinés à soutenir la
machine
* Ne déversez pas d’agents nettoyants infl ammables, ne faites pas fonctionner la machine à proximité de ces agents ou d’autres liquides
infl ammables.
* Ne nettoyez pas cette machine avec un nettoyeur à pression.
* Utilisez uniquement les brosses fournies avec l’appareil ou celles spécifi ées dans le manuel d’instructions. L’utilisation d’autres brosses
peut mettre la sécurité en péril.
PRUDENCE!
* Cette machine n’est pas conçue pour une utilisation sur les chemins ou voies publics.
* Cette machine n’est pas conçue pour le ramassage des poussières dangereuses.
* N’utilisez pas de disques de scarifi cateur ni de meules. Nilfi sk-Advance ne pourra en aucun cas être tenue pour responsable des
dommages occasionnés à vos sols par ce type d’équipement (vous risquez également d’endommager le système d’entraînement des
brosses).
* Lors de l’utilisation de cette machine, assurez-vous que des tiers, et notamment des enfants, ne courent pas le moindre risque.
* Avant de procéder à toute opération d’entretien, veuillez lire attentivement toutes les instructions qui s’y rapportent.
* Ne laissez pas la machine sans surveillance sans avoir, au préalable, coupé le contact, enlevé la clé de contact (O) et tiré le frein à
main.
* Positionnez la clé de contact sur off (O) avant de remplacer les brosses ou d’ouvrir tout panneau d’accès.
* Prenez toutes les mesures nécessaires pour éviter que les cheveux, les bijoux ou les vêtements amples ne soient entraînés dans les
parties mobiles de la machine.
* Faites attention lorsque vous déplacez cette machine dans un endroit où la température peut descendre sous 0°. Car l’eau contenue
dans les réservoirs de solution ou de récupération ou dans les conduites risquerait de geler et par là même d’endommager les valves et
raccords de la machine. Rincez avec un liquide de lave-glace.
* Prenez soin d’enlever les batteries de la machine avant de mettre cette dernière au rebut. Pour ce qui est de l’élimination des batteries,
conformez-vous aux réglementations locales en matière d’environnement.
* N’utilisez pas sur des surfaces dont la pente dépasse celle mentionnée sur la machine.
* Toutes les portes et couvercles doivent être dans la position mentionnée dans le manuel d’instruction avant de mettre la machine en
service.
CONSERVEZ SOIGNEUSEMENT CES INSTRUCTIONS
FORM NO. 56041583 - Adgressor™ / BR 850S, 850CS, 950S, 950CS, 1050S, 1050CS - 5
6 / ENGLISH
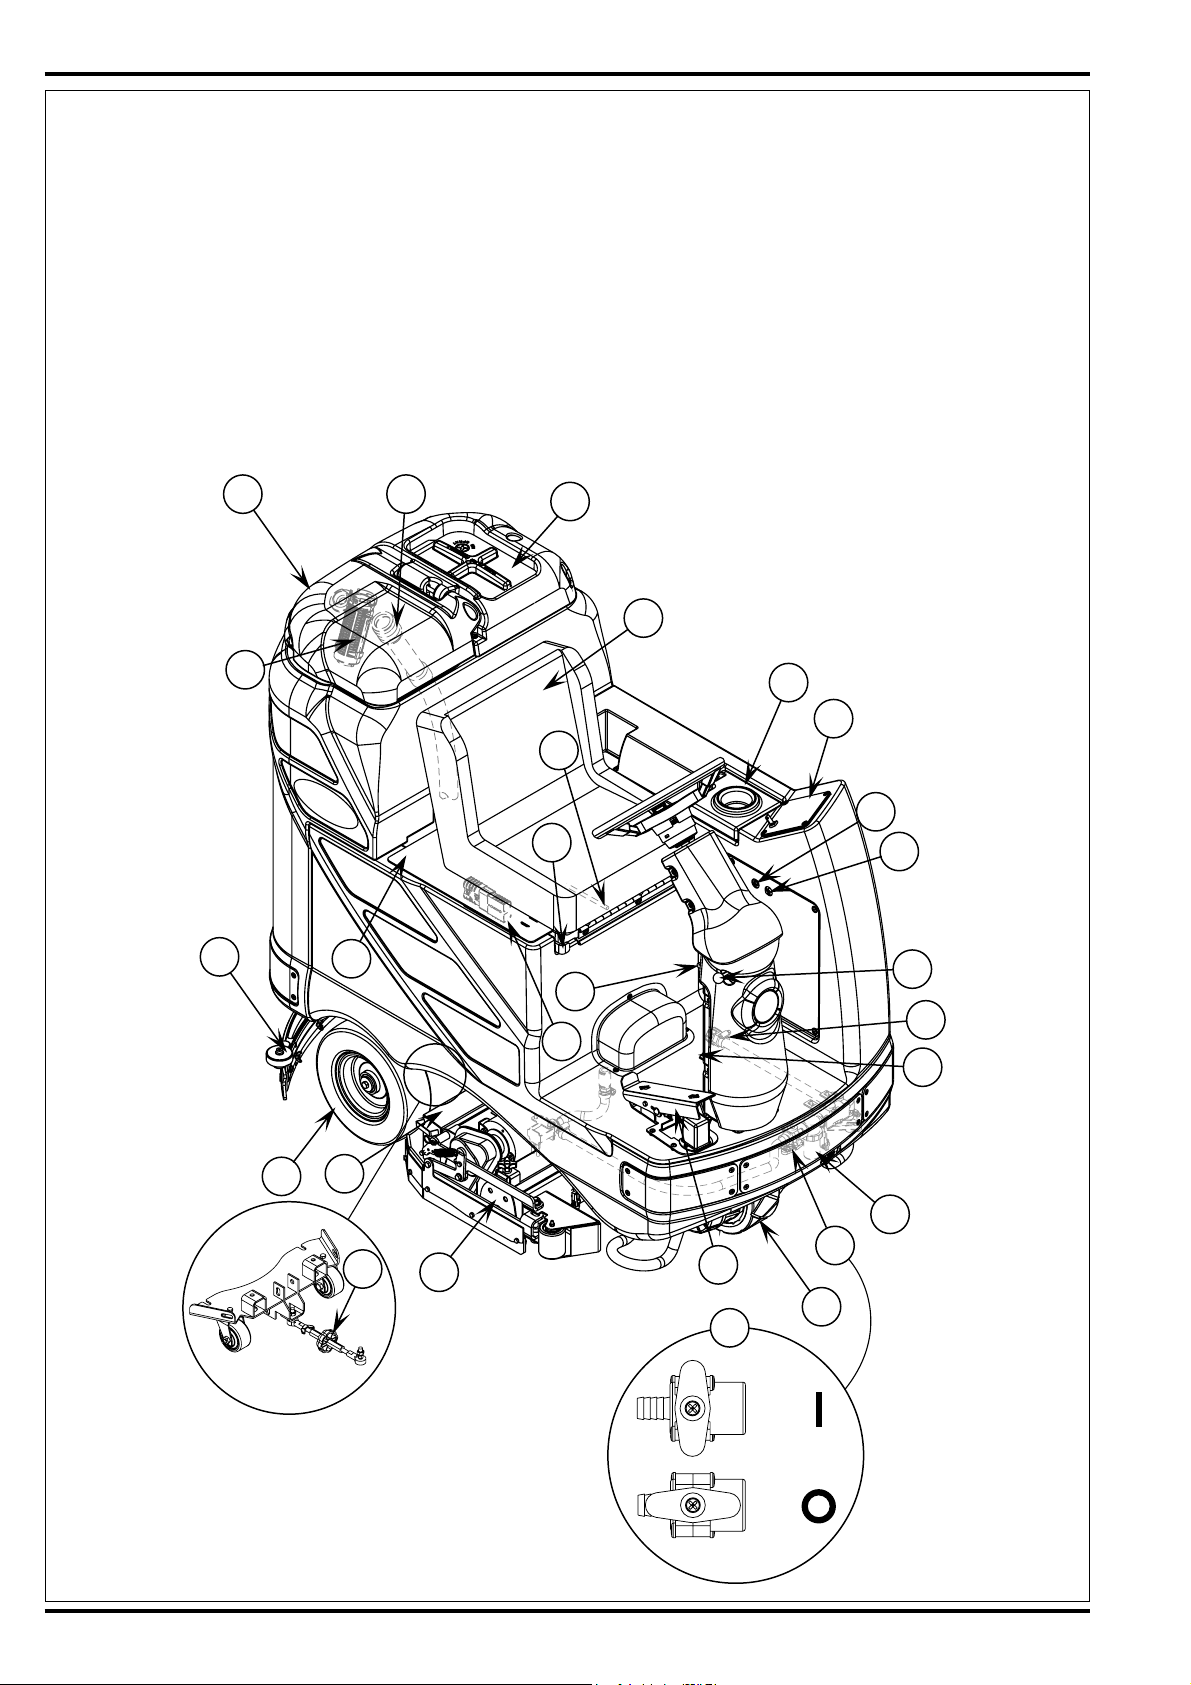
KNOW YOUR MACHINE
1 Recovery Tank Cover
2 Solution Tank Fill Cover
3 Operator’s Seat
4 Solution Tank Drain Hose
5 Steering Wheel Tilt Adjust Knob
6 Brake Pedal / Parking Brake
7 Solution Flow Control Lever
8 Drive Pedal, Directional/Speed
9 Hopper (cylindrical models only)
10 Drive and Steer Wheel
11 Wheel Drive Circuit Breaker
12 Control Circuit Circuit Breaker
1
17
21
13 Emergency Stop Switch / Battery Disconnect
14 Scrub Deck
15 Rear Wheel
16 Battery Compartment (under seat)
17 Recovery Tank Shutoff Float
18 Vacuum Motor Filter Housing
19 Squeegee Assembly
20 Solution Filter
21 Recovery Tank Drain Hose
22 Machine Battery Connector
23 Control Panel
24 Squeegee Tilt Adjust Knob
25 Operator Seat Adjustment Lever
26 Smart Solutions™ / ECO Solution™
18
3
2
19
15
16
9
24
14
25
13
23
11
12
5
7
4
22
6
20
26
8
26
ON
OFF
6 - FORM NO. 56041583 - Adgressor™ / BR 850S, 850CS, 950S, 950CS, 1050S, 1050CS
10
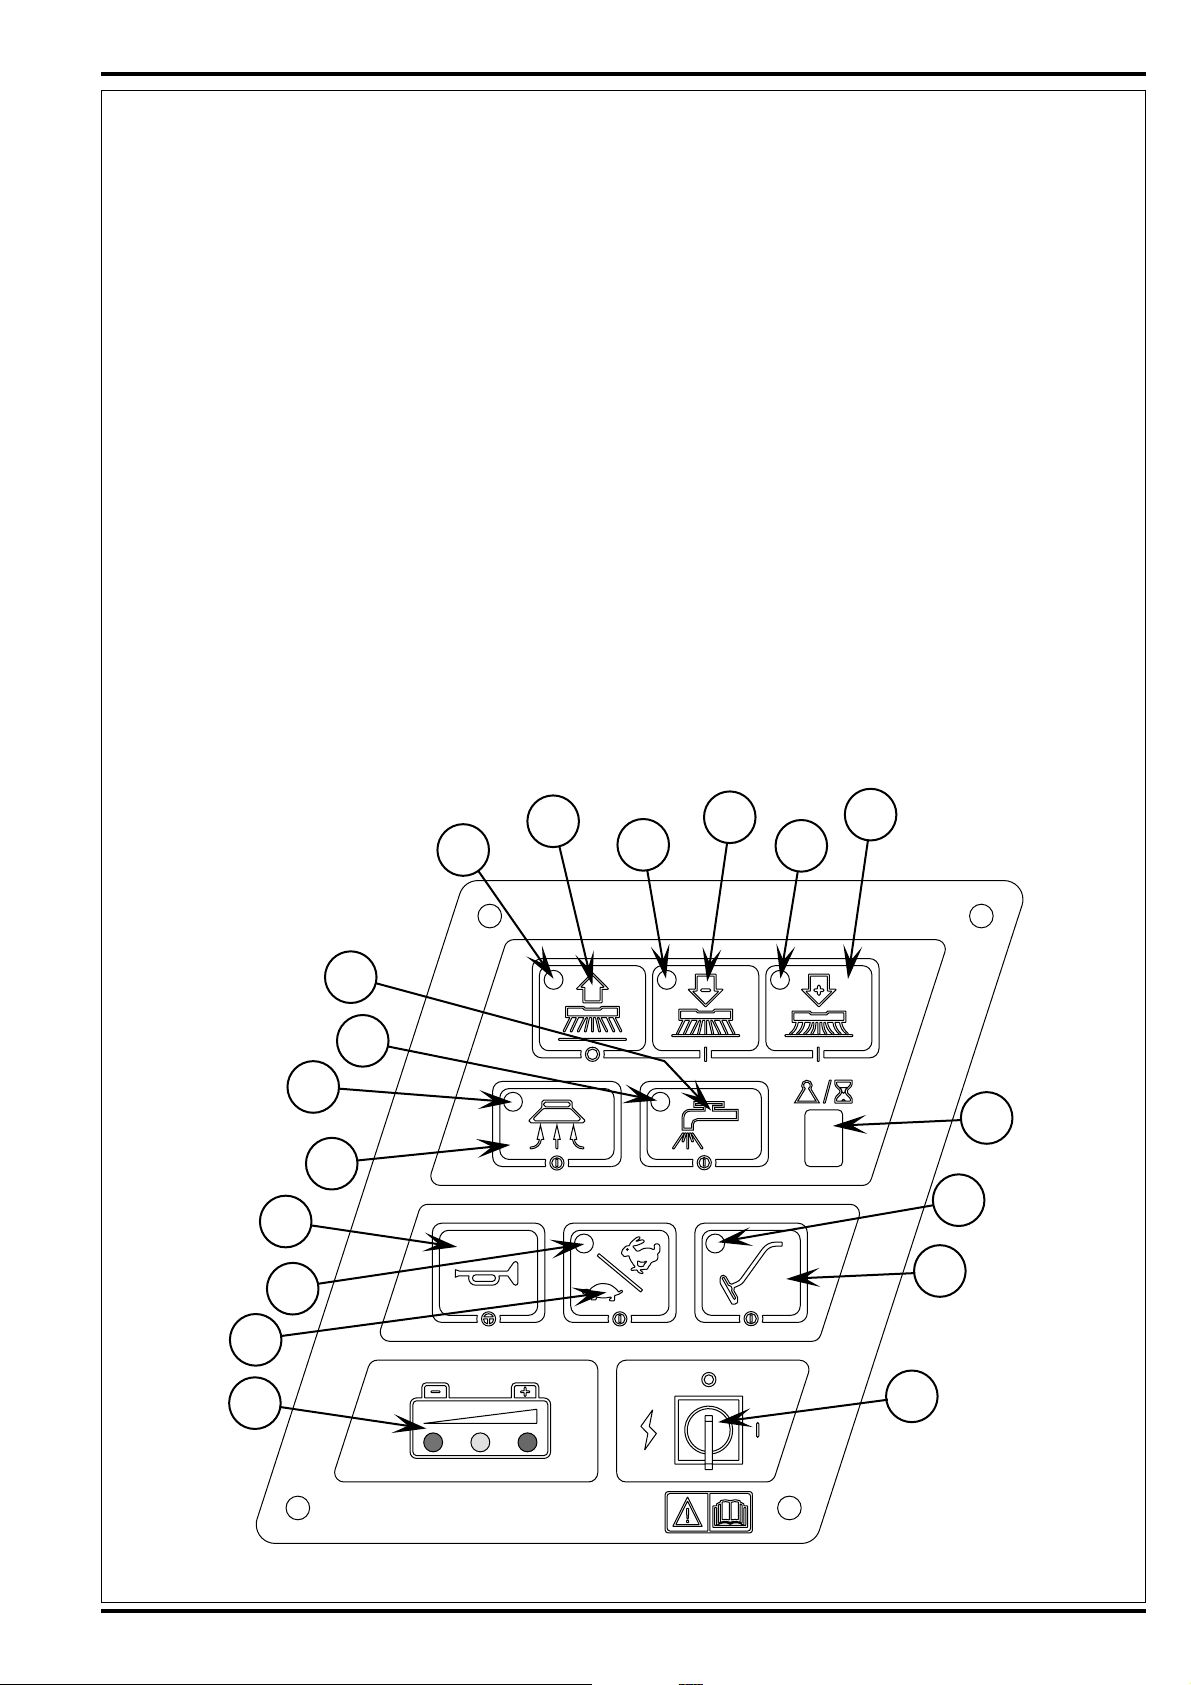
CONTROL PANEL
A Scrub OFF Indicator
B Scrub OFF Switch
C Scrub Pressure Decrease Indicator
D Scrub Pressure Decrease Switch
E Scrub Pressure Increase Indicator
F Scrub Pressure Increase Switch
G Scrub Pressure / Hourmeter Display
H Wand Switch Indicator
I Wand Switch
J Key Switch
K Battery Condition Indicator
L Speed Select Switch
M Speed Select Indicator
N Horn Switch
O Vacuum Switch
P Vacuum System Indicator
Q Solution System Indicator
R Solution Switch
ENGLISH / 7
L
N
M
P
O
R
Q
A
B
C
D
F
E
G
H
I
K
J
FORM NO. 56041583 - Adgressor™ / BR 850S, 850CS, 950S, 950CS, 1050S, 1050CS - 7

8 / ENGLISH
KNOW YOUR MACHINE DESCRIPTIONS:
Recovery Tank Cover (1) – Open to access Recovery Tank for rinsing and(or) cleaning Float Cage.
Solution Tank Fill Cover (2) – Open to fi ll the solution tank, use non-foaming chemicals only.
Operator’s Seat (3) – The machine operator sits here. The seat has a safety switch which prevents the machine from moving without an operator in the
seat.
Solution Tank Drain Hose (4) – Used to empty the solution tank.
Steering Wheel Tilt Adjust Knob (5) – Push down on this knob to adjust the Steering Wheel up or down.
Brake Pedal / Parking Brake (6) – Push down to stop machine. NEVER leave machine unattended without setting Parking Brake.
Solution Flow Control Lever (7) – Move this lever UP to increase solution fl ow to the fl oor. Move DOWN to decrease the amount of solution fl ow to the
fl oor. When the Drive Pedal (8) is released from either forward or reverse travel, the solution fl ow will stop automatically, and resume when the drive is
engaged.
Drive Pedal, Directional / Speed (8) – The operator can make the machine go forward by pushing forward on it, or reverse by pushing backward on it. The
speed is variable depending on how far forward or backward the pedal is moved. When the Scrub Deck (14) is in the “DOWN” position, the brushes, solution
and vacuum will operate when the drive pedal is engaged in either direction. The brushes stop after the drive pedal is in neutral for 1.5 seconds, the vacuum
stops after the drive pedal is in neutral for 10 seconds. NOTE: Solution only operates when moving forward.
Hopper (9) – Found only on cylindrical models, catches debris. Empty and clean daily.
Drive and Steer Wheel (10) – Wheel drive motor attached to this wheel to propel machine either forward or reverse. Also attached to Steering Wheel for
steering left or right.
Wheel Drive Circuit Breaker (11) – Provides overload protection to machine’s wheel drive motor. If it trips, it will pop out. To reset, wait one minute and
press the button back in. If any breaker trips repeatedly, have the machine serviced.
Control Circuit Circuit Breaker (12) – Provides overload protection. If it trips, it will pop out. To reset, wait one minute and press the button back in. If any
breaker trips repeatedly, have the machine serviced.
Emeregency Stop / Battery Disconnect (13) – Push in on lever to disconnect batteries.
Scrub Deck (14) – Contains brush drive motors and brushes.
Rear Wheel (15) – Rear wheel of machine.
Battery Compartment (16) – Batteries stored here, fl ip seat panel up to access.
Recovery Tank Shutoff Float (17) – Shuts off vacuum when recovery tank is full.
Vacuum Motor(s) Filter Housing (18) – Location of Vac Motor(s) air intake fi lter(s).
Squeegee Assembly
Solution Filter (20) – Filters solution prior to dispensing on fl oor.
Recovery Drain Hose (21) – Used to empty the recovery tank.
Machine Battery Connector (22) – Batteries plug into this connector, disconnect to charge batteries.
Control Panel (23) – Operator Controls found here, see “FUNCTIONAL DESCRIPTION OF CONTROL SWITCHES”.
Squeegee Tilt Adjustment Knob (24) – Used to adjust the tilt of the squeegee forward or backward.
Operator Seat Adjustment Lever (25) - Use this lever to slide the operator’s seat forward or backward.
Smart Solutions™ / ECO Solution™ (26) – This valve is used when a consistent reduced fl ow of solution is desired. When the lever is in the “OFF”
position; the machine operates conventionally; solution fl ow is determined with the Solution Flow Control Lever (7). When the lever is in the “ON” position;
solution fl ow is controlled automatically. The Solution Flow Control Lever (7) should not be shut off, but is otherwise inactive. Make sure that the lever for
Valve (26) is all the way ON or all the way OFF, never in between.
(19) – Picks up solution after scrubbing.
8 - FORM NO. 56041583 - Adgressor™ / BR 850S, 850CS, 950S, 950CS, 1050S, 1050CS
 Loading...