

Page 1
Instructions for Use Manual
Nilsk CFM 127 and 137 Industrial Vacuums
04/2009
Page 2

Page 3

127 / 137
INDEX
Operating instructions .......................................................................................................................................... page 2
Operator safety ............................................................................................................................................... page 2
General information about use of the vacuum cleaner ................................................................................... page 2
Proper uses ..................................................................................................................................................... page 2
General recommendations.............................................................................................................................. page 3
Description of the vacuum cleaner - Labels .................................................................................................... page 3
Optional kits .................................................................................................................................................... page 4
Accessories ..................................................................................................................................................... page 4
Packing and unpacking ................................................................................................................................... page 4
Connection to the power supply...................................................................................................................... page 5
Extensions ...................................................................................................................................................... page 5
Wet and dry applications ................................................................................................................................. page 5
Maintenance and repairs ................................................................................................................................ page 6
Technical data - Dimensions ........................................................................................................................... page 6
Controls and indicators (g. 4) ........................................................................................................................ page 7
Inspections prior to starting ............................................................................................................................. page 7
Starting-up ...................................................................................................................................................... page 7
Operation ........................................................................................................................................................ page 7
Operating lter shaker..................................................................................................................................... page 7
Emergency stopping ....................................................................................................................................... page 7
Emptying the container ................................................................................................................................... page 7
At the end of a cleaning session ..................................................................................................................... page 8
Maintenance, cleaning and decontamination.................................................................................................. page 8
How to disassemble and replace the main and Hepa lters ........................................................................... page 9
Main lter replacement .................................................................................................................................... page 9
Replacing the Hepa lter................................................................................................................................. page 10
Checking and cleaning the motor cooling fan ................................................................................................. page 10
Seal inspection................................................................................................................................................ page 10
Cleaning and replacing the separator (g. 17) ................................................................................................ page 10
Disposal of the machine.................................................................................................................................. page 11
Wiring diagrams .............................................................................................................................................. page 11
Recommended spares .................................................................................................................................... page 11
Troubleshooting .............................................................................................................................................. page 12
Manufacturer’s assistance center ................................................................................................................ pages12-15
I
04/2009
GB
F
D
E
1
C338
Page 4
127 / 137
Operating instructions
Read the operating instructions and comply with the important safety recommendations identied by the words:
WARNING !
Before starting the machine, it is absolutely essential to read these operating instructions and to keep them on le
for consultation. The vacuum cleaner can only be used by people who are familiar with the way it works and who
have been explicitly authorized and trained for the purpose. Before using the vacuum cleaner, operators must be
informed, instructed and trained on how to work it and for which substances its usage is permitted including the
safe method for removing and disposing of the vacuumed material.
- Operator Safety
WARNING !
To reduce the risk of re, electric shock, or injury:
• Do not leave appliance when plugged in. Unplug from
outlet when not in use and before servicing.
• To reduce the risk of electrical shock, do not use outdoors
or on wet surfaces.
• Do not allow this appliance to be used as a toy. This
machine is for adult-use only.
• Use only as described in this manual. Use only the
• manufacturer’s recommended attachments.
• Do not use with damaged cord or plug. If appliance is not
working as it should, has been dropped, damaged, left
outdoors or dropped into water, return it to a service center.
• Do not pull or carry by the cord, use cord as a handle,
close a door on cord, or pull cord around sharp edges
or corners. Do not run the appliance over the cord. Keep
cord away from heated surfaces.
• Do not unplug by pulling on cord. To unplug, grasp the
plug, not the cord.
• Do not handle plug, cord or appliance with wet hands.
• Do not put any object into the openings. Do not use with
any opening blocked; keep free from dust, lint, hair, and
anything that may reduce airow.
• Keep hair, loose clothing, ngers, and all parts of the body
away from openings and moving parts.
• Turn off all controls before unplugging.
I
• Use extra care when cleaning stairs.
• Do not use to pick up ammable or combustible liquids such
as gasoline or use in areas where they may be present.
GB
• Do not pick up anything that is burning or smoking, such as
cigarettes, matches, or hot ashes, or any hazardous dusts.
• Do not use without dust bag/or lters in place.
F
• Connect to a properly grounded outlet only. See grounding instructions.
D
GROUNDING INSTRUCTIONS
This appliance must be grounded. If it should malfunction or
breakdown, grounding provides a path of least resistance for
E
electric current to reduce the risk of electric shock. This appli-
ance is equipped with a cord that has an equipment-grounding
conductor and grounding plug. The plug must be inserted into
an appropriate outlet that is properly installed and grounded
in accordance with all local codes and ordinances.
Improper connection of the equipment-grounding conductor
can result in a risk of electric shock. Check with a qualied
electrician or service person if you are in the doubt as to
whether the outlet is properly grounded. Do not modify the
plug provided with the appliance-if it will not t the outlet, have
a proper outlet installed by a qualied electrician.
Make sure that the appliance is connected to an outlet hav-
ing the same conguration as the plug. No adapter should be
used with this appliance. If the appliance must be reconnected
for use on a different type of electric circuit, the reconnection
should be made by a qualied service personnel.
- General information about use of the vacuum
cleaner
Use of the vacuum cleaner is governed by the laws in force
in the country where it is used.
Besides the operating instructions and the laws in force in
the country where the vacuum cleaner is used, the technical
regulations for ensuring safe and correct work must also be
observed (Legislation concerning environmental and labor
safety).
Do not carry out any work that could jeopardize the safety of
people, property and the environment.
Comply with the safety indications and recommendations in
this instruction manual.
- Proper uses
This appliance is suitable for collective use, e.g. in hotels,
schools, hospitals, and factories.The vacuum cleaners
described in this instruction manual are appliances designed
for industrial use. They are produced in different versions and
for different applications.
C338
2
04/2009
Page 5
127 / 137
- General recommendations
WARNING !
Risk of re outbreaks and explosions.
The vacuum cleaner can only be used when it is certain that
active sources of ignition are not going to be vacuumed.
Do not vacuum the following materials: burning materials
(hot ashes, lighted cigarettes, etc.), ammable liquids,
aggressive fuels (e.g. gasoline, solvents, acids, alkaline
solutions, etc.).
Do not vacuum the following materials: explosive dusts or
ones liable to ignite spontaneously (such as magnesium
or aluminium dusts, etc.).
The vacuum cleaner is not suitable for vacuuming explosive or similar substances, as established by the laws
governing explosive substances, particularly: liquid fuels
and mixtures of ammable dusts and liquids.
WARNING !
Emergency
If an emergency situation occurs:
- lter breakage
- re outbreak;
- short-circuit;
- motor block;
- electric shock;
- etc.;
turn off the vacuum cleaner, unplug it and ask for assist-
ance from a qualied person.
Note
Check the place of work and substances tolerated for the
vacuum cleaner in version for liquids.
WARNING !
The vacuum cleaners must not be used or stored
outdoors, or in damp places.
Only versions with the level sensor can be used for
liquids.
If not, they can only be used to vacuum dry materials.
WARNING !
Version for liquids.
If foam or liquid spills from the machine, switch off
immediately and check for the cause.
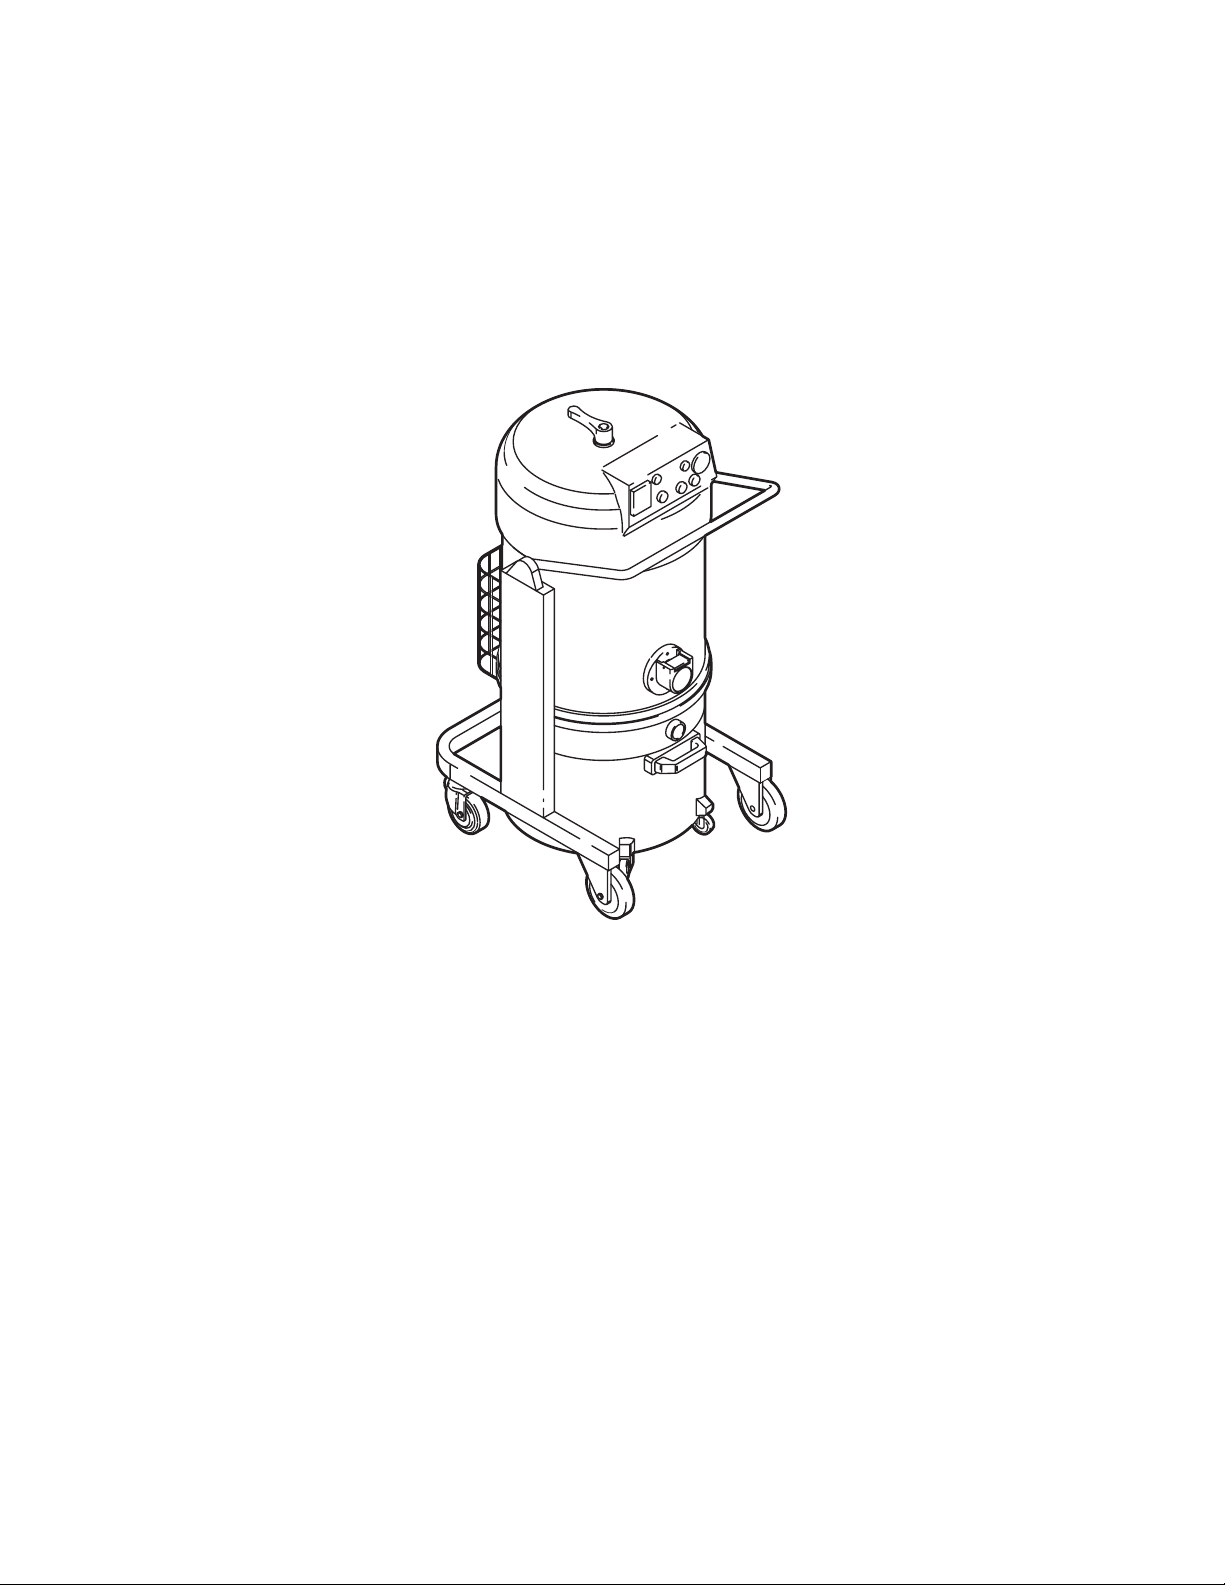
- Description of the vacuum cleaner - Labels
See g. 1.
- Labels key of g. 1
A- Identication plate: Code of the Model which include,
Technical Specications, Serial Number, CE marking, and
Year of manufacturing
B- Dust container
C- Fastening latches
D- Container lever
E- Inlet
H- Exhaust
I- Warning label
L- Panel power plate: Indicates that the panel is powered
by the voltage given on the data plate.
I
04/2009
GB
WARNING !
This vacuum cleaner creates a strong air ow which is drawn
in through inlet “E” and blows out through exhaust “H”.
Before turning on the vacuum cleaner, t the hose into the
inlet and then t the required tool to the end part. Refer to
Manufacturer’s accessory catalog or the service center.
The diameters of the authorized hoses are given in the
technical specications table.
This vacuum cleaner is equipped with an internal deector
which subjects the vacuumed substances to a circular cen-
trifugal movement that makes them drop into the container.
The vacuum cleaner is equipped with a main lter which
enables it to be used for multiple applications.
Different types of main lters are available: standard and
HEPA (for dusts that are hazardous for the health).
3
C338
F
D
E
Page 6
127 / 137
- Optional kits
Various optional kits are available for converting the vacuum
cleaner.
Component 127 137
Polyliner adapter kit • •
Fixed oor nozzle • •
Electric oat shut-off •
Dust bag kit • •
Cyclone lter protector • •
HEPA lter • •
On request, the vacuum cleaner can be supplied with optional
kits already installed. However, they can also be installed at
a later date.
Please contact Manufacturer’s sales network for further details.
Instructions describing how to t and operate the optional
kits as well as maintenance manuals are supplied with the
optional kits themselves.
WARNING !
Use only genuine spare parts supplied and authorized
by the Manufacturer.
- Accessories
Various accessories are available; refer to Manufacturer’s
Accessories Catalogue.
WARNING !
Only use genuine accessories supplied and authorized
by the Manufacturer.
- Packing and unpacking
GB
Dispose of the packing materials in compliance with any current laws and regulations.
- Cardboard packing (g. 2)
Model
A (in) 24 28 28
B (in) 28 32 32
I
C (in) 50 61 67
Weight with
packing (lbs.)
127 137
(60 liter)
111 168 177
137
(100 liter)
F
D
E
C338
4
04/2009
Page 7

- Connection to the power supply
127 / 137
WARNING !
- Make sure that the vacuum cleaner is in good condition before commencing work.
- Before plugging the vacuum cleaner into the power
supply, make sure that the voltage rating indicated on
the data plate corresponds to that of the power supply.
- Plug the vacuum into a socket with a correctly installed
ground contact/connection.
- Make sure that the vacuum cleaner is off.
- The plugs and connectors of the connection cables
must be protected against splashed water.
- Make sure that connections to the power supply and
plug are correct.
- Use vacuum cleaner only when the cables that connect
to the power supply are in good condition (damaged
cables could lead to electric shocks!).
- Regularly check that the electric cable does not show
signs of damage, excessive wear, cracks, or aging.
WARNING !
When the vacuum cleaner is operating, do not:
- crush, pull, damage, or tread on the cable that con-
nects to the power supply;
- only disconnect the cable from the power supply by
removing the plug (do not pull the cord);
- only replace the electric power cable with one of the
same type as the original. The same rule applies if an
extension is used;
- the cable should be replaced by an authorized service
center or qualied electrician.
WARNING !
Never spray water on the vacuum cleaner: such action
constitutes a danger hazard for persons and could shortcircuit the power supply.
- Wet and dry applications
Note
The vacuum lters and the safety container (if applicable)
must be installed correctly.
If the machine is used to clean up liquids, make sure that the
liquid level sensor is activated and installed correctly.
WARNING !
Comply with the safety regulations governing the materials for which the vacuum cleaner is used.
WARNING !
If the wet cleaning model is used:
- Make sure that the liquid level sensor operates correctly
before using the vacuum cleaner to clean up liquids;
- If foam forms, immediately stop work and empty the
container.
- Warning: switch off the vacuum cleaner immediately
if foam or liquid leaks out.
- Regularly clean the liquid level monitoring device and
check to make sure that there are no signs of damage.
- Warning: the dirty liquid collected by the vacuum must
be considered conductive.
I
- Extensions
If an extension is used, make sure it is sized properly for the
power requirements of the vacuum cleaner.
04/2009
GB
F
D
E
5
C338
Page 8

127 / 137
- Maintenance and repairs
WARNING !
Disconnect the vacuum cleaner from its power source
before cleaning, servicing, replacing parts or converting
it to another model
The plug must be removed from the socket.
- Only carry out the maintenance work described in
this manual.
- Only use original spare parts.
- Do not modify the vacuum cleaner in any way. Failure
to comply with these instructions could jeopardize
your safety. Moreover, such action would immediately void the CE declaration of conformity issued
with the machine.
WARNING !
Contact Manufacturer’s technical assistance service or
sales network for maintenance operations not described
in this manual.
- Technical data - Dimensions
- Technical data
Parameter Unit
Voltage @ 60Hz volts 120 120 120
Type of Power no. of phases 1 1 1
Power kW 2 2.4 2.4
Current Draw amps 13.5 15.5 15.5
Waterlift, max. inches of H2O 93 82 82
127 137
(60 l)
137
(100 l)
Airow, max. cfm 190 286 286
Filter Area, main sq. ft. 21 21 21
Filter Area, optional HEPA (upstream) sq. ft. 32.3 32.3 32.3
Noise Level, @ 3’ 3” (1 meter) dB(A) 68 70 70
Tank Capacity gallons/liters 10/38 16/60 26/100
Machine Inlet inches 3 3 3
Dimensions (l x wx h) inches 26 x 22.8 x 41.3 31 x 25.6 x 53.2 31 x 25.6 x 61
I
Weight lbs. 92.4 136 143
Cord Length ft. 30 30 30
GB
Filter Efciency, HEPA DOP tested
99.995% @
0.18 micron
99.995% @
0.18 micron
F
- Storage conditions:
T: -10...+40°C
D
Humidity : ≤ 85%
- Operating Conditions:
Maximum altitude 800 m (up to 2000 m with reduced performances)
E
T: -10 ...+40° C
Humidity: ≤ 85%
99.995% @
0.18 micron
C338
6
04/2009
Page 9

- Dimensions (g. 3)
127 / 137
Model
A (in) 22.8 25.6 25.6
B (in) 26 31 31
C (in) 41.3 53.2 61
127 137
(60 l)
137
(100 l)
- Controls and indicators (g. 4)
A- Vacuum gauge
B- Switch button
C- Lighted mains voltage indicator
- Inspections prior to starting
Prior to starting, check that:
- the lters are installed;
- all latches are tightly locked;
- the hose and tools have been correctly tted into inlet “A”
(g. 5);
- the bag or safety container is installed, if applicable.
- Do not use the vacuum cleaner if the lter is damaged.
WARNING !
When the vacuum cleaner is operating, always check to
make sure that the vacuum gauge pointer remains in the
green zone (OK).
Consult the “Troubleshooting” chapter if problems occur.
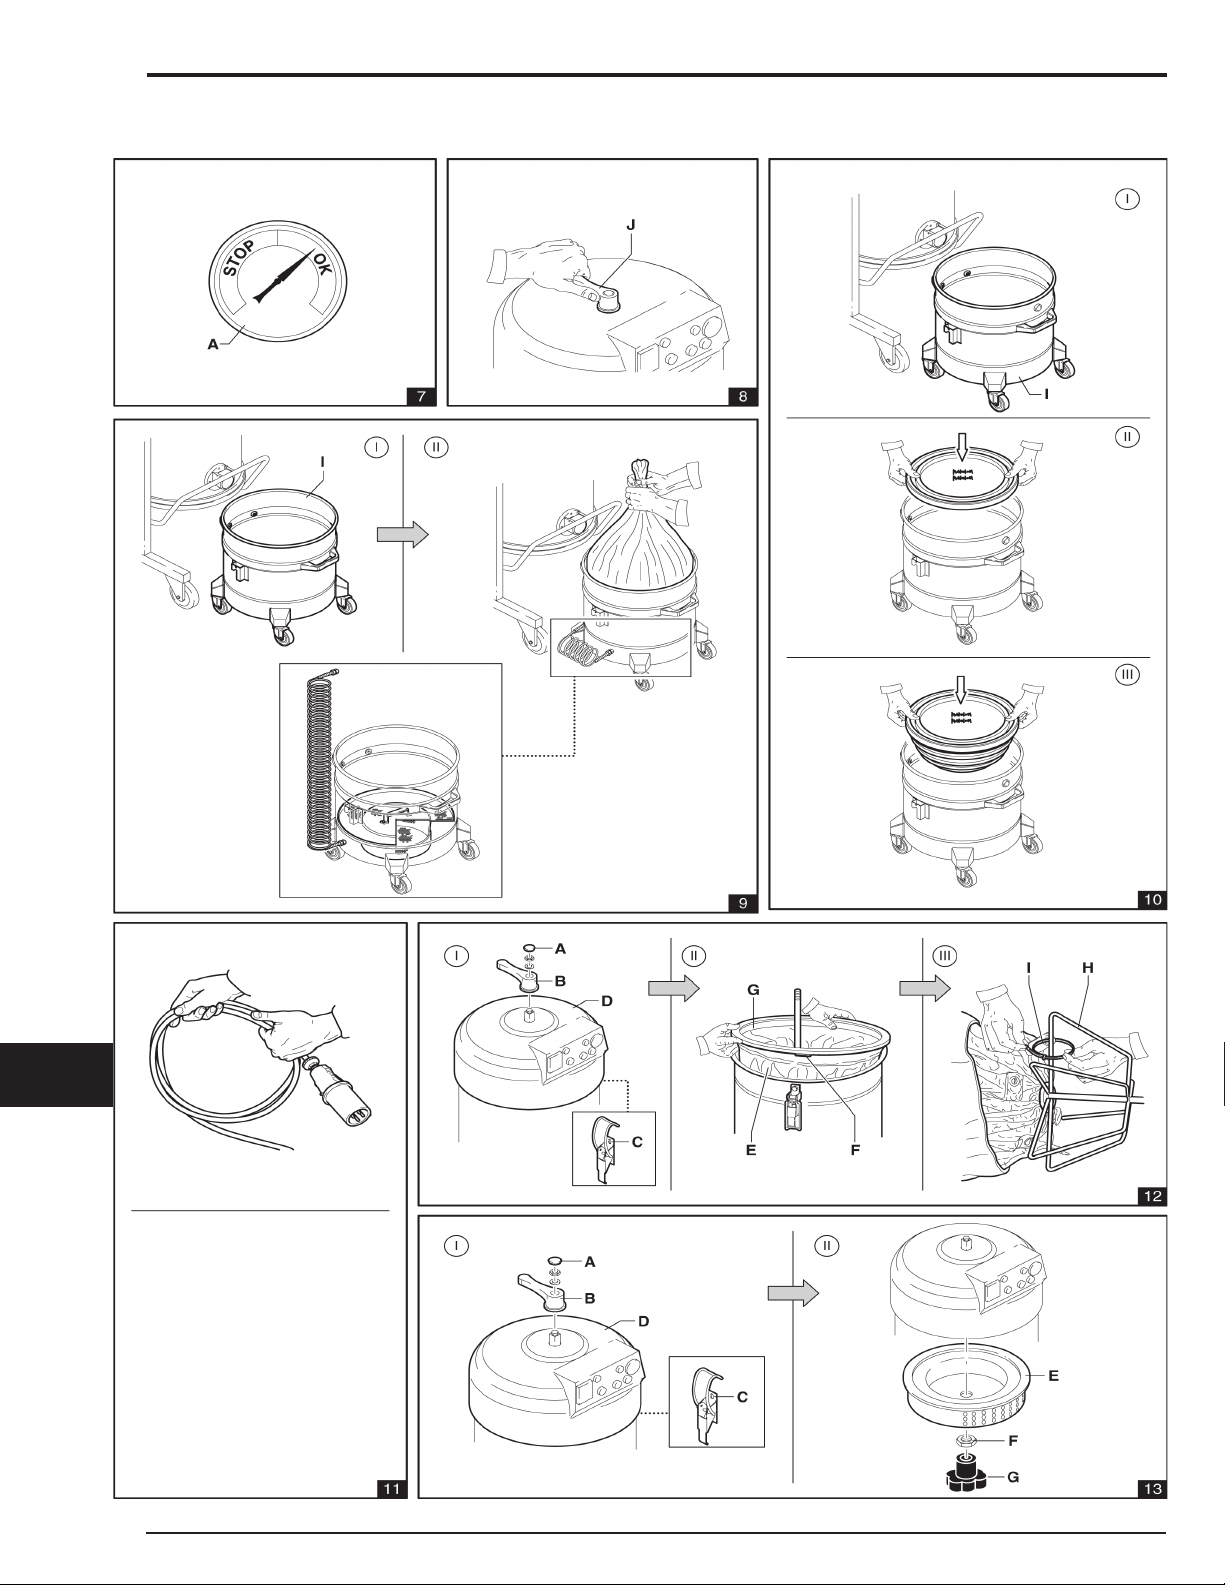
- Cleaning/Purging the main lter
Clean the main lter by means of the lever “J” (g. 8) when
the vacuum gauge pointer (“A” g. 8) switches from the green
zone (OK) to the red zone (STOP).
WARNING !
Stop the machine before cleaning the lter.
Do not purge the lter while the machine is on, as this
could damage the lter itself.
Wait before restarting the vacuum cleaner, to allow the dust
to settle.
Replace the lter if the pointer still remains in the red zone
(STOP) even after the lter has been shaken (consult the
“Main lter replacement” section).
- Starting-up
- Lock the castor brakes “E” (if present) before starting the
vacuum cleaner (g. 6);
- press the buttons “B” - g. 4.
- Operation
Check the ow rate:
- when the vacuum cleaner is operating, the pointer of the
vacuum gauge (“A” - g. 7) must remain in the green zone
(OK) to ensure that the speed of the intake air does not
drop below the safety value of 20 m/sec;
- if the pointer is in the red zone (STOP), it means that the
speed of the air in the hose is below 20 m/s and that the
vacuum cleaner is not working optimally - clean or replace
the lters;
- when the hose is blocked, the pointer of the vacuum gauge
will switch from the green zone (OK) to the red zone (STOP).
- Emergency stopping
Press the push-buttons “B” (g. 4).
- Emptying the container
WARNING !
Turn off the machine and remove the plug from the power
socket before proceeding with this operation.
I
GB
F
D
E
04/2009
7
C338
Page 10
127 / 137
- Before emptying the container it is a advisable to clean the
lter (see “Cleaning the main lter” sect.).
a) Standard model, not suitable for treating hazardous dust
- Release the container “I” (g. 9), then remove and empty it.
- Make sure that the seal is in good condition and correctly
positioned.
- Place the container back in position and use the lever to
secure it again.
Plastic liner
A plastic liner (our code 40100) can be used to collect dust
(see g. 9).
In this case, the machine must be equipped with optional accessories (grate and bypass hose - g. 9).
WARNING !
- In compliance with current laws, these operations can
only be carried out by trained and specialized personnel
who must wear adequate clothing.
- Do not agitate the dust during this operation. Wear a
protective mask.
- A plastic liner can be used (our code 40100) or ABS safety
container (our code 8 30202 - 8 31685) if dust that is
dangerous and/or hazardous for the health is vacuumed.
- The container and/or liner must only be disposed of by
trained personnel and in compliance with the current
laws in force.
Use as a wet cleaner
Make sure that the vacuum cleaner is equipped with a oat
(liquid level sensor) and is suitable for use as a wet cleaner.
(137 model only).
Do not clean up ammable liquids.
If foam forms, stop work immediately and empty the container.
The lter element will be wet after liquids have been cleaned up.
A wet lter can quickly become clogged if the vacuum cleaner
is then used to clean up dry substances.
For this reason, make sure that the lter is dry or replace it
with another one before using the vacuum cleaner to clean
up dry materials.
- At the end of a cleaning session
1- Turn off the vacuum cleaner and remove the plug from
the socket.
2- Wind the connection cable (g. 11).
3- Empty the container as described in the “Emptying the con-
tainer” section. Clean the vacuum cleaner as described in
the “Maintenance, cleaning and decontamination” section.
4- Wash the container with clean water if aggressive sub-
stances have been cleaned up.
5- Store the vacuum in a safe, dry place, out of the reach of
unauthorized people.
- Maintenance, cleaning and decontamination
How to replace the safety container
- Place the hose in a safe, dust-free place;
- Release the dusts container “I” (g. 10);
- Close the safety container with the supplied cover and re-
move it from the dusts container “I” (g. 10). Fit an empty
container in its place.
I
- Start the motor again to prevent dust from being blown out.
- Make sure that the seal is in good condition and correctly
positioned.
GB
- Switch off the motor, t an empty drum in place and fasten
it in position.
F
D
E
WARNING !
Note: the precautions described below must be taken
during all the maintenance operations, including cleaning
and replacing the main and Hepa lters.
a) To allow the user to carry out maintenance operations,
the vacuum must be disassembled, cleaned and overhauled as much as reasonably possible, without causing hazards for the maintenance staff or other people.
The suitable precautions include decontamination
before disassembling the vacuum, adequate ltered
ventilation for the air exhausted from the room in which
it is disassembled, cleaning of the maintenance area
and suitable personal protection.
C338
8
04/2009
Page 11

127 / 137
b) All parts of the appliance must be considered as con-
taminated when they are removed from a hazardous
zone and appropriate actions must be taken to prevent
dust from dispersing.
When service work or repairs are carried out, all the
contaminated elements that cannot be cleaned well
must be eliminated.
These elements must be disposed of in sealed bags
conforming to the applicable regulations and in accordance with the local laws governing the disposal
of such material.
This procedure must also be followed when the lters
are removed (main, Hepa and downstream lters).
Note: Compartments that are not dust-tight must be
opened with suitable tools (screwdrivers, wrenches,
etc.) and thoroughly cleaned.
c) ATTENTION: this appliance is designed to be able to
collect powders that are harmful for one’s health. All
maintenance work and emptying, including removing the powder from the container, must be done by
specialized personnel only and they must wear protec-
tive clothing. Do not start without the complete lter
system in place.
WARNING !
- How to disassemble and replace the main and
Hepa lters
WARNING !
When the vacuum cleaner is used to clean up hazardous
substances, and the lters become contaminated:
- work with care and avoid spilling the vacuumed dust
and/or material;
- place the disassembled and/or replaced lter in a
sealed plastic bag;
- close the bag tightly;
- dispose of the lter in accordance with the current laws.
WARNING !
Filter replacement is a serious matter.
The lter must be replaced with one of identical characteristics, lter surface and category.
Otherwise, the vacuum cleaner will not operate correctly.
- Main lter replacement
WARNING !
Use only spare parts supplied and authorized by the
Manufacturer.
Do not to agitate dust when this operation is carried out.
Wear a mask and other protective clothing plus protective gloves suited to the hazardous nature of the dust
collected. Refer to the regulations governing the handling
of hazardous materials.
Before proceeding with this operation, turn off the machine
and remove the plug from the power socket.
- Replace the main lter
Disassembly (g. 12)
- Remove plug “A”, unscrew the nut underneath and remove
lever “B”.
- Release the closing clips “C” and remove the head “D”.
- Lift lter “E”, unscrew clamp “F” and remove ring “G”.
- Unscrew cage “H” and turn the lter upside down.
- Cut the plastic clamps “I” and detach the cage from the lter.
I
GB
F
D
E
04/2009
9
C338
Page 12

127 / 137
Assembly (g. 12)
- Mount the lter catch and retention ring of the old lter on
to the new one.
- Insert cage “H” and x it to the lter by means of clamps
“I” at the bottom of the lter itself.
- Fit the lter into lter chamber.
- Mount the head “D” and lock it in place with the closing
clips “C”.
- Mount the lever “B” in position with the nut and relative
washer.
- Fit on the plug “A” by exercising slight pressure.
- Replacing the Hepa lter
WARNING !
Do not agitate the dust when this operation is carried out.
Wear a mask and other protective clothing plus protective gloves suited to the hazardous nature of the dust
collected. Refer to the regulations governing the handling
of hazardous materials.
- Replacing the upstream Hepa lter (g. 13)
- Remove the plug “A”, unscrew the nut underneath and
remove the lever “B”.
- Release the hooks “C” and lift the head “D”.
- Unsrew the knob “G” and take the nut “F” under the lter “E”;
- Cover the lter “E” with a plastic bag and remove it;
- Seal the bag, t the new lter and close the cover.
Mount the following parts in the given order:
- the HEPA lter;
- nut and central knob for locking;
- the head, locking it to the lter chamber “C”;
I
- the lever with the relative washer, nut and plug.
GB
- Checking and cleaning the motor cooling fan
Periodically clean the motor(s) cooling fan to prevent the
F
electric motor(s) from overheating, particularly if the appliance
is used in a dusty place.
D
- Seal inspection
- Checking the condition of the hoses
Make sure that connecting hose “A” is in good condition and
correctly secured to the inlet.
If the hose is damaged, broken or badly connected to the inlet,
it must be replaced.
When sticky materials are collected, check for possible clog-
ging along the hose, in outlet and in the lter chamber.
Scrape the inside of the outlet and remove the deposited waste
as indicated in g. 14.
- Checking the lid seal
If seal “A” under head “D” has become slack, unfasten screws
“B” that lock fastening latches “C” in place and allow them to
slide downward until lid “D” closes securely.
Now tighten locking screws“B”.
Replace seal “A” - g. 15 - if an optimum seal cannot be obtained.
- Checking the seal of lter chamber
If seal “A” - g. 16 - between the container and lter chamber
“C” is not secure:
- loosen the four screws “B” that lock lter chamber “C”
against vacuum structure.
- Allow lter chamber “C” to lower down and relock screws
“B” once it has reached the retention position.
The seal must be replaced if it is torn, cut, etc.
Replace seal “A” if it does not secure adequately
- Cleaning and replacing the separator (g. 17)
Note
If there is only a dust deposit on separator “D”, allow the dust
to drop through the central hole.
Separator “D” should rst be disassembled in order to be
cleaned:
- release lock fastening latches “A” and remove the head “B”;
- remove the lter;
- unscrew the two screws “C” and remove separator from
the container.
- Replace the part if excessively worn.
- Assemble separator “D” again.
- Lock it in position by screwing the two screws “C”.
- Ret the lter and close head “B”, locking it in place with
the two fastening latches “A”.
E
C338
10
04/2009
Page 13
127 / 137
- Disposal of the machine
Dispose of the machine in compliance with laws.
- Correct Disposal of This Product (Waste Electrical &
Electronic Equipment)
This marking (pos. N - g. 1) shown on the product or its literature, indicates that it should not be disposed of with other
household wastes at the end of its working life. To prevent
possible harm to the environment or human health from
uncontrolled waste disposal, please separate this from other
types of wastes and recycle it responsibly to promote the sustainable reuse of material resources. Business users should
contact their supplier and check the terms and conditions of
the purchase contract. This product should not be mixed with
other commercial waste for disposal.
- Wiring diagrams
See g. 18.
Wiring diagram key
Abbrev. Component Code
M1 - M2 - M3 Motor see table below
S1 - S2 - S3 Motors switches 8 39525
H2 Voltage indicator light 8 39526
- Recommended spares
The following is a list of spare parts that should be kept ready to hand in order to speed up maintenance work. (g. 19).
Recommended spare parts list (g. 19)
Pos. Description Model Dim. (mm) Code number
1 Main lter “L”
3 Filter ring
4
5 Filter ring seal
6 Filter clamp
7 HEPA lter
800 W single-phase motor
1000 W single-phase motor
127
137
127
137
127
137
127
137
127
137
127
137
Ø 460 8-17080
Ø 460 8-15003
N/A
Ø 460 8-17026
Ø 460 8-18079
Ø 460 8-17455
8-54006
8-54002.115
I
GB
F
D
E
04/2009
11
C338
Page 14

127 / 137
- Troubleshooting
Fault Causes Remedies
Check whether power is reaching the socket
Check whether the plug and cable are in good
The vacuum fails to start No power
Clogged main lter Clean the lter. Replace it if this is not sufcient
The rpm rate of the vacuum increases
Clogged hose Check the hose and clean it
condition
Ask for assistance from an authorized manufacturer’s technician
Dust leaks from the vacuum
Noisy suction motor Worn or broken carbon brushes Remove and replace the motor carbons
Electrostatic current on the vacuum non-existent or inefcient grounding
The lter is torn Change it for another of identical type
Inadequate lter Change it for another of suitable type and check
Check all ground connections. Particularly
check the suction inlet tting; lastly, the hose
must be strictly antistatic
- Manufacturer’s assistance center
See appendix.
I
GB
F
D
E
C338
12
04/2009
Page 15

127 / 137
I
GB
F
D
E
04/2009
13
C338
Page 16
127 / 137
GB
I
F
D
E
C338
14
04/2009
Page 17

127 / 137
I
GB
F
D
E
04/2009
15
C338
Page 18

Nilsk-Advance America
300 Technology Drive
Malvern, PA 19355
1-800-645-3475
questions@nilsk-advance.com
www.nilskcfm.com
 Loading...