

Page 1
Connection Guide (for COOLPIX)
Table of Contents
Preparing a Smart Device.........................................................................................................2
Pairing the Camera and a Smart Device............................................................................. 2
Image Upload...............................................................................................................................5
Tips on Pairing..............................................................................................................................7
This document uses Version 1.3 of the SnapBridge app as an example
for explanations.
You can do the following when you establish a wireless connection
(continuous connection via Bluetooth® low energy technology,
hereinafter referred to as “pairing”) between a SnapBridge-supported
camera and a smartphone/tablet (hereinafter referred to as “smart device”) with
SnapBridge installed.
Image Upload
You can upload still images and movies* captured with the camera to the smart
device, or display the shooting screen on the smart device and capture still images
remotely. See “Image Upload” (page 5) for more information.
* AVI format movies (COOLPIX A300 movies) cannot be uploaded.
Other Features
• Obtaining location data and synchronizing the date and time
• Imprinting information on images such as shooting date and time and comments
C SnapBridge
• For an overview, you can also visit the dedicated Nikon website.
http://snapbridge.nikon.com
• See the online help for details on how to use SnapBridge (after pairing, you can refer to
the Other tab M Info/settings M Instructions in SnapBridge).
http://nikonimglib.com/snbr/onlinehelp/en/index.html
• Use the latest version of SnapBridge. Oper ation of SnapBridge may vary depending on the
app version.
-1-
Page 2
Preparing a Smart Device
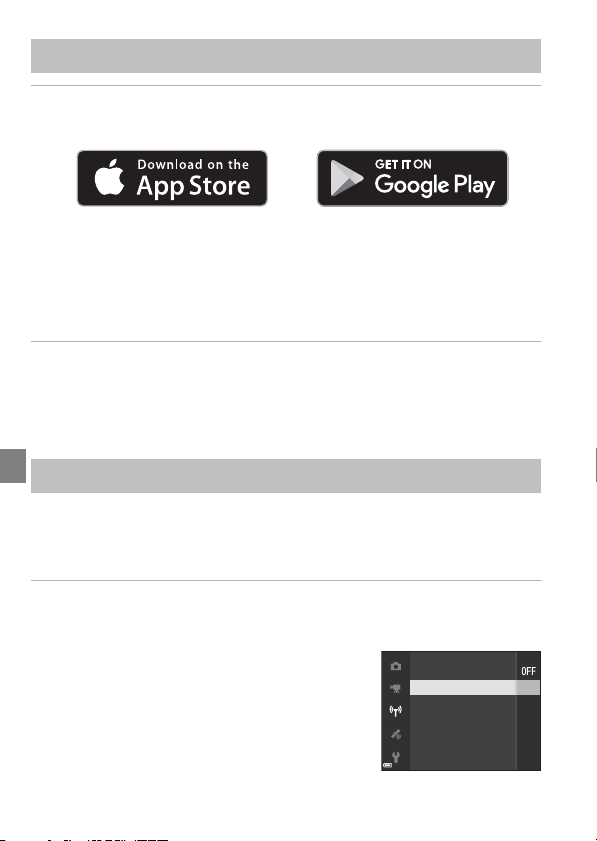
Airplane mode
Connect to smart device
Send while shooting
Wi-Fi
Bluetooth
Restore default settings
1 Install the SnapBridge app.
• iOS: Apple App Store® Android™: Google Play™
You can check the OS versions that SnapBridge supports by visiting the download
sites above.
• Input the search keyword “snapbridge.” When multiple apps are displayed in the
search results, select “SnapBridge.” “SnapBridge 360/170” cannot be used with
COOLPIX.
• Do not launch SnapBridge until you start pairing, even when the
installation is finished.
2 Enable Bluetooth and Wi-Fi on the smart device.
• Refer to the documentation provided with the smart device for information on how
to operate it.
• Pairing is performed on SnapBridge. Pairing cannot be performed from the
Bluetooth settings screen on the smart device.
Pairing the Camera and a Smart Device
• Use a sufficiently charged battery so that the camera does not turn off during the
procedure.
• Insert a memory card with sufficient free space into the camera.
• See the documentation provided with the camera for details on how to use it.
1 Turn on the camera.
• If the camera is turned on for the first time: A language selection screen will be
displayed. When you confirm the language, the camera displays the screen in step 2.
• If you did not pair with a smart device when the
camera was turned on for the first time: Select
Network menu M Connect to smart device in
the camera and press the k button to display the
screen in step 2.
-2-
Page 3
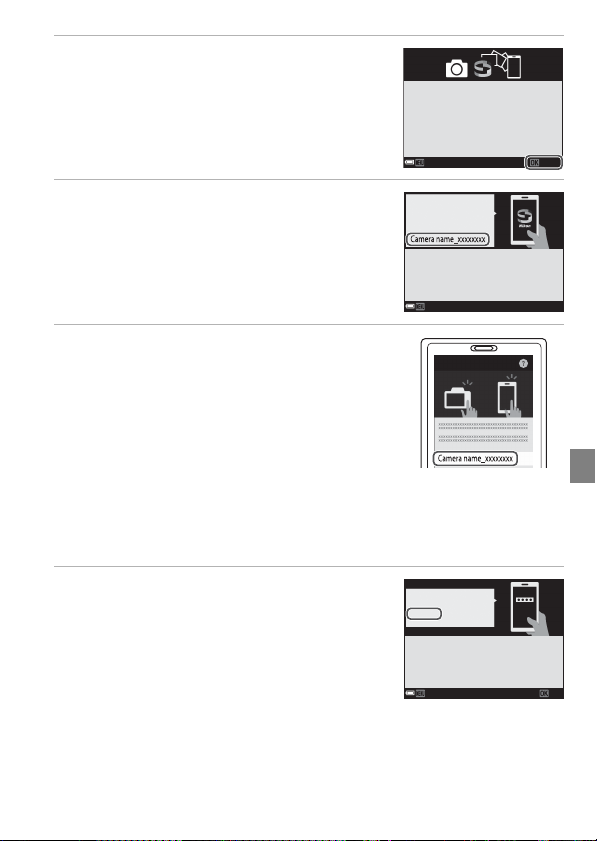
2 Press the k button when the dialog on
the right is displayed on the camera.
Use SnapBridge to send photos to your
smart device and share them online.
To skip this screen and set SnapBridge
later from the Network menu, press
MENU.
Later
Set
3 Launch SnapBridge on the smart device
when the dialog on the right is
displayed on the camera.
• Place the smart device close to the camera.
• If you are pairing after unpairing (page 7), launch
SnapBridge and then tap w in the y Connect
tab.
App
SnapBridge
Camera
On your smart device, go to the app
store and search for SnapBridge. After
installing, open the SnapBridge app.
Cancel
4 When the name of the camera you
want to pair with is displayed in the
smart device, tap it.
• For iOS:
If you are pairing for the first time, a dialog
explaining the procedure is displayed. Confirm the
details and tap Understood (If Understood is not
displayed, scroll down the screen.).
Tap the camera name again when the accessory
selection screen is displayed (it may take some time for the camera name to be
displayed.).
• If the camera name is not displayed even after waiting for a while, close SnapBridge
completely and perform pairing again from step 3.
Connect to Camera
Camera name
5 Confirm that the camera and smart
device display the same authentication
code (six digits).
• The authentication code may not be displayed in
some versions of iOS. Proceed to step 6 even in
such cases.
Auth. code
000000
Confirm that the same authentication
code is displayed on the smart device
and press OK.
Cancel OK
-3-
Page 4

6 Tap Pair on the smart device, and then press the k button on
the camera.
• If you pressed the k button on the camera first, continue and tap Pair on the smart
device.
• The button name Pair varies depending on the smart device model.
7 Press the k button when the dialog on
the right is displayed.
• If the camera displays Could not connect., press
the k button to perform pairing ag ain from step 3.
To cancel pairing, press the d button and set the
time zone, date, and time.
Your camera and smart device are
connected!
SnapBridge will send your photos to
your smart device as they are taken.
Next
8 Follow the on-screen instructions in the camera to complete the
setup process.
• To record location data with photographs, select Yes when prompted and enable
the location data features both in SnapBridge and on the smart device itself (for
more information, see the documentation provided with the smart device).
• You can also synchronize the camera clock to the time re ported by the smart device
by selecting Yes when prompted and enabling the clock synchronization function
in SnapBridge. If you select No, follow the on-screen instructions and set the camera
clock.
• You can change the location data settings in the camera setup menu or location
data options, and the synchronization of date and time settings in the camera setup
menu.
9 Press the shutter-release button to shoot when the camera
switches to the shooting screen.
• If the camera is paired with a smart device, the captured still image is automatically
uploaded to the smart device.
-4-
Page 5

Image Upload
Use any of the following methods to upload captured images to a smart device.
Image upload Description Setting method
Automatically upload still images to
Send while shooting
1
the smart device every time they are
captured.
Mark for upload
1
Remote photography
Download selected
1
pictures
1
When Network menu M Bluetooth M Send while off in the camera is set to On,
images are uploaded to the smart device even when the camera is turned off.
2
AVI format movies (COOLPIX A300 movies) cannot be uploaded.
Select still images in the camera and
upload them to the smart device.
Release the camera shutter using the
smart device.
Captured still images are automatically
downloaded to the smart device.
Select still images and movies2 in the
camera from the smart device and
download them to the smart device.
The images that can be uploaded vary depending on the type of wireless connection.
Image upload
Send while shooting w
Mark for upload w
Bluetooth Wi-Fi
Still images Movies Still images Movies
1
1
–––
–––
Remote photography ––w
Download selected pictures w
1
The image size uploaded is restricted to 2 megapixels.
2
Follow the instructions in SnapBridge to switch to a Wi-Fi connection. For iOS, see
“Switching to a Wi-Fi Connection (for iOS)” (page 6).
1
– w
Network menu in
the camera
Playback menu in
the camera
x Camera tab in
SnapBridge
x Camera tab in
SnapBridge
2
2
w
–
2
B Notes About When in a Wi-Fi Connection
If you switch to another tab from the x Camera tab in SnapBridge or switch from
SnapBridge to another app, the Wi-Fi connection will be disconnected.
-5-
Page 6

Switching to a Wi-Fi Connection (for iOS)
When using Remote photography or Download selected pictures, a dialog
prompting to switch to a Wi-Fi connection is displayed. For iOS, use the following
procedure to switch.
1 Write down the camera SSID (camera name at
default) and password displayed on the dialog
in the smart device, and then tap Go.
The device will connect to the
camera via Wi-Fi. Select
“Camera name_XXXXXXXX” for
“Wi-Fi” in the iOS “Settings”
display and enter the password
“XXXXXXXXX” to enable remote
photography.
Tap “Go” to go to “Settings” >
“SnapBridge”.
Close Go
2 Tap Settings M Wi-Fi, and select the SSID you wrote down in
step 1 from the list of connections.
3 If this is your first time connecting, input the password you
wrote down in step 1.
• Take note of uppercase and lowercase characters.
• The Wi-Fi connection is established when the SSID is displayed in the list of
connections.
B Changing the SSID and Password
You can change the SSID or password by using Network menu M Wi-Fi M Network
settings in the camera. To protect your privacy, we recommend that you change the
password regularly.
-6-
Page 7

Tips on Pairing
Disconnecting and Reconnecting the Pairing
Use any of the following methods to temporarily disconnect and reconnect the
pairing.
• Switch the setting in Network menu M Airplane mode in the camera.
You can set it to On to turn off all communication functions in places where
wireless communication is prohibited.
• Switch the setting in Network menu M Bluetooth M Connection in the
camera.
• Switch the setting in the y Connect tab M Auto link in SnapBridge.
You can reduce battery consumption of the smart device by disabling this setting.
Unpairing
• To pair with another SnapBridge-supported camera, use SnapBridge to remove the
registration of a paired camera in advance.
• If you have problems transferring images to a smart device, such as long transfer
times, you may be able to fix them by unpairing and then re-pairing.
1 In SnapBridge, tap z in
the y Connect tab, and
then tap End pairing M
Connect
Connection options
Connect
Select camera
Allow Wi-Fi access
Yes on the dialog that is
displayed.
• The camera and smart device
are unpaired.
End pairing
2 For iOS, remove the registration of the device (registered as the
camera name).
• If you do not remove the registration of the device, you cannot re-pair.
Go to “Settings” > “Bluetooth”
in iOS and unpair (“Forget”) this
device. You will not be able to
pair with the device again until
you have unpaired the device.
Go
Close
-7-
Page 8

3 To re-pair, select Network menu M Connect to smart device in
the camera and press the k button.
• Follow the instructions in “Pairing the Camera and a Smart Device” from step 2 (page 3).
Removing the Registration of a Device (for iOS)
If pairing fails, use the following procedure to check the registration status of the
device and delete it if the camera name remains before pairing again.
1 Launch the iOS settings app.
2 Remove the registration of the device (registered as the camera
name).
• The camera and smart device screens shown in this manual may differ from
those of the actual products.
• Trade names mentioned in this manual or documentation provided with your
Nikon product are the trademarks or registered trademarks of their respective
holders. See the documentation provided with the camera for details.
-8-
CT7E02(11)
6MQA7211-02
 Loading...