


Connection Guide (for COOLPIX)
This document describes the procedure for using the SnapBridge app
(Version 2.5) to establish a wireless connection between a supported
camera and smart device.
When you use the SnapBridge app, you can upload images captured
with the camera to the smart device or operate the camera remotely
from the smart device to take pictures.
• Use the latest versions of the SnapBridge app and the camera’s firmware.
The functions that can be used and the operating procedures may vary depending
on the versions of the SnapBridge app and camera’s firmware or the OS of the
smart device.
Installing the SnapBridge App
Download the app from the Apple App Store® for iOS, and from Google Play™ for
Android™.
The “SnapBridge 360/170 app” cannot be used with this camera.
For Detailed Explanations
• See the online help for detailed explanations about the SnapBridge app.
https://nikonimglib.com/snbr/onlinehelp/en/index.html
• See the “Reference Manual” (PDF format) for detailed explanations about the camera.
https://downloadcenter.nikonimglib.com
C Screens in the SnapBridge App
1 You can view the online help, as well as configure the app’s settings.
Primarily perform connection settings for smart devices and cameras.
2
3 You can play back images uploaded from the camera.
-1-
1
3
2

Connecting the Camera and a Smart Device
Pairing (Bluetooth Connection)
When you connect to a smart device through a Bluetooth connection, you can use
auto link features (automatic upload of still images, time information synchronization,
location data synchronization).
When connecting through Bluetooth for the first time, pair the camera with the smart
device.
• Insert a memory card with sufficient free space into the camera.
• Make sure that the remaining battery levels of the camera and smart device are
sufficient.
• Enable Bluetooth on the smart device.
1 Camera: Select Network menu M
Connect to smart device, and press
the k button.
• Depending on your camera, the screen on the
right for establishing the connection may be
displayed after you press the k button or turn the
camera on for the first time. Press the k button in
such cases.
• Depending on your camera, the screen on the
right may be displayed after you press the
k button on the screen for establishing the
connection.
When using NFC: Touch the NFC antenna of the
smart device to the Y (N-mark) on the camera.
When Start pairing? is displayed on the smart
device, tap OK and proceed to step 4.
When not using NFC: Press the k button.
-2-
Airplane mode
Choose connection
Connect to smart device
Connection to remote
Send while shooting
Wi-Fi
Use SnapBridge to send photos to your
smart device and share them online.
To skip this screen and set SnapBridge
later from the Network menu, press
MENU.
Later
NFC enabled devices: touch
the camera to the smart device.
Non-NFC enabled devices: press OK.
Cancel
Set
Next

2 Camera: Confirm that the
screen on the right is
displayed.
Smart device
SnapBridge app and tap
Connect to camera.
• When the list of camera
categories is displayed on the
smart device, tap the category
of the camera you want to pair.
• If you tapped Skip without connecting the camera when launching the SnapBridge
app for the first time, tap the A tab M Connect to camera and proceed to step 3.
: Launch the
App
SnapBridge
Camera
On your smart device, go to the app
store and search for SnapBridge. After
installing, open the SnapBridge app.
Cancel
3 Smart device: Tap the name of the camera you
want to pair.
• For iOS, if a screen explaining the procedure is displayed after
you tap the camera name, confirm the details and tap
Understood.
• Tap the camera name again when the screen for selecting an
accessory is displayed (it may take some time for the camera name to be displayed).
4 Camera/smart device:
Confirm that the same
number is displayed.
• Depending on the iOS version,
the number may not be
displayed on the smart device.
Proceed to step 5 in such cases.
Auth. code
123456
Confirm that the same authentication
code is displayed on the smart device
and press OK.
Cancel OK
5 Camera: Press the k button.
Smart device
• The actual name of the PAIR option may vary
depending on the smart device.
• When pairing for the first time, set the auto link
function using the smart device screen.
: Tap PAIR.
-3-
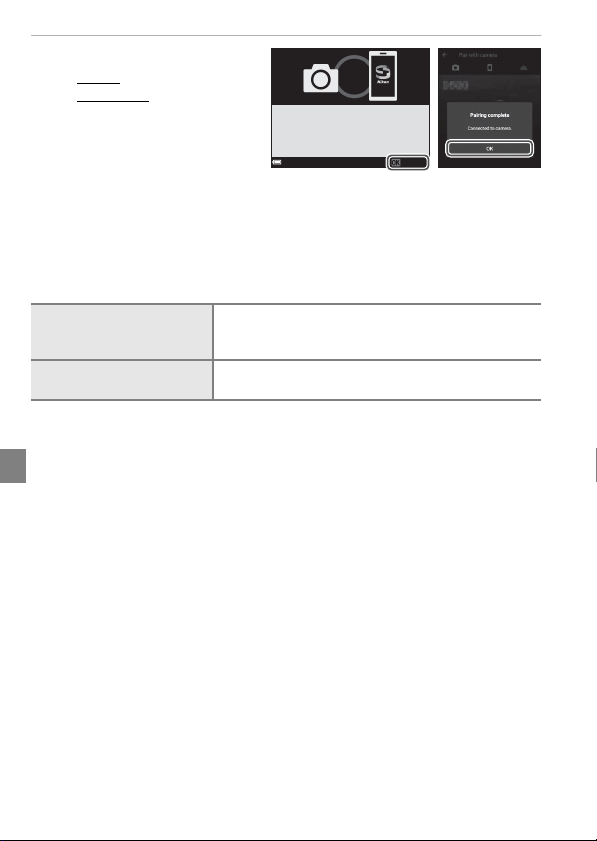
6 Finish the pairing.
• Camera: Press the k button.
• Smart device
• If you pair when connecting for
the first time, the camera can
connect to the smart device
through Bluetooth from the
next time without pairing.
Automatic Upload of Still Images
While connected through Bluetooth, you can use the following features to
automatically upload still images to a smart device. Still images are uploaded at an
image size of 2 megapixels.
A tab in the SnapBridge app M Auto link M enable Auto download in advance.
Network menu in the
camera M Send while
shooting M Still images
Playback menu in the
camera M Mark for upload
• To upload still images and movies at their original size, switch to a Wi-Fi connection
and use Download pictures (page 6).
C Images That Cannot Be Uploaded
• RAW images cannot be uploaded.
• For cameras with internal memory, images saved in the camera’s internal memory cannot
be uploaded depending on the camera.
Tips for Pairing
C If a Confirmation Dialog Is Displayed after Pairing Is Finished
After the pairing is finished, a confirmation dialog for the auto link function may be
displayed depending on the camera.
• To record location data with photographs, select Yes when prompted. Enable location
data features on the smart device.
• You can synchronize the camera clock to the time reported by the smart device by
selecting Yes when prompted.
To use the auto link function, you must also set the A tab M Auto link in the SnapBridge
app.
: Tap OK.
Your camera and smart device are
connected!
Conrm
Automatically upload still images to a smart device every
time they are captured.
Select still images on the camera’s playback screen, and
then automatically upload them to a smart device.
-4-
C If the Camera and Smart Device Cannot Be Paired
• Confirm that the settings in the Network menu in the camera are configured as follows.
- Airplane mode: Off
- Choose connection: Smart device (Only for cameras that have the Choose
connection option.)
- Bluetooth M Connection: Enable
• If the camera displays Could not connect., press the k button and repeat the procedure
from step 2 to perform the pairing again. (Depending on the camera, repeat the
procedure from the screen for establishing the connection in step 1.) Press the
d button to cancel the pairing.
• You may be able to finish the pairing successfully by closing the SnapBridge app
completely, turning the camera off and then on again, and then performing the
procedure in “Pairing (Bluetooth Connection)” (page 2) again.
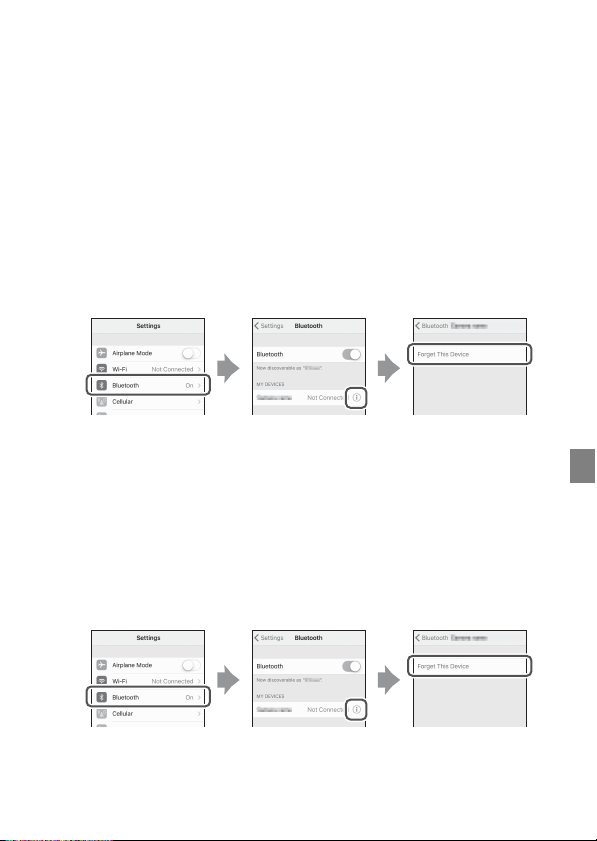
• For iOS, you may not be able to pair the camera with the smart device if the camera is
registered as a device. Delete the registered device (camera name) in the iOS settings app.
C Disconnecting and Reconnecting the Bluetooth Connection
Use either of the following methods to switch the setting.
• Network menu M Airplane mode in the camera (You can set it to On to turn off all
communication functions in places where wireless communication is prohibited.)
• Network menu M Bluetooth M Connection in the camera
C Unpairing
Tap the A tab M i M Forget camera M Camera you want to unpair M Yes in the
SnapBridge app. (During a Wi-Fi connection, tap i, and then tap Yes.)
For iOS, then tap Go and delete the registered device (camera name) in the iOS settings app.
-5-
Using Download Pictures/Remote Photography (Wi-Fi
Connection)
When the camera is connected to a smart device through a Wi-Fi connection, you can
use the following features in the A tab of the SnapBridge app.
Download
pictures
Remote
photography
• If you select Download pictures or Remote photography when connected
through Bluetooth, the Wi-Fi connection dialog will be displayed. Tap OK to switch
to a Wi-Fi connection.
To return to the Bluetooth connection from the Wi-Fi connection, tap the A tab
M F M Yes in the SnapBridge app.
Download still images (2 megapixels or original size) and movies to a
smart device.
Operate the camera remotely using a smart device to capture still images.
• Insert a memory card with sufficient free space into the camera.
Depending on your camera, you cannot perform remote photography
if a memory card is not inserted in the camera.
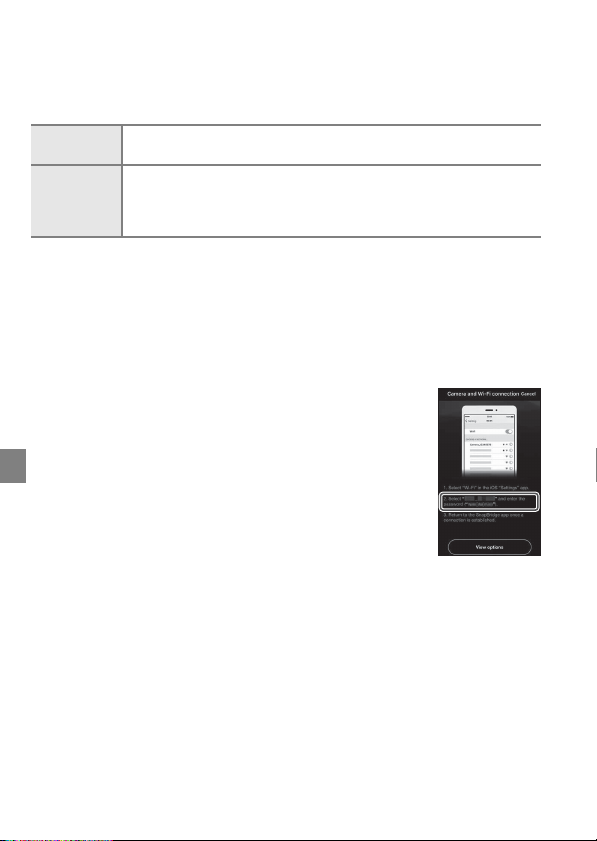
C If the “Camera and Wi-Fi connection” Screen Is Displayed in iOS
Depending on the iOS version, the Camera and Wi-Fi connection
screen may be displayed after you tap OK on the Wi-Fi connection
dialog.
• Write down the camera SSID and password displayed on the screen.
• When you tap View options, the iOS settings app launches. After
tapping Settings, tap Wi-Fi, and select the SSID you wrote down.
When connecting for the first time, input the password.
For details about operation, see the online help for the SnapBridge
app.
C SSID and Password
You can confirm or change the SSID and password using Network menu M Wi-Fi M
Network settings in the camera. See the camera’s “Reference Manual” for details about
operation.
C Images That Cannot Be Uploaded
• RAW images cannot be uploaded.
• AVI format movies (COOLPIX A300 movies) cannot be uploaded.
• For cameras with internal memory, images saved in the camera’s internal memory cannot
be uploaded depending on the camera.
-6-

If the Camera Cannot Be Connected or Images
Cannot Be Uploaded
The issue may be solved by trying one or all of the following operations.
• Turn the camera off and then on again.
• Switch the tab of the SnapBridge app.
• Close the SnapBridge app completely and then launch it again.
• Cancel the connection once and then establish a connection again.
- “Unpairing” (page 5)
-7-

• Smartphones and tablets are referred to as “smart devices” in this document.
• Screens, button names, and button positions shown in this document may
differ from those of the actual products.
• See the documentation provided with the camera and smart device for
detailed information on how to use them.
• Trade names mentioned in this document or documentation provided with
your Nikon product are the trademarks or registered trademarks of their
respective holders. See the documentation provided with the camera for
details.
-8-
6MQA7211-04
CT8K04(11)
 Loading...