


SB7J02(11)/ 6MB41011-02
Connection Guide (for D‑SLR Cameras)
En
Table of Contents
Introduction ......................................................................................2
The Interface ......................................................................................................2
Trouble Connecting? ......................................................................................2
More on SnapBridge .......................................................................................2
What You’ll Need ...............................................................................3
What SnapBridge Can Do for You ....................................................3
Readying the Smart Device .............................................................4
Pairing and Connecting ...................................................................5
Download/Remote Control ..............................................................9
Downloading Pictures ...................................................................................9
Remote Photography ..................................................................................10
Connection Tips ..............................................................................11
The Wi‑Fi Prompt (iOS Only)......................................................................11
Enabling/Disabling Wireless Connections ........................................... 12
More on Pairing and Connecting ..................................................13
The NFC Dialog .............................................................................................. 13
Pairing After Launch .................................................................................... 13
“Unable to Connect.” .................................................................................... 13
Pairing Problems ...........................................................................................14
Pairing with Multiple Cameras ................................................................. 14
Downloading Pictures ................................................................................15
Introduction
Read this guide for information on establishing wireless connections
between compatible cameras and smart devices (smartphones or
tablets) via the SnapBridge app (version 2.0).
The Interface
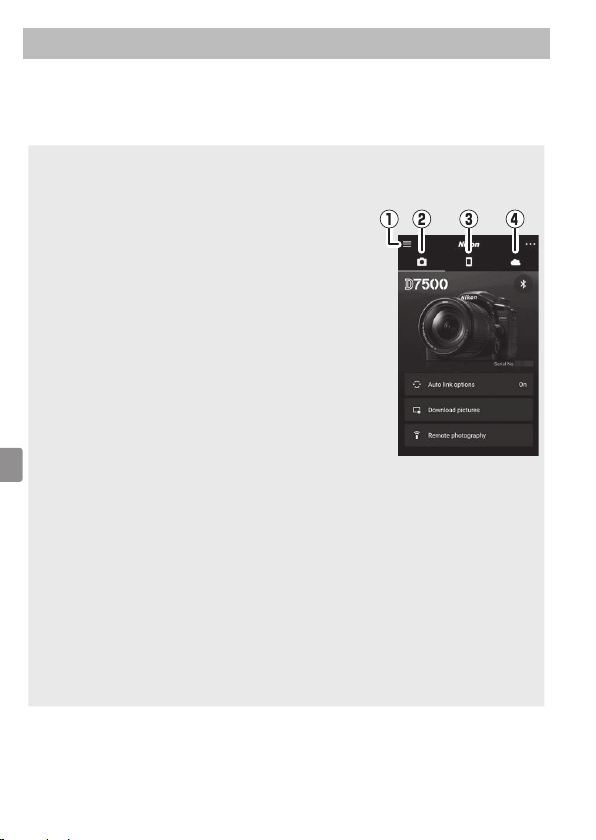
The SnapBridge app features a menu (q) and three tabs (w–r).
Adjust settings or view app help or
q
notications from Nikon.
Adjust settings, principally for connection
w
to the camera.
View pictures downloaded from the
e
camera or delete or share images.
Access NIKON IMAGE SPACE via a
r
dedicated app (app installation and
Nikon ID required).
Trouble Connecting?
See “More on Pairing and Connecting” (0 13).
More on SnapBridge
Basic information on the SnapBridge app is available from:
http://snapbridge.nikon.com
For detailed information, consult online help (once pairing is
complete, you can view online help by selecting Help in the
SnapBridge app menu).
http://nikonimglib.com/snbr/onlinehelp/en/index.html
2
Introduction
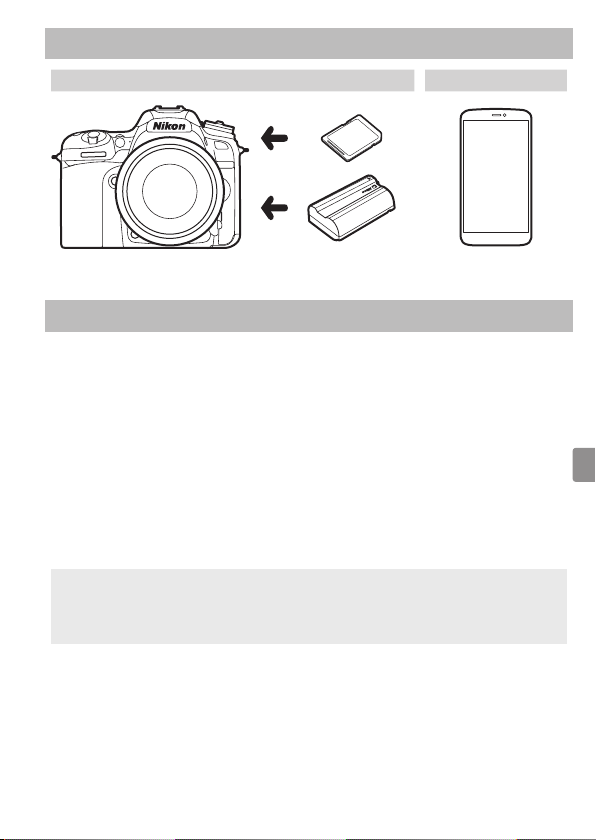
What You’ll Need
Camera Smart device
Memory card
Battery
What SnapBridge Can Do for You
Use the SnapBridge app to:
• Download pictures as they are taken or select earlier photos for
download
• Take pictures remotely using the controls in the SnapBridge app;
the pictures are downloaded to the smart device as they are taken
• Upload smart device location data to the camera
• Synchronize the camera clock to the time reported by the smart
device
• Imprint pictures with comments, the time of recording, and other
information as they are taken
A Downloading Pictures
See “Download/Remote Control” (0 9) for information on the
types of pictures that can be downloaded.
What You’ll Need
3

Readying the Smart Device
Before connecting, ready your smart device by installing the
SnapBridge app and enabling Bluetooth and Wi‑Fi.
Search for “snapbridge” on the Apple App Store® (iOS)
1
or Google Play™ (Android™) and install the SnapBridge
app.
Information on supported operating systems is available from the
download site. This camera is not compatible with the SnapBridge
360/170 app.
Enable Bluetooth and Wi‑Fi on the smart device. Note that
2
the actual connection to the camera will be made using the
SnapBridge app; do not attempt to connect using the Settings
app on your device.
4
Readying the Smart Device
Pairing and Connecting
Before pairing, conrm that there is space available on the camera
memory card. To prevent unexpected interruptions, you should also
check that the camera battery is fully charged.
A D7500 camera and Android smart device are used for illustrative
purposes in the instructions that follow.
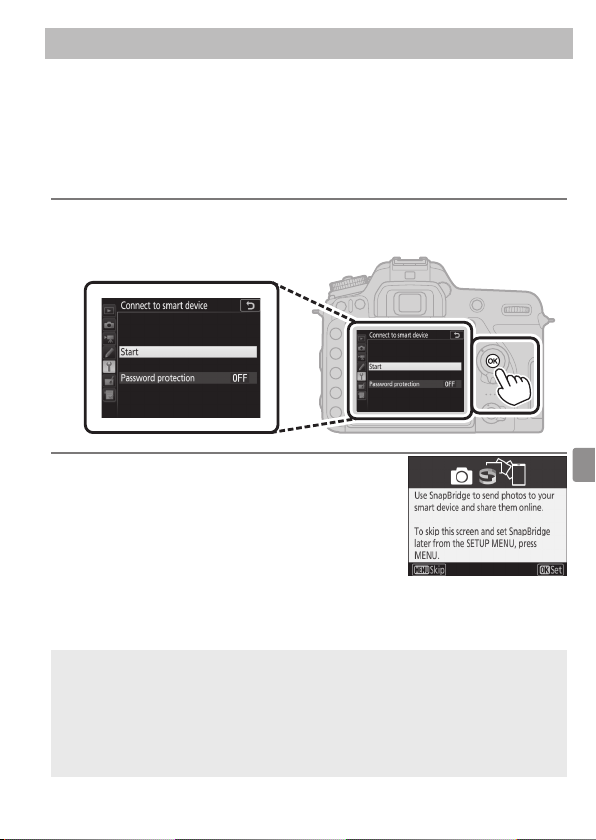
Camera: Select Connect to smart device in the setup menu,
1
then highlight Start and press J.
1
Camera: Press J when the following
2
message is displayed.
1 If the camera displays the message shown in Step 2 when rst turned on,
you can skip this step and proceed to Step 2.
2 If this message is not displayed, proceed to Step 3.
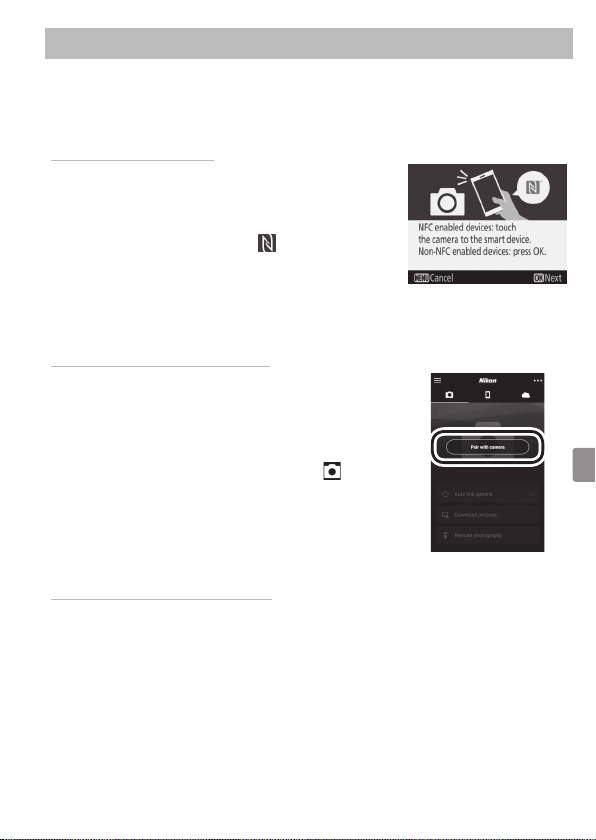
3 Some cameras may prompt you to connect using NFC. Press J to proceed
without using NFC. More information may be found under “More on Pairing
and Connecting” (0 13).
2, 3
Pairing and Connecting
5

Camera: Conrm that the camera displays
3
the message shown at right and ready the
smart device.
Smart device: Launch the SnapBridge app
4
and tap Pair with camera.
Smart device: Tap the camera name in the
5
“Pair with camera” dialog.
Users who are pairing a camera with
an iOS device for the rst time will rst
be presented with pairing instructions;
after reading the instructions, scroll
to the bottom of the display and tap
Understood. If you are then prompted to
choose an accessory, tap the camera name
again (there may be some delay before the
camera name is displayed).
4
4 If prompted to choose a camera, tap the camera name.
6
Pairing and Connecting

Camera/smart device: Conrm that the camera and smart device
6
display the same six‑digit number.
Camera/smart device: Press J on the camera and tap PAIR on
7
the smart device.
5
5 Some versions of iOS may not display a number; if no number displayed,
proceed to Step 7.
Pairing and Connecting
7

Camera/smart device: Complete pairing.
8
• Camera: Press J when the message at
right is displayed.
• Smart device: Tap OK when the message
at right is displayed.
Camera: Follow the on‑screen instructions to complete setup.
9
• To allow the camera to add location data to photos, select
Yes in response to “Download location data from smart device?”
and then enable location services on the smart device and
enable Auto link options> Synchronize location data in the
SnapBridge app tab.
• To synchronize the camera clock with the time provided
by the smart device, select Yes in response to “Sync clock
with smart device?” and then enable Auto link options>
Synchronize clocks in the SnapBridge app tab.
The smart device and camera are now connected. Any pictures you
take with the camera will automatically be uploaded to the smart
device.
8
Pairing and Connecting

Download/Remote Control
Use the SnapBridge app to download pictures and control the
camera remotely.
Downloading Pictures
Any of the following methods can be used to download pictures
from the camera:
• Download photos automatically as they are taken: To download
photos automatically as they are taken, select On for Send to
smart device (auto) in the camera setup menu.
• Select photos on the camera: Use this option to download photos
taken with O selected for Send to smart device (auto). Photos
can be selected using the Select to send to smart device option
in the camera playback menu or by pressing the i button during
playback and selecting Select to send to smart device/deselect.
• Select pictures on the smart device: Select Download pictures
in the SnapBridge app tab and tap OK when prompted to switch
to Wi‑Fi (some versions of iOS will require you to select a network,
in which case you will need to follow the instructions in “The Wi‑Fi
Prompt” after tapping OK).3 You can then use the controls on
the smart device to download pictures selected from a list of the
photos and movies stored on the camera.
1 Photos are downloaded at a size of 2 megapixels (some cameras may oer
additional sizes). Movies cannot be downloaded.
2 To allow download to continue while the camera is o, select On for
Bluetooth> Send while o in the camera setup menu.
3 If the camera is a D3400 or other model that supports SnapBridge but is
not equipped with Wi‑Fi, a conrmation dialog will be displayed; tap OK
to connect via Bluetooth (note that movies cannot be downloaded via
Bluetooth).
1, 2
1,2
D NEF (RAW)/TIFF
Photos in these formats cannot be downloaded.
Download/Remote Control
9
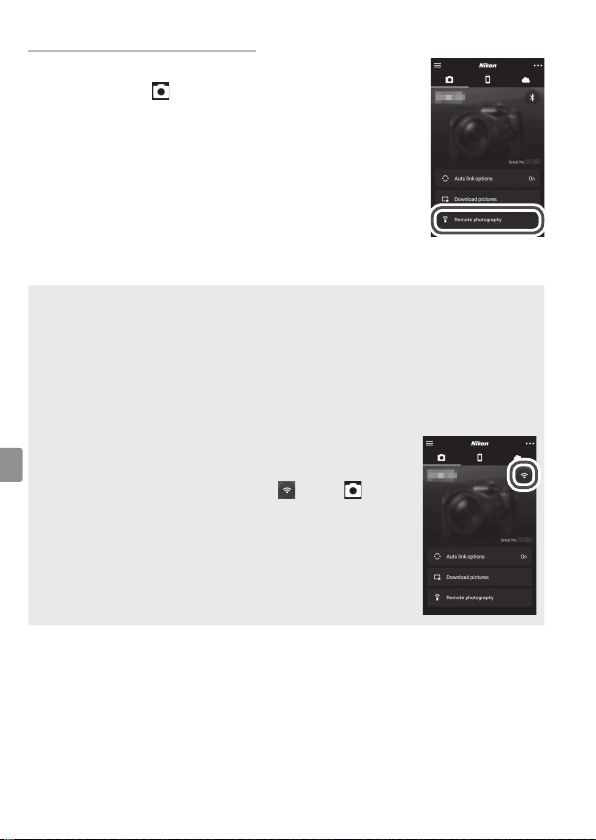
Remote Photography
The Remote photography controls in the
SnapBridge app tab can be used to release
the camera shutter remotely and download the
resulting photos to the smart device (movies cannot
be recorded). Remote photography requires a Wi‑Fi
connection; follow the on‑screen instructions in the
SnapBridge app to switch to Wi‑Fi (in some versions
of iOS, a Wi‑Fi prompt will be displayed, in which
case you will need to follow the instructions in “The
Wi‑Fi Prompt”).
D Bluetooth‑Only Cameras
The SnapBridge app cannot be used to control the D3400 and other
SnapBridge‑compatible cameras not equipped with Wi‑Fi.
D Wi‑Fi Connections
Wi‑Fi connections will end automatically if the smart device goes to
sleep or you switch to another app.
Some features of the SnapBridge app cannot be
accessed while the smart device is connected to the
camera via Wi‑Fi. To end Wi‑Fi, tap
and tap Yes in the dialog that is displayed.
in the tab
10
Download/Remote Control

Connection Tips
Read this section for help connecting or downloading pictures from
the camera.
The Wi‑Fi Prompt (iOS Only)
SnapBridge usually relies on Bluetooth for connection between
the camera and smart device, but will switch to Wi‑Fi for remote
photography and the like. In some versions of iOS, SnapBridge will
prompt you to perform the switch manually, in which case you will
need to follow the steps below.
After noting the camera network name (SSID)
1
and password, tap View options. The default
SSID is the same as the camera name.
In the network list, select the SSID you noted in
2
Step 1.
Connection Tips
11

When connecting via Wi‑Fi for the rst time, you
3
will be prompted to enter the camera password.
Enter the password you noted in Step 1 (note
that passwords are case‑sensitive). Once a
connection is established, a 4 will appear next
to the camera SSID as shown at right; return to
the SnapBridge app. You will not be required to
enter a password when next you connect to the
camera.
Enabling/Disabling Wireless Connections
The connection to the camera can be turned on or o using any of
the following options:
• The Airplane mode option in the camera setup menu (use this
option to disable all wireless functions in settings in which the use
of wireless devices is prohibited)
• The Bluetooth> Network connection option in the camera setup
menu
• The Auto link options > Auto link item in the SnapBridge app
tab (disabling Auto link also reduces the drain on the battery in the
smart device)
12
Connection Tips
More on Pairing and Connecting
This section describes some situations you may encounter while
using the SnapBridge app.
The NFC Dialog
Some cameras may display dialog at right in
Step 2 of “Pairing and Connecting”. To connect
using NFC, touch the NFC antenna on the
smart device to the camera logo (N‑Mark),
then wait for the SnapBridge app to launch
and proceed to Step 7. To proceed without
using NFC, press the camera J button.
Pairing After Launch
If you tapped Skip at the top right corner
of the welcome dialog to skip pairing when
launching SnapBridge for the rst time (see
Step 4 of “Pairing and Connecting”), tap Pair
with camera in the SnapBridge app tab
and proceed to Step 5.
“Unable to Connect.”
If the camera displays a message stating that it was unable to
connect, press J and return to Step2 of “Pairing and Connecting”. To
cancel pairing, press the G button.
More on Pairing and Connecting
13

Pairing Problems
If you experience problems connecting to the camera, try:
• Exiting and relaunching the SnapBridge app. Exit the
SnapBridge app and conrm that it is not running in the
background. Tap the app icon to re‑launch the app and then repeat
“Pairing and Connecting” from Step 1.
• Requesting iOS to “forget” the camera (iOS only). If pairing fails
on an iOS device, the device may still remember the camera name,
in which case you will need to request iOS to “forget” the camera as
shown below.
Pairing with Multiple Cameras
To pair with additional cameras, tap in the
SnapBridge app tab, select Add camera,
and repeat “Pairing and Connecting” from
Step 5. SnapBridge can be used to pair with
up to ve cameras.
14
More on Pairing and Connecting

Downloading Pictures
If you experience slow downloads or other problems downloading
pictures to the smart device, end pairing and try pairing the devices
again.
Smart device: In the
1
SnapBridge app, open the
tab, tap > Forget
camera, select the desired
camera, and tap Yes to end
pairing when prompted.
Users of iOS will then need
to request iOS to “forget”
the camera as shown
below.
Camera: Select Connect to smart device in the camera setup
2
menu, highlight Start, press J, and follow the instructions from
Step 2 of “Pairing and Connecting” to pair the camera with the
smart device.
More on Pairing and Connecting
15

Use the latest version of the SnapBridge app. The dialogs and
messages displayed by the camera and smart device may dier from
those shown here, and operations may dier depending on the OS,
camera rmware, and version of SnapBridge used. Button names and
positions may also vary from model to model. For more information
on using the camera or smart device, see the documentation
provided with the device.
The camera Wi‑Fi SSID and password can be changed using the
Wi‑Fi> Network settings option in the camera setup menu. We
recommend that you periodically change the password to protect
your privacy.
All trade names mentioned in this document are the trademarks or
registered trade marks of their respective owners.
2017 Nikon Corporation
©
 Loading...