

Page 1
日本語
このたびはニコンフィルターをお買い上げいただきありがと
うございます。正しく撮影していただくために、お使いにな
る前にこの使用説明書をよくお読みください。
特 長
この円偏光フィルターは、組み込み式フィルターホルダーを
有する望遠レンズと組み合わせて使用する円偏光フィルター
です。ガラスなどの非金属面や水面に反射した光などをカッ
トします。
●
AFカメラに通常の偏光フィルターを使用したときに生じる
測距、測光時の誤差が発生しません。
●
カラー撮影、白黒撮影の両方に効果があります。
●
AFカメラ以外のカメラボディにも使用できます。
対応レンズ
このフィルターを使用できるレンズについては対応レンズ表
を参照してください。また、ご使用になるレンズの使用説明
書も併せてお読みください。
効 果
1.反射するものの撮影
ガラスや光沢のあるプラスチック、陶器、タイル、木材、紙
などの平滑面や、水面からの反射光は一般に偏光しています。
円偏光フィルターを用いてこの反射光を軽減またはカットす
ることにより、物体の質感を十分に出したり、透明な物体や
水面の内部や底をはっきりと描写することができます。(金属
面に反射する光はカットできません。)
2.青空の撮影
青空からの光は太陽光が空気中で散乱したもので、一般に偏
光しています。円偏光フィルターを用いると、空気中の水蒸
気や微小なゴミに反射した光をカットすることができます。
これを利用して青空をより青く表現することができます。ま
た、白黒撮影では他のコントラストを変えずに青空だけを暗
く落として被写体を強調する描写が行えます。さらにカラー
撮影の場合には青空からの光による物体の反射光の色カブリ
を除去する効果もあります。日の出、日没時の真上の空、正
午頃の地平線近くの青空など、太陽の方向と直角方向の青空
に特に効果があります。
取り付け方法(図A)〈代表例:52mm型フィルター〉
このフィルターは、レンズ後部にあるフィルターホルダーに
取り替えて使用します。
1 円偏光フィルターのホルダーつまみ上部にある
指標線が
フィルターと平行
になっていることを確認してください。
2 円偏光フィルターの
FRONT表示部にある矢印をレ
ンズ先端方向に向け
、レンズに差し込んでください。
3 ホルダーつまみを押し、つまみ上部の
指標線がフィルタ
ーと直角になる
ようにそのまま90度時計方向にまわして
ください。
■ レンズへの装着は確実に行ってください。防塵、防滴構造
にはなっておりませんのでご注意ください。
使用方法(図B)
カメラのファインダー像を見ながら円偏光フィルターの回転
リングをまわし、反射光の軽減にもっとも効果のある位置を
探してから撮影を行います。
■
フィルターを回転させたとき、カメラのファインダー像に
わずかな色づきを生じることがありますが、実際に撮影さ
れた写真には影響ありません。
使用上の注意
●
マルチパターン測光では適性な露出が得られないことがあ
りますので、中央部重点測光で撮影してください。
●
TTL方式ではない露出計をご使用の場合、露出の増加(露
出倍数)が必要となります。露出倍数は被写体の反射面に
対する撮影角度、光の波長、フィルムの感色性などにより
異なってきますが、通常は2〜4倍(絞りで1〜2段)程度
です。
●
高温、高湿下および直射日光が当たる場所での長時間の保
管は避けてください。
注意
製品は幼児の手の届かないところに置くこと
ケガの原因になることがあります。
使用しないときは、太陽光のあたらない所に保管すること
太陽光が焦点を結び、火災の原因になることがあります。
放置禁止
保管注意
この表示を無視して、誤った取り扱いをすると、人が死亡また
は重傷を負う可能性が想定される内容を示しています。
この表示を無視して、誤った取り扱いをすると、人が傷害を負
う可能性が想定される内容および物的損害の発生が想定され
る内容を示しています。
安全上のご注意
ご使用の前に「安全上のご注意」をよくお読みのうえ、正しくお使いください。
この「安全上のご注意」は製品を安全に正しく使用していただき、あなたや他の
人々への危害や財産への損害を未然に防止するために、重要な内容を記載してい
ます。お読みになった後は、お使いになる方がいつでも見られる所に必ず保管し
てください。なお、カメラ本体の使用説明書に記載されている
「安全上のご注意」
もあわせてお読みください。
表示について
表示と意味は次のようになっています。
注意
警告
警告
分解したり修理・改造をしないこと
異常動作をしてケガの原因となります。
落下などによって破損したときは、破損部に手を触れないこと
破損部でケガをする原因となります。販売店または当社サービ
ス機関に修理を依頼してください。
水につけたり水をかけたり、雨にぬらしたりしないこと
接触禁止
すぐに修理依頼を
分解禁止
水かけ禁止
絵表示の例
△ 記号は、注意(警告を含む)を促す内容を告げるものです。図の
中や近くに具体的な注意内容(左図の場合は感電注意)が描かれて
います。
記号は、禁止(してはいけないこと)の行為を告げるものです。図
の中や近くに具体的な禁止内容(左図の場合は分解禁止)が描かれ
ています。
●記号は、行為を強制すること(必ずすること)を告げるものです。
図の中や近くに具体的な強制内容(左図の場合は電池を取り出す)が
描かれています。
お守りいただく内容の種類を、次の絵表示で区分し、説明しています。
Printed in Japan TT4D00100101 (80)
8MTA0280--
No reproduction in any form of this manual, in whole or in
part (except for brief quotation in critical articles or reviews),
may be made without written authorization from NIKON
CORPORATION.
使用説明書の内容が破損などによって判読できなくなったときは、
当社サービス機関にて新しい使用説明書をお求めください(有料)。
NIKON CORPORATION
FUJI BLDG., 2-3, MARUNOUCHI 3-CHOME,
CHIYODA-KU, TOKYO 100-8331, JAPAN
Jp
En
De
Fr
Es
It
Ck
組み込み式円偏光フィルター
Slip-in Circular Polarizing Filters
Runder Einsteckpolarisationsfilter
Filtres polarisants circulaires de type à insertion
Filtros polarizadores circulares tipo inserción
Filtri polarizzatori circolari scorrevoli
Ch
使用説明書
Instruction Manual
Bedienungsanleitung
Manuel d’utilisation
Manual de instrucciones
Manuale di istruzioni
C-PL1S/1L, C-PL2S/2L, C-PL3L
■
対応レンズ表
■
Table of Applicable Lenses
■
Tabelle verwentbarer Objektive
■
Objectifs utilisables
■
Tabla de objectivos aplicables
■
Tabella degli obiettivi utilizzabili
■
■
C-PL1S C-PL1L C-PL2S C-PL2L C-PL3L
レンズ (39mm用)(52mm用)(39mm用)(52mm用)(52mm用)
Lens (For 39mm) (For 52mm) (For 39mm) (For 52mm) (For 52mm)
Objektive (Für 39mm) (Für 52mm) (Für 39mm) (Für 52mm) (Für 52mm)
Objectif
(Pour 39mm) (Pour 52mm) (Pour 39mm) (Pour 52mm) (Pour 52mm)
Objetivos
(Para 39mm) (Para 52mm) (Para 39mm) (Para 52mm) (Para 52mm)
Per obiettivo (Da 39mm) (Da 52mm) (Da 39mm) (Da 52mm) (Da 52mm)
(39mm用) (52mm用) (39mm用) (52mm用) (52mm用)
(39mm用) (52mm用) (39mm用) (52mm用) (52mm用)
AF-S VR 200mm f/2G IF-ED ××××○
AF-S 300mm f/2.8D IF-ED Ⅱ ×○×××
AF-S 400mm f/2.8D IF-ED Ⅱ ×○×××
AF-S 500mm f/4D IF-ED Ⅱ ×○×××
AF-S 600mm f/4D IF-ED Ⅱ ×○×××
AF-S 300mm f/2.8D IF-ED ×○×××
AF-S 400mm f/2.8D IF-ED ×○×××
AF-S 500mm f/4D IF-ED ×○×××
AF-S 600mm f/4D IF-ED ×○×××
AF-I 300mm f/2.8D IF-ED ××○××
AF-I 400mm f/2.8D IF-ED ×××○×
AF-I 500mm f/4D IF-ED ××○××
AF-I 600mm f/4D IF-ED ××○××
AF 300mm f/2.8S IF-ED ○××××
AF 300mm f/4S IF-ED ○××××
300m f/2S IF-ED ×○×××
300mm f/2.8 IF-ED ЧЧЧЧЧ
300mm f/2.8S IF-ED ○××××
400mm f/2.8S IF-ED ×○×××
400mm f/3.5 IF-ED ○××××
400mm f/3.5S IF-ED ○××××
500mm f/4P IF-ED ○××××
600mm f/4 IF-ED ○××××
600mm f/4S IF-ED ○××××
600mm f/5.6 IF-ED ○××××
600mm f/5.6S IF-ED ○××××
800mm f/5.6S IF-ED ×○×××
800mm f/8 IF-ED ○××××
800mm f/8S IF-ED ○××××
1200mm f/11 IF-ED ○××××
1200mm f/11S IF-ED ○××××
1200–1700mm f/5.6-8P IF-ED ×○×××
■
各部の名称■Nomenclature ■Teilebezeichnung■Dénomination
■
Denominación de las partes ■Nomenclatura
■ ■
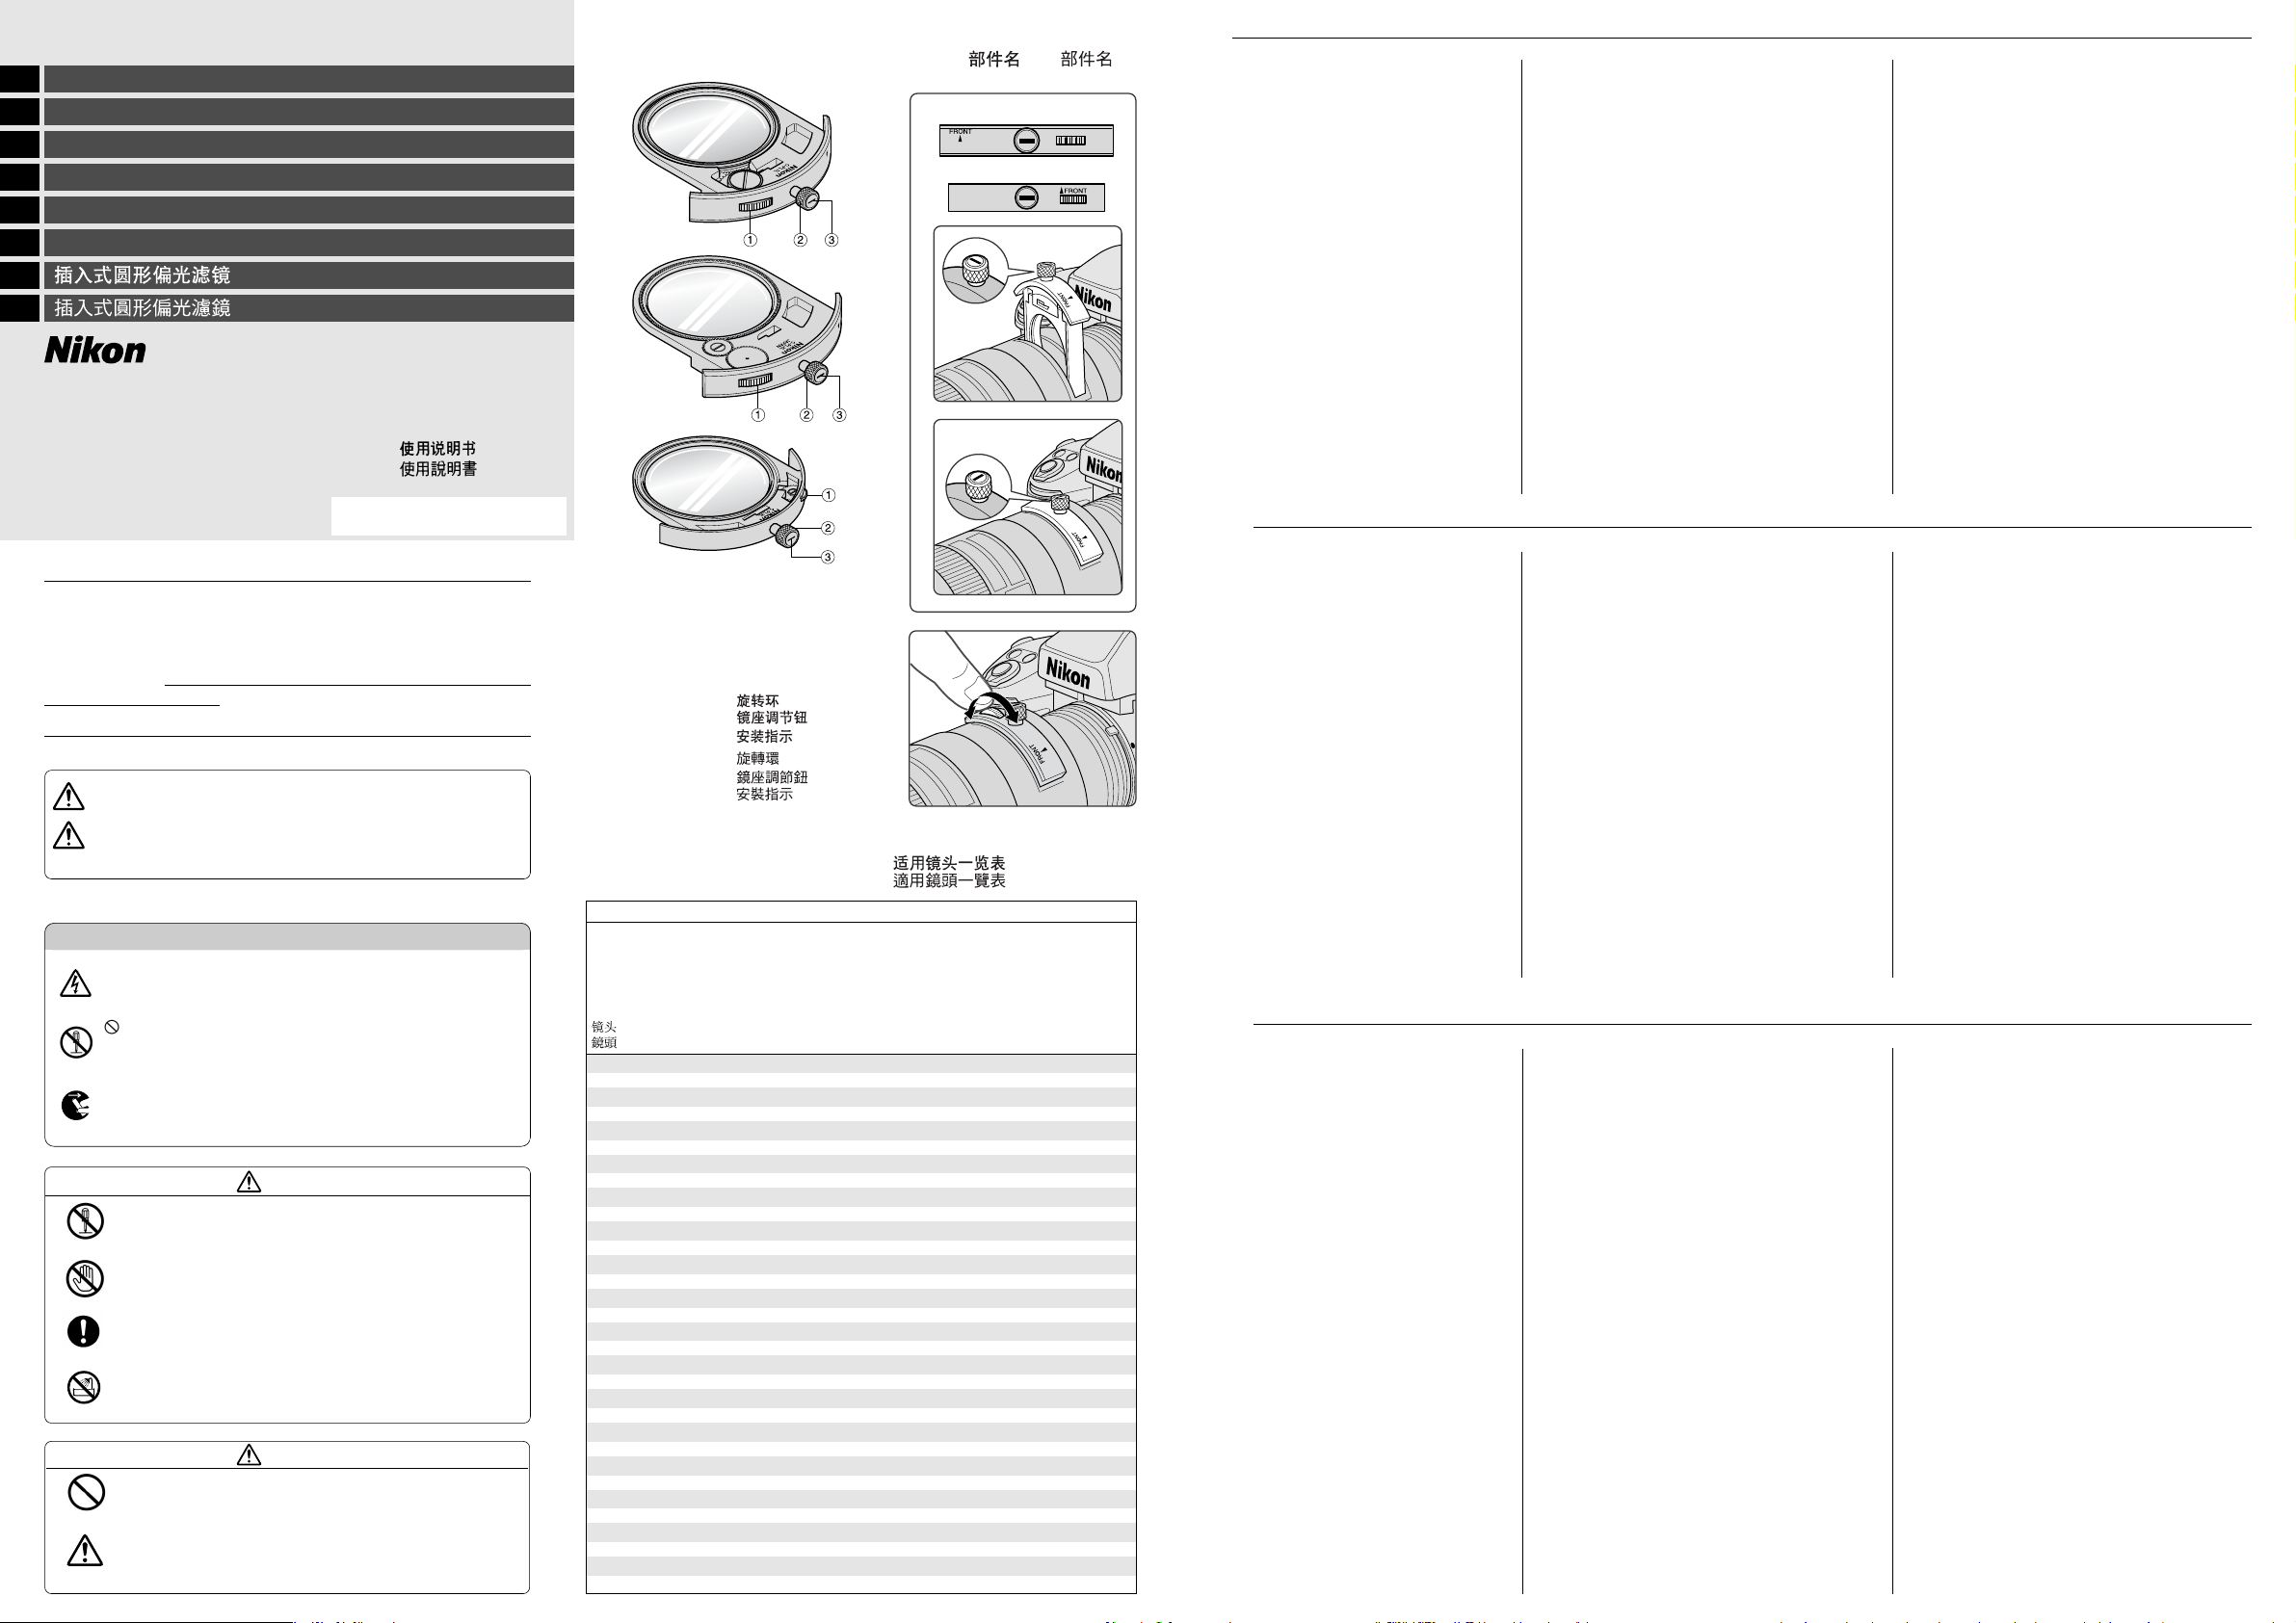
1回転リング
2ホルダーつまみ
3指標線
1Rotating ring
2Holder knob
3Mounting index
1Drehring
2Halterungsgriff
3Montage Index
1Bague rotative
2Bouton du support
3Index de montage
1Anillo rotativo
2Perilla del portafiltro
3Índice de montaje
1Anello rotante
2Manopola supporto
3Indicatore per il montaggio
1
2
3
1
2
3
C-PL1S/1L
• C-PL1S/1L
C-PL2S/2L
• C-PL2S/2L
C-PL3L
• C-PL3L
2
1
3
A
B
English
Thank you for purchasing a Nikon filter.
In order to use your new filter correctly, be sure to read this
instruction manual thoroughly.
Features
These circular polarizing filters are designed for use in
combination with telephoto lenses equipped with a slip-in filter
holder, and reduce glare from non-metallic surfaces such as
glass and water. Other filter features include:
• Prevention of focusing/metering errors that occur when using
AF cameras fitted with regular polarizing filters.
• Effective for both color and monochrome photography.
• Can also be used with non-AF cameras
Applicable lenses
See the Table of Applicable Lenses for information on the types
of lenses that can be used with these filters. Also refer to the
instruction manual provided with your lens.
Advantages
1. Photographing reflective subjects
Light reflected off smooth surfaces such as glass, shiny plastic,
ceramic, tile, wood, paper or water is usually polarized. By
reducing or blocking this reflected light with a circular polarizing
filter, you can create more realistic and attractive images of the
subject. (Note: These filters are not effective against light from
metal surfaces.)
2. Photographing blue sky
A blue sky is composed of dispersed sunlight, and is normally
polarized. With a circular polarizing filter, it is possible to block
the light reflected from airborne vapor or minute dust particles,
thus making a blue sky look even bluer. In monochrome
photography, you can also accentuate the photographic subject
by deepening sky tones without increasing contrast in the rest of
the photo. In color photography, the unnatural colors caused by
reflected sunlight can be eliminated. These filters are especially
effective when photographing blue sky at a right angle to the
direction of the sunlight, i.e., shooting the sky just above the
horizon when the sun is straight above you, or shooting the sky
directly overhead at sunrise or at sunset.
Installation (Fig. A)
Replace the current filter holder inserted in the lens with the
desired circular polarizing filter holder.
1 For the circular polarizing filter holder, make sure that the
mounting index on its knob is parallel to the filter.
2 Insert the circular polarizing filter holder into the filter slot.
The arrow labelled “FRONT” should be pointed
toward the front of the lens.
3 Press down the holder knob and turn it clockwise by 90° so
that the mounting index on the knob is at a right angle to
the filter.
Position the filter holder in the lens securely. Note that
the filter bay is not dust proof or waterproof.
Using the filter (Fig. B)
Before taking a photograph, turn the rotating ring of the circular
polarizing filter while looking at the image in the viewfinder. Find
the position that is most effective in reducing the reflected light.
A slight color difference may be noticeable in the
viewfinder when the filter is rotated, but this will not
affect the photograph.
Notes on use
• Use center-weighted metering. Multi-sensor metering may
result in incorrect exposure.
• When using a non-TTL exposure metering cameras, some
exposure compensation is required. The exposure factor will
vary depending upon the photographing angle relative to the
reflecting surface of the subject, the wavelength of the light,
the color sensitivity of the film, and other factors. However, a
factor of 2 to 4 (+1 to +2 F-stops) is normally sufficient.
• Do not store the filter in locations subject to high temperature,
high humidity or direct sunlight.
Vielen Dank für Ihnen Ankauf eines Nikon Filters.
Lesen Sie diese Anleitung gründlich durch, um Ihren neuen
Filter richtig gebrauchen zu können.
Eigenschaften
Diese runden Polarisationsfilter sind für den Gebrauch auf
Teleobjektiven mit Einsteckfilterhalterungen gedacht und
reduzieren Blendlicht von nicht metallischen Oberflächen wie
Glas oder Wasser. Andere Eigenschaften umfassen:
• Vermeidung von Scharfstellungs/Meßfehler, die bei Gebrauch
von AF Kameras auftreten.
• Effektiv sowohl bei Farb- als auch SchwarzWeißphotographie.
• Kann auch auf nicht-AF-Kameras verwendet werden.
Verwendbare Objektive
Siehe Tabelle verwendbarer Objektive hinsichtlich der Objektive,
auf denen diese Filter verwendet werden können. Siehe auch die
Bedienungsanleitung des Objektivs.
Vorzüge
1. Aufnahmen reflektierender Gegenstände
Von glatten Oberflächen wie Glas, glänzende Kunststoffe,
Keramik, Kacheln, Holz, Papier oder Wasser reflektiertes Licht ist
gewöhnlich polarisiert. Durch Reduktion oder Blockierung
dieses reflektierten Lichtes mit einem runden Polarisationsfilter
können Sie noch realistischere und attraktivere Bilder von
Gegenständen machen. (Hinweis: Diese Filter sind bei von
Metalloberflächen reflektiertem Licht nicht effektiv.)
2. Blauen Himmel fotografieren
Ein blauer Himmel besteht aus gestreutem Sonnenlicht, und ist
normalerweise polarisiert. Mit einem runden Polarisationsfilter
ist es möglich, das von schwebenden Dampf- oder kleinsten
Staubpartikeln reflektierte Licht zu blockieren, wodurch der blaue
Himmel noch blauer erscheint. Bei der SchwarzWeißphotographie können sie den photographischen
Gegenstand akzentuieren, indem Sie die Farbtöne des Himmels
vertiefen, ohne dabei den Kontrast auf dem restlichen Bild zu
erhöhen. Bei der Farbphotographie können die durch
reflektiertes Sonnenlicht hervorgerufenen unnatürlichen Farben
beseitigt werden. Diese Filter sind besonders wirksam bei
Aufnahmen im rechten Winkel zum Himmel oder entgegen dem
direkten Sonnenlicht, d.h. bei Aufnahmen des Himmels eben
oberhalb des Horizonts, während die Sonne direkt über Ihnen
steht, oder Aufnahmen des Himmels direkt über Ihnen bei
Sonnenauf- oder untergang.
Montage (Abb. A)
Den derzeitigen Filterhalter im Objektiv gegen den gewünschten
Zirkularpolarisationsfilterhalter austauschen.
1 Bei der runden Polarisationsfilterhalterung darauf achten,
daß der Montageindex auf dessen Griff parallel zum
Filter ist.
2 Die runde Polarisationsfilterhalterung in den
Filtersteckschlitz stecken. Der Pfeil mit der “FRONT”
Markierung sollten zur Vorderseite des Objektivs
weisen.
3 Den Halterungsgriff herunterdrücken und um 90° drehen, so
daß sich der Montageindex auf dem Griff im rechten
Winkel zu dem Filter steht.
Die Filterhalterung sicher im Objektiv befestigen.
Beachten Sie, daß das Filterfach weder Steub- noch
Wasserdicht ist.
Gebrauch des Filters (Abb. B)
Vor Aufnahmen den Drehring des runden Polarisationsfilters
drehen, während Sie dabei das Bild im Sucher betrachten.
Finden Sie zur Reduktion des Reflektionslichts wirksamste
Stellung.
Wenn der Filter gedreht wird, kann unter Umständen
eine gewisse Farbveränderung im Sucher beobachtet
werden. Allerdings hat dies keinen Einfluß auf das Bild.
Hinweise für den Gebrauch
• Vorwiegend zentrale Lichtmessungen. Messungen mit einem
Multisensor kann zu fehlerhafter Belichtung führen.
• Bei Gebrauch einer Kamera mit nicht TTLBelichtungsmessungen können unter Umständen geringfügige
Korrekturen notwendig werden. Der Belichtungsfaktor hängt
vom Aufnahmewinkel relativ zur reflektierenden Oberfläche
des Gegenstands, der Wellenlänge des Lichts, der
Farbempfindlichkeit des Films und anderer Faktoren ab.
Allerdings sollte für gewöhnlich ein Faktor von 2 bis 4
(Blendenöffnung (+1 to +2 F) ausreichend sein.
• Die Filter nicht an sehr heißen, feuchten Orten, oder im
direkten Sonnenlicht lagern.
Deutsch
Page 2
Français
Español
Italiano
Nous vous remercions pour votre achat de ce filtre Nikon. Veuillez lire
attentivement ce mode d’emploi pour pouvoir utiliser correctement votre
nouveau filtre.
Caractéristiques
Ces filtres polarisants circularires sont conçus pour être utilisés avec des
téléobjectifs équipés d’un support à filtre de type à insertion, et réduire
l’éblouissement dû à des surfaces non-métalliques, telles que le verre ou
l’eau. Autres caractérisques de ces filtres:
• Prévention des erreurs de mise au point/mesure survenant avec les
boîtiers AF dotés de filtres polarisants ordinaires
• Efficaces à la fois en photographie couleur et monochrome
• Peuvent aussi s’utiliser avec des boîtiers non-AF.
Objectifs utilisables
Voir le tableau des Objectifs utilisables pour les informations sur les types
d’objectif pouvant être utilisés avec ces filtres. Reportez-vous aussi au
manuel d’instructions fourni avec votre objectif.
Avantages
1. Photographie de sujets réfléchissants
La lumière réfléchie par des surfaces lisses, telles que verre, plastique
brillant, céramique, carreaux, bois, papier ou eau est généralement polarisée.
La réduction ou le blocage de cette lumière réfléchie avec un filtre polarisant
circulaire permet d’obtenir des images plus réalistes et plus intéressantes du
sujet. (Note: Ces filtres ne sont pas efficaces contre la lumière réfléchie par
des surfaces métalliques.)
2. Photographie du ciel bleu
Un ciel bleu se compose de lumière du soleil dispersée, et est normalement
polarisé. L’emploi d’un filtre polarisant circulaire permet de bloquer la
lumière réfléchie par la vapeur ou les particules de poussière minuscules en
suspension dans l’air, rendant le ciel bleu encore plus blue. En photographie
monochrome, il est également possible d’accentuer le sujet en fonçant les
tons du ciel sans augmenter le contraste du reste de l’image. En
photographie couleur, les couleurs peu naturelles dues à la réflexion de la
lumière solaire peuvent être éliminées. Ces filtres sont particulièrement
efficases pour la photographie d’un ciel blue à angle droit par rapport au
soleil, à savoir si vous prenez le ciel juste au-dessus de l’horizon quand le
soleil au-dessus de vous, ou si vous prenez le ciel directement au-dessus de
votre tête au lever ou au coucher du soleil.
Installation (Fig. A)
Remplacez le support à filtre en place dans l’objectif par le support à filtre
polarisant circulaire souhaité.
1 Vérifiez que l’index de montage sur le bouton du support à filtre
polarisant circulaire est parallèle au filtre.
2 Insérez le support à filtre polarisant circulaire dans la fente à filtre. La
flèche à l’indication “FRONT” sur le support doivent être dirigées
vers l’avant de l’objectif.
3 Pressez le bouton du support et tournez-le de 90° dans le sens horaire
de sorte que l’index de montage du bouton soit à angle droit avec le
filtre.
Insérez fermement le support à filtre dans l’objectif. Notez que la
baie du filtre n’est pas étanche à la poussière et à l’eau.
Utilisation du filtre (Fig. B)
Avant de prendre une photo, tournez la bague rotative du filtre polarisant
circulaire tout en regardant l’image dans le viseur. Recherchez la position la
plus efficase pour réduire la lumière réfléchie.
Une légère différence de couleur peut être perceptible dans le
viseur à la rotation du filtre, mmais cela n’affectera pas la
photographie.
Remarques sur l’utilisation
• Utilisez la mesure à pondération centrale. La mesure multi-capteur peut
provoquer une exposition incorrecte.
• A l’usage d’un boîtier à mesure d’exposition non-TTL, une certaine
correction de l’exposition est requise. Le facteur d’exposition variera
selon l’angle de prise de vue par rapport à la surface réfléchissante du
sujet, à la longuer d’onde de la lumière, à la sensibilité couleur du film, et
à d’autres facteurs. Mais, un facteur de 2 à 4 (+1 à +2 valeurs/f) est
normalement suffisant.
• Ne rangez pas le filtre à un emplacement très chaud, humide ou en plein
soleil.
Agradecemos la adquisción del filtro Nikon. Con el fin de usar correctamente
su nuevo filtro, se ruega leer enteramente este manual de instrucciones.
Características
Estos filtros polarizadores circulares están diseñados para el uso en
combinación con los teleobjetivos con el portafiltro insertable para reducir el
resplandor de las superficies no metálicas como el vidrio y el agua. Entre
otras características del filtro se citan:
• Previene los errores de enfoque/medición que ocurren al usar las cámaras
tipo AF (autoenfoque) provisas con filtros polarizadores regulares.
• Es eficaz tanto para las fotografías de color como monocromáticas.
• Pueden usarse también en las cámaras que no sean AF.
Objetivos aplicables
Con respecto a la información de los tipos de objetivos que pueden usarse
con estos filtros, se ruega ver la Tabla de Objetivos Aplicables. Consulte
también el manual de instrucciones proporcionado con su objetivo.
Ventajas
1. Fotografiado de objetos reflectivos
Las luces reflejadas de las superficies lisas como el vidrio, plásticos
brillantes, cerámicas, azulejos, maderas, papel o agua son normalmente
polarizadas. Mediante la reducción o el bloqueo de estas luces refljadas con
el filtro de polarización circular, podrán crear imágenes más realistas y
atractivas del objeto. (Nota: Esto filtros no son eficaces contra las luces que
provienen de superficies metálicas.)
2. Fotografiado del cielo azul
El cielo azul se compone de la luz solar dispersa y es normalmente
polarizado. Con el filtro polarizador circular, es posible bloquear la luz
reflejada por el vapor o pequeñas partículas de polvo en suspensión en el
aire, haciendo que el cielo azul se vea más azulado. En las fotografías
monocromáticas, podrán también acentuar el objeto fotográfico mediante la
intensificación del tono del cielo sin incrementar el contraste del resto de la
fotografía. En la fotografía de colores, pueden eliminar los colores
innaturales causados por la luz solar reflejada. Estos filtros son
especialmente eficaces para fotografiar el cielo azul en ángulo recto con
respecto a la dirección de la luz solar, o sea apuntando el cielo justo sobre el
horizonte cuando el sol estuviera directamente encima suyo o apuntando
directamente el cielo sobre la cabeza con el sol naciente o poniente.
Instalación (Fig. A)
Reemplazar el portafiltro que se encuentra insertado en el objetivo con el
portafiltro polarizador circular deseado.
1 Para el portafiltro polarizador circular, deberá verificarse que el índice
de guía de montaje de la perilla est paralelo con el filtro.
2 Insertar el portafiltro polarizador circular en la ranura del filtro
orientando a la flecha de la indicación “FRONT” hacia el
extremo frontal del objetivo.
3 Pulsar la perilla del portafiltro y girar 90° en el sentido de las agujas del
reloj, de manera que el índice de guía de montaje de la perilla quede en
ángulo recto con respecto al filtro.
La fijación en el objetivo debe realizarse con seguridad. Se hace
notar que el alojamiento del filtro no tiene una construcción a
prueba del polvo ni a prueba de agua.
Uso del filtro (Fig. B)
Antes de tomar la fotografía, girar el anillo rotativo del filtro polarizador
circular observando la imagen del visor. Buscar la posición que sea más
eficaz para la reducción de las luces reflejadas.
Al girarse el filtro, podrá notarse en el visor una ligera diferencia
de color, pero esto no afectará la fotografía.
Notas sobre el uso
• Se ruega usar la medición concentrada en el centro, debido a que la
medición de sensores múltiples podrá causar la exposición incorrecta.
• Cuando se utilice una cámara con fotómetro que no sea del tipo TTL (a
través del objetivo), se requerirá alguna compensación de exposición. El
factor de exposición variará según el ángulo de fotografiado relativo a la
superficie reflectante del objeto, la longitud de onda de la luz, la
sensibilidad del color de la película y otros factores. Sin embargo,
normalmente será suficiente con un factor de 2 a 4 (+1 a +2 de la escala
del diafragma).
• No guardar el filtro en lugares expuestos a la alta temperatura, alta
humedad o la luz solar directa.
Grazie per aver acquistato un filtro Nikon.
Per un uso corretto del prodotto, leggere attentamente il manuale d’istruzioni.
Caratteristiche
Questi filtri polarizzatori circolari sono stati progettati per essere utilizzati
unitamente ai teleobiettivi dotati di portafiltri scorrevole, quindi sono in
grado di ridurre il riflesso creato dalle superfici non metalliche tipo vetro e
acqua. Tra le altre caratteristiche del filtro:
• Prevenzione contro eventuali errori di messa a fuoco/misurazione in caso
di utilizzo di fotocamere AF dotate di normali filtri polarizzatori.
• Perfetti sia per la fotografia a colori sia per quella monocromatica.
• Possono essere utilizzati anche con le fotocamere non AF
Obiettivi utilizzabili
Per informazioni circa i tipi di obiettivo che possono essere utilizzati con
questi filtri, fare riferimento alla relativa tabella. Inoltre, fare riferimento al
manuale d’istruzioni fornito in dotazione.
Vantaggi
1. Fotografare i soggetti riflettenti
Le superfici lisce che riflettono la luce tipo vetro, plastica lucida, ceramica,
smalto, legno, carta o acqua solitamente sono polarizzate. Riducendo o
bloccando questa luce riflessa mediante filtro polarizzatore circolare, è
possibile creare riproduzioni del soggetto più realistiche e belle. (Nota:
Questi filtri non hanno efficacia contro la luce riflessa dalle superfici
metalliche).
2. Fotografare l’azzurro del cielo
Il cielo, composto da luce solare dispersa, viene normalmente polarizzato.
Con un filtro polarizzatore circolare, è possibile bloccare la luce riflessa dal
vapore disperso nell’aria o dalle minuscole particelle di polvere, in modo tale
che il cielo sembri persino più azzurro. Nella fotografia monocromatica, è
possibile inoltre accentuare il soggetto fotografico scurendo i toni del cielo,
senza aumentare il contrasto nel resto della foto. Nella fotografia a colori, i
colori non naturali causati dalla luce del sole riflessa vengono eliminati.
Questi filtri sono efficaci soprattutto quando si fotografa un cielo azzurro ad
angolo retto rispetto al sole, cioè riprendendo il cielo appena sopra
l’orizzonte quando il sole si trova sopra di voi, oppure riprendendo il cielo
direttamente da sopra la propria testa all’alba o al tramonto.
Installazione (Fig. A)
Sostituire il portafiltri attuale inserito nell’obiettivo con il portafiltri
polarizzatore circolare desiderato.
1 Con il portafiltri polarizzatore circolare, verificare che l’indicatore per il
montaggio sulla relativa manopola sia parallelo al filtro.
2 Inserire il filtro polarizzatore circolare nello slot del filtro. La freccia con
indicazione “FRONT” dovrebbe essere puntata verso la parte
anteriore dell’obiettivo.
3 Spingere la manopola del portafiltri verso il basso e ruotarla in senso
orario di 90° in modo tale che l’indicatore per il montaggio sia ad
angolo retto rispetto al filtro.
Posizionare saldamente il portafiltri sull’obiettivo. Tenere presente
che il vano filtro non è antipolvere né impermeabile.
Utilizzo del filtro (Fig. B)
Prima di scattare una fotografia, ruotare l’anello del filtro polarizzatore
circolare mentre si guarda l’immagine nel mirino. Trovare la posizione più
adatta a ridurre la luce riflessa.
Quando si ruota il filtro, è probabile che nel mirino si noti una
leggera differenza di colori, tuttavia ciò non avrà conseguenze
sulla fotografia finale.
Note circa l’utilizzo
• Utilizzare una misurazione a preferenza centrale. La misurazione con
multisensori potrebbe compromettere l’esposizione.
• Quando si utilizzano fotocamere di misurazione dell’esposizione non TTL,
sarà necessario effettuare la compensazione dell’esposizione. Il fattore di
esposizione varia in base all’angolazione dello scatto fotografico rispetto
alla superficie riflettente del soggetto, alla lunghezza d’onda della luce, alla
sensibilità cromatica della pellicola e ad altri fattori. Tuttavia, è
normalmente sufficiente un fattore tra 2 e 4 (da +1 a +2 F-stops).
• Non conservare il filtro in luoghi soggetti alle elevate temperature,
all’umidità o alla luce diretta del sole.
 Loading...