

Page 1
DIGITAL CAMERA
Reference Manual
•
R
ead this manual thoroughly before using the camera.
•
To ensure proper use of the camera, be sure to read “
y
our safety (page 12)”.
•
Be sure to read “
285)” in “ Caring for the product (page 285)”.
•
f this is your rst time using the camera, see “
I
ted (page 36)”and “
star
and playback (page 47)”
•
After reading this manual, keep it in a readily accessible
place for future reference.
Do not point the lens at the sun (page
Getting
Basic operations of shooting
.
For
Page 2

Types of manuals
he following manuals are available for this camera.
T
Manual Description
Reference Manual
(this manual)
Online Manual You can view the Reference Manual content online.
SnapBridge Online
elp
H
Quick Start Guide A manual included with the camera.
Explains details about using the camera.
https://onlinemanual
Explains details about using the app for smart devices,
“SnapBridge”.
https://nikonimglib.com/snbr/onlinehelp/en/index.html
Explains pr
.nikonimglib.com/p950/en/
eparation for shooting and basic operations.
2
Page 3

Table of contents
I
ntroduction ............................................................................................................................8
Read this rst ....................................................................................................................................... 9
For your safety .................................................................................................................................. 12
Parts of the camera ............................................................................................................ 16
T
he camera body ............................................................................................................................. 17
Principle functions of the controls ............................................................................................ 20
The monitor/viewnder ................................................................................................................25
Switching the information displayed on the screen (
ower-on lamp (charge lamp) .................................................................................................... 34
P
Getting started .................................................................................................................... 36
A
ttaching the strap ......................................................................................................................... 37
Attaching/removing the lens cap and lens hood ................................................................ 38
Inserting the battery and memory card .................................................................................. 39
Charging the battery ......................................................................................................................41
Opening the monitor ..................................................................................................................... 43
Camera setup .................................................................................................................................... 44
button) ............................. 32
Basic operations of shooting and playback .............................................................. 47
Shooting still images
Recording movies ............................................................................................................................53
Switching between the monitor and viewnder .................................................................54
Playing back images .......................................................................................................................55
Deleting images ............................................................................................................................... 57
......................................................................................................................48
Shooting features ............................................................................................................... 60
S
electing a shooting mode (mode dial) .................................................................................. 61
Auto mode (standard shooting) .................................................................................................62
, , , and modes ................................................................................................................. 63
Shooting with the Bulb setting or T
(user settings) mode ..................................................................................................................71
reative mode (applying eects when shooting) ............................................................... 75
C
Scene mode (shooting suited to the shooting conditions) ............................................. 78
Bird-watching .................................................................................................................................................. 79
Moon .....................................................................................................................................................................80
Portrait ..................................................................................................................................................................81
ime setting (when in
mode) .............................69
3
Table of contents
Page 4

Landscape ..........................................................................................................................................................81
Spor
ts ....................................................................................................................................................................82
Night portrait ...................................................................................................................................................83
Party/indoor ......................................................................................................................................................83
Beach .....................................................................................................................................................................84
Snow ......................................................................................................................................................................84
Sunset ...................................................................................................................................................................84
Dusk/dawn ........................................................................................................................................................85
Night landscape .............................................................................................................................................85
Close-up ..............................................................................................................................................................86
Food ....................................................................................................................................................................... 87
Fireworks show ............................................................................................................................................... 88
Backlighting ......................................................................................................................................................88
Easy panorama ................................................................................................................................................89
Pet portrait .........................................................................................................................................................92
Selective color .................................................................................................................................................93
Multiple exp. Lighten .................................................................................................................................. 94
Setting the ash mode, self-timer, focus mode, and exposure compensation .........98
Flash mode .........................................................................................................................................99
Self-timer ..........................................................................................................................................102
Smile timer ...................................................................................................................................... 104
Using autofocus .............................................................................................................................106
Using manual focus ......................................................................................................................113
Exposure compensation .............................................................................................................117
Default settings (ash, self-timer, and focus mode) .........................................................119
Using the
U
sing the zoom ............................................................................................................................. 124
Functions that cannot be used simultaneously when shooting .................................127
(function) button .............................................................................................. 121
Playback features ............................................................................................................. 131
Playback zoom ...............................................................................................................................132
Crop ................................................................................................................................................... 134
Thumbnail playback/calendar display .................................................................................. 136
Viewing and deleting images in a sequence ......................................................................138
Playback with easy panorama ..................................................................................................140
Editing images (still images) .....................................................................................................142
Printing still images ......................................................................................................................143
Movies ..................................................................................................................................
Basic operations of movie recording and movie playback ............................................145
Capturing still images while recording movies ................................................................. 149
Movie manual .................................................................................................................................150
4
Table of contents
144
Page 5

Time-lapse movie ..........................................................................................................................
Operations during movie playback ........................................................................................156
Editing movies ............................................................................................................................... 158
153
Using the menu ................................................................................................................ 161
Menu operations ...........................................................................................................................162
Menu lists .........................................................................................................................................166
The shooting menu (common across shooting modes) .................................................174
Image quality ................................................................................................................................................174
Image size .......................................................................................................................................................175
The shooting menu (
P
icture Control ............................................................................................................................................. 177
Custom Picture Control .......................................................................................................................... 180
White balance ...............................................................................................................................................181
Metering ...........................................................................................................................................................184
Continuous .....................................................................................................................................................185
ISO sensitivity ................................................................................................................................................189
Exposure bracketing .................................................................................................................................190
AF area mode ............................................................................................................................................... 191
Autofocus mode ......................................................................................................................................... 196
Flash exp. comp. ......................................................................................................................................... 196
Noise reduction lter ............................................................................................................................... 197
Long exposure NR ..................................................................................................................................... 197
Active D-Lighting .......................................................................................................................................197
Multiple exposure ...................................................................................................................................... 198
Zoom memory .............................................................................................................................................200
Startup zoom position ............................................................................................................................201
M exposure preview ................................................................................................................................. 201
The Movie manual mode menu .............................................................................................. 203
The movie menu ........................................................................................................................... 204
Movie options ...............................................................................................................................................204
Autofocus mode ......................................................................................................................................... 206
Electronic VR ..................................................................................................................................................207
Wind noise reduction .............................................................................................................................. 208
Zoom microphone .................................................................................................................................... 208
Frame rate ....................................................................................................................................................... 209
External mic sensitivity ........................................................................................................................... 209
The playback menu ......................................................................................................................211
Mark for upload ...........................................................................................................................................211
Quick retouch ............................................................................................................................................... 212
D-Lighting .......................................................................................................................................................213
Skin softening ...............................................................................................................................................213
, , , , or mode) ................................................................... 177
Table of contents
5
Page 6

Filter eec
ts ....................................................................................................................................................214
Slide show .......................................................................................................................................................216
Protect ............................................................................................................................................................... 218
Rotate image .................................................................................................................................................218
Small picture ................................................................................................................................................. 220
Sequence display .......................................................................................................................................221
Key picture selection ................................................................................................................................222
The network menu .......................................................................................................................223
The setup menu ............................................................................................................................ 227
Time zone and date .................................................................................................................................. 227
Slot empty release lock .......................................................................................................................... 229
Monitor settings ..........................................................................................................................................229
EVF auto toggle ...........................................................................................................................................232
Date stamp .....................................................................................................................................................232
Self-timer: after release ...........................................................................................................................233
Vibration reduction ................................................................................................................................... 234
AF assist ............................................................................................................................................................235
Digital zoom .................................................................................................................................................. 235
Assign side zoom control ...................................................................................................................... 236
Snap-back zoom .........................................................................................................................................236
Assign side dial ............................................................................................................................................ 236
AE/AF lock button ......................................................................................................................................237
Sound settings .............................................................................................................................................238
Auto o ............................................................................................................................................................. 238
Format card .................................................................................................................................................... 239
Language .........................................................................................................................................................239
HDMI .................................................................................................................................................................. 239
Charge by computer ................................................................................................................................ 241
Image comment .........................................................................................................................................241
Copyright information ............................................................................................................................ 242
Location data ................................................................................................................................................ 243
Toggle Av/Tv selection ............................................................................................................................244
Reset le numbering ................................................................................................................................244
Peaking .............................................................................................................................................................245
Reset all .............................................................................................................................................................245
Conformity marking ................................................................................................................................. 246
Firmware version ........................................................................................................................................ 246
Connecting the camera to a TV or computer ........................................................247
Viewing images on a TV ............................................................................................................. 248
Transferring images to a computer ........................................................................................250
6
Table of contents
Page 7

Accessories .........................................................................................................................254
List of ac
cessories ......................................................................................................................... 255
EH-5d AC Adapter and EP-5C Power Connector ................................................................258
Speedlights (external ash units) ............................................................................................259
ML-L7 Remote Control ................................................................................................................261
If there is a problem ........................................................................................................266
Troubleshooting ............................................................................................................................267
Error messages ...............................................................................................................................280
Technical notes .................................................................................................................
Notes about wireless communication functions .............................................................. 284
Caring for the product ................................................................................................................ 285
Cleaning and storage .................................................................................................................. 290
File names ........................................................................................................................................291
Specications ................................................................................................................................. 292
Trademarks ......................................................................................................................................298
Index................................................................................................................................................... 300
7
283
Table of contents
Page 8

Introduction
Read this rst
For your safety ...................................................................................................................... 12
........................................................................................................................... 9
Introduction
8
Page 9

Read this rst
Descriptions in this manual
•
Symbols
Symbol Description
This icon marks cautions and information that should be read before
using the camera.
This icon marks notes and information that should be read before
using the camera.
This icon marks other pages containing relevant information.
• SD, SDHC, and SDXC memory cards are referred to as “memory cards” in this
manual
.
• Smartphones and tablets are referred to as “smart devices.”
• The setting at the time of purchase is referred to as the “default setting.”
• The names of menu items displayed on the camera screen, and the names of
buttons or messages displayed on a computer screen are enclosed in [ ]
(brackets).
• Images are sometimes omitted from screen display samples so that screen
indicators can be more clearly shown.
Information and precautions
Life-long learning
As part of Nikon’s “Life-long learning” commitment to ongoing product support and
education, continually updated information is available online at the following
websites:
• For users in the U.S.A.: https://www.nikonusa.com/
• For users in Europe: https://www.europe-nikon.com/support/
• For users in Asia, Oceania, the Middle East, and Africa: http://www.nikon-asia.com/
Visit these websites to keep up-to-date with the latest product information, tips,
answers to frequently asked questions (FAQs), and general advice on digital imaging
and photography. Additional information may be available from the Nikon
representative in your area. Visit the website below for contact information.
https://imaging.nikon.com/
Introduction
Read this rst
9
Page 10

efore taking important pictures
● B
Before taking pictures on important occasions (such as at weddings or before taking
the camera on a trip), take a test shot to ensure that the camera is functioning
normally. Nikon will not be held liable for damages or lost prots that may result from
product malfunction.
● Use only Nikon brand electronic accessories
Nikon COOLPIX cameras are designed to the highest standards and include complex
electronic circuitry. Only Nikon brand electronic accessories (including battery
chargers, batteries, AC adapters, and USB cables) certied by Nikon specically for use
with this Nikon digital camera are engineered and proven to operate within the
operational and safety requirements of this electronic circuitry.
THE USE OF NON-NIKON ELECTRONIC ACCESSORIES COULD DAMAGE THE CAMERA
AND MAY VOID YOUR NIKON WARRANTY.
A holographic seal that indicates an accessory as an authentic Nikon product is
axed to the dedicated rechargeable Li-ion battery.
The use of third-party rechargeable Li-ion batteries not bearing the Nikon
raphic seal could interfere with normal operation of the camera or result in the
holog
batteries overheating, igniting, rupturing, or leaking.
For more information about Nikon brand accessories, contact a local authorized
Nikon dealer.
● About the manuals
• No part of the manuals included with this product may be reproduced,
transmitted, transcribed, stored in a retrieval system, or translated into any
language in any form, by any means, without Nikon’s prior written permission.
• Illustrations and screen content shown in this manual may dier from the actual
product.
• Nikon reserves the right to change the specications of the hardware and software
described in these manuals at any time and without prior notice.
• Nikon will not be held liable for any damages resulting from the use of this product.
• While every eort was made to ensure that the information in these manuals is
accurate and complete, we would appreciate it were you to bring any errors or
omissions to the attention of the Nikon representative in your area (address
provided separately).
● Comply with copyright notices
Under copyright law, photographs or recordings of copyrighted works made with the
camera can not be used without the permission of the copyright holder. Exceptions
apply to personal use, but note that even personal use may be restricted in the case
of photographs or recordings of exhibits or live performances.
Introduction
Read this rst
10
Page 11

isposing of data storage devices
● D
Please note that deleting images or formatting data storage devices such as memory
cards does not completely erase the original image data. Deleted les can sometimes
be recovered from discarded storage devices using commercially available software,
potentially resulting in the malicious use of personal image data. Ensuring the privacy
of such data is the user’s responsibility.
Before discarding a data storage device or transferring ownership to another person,
make sure to reset all of the camera’s settings in the setup menu
resetting, erase all data in the device using commercial deletion software, or format
the device in the setup menu
containing no private information (for example, images of empty sky). Care should be
taken to avoid injury or damage to property when physically destroying memory
cards.
● Conformity marking
Follow the procedure below to display the conformity markings that the camera
complies with.
Press the
button
button select (setup) button Conformity marking
[F
ormat card], then completely rell it with images
[Reset all]. A
fter
Introduction
Read this rst
11
Page 12

For your safety
T
o prevent damage to property or injury to yourself or to others, read “For your
safety” in its entirety before using this product.
Keep these safety instructions where all those who use this product will read them.
Failure to observe the precautions
ed with this icon carries a high
DANGER
WARNING
CAUTION
• Do not use while walking or operating a vehicle. Failure to observe this
precaution could result in accidents or other injury.
mark
risk of death or severe injury.
Failure to observe the precautions
ed with this icon could result in
mark
death or severe injury.
Failure to observe the precautions
ed with this icon could result in
mark
injury or property damage.
WARNING
• Do not disassemble or mo
that become exposed as the result of a fall or other accident. Failure to
observe these precautions could result in electric shock or other injury.
• S
hould you notice any abnormalities such as the product producing
smoke, heat, or unusual odors, immediately disconnect the battery or
power source. Continued operation could result in re, burns or other injury.
• K
eep dry. Do not handle with wet hands. Do not handle the plug with wet
hands. Failure to observe these precautions could result in re or electric shock.
• Do not let y
is on or plugged in. Failure to observe this precaution could result in low-
temperature burns.
our skin remain in prolonged contact with this product while it
dify this product. Do not touch internal parts
12
Introduction
For your safety
Page 13

• Do not use this pr
propane, gasoline or aerosols. Failure to observe this precaution could result in
explosion or re.
oduct in the presence of ammable dust or gas such as
• Do not aim the ash at the op
precaution could result in accidents.
eep this product out of reach of children. Failure to observe this precaution
• K
could result in injury or product malfunction. In addition, note that small parts
constitute a choking hazard. Should a child swallow any part of this product, seek
immediate medical attention.
• Do not en
observe this precaution could result in accidents.
• Do not use batt
designated for use with this product. When using batteries, chargers, AC
adapters, and USB cables designated for use with this product, do not:
- Damage, modify, forcibly tug or bend the cords or cables, place them
- Use travel converters or adapters designed to convert from one voltage
Failure to observe these precautions could result in re or electric shock.
• Do not handle the plug when char
during thunderstorms. Failure to observe this precaution could result in electric
shock.
• Do not handle with bar
low temperatures. Failure to observe this precaution could result in burns or
frostbite.
• Do not leave the lens pointed at the sun or other strong light sources. Light
focused by the lens could cause re or damage to product’s internal parts. When
shooting backlit subjects, keep the sun well out of the frame. Sunlight focused into
the camera when the sun is close to the frame could cause re.
tangle, wrap or twist the straps around your neck. Failure to
eries, chargers, AC adapters, or USB cables not specically
under heavy objects, or expose them to heat or ame.
to another or with DC-to-AC inverters.
erator of a motor vehicle. Failure to observe this
ging the product or using the AC adapter
e hands in locations exposed to extremely high or
C
AUTION
Introduction
For your safety
13
Page 14

urn this product o when its use is prohibited. Disable wireless features
• T
when the use of wireless equipment is prohibited. The radio-frequency
emissions produced by this product could interfere with equipment onboard
aircraft or in hospitals or other medical facilities.
ve the battery and disconnect the AC adapter if this product will not
• Remo
be used for an extended period. Failure to observe this precaution could result
in re or product malfunction.
• Do not t
• Do not r
• Do not r
• Do not leav
• Do not tr
• Do not mishandle batteries. Failure to observe the following precautions could
• C
ouch moving parts of the lens or other moving parts. Failure to
observe this precaution could result in injury.
objects. Failure to observe this precaution could result in burns or re.
camera accessory shoe. Failure to observe this precaution could result in re or
product malfunction.
temperatures, for an extended period such as in an enclosed automobile
or in direct sunlight. Failure to observe this precaution could result in re or
product malfunction.
Failure to observe this precaution could result in injury or product malfunction.
result in the batteries leaking, overheating, rupturing, or catching re:
- Use only rechargeable batteries approved for use in this product.
- Do not expose batteries to ame or excessive heat.
- Do not disassemble.
- Do not short-circuit the terminals by touching them to necklaces, hairpins, or
- Do not expose batteries or the products in which they are inserted to powerful
- Do not step on batteries, pierce them with nails, or strike them with hammers.
batteries leaking, overheating, rupturing, or catching re.
e the ash in contact with or in close proximity to the skin or
aise the built-in ash when using a ash unit mounted on the
e the product where it will be exposed to extremely high
ansport the camera with a tripod or similar accessory attached.
D
ANGER for batteries
other metal objects.
physical shocks.
harge only as indicated. Failure to observe this precaution could result in the
Introduction
For your safety
14
Page 15

f battery liquid comes into contact with the eyes, rinse with plenty of clean
• I
water and seek immediate medical attention. Delaying action could result in
eye injuries.
W
ARNING for batteries
• Keep batteries out of reach of children. Should a child swallow a battery, seek
immediate medical attention.
eep batteries out of reach of household pets and other animals. The
• K
batteries could leak, overheat, rupture, or catch re if bitten, chewed, or otherwise
damaged by animals.
• Do not immerse batt
precaution could result in re or product malfunction.
Immediately dry the product with a towel or similar object should it become wet.
• D
iscontinue use immediately should you notice any changes in the
batteries, such as discoloration or deformation. Cease charging EN-EL20a
rechargeable batteries if they do not charge in the specied period of time.
Failure to observe these precautions could result in the batteries leaking,
overheating, rupturing, or catching re.
• W
hen batteries are no longer needed, insulate the terminals with tape.
Overheating, rupture, or re may result should metal objects come into contact
with the terminals.
• I
f battery liquid comes into contact with a person’s skin or clothing,
immediately rinse the aected area with plenty of clean water. Failure to
observe this precaution could result in skin irritation.
eries in water or expose to rain. Failure to observe this
15
Introduction
For your safety
Page 16

Parts of the camera
The camera body .................................................................................................................17
rinciple functions of the controls ................................................................................ 20
P
The monitor/viewnder ....................................................................................................25
Switching the information displayed on the screen (
P
ower-on lamp (charge lamp) ........................................................................................ 34
button) ...................32
Parts of the camera
16
Page 17
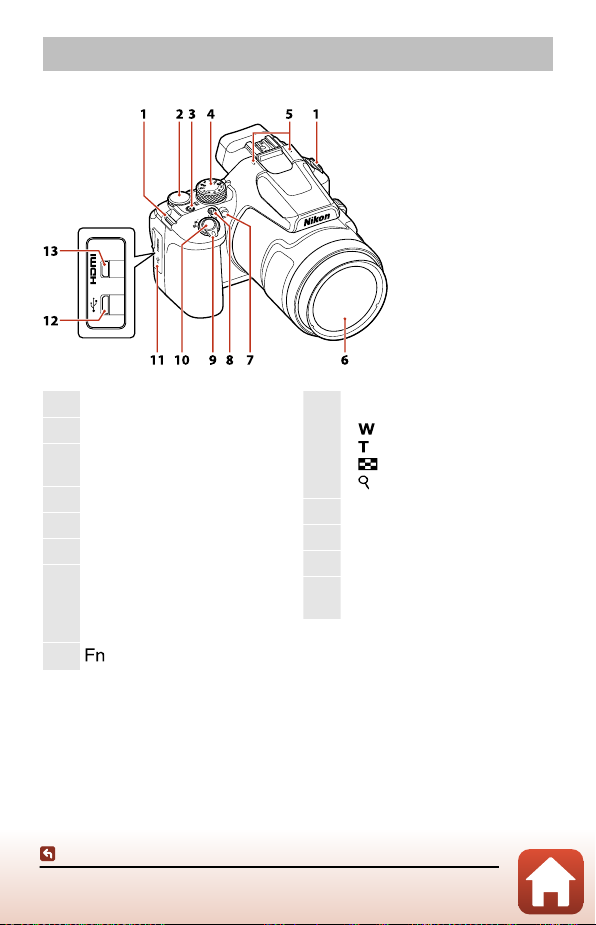
The camera body
Eyelet for strap .................................... 37
1
Command dial
2
Power switch/power-on lamp
3
(
charge lamp) .......................34, 41, 44
Mode dial ............................................... 61
4
Microphone (stereo) ..........
5
Lens
6
Self-timer lamp .....................
Red-eye reduction lamp ............
7
AF-assist illuminator .....................
(function) button .................. 121
8
Parts of the camera
The camera body
145, 208
102, 104
101
235
Zoom control
•
: Wide-angle ...........................
9
: Telephoto ................................
•
: Thumbnail playback ......136
•
•
: Playback zoom .....................
Shutter-release button ........48, 108
10
Connector cover .......... 41, 248, 250
11
Micro-USB connector .......... 41, 250
12
HDMI micro connector (Type
13
D) ..............................................................
17
124
124
132
248
Page 18
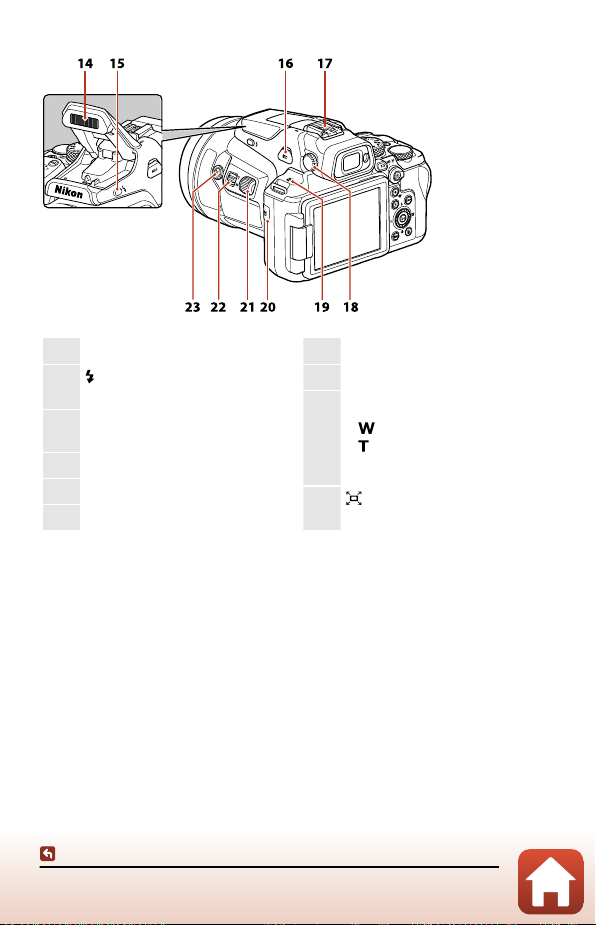
Built-in ash
14
(ash pop
15
................................................................52, 99
External microphone connector
16
co
ver ...................................................... 256
Accessory shoe .....................
17
Diopter adjustment control ....... 54
18
Speaker ......................................156, 238
19
.................................. 52, 99
-up) button .....................
Parts of the camera
The camera body
255, 259
Accessory terminal ........................
20
Side dial ................................................
21
Side zoom control
•
: Telephoto
•
: Wide-angle
22
.....................................................................
(snap-back zoom) button ..........
23
.....................................................................126
18
256
236
125
Page 19
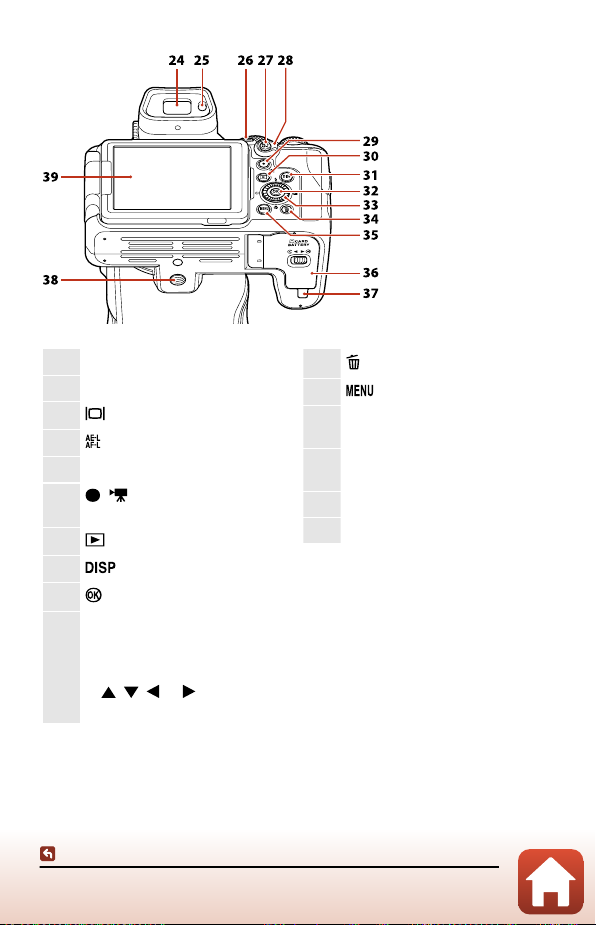
Electronic vie
24
Eye sensor .............................................. 54
25
26
(AE-L/AF-L) button ...... 111, 237
27
Focus-mode selector ........
28
( movie-record)
29
butt
30
31
(apply selection) button .... 162
32
wnder ...................... 54
(monitor) button ...................... 54
on ........................................... 53, 145
(playback) button .................... 55
(display) button .................... 32
Rotary multi selector (multi
selec
tor)
Pressing up, down, left, or right
33
on the multi selector is expressed
, , , or .
as
.............................................................
Parts of the camera
The camera body
106, 113
98, 162
34
(delete) button ............................ 57
35
36
37
38
39
(menu) button ..........
Battery-chamber/memory card
slot co
ver ................................................ 39
Power connector cover (for
optional A
C adapter) ................... 255
Tripod socket
Monitor ............................................ 25, 43
19
162, 166
Page 20
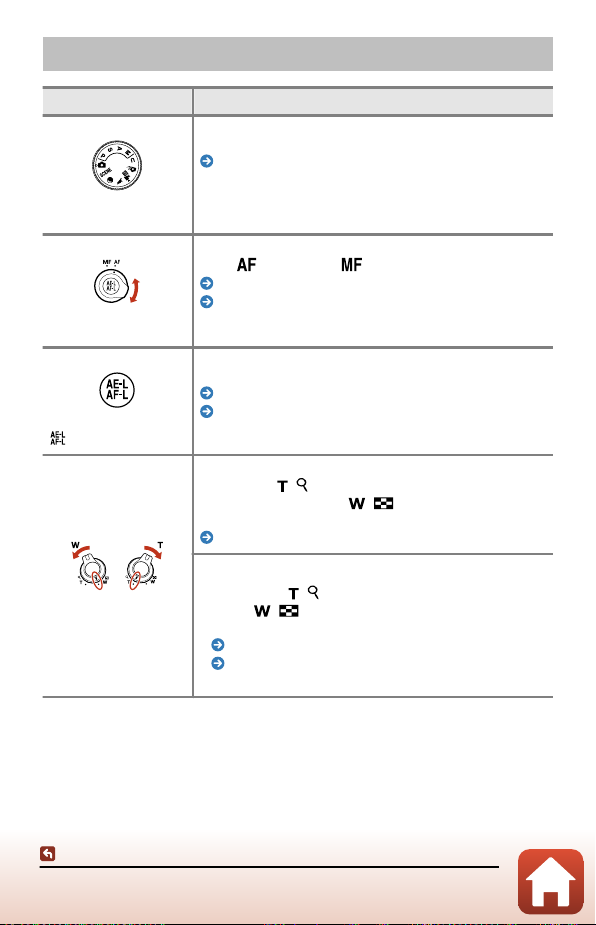
Principle functions of the controls
Control Main function
For shooting
elect a shooting mode.
S
Selecting a shooting mode (mode dial) (page 61)
Mode dial
For shooting
elect
S
(autofocus) or (manual focus).
Using autofocus (page 106)
Using manual focus (page 113)
Focus-mode selector
For shooting
ock the exposure or focus.
L
Focus lock (page 111)
AE/AF lock button (page 237)
(AE-L/AF-L) button
For shooting
Zoom control
M
ove toward
subject, and move toward ( ) (wide-angle) to zoom out
and vie
Using the zoom control (page 124)
For playback
•
M
ove toward
oward
t
calendar
Playback zoom (page 132)
Thumbnail playback/calendar display (page 136)
djust the volume for movie playback.
A
•
( ) (telephoto) to zoom in closer to the
w a larger area.
( ) to zoom in on the image, and move
( ) to display images as thumbnails or the
.
Parts of the camera
Principle functions of the controls
20
Page 21
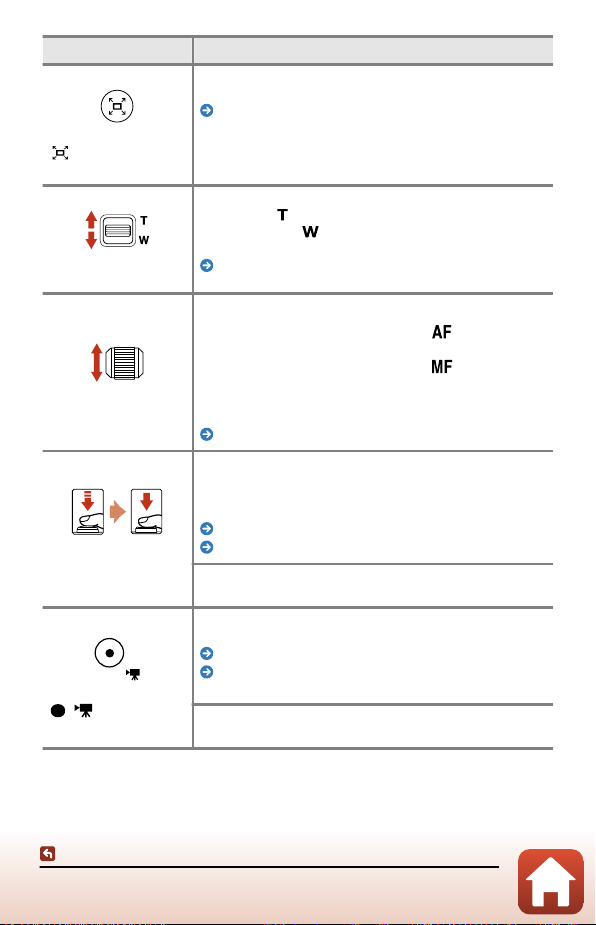
Control Main function
For shooting
iden the angle of view temporarily.
W
Using the snap-back zoom (temporarily widening the
visible range) (page 126)
(snap-back zoom)
on
butt
For shooting
Side zoom control
Side dial
Shutter-release
on
butt
( movie-record)
on
butt
M
ove toward
and mo
ger area.
lar
Using the side zoom control (page 125)
For shooting
•
When the f
setting that is selec
•
When the focus-mode selector is set to
ocus manually.
f
* This function is not available with some shooting modes.
Assign side dial (page 236)
For shooting
When the butt
When the button is pressed all the way: Release the shutter
(start and stop movie recording in Movie manual mode).
Shooting still images (page 48)
The shutter-release button (page 108)
For playback
Return to shooting mode.
For shooting
Start and stop movie recording.
Recording movies (page 53)
Basic operations of movie recording and movie playback
(page 145)
For playback
eturn to shooting mode.
R
(telephoto) to zoom in closer to the subject,
ve toward
(wide-angle) to zoom out and view a
ocus-mode selector is set to
ted in [Assign side dial].*
on is pressed halfway: Set focus and exposure.
: Change the
: Adjust the
Parts of the camera
Principle functions of the controls
21
Page 22
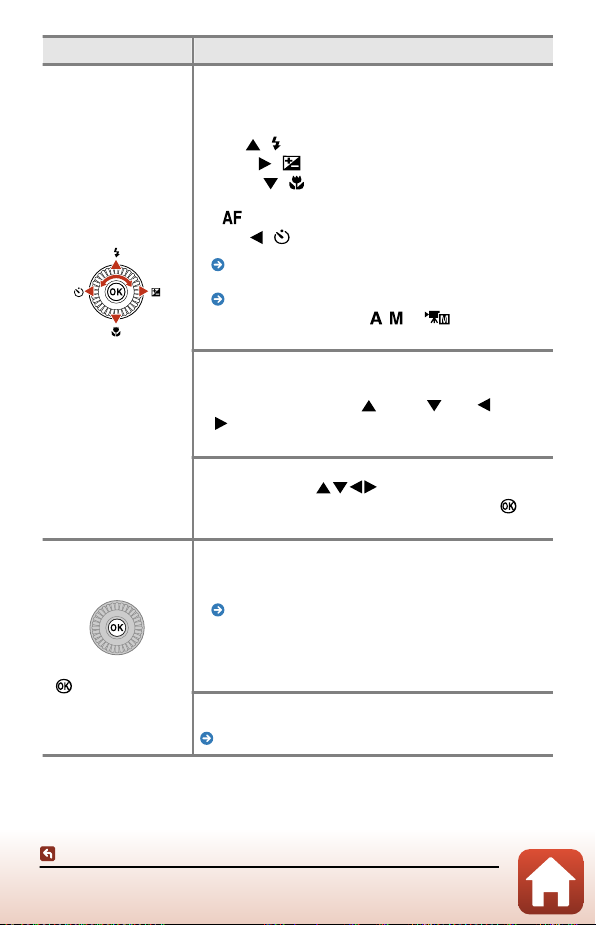
Control Main function
For shooting
Multi selector
(apply selection)
button
While the shooting scr
•
Display the following setting screens by pressing:
-
): (ash mode)
Up (
-
R
): (exposure compensation)
ight (
-
D
own (
(
Available only when the focus-mode selector is set to
.)
-
L
): (self-timer/smile timer)
eft (
Setting the ash mode
exposure compensation (page 98)
Menu operations (page 162)
•
When the shooting mode is , , or (Movie manual):
R
otate the multi selector to set the f‑number.
For playback
While the playback scr
•
displayed image using up (
( ), or by rotating the multi selector.
oomed image is displayed: Move the display area.
While a z
•
For setting
elect an item using
S
tor, and then apply the selection by pressing the
selec
button.
For playback
Display individual images of a sequence in full-frame
•
playback mode
Viewing and deleting images in a sequence (page 138)
croll an image shot with easy panorama.
S
•
Play back movies.
•
Switch from thumbnail playback or zoomed image display
•
to full-frame playback.
For setting
Apply the it
em that you selected by using the multi selector.
Menu operations (page 162)
een is displayed:
): (focus mode)
, self-timer, focus mode, and
een is displayed: Change the
.
), down ( ), left ( ), right
or by rotating the multi
Parts of the camera
Principle functions of the controls
22
Page 23
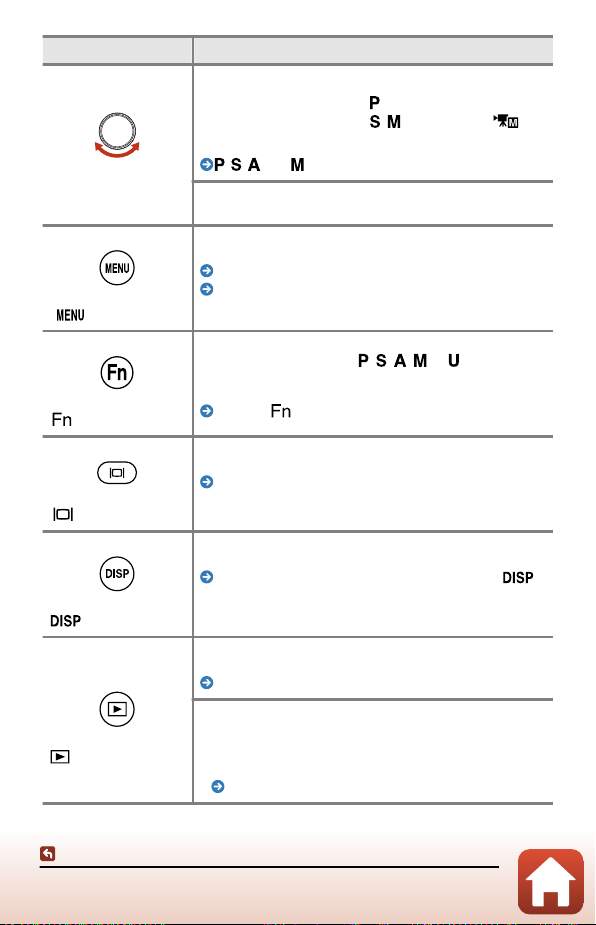
Control Main function
For shooting
•
When the shooting mode is : Set the exible pr
•
When the shooting mode is
(Movie manual): Set the shutter speed.
, , , and modes (page 63)
Command dial
(menu) button
(function) button
(monitor) button
(display) button
(playback) button
For playback
Change the mag
For shooting/playback
Display or close the menu
Menu operations (page 162)
Menu lists (page 166)
For shooting
When the shooting mode is
close the setting menus such as [C
reduction].
Using the (function) button (page 121)
For shooting/playback
S
witch between the monitor and viewnder.
Switching between the monitor and vie
For shooting/playback
witch or hide the information displayed on the screen.
S
Switching the information displayed on the screen (
button) (page 32)
For shooting
P
lay back images.
Playing back images (page 55)
For playback
Return to shooting mode.
•
When the camera is turned o, press and hold down this
•
button to turn the camera on in playback mode.
Playing back images (page 55)
nication rate of a zoomed image.
.
ogram.
anual] in
, , or [M
, , , , or : Display or
ontinuous] or [Vibration
wnder (page 54)
Parts of the camera
Principle functions of the controls
23
Page 24

Control Main function
For shooting
D
elete the last image that was saved.
Deleting images (page 57)
For playback
D
(delete) button
elete images.
Deleting images (page 57)
Parts of the camera
Principle functions of the controls
24
Page 25

The monit
The information that is displayed on the screen changes depending on the camera’s
settings and state of use.
or/viewnder
Shooting screen
Shooting mode .................................. 61
1
Flash mode ............................................99
2
Focus mode ............................
3
Zoom .......................................... 107, 124
4
Focal length (in 35mm [135]
5
f
ormat) ....................................... 124, 200
Focus indicator ................................... 48
6
Digital zoom mag
7
Movie options (normal speed
8
mo
vies) ................................................. 204
Movie options (HS movies) ......
9
Parts of the camera
The monit
or/viewnder
106, 113
nication ..... 124
205
Image quality ....................................
10
Image size ...........................................
11
Easy panorama ................................... 89
12
Long exposure NR (when [O
13
set) ...........................................................197
Noise reduction lt
14
Wind noise reduction (during
15
mo
vie recording) ............................208
Vibration reduction .......................
16
Electronic VR ..................................... 207
25
174
175
] is
er ................... 197
234
Page 26

Exposure indicator ............................66
17
Flash exposure
18
compensation
Exposure compensation
19
value .......................................................
Remaining movie recording
20
time ..............................................
Flash-ready indicator ...................
21
Number of exposures remaining
22
(still images)
Enable release (when no memory
23
car
d is inserted) ............................... 229
F-number ............................................... 63
24
..................................196
...............................48, 175
117
145, 147
100
Shutter speed ...................................... 63
25
Auto exposure (AE)/Autofocus
26
AF) lock (still image) ......... 111, 237
(
ISO sensitivity ...................................
27
Charging AC Adapter connection
28
Battery level .......................................... 48
29
Travel destination ...........................
30
“Date not set” .........................
31
Date stamp ........................................
32
Auto exposure (AE)/Autofocus
(
AF) lock (during movie
33
recording) .................................146, 237
26
189
227
227, 269
232
Parts of the camera
The monit
or/viewnder
Page 27
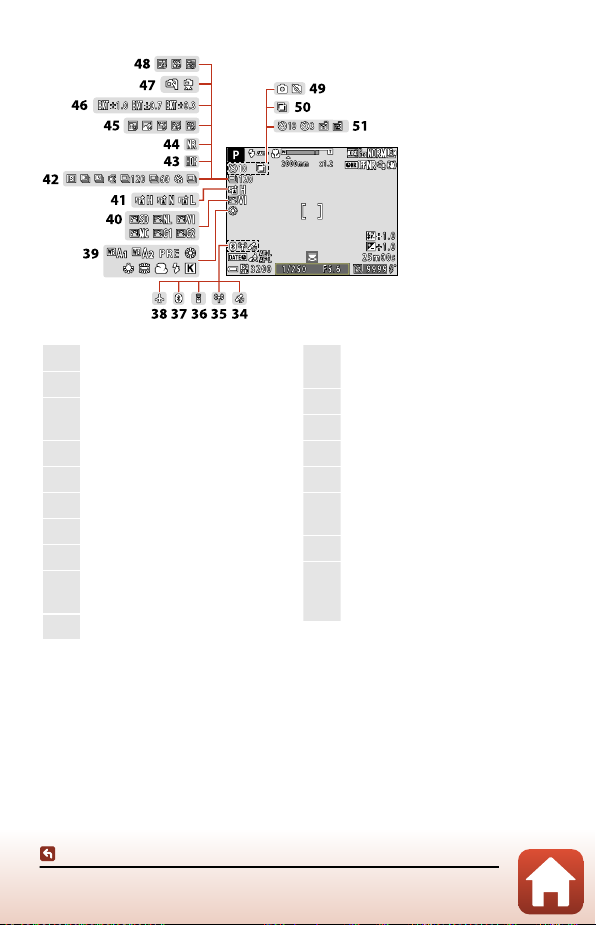
Location data ....................................
34
Wi-Fi communication ..................
35
Bluetooth remote control
36
connec
ted .......................................... 264
Bluetooth communication .......223
37
Airplane mode .................................
38
White balance ..................................
39
COOLPIX Picture Control ...........
40
Active D-Lighting ...........................
41
Continuous shooting mode .............
42
.............................................
Backlighting (HDR) ........................... 88
43
Parts of the camera
The monit
or/viewnder
243
223
223
181
177
197
79, 82, 92, 185
Noise reduction burst/single
44
45
46
47
48
49
50
....................................................81, 86
shot
Time-lapse movie ..........................
Exposure bracketing ....................
Hand-held/tripod ......................83, 85
Multiple exp. Lighten ......................94
Still image capture (during movie
r
ecording) ........................................... 149
Multiple exposure ..........................
Self-timer .............................................
Smile timer ......................................... 104
51
Pet portrait auto release ............... 92
27
153
190
198
102
Page 28
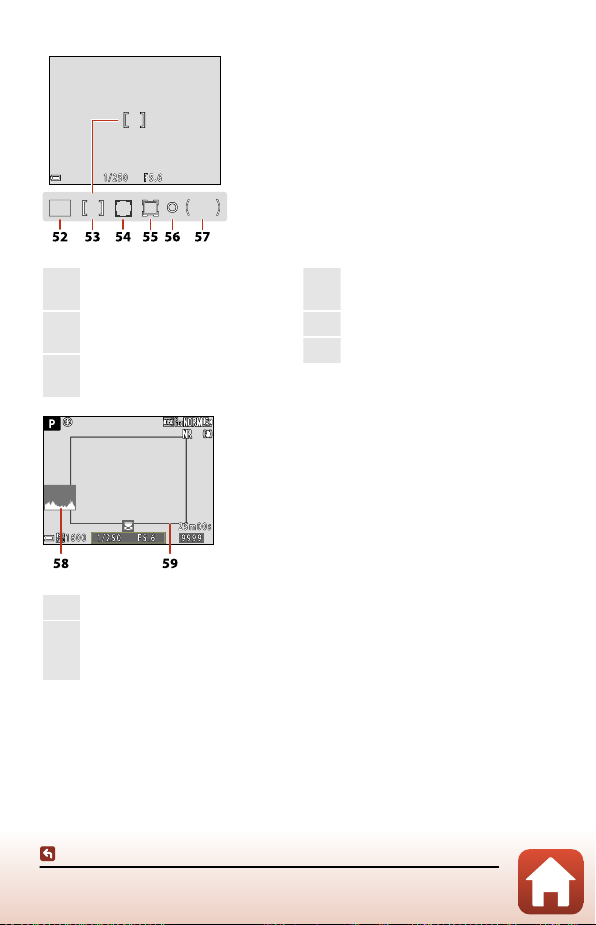
Focus area (target nding AF)
52
.......................................................... 108, 191
Focus area (center, manual) ..............
53
..................................................
Focus area (face detection, pet
54
det
ection) .............. 92, 104, 110, 191
Histogram ...........................................229
58
Framing border ([Bird-watching]
or [Moon] mode, or snap-back
59
zoom) ..................................... 79, 80, 126
Parts of the camera
The monit
or/viewnder
.........
79, 111, 191
Focus area (subject tracking) ...........
55
..........................................................
Spot metering area .......................
56
Center-weighted area .................
57
28
191, 194
184
184
Page 29
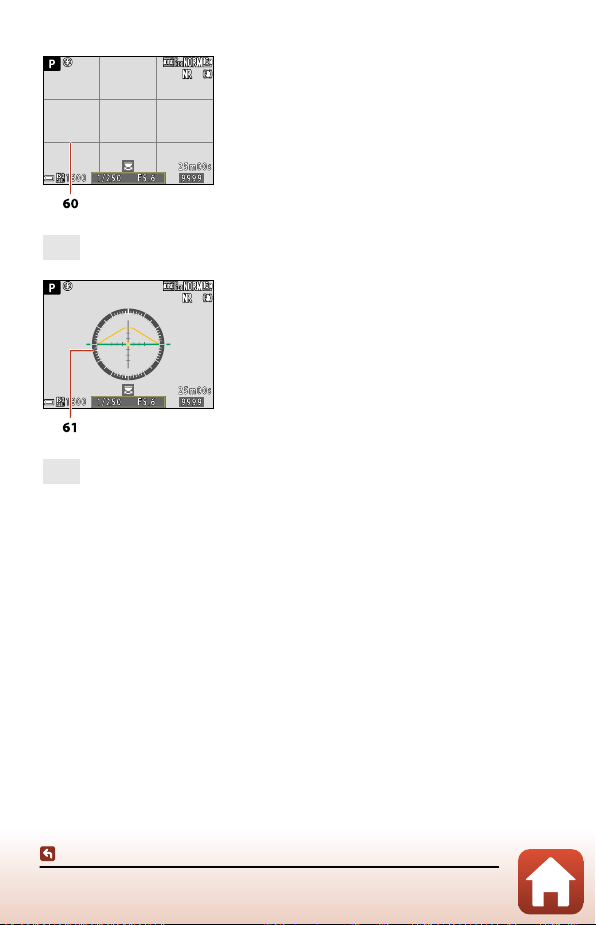
Framing grid ......................................
60
229
Virtual horizon .......................
61
Parts of the camera
The monit
or/viewnder
229, 231
29
Page 30

Playback screen
Protect ...................................................
1
Sequence display (when
[I
ndividual pictures] is
2
selected) .............................................. 221
Skin softening ..................................
3
Filter eec
4
D-Lighting .......................................... 213
5
Quick retouch ...................................
6
Marked for upload .........................
7
Current image number/total
8
number of images
Movie length or elapsed playback
9
time
Volume .................................................
10
Enable release (when no memory
11
car
Image quality ....................................
12
ts .......................................214
d is inserted) ............................... 229
Parts of the camera
The monit
or/viewnder
218
213
212
211
156
174
Image size ...........................................
13
Movie options ..................................
14
Easy panorama ................................... 89
15
Small picture .....................................
16
Cropped ...............................................
17
Easy panorama playback
guide ......................................................
18
Sequence playback guide ........ 138
Movie playback guide .................145
Time of recording
19
Date of recording
20
Charging AC Adapter connection
21
Battery level .......................................... 48
22
File number and type ..................
23
Recorded location data ..............
24
30
175
204
220
134
140
291
243
Page 31

Tone level information
ou can check for loss of contrast detail in highlights and shadows from the
Y
histogram that is displayed, or the ashing display for each tone level. These provide
guidelines when adjusting the image brightness with functions such as exposure
compensation.
Current image number/total
1
number of images
Histogram
•
A histogram is a graph showing
the distribution of tones in the
image. The horizontal axis
2
corresponds to pixel brightness,
with dark tones to the left and
bright tones to the right. The
vertical axis shows the number
of pixels.
Tone level
•
The tone level indicates the
brightness level. When the tone
level to check is selected using
3
the multi selector
r
otating it, the area of the
image that corresponds to the
selected tone level ashes.
Parts of the camera
The monit
or/viewnder
ISO sensitivity ................................... 189
4
COOLPIX Picture Control ...........
5
Image quality/Image size ..................
6
..........................................................
White balance ..................................
7
Time of recording ...................44, 227
8
Date of recording ................... 44, 227
9
File number and type ..................
10
Exposure compensation
11
value .......................................................
Shooting mode .................................. 61
12
Shutter speed ...................................... 63
13
or
F-number ............................................... 63
14
177
174, 175
181
291
117
31
Page 32

Switching the information displayed on the
scr
een (
T
o switch the information displayed on the screen during shooting or playback, press
the
(display) button. You can also hide the information.
For shooting
button)
w information
1: Sho
2: Movie frame
Display the range of a movie in a frame.
3: Display only the framing grid, histogram, and virtual horizon
4: Hide information
1 The framing grid, histogram, and virtual horizon are displayed depending on the
settings in the setup menu
2 If the framing grid, histogram, and virtual horizon are not set to be displayed in the
setup menu
1
1
2
[M
onitor settings (page 229)].
onitor settings (page 229)], this screen will not be displayed.
[M
32
Parts of the camera
Switching the information displayed on the screen ( button)
Page 33

For playback
1: Sho
w information
2: Tone level information (except movies)*
Display a histogram, tone level and shooting information.
Tone level information (page 31)
3: Image comment, copyright information*
Image comment (page 241), Copyright information (page 242)
4: H
ide information
*
If images in a sequence are displayed individually and you press the
inf
ormation is displayed.
Viewing and deleting images in a sequence (page 138)
Sequence display (page 221)
button, the
33
Parts of the camera
Switching the information displayed on the screen ( button)
Page 34

Power-on lamp (charge lamp)
T
he power-on lamp (charge lamp) turns on or ashes in the following situations.
Status Meaning
On
Flashing•T
urns on immediately after the camera is turned on. When the monitor is
T
•
on, the power-on lamp turns o.
The camera is connected to a computer with the USB cable (when the
•
setup menu
is complete with [Auto]).
The camera is connected to an HDMI-compatible device with the HDMI
•
cable.
The electronic viewnder is being used.
•
[Multiple exp. Lighten (page 94)] scene mode is set to [Star trails]
•
and shooting is in progress.
he camera is in standby mode because it has not been operated for
about one minute.
The auto o func
The battery is charging.
•
Charging the battery (page 41)
Charge by computer (page 241)
[I
ntvl timer shooting] is in progress.
•
Interval timer shooting (page 188)
M
ovie recording is in progress while the camera is connected to an HDMI-
•
compatible device (when the setup menu
lean HDMI output]
[C
[C
harge by computer]
tion (page 51)
n] is set).
[O
[O
] is set, or when charging
[HDMI (page 239)]
Parts of the camera
Power-on lamp (charge lamp)
34
Page 35

Status Meaning
Flashing
quick
The battery cannot be charged.
•
ly
Charging the battery (page 41)
When the power-on lamp (charge lamp) quickly ashes (page 241)
The battery (page 286)
I
f [Battery exhausted.] is displayed on the screen, charge or replace the
•
battery.
The inside of the camera or the battery has become hot. The camera turns
•
o automatically. Wait until the camera or battery temperature has cooled
before resuming use.
Parts of the camera
Power-on lamp (charge lamp)
35
Page 36

Getting started
Attaching the strap ............................................................................................................. 37
ttaching/removing the lens cap and lens hood ....................................................38
A
Inserting the battery and memory card ......................................................................39
Charging the battery ..........................................................................................................41
Opening the monitor .........................................................................................................43
Camera setup ........................................................................................................................44
Getting started
36
Page 37

Attaching the strap
A
ttach the strap to the left and right side of the camera.
Getting started
Attaching the strap
37
Page 38

Attaching/removing the lens cap and lens hood
•
When you are not shooting images, attach the lens cap to protect the lens.
• When the lens hood is attached, it cuts out light which adversely aects the image,
and also helps protect the camera. Remove the lens hood when shooting with a
ash or when the AF-assist illuminator is necessary for shooting.
• Turn o the camera before attaching/removing the lens hood. When attaching the
lens hood, screw it in suciently without excessive force so that it will not fall o.
38
Getting started
Attaching/removing the lens cap and lens hood
Page 39

Inserting the battery and memory card
Open the batt
1
Insert the battery and memory card.
2
ith the battery’s positive and negative terminals oriented correctly, move the
W
•
orange battery latch (1), and fully insert the battery (2).
•
Slide the memory card in until it clicks into place (3).
Be careful not to insert the battery or memory card upside-down or backward, as
•
this could cause a malfunction.
If the write-protect switch of the memory card is locked, you cannot shoot, delete
•
images, or format the memory card.
Close the batt
3
ery-chamber/memory card slot cover.
ery-chamber/memory card slot cover.
Formatting a memory card
T
he rst time you insert a memory card that has been used in another device into this
camera, make sure to format it with this camera.
39
Getting started
Inserting the battery and memory card
Page 40

ote that formatting a memory card permanently deletes all images and other
N
•
data on the memory card.
Be sure to make copies of any images you wish to keep before formatting the memory
card.
Insert the memory card into the camera, press the
•
menu [F
ormat card].
button, and select the setup
Removing the battery or memory card
Turn the camera o and make sure that the power-on lamp and screen have turned
o, and then open the battery-chamber/memory card slot cover.
• Move the orange battery latch to eject the battery.
• Gently push the memory card into the camera to partially eject the memory card.
• Be careful when handling the camera, battery, and memory card immediately after
using the camera, as they may be hot.
Memory cards that can be used
he camera supports SD, SDHC, and SDXC memory cards.
T
• The camera supports UHS-I.
Memory cards with an SD Speed Class rating of 6 (Video Speed Class V6) or faster
•
are recommended for recording movies. When [Movie options] is set to
[2160/30p] (4K UHD) or [2160/25p] (4K UHD), memory cards with a UHS Speed
Class rating of 3 (Video Speed Class V30) or faster are recommended. Movie
recording may stop unexpectedly when a memory card with a lower Speed Class
rating is used.
• If you use a card reader, make sure that it is compatible with your memory card.
• Contact the manufacturer for information on features, operation, and limitations on
use.
Getting started
Inserting the battery and memory card
40
Page 41

Charging the battery
U
se the USB cable (included) to connect the Charging AC
1
Adapter to the camera with the battery inserted.
nsert the plug of the Charging AC Adapter into an electrical
I
2
outlet.
A plug adapt
•
shape of the plug adapter varies with the country or region of purchase.
When charging starts, the power-on lamp (charge lamp) ashes. The charging time
•
for a fully exhausted battery is about 3 hours.
When charging is complete, the power-on lamp (charge lamp) turns o.
•
The battery cannot be charged when the power-on lamp (charge lamp) quickly
•
ashes, possibly due to one of the reasons described below.
The ambient temperature is not suited to charging.
-
The USB cable or Charging AC Adapter is not properly connected.
-
The battery is damaged.
-
er is attached depending on the country or region of purchase. The
41
Getting started
Charging the battery
Page 42

hen charging is complete, unplug the Charging AC Adapter
W
3
from the electrical outlet, and disconnect the USB cable.
Notes about the USB cable
o not use a USB cable other than the UC-E21. Using a USB cable other than the UC-E21
D
•
could result in overheating, re, or electric shock.
Check the shape and direction of the plugs and do not insert or remove the plugs at an
•
angle.
Notes about charging the battery
D
o not, under any circumstances, use another make or model of AC adapter other than
•
the EH-73P/EH-73PCH Charging AC Adapter, and do not use a commercially available
USB-AC adapter or a battery charger for a mobile phone. Failure to observe this
precaution could result in overheating or in damage to the camera.
If the camera is turned on while the battery is charging, charging stops.
•
Getting started
Charging the battery
42
Page 43

Opening the monitor
• You can adjust the direction and angle of the monitor. For normal shooting, fold
• When you are not using or carrying the camera, fold the monitor against the
•
•
or against the back of the camera, facing out (5).
the monit
camera body with the screen facing in (1).
Notes about the monitor
he monitor’s adjustable range may be limited when a cable or accessories are attached
T
to the camera.
When moving the monitor, do not apply excessive force and move slowly within the
monitor's adjustable range so that the connection will not be damaged.
43
Getting started
Opening the monitor
Page 44

Camera setup
When the camera is tur
and camera clock are displayed.
Use the multi selector (1) and
settings.
ress the power switch to turn on the camera.
P
1
P
ress
2
pr
ess the
he displayed languages vary depending on the country or region.
T
•
ned on for the rst time, screens to set the display language
(apply selection) button (2) to select and adjust
on the multi selector to highlight a language and
button to select.
Getting started
Camera setup
44
Page 45

elect [Yes] and press the
S
3
Highlight your home time zone and press the button.
4
•
o turn daylight saving time on, press
T
to turn daylight saving time o.
Press to select a date format and press the button.
5
S
et the date and time.
6
•
Press to highlight items and to change them.
•
S
elect the minute eld and press the
hen prompted, press
W
7
button.
; will be displayed above the map. Press
button to conr
to highlight [Y
m the setting.
es] and press the
button.
Setup is complete and the camera switches to the shooting screen.
•
Setting the language
T
he language can be set at any time in the
setup menu [Language].
Getting started
Camera setup
45
Page 46

To change the time zone and date setting
et in the
S
In [Time zone and date]
saving time is on, and goes back one hour when it is o.
setup menu [T
ime zone and date].
[T
ime zone], the time is one hour earlier when daylight
Getting started
Camera setup
46
Page 47

Basic operations of shooting and playback
Shooting still images ..........................................................................................................48
ecording movies ................................................................................................................53
R
Switching between the monitor and viewnder .....................................................54
Playing back images ...........................................................................................................55
Deleting images ...................................................................................................................57
47
Basic operations of shooting and playback
Page 48

Shooting still images
(auto) mode is used here as an example. (auto) mode enables you to perform
general shooting in a var
Rotate the mode dial to
1
Check the battery level and number of exposures remaining on
2
the shooting scr
•
ery level (1)
Batt
: The battery level is high.
: The battery level is low.
•
Number of exposur
Press the
•
each time
iety of shooting conditions.
.
een.
es remaining (2)
(display) button to switch the information displayed on the screen
.
Basic operations of shooting and playback
Shooting still images
48
Page 49

Hold the camer
3
Keep ngers and other objects away from the lens, ash, AF-assist illuminator, eye
•
sensor, microphone, and speaker.
rame the picture.
F
4
Move the zoom control or the side zoom control to change the zoom lens position.
•
•
To zoom in, move toward
•
T
o zoom out, move toward
If you lose sight of the subject while shooting with the lens in telephoto position,
•
press the (snap-back zoom) button (3) t
that you can frame the subject more easily.
•
ee “
S
Using a tripod (page 51)” when using a tripod.
a steady.
(1).
(2).
o temporarily widen the visible area so
Basic operations of shooting and playback
Shooting still images
49
Page 50

Press the shutter-release button halfway.
5
T
o press the shutter-release button “halfway” means to press and hold the button at
•
the point where you feel a slight resistance.
When the subjec
•
When y
•
the focus area is not displayed.
If the focus area or focus indicator ashes, the camera is unable to focus. Modify the
•
composition and try pressing the shutter-release button halfway again.
ithout lifting your nger, press the shutter-release button all
W
6
t is in focus, the focus area or focus indicator is displayed in green.
ou are using digital zoom, the camera focuses in the center of the frame and
the way down.
Notes about saving images or movies
he indicator showing the number of exposures remaining or the indicator showing the
T
remaining recording time ashes, or [Please wait for the camera to nish recording.] is
displayed while images or movies are being saved. Do not open the battery-chamber/
memory card slot cover or remove the battery or memory card while an indicator
is ashing. Doing this could result in loss of data, or in damage to the camera or the
memory card.
Basic operations of shooting and playback
Shooting still images
50
Page 51

Using a tripod
e recommend using a tripod to stabilize the camera in the following situations:
W
•
-
When shooting in dim lighting and the ash is (o)
When the zoom is at a telephoto position
-
When using a tripod to stabilize the camera during shooting, select the setup menu
•
[Vibration reduction] [O] to prevent potential errors caused by this function.
After attaching the camera to a tripod, make sure that the camera does not fall over
•
when zooming the lens in or out.
Extend one leg of the tripod toward the subject and the other two legs toward you at an
equal distance.
When zoom is at wide-angle position
-
oom is at telephoto position
When z
-
T
he camera may move slightly when operated, even if it is attached to a tripod, which
•
may interfere with the autofocus. Wait a few seconds after operating the camera, and
then slowly press the shutter-release button.
The auto o function
When no operations are performed for about one minute, the screen turns o, the
•
camera enters standby mode, and then the power-on lamp ashes. The camera turns o
after remaining in standby mode for about three minutes.
To turn the screen back on while the camera is in standby mode, perform an operation
•
such as pressing the power switch or shutter-release button.
51
Basic operations of shooting and playback
Shooting still images
Page 52

Using the built-in ash
n situations where a ash is needed, such as in dark locations or when the subject is
I
backlit, press the
(ash pop
-up) button to raise the built-in ash.
• When not using the built-in ash, gently push t
clicks shut.
52
Basic operations of shooting and playback
Shooting still images
o lower the built-in ash until it
Page 53

Recording movies
Display the shooting scr
r
ecording a movie. Press the
•
When y
ou rotate the mode dial to
speed and f-number f
•
For information about recording and playing back movies, see “
144)”
.
een and press the
( ) button again to end recording.
or movie recording.
( movie-record) button to start
(Movie manual), you can set the shutter
Movies (page
Basic operations of shooting and playback
Recording movies
53
Page 54

Switching between the monitor and vie
It is recommended that you use the viewnder (1) when bright conditions make it
dicult to see the monitor, such as when outdoors in sunlight.
• When you bring your face close to the viewnder, the eye sensor responds to it and
the viewnder turns on, and the monitor turns o (default setting).
•
You can also press the
or and viewnder.
monit
(monitor) button to switch the display between the
wnder
Diopter adjustment of the vie
When the display in the viewnder is dicult to see, adjust by rotating the diopter
adjustment control (1) while looking through the viewnder.
• Take care not to scratch your eye with your ngertips or nails.
wnder
54
Basic operations of shooting and playback
Switching between the monitor and vie
wnder
Page 55

Playing back images
P
ress the
1
mode
•
f you press and hold down the
I
camera tur
U
se the multi selector to select an image to display.
2
•
Use the multi selec
nex
•
Press and hold down
I
mages can also be selected by rotating the multi selector.
•
Press the
•
each time
•
To play back a recorded movie, press the
•
o return to shooting mode, press the
T
•
Move the zoom control toward
an image.
Playback zoom (page 132)
In full-frame playback mode, move the zoom control toward
•
thumbnail playback mode and display multiple images on the scr
Thumbnail playback/calendar display (page 136)
(playback) button to enter full-frame playback
.
ns on in playback mode.
tor
t image.
(display) button to switch the information displayed on the screen
.
button while the camera is turned o, the
to display the previous image, or to display the
to scroll through the images quickly.
button.
button or shutter-release button.
( ) in full-frame playback mode to zoom in on
( ) to switch to
een.
Other playback methods
•
Easy panorama
Playback with easy panorama (page 140)
Basic operations of shooting and playback
Playing back images
55
Page 56

• Sequence images
Viewing images in a sequence (page 138)
•
Movies
Basic operations of movie recording and movie playback (page 145)
Operations during movie playback (page 156)
Basic operations of shooting and playback
Playing back images
56
Page 57

Deleting images
I
n playback mode, press the
1
image cur
U
se the multi selector
2
method and pr
f you selected [Current image] or [All images], proceed to step 6.
I
•
To exit without deleting, press the
•
se the multi selector
U
3
y
ou want to delete.
rently displayed on the screen.
ess the
(delete) button to delete the
to select the desired deletion
button.
button.
or rotate it to select the image that
•
ove the zoom control toward
M
o switch to thumbnail playback.
t
Basic operations of shooting and playback
Deleting images
( ) to switch to full-frame playback, or ( )
57
Page 58

se
U
4
•
P
5
W
6
press the
•
•
Notes about deleting images simultaneously saved in RAW and JPEG
When using this camera t
Normal] in the [Image quality] setting, both of the simultaneously saved RAW and JPEG
images are deleted. You cannot delete only one format.
to show or hide .
Show under images that you want to delete. Repeat steps 3 and 4 to select
additional images
ress the
.
button to apply the image selection.
hen the conrmation dialog is displayed, select [Yes] and
button.
D
eleted images cannot be recovered.
The message in the conrmation dialog varies depending on the selected deletion
method.
o delete images captured using [RAW + Fine] or [RAW +
Basic operations of shooting and playback
Deleting images
58
Page 59

Deleting images captured continuously (sequence)
mages captured continuously are saved as a sequence, and only the rst image of the
I
•
sequence (the key picture) is displayed in playback mode (default setting).
•
I
f you press the
images in the sequence ar
•
To delete individual images in a sequence, press the
time and pr
button while a key picture is displayed for a sequence of images, all
ess the
e deleted.
button.
button to display them one at a
Deleting the image captured while in shooting mode
When using shooting mode
, press the
button to delete the last image that was saved.
Basic operations of shooting and playback
Deleting images
59
Page 60

Shooting features
Selecting a shooting mode (mode dial) ......................................................................61
uto mode (standard shooting) .....................................................................................62
A
, , , and modes ....................................................................................................... 63
Shooting with the Bulb setting or T
(user settings) mode ......................................................................................................71
Creative mode (applying eects when shooting) ................................................... 75
Scene mode (shooting suited to the shooting conditions) ................................. 78
Setting the ash mode, self-timer, focus mode, and exposure
compensation .......................................................................................................................98
Flash mode .............................................................................................................................99
Self-timer ..............................................................................................................................102
Smile timer .......................................................................................................................... 104
Using autofocus .................................................................................................................106
Using manual focus ..........................................................................................................113
Exposure compensation .................................................................................................117
Default settings (ash, self-timer, and focus mode) .............................................119
Using the
sing the zoom ................................................................................................................. 124
U
Functions that cannot be used simultaneously when shooting .....................127
(function) button ...................................................................................121
ime setting (when in
mode) .................69
Shooting features
60
Page 61

Selecting a shooting mode (mode dial)
Y
ou can rotate the mode dial to align the desired shooting mode with the indicator
mark on the camera body.
Shooting mode Description
(Auto) mode
, , , and
modes
(User settings)
mode
(Creative)
mode
(Movie
manual) mode
, , and
modes
Select this mode to perform general shooting in a variety of
shooting conditions.
Select these modes for greater control over shutter speed and
.
f‑number
The frequently used settings in
ed. To shoot with the saved settings, rotate the mode dial to
sav
Apply eec
You can record movies with the exposure mode set to aperturepr
Still images cannot be captured.
Select any one of scene modes based on the shooting conditions,
and y
conditions.
•
•
•
ts to images during shooting.
iority auto or manual.
ou can take pictures with the appropriate settings for those
(bird-watching): Use this mode when capturing images of
birds in a telephoto position.
(moon): Use this mode when capturing images of the moon
elephoto position.
in a t
(scene): Press the button and select a scene mode.
, , , and modes can be
.
Shooting features
Selecting a shooting mode (mode dial)
61
Page 62

Auto mode (standard shooting)
Select this mode to perform general shooting in a variety of shooting conditions.
The camera detects the main subject and focuses on it (target nding AF). If a
•
human face is detected, the camera automatically sets focus priority on it.
Using autofocus (page 106)
F
unctions available in
Flash mode
•
Flash mode (page 99)
Self-timer
•
Self-timer (page 102)
Smile timer
•
Smile timer (page 104)
Focus mode
•
Selecting the focus mode (page 106)
Exposure compensation
•
Exposure compensation (page 117)
Shooting menu
•
The shooting menu (common across shooting modes) (page 174)
(auto) mode
62
Shooting features
Auto mode (standard shooting)
Page 63

, , , and modes
In , , , and modes, you can set exposure (combination of shutter speed and
f‑number) accor
control when shooting images by setting the shooting menu options.
Shooting mode Description
Programmed
o
aut
Shutter-
priorit
Aperture-
priorit
ding to the shooting conditions. Also, you can achieve greater
You can let the camera adjust the shutter speed (4) and f‑number
(5).
he combination of shutter speed and f‑number can be changed
T
•
by rotating the command dial (1) (exible program). While the
y auto
y auto
exible program is in eect,
displayed on the upper left of the screen (3).
To cancel the exible program, rotate the command dial in the
•
opposite direction than when you set it until
ed. It is also canceled if you change the shooting mode,
display
turn o the camera, or raise or lower the built-in ash.
Rotate the command dial (1) t
camera automatically determines the f‑number (5).
Rotate the multi selector (2) t
automatically determines the shutter speed (4).
(exible pr
o set the shutter speed (4). The
o set the f‑number (5). The camera
ogram mark) is
is no longer
Shooting features
, , , and modes
63
Page 64

Shooting mode Description
Manual
Set both the shutter speed (4) and f‑number (5). R
command dial (1) to set the shutter speed. Rotate the multi
selector (2) to set the f‑number.
Exposure indicator (when in mode) (page 66)
Y
ou can use the Bulb setting or Time setting to capture images
•
with a long time-exposure.
otate the
• The allocations of the controls for setting the exposure can be changed in the
setup menu [T
oggle Av/Tv selection (page 244)].
Tips for setting exposure
The sense of dynamism and amount of background defocus in subjects vary by
changing the combinations of shutter speed and f‑number even if the exposure is
the same.
Eect of the shutter speed
The camera can make a fast-moving subject appear static at a fast shutter speed, or
highlight the motion of a moving subject at a slow shutter speed.
• Faster
1/1000 s
• Slower
1/30 s
Eect of the f‑numb
Shooting features
, , , and modes
er
64
Page 65

The camera can blur the subject’s background intentionally, or bring the subject,
oreground, and background into focus.
f
• Small f-number (larger aperture)
f/2.8
• Large f-number (smaller aperture)
f/8
Shutter speed and f‑numb
The control range of the shutter speed diers depending on the zoom position,
•
f‑number, or ISO sensitivity setting.
The f‑number of this camera also changes depending on the zoom position.
•
When zooming is performed after the exposure is set, exposure combinations or the
•
f‑number may be changed.
Large apertures (expressed by small f-numbers) let more light into the camera, and small
•
apertures (large f-numbers) let less light. The smallest f-number represents the largest
aperture, and the largest f-number represents the smallest aperture.
The closer the lens is to the telephoto zoom position, the smaller the aperture range
•
becomes.
er
Setting exposure when recording movies
ecording movies in
When r
ar
e not applied. When the mode dial is rotated to
exposur
e for movie recording.
, , , , or , the shutter speed and f-number that you set
(Movie manual), you can set the
Notes about setting exposure
When the subjec
exposure. In such cases, the shutter speed indicator or f‑number indicator ashes when the
t is too dark or too bright, it may not be possible to obtain the appropriate
65
Shooting features
, , , and modes
Page 66

shutter-release button is pressed halfway (except when the mode is used). Change the
er speed setting or f-number.
shutt
Exposure indicator (when in
T
he degree of deviation between the adjusted exposure value and the optimal
exposure value measured by the camera is displayed in the exposure indicator on the
screen. The degree of deviation in the exposure indicator is displayed in terms of EV
(-2 to +2 EV in increments of 1/3 EV).
mode)
Functions available in , , , and modes
Flash mode
•
Flash mode (page 99)
Self-timer
•
Self-timer (page 102)
Smile timer
•
Smile timer (page 104)
Focus mode
•
Selecting the focus mode (page 106)
Exposure compensation
•
Exposure compensation (page 117)
Shooting menu
•
The shooting menu (common across shooting modes) (page 174), The
shooting menu ( , , , , or mode) (page 177)
•
F
unctions that can be set using the
Using the (function) button (page 121)
Focus area
T
he focus area for autofocus varies depending on the setting in the shooting menu
area mode (page 191)]. When set to [Target nding AF] (default setting), the camera
detects the main subject and focuses on it. If a human face is detected, the camera
automatically sets focus priority on it.
button
[AF
Shooting features
, , , and modes
66
Page 67

The control range of the shutter speed ( , , , and
modes)
T
he control range of the shutter speed diers depending on the zoom position,
f‑number, or ISO sensitivity setting. Additionally, the control range changes in the
following continuous shooting settings.
Setting Control range (second)
1
ISO sensitivity
100-400
100-800
100-1600
100-3200
100-6400
100
200
400
800
1/2000 2–8 s (
1/4000
1/4000
1/2000 2–4 s ( or mode)
1/4000
1/4000
1/2000 2–2 s ( or mode)
1/4000
1/4000
1/2000 2–1 s ( or mode)
1/4000
1/2000 2–1/2 s ( or mode)
1/4000
1/2000 2–30 s ( or mode)
1/4000
1/4000
1/2000 2–15 s ( or mode)
1/4000
1/4000
1/2000 2–8 s ( or mode)
1/4000
1/4000
1/2000 2–4 s ( or mode)
1/4000
1/4000
or mode)
2, 3
–30 s (
2, 3
2, 3
2, 3
2, 3
2, 3
2, 3
2, 3
2, 3
2, 3
2, 3
2, 3
2, 3
2, 3
2, 3
2, 3
mode)
–30 s ( mode)
–30 s (
mode)
–30 s ( mode)
–30 s (
mode)
–30 s ( mode)
–30 s (
or mode)
–15 s ( or mode)
–30 s (
mode)
–30 s ( mode)
–30 s (
mode)
–30 s ( mode)
–30 s (
mode)
–30 s ( mode)
–30 s (
mode)
–30 s ( mode)
4
4
4
4
4
4
4
Shooting features
, , , and modes
67
Page 68

Setting Control range (second)
ISO sensitivity
Continuous Continuous H, Continuous L
1
1600
3200
6400
Pre-shooting cache,
ontinuous H: 120 fps
C
1/2000 2–2 s ( or mode)
2, 3
1/4000
–30 s ( mode)
2, 3
1/4000
–30 s (
1/2000 2–1 s ( or mode)
2, 3
1/4000
–30 s ( or mode)
1/2000 2–1/2 s ( or mode)
2, 3
1/4000
–15 s (
2, 3
1/4000
–1/30 s
4
mode)
or mode)
1/4000–1/125 s
Continuous H: 60 fps 1/4000–1/60 s
Intvl timer shooting Same as when [Single] is set
1 The ISO sensitivity setting is restricted depending on the continuous shooting setting.
Functions that cannot be used simultaneously when shooting (page 127)
2
The maximum shutter speed when the f‑number is set to the largest value (smallest
aperture) at the maximum wide-angle zoom position. The closer the zoom position is
to telephoto, or the smaller the f‑number (larger aperture) is, the slower the maximum
shutter speed becomes.
3 The exposure may vary when the same subject is captured multiple times at a shutter
speed in which the indicator is displayed in red (faster than 1/2000 second).
4 Bulb setting and Time setting are available.
Shooting with the Bulb setting or Time setting (when in mode) (page 69)
68
Shooting features
, , , and modes
Page 69

Shooting with the Bulb setting or Time setting
(when in
mode)
Use the Bulb setting or T
such as when taking pictures of reworks, night landscapes, the night sky, or car light
trails. The maximum exposure time for both the Bulb and Time setting is 60 seconds.
Option Description
Bulb The shutter remains open while the shutter-release button is pressed, and it
closes when the butt
Time The shutter opens when the shutter-release button is pressed all the way down,
and it closes when the butt
tabilize the camera by using a tool such as a tripod.
S
1
Select the setup menu
•
•
Using a tripod (page 51)” when using a tripod.
See “
R
otate the mode dial to
2
S
et [ISO sensitivity] to [100-400], [100-800], [100-1600], [100], [200], [400],
•
[800], or [1600].
Set [Continuous] to [Single].
•
otate the command dial to a slower speed until the shutter
R
3
ime setting to capture images with a long time-exposure,
on is released.
on is pressed all the way down again.
[V
ibration reduction]
[O
].
.
speed indicator displays [Bulb] or [Time].
P
ress the shutter-release button after setting the focus.
4
Bulb: Hold down the shutter-release button until the desired exposure time elapses.
•
Time: Press the shutter-release button all the way down again when the desired
•
exposure time elapses.
When the exposure time reaches 60 seconds, the shutter automatically closes and
•
shooting ends.
69
Shooting features
Shooting with the Bulb setting or Time setting (when in mode)
Page 70

Notes about shooting with the Bulb or Time setting
he Bulb or Time setting cannot be used when [ISO sensitivity] is set to [100-3200],
T
•
[100-6400], [3200], or [6400].
The Bulb or Time setting cannot be used when a setting other than [Single] is selected
•
for [Continuous].
Long time-exposures
I
t may take longer for the camera to save images if a slow shutter speed is used when
•
shooting.
It is recommended that you use a suciently charged battery or the EH-5d AC Adapter
•
and the EP-5C Power Connector (both available separately) to prevent the camera from
turning o unexpectedly.
EH-5d AC Adapter and EP-5C Power Connector (page 258)
70
Shooting features
Shooting with the Bulb setting or Time setting (when in mode)
Page 71

(user settings) mode
Setting combinations that are frequently used for shooting with (programmed
o),
aut
(shutter-priority auto), (aperture-priority auto), or (manual) can be
saved in .
R
otate the mode dial to
• Frame the subject and shoot with these settings, or change the settings as
required.
to retrieve the settings saved in [S
ave user settings].
Saving settings in
he frequently used settings in
T
pur
chase, the default settings of
otate the mode dial to
R
1
•
f you want to change the shooting mode, select
I
•
I
f you do not want to change the saved shooting mode, select
2
3
Change t
•
•
•
P
o a frequently used combination of shooting settings.
See “
List of setting options that can be saved in mode (page 72)” for details.
he exible program (when set to
T
f‑number (when set t
he focus area that is selected with the [Manual (spot)], [Manual (normal)], or
T
[Manual (wide)] setting in AF area mode will also be saved.
ress the
mode (Save user settings)
, , , and modes can be saved. At the time of
mode are saved.
, , , , or .
, , , or .
o
or ) settings will also be saved.
(menu) button to display the shooting menu.
), shutter speed (when set to or ), or
71
Shooting features
(user settings) mode
.
Page 72

se the multi selector
U
4
press the
•
he previous saved settings are overwritten by the current settings as the
T
button.
to select [S
ave user settings], and
Resetting (user settings) mode
I
f the shooting menu
saved in the user settings are restored to their default values.
Notes about the clock battery
f the internal clock battery is exhausted, the settings saved in
I
y important setting is recommended.
an
[Reset user settings] is selected, the settings that are
mode.
will be reset. Writing down
List of setting options that can be saved in
G
eneral settings
•
Shooting modes
, , , and modes (page 63)
Zoom position
•
Using the zoom (page 124)
Flash mode
•
Flash mode (page 99)
Self-timer
•
Self-timer (page 102)
Focus mode
•
Selecting the focus mode (page 106)
Exposure compensation
•
Exposure compensation (page 117)
Fn button
•
You can also save menu options assigned to the
Remote Control (available separately).
Using the (function) button (page 121)
Manual focus settings
Shooting features
(user settings) mode
, , , and
1/ 2 buttons of the ML-L7
72
mode
Page 73

• Distance to a subject, mag
Using manual focus (page 113)
D
isplay settings
• Monitor and viewnder display
Switching between the monitor and vie
• Displayed information
The monit
Shooting menu
• Image quality
Image quality (page 174)
•
Image size
Image size (page 175)
•
Picture Control
Picture Control (page 177)
•
Custom Picture Control
Custom Picture Control (page 180)
•
White balance
White balance (page 181)
•
Metering
Metering (page 184)
•
Continuous
Continuous (page 185)
•
ISO sensitivity
ISO sensitivity (page 189)
•
Exposure bracketing
Exposure bracketing (page 190)
•
AF area mode
AF area mode (page 191)
•
Autofocus mode
Autofocus mode (page 196)
•
Flash exp. comp.
Flash exp. comp. (page 196)
•
Noise reduction lter
Noise reduction lt
• Long exposure NR
Long exposure NR (page 197)
•
Active D-Lighting
Active D-Lighting (page 197)
•
Multiple exposure
Multiple exposure (page 198)
or/viewnder (page 25)
nication rate, and peaking level
er (page 197)
wnder (page 54)
Shooting features
(user settings) mode
73
Page 74

• Zoom memory
Zoom memory (page 200)
•
Startup zoom position
Startup zoom position (page 201)
•
M exposure preview
M exposure preview (page 201)
S
etup menu
• Monitor settings
Monitor settings (page 229)
Shooting features
(user settings) mode
74
Page 75

Creative mode (applying eec
ts when
shooting)
Apply eects to images during shooting.
• Five eect groups are available: [Light] (default setting), [Depth], [Memories],
[Classic], and [Noir].
Rotate the mode dial to
1
P
ress the
2
he eect selection screen is displayed.
T
•
se the multi selector
U
3
•
he eect group (2) can be changed by rotating the command dial.
T
To exit without saving the selection, press
•
o adjust the eect, press
T
4
button.
.
to select an eec
.
.
t (1).
•
f you do not want to adjust the eect, press the
I
Shooting features
Creative mode (applying eec
ts when shooting)
button to proceed to step 7.
75
Page 76

se
U
5
•
U
6
Press the shutter-release button or ( movie-record) button
7
t
•
Selecting an eec
You can also select an eect group and eect by pressing the
screen in step 2 is displayed.
to highlight the desired option and then press .
elect [Amount], [Exposure compensation], [Contrast], [Hue], [Saturation],
S
[Filter], or [Peripheral illumination]. The options that can be selected vary
depending on the group.
se
to adjust the eec
t level and press the
button.
o shoot.
When the camera detects the main subject, it focuses on the subject.
Using target nding AF (page 108)
t group and eect
button when the
Functions available in creative mode
• Flash mode
Flash mode (page 99)
• Self-timer
Self-timer (page 102)
• Focus mode
Selecting the focus mode (page 106)
• Exposure compensation
Exposure compensation (page 117)
Shooting features
Creative mode (applying eec
76
ts when shooting)
Page 77

• Shooting menu
The shooting menu (common across shooting modes) (page 174)
Shooting features
Creative mode (applying eec
77
ts when shooting)
Page 78

Scene mode (shooting suited to the shooting
c
onditions)
Select any one of scene modes based on the shooting conditions, and you can take
pictures with the appropriate settings for those conditions.
Rotate the mode dial to
1
•
I
f you select
Bird-watching (page 79)
Moon (page 80)
•
I
f you select
ress the
P
2
U
se the multi selector to select a scene mode, and press the
3
or (1), the camera swit
(2), pr
button.
button.
(bird-watching), (moon), or .
ches to the shooting screen.
oceed to step 2.
You can select from the following.
78
Shooting features
Scene mode (shooting suited to the shooting conditions)
Page 79

Portrait (page 81)
Landscape (page 81)
Sports (page 82)
Night portrait (page 83)
Party/indoor (page 83)
Beach (page 84)
Snow (page 84)
Sunset (page 84)
Dusk/dawn (page 85)
Night landscape (page 85)
Close-up (page 86)
Food (page 87)
Fireworks show (page 88)
Backlighting (page 88)
Easy panorama (page 89)
Pet portrait (page 92)
Selective color (page 93)
Multiple exp. Lighten (page 94)
Time-lapse movie (page 153)
Bird-watching
Use when shooting bir
Rotate the mode dial to
1
o capture images continuously, press the
T
•
-
[Single] (
button is pressed.
-
[C
images are captured continuously. The camera can capture up to about 10 images
continuously at a rate of about 7 fps.
ds staying still at a distance.
.
button and select [C
default setting): One image is shot each time the shutter-release
ontinuous]: While the shutter-release button is held all the way down,
ontinuous].
79
Shooting features
Scene mode (shooting suited to the shooting conditions)
Page 80

rame a bird in the framing border (1).
F
2
t the wide-angle zoom position, the framing border is displayed to indicate the
A
•
angle of view equivalent to that of a 500 mm lens (in 35mm [135] format) (default
setting).
You can change the angle of view for the framing border by pressing the
•
button and selecting [F
ress the
P
3
T
he camera zooms in so that the area inside the framing border takes up the entire
•
angle of view (focal length). Use the zoom control or side zoom control to adjust the
angle of view/zoom position according to the shooting conditions.
The camera focuses on the area in the center of the frame. If you press the
•
button, you can set [AF ar
(normal)], or [Center (wide)]. Set according to the size of the subject and the focus
range.
.
Shoot
4
The Bird-watching mode setting
T
he [Focal length selection], [Continuous], and [AF area mode] settings are saved in
the camera’s memory even after the camera is turned o.
ocal length selection].
button.
ea mode] to [Center (spot)] (default setting), [Center
Moon
Use this mode to shoot the moon.
•
Use of a tripod is recommended (
o stabilize the camera during shooting, select the setup menu
t
reduction]
Rotate the mode dial to
1
•
[O
].
T
he default setting of the self-timer is [
press the multi selector
Using a tripod (page 51)). When using a tripod
[V
.
( ).
3s] (3 seconds). T
o change the setting,
ibration
80
Shooting features
Scene mode (shooting suited to the shooting conditions)
Page 81

rame the moon in the framing border (1).
F
2
t the wide-angle zoom position, the framing border is displayed to indicate the
A
•
angle of view equivalent to that of a 1000 mm lens (in 35mm [135] format) (default
setting).
You can change the angle of view for the framing border by pressing the
•
button and selecting [F
ress the
P
3
T
he camera zooms in so that the area inside the framing border takes up the entire
•
angle of view (focal length). Use the zoom control or side zoom control to adjust the
angle of view/zoom position according to the shooting conditions.
You can adjust hue by using the command dial.
•
Adjust the brightness with exposure compensation according to shooting
•
conditions such as the waxing and waning of the moon and shooting requirements.
Exposure compensation (page 117)
Shoot
4
he [Focal length selection] and hue settings are saved in the camera’s memory even
T
after the camera is turned o.
.
During autofocus, the camera focuses on the area in the center of the frame. The
•
camera focuses at innity.
The Moon mode setting
ocal length selection].
button.
Portrait
Use this mode to shoot portraits that emphasize human subjects.
Rotate the mode dial to
button Portrait button
Landscape
Use this mode t
Shooting features
Scene mode (shooting suited to the shooting conditions)
o shoot landscapes.
81
Page 82

Rotate the mode dial to button Landscape
button
Option Description
Noise reduction burst This enables you to shoot a sharp landscape with a minimum
Single shot
(default setting)
elect [Noise reduction burst] or [Single shot].
S
1
rame the subject and take a picture.
F
2
The camera focuses on the area in the center of the frame. The position of the area
•
cannot be moved.
The camera focuses at innity.
•
For [Noise reduction burst]:
•
-
While the
release button all the way to capture a series of images which are combined into a
single image and saved.
Once the shutter-release button is pressed all the way, hold the camera still until a
-
still image is displayed. After taking a picture, do not turn the camera o before
the screen switches to the shooting screen.
For [Single shot]:
•
One image is captured when the shutter-release button is pressed all the way.
-
Notes about [Noise reduction burst]
The angle of view (i.e., the area visible in the frame) seen in the saved image is narrower
•
than that seen on the shooting screen.
Continuous shooting may not be possible in certain shooting conditions.
•
of noise
.
Saves images with emphasized outlines and contrast.
icon on the shooting screen is displayed in green, press the shutter-
Sports
While the shutter-release button is held all the way down, the camera shoots images
continuously.
Rotate the mode dial to button Sports button
• The camera can capture up to about 10 images continuously at a rate of about 7
fps
.
82
Shooting features
Scene mode (shooting suited to the shooting conditions)
Page 83

• The camera focuses on the area in the center of the frame. The position of the area
cannot be mo
Notes about [Sports]
he frame rate for continuous shooting may become slow depending on the current
T
•
image quality setting, image size setting, the memory card used, or shooting conditions.
Memory cards that can be used (page 40)
ocus, exposure, and hue for the second and subsequent images are xed at the values
F
•
determined with the rst image.
ved.
Night portrait
Use this mode to shoot evening and night portraits that include background scenery.
Rotate the mode dial to
button
Option Description
Hand-held
(default setting)
T
ripod
elect
S
1
R
aise the built-in ash.
2
F
rame the subject and take a picture.
3
One image is captured at a slow shutter speed.
•
Notes about [Tripod]
Vibration reduction is disabled regardless of the setup menu [V
setting. See “
Compared to using [T
shutter speed in accordance with the shooting conditions to prevent
camera shake.
Select when shooting with the camera stabilized on a tool such as a
ipod.
tr
[Hand-held] or [T
Using a tripod (page 51)” when using a tripod.
button Night portrait
ripod], the camera sets a slightly faster
ripod].
ibration reduction]
Party/indoor
or taking pictures at parties. Captures the eects of candlelight and other
Suitable f
indoor background lighting.
83
Shooting features
Scene mode (shooting suited to the shooting conditions)
Page 84

Rotate the mode dial to button Party/indoor
button
• The camera focuses on the area in the center of the frame. The position of the area
cannot be mo
• To avoid the eects of camera shake, hold the camera steady. When using a tripod
to stabilize the camera during shooting, select the setup menu
reduction]
ved.
[O
]. See “
ibration
Using a tripod (page 51)” when using a tripod.
[V
Beach
ight and vivid seas, lakes, and beaches in daylight.
Shoot br
Rotate the mode dial to
• The camera focuses on the area in the center of the frame. The position of the area
cannot be mo
ved.
button Beach button
Snow
Shoot br
ight and vivid snowscapes in daylight.
Rotate the mode dial to button Snow button
• The camera focuses on the area in the center of the frame. The position of the area
cannot be mo
ved.
Sunset
Use this mode t
Rotate the mode dial to
• The camera focuses on the area in the center of the frame. The position of the area
cannot be mo
• The camera focuses at innity.
•
Use of a tripod is recommended (
o stabilize the camera during shooting, select the setup menu
t
reduction]
o shoot sunsets and sunrises.
button Sunset button
ved.
Using a tripod (page 51)). When using a tripod
[O
].
[V
ibration
84
Shooting features
Scene mode (shooting suited to the shooting conditions)
Page 85

Dusk/dawn
Use this mode t
after sunset.
Rotate the mode dial to
button
• The camera focuses on the area in the center of the frame. The position of the area
cannot be mo
• The camera focuses at innity.
•
Use of a tripod is recommended (
o stabilize the camera during shooting, select the setup menu
t
reduction]
o shoot landscapes with little natural light, such as before dawn or
button Dusk/dawn
ved.
Using a tripod (page 51)). When using a tripod
[O].
[V
ibration
Night landscape
Use this mode to shoot night landscapes.
Rotate the mode dial to button Night landscape
button
Option Description
Hand-held
(default setting)
ripod
T
elect
S
1
Select when shooting with the camera in your hands instead of
stabilizing it on a t
Select when shooting with the camera stabilized on a tool such as a
ipod.
tr
[Hand-held] or [T
ool such as a tripod.
ripod].
85
Shooting features
Scene mode (shooting suited to the shooting conditions)
Page 86

rame the subject and take a picture.
F
2
The camera focuses on the area in the center of the frame. The position of the area
•
cannot be moved.
The camera focuses at innity.
•
For [Hand-held]:
•
-
While the
r
elease button all the way to capture a series of images which are combined into a
single image and saved.
Once the shutter-release button is pressed all the way, hold the camera still until a
-
still image is displayed. After taking a picture, do not turn the camera o before
the screen switches to the shooting screen.
For [Tripod]:
•
One image is captured at a slow shutter speed when the shutter-release button is
-
pressed all the way.
Notes about [Hand-held]
T
he angle of view (i.e., the area visible in the frame) seen in the saved image is narrower
•
than that seen on the shooting screen.
Continuous shooting may not be possible in certain shooting conditions.
•
Notes about [Tripod]
ibration reduction is disabled regardless of the setup menu
V
setting. See “
icon on the shooting screen is displayed in green, press the shutter-
[V
Using a tripod (page 51)” when using a tripod.
ibration reduction]
Close-up
Use when tak
Rotate the mode dial to
Noise reduction burst This enables you to shoot a sharp image with a minimum of
Single shot
(default setting)
ing close-up pictures of small subjects such as owers and insects.
button Close -up button
Option Description
noise.
Saves images with emphasized outlines and contrast.
S
elect [Noise reduction burst] or [Single shot].
1
86
Shooting features
Scene mode (shooting suited to the shooting conditions)
Page 87

rame the subject and take a picture.
F
2
•
The focus mode (
[M
acro close-up] and the camera automatically zooms to the closest position at
which it can focus.
•
You can move the focus area. Press the
or rotate it to move the focus area, and press the button to apply the setting.
or [Noise reduction burst]:
F
•
-
While the
elease button all the way to capture a series of images which are combined into a
r
single image and saved.
Once the shutter-release button is pressed all the way, hold the camera still until a
-
still image is displayed. After taking a picture, do not turn the camera o before
the screen switches to the shooting screen.
For [Single shot]:
•
One image is captured when the shutter-release button is pressed all the way.
Notes about [Noise reduction burst]
f the subject moves or there is a signicant camera shake during continuous shooting,
I
•
the image may be distorted, overlapped, or blurred.
The angle of view (i.e., the area visible in the frame) seen in the saved image is narrower
•
than that seen on the shooting screen.
Continuous shooting may not be possible in certain shooting conditions.
•
Available focus modes (page 107)) setting is changed to
button, use the multi selector
icon on the shooting screen is displayed in green, press the shutter-
Food
Use this mode when taking pictures of food. You can also change the hue.
Rotate the mode dial to
Adjust hue by using the command dial.
1
button Food button
he hue setting is saved in the camera’s memory even after the camera is turned o.
T
•
87
Shooting features
Scene mode (shooting suited to the shooting conditions)
Page 88

rame the subject and take a picture.
F
2
•
The focus mode (
[M
acro close-up] and the camera automatically zooms to the closest position at
which it can focus.
•
You can move the focus area. Press the
or rotate it to move the focus area, and press the button to apply the setting.
Available focus modes (page 107)) setting is changed to
button, use the multi selector
Fireworks show
The camera captures reworks at a slow shutter speed.
Rotate the mode dial to button Fireworks show
button
• The shutter speed is x
• It is recommended that you use manual focus.
Using manual focus (page 113)
•
Use of a tr
ipod is recommended because the shutter speed is slow (
tr
ipod (page 51)). When using a tripod to stabilize the camera during shooting,
select the setup menu
Notes about [Fireworks show]
e compensation cannot be used.
Exposur
ed at 4 seconds.
[V
ibration reduction]
[O
Using a
].
Backlighting
Use this mode to shoot backlit subjects. Use when taking pictures with very bright
and dark areas in the same frame.
Rotate the mode dial to
button
Option Description
On High dynamic range (HDR) compositing is applied. Use when taking
O
(default
setting)
landscapes with v
High dynamic range (HDR) compositing is not applied. The ash r
prevent the subject from being hidden in shadow. Raise the built-in ash
before shooting.
button Backlighting
ery bright and dark areas in the same frame.
es to
elect [On] or [O] for high dynamic range (HDR) compositing.
S
1
88
Shooting features
Scene mode (shooting suited to the shooting conditions)
Page 89

rame the subject and take a picture.
F
2
The camera focuses on the area in the center of the frame. The position of the area
•
cannot be moved.
If [On] is set:
•
When there is a big dierence between the bright and dark areas, the HDR icon
-
on the shooting screen changes to green.
When the shutter-release button is pressed all the way, the camera shoots images
-
continuously and saves the following two images.
A non-HDR composite image
-
An HDR composite image in which the loss of details in highlights or shadows is
-
minimized
If [O] is set:
•
One image is captured when the shutter-release button is pressed all the way.
Notes about HDR
T
he angle of view (i.e., the area visible in the frame) seen in the saved image is narrower
•
than that seen on the shooting screen.
After taking a picture, do not turn the camera o before the screen switches to the
•
shooting screen.
•
Use of a tripod is recommended (
stabiliz
e the camera during shooting, select the setup menu
].
[O
During hand-held shooting, after pressing the shutter-release button all the way, hold the
•
camera steadily so that it does not shake until the still image is displayed.
Under some shooting conditions, dark shadows may appear around bright subjects or
•
bright areas may appear around dark subjects.
If there is only enough memory to save one image, an image processed by D-Lighting at
•
the time of shooting, in which dark areas of the image are corrected, is the only image
saved.
Using a tripod (page 51)). When using a tripod to
[V
ibration reduction]
Easy panorama
Use this mode t
The camera captures several images and composites them into a panorama image.
Rotate the mode dial to
button
o shoot panorama images that can be played back on the camera.
button Easy panorama
89
Shooting features
Scene mode (shooting suited to the shooting conditions)
Page 90

elect
S
1
range and press the
Frame the rst edge of the panorama scene, and then press the
2
[N
ormal (180°)] or
button.
[W
ide (360°)] as the shooting
shutter-release button halfway to focus.
he zoom position is xed at wide-angle.
T
•
The camera focuses on the area in the center of the frame. The position of the area
•
cannot be moved.
Press the shutter-release button all the way, and then remove
3
your nger from the shutter-release button.
•
are displayed to indicate the direction of camera movement.
90
Shooting features
Scene mode (shooting suited to the shooting conditions)
Page 91

ove the camera in one of the four directions until the guide
M
4
indicator (1) reaches the end.
When the camera det
•
Shooting ends when the camera captures the specied shooting range.
•
Focus and exposure are locked until shooting ends.
•
ects which direction it is moving in, shooting begins.
Example of camera movement
•
Using your body as the axis of rotation, move the camera slowly in an arc, in the
direction of the marking (
• Shooting stops if the guide does not reach the edge within about 15 seconds
(when [N
[W
ide (360°)] is selected) after shooting starts.
Notes about easy panorama shooting
T
he range of the image seen in the saved image is narrower than that seen on the screen
•
at the time of shooting.
If the camera is moved too quickly or shaken too much, or if the subject is too uniform
•
(e.g. walls or darkness), an error may occur.
If shooting is stopped before the camera reaches the half-way point in the panorama
•
range, a panorama image is not saved.
If more than half of the panorama range is captured but shooting ends before reaching
•
the edge of the range, the range not captured is recorded and displayed in gray.
Image size of easy panorama
T
here are four dierent image sizes (in pixels), as described below.
ormal (180°)] is selected) or within about 30 seconds (when
).
91
Shooting features
Scene mode (shooting suited to the shooting conditions)
Page 92

•
When [N
ormal (180°)] is set
•
When
[W
ide (360°)] is set
Easy panorama playback
ee “
S
Playback with easy panorama (page 140)” for information about easy panorama
.
playback
Pet portrait
Use this mode when taking pictures of pets. When you point the camera at a dog or
cat, the camera detects the face of a dog or cat and focuses on it. By default, the
shutter is automatically released when the face of a dog or cat is detected (pet
portrait auto release).
Rotate the mode dial to
button
Option Description
Single
Continuous
(default setting)
Whenever the face of a dog or cat is detected, the camera captures
one image
Whenever the face of a dog or cat is detected, the camera captures
ee images continuously.
thr
button Pet portrait
.
92
Shooting features
Scene mode (shooting suited to the shooting conditions)
Page 93

elect
S
1
P
2
[Single] or [C
ontinuous].
oint the camera at a dog or cat, and wait for the shutter to
release automatically or press the shutter-release button.
[Pet portrait auto release]
he following settings can be set when you press the multi selector
T
•
[P
et portrait auto release]: The camera automatically releases the shutter when it
detects the face of a dog or cat.
-
Pet portrait auto release is set to [
-
You can also release the shutter by pressing the shutter-release button. When
ontinuous] is selected, images are captured continuously while the shutter-release
[C
button is held all the way down.
•
[
]: The camera releases the shutter when the shutter-release button is pressed all
the way do
-
-
When the camera det
•
camera acquires focus on a face displayed inside a double border (focus area), the double
border changes to green. If no faces are detected, the camera focuses on the area in the
center of the frame.
wn.
The camera focuses on the face of a dog, cat, or human when detected.
[C
When
shutter-release button is held all the way down.
Focus area
ontinuous] is selected, images are captured continuously while the
ects a face, the face is displayed inside a yellow border. When the
] after v
e bursts have been taken.
( ).
Under some shooting conditions
•
and other subjects may be displayed inside a border.
, the face of a dog, cat, or human may not be detected
Selective color
K
eeps only a selected color and makes other colors black-and-white.
93
Shooting features
Scene mode (shooting suited to the shooting conditions)
Page 94

Rotate the mode dial to button Selective color
button
se the command dial to select the desired color, and press the
U
1
button to apply the color.
•
o change the color selection, press the
T
rame the subject and take a picture.
F
2
The camera focuses on the area in the center of the frame. The position of the area
•
cannot be moved.
button again.
Multiple exp. Lighten
Light trails such as the o
automatically captures moving subjects at regular intervals, compares each image
and composites only their bright areas, and then saves them as one image.
Rotate the mode dial to
button
Option Description
ightscape + light trails
N
S
tar trails
F
ireworks
w of car lights or motion of stars are captured. The camera
button Multiple exp. Lighten
Use to capture the o
landscape background.
Use to capture the motion of stars.
Use to capture r
w of car lights against a night
eworks.
94
Shooting features
Scene mode (shooting suited to the shooting conditions)
Page 95

elect
S
1
[N
ightscape + light trails],
[S
tar trails], or
[Fireworks].
For [Nightscape + light trails]:
•
You can rotate the command dial to set the desired interval between the shots.
-
The set interval becomes the shutter speed.
et the focus on the subject.
S
-
Focusing in [Nightscape + light trails] (page 96)
F
or [Star trails]:
•
Set the focus on the subject.
-
Focusing in [Star trails] (page 96)
F
or [Fireworks]:
•
You can rotate the command dial to set the desired interval between the shots.
-
The set interval becomes the shutter speed.
You can rotate the multi selector to set the aperture.
-
Set the focus on the subject.
-
Focusing in [Fireworks] (page 96)
P
ress the shutter-release button to start shooting.
2
The screen may turn o during the shooting interval. The power-on lamp turns on
•
while the screen is o.
95
Shooting features
Scene mode (shooting suited to the shooting conditions)
Page 96

fter capturing the desired composite image, press the
A
3
button to end shooting.
If you continue shooting, details in the composited areas may be lost.
•
For [Nightscape + light trails]:
•
When 50 shots are taken, the camera automatically stops shooting.
-
For every 10 shots taken, one composite image with trails overlapped from the
-
start of shooting is automatically saved.
For [Star trails]:
•
Shots are taken at a shutter speed of 25 seconds, with an interval of approximately
-
5 seconds between the shots. When 300 shots are taken, the camera
automatically stops shooting.
For every 30 shots taken, one composite image with trails overlapped from the
-
start of shooting is automatically saved.
For [Fireworks]:
•
When 30 shots are taken, the camera automatically stops shooting.
-
For every shot taken, one composite image is automatically saved.
-
Notes about [Multiple exp. Lighten]
Use a suciently char
•
Do not rotate the mode dial or remove the memory card until shooting ends.
•
Use of a tripod is recommended. When using a tripod to stabilize the camera during
•
shooting, select the setup menu
tr
ipod (page 51)” when using a tripod.
The auto o function is disabled during shooting.
•
Exposure compensation cannot be used.
•
ged battery to prevent the camera from turning o unexpectedly.
[V
ibration reduction]
[O
]. See “
Focusing in [Nightscape + light trails]
ing autofocus, the camera focuses on the area in the center of the frame. You can set
Dur
•
the focus mode to
•
When shooting distant subjects, it is recommended that you select
manual focus.
[A
utofocus] (default setting) or
[I
nnity].
nnity] or use
[I
Focusing in [Star trails]
Dur
ing autofocus, the setting is xed to
To adjust the focus, switch to manual focus.
Using manual focus (page 113)
[I
nnity] and the focus area is not displayed.
Focusing in [Fireworks]
•
Y
ou can set the focus mode during autofocus to
[I
nnity]. The focus area is not displayed during
the camera focuses on the area in the center of the frame.
[I
nnity] (default setting) or
[I
nnity]. During
[I
96
Using a
nnity],
Shooting features
Scene mode (shooting suited to the shooting conditions)
Page 97

•
o adjust the focus, switch to
T
Available focus modes (page 107)
Using manual focus (page 113)
nnity] or manual focus.
[I
Time remaining
Y
ou can check the time remaining until shooting automatically ends on the screen.
97
Shooting features
Scene mode (shooting suited to the shooting conditions)
Page 98

Setting the ash mo
de, self-timer, focus mode,
and exposure compensation
When the shooting screen is displayed, you can press the multi selector
( ) ( ) ( ) to set the functions described below.
1 Flash mode
T
he ash mode can be set according to shooting conditions.
Flash mode (page 99)
2 Exposure compensation
Y
ou can adjust overall image brightness.
Exposure compensation (page 117)
3 Focus mode
When the f
mode accor
4 Self-timer/Smile timer
T
shutter-release button. If
the shutter whenever a smiling face is detected.
ocus-mode selector is set to
ding to the distance to the subject.
Using autofocus (page 106)
he camera releases the shutter when the specied time elapses after you press the
[Smile timer] is set, the camera aut
Self-timer (page 102)
Smile timer (page 104)
(autofocus), you can specify the focus
omatically releases
( )
The functions that can be set vary depending on the shooting mode.
98
Shooting features
Setting the ash mode
, self-timer, focus mode, and exposure compensation
Page 99

Flash mode
Y
ou can change the ash settings to match the shooting conditions.
1
Press the
(ash pop
-up) button to raise the built-in ash.
•
When the built
the shooting scr
Make sure that the built-in ash is lowered when using a Speedlight.
•
P
ress the multi selector
2
S
elect the desired ash mode and press the
3
•
F
or information about the types of ash modes, see “
100)”
•
If the setting is not applied by pressing the
canceled
-in ash is lowered, ash operation is disabled and
een.
( ).
.
button, the selection will be
.
99
Shooting features
Flash mode
is displayed on
button.
Available ash modes (page
Page 100

The ash-r
While the built-in ash is charging,
If charging is complete, is displayed steadily when you press the shutter-release button
halfway
eady indicator
ashes. The camera cannot shoot images.
.
Available ash mo
Option Description
Auto
Auto with red-
ye reduction/
e
Red-eye reduction
Fill ash/S
ash
sync
tandard
Slow sync
Rear-curtain
des
The ash r
•
Reduce red-eye in portraits caused by the ash.
•
The ash r
Suited to evening and night portraits that include background
scener
speeds are used to capture background at night or under dim
lighting.
Fill ash r
a stream of light following moving subjects.
es when necessary, such as in dim lighting.
The ash mode indicator is only displayed immediately after
setting on the shooting screen.
[Auto with red-eye reduction]/[Red-eye reduction] (page 101)
When [Red-
whenever a picture is taken.
eye reduction] is selected, the ash res
es whenever a picture is taken.
y. Fill ash res to illuminate the main subject; slow shutter
es just before the shutter closes, creating the eect of
Notes about shooting with the ash
ou use the ash at the wide-angle zoom position, the edge of the image may be
When y
dark depending on the shooting distance.
This may be improved by adjusting the zoom slightly to a telephoto position.
The ash mo
The available ash modes dier depending on the shooting mode.
de setting
100
Shooting features
Flash mode
 Loading...