

Page 1

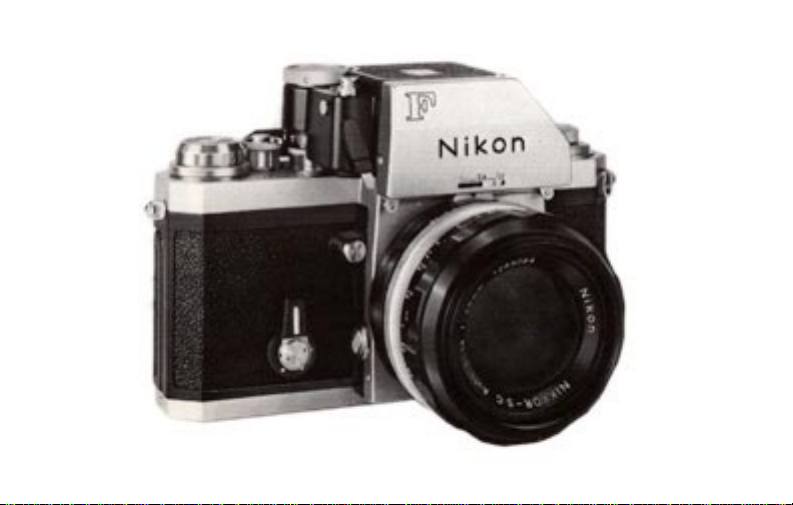
Nikon
Photomic
INSTRUCTION MANUAL
FTN
FINDER
1
Page 2
2
Page 3
1
23 7 8
4 5,6
3
Page 4
91011
12
13 14
4
Page 5

NOMENCLATURE
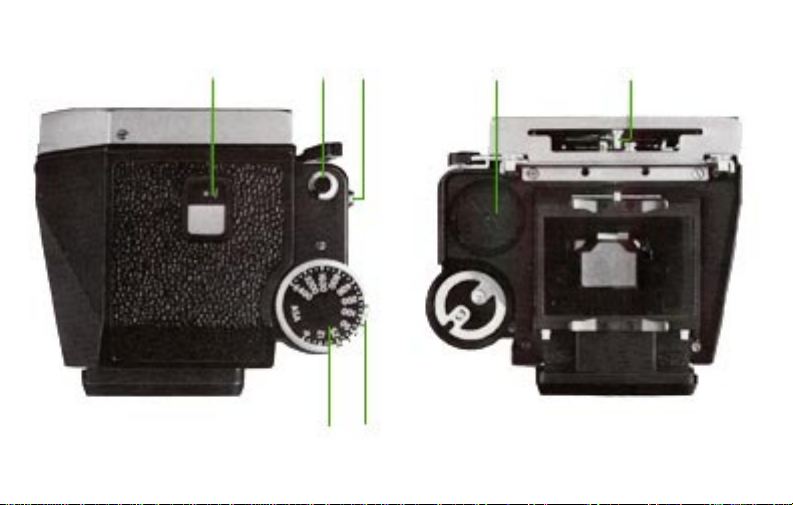
1. Meter window: houses the meter needle for exposure determination and battery checking
2. Meter switch-off button
3. Meter switch-on button
4. ASA film-speed dial: for setting the film speed from ASA 6-6400
5. ASA scale index ring: marked with a red triangular index and exposure correction scale for exposure compensation with certain lens-focusing screen combinations
6. Shutter speed selector: turns in either direction for setting the desired shutter speed
7. Battery chamber cap
8. Coupling pin: connects the meter mechanism to the lens diaphragm for fullaperture exposure measurement
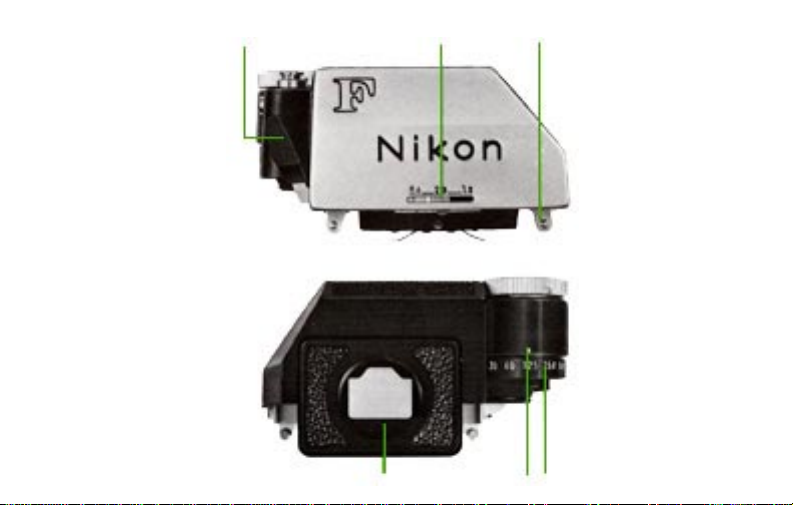
9. Finder lock lever: press to remove or attach the finder
10. Maximum aperture scale: check to verffy if the meter is set for the maximum aperture of the lens
used
11. Clamps: for positioning the finder on the camera
12. Viewfinder eyepiece: accepts screw-in finder eyecup and eyepiece correction lenses
13. Shutter speed index
14. Shutter speed scale
5
Page 6

NOMENCLATURE
Nomenclature . . . . . . . . . . . . . . . . . . . . . . . . . . . . . . . . . . . . . . . . . . . . . . . . . 5
Foreword . . . . . . . . . . . . . . . . . . . . . . . . . . . . . . . . . . . . . . . . . . . . . . . . . . . . 7
Checking the Batteries . . . . . . . . . . . . . . . . . . . . . . . . . . . . . . . . . . . . . . . . . . 8
Attaching the Photomic FTN Finder . . . . . . . . . . . . . . . . . . . . . . . . . . . . . . . 9
Shutter Speed Coupling
Lens Aperture Couplmg
Setting the Film Speed
Turning On the Meter
Exposure Measurement With the Photomic FTN Finder . . . . . . . . . . . . . . . 14
Centering the Needle
Getting the Right Exposure
Measurement by the Stop-Down Method . . . . . . . . . . . . . . . . . . . . . . . . . . 18
Bellows Focusing Attachment, Extension Rings
and Focusing Unit
Preset Lenses
Auto Lenses Without Coupling Prong
Reflex-Nikkor Lenses
Exposure Correction . . . . . . . . . . . . . . . . . . . . . . . . . . . . . . . . . . . . . . . . . . . 20
Special Lens-Focusimg Screen Combinations
Repro-Copyimg
Slide Copying
Care and Handling . . . . . . . . . . . . . . . . . . . . . . . . . . . . . . . . . . . . . . . . . 23
Feature s/ Specifications . . . . . . . . . . . . . . . . . . . . . . . . . . . . . . . . . . . . 24
The Nikon Warranty . . . . . . . . . . . . . . . . . . . . . . . . . . . . . . . . . . . . . . . 25
6
Page 7

FOREWORD
The Nikon Photomic FTN Finder incorporates a precise center-weighted CdS
exposure meter which couples to the camera's lens aperture diaphragm and shutter
speed controls. It makes possible easy, accurate thru-the-lens exposure measurement with the Nikon F.
This instruction booklet has been prepared to help you get the most out of your
Photomic FTN Finder. For best results, read the instructions carefully and keep
this booklet handy for ready reference until you have mastered its basic steps.
Follow the suggestions for care and handling on page 24 and you will get perfect exposures every time.
7
Page 8
CHECKING THE BATTERIES
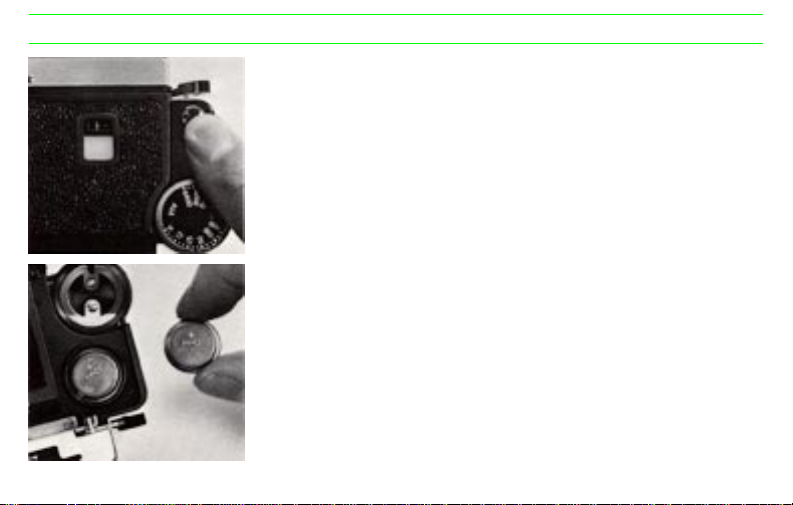
The Photomic FTN Fmder is powered by two 1.3 volt mercury batteries located
in the battery chamber on the bottom of the finder. To check the batteries, press
the meter switch-off button and observe the needle in the window on top of the
fmder. If the needle swings to the center circle or beyond, the batteries are in
good condition. The two mercury batteries come installed with the Photomic
FTN Finder.
T o replace weak or worn-out batteries, unscrew the cap over the battery chamber using a coin or key and the batteries will drop out. Make sure that the positive (+) side faces out when new batteries are installed.
Caution: Never throw discarded batteries into a fire as they will explode when
heated.
8
Page 9
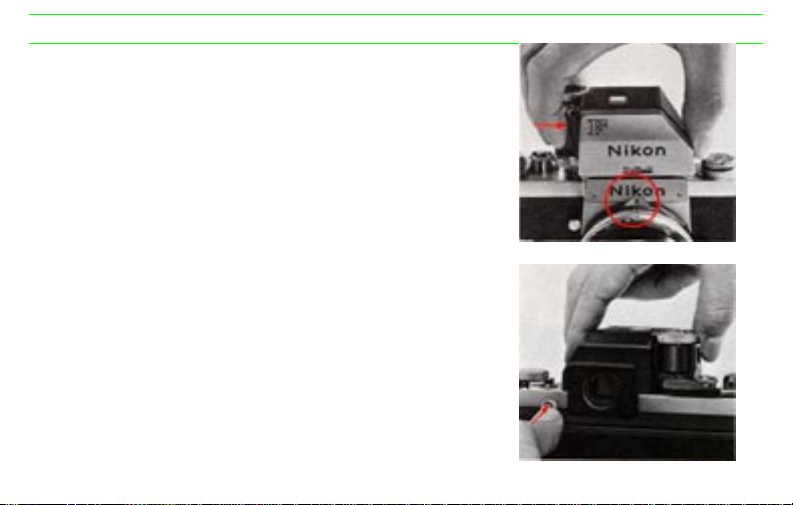
ATTACHING THE PHOTOMIC FTn FINDER
To attach the fimder to the camera with the lens in place, first set the
diaphragm at f/5.6 and place the finder in position loosely. Then depress
the finder lock lever and press down gently on the finder until it clicks
into place. The Photomic FTN Finder has a pair of pincer-type clamps
on the bottom to hold it securely in place. They are loosened by depressing the fmder lock lever.
Mounting the frnder on the camera body without a lens is simple. Just
depress the finder lock lever and press down gently on the finder until it
clicks into place.
T o remove the finder, depress the finder lock lever and press the finder
release button located on the back of the camera. The finder will be
unlocked amd can be lifted out.
Note: When using flash, be sure to set the camera for flash by lifting up
and turning the milled synchro-selector ring. Refer to the "Flash Synchronization" section in the Nikon F instruction manual.
9
Page 10
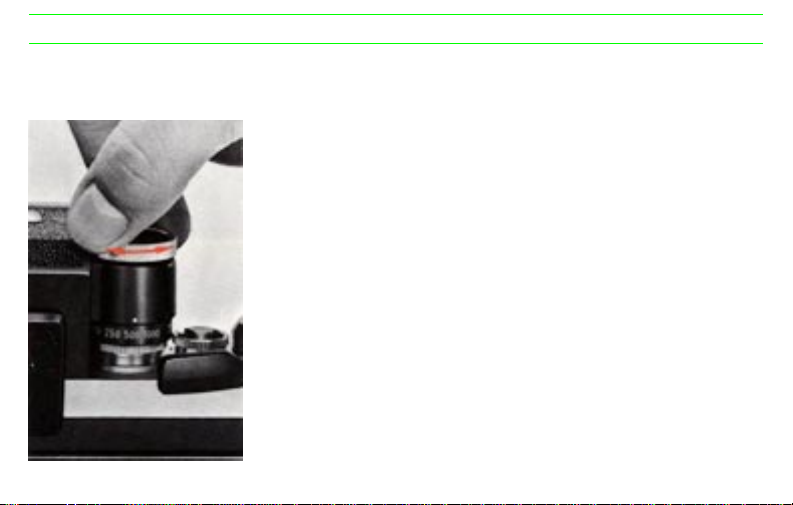
ATTACHING THE PHOTOMIC FTn FINDER
Shutter Speed Coupling
When the Photomic FTN Finder is attached to the camera, the shutter speed
dial on the camera is covered by the finder unit. Therefore, an auxiliary shutter speed scale is provided on the finder.
With the FTN Finderim place, twist the shutter speed selector right and left
until it engages the dial on the camera and the two rotate together.
10
Page 11

Lens Aperture Coupling
The Photomic FTN takes advantage of the automatic diaphragm feature
of Nikkor lenses to measure light with the lens wide open. Full-aperture
metering gives a bright, clear finder image for viewing and focusing and
minimizes the effect of light entering the viewfinder from the rear.
In order for the meter to measure exposure at full aperture with lenses of
different maximum aperture, it must be coupled with the maximum aperture of the lens in use. This is done each time the lens is attached or
changed by turning the aperture ring of the lens through its entire range.
With the lens mounted on the camera, twist the aperture ring counterclockwise, then clockwise as far as it will go. This meshes the coupling
prong on the lens with the pin on the Photomic FTN Finder and adjusts
the meter for the maximum aperture of the lens.
The adjustment can be verffied by checking the maximum aperture scale
on the front of the finder. The scale has a range from f/1.2 to f/5.6. For
example, if the 50mm f/1.4 lens is mounted on the camera, the red index
mark should appear between 1.2 and 2.8.
For instructions for mounting and removing lenses, see the Instruction
Booklet for the Nikon F.
11
Page 12
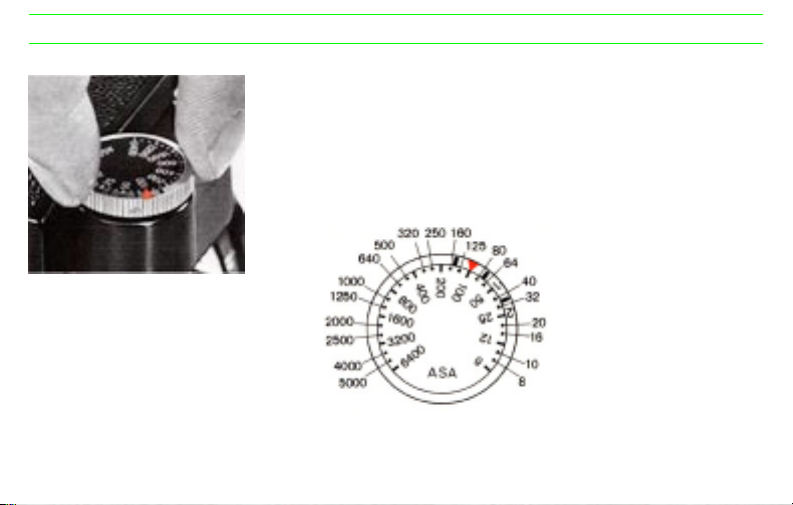
ATTACHING THE PHOTOMIC FTn FINDER
Setting the Film Speed
Lift and tum the milled ring around the ASA film speed dial so that the red
triangular index mark on the ring lines up with the number corresponding to
the ASA rating of the film loaded in the camera. The film speed dial covers a
range from ASA 6 to 6400. There are two dots between each pair of numerical marks for intermediate settings such as ASA 64, 80, 125, etc.
12
Page 13

Turning On the Meter
Switch on the meter circuit by pressing in the meter switchon button
located on the side of the finder. The meter switch-off button will then
pop up and a red line around its circumference will be visible. This serves
as a warning that the meter is on.
To turn off the meter, depress the top button until the red line is no
longer visible and the meter switch-on button on the side of the finder
pops out. Do not leave the meter on for long periods of time unnecessarily since the batteries are being drained as long as it is turned on.
13
Page 14
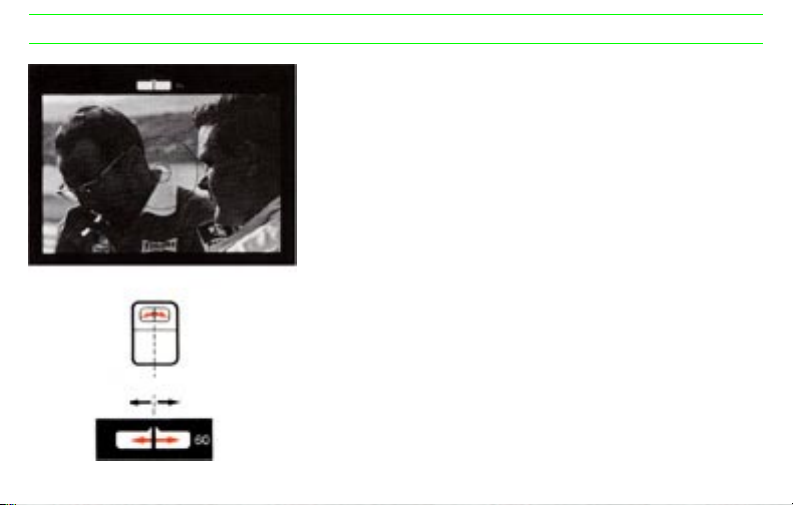
EXPOSURE MEASUREMENT WITH THE PHOTOMIC FTn FINDER (Full-Aperture Measuring Method)
The Photomic FTN uses a center-weighted thru-thelens metering system that reads the light over the entire focusing screen but favors the
central portion of the screen. This means that it is possible to get correct exposure in situations where an averaged reading of the entire screen
would result in underexposure of the main subject-with strongly backlighted portraits, for example. And since measurement is always done
at full aperture with Auto Nikkor lenses, the viewfinder image is bright
and clear.
The amount of light reaching the film (exposure) is detemmined by a
combination of lens aperture and shutter speed. Since the two are interrelated, different combinations will give the same amount of exposure.
For example, 1/500 second at f/2 is the same as 1/30 second at f/8.
OUTSIDE WINDOW
The choice of aperture and shutter speed depends on the results desired. Choose a fast shutter speed to "freeze" motion, a slow one to
create deliberate blur. Use a smaU lens aperture for wide depth of field
or a large one to make the main subject stand out and throw unimportant background out of focus.
Overexposure Underexposure
Correct exposure
EYEPIECE VIEW
14
Page 15

Centering the Needle
The correct exposure is found by centering the meter needle, either im the V-shaped notch which is visible in the
viewhinder or at the central mark located beneath the window on top of the finder. Tum either the shutter speed
selector or lens aperture ring until the needle is centered. For fine adjustments of less than one f/stop, use the lens
aperture ring, since it provides reliable imtemmediate settings between the marked f/numbers. The shutter speed
selector is not set for intermediate values.
As an added convenience, the shutter speed in use appears in the viewfinder, so the shutter speed can be adjusted
while observing the exposure meter needle. In dim light, the accessory Photomic Illuminator DL-1 illuminates the
meter needle and shutter speed for easy reading. Under extremely low light conditions, the meter needle may center
at the "B" setting on the shutter speed selector. If so, the correct exposure time is two seconds. If the needle centers
at "T," exposure time is four seconds.
If the needle cannot be centered or stiU moves erraticaUy after all possible aperture-shutter speed combinations have
been tried, then the light is too bright or too dim for the meter. The meter's effective range (coupling range) varies
according to lens used and film speed. For example, with the 50mm f/1.4 lens and film rated at ASA 100, it extends
from f/1.4 at 1/2 second to f/11 at 1/1000 second.
Note: If the meter is exposed to bright light at below-freezing temperature, it may malfunction or cease to
operate until the temperature rises again. Therefore, be careful not to leave the meter turned on for more than
three minutes at a time in cold weather.
15
Page 16

EXPOSURE MEASYMENT WITH THE PHOTOMIC FTn FINDER
Getting the Right Exposure
The central part of the focusing screen should always be aimed at the main subject when centering the needle.
Otherwise unimportant bright or dark areas may influence the exposure reading.
If an off-center composition is desired, first measure the light striking the main subject and set the aperture and
shutter speed to center the needle. Then move the camera until the desired composition appears im the viewfinder.
For subjects of unfform brightness, a reading may be taken from any part of the subject. However, ff the subject is
contrasty (sidelighted portraits, for example), measure the light faUing on the most important part of the subject in
which detail is desired in the final picture. For landscapes includimg large areas of sky, tilt the camera downward
during measurement or fiU the center of the finder with the main subject to prevent overexposure caused by the
bright skylight, otherwise the main subject will be underexposed.
Keep Out Stray Light!
The Photomic FTN Finder is designed to minimize the effect of light entering through the finder eyepiece
under normal picture-taking conditions. However, in the following situations the use of a finder eyocup is
recommended to insure complete exclusion of stray light.
• When the stop-down method of exposure measurement is used at small apertures
• When the camera is in suhlight and the subject is in shade
• When a shaft of sunlight falls between the eye and the eyepiece
When the needle on top of the finder is used to determine exposure, the eyepiece should be covered with the
hand to prevent extraneous light from entering the finderMeasuring the bright area in the center of the screen
will cause underexposure of the main subject.
For correct exposure, first measure the light striking the main subject, then compose and shoot.
16
Page 17
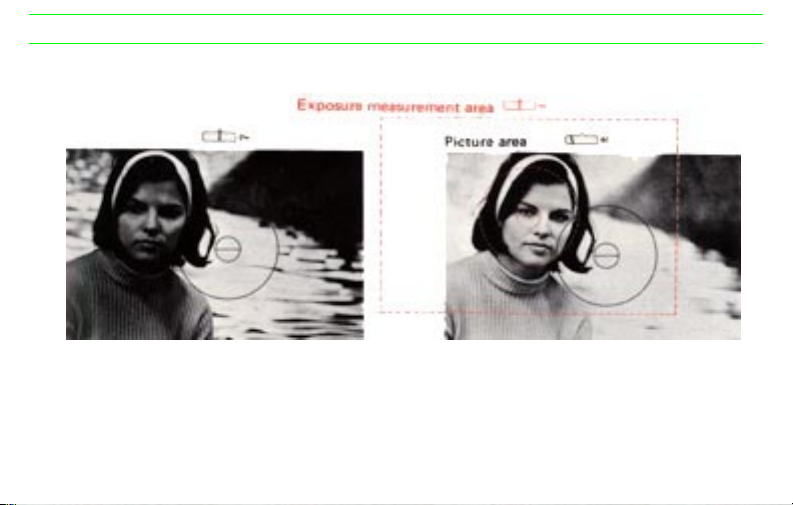
Measuring the bright area in the center of the
screen will cause underexposure of the main
subject.
For correct exposure, first measure the light
striking the main subject, then compose and
shoot.
17
Page 18
MEASUREMENT BY THE STOP-DOWN METHOD
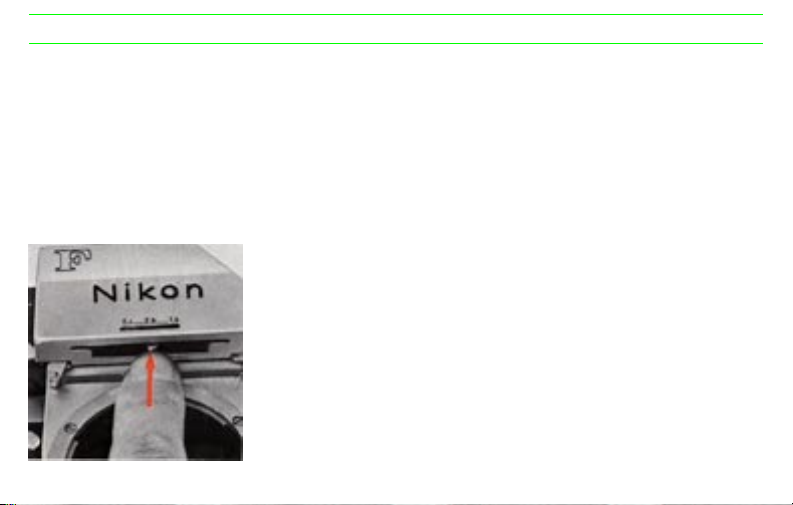
With the following lenses and accessories full-aperture exposure measurement is not possible, either because the lens has no auto-diaphragm or because the diaphragm will not couple with the Photomic FTN meter. Therefore, the stopdown method must be used. This means measuring exposure
with the lens aperture diaphragm stopped down to the taking aperture. With
the Photomic FTN finder, the meter coupling pin must first be pushed up into
the finder so that the red index on the maximum aperture scale springs to f/
5.6.
Mount the lens or lens/accessory setup to the camera and switch on the meter
in the usual way.
18
Page 19

Bellows FocusingAttachments, Extension Rings and Focusing Unit
To detemmine exposure, select the desired strutter speed and stop down
the lens manuaUy until the needUe centers.
Preset Lenses
Use the same procedure as above for lenses having preset diaphragms,
such as the PC-Nikkor 35mm f/2.8.
Auto Lenses Without Coupling Prong
Some lenses like the Zoom-Nikkor Auto 200-600mm f/9.5 have an auto
diaphragm but no coupling prong. Use the depth-of-field preview button
to stop down the lens until the needle iS centered.
Reflex-Nikkor Lenses
The Reflex-Nikkor 500mm f/8, lOOOmm f/11 and 2000mm f/ll lenses
have no aperture diaphragm. Adjust the shutter speed until the nee`Ue is
centered.
Note: Since focusing may be difficult or impossible at smaU apertures
due to image darkening on the screen, frst open the lens to full aperture to
focus. Then determine the correct exposure by the stop-down method.
19
Page 20
EXPOSURE CORRECTION
Special Lens-Focusing Screen Combinations
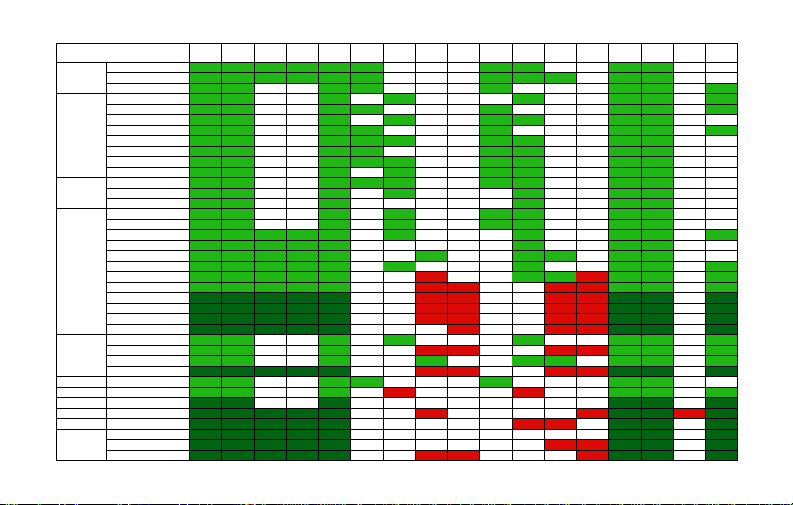
Because the light-transmitting properties of some focusing screens differ from those
of ordinary screens, certain lensscreen combinations require exposure correction to
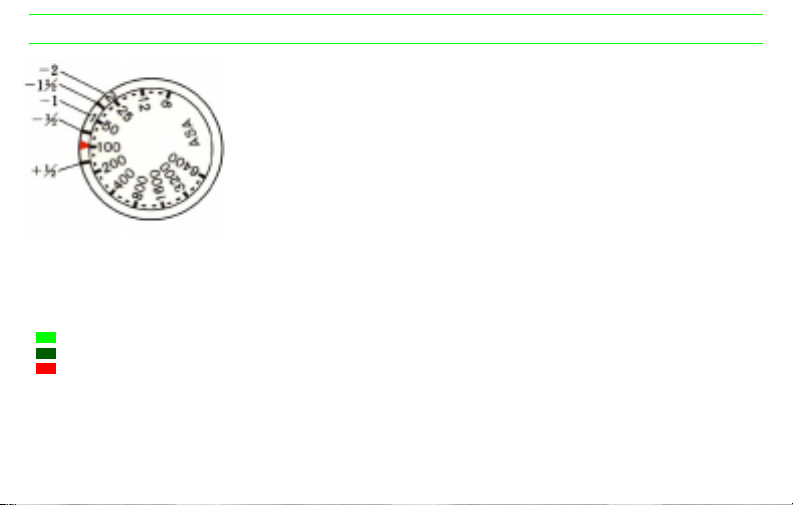
compensate for the influence of the screen. Compensating marks from -2 to +1/2
are engraved around the ASA film speed dial. Correct settings are given in the table
at right.
The numbers in the table indicate the exposure corrections to be made in f/stops:
this means you have to stop down or open up the lens diaphragm according to the
indicated numbers. With the Photomic FTN meter, however, exposure compensa-
index ring is set opposite the film speed dial. If exposure correction is required, line up the proper marking opposite
the number corresponding to the film speed. For example, the table indicates a half-stop decrease (-1/2) for the
135mm f/3.5 lens with Type C screen. If the film speed is ASA 100, 1ine up the number 100 on the film speed dial
opposite—1/2 mark. When no exposure correction (0) is indicated, the ASA rating for the film m use should appear
opposite the red triangular index.
- Measure exposure by the full-aperture method.
- Use the stop-down measuring method.
- Neither method will work. W ith these lens-screen combinations the viewfinder can be used only for focusing,
not exposure measurement.
Combinations represented by a blank space are unusable because of image darkening or considerable moire over the
screen area.
tion is automatic at all aperture settings when the proper mark on the ASA scale
20
Page 21
6mm f/2.8 0 0 -1/2 -1/2 0 0 0 0 0 0
2
-
Fisheye 8mm f/2.8 0 0 -1/2 -1/2 0 0 0 0 0 0 0
16mm f/3.5 0 0 0 0 0 0 0 0
15mm f/5.6 0 0 0 - 1 -1/2 0 0 0
20mm f/3.5 0 0 0 -1/2 -1/2 0 0 0
24mm f/2.8 0 0 0 0 0 0 0 0
Wideangle 28mm f/3.5 0 0 0 -1/2 -1/2 0 0 0
28mm f/2 0 0 0 +1/2 0 +1/2 0 0 0
35mm f/2.8 0 0 0 0 0 0 0 0
35mm f/2 0 0 0 +1/2 +1/2 +1/2 +1/2 0 0
35mm f/1.4 0 0 0 +1/2 +1/2 +1/2 0 0
50mm f/2 0 0 0 +1/2 +1/2 +1/2 +1/2 0 0
Normal 50mm f/1.4 0 0 0 +1/2 +1/2 0 0
55mm f/1.2 0 0 0 0 0 0
85 mm/f1.8 0 0 0 +1/2 +1/2 +1/2 0 0
105mm f/2.5 0 0 0 0 +1/2 +1/2 0 0
135mm f/3.5 0 0 -1/2 -1/2 0 -1 -1/2 0 0 0
135mm f/2.8 0 0 -1/2 -1/2 0 0 0 0
180mm f/2.8 0 0 -1/2 -1/2 0 -1/2 +1/2 0 0 0
Telephoto 200mm f/4 0 0 -1/2 -1/2 0
300mm f/4.5 0 0 -1/2 -1/2 0 -1-1/
400mm f/5.6 00000 00 0
400mm f/4.5 00000 00 0
600mm f/5.6 00000 00 0
800mm f/8 00000 00 0
1200mm f/11 00000 00 0
43-86mm f/3.6 0 0 0 -1/2 -1/2 0 0 0
Zoom 50-300mm f/4.5 0 0 0 00 0
80-200mm f/4.5 0 0 0 -1/2
200-600mm f/9.5 00000 00 0
GN 45mm f/2.8 0 0 0 0 0 0 0
Micro-P 55mm f/3.5 0 0 0 00 0
PC 35mm f/2.8 0 0 0 00 0
Bellows 105mm f/4 00000 00 0
Medical 200mm f/5.6 0 0 0 00 0
Reflex 500mm f/8 00000 00 0
Telephoto 1000mm f/11 00000 00 0
2000mm f/11 00000 00 0
A/L B C D E G1 G2 G3 G4 H 1 H2 H3 H4 J K / P M R
-1-1/2 - 1 0 0 0
1-1/2 0 0 0
-1-1/2-1/2 0 0 0
21
Page 22

Repro-Copying
For originals such as photographs which have tonal gradations, exposure is determined in the usual way.
In the case of originals having strong contrast and no gradation, such as documents or line drawings, measure the
brightness of the white portion of the original (if the original is predominantly black, a sheet of white paper may be
substituted) after decreasing the film speed by four marks. Or open up the lens about 1-1/3 stops.
Slide Copying
For originals with continuous tonal gradationS, determine exposure in the usual way by the stop-down method. To
copy slides with letters or figures on a transparent background, decrease the film speed four marks, or open up the
lens about 1-1/3 stops. In the case of transparent figures or letters on a dark background, either increase the film
speed five marks or stop down the lens about 1-2/3 stops.
Important: The above are only approximate guidelines. Exact exposure determination is extremely difficult, espe-
cially with reversal color films. Therefore, it is advisable to make several dffferent exposures for each subject to be
sure of getting one that is correct.
Fisheye-Nikkor Auto 8mm f/2.8
Because of its wide picture angle (180°), the Fisheye-Nikkor is susceptible to inflated exposure readings due to
direct sunlight. To compensate, open up the lens two stops.
22
Page 23

CARE AND HANDING
Your Photomic FTN Finder is ruggedly constructed. However, it deserves the same care you would give any precision instrument. Follow the simple precautions given below and the Photomic FTN will give years of dependable
service.
• Store the finder in a case to keep out dust. Avoid storing it in places liable to excessive heat,
cold or dampness.
• Attach a prism guard when storing the fnder separately.
• To insure most dependable service, clean the battery contact surfaces periodically with a
rough cloth.
• Avoid fingerprints and dust particles on the prism surface.
• Brush away grit or dust with a soft brush or use a rubber syringe. Do not use cloth or ordinary tissue.
• If smudges or fingermarks persist, use tissue with a professionally recommended lens cleaner very sparingly.
Wipe with a circular motion and gentle pressure. Even an approved cleaner can cause damage if it seeps into the
prism mount.
• To insure that the exposure meter will operate properly when needed, it should be checked periodically. Make a
few trial exposures before leaving for a holiday. Allow at least two or three weeks' time for processing the test film
and making any needed repairs or adjustment. This simple precaution may save a valuable holiday record which
would otherwise be lost.
23
Page 24

PHOTOMIC FTn FINDER FEATURES/SPECIFATIONS
Film speed scale: ASA 6 - 6400
Metering range: EV 2-17 at ASA 100 (1/2 sec at f/1.4-1/1000 sec at f/11 with 50mm f/1.4)
Light measuring method: Center-weighted, fuU aperture measurement.
Aperture coupling range: f/1.2-f/32
Shutter speed coupling
range: 1-1/1000 see, B (2 see) and T (4 see).
Maximum aperture scale
range: f/1.2-f/5.6
Meter needle: Visible in the finder and in *e window on top of the prism housing.
Meter switch &
battery check: Provided. Battery can also be checked by depressing the switch-off button further than
Battery: 2 mercury batteries (1.3V each)
Weight: 275g (9.5 oz)
Shutter speed is visible in the finder.
its "off" position.
24
Page 25

THE NIKON WARRANTY
The Nikon W orldwide Service Warranty Registration Card which identifies your Photomic finder by its serial number is your guarantee that the Photomic finder you buy is a new one. When you return this card to a Nikon distributor
you wiU receive your Nikon Worldwide Service Warranty Certificate, which entitles you to a one-year warranty
anywhere throughout the world, subject to the conditions listed in the certificate.
Only a franchised Nikon dealer can provide you with a Nikon W arranty Registration Card. We cannot guarantee any
camera or lens sold to you by an unauthorized dealer without a Warranty Registration Card, since it may be secondhand equipment.
25
 Loading...