


External TTL Flash
USER GUIDE
for Nikon
NS-DXFL2N
™
Before using your new product, please read these instructions to prevent any damage.

External TTL Flash for Nikon™
Contents
Welcome . . . . . . . . . . . . . . . . . . . . . . . . . . . . . . . . . . . . . . . . . . . . . . . . . . . . . . . .2
Important safety instructions . . . . . . . . . . . . . . . . . . . . . . . . . . . . . . . . . . . . .3
Features . . . . . . . . . . . . . . . . . . . . . . . . . . . . . . . . . . . . . . . . . . . . . . . . . . . . . . . . .3
Setting up your flash . . . . . . . . . . . . . . . . . . . . . . . . . . . . . . . . . . . . . . . . . . . . .6
Using your flash. . . . . . . . . . . . . . . . . . . . . . . . . . . . . . . . . . . . . . . . . . . . . . . . . .9
Troubleshooting . . . . . . . . . . . . . . . . . . . . . . . . . . . . . . . . . . . . . . . . . . . . . . . .17
Specifications . . . . . . . . . . . . . . . . . . . . . . . . . . . . . . . . . . . . . . . . . . . . . . . . . . .18
Legal notices. . . . . . . . . . . . . . . . . . . . . . . . . . . . . . . . . . . . . . . . . . . . . . . . . . . .19
ONE-YEAR LIMITED WARRANTY - INSIGNIA . . . . . . . . . . . . . . . . . . . . . . .21
NS-DXFL2N External TTL Flash for Nikon™
NS-DXFL2N
Package contents . . . . . . . . . . . . . . . . . . . . . . . . . . . . . . . . . . . . . . . . . . .3
Front view . . . . . . . . . . . . . . . . . . . . . . . . . . . . . . . . . . . . . . . . . . . . . . . . . .4
Back view. . . . . . . . . . . . . . . . . . . . . . . . . . . . . . . . . . . . . . . . . . . . . . . . . . .5
Installing the batteries . . . . . . . . . . . . . . . . . . . . . . . . . . . . . . . . . . . . . .6
Attaching the flash. . . . . . . . . . . . . . . . . . . . . . . . . . . . . . . . . . . . . . . . . .7
Removing the flash . . . . . . . . . . . . . . . . . . . . . . . . . . . . . . . . . . . . . . . . .8
Turning on the flash. . . . . . . . . . . . . . . . . . . . . . . . . . . . . . . . . . . . . . . . .8
Using your flash. . . . . . . . . . . . . . . . . . . . . . . . . . . . . . . . . . . . . . . . . . . . .9
Fully automatic flash shooting. . . . . . . . . . . . . . . . . . . . . . . . . . . . . . .9
Using Flash Exposure Compensation (FEC) . . . . . . . . . . . . . . . . . . .9
Using the Flash Value Lock (FVL). . . . . . . . . . . . . . . . . . . . . . . . . . . .10
Using manual flash (M) . . . . . . . . . . . . . . . . . . . . . . . . . . . . . . . . . . . . .10
Using S1/S2 slave triggering mode . . . . . . . . . . . . . . . . . . . . . . . . .11
Using bounce flash . . . . . . . . . . . . . . . . . . . . . . . . . . . . . . . . . . . . . . . .12
Creating a catchlight . . . . . . . . . . . . . . . . . . . . . . . . . . . . . . . . . . . . . . .13
Using the wide angle panel . . . . . . . . . . . . . . . . . . . . . . . . . . . . . . . .14
Using Auto Power Off . . . . . . . . . . . . . . . . . . . . . . . . . . . . . . . . . . . . . .15
Using the AF-assist beam firing function . . . . . . . . . . . . . . . . . . . .15
Over-Temperature Protection . . . . . . . . . . . . . . . . . . . . . . . . . . . . . .16
Welcome
Congratulations on your purchase of a high-quality Insignia product. Your
NS-DXFL2N i-TTL compatible flash represents the state-of-the-art in electronic flash
design and is designed for reliable and trouble-free performance.
2
www.insigniaproducts.com

NS-DXFL2N External TTL Flash for Nikon™
Important safety instructions
1 Read these instructions.
2 Keep these instructions.
3 Heed all warnings.
4 Follow all instructions.
5 Do not use this apparatus in the water.
6 Clean only with a dry cloth.
7 Do not store near any heat sources such as radiators, heat registers, stoves, or
other apparatus (including amplifiers) that produce heat.
8 Only use attachments/accessories specified by the manufacturer.
9 Refer all servicing to qualified service personnel. Servicing is required when
the apparatus has been damaged in any way, liquid has been spilled or objects
have fallen into the apparatus, the apparatus has been exposed to rain or
moisture, does not operate normally, or has been dropped.
10 To reduce the risk of fire or electric shock, do not expose this device to rain,
moisture, dripping, or splashing, and no objects filled with liquids, such as
vases, shall be placed on it.
Features
Package contents
•i-TTL Flash
•Mini stand
•Protective carrying bag
•User Guide
www.insigniaproducts.com
3

Front view
NS-DXFL2N External TTL Flash for Nikon™
# Item Description
1 Built-in wide angle panel Use to spread the flash light over a wider angle or to reduce its direct intensity.
2 Flash head Provides the light (flash) for the photograph.
3 AF-assist beam emitter Projects a red light beam to help t he camera focus in low-light settings.
4 Locking knob Tighten this knob to se cure the flash to the camera.
5 Mounting foot Connect to the camera’s hot shoe to mount and connect the flash on the camera. Also
6 Hot shoe contact Provides electrical contact to a camera’s hot shoe.
7 Mini stand Use to set up the flash away from the camera to use in slave mode.
8 White reflector card Pull out to create a more diffused light and a catchlight in a subject's eye for portrait
9 Power port cover Covers and protects the external power port.
10 PC sync terminal Connect a PC sync cord (not included) to this jack to control the flash remotely.
11 PC sync terminal cover Covers the PC sync terminal.
12 External power port Accessory port for external power pack (not provided).
4
connects to the mini stand to use the flash in slave mode.
shots.
www.insigniaproducts.com
NS-DXFL2N External TTL Flash for Nikon™
MODE TEST ON OFF
NS-DXFL2N
TTL M S1 S2
-1 -0 -0 0 +0 + 0 +1
.7 .3 .3 .7
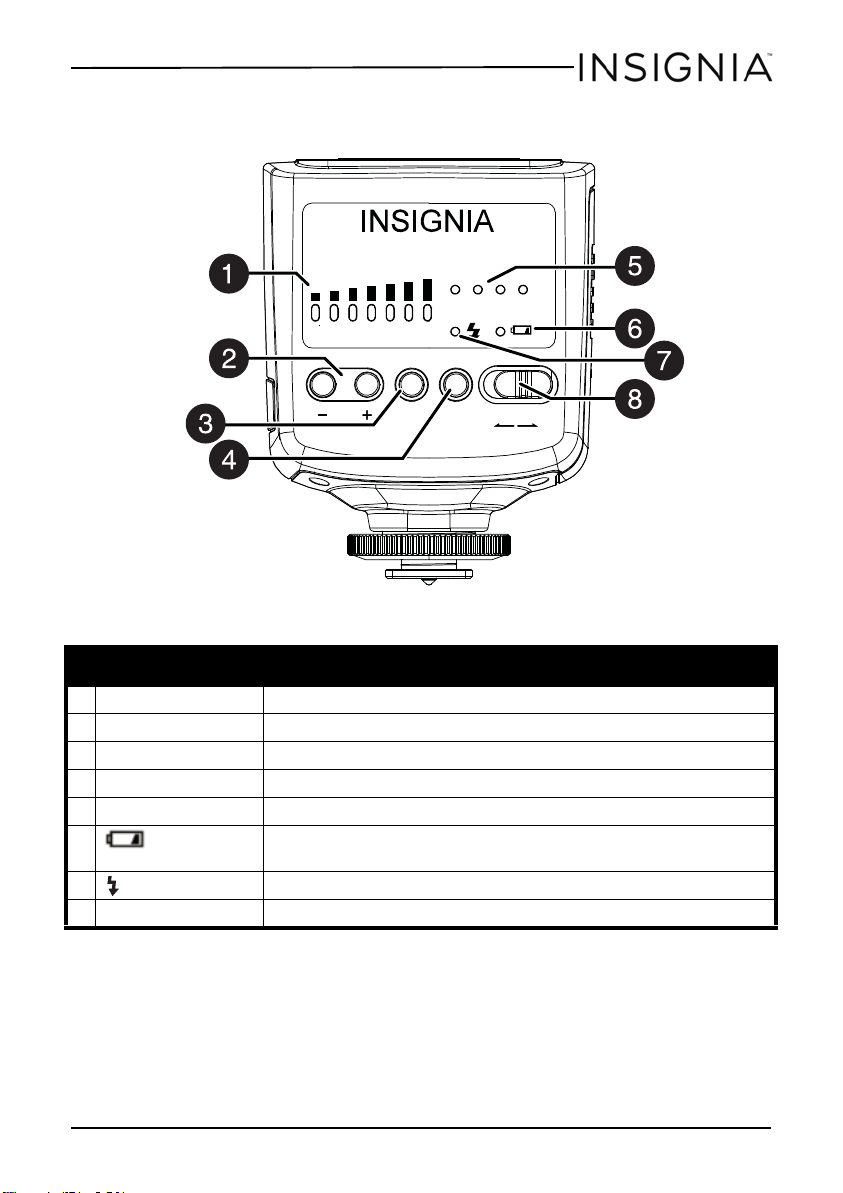
Back view
# Item Description
1 Power level indicator Shows the power level selected.
2Brightness/FEC –/+ button Press to lower or raise the brightness or Flash Exposure Compensation level.
3 MODE button Press repeatedly to change the flash mode.
4 TEST button Press to fire a test flash.
5 TTL/M/S1/S2 indicators Indicates the current mode of the flash.
6 (battery level
indicator)
(flash-ready indicator) Lights when the flash is ready.
7
8 ON/OFF switch Slide to the left to turn the flash on, or to the right to turn the flash off.
Lights when the battery level is l ow.
www.insigniaproducts.com
5
NS-DXFL2N External TTL Flash for Nikon™
Setting up your flash
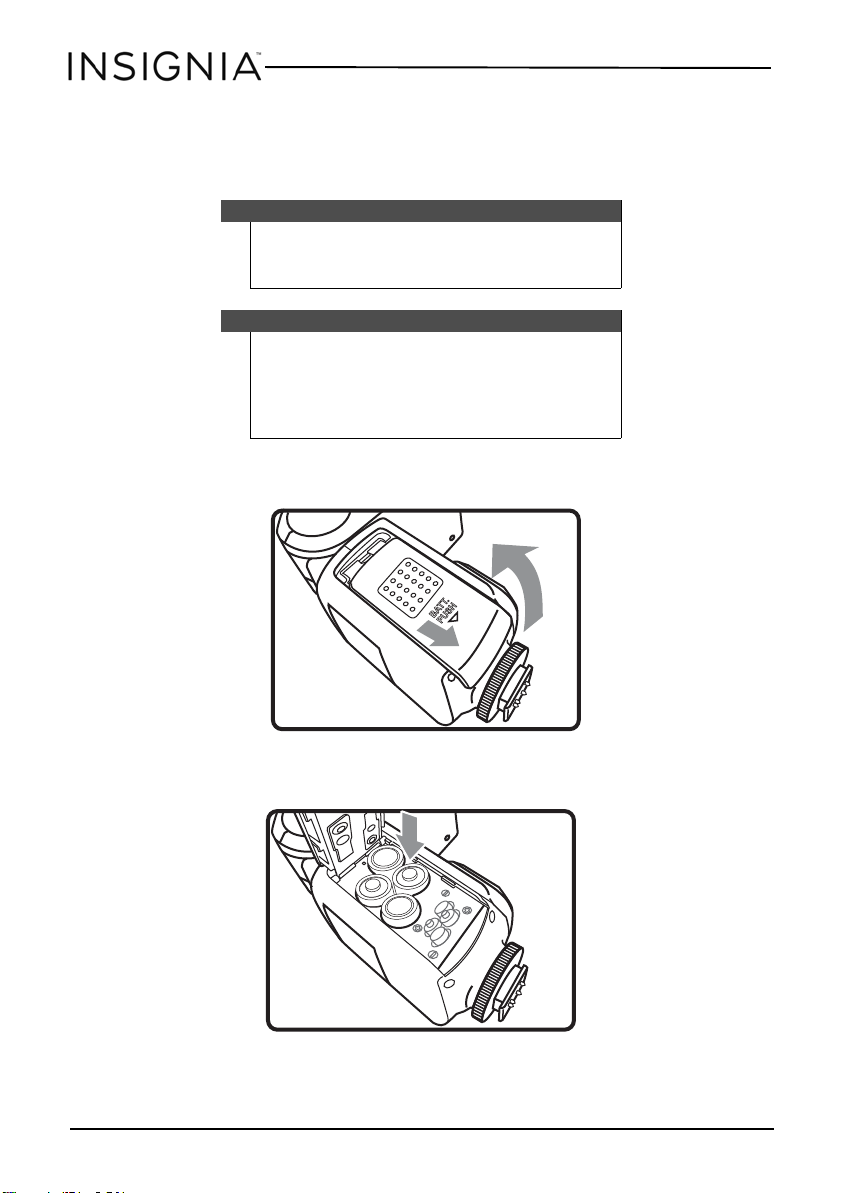
Installing the batteries
\
1 Open the battery compartment cover by pressing it with your thumb, sliding
the compartment down, then lifting it open.
Cautions
• Use only Alkaline or NiMH AA batteries.
• The batteries may become hot after firing many flashes
continuously.
Notes
• Make sure that all four batteries are the same brand and
type.
• When replacing the batteries, replace all four at one
time.
• Batteries are not included with this flash.
2 Insert four (4) AA batteries (not included). Make sure that the + and – match
what is indicated in the compartment.
6
www.insigniaproducts.com
NS-DXFL2N External TTL Flash for Nikon™
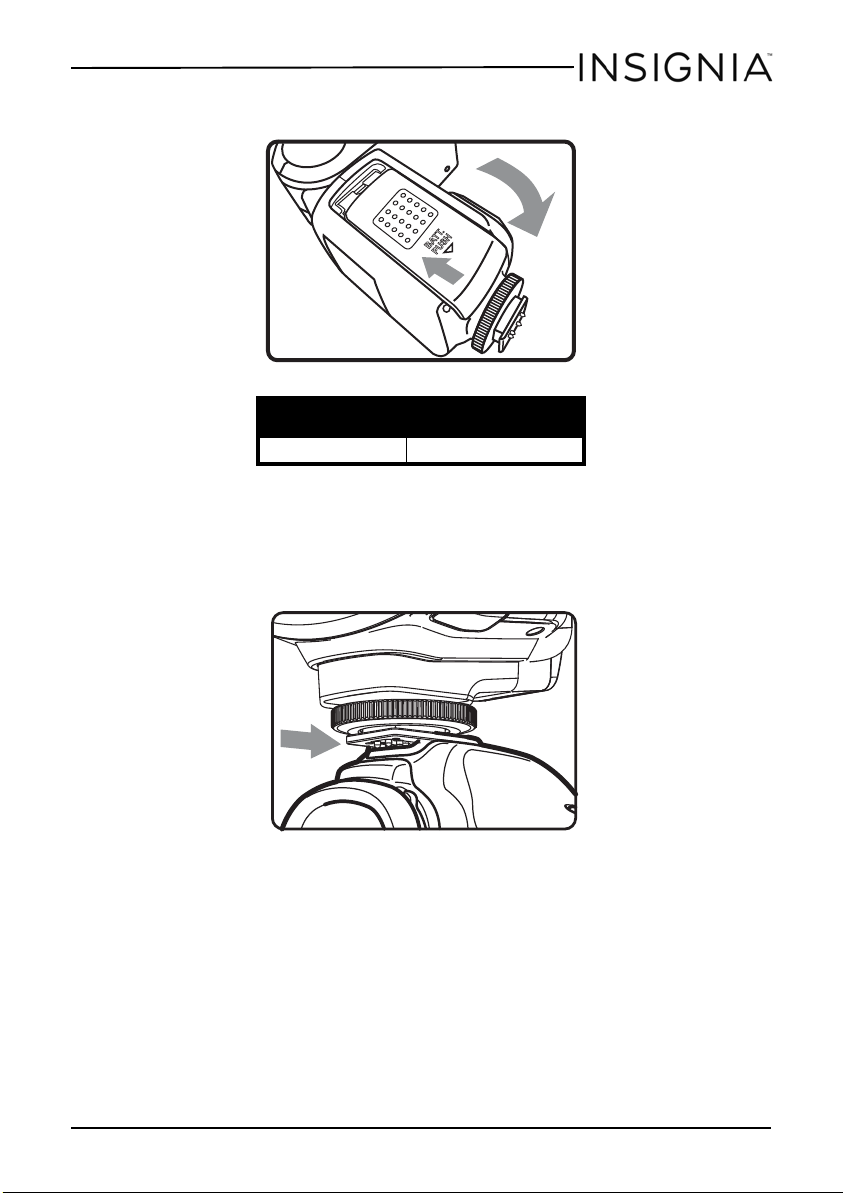
3 Close the battery compartment cover and slide it into place.
Recycle time* Flash count*
Approx. 0.1 – 5 seconds Approx. 100 - 1500 flashes
* Based on four (4) new, AA alkaline batteries.
Attaching the flash
1 Turn the camera and the flash off and loosen the locking knob.
2 With the flash facing toward the front of the camera, slide the flash’s mounting
foot all the way into the camera’s hot shoe.
www.insigniaproducts.com
7
 Loading...