

Page 1
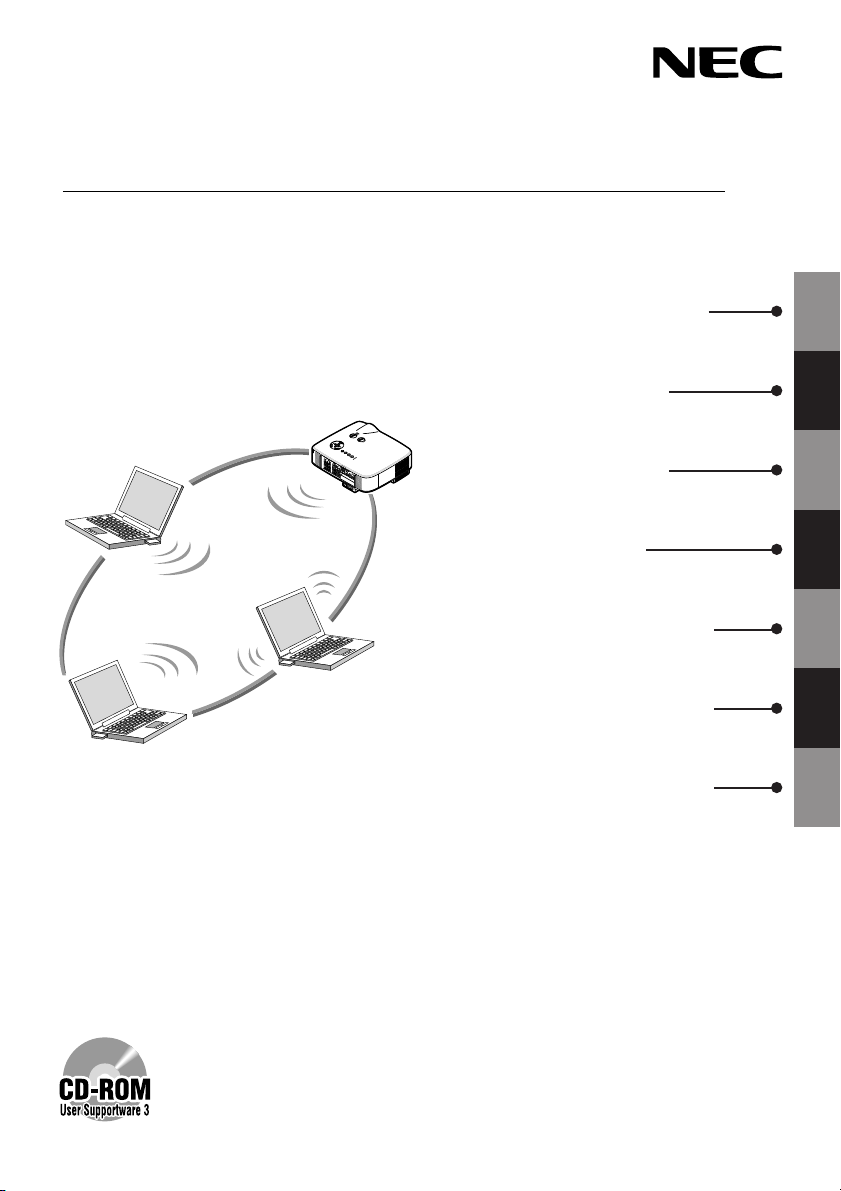
NEC Projector
NP2000 / NP1000
Wired and Wireless Network Setup Guide
1. What You Can Do with User
1
Supportware 3
2. Operating Environment
L
L
E
E
N
F
S
T
S
H
I
F
T
R
I
G
H
T
D
O
W
N
U
P
S
E
L
E
C
T
3
3
D
D
R
R
E
E
F
F
O
O
R
R
M
M
A
A
U
U
T
T
O
O
A
A
D
D
J
J
U
U
S
S
T
T
S
S
O
O
U
U
R
R
C
C
E
E
O
O
N
N
/
/
S
S
T
T
A
A
P
P
N
N
C
C
D
D
C
C
B
B
A
A
L
L
A
A
Y
Y
R
R
M
M
D
D
P
P
S
S
T
T
A
A
T
T
P
P
U
U
O
O
S
S
W
W
E
E
R
R
3. Connecting LAN Cable
4. Attaching LAN Card
5. Setting the LAN Setting of
2
3
4
5
Projector
6.
Setting the LAN Setting of
Personal Computer ([Example]
6
Wireless LAN of Windows
XP:Ad Hoc connection)
7. Refer to “User’s Guide” and
7
Help
Install in the PC the software stored in the User Supportware 3 CD-ROM.
This manual describes the LAN settings to use the software programs included in
the supplied User Supportware 3 CD-ROM. For how to operate each software
program, refer to “User’s Guide” (PDF) on User Supportware 3 CD-ROM.
Page 2

Introduction
Thank you for purchasing the NEC projector NP2000/NP1000 (hereafter referred to as the
“projector”).
The projector is equipped with the following features so that you can give effective presentations.
• LAN port (RJ-45), USB port (type A), PC card slot (TYPE II) supplied as standard
• Viewer that displays images from a flash memory card
• Wireless LAN card supplied as an option
*1 The projector is not supplied with a flash memory card or USB memory.
*2 For a list of countries where NEC’s optional wireless LAN card (NWL-100 series) is available, refer
to the Service Page for NEC Projectors (http://www.nec-pj.com).
*2
*1
and USB memory
The projector is also supplied with User Supportware 3 CD-ROM in which five programs of
software are stored for effective use of these features. The software stored on this CD-ROM are
as follows.
Each program runs on Windows XP and Windows 2000.
Install in the PC the software in the User Supportware 3 CD-ROM before using.
• Image Express Utility 2.0
• Desktop Control Utility 1.0
• Ulead Photo Explorer 8.0 SE Basic
• Viewer PPT Converter 3.0
• PC Control Utility 3.0
This document explains how to configure the LAN settings to use the above software programs.
For details of operations, refer to “User Supportware 3 User’s Guide” on User Supportware 3
CD-ROM and help function of the software.
For the network settings on the personal computer, refer to the User’s Manual for the personal
computer or the peripheral equipment for the network.
Use a wireless LAN card conforming to the Wi-Fi standard for your personal computer.
*1
NOTES
(1) The contents of this guide may not be reprinted in part or whole without permission.
(2) The contents of this guide are subject to change without notice.
(3) Great care has been taken in the preparation of this guide; however, should you notice any
questionable points, errors or omissions, please contact us.
(4) Notwithstanding article (3), NEC will not be responsible for any claims on loss of profit or
other matters deemed to result from using the Projector.
(5) Guides with incorrect collating or missing pages will be replaced.
Page 3

Cautions on Usage
Cautions on Usage
• A wireless LAN card is not meant for use with facilities or equipment involving the safeguard
of human life, such as medical equipment, nuclear facilities or equipment, aeronautical or
space equipment, transportation facilities or equipment, etc., or with facilities or equipment
requiring high levels of reliability. Do not use the card in such cases.
• Do not use a wireless LAN card near cardiac pacemakers.
• Do not use a wireless LAN card near medical equipment. Doing so may cause electromagnetic
interference with the medical equipment, possible leading to death.
• Do not disassemble or modify a wireless LAN card in any way. Doing so could lead to fire or
electric shock.
• Do not use a wireless LAN card in wet or moist places, such as in bathrooms or near
humidifiers. Doing so could lead to fire, electric shock or malfunctions.
To prevent damage due to static electricity, eliminate any static electricity from your body before
touching a wireless LAN card.
• Static electricity from the human body may damage a wireless LAN card. Before touching
the card, touch an aluminum window frame, a door knob, or some other metal object around
you to eliminate the static electricity.
The radio waves used by a wireless LAN card pass through the wood or glass used in normal
homes (but not through window panes with built-in metallic mesh).
The radio waves do not pass through iron reinforcing bars, metal or concrete, so a wireless LAN
card cannot be used for communicating through walls or floors made with these materials.
1
Page 4

Contents
Contents
Introduction ................................................................................ Inside cover
Cautions on Usage ........................................................................................ 1
Contents .........................................................................................................2
1. What You Can Do with User Supportware 3 ...........................................3
1-1. Image Express Utility 2.0 ...................................................................................... 3
1-2. Desktop Control Utility 1.0 .................................................................................... 5
1-3. Ulead Photo Explorer 8.0 SE Basic...................................................................... 6
1-4. Viewer PPT Converter 3.0 .................................................................................... 7
1-5. PC Control Utility 3.0 ............................................................................................ 7
2. Operating Environment ............................................................................8
2-1. Supported Projector .............................................................................................. 8
2-2. Operating Environment ......................................................................................... 9
3. Connecting LAN Cable ...........................................................................10
4. Attaching Wireless LAN Card ................................................................ 11
5. Setting the LAN Setting of Projector ....................................................13
5-1. Displaying On-Screen Menu (LAN Mode) .......................................................... 13
5-2. Wireless LAN ...................................................................................................... 15
5-3. Wired LAN ........................................................................................................... 24
6. Setting the LAN Setting of Personal Computer
([Example] Wireless LAN of Windows XP: Ad Hoc connection) ........26
7. Refer to “User’s Guide” and Help .........................................................31
7-1. Displaying “User’s Guide” (PDF) .......................................................................... 31
7-2. Using Help ............................................................................................................ 33
2
Page 5
1. What You Can Do with User Supportware 3
1. What You Can Do with User Supportware 3
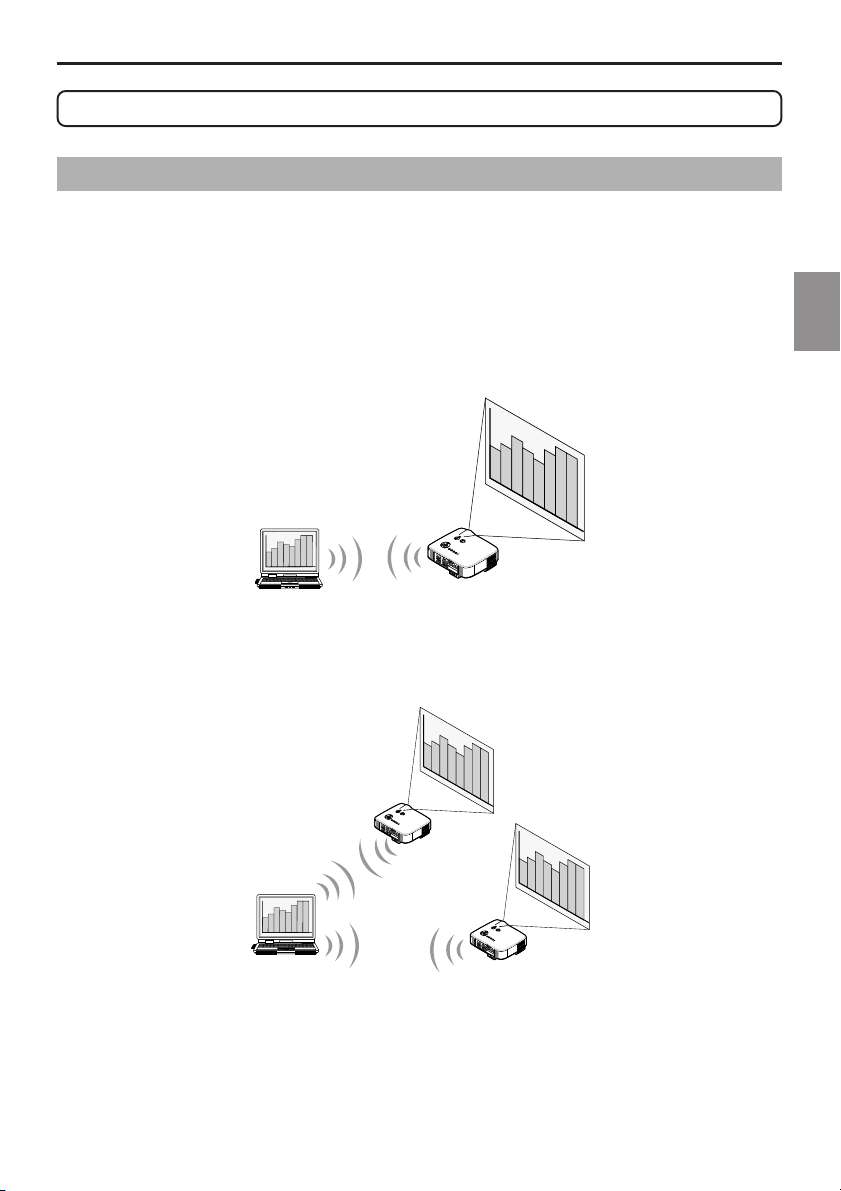
1-1. Image Express Utility 2.0
Image Express Utility 2.0 is a software tool used to send the screen of your personal computer
to the projector via a network, without the signal cables.
● High-speed, high-quality image transmissions based on NEC’s original
compression algorithm
NEC’s original compression algorithm allows high-quality images to be sent over the network
at high speed, from your personal computer to the projector.
L
L
E
E
N
F
S
T
S
H
I
F
T
R
I
G
H
T
D
O
W
N
U
P
S
E
L
E
C
T
3
3
D
D
R
R
E
E
F
F
O
O
R
R
M
M
A
A
U
U
T
T
O
O
A
A
D
D
J
J
U
U
S
S
T
T
S
S
O
O
U
U
R
R
C
C
E
E
O
O
N
N
/
/
S
S
T
T
A
A
P
P
N
N
C
C
D
D
C
C
B
B
A
A
L
L
Y
Y
AM
AM
R
R
D
D
P
P
S
S
T
T
A
A
T
T
P
P
US
US
OW
OW
ER
ER
1
What You Can Do with User Supportware 3
● Simultaneous projection by multiple projectors
Images can be sent from a personal computer to not only one projector but also to two or
more projectors at the same time.
L
L
E
E
N
F
S
T
S
H
I
F
T
R
I
G
H
T
D
O
W
N
U
P
S
E
L
E
C
T
3
3
D
D
R
R
E
E
F
F
O
O
R
R
M
M
A
A
U
U
T
T
O
O
A
A
D
D
J
J
U
U
S
S
T
T
S
S
O
O
U
U
R
R
C
C
E
E
O
O
N
N
/
/
S
S
T
T
A
A
P
P
N
N
C
C
D
D
C
C
B
B
L
L
A
A
A
A
Y
Y
R
R
M
M
D
D
P
P
S
S
T
T
A
A
T
T
P
P
U
U
O
O
S
S
W
W
E
E
R
R
L
L
E
E
N
F
S
T
S
H
I
F
T
R
I
G
H
T
D
O
W
N
U
P
S
E
L
E
C
T
3
3
D
D
R
R
E
E
F
F
O
O
R
R
M
M
A
A
U
U
T
T
O
O
A
A
D
D
J
J
U
U
S
S
T
T
S
S
O
O
U
U
R
R
C
C
E
E
O
O
N
N
/
/
S
S
T
T
A
A
P
P
N
N
C
C
D
D
C
C
B
B
L
A
A
L
A
A
Y
Y
R
R
M
M
D
D
P
P
S
S
T
T
A
A
T
T
P
P
U
U
O
O
S
S
W
W
E
E
R
R
● ”Easy Connection” function for connecting wireless LAN
By using “Easy Connection” function*1, the complicated setting of wireless LAN can be
simplified.
*1 This function can be used when Windows XP is used as the OS and when you have a “Computer
Administrator” privilege. The communication mode is set to “802.11 Ad Hoc”.
The “Easy Connection” function cannot be used with Windows 2000.
3
Page 6
1. What You Can Do with User Supportware 3
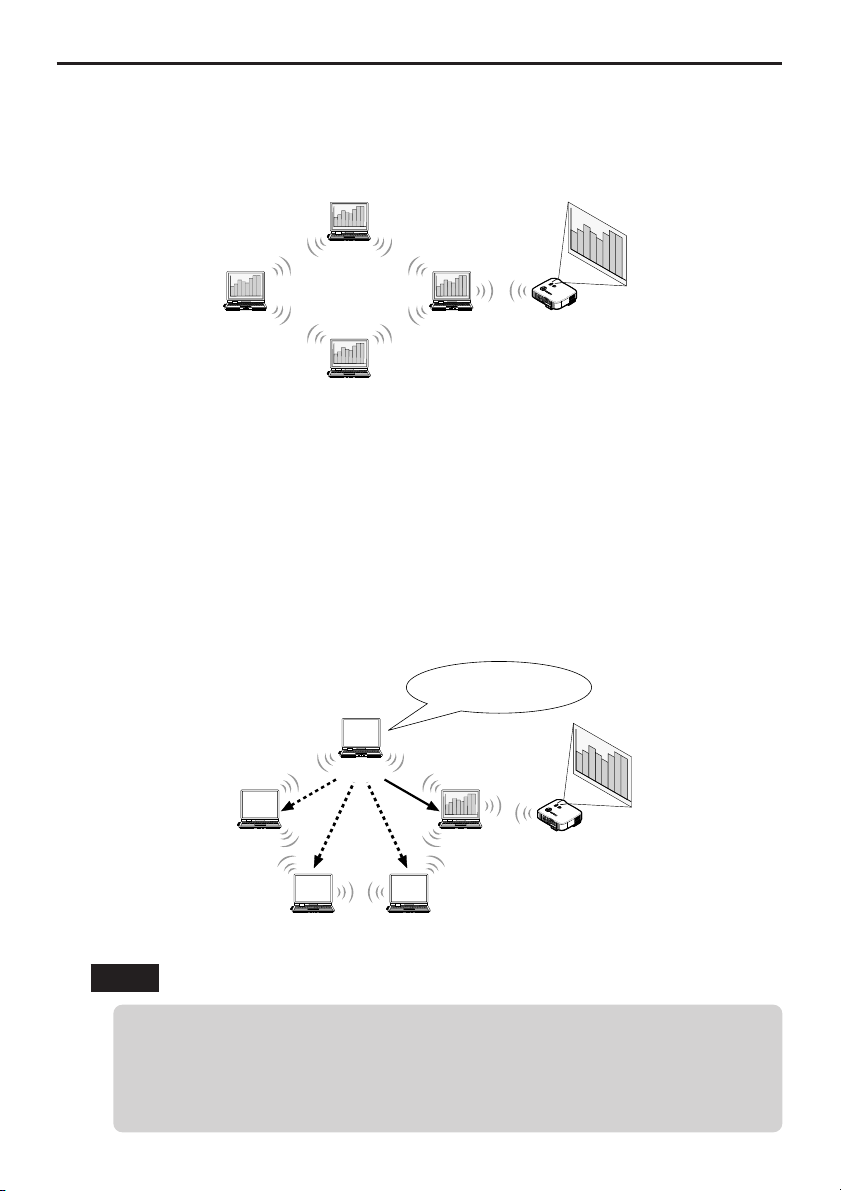
● Projected images can be transferred and saved to personal computers.
When “Meeting Mode” is used, projected images can be sent to the personal computers of
all the participants (attendants) of a “Meeting”. The received images can be saved to your
personal computer with a memo (text data) attached.
Attendant
Attendant
Presenter
L
LEF
EN
S S
T
HI
FT
RI
GH
T
D
O
W
N
U
P
S
E
L
E
C
T
3
3
D
D
R
R
E
E
F
F
O
O
R
R
M
M
A
A
U
U
T
T
O
O
A
A
D
D
J
J
U
U
S
S
T
T
S
S
O
O
U
U
R
R
C
C
E
E
O
O
N
N
/
/
S
S
T
T
A
A
P
P
N
N
C
C
D
D
C
C
B
B
L
L
A
A
A
A
Y
Y
R
R
M
M
D
D
P
P
S
S
T
T
A
A
T
T
P
P
U
U
O
O
S
S
W
W
E
E
R
R
Attendant
● 1-click switching of presenter
When switching to another presenter during the conference, the participants (attendants)
can simply click a button to switch over to the new presenter.
● Central management of the projecting personal computer
Using the Training Mode allows you to use a single personal computer (Manager) to manage
which personal computer (Attendant) projects. Possible operation includes switching
projecting personal computers to project from, as well as temporarily terminating
communication with the projector.
Mr. D, please start
your presentation.
Manager
LE
L
E
NS S
F
T
HIFT
RI
GHT
D
O
W
N
U
P
S
E
L
E
C
T
3
3
D
D
R
R
E
E
F
F
O
O
R
R
M
M
A
A
U
U
T
T
O
O
A
A
D
D
J
J
U
U
S
S
T
T
S
S
O
O
U
U
R
R
C
C
E
E
O
O
N
N
/
/
S
S
T
T
A
A
P
P
N
N
C
C
D
D
C
C
B
B
A
A
L
L
A
A
R
R
Y
Y
M
M
D
D
P
P
S
S
T
T
A
A
T
T
P
P
U
U
O
O
S
S
W
W
E
E
R
R
Attendant A Attendant D (presenter)
Attendant B Attendant C
Note
The Training Mode is not installed via the “Typical” installation option when Image Express
Utility 2.0 is installed.
To use Training Mode, select “Extension” installation option on the install selection screen
that is displayed while Image Express Utility 2.0 installation is in progress, and select “Training
(Attendant)” or “Training (Manager)”.
4
Page 7
1. What You Can Do with User Supportware 3
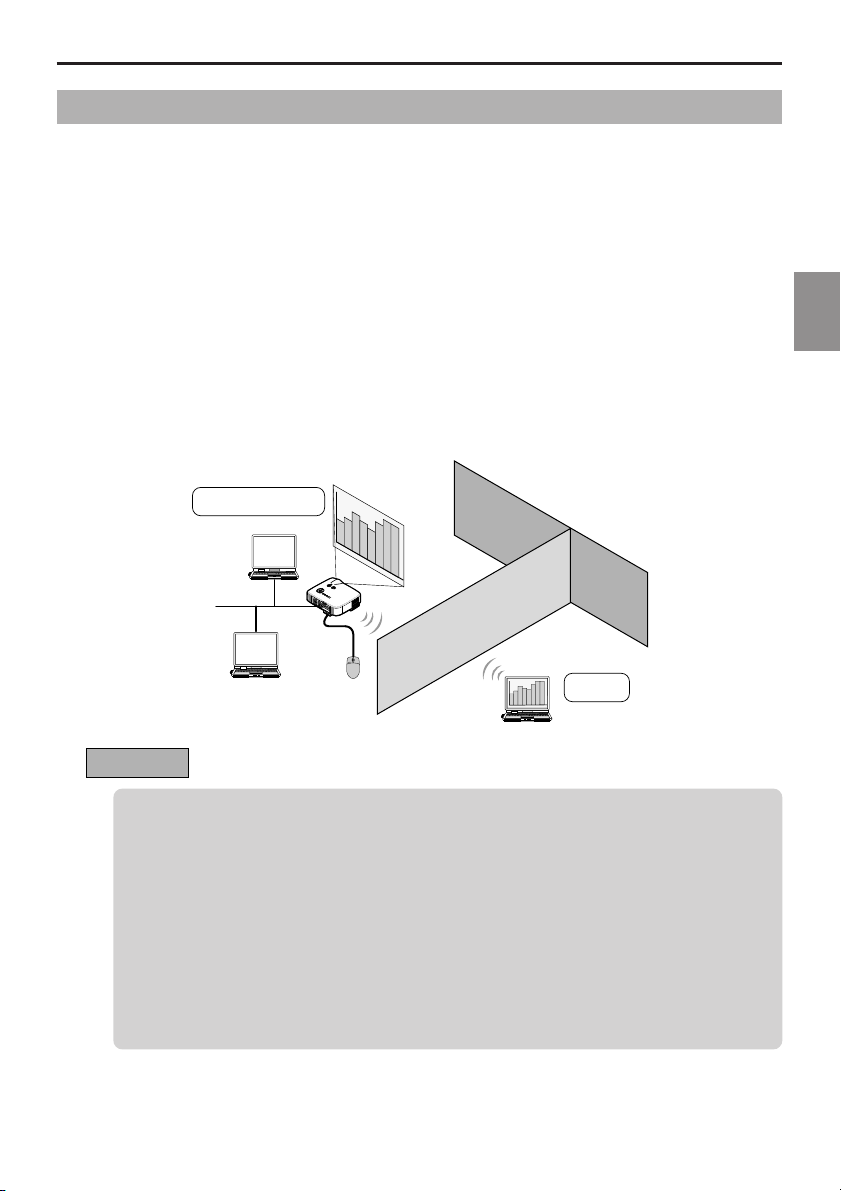
1-2. Desktop Control Utility 1.0
Desktop Control Utility 1.0 is software that operates the desktop screen of a personal computer
at a remote location from the projector by using a network.
● A commercially available USB mouse is connected to the projector to operate the personal
computer.
● Suppose, for example, a PowerPoint file to be presented in a conference is saved to a
personal computer in your office. If this personal computer is connected to the projector in
the conference room with LAN when the conference is held, the desktop screen of the
personal computer in your office (Windows XP/Windows 2000) can be projected and the
PowerPoint file can be presented by operating the projector. In other words the personal
computer does not need to be brought into the conference room.
Conference room
L
L
E
E
N
F
S
T
S
H
I
F
T
R
I
G
H
T
D
O
W
N
U
P
S
EL
EC
T
3
3
D
D
R
R
E
E
F
F
O
O
R
R
M
M
A
A
U
U
T
T
O
O
A
A
D
D
J
J
U
U
S
S
T
T
S
S
O
O
U
U
R
R
C
C
E
E
O
O
N
N
/
/
S
S
T
T
A
A
P
P
N
N
C
C
D
D
C
C
B
B
L
L
A
A
A
A
Y
Y
R
R
M
M
D
D
P
P
S
S
T
T
A
A
T
T
P
P
U
U
O
O
S
S
W
W
E
E
R
R
1
What You Can Do with User Supportware 3
Office
Important
• You can use the Desktop Control Utility 1.0 to operate a personal computer located in a
separate room from the projector over a network. Therefore, care must be exercised to
prevent any third party from viewing the screen of your personal computer (important
documents), copying files, or turning off the power.
NEC assumes no liability for any loss or damages arising from information leak or system
failure while you are using Desktop Control Utility 1.0.
• In the Windows operating system, click [Control Panel] → [Performance and Maintenance]
→ [Power Options] → [System Standby] → [Never]. This will disconnect LAN connection
when the personal computer goes in the standby mode while the Desktop Control Utility
1.0 is being used.
• The screen saver function is off while Desktop Control Utility 1.0 is running.
5
Page 8

1. What You Can Do with User Supportware 3
1-3. Ulead Photo Explorer 8.0 SE Basic
Ulead Photo Explorer 8.0 SE Basic (hereafter referred to as “Ulead Photo Explorer 8.0”) is a
multimedia image file management tool developed by Ulead Systems, Inc. This tool has functions
to capture images from a digital camera or scanner and to process or edit images, as well as
image file management functions. In addition, slideshows and screen savers can also be easily
created.
● Ulead Photo Explorer 8.0 in the User Supportware 3 CD-ROM has functions that allow you
to use the projector more conveniently, in addition to the functions that come with the software,
for when an NEC projector is connected.
Additional functions are listed below.
For details of each function, refer to the help function of Ulead Photo Explorer 8.0.
• Image transmission
Sends images to the projector.
• PowerPoint file conversion
Converts a PowerPoint file into an image file.
• Logo transfer
Registers an image file as the logo data of the projector.
• Capture
Saves the screens of the personal computer as image files.
• Slideshow start
Sends the image of a slideshow to the projector and executes the slideshow on the
projector.
• Viewer output
Converts a slideshow into an index file that can be played back by the viewer function of
the projector and outputs the index file.
• Connection destination selection
Select the projector to connect.
● The personal computer and projector may be connected with wired LAN or wireless LAN.
6
Page 9

1. What You Can Do with User Supportware 3
1-4. Viewer PPT Converter 3.0
Viewer PPT Converter 3.0 is software that converts files created with PowerPoint 95/97/ 2000/
2002/2003 into an index file that can be displayed with the viewer function of the projector.
● When converting, specify a flash memory card or USB memory as the destination to which
the index file is to be saved. Then you can easily make your presentation by simply inserting
the flash memory card or USB memory into the projector (viewer function of the projector).
● If PowerPoint 2000/2002/2003 is installed in your personal computer, you can activate Viewer
PPT Converter 3.0 from PowerPoint (PPT Converter add-in is automatically registered to
PowerPoint).
1-5. PC Control Utility 3.0
PC Control Utility 3.0 is software that allows you to operate the projector from the personal
computer when the personal computer and the projector are connected with LAN (wired or
wireless) or a serial cable.
● You can operate the projector as follows from your personal computer.
For details of each function, refer to the help function of PC Control Utility 3.0.
••
• Power on/off
••
••
• Input signal switching
••
••
• Muting (temporarily disabling audio/video)
••
••
• Freezing (locking the projected image)
••
••
• Logo image transmission
••
1
What You Can Do with User Supportware 3
7
Page 10

2. Operating Environment
2. Operating Environment
2-1. Supported Projector
User Supportware 3 supports the following NEC projector (as of February 2006)
Reference
NP Series
LT Series
Some of software can be used with projectors other than the above projectors. For details,
refer to the help function of each software.
NP2000/NP1000
LT380/LT280
8
Page 11

2. Operating Environment
2-2. Operating Environment
The following is the operating environment for Image Express Utility 2.0. For the operating
environment of other software, please refer to the help function of each software.
Supported OS
Supported hardware
CPU
Memory
Network environment
Resolution
Screen Colors
Windows 2000 Professional Service Pack 4 or later
Windows XP Home Edition Service Pack 2 or later
Windows XP Professional Service Pack 2 or later
Windows XP Tablet PC Edition
(Windows XP Tablet PC Edition Service Pack 2 or later)
• Windows power-saving function is not supported.
• The "Easy Connection" only supports the "Computer
Administrator" authority of Windows XP.
IBM PC/AT compatible personal computers
CD-ROM drive required for installation
Sender personal computer
Pentium MMX processor or higher required
Pentium 800 MHz or higher recommended
Recipient personal computer
Pentium III 800 MHz or higher required
Pentium 4 1.6 GHz or higher recommended
Windows XP
128 MB or more required (192 MB or more recommended)
• More memory may be necessary if other applications run
at the same time.
Windows 2000
64 MB or more required (128 MB or more recommended)
• More memory may be necessary if other applications run
at the same time.
TCP/IP-compatible LAN or wireless LAN environment required
1024 dots × 768 lines recommended
High Color (15 bits, 16 bits)
True Color (24 bits, 32 bits)
• 256 or fewer colors are not supported.
2
Operating Environment
Reference
If the communication mode has been set to “802.11 Ad Hoc” for wireless LAN of the
projector, IEEE802.11b specification (maximum transmission speed of 11 Mbps) is applied.
9
Page 12
3. Connecting LAN Cable
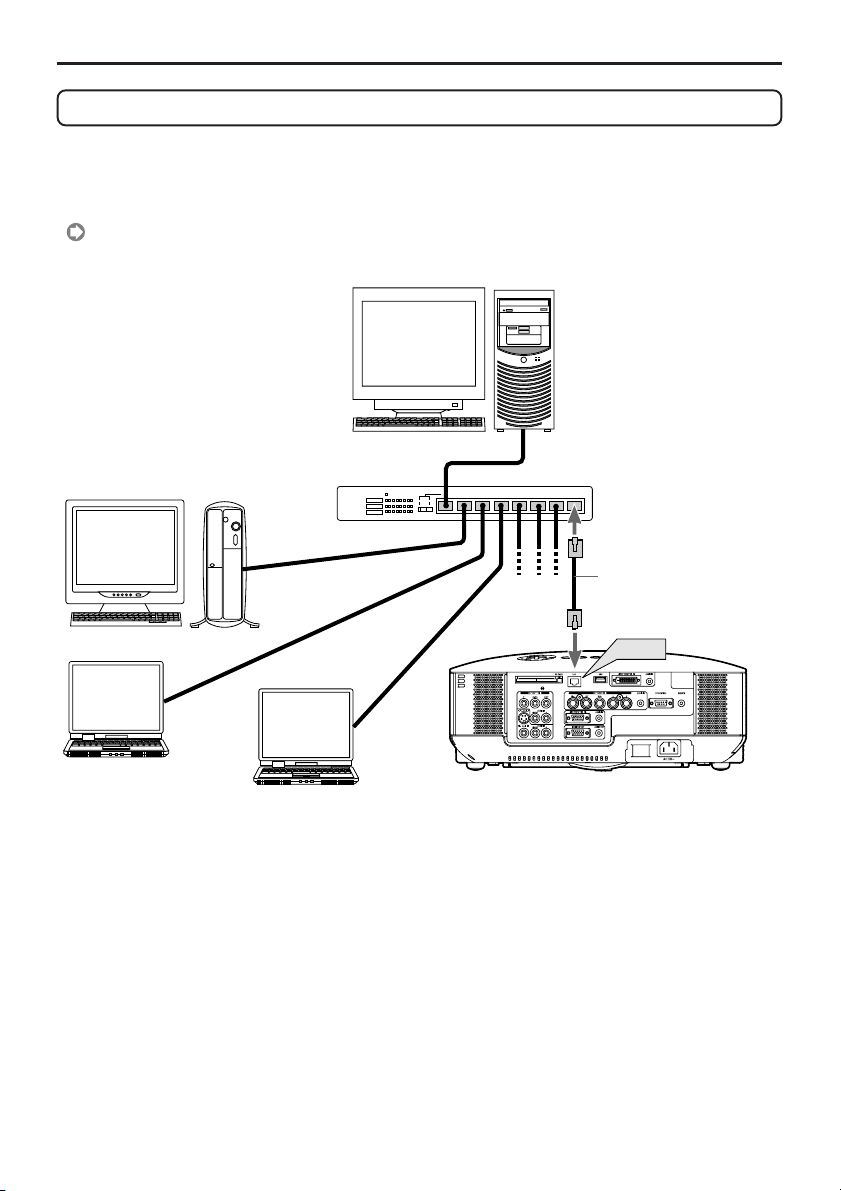
3. Connecting LAN Cable
Connect a LAN cable to the LAN port (RJ-45) of the projector when connecting the projector to
wired LAN.
After connecting LAN cable to the projector, set the required settings for the projector
page 24).
(
Server
HUB, etc.
LAN cable
(commercially available)
10
LAN
Page 13

4. Attaching Wireless LAN Card
4. Attaching Wireless LAN Card
Insert the wireless LAN card into the PC card slot on the rear panel of the projector.
Important
• The wireless LAN card must be inserted into the PC card slot in the correct direction. It
cannot be inserted in the reverse direction. If the card is inserted in the reverse direction
with excessive force applied, the pins in the projector and the PC card slot may break. Be
sure to insert the wireless LAN card with its label facing up.
• Before touching the LAN card, touch a metallic object (such as a door knob or aluminum
window frame) to discharge the static electricity from your body.
• Always insert or remove the wireless LAN card when the main power is turned off. Failure to do
so may cause projector malfunction or damage to the wireless LAN card. If the projector will not
work correctly, turn off the projector, wait 30 seconds, and turn it back on.
■ Setting card in PC card slot
1
Press POWER
ON/STAND BY
button to set
the projector to Stand-by mode, press the “O
(off)” side of the main power switch of the
projector.
2
With the label on the wireless LAN card facing
up, slowly insert the card into the slot
horizontally.
Note
Do not apply any excessive force while inserting the card.
4
Attaching Wireless LAN Card
S
E
L
E
C
T
3D REFORM
3D REFORM
AUTO ADJUST
AUTO ADJUST
SOURCE
SOURCE
O
O
N
N
/S
/S
T
T
A
A
N
N
D
D
B
B
Y
Y
11
Page 14

4. Attaching Wireless LAN Card
S
E
S
E
S
E
■ Removing card from PC card slot
1
Press POWER
ON/STAND BY
press the “O (off)” side of the main power switch of the projector.
2
Slowly press the PC card eject button.
The PC card eject button will slightly come forward.
3
Slowly press the PC card eject button once again.
The inserted card will slightly come forward.
button to set the projector to Stand-by mode,
S
E
L
E
C
T
3D R
3D R
EFOR
EFOR
M
M
AUTO
AUTO
ADJUS
ADJUS
T
T
SOUR
SOUR
CE
CE
ON/STAND BY
ON/STAND BY
P
P
C
C
C
C
A
A
L
L
A
A
R
R
M
M
D
D
P
P
S
S
T
T
A
A
T
T
P
P
U
U
O
O
S
S
W
W
E
E
R
R
4
Slowly pull out the card.
Reference
PC Card Lock
The supplied PC card lock prevents an optional wireless LAN card from being ejected
during use.
The screw for the PC card lock is mounted under the PC card slot on the rear side of the
projector. To attach the PC card lock to the projector, first remove the screw and use it.
12
L
E
C
T
Wireless LAN card
PC card lock
L
E
C
T
L
E
C
T
Page 15

5. Setting the LAN Setting of Projector
5. Setting the LAN Setting of Projector
Reference
For how to turn on/off the power to the projector and how to operate the buttons and
remote control of the projector, refer to “User’s Manual” included in the User’s Manual
CD-ROM.
5-1. Displaying On-Screen Menu (LAN Mode)
Preparation:
Turn on the power to the projector and project images to the screen.
It is not necessary to select the signals.
1
Press the
The on-screen menu will be displayed.
button.
Highlight
5
Setting the LAN Setting of Projector
2
Use the button to select the Setup submenu.
3
Press the button.
The “Basic” tab will be highlighted.
13
Page 16

5. Setting the LAN Setting of Projector
4
Press the button three times to highlight the “Installation” tab.
5
Press the
SELECT
button three times to highlight “LAN Mode”, and press
the button.
The “LAN Mode” screen will be displayed.
• To make setting of wireless LAN
Proceed to “5-2. Wireless LAN” ( next page).
• To make setting of wired LAN
Proceed to “5-3. Wired LAN” ( page 24).
14
Page 17

5. Setting the LAN Setting of Projector
5-2. Wireless LAN
When inserting the wireless LAN card into the PC card slot of the projector, configure the LAN
settings in the “PC Card” page of “LAN Mode” selected from On-Screen Menu.
■ Flow of Setting
Step
Display "PC Card" page of "LAN Mode".
1
Step Select "Profiles".
2
3
Step Enable or disable "DHCP".
If "Disabled" (without check mark)
Step Input "IP Address".
4
Step Input "Subnet Mask".
5
Step Input "Gateway".
6
Step Input "DNS Configuration".
7
Step - Setting of "Advanced".
8
16
Setting of "Network Type".
8
Select SSID in "Site Survey".
9
Input "SSID" (if necessary).
10
Select "Mode" (if necessary).
11
Select "Channel" (if necessary).
12
Step Finalize "Advanced".
17
If "Enabled" (with check mark)
Setting of "WEP"
13
Select the number of bits of "WEP".
14
Select "Key Select".
15
Set "Key 1 to Key 4".
16
If "Easy Connection" is selected
5
Setting the LAN Setting of Projector
Step Reconnect the network.
18
Step Finalize the setting.
19
15
Page 18

5. Setting the LAN Setting of Projector
■ Setting Wireless LAN
1
Display the “PC Card” page of “LAN Mode”.
Configure the setting of wireless LAN in the "PC Card” page of “LAN Mode” selected from On-Screen Menu.
<1> In the “LAN Mode” setting window, if the “Built-in” tab is highlighted, press the button
to highlight “PC Card”.
The “PC Card” page will be displayed.
• If “LAN Mode” is not displayed, refer to “5-1. Displaying On-Screen Menu (LAN Mode)” ( page 13).
2
Select “Profiles”.
<1> Press the
<2> Use the
SELECT
SELECT /
button once to highlight the “Profiles” field and press the button.
button to highlight “Profile 1”, and press the button.
• “Profile 1” or “Profile 2” can be stored in the memory of the projector as the setting for LAN.
• “Easy Connection” is a mode in which the personal computer that runs Image Express Utility 2.0 in
the User Supportware 3 CD-ROM is easily connected to wireless LAN.
Note that “Easy Connection” does not support software other than Image Express Utility 2.0.
• When “Easy Connection” is selected, the IP address and subnet mask do not have to be set. To
use “Easy Connection”, the OS of the personal computer must be Windows XP ([Computer
Administrator] privilege). It cannot be used with Windows 2000.
The communication mode is “802.11 Ad Hoc”.
16
Page 19
5. Setting the LAN Setting of Projector
3
Set “DHCP”.
Check this check box if the network to which the projector is to be connected automatically assigns the
IP address via the DHCP server.
<1> Press the
A check will be given if there is no mark found in the box.
• To clear the check box, press the button once again.
• If “DHCP” is checked, move the highlight to “Advanced” and press the button. Proceed
• If “DHCP” is not checked, input “IP Address”, “Subnet Mask”, “Gateway”, and “DNS
4
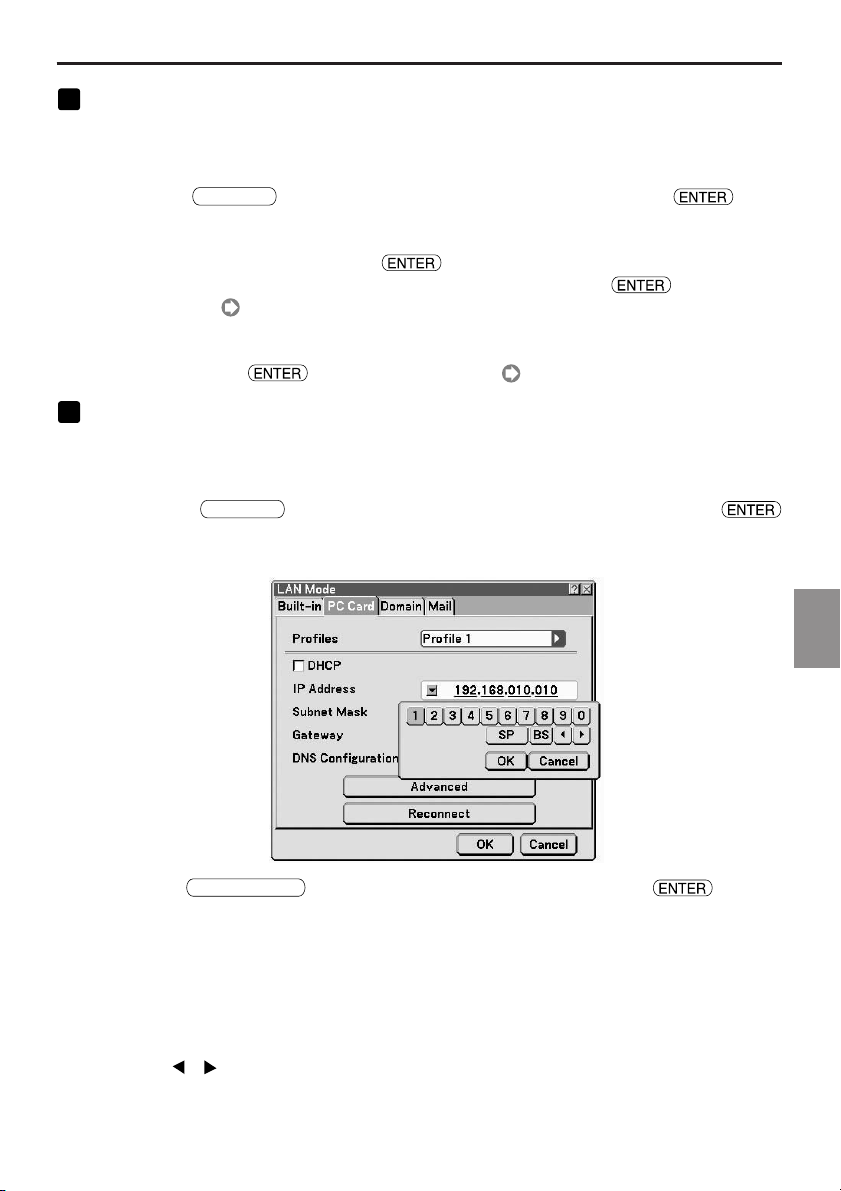
Input “IP Address”.
If “DHCP” is not checked, input the IP address assigned to the projector by the administrator of the
network to which the projector is connected.
<1> Press the
button.
The software keyboard will be displayed.
SELECT
to step 9 ( page 19). Input “DNS Configuration” field as necessary.
Configuration” as necessary. After each item has been set, move the highlight to “Advanced”
and press the button. Proceed to step 9 ( page 19).
SELECT
button once to highlight the “DHCP” check box and press the button.
button once to highlight the “IP Address” field and press the
5
Setting the LAN Setting of Projector
<2> Use the
The characters will be input.
<3> Repeat step <2> above to input the IP address.
• Each button on the software keyboard has the following function.
SELECT
• “SP”.................. Inputs space.
• “BS”.................. Deletes one character to the left of the character insertion position in the
• “ ”“ ” ........... Moves the character insertion position in the “IP Address” field to the left
• [OK] .................. Finalizes the input character and closes the software keyboard.
• [Cancel] ............ Cancels the input character and closes the software keyboard.
button to select a number to input, and press the button.
“IP Address” field.
or the right.
17
Page 20
5. Setting the LAN Setting of Projector
5
Input “Subnet Mask”.
If “DHCP” is not checked, input the subnet mask of the network to which the projector is connected.
The method of inputting is the same as that of the “IP Address” field.
6
Input “Gateway”.
If “DHCP” is not checked, input the default gateway of the network to which the projector is connected.
The method of inputting is the same as that of the “IP Address” field.
7
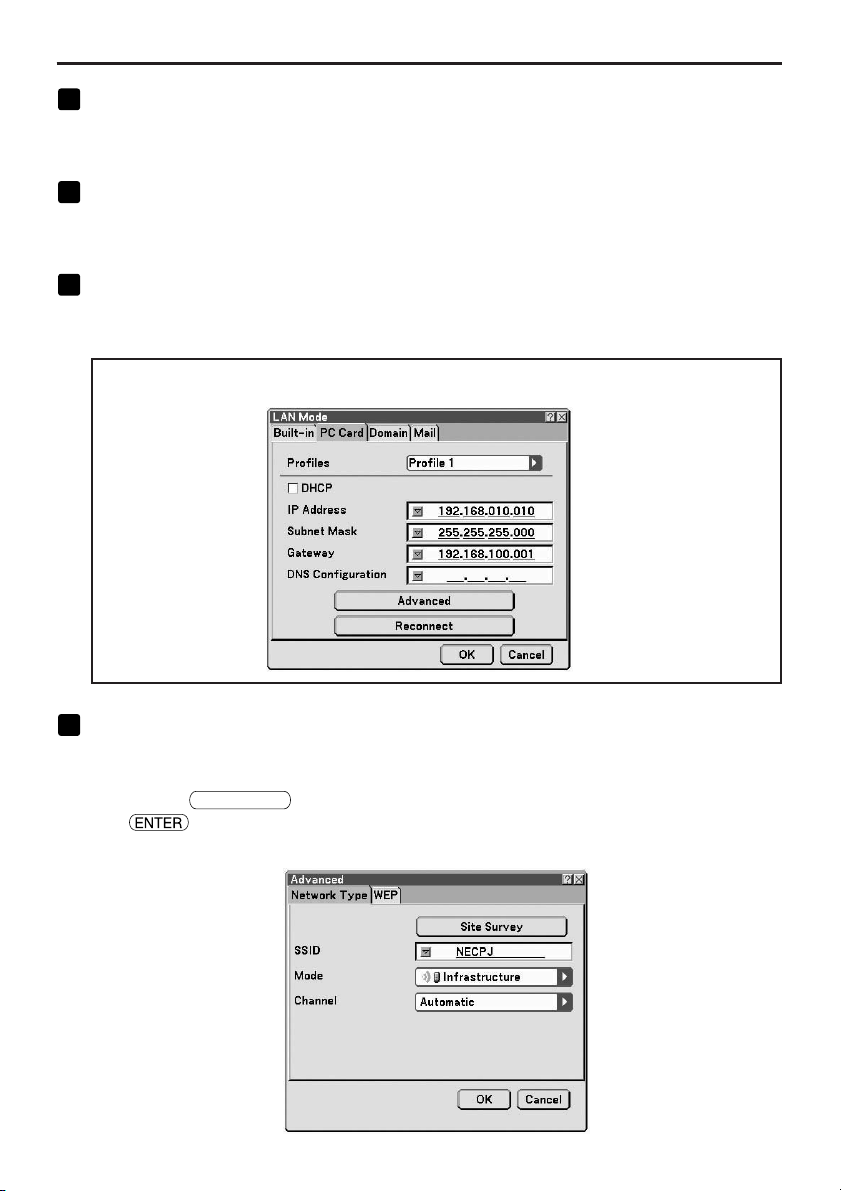
Input “DNS Configuration”.
Set the IP address of the DNS server of the network to which the projector is connected.
The method of inputting is the same as that of the “IP Address” field.
Example of setting 1
8
Select “Advanced”.
Set “Network Type” and “WEP” (encryption) specific to wireless LAN.
<1> Use the
The “Advanced” screen will be displayed.
SELECT /
button.
button to highlight “Advanced” on the “PC Card” page and press the
18
Page 21
5. Setting the LAN Setting of Projector
9
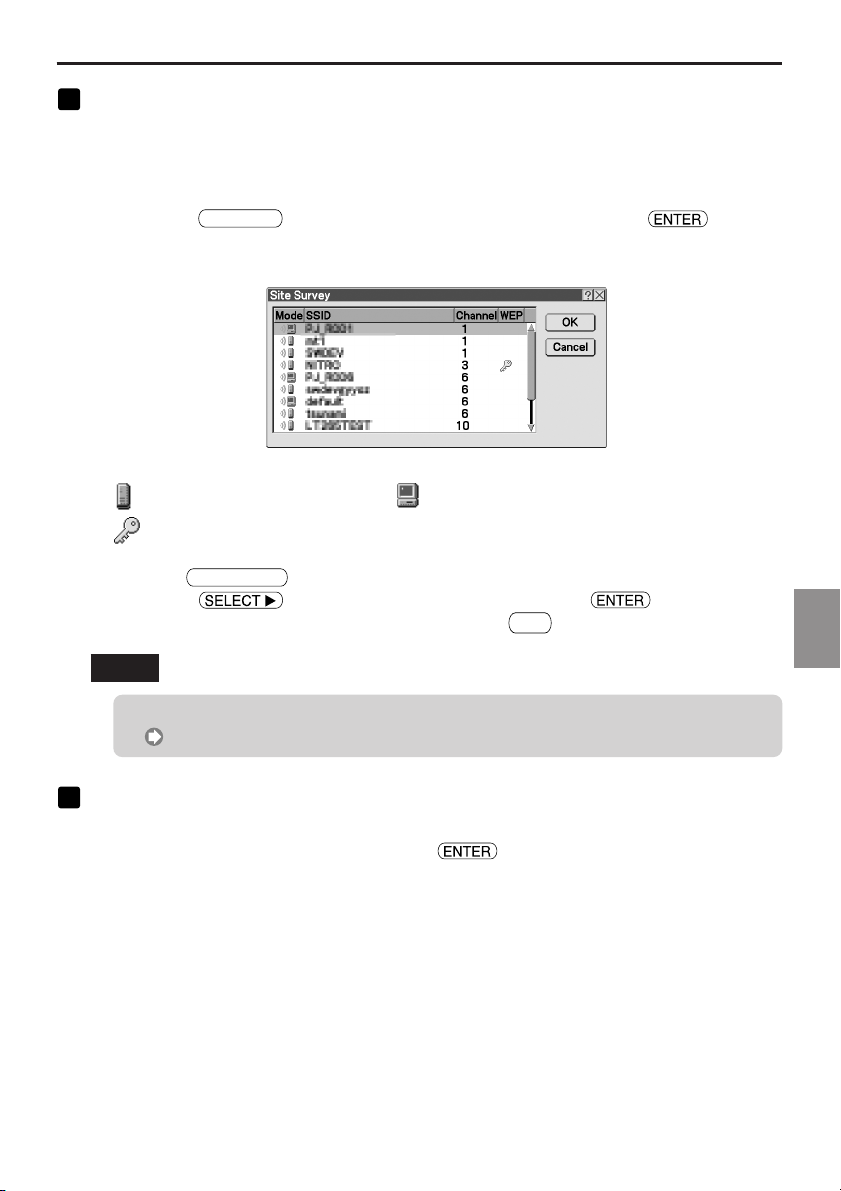
Select SSID from “Site Survey” (if necessary).
A list of SSID that can be connected to wireless LAN in this place are displayed, and the SSID that are
to be connected are selected from this list. When SSID is selected from the list, the “SSID” field,
“Mode” field and “Channel” field will also be automatically set.
<1> Press the
Searching SSID will begin.
When searching SSID is complete, a list of SSID is displayed.
Icon
............ Access point ............ Personal computer (Ad Hoc)
<2> Use the
Press the button once to highlight [OK] and press the button.
If the SSID to be connected is not on the list, press the
SELECT
........... WEP setting
SELECT /
button once to highlight “Site Survey” and press the button.
button to highlight the SSID of the network to be connected.
button.
EXIT
Note
To connect SSID for which WEP is set, the same setting must be made on the projector
( page 21).
5
Setting the LAN Setting of Projector
10
Input or edit “SSID” (if necessary).
SSID selected in “Site Survey” are automatically input.
If the highlight is moved to the “SSID” field and the button is pressed, a software keyboard is
displayed and characters can be input or edited.
The default setting of the projectors is “NECPJ”.
19
Page 22

5. Setting the LAN Setting of Projector
11
Select “Mode” (if necessary).
The communication mode of the SSID selected in “Site Survey” are automatically selected.
The settings can be changed by moving the highlight to the “Mode” field and pressing the
button.
• “Infrastructure” .............. This is selected if communication is performed with two or more devices
connected by wired or wireless LAN via an access point.
• “802.11 Ad Hoc” ............ This is selected to perform peer-to-peer communication between the
projector and a personal computer by using only wireless LAN.
Example of connection when Example of connection when
“Mode” is “Infrastructure”“Mode” is “802.11 Ad Hoc”
L
L
E
E
N
F
S
T
S
H
I
F
T
R
I
G
H
T
D
O
W
N
U
P
S
E
L
E
C
T
3D
3D
REF
REF
ORM
ORM
A
A
UTO
UTO
AD
AD
JU
JU
ST
ST
S
S
OURC
OURC
E
E
O
O
N
N
/
/
S
S
T
T
A
A
P
P
N
N
C
C
D
D
C
C
B
B
L
A
L
A
A
A
R
Y
R
Y
M
M
D
D
P
P
S
S
T
T
A
A
T
T
P
P
U
U
O
O
S
S
W
W
E
E
R
R
Access
point
Wired LAN
Example of setting 2
L
L
E
E
N
F
S
T
S
H
I
F
T
R
I
G
H
T
DOWN
U
P
S
E
L
E
C
T
3D
3D
RE
RE
FO
FO
RM
RM
AUT
AUT
O A
O A
DJU
DJU
ST
ST
S
S
OUR
OUR
CE
CE
O
O
N
N
/
/
S
S
T
T
A
A
P
P
N
N
C
C
D
D
C
C
B
B
L
A
L
A
A
A
R
Y
R
Y
M
M
D
D
P
P
S
S
T
T
A
A
T
T
P
P
U
U
O
O
S
S
W
W
E
E
R
R
12
Select “Channel” (if necessary).
Select a channel for communication using wireless LAN.
If neighboring channel numbers are used in one area, the speed of wireless LAN communication
decelerates. To avoid such a situation, select discrete channel numbers.
The setting upon shipment is "Automatic".
20
Page 23
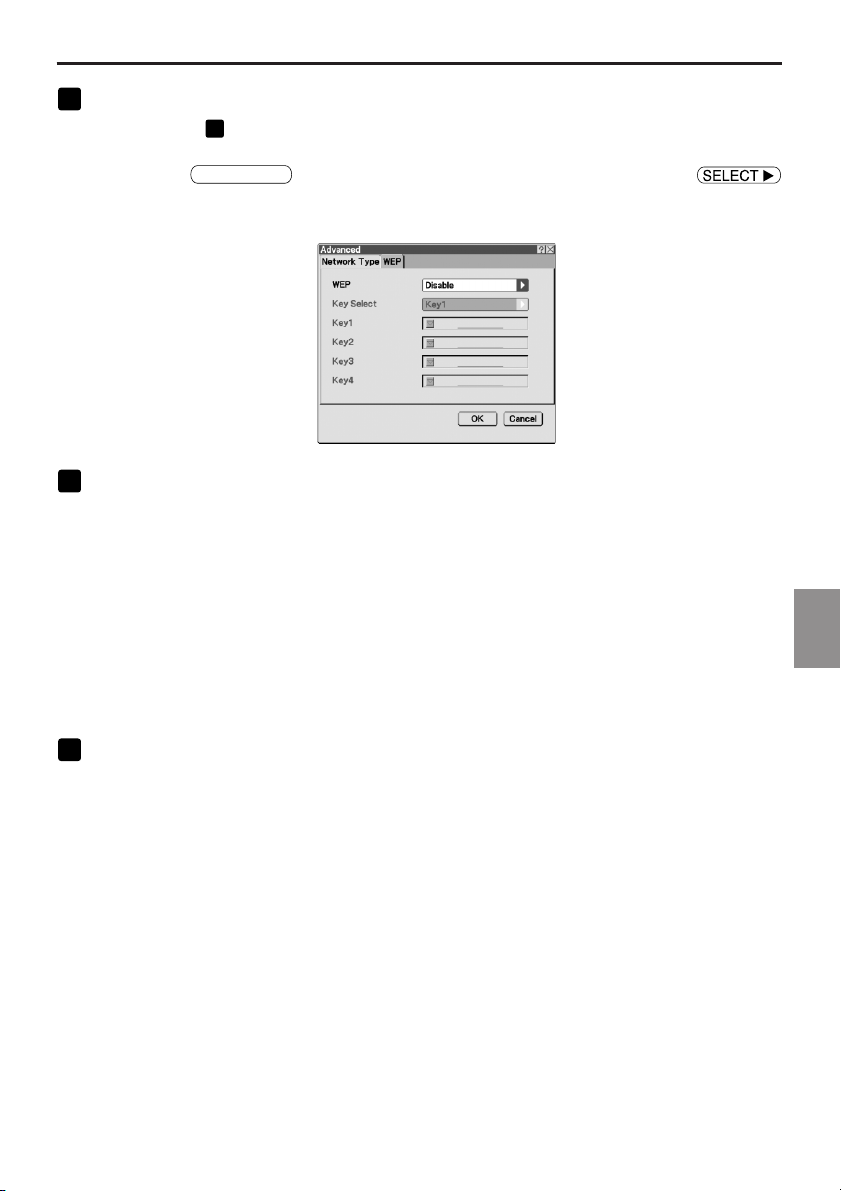
13
Select “WEP” page (if necessary).
Proceed to step 17 if WEP is not set.
5. Setting the LAN Setting of Projector
<1> Use the
button to highlight the “WEP” tab.
The “WEP” page will be displayed.
14
Select “WEP”.
Select whether WEP (encryption) is performed or not.
To perform WEP (encryption), set an encryption key.
• Disable ................... WEP (encryption) is not performed. There is a danger that the contents of
• 64 bit ...................... 64-bit data is used as an encryption key of WEP.
• 128 bit .................... 128-bit data is used as an encryption key of WEP.
• 152 bit .................... 152-bit data is used as an encryption key of WEP.
Security is reinforced as the number of bits is increased.
15
Select “Key Select” (only when WEP is selected).
If “64 bit”, “128 bit”, or “152 bit” is selected from “WEP”, select which of the following encryption keys,
“Key 1” to “Key 4”, is to be used.
SELECT /
button to select the “Network Type” tab, and press the
communication are monitored.
5
Setting the LAN Setting of Projector
21
Page 24
5. Setting the LAN Setting of Projector
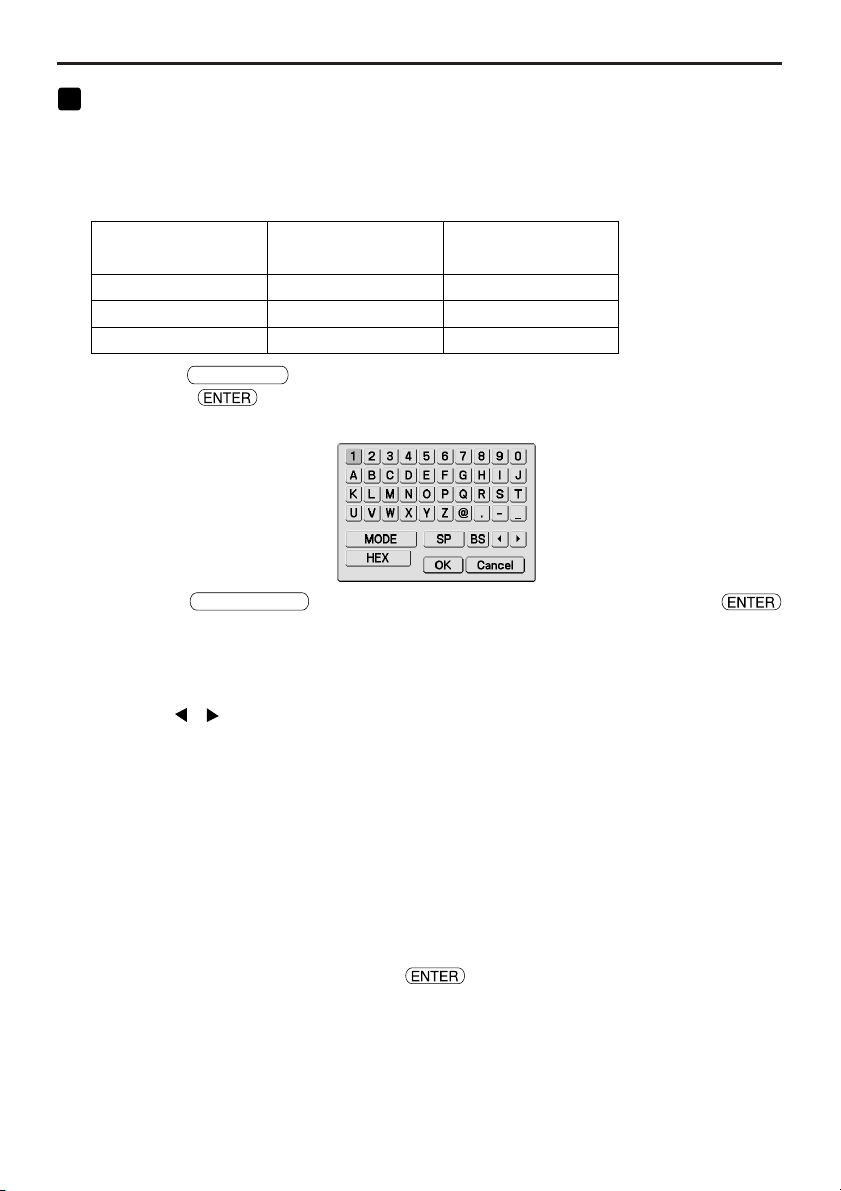
16
Input “Key 1” to “Key 4”.
If “64 bit”, “128 bit”, or “152 bit” is selected from “WEP”, input an encryption key.
Set the same encryption key as the access point and personal computer to be connected by the
wireless LAN.
Four types of keys can be input for WEP.
Authentic Method
64 bit
128 bit
152 bit
<1> Use the
press the button.
The software keyboard will be displayed.
<2> Use the
button.
<3> Repeat step <2> above to input the encryption key.
The character will be input.
• Each button on the software keyboard has the following function.
SELECT /
SELECT
• “ ”“ ” ................. Move the character insertion position in the encryption key field to the
• “MODE” ................. Selects uppercase, lowercase, or special characters.
• “SP” ....................... Inputs space.
• “BS” ....................... Deletes one character to the left of the character insertion position in
• [OK] ....................... Finalizes the input character and closes the software keyboard.
• [Cancel] ................. Cancels the input character and closes the software keyboard.
• “HEX” or “ASCII” .... Selects alphanumeric character input or hexadecimal number input.
Alphanumeric
Character (ASCII)
5 characters
13 characters
16 characters
button to select an item for which the encryption key is to be input and
button, move the highlight to a character, and press the
left or the right.
the encryption key field.
• When “HEX” is displayed, alphanumeric characters (ASCII) can
be input.
• To input hexadecimal numbers, move the highlight to “HEX” and
press the button. “ASCII” will be displayed instead of
“HEX”, and hexadecimal numbers can be input.
• When hexadecimal numbers can be input, “0x” is automatically
displayed at the beginning of the input field.
Hexadecimal
Number (HEX)
10 characters
26 characters
32 characters
22
Page 25

17
Finalize “Advanced”.
<1> Use the
The “PC card” page will be displayed again.
18
Reconnect the network.
<1> Use the
19
Finalize the setting.
<1> Use the
The contents of the setting will be stored in the memory of the projector.
SELECT /
SELECT /
SELECT /
5. Setting the LAN Setting of Projector
button to highlight [OK] and press the button.
button to highlight “Reconnect” and press the button.
button to highlight [OK] and press the button.
5
Setting the LAN Setting of Projector
23
Page 26

5. Setting the LAN Setting of Projector
5-3. Wired LAN
When connecting a LAN cable to the LAN port of the projector, configure the LAN settings in the
“Built-in” page of “LAN Mode” selected from On-Screen Menu.
■ Flow of setting
Step Display "Built-in" page of "LAN Mode".
1
Step Select "Profiles".
2
24
3
Step Enable or disable "DHCP".
If "Disabled" (without check mark)
Step Input "IP Address".
4
Input "Subnet Mask".
Input "Gateway".
Step Input "DNS Configuration".
5
Step Reconnect the network.
6
Step Finalize the setting.
7
If "Enabled" (with check mark)
Page 27

5. Setting the LAN Setting of Projector
■ Setting Wired LAN
1
Display the “Built-in” page of “LAN Mode”.
Configure the setting of wired LAN in the “Built-in” page of “LAN Mode” selected from On-Screen
Menu. If “LAN Mode” is not displayed, refer to “5-1. Displaying On-Screen Menu (LAN Mode)”
( page 13).
2
Select “Profiles”.
“Profile 1” or “Profile 2” can be stored in the memory of the projector as the setting of LAN.
<1> Press the
button.
<2> Use the
3
Set “DHCP”.
Follow the same procedure as in “5-2. Wireless LAN” ( page 17).
4
Input “IP Address”, “Subnet Mask”, and “Gateway”.
Follow the same procedure as in “5-2. Wireless LAN” ( page 17,18).
5
Input “DNS Configuration”.
Follow the same procedure as in “5-2. Wireless LAN” ( page 18).
6
Reconnect the network.
<1> When all the above items have been input or set, use the
“Reconnect” and press the button.
7
Finalize the setting.
<1> Use the button to highlight [OK] and press the button.
The setting will be stored in the memory of the projector.
SELECT
SELECT /
button once to highlight the “Profiles” field and press the
button to highlight “Profile 1” or “Profile 2”, and press the button.
SELECT /
button to highlight
5
Setting the LAN Setting of Projector
25
Page 28

6. Setting the LAN Setting of Personal Computer
6. Setting the LAN Setting of Personal Computer
([Example] Wireless LAN of Windows XP: Ad Hoc connection)
This section explains the procedure for Ad Hoc connection of wireless LAN between the personal
computer and projector, by using the wireless network setting function with Windows XP Service
Pack 2 (SP2).
Preparation:
• Install a commercially available wireless LAN card driver to your personal computer, and
complete setup of the wireless LAN card. For how to install the driver, refer to the User’s
Manual of the wireless LAN card.
• Check the display of the Windows XP taskbar. If a network connection utility dedicated to
a wireless LAN card is executed, terminate that utility.
• Make the wireless LAN setting of the projector. For details, refer to “4. Attaching Wireless
LAN Card” (
Shown below is an example of the wireless LAN settings for the projector.
[Example of settings for projector]
page 11) and “5. Setting the LAN Setting of Projector” ( page 13).
Contents
IP Address
Subnet Mask
SSID
Mode
WEP
Key Select
Key 1
1
Click Windows [Start] → [Control Panel].
The “Control Panel” window will be displayed.
2
Double-click the “Network Connections”.
• If the “Control Panel” window displays categories (with a blue background), click [Network and
Internet Connections], and then click [Network Connections].
The “Network Connections” window will be displayed.
Settings
192.168.100.10
255.255.255.0
NECPJ
802.11 Ad hoc
64 bit
Key 1
NECVT
26
Page 29

6. Setting the LAN Setting of Personal Computer
3
Right-click the [Wireless Network Connection] icon and click [Property].
Right-click
3-1
Click
3-2
A property window for wireless network connections will be displayed.
Setting the LAN Setting of Personal Computer
4
From the list of [This connection uses the following Items:], select (click)
[Internet Protocol (TCP/IP)] and click [Properties].
Select
4
-1
Click
4
-2
• The property window for wireless network connections will be displayed again.
6
27
Page 30

6. Setting the LAN Setting of Personal Computer
5
Click [Use the following IP address:], and input [IP address]and[Subnet mask].
• If, for example, the [IP address] and [Subnet mask] of the projector are set as show in “Example of
settings for projector” on page 26, set the personal computer as shown below.
• Example of setting the IP address and subnet mask.
Projector ( page 26)
IP Address
Subnet Mask
6
Click [OK].
A property window for wireless network connections will be displayed.
7
Click the [Wireless Networks] tab.
8
Click [Use Windows to configure my wireless network settings], display the
192.168.100.10
255.255.255.0
Click
5
-1
Personal computer(Screen Below)
192.168.100.20
255.255.255.0
Input
5
-2
check mark ( ) and click [OK].
Click
7
Click
8
-1
28
Click
8
-2
Page 31

6. Setting the LAN Setting of Personal Computer
9
Right-click the [Wireless Network Connection] icon and click [View Available
Wireless Networks].
Right-click
9-1
Click
9-2
The “Wireless Network Connection” window is displayed.
10
From the list, select SSID of the projector to be connected and click [Connect].
Click
10
-1
Setting the LAN Setting of Personal Computer
The “Wireless Network Connection” window is displayed.
10
-2
Click
6
29
Page 32

6. Setting the LAN Setting of Personal Computer
11
Input WEP key to set up an encryption key and click [Connect].
• Input an encrypiton key of “WEP”. Enter “NECVT” in the Network key box, for example, if you have
the WEP setting on the projector side configured with “64bit” and have “NECVT” input as Key 1.
• The same encryption key should be input in the confirmation.
Input
11
-1
Input for confirmation
11
-2
Click
11
-3
The window above does not appear unless WEP key is not configured on the projector to be connected.
Follow the steps below to change the encryption settings. For details, see the Windows Help file.
10
(1)Click [Change advanced settings] from the screen in step
The “Wireless Network Connection Properties” window is displayed.
(2)Click the [Wireless Network] tab.
(3)Select SSID of the projector under [Preferred Networks] and click [Properties].
The “Properties” of the selected SSID is displayed. Configure the wireless network key under the
[Association] tab according to those for the projector.
This Completes the Ad Hoc connection of wireless LAN on the personal computer (Windows XP).
Use each software program in User Supportware 3 to transmit the PC screen to the projector.
above.
30
Page 33
7. Refer to “User’s Guide” and Help
7. Refer to “User’s Guide” and Help
Each software program in User Supportware 3 contains each help file that explains the functions
and operation methods in detail.
Also, “User’s Guide” (PDF) explains the basic operation procedure of each software program
carefully.
7-1. Displaying “User’s Guide” (PDF)
Important
• User Supportware 3 CD-ROM does not contain Acrobat Reader or Adobe Reader. If no
PDF file can be opened from your personal computer, download Adobe Reader from the
Adobe Systems Incorporated home page, and install it.
1
Turn on your personal computer to start Windows.
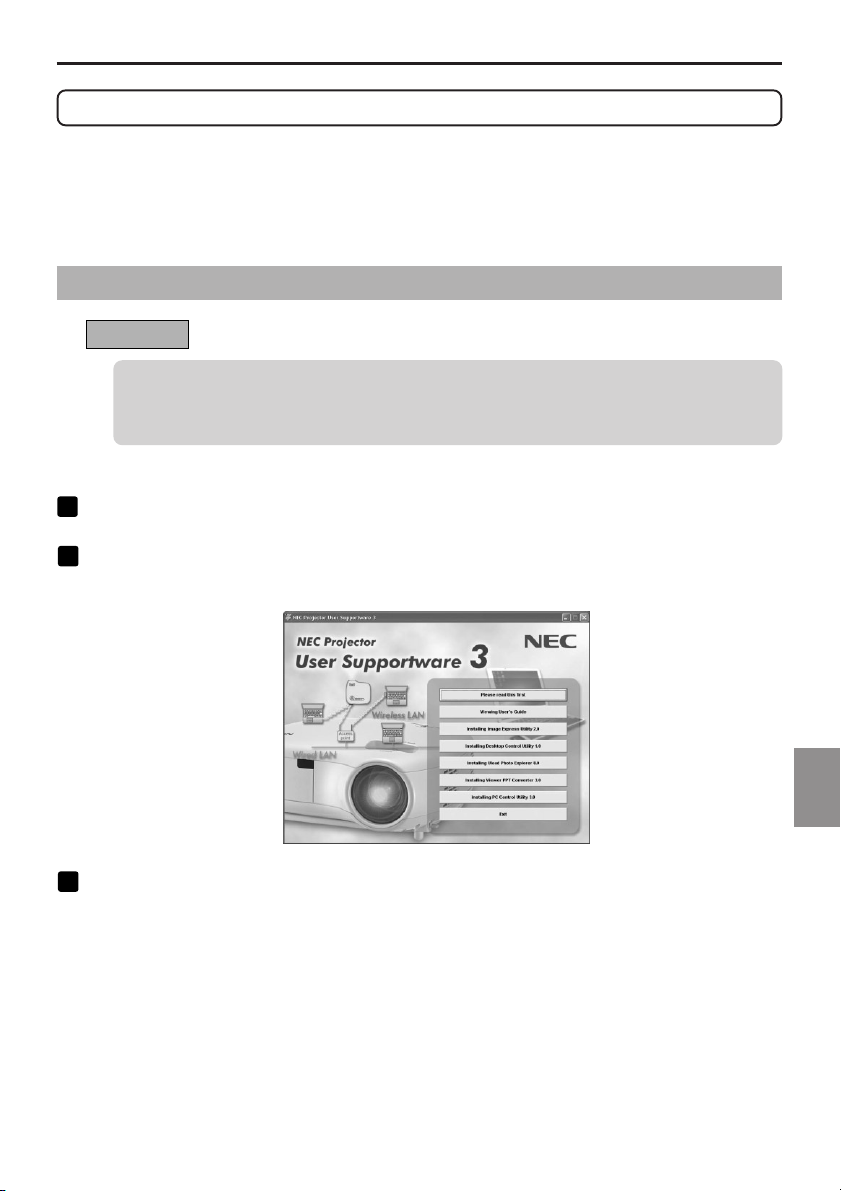
2
Insert User Supportware 3 CD-ROM in the CD-ROM drive.
The menu will be displayed.
3
Click [Viewing User’s Guide].
[User’s Guide] will be displayed.
For the following operations, browse User’s Guide according to Acrobat Reader or Adobe Reader
operation method.
Refer to
“User
’s Guide
” and Help
7
31
Page 34

7. Refer to “User’s Guide” and Help
Reference
If the above menu is not displayed, follow these steps.
1. Click [Start] of Windows.
2. Click [Run...].
3. In the [Open:] field, enter the CD-ROM drive name *1 (e.g., “Q:\”) followed by
“SETUP.EXE” (e.g., “Q:\SETUP.EXE).
*1 The CD-ROM drive name will vary depending on your personal computer’s configuration.
4. Click [OK].
The menu will be displayed.
32
Page 35
7. Refer to “User’s Guide” and Help
7-2. Using Help
The functions and operation of each software are described on the Help screen. This section
introduces how to display and use the Help screen.
Note
• The following instructions use operations under Windows XP as an example.
• Before displaying Help, install each software onto your personal computer from the User
Supportware 3 CD-ROM. You cannot run the programs nor view Help directly from the
CD-ROM.
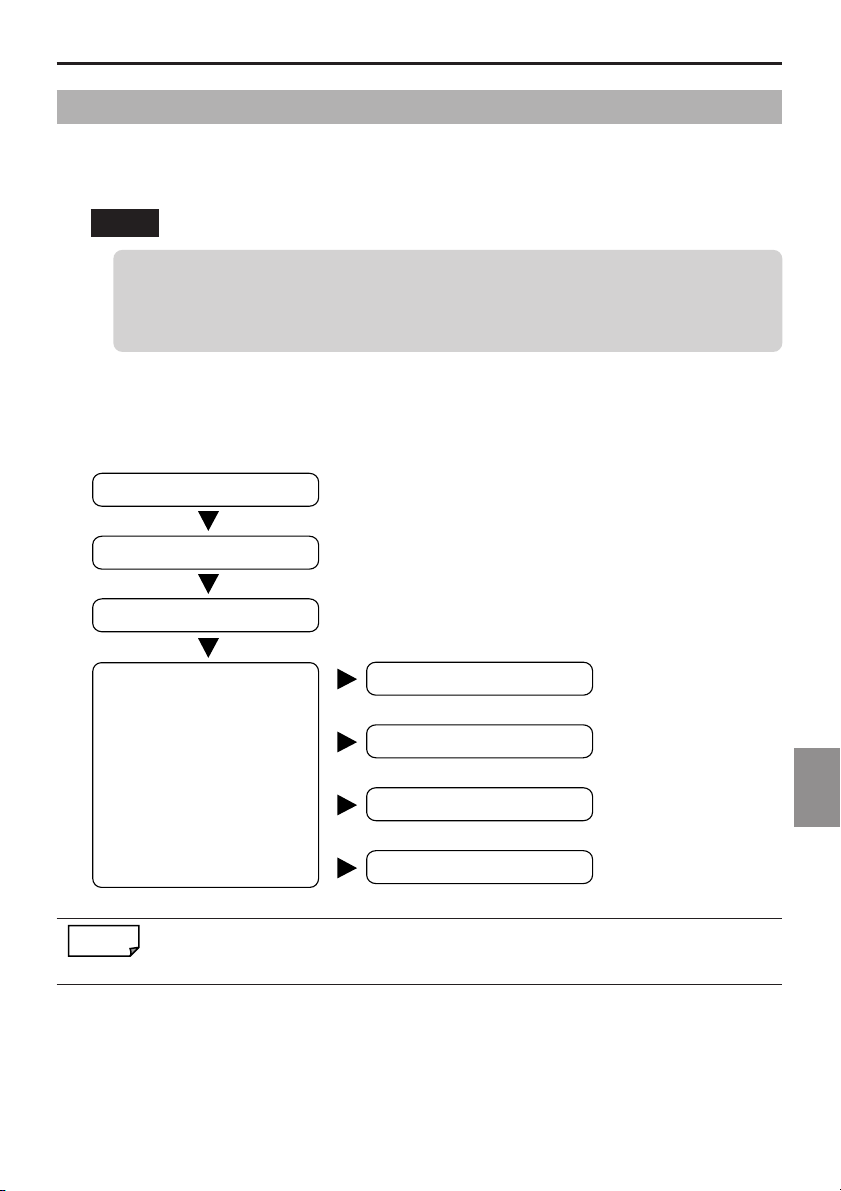
■ Displaying Helps other than Ulead Photo Explorer 8.0
Click in the following order.
Start
All Programs
NEC Projector User Supportware
Desktop Control Utility 1.0
Image Express Utility 2.0
PC Control Utility 3.0
Viewer PPT Converter 3.0
Reference
You can also display the Help by starting each program and clicking the [Help] menu or
[Help] icon of that program.
Desktop Control Utility 1.0 Help
Image Express Utility 2.0 Help
PC Control Utility 3.0 Help
Viewer PPT Converter 3.0 Help
Refer to
“User
’s Guide
” and Help
7
33
Page 36
7. Refer to “User’s Guide” and Help
■ Displaying Ulead Photo Explorer 8.0 Help
To display the Help of Ulead Photo Explorer 8.0, start the software and make your selection
from the [Help] menu.
1
Click [All Programs] in the start menu → [Ulead Photo Explorer 8.0 SE Basic]
→ [Ulead Photo Explore 8.0 SE Basic], in that order.
The Ulead Photo Explorer 8.0 will start.
2
From the Ulead Photo Explorer 8.0 menu bar, select [Help] → [Ulead Photo
Explorer Help] or [NEC Projector User Supportware Help].
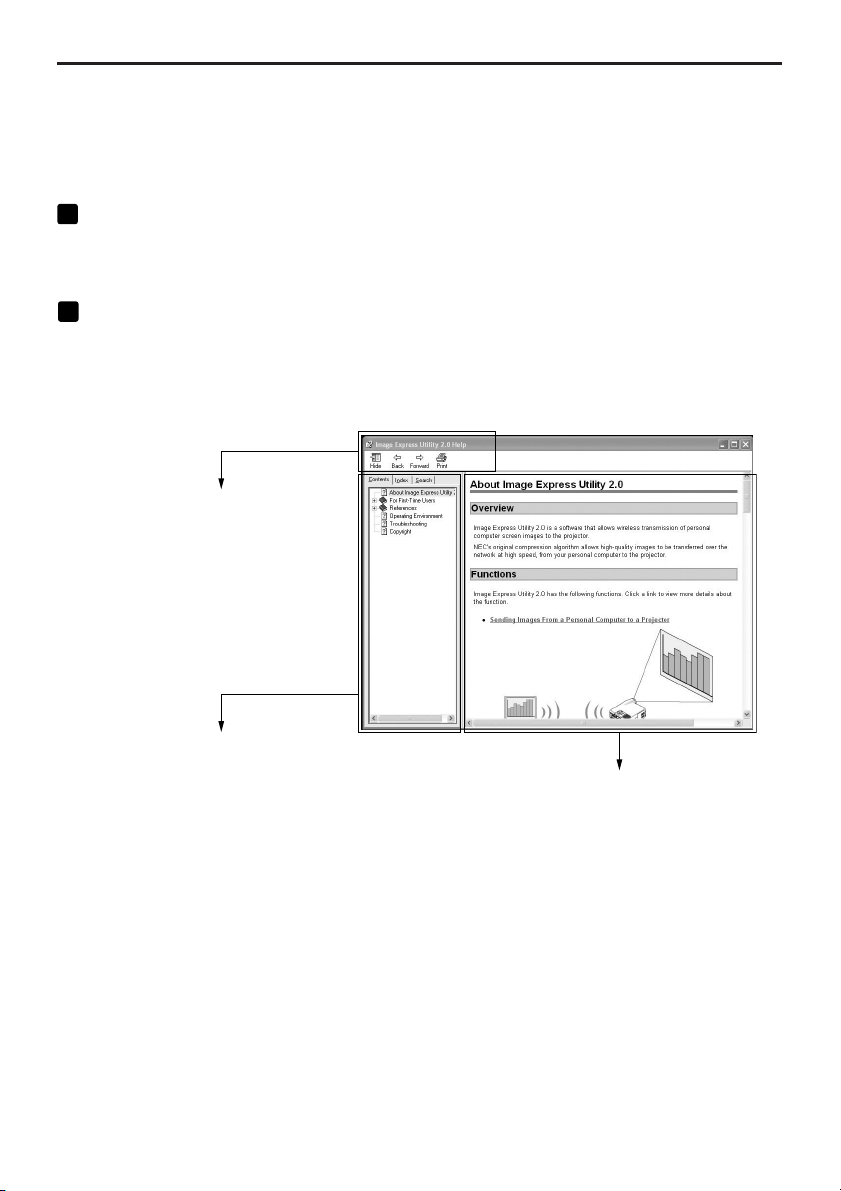
■ Help Screen Layout
[Hide] button
Shows/hides the left pane.
[Back] button
Displays the previously displayed topic.
[Forward] button
Displays the previously displayed topic when
using the [Back] button to step back through
the topics.
[Print] button
Prints the displayed Help topic.
[Contents] tab
Displays the contents of Help. Select a topic
to display contents in the right pane.
[Index] tab
Displays a list of keywords for Help. Select a
keyword to display the associated topics.
[Search] tab
Searches through Help for the entered text.
34
34
Explanation displaying area
Displays content for the topic selected in the left pane.
Page 37

MEMO
35
Page 38

MEMO
36
Page 39

• IBM and PC/AT are registered trademarks of International Business Machines
Corporation.
• Microsoft, Windows, PowerPoint, MS, MS-DOS, and DirectX are registered
trademarks or trademarks of Microsoft Corporation in the U.S. or other countries.
• Ulead Systems and Photo Explorer are registered trademarks of Ulead Systems,
Inc.
• Adobe, Adobe Acrobat Reader, and Adobe Reader are registered trademarks or
trademarks of Adobe Systems Incorporated in the U.S. or other countries.
• Other manufacturer names and product names in this document are registered
trademarks or trademarks of the respective companies.
©NEC Viewtechnology, Ltd. 2006 Printed in Japan First edition February 2006
Reproduction, modification, and other uses are prohibited without the permission of NEC Viewtechnology, Ltd.
Page 40

NEC Projector
User Supportware 3
■ Image Express Utility 2.0
■ Desktop Control Utility 1.0
■ Ulead Photo Explorer 8.0 SE Basic
■ Viewer PPT Converter 3.0
■ PC Control Utility 3.0
NP2000 / NP1000 Wired and Wireless Network Setup Guide
Printed on Recycled Paper 7N8P6581
 Loading...