

Page 1

Nikon
N90
INSTRUCTION MANUAL
Page 2

CONTENTS
FOREWORD................................................................................4
NOMENCLATURE....................................................................5 10
BASIC OPERATION...............................................................11 26
MOUNTING THE LENS
INSTALLING BAHERIES
CHECKING BAHERY POWER............................................14-15
LOADING FILM
BASIC SHOOTING
REWINDING FILM
GENERAL FUNCTIONS........................................................27 66
FILM ADVANCE MODE.......................................................28-29
SINGLE-FRAME SHOOTING
CONTINUOUS SHOOTING
EXPOSURE METERING SYSTEM
MATRIX METERING.............................................................30
CENTER-WEIGHTED METERING
SPOT METERING
SETTING METERING SYSTEM...........................................32
FOCUS.................................................................................33-48
FOCUS AREA..................................................................33-35
AUTOFOCUS...................................................................35-39
AUTOFOCUS WITH MAIN SUBJECT OFF CENTER
SPECIAL FOCUSING SITUATIONS
MANUAL FOCUS.............................................................46-48
EXPOSURE MODE..............................................................49-66
SELECTING EXPOSURE MODE
SETTING EXPOSURE MODE
FLEXIBLE PROGRAM
............................................................
..........................................................
....................................................................
..............................................................
...............................................................
...............................................
..................................................
.....................................
......................................
................................................................
.....
...............................
....................................
..............................................
..........................................................
12
13
16-18
19-24
25-26
28
29
30-32
31
31
40-43
44-45
50-53
54
55
2
Page 3

OPERATION IN SHUTTER-PRIORITY AUTO
EXPOSURE MODE
OPERATION IN APERTURE-PRIORITY AUTO
EXPOSURE MODE
OPERATION IN MANUAL EXPOSURE MODE
VARI-PROGRAM 67 85
WHAT IS VARI-PROGRAM?...............................................68-69
SELECTING VARI-PROGRAM SOFTWARE
SHOOTING WITH VARI-PROGRAM
PORTRAIT PROGRAM
PORTRAIT PROGRAM WITH RED-EYE REDUCTION
(with SB-25 Speedlight exclusively)
HYPERFOCAL PROGRAM.............................................76-77
LANDSCAPE PROGRAM................................................78-79
SILHOUETTE PROGRAM
SPORT PROGRAM
CLOSE-UP PROGRAM
SPECIAL FUNCTIONS 86 102
EXPOSURE COMPENSATION...........................................87-93
AE-L (AUTO EXPOSURE LOCK) LEVER
TO OBTAIN METER READING FOR A PARTICULAR
SUBJECT IN MANUAL EXPOSURE MODE
EXPOSURE COMPENSATION BUTTON.......................92-93
SELF-TIMER OPERATION..................................................94-96
ONE-SHOT SELF-TIMER.....................................................95
TWO-SHOT SELF-TIMER.....................................................96
TO CONFIRM SHARPNESS BEFORE SHOOTING
—DEPTH-OF-FIELD PREVIEW BUTTON
.....................................................
.....................................................
..............
.....................
..................................
...................................................
............................
..............................................
.........................................................
...................................................
.......................
..............
...........................
56-59
60-62
63-66
70-71
72-85
72-73
74-75
80-81
82-83
84-85
88-89
90-91
97
Page 4

LONG TIME EXPOSURE—Using bulb setting
TO USE NON-DX-CODED FILM
INTERCHANGING FOCUSING SCREENS
............................................................
.........................
..................................
98-99
100
101-102
LENSES....................................................................................103-106
LENS COMPATIBILITY CHART
...................................................
104-106
FLASH PHOTOGRAPHY 107 126
NIKON SPEEDLIGHT COMPATIBILITY.........................................108-109
FLASH MODES AVAILABLE
WITH NIKON SPEEDLIGHT
WHAT YOU CAN DO
WITH YOUR NIKON SPEEDLIGHT..............................................109
TTL AUTO FLASH—AUTOMATIC BALANCED
FILL-FLASH AND STANDARD HL FLASH
TYPE OF TTL AUTO FLASH......................................................110-113
AUTOMATIC BALANCED FILL-FLASH
WITH TTL MULTI SENSOR—3D MULTI-SENSOR
BALANCED FILL-FUSH AND MULTI-SENSOR
BALANCED FILL-FLASH..............................................................114
CENTER-WEIGHTED/SPOT FILL-FLASH........................................115
STANDARD TTL FLASH
SHUTTER SPEED/APERTURE FOR EACH EXPOSURE
MODE IN TTL AUTO FLASH
TTL AUTO FLASH ORERATION................................................118-119
TO MAKE NIGHT BACKGROUND MORE VISIBLE
------
SLOW SYNC OPERATION................................................120-121
TO CREATE NATURAL-LOOKING STREAM OF LIGHT
—REAR-CURTAIN SYNC
RED-EYE REDUCTION
.........................................................
................................
...................................................................
................................................
..........................................................
110-119
116-117
122-123
108
115
Page 5

{for use with SB-25 only)..........................................................124-125
NOTES ON FLASH PHOTOGRAPHY..................................................126
EV CHART FOR FLASH PHOTOGRAPHY...........................................127
MISCELLANEOUS 128 147
ACCESSORY COMPATIBILITY............................................................129
CAMERA CARE TIPS
NOTES ON BAHERIES................................................................132-133
SPECIFICATIONS........................................................................134-138
GLOSSARY..................................................................................139-142
LCD PANEL/VIEWFINDER INDICATIONS
..................................................................
..................................
130-132
143-147
Page 6

FOREWORD
Thank you for choosing the new Nikon N90 camera, it’s a high-performance
camera that offers today’s newest and most advanced capabilities, aii designed to
enable you to take more exciting pictures.
Because the N90 camera has a host of new features, many of which you may not
be familiar with, before actually taking pictures you should thoroughly read the
instruction manuals provided, including the “PHOTOGRAPHIC SYSTEM" leaflet.
These will help you understand the technical terminology used and how the various
new features work.
The N90, in its standard configuration, is a powerful camera with important features
such as Nikon’s exciusive Advanced Matrix Meter, many autofocus features inciuding
Focus Tracking, and Nikon’s latest innovation, TTL Multi-Sensor flash control. To
expand the camera’s performance and take full advantage of all its capabilities, you
will want to consider using the N90 with accessories such as the Nikon MF-26 Multi
Control Back, the Nikon SB-25 AF Speedlight, and the Nikon Data Link System with
1C Card AC-1 E which works exclusively with the Sharp® Electronic Crganizer.
Please read this manual thoroughly, then enjoy experimenting with all of the N90’s
exciting features. Good luck, and have a great time with this high-tech Nikon.
Sharp is a registered trademark of SHARP CORPORATION.
Page 7

NOMENCLATURE
Once you know the names of the parts of your new Nikon N90, as
well as their functions and the camera’s other controis, you will be
surprised how simpie and iogicai the N90 system’s operation can
be.
Page 8

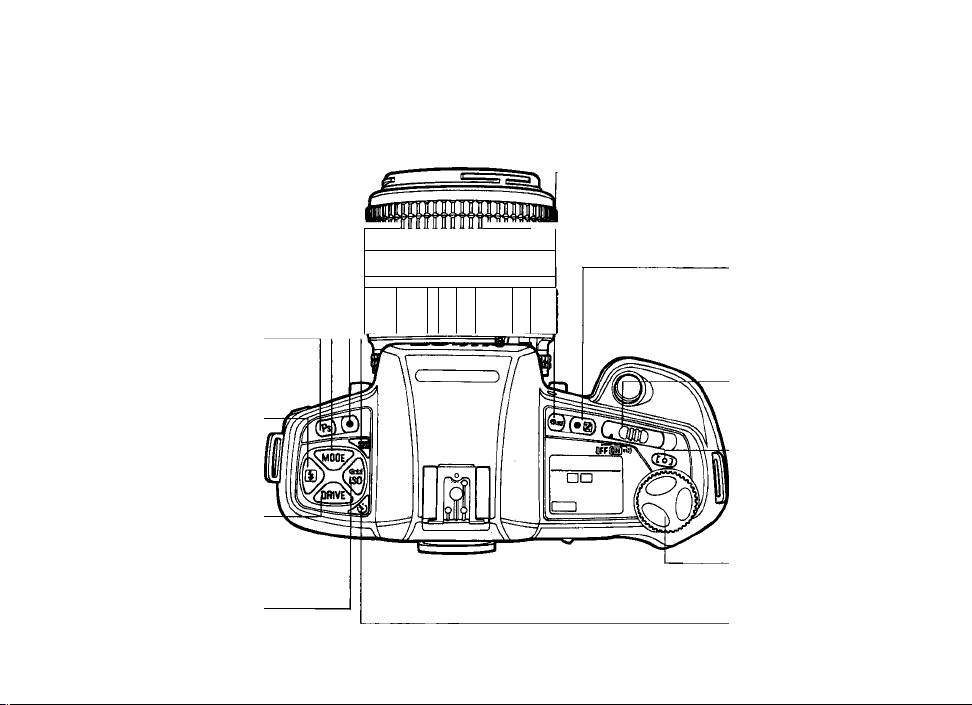
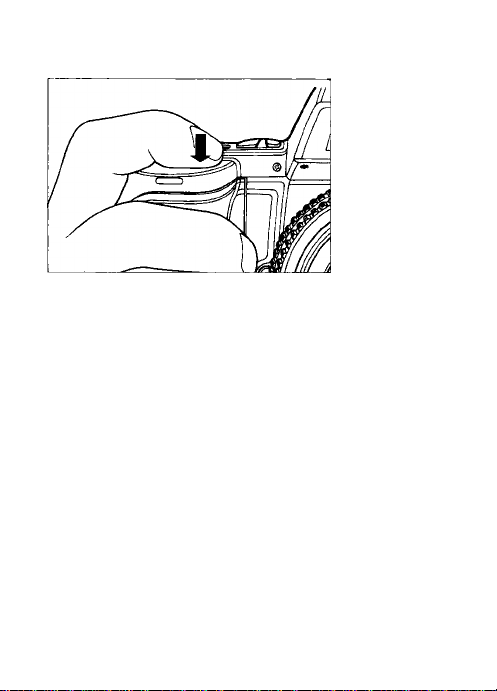
LCD panel (p. 9)
Shutter release button: To
activate exposure meter and
autofocus function, lightly
press; to release shutter,
depress fully; exposure
meter automatically
switches off after 8 sec.
Self-timer indicator LED
(pp. 95-96)
Depth-of-field preview
button (p. 97)
AF-L (Auto Focus Lock)
button: Locks focus when
pressed and held in.
Minimum aperture lock:
Setting for all Programmed
and Shutter-Priority auto
exposure modes.
Accessory shoe: For Nikon dedicated
Speedlights. The rear edge of the shoe
indicates film plane. Exact distance from lens
mounting flange to film plane is 46.5mm.
Sync terminal
10-pin remote terminal:
For Electronic Organizer
Connecting Cord MC-27,
Remote Cord MC-20,
etc. (see attached
PHOTOGRAPHIC
SYSTEM leaflet).
Lens release button
Focus mode selector:
S for Single Sen/o AF (pp.
36-37).
C for Continuous Servo AF
(pp. 38-39).
M for Manual focus (pp.
46-48).
_______________
Lens mounting index
Aperture scale
Focusing ring
Optional lens illustrated
(AF Zoom-Nikkor 28-70mm f/3.5-4.5 D)
Page 9

Eyepiece shutter lever: Used to pre
vent stray light from entering viewfinder
Viewfinder/LCD panel
illumination button:
Press to illuminate
viewfinder and LCD
panel, useful in dim
light. Illumination
automatically switches
off 8 sec. after you
remove your finger from
button.
Camera strap eyelet
Camera back lock releases: To
open camera back, slide camera
back lock releases together.
AE-L (Auto Exposure Lock)
lever: Sliding and holding
lever in locks auto exposure.
Film cartridge
confirmation window
Viewfinder eyepiece
Focusing screen type B:
Interchangeable with
optional type E screen
(pp. 101-102).
7
Page 10
Reset button: Press and hold this
button and exposure compensation/
reset button together for instant reset
of basic camera settings (p. 20)
Metering system (K)button*:
See page 32.
Film rewind button
Exposure mode (MODE) button*
See page 54.
Vari-Program (Ps) button*: See
pages 70-71.
Flash sync mode (i) button*:
See pages 121, 123 and 125 .
Film advance mode (DRIVE)
button*: See pages 28-29
Film speed/film rewind (S)
button: See pages 18, 25 and
100.
* Used with command dial
8
AF NIKKOR
■
----------
' m k o n
W
Exposure compensation/
ff
15 5
oo 5 2
T ?l
1
I
50 35
II
«¿8-70mm'
l=a5-4.5
21
reset button (• 0)*: See
pages 20 and 92.
Power switch: •'!) setting
activates eiectronic beeper
(pp. 14-15).
Focus area button: See
page 33.
Command input control
dial (Command dial):
Rotate to set various
functions.
Self-timer button (CS))*: See
page 95-96.
Page 11
LCD panel indications
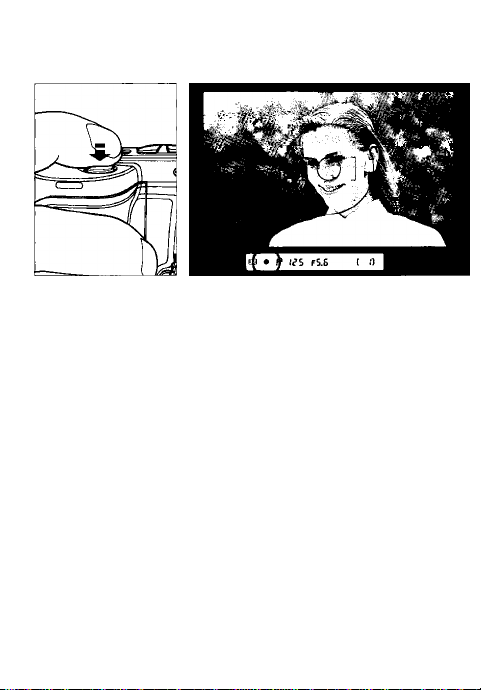
1. Focus area
2. Exposure mode
3. Metering system
4. Film speed setting mode
5. Exposure compensation
6. Shutter speed
7. Autofocus
8. Aperture
9. Release/Focus priority
10. Flash sync mode/Red-Eye Reduction
11. Manual focus
9
10
11
12
13
14
12. Electronic Organizer*
13. Custom*
14. Battery
15. Film advance mode
16. Frame counterA/ari-Program/ISO speed/Self-timer
duration/compensation value
17. Film loading
18. Film advance and rewind
19. Self-timer
‘Appears only when Data Link System is in use.
Page 12
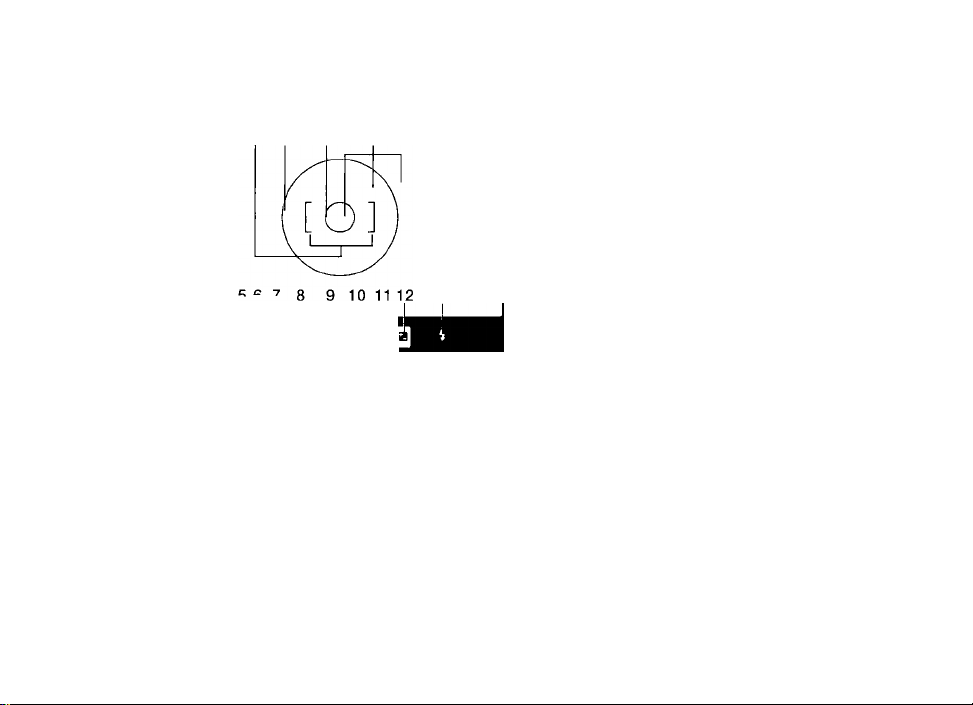
Viewfinder indication
w U I
S8ob F8.S
1. Wide-Area focus brackets
2.12mm-dia. reference circle for CenterWeighted Metering
3. 3mm dia. reference circle for Spot
Metering/Spot-Area focus
4. Clear matte field
5. Focus area
6. Focus indicators: 9 indicates a
stationary subject is in focus;
indicates a moving subject is in focus;
► ^ shows Focus Tracking; blinking
► 4 indicates autofocus is
impossible; ► and 4 arrows indicate
front and rear focus, respectively.
10
7. Exposure mode
8. Shutter speed
9. Aperture
10. Electronic analog display
11. Frame counterA/ariProgram/compensation value
12. Exposure compensation
13. Flash recommend/ready light
Lightly pressing the shutter release
button to turn on the exposure
meter switches on the viewfinder
illuminator at a low light level.
In dim light, when the exposure
meter is on, the illuminator
automatically switches on at full
brightness.
Page 13

BASIC OPERATION
This section shows you how to prepare the camera for shooting—
e.g., how to mount iens, load film, etc.—as well as how to actually
take pictures. Whether you’re a beginner or a seasoned
photographer, you should master this section before proceeding
further.
11
Page 14
MOUNTING THE LENS
Position the lens in the camera's
2
bayonet mount so that the
mounting indexes on iens and camera
body are aligned. Taking care not to
press the lens release button, twist lens
counterclockwise until it locks into place.
Remove camera body cap and front
and rear lens caps.
• When mounting/removing lens, make sure that the camera's power is turned
off and avoid direct sunlight.
• See page 104 for Nikon lens compatibility chart.
12
To remove
Push and hold lens release button and
turn lens clockwise.
Page 15
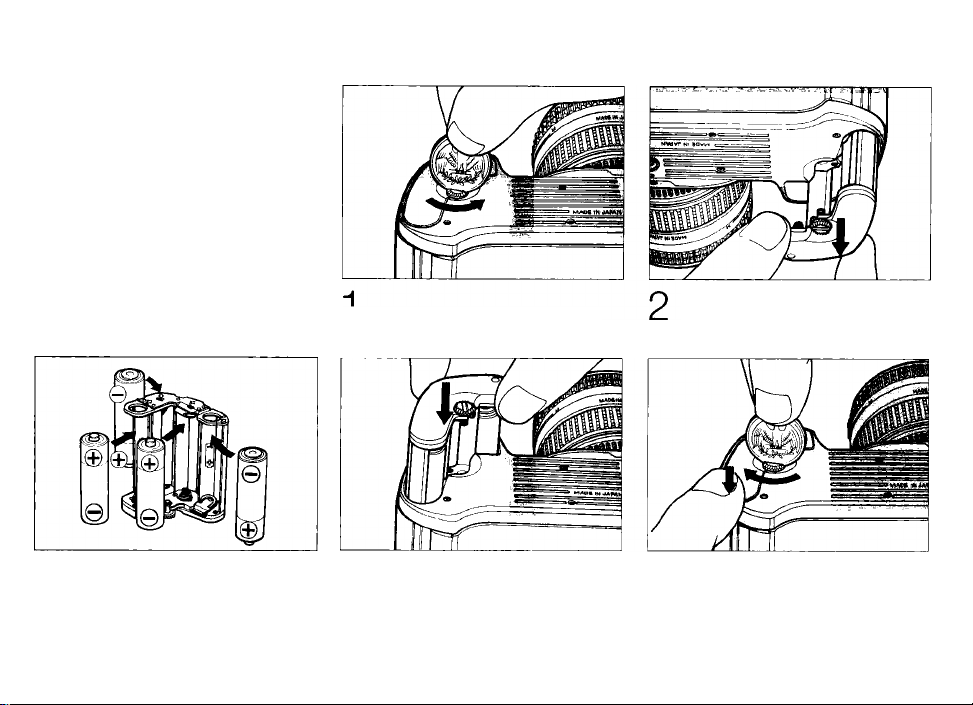
INSTALLING BATTERIES
• Make sure the power switch is set
at OFF position.
• NiCd batteries that have "+"
terminals exceeding 6mm in
diameter cannot be used.
• Manganese batteries are not
recommended for use at low
temperatures.
• See page 133 for "NOTES ON
BATTERIES."
Loosen battery holder lock screw
with a coin or similar object.
Remove battery holder.
Install four AA-type alkaline-
manganese, NiCd or high
3
performance manganese batteries with
"-I-” and terminals positioned as
shown inside holder.
Return battery holder to battery
chamber.
Press holder into place as you
tighten lock screw with coin.
13
Page 16
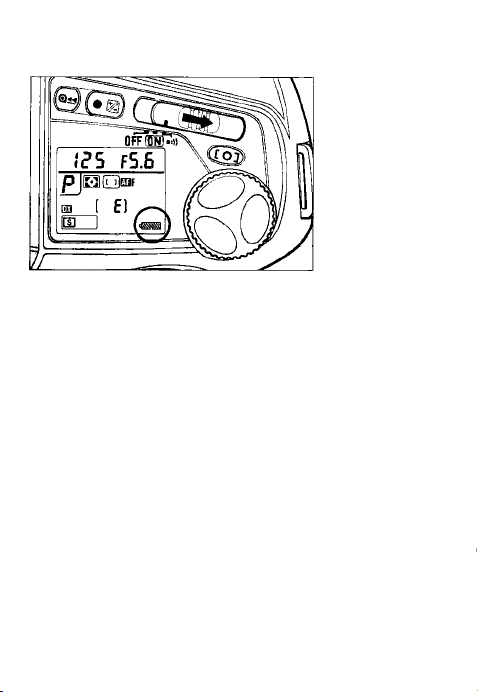
CHECKING BATTERY POWER
Slide power switch to ON or ■«) position, and confirm that a full
battery mark appears on LCD panel, indicating sufficient battery
power.The battery mark and exposure indications automatically
turn off after 8 sec.
Sufficient battery power.
\ I I I /
/ I I I N
I blinks with/without blinking
Err, batteries are just about
exhausted. Slide power switch to
OFF and replace batteries with a
fresh set.
14
Batteries are nearing exhaustion.
Have a fresh set ready.
If no indication/mark appears,
batteries are completely exhausted
or imporperly installed. Replace.
Page 17

About exposure meter
You can check battery power anytime by lightly pressing
the shutter release button. This action activates the
exposure meter; the LCD panel and viewfinder LCD show
aperture/shutter speed indications, and autofocus
operation starts (unless camera is set for manual
focusing). The exposure indications and battery mark stay
on for approx. 8 sec. after you take your finger off the
shutter release button, then automatically turn off. If the
shutter is released, these LCD readouts go off approx. 2
sec. after you take your finger off the button.
Data Link System users
You can set automatic meter switch-off as desired: 4
sec., 8 sec.,16 sec., 30 sec., 60 sec. For details, see
Nikon AC-1E card instruction manual.
Page 18

About electronic beeper
With the power switch set to ■')) ,the beeper
is on. Two types of sound are emitted: a
double-beep which indicates in-focus
position, and continuous beeping which is
either an operation signal or an alert.
Double-beep
A double-beep is emitted when a stationary
subject becomes in-focus in the Single
Servo AF mode*.
Continuous beeping sound indicates:
(As an operation signal)
• Film rewind is complete.
• Self-timer is activated (pp. 95-96).
(As an alert signal)
• Possible picture blur due to slow shutter
speed in Programmed or Aperture-Priority
Auto exposure mode.
• Possible over- or underexposure (with H I
or I. o indications) in auto exposure mode*.
• Lens aperture is not set to the minimum
setting in Programmed or Shutter-Priority
auto exposure mode*.
• Film reaches the end of the roll and
requires rewinding*.
• Sounds when the shutter release button is lightly pressed.
• You have loaded a non-DX film or film with
a damaged or unacceptable DX code for
auto DX setting.
• Camera detects an abnormality such as
torn or damaged Aim during film advance.
• Vari-Program is set with non-CPU lenses.
• Shutter-Priority Auto exposure mode is
set with Bulb setting.
• Bulb setting is selected for Automatic
Exposure Bracketing function of MF-26.
• Speedlight is not set to TTL flash mode
with Auto Multi-Program.
Data Link System
users
You can use the
Electronic Organizer
to cancel the double
beep alert for in-focus
and/or the continuous
beep for picture blur
alert.
The beeper also
comes on when the
camera’s computer
memory is full in the
Memo Holder
function.
For details, refer to
Nikon AC-IEcard
instruction manual.
15
Page 19

LOADING FILM
• To avoid fogging film {especially high-ISO film), do not
load/unload film in direct sunlight.
> Usable film speed range for DX-coded film is ISO 25 to
5000.
• For non-DX coded film, see p, 100.
Data Link System users
You can set the camera to DX-priority. For details, see
AC-1 E card instruction manual.
16
Page 20
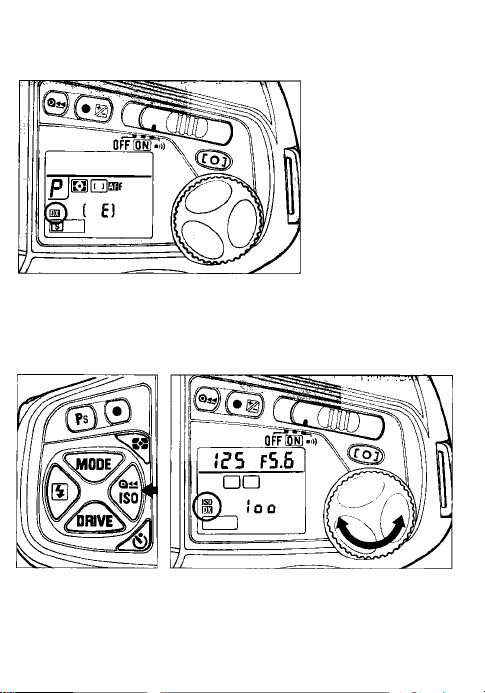
Confirm whether E53 for DX-coded film is shown on the
LCD panel.
If not, press and hold ISO button in, then rotate command dial
until [33 appears.
Page 21
_ _1.1.___
Slide camera back lock releases
together to open camera back.
SHaamm
fTm A ass
j
1 lODaDQODODay
Do not touch the shutter curtains
with your finger or with film leader.
Insert film cartridge.
Pull film leader out to red index
mark.
Check to ensure film is properly positioned with no slack (see illustration)
17
Page 22
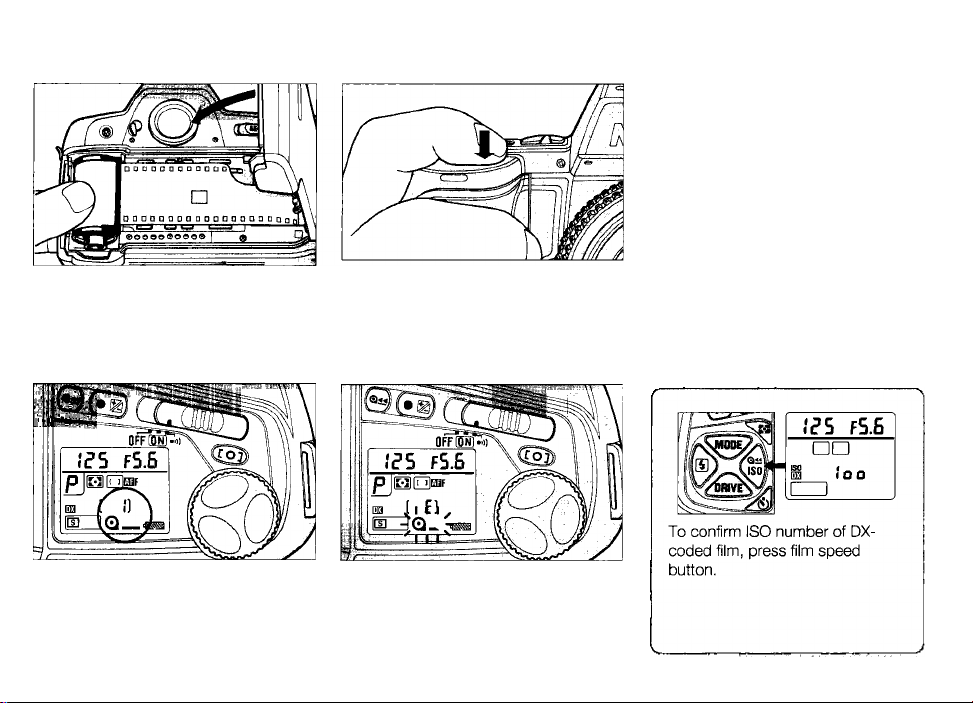
g Gently close camera back until lock
releases snap closed. 7
Fully depress shutter release button
to advance film to frame #1.
• If non-DX-coded film or film with an
unacceptable DX code is loaded, the
£ r r, ISO and EQ marks in the LCD
panel blink, the beeper sounds (if set),
and the shutter is locked. Set ISO
speed manually (see p. 100).
Confirm frame counter shows ! and
Q__symbol appears on LCD
8
panel.
18
> If film is incorrectly positioned, £
remains, Q_ symbol blinks and shutter
is locked. Open camera back and
reload film properly.
Page 23
BASIC SHOOTING
This section features the settings for
most common picture-taking situations
when AF Nikkor' tenses are used:
Fiim advance mode: singie-frame
shooting
Metering: Advanced Matrix Metering
Focus Area: Wide
Focus mode: Singie Servo AF
Exposure mode: Auto Muiti-Program
(If you are using Ai-P-Nikkor lens, use
manual focus [see pp. 46-48]. If you are
using other non-AF Nikkor ienses, use
Center-Weighted or Spot Metering [see
p. 32], manual focus, and AperturePriority Auto or Manual Exposure mode
[see pp. 60-62 or 63-66]. To confirm
usable mode by lens, see chart on p.
104.)
' AF Nikkor lenses includes D-type AF Nikkor lenses
and AF-I Nikkor lenses.
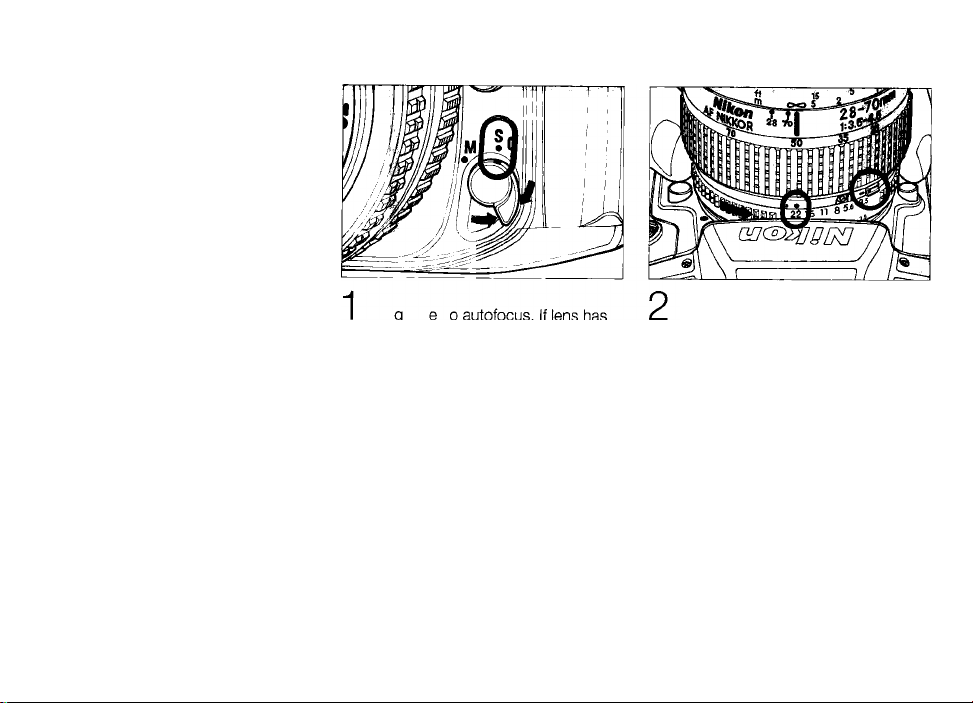
Set focus mode selector to S for
Single Servo autofocus. If lens has
an A-M switch, set switch to A. If you are
using an AF-I Nikkor lens, set the lens
focus mode ring to A or M/A.
Set lens to its minimum aperture
(highest f-number marked in orange
on AF Nikkor lenses) and lock lens
aperture of AF Nikkor lens at its
minimum setting (see lens instruction
manual).
19
Page 24
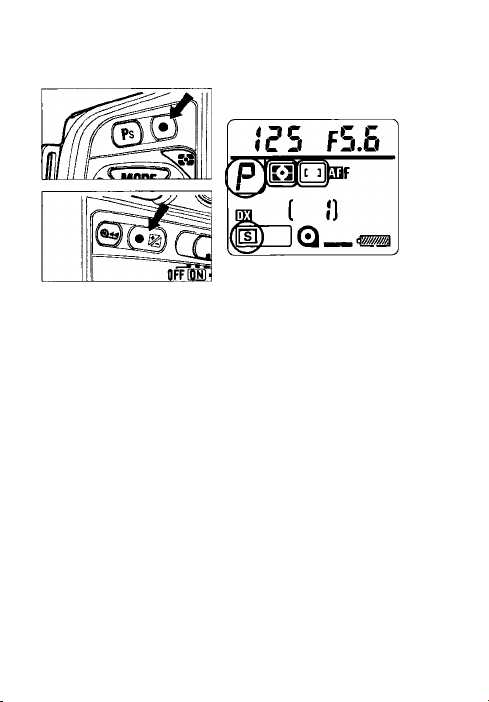
Press • reset button and • 0 button simultaneously for
two seconds until P, E), E] and E3 appear in the LCD
3
panel, indicating that the camera settings are automatically
reset for basic shooting shown here:
Film advance:
Metering system:
Exposure control:
Focus area:
Flexible program setting:
Exposure compensation:
Flash sync mode:
Single frame p3)
Matrix (E)
Auto-Multi Program (P)
Wide (EH)
Cancel
+0
Normal (If Speedlight is set at
rear-curtain sync, rear-curtain
sync will be performed.)
20
Page 25

Data Link System users
When activating Custom Reset with the Nikon AC-1E
card’s Customized Settings function, press and hoid the •
and • 0 buttons for two seconds to retrieve the Custom
Reset settings.
When one or more functions/options (including Custom
Reset) of the Customized Settings have been set, OKI
appears in the camera’s LCD panel*. To cancel the
functions/options of the Customized Settings and reset
your camera to the default setting (which will make 0003
disappear from the LCD), press and hold the • and • 0
buttons for more than four seconds until 0003 starts
blinking; then remove your fingers from the reset buttons
and press them again within two seconds. (0003 stops
blinking when the reset buttons are left untouched for two
seconds.)
filM also appears when “Store shooting data’’ is selected
and/or ’’Download stored data’’ is likewise selected in the
Memo Holder function. In this case, you also can make
0003 disappear from the LCD by following the instuctions
given above,
' When Custom Reset and/or “Simultaneous Lock of AF and AE’of User
Custom Option is set with the MF-26 attached to the camera, 0003
does not appear. To cancel Custom Reset or "Simultaneous Lock of AF
and AE“ with the MF-26, use the MF-26's(M^ button and the
camera's command dial. (For details, see the MF-26 's instruction
manual.)
Page 26
MF-26 users
Pressing the reset buttons also
cancels the MF-26’s following
functions:
Auto Exposure Bracketing
Multiple Exposure Operation
Auto Sequence Shooting
Long Time Exposure
Interval Timer
Flash Exposure Bracketing
Flash output level compensation
Focus Priority
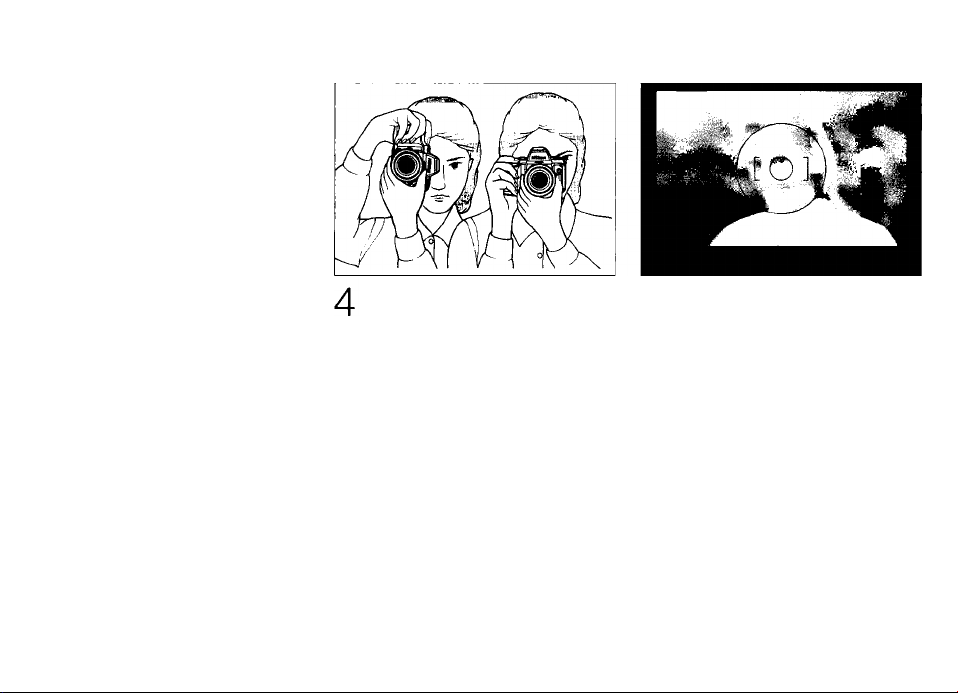
Hold camera, look through viewfinder and position focus brackets on main
subject.
With Nikon Autofocus
Speedlight SB-25
Pressing the reset buttons also
resets the Speedlight’s flash
output compensation to 0.
Although the viewfinder covers approx. 92% of the image area of the actual
photograph, a negative film will show you an image larger than what you see
through the viewfinder.
Note: The image in a slide film may be partially cropped by the mount. Also, the
edges of negative film are partially cropped by most labs.
21
Page 27
Lightly press shutter release button to start autofocus
operation and switch exposure meter on.
5
Confirm that the in-focus indicator • for a stationary subject or
for a moving subject appears on the viewfinder's LCD
readout. Confirm, too, that the shutter speed and aperture
indications are shown. Exposure readouts also appear in the
camera’s external LCD panel.
In the Single Servo autofocus mode with Focus-Priority, the
shutter cannot be released until # or appears, indicating
that the subject is in focus; the focus is then subsequently
locked. If the distance between you and the subject changes,
remove your finger from the shutter release button, then lightly
press it again to refocus.
22
Page 28

• In-focus indication for stationary subject
► A Focus Tracking (automatically activates)
In-focus indication for moving subject
A Subject is located closer than the lens' closest
focusing distance. Move away from the subject
and refocus.
► Appears when TC-16A is used, alerting that the
lens focusing ring is not set at infinity (H- See p.
36.
V I I I y
- ► 4- If ►
' " ' possible (p. 44).
A
blinks in the viewfinder: Autofocus is not
Page 29

If shutter speed indicated is 1/(lens focal length) sec. or slower, the picture may come out biurred. To avoid this,
hoid camera firmiy or use a tripod.
If H I appears in the shutter speed
position—Overexposure alert: Use Nikon ND
or similar fiiter.
If L o appears in the shutter speed position—
Underexposure alert: Use a Nikon Speediight,
higher ISO film or lens with faster aperture,
whichever is suitable.
If fEE blinks in the aperture position—Lens
setting error alert: Lens is not set to smallest
aperture setting, so shutter is locked. Set lens to
smallest aperture.
• P -.fffr
If i mark in green appears—Flashphotography recommended: If available
light is insufficient, i mark appears. Use
Nikon TTL-type Speediight.
23
Page 30
To take picture, fully depress shutter release button.
6
Camera automatically advances film by one frame, and
LCD frame counter increases by one.
24
Page 31

Page 32

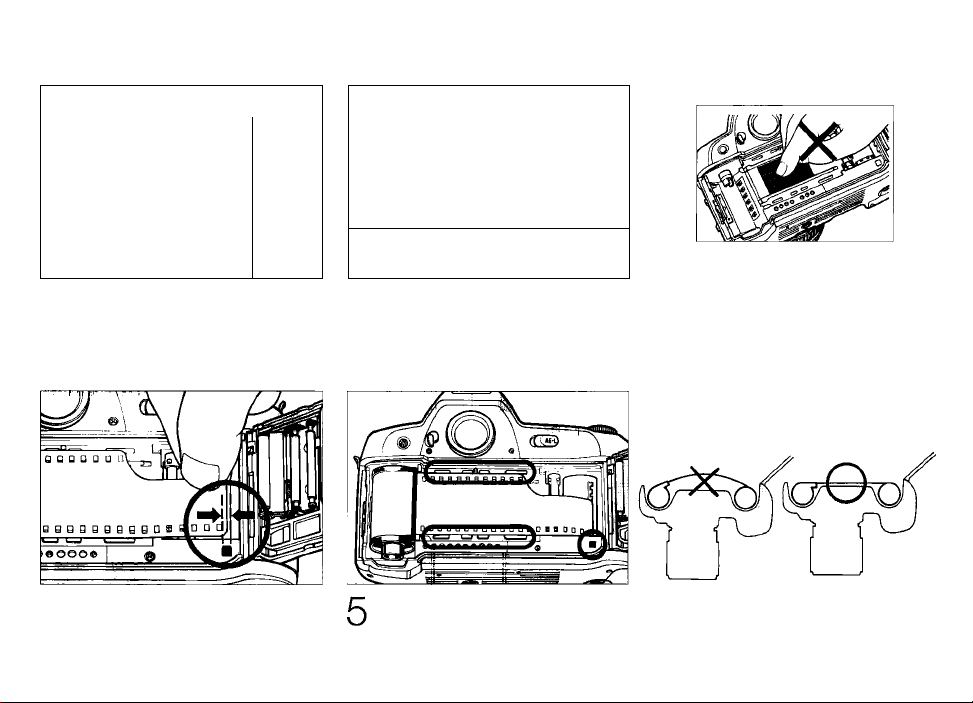
REWINDING FILM
-i Film advance stops automatically at end of roll with End
I and symbol in LCD panel blinking. (Audible beeper
sounds if set.)
At the end of film roll, each time you press shutter release
button, End and 0 - blink and audible beeper sounds (if set),
reminding you to rewind film.
Page 33

Press Qii button and im button to start film rewind. During
2
film rewind, Q _ appears on LCD panel, and frame
counter counts backwards until rewind is complete.
• You can rewind film, before it reaches end of roll. In the same
manner.
• If film does not start rewind or if film rewind has stopped at
mid-roll, check battery power. If battery power is insufficient,
turn power switch off, replace batteries with a fresh set, turn
power on, then press the film rewind and film speed
setting/film rewind buttons again to restart film rewind.
• Do not open the camera back during film rewind. If the
camera back is opened, film rewind will stop at mid-roll; to
restart film rewind, press the Qi; and §5 buttons again.
25
Page 34

After rewind automatically stops, confirm frame counter
shows £, and film installation symbol Q blinks for a few
3
seconds.
26
Page 35

Open camera back and remove film cartridge.
4
To conserve battery power, turn off the power switch
when you are not using the oamera. Always remove
batteries before storing a camera to prevent damage due
to leaking batteries,
Page 36

GENERAL FUNCTIONS
This chapter explains the various modes of the N90 camera’s
operation. Please review it thoroughly.
27
Page 37

FILM ADVANCE MODE
There are three automatic film advance modes. To choose a
mode, press and hoid the fiim advance mode button and rotate
the command dial. Set ID for single-frame shooting, 3!il for
continuous low-speed shooting or Q!i” for continuous high
speed shooting, and so on.
28
Page 38

SINGLE-FRAME SHOOTING
With the film advance mode at El, fully depressing the shutter
release button takes one picture and automatically advances
the film by one frame. Film is advanced immediately after the
shutter closes whether you remove your finger from the shutter
release button or keep the button depressed. To take the next
shot, lift your finger from the button, then fully depress it again.
Page 39

CONTINUOUS SHOOTING
Shots are taken continuously as long as you keep the shutter
release button fully depressed. You have a choice of shooting
speeds: approx. 3.6 fps (frames per second) in the ai” mode,
and approx. 2.0 fps in the
type batteries at normal temperature and at shutter speeds
higher than 1/250 sec. in the Manual exposure and Manual
focus modes. With shutter speeds slower than 1/250 sec., the
framing rate becomes progressively slower in proportion to the
shutter speed in use. If Focus Tracking is on, the maximum
shooting speed is approx. 3.0 frames per second in the Q|i“
mode.
Qjl mode—with fresh alkaline AA-
Page 40

29
Page 41

EXPOSURE METERING SYSTEM
The Nikon N90 has three type of exposure metering systemsCenter-Weighted Metering and Spot Metering,
MATRIX METERING
This system is ideal for quick operation in any exposure mode
(pp. 49-66). With D-type AF Nikkor lenses including AF-I Nikkor,
3D Matrix Metering is automatically activated. 3D Matrix
Metering uses three types of data: (1) scene brightness, (2)
scene contrast and (3) focused subject's distance (Distance
Information). Data on scene brightness and contrast are
detected by the camera’s 8-segment Advanced Matrix Sensor,
while data on the focused subject’s distance is detected and
relayed by the D-type AF Nikkor lens in use. in addition, the
information sent by the camera’s autofocus system indicating
whether the main subject is centered is also considered in the
computation. By analyzing these data, the N90’s built-in
microcomputer is able to provide correct exposure even in
extremely complex lighting situations.
30
Page 42

Matrix Metering,
If a non-D-type lens is used, Advanced Matrix Metering is
performed, Although lens' Distance Information is not given, 8segment Matrix sensor provides the correct exposure in most
lighting situations.
Note that Matrix Metering system can be used only with lenses
that have a built-in CPU (such as AF Nikkor and Al-P lenses.)
Page 43

CENTER-WEIGHTED METERING
With 75% of the meter's sensitivity concentrated on the 12mmdia. circle in the viewfinder and 25% outside this circle, this
meter becomes useful in situations where you want to base
exposure on a specific area in the scene. In the auto exposure
mode, to measure the brightness of the picture’s off-center
portion, use the camera’s AE-L iever (pp. 88-89).
Page 44

SPOT METERING
Nearly 100% of the meter’s sensitivity is concentrated on the
3mm circle in the center of the viewfinder. Use this meter for
reaiiy selective exposure control—achieving the best results
requires experience.
31
Page 45

SETTING METERING SYSTEM
While pressing the metering system (K)button, rotate
command dial until the desired symbol—lO for Matrix Metering,
[»] for Center-Weighted Metering or ED for Spot Metering—
appears in the LCD panel.
If you are using a lens without CPU, or accessories such as bellows or
extension rings
8-segment Matrix Metering automatically switches off and Center-Weighted Metering switches on
while the (□) symbol blinks. (If Auto Multi-Program or Shutter-Priority Auto is set on the camera,
the exposure mode also switches automatically to Aperture-Priority Auto with f - - and blinking
exposure mode indicator.) In this case, use Center-Weighted Metering or Spot Metering.
32
1^5 F5.B
PjgjniEBF
i *1
m [ o
|E__IQ__«a
Matrix Metering
F5.5
PjgpEBF
.. f 0
m [ iJ
to__IQ__«
Center-Weighted
Metering
il5 F5.5
PjrnjniEBF
m [ fJ
to \Q — mm
Spot Metering
Page 46

FOCUS
FOCUS AREA
The N90’s autofocus system offers a choice of two focus
areas: Wide and Spot.
While pressing focus area button, rotate command dial until the
desired symbol—(lD for Wide Area or [3 for Spot Area—
appears in the LCD panel.
When using Nikon dedicated Speedlight
When a Nikon dedicated Speedlight connected to the
camera is turned on, Wide Area is automatically switched
over to Spot Area focus. In this case, Ell blinks in the LCD
panel and S appears inside the viewfinder.
Page 47

lг5_F5.5
QQ
m IQ_<
Id p ,V5 fS.S
Wide-Area Autofocus
I?5_f5.5
olffif
DQ ( !1
IB \Q
____
i
E~H
.vs FS.S
Spot-Area Autofocus
33
Page 48

The Wide-Area focus brackets delineate the focus detecting
area in the viewfinder. Subjects of sufficient brightness and
detaii can be detected within these brackets. In addition to
general photography, autofocus using Wide-Area focus
brackets is suited to action photography in which the moving
subject requires a wide-range focus detection area.
However, focus detection may not be possible if the subject is
too small to fully cover the Wide-Area focus brackets. If various
subjects, each at a different distance, fall within the focus
detection area, focus will be confirmed for a single subject as
follows:
•For subjects of equal brightness: the closer one will be
focused.
•For subjects of unequal brightness: the brighter one will be
focused.
Spot Area AF, in which the focus detecting area is shown by
the 3mm-dia. circle at the center of the viewfinder, is
recommended in the following situations:
a. Subject considerably
smaller than the Wide-Area
focus brackets*
b. Subject obscured by an
object, such as a fence, in
the foreground
. A particular portion of the
subject must be in focus,
such as the eyes in a
portrait
* Use focus lock. See ’AUTOFOCUS WITH MAIN SUBJECT OFF CENTER" on pages 40 to 43.
•* To give correct exposure on your subject, see ‘AE-L LEVER" on pages 88 to 89 or "TO OBTAIN METER READING FOR A
PARTICULAR SUBJECT IN MANUAL EXPOSURE MODE" on pages 90 to 91.
34
d. Strongly backlit subject,
such as someone standing
beside bright window**
Page 49

AUTOFOCUS
The Nikon N90 has two autofocus modes, Single Servo AF with
Focus-Priority and Continuous Servo AF with Release-Priority.
In either autofocus mode and in any film advance mode, Focus
Tracking automatically activates when the subject starts
moving. Focus Tracking enables the camera to analyze the
speed of the moving subject according to the focus data
detected, and to obtain correct focus by anticipating the
subject’s position—and driving the lens to that position—at the
exact moment of exposure. You can thus obtain correctly
focused pictures for many moving subjects.
Data Link System users
You can give Focus-Priority to Continuous Servo AF
and/or Release-Priority to Single Servo AF.
For Single Servo AF in continuous shooting, you can also
cancel focus detection and lens driving for the next shot
after the first shot is taken so that the subject focus
remains locked.
For details, see the Nikon AC-1 E card's instruction
manual.
Page 50

Caution
Do not attempt to turn the lens focusing ring or impede its
rotation when the focus mode selector is set to S or C.
In addition to AF Nikkor lenses (including D-type AF
Nikkor and AF-I Nikkor lenses except the AF Nikkor lenses
for F3AF), autofocus is possible with AF Teleconverter TC-
16A attached to non-AF Al-Nikkor lenses with a maximum
aperture of f/3.5 or brighter. Al-Nikkor lenses that cannot
be used with the TC-16A are:
Al-S type 20mm f/2.8
Al-S type ED 400mm f/2.8 IF
Al-S type ED 400mm f/3.5 IF
28mm f/2 (with factory serial No. 540020 or smaller)
28mm f/2.8 (No. 500000 or smaller)
35mm f/1.4
35mm f/2 (No. 931000 or smaller)
35mm f/2.8 (No. 880000 or smaller)
50mm f/1.4 (No. 398000 or smaller)
50mm f/2 (No. 364000 or smaller)
ED 400mm f/3.5 IF
Micro 55mm f/3.5
All modified-AI-Nikkor and PC-NIkkkor lenses
For details, see the TC-16A's instruction manual.
35
Page 51

Iг5 f5.B
p
tna
( 1}
DQ—
Single Servo AF with Focus-Priority
For Single Servo AF with Focus-Priority, set the focus mode to
S
You lightly press the shutter release button, the lens starts
adjusting for focus. Because the priority is on correct focus, the
shutter cannot be released until the subject is in focus. After
focus is achieved, the focus remains locked for as long as the
shutter release button is lightly pressed. This feature is useful,
especially when recomposing the picture with the mains
subject off center. However, if the camera-to-subject distance
changes, you have to refocus.
36
Page 52

_______
With a stationary subject: Lightiy press the shutter release
button. When the subject is in focus, the lens stops moving, the
in-focus indication • appears in the viewfinder, and focus is
locked. If the subject moves, remove your finger from the
shutter release button, then lightly press it again to re-start
autofocus.
When a stationary subject comes into focus, a double beep
sounds (if set).
Subject is located closer than the closest focusing
distance of the lens. Move away from subject and
refocus.
Appears when TC-16A is used, alerting that the lens
focusing ring is not set at infinity (H- Set focus mode
selector to M, set lens focusing ring to <=<>, set focus
mode selector to S again, then refocus.
focus
stationary subject is in
Page 53

Moving subject is
expected to be in
focus
With a moving subject: Lightly press the shutter release
button. Focus Tracking is automatically activated with ► i
indication in the viewfinder. As soon as the subject is expected
to be in focus, appears, indicating that you can release
shutter. If subject stops and • appears without ► focus is
locked. If subject moves again, remove your finger from the
shutter release button and lightly press it again to start
autofocus with Focus Tracking,
\ I i I /
-► If^ ^ blinks in the viewfinder: Autofocus is not
^ ' possible (p. 44).
Page 54

> Single Servo AF with Focus-Priority is convenient for off-
center subjects. See pages 40 to 41.
• After shooting with the film advance mode selector set
at m, you do not have to remove your finger from the
shutter release button for the next shot. Slightly lift your
finger from the button (but maintaining the button in the
half-depressed position) then fully depress it to release
the shutter again. The focus setting will have remained
unchanged from the prior setting. In the Single Servo AF
with Focus-Priority mode, focus remains locked even
after the shutter is released, unless you remove your
finger from the shutter release button.
With film advance mode set at Oi” or Qii, camera
detects focus every time the shutter is released.
> With a moving subject, depending on subject status and
lens in use, slightly out-of-focus pictures may result.
37
Page 55

IE'S fS.5
p
« ,
(na
( ;i
w
Continuous Servo AF with Release-Priority
Under some conditions, such as very fast action situations, you
may want to take a picture even if focus has not been
successfully accomplished, in such cases, use this mode. Set
focus mode to C to use Continuous Servo AF with ReleasePriority.
In Continuous Servo autofocus mode, as you lightly press the
shutter release button, focus detection begins and the lens
focuses for as long as you keep the shutter release button
lightly pressed. Since the priority is on shutter release, you can
fully depress the shutter release button regardless of focus
status.
38
Page 56

stationary subject is in
___
focus
With a stationary subject; Lightiy press the shutter release
button to start autofocus operation. When the subject is in
focus, the camera’s autofocus motor (or the built-in motor of an
AF-I Nikkor lens) stops driving the autofocus lens and • lights
up. Unless you remove your finger from the shutter release
button, the motor will start driving the lens again to obtain an
in-focus picture if the focus distance changes.
Subject is located closer than the closest focusing
distance of the lens. Move away from subject and
refocus.
Appears when TC-16A is used, alerting that the lens
focusing ring is not set at infinity (~). Set focus mode
Page 57

Moving suject is
expected to be in
focus
With a moving subject: Lightly press the shutter release
button and Focus Tracking is automatically activated with ► i
indication. As soon as the subject is expected to be in focus,
viewfinder shows Focus Tracking remains on as long as
you keep lightly pressing the shutter release button. When the
subject stops, the viewfinder shows • without ► 4.
selector to M, set lens focusing ring to set focus
mode selector to C again, then refocus.
I /
If ► i blinks In the viewfinder: Autofocus is not
possible (p. 44).
Page 58

• As focus is not locked in Continuous Servo AF, to take
an off-center subject, use AF-L button. See pages 42 to
43.
• With a moving subject, depending on subject status and
lens in use, slightly out-of-focus pictures may result.
39
Page 59

AUTOFOCUS WITH MAIN SUBJECT OFF CENTER
• If there Is substantial difference of brightness between
subject and background, switch to Center-Weighted or
Spot Metering and use AE-L lever. See pages 88 to 89.
' With a moving subject, focus cannot be locked.
In Single Servo AF mode
As previously noted, in Single Servo autofocus, focus is locked
as long as the shutter release button is kept lightly pressed.
Use this feature for off-center subjects. In the following
procedure, Spot-Area AF demonstration photos are used.
1. Position focus brackets on subject and lightly press shutter
release button to start autofocus operation.
40
Page 60

2. Confirm in-focus indicator • appears (and In-Focus Signal
beeps if set) in viewfinder.
Page 61

3. Keeping the shutter release button lightly pressed,
recompose, then fully depress shutter release button to take
picture.
41
Page 62

In Continuous Servo AF mode
With an off-center subject, use AF-L button. In the following
procedures, Spot-Area AF demonstration photos are used.
Page 63

1. Position focus brackets on subject and lightly press shutter
release button to start autofocus operation.
Page 64

2. Keeping shutter release button lightly pressed, confirm in
focus indicator # appears in viewfinder. Then press and hoid
AF-L button to iock focus. Keep hoiding AF-L button until
next step is completed.
Page 65

3. While holding AF-L button in, recompose, then fully depress
shutter release button to take picture.
43
Page 66

SPECIAL FOCUSING SITUATIONS
■PP
SP
TF
I
lUj.
• c Tl F TitO
( i)
]
Autofocus operation depends on general lighting, subject contrast and detail, and
other technical factors. In rare situations where autofocus (and manual focus with
Electronic Rangefinder) is not possible, ► i blinks telling you to focus manually with
clear matte field (p. 48) or perform autofocus on another subject located at same
distance.
A. Very dark subject
Focus manually with clear matte field, or
for autofocus, focus on another brighter
subject located at same distance, then
use focus lock (pp. 38-43). Or, use a
Nikon autofocus Speedlight to perform
autofocus with Speedlight's AF
illuminator.
44
B. Low contrast subject
Focus manually with clear matte field, or
for autofocus, focus on another subject
at same distance but with more contrast,
then use focus lock (pp. 38-43).
C. Strongly backlit subject or bright
subject with shiny surface such as
silver or aluminum, or scene in which
there is a pronounced difference in
brightness, such as the light
patterns created by blinds.
Focus manually with clear matte field.
Page 67

In the following situations, ignore in-focus indicator • or
• Scene with subject located at different distances. (For
example, when shooting a person over a fence or when
shooting animals inside a cage)
Use Spot Area for autofocus (page 34) or focus manually with
clear matte field.
• With an extremely bright object near your subject
Use Spot Area for autofocus (page 34) or focus manually with
clear matte field.
• When using a linear polarizing filter*, or other special filter
such as a soft-focus filter.
Focus manually with clear matte fieid.
' Circular polarizing filter can be used in connection with autofocus operation.
Page 68

45
Page 69

MANUAL FOCUS
‘^5 f5.
To focus manually, set the focus mode selector to M. (If the lens
has an A-M switch, set it to M. If you are using an AF-I Nikkor
iens, set the focus mode ring to M or M/A.)
There are two ways of assuring precise manual focus: with the
Electronic Rangefinder or with the viewfinder’s clear matte field.
46
Page 70

Manual focus with Electronic Rangefinder
The Electronic Rangefinder enables you to see focus status
with the viewfinder indications while you are manually focusing.
It works with most Nikon lenses (including AF Nikkor when
operated manually) which have a maximum aperture of f/5.6 or
faster. (For a complete list of usable lenses, see LENS
COMPATIBILITY CHART on p. 104).
1. Look through viewfinder and position focus brackets on main
subject. Then lightly press shutter release button.
Page 71

2. Keeping shutter release button lightly pressed, rotate lens
focusing ring in direction indicated by focus-to-left arrow (4)
3. Confirm in-focus indicator • appears, then fully depress
shutter release button to take picture.
or focus-to-right arrow (►), until arrow disappears and in
focus indicator • appears.
If focus-to-left arrow {^ does not disappear when you turn
focus ring counterclockwise to the limit, subject is closer
than the distance at which the lens is able to focus. Move
back from subject.
For special focusing situations shown on page 44, ► i blinks to indicate that
the Electronic Rangefinder does not correctly work. Focus with clear matte field
(p. 48).
47
Page 72

Manual focus using clear
matte field
48
Look through viewfinder and rotate lens focusing ring until image on clear matte field
appears sharp. .
Page 73

EXPOSURE MODE
Light reaching the film is controlled by shutter speed and lens
aperture. The proper combination results in a correct exposure.
Shutter speed and lens aperture settings are based on the ISO
speed set for the film in use and the operation of the camera's
exposure control system.
The relationship between aperture and shutter speed is as
the amount of light transmitted. For example, a shutter speed
of 1/500 sec, passes half the light of 1/250 and double the light
of 1/1000 sec. The aperture f/8 passes half the light of f/5.6
and double the light of f/11, If the correct exposure for a scene
is 1/500 at f/8, then we can also select 1/250 at f/11 or 1/1000
at f/5,6 and achieve the same exposure results, and so on.
follows: One change in shutter speed either doubles or halves
Metering range
(for Matrix and Center-Weighted Metering with AF Nikkor 50mm f/1.4 iens)
OO II
■ ■
...
EV
1.4
2
2.8
4
5.6
6
11
16
4 2
8
li
30
0
1
i
4 2
a
4 2 1
IS 8 4
30
IS 8
30 IS 8 4
2 3 4
i/2 1/4
1/2 1/4 1/8 i/ts
1
2 1 1/2 1/4 1/8 1/15
4
30
IS 8 4 2 1
30 15 8 4
1/15
1/8
1/4
i/7
2 1 1/2 1/4
2
ИЗО 1/80
1/8 1/16 1/30 1/80 1/125
1
1/125 1/250 1/500 l/IOOO 1/2000 1/4000 1/8Ш
t/30 1/60 1/125 1/250
1/30 1/60 1/125 1/250 1/500 1/1000 1/2000
tit 1/15 1/30 1/80 1/125
1/2 1/4
2
1/8 1/15 1/30 1/60 1/125 1/250 1/500
1/4
1/2
1/2
1
10
11 12 13 14 15 16 17
1/500 1/1000
1/250 1/500 1/1000 1/2000 1/4000 1/8000
1/8 t/15 1/30 1/80 1/125 1/250 1/500
1/4
1/8
1/15 1/30 1/80 1/125 1/250 1/500 1/1000 1/2000 1/4000 I/800D
Metering range depends on the lens in use. With a lens having aperture from f/2.8 to
f/32, metering range at ISO 100 will be from EV1 to EV23.
IB 19 20 21
1/2000
1/4000 1/8000 (Sh utter spee d)
1/250 1/6D0 1/1000 1/2000 1/4000 1/8000
1/40Q0 1/8000
1/1000 1/2000 1/4000 1/8000
1/tOOO 1/2000 1/4000 1/8000
49
Page 74

SELECTING EXPOSURE MODE
Selecting the exposure control mode means deciding if you
want the shutter speed and/or lens aperture to be set
automatically or manually.
The Nikon N90 camera offers two types of programmed auto
exposure modes, Auto Multi-Program (P) and Vari-Program (Ps),
as well as Shutter-Priority Auto (S), Aperture-Priority Auto (fl),
and Manual (f1) exposure modes.
50
Page 75

Programmed auto exposure modes (P/Ps)
With the N90’s microcomputer choosing the combination of
shutter speed and aperture automaticaiiy, you can concentrate
on picture composition, without worrying about exposure.
Note that programmed auto exposure modes operate only with Nikon tenses
that have a built-in CPU (AF Nikkor and Al-P NIkkor lenses).
When Ps for Vari-Program is selected, you have a choice of
seven options: (1) Portrait Program, (2) Portrait Program with
Red-Eye Reduction, (3) Hyperfocal Program, (4) Landscape
Program, (5) Silhouette Program, (6) Sport Program and (7)
Close-Up Program,
For details about Vari-Program, see pp. 67-85.
Auto Multi-Program (P) is used for most common picture-taking
situations. The chart at right shows the shutter speed/aperture
combinations for Auto Multi-Program that are selected at each
EV (exposure value) brightness level.
With Auto Multi-Program, you can use the Flexible Program
function to temporarily shift an automatically selected shutter
speed/ aperture combination and obtain the desired shutter
speed/aperture (p. 55).
Page 76

Program chart of Auto Multi-Program
To check shutter speed and aperture values, follow either the
black or red line to where it intersects the diagonal line.
Auto Multi-Program chart (IS0100)
With AF Zoom 28-70mm f/3.5-f/4.5 at 28mm setting
With AF Zoom 28-70mm f/3.5-f/4.5 at 70mm setting
Page 77

51
Page 78

Shutter-Priority Auto exposure mode
You manually set the shutter speed you want. To freeze the
action, use a high shutter speed; to create motion effects,
choose a siower shutter speed. The N90's microcomputer
automatically sets the proper aperture to match the manually
selected shutter speed for correct exposure. See pp. 56-59 for
Shutter-Priority Auto operation.
Note that Shutter-Priority Auto exposure mode operates only
with Nikon lenses that have a built-in CPU (AFNikkor and Al-P
Nikkor lenses).
Aperture-Priority Auto exposure mode
You can control depth of field by varying the aperture. Smaller
apertures make the background and foreground sharper
(recommended for landscape pictures) while larger apertures
tend to blur the background (recommended for portraits).
Your selected aperture will determine the shutter speed that is
automatically set by the camera’s microcomputer. When using
smaller apertures with correspondingly slower shutter speeds,
remember that, generally, any speed below 1/(focal length in
use) second, requires the use of a tripod to prevent picture blur
due to camera shake. The higher the corresponding shutter
speed to the aperture you set, the easier it is to stop action.
Adjust the selected aperture if the speed is not appropriate for
conditions or the specific effect you want.
For Aperture-Priority Auto operation, see pp. 60-62.
52
Page 79

Manual exposure mode
Manual exposure control allows you to make both aperture and
shutter speed settings. For a technically correct exposure,
follow the recommendation of the camera’s light meter, as
indicated by LCD readout. To achieve a specific creative effect
(e.g., intentional blur, intentional under- or over-exposure),
disregard the LCD and modify the recommended exposure
settings.
For Manual exposure operation, see pp. 63-66.
Page 80

Pictures taken at different shutter speeds
High shutter speed
Slow shutter speed
Page 81

Pictures taken at different apertures
Wide aperture
Narrow aperture
53
Page 82

SETTING EXPOSURE MODE
Q
I
While pressing MODE button, rotate command dial. The
exposure mode changes as in the foliowing sequence:
P Auto Multi-Program
t
n Manual
To activate Vari-Program, use Ps button. For details, see pp. 67-85.
S Shutter-Priority Auto
;
R Aperture-Priority Auto
Data Link System users
If you have already created an original program line as
your own Custom Program and downloaded it from the
Eiectronic Organizer to the camera, P with C P will appear
in the LCD between H and P . For details, see the AC-1 E
card instruction manual.
54
Page 83

'I
- mOBrai
'V l(^i)
im IQ
____
m
|o> <p íгs F- -
For users of lenses that have no CPU, or
accessories such as bellows attachment or
]
extension rings
Use Aperture-Priority Auto or Manual exposure mode.
Auto Multi-Program or Shutter-Priority Auto exposure
mode automatically shifts to Aperture-Priority Auto
exposure mode with F - - and blinking exposure mode
indicator. (If Matrix Metering is set on the camera,
metering system is also automatically shifted to CenterWeighted and IHI blinks). Vari-Program cannot be used for
these lenses or accessories.
Page 84

FLEXIBLE PROGRAM
If you want to change the shutter speed/aperture combination
of Auto Muiti-Program, use the Flexibie Program function.
Flexibie Program enabies you to temporarily change an
automatically set shutter speed/aperture combination in 1 EV
steps, while maintaining the correct exposure.
1. Lightly press shutter release button.
Page 85

|q fs)
2. Turn command dial until desired shutter speed or aperture
value appears in viewfinder and in LCD panel. The exposure
mode indicator (P) blinks to indicate the program has been
shifted or changed.
• The shifted program is maintained as long as the exposure
meter stays on, unless you turn the command dial to the
previous shutter speed/aperture. As soon as the meter
switches off (i.e., the viewfinder and LCD panel displays
disappear), Flexible Program is cancelled.
Flexible Program is also cancelled when you switch the
exposure mode to another mode, readjust the camera
settings or turn off the power switch.
• Flexible Program cannot be used with Vari-Program. When
Ps is selected, the procedure just explained does not shift
the shutter speed/aperture combination.
ijJ
55
Page 86

OPERATION IN SHUTTER-PRIORITY AUTO EXPOSURE MODE
1. Set lens to its minimum aperture setting (highest f-number).
With AF Nikkor and Al-P Nikkor lenses, lock lens aperture at
minimum setting (refer to lens instruction manual).
56
2. While pressing MODE button, rotate command dial until “S”
appears on LCD panel and viewfinder.
If "bulb” is set on the camera, selecting the Shutter-
Priority (S) Auto exposure mode will cause bui. b to
blink—a warning that the "bulb” setting cannot be used in
in the S mode.
Page 87

F'-; ( ;)
3. Remove finger from MODE button, and rotate command dial
to select desired shutter speed.
Shutter speed indication changes one step at a time in the
following sequence:
3D" ;s" B" 4" г" r B 4 8 IS 3D 5D IBS BSD SDD
innn jnnn unnn onnn
luuu Cuuu nuuu duuu
If meter has automatically turned off, along with LCD
indications, turn on meter—and LCD readout—again by
lightly pressing shutter release button.
]
Page 88

4. Look inside viewfinder, compose and lightly press shutter
release button. Confirm the automatically set aperture value.
57
Page 89

If H I appears in the aperture position
with electronic analog
display*—Overexposure alert**: Select
higher shutter speed or use Nikon ND
filter.
1111;
-Fif -
If fE E blinks in the aperture
position—Lens setting error alert**:
Lens is not set to smallest aperture
setting and shutter is locked. Set lens to
smallest aperture, and lock setting.
If!. o appears in the aperture position
with electronic analog
display*—Underexposure alert**:
Select slower shutter speed, or use
If i mark in green appears—Flash
photography is recommended: If
subject brightness is insufficient, i mark
lights up in green. Use Nikon Speedlight.
accessory Nikon Speedlight.
* Shows value difference from correct exposure. If difference is beyond ± 1EV, ► for underexposure ori for overexposure appears.
' For overexposure alert, underexposure alert and lens setting error alert, electronic beeper sounds, if set.
58
Page 90

5. To take the picture, fully depress
shutter release button.
59
Page 91

OPERATION IN APERTURE-PRIORITY AUTO EXPOSURE MODE
Iг5 Cf5.S)
1. While pressing MODE button, rotate command dial until fl
appears on LCD panel and viewfinder.
• If using an AF Nikkor or Al-P lens, make sure it is not
locked to smallest aperture before next step.
60
2. Remove finger from MODE button and set lens to desired f-
number by rotating lens aperture ring.
Aperture set on lens is indicated in the LCD pahei and
viewfinder as follows:
f I f !.W F? f4 fS£ fB F i i F 15 Fc’c’ f3B FW5 few
(Available apertures limited to those of lens in use.)
• Intermediate figure (e.g. F IS, F3.3) displayed indicates
maximum aperture of lens in use. Also, with zoom lenses,
the maximum aperture for different focal length settings
appears in 1/6 EV steps.
Page 92

If meter has automatically turned off and the LCD panel is
off, turn meter on again by lightly pressing shutter release
button.
With lenses having no CPU, f - - appears
instead of aperture value in LCD panel and
viewfinder.
With Al-type lenses including Al-modified Nikkor
lenses: Confirm aperture value on lens barrel.
With lenses having fixed aperture, such as ReflexNikkor lenses: Aperture cannot be changed.
With lenses having no auto diaphragm such as PCNikkor lenses: Switch to Manual exposure mode (pp. 63-
66).
Page 93

3. Look inside viewfinder, compose and lightly press shutter
release button. Confirm automatically set shutter speed.
61
Page 94

If the selected shutter speed is 1/(focal length) sec. or slower, picture blur
may occur*. To avoid this, hold camera very steadily or use a tripod.
If H ! appears in the shutter speed position with
electronic analog display**—Overexposure alert*:
Select smaller aperture (larger f-number) or use ND filter.
4. To take the picture, fully depress
(Q fbe
lia ( I'l
B \Q—„
If i. o appears in the shutter speed position with
electronic analog display**—Underexposure alert*:
Select wider aperture (smaller f-number), or use a Nikon
Speedlight.
shutter release button.
H
' Electronic beeper sounds if set If you are using Data Link System, you can cancel picture-blur alert.
' Shows value difference from correct exposure. If difference is beyond ±1 EV,> for underexposure or
4 for overexposure appears.
If i mark in green appears—Flash photography
recommended: If subject brightness is insufficient,
ready-light blinks. Use Nikon Speedlight.
Page 95

OPERATION IN MANUAL EXPOSURE MODE
1. While pressing MODE button, rotate command dial until f1
appears in the LCD panel and viewfinder.
• If using an AF Nikkor or Al-P lens, make sure it is not
locked to smallest aperture before proceeding to next step.
Page 96

(So}Fгг
0J3 I I'l
IS IQ
____
^
|o
2. Remove finger from MODE button, set shutter speed by
rotating command dial.
• In Manual exposure mode, you can set shutter speed to
bui. b for long time exposure by rotating command dial.
For details about bui. b setting, see pp, 98-99.
o)
Fг ¿'
(
Z1
63
Page 97

Set aperture by rotating the lens aperture ring.
64
If meter has automatically turned off
and LCD readout Is off, turn meter
on again by lightly pressing shutter
release button.
Page 98

3. Look into the viewfinder, compose and lightly press shutter
release button.
Adjust aperture and/or shutter speed until electronic analog
display shows "0” or desired amount.
----------—---------------------------------
Over+IEV
--
Examples
|H|
+1EV
\
+i..0..i~
■1
+1/3EV
\ T I 1 /
_ + I..0..I“ _
\ T I 17
_ + i..0..i“_
llll^
/ I I I \
Electronic analog display blinks when the shutter
speed/aperture set on the camera is beyond the metering
range of the N90.
/ I I I \
+ I..0..I“
1
±0EV
+ I..0..I”
III
-2/3EV
+i..0..i~
liil^
Below -1EV
>
65
Page 99

With lenses having no CPU, F- - appears
instead of aperture value in LCD panel and
viewfinder.
With Al-type lenses including Al-modified Nikkor
lenses: Confirm aperture value on lens barrel.
With lenses having fixed aperture, such as Reflex-
Nikkor lenses: Aperture cannot be changed. Adjust
exposure by changing shutter speed.
With lenses having no auto diaphragm such as PC-
Nikkor lenses: Lens is stopped down when a smaller
aperture (larger f-number) is selected. Focus manually
with the lens set at maximum aperture.
66
Page 100

4. To take the picture, fully depress shutter release button.
 Loading...