

Page 1
Nikon
75
INSTRUCTION MANUAL
75QD
Page 2
Introduction
• Thank you for purchasing the Nikon
make photography a bigger part
to
know your N75/N75QD camera, and be sure
Get
thoroughly before using it.
handy.
of
We
recommend that you keep this manual
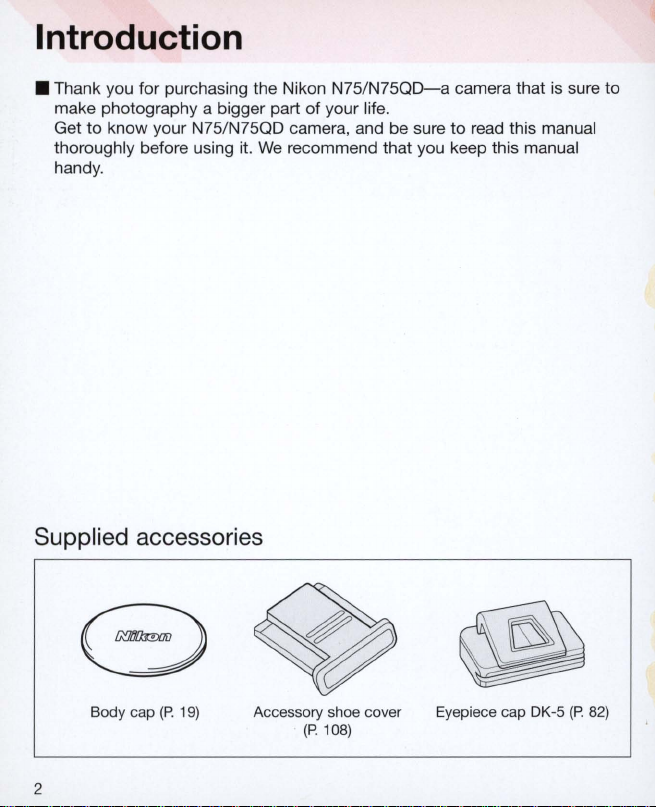
Supplied accessories
N75/N75QD-a
your life.
camera that is sure to
to
read this manual
Body
cap
(P.
19)
2
Accessory shoe cover
(P
. 108)
Eyepiece
cap
DK-5 (P. 82)
Page 3
•
Take
trial
shots
Take tri
al
shots before shooting at important occasions like weddings or
graduations.
•
Have
Nikon
spot-check
Nikon recommends that you have your camera serviced by
your
camera
regularly
an
authorized
dealer or service center at least once every two years.
•
Using
your
camera
correctly
The Nikon N75/N75QO's performance has been optimized for use with
Nikon brand accessories. Accessori
es
made by other manufacturers may
not meet Nikon's criteria for specifications, and nonconforming accessories
could damage the N75/N75QO's components. Nikon cannot guarantee the
N75/N75QO's performance when it
is
used with other than Nikon brand
accessories.
Note:
0011l!lIiJ
[J
[J
~
GG
to
(numbers from 1 to
Custom Setting menu number.
12)
indicates that the function /mode changes according
3
Page 4
Contents
BEFORE YOU BEGIN ........................................... ........................................ 2-
Introduction ............................. .............
Nomenclature ...................
LCD PanelNiewfinder
Available Exposure Modes
art
Shoot
ing
St
About Shutter Release Button ..............
Imm
..
......
Di
splay ............................................
..
......................................................................................... 10-11
ediately ..............
...
............................ ............................................
...
...
....
............. ................................................................. 6-7
...
....................................................
.....
...........
...
...............
....
.............
....
...
............................... .
.........................
........
............ 12-13
...
PREPARATION ............................................................................................ 15-22
1. Insta
ll Batt
2.
Mount Lens
3.
Load Film ....... ......
4. Set Date and Time (N75QD only) ..........................
eries and Check Battery Power ........
...........................
...
...............
...
.........
........
......
......
....
................
................................................................... 18-19
...
.................................................................... 2
...............................................
............................
.... ..
...........
BASIC OPERATION 1 ................................................................................. 23-31
1. Set Focus Mode and
2. Set Exposure Mode to
3.
Hold Camera and Focus
4. Release Shutter ...............
About Metering Systems and Exposure ....
BASIC OPERATION 2 .•
Shooting with Vari-Program .
Using Built-In Speedlight. .........
Self-Timer Operation .
Imprinting DateiTime
FOCUS OPERATION ....................
Focus Mode ...
Fo
cus Area Mode ......
Focus Area Selection
AF-A
Foc
us Lock .
ss
ist Illuminator
...
"",
.....
EXPOSURE MODE
Auto-Multi Program
Shutte
r-
Priority Auto Exposure Mode ..............
Aperture-Priority Auto Exposure Mode ..............................
Man
ual
Exposure Mod e .......................................
Long Time Exposure
AF
Area Mode .......... ..
'8'
................
....
..............................................................
.................
..
.••..•••..••..•••..•••..
......
..........................
..
....
....
............. :
(N75QD
....
,""""""
,""",
..
"" " ........
.", ... ..............................
,""',
....... , ......
..
.................................................................................... 53-62
..
,""',
.......
...................
...........
....
...........................
only) .........
......
,',.,""",
.......................................... ,
,""',
..
, ........ , ..... ,"" ........ ,",
"""',
.......... "
......
,"""""',
................ "., ........ ,', ..... ,""",
................
............
............
...
........
.................
...
.......................................................................
.•.
.......
.........
...
...........
:::
: ........................................................... 43-52
.... ,",
....
..
....... , ......
.,
.. " ......
................ ,
...................
............................................. 24-25
....
............................................
......
..••
.............................................. 33-42
...
........ ......
......................................... 34-37
..............
.............. .....................
...
.........................................
, ....
,"",
.....
...
....
" .................. ,"""
....
.....................................
,""", ..
,.,
... , ........
.,
...................................
.. , .. , ..
....
....
... , ..........
.... ..
...............
...
...........
........................ ............. .44-45
....
.............. ""', ............ ",,50-51
.......
, .................
,',
..
" ................... ,."., ........ 58-59
" .
...
..................
......
......
.....................
...
"",
...
...................................
......
................ 54-55
..
,"", ....
..................... "
........
,""""""
....
......... 30-31
...
...........
,"""'"
......... "" .46-47
...
..... 56-57
..
,"",
',
...
" ..........
4
...
....
..
16-17
0-21
. 26-27
28-29
. 38-39
..
.40-41
........
.48-49
... 60-
2-3
. 8-9
...
11
14
22
32
42
52
61
62
Page 5
ADVANCED OPERATION ...... =
Exposure Compensation
Auto Exposure Bracketing ............
Multiple Exposure ..................
...
............................................................................................. 64-65
CUSTOM SETTING .....................
Menu/Featur
es
of Custom Setting ............................. ................................................... 72-76
OTHER FUNCTIONS ........................................................
Film Rewind ............................................
Film Advance Mode ................ ....................
Au
to
Exposure Lock ........................
Diopter Adjus
Depth-of-Field Preview
Remote Control Operation (option
Available Mode Combinations .
tmentNi
ewfinder Accessories
..
.............
FLASH PHOTOGRAPHy ...........
Built-In SpeedlightlReady-Light ..................................................................................... 90-91
Flash Sync Mode Features ....................
Usi
ng Built-In Speedlight. ............................................. ............................................... 95-101
Fla
sh Shooting Distance Range .........................................
Available Flash Sync Mode Combinations ....
U
sa
ble Lenses with Built-In Speed ligh
About Depth of Field ................ .
MISCELLANEOUS .................................................................................. 103-
Lens Compatibility .......................................... ............................................................ 104-106
Usable Optiona l Speedlights ............................................
Optional Accessories .................................................................................................. 112-113
Camera Care ........................
Notes on Batteries .................................................................
Troubleshooting .........................................................
Glossary
..
Specifications ..
Index ....
Custom Setting Menu
.................
..
........................................................................................................ . 124-128
...
......................................................................
..
...
...................
..
...
.....................................................................................
...
::::
=:
................
....
..........................................................
...
...................... ................................................................ 69-70
::::
: ... :::.:.: ................................................ 71-76
...
. .............................
....
......
....
....
......
al)
..
.......................................................................................... 88
...........................................................
..............................................
....................
.................
...................................
..
....................................................................... 92-94
..
.............................................................. 99
t.
............................................ .................. 100-101
..
...
.................................................................. 102
::::~
.. :::::
..
:::::::::: .........
...
. ............. 66-68
..
......................... 77-88
....
..
..................
....................................................
..
........................................... 80-81
...
...
.......................................... 98
...
.................
......................
..
..........
~.~
......... 89-101
...
......... 82
...
......... 83
....
63-70
84-87
131
...
....................................... 1 07 -
................................ .................................................... 114-115
...
....................... ................................................... 121-123
............................................ 116
.....
............................................ 117 -120
...
........................................... 129-130
111
.............. 131
78
79
5
Page 6
Nomenclature
Built-in Speed light (p. 38/90)
Aperture
(p. 61
Compensation button (p.
Film rewind button (p. 78)
Self-timer
Red-Eye Reduction lamp
)/Exposure
(p. 40)
64)
/
/AF-Assist Illuminator (p. 50)/
(p.
93)
Camera strap
eyelet
Flash lock-release
Flash sync mode button
Auto Exposure Bracketing
Exposure
(p
. 69)/ Film rewind button
(p
(p
(p
. 66)/ Multiple
. 95)/
. 92)
6
Page 7
Exposure mode dial (p.
10)
I
~
I
Film advance mode/Custom Setting selector (p.
* Illustration shown is the N75QD. The camera back of the N75 differs from the N75QD .
• N75QD
QUARTZ
1
-----,
2-~~~-
:
----ED
filIDlj
only:
Data imprint LCD/buttons
DATE
.------
5
6
SELECT
ADJUST
9
0+-
7
1. Date/time LCD
2. ' :
Year
indicator
3. MODE button: Push to select one of five
available displays.
4. SELECT button: Push to select date/time to
be adjusted.
5. M : Month indicator
6.
-:
Data imprint indicator: Blinks approx.
2 sec. when data
7.
ADJUST button: Push to adjust date/time.
is
imprinted.
79n2)
7
Page 8
LCD PanelNiewfinder Display
• LCD panel
Self-timer (p.
Shutter spe
Auto Exposure
Bracketing
Flash sync mode
(p
. 92/
Focus area
95)
40)
ed
(p. 66)
(p. 48)
r.
~.~. ,~'
ooe.o
@~:
g
REAR
SLOW
~
~'-
Fr.
~
0.0
+.
~.mt{-.
~[]~
~+[
I]
::
I]::
~~.
I
_._
~iiill'
Remote control (p.
r.
r.
I'
Frame counter
Beep sound
Battery power (p.
Compensation (p.
Compensation value (p.
(p. 21)
84)
Apertur
(p.
28)
17)
Exposur
64)
/Exposur
64)
e
e
e
Multiple Exposure (p.
* The illustrations
NOT
E:
About LCD
The LCD panel and viewfinder displays tend
have slower response time at low temperatures.
to
returns
LCD illuminator
Pressing the e button turns exposure meter
and the LCD panel is illuminated and can be confirmed
the dark. The illumination remains
exposure meter
pressing the shutter release button or shutter release.
oo.mmJ ::: The illuminator can be set
an
8
normal, the displays also return to normal.
y button is pressed (p.
69)
are
fully labelled for your reference.
to
turn darker at high temperatures and
button
on (p.
on
as
long
is
on. Illumination turns off after lightly
76).
as
to
come on when
In
the
Custom Setting (p.
either case, when the temperature
17)
,
I/
in
~
~
Ie'
S
El:3
I
®J~
56
-
11)"-
[36]
@
72)
Page 9
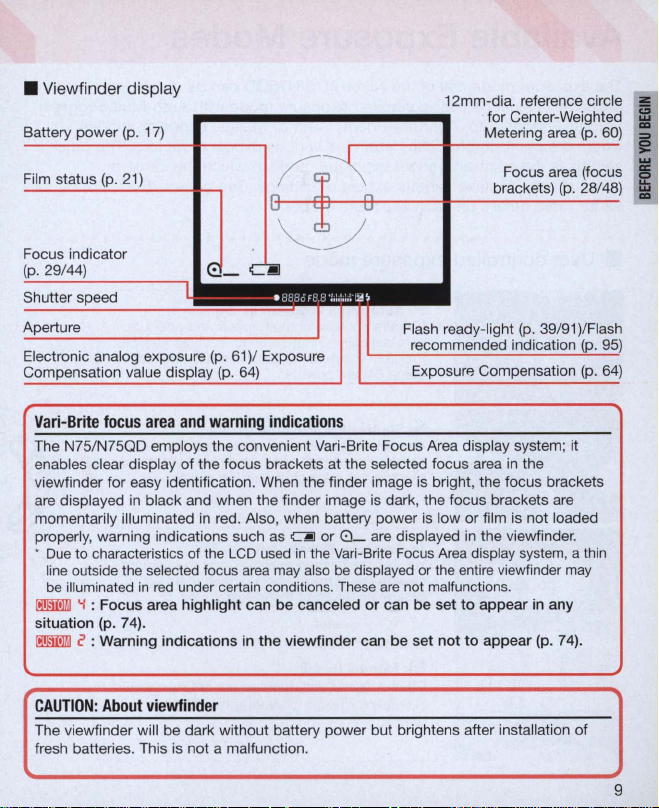
• Viewfinder display
p
____________
Battery power
Film status
Electronic analog exposure
Compensation
Va
ri-
The N75/N75QD employs the convenient Vari-Brite Focus Area display system; it
enables clear display of the focus brackets at the
viewfinder for easy identification. When the finder image is bright, the focus brackets
are
displayed
momentarily illuminated
properly, warning indications such
•
Due
line
be
00llIIillJ
situation
00llIIillJ
(p.
17)
(p.
61)
value
displ
Brite
focus
area
and
in
black and when the finder image is dark , the focus brackets
to
characteristics of the
outside the selected focus
illuminated
'i
in
red
: Focus area highlight can be canceled
(p.
under certain conditions.
74).
/ Exposure
ay
(p.
64)
warning
indications
in
red. Also, when battery power
as ~ or
LCD
used
area
may
r-
0 _
in
the Vari-Brite
also
be
These
______
se
are
displayed or the entire viewfinder
are
or
c : Warning indications in the viewfinder can be set not
12mm-dia. reference circle z
..
for Center-Weighted
~
------~--~~
Focus area (focus
brackets)
lected focus area
is
low or film is not loaded
displayed
Focus
Area
not malfunctions.
can be set
in
in
the viewfinder .
display
to
appear in any
to
appear (p. 74).
the
system
(p.
are
, a thin
may
60)
28/48)
~
~
....
I
CAUTION: About
The viewfinder wi
fresh batteries. This is not a malfunction.
viewfinder
ll
be dark without battery power but brightens after installati
on
of
9
Page 10
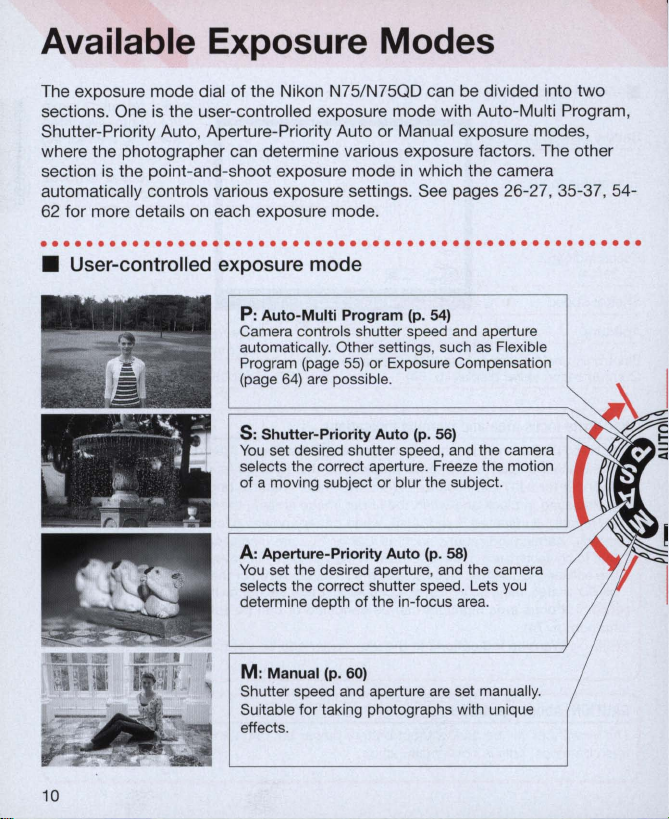
Available Exposure Modes
The exposure mode dial
sections. One
Shutter-Priority Auto, Aperture-Priority Auto or Manual exposure modes,
where the photographer can determine various exposure factors. The other
section
automatica
62
for more details
. . . . . . . .
• User-controlled exposure mode
is
the user-controlled exposure mode with Auto-Multi Program,
is
the point-and-shoot exposure mode
ll
y controls various exposure settings. See pages 26-27, 35-37, 54-
.. ..
of
the Nikon N75/N75QD can be divided into two
on
each exposure mode .
. .
..
. . . . . . . .
P: Auto-Multi Program (p. 54)
Camera controls shutter speed and aperture
automaticall
Program (page
64)
(page
5:
Shutter-Priority Auto (p. 56)
You
set desired shutter speed, and the camera
selects the correct aperture. Freeze the motion
of a moving subject or blur the subject.
A: Aperture-Priority Auto (p. 58)
You
set the desired aperture, and the camera
selects the correct shutter speed. Lets you
determine depth of the in-focus area.
...
. . . .
..
y.
Other settings, such
55)
are possible.
or Exposure Compensation
in
whi
ch
. . . . .
the camera
.. . ..
. . . . . . . . . .
as
Fle
xible
10
M:
Manual (p. 60)
Shutter speed and aperture
Suitable for taking photographs with unique
effects.
are
set manuall
y.
Page 11
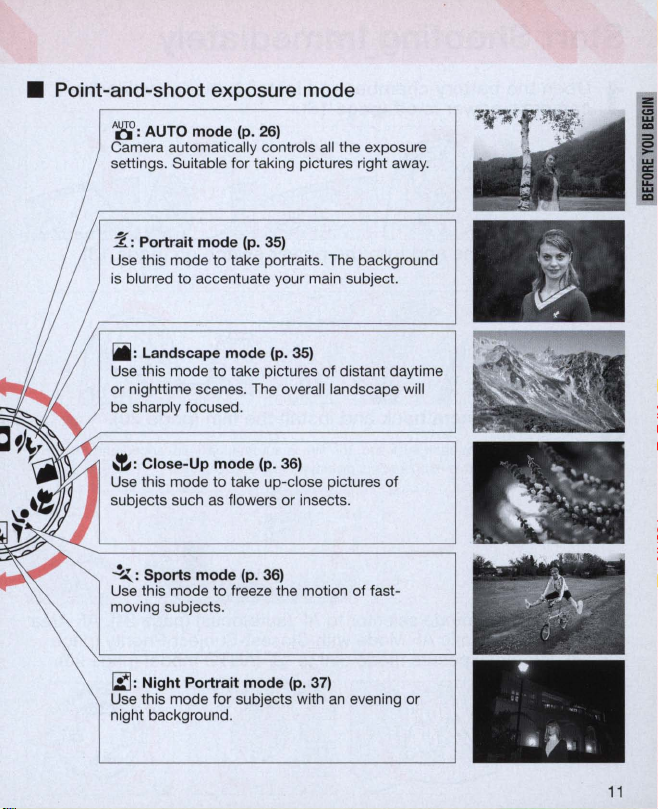
•
Poi
nt-and-shoot exposure mode
A
~:
AUTO mode (p.
Came
ra
automatically controls
settings. Suitable for taking pictures right away.
2:
Portrait mode (p.
Use this mode
is blurred
iii
: Landscape mode (
Use this mode
or nighttime scenes. The overall landscape will
be sharply focused.
,,-e,
: Close-Up mode
Use this mode
subjects such
~
:
Sports mode (p. 36)
Use this mode to freeze the motion of fastmoving subjects .
to
to
accentuate your main subject.
to
to
as
26)
all
the exposure
35)
take portraits. The background
p.
take pictures of distant daytime
take up-close pictures of
flowers or insects.
35)
(p. 36)
r.:::J:
Night Portrait mode (p. 37)
Use this mode for subjects with
night background.
an
evening
or
•
111
•
"
~
11
Page 12
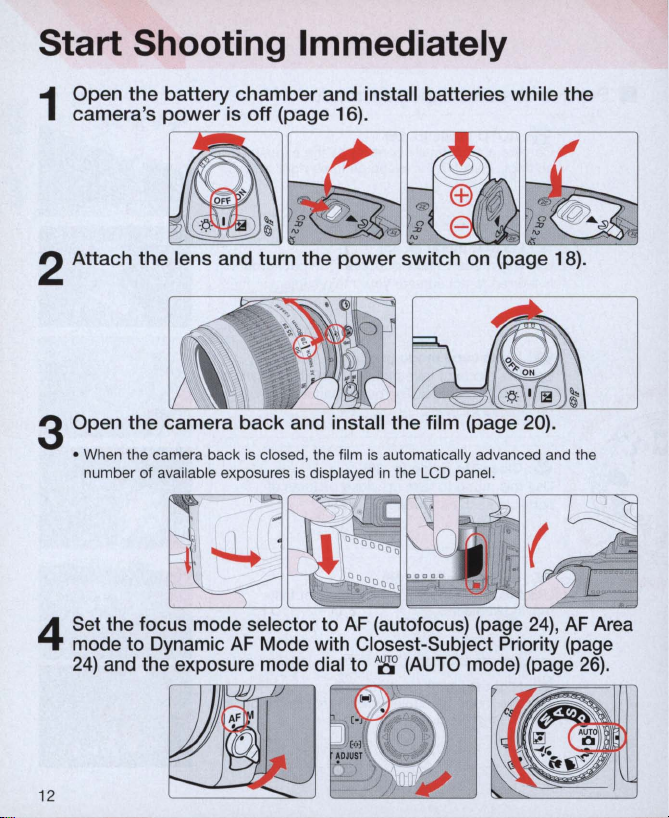
Start Shooting Immediately
Open
the
camera's
1
2 Attach the lens and turn the
battery chamber and install batteries while the
power
is off (page 16).
.
o~"
~
fl
.
"""
" @
~
'"
"---~--'
d)
power
switch on (page 18).
~
fl
~
"""
d)
..
<
3 Open
4
12
the
camera
• When the camera back
number of available exposures is displayed
Set the focus mode selector to
mode to Dynamic
24)
and
the exposure mode dial to
back
is
closed, the film
AF
Mode with Closest-Subject Priority (page
and install the film (page
is
automatically advanced and the
in
the LCD panel.
AF
(autofocus) (page
A8'
(AUTO
mode)
20)
.
24), AF
(page
Area
26)
.
Page 13
5
6
Hold
the
28)
Confirm
focus
release
camera properly,
by
lightly pressing
focus
indicator.
beep sound is emitted , and slowly depress the shutter c
button
(page 30).
the
shutter
compose
release
appears
frame and
button
without
focus
(page 18).
blinking and in- §
(page
~
...
~
c
...
~
i!
c::I
~
Ii:
~
en
Film starts
7
of
the roll (page 31) .
• Make sure a
the film cartridge .
to
rewind automatically when
in
the viewfinder and E
in
the LCD panel
it
reaches the end
are
blinking wh
en
removing
13
Page 14
About Shutter Release Button
Lightly
pressing
activates
releases
. . . . . . . . . . . . . . . . . . . . . . . . . . . . .
Lightly press the shutter release button.
the
the
the
camera's
shutter
shutter
exposure
.
rel
ease
meter
button
and
and hol
pressing
..
. . . . . .
ding
it
it a
..
halfway down
ll
the
way
. . . . .
1
• When the focus mode selector is set
Before pressing Lightly pressing
(autofocus), camera starts
subject when the shutter release button
lightly pressed (page
• Lightly pressing the shutter release button
activates the indications
and viewfinder (for approx. 5 sec. from
removal of finger).
information
on
the exposure meter.)
(See
28)
to
.
in
page
focus
the
17
2 Fully depress the shutter release button.
• Fully depressing the shutter release button
releases shutter and film automatica
advances to the next frame.
~[lJ
Li
ghtly
pressing
Fully
depressing
down
..
. . . . . . .
to
on
the
LCD
panel
for
ll
y
AF
is
NOTE: Camera
Pressing the shutter release button abruptly
press the shutter release button slowly.
14
shake
can
result
in
picture blu
r.
Make
sure
to
Page 15
PREPARATION
This section introduces the various
operations necessary before you start
shooting.
• Install batteries and check battery power
• Mount lens
• Load film
• Set date and time (N75QD only)
15
Page 16
Install
Use
two
. . . . . . . .
1
CR2-type
..
Turn
the power switch off and open the battery chamber
cover by sliding the battery chamber cover lock release lever
toward indicated direction.
Batteries
3V
lithium batteries .
. . . . . . . . . . . . . . . .
and
Check
..
. . . . . . .
Battery
...
. . . . . . . . . . . . . . .
Power
• When replacing batteries, be sure
batteries at the same time. Always use fresh batteries of the same brand.
NOTE:
Storing
batteries
Keep the batteries out
immediately. (For "Not
Insert batteries with the
marked inside the battery chamber, then firmly close the
2
battery chamber cover.
• Make sure to firmly close the battery chamber cover until it locks into place.
• Incorrect positioning of
Check
points
•
We
recommend that you take spare batteries with you, especially when travelling .
• For the number of film rolls that can be shot with fresh batteries, see page 128.
16
of
children's reach. If swallowed, contact a doctor
es
on
Batteries", see page 116
EB
to
turn the power switch off and replace both
.)
Ee
and e ends positioned as
and e poles may damage the camera.
Page 17
3
Turn
the power switch
~
the
indication.
on
and confirm battery power with
,--;----==
F _ =_
u~~~u
~~ON
.:
'.
I
IB
~
LCD
panel
~
(appears)
<O!l
(appears)
.....
' /
/'
-~-
......
I \
.......
(b
link
s)
• CAil in the viewfinder disappears when the
• Q blinks
~
~
: Warning
Lightly
press
Lightly pressing the shutter release button reactivates the exposure
meter and indications in
speed and aperture (
the LCD panel automatically turn off 5 sec. after removing yo ur
finger from
viewfinder turn off.) See page 14 for information on the shutter
release button.
~
B : The
can
be
set
~
Sufficient
power
Viewfinder
Cam
era's
met
er
on
Came
ra's
No
indication
c.J
(appears)
....
'
/.".
-
C]!]
-
,.
I \
.....
(bl
ink
s)
in
the viewfinder when the film
indications
the
shutter
the
shutter release button.
duration
to
3,
10
or
No
indication
No
indication
(appears)
in
the
release
the
LCD panel and viewfinder. Shutter
F-
- when lens is
of inactive
20 sec. (p. 75).
battery
met
er
off
c.J
power
is
not
viewfinder
button
to
activate
not
attached) indications
(All
indications in the
time
before
Insufficient
Sufficient battery power.
Batteries
fresh set ready. (Viewfinder indications turn
off when exposure meter
Batteries
(Shutter locks.)
is off.
loaded.
can
be
the
automatic
battery
are
nearing exhaustion. Have
are
exhausted. Replace batteries.
set
not
exposure
meter
power
Meaning
to
appear
meter.
in
switch-off
is
off.)
(p. 74).
~
"""J::3
~
[
36J
occurs
a
power
• When the
remains on in the LCD panel
switch
is
turned off with batteries installed, the frame counter display
17
Page 18
Mount Lens
Turn
the power switch off and mount the lens to the camera body .
. . . . . . . . . . . . . . . . . . . . . . . . . . . .
Check the lens type.
..
. .
.. . ..
. . . . . . .
..
. . . . .
1
CPU contacts of
Nikkor lens
G)
G-type Nikkor lens, without aperture ring
®
CPU
aperture ring
G-type
Nikkor
The G-type Nikkor lens has no aperture ring; aperture should be selected from
camera body. Unlike other CPU Nikkor lenses, aperture does not need to be set to
minimum.
Check
points
• Use a G- or D-type
• Make sure
• Avoid direct sunlight when attaching/detaching the lens.
NOTE: Non-CPU
When a non-CPU Nikkor lens is attached and the power switch
F- - blinks
(except
in
CPU
Nikkor lenses other than G-type (Illustration is D-type Nikkor lens), with
lens
AF
to
turn the power switch off when attaching/detaching the lens.
Nikkor
in
the LCD panel and viewfinder, and the shutter cannot be released
Manual exposure mode).
G)
G-type Nikkor lens
Nikkor lens to utilise all of this camera's funct ions.
lens
See
page 106 for a non-C
® CPU Nikkor lens other
than G-type
is
turned on,
PU
lens.
..
18
Page 19
2
Turn the
body.
power
switch
off
and
mount
the lens to
the
camera
• Position lens
and camera body are aligned, then twist lens anticlockwise until it locks into
place.
•
Wit
h CPU Ni
perture to
a
aperture setting and the power switch
and viewfinder and the shutter cannot be
Detach
in
the camera's bayonet mount so that the mounting indexes
(Be
sure not to touch the lens release button.)
kko
the
r lens wi
its
minimum
lens.
th
aperture
and
ring
lock.
When the lens is not set
is
turned on,
re
(other than G-type), set the lens
FE
leased.
E blinks
to
its minimum
in
the LCD panel
3
• Push and hold the lens release button, then
turn the lens clockwise
When
came
ra
is
left
unattended
When you leave the camera unattended without a lens attached, be sure to attach
the supplied body cap (page
be used.)
without
lens
2),
or optional body cap BF-1A.
to
detach the lens.
(BF-1
body cap cannot
on
lens
I
IE
19
Page 20
load
Turn the power switch on and load OX-coded film. With OX-coded film, film
speed will be set automatically (ISO 25-5000) . When the camera back is
closed, the fi lm automatica
exposures is displayed
Film
in
---------
ll
y advances and the number of available
the LCD panel.
.....................................................
Turn
the power switch on, open the camera back by sliding
1
the camera back lock release lever and load film.
• Film cartridge can be loaded smoothly if inserted from the bottom.
------
• Make sure to insert the film cartridge all the way
Pull film leader across to
red
index mark.
in.
2
~
X
• Make sure to align the film leader to the
properly aligned to the index mark (short of
loaded properly.
• Hold the film cartridge and ensure
red
index mark; if the film leader
or
beyond the mark), film may not be
fi
lm
is
properly positioned with no slack.
is
not
NOTE: Loading/removing
Shutter curtains
with your finger
20
are
very thin. Do not touch the shutter curtains
or
the film leader.
film
Page 21

Gently close the camera back until the camera back snaps
3
closed.
I
t':
FS
IcS
.6
@
• The film automatically advances
as indicated in
taken. The LCD panel indicates
• When
been taken.
• When E appears
viewfinder
reload fi lm
viewfinder
• Pictures
film roll may
001'ffil!J
c : W
the
the
film has c
blink
, film is
by
aligning
when
taken
on
be
discarded
arnin
g indications in the v
LCD panel, and film rewinds one frame
ompleted
in
the
LCD panel,
not
properly installed .
the
film is
frames
film leader
not
beyond
in
the
the
B~E: :3
to
the
final frame with blinking 0 , 0 _ , 0
number
of
set up, a shutter sound is let
loaded.
the
process
exposures left on film.
or
Err and E in
to
the
red index mark. 8 blinks
indicated
of
developing .
iewfinder can be set
Open
number
n
3@
at a time
out
the
LCD panel and
the
camera
of
the
not
but
no picture has
back
exposures
to
appe
__
, 0
as
photos
8_
again and
in
the
for
ar (p.
in
the
74
__
are
the
).
z
o
_
i
a;
w
a:
Q.
OX-coded
With OX-coded film, film speed will be set
automatically between ISO
Film speed is
coded
Check
• Avoid
You
•
through
• Infrared films
the
film.
points
direct
can
detect
film
check
the
film
ion
set
to
ISO 100 with non-OX-
sunlight
when
the
number
conf
irmation
cannot
be used with
of
the
film frame position .
25
to
ISO 5000.
changing film
of
available exposures on
window
.
this
OX-coded
~
~
~
outdoors
.
camera since an infrared
film
36
~
the
film roll and film speed
I
SO
(film
speed)
OX
mark
sensor
is used
for
21
Page 22
Set Date and Time (N75QD only)
This camera allows you to imprint Year/Month/Day, Day/Hour/Minute (24-hour
clock), Month/Day/Year or Day/Month/Year on your picture
mode. (For imprinting date/time, see page 42.)
in
any exposure
.....................................................
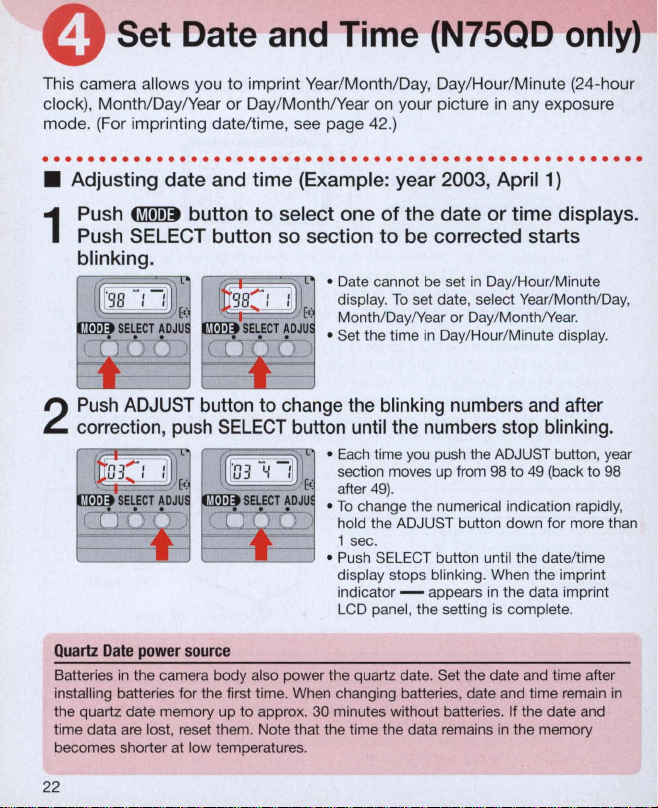
• Adjusting
Push
1
Push
blinking.
Push
2
correction,
date
~
SELECT
ADJUST
push
and time (Example: year 2003, April 1)
button
to
select one
button so section
• Date cannot be set
• Set the time
button
to
change
SELECT button
•
To
•
• Push SELECT button until the date/time
of
the
date
or time displays.
to
be
corrected starts
in
To
display.
Month/Day/Year or Day/Month/Year.
the
until
Each
section moves up from 98 to
after
hold the ADJUST button down for more than
1 sec.
display stops blinking. When the imprint
indicator - appears
LCD panel, the setting
set date, select
in
blinking
the
numbers
time you push the ADJUST button, year
49)
.
change the numerical indication rapidly,
Day/Hour/Minute
Day/Hour/Minute display.
numbers
stop
in
the data imprint
is
Year
/Month/Day,
and
blinking.
49
(back to 98
complete.
after
Quartz
Date
power source
Batteries
installing batteries for the first time. When changing batteries , date and time remain
the quartz date memory up
time data
becomes shorter at low temperatures.
in
the camera body also power the quartz date. Set the date and time after
to
are
lost, reset them. Note that the time the data remains
approx. 30 minutes without batteries. If the date and
in
the memory
22
in
Page 23
BASIC
OPERATION
1
This section features the settings for most
common picture-taking situations using
AUTO mode
(A~)
to enable easy operation
even for beginners.
Sh
00
Ing mo es unc Ions exp alne
t' d If t'
Lens attached G-type
Focus mode
an~a
Focus
Exposure metering system
Exposure mode
Flash sync mode
Film advance mode
Custom setting
• Automatically set when '8'
I ' d O thO
In
IS
sec
Ion
are as 0 ows :
AF
Nikkor
(p.
18)
(p
AF (autofocus)
Dynamic
Subject Priority
25-segment 3D Matrix Metering '
(p.26)
AUTO mode
Front-Curtain Sync
Single frame
Default (initial) settings
AUT
O mode
is
. 24)
AF
Mode with Closest-
(p.
24)
('8')
(p.
26)
(
r:!
(1Il) (p.
79)
selected.
18
)*
(p. 72)
f
II
(p.92)
Page 24
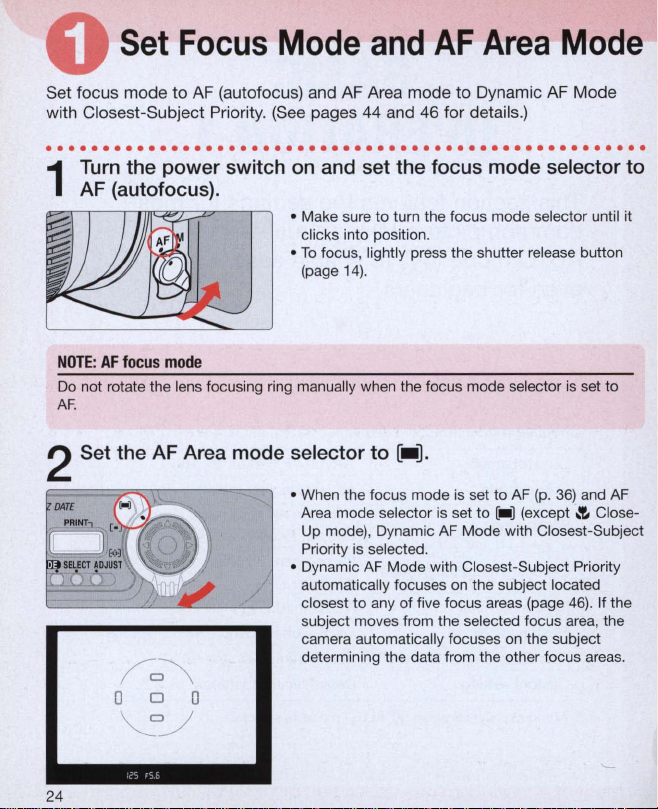
Set
Focus
Mode
and
AF
Area
Mode
Set focus mode
with Closest-Subject Priority. (S
to
AF (autofocus) and AF Area mode
ee
pages 44 and 46 for details.)
to
Dynamic AF Mode
.....................................................
Turn
the power switch
1
(a
utofocus).
AF
NOTE: AF
Do not rotate the lens focusing ring manually when the focus mode selector
AF
focus
mode
.
2 Set the AF Area mode selector to
on
and set the focus mode selector to
• Make sure to turn the focus mode selector until it
clicks into position .
•
To
focus, lightly press the shutter release button
(page 1
4).
is
set to
[-].
• When the focus mode
Area mode selector is set to [_ ] (except
Up mode), Dynamic
is
Priority
• Dynamic
automatically focuses
closest
subject moves from the selected focus area, the
camera automatically focuses
determining the data from the other focus areas.
selected.
AF
Mode with Closest-Subject Priority
to
any of five focus areas (page
is
set
to
AF (p.
36)
and
AF
Mode with Closest-Subject
on
the subject located
on
.'E.
46)
the subject
AF
Close-
. If the
24
Page 25
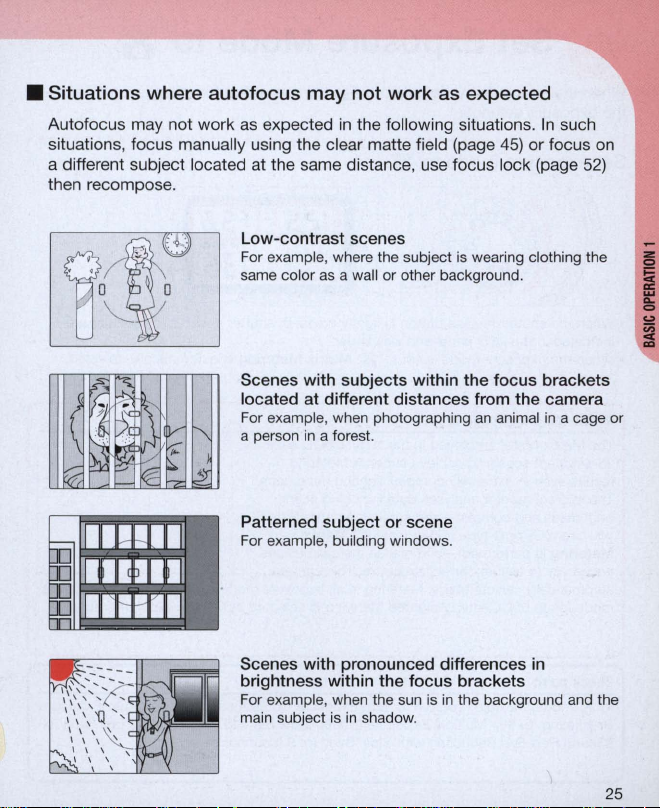
• Situations where autofocus may not work
Autofocus may not work
situations, focus manually using the clear matte field (page
as
expected
in
the following situations.
as
expected
45)
a different subject located at the same distance, use focus lock (page
then recompose.
Low-contrast scenes
For example, where the subject is wearing clothing the
same color
as
a wall or other background.
In
such
or focus
on
52)
Scenes with subjects within
the
focus
brackets
located at different distances from the camera
For example, when photographing
a person
Patterned
For example, building windows.
in
a forest.
subject
or
scene
an
animal in a cage or
Scenes with pronounced differences in
brightness within the
For example, when the sun is
main subject
is
in
shadow.
focus
brackets
in
the background and the
25
Page 26
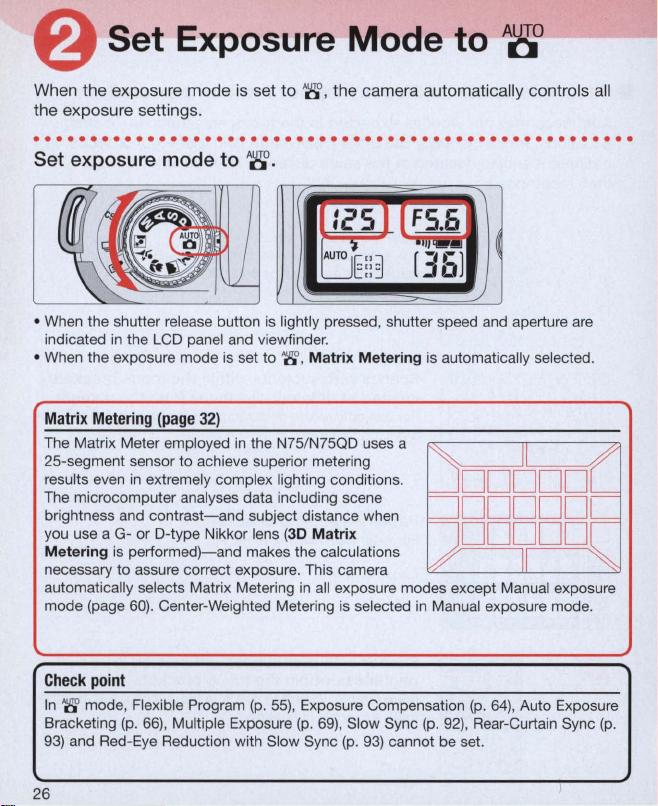
Set Exposure Mode to
A8°
When the exposure mode
the exposure settings.
·
...................................................
Set exposu re mode to
is
~
set to
.
~
,
the camera automatically controls all
Ie'S
I [
FS.6
.
~
LJt:~
• When the shutter release button is lightly pressed, shutter speed and aperture
indicated
• When the exposure mode is set to
Mat
The Matrix Meter employed
25-segment sensor to achieve superior metering
results even
The microcomputer analyses data including scene
brightness and
you use a G- or D-type Nikkor lens (3D
Meter
necessary
automatically selects Matrix Metering
mode (page
in
the LCD panel and viewfinder.
rix
Metering (page 32)
in
extremely complex lighting conditions.
contrast-and
ing is
performed)-and
to
assure correct exposure. This camera
60)
. Center-Weighted Metering
'8',
Ma
trix
in
the N75/N75QD uses a
subject distance when
makes the calculations
Matr
ix
in
all exposure modes except Manual exposure
is
ff6l
/
Mete
ring is automatically selected.
~
DDD
DDDDD
DDDDD
RF
V
selected
in
Manual exposure mode.
are
II
/
9F
II
~
Check
point
In '8' mode , Flexible Program (p.
Bracketing
93)
26
(p. 66)
and Red-Eye Reduction with Slow Sync (p.
, Multiple Exposure (p.
55)
, Exposure Compensation
69)
, Slow Sync (p.
93)
92)
cannot be set.
(p.
64)
, Auto Exposure
, Rear-Curtain Sync (p.
Page 27
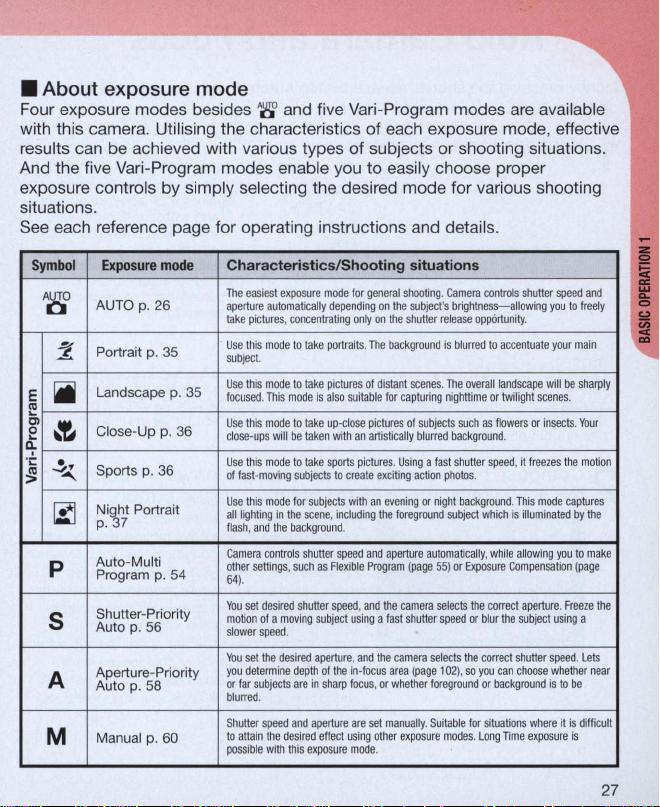
• About exposure mode
Four exposure modes besides '8' and five
with this camera . Utilising the characterist ics of each exposure mode, effective
an
results c
be achieved with various types of subjects or shooting situations.
And the five Vari-Program modes enable you
exposure controls by simp ly selecting the desired mode for various shooting
situations .
See each reference page for operating instructions and details.
Vari
-Program modes
to easily
choose proper
are
available
Symbol
A~
:!..
E
iii
ca
"-
Cl
0
~
"-
D;-
.;:
~
~
~
p
5
A
M
AUTO
~
Portrai
Landscape
Close-Up
Sports
Ni~
p. 7
Auto-Multi
Program p.
Shutter-Priority
Auto p.
Apertu
Auto p. 58
Manual p. 60
Exposure
p.
t p.
p.
ht
Portrait
56
re-
mode
26
35
p.
p.
36
54
Pri
ority
Characteristics/Shooting situations
The
easiest
exposu
re
mode
depending
take
portraits
take
pictures
is
also
suitable
take
up·close
taken
with
sports
subjects
to
create
subjects
scene, including
d.
r sp
eed
as
Flexible
shutter
speed
subject
aperture, and
depth
of
the
are
in
sha
rp
aperture
effect
usi
expcsure
for
only
. T
of
an
pictures
with
and
, and
using a fast shu
in·focus
focus, or
are
ng other
mode
36
35
aperture
automatically
take
pictures, concentrating
Use
this
mode
this
mode
this
mode
will
this
mode
fast·moving
this
mode
lighting
ash
, and t
settings, such
.
set
desired
speed
set
the
determine
far
subjects
urred
.
atta
in
the
le
with
to
to
mode
to
be
to take
for
in
the
he
backgroun
trols shutte
moving
.
desired
and
desired
this
subject.
Use
focused. This
Use
close·ups
Use
of
Use
all
fl
Camera con
other
64)
You
motion of a
slower
You
you
or
bl
Shutter speed
to
possib
general
shooting. Camera
on
the
subject
on
he
distant
pictures
artistically blurred
exciting
an
the
Program
the
the
set
.
's
the
shutter
release
background
is blurred
scenes. The
for
capturing
of
subjects
. U
sing
a f
ast shutter
action
photos
evening
or
night
foreground
aperture au
tomatically
(page
55)
camera sel
tter
speed
camera
selects
area
(page 102),
whether
foreground
manually. Suitable for sit
exposure
modes
controls
brightness-allowing
opportunity.
to
accentuate
overa
ll
landscape will
nighttime
or
twilight
such
as flowers
background
.
speed
, it
.
background. This
subject
which
is
, wh
ile allowing you
or
Exposure
Compensation
ects
the
correct
or
blur
the
subject
the
correct
shutter
so you
can
choose
or
background
uations
. L
ong TIme exposur
shutter
speed
and
you
to
freely
your
main
be
sharply
scenes.
or
insects. Your
freezes
the mot
mode
captures
illuminated
by
to
(page
aperture. Freeze
using
a
speed. Lets
whether
is
to
be
whe
re it
is
difficult
e is
ion
the
make
the
nea
r
27
Page 28
Hold Camera and
Lightly pressing the shutter release button automatically focuses the camera
on the subject.
.....................................................
EOcus
------I
Hold the camera properly.
1
o Keep your elbow propped
against your
o Stand with one foot forward a
half step and keep your upper
body still.
o Grasp the camera handgrip
with your right hand and use
your left hand
camera (or lens).
body
to
cradle the
for support.
NOTE: Camera
Camera shake
shutter speed. The built-in Speed light automatically fires in dark conditions (where
slow shutter speed is required) in
camera
Compose frame, center focus brackets
focus by lightly pressing the shutter release button .
2
•
!!'I"iIll!lllll
28
shake
is
likely
to
occur
when the camera
'8'
or
but
always remember
~
II!II'''''l!!I!!I!I'e!!''
to
--'''.
Vari-Program (except for ~ and
hold the camera correctly.
0 Compose frame so that the subject to be focused
located closest at any of five focus areas and lightly
press the shutter release button. When the Dynamic
AF
Mode with Closest-Subject Priority (pages 26,
is
set, camera automatically maintains focus
subject located closest to any of five focus areas.
o Lightly pressing the shutter release button
automatically focuses the camera
when the subject
highlighted with
sound is emitted and . appears
is
not
held steady or with slow
on
your subject, and
is
in
focus, that focus
Vari
-Bright display (p. 9), beep
.!.,,)
with this
on
the subject and
area
in
the viewfinder.
on
is
is
47)
the
Page 29
• Focus indicator appears or blinks
• appears: Subject is
, 1/
"/
r, blinks: Unable to focus using autofocus .
• With dark subjects, the camera's AF-Assist Illuminator (page
activated
t!!11lillJ
Check
• Diopter adjustment (page
viewfinder.
To
take a picture of a subject outside the focus area, shift the focus area (page
•
or
use focus lock (page
• In situations where autofocus may not work as expected, see page
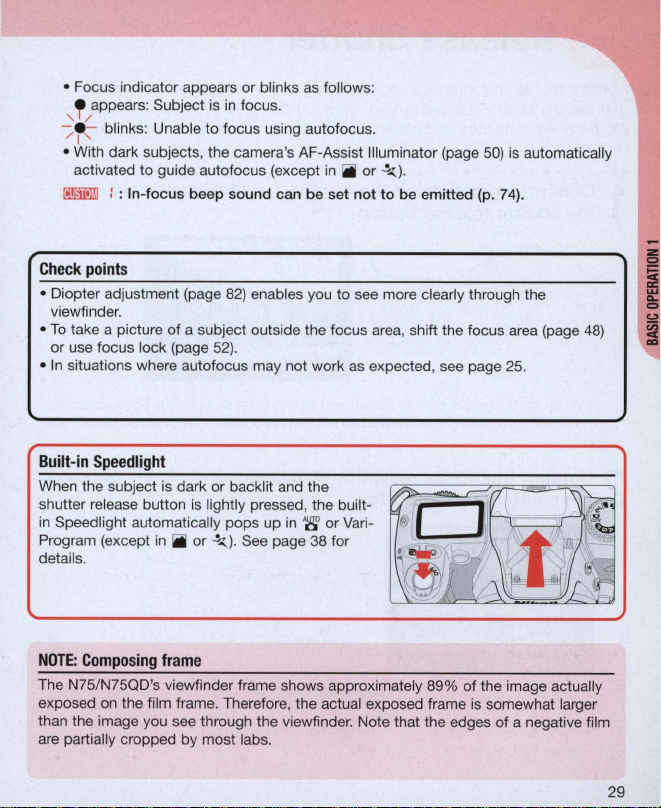
Built-in
Wh
en
shutter release button
in
Speed light automatically pops up
Program (except
details.
to
guide autofocus (except
: : In-focu s beep sound can be set not to be e
points
Speedlight
the subject is dark
in
in
focus.
82)
52)
.
or
backlit and the
is
lightly pressed, the built-
iii
or
.!....:.)
. See page 38 for
as
follows:
mitt
50)
ed (p. 7
in
iii
or
.!....:.)
.
enables you to see more clearly through the
in
'8' or Vari-
is
automatically
4).
25
.
48)
NOTE: Composing
The N75/N75QD's viewfinder frame shows approximately 89% of the image actually
exposed
than the image you see through the viewfinder. Note that the edges of a negative film
are partially cropped by most labs.
on
frame
the film frame. Therefore, the actual exposed frame is somewhat larger
29
Page 30
Release Shutter
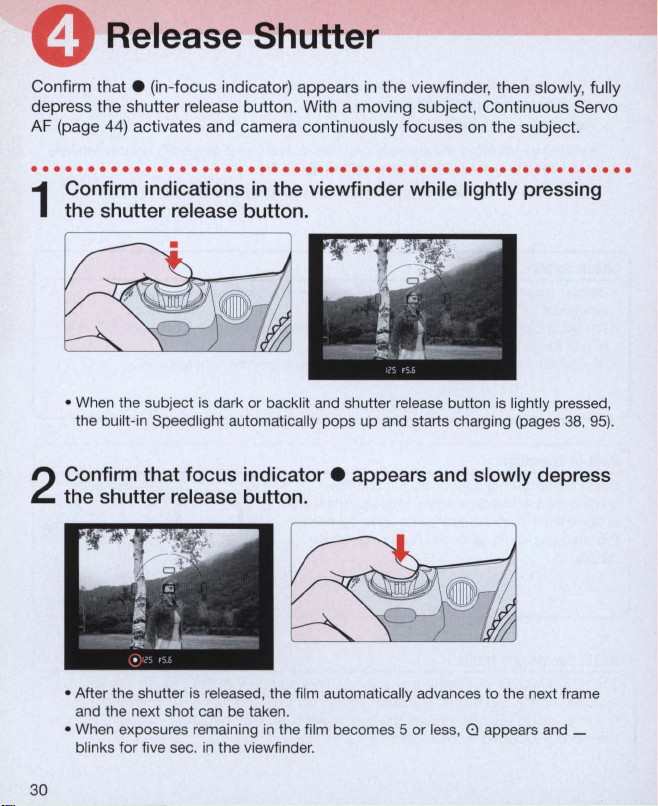
Confirm that . (in-focus indicator) appears
depress the shutter
AF (page 44) act ivates and camera continuously focuses on the subject.
re
lease button. With a moving subject, Continuous Servo
in
the viewfinder, then slowly, full
y
.....................................................
Confirm indications in the viewfinder while lightly pressing
1
the shutter release button.
• When the subject is dark or backlit and shutter release button
the built-in Speed light automatically pops up and starts charging (pages 38 ,
Confirm that focus
2
the shutter release button.
indicator.
appears and slowly depress
is
lightly pressed,
95)
.
• After the shutter is released, the film automatically advances to the next frame
and the next shot can be taken.
• When exposures remaining
blinks for five sec.
30
in
in
the viewfinder.
the
fi
lm becomes 5 or less, a appears and _
Page 31

Film starts to rewind automatically when the last shot
taken.
3
1(,
0
ItUT
.~
• 0
___
, 0
___
1
--
.",<WlI]
J§::~
__
[
, 0 _ , and then 0 is displayed during film rewind.
"\
~
11
./
is
Confirm that film
cartridge.
4
is
completely rewound, then remove film
FS.6
....
,-
"'1"
[
,; L
• Film is completely rewound when the frame counter shows blinking f
panel and
when the exposure meter is off.) Make sure the film is completely rewound
a
cartridge.
oo.millJ
Check
points
• If any other warning indications appear, see page 117 .
• For mid-roll rewind, see page
a
in
the viewfinder. (f appears without blinking and a disappears
are
blinking), open the camera back away from sunlight and remove the film
2 : Warning indications
in
the viewfinder can be set not
78.
in
to
appear (p. 74).
the LCD
(E
and
I
I
31
Page 32

Metering
Knowing
photographic
systems
the
and
characteristics
expression .
exposure
of
are
each
important
factor
helps you widen
factors
for
taking pictures.
your
• Metering Systems
As
the proper combination of shutter speed and aperture for correct exposure
is determined according
subject brightness is very important.
In
general, brightness inside the viewfinder is not uniform. The N75/N75QO
provides two metering systems:
Weighted Metering
brightness is detected by the 25-segment Matrix sensor. Using G- or O-type
Nikkor lenses, the N75/N75QO camera performs
Metering
Center-Weighted Metering, brightness is detected at the central areas
including five focus areas
Metering
than Manual and
exposure mode .
by adding distance information to determine correct exposure. With
is automatically selected when the exposure mode is set to other
to
subject brightness and film sensitivity, measuring
(page
Center-Weighted Metering is selected with Manual
Matrix Metering (page
60).
With Matrix Metering, data
in
the viewfinder. With the N75/N75QO, Matrix
26)
on
25-segment
and Center-
scene
3D
Matrix
• Exposure
Light from the subject passes through the lens and exposes the film. Light
reaching the film is controlled by the shutter speed and aperture. The proper
combination of shutter speed and aperture for subject brightness and film
sensitivity results
The N75/N75QO's
Program (page
Program gives you the option to choose from Portrait, Landscape, Close-Up,
Sports or Night Portrait
and photographic images.
you can manually set shutter speed and the camera automatically sets the
proper aperture.
manually set aperture and the camera automatically sets the proper shutter
In
speed.
speed and aperture.
in
the correct exposure.
'g'
mode (page
34)
automatically control shutter speed and aperture. Vari-
mode-designed
In
Aperture-Priority Auto exposure mode (page
Manual exposure mode (page
26),
In
Shutter-Priority Auto exposure mode (page
Auto-Multi Program (page
for specific picture-taking situations
60)
, you manually set both shutter
54)
58)
, you can
and Vari-
56),
32
Page 33

BASIC
OPERATION
This section describes the following
basic operations:
• Shooting with Vari-Program
• Using Built-In Speedlight
• Self-Timer Operation
• Imprinting OatelTime (N75QO only)
2
Page 34

Shooting with Vari-Program
---
Vari-Program gives you the option
Up, Sports
situations and photographic images .
. . . . . . . . . .
1
2
or
Night Portrait
..
. . . . . . . . . . . . . . .
Set the exposure mode dial to the desired
then lightly press the shutter release button.
• Center the focus brackets on your subject (where you want the focus) and lightly
press the shutter release button. Lightly pressing the shutter release button
automatically focuses the camera
focus
area
is
highlighted with
in
appears
When. is
•
Confirm that focus
the shutter release button.
the viewfinder.
blinking
in
the viewfinder, the camera
to
mode-designed
choose from Portrait, Landscape, Close-
..
on
the subject
Vari
-Bright display
indicator.
appears and slowly depress
for specific picture-taking
. .
..
. . .
..
. . . . . . .
Vari
-Program,
and
when the subject
(p. 9), beep sound
is
unable to focus using autofocus.
is
is
emitted
.. . .. . ..
in
focus, that
and
.
• Shutter speed and aperture are automatically determined
Program and are displayed
• When the subject
and fires (except
34
is
in
in
dark
iii
the LCD panel and viewfinder.
or
backlit, the built-in Speed light automatically pops up
or
~..:.)
.
to
suit the selected Vari-
Page 35

~
..x..:
Portrait mode
Use this mode whenever you are taking pictures of
people. It creates a blurred background
your main subject.
• 85mm
to
maximum apertures
• Distancing the main subject and the background
emphasises the effect.
1iIiI:
Use this mode whenever you'
distant scene. The overall picture, whether the
subject
allows you
twilight scenes.
• Built-in Speed light does not fire even when the
subject is dark or backlit.
In
•
night scenes, slow shutter speed
of self-timer or remote control also helps to avoid camera shake.
• A wide-angle lens is suited
200mm telephoto lenses with large
are
recommended .
Landscape mode
re
is
near or far, is sharply focused. It also
to
capture the beauty of nighttime or
some shooting situations, especially shooting
to
to
accentuate
taking a picture of a
is
selected.
capturing a wide view of the landscape.
To
avoid camera shake, use a tripod. Use
NOTE:
Vari-Program
Flexible Program (page
Exposure (page
Vari-Program, available Flash Sync modes differ with each program (page
55)
69)
, Auto Exposure Bracketing (page
cannot be performed
66)
in
Vari-Program. When using the flash in
and Multiple
96).
35
Page 36

Shooting with
~
:
Close-Up mode
Use this mode when you are taking pictures up close.
It
creates a blurred background
main subject. Useful
such
as
flowers or insects.
• Dynamic
center focus area are automatically selected (page
46)
AF
•
In
a tripod. U
• Effect is maximized at minimum focusing distance of the lens
zoom lens, use telephoto zoom position.
• For more professional uses, Micro-Nikkor lenses are recommended .
•
~
Use this mode
speed suitable for stop-ac tion photography. In Sports
mode, Continuous Servo
automatically activated and the camera continues
focus on the subject without Focus lock (page 52).
• Built-in Speed light does not fire even when the
subject is dark
• 80mm to 300mm telephoto lenses are
recommended .
• Continuous shooting is possible when film advance mode is set
(p.79).
• Use of ISO 400 or faster film speed
• A tripod
AF
even when the AF Area mode
Mode with Closest-Subject Priority.
some shooting situations, slow shutter speed
se
: Sports mode
is
in
taking close-ups
Mode with Center-Subject Priority and
of
sel
f-timer or remote control also helps to avoid camera shake.
to
freeze action. It uses a fast shutter
AF
or
backlit.
recommend
ed when
Vari-Program-continued
to
accentuate your
of
subjects
is
set to Dynamic
is
selected.
(page
44)
is
is
recommended.
using a telephoto lens to avoid camera shake.
to
To
avoid camera shake, use
in
use. When using a
to ~ continuous
36
Page 37

~:
Night Portrait mode
Use this mode for subjects with
background. Night Portrait mode captures all the
in
lighting
subject and background.
• Use
• Use of ISO 400 or faster film speed
• To avoid camera shake, use a tripod.
the scene, including the foreground
~
Landscape mode for twilight or nighttime
scene without foreground subject.
recommended.
an
evening
is
or
night
37
Page 38

Using Built-In Speedlight
----
When the subject is dark
pressed, the built-in Speed light automatically pops up
(except
with the Speed
in
iii
or
~)
light.
or
backlit and the shutter release button is lightly
.
Fully depress the shutter release button
in
'8' or Vari-Program
to
take pictures
.....................................................
When the subject is dark or backlit and the
1
button is lightly pressed, the built-in Speedlight
automatically pops up and starts charging.
• When the builtviewfinder (when the camera's meter is
• When you want to take a picture without the flash, close the built-in Speed light
until it clicks shut while lightly pressing the shutter release button. (When the flash
is
canceled
pressed, flash is canceled for subsequent shots. When you remove your finger
from the shutter release button and shutter
the built-
•
To
cancel the flash, select the Flash Cancel mode (page
the shutter release button.
Built-in
Speedlight
• The builtnumber of
is used
the peripheral area and may
• Using CPU Nikkor lenses such
Multi-Sensor Balanced Fill-Flash. Analysing the brightness and contrast level
derived from Matrix Metering, the 3D Multi-Sensor Balanced Fill-Flash ensures
proper exposure of the main subject and background, while providing adequate
flash output to create natural-looking flash photography. See page
in
in
in
Speed light is ready to fire, ~ appears without blinking
in
this manner,
in
Speed light pops up again and flash starts charging.)
and
Speed light offers
12
(ISO
flash photography using the built-in Speed light, the flash may not reach
100, m). When a wide-angle lens of less than 28mm focal length
as
long
Multi-Sensor
an
angle of coverage of 28mm lens with a guide
resu
lt
as
on)
.
as
the shutter release button
re
lease button
Balanced
in
a G- or D-type Nikkor lens enabl
Fill-Flash
a dark picture .
shu
tter release
in
is
kept lightly
is
lightly pressed again,
93)
before lightly pressing
es
use of 3D
91
for detail
the
s.
38
Page 39

Conf
irm ~ in viewfinder, then compose , focus and take the
picture with flash by fully depressing the shutter release
2
button .
• 90
• The shutter cannot be released unless ~ appears without blinking
viewfinder.
•
~
underexposure may have occurred . Check the flash shooting distance range
(page
• With dark subjects, the camera's AF-Assist I
to
NOTE: Continuous
After continuous use
tube. Wait for a while before using the built-in Speed light again.
Check
• Be sure to remove (or store) the lens hood before flash shooting.
• Some lenses have limitations using the built-in Speedlight and may cause vignetting
(a
shadow may appear within the frame) (page
• Normal Front-Curtain Sync flash mode
sync modes are also available. For details, see page 92.
FS.b
blinks
in
the viewfinder approx. 3 sec. after full flash output. If this happens,
98)
and shoot again.
guide autofocus . See page
use
~
ll
50
for details.
of
built-in
Speedlight
of
the built-in Speed light, it may stop firi
uminator
is
automatically activated
ng
points
100)
is
introduced
.
in
this section. Various flash
in
to protect t
the
he
firing
39
Page 40

Self-Timer Operation
Yo
u can use the self-time r
camera shake .
. . . . . . . . . . . . . . . . . . . . . . . . . . . . . . . . . . . . . . . . .
Press
@)
(self-timer) button and confirm that
1
the LCD panel. (O
button until ~ appears on the LCD paneL)
whe
n you want
r,
rotate the Command Di
------
to
be in the photograph
al
while pressing the ®
...
19
or reduce
. . . . . . . . .
appears
on
The display changes as follows:
I L Immediate release for
~
Check
points
• Use a tripod or place the camera
• To shoot
supplied eyepiece cap DK-5 (page
release button
• Do not stand
40
in
an
exposure mode other than Manual, cover the eyepiece with the
to
prevent interference from stray
in
front of the lens when setting the self-timer
:25 @
6E::~
No display
(cancel)
remote control
Two-sec. delay release
for remote control
on
a stable surface before using the self-ti
82)
or with your hand before pressing the shutter
~
5.6
II
..
@
[36)
mer.
lig
ht and achieve correct exposure.
in
autofocus mode.
Page 41

Compose picture, focus
release button and fully depress the shutter release button.
2
• Self-timer shooting cannot be performed unless the camera's shutter can be I
released (i.e. when subject cannot be brought into focus with autofocus).
• Once the self-timer is activated, the shutter will release
timer lamp will blink for 8 sec. and then illuminate for 2 sec. before the shutter is :I
released. During activation of the self-timer, beep sound is emitted.
• Self-timer
• When Red-Eye Reduction (page
timer/red-eye reduction lamp lights for 1 sec. before the shutter releases at the
same output level
•
To
turn the power switch off, press the
LCD panel or rotate the Command Dial while pressing the
disappear from the LCD panel.
0011l!lliI
oom!lIiI
is
canceled after shutter is released.
as
cancel the self-timer mode or the self-timer during self-timer operation, either
I : Self-timer beep sound can be
9 : The ti me delay
the normal Red-Eye Reduction function.
by
lightly pressing the shutter
93)
is set, self-timer activates and the self-
@)
button until'::'> and 6 disappear from the
set
not
to
of
the self-timer can be set to
in
10 seconds . The self- i
@)
button until'::'> and
be emitted
2, 5 or
(p.
74).
20 sec. (p.
76)
.
N
15
41
Page 42

Imprinting Date/Time (N7SQD only)
You
can imprint the following date information on your picture:
Mont
Year/
page 22
. . . . . . . . . . . . . . . .
1
h/Day, Day/Hour/Minute,
to
set date and time .
..
. . . .
Push MODE button
(Example: year 2003, April 1, 15:30)
Each time you push the MODE button the display changes
Year
Mont
h/DaylYear
..
. . . . .
..
to
select available imprinting displays.
/Month/Day Day/Hour/Minute No imprint
'n
-,
i ,
-,
or
Day/MonthlYear. See
. . . . . . . . .
,
11-
·
"iii
as
follows:
..
. .
..
. . . . . . .
I I
L
'--_
-=
'--
____
• The data displayed on the data imprint LCD will
Select - - - - - - (no imprint)
imprinting are IS032-3200.
Compose picture,
2
button
Imprinted
The i
imprinted date/time on the film . It may be difficult to read
against bright colors such
42
date/time
ll
ustration at right indicates the position of the
/<:1
to
take a picture with
• Data imprint indicator - blinks for approx. two
sec. immediately after the shutter is released (when film
loaded).
as
~'Y
'
~
=
oo,
I
i-l'
03
to
cancel data imprint. Compatible film speeds for data
focus
and fully depress the shutter release
white or reddish hues.
be imprinted
the
imprinted date/time .
'
'»~
::
II I i_I
on
the picture.
,;;~~
I'D
31
l
:.-..J
to
three
is
-
Page 43

FOCUS
OPERATION
This section features detailed
of
descriptions
• Focus mode
• Focus area mode
•
AF
• Focus lock
focusing operations.
-Assist Illuminator
Page 44

Focus Mode
Two
focus modes, autofocus usi
Continuous Servo A
·
...................................................
•
Autofocus
• Auto-Servo AF
Camera automatically chooses Single Servo
according to the subject status, i.e. stationary or moving.
• Single Servo AF
Automatically activated when shooting a stationary subject.
The shutter can be released when the focus indicator . appears
Once focused
focus (Focus Lock, page
deactivated, and the focus mode automatically switches to Continuous Servo AF.
•
Continuous
Continuous Servo
shutter can be released when the focus indicator . appears
focus
is
not locked and the camera continues
release. With a moving subject, Focus Tracking (page 122) is activated and the camera
continuously focuses
a main subject with Lock-On™ .
• Wh
en
~...:.
and the camera continuously focuses
Sports mode is selected, Continuous Servo
F)
and Manua l focus, are available with the N75/N75QO.
on
a subject, keeping the shutter release button lightly pressed locks
52)
Servo AF
AF
is automatically activated when the subject
on
the subject. Also, N75/N75QO will
ng
the Auto-Servo
• With the focus mode selector set to AF, lightly
pressing the shutter release button automatically
focuses the camera
area (page 9/
viewfinder.
AF
or Continuous Servo
. However, if the subject starts moving, Focus Lock is
to
on
the subject.
AF
(Single Servo
on
48)
focus on the subject until shutter
the subject at the focus
and causes .
AF
to
in
is
in
the viewfinder; however,
continue to focus firmly
is automatically activated
AF
appear
in
the
AF
operation
the viewfinder.
moving. The
and
.
on
About
Lock-OnTM
Lock-On™ Autofocus keeps focus firmly
momentarily blocks it
in
the viewfinder.
44
on
a main subject even if some other object
Page 45

• Manual focus
• Set the focus mode selector to M. Look through the
viewfinder and rotate the lens focusing ring until the
image appears sharp
viewfinder. The shutter can be released whether or
not the subject
focus indicator status.
• Use Manual focus
may not work
which do not allow autofocus operation when
attached to the N75/N75QD (page 104).
• When using a lens with the A-M select function , set
the switch /ring
(autofocus with manual priority)
your lens, Manual focus is possible either with the
switch/ring set
manual of your lens for details.
Manual
focus
using
Electronic
Set the focus mode selector to M. The focus can be confirmed with . indication
the viewfinder. The Electronic Rangefinder works with most Nikkor lenses (including
AF Nikkors when operated manually) having a maximum aperture of fl5 .6 or faster.
Lightly press the shutter release button and while the meter is
focusing ring until . appears
The Electronic Rangefinder can be activated with any of five focus brackets selected
as the focus area (pages 9/
Rangefinder
in
the viewfinder. The shutter can be released anytime.
48)
.
on
the clear matte field
is
in
focus and regardless of the
in
situations where autofocus
as
expected (page
to M to
focus manually. If M/A
to
M or M/
25)
is
A.
See
the instruction
on
, rotate the lens
or with lenses
available with
in
the
in
45
Page 46

Focus Area
Mode
The N75/N75QD
mode is set
Closest-Subject Priority, where the camera automatica
area, Dynamic AF
selects center focus area,
focus area. When the focus mode is set
either Center Area
area,
or
Single Area
focus area.
~
Tip
Dynamic AF Mode with Closest-Subject Priority is useful w
take automatic control over focus operations, or when shooting a moving subject.
Dynamic AF Mode is useful
when the composition of the photograph
. . . . . . . . . . . . . . . . . . .
Rotate
AF
125
B~E::~
~ lE::~["J
's
five focus areas cover a wide frame area. When the focus
to
AF (page
Area mode selector to select
FS
'1)1"
[36]
44)
, you can select either Dynamic
Mode
with Center-Subject Priority, where the camera
or
Dynamic AF
Mode
, where you focus manually using the center focus
Mode
, where you focus manually using the selected
in
achieving focus
..
. . . . . . . . . . . . . .
Mode
, where you select the desired
to
M (manual focus), you ca n select
on
a particular part of a subject, or
is
your top priority .
..
AF
• When the focus mode is set to AF (autofocus),
.6
Dynamic AF Mode with Closest-Subje
selected with the
(e
xcept
in
Mod
e with Center-Subject Priority
the AF Area mode
AF
Mod
e with the
Et:>l
When the focus mode is set to M (manual
focus), Center Area
Area mode selector set to either [_ )
@
A
Ar
Single
to
Et:>l
set
• All five focus areas
when Dynamic
Priority is selected. When a subject
focus brackets located at in-focus subject is
highlighted momentarily with the Vari-Bright display
(p. 9)
in
the viewfinder.
.!.
ea
AF
Area mode selector set
Vari
-Program, p.
se
lector set to [. ), and Dynamic
AF
Area mode selector set to
Mode
Mode
with the
are
AF
Mode with Closest-Subject
AF
ll
y selects the focus
hen
you want the camera to
. . . . . . . . . . . .
Area mode .
36)
is
selected with the AF
AF
Area mode selector
displayed
Mode
ct
, Dynamic AF
is
selected with
or
[. ), and
in
the LCD panel
is
in-focus,
with
..
Priority is
to
[_)
. .
46
Page 47

• When focus mode
[_ ): Dynamic AF
Dynamic
subject located closest
achieved
display
automatica
[.
Dynamic AF Mode with Center-Subject Priority automatically maintains focus
subject located at center focus areas and focus
subject moves from t
subject determining the data from the other focus areas. Center focus area
highlighted with the Vari-Bright display (p. 9).
E(l3:
Focus is obtained at the selected focus area and focusing
shutter release button is lightly pressed) once it is achieved
from the selected focus area, the camera automatica
determining the data from the other focus areas. Selected focus area is highlighted
with the Vari-Bright display
• In Continuous Servo
AF
'.
(p. 9).
):
Dynamic AF
Dynamic AF
the subject
Mode with Closest-Subject Priority automatically maintains focus
The focus area
If
the subject moves from the selected focus area, the camera
ll
y focuses on the subject determining the data from the other focus areas.
(see
is
Mode
Mode
Mode
page
set to Autofocus
with Closest -Subject Prior ity
to
any of five focus areas and focus is locked once it is
of
the subject
with Center-Subj
he
center focus area, the camera automatically focuses
(p. 9)
AF
, focus is not locked and camera continuously focuses
44)
.
is
in
focus
is
highlighted with the Vari-Bright
ect
Priority
is
locked once it
is
locked
'.
If
ll
y focuses
.
the subject moves
is
achieved
(as
on
the subject
long
on
the
on
the
'.
If the
on
the
is
as
the
on
• When focus mode
[-)1[.):
Center Area
Focus is obtained only at the center focus area when the
set to either
highlighted with the Vari-Bright display
E[>~:
Focus is obtained only at the selected focus area when using the manual focus.
Selected focus area is highlighted with the Vari-Bright disp l
Single Ar
[_)
or [ . ) and when using the manual focus. Center focus area is
ea
Mode
is
set to Manual
Mode
(p. 9).
AF
Area mode selector
ay (p. 9).
is
47
Page 48

Focus Area Selection
This camera's five focus areas cover a wide frame area, and you can select
among them, depending on the subject's position
composition. They
(page
52)
.
re
liably provide sharp focus wit hout u
. . . . . . . . . . . . . . . . . . . . . . . . . . . . . . . . . . . . .
Set
the
1
fS
.
11)
[3
I:(ll
• Dynamic
mode set
is selected with the focus mode set to manual.
• Focus Area selector is locked and focus area
cannot be selected when AF Area mode other
E
than
Press
2
select a
• Lightly press the shutter release button and
press the focus area selector up/down/righV
left to change the focus area toward the
corresponding directi
is highlighted with the Vari-Brite display (p.
Se
lected focus area is also indicated in the
LCD panel.
in
the frame or your des
se
of
focus l
..
. . . . . . . . . . . . . .
AF
Area
mode
selector
AF
Mode is selected with the focus
to
autofocus, and Single Area mode
c)3
is selected .
the
focus
area selector
focus
area.
on. Se
lected focus area
ock
ire
to
to
d
9).
48
Page 49

Check poi
• When exposure mode
• When exposure mode
• Select the focus area while exposure meter
nts
is
switch off and on again resets the focus area
set to
P, 5, A or M, or
'8'
or
Vari-Program from P, 5, A or M
When exposure mode is changed within
focus, selected focus area remains.
when exposure meter
set to '8' or
in
manual focus, selected focus area remains.
is
changed within '8' and any
is
off.
Vari
-Program
in
auto focus, focus area resets
P, 5 , A and M
in
autofocus, turning the power
to
the center. When exposure mode is
of
Vari-Program, or changed to
in
autofocus, or
is
on. Focus area cannot be selected
to
the center.
in
manual
49
Page 50

AF-Assist Illuminator
When the subject
is
dark and the shutter release button
is
pressed lightly, the
camera's AF-Assist Illuminator automatically turns on and enables autofocus
in
operation
a dark environment.
.....................................................
• AF-Assist Illuminator automatically turns
following situations:
Focus mode is autofocus ,
subject is dark and center focus area
Dynamic
activated.
• AF-Assist Illuminator does not turn
• Focal length of the usable
200mm.
• The distance range of the AF-Assist Illuminator is
approx. 0.5-3m (1.6-9.8 ft.). Autofocus using the
camera's AF-Assist Illuminator cannot be performed
due
distance less than 1 m (page
• When the optional Speed light with AF-Assist
Illuminator is attached and the conditions for the
AF
Illuminator
turns on. With other optional Speed lights, the
camera's Illuminator turns
~
(p.76).
N
OTE: Continuous
When the AF-Assist Illuminator
to protect the firing tube. The illumination restarts after a few moments. Also, when
the AF-Assist Illuminator is used repeatedly
touch the AF-Assist Illuminator lamp because it may become hot.
use
of
the AF-
Assist
is
used continuously, illumination is limited temporarily
AF
Mode with Closest-Subject Priority
to
vignetting with some lenses at a shooting
-Assist Illumination are met, the AF-Assist
of
the optional Speedlight automatically
:e
: AF-Assist Illuminator can be canceled
Illuminator
in
a short period of time, be careful not to
AF
Nikkor lens is used,
AF
Nikkor lens is 24-
51)
.
on
(page 109).
on
is
in
on
in
the
selected or
is
iii
or
..!...z
.
50
Page 51

NOTE: Lenses
• Autofocus using the camera's AF-Assist Illuminator cannot be performed with
following lenses at a shooting distance within 1 m
AF
AF
AF
AF
AF
AF
AF
• Autofocus using the camera's AF-Assist Illuminator cannot be performed with
following lens at a shooting distance within 1.5m
vignetting.
AF-S
shooting distance at wideangl
• Autofocus using the camera's AF-Assist I
following lenses due
AF-S BO-200mm f/2.B IF-ED
AF
AF
incompatible
Micro 200mm f/4 IF-ED
-S 17-35mm fl2.B
1B-35mm
20-35mm f/2. B
24-B5mm
24-120mm f/3.5-5.6 IF
Micro 70-1BOmm
BO-200mm f/2.B
VR
f/3.5-4.5
f/2. B-4
2B-70mm
BO-400mm
ED
IF
IF
fl4.5-5.6
f/2. B IF-
to
vignetting.
ED
f/4.5-5.6
with AF-
ED
Assist
Illuminator
(3
.3 ft.) due
ED
(4
.9
ED
at 70mm (usable at approx. 1m [3.3 ft.] or longer
e)
ll
uminator cannot be performed with I
ED
to
vignetting .
ft
.)
at telephoto due
to
~
I;
i
51
Page 52

Focus Lock
Focus lock is useful
that's framed outside of the N75/N75QO's five focus areas.
~
Tip
Focus lock
situations where autofocus may not work
is
best suited for a photograph where composition
in
autofocus shooting when you want
as
expected (page
to
capture a subject
is
your top priority, and
25)
.
in
• • • • • • • • • • • • • • • • • • • • • • • • • • • • • • • • • • • • • • • • • • • • • • • • • • • • •
Position the focus area
subject and lightly press the
1
shutter release button.
when
center
focus
area
• • appears when the subject
the focus is locked
release button is kept lightly pressed.
• Focus lock cannot be used
• Focus is not locked with a moving subject.
lock focus
been moving, remove your finger from the
shutter release button and lightly press the
shutter release button again.
as
on
a stationary subject which has
Confirm focus indicator
2
compose while lightly pressing the
shutter release button and shoot.
• After you have locked focus, do not change
the camera-to-subject distance.
is
long
on
the
(For
example,
selected.)
is
in
focus and
as
the shutter
in
~.
e,
To
52
Page 53

EXPOSURE
MODE
This section describes how to take
pictures
in
each exposure mode.
• Auto -Multi Program
• Shutter-Priority Auto
• Aperture-Priority Auto
• Manual
Page 54

Auto-Multi Program
P:
Auto-Multi Program
The camera automatically controls exposure
achieve correct exposure
situation . For more complex shooting, use
Flexible Program (page
Compensation (page
Bracketing (page
• P (Auto-Multi Program) can only be used with a
CPU Nikkor lens such
104).
~
Tip
Auto-Multi Program is best suited for snapshots .
. . . . . . . . . . . . . . . . . . . . . . . . . . . . . . . .
66)
..
in
any shooting
55)
, Exposure
64)
or Auto Exposure
.
as
G- or D-type Nikkor (page
. . . . . . . . . . . . . . . . . . .
1 Set the exposure mode dial to
NOTE:
CPU
Nikkor
lenses
other
than
G-type
Always set the aperture ring of a CPU Nikkor lens (except G-type) to its minimum
(largest f-number). When the lens
blinks
in
the LCD panel and viewfinder, and the shutter locks.
is
not set
to
its minimum aperture setting,
FE
to
P.
E
54
Page 55

Difference
Although exposure controls
functions such as
Bracketing, Multiple Exposure (page
flexible shooting. In Auto-Multi Program, however, the built-in Speed light does not
pop up automatica
between
Fle
'8'
(AUTO
mode)
and P (Auto-Multi
are
xible Program, Exposure Compensation, Auto Exposure
ll
y with a dark
the same, with Auto-Multi Program , you can select
69)
or Slow Sync flash (page
or
backlit subject.
Program)
92)
for more
Compose picture, confirm focus
2
indicator.
and shoot.
• When the subject is too dark or too bright, one
of the following warning indications
in
the viewfinder and LCD panel.
• H
::
Use
ND
•
to
: Use Speed light.
• If the subject
recommended indication
viewfinder when you lightly press the shutter
release button. Use the Speed light (pages
95/107).
Flexible
Program
By rotating Command Dial
Program, you can change the combination
of shutter speed and aperture while
maintaining correct exposure. With this
function , you can shoot
Program
Priority Auto or Aperture-Priority Auto.
cancel the Flexible Program, either change the exposure mode,
turn off the power switch,
as
though shooting
in
Auto-Multi
in
Auto-Multi
in
or
use the built -
Shutter-
To
~
in
Speedlight (page
filter (optional) .
is
too dark or backlit, the flash
~I~
E::~
(36]
::l
~ ~
_ /
95)
r---
.
~
blinks
16ol.~
m (
::l
wi
ll
appear
in
the
I
I
36
]
55
Page 56

Shutter-Priority Auto Exposure Mode
s:
Shutter-Priority Auto
Enabl
es you to manually set the desired
shutter speed
automatica
provide correct exposu
• S (Shutter-Priority Auto) can only be used with a
C
PU
Nikkor lens such
Fast shutter speed 1/500 sec.
Sl
ow
shutter speed 1/4 sec .
104).
~
Tip
With high shutter speeds, you can freeze the motion
of a fast-moving subject; with slower speeds, you
can create a motion effect.
. . . . . . . . . . . . . . . . . . . . . . . . . . . . . .
(3
0-1/2000 sec.); the camera
ll
y selects the proper apertu
re
.
as G-or
..
. . . . . . . . . . . . . . . . . . . . .
D-type Nikkor (page
re
to
1 Set the exposure mode dial to S.
NOTE:
CPU
Nikkor
lenses
other
Always set the aperture ring of a C
(largest f-number). When the lens
blinks
in
the L
CD
panel and viewfinder, and the shutter locks.
56
than G-type
PU
Nikkor lens (except G-type)
is
not set to its minimum aperture setting,
to
its minimum
FE
E
Page 57

Set the shutter speed
2
sec.) with the Command Dial.
(30-1/2000
Compose pict
indicator . and shoot.
3
• When the subject
of the following warning indications
in
underexposure value
electronic analog exposure display
viewfinder.)
•
125
H 1
+~I~I~
1
2-
Overexposure
•
125
L 0
+2
1
~I~I~-
~
Underexposure
Check point
•
If
- - (Long Time exposure) is selected
mode is changed
shutter locks.
other than - - by rotating the Command Dial.
to
Shutter-Priority Auto without cancelling - - , - - blinks and the
To
shoot
in
Shutter-Priority Auto exposure mode, select shutter speed
• H
•
• If the subject is too dark or backlit , the flash ~
recommended indication ~ blinks
viewfinder when y
release button. Use the Speedlight (pages
95/
in
ure
, confirm focus
is
too dark or too bright, one
the viewfinder and LCD panel. (Over- or
::
Select higher shutter speed. If the
warning indication still remains
an
ND
l.
0: Select slower shutter speed. If the
warning indication still remains
the Speed light. When the Speedlight
used, fastest shutter speed is limited to
1/90 sec .
107)
.
Manual exposure mode and the exposure
is
indicated with the
filter (optional).
ou
lightly press the shutter
wi
ll
appear
in
the
on
, use
on
, use
in
the
is
w
CI
i
~
~
57
Page 58

Aperture-Priority
A:
Enables you
minimum to maximum) manually. The camera
automatically selects a shutter speed suitable
for correct exposure .
• A (Aperture-Priority Auto) can only be used with a
Small aperture f/32
Large aperture f/2.8
..................
•
~
By varying the aperture, and thus controlling the
depth
background and foreground, or blur the background.
...................................
1 Set the exposure mode di
Auto
Aperture-Priority Auto
CPU Nikkor lens such
104).
In
flash photography, varying the aperture changes
the flash shooting distance (page
Exposure
to
set the desired aperture (lens'
as
G- or D-type Nikkor (page
Mode
98)
.
Tip
of
field (page 102), you can sharpen the
al
to
A.
NOTE
: C
PU
Nikkor
lenses
other
than
G-type
Always set the aperture ring of a CPU Nikkor lens (except G-type) to its minimum
(largest f-number). When the lens is not set to its minimum aperture setting,
blinks
in
the LCD panel and viewfinder, and the shutter locks.
58
FE E
Page 59

•
H:
FS.5
Overexposure
• ~ 0
FS.5
Underexposure
'~I:I~ 1 ~-
~
Set the aperture
2
maximum)
by rotating the
(lens' minimum
Command Dial.
Compose picture, confirm focus
indicator.
3
• When the subject is too dark or too bright, one
of the fo
in
the viewfinder and LCD pane
underexposure value is indicated
electronic analog exposure display
viewfinder.)
::
• H
0: Select larger aperture (smaller f-number).
• L
the Speedlight.
• If the subject is too dark
recommended indication
viewfinder when you lightly press the shutter
release button. U
95
/107).
and shoot.
ll
owing warning indications will appear
Select smaller aperture (larger f-number).
If the warning indication remains on, use
an
ND
filter (optional) .
If the warning indication
se
the Speed light (pages
l.
(Over- or
wi
re
mains on, use
or
backlit, the flash
~
blinks
in
th the
in
the
the
to
I
I
59
Page 60

Manual Exposure Mode
M:
Manual
Enables you
[Time)
minimum
• Non-CPU lenses (page
Manual exposure mode.
~
Tip
With electronic analog exposure display
viewfinder, you can produce various creative effects
by adjusting the exposure. Long Time exposure
(Time) can be set
to
and 30-1/2000 sec.) and aperture (lens'
set both shutter speed (- -
to
maximum) manually .
106)
can only be used
in
Manual exposure mode .
in
in
the
. . . . . . . . . . . . . . . . . . . . . . . . . . . . . . . . . . . . . . . . . . . . . . . . . . . . .
Set the exposure mode dial to M.
1
• Metering system automatically switches to
r-
Weighted from Matrix
Cente
exposure mode .
• When a non-CPU Nikkor lens is attached,
appears
in
Set/confirm aperture with the lens aperture
ring. Camera's exposure meter cannot be
used.
the LCD panel and viewfinder.
See
page 106 for details.
in
Manual
F- -
Center-Weighted
Center-Weighted Metering places special emphasis
brightness within the 12mm-diameter circle
viewfinder and is thus useful for basing exposure on a
specific area of the scene.
60
Metering
in
the
on
0
Page 61

NOTE:
CPU
Nikkor
lenses
other
than G-type
Always set the aperture ring of a CPU Nikkor lens (except G-type) to its minimum
(largest f-number). When the lens is not set to its minimum aperture setting,
blinks
in
the LCD panel and viewfinder, and the shutter locks.
fEE
Set the shutter speed and aperture
2
while checking the electronic
analog exposure display
in
the
viewfinder.
• Set the shutter speed (-- [Time] and 30-1/2000
sec.) by rotating the Command Dial and
aperture (minimum to maximum) by rotating the
Command Dial while pressing the
button .
• The electronic analog display
indicates the difference between the selected
exposure (shutter speed and aperture) and the
correct exposure. The electronic anal
exposure display blinks when the subject
brightness is beyond the camera's exposure
range. (Electronic analog exposure display is not
available with Long Time exposure.)
The following examples show electronic analog
exposure display indications:
@ aperture
in
the viewfinder
og
3 Compose picture, focus and shoot.
• If the subject is too dark
recommended indication
viewfinder when you lightly press the shutter
release button. Use the Speed light (pages
95/107).
or
backlit, the flash
~
blinks
in
the
61
Page 62

Long Time Exposure
• Long Time (Time) exposure of more than 30 sec.
When the exposure mode dial
indication
the shutter release button once
release button again
nighttime scenes or stars.
~
In
Long Time exposure, camera shake can be reduced by using the Self-Timer (page
or
. . . . . . . . . . . . . . . . . . . . . . . . . . . . . . . . .
to
- - (next after 30 sec.)
Tip
Remote Control (page
to
84)
is
set
to
M (Manual), set the shutter speed
to
set Long Time (Time) exposure. Depress
to
close the shutter. This function
and tripod .
open the shutter, then press the shutter
..
. . . . . . . . . . . . . . . . . .
Set the exposure mode dial to M
1
and rotate the Command Dial to
set the shutter speed indication
to
Rotate the Command Dial while
pressing the
2
set the aperture.
@ aperture button to
is
useful for shooting
3 Compose picture, focus and shoot.
• Depressing the shutter release button once opens the shutter and the self-timer
lamp flickers slightly during Long Time
• - - and other indications such
the indications turn off
• Press the shutter release button again to close the shutter.
• Continuous exposure
Note that continuous exposure time is reduced when shooting at low
temperatures.
• Auto Exposure Bracketing (page
(Time) exposure.
62
in
the viewfinder.
is
possible for approx. 4 hours with a fresh set of batteries.
(Time)
as
aperture are displayed in the LCD panel, but all
66)
exposure.
cannot be performed during Long Time
40)
Page 63

ADVANCED
OPERATION
This section features descriptions of
operations using the N75/N75QD 's
advanced functions.
• Exposure Compensation
• Auto Exposure Bracketing
• Multiple Exposure
Page 64

Exposure Compensation
To
modify exposure control
Compensation function. This can be useful when intentiona
or
overexposure
compensation of
• Exposure Compensation can be set
~
Tip
Compensate to the + side
the specific photographic effect you desire .
. . . . . . . . . . . . . . . . . . . . . . .
Electronic analog exposure
No compensation
+0.5
-1.5
to
-3
display
+
2.1.
. 2.1
1~
EV
compensation
EV
compensation
obtain a specific photographic effect. This camera offers
~ .1.2-
,.2-12
(Le.
from the ISO standard). use the Exposure
EV
to
+3
EV
in
to
brighten, and the - side
..
1
~
1/2 steps.
in
P, S, A and Vari-Program.
to
darken overall picture
. . .
..
. . . . . . . . . . . . . .
Set Exposure Compensation
rotating the Command Dial while
pressing the
ID
button until the
desired compensation value
(-3
EV
appears
to +3
steps).
• When the Exposure Compensation is set,
appears
in
• The compensation value can be checked
the LCD panel and viewfinder by pressing the
ID
between
the LCD panel.)
the LCD panel and viewfinder.
button. (Confirm the compensation value
-2
EV
to
-3
EV
ll
y achieving under-
to
obtain
..
. . . . . . .
by
EV
in
1/2
and +2
to
+3
EV
~
in
in
64
Over
Under
+2
.0
-2
.0
EV
compensation
EV
compensation
Page 65

NOTE:
Setting
Exposure
Normally, you should compensate exposure to the + side when the background
brighter than your main subject,
Compensation
or
to
the - side when the background is darker.
is
Compose
2
indicator.
•
To
cancel Exposure Compensation, rotate the
Command Dial while pressing the
reset the compensation value to D.
Program, changing the exposure mode also
cancels the Exposure Compensation. (Turning
the power switch off does not cancel the
Exposure Compensation.)
Check
points
• The Exposure Compensation cannot be set
• Once the Exposure Compensation
compensation remains
'8'
or
Vari-Program temporarily cancels the compensation.
• Exposure Compensation set
changed.
•
In
any of the exposure modes, both flash output level for the flash illuminated
subject and exposure on the background are bracketed when a Speed light
in
that exposure mode. Changing the exposure mode to M,
is
set
in
in
Vari-Program is canceled when exposure mode
picture
and
in
'8' or M exposu
each P, S
or
, confirm focus
shoot.
re
mode. I
A exposure mode, j;i
ID
D.
button
In Vari-
is
is
used.
to
~
li:!
I
::c
65
Page 66

Auto Exposure Bracketing
Auto Exposure Bracketing allows you
values (maximum
exposure (or selected exposure
each time the shutter is released.
• Auto Exposure Bracketing is available
~
Tip
Bracketing
exposures after processing the film, when the subject has pronounced contrast
shooting with color slide film and where the latitude
is
useful
of
±2
EV)
shifting from the automatic'ally set proper
in
selecting one shot out of several shots with bracketed
to
shoot
in
selected compensated EV
in
Manual exposure mode) for three shots
in
P, 5 , A and M exposure modes .
of
the proper exposure
is
minimal.
in
.....................................................
Rotate
1
Bracketing "
±2
The display changes
EV
the
Command
without
(no display)
Dial while pressing the Auto Exposure
button
to
combining
as foll
ows:
/.
- /
.....
I.U
Cancel
......
set
des
ired bracketing value (within
exposure compensation).
IlmI
f---
••
Ii!J
......
___
:/
&;:.
..,jt
....
u
/
66
Page 67

• When the bracketing value is set (and while the exposure meter is
appears and IB blinks
display blink
• Bracketing value can be confirmed by pressing the
• Shutter speed and aperture
exposure mode are bracketed.
In
any
•
subject and exposure
used .
•
Compensated
Compensated
in
of
the exposure modes, both flas
EV
EV
D.S
,M
I.U
:.5
c.D
~
3 : Bracketing order can be
value (p. 74).
in
the viewfinder.
value and
value
the LCD panel, and IB and electronic analog exposure
on
the background
in
P,
aperture
bracketing
Bracketing order
0, -0.5, +0.5
0, -1.0, +1.0
0, -1 .5, +1.5
0, -2.0, +2.0
set
to
change from negative
in
e button.
S and shutter speed
h output level for the flash illuminated
are
bracketed when a Speedlight is
order
EV
in
value
on)
, Iil:tj
A and M
to
positive
EV
Compose
picture, confirm
focus
indicator.
2
• Each time the shutter release button is depressed, correct EV, under
EV
exposure are performed
exposure display shows the correct, under-, then overexposur
shutter speed and aperture valu
in
that order while the blinking electronic analog
es are displayed during shooting. i
and shoot.
EV,
and over
e.
Compensated
lIE
I
67
Page 68

Auto
Exposure
Bracketing-continued
• If the Exposure Compensation function (page
combined with the Exposure Compensation values.
Bracketing with a compensated value of over
±S
EV).
• If the end of the film roll
taken after new film has been loaded. Also, if you turn the power switch off during
bracketing, the remaining shots can be taken after the power is turned back on.
Auto Exposure Bracketing
canceled when the
3
•
rn:H
and ~ in
the viewfinder disappear when the bracketing is completed.
•
To
cancel the bracketing, rotate the Command Dial while pressing the e button
so
rn:H
cancel bracketing.
Check
points
• Auto Exposure Bracketing cannot be performed
• Auto Exposure Bracketing and Multiple Exposure (page
simultaneously.
• Auto Exposure Bracketing and Long Time exposure (page
simultaneously.
the LCD panel and ~ and the electronic analog exposure display
disappears from the LCD panel. Turning the power switch off does not
is
reached during bracketing, the remaining shots can be
Electronic analog exposure display
(Example: bracketing value 1.0,
is
third
shot is taken.
64)
is also set, bracketing wi
It
is
+2
useful to perform
EV
or under
-2
EV
in
First shot (correct
Second shot
EV)
(under
Third shot (over
completed and automatically
in
A8 and Vari-Program.
69)
cannot be set
62)
cannot be set
ll
be
(maximum of
A mode)
EV)
EV)
in
68
Page 69

Multiple Exposure
Multiple Exposure consists
in
the same frame.
• M
ul
tiple Exposure can be set
. . . . . . . . . . . . . . . . . . . . . . . . . . . . . . . . . . . . . . . . . . . . . . . . .
Rotate
1
exposure " button
display changes as follows:
Rotate the Command Dial while pressing the
set
2
• Test shooting is recommended since the compensation actually required varies
• When the background is completely dark and subjects do not overlap, no c
• In some cases, frames may shift slightly
the
Command Dial while pressing
the
necessary Exposure Compensation.
depending on the shooting situation. I
compensation
advance becomes unstable at the beginning and near the end of a film roll so
multiple exposure
is
of
two
or more exposures
in
P, S, A and M exposure modes .
so ~ appears in
ll5
t-
~
appears
•
Multiple Exposure
necessary for each shot.
is
not recommended.
of
one or more subjects
the
multiple
the
LCD panel. The
~ ~
....
in
multiple exposure. In particular, film
1
.0
....
Cancel _
(no display)
in
the LCD panel when the
is
set.
ID
1.5....
"'"
••
----->+
button
..
rn6
to
. .
jn
t;;.U
69
i
~
Page 70

Multiple
St
anda
rd
compensation
Number of exposures Compensation value
Two
Three
Four
Eight or nine
Exposure-continued
value
in
multiple
-1 .0
EV
-1.5
EV
-2
.0
EV
-3
.0
EV
exposu
re
Exposure Compensation
necessary depending
number of exposures
exposure since more than one
image
is
frame.
exposed
on
in
in
the same
is
the
multiple
Compose picture, confirm focus indicat
or.
and
3
• The first shot is taken and ~ and frame
counter blink
shutter release button is fully depressed. The
frame counter
count down and the film does not advance,
and multiple exposures can be taken from the
second shutter release . The multiple exposure
is
canceled, film advances and ~ disappears from the LCD panel when the
second shot
To
take more than two shots
•
pressing the
release button and while
this operation
frame .
To
cancel multiple exposure, rotate the Command Dial while pressing the e
•
button so ~ disappears from the LCD panel, set Auto Exposure Bracketing, or
set the exposure mode
counter counts down when the
multiple exposure operation.
Ch
eck
points
• Multiple Exposure cannot be performed
• Multiple Exposure and Auto Exposure Bracketing (page
simultaneously.
is
taken .
on
the same frame, rotate the Command Dial while
e button again after the first shot
~
as
many times
is blinking so ~ appears without blinking. Repeat
as
you wish
to
'8' or
Vari
-Program. Film is advanced and frame
mu
ltiple exposure
in
'8'
70
in
the LCD panel when the
in
the LCD panel does not
is
taken by depressing the shutter
to
continue taking pictures
is
canceled before or during
or
Vari-Program .
66)
cannot be set
shoot.
on
the same
Page 71

CUSTOM
SEnlNG
Using the Custom Setting feature, you
can create a combination
that is different from the initial factory
settings. The functions listed
section can be selected with the
N75/N75QD.
of
functions
in
this
Page 72

Menu/Features of Custom Setting
• Creating Custom Setting
Set the Custom Setting selector to
number by rotating the Command Dial.
1
•
12
menus ( 1 to
12)
are available.
2 Select the desired option number
• The option
Wh
•
!!!m!m
se
lector
• The shutter cannot be
se
lector is set
shooting .
nu
en
mber changes
the option number other th
appears
in
to
the LCD pane
set desired film advance mode .
to
re
leased when the film advance mode/Custom Setti
CSM
. Set the di
as
you press the
an
initial setting is displayed
l.
Rotate the film advance mode/Custom Setting
al
to
the desired film advance mode before
CSM
and select a menu
by
pressing the
If)
button.
ID
button.
in
the LCD panel,
ng
72
Page 73

• Cancelling Custom Setting
Set the Custom Setting selector to
a and
~
buttons simultaneously for more than two
CSM
and press the
sec .
• All the Custom Settings
disappears from the LCD panel.
• Each Custom Setting can be canceled and reset to initial setting by selecting the
number of "initial setting" (e.g.
the "Creating Custom Setting".
are
canceled and reset to their initial factory settings.
D with Custom Setting menu number
1)
at step 2 of
00J,'ililll
73
Page 74

Menu/Features
of
Custom
Setting-continued
• Menu number and Custom Setting options
• Refer also
:.
to
the Custom Setting Menu table at the end of this instruction manual.
Beep sound (pages 28, 41, 84)
Options: D: Activated (initial setting)
At initial setting, beep sound
during self-timer or two-sec. remote control operation.
turned off with
::
Di
sabled
option : in this
is emitted when focus
menu.
is
achieved
in autofocus,
Th
is beep sound can be
2. Warning indications
Options: D: Displayed (initi
:: Off
At initial setting, when battery power is low, no film
loaded properly, warning indications such
However, these warning indications c
in
the viewfinder (pages 9, 17, 21, 31, 78)
al
setting)
is
as
an
be turned off.
loaded, or film is not
C-.J
or
Q appear
3. Bracketing order (page 67)
Options: D: Metered value, under, over (initial setti
Bracketing is normally performed
Bracketing order can be changed to be performed from negative compensation
to
'-/
. Focus area illumination (page
Options: D: Automatically illuminated for low light (initi
At initial setting, selected focus area (focus bracket
temporarily illuminated
identification. However, it can be set not
regardless
:: Under, metered value, over
positive compensation.
:: Canceled
2: Always illuminated
in
of
the subject brightness.
red
depending
in
the order
9)
on
to
ng)
of
the initial setting. However,' this
al
setting)
s)
in
the subject brightness for easy
be illuminated
the viewfinder
or
always illuminated
74
in
the viewfinder.
is
Page 75

5. Auto Exposure Lock when shutter release button
is
lightly pressed
(page 80)
Option
s:
D: Disabled (initial setting) E
At initi
However, Auto Exposure can be set
re
lease button. _
o.
AE-L button (pages 52/80)
Options D: Auto
I: Activat
al
setting, Auto Exposure Lock can be performed by pressi
I: AEiAF simultaneous lock
c: AF operation
At initial setting,
However, Auto Exposure and autofocus can be set
at
in
itial setting, autofocusing starts when the shutter release button
pressed, but it can be set
pressing the shutter release button lightly does not start
ed
to
be locked by
Exposure lock only (initial setting)
on
on
ly Auto Exposure
ly starts by pressing
is
locked when the
to
activate when the
ng
the
is
CD
lightly
li
ghtly pressing the shutter i
CD
button
CD
button is pressed.
to
be
locked simultaneo usl
CD
button
is
pressed. (In this setting,
au
tofocusing.)
button.
y. Also
Z
bJ
~
1. Metering system
Options:
D:
I: Matrix
in
Center-Weighted (initial setting)
the Auto Exposure lock (page 80)
c: Spot
At init
ia
l setting, the exposure meteri
Weighted Metering when Auto Exposure lock
Matrix or Spot Metering.
B. Time delay for auto meter-switch-oft (page 17)
Options 3 : 3 sec.
S : 5 sec. (initial setting)
ID
: 10 sec.
cD
:
20
Note that the usable
delay time for auto meter-switch-off since it consumes more power.
sec.
nu
mber of film rolls per batteries decreases with the longer
ng
system automatical
is
performed. However, it can be set
ly
changes to Center-
to
75
Page 76

Menu/Features
9. Self-timer duration (page 40)
Options 2 : 2 sec.
:a.Standby duration for the remote control operation (page 84)
Options : : 1 min. (initial setting)
5 : 5 sec. 20 : 20 sec.
5 : 5 min.
:a
: 10 min.
of
Custom
:a
Setting-continued
: 10 sec. (initial setting)
: :'LCD illuminates by pressing any function button (page
Options 0: Disabled (initial setting)
At initial setting , pressing the a button activates the LCD illuminator. However, it
can be set to be activated with a press
:c.AF-Assist Illuminator activation (page 50)
Options 0: Activated (initial setting)
Note that
this option.
76
:: Activated
I: Disabled
AF
-Assist Illuminator
of
any button.
of
the optiona l Speed light cannot be turned off with
8)
Page 77

OTHER
FUNCTIONS
This section describes other useful
camera functions and information.
• Film rewind
• Film advance mode
• Diopter adjustment
• Viewfinder accessories
• Available mode combinations
Page 78

Film Rewind
This section explains mid-roll rewind and what to do if the film does not
rewind .
. . . . . . . . . . . . . . . . . . . . . . . . . . . . . . . . . . . . . .
Mid-
roll
•
To
El~
Shutter sound
· 0
during film rewind and the frame counter counts
backwards until rewind is complete.
• Film is comp letely rewound when a blinking E
shows
appears without blinking and 8 disappears when
the exposure meter
blinking, open the camera back away from sunlight
and remove the film cartridge.
If film does not start to rewind or film
rewind stops at mid-roll
• When battery power is very low, or at low
temperatures, film may not start rewinding or film
rewind may stop at mid-roll, and
number and insufficient battery power indication
C-.J will blink
will blink
power switch off , change batteries, then turn the
power switch
counter display does not change until camera back
is opened once and closed again after removing the
film cartridge.)
~
be set not to appear (p. 7
rewind
rewind film at mid-roll, press the two film rewind
buttons simultaneously for approx. 1 sec.
___
, 0
i! : Warning indications
is
let out and film rewind will start.
__
, 0 _ and then 0 appear
in
the LCD panel and 8
in
the LCD panel, and 8 _ and CA!I
in
the viewfinder.
on
to
..
. . . . . . . . . . . . .
in
the LCD panel
in
the viewfinder.
is
off.) Make sure E and 8
0
__
, frame
In
this case, turn the
rewind film again.
in
4)
.
(The
the viewfinder can
(E
are
frame
78
Page 79

Film Advance
Two film advance modes, single-frame and continuous shooting are available
with the N75/N75Q D .
Mode
. . . . . . . . . . . . . . . . . . . . . . . . . . . . . . . . . . . . . . . . . . . . . . . . . . . . .
Set the
I]]
(]]: Single-frame shooting
Fully pressing the shutter release button takes one picture and automatically
advances the film by one frame.
~:
Co
nti
nuous shooting
Shots
are
keep the shutter release button fully pressed.
Continuous shooting cannot be performed
taken continuously at the rate of up
Film advance speed is tested usi
mode M, shutter speed
normal temperature of
of a film.
1/125 sec.
20
°C/68°F, with fresh batteries, for the 1 st to 36th frames
film
advance mode selector to
or
gu
o
to
approx. 1.5 fps
in
flash photography.
ng
camera settings of focus mode
or
faster, aperture other than maximum, at
as
long
M,
as
you
exposure
79
Page 80

Auto Exposure Lock
When you want
measure the exposure on that area and press the
exposure, then recompose the picture. This function is useful when there
pronounced difference between the brightness
exposure on and the area surrounding it. Set exposure
Manual.
to
control the exposure of a specific area within a scene,
f:1D
button to lock the
of
an
area you want
to
a mode other than
to
is
set the
a
.....................................................
Position focus area
release button, then press the
1
indicator.
• When the
selected and exposure at the 12mm-diameter circle at center of frame is locked
and remains locked
mI!lliI
i : Metering system in the Auto Exposure lock can be changed (page 75).
• At initial setting, the exposure metering system automatically changes to CenterWeighted Metering when Auto Exposure lock is performed. However, it can be set
to
Matrix or Spot Metering using the Custom Setting.
• When Spot Metering
focus brackets (approx. 1
measured focus area differs with the
• When Dynamic AF Mode with Closest-Subject Priority (p.
Mode
Exposure
• When Dynamic AF Mode
Exposure
appears
tID
button
with Center-Subject Priority
on
the center focus area is measured .
on
the selected focus area is measured.
on
subject and lightly press the shutter
tID
button. Confirm focus
in
the viewfinder.
r-~~
~------------
is
pressed, Center-Weighted metering
as
long as the button
is
selected, exposure on the 4mm-diameter area within the
% of the total frame) is measured. Note that the
or
Single Area
is
kept pressed.
AF
Area mode selected .
or
Center Area Mode
Mode
is selected
--~
is
automatically
47)
or
Dynamic AF
(p.
47)
is selected:
(p.
47):
80
Page 81

While keeping the
2
shoot.
~
5 : Auto Exposure
shutter release button (p. 75).
~
6 : Auto Exposure
simultaneously
NO
TE:
When
When option 2
locked by pressing the
the Custom Setting menu 6, or select option :
Auto Exposure Lock by lightly pressing the shutter release button.
by
AF
operation with
in
the Custom Setting menu 6 is selected, Auto Exposure cannot be
CD
Lock
Lock
pressing the
CD
t1D
button.
button
can be set
and Autofocus lock can be set
pressed, recompose,
to
be activated
00
button (p.
button
To
lock exposure, set the option other than 2
75).
is
selected
with
the
in
Custom Setting menu 5 to activate
focus
by
lightly pressing the
to
be activated
Custom
Setting
(p.
and
75)
in
81
Page 82

Diopter
The N75/N75QD enables near- or far-sighted photographers to adjust the
eyepiece diopter
eyepiece cap or eyepiece correction lens can also be attached.
·
...................................................
AdjustmentNiewfinder
to
suit their vision. Viewfinder accessories such
Accessories
as
an
.
Diopter adjustment
• Remove the rubber eyecup and slide the diopter adjustment lever while looking
through the viewfinder until the focus brackets or other displays
appear sharp. Attach the rubber eyecup again after adjustment.
•
Th
e adjustable range of the finder diopter is
correction lenses provide a viewfinder diopter range of
NOTE:
Using
the
diopter
adjustment
Since the diopter adjustment lever is located next to the viewfinder, be careful not
poke yourself
in
the eye with your finger or fingernail while sliding the
lever
-1.5m
-1 to
+O.8m
-5m
in
the viewfinder
1
-
Nine optional eyepiece
.
-1 to
+3m-1 (page 112).
lever.
to
Attaching viewfinder accessories
•
To
attach the eyepiece cap DK-5 or eyepiece correction lens, remove the rubber
eyecup and slide down the eyepiece cap
•
To
reattach the rubber eyecup after removing the DK-5 or eyepiece correction lens,
make sure the
"Nikon DK-16" stamp is at the bottom.
or
eyepiece correction lens.
82
Page 83

Depth-of-Field Preview
Electronic preview function
of-f
ield preview button
(see page 102) .
. . . . . . . . . . . . . . . . . . . . . . . . . . .
Check
point
Electronic preview function is executed when CPU Nikkor lens
be performed with non-C
is
available with this camera. Depress the depth-
to
confi
rm
the depth of field through the viewfinder
..
. . .
..
. . . . . .
),
Var
i-Program, Auto-Multi Program or
PU
•
Pre
ssing the depth-of-field preview button stops
the lens down to the aperture controlled
(AUTO mode
Shutter-Priority Auto exposure mode, and down
the aperture selected
Manual exposure mode. By looking through the
viewfinder, the approximate depth of field with the
given aperture can be confirmed.
lenses
(p.
106).
..
. . . . . . . . .
in
in
Aperture-Priority Auto or
is
attached. It cannot
..
'6
to
83
Page 84

Remote Control Operation (optional)
Use
the
distance.
when you
instea
·
•
• Once remote control operation is set, the camera remains ready
• The remote control cannot
• After the shutter is released, the camera remains ready to recei
001'ffilll
10 mi
optional
d of a
...................................................
NOTE:
Before
W
hen
using the remote control for the first time, make sure to pull out the insulation
sheet placed on the battery inside the remote cont
You
can choose to release the shutter either immediately after
the shutter release button on the remote control unit
from the remote control unit for 1 min. If no signal
mode is canceled and
(i.e
. when subject is not
the remote control unit for 1 minute.
:a
: Standby duration for the remote co
n.
(p.
As
want
76)
with
cab
using
.
remote control
self-timer
to
be
le
release
the
in
the phot
to
remote
operati
Press the @ remote control button a
number of times
1
or
the LCD panel. (O
while pressing
The display changes
~
or disappears from the
be
operated unless the camera's shutter
in
focus with autofocus).
to
release
the
ograph
reduce
on,
the
camera
remote
. You
camera's
can
shake.
shutter from
control can
also u
se
the
also
remote control
control
rol
unit that is set when purchased.
so ~ (immediate release)
0 (two-sec. delay release) appears
r,
rotat
e t
he
Command
the
@)
remo
te
control butt
as
follows:
•
~
(9
-+~-+~-+
=
L Self-timer
is
is
sent for 1 min
LCD
ntr
ol operation ca n be changed
pressed.
panel.
No display
(cancel)
(~)
or two sec. after
to
receive a signal
.,
the remote control
can
be
ve
another signal from
a
be
used
on.}
released
Dial
to
.
in
(~)
5 or
84
Page 85

Point the remote control unit toward the
camera and press the shutter release
2
button.
o When immediate release
lamp lights after shutter release (except when the
Speed light is used). When Red-Eye Reducti
93)
is also set, the self-timer lamp lights at the same
output level
the shutter releases and the flash fires when the
shutter is released.
o The shutter is released after the self-timer lamp lights
for approx. 2 sec. ·
Eye
lights at the same output level
Reduction after the self-timer lamp lights for approx. 2
sec. and the flash fires when the shutter
o
To
cancel the remote control operation , press the @
button again
pressing the
LCD panel. Or, turn the power switch off.
o
To
cancel the remote control operation after the shutter
release button
turn the power switch off or press the
as
the normal Red-
Reduction (page
or
rotate the Command D
@ button so
is
is
selected, the self-timer
Eye
Reducti
in
two sec. delay mode. When
93)
is also set, the self-timer lamp
as
the normal Red-Eye
is
~
or '" disappears from the
pressed and before shutter release,
ial
@ button.
on
(page
on
before
released.
while
Red
-
Focusing
Two methods to shoot with autofocus with remote control:
1.
2. Autofocus activated by lightly pressing shutter release button
in
remote
control
operation
Autofocus activated by signal from remote control:
Shutter is released when (or two sec. after) the subject
focus cannot be achieved, it remains
before remote control operation:
Lightly press the shutter
control is standing by
(even though the finger is removed from the shutter
released when (or two sec. after) the shutter release signal is received from the
remote control unit. The focus remains locked until remote control
re
lease button
to
achieve focus. Once focus
in
standby mode.
on
the camera body while the remote
is
in
focus. However, when
on
the camera body
is
achieved, focus is locked
re
lease button). Shutter is
is
canceled.
85
Page 86

Remote
Check
• Use a tripod or place the camera
control.
• When you
eyepiece with the supp
pressing the shutter
achieve correct exposure.
he
shooting distance for remote control operation is within
• T
the camera. To shoot beyond the shooting distance of the remote control, use the
self-timer (page
camera has extreme back
• If the shutter cannot be released with the remote control, change the battery inside
the remote control unit (page
unit
is
• U
se
Long
Time
When the camera is set
cont
ro
release button again closes the shutter.
scenes or stars. (U
once every 2 sec. during Time exposure.
Control
poin
ts
are
taki
ng
40)
. Remote control operation cannot be performed wh
approx. 5 years.)
one
3V
CR2025 lithium battery
(Time)
exposure
l's shutter release button opens the camera's shutter and pressing the shutter
se
of a tripod is recommended.) Self-timer lamp flickers slightly
Operation
on
a stable surface before using the remote
pictures but not looking through the viewfinder, cover the
li
ed
eyepiece cap DK-5 (page
re
lease button
li
with
to
Long Time (Time) exposure (page
to
prevent interference from stray light and
ghting. Change the camera position
87). (The
life of the battery inside the remote cont
in
the remote cont
remote
control
Th
is
(optional)-continued
82)
or with your hand before
5m
directly
in
front of
en
in
rol
unit.
62)
, pressing the remote
function is useful for shooting nighttime
the
this case .
rol
86
Page 87

• Changing
s::;
..
~ ~
battery
s:::;
~:
inside the remote control unit
While keeping the battery holder
release lever pressed as the arrow
1
on
the
indicates
out
the
remote control unit.
2 Remove the used battery.
remote control unit
to
release the
battery holder from
lock
, pull
the
Insert a
3
battery with
Insert
4
clicks shut.
NOTE: Storing
Keep batteries out of children's reach. If swallowed, contact a doctor
immediately. (For "Notes
batteries
on
Batteries", see page 116.)
new
the
CR2025 3V lithium
EEl
side facing up.
battery
holder
until
it
87
Page 88

Available
The following chart lists available modes when a CPU Nikkor lens such as a
G-
or
D-type lens is attached .
. . . . . . . . . . . . . . . . . . . . . . . . . . . . . . . .
Exposure
mode
"8'
~
.J:.
iii
~
~
~
p
S
A
M
Exposure
mode
"8'
.:l
iii
~
~
~
p
S
A
M
0 : Available
-:
Unavailable
• Automatically set when the exposure mode
Mode
AF-Asslst
Illuminator
0
0
-
0
-
0
0
0
0
0
Auto
Exposure
Bracketil1ll
- -
- -
- -
-
-
- -
0
0 0
0 0
0 0
Combinations
..
. . . . . . . . . . . . . . .
Flexible
Multiple
is
selected.
Program
-
-
-
-
-
-
0
-
-
-
exposure
-
-
0
Exposure
Metering
Center-Weighted
..
compensation
-
0
0
0
0
0
0
0
0
-
system
M
atrix
Matri
x
Matri
x
Matri
x
Matri
x
Matri
x
Matri
x
Matrix
Matri
x
. .
·
88
Page 89

FLASH
PHOTOGRAPHY
This section introduces various
aspects
the built-in Speedlight.
• Built-in Speedlight (Automatic Balanced
• Flash sync mode features
• Using built-in Speed light
of
flash photography using
Fill-Flash with TTL Multi Sensor,
Standard
TIL
Flash)/Ready-light
Page 90

Built-In SpeedlightlReady-Light
• Built-in Speedlight and TTL Flash modes
This camera
coverage for a 28mm lens with a guide number
When the subject
~),
the built-in Speedlight automatically pops up. When the shutter
released, the flash fires
Multi-Sensor
In
P, S, A or M exposure mode, when the subject
recommended indication
up when the Speedlight lock-release button
Sensor
(In
M exposure mode,
shooting
the main subject or to put catchlights
Five flash sync
Rear-Curtain Sync, Red-Eye
Sync-are
• See below for the
92 for the flash sync modes .
..
. . . . . . . . . . . . . . . . . . . . . . . . . . . . . . . . . . . . . . . . . . . . . . . . . . .
•
The
Speed
D-
CPU
type
Non-CPU Nikkor lens Standard
' 1 When built-in Speedlight
mode
*2
To
*3 Monitor-Pre Flash
is
equipped with a built-
is
dark or backlit ,
to
create natural-looking flash photography utilising 3D
Balanced Fill-Flash or
~
blinks
Balanced
Fill-Flash or
Multi-Sensor
Standard
in
dim light, the flash can be used
modes-Front-Curtain
Reduction
available with this camera.
TIL
Flash modes, page 95 for using the built-in Speedlight and page
following
light
or
G-type Nikkor lens
Nikkor
(except
automatically changes to Standard
cancel
TTL
Auto
depending
Lens
lens
other
than D/G-
AF
Nikkor
for
Monitor
Pre-Flash, select Manual exposure mode.
is
Flash
on
the
3D Multi-Sensor Balanced Fill-Flash"
(with Distance Information and Monitor Pre-Flash'2)
F3AF)
not
(with Monitor Pre-Flash
is
used and the exposure mode
fired in Standard
in
Speedlight that provides
of
12/39
in
'8' or Vari-Program (except
Multi-Sensor
in
the viewfinder, and the Speedlight pops
is
Balanced Fill-Flash .
is
dark or backlit , flash
pressed and the 3D
(ISO
an
100, m/ft.).
Balanced Fill-Flash
TTL Flash
modes
type
Multi-Sensor Balanced Fill-Flash"
is
selected.)
in
daylight to reduce shadows on
in
your subject's eyes.
Sync (Normal Sync),
and Red-Eye
are
available
of
lens
used.
TTL
Auto
Flash
'2)
TIL
'3
is
TTL
TTL
Fla
sh.
Fla
set to Manual,
sh.
In
addition to
Slow
Reduction
with
built-in
mode
TTL
angle of
in
Iij
is
Multi-
is
possible.
Sync,
with
Auto Flash
or
Slow
90
Page 91

3D Multi-Sensor Balanced Fill-Flash
3D
Multi-Sensor Balanced
•
in
'8',
Vari
set
with D- or G-type Nikkor lens attached.
mode, just after you press the shutter release button
and before the shutter is activated, the builtSpeedlight will fire a series of imperceptible preflashes that
segment
Distance Information from the lens with other exposure control information, automatically
compensati
3D
situations, such as a scene that includes
subject against
Multi-Sensor Balanced Fill-Flash
• Multi-Sensor Balanced
Multi-Sensor Balanced Fill-Flash, can be performed with a combination of the
N75/N75QD camera and
3D
Automatic
Standard TTL Flash
• Standard
Standard
not considered. Standard
ng
Multi-Sensor Balanced Fill
Multi-Sensor
the flash output
an
Balanced
Balanced
TIL
Flash
TIL
Flash
"infinite" background (empty sky, clouds, etc.).
Fill
CPU
Fill-Flash
Fill-Flash
is
automatically selected when the exposure mode
, the main subject
TIL
-Flash, without the Distance Information added to the
brightness and contrast. Furthermore, it integrat
level
so that flash output and ambient light
-Flash enables flash photography
Nikkor lens other than DIG-t ype.
together
with
TTL
Multi Sensor
is
Flash
correctly exposed but background exposure
is
use
-Program, P, S or A exposure mode
are
detected
TIL
Multi Sensor, then analysed for
an
obje
ct
with extremely high reflectivity or a
with
Multi-Sensor
ful
when you want to highlight the main subject.
Fill
-Flash is automatically
by
the N75/N75QD's five-
in
very difficult
Balanced
Fill-Flash
is
In
this flash
are
balanced.
is
called
set to M.
in
3D
In
• Ready-light
• go
FS.E.
~
es
E
I
is
• When using the builtappears
in
• If the ready-light
occurred. Check the focus distance, aperture or flash shooting distance range
and shoot again.
the viewfinder when the Speed light
in
Speedlight or
~
blinks appro
an
optional Speedlight (p. 107), the ready-light
is
x.
3 sec. after full flash output, underexposure may have
fully charged and ready to fire.
(p.
~
98)
91
Page 92

Flash Sync
Five flash sync modes can be selected for desired photographic effect
depending on the conditions when using the built modes, flash
is
not available even when the subject is dark or backlit.
Mode
Features
in
Speedlight. In
ill
an
d
~
.....................................................
Set the flash sync mode by rotating the Command Dial while
pressing the flash sync mode button
EJ
/0 : Front-Curtain Sync (Normal Sync)
Set the flash sync mode to Front-Curtain Sync for normal
flash photography. The camera's shutter speed is
automatically set between 1/60-1/90 sec. for flash
photography
exposure mode.
§j
Slow Sync can be used
Normally, the camera's shutter speed is automatically set to
1/90 sec. for flash photography. However, for shooting
nighttime scenes, Sl
(down to maximum of 30 sec
background details using all of the available light.
camera shake, use a tripod. Use of self-timer also helps to
avoid camera shake.
/
[;1
: Slow Sync
in
'g'
or
Z , and
to
1/90 sec.
in
iii
, P
or
A exposure mode.
ow
Sync uses a slower shutter speed
.,
1 sec.
in
iii)
in
~
to
O.
,
P
or
bring out
To
avoid
A
92
Page 93

[;;J
/
b:J
Rear-Curtain Sync can be used
mode. Normally, the Speed light fires at the end of the
exposure, turning available light into a stream of light that
follows the flash-illuminated moving subject. When RearCurtain Sync is set
automatically set. (With
24
, set the Speed light's sync mode selector to
~~
U / u : Red-Eye Reduction
The Red-Eye Reduction lamp lights for approx . 1 sec. before
the flash fires
of
people
Vari-Program (except for iii, ~ and
exposure mode.
[;;t
Red-Eye Reduction with Sl
Reducti
~:
Flash Cancel can only be selected
Command Dial and
have the photograph exposed only with the natural light. Flash Cancel cannot be set
when the built-in Speed light is
pressing the shutter release button .
• If
automatically canceled .
•
To
attached optional Speed light on.
: Rear-Curtain Sync
in P or
A exposure mode, Slow Sync
an
optional Speed light S8-26 , 25 and
f<O'~
in
order
to
or
animals. Red-Eye Reduction can be used
/g : Red-Eye Reducti
on
and Sl
Flash Cancel
iii
or
.!....:.
is set when the built-in Speedlight is
cancel Flash Cancel, tu
reduce the red-eye effect
ow
ow
Sync mode are simultaneously set.
Sync can be used
0 button. Set Flash Cancel when you want to cancel the flash and
in
rn
camera power off, change the exposure mode or tu
in
P, S, A, or M exposure
is
REAR
.)
in
photos
in
~)
,
P, S, A, or M
on
with Slow Sync
in
'8' or Vari-Program (except for
the up position. Set the Flash Cancel before lightly
'8',
in
~,
P or A exposure mode. Red-Eye
iii
and
in
the up position, flash is
.!....:.)
with the
rn
I
93
Page 94

Flash Sync
NO
TE:
Flash Sync
•
In
Front- and Rear-Curtain Sync, shutter speed shifts automatically to 1/90 sec.
when the shutter speed is set
this case, 30
• When Red-Eye Reduction or Red-Eye Reduction with Slow Sync
Red-Eye Reduction lamp lights for approx. 1 sec. before the flash fires. Do not
move the camera
Reduction is not recommended
top priority.)
• With some lenses, light from the Red-Eye Reduction lamp may not reach the
subject's eyes.
due to the location
• With Slow Sync and Red-Eye Reduction with Slow Sync, keep the camera steady
to
prevent picture blur since the shutter speed
recommended.
Mode
is
displayed
In
Mode
FeatureS-continued
s
to
faster than 1/90 sec.
in
the LCD panel and the viewfinder.
or
let the subject move until the shutter is released. (Red-Eye
some cases , the red-eye effect may not be sufficiently reduced
of
the subject.
in
shooting situations where shutter release is your
in S or
M exposure mode .
is
is
slow. Use of a tripod is
selected, the
In
94
Page 95

Using Built-In Speedlight
This section explains how
sync mode when a G-
. . . . . . . . . . . . . . . . . . . . . . . . . . . . . . . . . . . . . .
In
P, S, A or M exposure mode, release the built-in
1
Speed light
W or Vari-Program (except in
dark or backlit and the shutter release button
pressed, the built-in Speedlight automatically pops up.
In
P, S, A
• When the subject
the flash recommended indication
exposure mode.
In
~
•
• When the Speed light is ready to fire,
(when the camera's meter is
• Press the Speedlight down gently until it clicks into place to retract it.
Set the flash sync mode by rotating the Command Dial while
2
pressing the
by
or
M exposure mode
,
:l
or
.:r.
to
use the built-in Speedlight set
or
O-type AF Nikkor lens is attac hed .
pressing the 0 flash lock-release button.
ii
or
~)
In
A
~
or
Vari
~
(except
is
dark
or
backlit and shutter release button
~
blinks
in
To
use built -
, 8 is displayed
on)
in
Speed light, press the 0 flash lock-release button.
in
the LCD panel;
.
the viewfinder
~
appears without blinking
in
to
desired flash
..
. . . . . . . . . . . . .
,
when the subject
is
lightly
-Program
or
~)
is
lightly pressed,
in
P, S, A or M
r::J
,
~
is
displayed.
in
0 flash sync button.
the viewfinder
In
is
i
I
95
Page 96

Using
• If
automatically canceled.
•
Multi-Sensor
and Standard TTL Flash
details.
See
•
sync mode
In
•
To
button
•
In
mode cancels the selected flash sync mode and returns to its initial setting (page
99)
Built-In Speedlight-continued
IiiiiiI
or ~ is
set when the built-in Speedlight
Balanced Fill-Flash is selected
the table
P, S, A or M exposure mode, selected flash sync mode remains once it is set.
change the flash sync mode, rotate the Command Dial while pressing the 0
on
pages 97, 98 and 99 for shutter speed and aperture, available
in
each exposure mode.
to select another flash sync mode.
is
selected for M exposure mode.
'8' or Vari-Program, turning the power switch off or selecting another exposure
.
is
in
the up position, flash
in
exposure modes other than M
See
page
91
is
for
• Rotating the
display
In '8'
or
Vari-Program
B~ -l~
as
follows
Command
.
(except
l
+-+
~
Dial while pressing the 0 button changes the
1iiiiiI.
~
' 1
t ,
In~:
~l-~'~
t ,
In P
or A exposure
~ LJ~ ~~ ~~ Q~
.......-.
[j
mode:
........-.
~l
SLOW
.............
t ,
In S
or M exposure
'1 ($l cannot
'2
The
display changes to Q
96
be
mode:
set
when
the built-in Speedlight is
when
you
SLOW
leave
or
~
..............
your finger
):
REAR
up.
'2
from
the 0 button.
Page 97

Confirm ~ appears
3
within the flash shooting distance range and shoot.
•
::I~
FS.6
• The shutter cannot
viewfinder.
~
in
the
•
• When the subject is dark, the AF-Assist Illuminator automatically turns on
viewfinder blinks approx. 3 sec. after full flash output. This may indicate
underexposure has occurred. Check the focus distance, aperture
distance range and
autofocus. See page 50
in
the viewfinder, make sure the subject
~
be
released unless ~ appears without blinking
shoot
again.
for
details.
in
the
or
flash shooting
to
is
guide
• Available shutter speed and aperture
•
In
Front-Curtain Sync,
Exposure mode
'8'
Z
1iII*1
~
~...{.*1
Red-Eye
Reduction
Available shutter speed Available aperture Page
Automatically set to 1/90-1 /
Automatically set to 1/90-1/15 sec.
Automatically set to 1/
or
Rear-Curtain Sync
90
sec.
p
-30 sec:
to 1/90
depends
according
set
2
2
With
to
an
(Time)
, - -
Slow
Flash
sec. when
the
ISO
to
the
Sync
Cancel
speed
flash
or
the
5
A Automatically set to 1/90 sec.
M 1/
•
In
Slow
Sync, Red-Eye
Exposure mode Available shutter speed
~
p
A
*1
Bullt-m
Speedltght
(p.l07)
.
Shutter
speed
*2
built-in
Speed/ight
*3
Flash
shoating
exposure
made, set
1/90-30 sec:
90
Reduction
Automatically set to 1/90-1 sec.
Automatically set to 1/90-30 sec.
IS
automatically
shifts
automatically
paps up.
distance
range
the
aperture
in
each exposure mode
60
sec.
Rear-Curtain
in
iI
or.!-..(.; however,
shutter
of
the
shooting
speed
film
in
distance
Sync
is
use
(in S or
Automatically set
Desired setting
Available aperture
Automatically set
Desired setting
set
to
and
range
M exposure mode
(In
P
or A exposure
optIOnal
Speed!tght
faster
than 1/90
aperture
setting. In A or
table
an
the
*3
*3
next
----s5
----s5
36
36
54
56
60
mode
~
can
be
sec. and
page
.
only)
i
26
1
58
only)
Page
54
58
used
the
M
97
Page 98

Using Built-In Speedlight-continued
• Flash
shooting
distance
range
,
Flash shooting distance for the built-in Speedlight changes according to the
in
film speed
ISO
Guide
Aperture
•
The maximum flas
number by the
Example:
Speed light, the maximum flash shooting distance will
or 39/2.8 = appro
use and aperture setting.
film
speed
number
25 50 100 200 400
m/ft.
6/20 8.5/28 12/39 17/56 24/79 34/112
- -
-
1.4 2 2.8 4 5.6
value
When
2 2.8 4 5.6
2.8 4 5.6 8
4 5.6 8
5.6
8
h shoot i
se
lected aperture value.
f/2.8 is s
x. 13.
8
800
1.4 2 2.8
1.4 2 2.8 4 5.6 1.4-6m/4.6-19.7
11
8
11
16 22 32
11
16 22 32
ng
distance can also be calculated by dividi
ele
cted with
ft
.
ISO
100
film using the camera's built-
4
8
11
8
11
16 0.6-2 .1 m/2.
16 22
- 0.6-0 .8m /2.0-2.6
be:
12
/2.8 = approx. 4.
Flash shooting
distance
2-8
.5m/6.6-27.9
1-4.2m/3.3-13.8
0.7-3m/2.3-9.8
6-1
.5m/2.
0.
6-1
.1 m/2.0-3.6
0.
ng
the guide
in
2m
range
0-6
.9
0-4
.9
ft
.
ft
.
ft.
ft
.
ft
.
ft
.
ft
.
ft
.
98
Page 99

• Available flash sync mode combinations
Exposure
Exposure
~
~
..!:
iii
~
.!-.
""
I::l
P
~
~
..!:
iii
,'r.,
~
I::l
p
S
A
M
mode
mode
Red-Eye
with
Slow
mAutoFlash
CD
CD
-
CD
-
CD
CD
CD
CD
®
Reduction
Sync
-
-
-
-
-
0
0
S -
A
M
CD:
3D
MUlti-Sensor Balanced Fill-Flash
®:
Standard TTL flash
0 : Available
©:
Automatically set when the exposure mode is selected. (Other fl
selectable
- : Unavailable
Se
"1
"2
Flash
.)
lectable when built-in Speedlight is retracted.
is
automatically canceled if
0
-
iii
or
.!."
Front-Curtain
©
©
-
©
-
-
0
0
0
0
Slow
Sync
Rear-Curtain
- -
- -
- -
-
- -
©
0 0
-
0 0
-
is
selected when built-in Speedlight is up.
Sync
Sync
-
-
0
0
ash
Red-Eye
Reduction
0
0
-
0
-
-
0
0
0
0
Flash
0
0"
©
0"
©
0
-
-
-
-
sync mode also
Cancel
"1
1
"2
1
"2
"1
i
99
Page 100

Using
Built-In
Speedlight-continued
• Usable lenses with built-in
28mm
to
300mm f/4
occurs at the edges
lenses, which have limitations
NOTE: Using
• Make sure
• The built-in Speed light cannot be used with zoom lenses set
• AF-S 17-
• Vignetting is reduced with regular color print film compared
With
AF
AF 20AF 24AF-S
AF
1/
3.5
AF 24AF
AF-S
AF
AF
AF 2BAF 35AF
1/
AF-S
200mm non-zoom CPU Nikkor lenses,
ED
lenses can be used with the built-in Speedlight. Vignetting
of
the frame resulting
built-
in
Speedlight
to
remove the lens hood.
35mm
fl2 .B
ED
zoom lens
of
the edges
standard
1B-35mm
35mm
B5mm
24-B5mm f/3.5-4.5G
-S
VR
-5.
6G
120mm
2Bmm
2B-70mm
2B-BOmm
2B-1
OOmm
200mm
70mm
Micro
4.5-5.6
VA
70-200mm f/2.BG
the frame are
color
print
Lens Limitations
f/3.
5-4.5
112
.B
f/2.B-4
24-120mm
ED
1/1.4 0.
1/3.5-5.6
1/
70-1BOmm
ED
1/3.5-5.6
1/2.B
ED
1/3.
5-5.6G
1/3.5-5.6
2.B
ED
ED
cropped
film
35mm
focal
35mm
focallenath
35mm
or
2Bmm
or
35mm
or
distance
2Bmm
or
distance; at
9m (3.0
50mm
or
At
2Bmm
At
2Bmm, 1.2m
35mm
or
At
35mm
At
70mm, 0.7m (2.3 ft.)
At
70mm, 3m
Speedlight
AF
in
underexposure with the following
in
usable focal length or shooting distance.
cannot
be used with the built-in Speedlight.
out
in film processing with
length
at
0.7m
(2.3
ft.)
or
long
er
ft.l
or lonaer
at
35mm O.Bm (2.6
at
2Bmm
0.7m
at
35mm
at
2Bmm, 2.5m
or
longer
distance
at
SOmm
, 1.
shooting
distance
shooting
distance
shooting
distance
shooting
distance
shooti
ng
distance
longer
focal length' and
lonaer
locallenath
longer
local
longer
local
35mm
ft
.)
or
longer
longer
local
, 0.
7m (2.3 ft.)
(3.9
longer
local
, 1.
2m (3.9 ft.)
(9
.B
at 1.2m
length; and
length; and
, O.
Bm
shooting
length; and
or
ft.)
or
length
or
or
ft.)
or
longer
(3.9
· a
(2.6
longer
longer
longer
longer
nd
ft.)
300mm f/4
to
Macro
to
color slide film since
color
shooting
distance
shootina
distance
ft
.)
or
long
(2.3
ft.l
or
(B
.2
distance
ft
.)
lona
or longer
ft.)
or
or
longer
, 1.
2m (3.9 ft.)
shooting
2m (3.9
ED
and AF-S
in
wideangle.
print film.
er
shooting
er
shootina
shooting
longer
shooting
shooting
distance
distance
distance
100
 Loading...