

Page 1

\
\V\S
Page 2

FOREWORD
Thank you for purchasing the Nikon N6006. We
hope you enjoy the Nikon N6006, and we’re sure it
will make photography a bigger part of your life.
Get to know your N6006, but before using it, be
sure to read this manual thoroughly, as well as the
supplemental manual "FLASH PHOTOGRAPHY."
CONTENTS
FOREWORD
NOMENCLATURE ....................................................... 4- 8
BASIC OPERATION..................................................................... 9-22
MOUNTING THE LENS
INSTALLING BATTERY
CHECKING BATTERY POWER...........................................12
LOADING FILM
BASIC SHOOTING
REWINDING FILM....................................................... 21-22
CONTROLS IN DETAIL/
PHOTOGRAPHIC TECHNIQUES
FILM SPEED SETTING
USING AUTOMATIC FILM SPEED SETTING
FOR DX-CODED FILMS
MANUAL FILM SPEED SETTING
...........................................................................
........................................................
......................................................
..........................................................
....................................................
........................................
...............................................
..................................................
.......................................
13-15
16-21
23-80
24-27
24-25
25-26
10
11
2
2
Page 3

FILM ADVANCE MODE SETTING
SINGLE-FRAME SHOOTING
CONTINUOUS SHOOTING
FOCUSING
AUTOFOCUS........................................................... 28-35
MANUAL FOCUS
EXPOSURE
EXPOSURE METERING SYSTEMS
..................................................................
FOCUS-PRIORITY SINGLE AUTOFOCUS
FOCUS-PRIORITY CONTINUOUS
AUTOFOCUS
AUTOFOCUS WITH MAIN SUBJECT
OFF CENTER - SETTING
AF-L (AUTOFOCUS LOCK) FUNCTION
IN FOCUS-PRIORITY SINGLE AUTOFOCUS
IN FOCUS-PRIORITY CONTINUOUS
AUTOFOCUS........................................................34
SPECIAL FOCUSING SITUATIONS
MANUAL FOCUS WITH
ELECTRONIC RANGEFINDER
MANUAL FOCUS USING
CLEAR MATTE FIELD..............................................38
.................................................................
MATRIX METERING.....................................................39
CENTER-WEIGHTED METERING
SPOT METERING.........................................................40
METERING SYSTEM SETTING...................................41
METERING SYSTEM SELECTION -
WHEN TO USE MATRIX OR
CENTER-WEIGHTED METERING
..................................................
...................................................
.......................................
...........................................
.............................................
28-38
------
28-29
30-31
------
32-34
.........
...........................
36-38
......................
.......................
...............................
..................
36-37
39-72
39-45
42-45
27
27
27
33
35
40
Page 4

EXPOSURE MODE
EXPOSURE MODE SETTING.......................................47
PROGRAMMED (PM AND P) AUTO
FLEXIBLE PROGRAM
SHUTTER-PRIORITY AUTO EXPOSURE
MODE
...............................................................
OPERATION IN SHUTTER-PRIORITY
AUTO EXPOSURE MODE
APERTURE-PRIORITY AUTO EXPOSURE
MODE
...............................................................
OPERATION IN APERTURE-PRIORITY
AUTO EXPOSURE MODE
MANUAL EXPOSURE MODE ............................. 59-63
OPERATION IN MANUAL EXPOSURE MODE.. 59-61
TO OBTAIN EXPOSURE READING
FOR A MAIN SUBJECT OFF CENTER
OR TOO SMALL SUBJECT .................................62
BULB SETTING ........................................................63
EXPOSURE COMPENSATION................................ 64-72
AE (AUTO EXPOSURE) LOCK LEVER
EXPOSURE COMPENSATION BUTTON........... 66-67
AUTO EXPOSURE BRACKETING...................... 68-72
SELF-TIMER OPERATION
ONE-SHOT SELF-TIMER..................................................73
TWO-SHOT SELF-TIMER
BUILT-IN TTL FLASH
USING BUILT-IN TTL FLASH ................................. 76-78
BUILT-IN TTL FLASH SPECIFICATIONS
GUIDE NUMBER
ANGLE OF COVERAGE
.................................................
...................
..............................................
...........................
...........................
.............
.........................................
.................................................
.................................................
..............
...........................................................
..............................................
46-63
48-50
51-54
52-54
55-58
56-58
64-65
73-74
75-80
78-80
50
74
78
78
Page 5

USABLE LENSES
FLASH SHOOTING DISTANCE RANGE......................80
CONTROLLED MAX. APERTURE IN
PROGRAMMED AND SHUTTER-PRIORITY
AUTO EXPOSURE MODE
.......................................................
........................................
- 79
80
ACCESSORIES................................................................. 81-90
LENS COMPATIBILITY................................................ 82-83
ACCESSORIES
OPTIONAL SPEEDLIGHTS
CLOSE-UP ACCESSORIES
VIEWING ACCESSORIES ................................................87
OTHER ACCESSORIES
...........................................................
..............................................
....................................
..........................................
84-90
84
85-87
88-90
MISCELLANEOUS........................................................... 91 -106
CAMERA CARE TIPS
NOTES ON BATTERIES
SPECIFICATIONS
GLOSSARY................................................................... 99-101
WARNING INDICATIONS ............................................102-105
..................................................
......................................................
.......................................................
92-93
94
95-98
Page 6
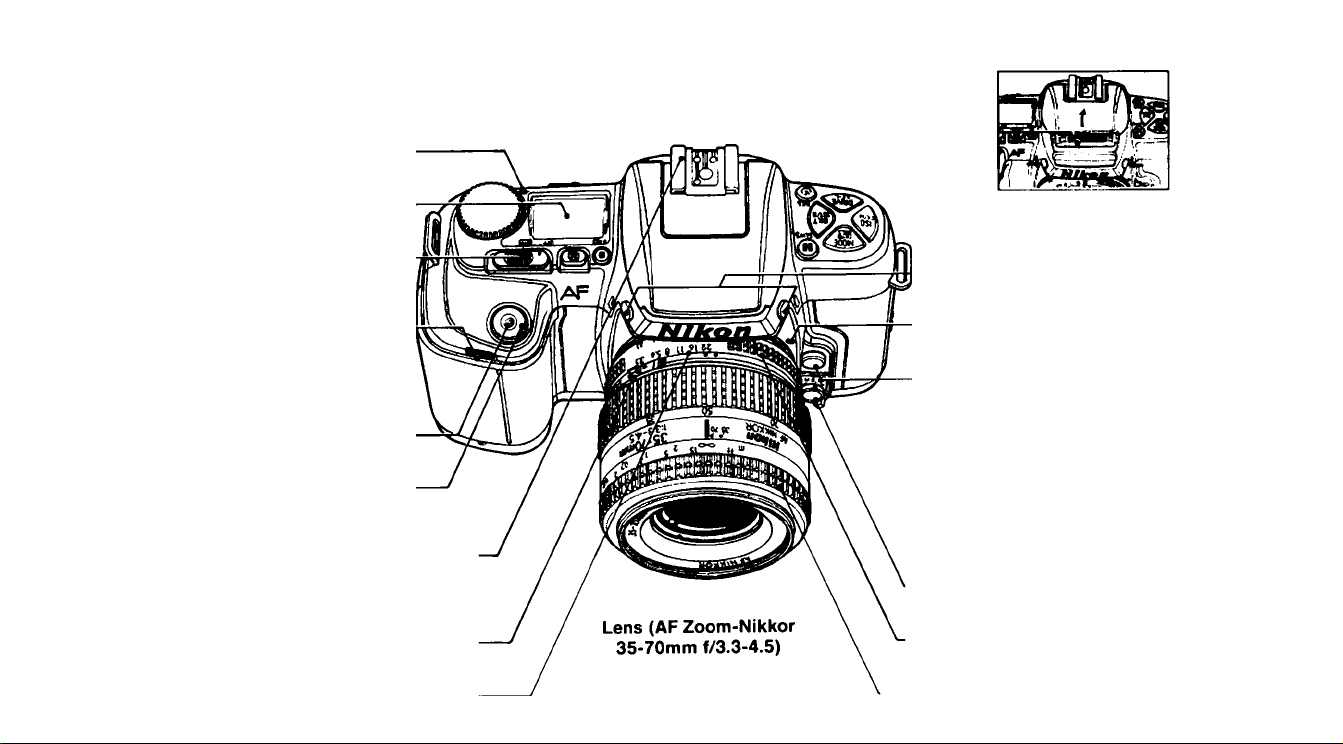
NOMENCLATURE
Film plane indicator: Exact distance
from lens mounting flange to film plane
is 46.5mm.
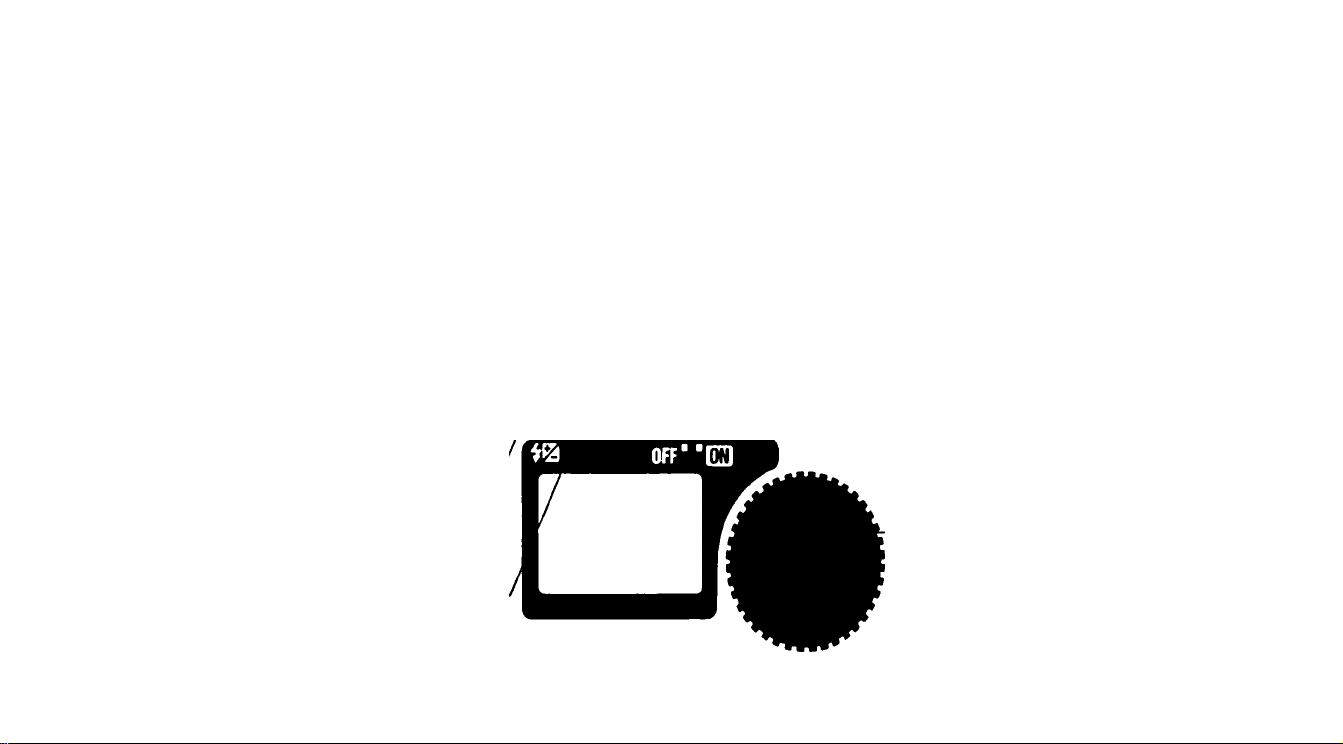
LCD panel: See page 8.
Power switch
Self-timer indicator LED:
See pages 73 to 74.
Release terminal: Accepts
optional Nikon Cable Release
AR-3 or Double Cable Release
AR-7.
Shutter release button
Accessory shoe: Accepts Nikon dedi
cated Speedlights.
Minimum aperture lock: Lock for
programmed auto or shutter-priority auto
exposure mode.
Aperture scale
Built-in TTL flash: See
pages 75 to 80.
Flash lock-release buttons:
To use the built-in TTL flash,
push them.
Lens mounting index
Lens release button
Focus mode selector:
S for Focus-Priority Single auto
focus (see pages 28 to 29).
CF for Focus-Priority Continuous
autofocus (see pages 30 to 31).
M for manual focus (see pages
36 to 38).
Aperture ring
Focusing ring: Used for manual focus
Page 7
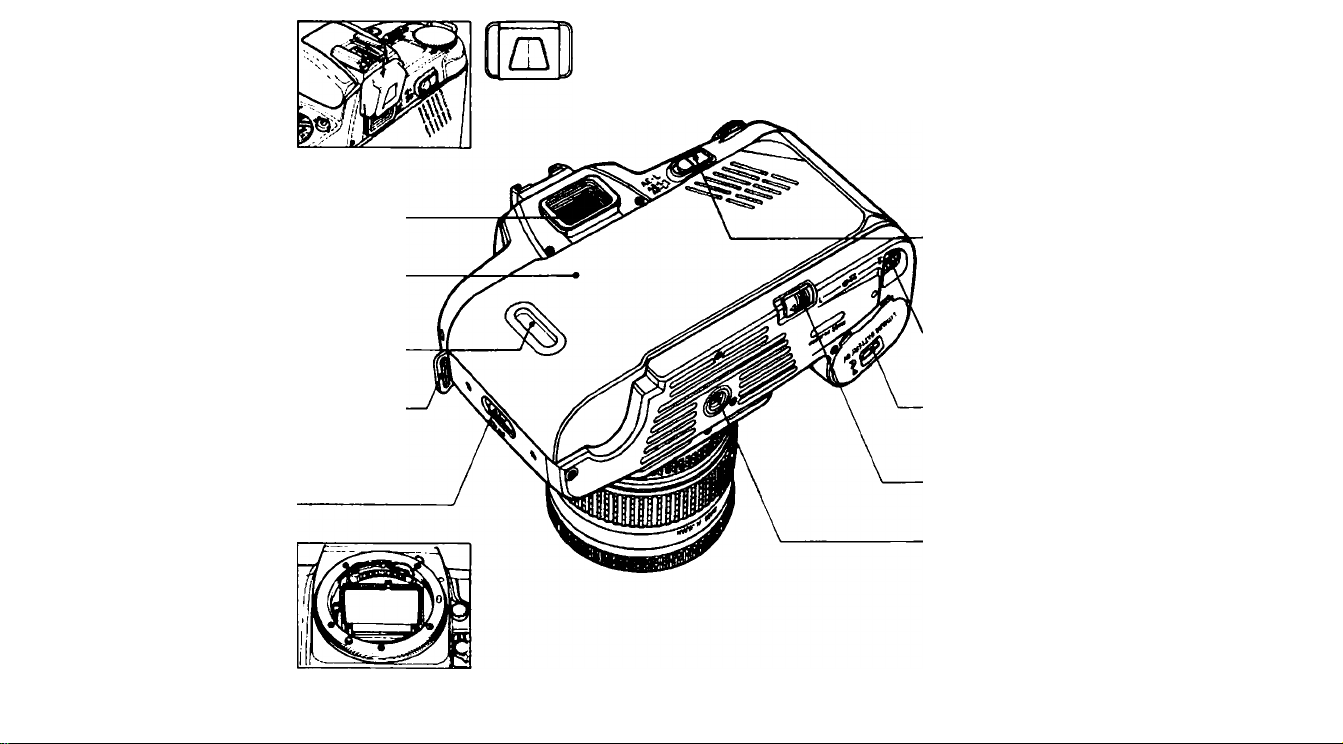
Viewfinder eyepiece
Camera back
Eyepiece cover DK-5 (pro
vided): Prevents stray light from
entering viewfinder.
AE-L (Auto Exposure Lock)/
AF-L (Auto Focus Lock) lever:
See page 34 for autofocus lock
or pages 64 to 65 for auto expo
sure lock.
Film cartridge confirmation
window
Camera strap eyelet
Camera back lock release
Push down to open camera
back.
CPU contacts: Do not touch.
Film rewind button: Press
while sliding lever.
Battery chamber cover lock
release
Film rewind lever: Slide in
the direction of the arrow.
Tripod socket
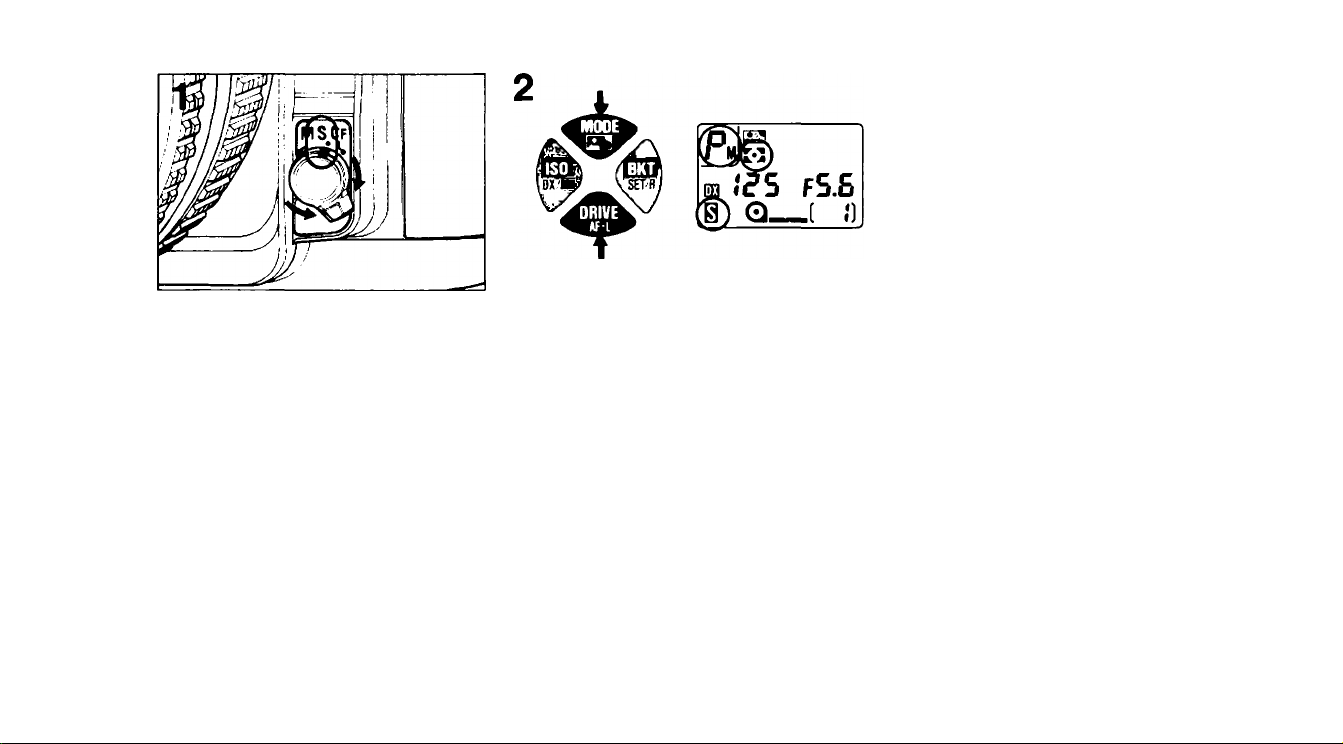
Page 8
Exposure mode (MODE) button/Automatic
Balanced Fill-Flash (£3) button
Metering system (:•:) button/Slow sync
button
Film speed (ISO) button/Film speed setting
mode (DX/M) button
Film advance mode (DRIVE)/Auto Focus Lock
function (AF-L) button: For autofocus lock func
tion, see pages 32 to 34.
These buttons are used with command dial or shift button.
For functions of each button, see next page.
Shift button: Press to set the functions
shown in matte gold ■ on the camera
body. For details, see next page.
Exposure compensation button
^SLWi
Auto exposure bracketing (BKT) button
Self-timer (0) button/Rear-Curtain sync
button
O ffinp
Command input control dial
(Command dial): Can be rotated
to set various functions.
Page 9

Command dial/shift button functions
Combined with buttons listed below, the command dial and shift button provide various functions.
Button
Metering system (K)/Slow sync
button
Exposure mode (MODE)*/Automatic
Balanced Fill-Flash (B3) button
Film speed (ISO) button/Film speed
setting mode (DX/M) button
Film advance mode (DRIVE)/
AF-L function button*
Exposure compensation (gj)
button
Auto exposure bracketing (BKT)
button
Self-timer (0 )/Rear-curtain sync
button
—
With Command Dial
To select metering system, rotate dial while
pressing this button. (See page 41)
To select exposure mode, rotate dial while
pressing this button. (See page 47)
To manually set film speed, rotate dial while
pressing this button. (See pages 25 to 26)
To set film advance mode, rotate dial while
pressing this button. (See page 27)
To make exposure compensation, rotate dial
while pressing this button. (See pages 66 to 67)
See pages 68 to 72.
Rotate it to set self-timer operation.
(See pages 73 to 74)
With shift button pressed, rotate command dial for flash output level compensation.
For details, see pages 35 to 37 in "FLASH PHOTOGRAPHY", a separate instruction book.
With shift button pressed, this button is used to
set/cancel slow sync for flash photography.
With shift button pressed, this button is used to
set/cancel automatic balanced Rll-Rash for
flash photography.
With switch film speed setting mode (auto for DXcoded film or manual), push it while pressing shift
button. (See page 24)
With shift button pressed, this button is used to set/
cancel autofocus lock function. (See pages 32 to 34)
With shift button pressed, this button is used to
set/cancel rear-curtain sync lor (lash photography.
With Shift Button
—
"Pushing any two of MODE, ISO, DRIVE and BKT buttons simultaneously lor more than one second sets N6006 for basic shooting.
In the following cases, command dial can be used by itself.
In Programmed auto exposure mode Turn command dial for flexible program
In Shutter-Priority auto or Manual exposure mode Turn command dial to set shutter speed
Page 10

4 5 6 7
40
ït^ O COD L rO.O
wüûjüûrû:a
mQMiSËi
13 14 15 16 17
►•<3 sssbrasiiMM
-10
-11
-12
LCD panel indications
1. Exposure mode
2. Film speed setting mode
3. Shutter speed/film speed (for
manual film speed setting)/AF-L
function/number of frames for auto
exposure bracketing
4. Metering system
5. Automatic Balanced Fill-Flash
6. Flash output compensation
7. Slow flash sync
8. Rear-curtain sync
9. Electronic analog display
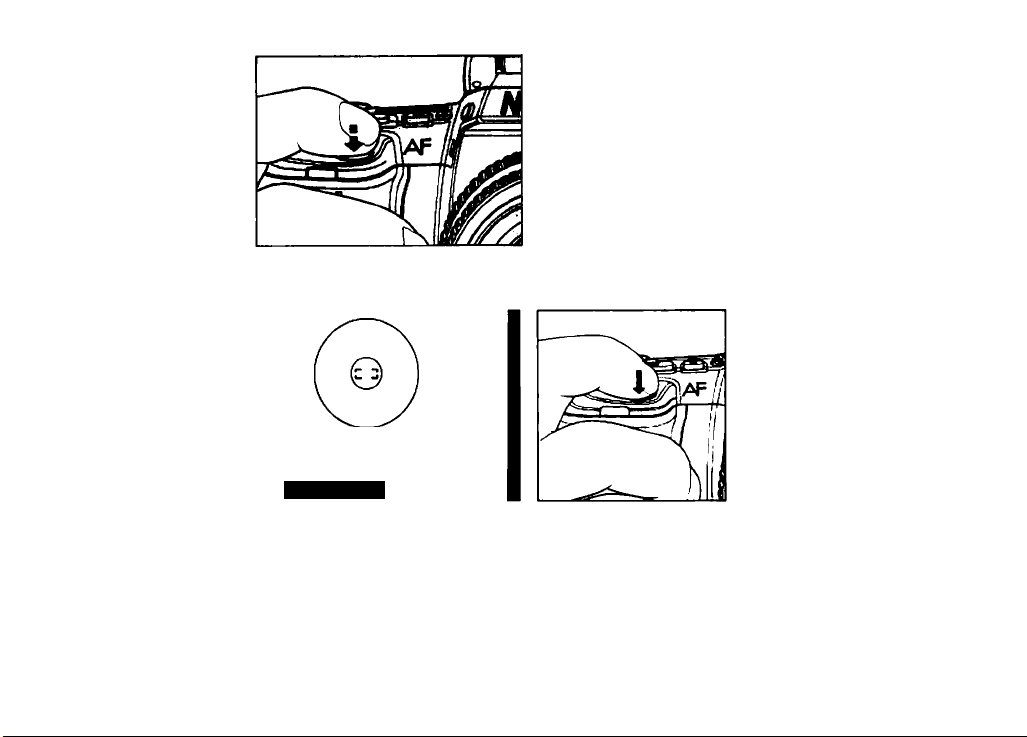
Viewfinder indications
1.12mm-dia. reference circle
2. Focus brackets
3. 5mm-dia. reference circle
4. Clear matte field
5. Focus indicators: • indicates a
stationary subject is in focus while
► • ◄ shows focus tracking in
autofocus operation (see pages
28 to 31): either focus-to-right arrow
(►) or focus-to-left arrow (◄ )
appears for manual focus (see
pages 36 to 37)
10. Exposure compensation
11. Aperture/exposure compensation
value
12. Auto exposure bracketing
13. Rim advance mode
14. Film loading
15. Film advance and rewind
16. Self-timer
17. Frame counter/number of remain
ing frames for auto exposure
bracketing/self-timer duration
6. Exposure mode
7. Shutter speed/film speed (for
manual film speed setting)/number of frames for auto exposure
bracketing
8. Aperture/exposure compensation
value
9. Electronic analog display
10. Exposure compensation
11. Ready-light LED
Page 11

BASIC OPERATION
Page 12
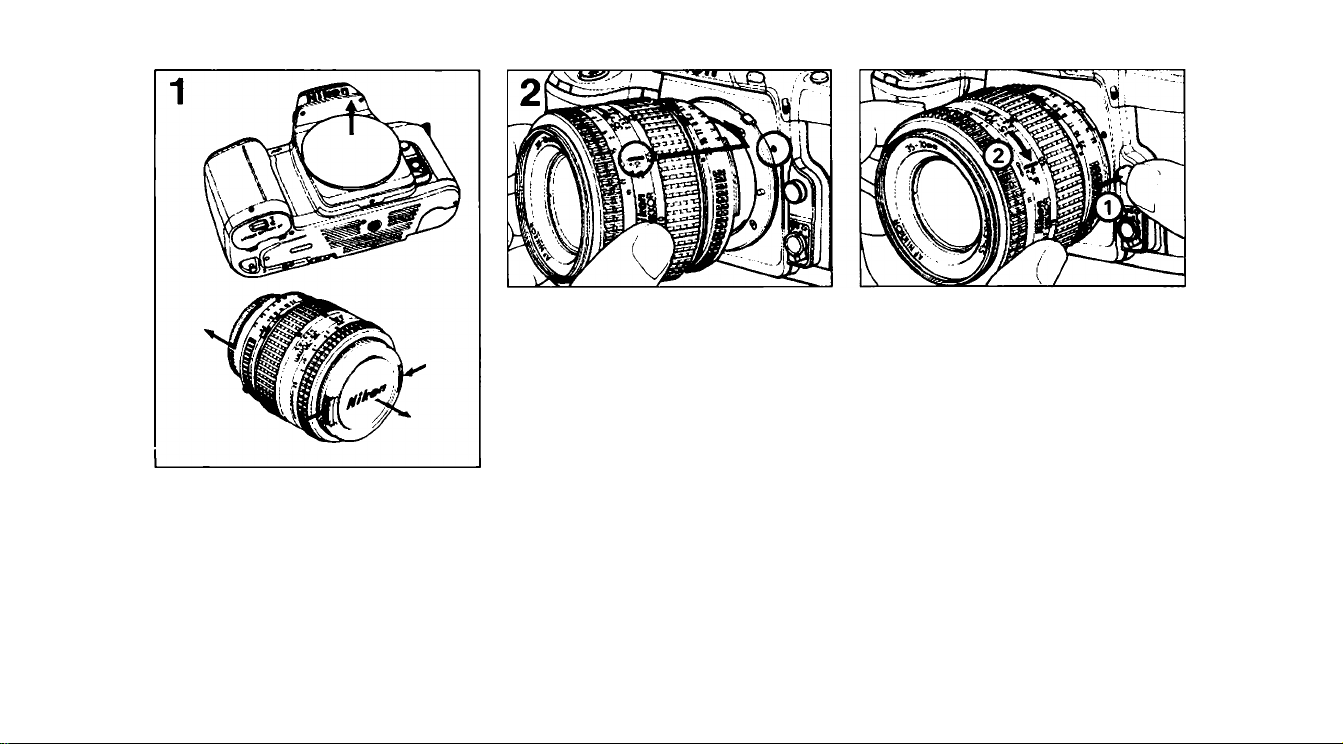
MOUNTING THE LENS
Remove camera body cap and front and
rear lens caps.
10
Aligning lens mounting index on the
camera body with lens’ aperture index,
twist lens counterclockwise until it locks
securely into place.
See page 82 for Nikon lens com
patibility chart.
To remove
Push lens release button and turn lens
clockwise.
Page 13

INSTALLING BATTERY
Open battery chamber ccrver by sliding
the lock release.
The battery chamber cover may be detached if
pressure is applied. This prevents it from being
broken. If the cover is accidentally detached,
simply reattach it as illustrated, making sure to
push it until it clicks into place.
Insert 6V lithium battery pack (Duraceli
DL 223A, Panasonic CR-P2 or equiva
lent) with “-I-” and ” ends positioned
as shown on the inside cover. Then
push the battery pack down until it locks
into place.
Close the cover by pushing until it clicks.
See page 94 for “NOTES ON
BATTERIES."
11
Page 14
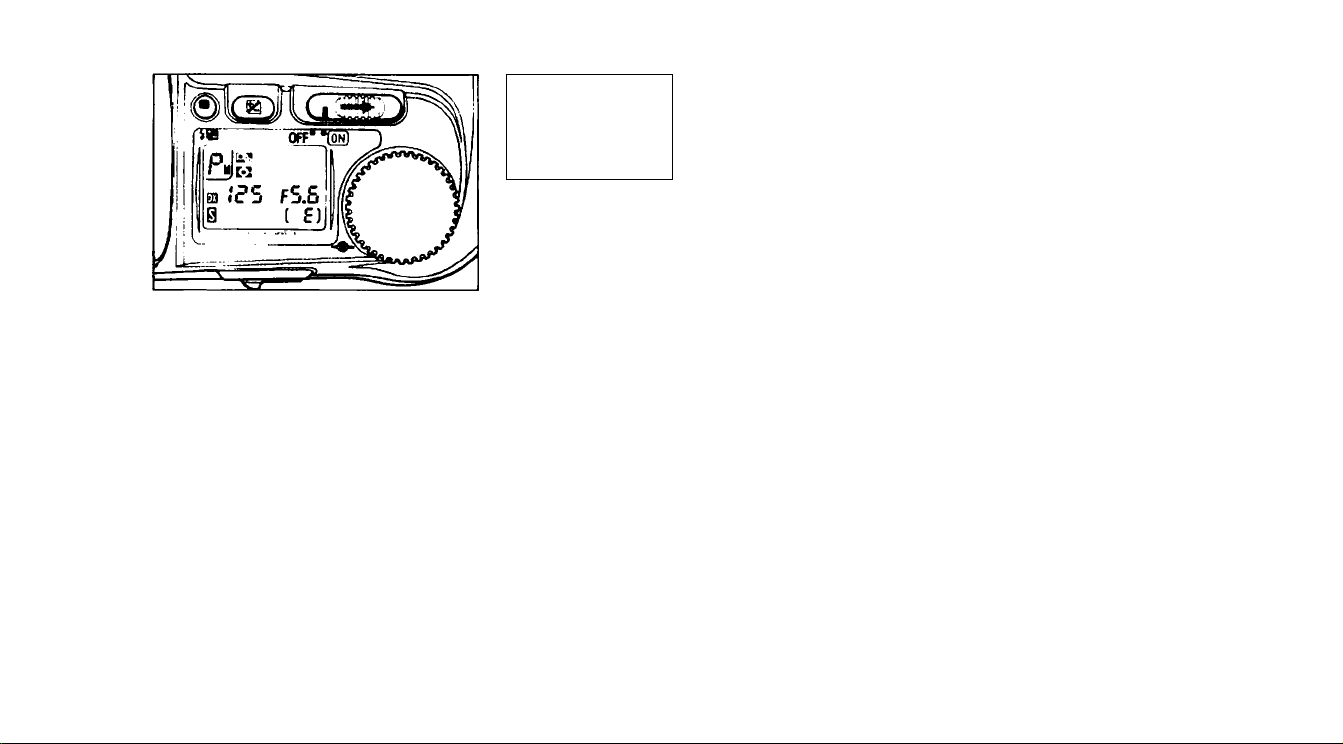
CHECKING BATTERY POWER
P-IS
Q] (C*5 f5.5
With sufficient battery power, shutter speed and aperture indicators remain on for
approx. 8 sec., unless you release shutter.
If indicators turn off immediately, replace battery.
• Even with sufficient battery power, shutter speed and aperture indicators go off
Slide power switch to ON and confirm
indications on LCD panel.
•When not using the camera, be sure to turn power switch
off, to conserve battery power.
• The battery operates camera motor. When film-advance
speed becomes noticeably slower, replace battery with
fresh one.
• If all indicators on LCD panel blink when you lightly press
shutter release button, battery should be replaced.
approx. 2 sec. after you remove your finger from button, following shutter release.
• Lightly pressing the shutter release button, after exposure meter automatically
turns off, turns exposure meter on again. With sufficient battery power, meter stays
on for approx 8 sea after you remove your finger from the shutter release button.
With focus mode selector at S or CF, lightly pressing shutter release button also
starts autofocus operation.
( 5)
P.
After approx.
8 sec.
• If shutter does not operate and data does not appear on
the LCD panel or viewfinder, the battery pack is exhaust
ed or improperly loaded.
_______________________________.
I'i)
12
Page 15
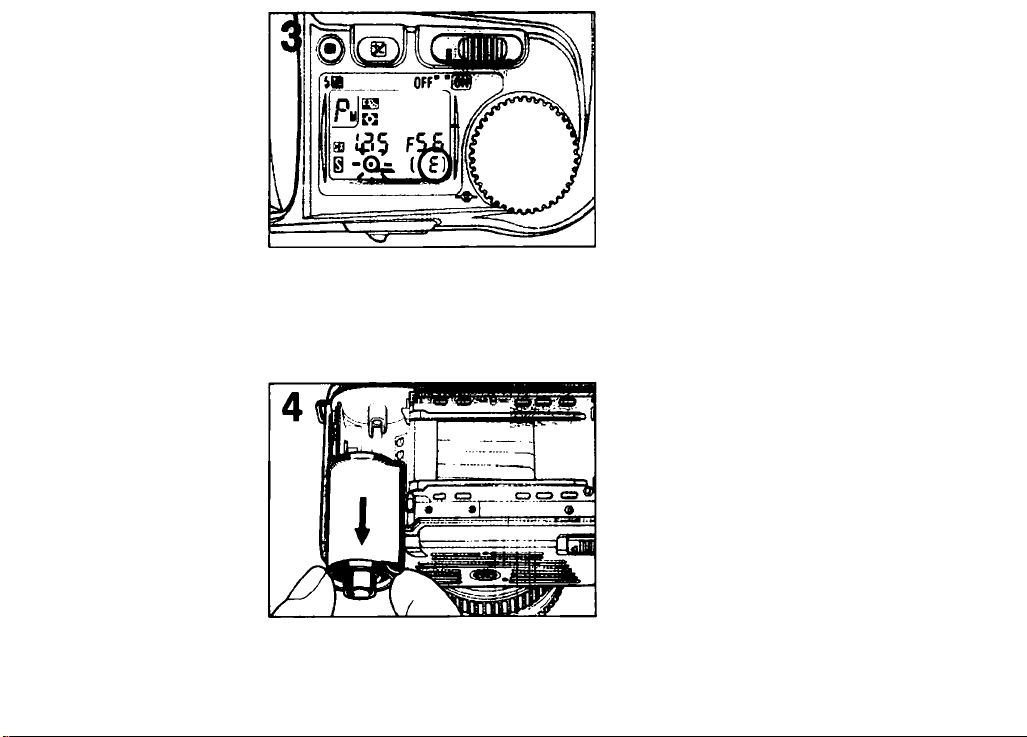
LOADING FILM
To avoid fogging film (especially
high-ISO film), do not load/unload
film in direct sunlight.
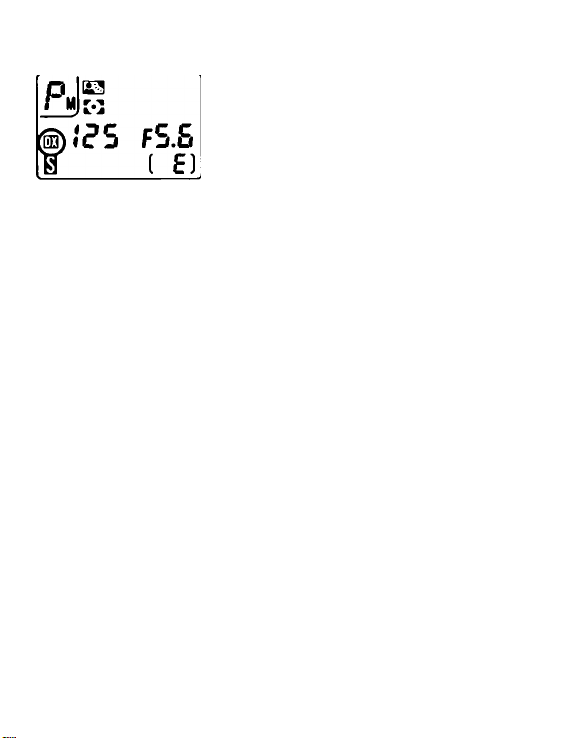
1
|)íг5
Confirm whether for auto setting is shown on the LCD panel.
f5.5
(
E]
o
©
If not, press and hold shift button, then press ISO button so OQ appears.
• Usable film speed range for DX-coded films is ISO 25 to 5000.
• For details about film-speed setting including manual film speed setting, see
pages 24 to 26.
•
13
Page 16
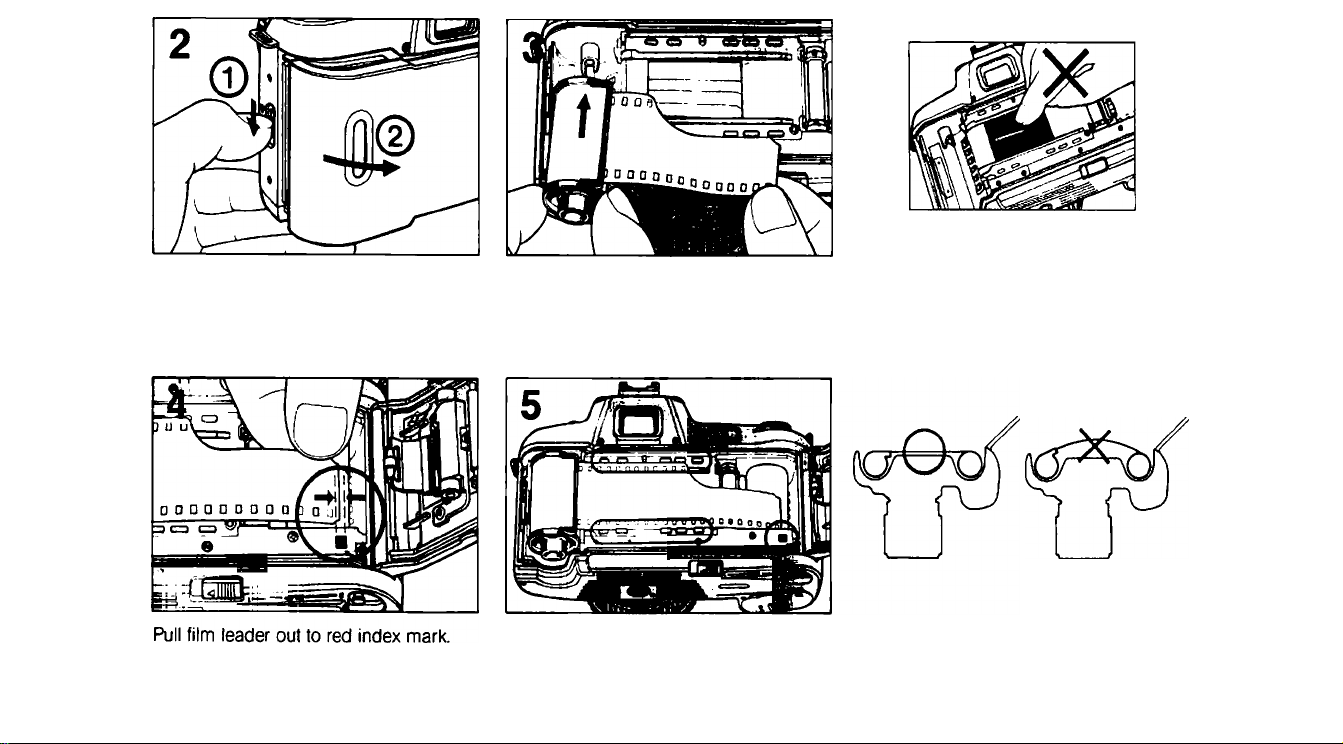
Slide camera back lock release to open Insert film cartridge,
camera back
Check to ensure film is properly positioned with no slack. (See illustration)
14
Do not touch shutter curtains with
your finger a with film leader.
Page 17
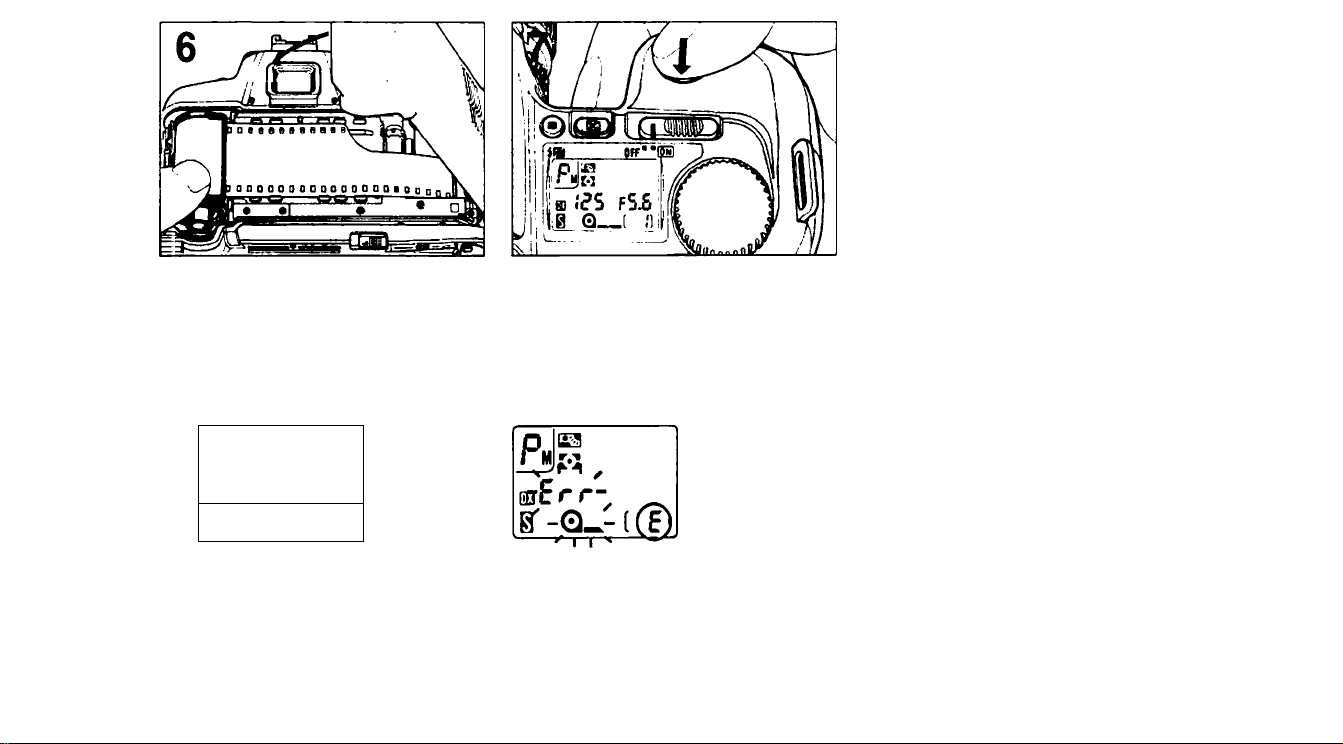
Close camera back until lock release
snaps closed.
8
Fully depress shutter release button to
automatically advance film to frame 1.
liD IP^.
IM
Confirm frame “1" and Q-
appear on LCD panel.
—( *'1
symbol
tif film is not correctly positioned, “E"
remains, Err and Q_ symtx>l blink
and shutter locks Open camera back
and reload film.
¡a
S3 too
To confirm ISO number of DXcoded film, press ISO button.
15
Page 18
BASIC SHOOTING (Requires AF Nikkor lens)
Set focus mode selector to S for FocusPriority Single autofocus. If lens has an
A-M switch, set the switch to A.
16
Push any two buttons (MODE, ISO, DRIVE and BKT) simultaneously for more than
one second until K and 0 appear in the LCD panel (while viewfinder LCD shows
P), indicating that the camera settings are automatically reset for basic shooting as
shown below;
Film advance
Metering system
Exposure control
Flexible program setting
Exposure compensation on camera
Auto exposure bracketing
(For flash photography)
Flash sync
Automatic Balanced Fill-Flash
Manual flash light output compensation
Single frame (0)
Matrix (i*3)
Multi-program (^J)
Cancel
±0
Not set
Normal — Slow sync and Rear-curtain
sync cancelled
Set
±0
Page 19

Shown here are basic settings for the easiest, most
common picture-taking situations using AF Nikkor
lenses with a CPU. With other than lenses Al-P Nikkor,
Center-Weighted metering and Aperture-Priority auto ex
posure mode are automatically selected, and autofocus
is not available (including Al-P Nikkor).
For film advance mode See page 27
For metering system See pages 39 to 45
For exposure control See pages 46 to 63
For flexible program See page 50
For exposure compensation
with button See pages 66 to 67
For auto exposure bracketing See pages 68 to 72
For flash photography See separate
instruction book
Page 20
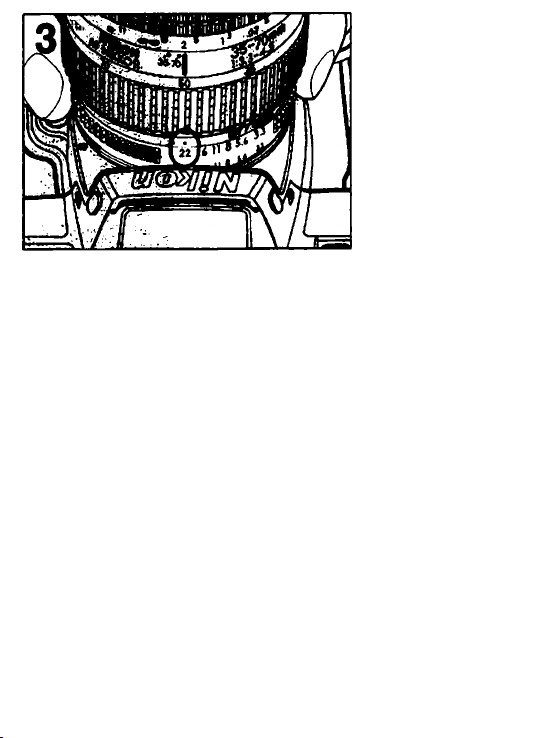
Set lens to its minimum aperture (highest f-number marked in
orange on AF Nikkor lenses).
Also lock lens aperture of AF Nikkor lens at its minimum set
ting (See lens instruction manual).
17
Page 21
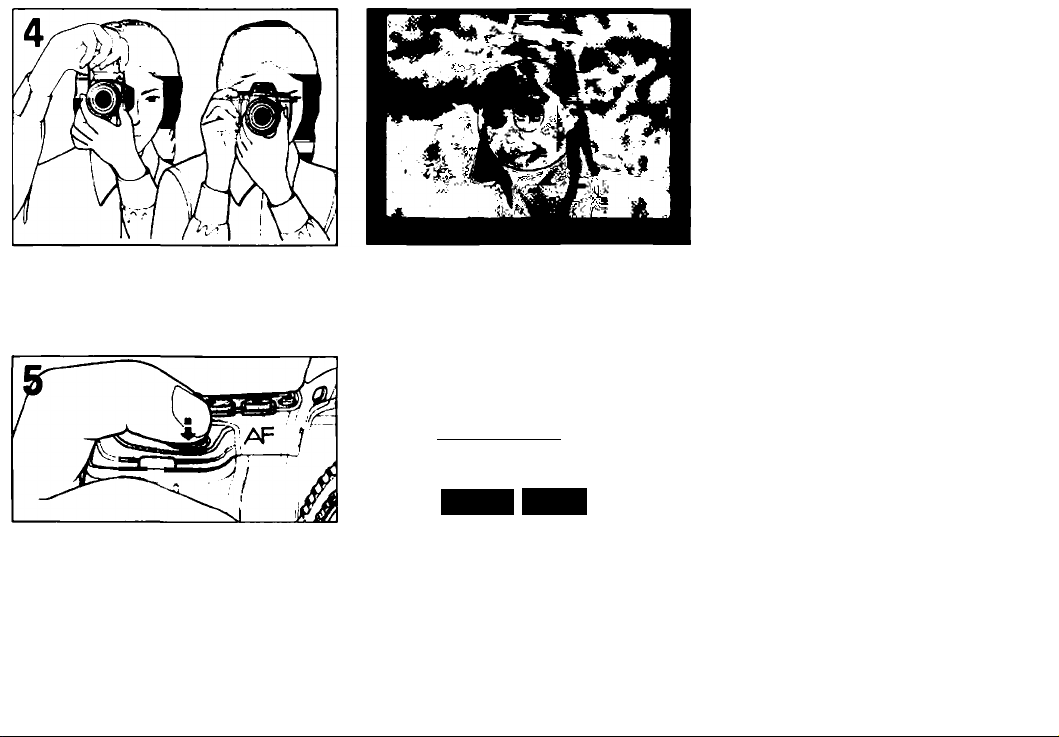
Look through the viewfinder and position focus brackets on the main subject.
|£3
ijnCt^S fS.S..
0 Q_1 "ÏÏ
The N6006 viewfinder covers
approx. 92% of the image area
of the actual photograph so the
actual picture comes out larger
than the image in the viewfinder.
Note that the picture comes out
trimmed down in the case of
mounted slides or service-size
prints from negatives.
Ughtly press shutter release button to
start autofocus operation and turn the
exposure meter on.
18
”i '( TC
“ IL J
Confirm in-focus LCD indicator • or
► • ◄ is continuously visible in the
viewfinder. Also check exposure by con
firming shutter speed and aperture are
shown. Exposure indications are also
displayed in the LCD panel.
rC c ■>
r J.Û
Shutter cannot be released until • or
► • ◄ appears Indicating that subject is
in focus.
• In-focus indication for a
stationary subject
► • ◄ Focus-tracking indication
Page 22

P io F3.8
If shutter speed indicator biinks - Picture blur alert:
If a selected shutter speed is 1/(focal length) or slower, picture blur may occur due to camera shake
or subject movement. To avoid blur, hold camera very steady, use a tripod, or use accessory Nikon
Speedlight.
If “HI” blinks in the shutter speed position with
electronic analog display* - Overexposure alert:
Overexposure may occur. Use a filler such as the Nikon
ND filter.
If “Lo” blinks in the shutter speed position with or
If ready-light LED (i ) biinks —
Flash-photography suggestion:
If the subject brightness is insuffic
ient, ready-light blinks. Use built-in
TTL flash or accessory Nikon
Speedlight.
without eiectronic analog display* - Underexposure
alert:
Underexposure may occur. Use built-in TTL flash or acces
sory Nikon Speedlight.
If “fEE” blinks in the aperture position Lens setting error alert:
Lens is not set to smallest aperture setting and shutter
locks. Set lens to smallest aperture.
‘Shows value difference from correct
exposure.
19
Page 23
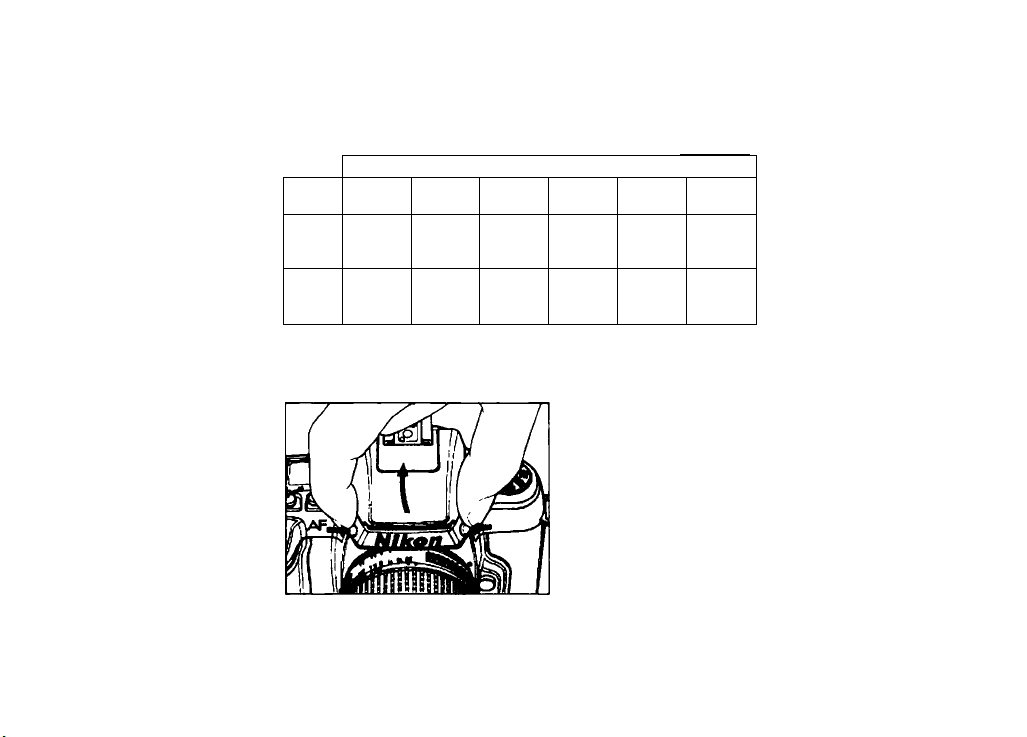
Flash shooting with built-in TTL flash
First, make sure that subject is within flash shooting dis
tance range: With AF Zoom-Nikkor 35-70mm fl3.3-fl4.5
lens, the built-in TTL flash covers the following range:
Unit: m (ft)
Zoom
setting
35mm
70mm
25 50 100 200
0.6~2
(2,0~
6.6)
0.6-1.4
(2.0-
4.6)
0.7-2.8
(2.39-2)
0.6-2
(2.0-
6.6)
1. Push flash lock release buttons so that built-in TTL flash
pops up.
Rim speed (ISO)
1-3.9
(3.3-
12.9)
0.7-2.9
(2.3-
9.6)
1.3-5.5
(4.3-
18.2)
1.0-4.1
(3.3-
13.5)
400 800
1.6-6.5
(5.3-
21.5)
1.4-5.8
(4.6—
19.1)
1.9-7.7
(6.3-
25.4)
1.9-7.7
(6.3- '
25.4)
20
Page 24
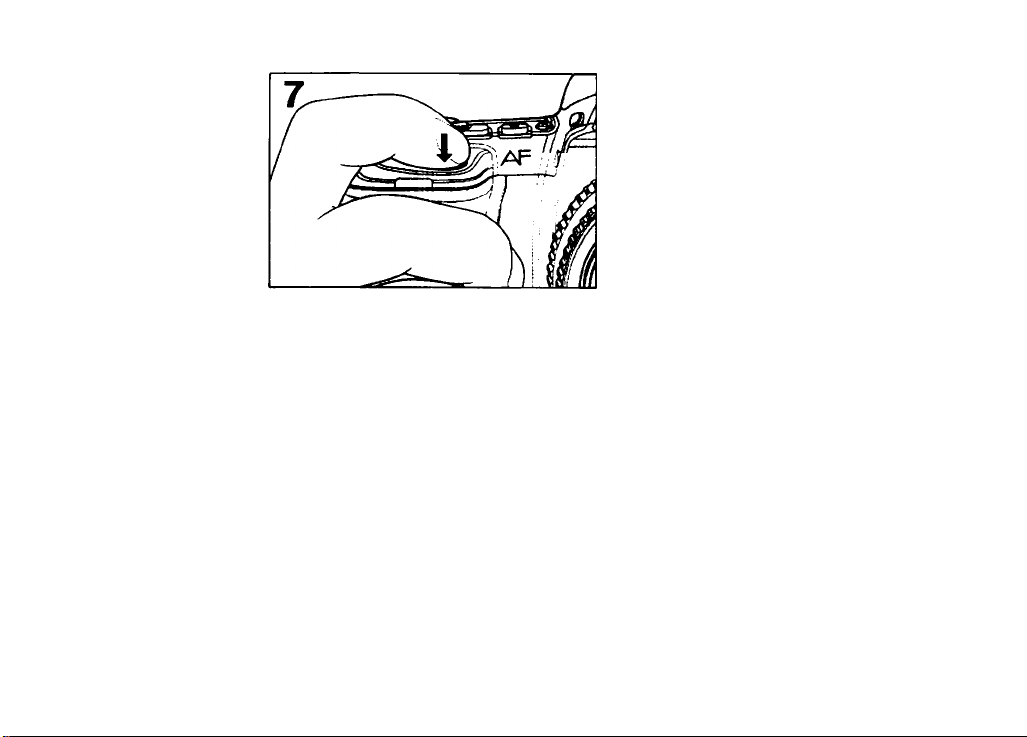
2. Lightly press the shutter release button.
• P US fS.S
3. Wait a few seconds for ready-light to come on, then
shoot. If subject is beyond flash's range, ready-light
blinks for approx. 3 sec. after shooting.
For details, see pages 75 to 79.
Page 25
Fully depress shutter release button to take picture. Camera
automatically advances film by one frame. And LCD panel’s
frame counter increases by one.
Shutter speed aperture indicators in LCD panel and in
side viewfinder turn off approx. 2 sec. after you release
shutter and remove your finger from shutter release
button.
Page 26
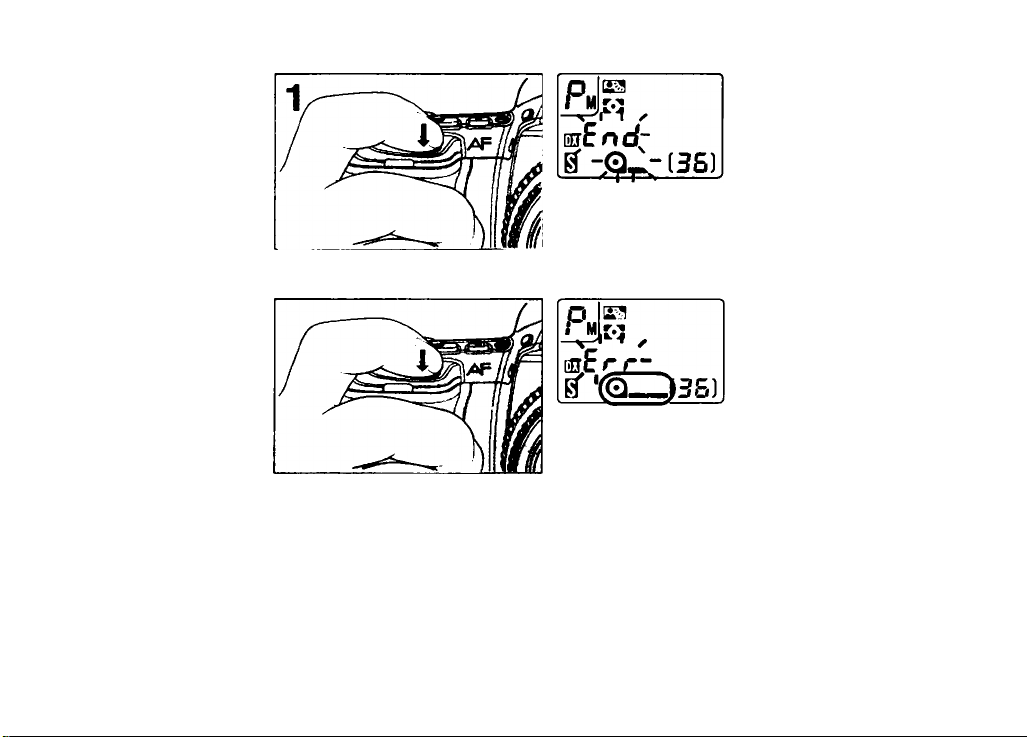
REWINDING FILM
O
Film advance stops automatically at end of roll with blinking
End and Q_ symbol on the LCD panel. After exposure meter
automatically turns off, each time you press shutter release
button, Err blinks and Q__ symbol appears instead, remind
ing you to rewind film.
21
Page 27
Рм|к
ОБ
QjiLOS)
——
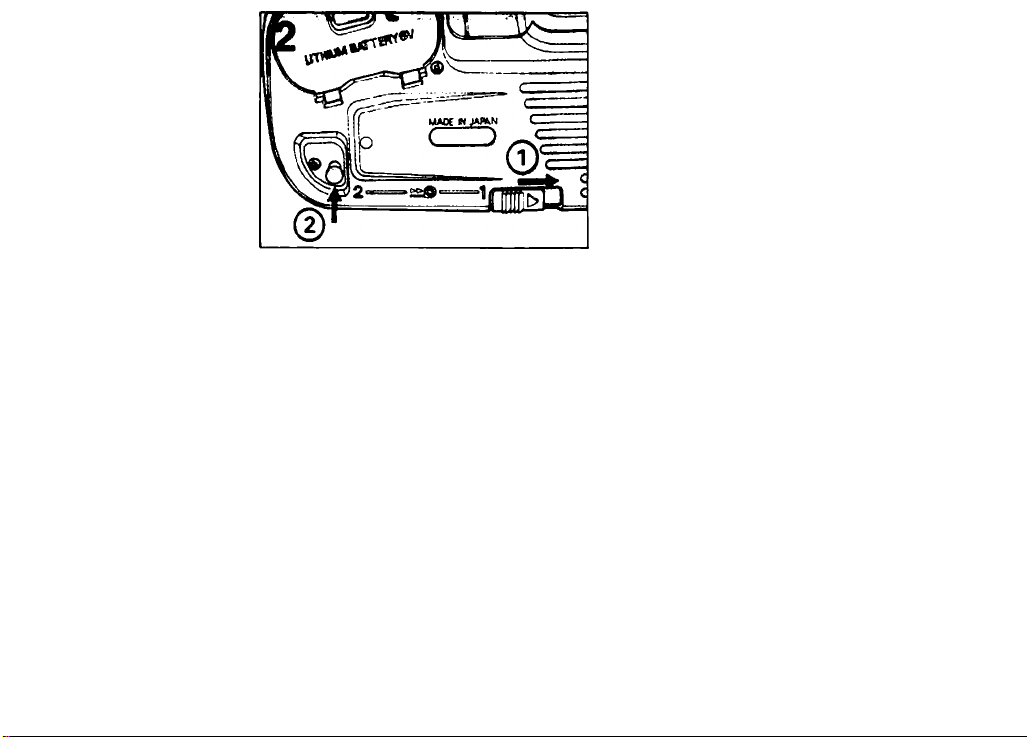
While sliding film rewind lever in the direction of arrow, press
film rewind button to start film rewinding. During film rewind,
Q_ and Q__ symbols alternately appear on the LCD panel,
and frame counter will count backwards until rewind is
complete.
• You can rewind film before it reaches end of roll in the same
manner.
• If camera stops during film rewind, replace battery without
opening camera back
After installing battery, turn power switch on, and restart film
rewind by the same method as before.
22
Page 28
After rewind automatically stops, confirm frame counter shows
E, and film installation symbol (Q_) blinks fa a tew seconds.
Open camera back and remove film cartridge.
Page 29

CONTROLS IN DETAIL/
PHOTOGRAPHIC TECHNIQUES
23
Page 30
FILM SPEED SETTING
m)m
-Jiгs
f5.5
^ ( E)
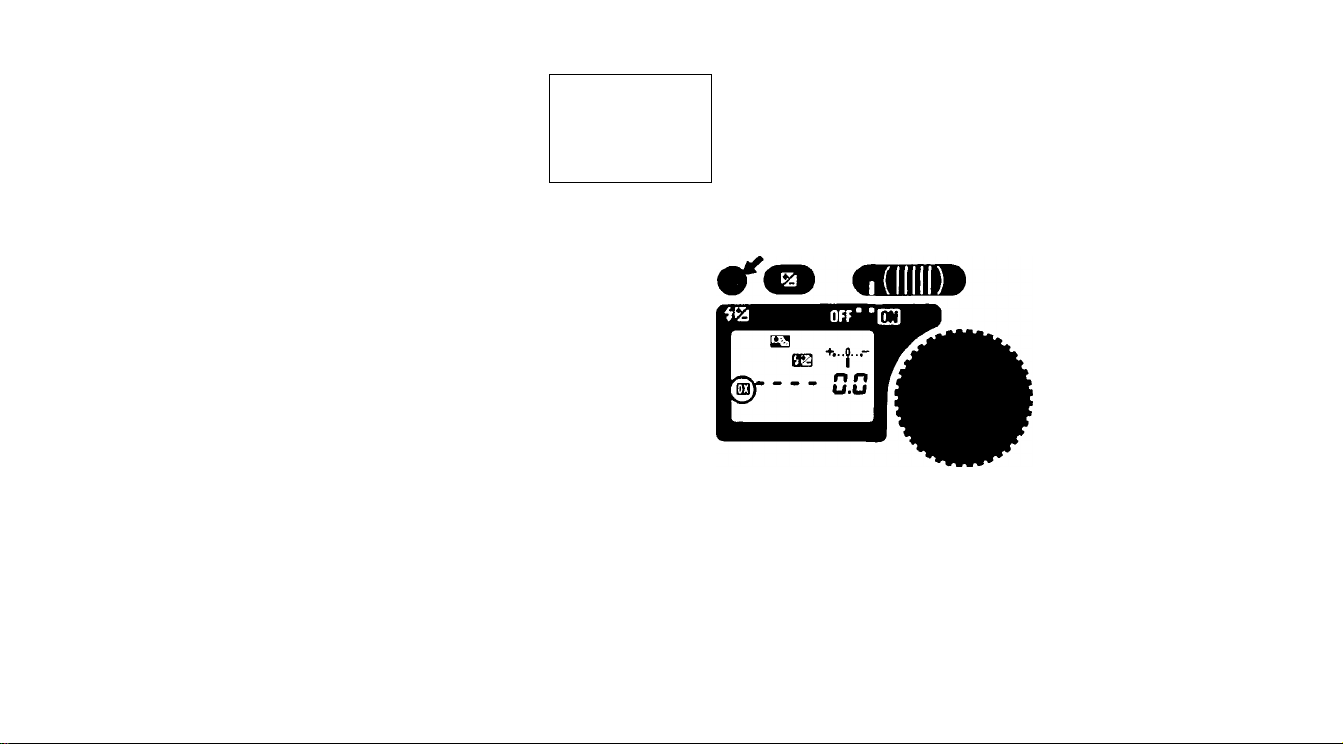
The N6006 offers two ways to set film speed — automatic film
speed setting for DX-coded film and manual film speed setting.
Each time you press the ISO button, while depressing the shift
button, film speed setting changes from auto/DX to manual,
or vice versa. The LCD panel shows 03 for auto; there is no
indication for manual.
24
Page 31

USING AUTOMATIC FILM SPEED
SETTING FOR DX-CODED FILMS
Usable film speed range for DX-coded film is ISO 25 to 5000.
1. Slide power switch to ON.
2. While depressing shift button, press film speed (ISO) button
so OB is shown in LCD panel.
Camera automatically detects film speed (ISO 25 to 5000) of
DX-coded film.
•After loading film, you can
confirm speed by pressing
ISO button. ISO number will
appear In LCD panel and
viewfinder.
Page 32

If “Err,” ISO symbol and DX symbol are blinking:
Non-DX-coded film or film with an unacceptable DX
code is loaded. Set ISO manually.
Page 33

MANUAL FILM SPEED SETTING
e
Usable range for manual film speed settings is ISO 6 to 6400.
1. Slide power switch to ON.
2. While depressing shift button, press film speed (ISO) button
so that OD in the LCD panel disappears.
25
Page 34

O
REt
3. While pressing ISO button, rotate command dial until
desired number is shown.
Film speed setting display changes as follows;
6 - 8 -10 -12 -16 - 20 - 25 - 32 - 40 - 50 - 64 - 80 -100 125 -160 - 200 - 250 - 320 - 400 - 500 - 640 - 800 -10001250 -1600 - 2000 - 2500 - 3200 - 4000 - 5000 - 6400
• With or without film loaded, you can confirm film speed by
pressing ISO button. Manually set ISO number will appear
on the LCD panel and viewfinder.
• If DX-coded film is loaded, but manual film speed setting is
selected, camera gives priority to the manually set ISO
number.
26
Page 35

Page 36

FILM ADVANCE MODE SETTING
fflUn»
O
4f^0
The Nikon N6006 has three automatic film-advance modes.
To switch film-advance mode, press and hold DRIVE button
and rotate command dial. 0 for single-frame shooting, 0i for
continuous low-speed shooting and 0^ for continuous high
speed shooting appear consecutively.
Page 37

SINGLE-FRAME SHOOTING
m)k
Psl
lгs
f5.s
Q
___
H)
With film advance mode at fully depressing shutter release
button takes one picture and automatically advances film by
one frame.
( i)
CONTINUOUS SHOOTING
5 fS.S
@0.—( i]
Shots are taken continuously as long as shutter release button
is depressed. High- or low-speed continuous shooting can be
selected.
Shooting speed is approx. 2 fps (frames per second) in 0*^
mode or approx. 1.2 fps in 0l mode — with a fresh battery
pack at normal temperature and a shutter speed faster than
1/125 sec. The slower the shutter speed, the slower the motor
speed.
life's fS.S
(gOQ—( j]
27
Page 38

FOCUSING
-----------------
AUTOFOCUS
The Nikon N6006 provides tvra autofocus
modes, FocuS'Priority Single autofocus
and Focus-Priority Continuous autofocus
For both autofocus modes, and in any
film advance mode, if subject is moving,
focus tracking automatically works. The
focus tracking system enables the
camera to analyze the speed of the
moving subject according to focus de
fection data, and drive the autofocus
lens by anticipating the position at the
exact moment of exposure. So, you can
get correctly in-focus pictures for most
moving subjects, as well as stationary
subjects.
In both autofocus modes, shutter
cannot be released until • or ► • ◄
appears in the viewfinder.
FOCUS-PRIORITY SINGLE
AUTOFOCUS - with focus
mode selector at S
stationary subject is in focus
With a stationary subject: When
subject is in focus, autofocus stops and
• appears. Once subject is in focus in
the Focus-Priority Single autofocus
mode, focus is locked. If subject moves,
remove your finger from shutter release
button, then lightly press it again to start
autofocus with focus tracking.
28
Page 39

!гs fi8
Focus tracking
With a moving subject: Focus tracking is automatically acti
vated when you lightly press the shutter release button, as the
lens is being driven. As soon as in-focus image is expected,
► • ◄ appears, indicating that you can release shutter. If sub
ject stops and • appears without ► and ◄ arrows, focus is
locked. If subject moves again, remove your finger from the
shutter release button and lightly press it again to start auto
focus with focus tracking.
Page 40

• As focus is locked, Focus-Priority Single autofocus is
convenient for off-center subjects. See pages 32 to 33.
•After shooting, you do not have to remove your finger
from the shutter release button for the next shot. Slight
ly lift your finger off the button then fully depress it to
release shutter again. In Focus Priority Single auto
focus, focus remains locked even after shutter release
unless you remove your finger from the shutter release
button with film advance mode at S. Camera detects
focus every time shutter is released with film advance
mode at Ch or Cl.
• With a moving subject, depending on subject status
and lens in use, slightly-out-of-focus pictures may
result.
29
Page 41

FOCUS-PRIORITY CONTINUOUS AUTOFOCUS
— with focus mode selector at CF
Autofocus continues as long as you keep lightly pressing the
shutter release button.
30
Page 42

• P tes Fis
stationary subject is in focus
With a stationary subject: Autofocus starts when you lightly
press the shutter release button. When subject is in focus,
camera's motor stops driving the autofocus lens and • lights
up. Unless you remove your finger from the shutter release
button, the motor will start driving the lens again to obtain an
in-focus picture if the focus distance changes because either
you or the subject moves.
Page 43

Focus tracking
With a moving subject; Focus tracking is automatically acti
vated when you lightly press the shutter release button, as the
lens is being driven. As soon as an in-focus image is expect
ed. ◄ appears, indicating that you can release shutter.
Focus tracking stays activated as long as you keep lightly
pressing the shutter release button while following the moving
subject. When the subject stops, the motor stops driving the
autofocus lens as soon as an in-focus image is obtained and
• appears.
Page 44

•After shooting, you do not have to remove your finger i
from the shutter release button for the next shot. Slightly lift your finger off the button then fully depress it to i
release shutter again. In Focus Priority Continuous
autofocus, camera detects focus every time shutter is
released regardless of film advance mode.
•With a moving subject, depending on subject status
and lens in use, slightly-out-of-focus pictures may
result.
31
Page 45

AUTOFOCUS WITH MAIN
SUBJECT OFF CENTER -
SETTING AF-L (AUTOFOCUS
LOCK) FUNCTION
The N6006’s AF-L function lets you lock
both focus and auto exposure. So it is
recommended that you should set AF-L
function on the camera.
iCf'O «
OI
32
AF-L function is set
To set AF-L function, while pressing shift button, press AF-L function button so AF-L
appears in the LCD panel.
Each lime you press AF-L button, while pressing shift button, AF-L function is set or
canceled.
««III»
• If you remove your finger from shift button,
AF-L function indication disappears. However,
you can check whether AF-L function is set or
canceled by pressing shift button again.
AF-L function is canceled
Page 46

IN FOCUS-PRIORITY SINGLE AUTOFOCUS
With AF-L function set, in auto exposure mode, exposure is
simultaneously locked when focus is locked. Without AF-L
function set, only focus is locked in Focus-Priority Single
Autofocus.
With a moving subject, focus cannot be locked.
te s fs.6
2. Confirm in-focus indicata • appears in the viewfinder.
Page 47

1. Position focus brackets on subject and lightly press the
shutter release button.
• p tes fis
3. Keeping the shutter release button lightly pressed, recom
pose, then fully depress shutter release button.
33
Page 48

IN FOCUS-PRIORITY CONTINUOUS AUTOFOCUS
You can lock focus in Focus-Priority Continuous autofocus with
AE-17AF-L lever. To use the lever for focus locK first set AF-L
function on the camera. Without AF-L function set, only expo
sure is locked in auto exposure mode.
2. Keeping shutter release button lightly pressed, confirm in
focus indicator • is visible, then slide AE-L/AF-L lever and
hold in.
34
Page 49

1. Position focus brackets on subject and lightly press the
shutter release button to start autofocus operation.
3. With AE-I7AF-L lever held in. recompose as desired and
fully depress shutter release button to take picture.
Page 50

SPECIAL FOCUSING SITUATIONS
Autofocus operation depends on general lighting, subject contrast and detail, and other technical
points. In those rare situations where autofocus is not possible, • blinks telling you to...
A. Very dark subject
Focus manually with clear matte
field, or for autofocus, focus on
another, brighter subject located at
same distance then use focus
lock.
Or, use a Nikon autofocus Speedlight to perform autofocus with AF
illuminator (See page 84).
C. Subject with no vertical
lines
Focus manually with clear matte
field, or for autofocus, turn the
camera sideways. You can also
perform autofocus on another
subject at same distance but with
vertical lines, using focus lock.
B. Low-contrast subject
Focus manually with clear matte
field, or for autofocus, focus on
another subject at same distance
but with more contrast, then use
focus lock.
D. Scene with subjects located at
different distances
E. Bright subjects with a shiny sur
face, such as silver or aluminum
F. Strongly backlit subjects
G. When using a linear polarizing
Focus manually
with clear malte
field.
filter, or special fitter* such as a
soft-focus filter
"Circular polarizing filter can be used for autofocus operation.
35
Page 51

MANUAL FOCUS
There are two ways to manually focus. Manual focus with elec
tronic rangefinder and manual focus using viewfinder clear
matte field.
MANUAL FOCUS WITH ELECTRONIC RANGEFINDER
Manual focus using the electronic rangefinder works with most
Nikon lenses, including AF Nikkor when operated manually.
(For a complete list of usable lenses, see LENS COMPATIBIL
ITY CHART on page 82). With focus mode selector at M, you
can see focus status with the viewfinder indications.
• For special focusing situations shown on page 35, electronic
rangefinder does not correctly work. Focus using clear matte
field.
• When using lenses with a maximum aperture slower than
//5.6, ignore focus indications and use clear matte field for
focusing.
36
Page 52

1. Set focus mode selector to M for manual focus.
•If lens has an A-M switch, set to M.
2. Look through viewfinder and position focus brackets on the
main subject. Then lightly press the shutter release button.
Page 53

3. Keeping shutter release button lightly pressed, rotate lens focusing ring in the di
rection that focus-to-left arrow (◄) or focus-to-right arrow (►) indicates, until the
arrow disappears and in-focus indicator • appears.
• =• iгs fS6
If focus-to-left arrow (◄) does not
disappear when you turn focus
ring conterclockwise to the limit,
subject is closer than the lens’
closest focused distance. Move
back from the subject.
4. Confirm in-focus indicata • appears, then fully depress
shutter release button to take the picture.
37
Page 54

MANUAL FOCUS USING CLEAR MATTE FIELD
1. Set to focus mode selector to M for
manual focus.
•If lens has an A-M switch, set to M.
2. Look through the viewfinder and rotate lens focus ring until subject on clear matte
field appears sharp.
When using a zoom lens:
For maximum focusing accuracy, it is advised that you should focus at the
lens' longest focal length setting (at telephoto side). The shallow depth of field
and large image scale at the longest focal length setting, help to ensure pin
point focusing. Conversely, focusing at the shortest focal length setting and
then zooming up to the longest focal length setting will magnify any slight
imprecision in focusing and could result in unsharp pictures.
38
Page 55

EXPOSURE------------------------------------
EXPOSURE METERING SYSTEMS
The Nikon N6006 provides three types of exposure metering
systems - Matrix Metering, Center-Weighted Metering and
Spot Metering.
Page 56

MATRIX METERING
This system is ideally suited for quick operation and for the
most dependable auto exposure control. It can also be used
for manual metering and flash exposure control operation with
any Nikon TTL Speedlight.
In Matrix Metering, the meter automatically provides the correct
exposure of the main subject in virtually any lighting situation,
without requiring manual exposure compensation. The Matrix
Metering sensor determines scene brightness by dividing the
scene into five areas, then analyzing each area for brightness
and scene contrast.
39
Page 57

CENTER-WEIGHTED METERING
Choose Center-Weighted Metering when you want to base
exposure on either auto or manual exposure control for a cen
trally located subject Selecting Center-Weighted Metering
overrides Matrix Metering and concentrates 75% of the meter’s
sensitivity into the center of the viewfinder outlined by a 12mm
circle.
40
Page 58

SPOT METERING
For selective metering of tiny subjects or for advanced manual
metering techniques, use Spot Metering.
The area metered is represented by the approx. 3.5mm-diameter circle in the center of the viewfinder. This metering
system is effective when precise measurement of a special
portion of the subject is required.
Page 59

.'10
^siwt
METERING SYSTEM SETTING
1. Slide main switch to ON.
2. While pressing metering system button, rotate command
dial until your desired symbol -1*3 for Matrix Metering, [<•>]
for Center-Weighted Metering or[[0for Spot Metering ap
pears in the LCD panel.
Page 60

3 f5.5
Center-Weighted
Metering
Matrix Metering is possible only with lenses that have a
built-in CPU (such as AF Nikka and Al-P lenses). When
a lens without a built-in CPU or no lens is used, the
metering system is automatically set to Center-Weighted.
In either case, if you lightly press the shutter release but
ton, the i*3 symbol blinks.
Spot Metering
i)
41
Page 61

METERING SYSTEM SELECTION - WHEN TO USE MATRIX OR CENTER-WEIGHTED METERING
In scenes with both very bright and very dark areas, these two
metering systems produce varying results. For example:
A. Scene containing the sun or scenes with high reflectivity
If a scene contains strong highlights, such as the sun, snow or
bright reflections, Center-Weighted Metering renders the main
subject as a silhouette. With Matrix Metering, however, the light
value of darker parts is evaluated, resulting in an overall well-
balanced exposure.
B. Outdoor backlit subject
With Center-Weighted Metering, a backlit subject or scene with
people against a bright sky and/or clouds may lead to an under
exposed shot. With Matrix Metering, however, the camera auto
matically gives more exposure to darker subjects to ensure a
balanced overall exposure.
C. Front-lit subject against dark background
If a brightly lit off-center subject is positioned against a dark
background, Center-Weighted Metering places too much empha
sis on the dark center of the picture. So although the background
is correctly exposed, the main subject will be overexposed. Matrix
Metering, however, automatically integrates a dark background
with a bright subject to ensure the best overall exposure.
42
Page 62

Scene containing the sun
Center-Weighted Metering
Page 63

Outdoor backlit subject
Center-Weighted Metering
Page 64

Front-lit subject
Matrix Metering
I
I
Center-Weighted Metering
43
Page 65

D. Small dark subjects against a bright background
A subject significantly smaller than any of the Matrix Meter-
• ing sections may not be recognized and integrated into the
automatic exposure evaluation. For such subjects, switch to
Center-Weighted Metering and make exposure compensa
tion with AE lock lever* or exposure compensation button**
in Auto exposure mode, or obtain carect exposure meter
reading on the main subject*** in Manual exposure mode.
* See pp 64 - 65
** See pp 66 - 67
*** See pp 62-63
44
Center-Weighted Metering (with AE Lock)
Page 66

Center-Weighted Metering (without AE Lock)
Page 67

E. Sunset scenes
If you want to emphasize a dramatic sunset but don’t want
Matrix Metering to lighten the scene for a dark foreground
subject, use Center-Weighted Metering with or without
exposure compensation.
Page 68

Center-Weighted Metering
45
Page 69

EXPOSURE MODE
Light reaching the film is controlled by the shutter and aper
ture. The proper combination of shutter and aperture settings
results in the correct exposure. The necessary settings will be
based upon the ISO speed set for the film in use and the
operation of the camera’s exposure control system.
The relationship between aperture and shutter is as follows:
One change in shutter speed either doubles or halves the light
transmitted. For example, 1/500 passes half the light as 1/250
and double the light of 1/1000. The aperture f/8 passes half the
light of f/5.6 and double the light of f/11. If the carect exposure
for a scene is 1/500 at f/8, then we can also select 1/250 at f/11
or 1/1000 at f/5.6 and achieve the same exposure results.
Selecting the exposure control mode means deciding if you
want the shutter speed/aperture to be set automatically or
manually.
The Nikon N6006 offers five modes: four automatic exposure
control modes - Auto Multi-Program (^), Normal-Pro
grammed (PJ), Shutter-Priority auto (^), and /\perture-Priority
auto (^) - in addition to Manual (rjj) mode.
Each exposure mode has its own advantages.
In Programmed auto exposure mode, as the optimum combi
nation of shutter speed and aperture is automatically set by the
N6006’s miaocomputer, you can concentrate completely on
picture composition and have greater opportunities to shoot,
without worrying about exposure.
46
Page 70

In Shutter-Priority auto exposure mode, you can manually set
shutter speed as desired. That is, you can freeze the action
with sharp, clear images using a fast shutter speed, or aeate
motion effects by choosing slower shutter speeds.
In Aperture-Priority auto exposure mode, you can control depth
of field by varying the aperture. You can use a larger aperture
(smaller f-number) for shallower depth of field to create softer,
less distinct backgrounds, a choose a smaller aperture (larger
f-number) for greater depth of field.
In Manual exposure mode, in addition to controlling both shut
ter speed and aperture, you can easily create intentionally
over- or underexposed photos.
Page 71

lyr.
©
DCPOSURE MODE SETTING
,tter turning power switch on, while pressing MODE button,
)tate command dial. Exposure mode changes in the following
equence:
Page 72

m
03 ic^S fS.S IB ic'S fS.5
0 Q—( /) 0 Q
Auto Multi-Program Manual
1
__ _
( i)
SII
03 ic'S fS.5 ® ic’S fS.S
0 Q
__ _
( i) 0 Q
Shutter-Priority Auto
m
1
'EM
__ _
Normal Program
( t]
fS.6
mlгs fs.8
S ( I)
Aperture-Priority Auto
Correspondingly, Pm, S, A, M or P will appear on the LCD panel
while P (for both Auto Multi-Program and Normal Program),
S, A and M will appear inside viewfinder.
47
Page 73

mlгs
S Q-
For Programmed auto or Shutter-Priority auto exposure
mode, use only lenses that have a built-in CPU such as
AF Nikkor or Al-P lenses. With other lenses, exposure
mode is automatically set to Aperture-Priority auto and
the metering system to Center-Weighted.
In this case, when you lightly press shutter release but
ton, exposure mode indicator blinks and F-- appears on
the LCD panel.
J
48
Page 74

PROGRAMMED (Pm AND P) AUTO
The N6006 offers two programmed auto exposure modes:
Auto Multi-Program mode and Normal Program mode.
Rcture sharpness can vary with the shutter speed used. Differ
ent focal length lenses handle differently at slow shutter
speeds. The recommended slowest shutter speed to be used
with any lens when hand-holding the camera is 1/focal length
(FL) of the lens. For example, with a 60mm lens, use 1/60 sec.
as the slowest hand-held speed. Keep in mind, however, that
1/30 sec. is the lowest recommended shutter speed for blurfree hand-held shooting.
The N6006’s Auto Multi-Program varies the exposure program
lines according to the focal length and lens maximum aper
ture. The inclinations of lines in the chart are designed to re
duce the possibility of picture blur by avoiding slower shutter
speeds. With Namal Program, you get a standard combination
of shutter speed and aperture.
Page 75

Program Charts
The EV (exposure value) charts demonstrate the difference
between N6006 Auto Multi-Program and Normal Program.
Follow either colored line to where it intersects a diagonal line.
This shows the combination of aperture (vertical line) and shut
ter speed (horizontal line), which will automatically be selected
at each EV brightness level.
Auto Multi-Program Chart (IS0100)
------------ With 50mm f/1.4
------------
With 28mm f/2.8
------------ With Zoom 35-135mm f/3.5-f/4.5
at 100mm (f/4.2) setting
With 500mm f/4
Page 76

Operation in programmed auto exposure mode
Operation for Auto-Multi Program and Normal Program are
performed in the same manner. See BASIC SHOOTING on
pp 16 - 21.
Normal Program Chart (ISO 100)
With f/1.4 lens
------------
With f/2.8 lens
------------With f/4 lens
49
Page 77

FLEXIBLE PROGRAM
When you want to use a specific shutter speed or aperture in
Programmed auto exposure mode, use the Rexible Program
function. Rexible Program enables you to temporarily change
an automatically set shutter speed/aperture combination in 1
EV steps, while maintaining the correct exposure.
Q_( T
1. Lightly press shutter release button.
50
Page 78

2. Turn command dial until desired shutter speed or aperture
value appears in viewfinder and in LCD panel.
• When program is shifted, exposure mode indicator blinks
in LCD panel and viewfinder.
•As soon as the display in LCD panel and viewfinder dis
appears (i.e., as soon as meter is automatically turned off).
Flexible Program is cancelled.
Page 79

SHUTTER-PRIORITY AUTO EXPOSURE MODE
Subject movement and your ability to hold the camera steady
will determine what shutter speed you should choose. Faster
speeds will generally produce sharper images. For aeative
effects you may use slower speeds. Make your choice accordmgly. The N6006’s computer automatically selects the proper
aperture to match the selected shutter speed for cared expo
sure. Shutter-Priority auto mode operates only with Nikon
enses that have a built-in CPU (AF Nikkor and Al-P Nikka).
Page 80

'4 -jf
r-.
At a fast shutter speed
At a slow shutter speed
51
Page 81

OPERATION IN SHUTTERPRIORITY AUTO EXPOSURE
MODE
1. Set lens to its minimum aperture setting (highest f-number).
With AF Nikkor and Al-P-Nikkor lenses, lock lens aperture at minimum setting.
52
2. While pressing MODE button, rotate command dial until “S" appears on LCD
panel and viewfinder.
Page 82

#• "i r
•«I L JU
3. Remcwe finger from MODE button, and rotate command
dial to select desired shutter speed.
• Shutter speed indication changes one step at a time in the
following sequence:
30"-15"-8"-4"-2"-1"-2-4-8-15-30-60-125-250-500-1000-
2000
If meter has automatically turned off and LCD indicators
disappear, turn meter on again by lightly pressing shut
ter release button.
Page 83

4. Look inside viewfinder, compose and lightly press shutter
release button.
53
Page 84

ÈD So “H
g Q—f 'Jr
If “HI” blinks in the aperture position with electronic
analog display* - Overexposure alert;
Overexposure may occur. Select higher shutter speed or
use Nikon ND filter.
5. Confirm aperture value.
Camera selects correct aperture (or
shutter speed selected.
6. Fully depress shutter release button
to take the picture.
54
u
:-3
tncSo -i o-
g Q—fi/>J
• Shows value difference from correct exposure
If “Lo” blinks in the aperture position with or without
electronic analog display* - Underexposure alert;
Underexposure may occur. Select slower shutter speed, or
use built-in TTL flash or an accessory Nikon Speedlight.
If “fEE” blinks in the aperture position Lens setting error alert;
Lens is not set to smallest aperture setting and shutter
locks. Set lens to smallest aperture.
Page 85

APERTURE-PRIORITY AUTO EXPOSURE MODE
Select the aperture based on how shallow or large you want
depth of field to be. Smaller apertures will make the back
ground and foreground sharper (good for scenic pictures)
while larger apertures will produce a shallower depth of field
(good for portraits). Your selected aperture will determine the
shutter speed which is automatically set by the camera's com
puter. When using the smaller apertures with corresponding
slower shutter speeds, remember as a rule of thumb that any
speed below 1/30 sec. may require the use of a tripod to pre
vent picture blur due to camera shake. Also, the higher the
corresponding shutter speed, the easier it is to stop action.
Adjust the selected aperture if the speed is not appropriate for
conditions or the specific effect you want.
Page 86

At small aperture
55
Page 87

OPERATION IN APERTUREPRIORITY AUTO EXPOSURE
MODE
©
I
1. While pressing exposure MODE button, rotate command dial until “A” appears on
the LCD panel and viewfinder.
03 ic*5 (fS.S]
0 Q_r^
2. Remove finger from exposure mode setting button and set lens to desired
f-number by rotating lens aperture ring.
Aperture changes in the following sequence, as indicated in LCD panel and
viewfinder.
F1-Ft.4-F2-F2.8-F4-F5.6-F8-F11-F16-F22-F32-F45-F64
(Available apertures limited to those on lens in use.)
56
Page 88

If meter is automatically turned oft and LCD indicators
disappear, turn meter on again by lightly pressing shut
ter release button.
• An intermediate figure (e.g. F1.8, F3.3) displayed indicates a
lens' maximum aperture. Also, with zoom lenses, the maxi
mum aperture for different focal length settings appears in
1/6 EV steps.
• With lenses having no CPU, “F-" appears instead of aper
ture value on the LCD panel and viewfinder.
• With an AF Nikkor or Al-P lens, make sure to unlock aper
ture ring before rotating it.
Page 89

3. Lcx)k inside viewfinder, cx)mpose and lightly press shutter
release button.
57
Page 90

4. Confirm shutter speed.
Camera selects correct shutter speed
to match your aperture setting.
P, 3o F
If shutter speed indicator blinks — Picture blur alert:
A shutter speed of 1/FL is generally accepted as the mini
mum speed for hand-held photography, but since not
everyone can hold a camera equally steady, this is just a
guideline. The blinking shutter speed indication
warns you that the exposure conditions call for a
speed of 1/FL or slower. For example, with a
200mm lens, shutter speed indication blinks when auto
matically selected speed is 1/200 sec. or slower. Make ad
justments to shutter/aperture if that speed is inappropriate
fa the picture conditions.
5. Fully depress shutter release button
to take the picture.
58
If “HI” blinks in the shutter speed position with
electronic analog display* — Overexposure alert:
Overexposure may occur. Select smalla aperture (larger
f-number) or use ND filter.
—
m ■
0 .*)
'A'
H l-F^
If “Lo” blinks in the shutter speed position with or
without electronic analog display* - Underexposure
alert:
Underexposure may occur. Select wider aperture (smaller
f-number), a use a Nikon Speedlight.
* Shows value difference from correct exposure.
Page 91

MANUAL EXPOSURE MODE
Manual exposure control allows you to make both aperture
and shutter speed settings. You’ll probably follow the recom
mendation of the camera’s light meter for technically correct
exposure, but you may choose otherwise and modify exposure
settings fa creative effects a special requirements.
Page 92

OPERATION IN MANUAL EXPOSURE MODE
1. While pressing exposure mode button (MODE), rotate com
mand dial until “M" appears on the LCD panel and view
finder.
59
Page 93

2. Remove finger from exposure mode button, set shutter
speed using command dial, and aperture using lens aper
ture ring.
If meter is automatically turned off and LCD indicators
disappear, turn meter on again by lightly pressing shut
ter release button.
60
• With lenses that have no CPU, "F-" appears instead of
aperture value on the LCD panel and viewfinder.
t1 IIS fS
3. Look into the viewfinder, compose and lightly press shutter
release button.
Page 94

ri c «•'••U'
r X iJ
4. Adjust aperture and/or shutter speed until Electronic Analog
Display indicates “0" or the desired exposure.
• With an AF Nikkor or Al-P lens, make sure to unlock aper
ture ring before rotating it
Examples:
• «O»••
^llll
Over +1EV
•*0«•
I
±0EV
"ti • *0« •
l"l
+1EV
I■•»O«•
I"
-2/3EV
>1
+1/3EV
llll^
Below -1EV
The electronic analog display range is +1EV to -1EV, in
increments of 1/3EV.
◄ and ► appear in the electronic analog display when
exposure is beyond ±1EV.
5. Fully depress shutter release button to take the picture.
61
Page 95

TO OBTAIN EXPOSURE METER
READING FOR A MAIN
SUBJECT OFF CENTER OR
TOO SMALL SUBJECT
If you want to set exposure as desired
on a particular subject, use Center-
Weighted or Spot Metering. With a sub
ject located off center in the viewfinder,
when a subject is too small to cover the
12mm-diameter center circle, or when
there is a substantial difference in bright
ness between the main subject and the
background (e.g., a strongly backlit sub
ject), use the following method.
1. Center main subject inside view
finder’s 12mm circle and/or move in
closer so the circle is covered by the
subject.
2. Lightly press shutter release button.
62
3. Adjust shutter speed and aperture until electronic analog display shows desired
exposure.
Page 96

4. Recompose the picture, focus and shoot.
Page 97

BULB SETTING
; ”1 h >jBf 5. fa
For long-time exposure, use B (bulb) setting. On bulb setting,
shutter remains open as long as shutter release button re
mains depressed. This setting can only be used in Manual
exposure mode. To select, rotate command dial clockwise until
"buLb" appears.
►When using bulb setting, camera must be held very
steady. Use a tripod and cable release.
► You can perform long-time exposure for approximately
7 hours with a fresh battery set.
63
Page 98

EXPOSURE COMPENSATION
Matrix Metering provides the main subject with correct expo
sure in virtually any lighting situation, without having to use
manual exposure compensation. But in Center-Weighted
Metering or Spot Metering, for situations where you want to
change compositions or for unusual situations such as
snowscapes, backlit subjects or when the main subject con
trasts sharply with the background, exposure compensation is
recommendecf.
Also, in Matrix Metering, "correct" exposure is a value based
on a combination of film sensitivity, aperture and shutter speed
necessary to produce a "technically correct” exposure result.
We often want to vary the exposure results to create different
versions of the same picture or put aeative emphasis on a
specific part of the picture. This is accomplished by using
exposure compensation.
Exposure compensation can be accomplished in either one or
a combination of the following ways.
• AE (Auto Exposure) Lock Lever
• Exposure Compensation Button
• Auto Exposure Bracketing
As the results can vary depending on conditions, you may
want to experiment with each method.
64
Page 99

AE (AUTO EXPOSURE) LOCK LEVER
In auto exposure mode with Center-Weighted or Spot Meter
ing, when you want to control exposure based on a particular
brightness area of the scene, use the AE-L (auto exposure
lock) lever, as follows.
1. Center main subject inside viev\rfinder’s 12mm circle for
Center-Weighted Metering and/or move in closer so the
circle is covered by the subject.
Page 100

2. Lightly press shutter release button, and confirm shutter
speed and aperture in viewfinder.
4. Recompose and shoot.
 Loading...