Shutter Speed Range: Shutter speeds as long as 30 seconds or as fast as 1/2000 Secs.
Minimum Aperture Lock: Certain more programmed auto or shutter priority auto exposure modes are to be fed through a Lock.
Weight: Design is of lightweight enabling the user to handle the equipment with ease.
Lens Compatibility: Can be used on AF Nikkor and AI-P lenses
Viewfinder: 12Mm-dia. central area which is rafted with micro prism collar & split image rangefinder, which is employed in a reflex viewfinder examination.
Tripod Socket: Tri-pod thread
Frequently Asked Questions
What type of battery does the Nikon N6000 use?
The type of battery used is a 6V lithium battery pack with the Nikon N6000 such as Duracell DL 223A, Panasonic CR-P2.
To change film advance modes, hold in the DRIVE button and spin the command dial to choose either single-frame or continuous shooting modes.
Which metering systems doorman the Nikon N6000?
The N6000 has Matrix Metering and Center-Weighted Metering metering and photometering systems.
Does the Nikon N6000 work with every Nikon lens?
The AF Nikkor and AI-P lenses can be fitted on to the N6000. Non - CPU lenses may restrict certain automatic features.
What is the method of exposure compensation adjustment?
Exposure compensation can be made using the exposure compensation button, which can be set to +/- 3 EV in 1/3 EV increments.
What should I do if I am warned of the aperture or shutter speed indicator?
If "HI" or "Lo" is blinking, it indicates high or low exposure: the exposure should be changed to a set value that will not allow the indicators to blink.
Does it allow for tripod fixing?
There is a tripod socket which enables the Nikon N6000 to be fitted onto tripods.
The settings shown here are basic settings for the easiest,
most
common
with a CPU (such as AF Nikkor or AI-P lenses). With
other lenses, Center-Weighted metering and AperturePriority auto exposure
For detailed information, see following pages.
For
film advance
For metering system See
For exposure control See
For flexible program See page
For exposure compensation
with button
For auto exposure bracketing
For flash photography
picture-taking situations using lenses
mode
are automatically selected.
mode
See page 25
pp
28 - 33
pp
34 - 49
38
See
pp
52 - 53
See
pp
54 - 58
See separate
instruction section
Page 17
Set
lens
to
its
(highest f-number marked
AF
Nikkor lenses).
With
AF
aperture
lens instruction manual)
minimum aperture
Nikkor
or
at
AI-P lenses, lock lens
its
minimum setting.
in
orange on
(See
Look through viewfinder while turning focusing ring until the two halves of the split
image rangefinder coincide perfectly
in the microprism gird appears sharp.
Out of focus
For
details about focusing, refer
to
form a single unbroken image and the image
In
focus
to
pp 26 -
27.
17
Page 18
If shutter speed indicator blinks - Picture blur
alert:
If
a selected shutter speed
picture blur may occur due to camera shake or subject
movement.
a tripod, or use accessory Nikon Speedlight.
To
avoid blur, hold camera very steady, use
is
1/(focallength)
or
slower,
Compose picture and lightly press shut-
re
lease button to turn meter on.
ter
;=1
:
c'
5 F
s.
6
Confirm exposure.
When exposure
and aperture indicators appear
viewfinder and on the
is
correct, shutter speed
LCD
in
panel.
the
18
If "HI" appears
Overexposure alert:
Overexposure may occur. Use a filter such as the
Nikon ND
If "Lo" blinks
Underexposure alert:
Underexposure may occur. Use a Nikon Speedlight.
If "
FEE"
setting error alert:
Lens
is
not set to smallest aperture setting and shutter
locks.
Set
in
the shutter speed position -
filter.
in
the shutter speed position -
blinks
in
the aperture position - Lens
lens to smallest aperture.
Page 19
REWINDING
FILM-------
~
Mr·::
I I
~
Ill!
"d
~ -~
.:-(36)
I'
-
Fully depress shutter release button to take picture. Camera
automatically advances film by one frame.
counter increases by one.
Shutter speed aperture indicators on the
inside viewfinder turn off approx. two
lease shutter and remove your finger from shutter
release button.
LCD
LCD
sec.
after you re-
panel's frame
panel and
Film advance stops automatically
press shutter release button, End and
panel blink reminding you to rewind film.
at
end of roll. Each time you
<:::1_
symbol on the
LCD
19
Page 20
35)
To
rewind film, while sliding film rewind lever in the direction of
arrow, press film rewind button
film rewind,
frame counter will count backwards until rewind
e
You
manner.
e
lf
camera stops during film rewind, replace battery without
opening camera back.
After installing battery, turn power switch
rewind by the same
(!) _ symbol appears on the
can rewind film before it reaches end
method
to
start film rewinding. During
as before.
LCD
panel, and
is
complete.
of
roll
in
on,
and restart film
the same
20
After rewind automatically stops, confirm frame counter shows
"E,"
and film installation symbol (
Open camera back and remove film cartridge.
!)
) blinks for a few seconds.
Page 21
CONTROLS
IN
DETAIL/
PHOTOGRAPHIC
TECHNIQUES
~~~----------------
21
Page 22
FILM SPEED
SETTING-----------------
FS.o
(
El
The N6000 offers two ways to set film speed - automatic film
speed setting for OX-coded film and manual film speed setting.
Each time you press the
button, film speed setting changes from auto/OX to manual,
or vice
versa.
dication for manual.
The
LCO
panel shows
ISO
button, while depressing the shift
IiJJ
for auto; there
is
no in-
USING
AUTOMATIC
SETTING
FOR
OX-CODED
FILM
SPEED
FILMS
22
Usable film speed range for OX-coded film
1. Slide power switch to
2. While depressing shift button, press
so
IiJJ
is
Camera automatically detects film speed
OX-coded film.
shown
ISO
[[1
f
.00
ON.
in
LCO
panel.
fi
lm speed (I
• After loading film, you can
confirm speed
ISO
button.
appear
viewfinder.
is ISO
25 to 5000.
(ISO
25 to 5000)
by
pressing
ISO
number will
in
LCD panel and
SO)
button
of
Page 23
If
"Err
,"
150
is
loaded. Set I
symbol and
Non-OX-coded film or film with an unacceptable
code
SO
manually.
OX
symbol are blinking:
OX
MANUAL FILM SPEED
SETIING
Usable range for manual film speed settings
1. Slide power switch to
ON.
is
ISO
2. While depressing shift button, press film speed
selected, camera gives priority to the manually set
n(1mber.
24
ISO
button, rotate command dial until
is
shown.
- 200 - 250 - 320 - 400 - 500 - 640 - 800 -
without film loaded, you can confirm film speed
ISO
- 20 - 25 - 32 - 40 - 50 - 64 - 80 - 100 -
button. Manually set
and
viewfinder.
but
as
follows:
ISO
number will appear
manual film speed setting
ISO
1000-
by
You
can modify exposure by intentionally setting film
speed to a value different from that of film in
example, with
step over exposure or set
exposure. After taking the picture, make sure to reset
film speed.
methods, see pp 50 -
is
ISO
100 film, set film speed
to
200
for
For
exposure compensation using other
58.
use.
to
one step under-
50 for one
For
Page 25
FILM ADVANCE MODE
SETTING---
-----
SINGLE-FRAME
ol
~
.Qjr-::
:2S
With film advance mode
button takes one picture and automatically advances film by
one frame.
<:l_
FS.b
(
SHOOTING
Il
at
~
-
----
,
fully depressing' shutter release
Nikon N6000 has three automatic film-advance modes.
To
switch film-advance mode, press and hold
and rotate command dial.
continuous low-speed shooting and
speed shooting appear consecutively.
~
for single-frame shooting,
[BH
DRIVE
button
for continuous high-
IBl
for
CONTINUOUS
SHOOTING
FS.b
Il
Shots are taken continuously as long as shutter release button
is
depressed. High- or low-speed continuous shooting can be
selected.
Shooting speed
mode
or
pack at normal temperature and a shu
1/125
sec. The slower the shutter speed, the slower the motor
speed.
approx.
is
approx. 2 fps (frames per second)
1.2
fps
in
IBl
mode - with a fresh battery
tt
er
speed faster than
in
IB
H
25
Page 26
FOCUSING----------------------------------------
1. 12mm-dia. central
area
2. Split-image range -
finder
3. Microprism color
4. Matte field
.
':' :25 F';.
oS
The type K focusing screen that comes with the N6000 has
three focusing aids:
A.
Split-image focusing
For
precise, pinpoint focusing of subjects with distinct
edges/contours, turn the focusing ring until the split-image
becomes whole.
B.
Microprism focusing
For
rapid focusing and for subjects with indistinct outlines,
turn focusing ring until the shimmering image becomes
sharp.
C.
Matte-field focusing
For
close-up photography
using a telephoto lens with a maximum aperture of approx .
1111
or
smaller, the split-image may darken.
ring until image
on
at
high magnification, or when
the matte field appears sharp.
Turn
focusing
The N6000 viewfinder covers approx. 92% of the image
area of the actual photograph so the actual picture
comes out larger than the image
that the picture comes out trimmed down
mounted slides or service-size prints from negatives .
When using a zoom lens:
For
maximum focusing accuracy, focus
longest focal length setting. The shallow depth of field
and large image scale
help ensure pinpoint focusing. Conversely, focusing
the shortest focal length setting and then zooming up
the longest focal length setting will magnify any slight
imprecision
pictures.
in
focusing and could result
in
the viewfinder. Note
in
the case
at
the lens'
at
the longest focal length setting
in
unsharp
of
at
to
26
Page 27
A. Split-image
focusing
B.
Microprism
focusing
c.
Matte-field
focusing
27
Page 28
EXPOSURE--------------------
EXPOSURE
The Nikon N6000 provides two types
ing and Center-Weighted Metering.
METERING
SYSTEMS
of
exposure metering systems - Matrix Meter-
--
----------
------
--
--
MATRIX METERING
This system is ideally suited for quick operation and for the
most dependable auto exposure contro
for manual me tering and flash exposure control operation
any Nikon TIL Speed light.
In Matrix Metering, the meter automatically provides the correct
exposure of the main subject
without requiring manual exposure compensation.
Metering
scene into
and scene contrast.
se
nsor determines scene brightness by dividing the
five
areas, then analyzing each area for brightness
in
l.
It
can also be used
virtually any lighting situation,
Th
e Matrix
wi
th
28
CENTER-WEIGHTED METERING
Choose Center-Weighted Metering when you want to base
exposure on
ll
y located subject. Selecting
tra
overrides Matrix Metering and concentrates 75% of the meter
sensitivity into the center of the viewfinder outlined by a 12mm
circle.
ei
ther auto
or
manual exposure control for a cen-
Center-W~ighted
Metering
's
Page 29
METERING SYSTEM SETTING
1. Slide main switch to
ON.
2. While pressing metering system button, rotate command
:: • .l
dial until your desired symbol -
:(.)~
for
Center-Weighted Metering appears in
for Matrix Metering
LCD
panel.
Matrix Metering
built-in
a lens without a built-in
metering system
In
either case,
ton, the
or
is
CPU
:: • .l
possible only with lenses that have a
(such
as
AF
Nikkor and AI-P lenses). When
CPU
is
automatically set to Center-Weighted.
if
you lightly press the shutter release but-
symbol blinks.
or no lens
is
used, the
29
Page 30
METERING SYSTEM SELECTION - WHEN
TO
MATRIX OR CENTER-WEIGHTED METERING
In
scenes with both very bright and very dark areas, these two
metering systems produce varying results.
For
example:
USE
Scene containing the
sun
A. Scene containing the
If
a scene contains strong highlights, such
bright reflections, Center-Weighted Metering renders the main
as
subject
value of darker parts
balanced exposure.
B.
Outdoor backlit subject
With Center-Weighted Metering, a backlit subject or scene with
people against a bright sky and/or clouds may lead to an underexposed shot. With Matrix Metering, however, the camera automatically gives more exposure to darker subjects to ensure a
balanced overall exposure.
C.
Front-lit subject against dark background
If
a brightly
background, Center-Weighted Metering places too much emphasis on the dark center of the picture.
is
correctly exposed, the main subject will be overexposed. Matrix
Metering, however, automatically integrates a dark background
with a bright subject to ensure the best overall exposure.
a silhouette. With Matrix Metering, however, the light
lit
off-center subject
sun
or scenes with high reflectivity
is
evaluated, resulting in an overall well-
is
positioned against a dark
as
the sun, snow or
So
although the background
30
Center-Weighted Meter ing
Page 31
Outdoor backlit subject
Matrix Metering
Front-lit subject
•
...
J
Matrix Metering
~.
~
-
Center-Weighted Metering
"-'
Center-Weighted Metering
31
Page 32
D.
Small dark subjects against a bright background
A subject significantly
ti
ons
pp
pp
pp
may
lock
50 -51
52 - 53
48 -49
ing sec
automatic exposure evaluation. For such subjects, switch to
Center-Weighted Metering and make exposure compensation with AE
in
Auto exposure
reading on the main subject'" in Manual exposure mode.
*
See
**
See
***
See
smaller than any of the Matrix Meter-
not be recognized and integrated into the
lever' or exposure compensation button"
mode
, or obtain correct exposure meter
Matrix
Metering
32
~
Center-Weighted
-
...,
Metering
'""'-
~
(with AE Lock)
Page 33
E.
Sunset scenes
If
you want to emphasize a dramatic sunset but don't want
Matrix Metering to lighten the scene for a dark foreground
subject, use Center-Weighted Metering with or without
exposure compensa
ti
on.
Matrix Metering
Center-Weighted Metering
33
Page 34
EXPOSURE
light
reaching the film
ture. The proper combination
results in
based upon the
operation of
The relationship between aperture and shutter
One change
tr
a
light of
for a scene
or
Se
want the shutter speed/aperture to be set automatica lly or
manually.
The Nikon N6000 offers five modes: four automatic exposure
control modes - Auto Multi-Program
grammed
a
Each exposure mode h
In Programmed auto exposure mode,
na
N6000's microcomputer, you can co ncentrate completely on
picture composi
without worrying about expos ur
th
ansmitted.
nd
double the lig
115.6
111000
at
lecting the exposure control mode means deciding if you
ut
o (.BJ) - in addition to Manual
ti
on of shutt
MODE
is
controlled by the shutter a
of
e correct expos ur
ISO
speed set for the film in use and the
th
e camera's exposure control syste
in
shutter speed e
For
exampl
e,
ht
of
a
is
115
nd
1/500
111000. Th
double the light of
at
118,
.6 and achi
shutter and aperture settings
e. The necessary settings will be
ith
er doubl
1/500 passes half the light
th
en we can also select 1/250 at f/11
eve the same exposure result
es
e aperture
1111.
If the correct exposure
(i:d), Normal-Pro-
(fj),
Shutter-Priority auto
as
its own advantages.
er speed and aperture is automatically set by the
ti
on and have greater opportunities to shoot,
(~),
and Aperture-Priority
(111)
mode.
as the optimum combi-
e.
m.
is
or
hal
118
passes ha
nd
as follows:
ves the light
as
ape
1/250
s.
r-
lf the
In Shutter-Priority auto exposure mode, you can manually set
shutter speed
with sharp, clear images using a fast shutter speed, or create
motion effects by choosing slower shutter speeds.
In
Aperture-Priority auto exposure mode, you can control dep
of field by varying the apertur
(smaller f-number) for shallower depth of
less distinct backgro und
f-numbe
In
Manual exposure mode,
ter speed and apertur
over- or underexposed photos.
as
desired. That
e.
s,
r)
for greater depth of field.
or choose a smaller aperture (larger
in
e, you can easily create intentionally
is,
you can freeze the action
You
can use a larger aperture
fi
eld to create softer,
addition to controlling both shut-
th
34
Page 35
ffiJ
125 F5.5
~
(!)_
,
..
~
• I
:::.~
+ •
.. ~ ..• -
ffiJ
125 F5.5
~
(!)_
(
(
IJ
IJ
EXPOSURE MODE SETTING
After turning power switch
rotate command dial. Exposure mode changes
sequence:
on,
while pressing MODE button,
in
the following
Auto Multi-Program
Shutter-
Pr
iority Auto
ffiJ
125
~
Aperture-Priority Auto
Correspondingl
while P
S,
F5.5
(:J
y, PM,
S,
A,
(for
A and M will appear inside viewfinder.
both Auto Multi-Program and Normal Program),
M or P will appear on the
Manual
Normal Progr
am
LCD
panel
35
Page 36
PROGRAMMED
The N6000 offers two programmed auto exposure modes:
Auto Multi-Program mode and Normal Program mode.
(PM
and P) AUTO
For Programmed auto
mode, use only lenses that have a built-
AF Nikkor or AI-P lenses. With other lense
is
mode
th
In
ton, exposure mode indicator blinks and
the
36
automatically set to Aperture-Priority auto and
e metering system to Center-Weighted.
this case, when you lightly press shutter release but-
LCD
panel.
or
Shutter-Priority auto exposure
in
CPU
such
s,
exposure
as
F-- appears on
Picture sharpness can vary with the shutter speed used. Different focal length lenses handle differently
speeds. The recommended slowest shutter speed to be used
with any lens when hand-holding the camera
(FL)
of the lens.
as
the slowest hand-held speed. Keep
1/30 sec.
free hand-held shooting.
The N6000's Auto Multi-Program varies the exposure program
lines according to the focal length and lens maximum aperture. The inclinations
duce the possibility
speeds. With Normal Program, you get a standard combination
of shutter speed and aperture.
For
example, with a 60mm lens, use 1/60 sec.
is
the lowest recommended shutter speed for blur-
of
lines
in
of
picture blur by avoiding slower shutter
the chart are designed to re-
at
slow shutter
IS 1/focal length
in
mind, however, that
Page 37
Program Charts
The
EV
(exposure
between N6000 Auto Mul
Follow either colored line to where
This shows the combination of aperture
ter
speed (horizontal line), which will automatically be seleced
at
each
EV
Auto
Multi-Program
value)
charts demonstrate the difference
ti
-Program and Normal Program.
brightness
With 50mm 1/
With 28mm 1/2.8
With Zoom 35-135mm 1/3.
With 500mm
level.
Chart
1.4
114
(ISO 100)
it
intersects a diagonal line.
(vertical
line) and shu
60
125
250
500
5-1
/4.5 at 100mm setting
1000
2000
Operation
in
programmed auto exposure mode
Operation for Auto Multi-Program and Normal Program are
in
performed
pp
16 -19
the same manner. See the BASIC SHOOTING on
.
t-
Normal
Program
---.-
---
Chart
With
111.4
112.8
lens
lens
With
With 1/4 lens
(ISO 100)
37
Page 38
FLEXIBLE
When you want to use a specific shutter speed or aperture
Programmed auto exposure mode, use the Flexible Program
function. Flexible Program enables you to temporarily change
an automatically set shutter speed/aperture combination in 1
EV
step, while maintaining the correct exposure.
PROGRAM
in
1. Lightly press shutter release button.
38
2. Tu
rn
command dial until desired shutter speed or aperture
value appears in viewfinder and on
When
program is shifted, exposure
•
in LCD panel and viewfinder.
• As soon as the display on LCD panel and viewfinder dis-
appears
Flexible Program is cancelled.
(i
.e.,
as
soon
as
meter is automatically turned off),
LCD
panel.
mode
indicator blinks
Page 39
SHUTTER-PRIORITY AUTO EXPOSURE MODE
Subject movement and your ability to hold the camera steady
will determine what shutter speed you should choose. Faster
speeds will generally produce sharper images.
effects
you may use slower speeds. Make your choice accord-
ingly. The N6000's computer automatically selects
aperture to match
sure. Shutter-Priority auto mode operates only with Nikon
lenses that have a built-in
th
e selected shutter speed for correct expo-
CPU (AF
Nikkor and AI-P Nikkor).
For
creative
th
e proper
At
a fast shutter speed
At
a slow shutter speed
39
Page 40
OPERATION IN SHUTTERPR
IORITY AUTO EXPOSURE
MODE
1. Set lens to its minimum aperture
setting (highest f-number).
With
AF
Nikkor and AI-P-Nikkor
lenses, lock lens aperture
mum
setting.
40
at
mini-
,-
.:.
2.
While pressing MODE button, rotate command dial until "S" appears on
panel and viewfinder.
:;
E'
S
c,
F
S.
:;
LCD
3. Remove finger from MODE button, and rotate command dial to select desired
Overexposure may occur. Select higher shutter speed or
NO
use Nikon
filter.
4. Confirm aperture value.
Camera selects correct aperture for
shutter speed selected.
If
meter has automatically turned
off and
LCO
turn meter on again by lightly
pressing shutter release button.
5.
Fully depress shutter release button
to take the picture.
indicators disappear,
If "Lo" blinks
Underexposure alert
in
the aperture position -
":
Underexposure may occur. Select slower shutter speed, or
use a Nikon Speedlight.
':
,.;.
1.+
...
0
..
..... '
••
' '.'
'.
'.' 1111
,-
..
If "
FEE
" blinks
in
the aperture position -
Lens setting error alert:
Lens
is
not set to smallest aperture setting and shutter
to
locks. Set lens
smallest aperture.
• Electronic analog display appears in both LCD panel and viewfinder to show
value difference from correct exposure.
41
Page 42
APERTURE-PRIORITY AUTO EXPOSURE MODE
Select the aperture based on how shallow or large you want
depth of field
ground and foreground sharper (good for scenic pictures)
while larger apertures will produce a shallower depth of field
(good for portraits).
shutter speed which
puter. When using
slower shutter speeds, remember as a rule of thumb that any
speed below 1/30
vent picture blur due
corresponding shutter speed, the easier
Adjust the selected aperture
conditions
to
be. Smaller apertures will make the back-
Your
selected aperture will determine the
is
automatically set by the camera's com-
the
smaller apertures with corresponding
sec.
may require the use of a tripod to pre-
to
camera shake. Also, the higher the
if
or
the specific effect you want.
the speed
it
is
to
is
not appropriate for
stop action.
42
At wide aperture
At small aperture
Page 43
OPERATION
PRIORITY
AUTO
MODE
IN
APERTURE-
EXPOSURE
,-,
;-,
1.
While pressing exposure MODE button, rotate command dial until
LCD
panel and viewfinder.
the
UP\'
appears on
!=:
:
c·
5 F
5.
:5
2. Remove finger from exposure mode setting bu
to
desired f-number by rotating lens aperture ring. .
lens
Aperture changes in the following sequence,
LCD
panel and viewfinder.
F1-F1.4-F2-F2.8-F4-F5
(Available apertures limited to those on lens in
.6-F8-F11-F16-F22-F32-F45-F64
tt
on and set
as
indicated
use.)
• An intermediate figure
lens' maximum aperture. Also, with zoom lenses, the maximum
1/6
EV
With
•
ture value on the LCD panel and viewfinder.
With
•
ture ring before rotating
in
(e.g.
F1.B, F3.3)
aperture for different focal length settings appears
steps.
lenses having
an AF Nikkor or AI-P
no
CPu,
"F--" appears instead
lens,
it.
displayed indicates a
of
aper-
make sure to unlock aper-
in
43
Page 44
3.
Confirm shutter speed,
Camera selects correct shutter speed
to
match your aperture setting,
If shutter speed indicator blinks - Picture blur alert:
A shutter speed of 1/FL
mum speed lor hand-held photography, but since not
everyone can hold a camera equally steady, this
guideline, The blinking shutter speed indication
warns you that the exposure conditions call lor
a speed
200mm lens, shutter speed indication blinks when automatically selected speed
justments to shutter/aperture il that speed
for the picture conditions,
01
is
generally accepted
1/FL
or
slower,
is
1/200 sec,
For
example, with a
or
slower. Make ad-
is
as
the miniis
just a
inappropriate
If
meter
is
and
turn meter on again by lightly
pressing shutter release button,
4.
Fully depress shutter release button
to
automatically turned off
LCD
indicators disappear,
take the picture,
44
If "HI" appears
Overexposure alert
Overexposure may occur. Select smaller aperture (larger
I-number)
If "Lo" blinks
Underexposure alert
Underexposure may occur. Select wider aperture (smaller
I-number),
• Electronic analog display appears both on the LCD panel and viewfinder to
show value difference from correct exposure,
in
the shutter speed position -
':
or
use ND
filter,
in
the shutter speed position -
':
or
use a Nikon Speedlight.
Page 45
MANUAL EXPOSURE MODE
Manual exposure control allows you to make both aperture
tt
and shu
mendation
exposure, but you may choose otherwise and modify exposure
settings for creative effects or special requirements.
er speed settings.
of
the camera's light meter for technically correct
You'l
l probably foll
ow the recom-
OPERATION
IN
MANUAL
EXPOSURE
,~,
: I
MODE
1. While pressing exposure mode button (MODE), rotate com-
LCD
mand dial until "M" appears on the
finder.
panel and view-
45
Page 46
2.
Remove finger form exposure mode button, set shutter
speed using command dial, and aperture using lens aperture ring.
t·:
bet
FE:
•
With
lenses that have
aperture value on the LCD panel and viewfinder.
+I . . ~ ..
,-
no
CPU,
"F--" appears instead
of
3. Adjust aperture and/or shutter speed until Electronic Analog
or
Display indicates "0"
With
an AF Nikkor
•
ture ring before rotating
the desired exposure.
or
AI-P lens, make sure to unlock aper-
it.
46
The electronic analog display range
increments
....
and ~ appears when exposure
of
1/3EV
is
+1EV
is
beyond ±1EV
to -1EV,
in
Page 47
+
~IIII
Over +1EV
+ ... 0
+ ... 0 .•• -
"--=-
Examples:
...
0
..•
-+ ... 0 .•• -
..•
-+
1111
+1EV
II
+1/3EV
±
...
-2/3EV
+ ... 0
Below
OEV
I
0 •.• -
III
•.•
IIII~
-1EV
)
If
meter
is
and LCD indicators disappear,
turn meter on again by lig
pressing shutter release button.
automatically turned off
htl
y
4. Fully depress shutter release button
to take the picture.
47
Page 48
TO
GET
READING
SUBJECT
If
you want to set desired exposure on a
particular subject, use Center-Weighted
Metering. With a subject outside the
12mm-dia. circle, or when there
sUbstantial difference
between the main subject and the background
use the following manner.
FOR A MAIN
OFF
(e.g.,
a strongly backlit subject),
EXPOSURE
METER
CENTER
in
brightness
is
a
48
1. Center main subject inside view-
finder's 12mm circle and/or move
closer
so
subject.
t·:
the circle
:
E'
5 F
is
covered by the
5.
E.
+I •. ~ ..
,-
2. Lightly press shutter release button.
in
3. Adjust shutter speed and aperture until electronic analog display shows desired
exposure.
Page 49
4. Recompose the picture and shoot.
BULB SETTING
r":
b~,
t b F
S.
:;
For
long-time exposure, use B (bulb) setting. On bulb setting,
shutter remains open as long as shutter release button
mains depressed. This setting can only be used
exposure mode.
"
bulb
" appears.
e With
shutter-priority auto causes
ter
eWhen using bulb setting, camera must be held very
steady.
You
e
10
hours with
To
select, rotate command dial clockwise until
th
e bulb setting, changing the exposure mode to
is
locked.
Use
a tripod and cable release.
can perform long-time exposure for approximately
a fresh battery.
"
bulb
" to blink, and shut-
in
Manual
re
-
49
Page 50
EXPOSURE
Matrix Metering provides the main subject with correct exposure in virtually any lighting situation, without having to use
manual exposure compensation. But
Metering, for situations where you want to change compositions or for unusual situations such as snowscapes, backlit
subjects or when the main subject contrasts sharply with the
background, exposure compensation
Also, in Matrix Metering, "correct" exposure
on a combination of film sensitivity, aperture and shutter speed
necessary to produce a "technically correct" exposure result.
We
often want to vary the exposure results
versions of the same picture or put creative emphasis on a
specific part of the picture. This
exposure compensation.
Exposure compensation can be accomplished
a combination of the following ways.
AE
(Auto Exposure) Lock
•
• Exposure Compensation Button
• Auto Exposure Bracketing
As the results can vary depending on conditions, you may
to
experiment with each method.
want
COMPENSATION
in
Center-Weighted
is
recommended.
to
is
accomplished by using
Lever
is
a value based
create different
in
either one
or
AE
(AUTO EXPOSURE) LOCK LEVER
In
auto exposure mode with Center-Weighted Metering, when
you want to control exposure based on a particular brightness
of
the scene, use the
area
1.
Center main subject inside viewfinder's 12mm circle and/or
in
move
closer so the circle
AE
lock
lever.
is
covered by the subject.
50
Page 51
2. Lightly press shutter release button, and confirm shutter
in
speed and aperture
viewfinder.
4. Recompose and shoot.
3. While lightly pressing shutter release button, slide
lever and hold
- While
does not blink for picture-blur alert, even if a slow shutter
speed
AE
lock lever
is
selected.
in.
is
held
in,
shutter speed indication
AE
lock
Page 52
EXPOSURE COMPENSATION BUTTON
If
you wish to modify the exposure control (from the
dard), use the Exposure Compensation system. Modification
-5EV
from
zero to resume normal operation.
to +5EV
is
possible. Be sure to reset the control to
ISO
stan-
• Once set, exposure compensation remains fixed until
reset.
Although II! symbol stays on to indicate that exposure
compensation remains, compensation value and elec-
tronic ana log disp lay disappear after you remove fin-
ger from
press button again .
• Exposure compensation can also be achieved by
setting film speed manually. See page
II! button.
To
confirm compensation value,
24.
While pressing exposure compensation
mand dial to set desired compensation value. The following
display appears on the
II!
symbol
LCD
panel and viewfinder:
II! button, rotate com-
Electronic analog display with indications
+1
EV
in
1/3
from - 1 to
(-
exposure
or +).
Compensation value (from
Confirm amount of exposure compensation.
steps: Confirm the direction of
-5
to
+5
EV
in
1/3 steps):
52
Page 53
Without compensation
r-----------~
Over +1EV
Examples:
>11+jii~
..
'-
,n
I.U
,-----------,
>11+'."1""'
nrl
!.I.LI
D.
D
+,
.. ~ ..
±
OEV
>11+·
··
~ii'
r,
-,
!.I. I
I-
~
+2EV compensation
+1EV
+1/3EV
-2/3EV
>11+·
·
·~iir;
,
I.
Below-1EV
-,
I
53
Page 54
AUTO EXPOSURE
BRACKETING
When you want a variety of exposures of
the same subject
sunset), use the N6000's auto exposure
bracketing func
five different exposures.
Auto exposure bracketing only operates
in connection with any of
sure control modes.
(e.g.,
when shooting a
ti
on to obtain three or
th
e auto expo-
54
Page 55
t-
•
fJ
'
1.
Set exposure mode to Programmed auto, Shutter-Priority
auto or Aperture-Priority auto.
In
Programmed auto exposure mode, both shutter speed
and aperture will be changed for your set compensation
value
in
stepped sequence. Aperture will be changed
Shutter-Priority auto; shutter speed will be changed
Aperture-Priority auto.
at
With exposure mode set
pensation will be made but
frames set will be taken. With Bulb setting, shutter
locked.
Manual, no exposure com-
as
many shots
as
number of
I
~
P
~.~n·
i'" ~~
L...J
",
liD
5
~
I ,
in
in
is
[ijH
2. While pressing shift button, push BKT button to set auto ex-
posure bracketing. BlinkingrnJ* and
the
* rnJ symbol remains after meter
FS.5
: -:
LCD
panel. Inside viewfinder, ~ symbol
blinking.
~
marks appear on
is
is
turned off, but stops
blinking.
55
Page 56
-,.-
.-,-,
:.,_'"
'-'.'
3.
While pressing BKT button, rotate command dial until your
desired combination of number of frames and compensation value appear on the
example, to shoot three frames with
tion, set 3F-0.?
Indication changes:
F-OO
Oust
1
3F-0.3
3F-0.?
3F-1.0
SF-0.3
SF-O.?
SF-1.0
after the BKT button
LCD
panel and viewfinder.
O.?
is
pressed)
degree compensa-
S6
For
4. Remove your finger from BKT button.
number of frames you set for auto exposure bracketing
appears instead
and ~ marks remain to show auto exposure bracketing
set.
Inside the viewfinder, ~ symbol blinks.
Now,
exposure
(Depending on compensation value you
viewfinder may show exposure indication different from that
shown before step
of
normal frame counter and blinking
is
compensated as you set
3).
On
the
set,
in
LCD
step
LCD
panel, the
3.
panel and
!TIll
is
Page 57
5. Depress shutter release button to release shutter and start
auto exposure bracketing operation.
Number of frames for auto exposure bracketing decreases
each time shot
For
example,
pensation value
underexposed, the second with
third with +0.7 overexposed - will be taken.
is
taken.
if
you have set number of frames and com-
as
3F-O.7,
three shots - the first with
out compensation and the
-0.7
With film advance mode set at
Camera takes three
time you depress shutter release button.
or
five shots
With film advance mode set at
Depressing shutt
three or
shutter
re
taken, the operation stop
depress and hold shutter release button again.
er
fi
ve
lease button before the set number
release button and holding
shots
as
set.
If
s.
S:
as
set - one shot each
CL
or
CH:
you remove your finger from
To take the remaining shots,
of
it
in
shots
triggers
is
57
Page 58
,:.
5
c.
F
5.
E.
6.
When all frames set are taken,
and ~ marks disappear showing
auto exposure bracketing operation
completed and automatica
cancelled.
58
( )
ll
y
ITIJj
~;~
e
To
cancel auto exposure bracketing before or during operation,
pressing shift button, push BKT button.
lf
you set auto exposure bracketing with self-timer function, auto exposure
e
bracketing will not be performed but one shot without exposure compensation will be taken.
e Auto exposure bracketing
output regardless
e
lf film reaches end of roll during shooting, auto exposure bracketing auto-
matically stops. After loading a new
resume operation.
e
if
auto exposure bracketing
tion on camera or SpeedJight, any compensation value can be added.
of
camera's exposure mode.
OFF'
•
1TIJj
and
>11
marks disappear.
in
flash photography compensates amount of flash
fi
lm roll
, push shutter release button
is
performed with another exposure compensa-
while
to
Page 59
SELF-TIMER
ONE-SHOT
SELF-TIMER
OPERATION-----------------
1. While pressing
timer duration appears on the
Timer duration can be selected between 2 to 30 seconds
one-second increments.
e2F-10
two-shot self-timer operation, see next page.
~
button, rotate command dial until desired
for two-shot self-timer appears next to 1F-30. For
LCD
panel.
2.
Compose picture and confirm focus and exposure.
in
3. While pressing
button.
Se
panel blinks.
speeds
lf-timer L
up,
~
button, fully depress shutter release
ED
starts blinking and ~ symbol on the
For
the final two seconds, the blinking
telling you
to
get
ready.
LCD
LED
59
Page 60
TWO-SHOT
SELF-TIMER
It
is
possible to take two consecutive self-timer pictures. .
1. While pressing self-timer 0 button, rotate command dial
counterclockwise until
LCD panel.
2F-1O
(next
to
1F-30) appears on the
2. Compose picture and confirm focus and exposure.
3.
While pressing 0 button, fully depress shutter release
button.
Self-timer
panel blinks.
The shutter is released for the first shot after approx.
and the second shot is taken 5 sec.
Two
telling you to get ready.
60
LED
starts blinking and 0 symbol on the LCD
seconds before each shot, the blinking
later.
LED
10
speeds
sec.,
up,
again.
• Exposure is locked when se
.
When
using any auto exposure mode, use eyepiece
cover DK-5 (provided) before setting self-timer
prevent stray light from entering the viewfinder and
affecting exposure.
• Regardless of
frame shooting is not performed (except for two-shot
self-timer operation).
• Bulb setting cannot be used for self-timer operation.
fi
lm advance mode setting, continuous-
lf
-timer operation starts.
to
Page 61
ACCESSORIES
61
Page 62
LENS
COMPATIBILlTV--------------
LENS COMPATIBILITY CHART
Programmed Shutter-Aperture-
auto
AF
Nikkor lenses (except
Nikkor lenses for
AI-P type Nikkor
AI- or AI-S-type Nikkor lenses (in-
cluding AI-modified Nikkor lenses)
Medical-Nikkor 120mm f/4 IF
Ref
lex Nikkor lenses X X
PC-Nikkor lenses X X
AI-
or AI-S-type Teleconverters X X
Bellows Focusing Attachment PB-6 X X
K Ring Set (K1-K5 rings)* X X
Auto Extension Rings
(PK-11,
11A,
*
K1
ring cannot
**
PK-1,
PK-2, PK-3
rings may damage
12,
ED
13
be
AF
F3AF)
500mm
1/4
IF
and PN-1
and PN-1 rings cannot be attached to the N600o.
1)**
attached to AF Nikkor lenses.
CPU
contacts. Use
0 0 0 0 0 0
0 0 0 0
X X
X
X X
PK-11A
priori
The
ring may damage
for AF-Nikkor lenses instead
o Compatible
X Incompatible
L';
1 Set shu
L';
2 Set preset ring, then use AE-Iock l
tt
er speed to 1
/60
sec. or slower.
ever
before shifting.
--
Exposure mode Metering system
ty
auto priority auto
0 0
X X
0
L';
0
L';
L';5
0 0
CPU
PK-11
ring cannot be attached to AF Nikkor lenses. Those
L';
3 Set preset ring, ihen determine exposure before shifting.
L';
4 Shutter should be released after exposure
stopping down PB-6.
L';
5 Stop-down exposure measurement will be performed.
2
4
contacts. Use
of
PK-11.
Manual Matrix
0 0
X
L';
1
0
L';
3
0
L';
4
L';
5
PK-11A
X
X
X
X
X
X
X
or
BR-6 instead.
Center-
Weighted
is
measured by
-
0
0
0
0
0
0
0
0
62
Page 63
e The following Nikkor lenses cannot be attached to the
N6000. (Camera body or lens may be damaged).
e Non-AI lenses
e Fisheye
e Fisheye OP
e
e
e
e
e
e
e Reflex 1000mm
e Reflex
eThe
6mm
f15.6
10mm
200-600mm
ED
180-600mm
ED
360-1200mm
400mm
f15.6
PC
28mm
PC
35mm
2000mm
115.6
fl9.5 (No. 280001
118
(No.
174041
1/11
(No. 174031 to 174127)
and
600mm
114
(No. 180900 or smaller)
fl2.8
(No.
1111(No. 142361
1111
851001
(No.
200111
1/5
to 906200)
to
301922)
to 174180)
.6 with Focusing Unit
to 143000)
to 200310)
following teleconverter/lens cannot be used with
AU-1
the N6000. (Correct exposure may not be obtained
using these accessories).
AF
Teleconverter TC-16/TC-16A
e
e
AF
Nikkor
80mm
e AF Nikkor
200mm
112.8
113.5
63
Page 64
ACCESSORIES--------------------------------------
OPTIONAL
Nikon Speedlights
With these Speed lights, N6000 provides automatic balanced
fill-flash.
background illumination l
addition, manual flash output l
rear-curtain slow sync are also possib l
SPEEDLIGHTS
S8-24/S8-23/S8-22/S8
You
can brighten shadows and balance subject and
eve
ls without compl
eve
l adjustment, front-curtain/
e.
-20
ex
calculations. In
64
88-24
88-22
88-23
88
-20
Page 65
CLOSE-UP ACCESSORIES
For
nature lovers, scientists, even general use, close-up photography provides the means to see
deta
il
s.
The following are availab le for making your close-up
photography even closer than the distance index engraved on
your lens:
These convenient, easy-to-use close-up attachment lenses
screw directly into the front thread of the lens and magnify
the image.
Numbers
length up to 60mm. 3T and 4T work best with lenses from
85mm
210mm. Numbers 5T and 6T have a front attachment size of
62mm
For
the closer you can focus.
focal length, the greater the reproduction ratio you can obtain.
0,
1 and 2 are recommended for lenses with a focal
to 200mm; 5T and 6T with lenses from
while the rest are designed for 52mm.
close-up attachment lenses, the higher the lens number,
For
th
e world
in all
its
smaller
70mm
to
the prime lens, the longer the
e
PK
rings do not use lens' electronic contacts. All functions
related to those contacts are inoperable when using these
rings.
Auto Extension Rings
Compact and lightweight, Nikon Auto Extension Rings offer a
wide range of reproduction ratios. Models include the
PK-12,
PK-13
and
PN-11
re
layed via the
is
use is Aperture-Priority auto or Manual.
. Because information on lens aperture
PK
ring to the camera, the exposure mode to
PK-11A,
Caution:
ePK-ll,
BR-4,
and
Kl
Use
lenses.
e
K2
ring and non-AI rings (such as
rings cannot be used with AF-Nikkor
PK-IIA and BR-6 instead.
PK-l,
PK-2,
PK-3
and PN-l)
cannot be used with N600o.
Close-Up Attachment Lenses
Auto Extension Rings
65
Page 66
Nikon Bellows Attachment PB-6
Mounts between the N6000 and lens for close-up and macro
photography.
duc
tion ratios from 1 : 1.1 up to 4: 1 with a 50mm lens mounted
normally. The lens can also be moun ted
aberration correction
The P8-6 has a stop-down lever
metering. Usable exposure modes are Aperture-Priority auto
and Manual.
-
When
position.
-
Use
using PB-6 with the N600o.
- PB-6 does
related to those contacts are inoperable when using the
close-up photography, depth of field
shallow. Thus, you must stop lens aperture down
much
as
focus.
e lmage magnification
movement during shooting will cause a blurred image.
To
the shutter.
possible to get the greatest area of sharp
is
so high that even the slightest
avoid this, use tripod with a cable release
is
generally
to
activate
as
VI
EWING
Eyepiece correcti
To
correct both near- and farsightedness, nine lenses are available from
from the dioptry of both the finder and the correction lens.
Eyepiece Magnifier OG-2
Provides
image with Eyepiece Adapter. Eyesight adjustment provided.
Useful for critical focusing
Nikon Eyepiece Adapter
Lets
you attach the OG-2 to the eyepiece.
ACCESSORIES
on
lenses
-5
to
+3
diopter values. These values are derived
2x
magnification of the central portion of the finder
in
close-up photography.
ec
e Correction Lenses
Eyepi
OG-2
Eyepiece
Ad
apter
67
Page 68
OTHER
Lens Hoods
These are recommended to prevent stray light from entering
the lens and causing ghost images and flare. Four types are
available to match various Nikon/Nikkor lenses: snap-on,
screw-in, telescopic (already incorporated into the lens), and
slip-on.
ACCESSORIES
Filters
Nikon offers a wide selection of filters of various sizes and
to
meet the needs
types
raphy. These filters work best with Nikon/Nikkor lenses. They
are also useful for protecting the front of the lens, and their
optical quality compliments any Nikkor optic.
of
color and black-and-white photog-
68
Lens Hood
00
0000
000
-
Filters
Page 69
Nikon Filters
Type
For Both Color and
Bla
ck-a
nd-White Film
For Black-and-White
Film
For Both Co lor and
Bl
ack-and-White Film
For
Color
Film
) indicates Increase
- For lens protection the L37C
- Do not u
- When shoo ting a backlit subject
se
occu
r.
Be especially caref
rt
focal-length len
sho
fr
ame, a ghost image
in the
filter.
In
thi
s case, remove
Skylight
Ultraviolet
Ultraviolet
Light Y44 1.5
Yellow
Medium Y48
Deep
Orange
Red
Light XO 2
Deep
Soft filters
Circular Polarizing C-PL 2- 4
Neutral Density
Light
Amber
Deep
Light
Blue Medium
Deep
In
flstop.
more than one filter at a time, or vig netting m
is
ul
when using
ses.
is likely to result when using a
filter.
Filler
designa-
tion
L1BC
L37C
L39 1
Y52
056
R60 8
Xl
No
. 1 1
No. 2 1
ND2X
ND4X 4 (2)
ND8X
ND400X
A2
A12
82
88
B12
recommended.
filters together with
or
if
there
is
Filter
factor
(1/2)
(2/3)
(1)
2
(1-5/6)
(3)
(1)
(2-1/3)
2.2
Tungsten
1
1
1.2 (1/3)
1.4 (1/2)
5
1.7 (2/3
3.5
(1-2)
2
(1)
8 (3)
400 (8.6)
1.2 (1/3)
2
(1)
1.2
(1/3)
1.6
(2/3)
(1-1
/6)
ay
Daylight
1.7
3.5
5
a bright source
Screw-in
type
(mm)
82
122 160
39 52 62
light
• • • • •
• • • • • • • • •
1
2
(1)
(2-1/3)
(1-5/6)
• •
•
• • • •
• • •
• • • • •
• • • • • • • •
)
• Green
•
• •
• • •
• •
•
• •
• •
•
• • •
•
•
• •
• • •
•
• •
• • •
- When using a filter requi
th
e 056, R60,
as
altered by the filter
e,
use Center-Weighted metering.
sur
- When using R60 under tungsten lig
value by one f/stop more than that indicated by the exposure
meter.
72
•
•
77
NO
's
95
• • • •
•
rin
g exposure co mpensation such
filter,
etc., Matrix Meter performance
affect on contrast; to get correct expo-
Drop-in
type
(Series
ht
, increase the exposure
Bayonet-
mount
type
IX)
•
• •
•
•
is
69
Page 70
Semi-Soft
Two
Nikkor 35-70mm
AF Zoom-Nikkor 35-135mm
camera
types are available: the CF-45 for use with AF Zoom-
Clean viewfinder eyepiece and
panel with a soft, clean cloth. Do not
use liquid cleaners.
72
LCD
2. Never touch shutter curtains.
8.
Clean glass surfaces such as the
lens with a blower brush; avoid using
lens tissue
remove dirt and smudges, use soft
lens tissue slightly moistened with
lens cleaner. Wipe in a spiral motion
as
much
as
possible.
3. Never touch
with blower brush.
from center to periphery being careful
not to leave traces.
Caution!
Be very careful when using a spray
can-type blower.
contact with the camera or lens,
seriously damage the equipment. The
can should be placed on a table and
the lens should be passed through the
air jet no closer than about 30cm (20
inches) from the air nozzle. Never invert,
or
shake
To
OX
contacts. Keep clean
If
the can comes into
move the can when using
it
could
it.
Page 73
4. Do not leave camera
in
a hot place.
5.
Keep camera away from water or
moisture. When using camera near
water, guard against splashes, especially salt water spray.
6.
If
camera malfunctions, take
diately to an authorized Nikon dealer
or
service center.
it
imme-
9. Do not lubricate the camera.
10. Store camera
away from naphthalene or camphor
(moth repellents).
ronment, store camera inside a
vinyl bag with a desiccant to keep
out dust, moisture and
in
a cool, dry place
In
a humid envi-
salt.
Note, however, that storing the
leather case in a vinyl bag may
cause leather to deteriorate.
73
Page 74
NOTES
ON
BATTERIES--------
1. When not using camera for a long
remove
period,
3.
When replacing battery, be sure to
use fresh battery.
battery.
74
2. Battery power drains off in extremely
cold temperatures - make sure bat-
is
new and keep camera body
tery
wrapped in something warm.
4. Do not throw used batteries into
a fire.
in
another
15
in
ac-
This device complies with Part
of the FCC
subject to the following two conditions:
cause harmful interference, and
(2)
terference received, including interference that may cause undesired
operation.
"This equipment has been tested
and found to comply with the limits
for a Class B digital device
cordance with the specifications
set forth
Rules.
interference
reception which can be determined
by turning the equipment on and
off,
location and/or
outlet different from that used by
the
Rules.
Operation i,s
(1)
This device may not
this device must accept any in-
in
Part
15
of
If
this equipment does cause
to
use the equipment
the FCC
radio or television
utilize
an electrical
receiver."
Page 75
SPECIFICATIONS-
----
----------
-----
Type of camera
Picture format
Lens mount
Lens
Exposure metering
Metering range
Exposure meter
Exposure modes
Programmed auto
exposure control
Shutter-priority auto
exposure control
Aperture-priority
auto exposure
control
Integral-motor 35mm single-lens
reflex
36mm
24mm x
format)
Nikon F mount
Nikkor lenses having
AI-S-type Nikkor lenses', AI-Nikkor
lenses' and AI-modified Nikkor
lenses'
'With limitation. See chart on page 62.
Two
types of exposure metering systems - Matrix metering and CenterWeighted metering
EV
0 to
lens
Activated by powering the camera on
or by lightly pressing shutter release
button; stays on for approx.
after lifting finger from button
Programmed auto
Priority auto
(A)
and Manual
Both shutter speed and aperture are
se
t automatically; Flexible Program in
EV
one
Aperture automatica
match manually set shu
Shutter speed automatically selected
to
match manually selected aperture
(standard 35mm film
CPU
contacts,
EV
19
at
ISO
100 with
(P
M, P), Shutter-
(S),
Aperture-Priority auto
(M)
modes
step increments possible
ll
y selected to
16
tt
er speed
fl1.4
sec.
Manual exposure
control
Exposure
compensation
Auto exposure lock
Auto exposure
bracketing
Shutter
Shutter release
Shutter
speeds
Viewfinder
Eyepoint
Eyepiece cover
Both aperture and shutter speed are
set manually
Possible using exposure compensation button within
1/3EV steps
Available by sliding
while the meter
fr
ames can be taken of the
3 or 5
same subject using a variety of exposures (with compen
0.3,0
.7 or 1
Electromagnetically con
travel focal-plane shutter
Electromagnetic type
Lithium niobate osci
speeds from 1/2000 to 30
less in Programmed auto and Aperture-Priority auto exposure modes;
EV
steps in Shutter-Priority auto
one
and Manual exposure modes; Electromagnetically contro
at
B setting
eyeleve
Fixed
eyepoint type; 0.75X magnification
with 50mm lens
coverage
Approx. 18mm
Model DK-5 (provided) prevents stray
light from entering viewfinder
±5EV
range in
the AE
is
on
EV
between each frame)
l pentaprism high-
at
lock lever
sa
tion degree of
troll
ed vertical-
ll
ator-controlled
.sec.;
ll
ed long exposure
infinity; 92% frame
step-
75
Page 76
Focusing screen
Film speed range
Film speed setting
Self-timer
Reflex mirro r
Flasll sync control
Flash
synchronizati
on
Fixed Nikon
central split-image rangefinder circl
microprism collar and matte/Fresnel
outer field; 12mm-dia. reference circle
denotes Center-Weighted metering
area
ISO 25 to ISO 5000 for OX-coded
ISO 6 to I
Auto for OX-coded films and manual
setting availab le
Electronically controlled; timer duration can be selected between 2 to 30
sec. in one sec. increments; blinking
LED
two-shot
cancel
Automatic, instant-return type
Normal sync, slow sync and rear-
curtain sync provided
In Programmed auto or Aperture-
Priority auto shutter operates 1/125 to
1/60 sec. {or 1/(focal length)
lens focal length less than
normal sync or 1/125 to 30
slow sync; in Shutter-Priority auto or
Manual exposure mode, shutter fires
at
speed
to 1/2000 sec., shutter
se
t to
Type
K screen with
SO
6400 for manual setting
indicates self-timer operation;
se
lf-timer
is
at
1/125
any time
set,
sec.
possible; can
in
use
60mml
sec.
and when set from 1/250
is
automatically
e,
fi
lm;
at
in
in
Automatic
Balanced
Fill-Flash
Manual flash light
output
compensation
Aash ready-light
Accessory shoe
Film loading
Film advance
Possible with Nikon-dedicated Speedlights such as SB-24, SB-23, S8-22,
S8-20, 8B-18 and S8-168
Can be controlled from
in
1/3 step increments
Viewfinder
dedicated Speed light
blinks to alert poor camera/speedlight
connection or insufficient light for
correct exposure
Standard ISO-type hot-shoe contact;
ready-light con t
monitor contact
Film automatica
frame when shutter release button
depressed once
In S (Single-frame) shooting mode,
fi
lm automatically advances one frame
when shutter is released;
tinuous High)
shooting mode, shots are taken as
long
pressed;
is
approx.
1.2fps
LED
act, TIL flash contact,
or
as
shutter release button
in
CH
mode, shooting speed
2.Ofps,
+1EV
to
-3EV
lights up when Nikon-
is
ready to fire;
ll
y advances to first
in
CL
(Continuous
and in
CL,
CH
(Con-
Low)
is
de-
approx.
is
76
Page 77
Number of film rolls per fresh battery·
at
20°C
(68°F)
With 36-exposure
film rolls
With 24-exposure
film rolls
*At 11125
sec.
or
Frame counter
Film rewind
Camera back
Power source
Checking battery
power
approx.140 approx. 80
approx.210
faster shutter speed
Additive type; counts back while film
rewinding
Automatically rewinds by sliding film
rewind lever while pressing film rewind
button; approx. 25
sure film roll or
sure film
when film
Hinged back; unchangeab le
6V
lithium battery pack (Duracell DL-
223NPanasonic CR-P2
Battery power is sufficient
speed and aperture indications appear
LCD
on the
turning camera on or by lightly pressing shutter release button, and remain
on for approx.
moved from the button; battery power
is
insufficient
off immediately after
from the button; if
17
roll; stops automatically
is
rewound
panel and viewfinder by
16
if
these indications turn
at
-10°C
approx. 120
sec.
sec.
per 24-expo-
sec.
after finger
fi
nger
LCD
(WF)
per 36-expo-
or
equivalent)
if
shutter
is
is
removed
blinks and
shutter does not operate, batteries are
exhausted
or
improperly loaded
Dimensions (WxHxD) 154.5 x 96 x 65mm
Weight Approx. 565g
battery pack)
All specifications apply when using fresh lithium battery
at normal temperature (20°C
Specifications and designs are subject to change without
is
notice.
re-
or
68°F).
or
19.9
or
6.1
oz.
(without
x 3.8 x 2.6 in.
pack
77
Page 78
GLOSSARV--------
--
--------
----
--------
----
----
---
Balanced fill-flash operation
A method of flash photography which keeps flash brightness
in
balance with the ambient light. N6000 provides automatic
balanced fill-flash operation with Nikon-dedicated
trolled Speedlights.
Center-Weighted metering
An
SLR
light meter, invented by Nikon, which concentrates its
sensitivity on the center portion of the camera's viewing areas.
CPU
Central Processing
trols equipment functions.
AF Nikkor and AI-P-Nikkor lenses have a built-in
Depth of field
The zone of acceptable sharpness
subject on which the lens is focused.
OX
code
Film information code printed on the film cartridge. The N6000,
at
auto film speed setting mode, automatically senses the
set
fi
lm speed (I
loaded.
Unit.
The electronic component which con-
in
front of and behind the
SO
25 to 5000) of OX-coded film the instant
TIL
CPU.
con-
it
is
EV
Exposure Val
nations of shutter speed and aperture that give the same exposure effect when the scene brightness and
same.
At
ISO
ue.
A number representing the available combi-
ISO
remain the
100,
the combination of a one-second shutter speed
78
and an aperture of
The camera's meter may be used only within
exposure meter.
ing range is from
Exposure compensation
Exposure compensation for available light
changing shutter speed and/or aperture via auto exposure
ever,
lock l
bracketing.
In flash photography
exposure compensation
amount 6f flash light output.
Exposure compensation made on camera affects both foreground subject and backgro
amount affects only foreground.
Exposure control
Programmed auto: Camera controls both shutter speed and
aperture for co
ri
Shutter-p
chooses aperture for correct exposure.
Aperture-priority aut
chooses shutter speed for correct exposure.
Manual:
meter's recommendations for correct exposure.
ority auto: User selects shutter speed and camera
User
111.4
is
defined
as
EV1
.
EV
For
example, with the N6000, exposure meter-
EVO-EV19
exposure compensation button
rr
ect exposure.
select both shutter speed and aperture with the
at
ISO
100 with
wi
th a Nikon-dedicated
is
also performed by varying the
un
d while varying flash output
o:
User selects aperture and camera
range of the
111.4
lens.
is
performed by
or
auto exposure
TIL
Speed light,
Page 79
Fill-flash
A method of flash photography which combines flash illumination and ambient
balance the two types of illumination.
li
ght, but does not necessarily attempt to
Flash synchronization
The timing
of the camera's shu
Normal Sync which fires the flash
and Rear Sync which fires the flash
of
the flash
so
it
fires coincident with the operation
tt
er.
There are two types of synchronization:
at the start of the exposure,
at
the end of the exposure.
LCD
Liquid Crystal Display.
top of camera body and
For
Manual flash
Flash outp
power vari
mode. Some Speed
selectable manual output
provide full output only.
ut
is
fixed in manual flash mode, while flash output
es
according to selected aperture
li
ghts including SB-20 and SB-24 provide
the N6000, used on the panel on
in
side viewfinder.
in
auto flash
(full, 1/2, 1/
4,
1/S, 1/16,
etc.) and some
f-number
Number which indicates brightness of film plane image. Increasing/decreasing f-number
aperture. The f-number series
S, 11, 16,
number
1/2; moving to nearest lower number doubles
22,
(i.e.,
32,
etc.
Changing one step to the next larger
from
111
1 to
is
opening/stopping down lens
is
equivalent to
1116)
decreases image brightness by
1.4,
th
e brightness.
2, 2.S, 4,
5.6,
Guide number
The number given to a flash bulb
its
indicate
or
feet,
Guide numbers quoted assuming a relatively efficie
surrounds the flash sour
150
The international standard for representing film sensitivity
(speed with which
greater the sensitivity, and vice versa. A film speed of ISO 200
is
twice
power. A guide number may be quoted
and depends on the speed of the film being used.
ce,
film speed
it
reacts to light
as
fast
as
ISO
100,
or
electronic flash unit to
e.g.,
an average-sized room.
).
The high er the num
and half the speed of I
in
nt refl
SO
meters
ector
ber,
400 film.
Matrix metering system
An
advanced camera lig
segment sensor and computer; available
F-601
/N6006, F-601M/N6000,
is
versin
models. Matrix metering
used with the Nikon F401/N4004 and F401s/N4004s
ht
metering system using a
F4
and
is
an exclusive Nikon feature.
in
F-S01/NSOOS.
Non-TTL auto flash
A sensor measures illumination without viewing through
camera's
lens.
5LR
Single Lens Reflex. A type
through the camera's lens as you view through the camera
finder. Other camera functions, such
flash contro
the
l, also
of
camera in which you look
as
operate through the camera's l
light metering and
Nikon S
ens.
mUlti
LR
models
A basic
-
79
Page 80
TTL
Through-The-Lens. Most
which measure light after
feature that enables exposure readings to be taken from the
actual image about to be recorded on film, whatever the lens'
angle of view and regardless of whether a filter
SLR
cameras have built-in meters
it
has passed through the lens, a
is
used.
TTL auto flash
The camera's light sensor measures flash light,
the subject on the film and shuts off t
ment indicates correct exposure. Because the sensor that controls the flash receives light through the l
can be used for bounce photography, fill-in flash, multiple flash
photography,
that you can use a wide range
ensuring correct exposure.
etc.
An
additional advantage of
he
of
aperture settings, while
as refl
TIL
TIL
ected by
auto flash
auto flash
flash when measure-
ens,
is
80
In
certain cases, due
battery, the N6000's microcomputer may turn the camera
off,
even with fresh, properly installed battery. For the
same reason, film may not advance properly.
of these cases, to resume operation, simply turn the
OFF
power
install again.
Nikon cannot be held responsible for any malfunction
resulting from the use of the camera other than
specified in this manual.
and turn ON again, or remove battery and
to
static electricity
or
poorly loaded
In
each
as
Page 81
WARNING
INDICATIONS-----
-----
------
-
,
I I I I
5J~
Mr.,
L~
([l
IeS
<::l_(
~
" " I
• M
::.
1
~F
ISO
/
([lE ••
-
~lle
~(
5J~
M F.'
L~
([l
lAS
~-<::l
.:.
~~
M F.'
ILl
,-
mEnd-
§' -
<::l
':
I I I
S.
F
I
FS.o
(
(35)
LCD panel ShuHer Cause and remedy
~
-
All
indicators shown blink
-
Lo
cks Battery power
battery pack.
is
insufficient. Replace with a fresh
O :
:J
-
I '
Err, ISO and
OX
marks blink
Locks
Non-DX-coded film or film with an unacceptable
code
is
loaded .
Set
manually to the correct setting.
:J
<::l_
blinks
Locks
Film
is
not correctly positioned. Reload film.
E)
End
and
<::l_
blink
Lo
cks
Film' reach
es
end of roll. Rewind film.
I
DX
81
Page 82
&i
. [.] -
rn
:25
~
~
<:l_
F-
LCD panel
t·::
blinks Can be
-
[
n
Shutter
released
Cause
and
remedy
You
set Matrix metering though a lens without
attached. Metering system
Center-Weighted metering.
is
automatically set
CPU
to
j
is
J
M
~
I~
rn
l
S
<:l_
- 30-
~
/
~
~~
rn
~ /()~[
82
PM
appears
n
Shutter speed indicator blinks Can be Automatically selected shutter speed
in
aperture-priority auto exposu
F3.8
mode
n
, P
or
5 blink and F--
programmed auto or released
re
Can be
released
You
set programmed auto or shutter-priority auto
exposure mode though a lens without
attached. Exposure mode
aperture-priority auto.
or slower and picture blur may occur.
avoid camera shake, or use a Nikon Speedlight.
is
automatically set to
CPU
is
is
1/(focal length)
Use
a tripod to
Page 83
LCD panel Shutter
cause and remedy
1
5J
~
M F.'
ffiJ
Ci O
._
~
M [.; ,
-l 0-
~
L~
-
(!)~(
F22
(
:J
F3.B
(
:J
,
I"
FE
E
I
II
~
5l
ffiJ
~ '~~
5J
ffiJ
~
~~,/
rn:r
bul~-
~
'e..!-(
:J
HI
appears in auto
~
r.l
_
~
60
ffiJ
(!)-
~
~
[O
.:1
[.~
•
ffiJ
250
~
FEE
shutter-priority auto exposure mode
bulb
- l
(!)_
blinks in programmed auto or Locks
blinks
exposure mode released
1-1:
D
( :
lo
blinks
in
~"~ii,
o
~
( ' :}
exposu
auto Can be
re
mode released
Can be Overexposure may occur.
Underexposure may occur.
Lens
is
not set to smallest aperture setting.
Set lens to smallest aperture.
Bulb
is
Locks
set in shutter-priority auto exposure
mode. Set shutter speed to proper one
exposure mode to manual.
or
set
83
Page 84
No reproduction in any form of th
whole
or
in part (except for brief quotation in critical
articles or reviews),
authorization from NIKON CORPORATION.
may
be
is
made
manuat, in
without written
Nikon
NIKON
FUJI
BLDG., 2-3, MARUNOUCHI 3-CHOME, CHIYODA-KU, TOKYO
PHONE:
CORPORATION
81
-3-
214-5311
TELEX: J22601 (NIKON) FAX:
81
-3-201-5856
100
, JAPAN
Printed
in
Japan 9&010-A004
Page 85
IF
"Err"
BLINKS
ON
THE LCD PANEL:
During
If the camera detects a malfunction with the film transport function,
film advance stops and
occurs, remove your finger from the shutter release button, then fully
depress the shutter release button and confirm that
When you
If the camera detects a malfunction, Err blinks
When this occurs, remove your finger from the button, then try to
rewind film again.
film
advance
press
film
Err blinks
rewind
in
the
button
LCD
panel. When this
to
rewind
in
the
Err disappears.
film
LCD
panel.
Loading...
+ hidden pages
You need points to download manuals.
1 point = 1 manual.
You can buy points or you can get point for every manual you upload.


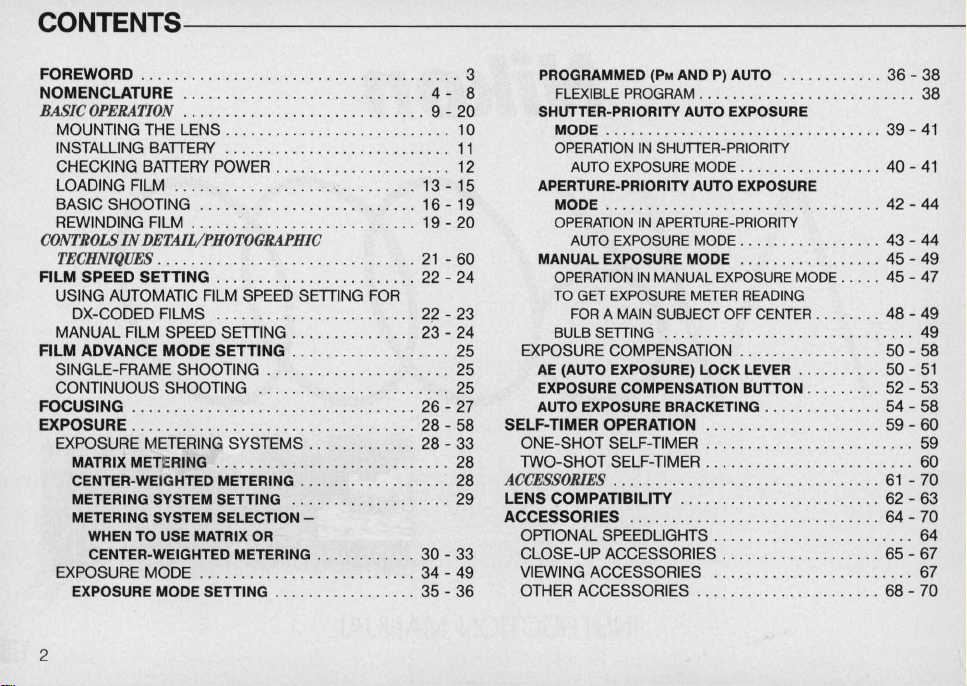
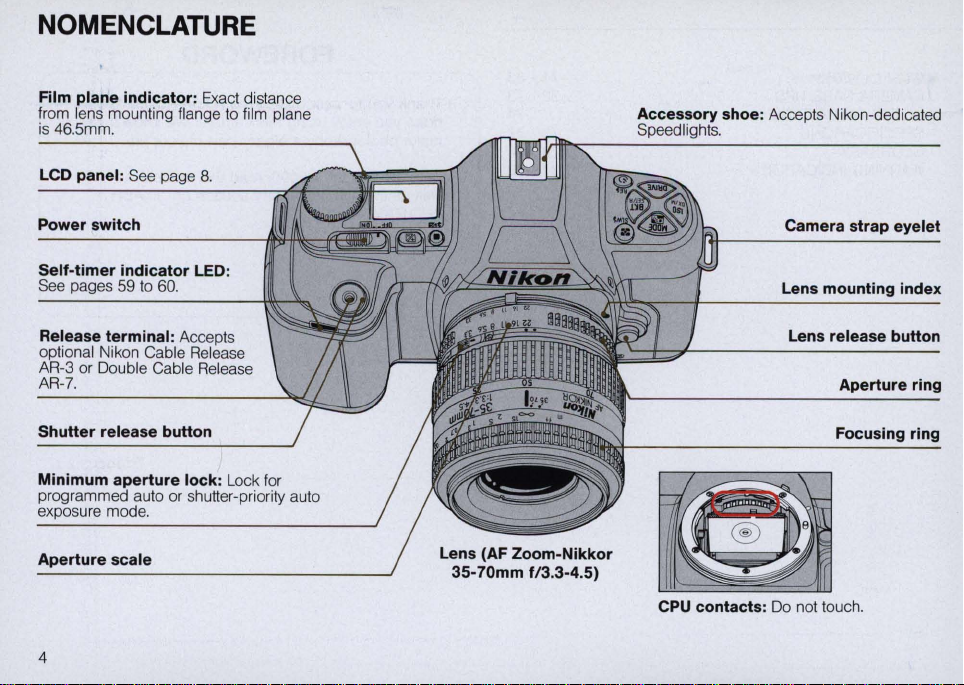
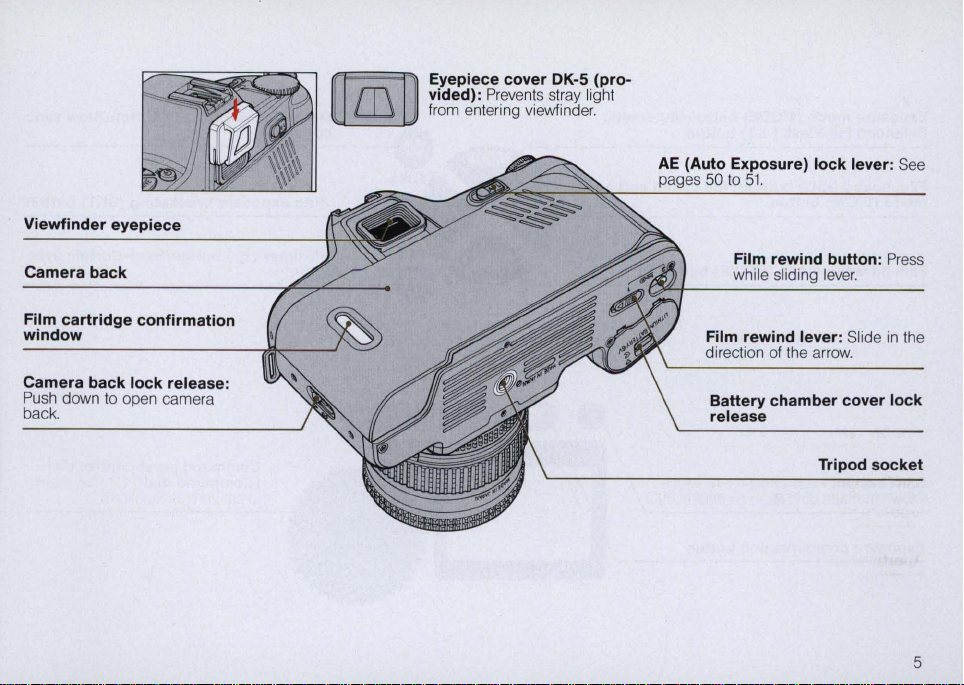
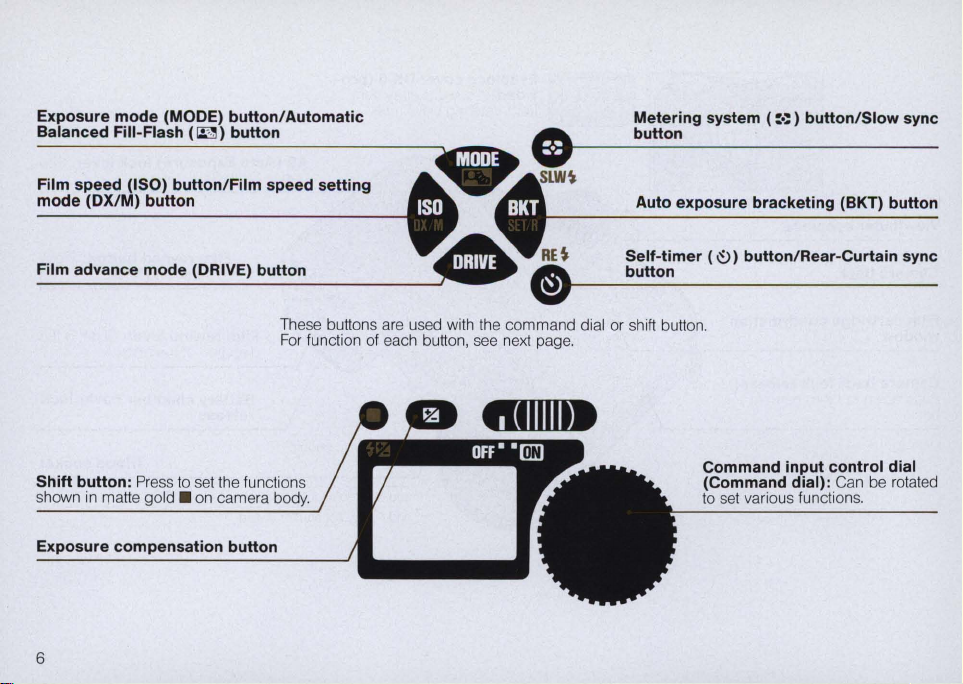
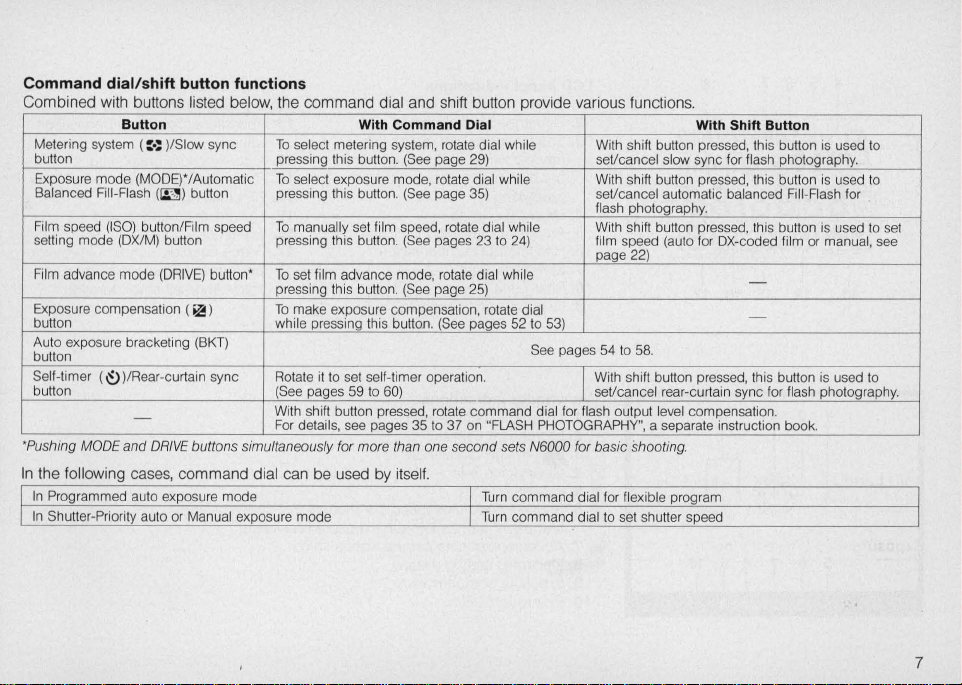
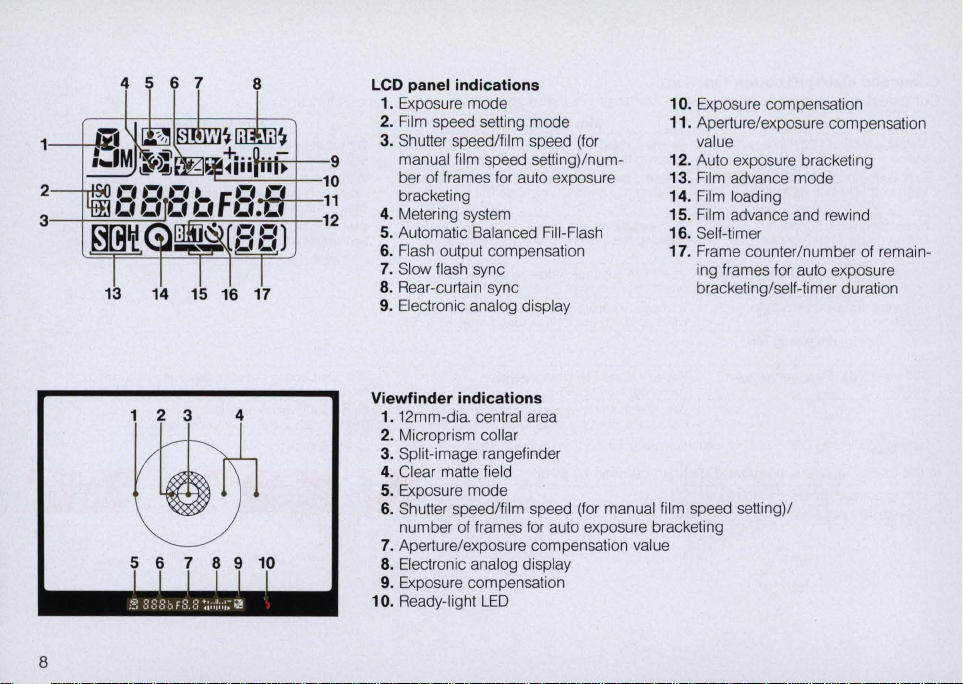

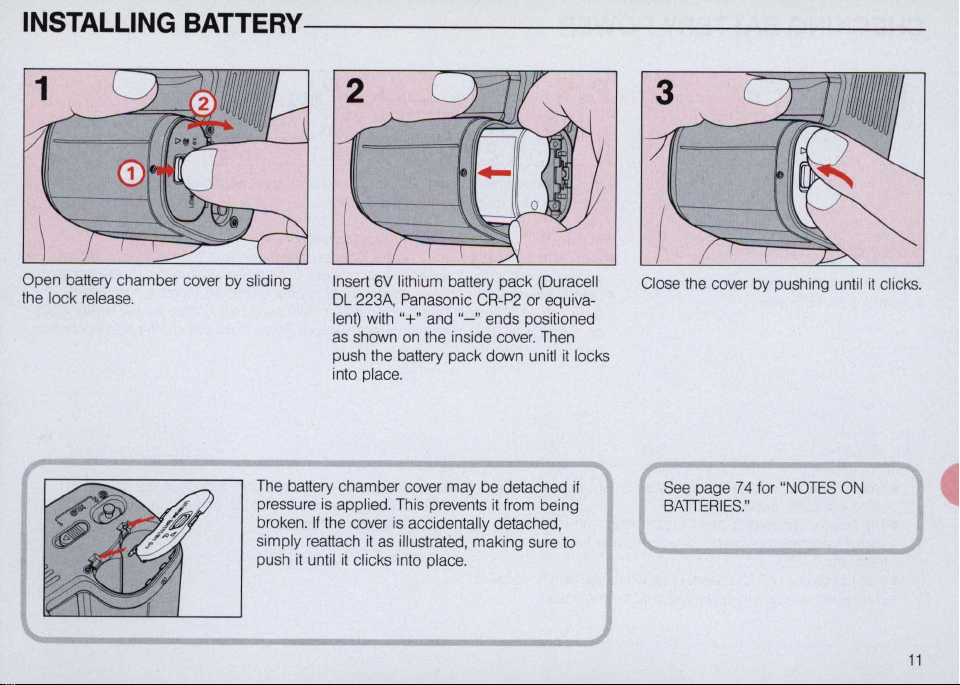
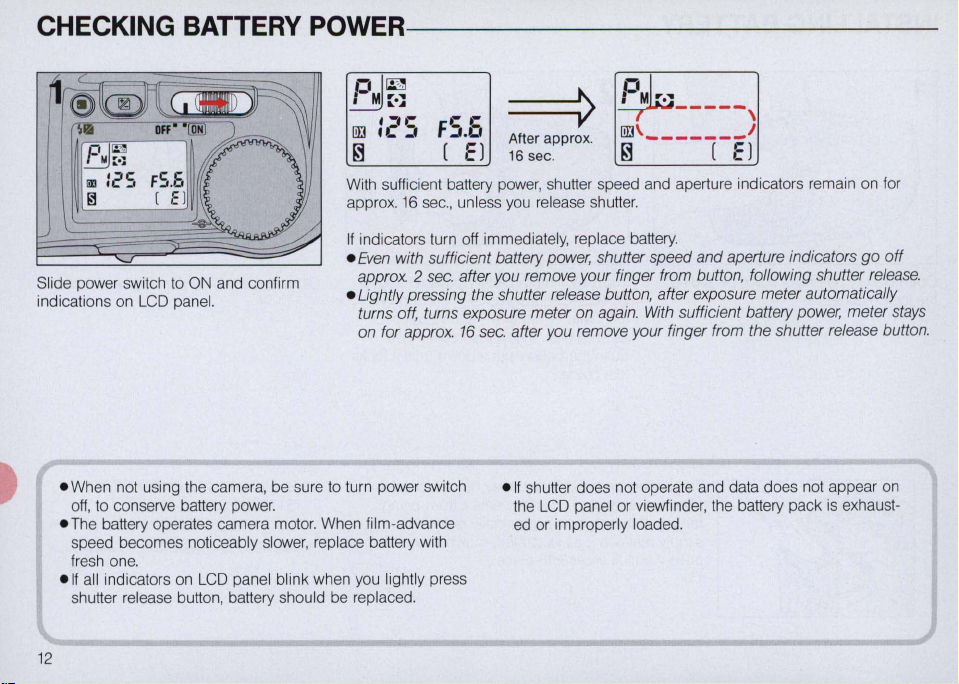
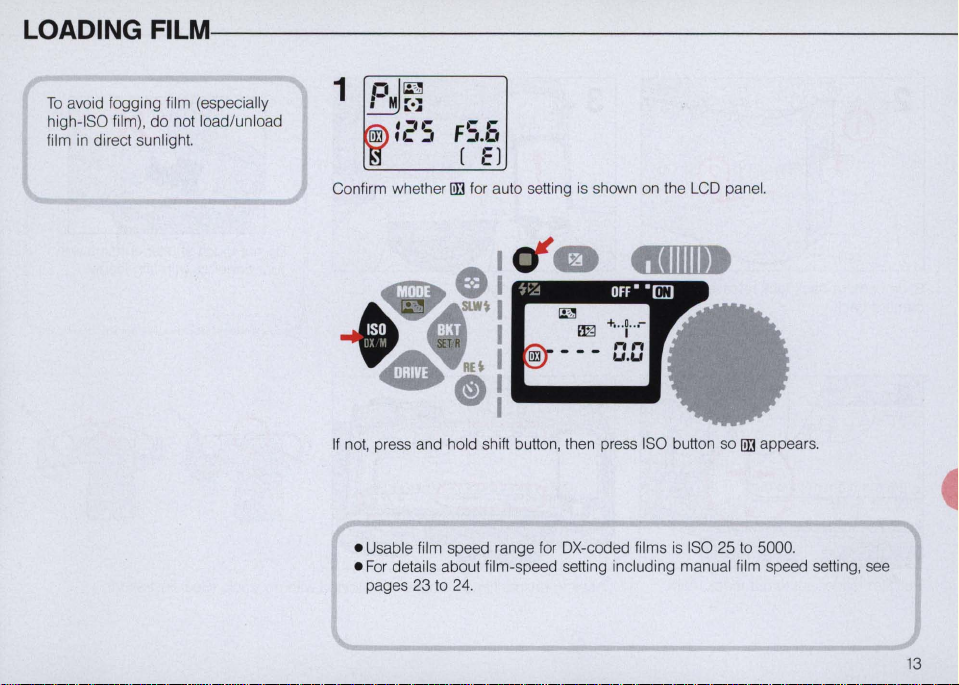
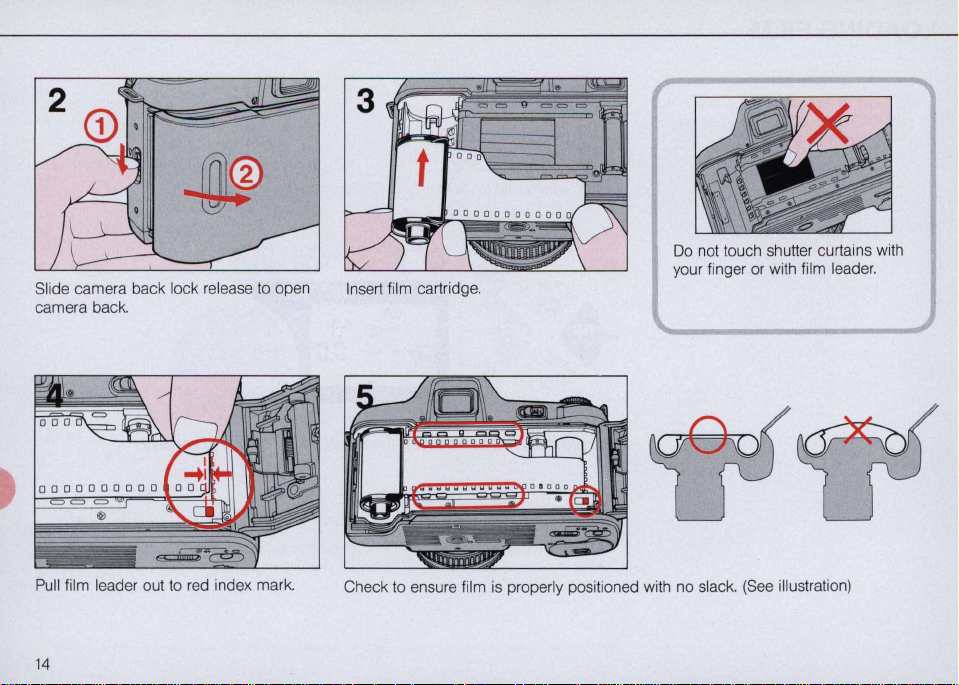
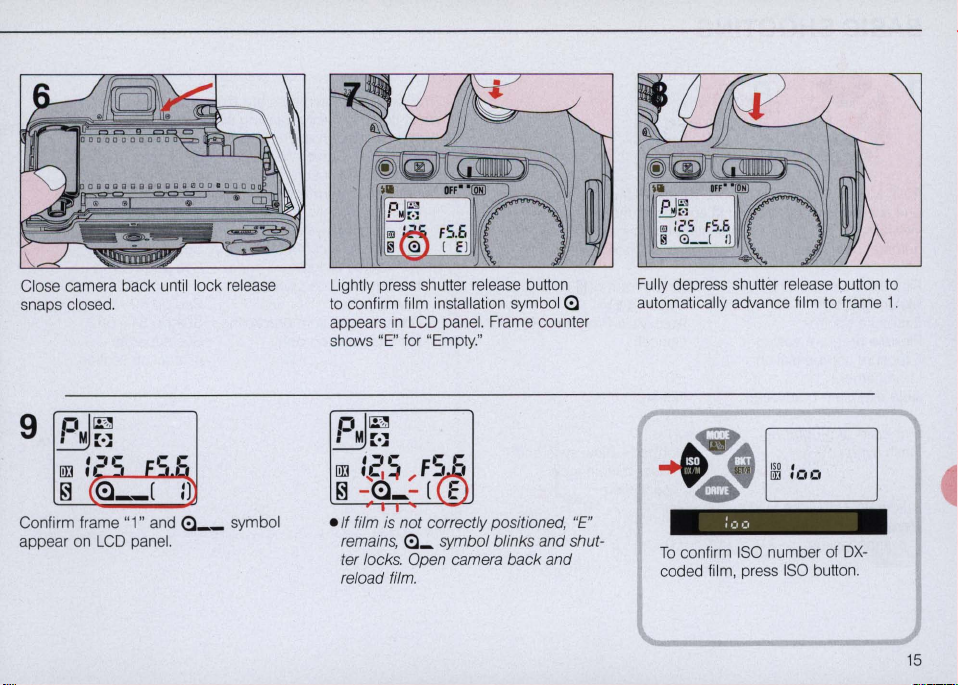
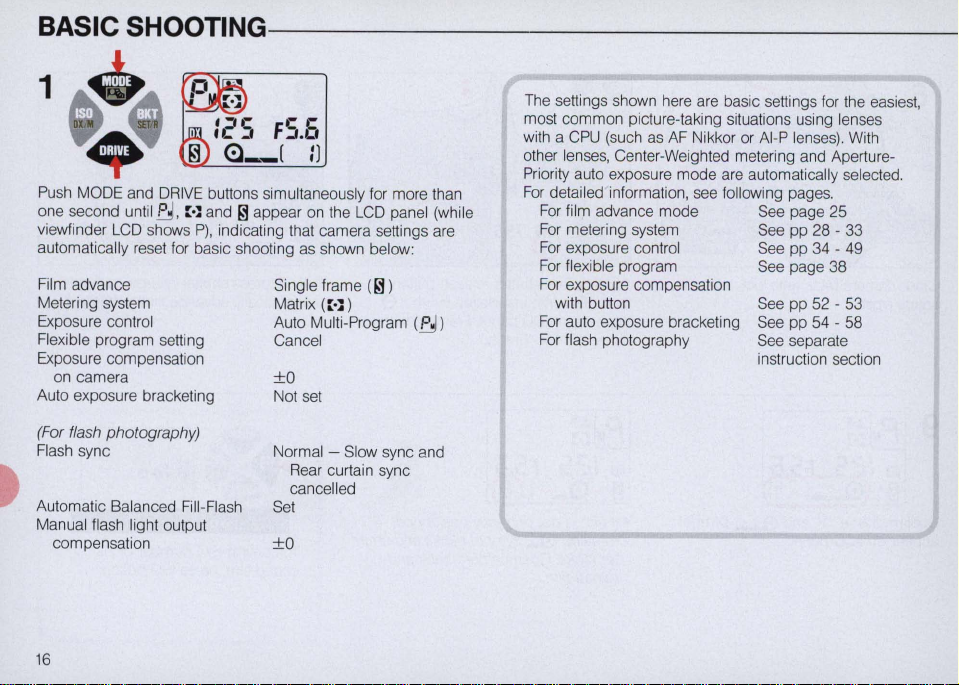
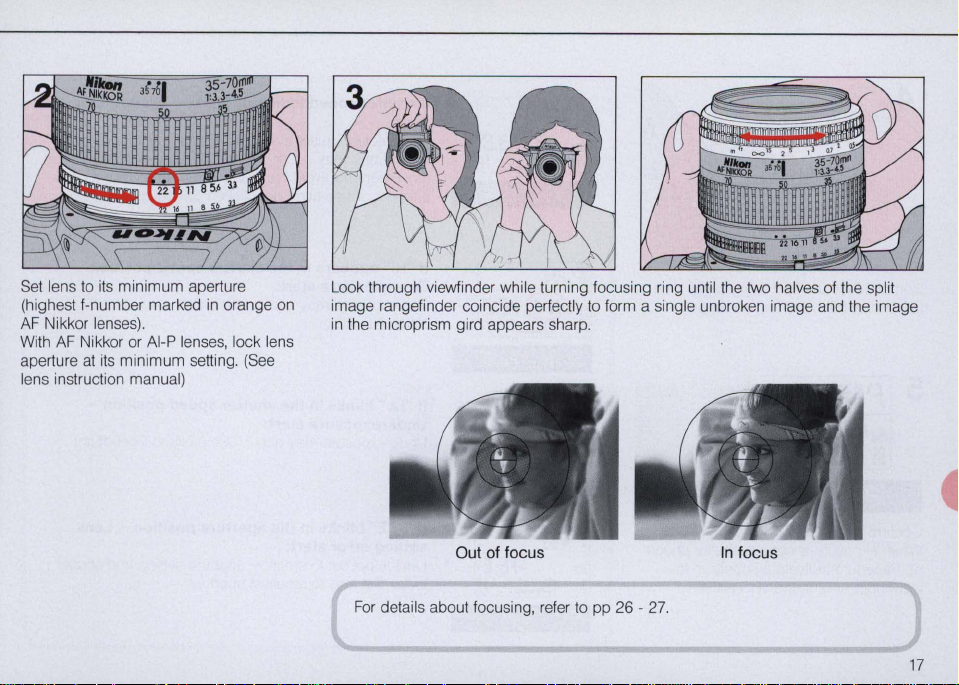

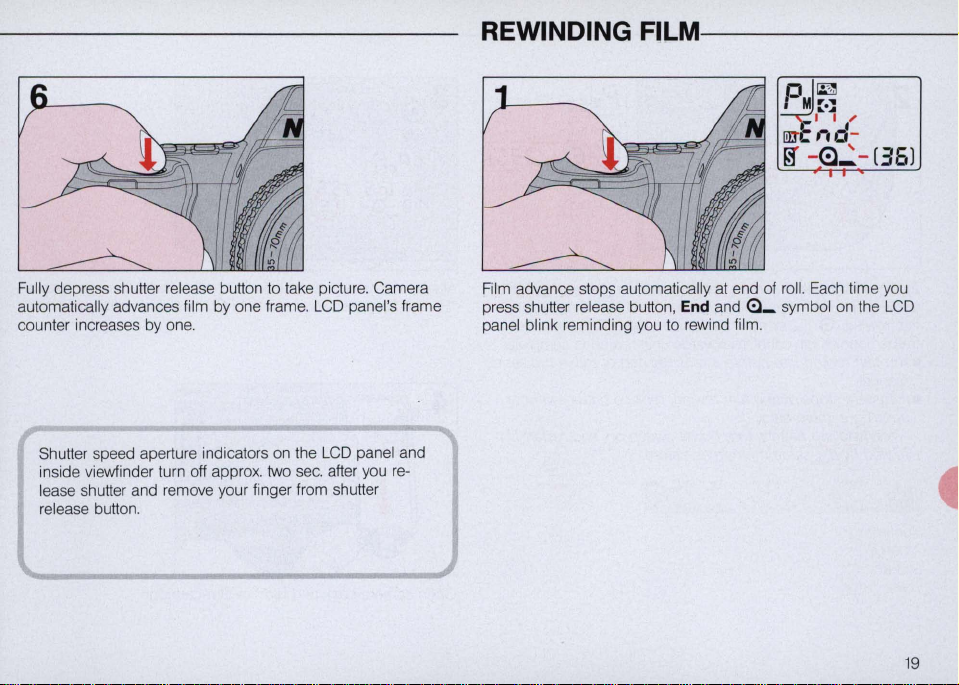
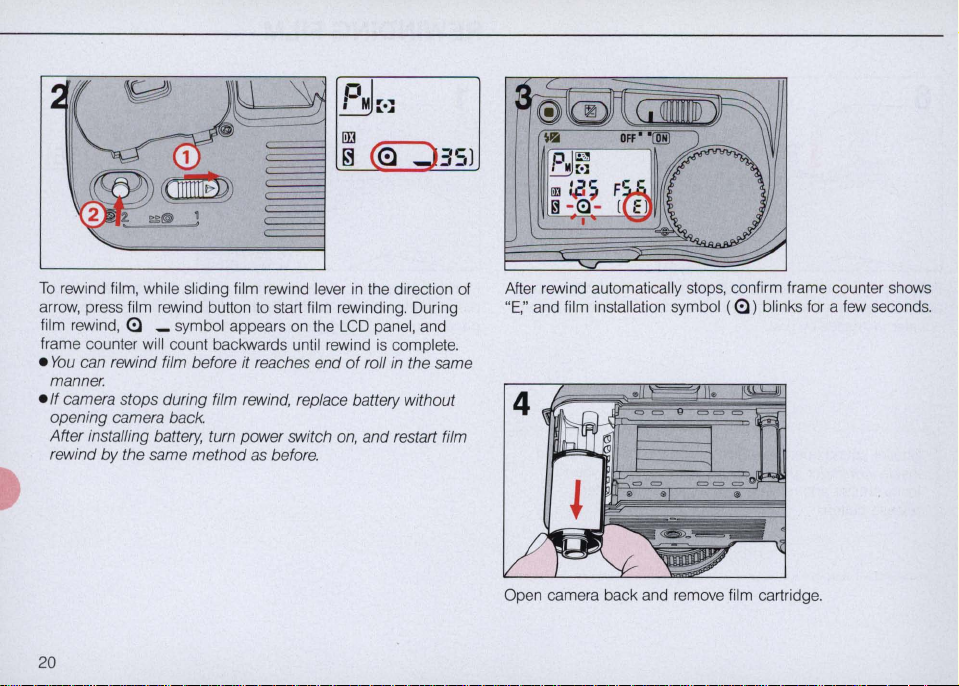
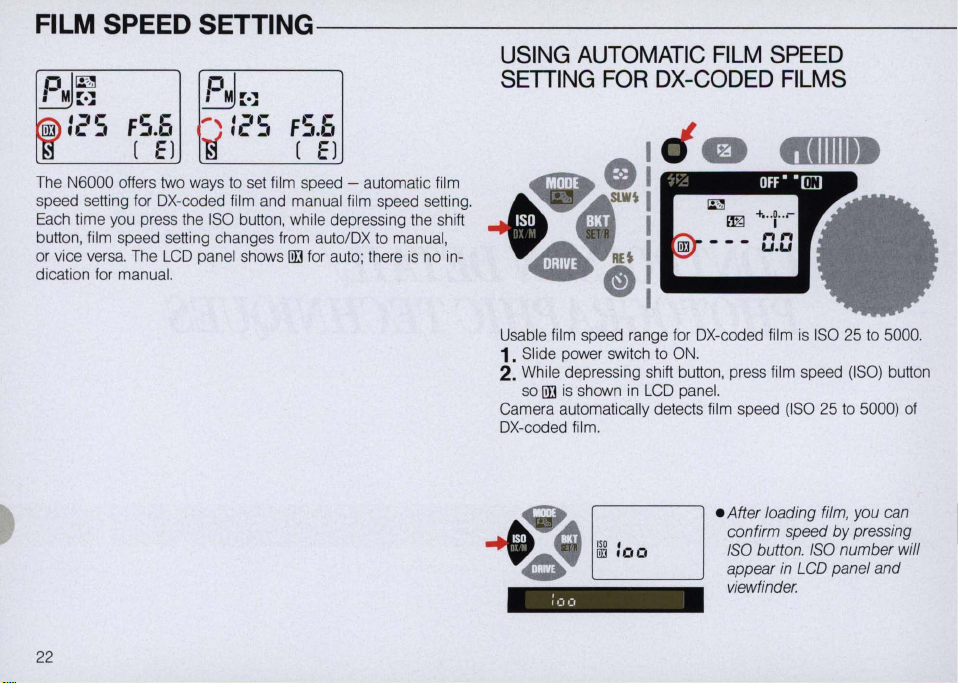
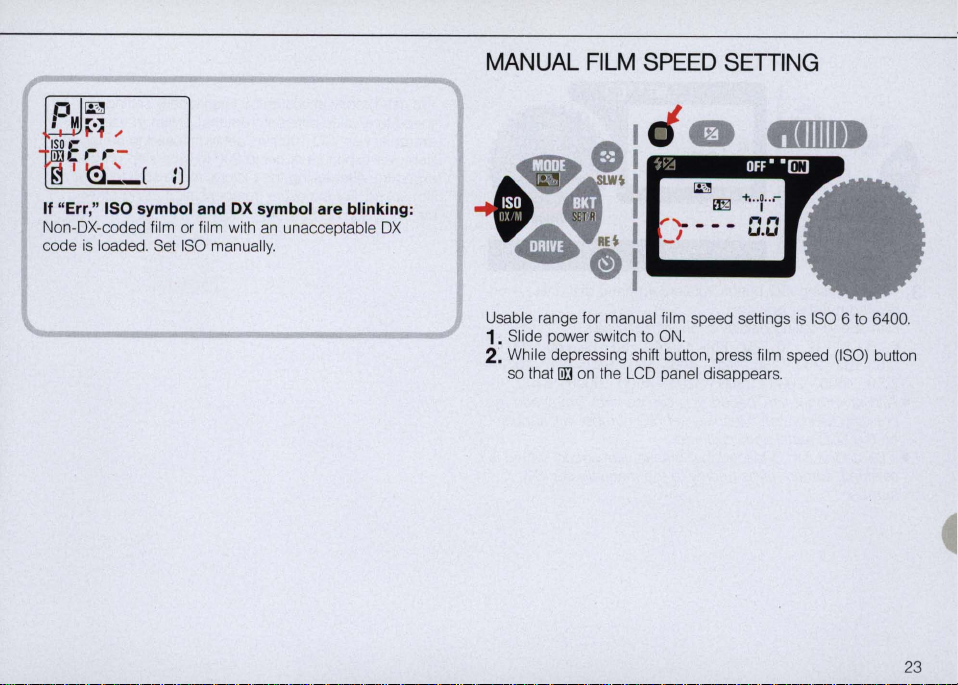
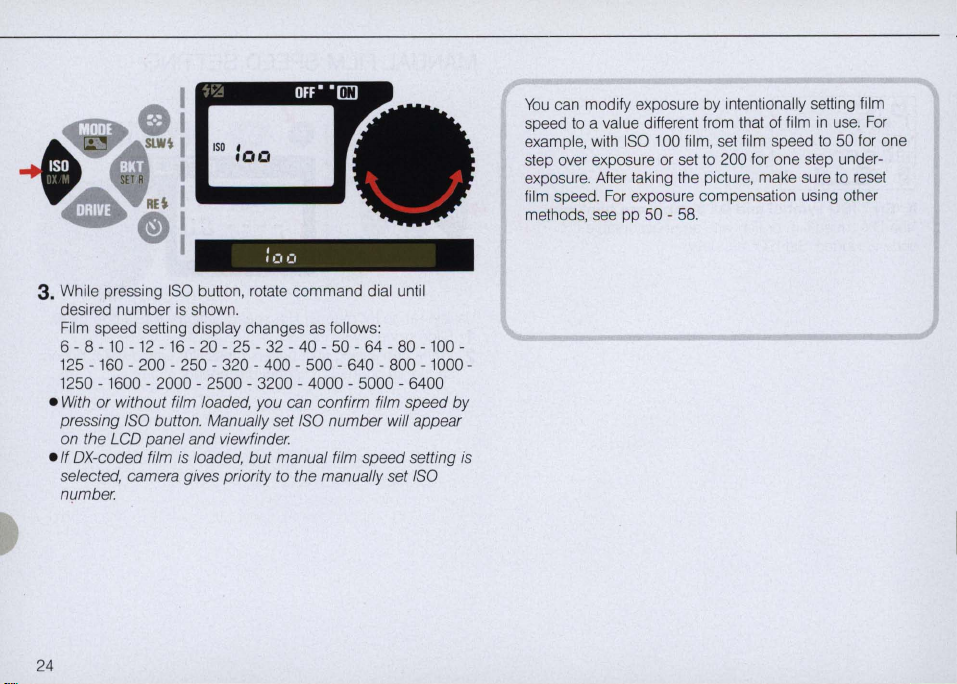
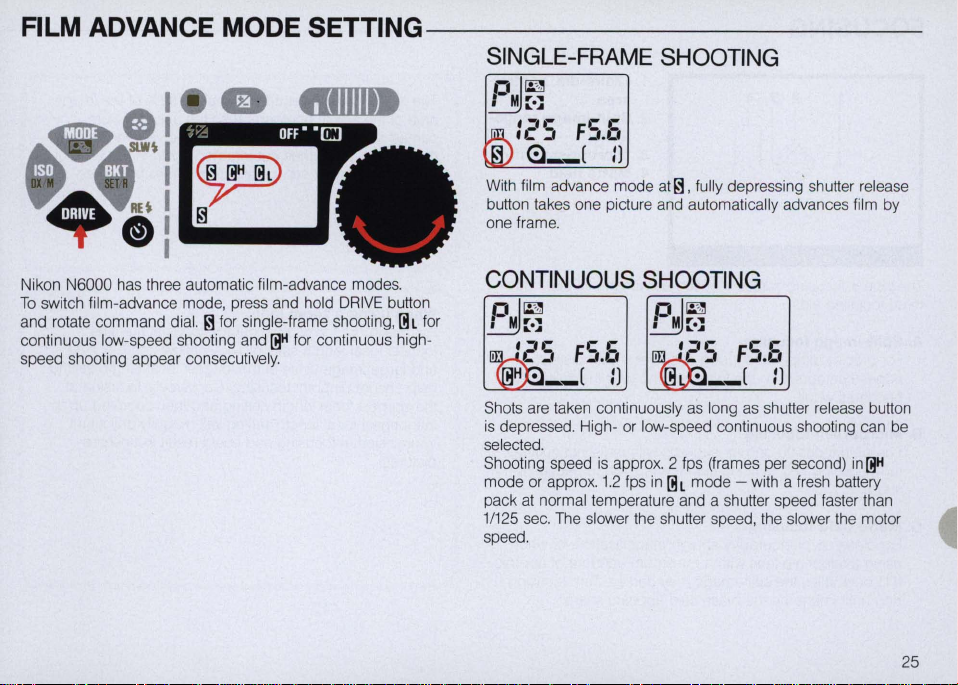
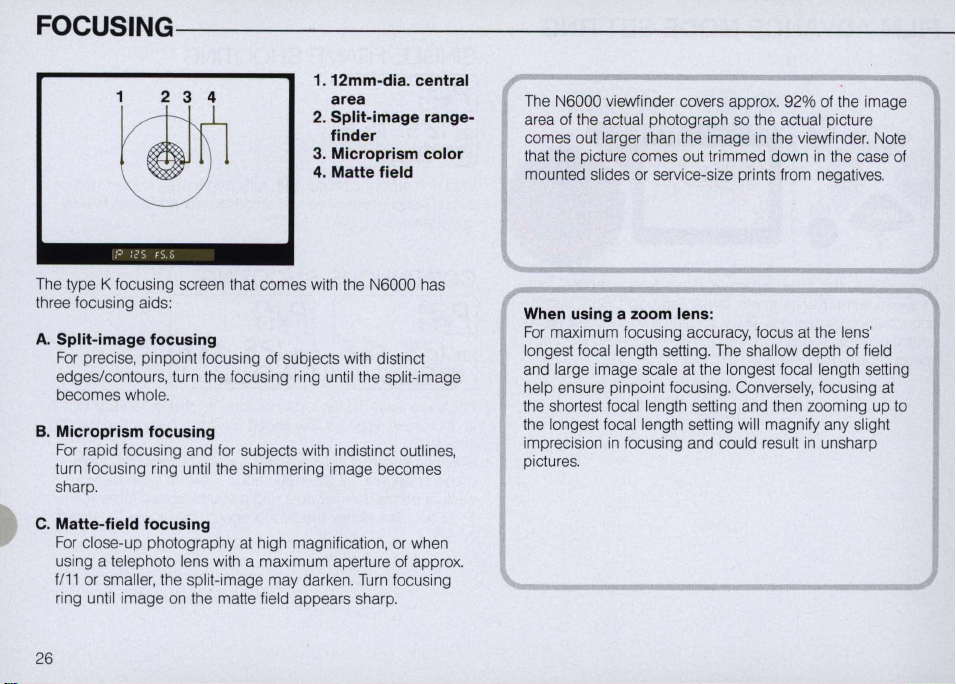


 Loading...