

Page 1

Nikon
NSJD
INSTRUCTION MANUAL
Page 2

CONTENTS
FOREWORD............................................................................... 3
NOMENCLATURE
BASIC OPERATION
MOUNTING THE LENS
INSTALLING BATTERY
CHECKING BATTERY POWER.......................................... 12
LOADING FILM ...........................................................13-15
BASIC SHOOTING
REWINDING FILM
CONTROLS IN DETAIL/PHOTOGRAPHIC
TECHNIQUES................................................................21-60
FILM SPEED SETTING....................................................22-24
USING AUTOMATIC FILM SPEED SETTING FOR
DX-CODED FILMS ..................................................22-23
MANUAL FILM SPEED SETTING...............................23-24
FILM ADVANCE MODE SETTING...........................................25
SINGLE-FRAME SHOOTING...............................................25
CONTINUOUS SHOOTING
FOCUSING.......................................................................26-27
EXPOSURE......................................................................28-58
EXPOSURE METERING SYSTEMS
MATRIX METERING ........................................................28
CENTER-WEIGHTED METERING
METERING SYSTEM SETTING
METERING SYSTEM SELECTION -
WHEN TO USE MATRIX OR
CENTER-WEIGHTED METERING
EXPOSURE MODE......................................................34-49
EXPOSURE MODE SETTING
............................................................
.............................................................
.......................................................
....................................................
.....................................................
......................................................
.................................................
...........................
...................................
......................................
......................
.................................
4 - 8
9-20
10
11
16-19
19-20
28-33
30-33
35-36
25
28
29
Page 3

PROGRAMMED (Pm AND P) AUTO ......................36-38
FLEXIBLE PROGRAM
.................................................
SHUTTER-PRIORITY AUTO EXPOSURE
MODE
..................................................................
39-41
OPERATION IN SHUTTER-PRIORITY
AUTO EXPOSURE MODE
..............................
40-41
APERTURE-PRIORITY AUTO EXPOSURE
MODE...................................................................42-44
OPERATION IN APERTURE-PRIORITY
AUTO EXPOSURE MODE
..............................
43-44
MANUAL EXPOSURE MODE ................................45-49
OPERATION IN MANUAL EXPOSURE MODE..45-47
TO GET EXPOSURE METER READING
FOR A MAIN SUBJECT OFF CENTER
..........
48-49
BULB SETTING ...........................................................49
EXPOSURE COMPENSATION...................................50-58
AE (AUTO EXPOSURE) LOCK LEVER.................50-51
EXPOSURE COMPENSATION BUTTON...............52-53
AUTO EXPOSURE BRACKETING
SELF-TIMER OPERATION
............................................
.........................
54-58
59-60
ONE-SHOT SELF-TIMER.................................................... 59
TWO-SHOT SELF-TIMER
ACCESSORIES...................................................................61-70
...................................................
60
LENS COMPATIBILITY...................................................62-63
ACCESSORIES
OPTIONAL SPEEDLIGHTS
CLOSE-UP ACCESSORIES
VIEWING ACCESSORIES
..............................................................
.................................................
.......................................
.................................................
64-70
64
65-67
67
OTHER ACCESSORIES..............................................68-70
38
Page 4

MISCELLANEOUS..............................................................71-83
CAMERA CARE TIPS .................................................72-73
NOTES ON BATTERIES ..................................................... 74
SPECIFICATIONS . .. ..................................................75-77
GLOSSARY..................................................................78-80
WARNING INDICATIONS ...........................................81-83
Page 5

FOREWORD
Thank you for purchasing the Nikon N6000. We
hope you enjoy using this camera. We know it will
make photography a bigger part of your life.
Before using the N6000, read this manual, as
well as the supplementary section on “FLASH
PHOTOGRAPHY,”
Page 6
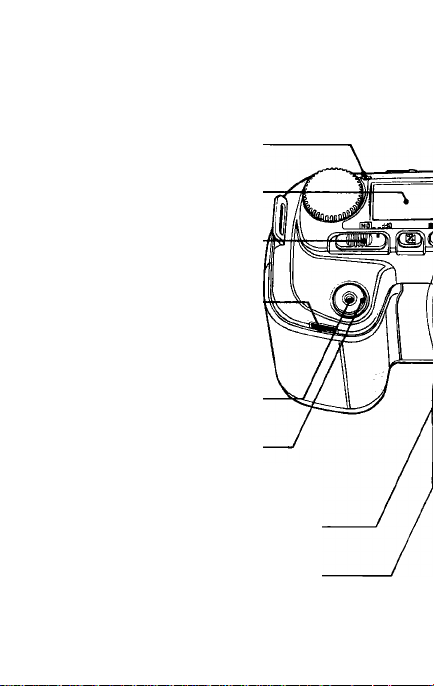
NOMENCLATURE
Film plane indicator: Exact distance
from lens mounting flange to film plane
is 46.5mm.
LCD panel: See page 8.
Power switch
Self-timer indicator LED:
See pages 59 to 60.
Release terminal: Accepts
optional Nikon Cable Release
AR-3 or Double Cable Release
AR-7.
Shutter release button
Minimum aperture lock: Lock for
programmed auto or shutter-priority auto
exposure mode.
Aperture scale
Page 7
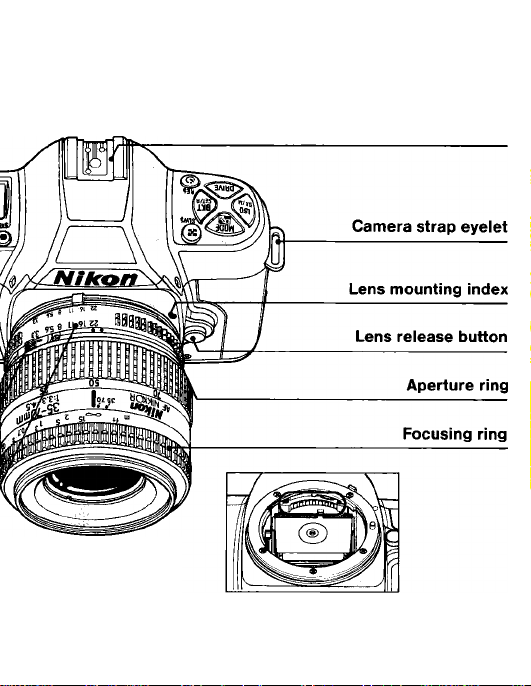
Lens (AF Zoom-Nikkor
35-70mm f/3.3-4.5)
Accessory shoe: Accepts Nikon-dedicated
Speedlights.
CPU contacts: Do not touch.
Page 8
Page 9
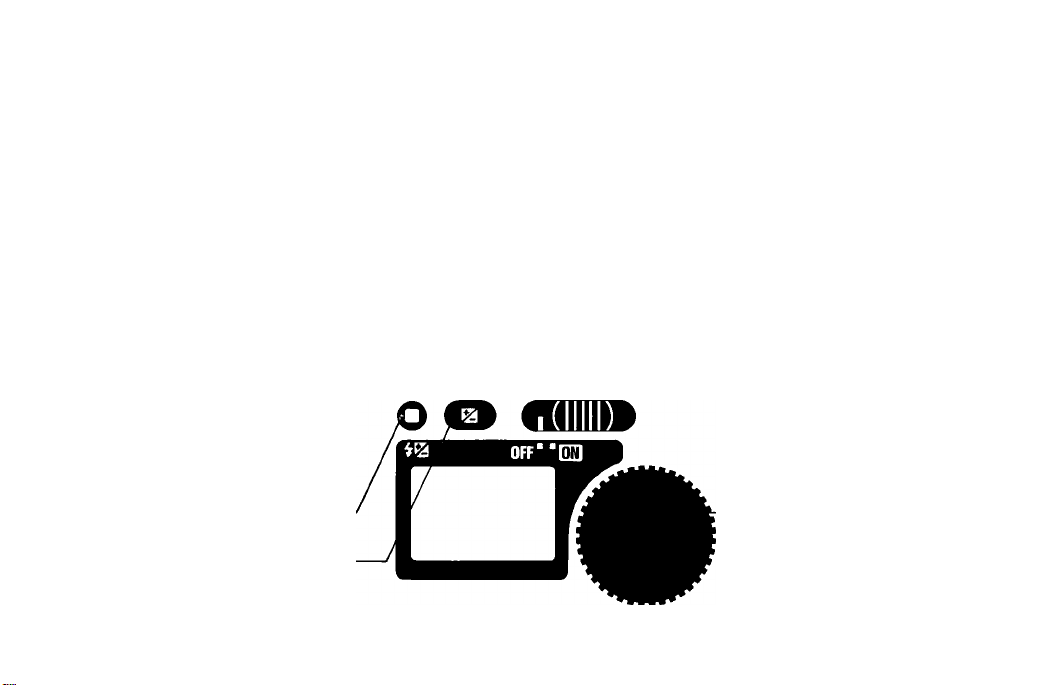
Exposure mode (MODE) button/Automatic
Balanced Fill-Flash (lAl) button
Film speed (ISO) button/Film speed setting
mode (DX/M) button
&
Metering system () button/Slow sync
button
Auto exposure bracketing (BKT) button
Film advance mode (DRIVE) button
These buttons are used with the command dial or shift button.
For function of each button, see next page.
Shift button: Press to set the functions
shown in matte gold ■ on camera body.
Exposure compensation button
REi
Self-timer (0) button/Rear-Curtain sync
button
Command input control dial
(Command dial): Can be rotated
to set various functions.
Page 10

Command dial/shift button functions
Combined with buttons listed below, the command dial and shift button provide various functions.
Metering system (K )/Slow sync
button
Exposure mode (MODE)*/Automalic
Balanced Fill-Rash (|rg) button
Film speed (ISO) button/Film speed
setting mode (DX/M) button
Film advance mode (DRIVE) button* To set film advance mode, rotate dial while
Exposure compensation (¡2)
button
Auto exposure bracketing (BKT)
button
Self-timer (¿) )/Rear-curtain sync
button
^Pushing MODE and DRIVE buttons simultaneously for more than one second sets N6000 for basic shooting.
Button With Command Dial
To select metering system, rotate dial while
pressing this button. (See page 29)
To select exposure mode, rotate dial while
pressing this button. (See page 35)
To manually set film speed, rotate dial while
pressing this button. (See pages 23 to 24)
pressing this button. (See page 25)
To make exposure compensation, rotate dial
while pressing this button. (See pages 52 to 53)
Rotate it to set self-timer operation.
(See pages 59 to 60)
—
With shift button pressed, rotate command dial for flash output level compensation.
For details, see pages 35 to 37 on “FLASH PHOTOGRAPHY”, a separate instruction book.
With shift button pressed, this button is used to
set/cancel slow sync for flash photography.
With shift button pressed, this button is used to
set/cancel automatic balanced Fill-Flash for
flash photography.
With shift button pressed, this button is used to set
film speed (auto for DX-coded film or manual, see
page 22)
See pages 54 to 58.
With shift button pressed, this button is used to
set/cancel rear-curtain sync for flash photography.
In the following cases, command dial can be used by Itself.
In Programmed auto exposure mode
In Shutter-Priority auto or Manual exposure mode
Turn command dial for flexible program
Turn command dial to set shutter speed
With Shift Button
—
—
Page 11
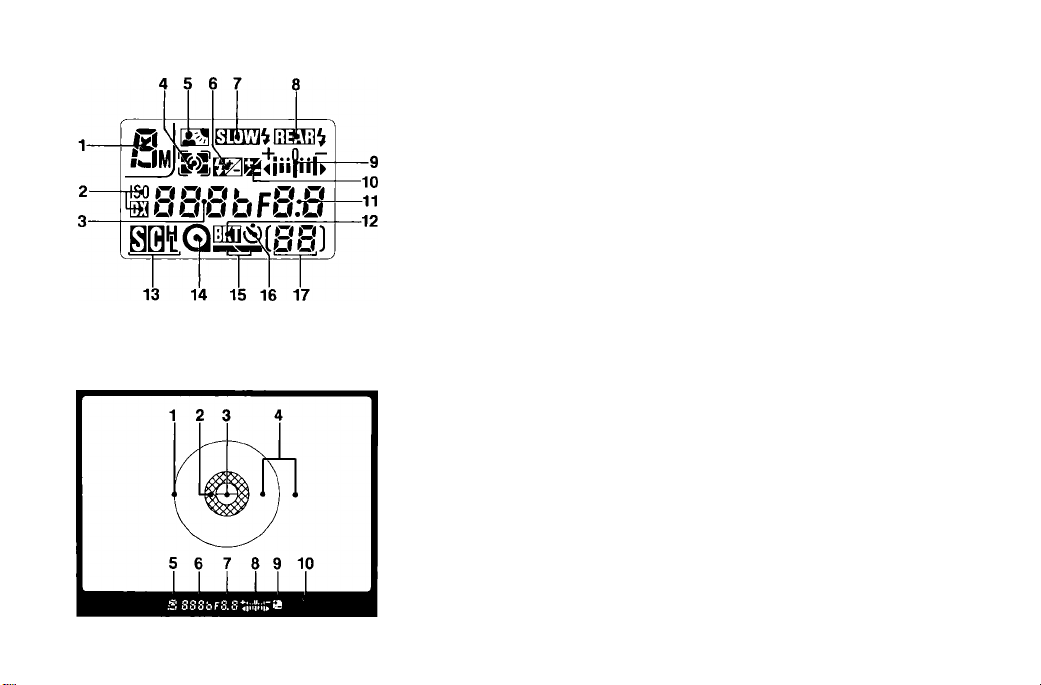
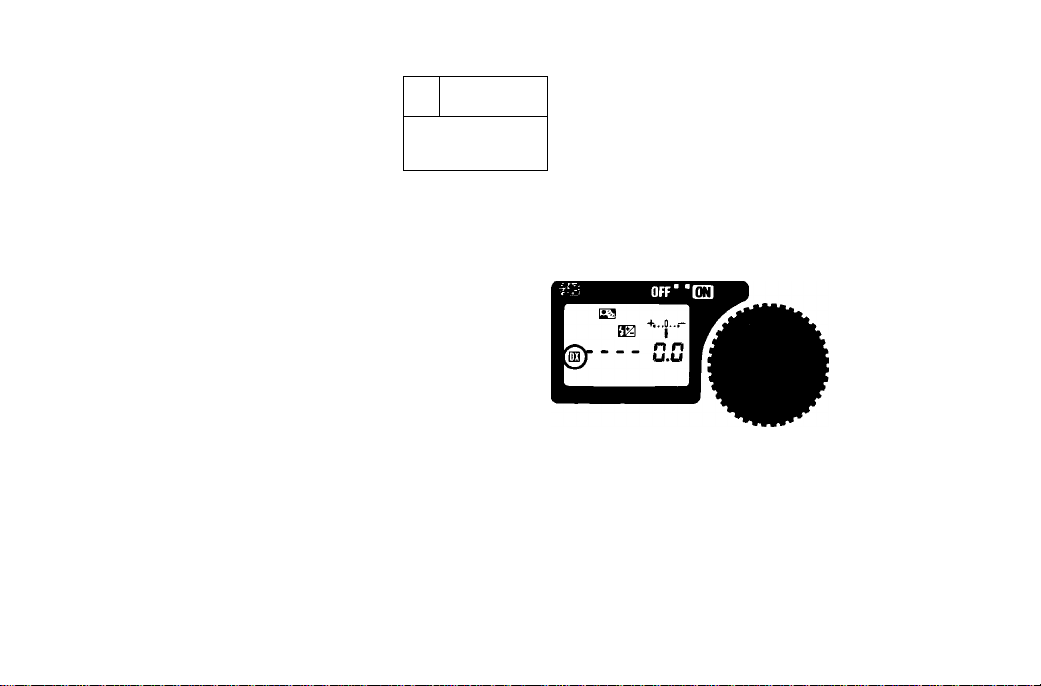
LCD panel indications
1. Exposure mode
2. Film speed setting mode
3. Shutter speed/film speed (for
manual film speed seffing)/number of frames for aufo exposure
bracketing
4. Metering system
5. Automatic Balanced Fill-Flash
6. Flash output compensation
7. Slow flash sync
8. Rear-curtain sync
9. Electronic analog display
Viewfinder indications
10. Exposure compensation
11. Aperture/exposure compensation
value
12. Auto exposure bracketing
13. Film advance mode
14. Film loading
15. Film advance and rewind
16. Self-timer
17. Frame counter/number of remain
ing frames for auto exposure
bracketing/self-timer duration
1.12mm-dia. central area
2. Microprism collar
3. Split-image rangefinder
4. Clear matte field
5. Exposure mode
6. Shutter speed/film speed (tor manual film speed setting)/
number of frames for auto exposure bracketing
7. Aperture/exposure compensation value
8. Electronic analog display
9. Exposure compensation
10. Ready-light LED
Page 12

BASIC OPERATION
Page 13
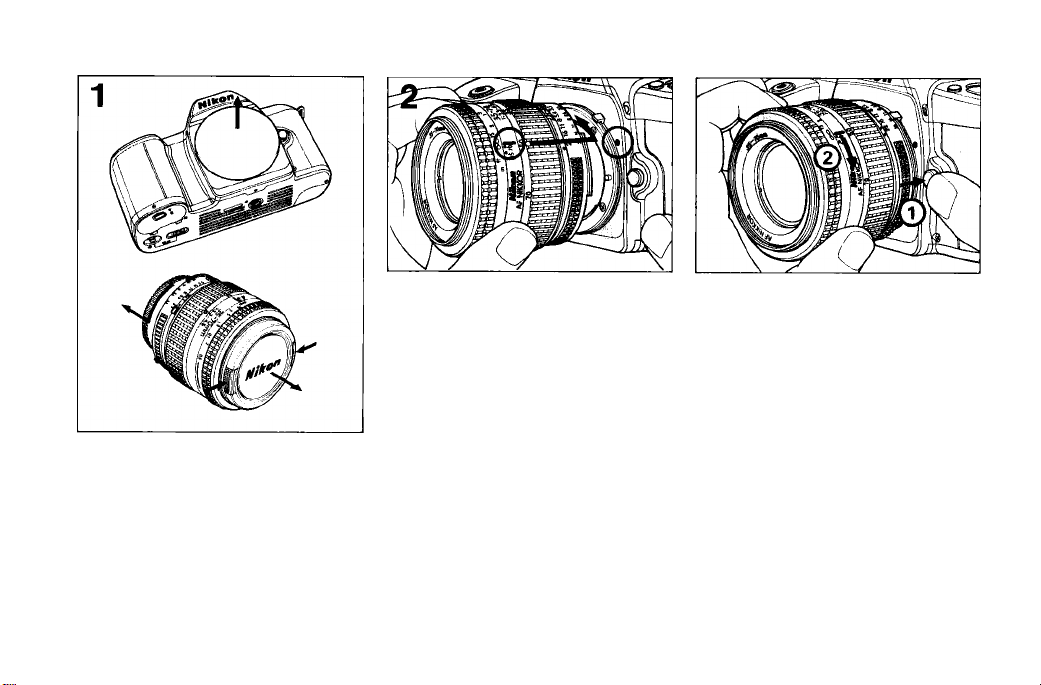
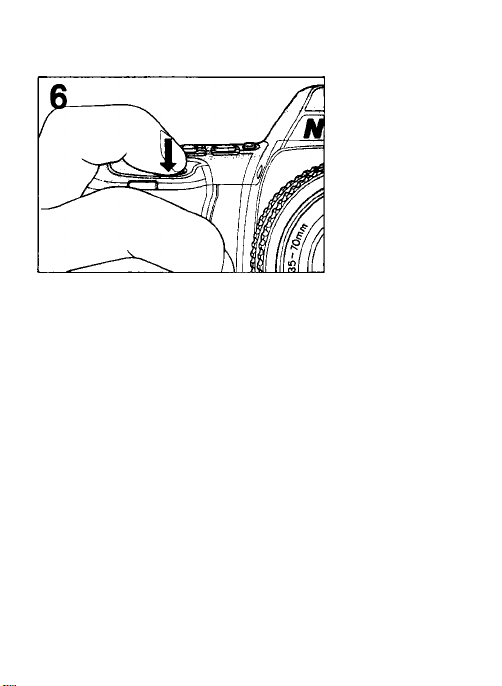
MOUNTING THE LENS
Remove camera body cap and front and
rear lens caps.
10
Aligning lens mounting index on the
camera body with lens' aperture index,
twist lens counterclockwise until it locks
securely into place.
See page 62 tor Nikon lens com
patibility chart.
To remove
Push lens release button and turn lens
clockwise.
Page 14
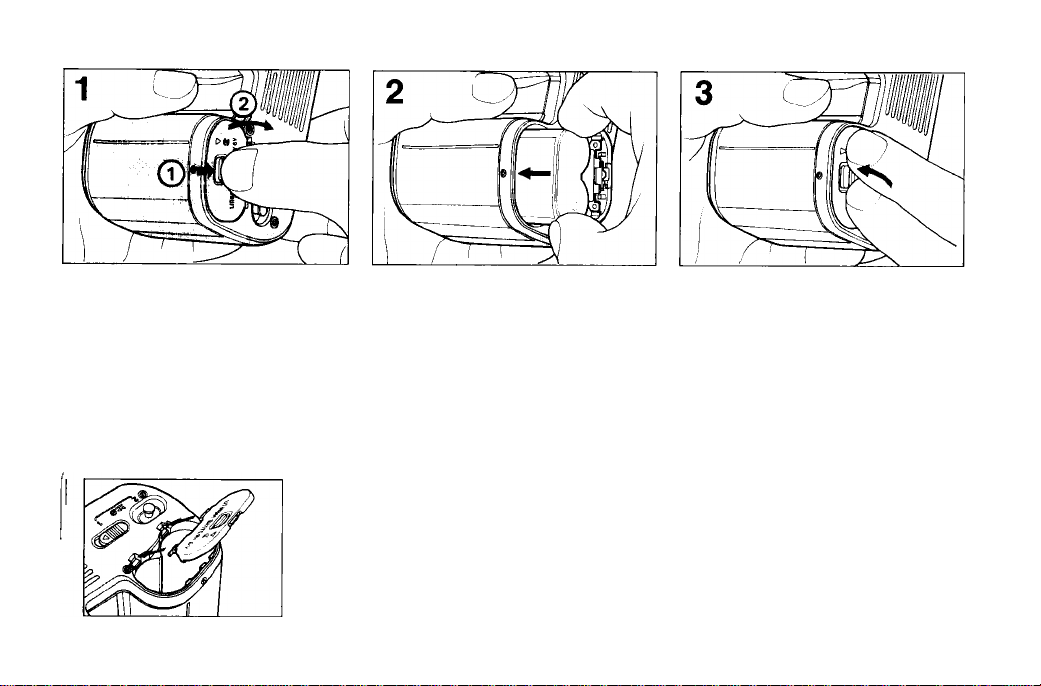
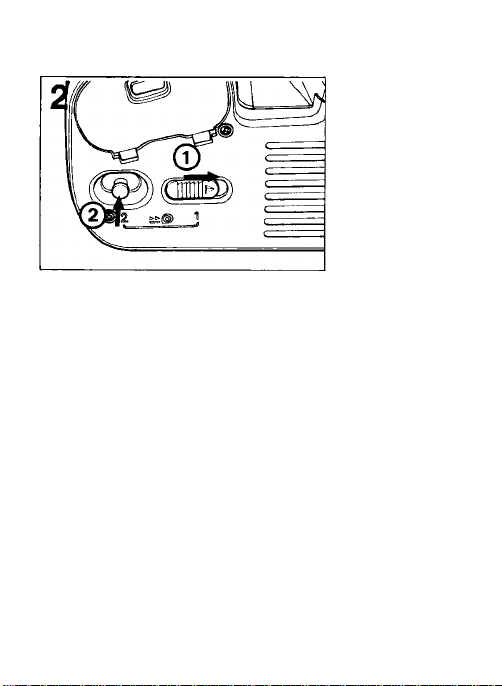
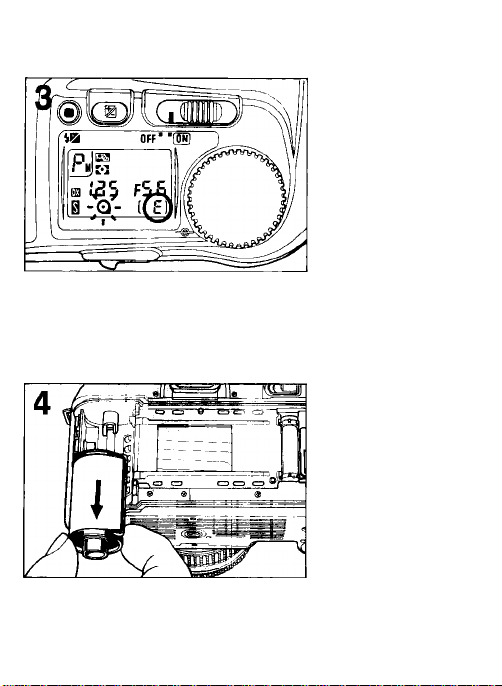
INSTALLING BATTERY
Open battery chamber cover by sliding
the lock release.
The battery chamber cover may be detached if
pressure is applied. This prevents it from being
broken. If the cover is accidentally detached,
simply reattach it as illustrated, making sure to
push it until it clicks into plaoe.
Insert 6V lithium battery pack (Duracell
DL 223A, Panasonic CR-P2 or equiva
lent) with and ” ends positioned
as shown on the inside cover. Then
push the battery pack down uniti it locks
into place.
Close the cover by pushing until it clicks.
See page 74 for ‘‘NOTES ON
BATTERIES."
11
Page 15
CHECKING BATTERY POWER
Fu
i ZiC
[>}] fU
s
With sufficient battery power, shutter speed and aperture indicators remain on for
approx. 16 sec., unless you release shutter.
If indicators turn off immediately, replace battery.
• Even with sufficient battery power, shutter speed and aperture indicators go off
Slide power switch to ON and confirm
indications on LCD panel.
• When not using the camera, be sure to turn power switch
off, to conserve battery power.
• The battery operates camera motor. When film-advance
speed becomes noticeably slower, replace battery with
fresh one.
• If all indicators on LCD panei blink when you lightly press
shutter release button, battery should be replaced.
12
approx. 2 sec. after you remove your finger from button, following shutter release.
• Lightly pressing the shutter release button, after exposure meter automatically
turns off, turns exposure meter on again. With sufficient battery power, meter stays
on for approx. 16 sec. after you remove your finger from the shutter release button.
fS.5
( E)
--------------
-------------After approx.
16 sec.
• If shutter does not operate and data does not appear on
the LCD panel or viewfinder, the battery pack is exhaust
ed or improperly loaded.
/“'m
N
V
[33V
r
0 1 E ]
A
Page 16
LOADING FILM
To avoid fogging film (especially .|
high-ISO film), do not load/unload I
film in direct sunlight.
1
/"'m
^ OC rC c
roHjtCj tji.u
( 5]
Confirm whether S3 for auto setting is shown on the LCD panel.
cf& ffimn»
Jlk
'Hli
o
If not, press and hold shift button, then press ISO button so S3 appears.
• Usable film speed range for DX-coded films is ISO 25 to 5000.
• For details about film-speed setting including manual film speed setting, see
pages 23 to 24.
13
Page 17
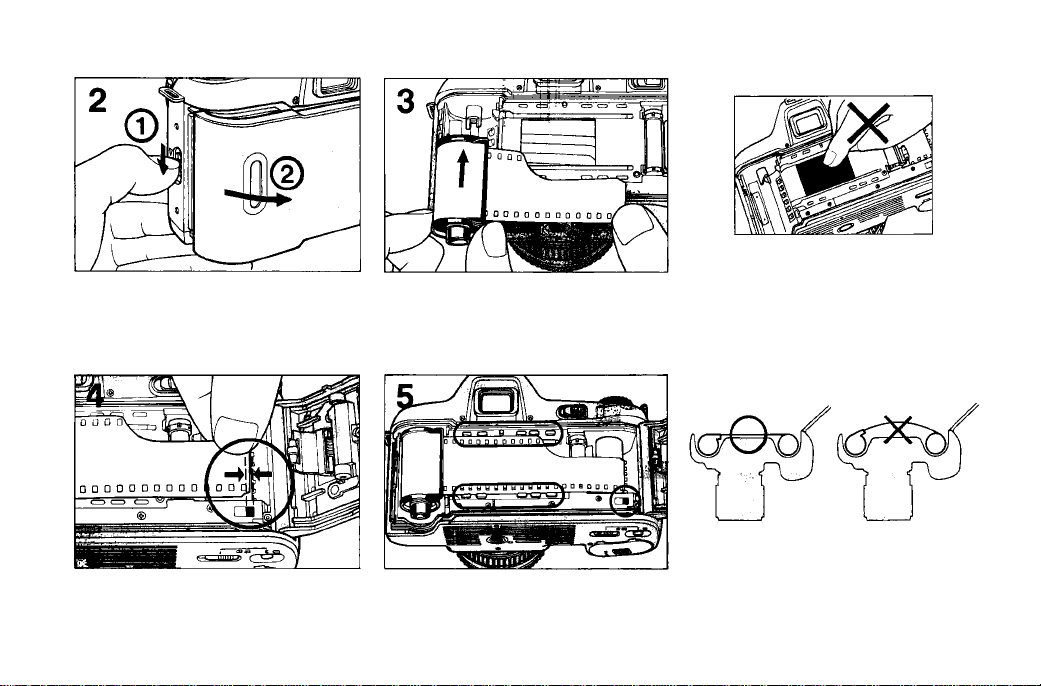
Do not touch shutter curtains with i I
Slide camera back lock release to open
camera back.
Pull film leader out to red index mark. Check to ensure film is properly positioned with no slack. (See illustration)
Insert film cartridge.
your finger or with film leader. j
14
Page 18
Close camera back until lock release
snaps closed.
Lightly press shutter release button
to confirm film installation symbol Q
appears in LCD panel. Frame counter
shows “E” for “Empty.”
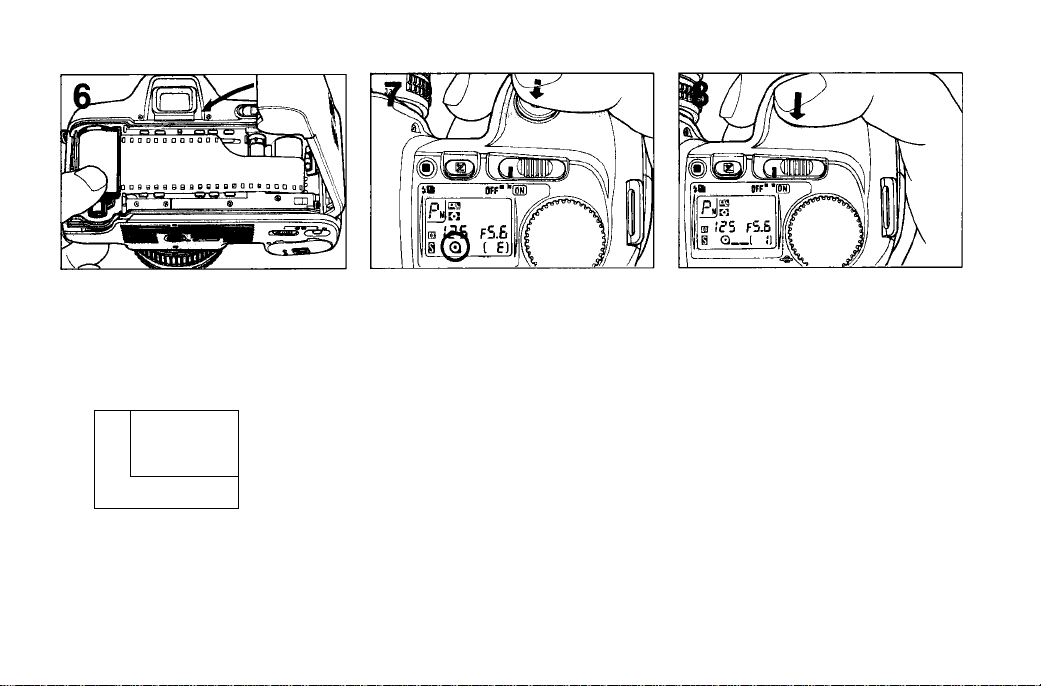
Fully depress shutter release button to
automatically advance film to frame 1.
S3
.
OH 1
f5.S
0
Confirm frame “1” and Q,
appear on LCD panel.
, symbol
P.
OH
fS-^-
0 -Q«- (
• If film is not correctly positioned, “E"
remains, Q_ symbol blinks and shut
ter locks. Open camera back and
reload film.
BO .
GQ lOO
To confirm ISO number of DXcoded film, press ISO button.
15
Page 19

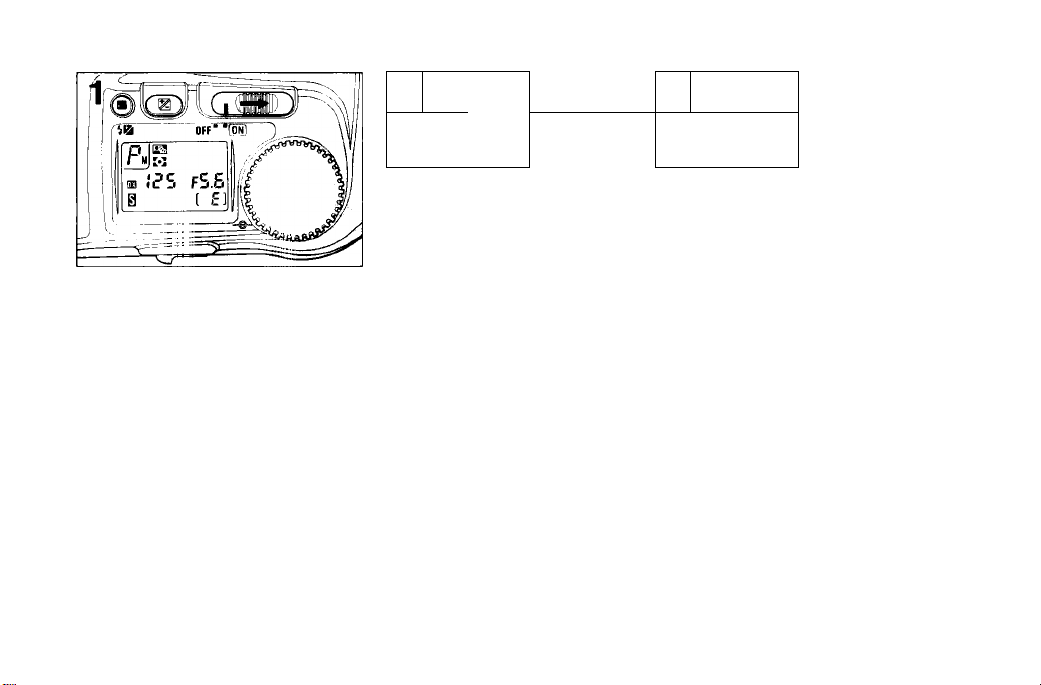
BASIC SHOOTING
< 3C cC C
r« rJi.O
Q«-(
Push MODE and DRIVE buttons simultaneously for more than
one second until 1-3 and 0 appear on the LCD panel (while
viewfinder LCD shows P), indicating that camera settings are
automatically reset for basic shooting as shown below:
Film advance
Metering system
Exposure control
Flexible program setting
Exposure compensation
on camera
Auto exposure bracketing
(For flash photography)
Flash sync
Automatic Balanced Fill-Flash
Manual flash light output
compensation
16
Single frame (0)
Matrix (i-3)
Auto Multi-Program (py)
Cancel
±0
Not set
Normal — Slow sync and
Rear curtain sync
cancelled
Set
±0
Page 20

The settings shown here are basic settings for the easiest,
most common picture-taking situations using lenses
with a CPU (such as AF Nikkor or Al-P lenses). With
other lenses, Center-Weighted metering and AperturePriority auto exposure mode are automatically selected.
For detailed information, see following pages.
For film advance mode
For metering system
For exposure control
For flexible program
For exposure compensation
with button
For auto exposure bracketing
For flash photography
See page 25
See pp 28 - 33
See pp 34 - 49
See page 38
See pp 52 - 53
See pp 54 - 58
See separate
instruction section
Page 21
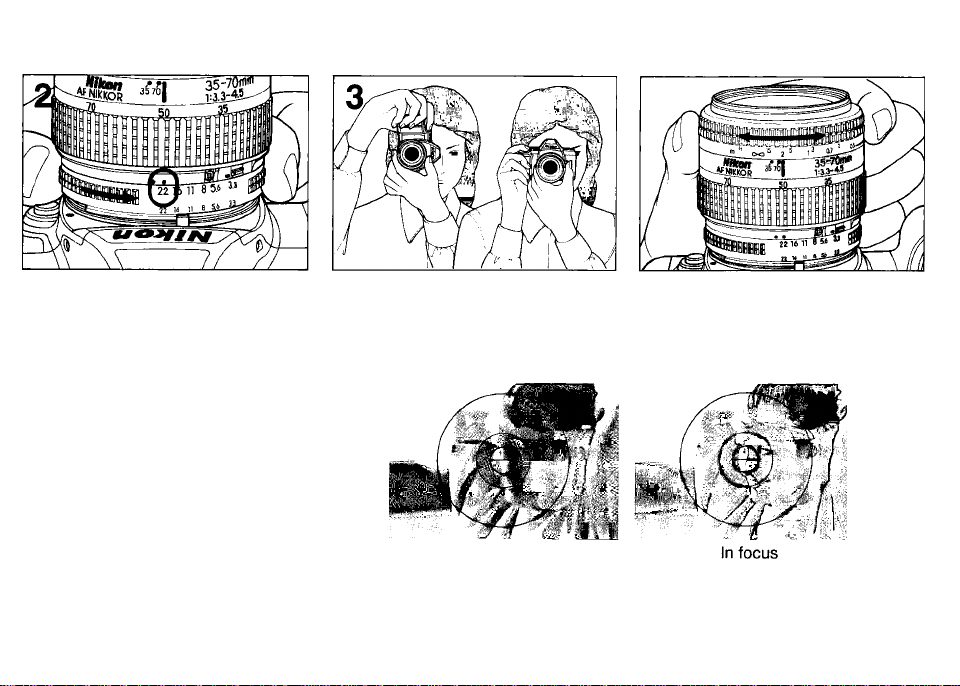
Set lens to its minimum aperture
(highest f-number marked in orange on
AF Nikkor lenses).
With AF Nikkor or Al-P lenses, lock lens
aperture at its minimum setting. (See
lens instruction manual)
Look through viewfinder while turning focusing ring until the two halves of the split
image rangefinder coincide perfectly to form a single unbroken image and the image
in the microprism gird appears sharp.
Out of focus
For details about focusing, refer to pp 26 - 27.
r
17
Page 22

p - 3 - r :« •?
; p.u. u
If shutter speed indicator blinks — Picture blur alert;
If a selected shutter speed is 1/(focal length) or slower,
picture blur may occur due to camera shake or subject
movement. To avoid blur, hold camera very steady, use
a tripod, or use accessory Nikon Speedlight.
Compose picture and lightly press shut
ter release button to turn meter on.
DoOes fs.5,
B (i_l if
Confirm exposure.
When exposure is correct, shutter speed
and aperture indicators appear in the
viewfinder and on the LCD panel.
18
O E3
■ M)k
mQiJ)Fгг
0
I )
If “HI” appears in the shutter speed position -
Overexposure alert:
Overexposure may occur. Use a filter such as the
Nikon ND filter.
If “Lo” blinks in the shutter speed position — Underexposure alert:
Underexposure may occur. Use a Nikon Speedlight.
If “fEE” blinks in the aperture position — Lens
setting error alert:
Lens is not set to smallest aperture setting and shutter
locks. Set lens to smallest aperture.
J
Page 23
Fully depress shutter release button to take picture. Camera
automatically advances film by one frame. LCD panel’s frame
counter increases by one.
Shutter speed aperture indicators on the LCD panel and
inside viewfinder turn off approx, two sec. after you re
lease shutter and remove your finger from shutter
release button.
Page 24

REWINDING FILM
Film advance stops automatically at end of roll. Each time you
press shutter release button, End and Q_ symbol on the LCD
panel blink reminding you to rewind film.
19
Page 25
p..
liQ
To rewind film, while sliding film rewind lever in the direction of
arrow, press film rewind button to start film rewinding. During
film rewind, Q _ symbol appears on the LCD panel, and
frame counter will count backwards until rewind is complete.
• You can rewind film before it reaches end of roll in the same
manner.
• If camera stops during film rewind, replace battery without
opening camera back
After installing battery, turn power switch on, and restart film
rewind by the same method as before.
20
Page 26
After rewind automatically stops, confirm frame counter shows
“E,” and film installation symbol (Q) blinks for a few seconds.
Open camera back and remove film cartridge.
Page 27

CONTROLS IN DETAIL/
PHOTOGRAPHIC TECHNIQUES
21
Page 28

FILM SPEED SETTING
1^
p
•' M
Ok rC c
fomic:3 rji.a
( E)
The N6000 offers two ways to set film speed — automatic film
speed setting for DX-coded film and manual film speed setting.
Each time you press the ISO button, while depressing the shift
button, film speed setting changes from auto/DX to manual,
or vice versa. The LCD panel shows 0] for auto; there is no in
dication for manual.
P.
) /c'S fS.S
( 5)
22
Page 29
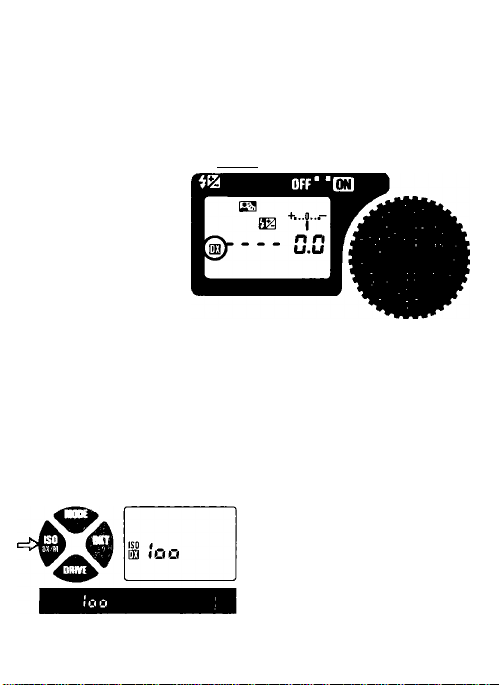
USING AUTOMATIC FILM SPEED
SETTING FOR DX-CODED FILMS
cio fflim»
Usable film speed range for DX-coded film is ISO 25 to 5000.
1. Slide power switch to ON.
2. While depressing shift button, press film speed (ISO) button
so OB is shown in LCD panel.
Camera automatically detects film speed (ISO 25 fo 5000) of
DX-coded film.
•
• After loading film, you can
confirm speed by pressing
ISO button. ISO number will
appear in LCD panel and
viewfinder.
Page 30

If “Err,” ISO symbol and DX symbol are blinking;
Non-DX-coded film or film with an unacceptabie DX
code is loaded. Set ISO manually.
Page 31

MANUAL FILM SPEED SETTING
o
^qglp^
WUi
'№t
©
Usable range for manual film speed seffings is ISO 6 to 6400.
1. Slide power switch to ON,
2. While depressing shift button, press film speed (ISO) button
so that 03 on the LCD panel disappears.
23
Page 32

mi
3. While pressing ISO button, rotate command dial until
desired number is shown.
Film speed setting display changes as follows:
6 - 8 -10 - 12 -16 - 20 - 25 - 32 - 40 - 50 - 64 - 80 - 100 -
125 - 160 - 200 - 250 - 320 - 400 - 500 - 640 - 800 -1000 1250 - 1600 - 2000 - 2500 - 3200 - 4000 - 5000 - 6400
• With or without film loaded, you can confirm film speed by
pressing ISO button. Manually set ISO number will appear
on the LCD panel and viewfinder.
• If DX-coded film Is loaded, but manual film speed setting Is
selected, camera gives priority to the manually set ISO
number.
24
Page 33

You can modify exposure by intentionally setting film
speed to a value different from that of film in use. For
example, with ISO 100 film, set film speed to 50 for one
step over exposure or set to 200 for one step under
exposure. After taking the picture, make sure to reset
film speed. For exposure compensation using other
methods, see pp 50 - 58.
Page 34

FILM ADVANCE MODE SETTING
®m «DU»
Nikon N6000 has three automatic film-advance modes.
To switch film-advance mode, press and hold DRIVE button
and rotate command dial. @ for single-frame shoofing, 0i for
confinuous low-speed shoofing and 0« for continuous high
speed shooting appear consecutively.
Page 35

SINGLE-FRAME SHOOTING
sa
P.
ic'S f5.5
Q__( i]
With film advance mode at@, fully depressing shutter release
button takes one picture and automatically advances film by
one frame.
CONTINUOUS SHOOTING
o ^
t MM
18 S
fS.5
Ife
Shots are taken continuously as long as shutter release button
is depressed. High- or iow-speed continuous shooting can be
selected.
Shooting speed is approx. 2 fps (frames per second) in0H
mode or approx. 1.2 fps in 0^ mode — with a fresh battery
pack at normal temperature and a shutter speed faster than
1/125 sec. The slower the shutter speed, the slower the motor
speed.
-( i]
p.
oc
rC c
FD.O
-( i)
sSi
25
Page 36

FOCUSING
1.12mm-dia. central
area
2. Split-image range
finder
3. Microprism color
4. Matte field
IP .'г5 FS.S
The type K focusing screen that comes with the N6000 has
three focusing aids:
A. Split-image focusing
For precise, pinpoint focusing of subjects with distinct
edges/contours, turn the focusing ring until the split-image
becomes whole.
B. Microprism focusing
For rapid focusing and for subjects with indistinct outlines,
turn focusing ring until the shimmering image becomes
sharp.
C. Matte-field focusing
For close-up photography at high magnification, or when
using a telephoto lens with a maximum aperture of approx.
f/11 or smaller, the split-image may darken. Turn focusing
ring until image on the matte field appears sharp.
26
Page 37

The N6000 viewfinder covers approx. 92% of the image
area of the actual photograph so the actual picture
comes out larger than the image in the viewfinder. Note
that the picture comes out trimmed down in the case of
mounted slides or service-size prints from negatives.
When using a zoom lens:
For maximum focusing accuracy, focus at the lens’
longest focal length setting. The shallow depth of field
and large image scale at the longest focal length setting
help ensure pinpoint focusing. Conversely, focusing at
the shortest focal length setting and then zooming up to
the longest focal length setting will magnify any slight
imprecision in focusing and could result in unsharp
pictures.
Page 38

A. Split-image
focusing
B. Microprism
focusing
C. Matte-fieid
focusing
Out of focus
Page 39

In focus
27
Page 40

EXPOSURE---------------------------------------
EXPOSURE METERING SYSTEMS
The Nikon N6000 provides two types of exposure metering systems ing and Center-Weighted Metering.
Matrix Meter-
MATRIX METERING
This system is ideally suited for quick operation and for the
most dependable auto exposure control. It can also be used
for manual metering and flash exposure control operation with
any Nikon TTL Speedlight.
In Matrix Metering, the meter automatically provides the correct
exposure of the main subject in virtually any lighting situation,
without requiring manual exposure compensation. The Matrix
Metering sensor determines scene brightness by dividing the
scene into five areas, then analyzing each area for brightness
and scene contrast.
28
CENTER-WEIGHTED METERING
Choose Center-Weighted Metering when you want to base
exposure on either auto or manual exposure control for a cen
trally located subject. Selecting Center-Wejghted Metering
overrides Matrix Metering and concentrates 75% of the meter’s
sensitivity into the center of the viewfinder outlined by a 12mm
circle.
Page 41

METERING SYSTEM SETTING
1. Slide main switch to ON.
2. While pressing metering system button, rotate command
dial until your desired symbol —1’3 for Matrix Metering or
[w] for Center-Weighted Metering appears in LCD panel.
Page 42

.M
I.
lгs
F- -
Q«
-( /)
Matrix Metering is possible only with lenses that have a
built-in CPU (such as AF Nikkor and Al-P lenses). When
a lens without a built-in CPU or no lens is used, the
metering system is automatically set to Center-Weighted.
In either case, if you lightly press the shutter release but
ton, the I-3 symbol blinks.
29
Page 43

METERING SYSTEM SELECTION - WHEN TO USE MATRIX OR CENTER-WEIGHTED METERING
In scenes with both very bright and very dark areas, these two
metering systems produce varying results. For example:
A. Scene containing the sun or scenes with high refiectivity
It a scene contains strong highlights, such as the sun, snow or
bright reflections, Center-Weighted Metering renders the main
subject as a silhouette. With Matrix Metering, however, the light
value of darker parts is evaluated, resulting in an overall well-
balanced exposure.
B. Outdoor backlit subject
With Center-Weighted Metering, a backlit subject or scene with
people against a bright sky and/or clouds may lead to an under
exposed shot. With Matrix Metering, however, the camera auto
matically gives more exposure to darker subjects to ensure a
balanced overall exposure.
C. Front-iit subject against dark background
If a brightly lit off-center subject is positioned against a dark
background, Center-Weighted Metering places too much empha
sis on the dark center of the picture. So although the background
is correctly exposed, the main subject will be overexposed. Matrix
Metering, however, automatically integrates a dark background
with a bright subject to ensure the best overall exposure.
30
Page 44

Scene containing the sun
Center-Weighted Metering
Page 45

Outdoor backlit subject
Center-Weighted Metering
Page 46

Front-lit subject
If
Matrix Metering
Center-Weighted Metering
31
Page 47

D. Small dark subjects against a bright background
A subject significantly smaller than any of the Matrix Meter
ing sections may not be recognized and integrated into the
automatic exposure evaluation. For such subjects, switch to
Center-Weighted Metering and make exposure compensa
tion with AE lock lever* or exposure compensation button**
in Auto exposure mode, or obtain correct exposure meter
reading on the main subject*** in Manual exposure mode.
* See pp 50 - 51
** See pp 52 - 53
*** See pp 48 - 49
Center-Weighted Metering (with AE Lock)
32
Page 48

Matrix Metering
Center-Weighted Metering (without AE Lock)
Page 49

E. Sunset scenes
If you want to emphasize a dramatic sunset but don’t want
Matrix Metering to lighten the scene for a dark foreground
subject, use Center-Weighted Metering with or without
exposure compensation.
Page 50

Matrix Metering
Center-Weighted Metering
'' ■' ' '■
-
33
Page 51

EXPOSURE MODE
Light reaching the film is controiled by the shutter and aper
ture. The proper combination of shutter and aperture settings
results in the correct exposure. The necessary settings will be
based upon the ISO speed set for the film in use and the
operation of the camera’s exposure control system.
The relationship between aperture and shutter is as follows:
One change in shutter speed either doubles or halves the light
transmitted. For example, 1/500 passes half the light as 1/250
and double the light of 1/1000. The aperture f/8 passes half the
light of f/5.6 and double the light of f/11. If the correct exposure
for a scene is 1/500 at f/8, then we can also select 1/250 at f/11
or 1/1000 at f/5.6 and achieve the same exposure results.
Selecting the exposure control mode means deciding if you
want the shutter speed/aperture to be set automatically or
manually.
The Nikon N6000 offers five modes: four automatic exposure
control modes — Auto Multi-Program (^), Normal-Pro
grammed {PJ), Shutter-Priority auto (^), and Aperture-Priority
auto (^) — in addition to Manual (Hj) mode.
Each exposure mode has its own advantages.
In Programmed auto exposure mode, as the optimum combi
nation of shutter speed and aperture is automatically set by the
N6000’s microcomputer, you can concentrate completely on
picture composition and have greater opportunities to shoot,
without worrying about exposure.
34
Page 52

In Shutter-Priority auto exposure mode, you can manually set
shutter speed as desired. That is, you can freeze the action
with sharp, clear images using a fast shutter speed, or create
motion effects by choosing slower shutter speeds.
In Aperture-Priority auto exposure mode, you can control depth
of field by varying the aperture. You can use a larger aperture
(smaller f-number) for shallower depth of field to create softer,
less distinct backgrounds, or choose a smaller aperture (larger
f-number) for greater depth of field.
In Manual exposure mode, in addition to controlling both shut
ter speed and aperture, you can easily create intentionally
over- or underexposed photos.
Page 53

e
^RE*
EXPOSURE MODE SETTING
After turning power switch on, while pressing MODE button,
rotate command dial. Exposure mode changes in the following
sequence:
Page 54

<
03 lc*b fS.S DD
IE'S f S. S
a Q_-( ;] a Q«_( /1
Auto Multi-Program Manual
H
OC rC C
(23 iC3 FD.O
a Q
___
( ;i
Shutter-Priority Auto
Aperture-Priority Auto
Correspondingiy, Pm, S, A, M or P will appear on the LCD panel
while P (for both Auto Multi-Program and Normal Program),
S, A and M will appear inside viewfinder.
Si
03
lES fS .S
a Q__( f)
? •: r c *:
L J r J. LI
Normal Program
35
Page 55

p.
* z>
GQ (C
5(E3
Q
_ _
( i)
For Programmed auto or Shutter-Priority auto exposure
mode, use only lenses that have a built-in CPU such as
AF Nikkor or Al-P lenses. With other lenses, exposure
mode is automatically set to Aperture-Priority auto and
the metering system to Center-Weighted.
In this case, when you lightly press shutter release but
ton, exposure mode indicator blinks and F— appears on
the LCD panel.
36
Page 56

PROGRAMMED (Pm and P) AUTO
The N6000 offers two programmed auto exposure modes:
Auto Multi-Program mode and Normal Program mode,
I Picture sharpness can vary with the shutter speed used. Differ
ent focal length lenses handle differently at slow shutter
speeds, The recommended slowest shutter speed to be used
with any lens when hand-holding the camera is 1/focal length
(FL) of the lens. For example, with a 60mm lens, use 1/60 sec.
as the slowest hand-held speed. Keep in mind, however, that
1/30 sec. is the lowest recommended shutter speed for blurfree hand-held shooting.
The N6000’s Auto Multi-Program varies the exposure program
lines according to the focal length and lens maximum aper
ture. The inclinations of lines in the chart are designed to re
duce the possibility of picture blur by avoiding slower shutter
speeds. With Normal Program, you get a standard combination
of shutter speed and aperture.
Page 57

Program Charts
The EV (exposure value) charts demonstrate the difference
between N6000 Auto Multi-Program and Normal Program.
Follow either colored line to where it intersects a diagonal line.
This shows the combination of aperture (vertical line) and shut
ter speed (horizontal line), which will automatically be seleced
at each EV brightness level.
/^'V'VV> / /"
zz
/
/
/ /
/ / 444/
/ /
/
4/
z
z
44444
y
/
z
/ /
z z
zz
z
zzz
z zz
7z
z4
zz
y
/
/
z
z
/
/ z
Sec.30”l5’’ 8” 4" 2" I" 2 4 8 1 5 30 60 125 250 500 1000 2000
Auto Multi-Program Chart (ISO 100)
--------- With 50mm f/1.4
-----------
-----------
------------
/
With 28mm f/2.8
With Zoom 35-135mm f/3.5-f/4.5 at 100mm setting
With 500mm f/4
zz z
z
z:
z
z
z
Page 58

Operation in programmed auto exposure mode
Operation for Auto Multi-Program and Normal Program are
performed in the same manner. See the BASIC SHOOTING on
pp 16 -19.
Normal Program Chart (ISO 100)
—^—- With f/1.4 lens
-----------
With f/2.8 iens
-----------
With f/4 iens
37
Page 59

FLEXIBLE PROGRAM
When you want to use a specific shutter speed or aperture in
Programmed auto exposure mode, use the Flexible Program
function. Flexible Program enables you to temporarily change
an automatically set shutter speed/aperture combination in 1
EV step, while maintaining the correct exposure.
l^
p
•' M
M
____
rC C>
( I)
OHMC 3 Fd.Oj
& Q
1. Lightly press shutter release button.
38
Page 60

( c - rO
i^LILI r U
2. Turn command dial until desired shutter speed or aperture
value appears in viewfinder and on LCD panel.
•
• When program is shifted, exposure mode indicator biinks
in LCD panei and viewfinder.
• As soon as the dispiay on LCD panei and viewfinder dis
appears (i.e., as soon as meter is automaticaily turned off),
Ftexible Program is cancelied.
Page 61

SHUTTER-PRIORITY AUTO EXPOSURE MODE
Subject movement and your ability to hold the camera steady
will determine what shutter speed you should choose. Faster
speeds will generally produce sharper images. For creative
effects you may use slower speeds. Make your choice accord
ingly. The NBOOO's computer automatically selects the proper
aperture to match the selected shutter speed for correct expo
sure. Shutter-Priority auto mode operates only with Nikon
lenses that have a built-in CPU (AF Nikkor and Al-P Nikkor).
Page 62

"*•
At a fast shutter speed
At a slow shutter speed
39
Page 63

OPERATION IN SHUTTERPRIORITY AUTO EXPOSURE
MODE
1. Set lens to its minimum aperture
setting (highest f-number).
With AF Nikkor and Al-P-Nikkor
lenses, lock lens aperture at mini
mum setting.
40
2. While pressing MODE button, rotate command dial until "S” appears on LCD
panel and viewfinder.
C :> c r c c
c o r j. u
3. Remove finger from MODE button, and rotate command dial to select desired
shutter speed.
• Shutter speed indication changes one step at a time in the following sequence:
30"-15"-8"-4''-2"-1 "-2-4-8-15-30-60-125-250-500-1000-2000
Page 64

C ^
Ital
m3 5 o
0 Q_
If “HI” appears in the aperture position — Overexposure alert*:
Overexposure may occur. Select higher shutter speed or
use Nikon ND filter.
4. Confirm aperture value.
Camera selects correct aperture for
shutter speed selected.
If meter has automatically turned
off and LCD indicators disappear,
turn meter on again by lightly
pressing shutter release button.
5. Fully depress shutter release button
to take the picture.
C
ll
1
me DO
1
1
0 Q_ J ll>
,1 * Electronic analog display appears In both LCD panel and viewfinder to show
I value difference from correct exposure.
N
_ »
If “Lo” blinks in the aperture position — Underexposure alert*:
[■"/
Underexposure may occur. Select slower shutter speed, or
Or
use a Nikon Speedlight.
If “fEE” blinks in the aperture position —
Lens setting error alert:
Lens is not set to smallest aperture setting and shutter
locks. Set lens to smallest aperture.
41
Page 65

APERTURE-PRIORITY AUTO EXPOSURE MODE
Select the aperture based on how shallow or large you want
depth of field to be. Smaller apertures will make the back
ground and foreground sharper (good for scenic pictures)
while larger apertures will produce a shallower depth of field
(good for portraits). Your selected aperture will determine the
shutter speed which is automatically set by the camera's com
puter. When using the smaller apertures with corresponding
slower shutter speeds, remember as a rule of thumb that any
speed below 1/30 sec. may require the use of a tripod to pre
vent picture blur due to camera shake. Also, the higher the
corresponding shutter speed, the easier it is to stop action.
Adjust the selected aperture if the speed is not appropriate for
conditions or the specific effect you want.
42
Page 66

At small aperture
Page 67

OPERATION IN APERTUREPRIORITY AUTO EXPOSURE
MODE
1. While pressing exposure MODE button, rotate command dial until “A” appears on
the LCD panel and viewfinder.
O I c
; I iL j
2. Remove finger from exposure mode setting button and set
lens to desired f-number by rotating lens aperture ring. .
Aperture changes in the following sequence, as indicated in
LCD panel and viewfinder.
F1-F1.4-F2-F2.8-F4-F5.6-F8-F11-F16-F22-F32-F45-F64
(Available apertures limited to those on lens In use.)
• An Intermediate figure (e.g. F1.8, F3.3) displayed indicates a
lens' maximum aperture. Also, with zoom lenses, the maxi
mum aperture for different focal length settings appears in
1/6 EV steps.
• With lenses having no CPU, “F-" appears instead of aper
ture value on the LCD panel and viewfinder.
• With an AF Nikkor or AFP lens, make sure to unlock aper
ture ring before rotating it
43
Page 68

3. Confirm shutter speed.
Camera selects correct shutter speed
to match your aperture setting.
If meter is automatically turned off
and LCD indicators disappear,
turn meter on again by lightly
pressing shutter release button.
4. Fully depress shutter release button
to take the picture.
44
If shutter speed indicator blinks — Picture blur alert:
A shutter speed of 1/FL is generally accepted as the mini
mum speed for hand-held photography, but since not
everyone can hold a camera equally steady, this Is just a
_____
p £3
■ I
\ /
m~L or FE' c'
0 i)
' Electronic analog display appears both on the LCD panel and viewfinder to
show value difference from correct exposure.
guideline. The blinking shutter speed indication
warns you that the exposure conditions call for
a speed of 1/FL or slower. For example, with a
200mm lens, shutter speed indication blinks when auto
matically selected speed is 1/200 sec. or slower. Make ad
justments to shutter/aperture if that speed is inappropriate
for the picture conditions.
If “HI” appears in the shutter speed position — Overexposure alert*:
Overexposure may occur. Select smaller aperture (larger
f-number) or use ND filter.
If “Lo” blinks in the shutter speed position — Underexposure alert*:
Underexposure may occur. Select wider aperture (smaller
f-number), or use a Nikon Speedlight,
■ 1 j
Page 69

MANUAL EXPOSURE MODE
Manual exposure control allows you to make both aperture
and shutter speed settings. You’ll probably follow the recom
mendation of the camera’s light meter for technically correct
exposure, but you may choose otherwise and modify exposure
settings for creative effects or special requirements.
Page 70

OPERATION IN MANUAL EXPOSURE MODE
1. While pressing exposure mode button (MODE), rotate com
mand dial until “M” appears on the LCD panel and view
finder.
45
Page 71

2. Remove finger form exposure mode button, set shutter
speed using command dial, and aperture using lens aper
ture ring.
3. Adjust aperture and/or shutter speed until Electronic Analog
Display indicates “0” or the desired exposure.
• With an AF Nikkor or Ai-P lens, make sure to unlock aper
ture ring before rotating it.
46
Page 72

|H|
• With lenses that have no CPU, “F-" appears instead of
aperture value on the LCD panel and viewfinder.
The electronic analog display range is +1EV to —1EV, in
increments of 1/3EV.
◄ and ► appears when exposure is beyond +1EV.
Page 73

^■■■1
Over +1EV
Examples:
I
±OEV
If meter is automatically turned off
and LCD indicators disappear,
turn meter on again by lightly
pressing shutter release button.
E3
I 3C
tu D
Q«_
I"l
+1EV
■ I
+1/3EV
• «O* • i~~
I"
-2/3EV
■ aO* •
im^
Below-1EV
V
4. Fully depress shutter release button
to take the picture.
47
Page 74

TO GET EXPOSURE METER
READING FOR A MAIN
SUBJECT OFF CENTER
If you want to set desired exposure on a
particular subject, use Center-Weighted
Metering. With a subject outside the
12mm-dia. circle, or when there is a
substantial difference in brightness
between the main subject and the back
ground (e.g., a strongly backlit subject),
use the following manner.
48
1. Center main subject inside view
finder’s 12mm circle and/or move in
closer so the circle is covered by the
subject.
3. Adjust shutter speed and aperture until electronic analog display shows desired
exposure.
Page 75

4. Recompose the picture and shoot.
Page 76

BULB SETTING
*'»< * L r C C
; I o >j L u r 3. o
For long-time exposure, use B (bulb) setting. On bulb setting,
shutter remains open as long as shutter release button re
mains depressed. This setting can only be used in Manual
exposure mode. To select, rotate command dial clockwise until
“buLb” appears.
• With the bulb setting, changing the exposure mode to
shutter-priority auto causes “buLb” to blink, and shut
ter is locked.
• When using bulb setting, camera must be held very
steady. Use a tripod and cable release.
• You can perform long-time exposure for approximately
10 hours with a fresh battery.
•
49
Page 77

EXPOSURE COMPENSATION
Matrix Metering provides the main subject with correct expo
sure in virtually any lighting situation, without having to use
manual exposure compensation. But in Center-Weighted
Metering, for situations where you want to change composi
tions or for unusual situations such as snowscapes, backlit
subjects or when the main subject contrasts sharply with the
background, exposure compensation is recommended.
Also, in Matrix Metering, “correct” exposure is a value based
on a combination of film sensitivity, aperture and shutter speed
necessary to produce a “technically correct” exposure result.
We often want to vary the exposure results to create different
versions of the same picture or put creative emphasis on a
specitic part of the picture. This is accomplished by using
exposure compensation.
Exposure compensation can be accomplished in either one or
a combination of the following ways.
• AE (Auto Exposure) Lock Lever
• Exposure Compensation Button
• Auto Exposure Bracketing
As the results can vary depending on conditions, you may
want to experiment with each method.
50
Page 78

AE (AUTO EXPOSURE) LOCK LEVER
In auto exposure mode with Center-Weighted Metering, when
you want to control exposure based on a particular brightness
area of the scene, use the AE lock lever.
1. Center main subject inside viewfinder’s 12mm circle and/or
move in closer so the circle is covered by the subject.
Page 79

2. Lightly press shutter release button, and confirm shutter
speed and aperture in viewfinder.
4. Recompose and shoot.
Page 80

, While lightly pressing shutter release button, slide AE lock
lever and hold in.
• While AE lock lever is held in, shutter speed indication
does not blink for picture-blur alert, even if a slow shutter
speed is selected.
51
Page 81

EXPOSURE COMPENSATION BUTTON
If you wish lo modify the exposure control (from the ISO stan
dard), use the Exposure Compensation system. Modification
from —5EV to -I-5EV is possible. Be sure to reset the control to
zero to resume normal operation.
While pressing exposure compensation i2 button, rotate com
mand dial to set desired compensation value. The following
display appears on the LCD panel and viewfinder:
^symbol
Electronic analog display with indications
from —1 to +1 EV in 1/3 steps: Confirm the direction of
exposure (— or -t-).
Compensation value (from -5 to -1-5 EV in 1/3 steps):
Confirm amount of exposure compensation.
52
Page 82

# ^ tflmif»
• Once set, exposure compensation remains fixed until
reset.
Although ^ symbol stays on to indicate that exposure
compensation remains, compensation value and elec
tronic analog display disappear after you remove fin
ger from (2 button. To confirm compensation value,
press button again.
• Exposure compensation can also be achieved by
setting film speed manually. See page 24.
Page 83

Examples
1
1
C n
JI.U
n n
U.LJ
1
+2EV compensation
Over +1EV
1
1
aliil ■ 0^- jii-
< n n
I.U U. )
+1EV
+1/3EV
±OEV
-2/3EV
Below —1EV
53
Page 84

AUTO EXPOSURE
BRACKETING
When you want a variety of exposures of
the same subject (e.g., when shooting a
sunset), use the N6000's auto exposure
bracketing function to obtain three or
five different exposures.
Auto exposure bracketing only operates
in connection with any of the auto expo
sure control modes.
54
Page 85

1. Set exposure mode to Programmed auto, Shutter-Priority
auto or Aperture-Priority auto.
In Programmed auto exposure mode, both shutter speed
and aperture will be changed for your set compensation
value In stepped sequence. Aperture will be changed In
Shutter-Priority auto; shutter speed will be changed in
Aperture-Priority auto.
With exposure mode set at Manual, no exposure com
pensation will be made but as many shots as number of
frames set will be taken. With Bulb setting, shutter is
locked.
Page 86

OI
E3 .
/"'h
[(•)]
0]
So.fS.S
1
2. While pressing shift button, push BKT button to set auto ex
posure bracketing. Blinkingmjj* and ¡2 marks appear on
the LCD panel. Inside viewfinder, ¡2 symbol is blinking.
* 03] symbol remains after meter is turned off, but stops
blinking.
55
Page 87

3. While pressing BKT button, rotate command dial until your
desired combination of number of frames and compensa
tion value appear on the LCD panel and viewfinder. For
example, to shoot three frames with 0.7 degree compensa
tion, set 3F-0,7.
Indication changes:
1F—00 (just after the BKT button is pressed)
3F-0.3
3F-0.7
3F-1.0
5F-0.3
5F-0.7
5F-1.0
56
Page 88

sa
D
03
=-.5
4. Remove your finger from BKT button. On the LCD panel, the
number of frames you set tor auto exposure bracketing
appears instead of normal frame counter and blinking msi
and (2 marks remain to show auto exposure bracketing is
set. Inside the viewfinder, (2 symbol blinks.
Now, exposure is compensated as you set in step 3.
(Depending on compensation value you set, LCD panel and
viewfinder may show exposure indication different from that
shown before step 3).
Page 89

5. Depress shutter release button to release shutter and start
auto exposure bracketing operation.
Number of frames for auto exposure bracketing decreases
each time shot is taken.
For example, if you have set number of frames and com
pensation value as 3F-0.7, three shots — the first with —0.7
underexposed, the second without compensation and the
third with -1-0.7 overexposed — will be taken.
With film advance mode set at S:
Camera takes three or five shots as set — one shot each
time you depress shutter release button.
With fiim advance mode set at Cl or Ch:
Depressing shutter release button and holding it in triggers
three or five shots as set. If you remove your finger from
shutter release button before the set number of shots is
taken, the operation stops. To take the remaining shots,
depress and hold shutter release button again.
57
Page 90

ea
o
1 M
__
_
1 y
DH
5q Fb.S
15)
, When all frames set are taken, 031
and (2 marks disappear showing
auto exposure bracketing operation
completed and automatically
cancelled.
58
• To cancel auto exposure bracketing before or during operation, while
pressing shift button, push BKT button, inaj and marks disappear.
• If you set auto exposure bracketing with self-timer function, auto exposure
bracketing will not be performed but one shot without exposure compensa
tion will be taken.
• Auto exposure bracketing in flash photography compensates amount of flash
output regardless of camera’s exposure mode.
• If film reaches end of roll during shooting, auto exposure bracketing auto
matically stops. After loading a new film roll, push shutter release button to
resume operation.
• If auto exposure bracketing is performed with another exposure compensa
tion on camera or Speedlight, any compensation value can be added.
Page 91

SELF-TIMER OPERATION
ONE-SHOT SELF-TIMER
«nn»
1. While pressing cD button, rotate command dial until desired
timer duration appears on the LCD panei.
Timer duration can be selected between 2 to 30 seconds in
one-second increments.
• 2F-10 for two-shot self-timer appears next to 1F-30. For
two-shot self-timer operation, see next page.
Page 92

2. Compose picture and confirm focus and exposure.
o
03 / (? 5 ^
mm
3. While pressing 0 button, fully depress shutter release
button.
Self-timer LED starts blinking and 0 symbol on the LCD
panel blinks. For the final two seconds, the blinking LED
speeds up, telling you to get ready.
0 Q-^r i)
fS.S
59
Page 93

TWO-SHOT SELF-TIMER
fflim»
It is possible to take two consecutive self-timer pictures.
1. While pressing self-timer button, rotate command dial
counterclockwise until 2F-10 (next to 1F-30) appears on the
LCD panel.
2. Compose picture and confirm focus and exposure.
3. While pressing ci) button, fully depress shutter release
button.
Self-timer LED starts blinking and 0 symbol on the LCD
panel blinks.
The shutter is released for the first shot after approx. 10 sec.,
and the second shot is taken 5 sec. later.
Two seconds before each shot, the blinking LED speeds up,
telling you to get ready.
60
Page 94

O S3
i O
EB
Ic'S^-fS.S
0 Q_iJ f)
• To cancel self timer after it is activated, press ci) button
again.
• Exposure is locked when self-timer operation starts.
• When using any auto exposure mode, use eyepiece
cover DK-5 (provided) before setting self-timer to
prevent stray light from entering the viewfinder and
affecting exposure.
• Regardless of film advance mode setting, continuousframe shooting is not performed (except for two-shot
self-timer operation).
• Bulb setting cannot be used for self-timer operation.
•
Page 95

ACCESSORIES
61
Page 96

LENS COMPATIBILITY
LENS COMPATIBILITY CHART
Exposure mode Metering system
Programmed
auto
AF Nikkor lenses (except AF
Nikkor lenses for F3AF)
Al-P type Nikkor ED 500mm f/4 IF O O O O
Al- or Al-S-type Nikkor lenses (in
cluding Al-modified Nikkor lenses)
Medical-Nikkor 120mm f/4 IF
Reflex Nikkor lenses
PC-Nikkor lenses X X A3
Ai- or Al-S-type Teleconverters
Bellows Focusing Attachment PB-6
K Ring Set (K1~K5 rings)* X X AS
Auto Extension Rings
(PK-11,11A, 12,13 and PN-11)**
' K1 ring cannot be attached to AF Nikkor lenses. The ring may damage CPU contacts. Use PK-11A or BR-6 instead.
' PK-1, PK-2, PK-3 and PN-1 rings cannot be attached to the N6000. PK-11 ring cannot be attached to AF Nikkor lenses. Those
rings may damage CPU contacts. Use PK-11 A for AF-Nikkor lenses instead of PK-11.
O Compatible
X Incompatible
A' Set shutter speed to 1/60 sec. or slower.
A2 Set preset ring, then use AE-lock lever before shifting.
O O O O O O
X X
X
X X
X X
X X
X X
Shutter-
priority auto
X X
Aperture-
priority auto
O O
O
O
A'' A't
O O
A3 Set preset ring, then determine exposure before shifting.
A'' Shutter should be released after exposure is measured by
stopping down PB-6.
A= Stop-down exposure measurement will be performed.
Manual Matrix
O O
X
A'
O
A3
O
AS
X
X
X
X
X
X
X
Center-
Weighted
O
O
0
O
O
O
O
O
62
Page 97

•The following Nikkor lenses cannot be attached to thè
N6000. (Camera body or lens may be damaged).
• Non-AI lenses
• Fisheye 6mm f/5,6
• Fisheye OP 10mm f/5.6
• 200-600mm f/9.5 (No. 280001 to 301922)
• ED 180-600mm f/8 (No. 174041 to 174180)
• ED 360-1200mm f/11 (No. 174031 to 174127)
• 400mm f/5.6 and 600mm f/5.6 with Focusing Unit AU-1
• PC 28mm f/4 (No. 180900 or smaller)
• PC 35mm f/2.8 (No. 851001 to 906200)
• Reflex lOOOmm f/11 (No. 142361 to 143000)
• Reflex 2000mm f/11 (No. 200111 to 200310)
•
• The following teleconverter/lens cannot be used with
the N6000. (Correct exposure may not be obtained
using these accessories).
• AF Teleconverter TC-16/TC-16A
• AF Nikkor 80mm f/2.8
• AF Nikkor 200mm f/3.5
Page 98

63
Page 99

ACCESSORIES
OPTIONAL SPEEDLIGHTS
Nikon Speedlights SB-24/SB-23/SB-22/SB-20
With these Speedlights, N6000 provides automatic balanced
fill-flash. You can brighten shadows and balance subject and
background illumination levels without complex calculations. In
addition, manual flash output level adjustment, tront-curtain/
rear-curtain slow sync are also possible.
64
Page 100

SB-24
SB-23
SB-22
SB-20
 Loading...