

Page 1

Nikon
N
55
INSTRUCTION MANUAL
Page 2
Introduction
• Thank you for purchasing the Nikon
photography a bigger part
to
know your N55 camera, and be sure
Get
of
N55-a
your life.
camera that
to
read th
is
is
manual thoroughly
before using it. We recommend that you keep this manual handy.
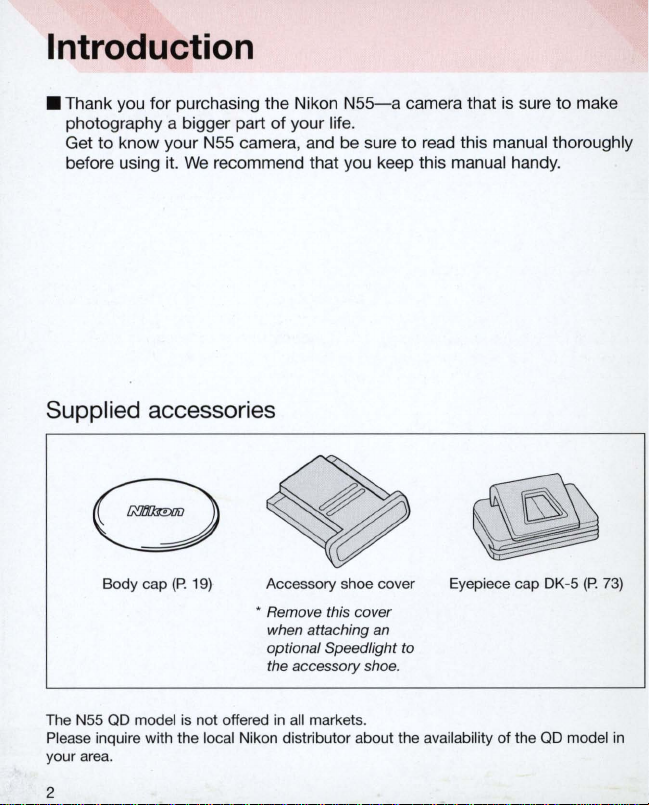
Supplied accessories
Body cap (P.
19)
Accessory shoe cover
• Remove this cover
when attaching
optional Speedlight to
the accessory shoe.
an
Eyepiece cap DK-5
sure
to
make
(P. 73)
in
all
The N55 QD model is not offered
Please inquire with the local Nikon distributor about the availability
your area.
markets.
2
of
the
QD
model
in
Page 3
•
Take
trial
shots
Take trial shots before shooting at important occasions like weddings or
graduations.
•
Have
Nikon
spot-check
Nikon recommends that you have your camera serviced by
dealer or service center at least once every
•
Using
your
camera
The Nikon N55's performance has been optimized for use with Nikon brand
accessories. Accessories made by other manufacturers may not meet
Nikon 's criteria for specifications, and nonconforming accessories could
damage the N55's components. Nikon cannot guarantee the N55's
performance when it is used with other than Nikon brand accessories.
your
correctly
camera
regularly
two
years.
an
authorized
I
I
I
3
Page 4
Contents
BEFORE YOU BEGIN ............................................................................
Introduction .................................................................... ....................................
Nomenclature ...............
LCD PanelN
Available Exposure Mod
Start
~
PRcPA~TI()~
1. Insta
2.
Mount Lens ..............................
3. Load F
4. Set Date and Time (QD model only) .............................
About Shutter Re
iewfinder Display .......................
Shooting
ll
Batteries and Check Battery Power ..............................
il
m ..................................................
.....
....
......
.............................................................................. 6-7
es
...................................................................................
Immediately
....•..
le
ase Button ...........................................................
....
........................................................................... 12-13
~
.............................................
......................................................................... 18-19
..........
...
...................................
...
....
.............................
..
.................................. 22-23
~:
.................
....
..................... 16-17
.................... 20-21
.....
......
2-11
...
.... 2-3
......
..... 8-9
10-
::1
s:~
............. 24
BASIC OPERATION 1 .......................................................................... 25-33
1. Set Focus Mode to
2. Set Exposure Mode to
3. Hold Came
4. Release Shutter ................................................................................................ 32-33
About Metering Systems and Exposure .....
AF
.........................................................................
8
ra
and Focus ................................................................................... 30-
................................................................................
..
.................................................
............. 26-27
28-
............ 34
BASIC OPERATION 2 .......................................................................... 35-44
Shooting with
Using Buil
Self-Timer Operation ................................................................
Imprinting Date
fFOCUS OPERA
Focus Mode ............................................................
Focus Area
AF-Assist Illuminator
Focus Lock ...................
Vari
-Program ...............................................................................
t-
In
Speedlight ...................................................................................... 40 -
fT
ime
(QD
model only) ....................................................................... 44
nON
................................................................. ..........
............................................................................
..
...
............................
..
..........................................................................................
--
-
---
....
...................
......
....................... 42-43
--
- - -
.....................................
.......
.............
~--
....
.................... .48-49
...
....
......
............... 50-51
... 36-39
~
...
. .46-47
..
11
1
29
31
41
I
52
4
Page 5
rexPOSUR~ODE
Auto-Multi Program .............................................................................................. 54-55
Shutter-Priority Auto Exposure Mode ...................................
Aperture-Priority Auto Exposure Mode ................................................................ 58-
Man
ual
Exposure Mode .
Long Time Exposure .......................
~
LADVANCED OPERATION ....................................................................
Exposure Compensation ...................................................................................... 64-65
Auto Exposure Bracketing ..
Multiple Exposure ..................
..............................................................................
..
............
.................. 56-
.........
...................................
..
......................................................................... 62
....................
.....................
-
..
................................................................................ 66-68
.........................................................................
...... 69-70
53=
~
..
60-61
~
63-7~
57
59
I
I
L
I
OTHER FUNCTIONS ...........................................................................
Film Rewind .......
Diopter AdjustmenWiewfind er Accessories .
Availa
bl
e Mode Combinations .......
FLASH PHOTOGRAPHY .................................................................... 75-85
Built-
In
Flash Sync Mode F
Using Buil
Fl
ash Shooting Distance Range ..........................................
Available Flash Sync Mode Combinations ....................................
Usable Lenses with Bu
About Depth of
"Mfs
CELLANEOUS ............................................................................. 87-1171
Lens Compatibili
Usable Optional Speedlights ....
Optional Accessories ............................................................................................ 98-99
Camera Ca
Notes on Batteries ................................................................................................... 1 02
Tro
ubleshooting .......................................
Glossary
fi
cations ....................
Speci
Index ...................................................
...
...............................
.......................................................................
.............
..............
................
...
---_.
SpeedlightiReady-Light ...............................
t-
..................
ea
In Spee
re
tures .........................................
dlight ............................................................
Fi
eld ..............
ty
........
.................
.......................
ilt-In Spee
...
............................................
...
............
dlight. .........................................................
.......
.........
.............
..
.......
...
....................
...
.................................................................. 100-
......................................................... 1 03-1 05
.......
...
.....................................
................
..
............................................................ 116-117
.......................
.................
-
...
........
.......................................... 78-79
............................
....
...........
...
..............
....................................... 110-114
.......
.........
....................... 73
........................
-----_
......
........................... 76-77
...................
...........................
.....
................................ 86
...
..........................
.......
...................
71-7~
........... 74
..
_.
...
.... 80-85
........
..............
..
...
.......... 88-90
. 1 06-1 09
....
84-85
91-97
101
1
72
83
. 84
5
Page 6
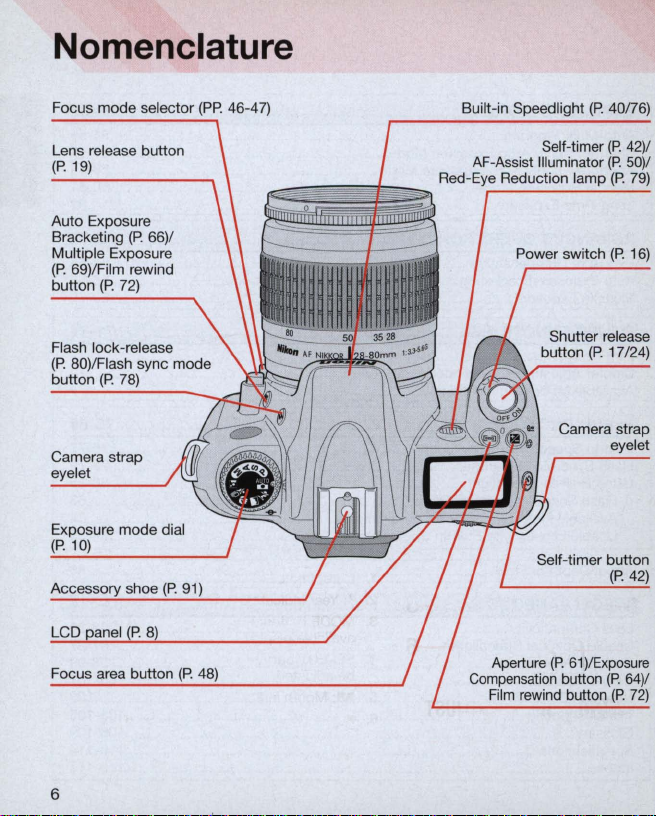
Nomenclature
Focus
mode
selector
(PP.
46-47)
Built-in Speedlight
(P
o
40n6)
Lens release button
(P.
19)
Auto Exposure
Bracketing
Multiple Exposure
(P
o 69)/Film rewind
button
Flash lock-release
(P
o 80)/Flash sync
button
Camera strap
eyelet
t:X[)osure
Accessory shoe
LCD
Focus area button
(P.
(P.
(Po
72)
78)
mode
66)/
dial
(Po
mode
91)
AF-Assist Illuminator
Red-Eye Reduction lamp
Compensation button
Self-timer
Shutter release
button
(P.
Camera strap
Self-timer button
(P
o
61
Aperture
Film rewind button
)/Exposure
(P.
42)/
(P.
50)
(P.
79)
17/24)
eyelet
(P
o 42)
(P.
64)
(P
o
72)
/
/
6
Page 7
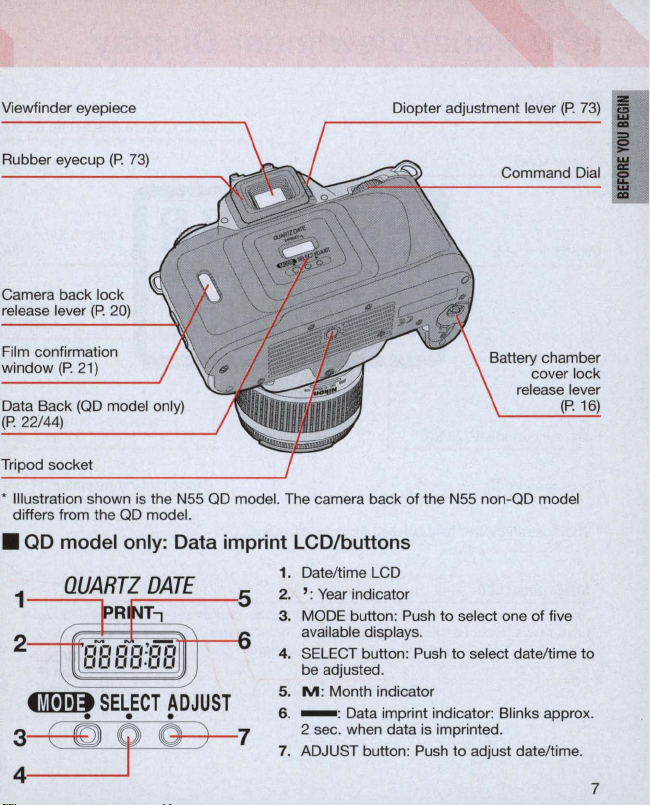
Viewfinder eyepiece
Diopter adjustment lever
(P.
73)
I
Rubber eyecup
Camera back lock
release lever
Film confirmation
window
Data Back
(P.22/
44)
Tripod socket
• Illustration shown
differs from the
(P.
(P.
(P. 20)
21)
(00
model only)
• QD model
1
-~-,
fiMD
SELECT
• • •
73)
is
the N55
00
00
model.
only:
Data imprint LCD/buttons
ADJUST
model. The camera back of the N55 non-OD model
1. Date/time LCD
2.
3. MODE button: Push
4. SELECT button: Push to select date/time to
5.
6. - : Data imprint indicator: Blinks approx.
7.
':
Year indicator
to
available displays.
be adjusted.
M : Month indicator
2 sec. when data is imprinted.
ADJUST button: Push
select one of five
to
adjust date/time.
I
Command Dial I
7
Page 8
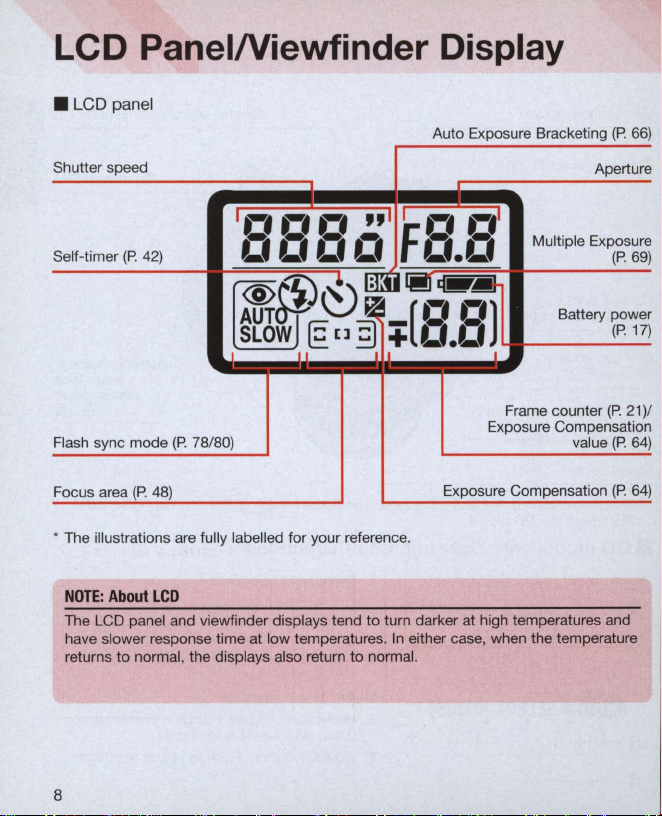
LCD PanelNiewfinder Display
• LCD panel
Auto Exposure Bracketing (P.
66)
Shutter speed
1
,-,,-,,-,
(P.
Self-timer
Flash sync mode
Focus area
• The illustrations are fully labelled for your reference.
NOTE: About
The LCD panel and viewfinder displays tend to turn darker at high temperatures and
have slower response time at low temperatures.
returns
42)
0000
'@~~
AUT
SLOW
(P
. 78/
80)
(P.
48)
LCD
to
normal, the displays also return
II
@:
[]
to
"I
t .-•
.-.
1
fo.o
lillti
~
~
~
__
[t:'
t:,)
~
+
L'.L'
III
In
either case, when the temperature
normal.
I
Frame counter (P.
Exposure Compensation
Exposure Compensation
Multiple Exposure
Aperture
Battery power
value
(P.
(P.
(P.
(P.
21)
69)
17)
/
64)
64)
8
Page 9
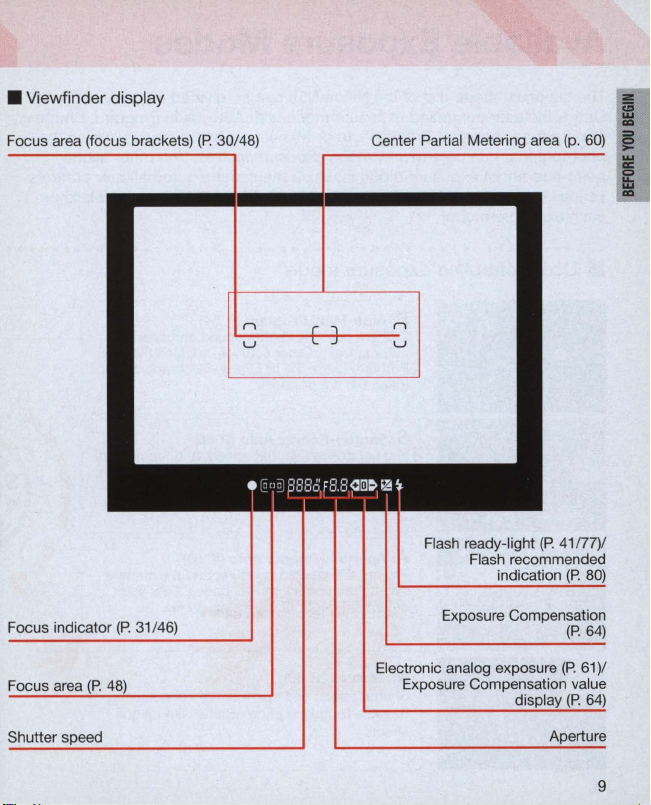
• Viewfinder display
Focus area (focus brackets)
(P.
30/48)
Center Partial Metering area (p.
Flash ready-light (P. 41n7)/
Flash recommended
indication
(P.
60)
80)
I
i
I
Focus indicator
Focus area
Shutter speed
(P. 31
/46)
Exposure Compensation
Electronic analog exposure
Exposure Compensation value
(P.
64)
(P. 61)
Aperture
/
9
Page 10
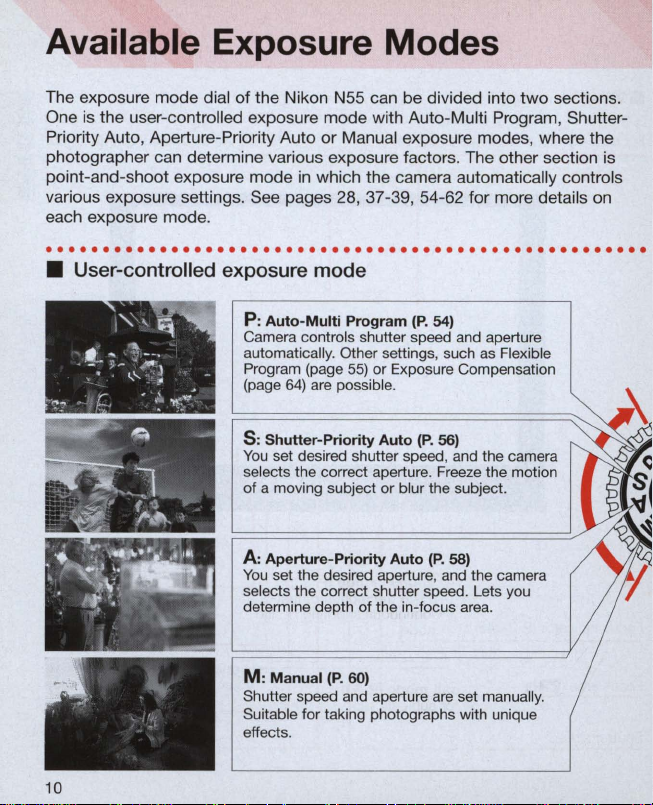
Available Exposure Modes
The exposure mode dial of the Nikon N55 can be divided into
One
is
the user-controlled exposure mode with Auto-Multi Program, ShutterPriority Auto, Aperture-Priority Auto or Manual exposure modes, where the
photographer can determine various exposure factors . The other section
point-and-shoot exposure mode
various exposure settings. See pages 28, 37-39, 54-62 for more details
each exposure mode.
·
...................................................
• User-controlled exposure
1'-'"
....
~
~
.
h.
~
~-
..'
j
~
-
\
.
W
--.
""J
,,-,
.
~
..
"
""
'It~'/
.:
",,>ill
----
-
. -
..
..
_ . T , .
"'...
' .
..
..
'
~
· -
.
W'
•
in
which the camera automatically controls
mode
P:
Auto-Multi
Camera controls shutter speed and aperture
automatically. Other settings, such as Flexible
Program (page
(page
64)
s:
Shutter-Priority
You
set desired shutter speed , and the camera
selects the correct aperture. Freeze the motion
of
a moving subject
A:
Aperture-Priority
You
set the desired aperture, and the camera
selects the correct shutter speed. Lets you
determine depth of the
M:
Manual (P. 60)
Shutter speed and aperture are set manually.
Suitable for taking photographs with
effects.
Program
55)
are possible .
or Exposure Compensation
Auto
or
(P.
54)
(P.
56)
blur the subject.
Auto
(P.
58)
in
-focus area.
un
two
ique
sections.
is
on
.
10
Page 11

• Point-and-shoot exposure mode
8:
AUTO mode (P. 28)
Camera automatically controls all the exposure
settings. Suitable
~
:
Portrait mode (P. 37)
Use this mode
is blurred
for
taking pictures right away.
to
take portraits. The background
to
accentuate your main subject.
I
!
i
rJ: Landscape mode
Use this
mode
or
nighttime scenes. The overall landscape will
be sharply focused.
~
:
Close-Up mode (P. 38)
Use this mode
subjects such as flowers or insects.
~QI:
Sports Continuous mode
Use this mode
moving subjects . Continuous shooting is also
possible with this mode.
~
:
Night Portrait mode (P. 39)
Use this mode
night background.
(P
to
to
to
for
. 37)
take pictures
take up-close pictures
freeze the motion
subjects with
of
an
distant daytime
of
(P.
38)
of
fast-
evening or
.
.
I • " -
~~
',~
. .
"';. ':,~.
~
.
11
Page 12
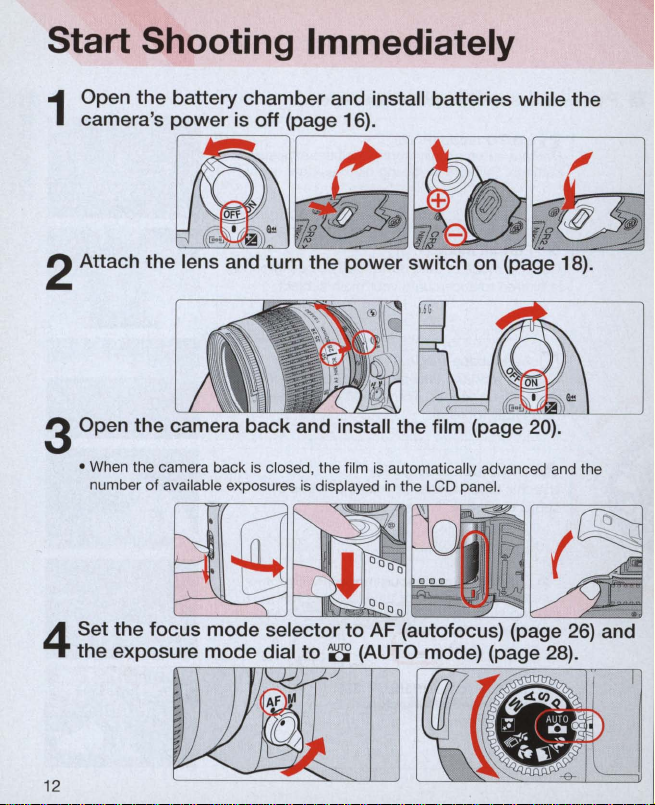
Start Shooting Immediately
Open the batte
1
camera's power
2 Attach the lens and turn the power switch
ry
chamber and install batteries while the
is
~
off (page 16).
#
~
on
(page 18).
#
~
cj>
3 Open the camera back and install the film (page 20) .
• When the camera back
number of available exposures is disp layed
Set the focus mode selector to AF (autofocus) (page 26) and
4
the exposure mode dial to
is
closed, the film
is
automatically advanced and the
in
the LCD panel.
~
(AUTO mode) (page 28).
"
~
~
12
Page 13
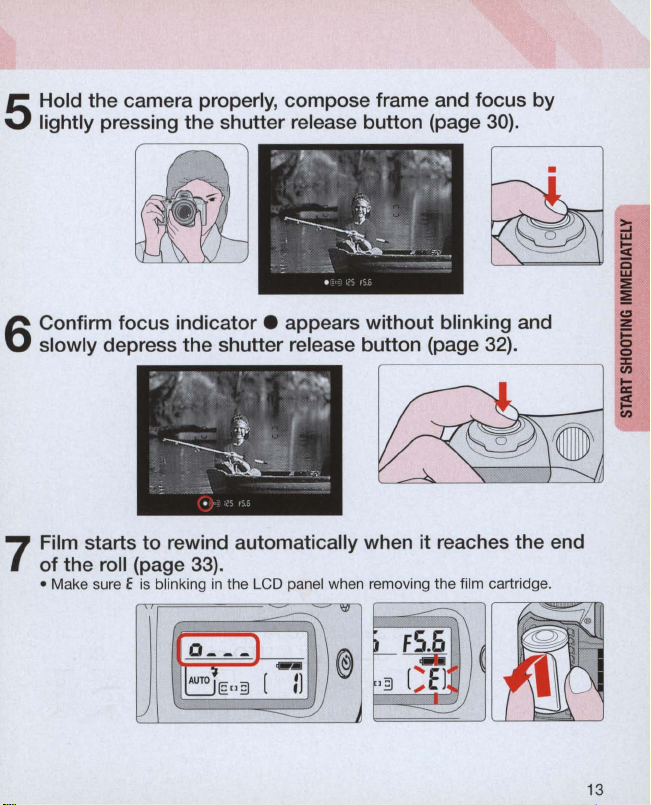
Hold
the
lightly pressing
5
camera properly,
the
shutter
compose
release
frame and
button
(page 30).
focus
by
Confirm
slowly depress
6
Film starts
7
of
• Make sure E is blinking
focus
the
roll (page 33) .
indicator.
the
shutter release
to
rewind automatically when it reaches the end
in
Q-
--
AUT
~E"
V
appears
the LCD panel when removing the film cartridge.
S\
1
-
3
[
:J
without
button
<V
@
blinking and
(page 32).
~
F-
FS.6
~
'3[~
~
-2J
13
Page 14

14
Page 15
PREPARATION
This section introduces the various
operations necessary before you start
shooting.
• Install batteries and check battery power
• Mount lens
• Load film
(QD
• Set date and time
• About shutter release button
model only)
15
Page 16
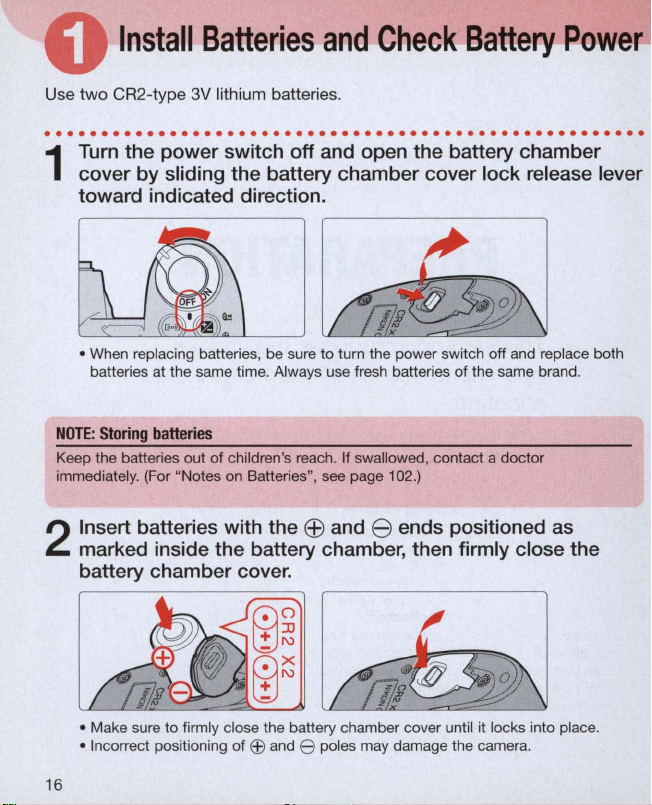
Use
Install
two
CR2-type
Batteries
3V
lithium batteries .
and
Check
Battery
Power
. . . . . . . . . . .
Turn
cover by slidi
1
toward indicated direction.
• When replacing batteries, be sure
batteries at the same time. Always use fresh batteries of the same brand.
N
OTE:
Storing
Keep the batteries out of children's reach. If swallowed, contact a doctor
immediately. (For "Notes on Batteries
Insert batteries with the
2
marked i
battery chamber cover.
..
. . . .
..
. . . .
...
. . . . . . . .
the power switch off and open the battery chamber
ng
the battery chamber cover lock release lever
to
turn the power switch off and replace both
batteries
",
see page 102.)
EB
and 8 ends positioned as
ns
ide the battery chamber, then firmly close the
..
. . . . . . . . . . .
..
. .
..
• Make sure
• Incorrect positioning of
16
to
firmly close the battery chamber cover until it locks into place.
EEl
and e poles may damage the camera.
Page 17
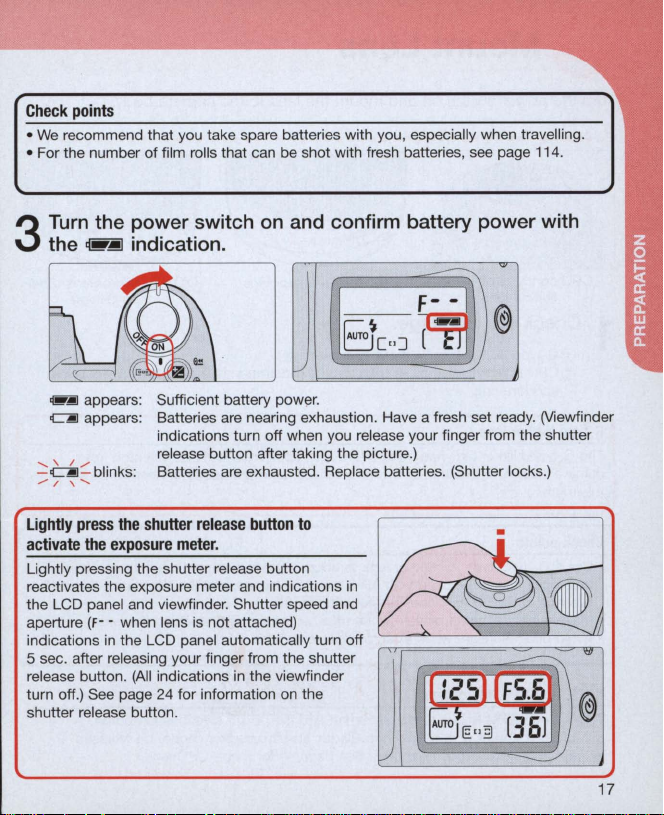
Check
points
•
We
recommend that you take spare batteries with you, especially when travelling .
• For the number of film rolls that can be shot with fresh batteries, see page 114.
Turn
3
the power switch
,.jiJ
the
~
appears:
CjIJ
appears:
......
\.
/",.
I \
.
bllnks
......
-~-
./
indication.
Sufficient battery power.
Batteries are nearing exhaustion. Have a fresh set ready. (Viewfinder
indications turn off when you release your finger from the shutter
release button after taking the picture.)
Batteries
:
on
and confirm battery power with
are
exhausted. Replace batteries. (Shutter locks.)
Lightly press
activate
Lightly pressing the shutter release button
reactivates the exposure meter and indications
the LCD panel and viewfinder. Shutter speed and
aperture (f - - when lens is not attached)
indications
5 sec . after releasing your finger from the shutter
release button.
turn off.) See page
shutter release button.
the
shutter
release
button
the
exposure
in
mete
r.
the LCD panel automatically turn off
(All
indications
24
in
for information
the viewfinder
on
to
the
•
in
Page 18
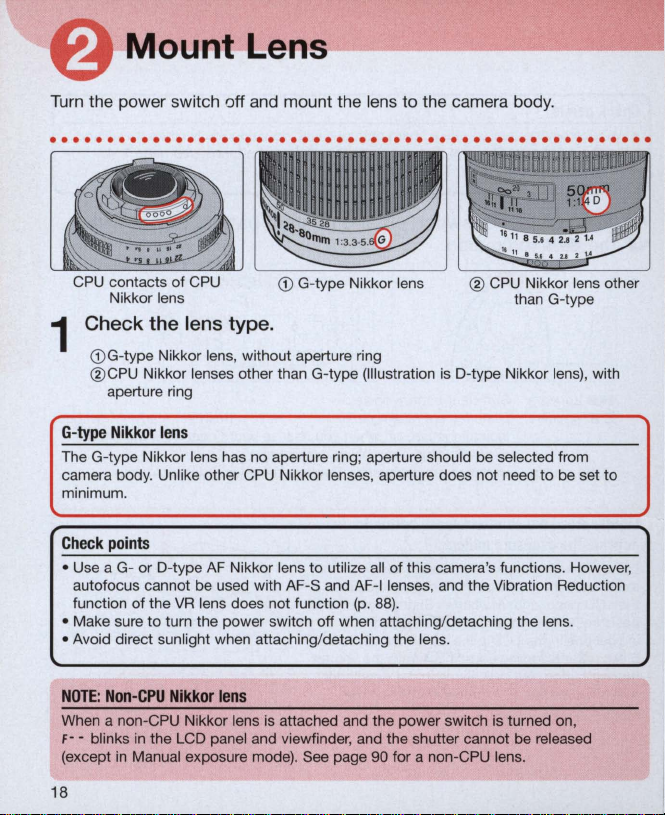
MountLens
~~------------
Turn the power switch off and mount the lens
. . . . . . . . . . . . . . . . . . . . . . . . . . . . .
CPU contacts of CPU
Nikkor lens
Check the lens type.
1
CD
G-type Nikkor lens, without aperture ring
CPU
Nikkor lenses other than G-type (Illustration is O-type Nikkor lens), with
®
aperture ring
G-type Nikkor
The G-type Nikkor lens has no aperture ring; aperture should be selected from
camera body. Unlike other CPU Nikkor lenses, aperture does not need
minimum.
Check
• Use a Gautofocus cannot be used with AF-S and A
function of the
• Make sure
• Avoid direct sunlight when attaching/detaching the lens.
lens
points
or
O-type
AF
VR
lens does not function (p.
to
turn the power switch off when attaching/detaching the lens.
CD
G-type Nikkor lens
Nikkor lens to utilize all of this camera's functions. However,
to
the camera body .
..
. .
..
. .
..
. .
..
. . . . .
®
CPU
Nikkor lens other
than G-type
to
F-I
lenses, and the Vibration Reducti
88)
.
be set
..
. . .
to
on
NOTE:
Non-CPU Nikkor
When a non-CPU Nikkor lens is attached and the power switch is turned on,
f-
- blinks
in
(except
18
the LCD panel and viewfinder, and the shutter cannot be released
in
Manual exposure mode). See page 90 for a non-CPU lens.
lens
Page 19

With
G-type
Nikkor
Position lens
and camera body are aligned, then twist lens anticlockwise until it locks into
place.
(Be
With CPU
Position lens
and camera body
place.
aperture
• When the lens is not set to its minimum aperture setting and the power switch is
turned on,
released.
Nikkor
(Be
to
lens
in
the camera's bayonet mount so that the mounting indexes
~ure
not
to
touch the lens release button.)
lens
with
in
the camera's bayonet mount so that the mounting indexes
are
sure not
its
minimum
FE
E blinks
aperture
aligned, then twist lens anticlockwise until it locks into
to
touch the lens release button.) And then,
and
in
the LCD panel and viewfinder and the shutter cannot be
lock
.
ring
(other
than
G-type)
set
the
Detach the lens.
3
• Push and hold the lens release button, then
turn the lens clockwise
When
camera
is
left
unattended
When you leave the camera unattended without a lens attached, be sure
the supplied body cap (page
be used.)
without
lens
2)
, or optional body cap BF-1A.
to
detach the lens.
(BF-1
body cap cannot
to
on
on
lens
attach
•
lens
lens
19
Page 20
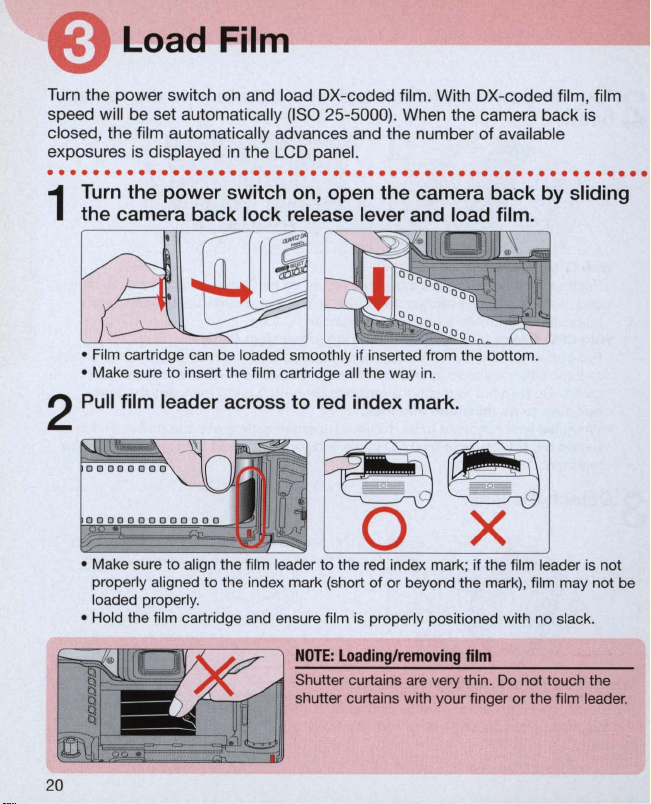
load
Film
--~--------\
Turn the power switch on and load OX-coded fil
speed will be set automatically
closed, the film automatically advances and the number of available
exposures
is
displayed
(IS
O 25-5000). When the camera back
in
the LCD panel.
m.
With OX-coded film, film
is
.....................................................
Turn
the power switch on, open the camera back by sliding
the camera back lock release lever and load film.
1
• Film cartridge can be loaded smoothly if inserted from the bottom .
• Make sure
Pull
2
• Make sure
properly aligned to the index mark (short of or beyond the mark), film may not be
loaded properly.
• Hold the film cartridge and ensure film is properly positioned with no slack.
to
insert the film cartridge
film leader across to red index mark.
to
align the film leader
all
the way in.
to
the red index mark ; if the film leader is not
NOTE: Loading/removing
Shutter curtains are very thin. Do not touch the
shutter curtains with your finger
film
or
the film leader.
Page 21
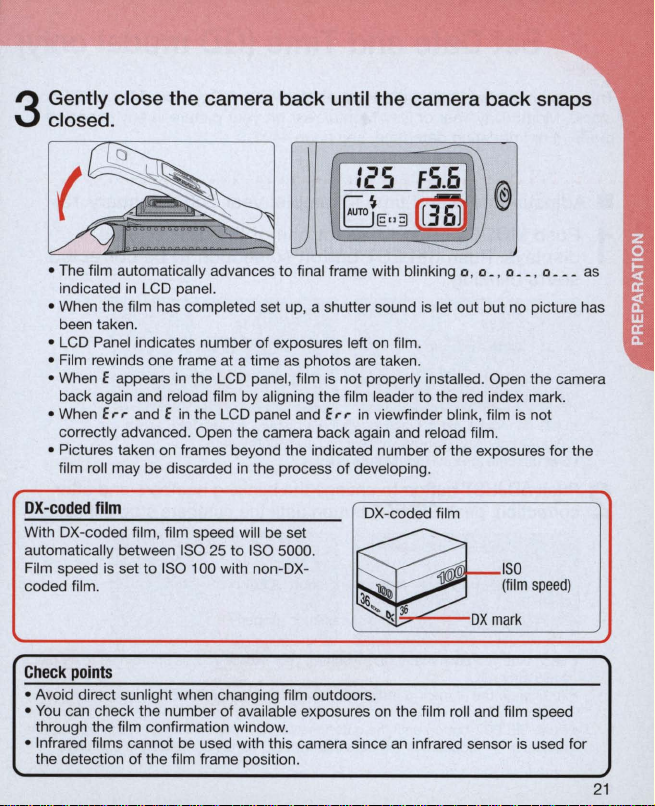
Gently close t
closed.
3
he
camera back
until
the camera back snaps
-~
:(,5
BE
J
• The film automatically advances
indicated
• When the film has completed set up, a shutter sound is let out but no picture has
been taken.
• LCD Panel indicates number of exposures left on film.
• Film rewinds one frame at a time as photos are taken.
• When E appears
back again and reload film by aligning the film leader
• When
correctly advanced. Open the camera back again and reload film.
• Pictures taken
film roll may be discarded
Err
in
LCD panel.
in
the LCD panel, film is not properly installed. Open the camera
and E
in
the LCD panel and
on
frames beyond the indicated number of the exposures for the
to
final frame with blinking 0 , 0 _ , 0
Err
in
the process of developing.
F5.6
u
3[m
2)
to
in
viewfinder blink, film
the red index mark.
@
__
is
, 0
not
___
as
OX-coded
With OX-coded film, film speed will be set
automatically between ISO
Film speed is set
coded film.
film
25 to I
to
ISO 100 with non-OX-
SO
5000.
OX-coded film
~
~
~
Check
points
• Avoid direct sunlight when changing film outdoors.
You
can check the number
•
through the film confirmation window.
• Infrared films cannot be used with this camera since
the detection of the film frame position.
of
available exposures
ISO
(film
j6
I);
on
the film roll and film speed
an
DX
mark
infrared sensor is used for
speed)
21
Page 22

Set
Date
and
Time
(QD
model
only)
This camera allows you to imprint Year/Month/D
clock), Month/DaylYear or Day/MonthlYear
mode. (For imprinting date/time, see page 44.)
ay,
on
your picture
Day/Hour/Minute (24-hour
in
any exposure
.....................................................
• Adjusting
Push
1
displays. Push
starts blinking.
• Date cannot be set
Year
• Set the time
Push
2
correction,
•
Each
to 98 after
•
To
more than 1 sec.
• Push SELECT button until the date/time display stops blinking. When the imprint
indicator - appears
date
and time (Example: year 2002 , January 15)
MODE
/Month/Day, Month/Day/Year
ADJUST button
time you push the ADJUST button, year section moves up from 98 to
change the numerical indication rapidly , hold the ADJUST button down for
button
in
Day/Hour/Minute display.
push
49)
.
to
select one of the
SELECT
in
Day/Hour/Minute display.
to
change
SELECT
in
the data imprint LCD panel, the setting is complete.
button so section
To
or
Day/MonthlYear .
button
the bli
until
set date, select
nking
the
numbers
date
or time
to
be corrected
numbers
stop
and
blinking
after
49
.
(back
22
Page 23
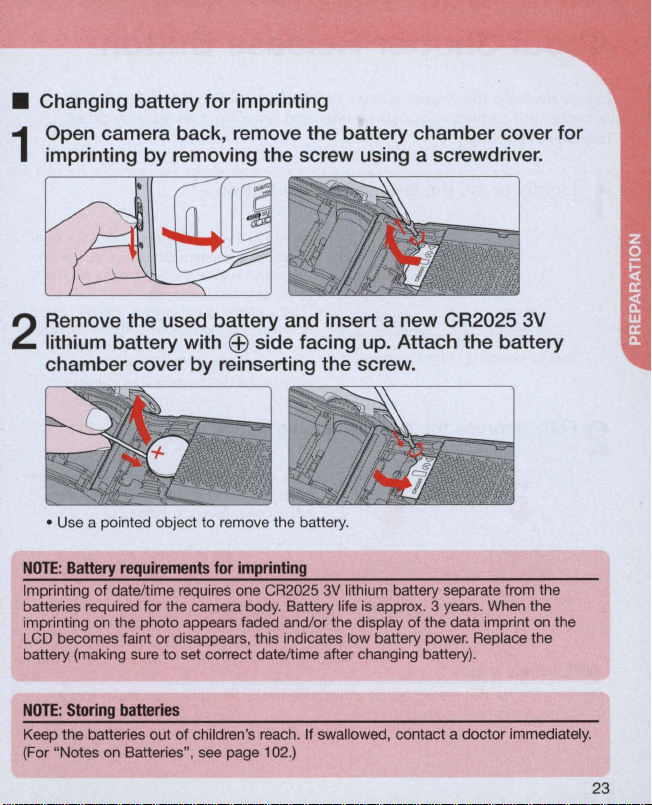
• Changing battery for imprinting
Open camera back, remove the battery chamber cover for
imprinting by removing the screw using a screwdriver.
1
Remove the used battery and insert a new CR2025 3V
lithium battery with
2
EEl
side facing up. Attach the battery
chamber cover by reinserting the screw .
• Use a pointed object to remove the battery.
NOTE:
Battery
requirements
Imprinting
batteries required for the camera body. Battery life is approx. 3 years. When the
imprinting on the photo appears faded and/or the display of the data imprint on the
LCD becomes faint or disappears, this indicates low battery power. Replace the
battery (making sure
of
date/time requires one CR2025
for
imprinting
3V
lithium battery separate from the
to
set correct date/time after changing battery).
NOTE:
Storing
batteries
Keep the batteries out of children's reach. If swallowed, contact a doctor immediately.
(For "Notes on Batteries", see page 102.)
23
Page 24
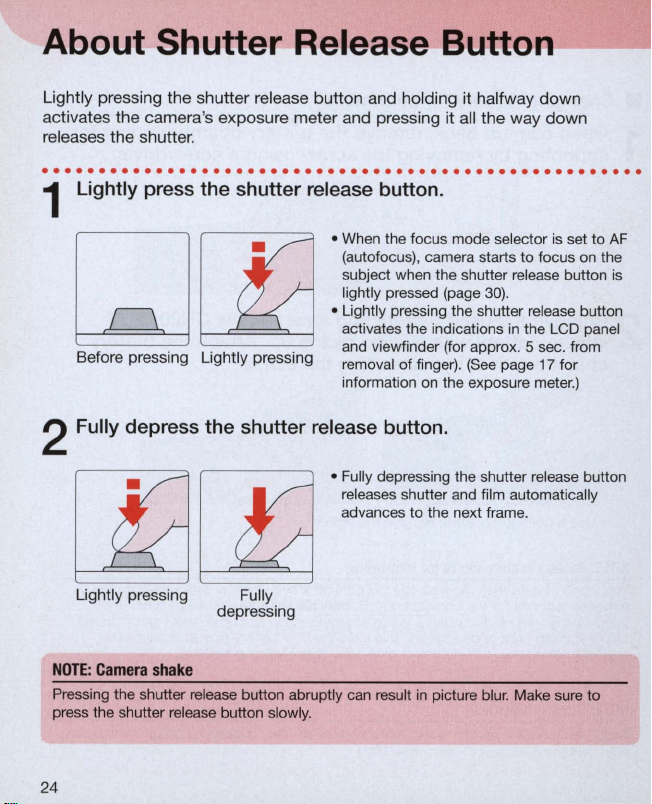
About Shutter Release
Lightly
pressing
activates
releases
. . . . . . . . . . . . . . . . . . . .
Light
the
shutter
release
the
camera
's
the
shutter
ly
press the shutter release button.
exposure
.
meter
...
button
and
. . .
..
. . . . . . . . . . . . .
and hol
pressing
ding
1
When
the focus mode selector is set
•
(autofocus), camera starts
subject when the shutter release button
lightly pressed (page
• Lightly pressing the shutter release button
activates the indications
Before pressing Lightly pressing
and viewfinder (for approx. 5 sec. from
of
removal
information
finger).
on
2 Fully depress the shutter release button.
• Fully depressing the shutter release button
re
leases shutter and film automatically
to
advances
the next frame.
[1a[!j
Button
it
halfway
it
all
the
30)
(See
the exposure meter.)
~--
down
way
down
..
. . . . . . . . . .
to
focus
on
.
in
the
LCD
page 17 for
to
the
panel
AF
is
Lightly pressing
NOTE: Camera
Pressing the shutter
press the shutter release
24
shake
depressing
re
lease butt
bu
Fully
on
abruptly can
tton slowly.
resu
lt in pictu
re
blur. Make sure to
Page 25
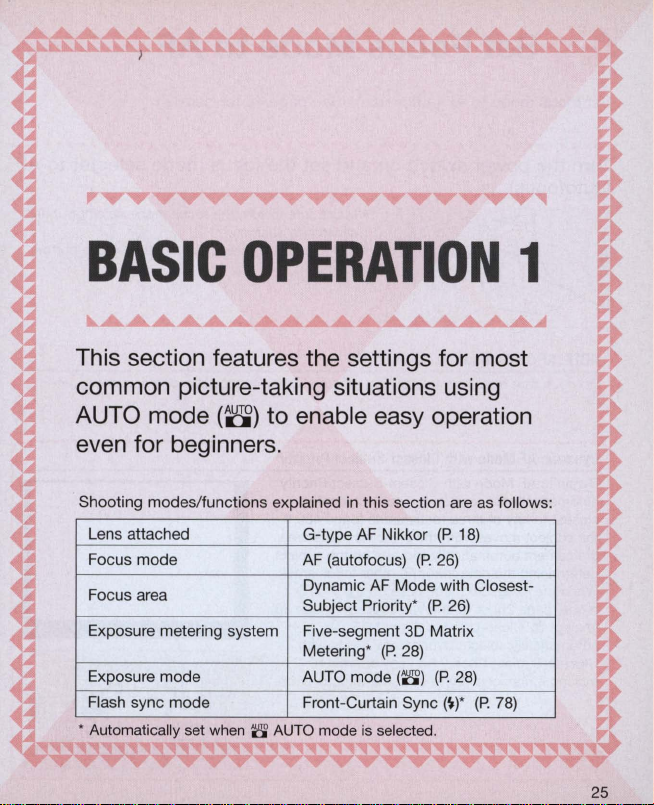
BASIC
OPERATION
This section features the settings for most
common picture-taking situations using
AUTO mode
(8)
to enable easy operation
even for beginners.
1
Shooting modes/functions explained
Lens attached
Focus mode
Focus area
Exposure metering system
Exposure mode
Flash sync mode
, Automatically set
when 8 AUTO
G-type AF Nikkor
AF
(autofocus) (P.
Dynamic
Subject Priority'
Five-segment
Metering'
AUTO mode
Front-Curtain Sync
mode
in
this section are
AF
Mode with Closest-
3D
(P. 28)
(8)
is
selected.
(P.
26)
(P. 26)
Matrix
(P.
28)
(W
18)
as
follows:
(P. 78)
25
Page 26
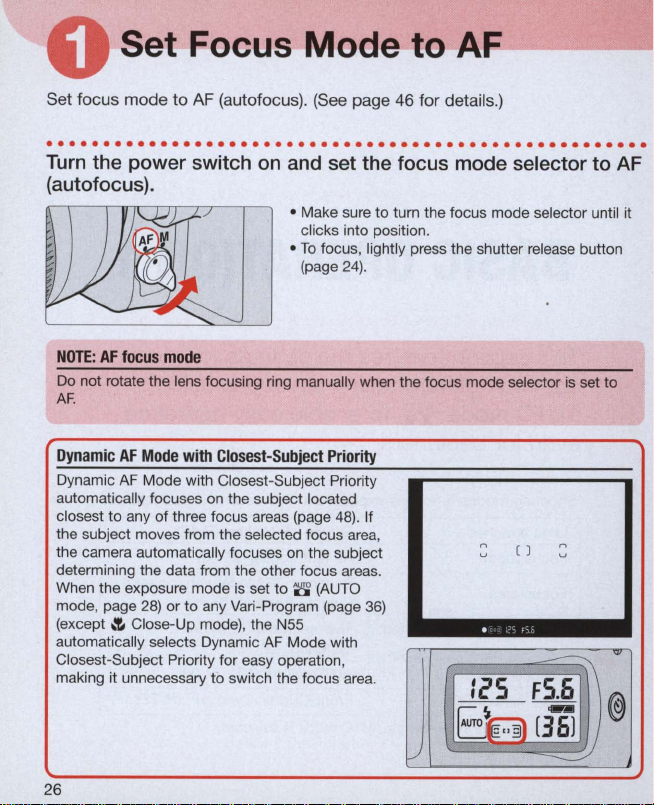
Set Focus Mode to
AF
-------I
Set focus mode to AF (autofocus).
(See
page 46 for details.)
.....................................................
Turn
the power switch
(autofocus).
NOTE:
AF
focus
mode
Do not rotate the lens focusing ring manually when the focus mode selector is set to
AF
.
Dynamic
Dynamic AF Mode with Closest-Subject Priority
automatically focuses on the subject located
closest to any
the subject moves from the selected focus area,
the camera automatically focuses
determining the data from the other focus areas.
When the exposure mode is set to
mode, page
(except
automatically
Closest-Subject Priority for easy operation,
making it unnecessary to switch the focus area.
AF
Mode
with
of
three focus areas (page
28)
or
.!.
to
Close-Up mode), the N55
se
lects Dynamic AF Mode with
on
and set the focus mode selector to AF
• Make sure
clicks into position .
• To focus, lightly press the shutter release button
(page
24).
Closest-Subject
any Vari-Program (page
Priority
on
the subject
8
(A
48)
UTO
to
turn the focus mode selector until it
. If
n
( )
u
36)
:~S
FS
n
u
~
@
26
f-/
im
[36J
~
Page 27
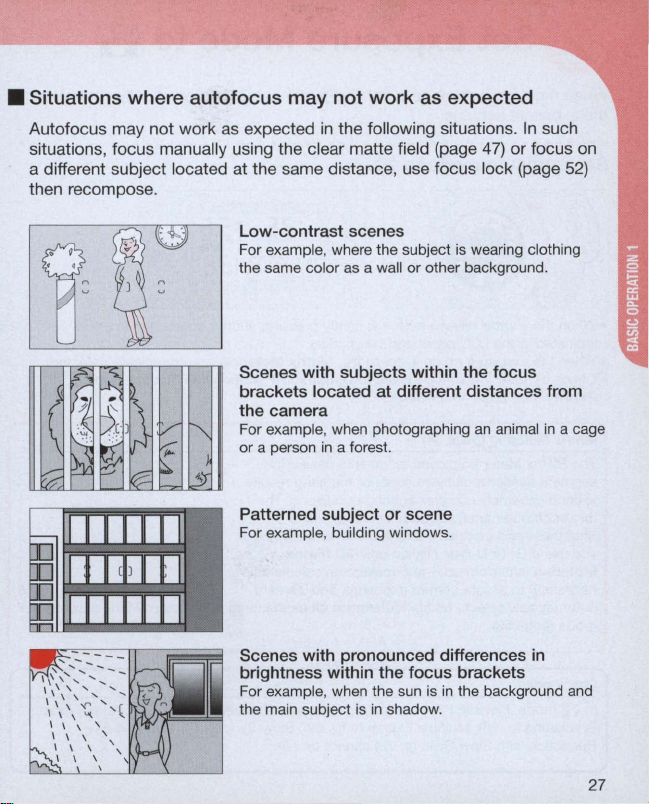
• Situations where
Autofocus may not work
situations, focus manually using the clear matte field (page
autofocus
as
expected
may
not
work
in
the following situations.
as
expected
47)
a different subject located at the same distance, use focus lock (page
then recompose.
In
such
or focus
on
52)
Low-contrast
For example, where the subject
the same color
Scenes with subjects within
scenes
as
a wall
is
or
wearing clothing
other background.
the
focus
brackets located at different distances from
the
camera
For example, when photographing
or
a person
Patterned
For example, building windows.
Scenes
brightness within the
For example, when the sun is
the main subject
in
a forest.
subject
with
or
scene
pronounced differences in
focus
is
in
shadow.
an
animal
in
brackets
in
the background and
a cage
27
Page 28
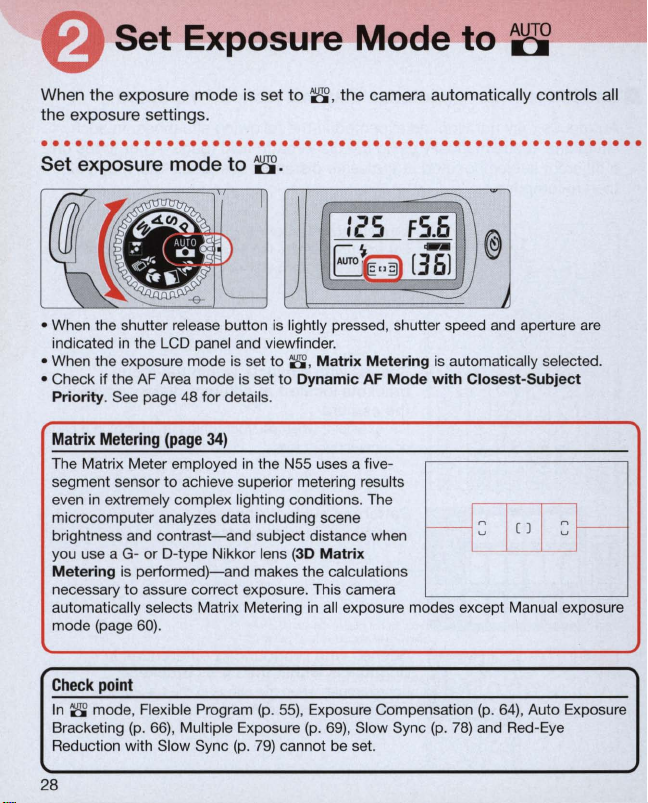
Set Exposure
Mode
to 8
When the exposure mode is set
the exposure settings.
·
...................................................
Set exposure
mode
to
to
8 , the camera automatically controls all
8.
.
-~
I
i'S FS.6
B
~
[36i
./
• When the shutter release button is lightly pressed, shutter speed and aperture
indicated
• When the exposure mode is set
• Check if the
Priority. See page
Matrix
The Matrix Meter employed
segment sensor
even
microcomputer analyzes data including scene
brightness and
you use a G- or D-type Nikkor lens (3D
Me
necessary to assure correct exposure. This camera
automatica
mode (page
in
the LCD panel and viewfinder.
AF
Area mode
48
for details.
Metering
in
tering is
(page 34)
to
extremely complex lighting conditions. The
achieve superior metering results
contrast-and
performed)-and
ll
y selects Matrix Metering
60)
.
to
8 ,
is
set
in
Ma
to
Dynamic AF
the N55 uses a five-
subject distance when
makes the calculations
in
trix Me
tering
Mode wi
Mat
rix
all exposure modes except Manual exposure
@
2J
is automatically selected.
th
-1
Closest-Subj
=
I
()
I
ect
=
are
~
Check
poin
t
In 8 mode, Flexible Program (p.
Bracketing
Reduction with Slow Sync
28
(p. 66),
Multiple Exposure (p.
(p.
55)
, Exposure Compensation (p.
69)
79)
cannot be set.
, Slow Sync (p.
78)
and Red-Eye
64)
, Auto Exposure
Page 29
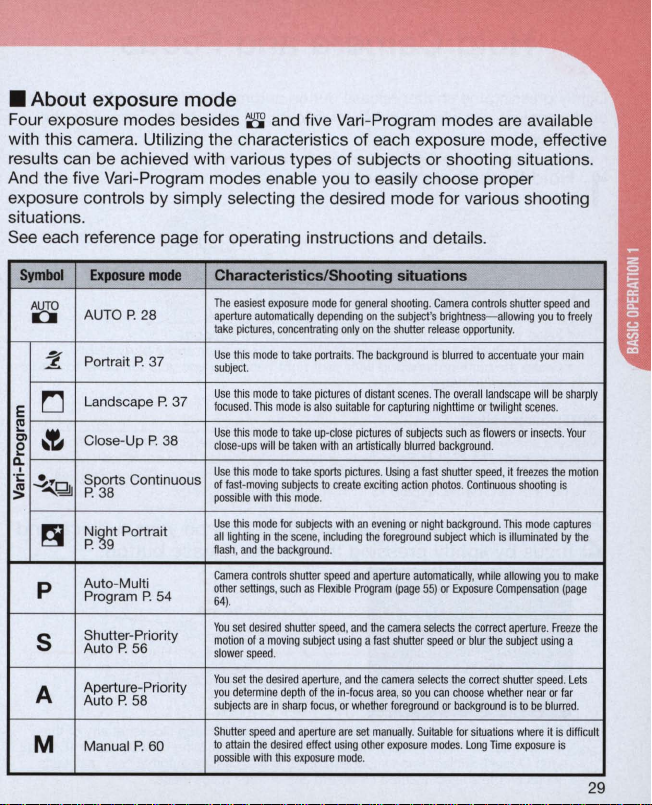
• About exposure mode
Four exposure modes besides 8 and five
with this came
re
sults can be achieved with various typ
And the five
exposure controls by simply selecting the de
situations.
See each reference page for
ra
. Utilizing the characteristics
Vari
-Program modes enable you
op
erating instructions and details.
es
Vari
-Program modes
of
each exposure mode, effective
are
available
of subjects or shooting situation
to
easily choose proper
sired mode for various shooting
s.
Symbol
~
~
~
rJ
E
m
...
OJ
~
e
q.
~Qj
~
~
p
S
A
M
Exposure
mode
AUTO P. 28
Portrait
P.
37
Landscape
P.
37
Close-Up P. 38
Sports Continuous
P
.38
Ni~ht
Portrait
P. 9
Au
to-
Multi
Program
P.
54
Shutter-Priority
Auto P. 56
Aperture-Priority
Auto
P.
58
Manual P. 60
Characteristics/Shooting situations
The
easiest
exposure
mode
for
general
aperture
automatically
take
pictures. concentrating
Use
this
mode
this
mode
this
mode
will
this
mode
fast
·moving
witll
this
mode for
lighting
in
tile
the
contro
settings, such as
.
set
desired
of a moving
speed
.
set
the
desired
determi
ne
are
in
speed
attain
tile
desired
le wi
th this
to
to
mode
to
be
to
subjects
this
background
ls
shutter
dep
sharp
and
subject.
Use
focused. This
Use
close-ups
Use
of
possible
Use
a
ll
flash, and
Camera
other
64)
You
motion
sl
ower
You
you
subjects
Shutter
to
possib
depending
take
portraits. The
take
pictures
is also
take
up-close
taken with
take
sports
to
mode
.
subjects
scene, including
.
shutter
speed
Flexible
speed, and
subject
aperture, and
th
of
the
focus,
aperture
effect
exposure
shooting. Camera
on
the
subject
only
on
tile
shutter
background
of
distant
suitab
create
with
using
scenes
le
for
capturing
pictures
of subjects
an
artistically blurred
pictures. Using a fast
exciting
action
an
evening
the
foreground
and
aperture
Program
(page
tile
camera
using a fast
shutter speed
the
camera sel
in-foc
us
area, so you
or
whether foregr
are
set man
ually. Suitable
other
exposure
mode
.
's
brightness-allowing
release
is
blurred
. T
he
nighttime
such as
background.
shutter
photos. Continuous
or
night
background. This
subject
automatically,
55)
or Exposure
selects
ects
the
can choose whether near
ound or background
modes. Long
controls
opportunity
to
overall
or
flowers
speed. it
which
while
the
correct
or
blur
correct shutt
for
situations
shutter
speed
you
.
accentuate
your
landscape
will
twilight
scenes
or
insects. Your
freezes
shooting
mode
is
illuminated
allowing
you
Compensation
aperture. Freeze
the subject using
er
speed
or
is
to
be blurred.
where
it
Time
exposu
re
and
to
freely
main
be
shar
.
the
motion
is
captures
by
tile
to
make
(page
a
. L
ets
far
is
difficult
is
ply
the
29
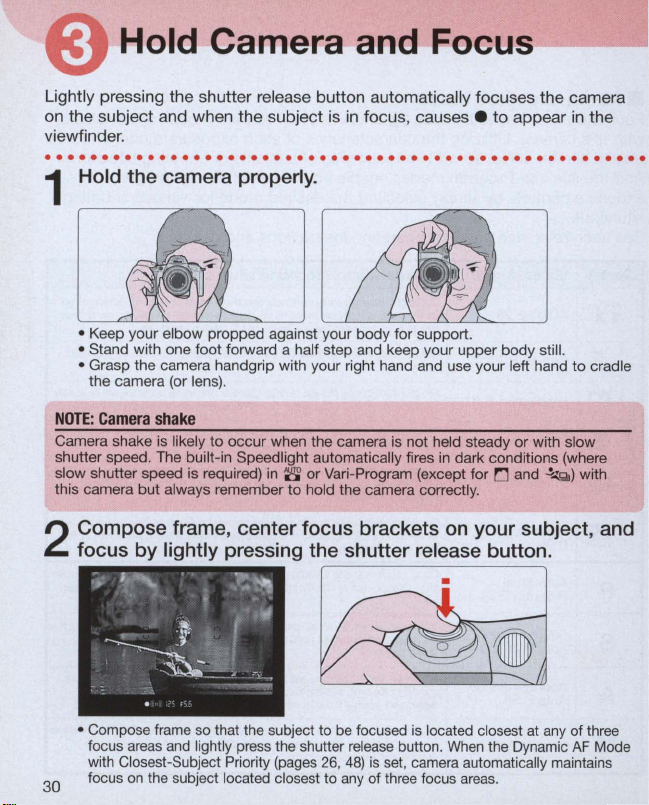
Page 30
Hold Camera and
Focus
~-~
Lightly pressing the shutter release button automatically focuses the camera
on the subject and when the subject is
viewfinder .
...
. . .
..
. . . . . . . . . . . . . . . . . . . . . . . . . . . . . .
Hold the camera properly.
in
focus, causes .
to
appear
.. . ...
. . . . . . . . .
in
the
1
• Keep your elbow propped against your body for support.
• Stand with one
• Grasp the camera handgrip with your right hand and use your left hand to cradle
the camera (or lens).
NO
TE: Came
Camera shake is likely
shutter speed. The built-in Speedlight automatically fires
slow shutter speed is required)
this camera but always remember
Compose frame, center focus brackets
focus by lightly pressing the shutter release button .
2
ra sha
foot
forward a half step and keep your upper body still.
ke
to
occur
when the camera is not held steady or with slow
in
8'
or Vari-Program (except for
to
hold the camera correctly.
in
dark conditions (where
on
•
r:J
and
~Q)
with
your subject, and
• Compose frame
focus
areas
with Closest-Subject Priority (pages 26,
on
focus
30
so
that the subject to
and
lightly press the shutter rel
the subject located closest to any of three focus ar
be
focused
is
located closest
button.
When
is
set, camera automatically maintains
the Dynamic
eas.
48)
ease
at
any
of three
AF
Mode
Page 31

• When shutter release button is lightly pressed, the camera focuses automatically
and focus indicator appears or blinks as follows:
• appears: Subject is
,
l/
-/
___
blinks: Unable
I'
• With dark subjects, the camera's AF-Assist Illuminator (page 50) is automatically
activated
to
guide autofocus (except
in
focus.
to
focus using autofocus.
in
0 or
~Q)
.
Check poi
• Diopter adjustment (page
•
• In situations where autofocus may not work
Built-in
When the subject is dark
shutter release button
in
Program (except
details.
NOTE:
This camera's viewfinder frame shows approximately 89% of the image actually
exposed on the film frame. Therefore, the actual exposed frame is somewhat larger
than the image you see through the viewfinder. Note that the edges of a negative film
are partially cropped by most labs.
nts
73)
viewfinder.
To
take a picture of a subject outside the focus area, shift the focus area (page
or
use focus lock (page
enables you
52).
to
see more clearly through the
as
expected, see page 27.
Speedlight
or
backlit and the
is
lig
Speed light automatically pops up in
in
Composing
0 or
frame
htly pressed, t
~Q).
See page 40 for
S'
he
or
buil
Var
t-
i-
48)
31
Page 32

Release
Shutter-
------
Confirm
depress the shutter release button. With a moving subject, Continuous Servo
AF (page
that.
(in
-focus indicator) appears
46)
activates and camera continuously focuses on the subject.
in
the viewfinder, then slowly, fully
.....................................................
Confirm indications
the shutter release button .
1
• When the subject is dark or backlit and shutter release button
the built-in Speed light automatically pops up and starts charging (pages 40,
Confirm that focus
2
the shutter release button .
in
the viewfinder while lightly pressing
is
lightly pressed,
indicator.
appears and slowly depress
76)
.
• After the shutter is released, the film automatically advances to the next frame
and the next shot can be taken.
32
Page 33

Film starts to rewind automatically when the last shot
3
taken.
~
0_
--
1
.-
dE"3
V
· 0 _
__
is displayed during film rewind.
(
@
Il
2J
is
Confirm that film
4
cartridge.
IcS
is
completely rewound, then remove film
<1l
FS.6
@
B
1£"3
eEl I)
v
• Film is completely rewound when the frame counter shows blinking E
panel.
(E
film is completely rewound
away from sunlight and remove the film cartridge.
Check poi
• If any other warning indications appear, see page 103 .
• For mid-roll rewind, see page 72.
nts
----
--------
appears without blinking when the exposure meter is off.) Make sure the
(E
is blinking
in
the LCD panel), open the camera back
in
the LCD
33
Page 34

About
............................
Metering
Knowing
photographic
Metering
systems
the
and exposure are
characteristics
expression .
Systems
1
...................................
important
of
each
factor
helps
and
factors
you
Exposure
for
taking pictures.
widen
your
.
• Metering Systems
As
the proper combination of shutter speed and aperture for correct exposure
is determined according
subject brightness is very important.
In
general, brightness inside the viewfinder is not uniform. The N55 provides
two metering systems:
Metering
detected by the five-segment Matrix sensor. Using G- or O-type Nikkor lenses,
the N55 camera performs
to
detected at the central areas including three focus areas
the N55,
is
Manual exposure mode .
(page
determine correct exposure. With Center Partial Metering, brightness is
Matrix Metering
set to other than Manual and Center Partial Metering is selected with
to
subject brightness and film sensitivity, measuring
Matrix Metering (page
60)
. With Matrix Metering, data on scene brightness is
3D Matrix Metering by adding distance information
is
automatically selected when the exposure mode
28)
and Center Partial
in
the viewfinder. With
• Exposure
Light from the subject passes through the lens and exposes the film. Light
reaching the film is controlled by the shutter speed and aperture. The proper
combination of shutter speed and aperture for subject brightness and film
sensitivity results
The N55's AUTO mode (page
Program (page
Program gives you the option to choose from Portrait, Landscape, Close-Up,
Sports Continuous or Night Portrait
taking situations and photographic images.
mode (page
automatically sets the proper aperture.
mode (page
sets the proper shutter speed.
manually set both shutter speed and aperture .
in
the correct exposure.
36)
automatically control shutter speed and aperture.
56)
, you can manually set shutter speed and the camera
58)
, you can manually set aperture and the camera automatically
28)
, Auto-Multi Program (page
mode-designed
In
In
Aperture-Priority Auto exposure
In
Manual exposure mode (page
for specific picture-
Shutter-Priority Auto exposure
54)
and Vari-
60)
, you
Vari
-
34
Page 35

,..
....................
.............
BASIC
This section describes the following
basic operations:
• Shooting with Vari-Program
• Using Built-In Speedlight
• Self-Timer Operation
• Imprinting DatefTime
OPERATION
(QD
model only)
2
35
Page 36

Shooting with Vari-Program
---
Vari-Program gives you the option
Up, Sports Continuous or Night Portrait
taking situations and photographic images .
. . . . . . . . . . . . . . . . . . . . .
Set the exposure mode dial to the desired Vari-Program,
1
then lightly press the shutter release button .
• Center the focus brackets on your subject (where you want the focus) and lightly
press the shutter release button. The camera focuses automatically and focus
indicator appears or blinks
e appears: Subject is
, 1/
-/e - blinks: Unable
I'
Confirm that focus
the shutter release button .
2
in
to
focus using autofocus.
to
choose from Portrait, Landscape, Close-
..
. . . .
as
follows:
focus.
indicator.
mode-designed
..
. . . . . .
appears and slowly depress
for specific picture-
..
. .
.. . ..
•
. . . . . . . . .
• Shutter speed and aperture
Program and
• When the subject
and fires
36
(e
xcept
are
displayed
is
dark
in
!":J
or
are
automatically determined
in
the LCD panel and viewfinder.
or
backlit, the built-in Speedlight automatically pops up
.!...zQ).
to
suit the selected
Vari
-
Page 37

~
...:!....
: Portrait mode
Use this mode whenever you are taking pictures of
people. It creates a blurred background
accentuate your main subject.
• 85mm to 200mm telephoto lenses with large
maximum apertures are recommended.
ci
• Distan
r:J:
Use this mode whenever you'
distant scene . The overall picture, whether the
subject is near
allows you
twilight scenes.
• Built-in Speed
• In some shooting situations, especially shooting
• A wide-angle lens is suited
ng the main subject and the background
emphasizes the effect.
Landscape mode
re
or
far, is sharply focused. It also
to
capture the beauty of nighttime or
li
subject is dark or backlit.
night scenes, slow shutter speed is selected. To
avoid camera shake, u
also helps to avoid camera shake.
of the landscape.
ght does not fire even when the
se
a tripod. U
to
to
taking a picture of a
se
of self-timer
capturing a wide view
NOTE:
Vari-Program
Flexible Program (page
Exposure (page
Vari-Program, available Flash Sync modes differ with each program (page
55)
69)
, Auto Exposure Bracketing (page
cannot be performed
in
Vari
-Program. When using the flash
66)
and Multiple
84)
in
.
37
Page 38

Shooting with
~:
Close-Up mode
Use this mode wh
close. It creates a blurred background to accentuate
your main subject. Useful
subjects such as flowers
• Dynamic AF Mode and center focus area
automatically selected (page
• In some shooting situations, slow shutter speed is
selected.
of self-timer also helps
• Effect is maximized at minimum focusi
of the lens
telephoto zoom position.
• For more professional uses, Micro-Nikkor lenses
are recommended .
•
~Qj:
Use this mode to freeze action. It uses a fast shutter
speed suitable for stop-action photography. In
Sports Continuous mode, Continuous Servo AF
(page
46)
continues
lock (page
repeatedly
fully depressed.
• Built-in Speed light does not fire even when the
subject is dark or backlit.
to
• 80mm
recommended.
• Use of I
recommended.
• A tripod
lens to avoid camera shake.
en
you
are
or
To
avoid camera shake, use a tripod . Use
in
use. When using a zoom lens, u
to
Sports Continuous mode
is
automatically activated and the camera
to
focus
on
52)
as
300mm telephoto lenses are
SO
400
is
recommended when using a telephoto
the subject without Focus
. Also, the shutter
long as the shutter release button is
or
faster film speed is
Vari-Program-continued
taking pictures up
in
taking close-ups of
insects.
48)
.
avoid camera shake.
is released
are
ng
distance
se
38
Page 39

~
:
Night Portrait mode
Use this mode for subjects with
background. Night Portrait mode captures
lighting
in
subject and background.
• Use
• Use of ISO 400 or faster film speed is
•
the scene, including the foreground
0 Landscape mode for twilight
scene without foreground subject.
recommended .
To
avoid camera shake, use a tripod.
an
evening
or
or
night
all
the
nighttime
39
Page 40

Using Built-In Speedlight
:------
When the subject is dark
pressed , the built-in Speedlight automatically pops up
(except
with the Speedlight.
in
rJ
or
~Q).
or
backlit and the shutter release button is lightly
Fully depress the shutter release button
in 8 or
Vari-Program
to
take pictures
.....................................................
When
the
subject is
1
button is lightly pressed,
automatically
• When the built-in Speedlight is ready to fire, ~ appears without blinking
viewfinder (when the camera's meter
• When you want
until it clicks shut while lightly pressing the shutter release button . (When the flash
is
canceled
pressed, flash
from the shutter release button and shutter release button is lightly pressed again,
the built-in Speedlight pops up again and flash starts charging.)
•
To
cancel the flash, select the Flash Cancel mode (page
the shutter release button.
Built-in
Speedlight
• The built-in Speedlight offers
• Using CPU Nikkor lenses such as a G-
of
number
length is used
reach the peripheral area and may result
Balanced Fill-Flash. Analyzing the brightness and contrast level derived from
Matrix Metering, the
main subject and background, while providing adequate flash output
natural-looking flash photography. See page 76 for details.
to
in
this manner, as long
is
canceled for subsequent shots. When you remove your finger
and
12/
40
(ISO
in
flash photography using the built-in Speed light, the flash may not
dark
or
backlit and the shutter release
the
built-in Speedlight
pops
up and starts charging.
in
to
the
Matrix
create
is
take a picture without the flash, close the built-in Speed light
Matrix
Balanced
an
100, m/
Matrix
angle of coverage of 28mm lens with a guide
ft.).
When a wide-angle lens of less than 28mm focal
Balanced Fill-Flash ensures proper exposure of the
on).
as
the shutter release button is kept lightly
79)
before lightly pressing
Fill-Flash
in
a dark picture .
or
O-type Nikkor lens enables use of
40
Page 41

Confirm ~ in
2
picture with flash by fully dep
viewfinder, then compose, focus and take the
button .
re
ssing the shutter release
• The shutter cannot be released unless ~ appears without blinking
viewfinder .
•
~
blinks
in
underexposure may have occurred. Check the flash shooting distance range
(page
• With dark subjects, the camera 's AF-Assist Illuminator is automatically activated
to guide autofocus. See page
NOTE: Continuous
After continuous use of the built-in Speedlight, it may stop firing
tube. Wait for a while before using the built-
Check
• Be sure
• Some lenses have limitations using the built(a
shadow may appear within the frame) (page
• Normal Front-Curtain Sync flash mode
sync modes are also availab
the viewfinder appro
83)
and shoot again.
use
of
built-in
points
to
remove (or store) the lens hood before flash shooting.
x.
3 sec. after full flash output. If this happens ,
50
for details.
Speed
light
in
Speedlight again.
in
Speed light and may cause vignetting
85)
le
. For details, see page
is
.
introduced
in
this section. Various flash
78.
in
the
to
protect the firing
41
Page 42

Self-Timer-
You
can use the self-timer when you want
camera shake .
. .
..
. . .
..
. . . . . . . . . . . . . .
Press @ (self-timer) button and confirm that ~ appears
1
the LCD panel.
Check
points
• Use a tripod or place the camera
To
shoot
in
an
•
supplied eyepiece cap DK-5 (page
release button
• Do not stand
exposure mode other than Manual, cover the eyepiece with the
to
in
front of the lens when setting the self-timer
Operation
..
. . . . . . . . . . . . . . . . .
on
a stable surface before using the self-timer.
2)
prevent interference from stray light and achieve correct exposure.
or with your hand before pressing the shutter
-~~~--
to
be
in
the photograph or reduce
in
autofocus mode.
..
. . . . . . . . .
on
42
Page 43

Compose picture, focus by lightly pressing the shutter
release button and fully depress the shutter release button.
2
• Self-timer shooting cannot be performed unless the camera's shutter can be
re
leased
(i.e
• Once the self-timer is activated, the shutter will release
timer lamp will blink for 8 sec. and then illuminate for 2 sec. before the shutter
re
leased.
• When
timer/red-eye reduction lamp lights for 1 sec. before the shutter
same output level
To
cancel the self-timer mode or the self-timer during self-timer operation, either
•
tu
rn
pane
. when subject cannot be brought into focus with autofocus).
Red-Eye
the power switch off,
l.
Reduction (page
as
the normal Red-Eye Reduction function.
79)
is
set, self-timer activates and the self-
or
press the ~ button until ~ disappears from the L
in
10 second
re
leases at the
s.
The self-
is
CD
43
Page 44

Imprinting
You
can imprint the following date information on your picture:
Year/Month/Day, Day/Hour/Minute, Month/Day/Year or Day/Month/Year. See
page 22
. . . . . .
1
• The data displayed on the data imprint LCD will be imprinted
to
set date and time .
..
. . . . . . .
Push MODE button
(Example: year 2002, January 15, 15:30)
Each time you push the MODE button the display changes
Select - - - - - - (no imprint) to cancel data imprint. Compatible film speeds for data
imprinting are
IS0
Datef-T-ime
..
. . . . . . . . .
to
select available imprinting displays.
Year/Month/Day Day/Hour/Minute
'02
-:
Day/Month/Year Month/Day/Year
L
32-3200.
[ : 5
..
. . . . .
:5)
-.[:5
-:'02)
(QD
model
..
. . . . . . . . .
as
:5:30)
-'
" [ -: :
on
the picture .
follows:
[-- -
5'02)
only)
..
. . . . . . .
No imprint
:J
--)
Compose picture,
button
2
Imprinted
The illustration at right indicates the position of the
imprinted date/time
against bright colors such as white
44
to
take a picture with the imprinted date/time.
PRINT
....
date/time
focus
and fully depress
• Data imprint indicator - blinks for approx.
sec. immediately after the shutter is released (when film
loaded).
on
the film. It may be difficult
or
reddish hues.
to
read
the
shutter release
two
to
three
is
-
Page 45

t
~
~
,..
~
FOCUS
A
~
~A
!
~A
This section features detailed
descriptions
• Focus mode
• Focus area
• AF-Assist Illuminator
• Focus lock
!
~A
.......
OPERATION
of
focusing operations.
T
........
....
"11
..6...A
~
~
~
~
~
~
~
~
~
~
~~
45
Page 46

Focus Mode
Two focus modes, autofocus using the Auto-Servo
Continuous Servo
·
...................................................
AF)
and Manual focus, are available with this camera.
AF
(Single Servo
AF
and
.
• Autofocus
• With the focus mode selector set to AF, lightly
pressing the shutter release button automatically
focuses the camera
area (page 9/48) and causes .
viewfinder.
• Auto-Servo AF
Camera automatically chooses Single Servo
according to the subject status, i.e. stationary or moving.
• Single Servo
Automatically activated when shooting a stationary subject.
The shutter can be released when the focus indicator . appears
Once focused
focus (Focus Lock, page
deactivated, and the focus mode automatically switches
• Continuous Servo AF
Continuous Servo
shutter can be released when the focus indicator . appears
focus is not locked and the camera continues
release. With a moving subject , Focus Tracking (page 108) is activated and the camera
continuously focuses on the subject. Also, N55 will continue to focus firmly
subject with Lock-On™ .
• When
automatically activated and the camera continuously focuses on the subject.
AF
on
a subject, keeping the shutter release button lightly pressed locks
52).
However, if the subject starts moving, Focus Lock is
AF
is
automatically activated when the subject is moving. The
~
Sports Continuous mode is selected, Continuous Servo
AF
or
to
on
the subject at the focus
to
appear
in
the
Continuous Servo
to
focus on the subject until shutter
AF
operation
in
the viewfinder.
Continuous Servo
in
the viewfinder; however,
AF
AF.
on
is
a main
About
Lock-OnTM
Lock-On™ Autofocus keeps focus firmly
momentarily blocks it
46
in
the viewfinder.
on
a main subject even if some other object
Page 47

• Manual focus
• Set the focus mode selector
viewfinder and rotate the lens focusing ring until the
image appears sharp
viewfinder. The shutter can be released whether or
not the subject is
focus indicator status.
• Use Manual focus
may not work
which
do
attached to the N55 (page
• When using a lens with the A-M select function, set
the switch/ring to M
(autofocus with manual priority) is available with
your lens, Manual focus
switch/ring set to M or M/A. See the instruction
manual of your lens for details.
Manual
focus
using
Electronic
Se
t the focus mode selector
the viewfinder. The Electronic Rangefinder works with most Nikkor lenses (including
AF Nikkors when operated manua
Lightly press the shutter
focusing ring until . appears
The Electronic Rangefinder can be activated with any of three focus brackets
selected
as
the focus area (page 9/
Rangefinder
to
M. The focus can be confirmed with .
ll
y)
re
lease button and while the meter is on, rotate the lens
having a maximum aperture of f/5.6
in
the viewfinder. The shutter can be released anytime.
49).
in
in
as
expected (page
not allow autofocus operation when
to
M. Look through the
on
the clear matte field
focus and regardless
situations where autofocus
88)
.
to
focus manually. If M/A
is
possible either with the
of
27)
or with lenses
in
dication
or
faster.
in
the
in
the
47
Page 48

Focus Area
This camera's three focus areas cover a wide frame area, and you can select
among them, depending
composition. When the focus mode
either
Dynamic AF
automatically selects the focus area, or
the desired focus area. When the focus mode
47),
Single Area Mode
manually using the selected focus area.
~
Tip
Dynamic AF Mode with Closest-Subject Priority is useful when you want the camera
take automatic control over focus operations , or when shooting a moving subject.
Dynamic AF Mode is useful
when the compositi
on
the subject's position
Mode
with Closest-Subject Priority, where the camera
is
automatically selected.
in
on
achieving focus
of
the photograph is your top priority .
is
set
to
Dynamic AF Mode, where you select
in
the frame or your desired
AF (page 46), you can select
is
set
to
M (manual focus, page
In
this mode, you focus
on
a particular part of a subject, or
to
. . . . . . . . . . . . . . . . . . . . . . .
• When focus mode
is
.. . ..
set to Autofocus
Set the focus mode selector to AF
(autofocus) and rotate the Command
Dial while pressing the focus area
button to select focus area .
• Rotating the Command Dial while pressing the
focus area button changes the display
__________
• Confirm selected focus area
viewfinder.
48
. . . . . . .
..
I
+---+~[ ~I
. . . . . . . . . . . . . . . .
as
follows:
AF
Dynamic
••
in
the LCD panel and
Mode
---+~
E
I
]
1
Page 49

• Dynamic
Dynamic
subject located closest
achieved. If the subject moves from the selected focus area, the camera automatically
focuses
AUTO mode
Mode with Closest-Subject Priority is automatically selected.
• Dynamic AF Mode
Focus
shutter
the selected focus area, the camera automatically focuses
the data from the other focus areas. When
Mode and center focus area are automatically selected.
AF
Mode with
AF
Mode with Closest-Subject Priority automatically maintains focus
on
the subject determining the data from the other focus areas. W
or
Vari-Program (except
is
obtained at the selected focus area and focusing is locked
re
lease button is lightly pressed) once it is achieved. If the subject moves from
Closest-Subject
to
any of three focus areas and focus is locked once it is
Priority
.!.
Close-Up mode) is selected, Dynamic
(as
on the
.!.
Close-Up mode is selected, Dynamic
subject determining
long
hen
as
on
8
AF
the
the
AF
• When focus mode
• Single Area Mode
Singl
e Area
Mode
(manual
focus.
).
Focus
is automatically selected when the focus mode selector is set
is
obtained only at the selected focus area when using the manual
is
set to Manual
Set the focus mode selector to M I
(manual) and rotate the Command Dial
wh
ile pressing the focus area button to
select focus area.
• Rotating the Command Dial while pressing the
focus area button changes the display
[[]
J~.--~ [ ~I
t
_________
• Confirm selected focus area
viewfinder.
••
-_~
in
as
follows:
@:J
J
the LCD panel and
to
~
15
!:!I
~
M
49
Page 50

AF-Assist Illuminator
When the subject is dark and the shutter release button is pressed lightly, the
camera's AF-Assist Illuminator automatically turns on and enables autofocus
operation
in
a dark environment.
••••••••••••••••••
Appro
x.
O.5-3~
O"M.8ft
NOTE:
Continuous
When the AF-Assist Illuminator is used continuously, illumination is limited temporarily
to
protect the firing tube. The illumination restarts after a few moments. Also, when
AF
-Assist Illuminator is used repeatedly
the
touch the AF-Assist Illuminator lamp because it may become hot.
.•
use
•••••••••••••••••••••••••••••••••••
• AF-Assist Illuminator automaticall y turns
following situations:
"
of
the
Focus mode is autofocus,
AF-S and
focus area is selected
Closest-Subject Priority
• AF-Assist Illuminator does not turn
• Focal length of the usable
200mm.
• The distance range
approx. O.5-3m or 1.6-9.8 ft. Autofocus using the
camera's AF-Assist Illuminator cannot be performed
due to vignetting with some lenses at a shooting
distance less than 1m (page
Even
•
Illuminator
turns
AF-Assist
AF
-I) is used, subject is dark and center
of
when the optional Speed light with AF-Assist
is
attached, the camera's Illuminator
on
(page
94)
.
Illuminator
in
a short period of time, be careful not
on
in
AF
Nikkor lens (except
or
Dynamic
is
the AF-Assist Illuminator
AF
activated .
on
AF
Nikkor lens is 24-
51)
.
Mode with
in
Ll
or
the
~
<;iI.
is
to
50
Page 51

NOTE:
Lenses
incompatible
• Lenses with autofocus using the camera's AF-Assist Illuminator cannot be
performed due
AF
Micro 200mm f/4 IF-ED
AF 1B-35mm
AF 2o-35mm fl2.B
AF 24-B5mm fl2 .B-4
AF
24-12omm f/3.5-5.6
AF
Micro 70-1 Bomm f/4.5-5.6
• Lenses with autofocus using the camera's AF-Assist Illuminator cannot be
performed due
AF Bo-2oomm f/
AF
VR
• Autofocus cannot be used with AF-S and AF-I lenses (AF-Assist Illuminator also
does not turn
to
f/3.5-4.5
to
Bo-4oomm f/4.5-5.6
on)
with
AF-Assist
vignetting at a shooting distance less than 1 m.
ED
IF
IF
IF
vignetting regardless of shooting distance.
2.B
ED
ED
.
Illuminator
ED
51
Page 52

Focus Lock
Focus
lock
is
useful
in
that's
framed
outside
~
Tip
Focus lock is best suited for a photograph where composition
situations where autofocus may not work as expected (page
autofocus
of
the
N55's
shooting
three
when you want
focus
areas.
to
capture a subject
is
your top priority, and
27)
.
in
..........•............................•.............
Position the focus area
subject and lightly press the
1
shutter release button.
wh
en center
focus
area is
on
(For exa
selected
the
.)
mple
,
52
• • appears when the subject is
the focus is locked
release button is kept lightly pressed.
• Focus lock cannot be used
• Focus is not locked with a moving subject.
lock focus
been moving, remove your finger from the
shutter release button and lightly press the
shutter release button again.
as
on
a stationary subject which
Confirm focus indicator
2
compose while lightly pressing the
in
in
focus and
-l-..{
Q .
long as the shutter
e,
shutter release button and shoot.
• After you have locked focus, do not change
the camera-to-subject distance.
To
has
Page 53

,.,.
,.,.,.,.,.,. ,.,.,.,.,.,.
,.,.
,.,.
...
,.,.
EXPOSURE
This section describes how
pictures
• Auto-Multi Program
• Shutter-Priority Auto
• Aperture-Priority Auto
• Manual
in
each exposure mode.
MODE
to
take
53
Page 54

Auto-Multi Program
P: Auto-Multi Program
The camera automatically controls exposure
achieve correct exposure
situation. For more complex shooting. use
Flexible Program (page
..
. . . . . .
..
. . . . . . . . .
Compensation (page
Bracketing (page
• P (Auto-Multi Program) can only be used with a
CPU
Nikkor lens such as G- or D-type Nikkor (page
88).
~
Tip
Auto-Multi Program is best suited for snapshots .
..
. . .
...
. .
..
64)
66)
.
. . . . . . .
1 Set the exposure mode dial to
NOT
E:
CPU
Nikk
or lenses
Always set the aperture ring of a CPU Nikkor lens (except G-type)
(largest f-number). When the lens is not set
blinks
in
the LCD panel and viewfinder. and the shutter locks.
other th
an
G-type
to
its minimum aperture setting.
in
any shooting
55)
. Exposure
or Auto Exposure
...
. . . . .
..
to
its minimum
fEE
to
. . . . .
P.
54
Page 55

Difference
Although exposure controls are the same, with Auto-Multi Program, you can select
functions such
Bracketing, Multiple Exposure (page
flexible shooting.
pop up automatically with a dark or backlit subject.
between 8 (AUTO
as
Flexible Program, Exposure Compensation, Auto Exposure
In
Auto-Multi Program, however, the built-in Speedlight does not
mode)
and P (Auto-Multi
69)
or Slow Sync flash (page
Program)
78)
for more
Compose picture, confirm focus
2
indicator.
• When the subject is too dark or too bright, one
of the following warning indications will appear
in
the viewfinder and LCD panel.
• H I: Use
to
: Use Speedlight.
•
• If the subject is too dark or backlit, the flash
recommended indication
viewfinder when you lightly press the shutter
release button. Use the Speed light (page
80/
91)
Flexible
Program
By rotating Command Dial
11
25
F5.5
E"E]
136J
"
"'
.-----
-.
-
Flexible Program, either change the exposure mode, turn off the power switch, or use
the built-
in
Speed light (page
I)
@
'
~
I
ii
50
~
"'
~
-.
E"E]
-
80)
FB
136J
.
Program, you can change the
combination of shutter speed and
I)
@
aperture while maintaining correct
exposure. With this function, you can
shoot
~
shooting
Aperture-Priority Auto.
and shoot .
ND
filter (optional) .
~
blinks
in
the
. i
in
Auto-Multi
in
Auto-Multi Program
in
Shutter-Priority Auto or
To
cancel the
as
though
I!I
I
55
Page 56

Shutter-Priority Auto Exposure Mode
s:
Sh
utter-Priority Auto
Fast shutter speed 1/500 sec.
Enables you
shutter speed (30-1/2000 sec.); the camera
automatically selects the proper aperture
provide correct exposure .
• S (Shutter-Priority Auto) can only be used with a
CPU Nikkor lens such as G- or O-type Nikkor (page
88).
< Tip
With high shutter speeds, you can freeze the motion
of a fast-moving subject; with slower speeds, you
can create a motion effect.
to
manually set the desired
to
Slow shutter speed
•
••
• •
•••
• • • • •
1/4 sec .
••
• • • • • • • • •
1 Set the exposure mode dial to S.
NOTE: CPU
Always set the aperture ring of a C
(largest f-number). When the lens is not set
blinks
56
Nikkor
lenses
other
than
G-type
PU
in
the LCD panel and viewfinder, and the shutter locks.
••
• • • • • • • • • •
Nikkor lens (except G-type) to its minimum
to
its minimum aperture setting,
••• • ••
• •
••
• • • •
FE
E
••
•
Page 57

Set the shutter speed (30-1/2000
2
sec.) with the Command Dial.
Compose picture, confirm focus
3
indicator.
• When the subject is too dark or too bright, one
of
the following warning indications will appear
in
the viewfinder and LCD panel. (Over- or
underexposure value is indicated with the
electronic analog exposure display
viewfinder.)
• H :: Select higher shutter speed. If the
Overexposure
Underexposure
Check
point
• If - - (Long Time exposure) is selected
mode is changed to Shutter-Priority Auto without cancelling - - , - - blinks and the
shutter locks.
other than - - by rotating the Command Dial.
To
shoot
in
Shutter-Priority Auto exposure mode, select shutter speed
• lo: Select slower shutter speed. If the
• If the subject is too dark or backlit, the flash
re
commended indication ~ blinks
viewfinder when you lightly press the shutter
release button. Use the Speedlight (page
80/
91)
in
Manual exposure mode and the exposure
and shoot.
in
the
warning indication still remains
an
NO
filter (optional).
warning indication still remains
the Speed light. When the Speed light is
used, fastest shutter speed
1/90 sec.
.
is
limited
in
the
on
on
, use
, use
to
I
I
57
Page 58

Aperture-Priority
Auto
Exposure
Mode
A: Aperture-Priority Auto
Enables you to set the desired aperture (lens'
mi
nimum
to
maximum) manually. The camera
ll
y selects a shutter speed suitab le
.
of
field (page
86)
, you can sharpen the
83)
.
Sma
ll
aperture f/32
Large aperture
fl2.8
automatica
for
correct exposure .
• A (Aperture-Priority Auto) can only be used with a
CPU Nikkor lens such as G- or D-type Nikkor (page
88)
•
In
flash photography, varying the aperture changes
the flash shooting distance (page
~
Tip
By varying the aperture, and thus controlling the
depth
background and foreground, or blur the background.
.....................................................
1 Set the exposure mode dial to
A.
NOT
E:
CPU Nikko
Always set the aperture ring
(largest f-number). Wh
blinks
in
58
r lenses
en
the LCD panel and viewfinder, and the shutter locks .
other
than G-type
of
a CPU Nikkor lens (except G-type)
the lens is not set
to
its minimum aperture setting,
to
its minimum
fEE
Page 59

Set the aperture
m
axi
mum)
2
Command Dial.
Compose picture, confirm focus
indicat
3
by rotating the
or.
(lens' minimum
and shoot .
to
Overexposure
Underexposure
• When the subject is too dark
of the following warning indications will appear
in
the viewfinder and LCD panel. (Over- or
underexposure value
electronic analog exposure display
viewfinder.)
• H :: Select smaller aperture (larger f-number).
If the warning indication remains
an
ND
• l 0: Select larger aperture (smaller f-number).
• If the subject is too dark
recommended indication
viewfinder when you lightly press the shutter
release button. Use the Speedlight (page
80
/91).
filter (optional) .
If the warning indication remains on, use
the Speed
li
ght.
or
too bright, one
is
indicated with the
or
backlit, the flash
~
blinks
in
in
the
the
on
, use
I
I
59
Page 60

Manual Exposure Mode
M: Manual
. . . . . . . . . . . . . . . . . . . .
...
Enables you
[Time] and 30-1/
minimum
• Non-CPU lenses (page
Manual exposure mode.
~
Tip
With electronic analog exposure display in the
viewfinder, you can produce various creative effects
by adjusting the exposure. Long Time exposure
(Time) can be set
. . . . . . . . . . . . . . . .
Set the exposure mode dial to M.
to
set both shutter speed (- -
2000
to
maximum) manually .
in
Manual exposure mode .
1
• Metering system automatically switches
Center Partial from Matrix
mode .
• When a non-CPU Nikkor lens is attached,
appears
in
SeVconfirm aperture with the lens aperture
ring. Camera's exposure meter cannot be
used. See page 90 for details.
Center
Partial M
Center Partial Metering places special emphasis
brightness around three focus areas
viewfinder and is thus useful for basing exposure
center area
etering
of
the scene.
in
the center of the
the LCD panel and viewfinder.
on
on
the
sec.) and aperture (lens'
90)
can only be used
..
. .
..
in
Manual exposure
I: :1
in
. . . . . . . .
to
F- -
[J
60
Page 61

NOTE:
CPU
Nikkor
lenses
other
than G-type
Al
ways set the aperture ring
(largest f-number). When the lens is not set to its minimum aperture setting,
blinks
in
the LCD panel and viewfinder, and the shutter locks.
of
a C
PU
Nikkor lens (except G-typ
e)
to its minimum
Set the shutter speed and aperture
while checking the electronic
2
e
r8!l8J
2So
F'-I
analog exposure display
viewfinder.
• Set the shutter speed (-- [Time] and 30-1/2000
sec.) by rotating the Command D
aperture (minimum
Command Dial while pressing the @ aperture
button .
• The electronic analog display
indicates the difference between the selected
exposure (shutter speed and apertu
correct exposure. T
exposure display blinks when the subject
brightness is beyond the camera's exposure
range. (Electronic analog exposure display
available with Long Time exposure.)
[!)
The following examples show electronic analog I
exposure display indications:
~
~[!]
[!]
[!]~
~
to
maximum) by rotating the
he
electronic analog
Over 1
EV
+1/2
EV
Correct exposure
-1/2
EV
U
nder-1
EV
in
ial
in
the viewfinder
3 Compose picture, focus and shoot .
FE E
the
and
re)
and the
is
not
I
• If the subject is
recommended indication
viewfinder when you lightly press the shutter
re
lease button. Use the Speedlight (page
80/91).
too
dark or backlit, the flash
~
blinks
in
the
61
Page 62

Long Time Exposure
• Long Time (Time) exposure of more than 30 sec.
When the exposure mode dial
indication
the shutter release button once
release button again
nighttime scenes or stars.
~
In
Long Time exposure, camera shake can be reduced by using the Self-Timer (page
and tripod .
to
Tip
- - (next after 30 sec.)
to
. . . . . . . . . . . . . . . . . . . .
is
set
to
M (Manual), set the shutter speed
to
set Long Time (Time) exposure. Depress
to
open the shutter, then press the shutter
close the shutter. This function
..
. . . . . . . . . . . . . . .
Set the exposure mode dial to M
and rotate the Command Dial to
set the shutter speed indication
to
Rotate the Command Dial while
pressing the
2
set the aperture.
@ aperture button to
is
useful for shooting
..
. . . . . . . . . . . . . .
3 Compose picture, focus and shoot.
• Depressing the shutter release button once opens the shutter and the self-timer
lamp flickers slightly during Long Time
• - - and other indications such
the indications turn off
• Press the shutter release button again to close the shutter.
• Continuous exposure is possible for approx. 4 hours with a fresh set of batteries.
Note that continuous exposure time is reduced when shooting
temperatures.
• Auto Exposure Bracketing (page
(Time) exposure.
62
in
the viewfinder.
(Time)
as
aperture are displayed
66)
cannot be performed during Long Time
exposure.
in
the LCD panel, but all
in
low
42)
Page 63

"
.....
..........................
.....
.....
ADVANCED
OPERATION
This section features descriptions of
operations using this camera's
advanced functions.
• Exposure Compensation
• Auto Exposure Bracketing
• Multiple Exposure
63
Page 64

Exposure
To
modify exposure control
Compensation function. This can be useful when intentionally achieving under·
or overexposure to obtain a specific photographic effect. This camera offers
compensation
• Exposure Compensation can be set
~
Tip
Compensate
specific photographic effect.
••••••••••••••••••••••••••••••••••••••••••••••••••••
Compensation
(i.e.
from the ISO standard), use the Exposure
of
-2
EV
to
+2
EV
in
1/2
steps.
in
P, S, A and Vari-Program.
to
the + side to brighten, and the - side to darken overall picture
Set Exposure Compensation by
·
1
rotating the Command Dial while
pressing the
® button until the
to
obtain
desired compensation value
appears
(-2
EV
to +2
EV
in
1/2
steps).
Electronic analog exposure
display
No compensation
EV
compensation
+0.5
EV
compensation
-D.5
• When the Exposure Compensation
appears
in
• The compensation value can be checked by
pressing the
exposure display also appears as illustrated
the viewfinder when the @ button
the LCD panel and viewfinder .
@ button. The electronic analog
is
set,
is
pressed.
~
in
j
Over +1.0
Under
64
-1.0
EV
compensation
EV
compensation
Page 65

NOTE: Setting
Normally, you should compensate exposure
brighter than your main subject, or to the - side when the background is darker.
Exposure
Compensation
to
the + side when the background is
Compose picture, confirm focus
2
indicator.
•
To
cancel Exposure Compensation, rotate the
Command Dial while pressing the
reset the compensation value
Program, changing the exposure mode also
cancels the Exposure Compensation . (Turning
the power switch off does not cancel the
Exposure Compensation.)
Ch
eck
points
• The Exposure Compensation cannot be set
• Once the Exposure Compensation is set
compensation remains
8
or
Vari-Program temporarily cancels the compensation.
• Exposure Compensation set
changed .
• If the exposure compensation is set when the built-in SpeedJight is used, the flash
output level is also compensated.
in
that exposure mode . Changing the exposure mode to M,
in
Vari-Program is canceled when exposure mode
in 8 or
in
each P, S
and
shoot.
~
button
to
a.
a.
In
Vari-
M exposure mode. I
or
A exposure mode,
is
to
65
Page 66

Auto Exposure Bracketing
Auto Exposure Bracketing allows you
values (maximum
exposure (or selected exposure
each time the shutter
• Auto Exposure Bracketing
~
Tip
Bracketing is useful
after processing the film, when the subject has pronounced contrast
color slide film and where the latitude
of
±2
EV)
shifting from the automatically set proper
is
released.
is
in
selecting one shot out of several shots with bracketed exposures
to
shoot
in
selected compensated
in
Manual exposure mode) for three shots
available
in
P, S, A and M exposure modes.
of
the proper exposure is minimal.
in
shooting with
EV
.....................................................
Ro
tate the Command Dial while pressing the Auto Exposure
1
Bracketing
±2
EV
The display changes
IillH IillH IillH
IB
"S
u.
• When the bracketing value is set (and while the exposure meter is on),
appears and ~ blinks
display blink
• Bracketing value can be confirmed by pressing the
8 button to set desired bracketing value (within
without combining exposure compensation).
®
as
follows:
IillH
IB
'"
IB
'5
IB
I .
...
t....
I.U
Cancel
(no display)
in
in
the viewfinder .
'"
.--.
the LCD panel, and ~ and electronic analog exposure
...
Iiiiiiiiiin
Lt!!!!!.I
.....
__
2.0
---J+
e button.
rn:t)
66
Page 67

• Shutter speed and aperture
exposure mode are bracketed.
In
any of the exposure modes, both flash output level for the flash illuminated
•
subject and exposure
used .
• Compensated EV value and bracketing order
EV
Compensated
value Bracketing order
0.5
1.0
1.5
2.0
in
P,
aperture
in
S and shutter speed
on
the background are bracketed when a Speed light is
0,
-0.5
, +0.5
0,
-1.0, +1
.0
0,
-1.5, +1.5
0,
-2.0, +2
.0
in
A and M
2 Compose picture, confirm focus
• Each time the shutter release button is depressed, correct
EV
exposure are performed
exposure display shows the correct, under-, then overexposure. Compensated
shutter speed and aperture values are displayed during shooting .
• If the Exposure Compensation function (page
combined with the Exposure Compensation values. It
Bracketing with a compensated value of over +2
±4
EV)
.
• If the end
taken after new film has been loaded. Also, if you turn the power switch off during
bracketing, the remaining shots can be taken after the power is turned back
of
the film roll is reached during bracketing, the remaining shots can be
in
that order while the blinking electronic analog
Electronic analog exposure display
indicator.
64)
is also set, bracketing will be
EV
and shoot.
EV,
is
useful
or
under
First shot (correct
Second shot
(under
Third shot (over
under EV, and over
to
-2
perform
EV
(maximum
EV)
on
EV)
of
.
EV)
I
I
67
Page 68

Auto
Exposure
Bracketing-continued
Auto Exposure Bracketing
canceled when the
3
•
lim
and ~ in
the viewfinder disappear when the bracketing is completed .
•
To
cancel the bracketing, rotate the Command Dial while pressing the e button
so
lim
cancel bracketing.
Check poi
• Auto Exposure Bracketing cannot be performed
• Auto Exposure Bracketing and Multiple Exposure (page
• Auto Exposure Bracketing and Long Time exposure (page
nts
simultaneously.
simultaneously.
the LCD panel and ~ and the electronic analog exposure display
disappears from the LCD panel. Turning the power switch off does not
third
is
completed and automatically
shot is taken .
in
8 and Vari-Program.
69)
cannot be set
62)
cannot be set
in
68
Page 69

Multiple Exposure
lI1ultiple
n the same frame.
, Multiple Exposure can be set
Exposure consists
. . .
..
. . . . . . . . . . . . . . . . . . . . . . . . . . . . . . . . . . . . . . . . . . . .
Rotate the Command Dial while pressing the multiple
exposure
display changes as follows:
Rotate the Command Dial while pressing the ® button to
set the necessary Exposure Compensation.
e button
~
of
two
or more exposures
in
P,
S,
A and M exposure modes .
so ~ appears
r
ns
u.
L.
• ~ appears
Multiple Exposure is set.
of
one or more subjects
in
the LCD panel. The
m:u m:u m:u
ilj
,n
ilj
.....
I.U
"'"
Cancel
(no
display)
in
the LCD panel when the
__
'5
I.
Iiiiiiin
~
"'"
f..~~
•
Test
shooting is recommended since the compensation actually required varies
depending on the shooting situation.
• When the background is completely dark and subjects do not overlap, no
compensation is necessary for each shot.
In
some cases, frames may shift slightly
•
advance becomes unstable at the beginning and near the end
multiple exposure is not recommended. 69
in
multiple exposure.
In
particular, film
of
a film roll so
ilj
~
..
~n
c:.u
+
.
I
Page 70

Multiple
Exposure-continued
Standard
3
compensation
Number
of
exposures Compensation value
Two
Three
Four
Eight or nine
Compose picture, confirm focus
,------.,
is canceled, film advances and
second shot is taken .
•
To
take more than
pressing the
release button and while
this operation
frame .
To
cancel multiple exposure, rotate the Command Dial while pressing the e
•
button so ~ disappears from the LCD panel or set the exposure mode
Vari-Program. Film is advanced and frame counter counts down when the
exposure is canceled before or during multiple exposure operation.
value
in
multiple
- 1.0
-1.5
-2.0
- 3.0
EV
EV
EV
EV
exposure
Exposure Compensation is
necessary depending
number of exposures
exposure since more than one
image
is
frame.
exposed
indicator.
two
shots
• The first shot
counter blink
shutter release button is fully depressed. The
frame counter
count down and the film does not advance ,
and multiple exposures can be taken from the
second shutter release. The multiple exposure
~
disappears from the LCD panel when the
on
the same frame, rotate the Command Dial while
is
taken and ~ and frame
in
the LCD panel when the
in
the LCD panel does not
e button again after the first shot is taken by depressing the shutter
~
as
many times
is blinking so ~ appears without blinking. Repeat
as
you wish
to
continue taking pictures
in
and
on
the
in
multiple
the same
shoot.
on
to ~ or
the same
multiplE
Check
points
• Multiple Exposure cannot be performed
• Multiple Exposure and Auto Exposure Bracketing (page
simultaneously.
in
the ~ or Vari-Program .
70
66)
cannot be set
Page 71

OTHER
This section describes other useful
camera functions and information.
• Film rewind
• Diopter adjustmenWiewfinder accessories
• Available mode combinations
FUNCTIONS
71
Page 72

Film Rewind
This section explains mid-roll rewind and what to do if the film does not
rewind .
. . . . . . . . . . . . . . . .
0 _
__
E"~
1--/
"Q~:
II
"\"'
E,,~
~
1
~
V
1
[
"T
..
. . . . . . . . . . . . . . . .
Mid-roll rewind
•
To
rewind film at mid-roll, press the two film rewind
buttons
· 0
___
during film rewind and the frame counter counts
backwards until rewind is complete.
• Film is completely rewound when a blinking E
~
shows
~
--
:SJ
blinking when the exposure meter is off.) Make sun
E is blinking, open the camera back and remove th
film cartridge.
@
----J
~
S\
I
c:-.
:SJ
EJ
If film does not start
rewind
• When battery power is very low,
@
temperatures, film may not start rewinding or film
rewind may stop at mid-roll, and
number and insufficient battery power indication
~
the power switch off, change batteries, then turn
the power switch on and press the two
buttons
rewind film again.
..
. . . . . .
El.!! simultaneously for approx. 1 sec.
,0
__ ,0_
and then 0 appear
in
the frame counter.
stops
at mid-roll
will blink
in
the LCD panel.
El.!! simultaneously for approx. 1 sec. to
..
in
(E
appears without
to
rewind
or
at low
0
__
In
this case, turn
. .
the LCD
, frame
.. ..
or
fi
lm rewind
. .
pane
film
72
Page 73

AdjustmentNiewfinder
Accessories
-he N55 enables nearto
~yepiece
)
i~~;;
through the viewfinder until the focus brackets
appear sharp. Attach the rubber eyecup again after adjustment.
correction lenses provide a viewfinder diopter range of
NOTE: Using
Since the diopter adjustment lever is located next
poke you rself
~ttaching
To
slide down the eyepiece cap
To
lens, make sure the
suit their vision. Viewfinder accessories such as an eyepiece cap or
correction lens can also be attached.
r ·;dj~;;;'~~;
the
in
attach
reattach the rubber eyecup after removing the eyepiece cap or eyepiece correction
viewfinder accessories
an
eyepiece cap or eyepiece correction lens, remove the rubber eyecup and
or
far-sighted photographers
to
adjust the eyepiece
. · · · · · · · . · · . · · · · · · · · · · · . · · · · · · · · · · ·
or
other displays
-1.5m
-1 to
+O.8m
-5m
diopter
adjustment
the eye with your finger or fingernail while sliding the lever.
"Nikon DK-16" stamp is at the bottom.
lever
or
eyepiece correction lens.
to
the viewfinder, be careful not
in
the viewfinder
1
.
-
Nine optional eyepiece
-1 to
+3m-1 (page
98)
I
..
I
.
to
73
Page 74

Available Mode Combinations
The following chart lists available modes when a CPU Nikkor lens such
as
G- or O-type lens is attached .
....................................................
Exposure
mode
8
AF-Asslst
Illuminator
0
% 0
Ll
~
~
1dI
ri
p
S
A
M
Exposure
mode
8
~
..!'.
Ll
~
~
g.
ri
P
S
A
M
CD:
Dynamic
Subject Priority
@: Dynamic
@: Single Area Mode
• Single frame with use of built-in
Speed light.
74
- -
0
- -
0
0 0
0
0
0
Metering
system
Matrix
Matrix
Matrix
Matrix
Matrix
Matrix
Matrix
Matrix
M
atrix
Center
Partial
AF
Mode with Closest-
AF
Mode
Film
Single
Single
Single
Single
Single
Single
Sing
Sing
Single
Flexible
Program
-
-
-
-
-
-
-
advance
mode
frame
frame
frame
frame
Continuous'
frame
frame
le
frame
le
frame
frame
Exposure
compensation
Auto
Exposure
Bracketing
- - -
AF
Focus
©
- -
- -
-
-
- -
0 0
0 0
mode
(g)
0 0
(Center)
0
0
0
0
0
0 0 0
0
0 0 0
-
C!)
© 0 0
© 0 0
©
0
© 0 0
© 0 0
0 0
0 0 0
0 0 0
0 0 0
0 : Available
©: Automatically set when the
mode is selected. (Other mode also
selectable.)
-:
Unavailable
Multiple
exposure
-
-
MF
@
0
0
ex
posure
a
.
Page 75

FLASH
PHOTOGRAPHY
This section introduces various aspects
of
flash photography using the built-in
Speedlight.
• Built -
• Flash sync mode features
• Using built-
in
Speedlight (Matrix Balanced Fill-
Flash, Standard TTL Flash)/Ready-light
in
Speedlight
75
Page 76

Built-In SpeedlightlReady-Light
• Built-in Speedlight and TTL Flash modes
This camera is equipped with a built-in Speed light that provides
coverage
100,
rJ
released, the flash fires
for
a 28mm lens with a guide number
ft
.). When the subject is dark
or
~Ql)
,
the built-in Speedlight automatically pops up. When the shutter is
to
of
12 (ISO 100,
or
backlit,
in 8 or
create natural-looking flash photography utilising
Vari-Program (except
Matrix Balanced Fill-Flash.
In
P, S, A
or
M exposure mode, when the subject is dark or backlit, flash
~
blinks
in
recommended indication
up
when the Speedlight lock-release button is pressed and the Matrix
Balanced Fill-Flash
selected .)
to
eyes.
Four flash sync
In
reduce shadows on the main subject
addition
Eye Reduction
this camera .
• See below for the
78 for the flash sync modes .
is possible.
to
shooting
modes-Front-Curtain Sync (Normal Sync), Slow Sync, Red
and Red-Eye Reduction with Slow
TIL
Flash modes, page 80 for using the built-
the viewfinder, and the Speedlight pops
(In
M exposure mode, Standard TTL Flash
in
dim light , the flash can be used
or
to
put catchlights
Sync-are
an
angle
m)
or
40 (ISO
in
in
in
Speed light and pagl
dayligh'
your subject's
available with
of
in
i~
. . . . . . . . . . . . . . . . . . . . . . . . . . . . . . . . . . . . . . . . . . . . . . . . . . . .
Matrix Balanced Fill-Flash
• Matrix Balanced Fill-Flash is automatically set
8,
Vari
-Program, P, S or A exposure mode.
flash mode, a well-balanced exposure of the main
subject (subject
achieved-based
Matrix Metering.
in
focus) and the background is
on
the brightness sensed by the
in
In
this
76
Page 77

Standard TTL Flash
• Standard
Standard
not considered. Standard
subject.
TIL
Flash is automatically selected when the exposure mode is set
TIL
Flash, the main subject is correctly exposed but background exposure is
TIL
Flash is useful when you want to highlight the main
to
M. In
• Ready-light
•
?o
FS6
• When using the built-in Speed light or
appears
• If the ready-light
occurred (when using built-in Speed light or optional Speed light set to
shoot again.
• When the optional Speed light
at full output. Make sure
(Manual Flash) mode.
in
the viewfinder when the Speedlight
Flash mode). Check the focus distance , aperture or flash shooting distance range and
pressed, the ready-light
~
an
optional Speedlight (p.
is
~
blinks approx. 3 sec. after full flash output, underexposure may have
is
set
to
~
in
the viewfinder blinks
to
set the optional Speed light
TIL
fully charged and ready to fire.
and the shutter release button is lightly
to
indicate that the flash will be fired
91)
, the ready-light
non-TIL
to
A (non-TIL Auto Flash) or M
Auto
I
~
77
Page 78

Flash Sync
Five flash sync modes can be selected for desired photographic effect
depending
~
~
on
the conditions wh
modes, flash is not available even wh
Mode
en
using the built-in Speedlight.
Features
en
the subject
is
In
rJ
and
dark or backlit.
.....................................................
Set the flash sync mode by rotating the Command Dial whi
pressing the flash sync mode button O .
B : Front-Curtain Sync (Normal Sync)
Set the flash sync mode
flash photography. The camera's shutter speed is
automatically set
~
,
P or A exposure mode.
to
Front-Curtain Sync for normal
to
1/90 sec. for flash photography
in
8 , 2 ,
le
~
:
Slow Sync
Slow Sync can be used
Normally, the camera's shutter speed
1/90 sec. for flash photography. However, for shooting
nighttime scenes, Slow Sync uses a slower shutter speed
(down to maximum of 30 sec., 1 sec.
background details using all of the available light.
78
in
~
,
P or A exposure mode.
is
in
automatically set
~)
to bring out
to
-
.
I
~
~""""-
.
f7·~._·
.,.
J'
_'
,.~--.
't,\l "I
~+.
Page 79

~
: Red-Eye Reducti
The
Red-Eye
reduce the red-eye effect
used
[Ij
Red-Eye Reduction with Slow Sync can
Reduction and Slow Sync mode
Reduction lamp lights for approx . 1 sec. before the flash fires
in
8 .
Vari
-Program (except for
: Red-Eye Reduction with Slow Sync
in
photos
on
of
people or animals. Red-Eye Reduction can
r:J
and .!. ...
be
are
simultaneously set.
-r..
). p. S. A. or M exposure mode.
used
in
~
.
P or A exposure mode.
in
order
be
Red-Eye
to
\1>:
Flash Cancel
Flash Cancel can only
the Command Di
and have the photograph exposed only with the natural light. Flash Cancel cannot
when the built-in Speed light is
pressing the shutter release button .
• If
r:J
or
~
automatically canceled.
~
NOTE: Flash
•
In
Front-Curtain Sync. shutter speed shifts automatically
shutter speed is set to faster than 1/90 sec.
Red-Eye
• When
Red-Eye Reduction lamp lights for approx. 1 sec. before the flash fires. Do not
move the camera or let the subject move until the shutter is released. (RedReduction is not recommended
top
priority.)
• With some lenses. light from the
subject's eyes. In some cases. the red-eye effect may not be sufficiently reduced
due
to
the location
• With Slow Sync and
to
prevent picture blur since the shutter speed is slow. Use of a tripod is
rec
ommended.
be
al
is set when the built-
Sync
selected
and 0 button. Set Flash Cancel when you want
Mode
s
Reduction or
of
subject.
Red-Eye
in
8 or
Vari
-Program (except for
in
the up position. Set the Flash Cancel before lightly
in
Speed light is
Red-Eye
Reduction with Slow Sync is selected. the
in
shooting situations where shutter release is your
Red-Eye
Reduction with Slow Sync. keep the camera steady
in
the up position. flash is
in
S or M exposure mode.
Reduction lamp may not reach the
r:J
and
to
cancel the flash
to
1/90 sec. when the
~~)
Eye
with
be
I
set
79
Page 80

Using Built-In Speedlight
This section explains
sync mode wh
. . . . . . . . . . . . . . . . .
In P, S, A
Speedlight
1
8
or
Vari-Program (except in rJ
is
dark
or
pressed, the built-in Speedlight automatically
In
P, S, A
• When the subject is dark or backlit and shutter release button is lightly pressed,
the flash recommended indication
exposure mode.
• In
8,
1"
• When the Speed light is ready to fire,
(when the camera's meter is
• Press the Speed light down gently until it clicks into place
Set the flash sync
2
pressing the 0 flash sync
how
en a G-
or
D-type AF Nikkor lens is attached .
..
or
M exposure
by
pressing
backlit
or
M exposure mode
or
.:r"
and
To
use built-in Speedlight, press the 0 flash lock-release button.
AUTO
~
to
use the built-in Speed light set
. . . . . . . .
the
is displayed
on).
mode
..
. . . . .
..
mode
, release the built-in
the
0 flash
shutter
~
blinks
in
the LCD panel;
~
by
rotating the Command Dial while
button
lock
or
~~)
release
In
8 or Vari-Program
(except
rJ
in
the viewfinder
appears without blinking
.
to
desired flash
. . . . . . . .
-release button. In
,
when the subject
button
or
in
is lightly
pops up.
~Q)
in
P, S, A
~, ~~6~
in
to
retract it.
~
the viewfinder
.. . ...
is displayed.
or
. . .
M
80
Page 81

• If 0
or ~ ..
automatically canceled.
•
Matrix
Standard
• See the table
sync mode
•
In
P,
To
change the flash sync mode, rotate the Command Dial while pressing the 0
button to select another flash sync mode. I
•
In
8 or
mode cancels the selected flash sync mode and returns
is set when the built-
Balanced Fill-Flash is selected
TIL
Flash
is
on
in
each exposure mode.
S,
A or M exposure mode, selected flash sync mode remains once it is set.
Vari
-Program, turning the power switch off or selecting another exposure
selected for M exposure mode. See page 76 for details.
pages
82, 83
in
Speed light is
in
and
84
for shutter speed and aperture, available
in
the up position, flash is
exposure modes other than M and
to
its initial setting .
• Rotating
display as follows.
In 8
B
the
or
Vari-Program
-
Command Dial while pressing
(except
~
-@·
t t
In~:
In
P
or A exposure
C
-
t t
In
S
or M exposure
C-
mode:
«i>~
U
-
mode:
EJ
t t
• ~ cannot
be
set
when
the built-
O. ~ ...
«i>~
~
-
in
Speed
or
I~
~
light is up.
~):
the"
button changes the
81
Page 82

Using
Built-In
Speedlight-continued
Confirm ~ appears
3
within the flash shooti
• The shutter cannot be released unless ~ appears without blinking
viewfinder.
~
in
the viewfinder blinks appro
•
underexposure has occurred. Check the focus distance, aperture or flash shooting
distance range and shoot again.
• When the subject is dark, the AF-Assist Illuminator automatically turns on to guide
autofocus.
• Avai
lable shutter speed and apertu re
Exposure mode
See
page 50 for details .
in
the viewfinder, make sure the subject
ng
distance range and shoot.
in
the
x.
3 sec. after full flash output. This may indicate
in
each exposure mode
Available shutter speed Available aperture Page
~
:2
~
~
P
S
A
M
*1 Shutter speed
Sync.
*2
Shutter speed shifts automatically to 1/90 sec. when the shutter s
1/90 sec.
*3 Flash shooting distance range depends on the ISO speed
setting. In
range table on the next page.
Automatically set
Automatically set
Automatically set to 1
1/90-30 sec:
Automatically set
1/90-30 sec:
is
prolonged up to
and
the built-in Speedlight
A
or
M exposure mode, set the aperture according to the flash shooting distance
to
1/90 sec.
to
1/90-1 sec.
/9
0 sec.*' 54
2
to
1/90 sec
:'
2
, - - (Time)
30
sec. with Slow Sync and Red-
pops
up.
Automatically set
Desired setting*3
Eye
peed
of
the film
in
Reduction with Slow
is
set to faster than
use and aperture
r--
r---
r--
r--r---
r---
is
28
37
38
39
56
58
60
82
Page 83

• Flash shooting distance range
Flash shooting distance for the built-in Speedlight changes according
film speed
in
use and aperture setting.
to
the
ISO
film
Guide
speed
number
25 50
(m/ft
.) 6/20 8.5/28 12/40 17/56 24/79
- -
-
1.4 2 2.8 4 5.6
Aperture
value
The
maximum flash shooting distance
•
number by the selected aperture value.
Example:
Speedlight, the maximum flash shooting distance will
12
When
/2.8 = appro
2
2.8 4 5.6
4 5.6 8
5.6 8
8
f/2.8
is
selected with
x.
4.2m or 40/2.8 = approx.
100
200 400 800
1.4 2 2.8 4
1.4 2 2.8 4 5.6
2.8 4 5.6
8
11
11
16 22 32
11
16 22 32
can
also
be
ISO
100 film using the camera's built-in
14 ft.
Flash
shooting
distance
34/12,
11
8
11
16
16 22
8
0.6-2.1/2.0-6.9
0.6-1.5/2.0-4.9
0.6-1 .1/2.0-3.6
range
(m/ft.)
2-8.5/6.6-28
1.4-6/4.6-20
1-4.2/3.3-14
0.7-3/2.3-9.8
- 0.6-0.8/2.0-2.6
calculated by dividing the guide
be:
I
83
Page 84

Using
Built-In Speedlight-continued
• Available flash sync mode combinations
is
selected.
is
selected
Red-Ey
R
eduction
Slow
-
-
-
-
0
-
-
when
Sync
(Other
Exposu
re
mode
~
CD:
®:
0 : Availab
©:
-:
"1 Selectable
"2
Flash
mAuto
Rash
8
::l
r::l
~
Q
~
P
S
A
M
Matrix Balanced Fill-Flash
Standard
Automatically
selectable.)
Unavailable
CD
CD
- -
CD
- -
CD
CD
CD
CD
®
TTL
flash
le
set
when
is
built-in Speedlight
automatically canceled if
Front-Curta
Sync
©
©
©
-
0
0
0
0
when
the exposure mode
in
is
r:J
or
Red-Eye
Reduction
0
0
-
0
- -
-
0 0
0
0 0
0
retracted.
~
Q
e
with
Slow
Sync
-
-
-
-
-
0
0
- -
0
- -
flash sync mode
built-in Speedlight
Flash
also
is
up
Cancel
0
"1
0
"1
0
"2
0
"1
©
"2
0
"1
-
-
.
• Usable lenses with built-
28mm to 200mm non-zoom C
300mm
Vignetting occurs at the edges
lenses, which have limitations
reduced , however, with regular color print film compared
edges
84
f/4
ED lenses can be used with the built-in Speedlight.
NOTE: Us
• Make sure to remove the lens hood.
• The built-in Speedlight cannot be used with zoom lenses set
• AF-S 17-35mm f/2.8 ED,
ing built-i
cannot be used with the built-in Speed light.
of
the frame are cropped out
n S
peed
in
Speedlight
PU
Nikkor lenses, AF 300mm
ligh
t
AF
18-35mm f/3.5-4.5
of
the frame resulting
in
usable focal length or shooting distance . Vignetting is
in
film processing with color print film.
ED,
AF
in
underexposure with the following
to
f/4
ED and AF-S
to
Macro
in
20-35mm f/2.8 zoom lenses
color slide film since the
wideangle.
Page 85

With standard color print film
Lens Limitations
AF
24-85mm
1/2.
8-4
AF
24-120mm
AF
28mm 1/1.4
AF-S
AF
28-80mm
AF
28-105mm
AF
28-200mm
AF 35-
AF
Micro 70-
1/
4.5-5
AF-S
With color slide film
AF
24-50mm
AF
24-85mm
AF
24-120mm
AF
28mm 1/1.4
AF-S
AF
28-70mm 1/3.5-4
AF
28-80mm
AF
28-80mm 1/3.5-5.6
AF
28-105mm
AF
28-200mm
AF
35-70mm 1/2.8
AF
Micro
1/
4.5-5
AF-S
1/3.
28-70mm
1/3.
1/3.
1/3.
70mm
1/2
180mm
.6
ED
80-200mm
Lens
1/3.
1/2.
1/3.5-5
28-70mm
1/3.
1/3.
1/3.
70-180mm
.6
ED
80-200mm
5-5
1/2
5-5
5-4
5-5
.8
1/2.8
3-4.5
8-4
1/2.8
3-5.6G
5-4
5-5
1/2.8
.6
.8
ED
.6
.5
.6
ED
.6
ED
.5
.5
.6
ED 1 05mm
35mm
shooting
35mm
distance
1.
5m
70mm
At
28mm
35mm
distance
At
35mm, 2.5m (8.2 fl
At
70-85mm
105mm
35mm
35mm
shooting
35mm
shooting
2m (6.6
70mm
At
28mm
At
28mm, 1.5m (4.9 fl.)
35mm
shooting
50mm
At
70mm, 1.5m
1 m
(3.3
or
longer
distance; at
or
longer
(4.9
fl
.)
local
length
, 1 m (3.3 fl .)
or
longer
, 1 m
or
longer
or
longer
or
longer
distance;
or
longer
distance
fl.)
or
local
length
, 1 m
or
longer
distance
or
longer
fl.)
or
or
longer
local
local
or
longer
local
local
local
local
longer
(3.3
local
local
(4.9
longer
length; and
50mm
length; and
or
length, and
.)
(3.3
fl
local
length
length; and
at
50mm
length; and
shooting
fl.)
or
length; and
length
fl.)
shooting
local
, 1 m (3.3 fl .)
shooting
longer
or
longer
.)
or
longer
length
Limitations
, 1 m (3.3
longer
or
longer
or
longer
length
at
35mm
, 1.
or
at
35mm
, 1 m
distance
shooting
distance
at
35mm, 2m
shooting
distance
shooting
at
35mm
, 2.
fl
.)
or
at
35mm, 1.5m (4.9 fl .)
distance
shooting
distance
shooting
distance
at
35mm, 2.5m
shooting
distance
distance;
5m
(4.9
longer
shooting
(3.3
(6.6
distance
5m (8.2 fl.)
longer
shooting
(8.2
fl.)
fl
.)
or
fl
.)
or
fl.)
at 85-1
or
longer
distance
longer
longer
or
longer
distance
or
longer
or
longer
05mm
shooting
shooting
,
I
85
Page 86

(' ) r
Basics
of
the relationship between focus and depth
explained
in
this section .
\-
of
field are
!I.J
• Depth of field
When focusing, depth of field should be considered. Depth of field is the zone
of sharpest focus
focused. It varies according to shooting distance, focal length and, above all,
aperture. Smaller apertures (larger f-numbers) will produce a deeper depth of
field where the background and foreground become sharper; larger apertures
(smaller f-numbers) will produce a shallower depth
background becomes blurred. Similarly, shorter shooting distance or longer
focal length will produce a shallower depth
distance or shorter focal length will produce a deeper depth of field. Note that
depth
of
in
field tends to be shallower
focus.
in
front of and behind the subject
of
in
front of and deeper behind the subject
on
which the lens is
of
field where the
field, and longer shooting
86
Large aperture f/
• {) I' M
2.B
Small aperture f/32
!\;
Page 87

MISCELLANEOUS
This
section
information.
• Lens compatibility
• Usable optional Speedlights
• Optional accessories
• Camera care
• Notes on batteries
• Troubleshooting
• Glossary
• Specifications
• Index
explains
miscellaneous
87
Page 88

Lens Compatibility
Use a CPU Nikkor lens (except IX-Nikkor) with this camera. G- or D-type
lenses give you access
compatible with the Vibration Reduction function of the
autofocus function
to
all available functions. (This camera
of
the AF-S and AF-I lens.)
is
VR
not
Nikkor lens and
AF
.....................................................
Focus
lens/accessories
~
G-
type
AF
Nikko
e
AF
Nikkor
Nikkor
f/
2.80
Teleconverter
or Ootyp
(ex
cept
Nikkor
or
AI
type
f/4
or
AI
type
Ext
ens
and PN-11)
ion
*4
e
AF
Nikkor
r,
*3
AF
'12
Ring
,
Nikkor
Nikkor
s
Oo
typ
AF
-S, AF-I
N
.~
PC
Micro-Nikkor
0
.><
85
mm
.><
Z
AF
-S/AF-I
::::l
c...
Non
-G
c..:>
Nikkor
for F3AF)
AI
-P
AI
-S
Series-E, AI-modified
Medical-Nikkor
en
120mm
L
0
Reflex-Nikkor
.><
.><
PC-Nikkor
Z
::::l
AI
-S
c...
Teleconverters
'-i'
c:
Bellows Focusing
0
z
Attachment PB-6
Auto
(PK-11A, PK-12
PK-13
mode
Manual
Autofocus
0 0 0
-
-
*6
-
0 0
-
,
-
-
with
electronic
rangefinder
0 0 0 0 0
0
*5
0
*7
O
*s
O
*s
0 0
- - - - - -
0
0'7
0*7
0
'5
'7
-
- -
-
-
Exposure
Any
Manual
mode
other
than
M
0 0 0
-
0
0 0 0
0 0
0 0 0
-
0
-
0
-
0
0
-
0
-
0
mode
M
0
0
0*
0*
0*
0'
0*
0'
0'10
30
segment
-
-
-
-
10
- - -
11
- - -
10
10
- - -
10
-
10
- - -
- - -
Metering
Matrix
5- 5-
segment
system
Center
Parlial*l
-
-
-
0 0
0 0
0 0
- -
0
0
0
88
Page 89

'1
Metering
'2
IX-Nikkor
This
'3
'4
The
lens
'5
Without
Compatible
'6
'7
With
'8
With
'9
Some
'1
0
Wi
'11
With
used.
'12
Attach
•
AS-15
•
Reprocopy
th
system
automatically
lenses
camera
camera's
,
maximum
maximum
exposure
exposure
cannot
is
not
compatible
exposure
or
when
using
shifting
andlor
with
AF-S
effective
aperture
lenses/accessories
mode
mode
the PB-6
vertically. (PB
must
be
attached
Outfit PF-4
metering
an
aperture
tilting
and AF-I
set
set
can
switches
be
attached
with
other
the
Nikkor
aperture
of f15.6
cannot
to
Manual. The
to
Manual
-6
in
combination
be
attached
to
.
the
Vibration
and
flash
than
lens
.
except AF-S
of f15.6
or
or
faster.
be
attached. (See
exposure
and
shutter
can
be
set
with
in
combination
Center
Partial
Reduction
control
system
the
maximum
17-35mm
faster.
page
meter
speed
to
horizontal
Medical-Nikkor
Metering
aperture
90.)
cannot
set
to 1190
position
with
function
do
not
f12.
200mm
Camera
80 IF-
be
after
work
sec.
when
of
the
properly
.
used.
or
attaching.)
1/5
Holder
the
VR
ED
and
slower,
.6 lor
exposure
Nikkor
when
AF-S
the
the
PA-4
.
mode
lens
shifting
28-70mm
exposure
lens
to
.
fire
is
set
and/or
fl2.80
meter
the
to
flash.
Manual
tilting
IF-ED
cannot
.
the
.
be
C
PU
G-type
contacts
Nikkor lens
Nikkor
and
01
CPU
other
CPU
Nikkor
G-type Nikkor lens
lens
(page
19)
D-type Nikkor lens
• The G-type Nikkor lens has no aperture ring; aperture should be selected from the
camera body. Unlike other CPU Nikkor lenses, aperture does not need
to
be set
minimum (largest I-number).
• CPU Nikkor lenses other than G-type Nikkor lens have
aperture
setting and the power switch is turned on,
to
its minimum and lock. When the lens is not set
FE
E blinks
an
aperture ring. Set the lens
to
its minimum aperture
in
the LCD panel and
viewfinder and the shutter cannot be released.
to
89
Page 90

Lens
Compatibility-continued
When a non-CPU
Set exposure mode
(When
other modes
released.) The camera's exposure meter cannot be
used and the aperture cannot be set using the
Command D
appears
LCD panel and viewf inder; set/confirm aperture
using the lens aperture
CAUTION
The following non-CPU Nikkor lenses/accessories cannot be attached to the
(otherwise camera body
•
TC
-16A Teleconverter
• Non-
AI
• 400mm f/4.S, 600mm f/S.6, 800mm f/8 and 1200mm f/
• Fisheye 6mm
• Old-type
• K1,
K2
•
ED
180-600mm f/8 (No. 174041-1741
•
ED
360-1200mm f/11 (No. 174031-174127)
• 200-600mm
f/
• 80mm
•
PC
28mm f/4 (No. 180900 or smaller)
•
PC
3Smm f/
• Old-type
• Old-type Reflex 1
• Reflex 1000mm f/
• Reflex 2000mm
lens
is
attached
to
M with a non-CPU lens.
are
selected, shutter cannot be
ial
when using non-C PU lenses. f - -
in
place of the aperture indication in the
ri
ng.
: Nikk
or
lenses/accessories
or
lens may be damaged):
lenses
f/S.6, 7.Smm tlS.6, 8mm f/8 and OP 10mm f/S.6
21
mm
f/4
Ring, Auto Extension Ring PK-
f/9.S (No. 280001-300490)
2.8
, 200mm f/3.S and
2.8
(No.
PC
8S1001
3Smm f/3.S
OOOmm
11
(No. 142361-143000)
f/
11
(No.
f/6.3
200111-20031
that
cannot
1, PK-11, Auto Ring BR-
80)
TC
-16 Teleconverter for F3AF
-906200)
0)
be
attached
c50 r
C,,]
f-
-
[
36J
~
to
the
N55
11
with Focusing Unit AU-1
2,
BR-4
@
Jj
NSS
90
Page 91

Usable Optional Speedlights
Usable optional Speedlights and available flash modes are listed
ll
owing table. Available modes are listed assuming a CPU lens is attached.
fo
·
...................................................
Non-
Speedlight
~
S8-29*', S8-28,
S8-24, S8-22, S8-22s, S8-20, S8-168
S8-15, S8-14, S8-11,
S8-218*'
•
Standby
• m
•
S8-280X,
Autofocus
*1
*2
Ultraviolet
perfonned.)
mode
Auto
Flash
S8-500X
photography
is
S8-27, S8-26, S8-25
S8-140*
of
optional
Speedlight
cannot
be
used.
and
only
S8-23
available
can
with
be
2
Set
cannot
AF
perfonned
,
,
cannot
the
Speedlight
be
Micro
be
used.
Make
to
A
used
lens
only
(non-m Auto
.
(60mm, 105mm, 200mm
when
S8-140
TIL
Au
to Flash Flash
0 0
-
sure
to
cancel
standby
Rash)
or M (Manual
or
to
M.
10-180mm)
(Infrared
is
set
in
the
Manual
0
mode
.
Rash).
.
photography
cannot
.
be
I
• Accessory shoe
• An optional Speed light, i.e.
S8-22s
can be attached directly to the accessory
of
the N55 without a cord. This accessory
shoe
shoe is equipped with a safety lock which prevents
accidental drop when a Speed light with a safetylock pin (S8-28, S8-27, S8-26, S8-25 or S8-22s) is
attached.
S8-28
, S8-27 or
91
Page 92

Usable Optional
Speedlights-continued
Flash photography can be performed usi
the accessory shoe
Speedlight's light sensor). It
built-in Speed light does not reach the subject. See your Speedlight manual for
details on operation .
of
this camera (Non-TTL Auto Flash using the optional
is
useful
ng
an optional Speedlight attached to
in
situations such as when the camera's
• Non-TTL Auto Flash using optional Speedlight
Attach the optional Speed
1
camera.
Turn
the camera power switch
exposure mode dial to A or M.
• Programmed Auto Flash
Vari-Program, P or s. See page 95 for details.
Turn
the optional Speedlight
(Non-TTL Auto Flash).
2
>SO
[i
!!.!
!;!.!.~.!.!.
""=3Smm FS.6
..
..
1
00
0
@ O
o .....
•
In
exposure mod
speed faster than
~
•
the camera meter
tf
A exposure mod
e,
appears in the viewfinder when the optional Speedlight is fully charged (when
is
t
"1'
m
CITG I
cc:::&
ON/~
e,
the shutter speed is automatically set to 1/90 sec.
the shutter speed
1/90 sec. is selected.
is
on).
light
to the accessory shoe of the
on
and set the
r-~=---~~----r---~
performed when the exposure mode di
on
and set the flash mode to A
®
IOC
t..
::::.!.
!!_.!..!!.,
Uti
m
""=3Smm
..
C&0
FS.6
CITG
to
1/90 sec. when a shutter
..
O
is
automatically set
al
is set to
~,
In
M
92
Page 93

NOTE: Standby
Make sure to cancel the standby mode
NOTE:
Only A (Non-TTL Auto Flash) and M (Manual Flash) modes are available with the
optional Speedlight. Proper flash operation cannot be performed when t
mode is set to
an
d the shutter release button is lightly pressed, ~ blinks in the viewfinder to warn
that fl
as
at full output. See your Speed light manual for details on Manual Flash.
function
Flash
mode
TTL
h synchronization is not being performed and the optional Speedlight wi
of
optional
with
optional
Auto Flash. Wh
Speedlight
of
the optional Speedlight.
Speed
light
en
the optional Speedlight is set to
he
TT
L Auto
flash
Flash
ll
fire
Compose picture and set aperture
so
that the subject
located within the flash shooting distance.
Set ISO film speed, aperture and zoom-head position of the
4
optional
Speed
light
according to camera's ISO film speed,
aperture and focal length (zoom position).
III
ISO
I
CC
"'
~!2
.!. .!. .!.
.!.'
d,i
.61
Ct
1&:-:I.I
....
,
m
.
..,
-
"
~!!.!..!.
.!.!."!1''''
moll3Smm
FS.6
o 0 @II..
• Automatic power zoom of the optional Speedlight does not function. Always set
the zoom-he
Ct
1i-:.l
ad
position manually.
moll3SmmlFS
..
..
00 Co:&
.,
'7'\'
III
laO
JOC
U!!
.!.!!.!..!..!..!.
3Smm
[..:l
..
.
..
C~0
} S.6
C±JE)
'''
is
II",
93
Page 94

Usable Optional
Speedlights-continued
Confirm ~ appears
the shutter release button to shoot.
5
• ~ in
the viewfinder blinks approx. 3 sec. after full
underexposure has occurred. Check the focus distance, aperture or fl
distance range and shoot again .
• When the subject is dark, the camera's AF-Assist
on
to
guide autofocus (the Speedlight's AF-Assist Illuminator does not turn
50
See page
Non-TTL
In Non-TTL Auto
flash-to-subject distance, but the light is measured by the light sensor
Speed light instead of being measured through the lens. Compared to TTL Auto Flash
of the built-in Speed light, where the light is measured through the lens, the control of
the flash output level is somewhat less accurate.
Auto
for details.
Flash
Flas
in
the viewfinder, focus and fully depress
flash output. This may indicate
Il
luminator automatically turns
h shooting , light output automatically changes to match the
ash
on
the optional
shooting
on)
.
94
Page 95

• Programmed Flash mode
When the optional Speed light is attached with the flash mode set
TTL Auto Flash) and the exposure mode dial is set
S,
Programmed Flash is performed (camera aperture is automati cally
cc
ording
to
controlled a
• When
an
the camera automatically selects the aperture accordi
aperture on the Speedlight according to the aperture indicated on the camera.
* One EV change in the film speed changes aperture by one
• See "Non-TIL Auto Flash using optional Speedlight" on page
other than setting the apertu
optional Speed light is attached and the camera power switch is turned on,
il
m speed
ISO f
Aperture
film
in
use is an intermediate value
aperture changes accordingly. If the controlled aperture is darker than maximum
aperture, maximum aperture
the film speed).
of
the film speed indicated
of
the attached lens is selected.
re
.
to
8,
Vari-Program, P
ng
to the film speed. Set the
EV
. If the film speed
in
the table, the
92
for the operation
• Available flash sync mode with optional Speedlight
Cancel
mode.
Red-Eye
Reduction
with
Slow
Slow
Sync
- - -
Sync
- - -
-
- - -
- - -
-
- - -
- - -
- - -
-
when
Ll or
t.
However, turning the optional
- -
~
Q
is selected but flash
Exposure
mode
8
~
r:J*
~
~
Q*
~
p
S
A
M
• Built-in Speed light
shooting becomes possible with optional Speedligh
Speedlight power off activates
Front-Curtain
Sync
0 0
0 0
0
0 0
0 0
0 0
0 0
0 0
0
0 0
is
always set to
Red-Eye
Reduction
0
0 0 0
Flash
Flash Cancel
to A (N
on-
of
Flash Cancel
-
-
or
the
95
~
&I
~~
iii
Page 96

Usable Optional
SP.eedlights-continued
• Notes on using optional Speed lights
• See your Speed light manual for details.
• Make sure
• Flash sync speed
• When Red-Eye Reduction or Red-Eye Reduction with Slow Sync
attached with
lights up .
• Even when
Illuminator
Nikkor lens
AF Mode with Closest-Subject Priority is activated .
• Selecting Flash Cancel mode on the camera does not override the operation
optional Speedlight.
• Flash exposure compensation
• With the
Sync
• With the
Flash
• Use the optional Accessory Shoe Adaptor AS-15
to
cancel the standby mode
is
1/90 sec. or slower when using
an
optional Speed light, the
an
optional Speed light with AF-Assist Illuminator
of
the camera body emits light when the focus mode
is
attached, the subject
is
S8
-26, 25 or 24, Speed light performs Front-Curtain Sync even if Rear-Curtain
is
set on Speedlight (Speedlight setting is overridden).
S8-26
is
, 25 or 24, when Slow Sync
not performed and the shutter speed is automatically set
of
the optional Speedlight.
an
optional Speedlight.
is
Red
-Eye Reduction lamp
is
dark and center focus area
not performed with the optional Speed light.
is
set on the camera body
to
use the sync terminal.
set on a camera
of
the camera body
is
attached, the AF-Assist
is
set
to
is
selected or Dynamic
in
to
1/90 sec.
AF,
~
an
AF
of
the
,
Slow Sync
96
Page 97

NOTE:
When
optional
Speed
light
is
attached
Turn on the optional Speed light power switch
Cancel mode so the built-in Speedlight won't pop up automatically when
Speedlight is attached. When the builtVari-Program (except
the Speed light may not pop up all the way. ,
NOTE:
Flash
attachments
Use only Nikon Speedlights. Other units may damage the camera's electrical circuit
to
incompatible voltage requirements (not compatible with 250V or higher),
due
electric contact alignment
manufacturers other than Nikon are attached, the built-in Speedlight may not pop up
all the way (with power switch of the Speed light on or off). When the built-in
Speedlight is automatically fired
or
uneven illuminati
D
or
on
may result.
~""Q)
,
vignetting or uneven illumination may result since
made
by
manufacturers
or
switch phase. When flash attachments made by
in 8 or
or
set the built-in Speedlight
in
Speed light automatically pops up
other
than
Nikon
Vari-Program (except D
or
~Q)
to
Flash
an
optional
in
8 or
,
vignetting
I
97
Page 98

Optional Accessories
A variety
the N55.
·
...................................................
Eyepiece correcti
• Eyepiece correction lenses enable neareyepiece diopter
diopter settings of -S,
setting
diopter differs from one person to another. Use the optional eyepiece correction lens
the
The rubber eyecup cannot be used together with the eyepiece correction lenses.
of
optional accessories, including lens and Speed light
on
lenses
to
viewfinder eyepiece. Nine optional eyepiece correction lenses provide viewfinder
on
with various correction lenses attached before making a purchase, since viewfinder
when you need eyepiece correction over - 1.S
camera body).
NSS
's diopter adjustment lever.
suit their vision, and can be attached easily by inserting onto the
-4,
-3, -2
We
recommend that you actually look through the viewfinder
or
far-sighted photographers
, 0, +O.S, +1,
+2
and +3m-1 (combined diopter with
to
+0.8m-1 that can be adjusted using
is
available for
to
adjust the
.
Lenses
• A wide variety of AF
Control)-is
lenses-wideangle
available for the
NSS
, telephoto, zoom, Micro or
.
DC
(Defocus image
Filters
• Nikon filters can be divided into three types: screw-in, drop-in and rear-interchange.
With the
Compensate exposure + 1
autofocus or the electronic rangefinder may not operate properly.
• Use circular-polarising filter C-PL instead of polarising filter Polar. The linear polarising
filter cannot be used with the
• Use NC filter when using the filter
• Moire may occur when shooting a subject against bright light
is
NSS
, the filter factor need not be considered except for the R60 filter.
Note that when special filters available from manufacturers other than Nikon
in
the frame.
In
EV
when using the
NSS.
to
this case, remove the filter before shooting.
R60
.
protect the lens.
or
if a bright light source
are
used,
98
Page 99

Speedlight
• Speed light
a guide number of
position, ISO 100,
or Power 8racket SK-6A (S8-28 only) can also be used. Non-TTL Auto Flash is
compatible with the
S8-28/S8-27
S8
-28/
S8-27
normally uses four AA-type alkaline-manganese batteries with
36/118 (S8-28) and 30/98 (S8-
m/ft
.,
20°C/68°
S8
-28 /S8-27.
27)
F).
Optional external power source SO-7 and SO-8A
(manual flash, 35mm zoom-head
Soft case (CF-62)
• Camera case CF-62 is available for this camera. The camera body fits inside the case
with
AF
28-80mm f/3.3-5.6G
or
smaller lens attached.
Neckstraps/Handstrap AH-4
• 8raid-type
AN-6Y (yellow) and
• Handstrap AH-4 helps you hold the camera firmly and easily, and shoot
motion. :
AN-48
(black) and AN-4Y (yellow), wide braid-type
AN
-6W (burgundy) neckstraps are available. §
in
quick-
~
::IE
99
Page 100

Camera Care
• Cleaning camera body
Use a blower brush
soft, clean cloth . After using the camera near seawater, wipe the camera body with a
soft, clean cloth slightly moistened with pure water
a dry cloth .
the camera.
• Cleaning mirror and lens
Use a blower brush to remove dirt and dust from the mirror
fingerprints
tissue moistened with ethanol (alcohol) or lens cleaner.
• Do not subject the camera or lens to strong vibration or shock
Do not drop the camera body and lens or hit them against a hard surface as this may
damage their precision mechanism.
• Do not touc h the shutter curtains
The shutter is made
blower brush. Doing so may scratch, deform or tear the shutter curtains.
• Avoid strong electric or magnetic fields
The camera may not function properly
a transmitter tower. Avoid using the camera
• Store the camera in a cool, dry place
Store the camera
Keep it away from naphthalene
generate magnetic fiel
the summer
• Avoid extreme temperature change
An
extreme temperature change can cause condensation inside the camera body.
When taking the camera
it inside
an
the camera gradually to the temperature change.
• Avoid water or moisture
Keep the camera away from water
guard against splashes, especially
to
remove dirt and dust from the camera body and clean it with a
to
NEV
ER
use organic solvents like thinner or benzene. They may damage
or
smudges from the lens' surface, use a soft, clean cotton cloth
of
very thin curtains. Do not hold, poke, or blow strongly with a
in
strong electric or magnetic fields such
in
in
a cool , dry place
ds
or
or
near a heater.
airtight container such
an
to
a very hot place from a very cold place
to
prevent mold and mildew.
or
camphor (moth repellent), electrical appliances that
excessively hot place such
as
a plastic bag and leave it inside a while to expose
or
moisture. When using the camera near water,
sa
lt water spray.
remove salt, and then dry it with
or
lens.
To
such locations.
as
inside a vehicle during
or
remove
or
vice versa, place
lens
as
near
100
 Loading...