

Page 1

Nikon
INSTRUCTION
MANUAL
Page 2

CONTENTS
FOREWORD . .
NOMENCLATURE
BASIC OPERATION .....
MOUNTING THE LENS
INSTALLING BATIERIES
CHECKING BATIERY POWER . . . . . . . . . . . . . . . . . .
LOADING FILM
BASIC SHOOTING
REWINDING FILM
FOCUS
AUTO FOCUS ...
With a stationary subject
With a moving subject . . . . . . . . . . . . . . . . . . . . . . . .
Taking pictures with an off-center main subject
Autofocusing with
MANUAL FOCUS WITH ELECTRONIC FOCUSING
CONFIRMATION .
MANUAL FOCUS USING CLEAR
SPECIAL FOCUSING SITUATIONS .
.........
......
..........................
..........................
.........
................
....
. . .
............
......
...
............
......
........
. ....
..
AF
illuminator
..............
.............
.
...................
.........
.............
. . .... . .
.........
.............
.............
....
. . .
............
MATIE
FIELD
..
.............
...... ..
.
...........
. .
.
......
..........
..
. .
...
..
.....
. . . . .
. . .
...
........
.. 4
.
..
5-7
8-20
..
10-11
..
12-13
14-17
18-19
.
20-27
.
20-23
.....
20
..
21
...
22
. . . . . . 23
. . 24
25
26-27
EXPOSURE ................
SHUTIER
PROGRAMMED AUTO EXPOSURE MODE -
8
SHUTIER-PRIORITY AUTO EXPOSURE MODE
9
APERTURE-PRIORITY EXPOSURE MODE
MANUAL EXPOSURE MODE
SPEED DIAL AND APERTURE DIAL
AUTO MULTI-PROGRAM . .
T setting . . .
........
EXPOSURE METERING SYSTEM
MATRIX METERING
CENTER-WEIGHTED METERING
MATRIX METERING VS.
CENTER-WEIGHTED METERING
CENTER-WEIGHTED METERING FOR
SPECIAL EXPOSURE SITUATIONS
AEL (Auto Exposure Lock) button . . . . . . . . . . . . . .
Manual exposure mode . . . . . . . . . . . . . . . . . . . . . . . .. 43
SELF-TIMER
............................
............................
. . .. .
............
...
. . .
...
.........
. . .
..................
. . .... . .
....................
.....•....•
..............
...
...........
.........
...........
.........
.....
.
....
. . .
. . . .
. .
..
28--36
28
29
30-31
32-33
34-36
...
36
37-43
. . . 37
37
38-41
42-43
..
42
44-4!i
2
Page 3

FLASH PHOTOGRAPHY .....................
AUTOMATIC BALANCED FILL-FLASH
Matrix Balanced Fill-Flash
Center-Weighted Fill-Flash .............
USING BUILT-
Notes
Operation
auto exposure mode
Operation
auto exposure mode .
Operation
auto exposure mode
Operation
USABLE AF NIKKOR LENSES . . .
BUILT-
SPEEDLIGHT COMPATIBILITY CHART . . . . . . . . . . . . . . . . 64
IN
TTL FLASH
on
selecting aperture . . . . . . . . . . . . . . . . . . .
in
programmed
in
shutter-priority
in
aperture-priority
in
manual exposure mode . .... . . . . .
IN
TTL FLASH SPECIFICATIONS .
......•..............
.....................
..
..............
...•.....
.........
...
......
...
...........
..........
........
. .
..•....•...
...
. .
.......
. .
...
. . . 55- 57
. . .
46-64
.
46-47
...
48-
..
.
49-51
52-54
58
..
62- 63
47
47
61
48
- 60
61
LENSES
..........................
ACCESSORY COMPATIBILITY
CAMERA CARE TIPS . .
NOTES ON BATTERIES .
SPECIFICATIONS .
GLOSSARY
........
...
.. .
....................
...........
.. ......... .
VIEWFINDER INFORMATION
.
.........
.. .......
......
.. .
.......
. . .
............
......
..................
.. .
.. . .
.....
65-66
67
68- 70
70-71
72- 75
76-78
79
3
Page 4

FOREWORD
Thank you for purchasing this Nikon product.
the Nikon N5005, and we'
re
sure it will make photography a
We
hope you enjoy
bigger part of your life.
it,
be
Get to know your N5005, but before using
sure to read this
manual thoroughly.
Nikon cannot be held responsible for malfunction resulting from
in
the use of the camera other than as specified
The
Nikon
any
of
its
NSOOS,
N4004s, N2020,
used
integrally, with
AF
Nikkor
mation
required
autofocus
Nikon
occurs
to
are
used
lenses
and
autofocus
components, such
lenses
SLR systems.
does
the
with it.
Nikon
SLR system is
as
AF
Nikkor
one
another.
electronically
for
perfect
not
assume
NSOOS
For
system accessories.
operation
responsibility
when lenses
this reason, we
designed
the
F4
lenses
communicate
and/or
recommend
series
and
within
if
malfunctions
accessories
this manual.
based
Nikon
all
current
the use
on
accessories
the
, N8008s, N8008, N6006,
the
premise
necessary
and
future
or
damage
of
other
of
AF
that
will
infor-
Nikon
makers
Nikkor
be
4
Page 5

NOMENCLATURE
Aperture dial
Film rewind button
Frame counter
Dial lock-release button
Self-timer indicator
Shutter release button
Shutter speed dial
Handgrip
AEL (Auto Exposure Lock) button
Minimum aperture lock
Aperture scale
Focusing ring
LED
Lens (AF Zoom-Nikkor
35-70mm
f/3.3-4.5)
Film
Flash lock-release buttons
Lens mounting index
Lens release button
Focus mode selector
CPU
contacts: Do not touch.
Accessory shoe
plane indicator
Self-timer button
Flash head
Aperture ring
5
Page 6

Eyepiece cover DK-5 (pro-
Prevents
vided):
entering viewfinder.
stray light from
Film rewind lever
Viewfinder eyepiece
Film cartridge confirmation
window
Camera strap eyelet
Camera back lock release
6
Film advance indicator
Camera back
Battery chamber lid
Battery chamber lock release
Tripod socket
Page 7

Inside viewfinder
12mm-dia. central area
Focus brackets
Exposure indicator
Focus indicator
LEOs
LED
Clear matte field
Flash ready-light
7
Page 8

BASIC OPERATION
MOUNTING THE LENS
Twist lens counterclockwise until
securely clicks into place.
The N5005
with AF Nikkor lenses, except
Nikkor
fl3.5
TC-16/TC-16A.
non-AF Nikkor lenses, see pages
65 to
is
designed for use
SOmm
fl2.S,
ED
IF,
and Autofocus Converter
67.
For
limited use of
200mm
S
it
AF-
To
remove
Push
lens release button and turn lens
00
clockwise.
ton except when removing
not push lens
rei
lens.
ease but-
Set lens to its minimum aperture
in
(largest f-number marked
on
AF
Nikkor lenses). Then lock lens
orange
aperture at its minimum setting.
(See lens instruction manual.)
With the N5005, all aperture
setting operations are performed
using the aperture dial on the
camera body. Do not move lens'
aperture ring once
smallest aperture (largest
number).
it
is
set
to
its
f-
Page 9

INSTALLING
BATTERIES
1 2
Open the battery chamber lid by sliding
the lock release.
Install four fresh AA-type batteries with
"+"
ends positioned
battery chamber.
Batteries with a
exceeding 6mm
not be used.
as
shown inside the
"+" terminal
in
diameter can-
Close the battery chamber lid.
9
Page 10

CHECKING
To
turn the camera power on, rotate the
shutter speed dial from L to another setting while pressing the dial lock-release
button.
When not using the camera, be
to
sure
to
turn off power and conserve
battery power.
BATIERY
set the shutter dial to L,
POWER
,---------------------~
2
Lightly press shutter release button and check viewfinder exposure indicator
(+ ,0 and/or - ) to make sure battery power
Exposure indicator
approx. 8
sec.
LED(s)
after you take your finger off the button.
lights up or blinks
is
sufficient.
if
power
is
sufficient, and stays on
LED(s)
10
Page 11

If
LED
goes off approx. 2 sec. after finger is removed from
button, batteries need replacement.
During shooting, replace batteries when:
a)
Film-advance speed, operation speed of autofocus
lens or flash recycling time
b)
Lightly pressing the shutter release button causes the
se
lf
-timer indicator
ter
to
lock.
At
low temperatures or when weakened batteries are
is
noticeably slower, or
LED
to
start blinking and the shut-
used, film advance may cause low battery voltage for a
moment and the self-timer indicator
short while . However, you may be able
LED
to
may blink
continue
for
shooting.
a
No
LED,
batteries.
and shutter locks. Check battery installation or change
The microcomputer
in
the F-401x may turn the camera
off, even when batteries with sufficient power are prop-
To
sta
rt
erly installed.
or resume operation, remove
batteries and install again .
11
Page 12

LOADING
FILM
000000000
Slide down camera back lock release
open camera back.
12
to
Insert film cartridge.
-
- Usable film speed range for
-
- Avoid loading/unloading
Use
only OX-coded film.
coded film
All
matica
direct sunlight.
is
ISO
t to I
25 to 5000.
SO
100.
non-OX-coded films are auto-
lly se
Pull
film leader out
OX-
in
to
red
index mark.
Page 13

Check to make sure film is positioned
properly, with no slack.
Close camera back and confirm lockrelease snaps closed.
Fully depress shutter release button
automatically advance film
Observe film advance indicator rotation
to confirm proper film installation and
transport.
to
to
frame "1."
elf film is not correctly installed, the
LED
self-timer indicator
shutter speed dial to
blinks. Set the
L,
then reset the
dial to another setting while pressing
The
the dial lock-release button.
timer indicator
Reload the
LED
film.
will disappear.
self-
13
Page 14

BASIC SHOOTING
The Nikon N5005 offers both auto and
manual focusing.
auto exposure modes - programmed
auto, aperture-priority auto, shutter-priority auto - plus manual exposure control.
The following instructions are for autofocus shooting
exposure mode with an
Programmed auto
exposure mode.
For
details about other focusing methods
and exposure modes, see pages 20
27 and 28 to 36, respectively.
It
also gives you three
in
programmed auto
AF
is
Nikkor lens.
the easiest-to-use
to
Confirm lens
aperture (largest f-number);
is
incorrectly
release locks and
blink alternately inside the
finder. The self-timer indicator
will also blink.
is
set to smallest
set,
the
sh
+ and -
utter
LEDs
view-
if
lens
LED
Set shutter speed dial
to
S.
dial
to
A,
and aperture
14
Page 15

When both A and S are
auto
mode
is
in
The shutter dial locks
position, and the aperture dial locks
at
the S position.
rotate the shutter or aperture dial
while pressing the dial lock-release
button.
set,
operation.
at
To
release them,
programmed
the A or L
Set focus mode selector to A (autofocus).
If
the lens in use has an A-M switch, set
the switch to
A.
Aim camera
at
the subject.
15
Page 16

Position the viewfinder focus brackets
(:
:)
on the main subject.
16
Lightly press the shutter release button.
Confirm the green focus indicator
and the red exposure indicator
light up.
LED
LED
0
.
Page 17

e
lf
focus indicator
e
lf
subject moves, remove your finger from shutter release
button, then lightly press again to start autofocus with
focus tracking.
For
details about autofocus, see pages 20 to
e
LED
. blinks, see pages 26 to
23.
*****************************
o blinks
Picture blur possibility (shutter speed is
1/[focal length] sec. or slower).
Use tripod to avoid camera shake, or use
TIL
built-in
light
flash or accessory Nikon speed-
to
synchronize shutter speed
at
27.
1/125
sec.
7
Fully depress shutter release button to take picture. This
automatically advances film by one frame.
+ lights up ·Overexposure warning .
Too
bright - very rare condition; use film with
SO
lower I
- lights up ·Underexposure warning.
J blinks
'Shutter
Too
sory Nikon speedlight.
Use built-in
speedlight. See pages 46 to
is
locked.
speed.
dark - use built-in
TIL
flash or accessory Nikon
TIL
flash or acces-
64.
e Upon shutter release, the exposure indicator
turns off approx. 2 sec. after you remove your finger
from the button.
e
lf
camera detects abnormality during film advance
(when film
blinks for a few seconds.
shutter speed dial
usual.
is
loaded), the self-timer indicator
If
this happens, set the
to
L (lock), then proceed as
LED(s)
LED
17
Page 18

REWINDING
FILM
The film advance stops automatically
the end of the roll. Then, the self-timer
indicator
and the shutter locks.
LED
blinks for a few seconds
If
you
do
you come to the end of the roll,
each time the shutter release
button
indicator
onds to remind you to rewind
not rewind the
is
depressed, the self-timer
LED
blinks for a few sec-
film
when
it.
18
at
While sliding
film rewind button.
film
rewind
lever,
push the
After rewinding stops, confirm
counter has returned to "S" and the selftimer indicator
approx. 2 seconds.)
LED
blinks (stops after
film
frame
Page 19

Open camera back and remove
cartridge.
film
19
Page 20

FOCUS
AUTOFOCUS
In
autofocus mode, the shutter cannot be released until the
subject is correctly focused, and once in focus, the focus
locked as long as the shutter release button remains lightly
pressed.
If
subject
is
focus tracking system enables the camera to analyze the speed
th
of
drive the autofocus lens by anticipating the position at the exact
moment of exposure. So you can get correctly in-focus-pictures
for most moving subjects,
moving, focus tracking works automatically.
e moving subject according
to
focus detection data, and
as
well as stationary subjects.
is
The
With a stationary subject
When subject
Once subject
move your finger from shutter release button, then lightly press
it
again to start autofocus with focus tracking.
is
in
focus, autofocus stops and . appears.
is
in focus, focus
is
locked.
If
subject moves, re-
20
Page 21

With a moving subject
Lightly pressing the shutter release button with a moving sub-
ject will activate the lens
LED
. will not appear during focus tracking. Confirm the sub-
Ject
is
in
fully depressing the shutter release button.
If
your finger from the shutter release bu
again
The shutter may lock
erratic speed.
focus on the matte field inside the viewfinder before
subject stops, focus
to
start autofocus with focus tracking.
for
focus tracking. The focus indicator
is
locked.
If
subject moves again, remove
tt
on and lightly press
if
the subject moves irregularly
or
at
an
With a moving subject, depending on subject status and
lens in
use,
slightly-out-of-focus picture may result.
it
21
Page 22

Taking pictures with an
off-center main subject
2.
Confirm the focus indicator
up.
22
LED
lights
1.
Center the focus brackets
button.
3.
Keeping the shutter release button lightly pressed, recompose and fully depress
the shutter release button.
on
the subject and lightly press the shutter release
Page 23

Autofocusing with AF illuminator
If
existing light
1. Mount Nikon Autofocus 8peedlight
on the accessory shoe of the N5005.
2. Lightly press the shutter release button.
3. The speedlight's
operation.
is
insufficient for autofocus operation:
AF
For
illuminator lights up
details, see speedlight instruction manual.
88-24/88-23/88-22/88-20
to
start autofocus
23
Page 24

MANUAL
1.
Set focus
(manual
A-M switch, set the switch to
4.
Keeping the shutter release button lightly pressed, watch the focus indicator
in the viewfinder and rotate the lens focusing ring manually until the focus indicator
LED
FOCUS
mode
).
If
the lens in use has an
lights up.
WITH
selector to M
ELECTRONIC
.)/!.~
",,,
".
.....
""
It·
,."
2.
Look inside viewfinder and center the
M.
focus brackets on the main subject. button.
FOCUSING
......
,
""'!!.IIl"ll\.
'\.
.,..
,
.\" .
...
........•.
J
..........
~
.......
~rlt
~
l§\il . '
.
\'
..
..
·, ' ....... .,.
CONFIRMATION
'I!l
...
'
LED
r-----------------------~
3.
Lightly press the shutter release
5.
Fully depress the shutter release
button.
24
Page 25

MANUAL
1.
Set the focus mode selector to M
(manual).
FOCUS
USING
CLEAR
2.
MATTE
Focus subject using the clear matte field.
FIELD
25
Page 26

SPECIAL
Autofocus operation and electronic
focusing confirmation depend upon the
general lighting
contrast and details, and other technical
points. Under certain conditions, the
automatic focusing system/electronic
focusing confirmation may experience
difficulty.
recommend you focus manually using
the clear matte field.
FOCUSING
of
the scene, subject
In
these circumstances,
SITUATIONS
we
-------
c c
Focus indicator
with the following subjects:
LED
blinks or disappears
1)
Very dark subject
Focus manually,
on
focus
at
located
accessory Nikon Autofocus 8peedlight 88-24, 88-23,
(No other flash unit can
or
another, brighter subject
the same distance, or use
for autofocus,
88-22
be
or
88-20.
used.)
26
Page 27

In the
fo
llowing situations, ignore focus-
LED
indicator
the clear matte fiel
and focus manually using
d.
2)
Low-contrast subject
Focus manually, or for autofocus,
focus on another subject located
the same distance - but with more
contrast - until the green focus indi-
LED
cator
appears.
at
3) Subject with
Turn
the camera sideways
focus manually.
autofocus, then focus on another subject with vertical lines located at the
same distance.
no
vertical lines
You
may also select
to
focus,
1) When shooting the
eVery bright subject with shiny sur-
face, such as silver or aluminum.
eStrongly backl
eScene with subject located
ent distances.
2)
When using a polarizing
lar polarizing filter can be used for
autofocus operation.)
or
it
subject.
following:
filter.
at
differ-
(Circu-
27
Page 28

EXPOSURE
Exposure control consists of two parts aperture control and shutter speed control.
Th
e aperture works basically the same way
as the iris of
amount of light passing through the l
The shutter, located in the camera body,
th
e human eye and controls the
ens.
varies the amount of light admitted to the
at
film by opening and closing
speeds. Together, these two controls determine the amount of light that strikes the film,
resulting in exposure control.
Using the shutter speed and aperture dials
of the N5005, you can select three different
automatic exposure control modes and one
manual mode.
different
SHUTTER
Always set dials
The shutter dial locks
position.
lock-release button.
SPEED
at
click-stop positions -
To
release them, rotate the shutter or aperture dial while pressing the di
DIAL
AND
APERTURE
never
in-between.
at
the A or L position, and the aperture dial locks
DIAL
at
Shutter Speed Dial
Lock
shutter releasel
turn off power
ex
posures
Time
Imtermediate settings
Shutter speed settings
(1 -
1/2000 sec.
Dial
lock
button
Aperture settings
(1
/1.4 - 32)
Aperture Dial
Shutter speed dial
A
1 - 2000
A
T, 1 - 2000
*
In
programmed auto and aperture-priority auto exposure mode, shutter speed IS
automatically controlled from 30 to 112000
Aperture di
S
S
1.4 - 32
.4
- 32
1
al
sec.
Exposure mode
Programmed auto
Shutter-priority auto
re
-priority auto
Apertu
Manual
the S
al
)'
-releas e
28
Page 29

PROGRAMMED
Auto Multi-Program automatically sets the best combination of
shutter speed and lens aperture, making
mode to use.
Because lenses of different focal length handle differently
slow shutter speeds, picture sharpness varies with the shutter
speed used. The slowest shutter speed recommended for any
lens when hand-holding the camera
lens. With a 60mm lens, for example, use
est hand-held speed. Keep in mind, however, that
the lowest recommended shutter speed for blur-free hand-held
shooting. The exposure program line for N5005's Auto MultiProgram varies according to the focal length and maximum
aperture of the lens. The following chart shows how the possibility of picture blur
speeds.
AUTO
EXPOSURE
it
the easiest exposure
is
1/(focal length) of the
1/60
sec.
1/30 sec.
is
reduced by avoiding slower shutter
MODE -AUTO
at
as the slow-
is
MULTI-PROGRAM
Auto Multi-Program chart
The
EV
(exposure value) charts demonstrate the differences
among program lines of various lenses. Follow either colored
line to where
bination of aperture (vertical line) and shutter speed (horizontal
line) that will automatically be selected at each
level.
Auto Multi-Program Chart (ISO 100)
---
- .- .-
---
it
intersects a diagonal line. This shows the com-
EV
With
50mm
With
With
at
fll.4
28mm fl2.8
Zoom 35-l35mm fl3.5-fl4.5
100mm
(1/4.2)
setting
brightness
29
Page 30

SHUTIER-PRIORITY
This mode lets you choose shutter speeds manuall
with sharp, clear outlines using fast shutter speeds, or create motion effects by
choosing slower shutter speeds. The microcomputer
selects the correct aperture
At
a slow shutter speed
30
AUTO
to
match the shutter speed you
EXPOSURE
y,
MODE
so you can freeze the action
in
the N5005 automatically
set.
At
a fast shutter speed
1.
Set
aperture dial
2.
Set
shutter speed dial
speed.
to
S.
to
desired
Page 31

3.
Look inside viewfinder
button.
+ lights up· or
+ 0 light
- lights up· or
O - light
+/ - blink alternately·
up
up
+/- disappear·
'Shutter is locked.
and
lightly press
Select a higher shutter speed
Select a slower
flash
or
Set
lens
Shutter
the
shutter
shutter
speedlight
to
its
smallest aperture setting
dial
is
set
to
"T";
or
use
4.
built-in
release
speed,
select other position
When
shutter
TIL
the
exposure indicator
release
button.
LED
lights
up,
fully depress
the
31
Page 32

APERTURE-PRIORITY
The microcomputer
match the aperture you
your prime consideration.
use wider apertures.
smaller apertures.
32
in
the N5005 automatically selects the correct shutter speed to
set.
For
At
small aperture
This
To
create softer, less distinct backgrounds, as in portraitures,
overall sharp, clear picture, such
EXPOSURE
is
the recommended mode when depth
MODE
as
scenic photography, use .MlNIIIl.
At
wide apertu re
01
lield
is
[)
1.
Set shutter speed dial to
2.
Set aperture dial to desired I-number.
""Q"
A.
Page 33

3.
Look inside viewfinder and lightly press shutter release
button.
o blinks
+ lights
+ 0 light
- lights up· or
O - light
up
· or
up
up
Picture blur possibility (shutter speed
sec.
length)
(smaller I-number), or use a tripod to avoid camera
shake.
Select slower aperture setting (larger I-number).
Select a laster aperture setting, or use built-in
flash or speedlight.
or slower). Select laster aperture setting
+/- blink alternately· Set lens to its smallest aperture setting.
'Shutter is locked
4.
When the exposure indicator
shutter release button.
is
1/[local
TIL
LED
lights up, lully depress the
II
aperture dial
aperture range, aperture
matically adjusted to minimum or
maximum setting, whichever
nearest, and correct shutter speed
is
selected accordingly.
is
set beyond lens'
is
auto-
is
33
Page 34

MANUAL
In
manual exposure mode, both shutter
speed and aperture can be set manually
according to the desired effect. Use fast
shutter speeds to stop the action, slower
speeds to create motion effects
distinct outlines . Manually.setting the
exposure mode also lets you control
depth of field, either by softening the
background
picture stands out, or by creating
uniform sharpness.
Note that Center-Weighted Metering
se
lected in manual exposure mode.
EXPOSURE
so
the main subject of the
MODE
or
less
overall
is
1.
Set shutter speed dial to desired
speed.
3.
With your
eye
on the viewfinder, lightly press the shutter release button.
2.
Set aperture dial
to
desired f-number.
34
Page 35

4. Rotate either shutter speed dial or aperture dial until exposure indicator
up.
+ or -
LED
lights up
+ Overexposure warning
+ 0 Overexposure warning +1/3EV -
o Correct exposure
0 - Underexposure warning -1EV - -1/3EV
Underexposure warning - -1EV
'Shutter does not lock
in
the following cases':
in
any
of
these cases.
+1EV
-1/3EV
+1EV
- +1/3EV
5.
LED
lights
If
aperture dial
aperture range, aperture
matically adjusted to minimum
maximum setting, whichever
nearest.
Fully depress the shutter release
button.
is
set beyond lens'
is
auto-
or
is
35
Page 36

Tsetting
For
long-time exposures, use the T setting. .
To
avoid camera shake,
1. Set the shutter speed dial to
2. Fully depress the shutter release button then remove finger
from the button. After 0.5 sec., exposure begins.
3. During exposure, the self-timer indicator
second.
36
it
is advisable to use a tripod.
T.
LED
blinks every
4.
To
stop the exposure, lightly press the shutter release button.
in
- Long-time exposures can be performed
operation; for self-timer operation, see pages 44
self-timer
- A fresh set of alkaline-manganese batteries will allow
to
perform long-time exposure for approximately
you
seven hours.
-
The
T setting can only be used
mode; be sure to set the aperture dial to a setting other
S.
With the shutter speed dial at T and the aper-
than
ture dial set
button causes the self-timer indicator
at
S,
lightly pressing the shutter release
in
manual exposure
LED
to
blink
to
45.
Page 37

EXPOSURE METERING SYSTEM
The Nikon N5005 provides two types of
exposure metering systems - Matrix
Metering and Center-Weighted Metering.
MATRIX
In
auto exposure modes (programmed
auto, shutter-priority auto and aperture-
priority auto), Matrix Metering
The Matrix Metering sensor determines
scene brightness by dividing the scene
into five areas, then analyzing each area
for brightness and scene contrast. Thus,
the meter automatically provides the
correct exposure of the main subject in
virtually any lighting situation, without requiring manual exposure compensation.
METERING
is
selected.
CENTER-WEIGHTED
METERING
In
manual exposure mode or when AEL
(Auto Exposure Lock) button'
the camera automatically switches to
Center-Weighted Metering.
Center-Weighted Metering places special
emphasis on brightness within the
12mm-diameter central area of the viewfinder, and
special effects.
*For
is
recommended for creating
AfL
button, see page
42.
is
used,
37
Page 38

MATRIX
In
scenes with both very bright and very dark areas, these two
metering systems produce varying results.
A.
Scene containing the
If
bright reflections, Center-Weighted Metering renders the main
subject as a silhouette. With Matrix Metering, however, the light
value of darker parts
balanced exposure.
METERING VS.
a scene containing strong highlights, such
sun
is
evaluated, resulting in an overall well-
CENTER-WEIGHTED
For
or scenes with high reflectivity
example:
as
the sun, snow or
B. Outdoor backlit subject
With Center-Weighted Metering, a backlit subject or scene with
people against a bright sky and/or clouds may lead to an
underexposed subject. With Matrix Metering, however, the
camera automatially gives more exposure to darker subjects to
ensure a balanced overall exposure.
C.
Front-lit subject against dark background
If
a brightly
background, Center-Weighted Metering places too much
emphasis on the dark center
background
exposed. Matrix Metering, however, automatically integrates a
dark background with a bright subject to ensure the best overa
exposure.
lit
off-center subject
is
correctly exposed, the main subject will be over-
is
positioned against a dark
of
the picture.
So
although the
METERING
ll
Scene containing the
Matrix Metering
Center-Weighted Metering
sun
38
Page 39

Outdoor backlit subject
Front-lit subject
Matrix Metering
Center-Weighted Metering
J
Matrix Metering
Center-Weighted Meteri
ng
39
Page 40

D. Small, dark subjects against a bright background
A subject significa
sensor areas may not be recognized and integrated into
the automatic exposure evaluation.
recommend you use either the
sure control for Center-Weighted Metering.
ntl
y smaller
than
anyo
ne of the
For
such subjects,
AEL
button or manual expo-
five
we
Matrix Metring
Center-Weighted Metering (with AEL button)
Main subject is correctly exposed.
page 42.
For
40
details, see
Center-Weighted Metering
Page 41

E. Sunset scenes
When you want
want the Matrix Metering to lighten the scene for dark foreground subject, use the
control for Center-Weighted Metering.
to
emphasize a dramatic sunset, but don't
AEL
button or manual exposure
Matrix Metring
Center-Weighted Metering
41
Page 42

CENTER-WEIGHTED
METERING
AEL (Auto Exposure Lock) button
1.
Center main subject inside viewfinder and/or move
so the 12mm circle
is
covered by the subject.
FOR
in
SPECIAL
closer
2.
EXPOSURE
Lightly press shutter release button.
SITUATIONS
3. While lightly pressing shutter release
button, depress the AEL button and
it
in.
hold
42
4.
Recompose and shoot.
•
When
recomposing may change the subject-to-camera distance, refocus by
briefly removing your finger from the shutter release button and lightly pressing
it again.
Page 43

Manual exposure mode
1.
Center main subject inside viewfinder and/or move
covered by the subject. Lightly press the shutter release button.
3.
Confirm the exposure indicator
lights up.
LED
4.
in
closer so the 12mm circle
Recompose and shoot.
•
When
recomposing may change the subject-to-camera distance, refocus by
briefly removing your finger from the shutter release button and lightly pressing
it again.
2.
is
Adjust the shutter speed and aperture
for correct exposure.
43
Page 44
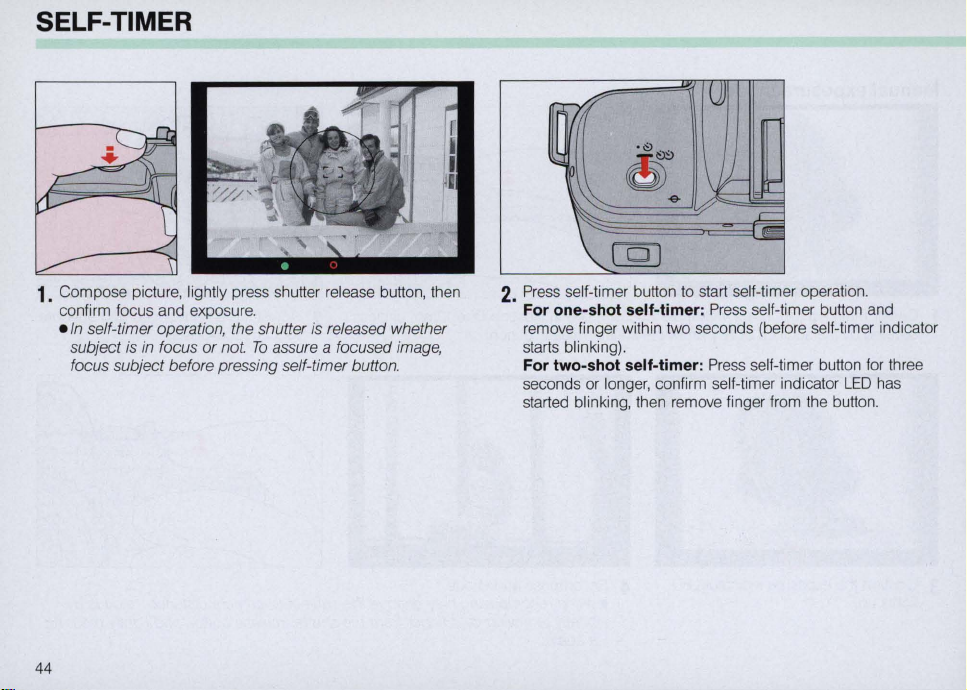
SELF-TIMER
1.
Compose picture, lightly press shutter release button, then
confirm focus and exposure.
-
In
self-timer operation, the shutter
is
in
focus
or
subject
focus subject before pressing self-timer button.
not.
is
To
released whether
assure a focused image,
2.
Press
self-timer button to start self-timer operation.
For one-shot self-timer: Press self-timer button and
remove finger within two seconds (before self-timer indicator
starts blinking).
For two-shot self-timer: Press self-timer button for three
seconds
started blinking, then remove finger from the button.
or
longer, confirm self-timer indicator
LED
has
44
Page 45

3.
Shutter will be released after approx.
first seven seconds, self-timer indicator
final three seconds, the
ready. For two-shot self-timer operation, the second shot will
be taken five seconds after the first.
LED
10
seconds.
LED
lights up, warning you to get
For
blinks; for the
the
To
cancel the self-timer after activating: Press self-timer
button again.
In
programmed auto, shutterpriority auto or aperture priorityauto exposure mode, use eyepiece cover DK-5
stray light from entering the
viewfinder.
to
prevent
45
Page 46

FLASH PHOTOGRAPHY
Generally performed at night or in dim light, flash photography
also removes shadows in pictures shot in bright sunlight, resulting in a more natural, pleasing effect.
When existing light
shooting a dark subject against a bright background
ject positioned against a bright window), the ready-light indicator
LED
inside the viewfinder blinks to indicate you should use
the built-in
TIL
is
insufficient for normal shooting or when
flash or an accessory Nikon Speedlight.
(i.e.,
sub-
AUTOMATIC
With either the Nikon
dedicated Speedlight set
balanced fill-flash.
With automatic balanced fill-flash, both the main subject and
the background are correctly exposed.
There are two types of automatic balanced fill-flash - Matrix
Balanced Fill-Flash with Matrix Metering and Center-Weighted
Fill-Flash with Center-Weighted Metering.
BALANCED
NSOOS's
built-in
at
TIL
you can perform automatic
FILL-FLASH
TIL
flash or Nikon
46
Page 47

Matrix Balanced Fill-Flash
As
mentioned on page
selected
phy,
and signals the computer, which then calculates available-light
exposure settings. When the shutter
TIL
then relays this information to the computer, which automatically controls flash operation. The computer automatically determines the appropriate amount of flash output compensation
required.
output (with automatic compensation), the computer turns off
the flash. The result
sure for both the background and foreground subject. All this
takes place automatically and much quicker than
explained.
in
auto exposure mode.
the Matrix Meter reads the scene's light levels/light pattern
sensor senses the available light and flash illumination,
As
soon as the right amount of flash illumination
37,
Matrix Metering
In
is
a well-balanced photo with correct expo-
is
TIL
is
automatically
auto flash photogra-
released, the camera's
it
can be
is
Center-Weighted Fill-Flash
If
you want to choose the brightness level for a basic availablelight exposure, set the camera's exposure mode to manual
exposure mode to perform Center-Weighted Fill-Flash. By
pointing the center-weighted area
ture, you can choose the desired brightness
ness value you have selected
aperture range', flash output compensation will be made automatically for a natural fill-flash effect.
value beyond the controlled shutter/aperture range, flash will
be output without compensation.
•
See
page
62.
at
different parts of the pic-
level.
If
is
within the controlled shutter/
If
you select a brightness
the bright-
The following shows operation with the built-in
For
flash photography operation with an accessory Nikon
Speedlight, see the Speedlight instruction manual.
For
accessory Nikon Speedlight compatibility, see page
TIL
64.
flash.
47
Page 48

USING
BUILT-IN
TTL
FLASH
- Do not touch the flash when firing it; normal operation
can make
it
quite
hot.
e Never fire the flash more than 20 consecutive times at
intervals
than
each major flash shooting, let the flash rest at least
10
When you continuously fire the flash, the camera's
handgrip may become hot due to normal operation.
this case,
because the flash automatically stops charging for a
while.
- When battery voltage decreases due
ture or weak batteries, the ready-light may turn off even
after
ready-light
eWhen the built-in
light will not
built-in
e Before shooting, make sure your subject
flash shooting distance range.
- Usable film speed range for the built-in
25 to ISO 800.
For
e
of
5 sec. or shorter. Firing continuously more
20 times may impair flash performance. After
minutes before firing again.
it
will take longer for the ready-light come on
to
low tempera-
it
lights up once. Before shooting, make sure the
is
on.
TIL
flash
is
fire.
TIL
usable lenses, see page
When using a Speed light, store the
flash
in
the down position.
up, an accessory Speed-
is
within the
TI
L flash
61.
48
In
is ISO
Notes
In
on
selecting aperture
aperture-priority auto and manual exposure
mode
eThe larger the aperture (the smaller the f-number) you
select, the greater the maximum shooting distance,
whereas the smaller the aperture (the larger the
f-number), the less the maximum shooting distance.
- When subject distance remains the same, as the aperture increases, the depth of
smaller the aperture, the greater the depth of field.
In
shutter-priority auto exposure mode
e With a slower shutter speed, a smaller aperture
matically selected, causing a shorter shooting distance
range.
e
lf
shutter speed remains the same, as background
brightness increases, the aperture becomes smaller.
perform flash shooting in daytime, Nikon recommends
that you switch
exposure mode in order to select a wider aperture for
greater flash shooting distance.
io
aperture-priority auto
fie
ld becomes smaller. The
is
or
manual
auto-
To
Page 49

-"
0
,
Operation
auto exposure mode
in
programmed
1.
If
subject brightness
viewfinder ready-light blinks to sug-
gest that you use a flash.
I
is
insufficient, the
2.
Press both flash lock-release buttons.
The built-in
automatically turn on.
TIL
flash will pop up and
49
Page 50

3.
Compose picture and lightly press shutter release button.
.
00
not use
AEL
button
in
• For controlled shutter speed/aperture, see table on page
Matrix Balanced Fill-Flash.
62.
50
4.
Make sure the subject
range .
Guide for flash shooting distance range (at ISO 100):
For
subjects backlit by the sun 0.6m
For
outdoor subjects on sunny day
For
outdoor subjects on cloudy day
or
in
shadows
For
indoor subjects
The
listed ranges should only be used
desired flash shooting distance range, switch exposure mode
to aperture-priority auto or manual.
is
within the flash shooting distance
-0.8m
(2.0
ft.-2.6
0.6m-1.5m
(2.0
ft. -4.9
0.
7m-2.1m
(2.3 ft.-6.9
0.
7m-4.3m
(2
.3 ft.-14.1
as
a guide.
To
choose
ft.)
ft.)
ft.)
ft.)
Page 51

-
5.
Confirm ready-light
button to take a shot with the flash.
•
With
ready-light off, the flash is charging and shutter
remains locked.
is
on, then fully depress shutter release
If ready-light blinks for a few seconds after shooting:
The flash has fired
insufficient. Confirm shooting distance and, if necessary, move
closer to subject, or switch exposure mode to aperture-priority
auto to select a wider aperture.
at
its maximum output and light might be
51
Page 52

Operation
in
shutter-priority
auto exposure mode
52
1.
If
subject brightness
viewfinder ready-light blinks
gest that you use a flash.
I
is
insufficient, the
to
sug-
2.
Press both flash lock-release buttons.
The built-in
automatically turn
TIL
flash will pop up and
on.
Page 53

3.
Compose picture and lightly press shutter release button.
Confirm exposure indicator
LED
for background exposure.
o lights up Correct exposure
+ or + 0 light
or
- 0 light
-
With a flash,
•
• For controlled shutter speed/aperture, see the table on page
62.
• Do not use
up'
Background may
faster shutter speed
up'
Background may
slower shutter speed.
shutter speed of 1
underexposed
the shutter will not lock
AEL
button in Matrix Balanced Fill-Flash.
be
overexposed. Select
be
underexposed. Select
If
sec.,
even
- remains with a
background will
if
+ or - lights
be
up.
4. Make sure subject
range.
Guide for flash shooti
For
subjects backlit by the sun 0.
For
outdoor subjects
For
outdoor subjects on
cloudy day/
For
The
desired flash shooting distance range, switch exposure mode
to aperture-priority auto
in
indoor subjects
listed ranges should only be used as a guide.
on
shadows
is
within the flash shooting distance
ng
distance range (at ISO 100):
6m-0.8m
at
1/125
sunny day 0.6m -1.5m
or
manual.
at 1/
0.7m-2.1m
at 1/125
0.7m-4
at 1/30
125
sec.
sec.
sec.
.3m
sec.
(2.0
(2.0
(2
.3 ft.-6.9
(2.3
To
ft.-2
.6
ft.
-4.9
ft.)
ft.-14.1 ft.)
choose
ft.)
ft.)
53
Page 54

5. Confirm ready-light
button to take a shot with the fl
•
With
ready-light off, the flash is charging and shutter
remains locked.
is
54
on, then fully depress shutter release
ash.
If ready-light blinks for a few seconds after shooting:
The flash has fired at its maximum output and light might be
insufficient. Confirm shooting distance and, if necessary, move
closer to the subject
priority auto
or
to
switch exposure mode to aperture-
select a wider aperture.
Page 55

Operation
in
aperture-priority
auto exposure mode
1.
If
subject brightness is insufficient, the
viewfinder ready-light blinks
gest that you use a flash.
2.
Press both flash lock-release buttons.
to
sug-
The built-in
automatically turn
TIL flash will
on.
pop
up and
55
Page 56

3.
Compose picture and lightly press shutter release button.
Conlirm exposure indicator
LED
lor background exposure.
o lights up Correct exposure
+ or + 0 light
- or - 0 light
•
With
• For controlled shutter speed, see page
•
Do
not use
up'
Background may
smaller aperture (larger I-number)
up'
Background may be underexposed. Select
wider aperture (smaller I-number)
a flash, shutter will
AEL
button in Matrix Balanced Fill-Flash.
not
lock
be
overexposed. Select
€Ven
if + or
62.
- lights up.
4.
Make sure subject
range.
25
50
- - - - 2 2.8
- -
-
1.4
-
~
1.4 2
::J
t:
Q)
a.
You
guide number.
guide number .
-"------
lull aperture
i.e.
, il
12
--
4 4
Guide number for each
2.8 4
2
2.8 < 4 5.6 8
4 5.6 8
5.6 8
11
8
can also estimate the maximum shooting distance by
an
114
lens
= 3m or
is
within the Ilash shooting distance
ISO
film speed
100
200
400 800
2 2.8 4
2.8
2
2.8 4 5.6
5.6
11
11
16 22 -
16 22 - -
= Maximum shooting distance
is
used at
ISO
39
--
= appro
x.
ISO
is
4
8
11
16 22
100:
9.8
It.
shown
5.6
8
11
16
on
Flash shooting
distance range
4.0-12
2.8-8
2.
0-6
1.
4-4
1.0-3
0.7-2
0.
6-1.5
0.
6-1.1
0.
6-0.8 (2.
page 62.
Unit· m
(13.1-39.4)
.5 (9.2
-27.9)
.0 (6.6-19.7)
.2 (4.
6-13.8)
.0 (3.3 -9.
.1 (2.
8)
3-6.9)
(2.0-4.9)
(2.0-3.6)
0-2.6)
(It)
56
Page 57

5.
Confirm ready-light
button to take a shot with a flash.
•
With
ready-light off, flash is charging and shutter is
locked.
is
on, then fully depress shutter release
If ready-light blinks for a few seconds after shooting:
The flash has fired
insufficient. Confirm shooting distance and,
closer to subject or select a wider aperture.
at
its
maximum output and light might be
if
necessary, move
57
Page 58

Operation
mode
58
in
manual exposure
1.
Press both flash lock-release buttons.
The built-in
automatically turn
e
ln
ready-light does
recommend flash use.
TIL
flash will pop up and
manual exposure mode, the
on.
not
appear to
2.
Look through the viewfinder, center
camera on the area where you desire
a correct exposure and lightly press
the shutter release button.
Page 59

3. Conlirm exposure indicator
o lights up
+ lights up
0
+ and
lights up
0
- and
lights up
- lights up
• For controlled shutter speed, see the table on page 62.
Correct exposure
Background may be overexposed.
+1EV)
(Over
Background may be overexposed.
(+1/3EV Background may
(-
1/3EV - -1EV)
Background may
(Below
-1
+1EV)
EV)
LED.
be
underexposed.
be
underexposed.
Select laster shutter speed
and/or smaller aperture
(larger I-number)
Select slower shutter
speed and/or wider aperture (smaller I-number)
4.
Make sure subject
shooting distance range. With
lilm, lor examp
range will be:
At
112
At
112.8
At
114
At
115.6
At
118
At
1111
At f/16
For
56.
You
ing distance using the guide number.
guide number· _ Maximum shooting
full aperture - distance
i.e
., if
12
- 4- = 3m or - 4- = approx. 9.8
Guide number for each
page
2.0m -6.0m
1.4m
1.0m -3.0m
0.7m-2.1m
0.6m
0.6m-1.1m (2.0 ft.-3.6 ft.)
0.6m-0.8m
other film speeds, see the table on page
can also estimate maximum shoot-
an
114
lens
62.
is
within the Ilash
le,
flash shooting distance
(6.6
ft.
-19.7
-4.2m
(4.6 ft. -13 .8
(3.3 ft.
-9.8 ft.)
(2.3 ft.-6.9ft
-1.5m
(2.0 ft.
-4.9
(2.0
ft.-2
is
used
at
ISO
100:
39
ISO
is
shown
ISO
.6
It.
.)
ft
ft.)
ft
ft.)
.)
100
.)
on
59
Page 60

5.
Recompose as desired, confirm ready-light
depress shutter release button to take a shot with the flash.
•
With
ready-light off, flash is charging and shutter remains
locked.
is
on, then fully
60
If
ready-light blinks for a few seconds after shooting:
The flash has fired
insufficient. Confirm shooting distance and,
closer to subject
at
its maximum output and light might be
or
select a wider aperture.
if
necessary, move
Page 61

USABLE
-
All
be
_ Usable
AF
AF
AF
AF
AF
AF
AF
AF
AF
AF
AF
••••• Vignetting may occur when shooting a subject within
•••••• Cannot be used when shooting
Note
AF
NIKKOR
non
-Zoom
AF
used,
AF
24-50mm
2S-70mm
2S-S5mm
35-70mm
35-70mm
35-105mm 1/3.5-f/4
35-135mm 113.5-1/4.5·····
70-210mm
70-210mm
75-300mm
SO-200mm
Cannot be used at a foeal length shorter than 28mm,
or
when shooting a subject within
tocal length.
Cannot be used when shooting
(3.3
ft.)
Cannot be used at
or
when shooting a subject within
focal length.
Cannot be u
(6.6
ft.)
(6.6
ft.)
that
Nikkor
except
AF
zoom
zoom
Nikkor
lenses
113.3-114.5'
113.5-1/4.5"
113.5-114.5'"
112.S····
1/3.3-1/4.5
1/4
114-115.6
114.5-1/5.6
1/2.S······
at 28mm foeallength.
se
d at a tocallength shorter than
at
3Smm
tocallength.
at
8Qmrn
toeallength.
lenses
LENSES
lenses
from
2Smm
to
ED
300mm
are
:
.5
a subject within
a tocallength shorter than 35mm,
a subject within
cannot
be
used
300mm
112.S IF.
1m
(3.3
ft,) at 28mm
2m
(6.6
ft.)
for
macro focusing.
1m
at
3Smm
SOmm.
2m
can
2m
- Do
-
Use
not
use a lens
only
AF
Nikkor
hood;
lenses.
it
could
cause
slight vignetting.
61
Page 62

BUILT-IN
Guide number
25
6 (20)
FLASH
50
I
8.5 (28)
I
SPECIFICATIONS
ISO film speed
I
I
12
100
(39)
I
I
17
200
(56)
I
I
24
400
(79)
Unit: m (ft.) Angle of coverage
800
I
34
(112)
I
28mm
to
300mm
Controlled shutter speed/aperture
Camera's exposure mode Controlled shutter speed Controlled aperture
Programmed auto
Shutter-priority auto
Aperture-priority auto
Manual
• Depends on film speed. See table at right.
•• If you set shutter speed dial to 11
synchronization speed.
62
in
auto exposure mode
If focal length
1/(focallength) sec., to
If
focal
1/60 to
As
set on dial
If focal length
1I(focallength) sec
If focal length
1/60
to 1/125 sec.
As
set on dial (1/125 sec. to 1 sec. or
250
or
in
use
is
60mm or shorter:
length
in
1/125 sec.
(11125
in
in
higher, shutter speed automatically switches to
1/125 sec. Between available
use
is
longer than 60mm:
sec. to 1 sec.)""
use
is
60mm or shorter:
.,
to
11125
use is longer than 60mm:
sec.
T)"
ma
and smallest aperture
Between available maximum aperture"
and smallest aperture
As
set on dial
"
As
set on dial
11125
sec.,
ximum aperture"
the camera's
Page 63

Controlled maximum aperture
exposure mode:
in
programmed and shutter-priority auto
Lens in use
~
With
f/1.4
With 1/3.3 lens
With 1/4.5 lens
lens
25 50
f/2
f/3
.3
f/4
.5
f/2
1/3
1/4
100 200 400 800
.4
f/2
.8
f/3
.4
f/3
.3
.5
.3
f/4
.5 1/4.5
1/3.4
f/4
f/4 f/4
f/4
.5
f/4
.8
.8
f/4.8
63
Page 64

SPEEDLIGHT
Nikon Speedlight
S8-24
88-23
S8
-22
S8-20
S8-168
S8
-15
S8-218
S8-21 A·····
S8-11
S8
-14
S8
-140
S8
-17
S8
-16A
·····
Medical-Nikkor
120mm
f/4
• Possible when N5005 camera is set
shutter-priority
•• Possible when the N5005 camera is set at manual
exposure mode.
••• Possible when the N5005 camera is set at aperturepriority auto
COMPATIBILITY
Connecti
Via
Via
Via AS-16
IF
or
or
manual exposure mode.
(Provided)
aperture-priority auto exposure mode.
ng
Direct
Direct
Via AS-6 No
SC-23
SC-13
or AS-15
SC-22
at
programmed,
CHART
Matrix 8alanced
Fill-Flash'
Yes
Yes****
Yes
No
No
Speed light's flash exposure mode
TIL
auto
Center-Weighted
Fill-Flash"
Yes
Yes
·**·
No No
Yes
No
No
(For
..
Guide Number System
details, see the lens' instruction manual.)
...
Although possible with the SB-218, Matrix Balanced Fill-
.
Flash and Center-Weighted Fill-Flash are not recommended
for close-up photography.
SB-21
at
•••
The
SB-16A
(For details, see Speedlight instruction manual.)
manual flash exposure mode.
difference between SB-21A
and
SB-16B,
Non-TIL
auto flash'"
(except S8-23)
is the type
Manual flash'"
Yes
No
Yes Yes
Yes
Yes
With
the N5005 camera, use
and
SB-21B,
of
controller attached.
Yes
Yes
Ye
Yes
Yes
or
between
s
64
Page 65

LENSES
Nikon N5005
Nikkor lenses (except AF-Nikkor lenses for
advantage of the N5005's conveniences,
that you should use
Howev
N5005 for manual focusing and manual exposure control, in
line with
is
designed for autofocus photography with
AF
er,
the following lenses can be used with the Nikon
th
e conditions listed at right.
Nikkor lenses.
F3AF).
it
is
recommended
To
AF
take full
MOUNTABLE NON-AF NIKKOR LENSES
AI-P Nikkor lenses
All AI-type Nikkor lenses (including AI
Nikon Series E lenses
Reflex Nikkor lenses 500mm
PC-Nikkor lenses 28mm
Medical-Nikkor 120mm
Te
leconverters (except
of
other lenses may damage the camera.
Use
1000mm
No.
143001
2000mm
fl3.5
28mm
1/4
fl2.8
35mm
No. 906201
fl4
TC-16/TC-16A;
-S
and AI-modified)
fl8
fl11
(No.
142360
or larger)
1/11
(No.
200311
(No.
180901
(No.
or
or larger)
851000 or smaller, or
larger)
they cannot be mounted)
or
smaller, or
or larger)
When mountable non-AF Nikkor lenses are used:
- Exposure indicator
sure meter, then set the exposure using lens aperture ring
and shutter speed dial. Ignore
aperture dial.
-
If
the shutter speed dial
set
at
S,
locks.
- Standard
sory Nikon Speedlight SB-24, SB-23, SB-22, SB-20,
use flash or Speedlight, set shutter speed dial
slower, then set the aperture using the lens' aperture ring.
Speedlight settings and shooting distance range, see Speedlight's instruction manua
ready-light functions as normal. Automatic balanced fill-flash
is
- When using the N5005 with an AI-P-Nikkor lens, automatic
exposure control
the self-timer indicator
TIL
not possibl
LEOs
do
not appear. Use external expo-
th
e aperture set on camera's
is
set
at
L or
A,
LED
blinks and the shutter
flash
is
possible with built-in
l.
Except for flash reco mmendation,
e.
is
available but automatic focusing
or the aperture dial
TIL
flash or acces-
etc.
1/
125
is
To
sec.,
no!.
to
is
or
For
65
Page 66

Lens compatibility
AF
Nikkor lenses
(except
AF
Nikkor lenses for
AI
-P Nikkor lens
AI-type Nikkor lenses
Series E lenses
Reflex Nikkor lenses
PC-Nikkor lenses
Medical-Nikkor 120mm
Teleconverters
(except TC-16/
TC
4
)
-16A)
4
)
Focusing Exposure Control
Autofocus
F3AF)
f
/4
Manual w/electronic
focusing confirmation
0
X
X
X
X X
X
X
X
0
61)
6')
0 0
62)
0
3
)
6
Programmed Shutter-priority Aperture-priority
Manual
auto auto auto
0 0 0
0
0
0
0
0
0
0
Camera's exposure meter does not operate
and exposure indicator
Set exposure using the lens aperture ring
and camera's shutter speed dial.
0
LEOs
do not appear.
Manual
0
0 0
0
1) With maximum aperture of
2) Unless lenses are shifted.
3)
With maximum effective aperture of
4)
Some lenses cannot be used.
66
1/5.6
or fast
1/5.6
er.
or faster.
Page 67

ACCESSORY COMPATIBILITY
The following accessories cannot be used with the Nikon
N5005.
- Cords that connect to remote terminal
- Accessories that connect to sync terminal
- Cable releases
- Neckstrap AN-1 (leather)
- Others:
PF-1-
PF-3,
Accessories exclusively designed for other cameras
PH-3, PB-2, PK-1-
PK-3,
PN-1,
K2,
BR-2
e
lf
accessories such as close-up attachments are mounted
directly on the lens mount of the N5005, exposure indicator
LEDs
do
e Filters with a larger exposure factor may affect the Matrix
Metering. Use Center-Weighted Metering (with
manual exposure mode).
PK-1,
e
on
Po
e
sure; use a circular polarizing
e Special filters, such as soft focus filters, cannot be used for
autofocus
mation.
not appear. Set aperture using lens aperture ring.
AEL
button
PK-11,
BR-4 and
AF
Nikkor lenses.
larizing filters cannot be used for autofocus or auto expo-
or
for manual focus with electronic focusing confir-
K1
Rings cannot be mounted directly
filter.
or
67
Page 68

CAMERA CARE TIPS
1.
Never touch the reflex mirror, focusing screen or
dust with a blower brush.
7.
Clean the viewfinder eyepiece with a
soft, clean cloth. Do not use alcohol.
AF
contacts. Remove
2.
Never touch the shutter curtains.
8.
Clean glass surfaces such as the lens
with a blower brush; avoid using lens
tissue as much
move dirt and smudges, use soft cotton moistened with pure alcohol and
as
possible.
To
re-
3.
Never touch the DX-contacts. Keep
clean with blower brush.
in
a spiral motion from center to
wipe
periphery. Be careful not
Caution
A spray gun-type blower may damage
the glass
cially when
lens element.
blower upright with its nozzle more than
30cm
keep the nozzle moving so the stream
of
air is
if
used to clean the
ED
glass is used for the front
To
(12
in.)
from the lens surface and
not
concentrated
to
leave traces.
avoid damage,
in
one spot.
lens,
espe-
hold
the
68
Page 69

4.
Do not leave the camera in an
excessively hot place.
5.
If
the camera
mist,
wipe with a clean, soft cloth.
is
or
exposed
after shooting near the
6.
If
to
rain
or
sea,
the camera malfunctions, take
immediately to an authorized Nikon
dealer or service center.
it
9.
Do not lubricate the camera.
10.
Store the camera in a cool, dry
place away from naphthalene or
camphor (moth repellents).
In
a humid environment, store the
camera inside a vinyl bag with a
desiccant
and salt.
Note, however, that storing the leather
case
leather
to
keep out dust, moisture
in
a vinyl bag may cause the
to
deteriorate.
69
Page 70

11.
If
camera has not been used for a
long time, recycling time of the builtin flash may be longer.
the flash's condenser in peak condition, thereby enabling you to use the
flash for many years, fire the flash
a few times every month.
To
maintain
NOTES ON BATTERIES
1.
Keep batteries out of children
If
swallowed, call a doctor immediately.
6.
Do not throw used batteries into a
fire.
's
reach.
2.
Never disassemble, short-circuit
heat batteries.
7.
If
battery chamber
battery leakage, take the camera to
an authorized Nikon dealer.
is
contaminated by
or
70
Page 71

3.
Battery power falls off in extremely
low temperatures - make sure bat-
teries are new and keep the camera
body wrapped
in
something warm.
4.
When replacing batteries, be sure
replace all batteries
Always use fresh batteries of the
sa
me brand.
at
the same time.
to
5.
When not using the camera for a
long period, remove batteries.
Compared with regular batteries, NiCd batteries provide
greater efficiency
NiCd batteries, thoroughly read the instructions for
batteries and battery charger.
at
low temperatures. Before charging
71
Page 72

SPECIFICATIONS
Type of camera Integral-motor autofocus 35mm single- mode or when using the
Picture format 24mm x 36mm (standard 3Smm
lens reflex with built-in
Lens mount Nikon bayonet mount
format)
Lens
Focus modes
AF
Nikkor lenses (except AF-Nikkor Metering range
SOmm
1/2.S,
autofocus converter TC-16fTC-16A), aperture-priority auto and manual
and non-AF Nikkor lenses (with limita- exposure modes
tion) availab le
Autofocus, and manual focus with exposure control
focusing confirmation automatically
ED
Autofocus
Autofocus detec-
TIL
phase detection system using exposure control
tion system Nikon Advanced AM200 sensor
Autofocus detec- Approx.
EV
-1
200mm
to
EV
TIL
flash auto exposure mode)
fi
lm Exposure meter Activated by lightly pressing shutter
switch
f/3.S
I
F,
and Exposure modes Programmed auto, shutter-priority auto,
re
lease button; stays on for approx.
8 sec. after lifting finger from button
EV
0 to
Programmed auto Nikon Auto Multi-Program; both shutter
speed and aperture are set
19
(at ISO
100)
Shutter-priority auto
Aperture-priority
auto exposure
Aperture automatically selected
match manually set shutter speed
Shutter speed automatically selected
to match manual set aperture
EV
19 at I
SO
100 with f/1.4 lens
tion range control
Autofocus actua-
tion method control
Autofocus lock Possible Shutter
Focus tracking Automatically activated with a moving focal
Focusing Available
confirmation an
Exposure metering Matrix Metering (for ensuring correct
Single servo Manual exposure Both aperture and shutter speed are
subject
Series E lens with a maximum aperture of f/5.6 or
automatic operation in programmed,
shutter-priority and aperture-priority
auto exposure modes); Center-Weighted Metering (for manual exposure
in
AF
manual focus mode with
Nikkor, mountable Nikkor and
faster.
Shutter release Elec
Shutter speeds 1/2000 to 30
Viewfinder Fixed eye-level pentaprism type;
set manually
Electronically controlled vertical-travel
-p
lane shutter
tr
omagnetic
sec.
and aperture-priori
1/2000 to 1
modes;
priority auto and man
modes; T setting for long-time exposure provided
magnification with
infinity; 92% frame coverage
on programmed
ty
auto exposure
sec.
ual
SOmm
72
AEL
button in
to
on shutter-
exposure
lens set at
O.Sx
Page 73

Eyepiece cover
Focusing screen
Viewfinder
information
Auto exposure lock
Film speed range
Film speed setting
Film loading
Film advance
Frame counter
Film rewind
Model OK-5 prevents stray light from
entering viewfinder
Nikon BriteView screen with central
focus brackets for autofocus operation
Green focus indicator
red exposure indicator L
over- and underexposure warning, and
correct exposure;
for
flash photography
Available via pressing the
while the meter
Metering selected when the
button
is
ISO
Automatical ly set by OX-coded film
(I
non-OX-coded films)
Film automatically advances to frame
one when shutter release button
pressed once; film advance indicator
rotates
being advanced properly
Fi
frame
is released; film advance stops automatically
Accumulative type; automatically reset
when camera back
Automatical ly rewound by built-in
motor
pressed)
25
to
5000 for OX-coded film
SO
100
is
automatically set for all
to
show that film
lm automatically advances one
at
approx. 0.4
at
end of film roll
LED
for focusing,
ED
shows
red
flash ready-light
AEL
is
on (Center-Weighted
sec.
is
AEL
is
loaded and
when shutter
opened
button
is
de-
Self-timer
Reflex mirror
Camera back
Accessory shoe
Built-
in
TTL flash
Flash
synchronization
Electronically controlled; approx.
sec.
exposure delay; blinking
cates self-timer operation; two-shot
self-timer
Automatic, instant-return type
Hinged back;
mation window and film advance
indicator
Standard ISO-type with hot-shoe
contact, ready-light contact,
contact, monitor contact
Guide number:
at
coverage: 28mm lens
Balanced Fill-Flash
exposure modes; Center-Weighted
Flash
mode
In programmed auto or aperture-priority auto, shutter operates
sec.
focal length less than 60mm);
ter-priority auto or manual exposure
mode, automatically set
when shutter
sec. or faster;
at
set
is
possible; cancellable
fi
lm cartridge confir-
12
ISO
100
is
possible in manual exposu'
(or
1/[focal length] sec. with lens
1/125
sec.
(meters) or 39 (feet)
and 20°
C;
angle of
or
is
possible
is
manually set at
if
shutter
or
is
slower, shutter fires as
10
LED
indi-
TIL
flash
longer; Matrix
in
auto
re
1/
125
to
1/60
in
shut-
to
1/125
sec.
1/125
manually set
Fill
-
73
Page 74

Flash indication
Flash ready-light blinks when flash
recommended (scene darker than
10
at 1
80
100,
or a scene with bright-
EV
10
or
higher
at
ness of
where the center portion
other areas by more than
lights up when built-in
ISO
is
darker than
EV
TIL
flash or
accessory Nikon Speed light is ready to
fire
Autofocus flash
photography
Possible only with Nikon Autofocus
Speedlight 8B-24, 88-23,
88-22
88-20
Power source Four
M-type
batteries
Number of 36-exposure film rolls per set of fresh
batteries (approx.)
For
autofocus operation with AF Zoom-Nikkor 35-70mm f/3.3-
114
.5 lens covering the full range from infinity
(00)
distance and back to infinity
before each shot,
(00)
to the closest
at
or faster shutter speed
With
AF
Nikkor 35-70mm f/3.3-4.5
Batteries
AA-type
alkaline-
manganese (LR06)
NiCd (KR-AA)
Zinc-carbon
(SUM-3)
Without flash With flash
at 20°C
(68°
at-10°C
F)
(WF)
78
38 22
20
20
at
20°C
(68°F)
19
11
5 2 -
74
100
2)
1/125
at-10
(14°F)
and
and
4
6
is
Dimensions
EV
(WxHxD)
154 x 102 x 65 mm
or
6.1
x 4.0 x 2.6
in.
Weight (body only) Approx. 647g
oz.
or 22.8
With
fresh alkaline batteries at normal temperature (20°C
[68°F]).
Specifications and design are subject to change without notice.
sec.
°C
Page 75

This device complies with Part
Operation
(1)
(2)
including interference that may cause undesired
operation.
is
This device may not cause harmful interference, and
this device must accept any interference received,
subject to the following two conditions:
15
of the
FCC
Rules.
This equipment has been tested and found to comply
with the limits for a Class B digital device
with the specifications set forth
If
this equipment does cause interference to radio
Rules.
or television reception which can be determined by
turning the equipment on and
another location and/or utilize an electrical outlet different from that used by the receiver.
in
off,
in
15
of
accordance
the FCC
Part
use the equipment
in
75
Page 76

GLOSSARY
AEL (Auto Exposure Lock)
AEL
is
recommended for shooting small dark subjects against
a bright background or for shooting dramatic sunset scenes.
When AEL
cally switches to Center-Weighted Metering.
AF
When existing light
set for autofocus mode, the
illuminator turns on automatically and provides enough subject
contrast to enable the
though
Balanced fill-flash operati
A method of flash photography that keeps flash brightness in
balance with the ambient light. (8ee "Fill-flash.")
With the built-in
8peedlights, the
called Matrix Balanced Fill-Flash, so both subject and background are correctly exposed, to produce a well-balanced
picture.
is
used
illuminator
it
were daytime.
(For
automatic balanced fill-flash, see page
in
auto exposure mode, camera automati-
is
below a certain level and the camera
8B-24/8B-23/8B-22/8B-20's
NSOOS's
autofocus system to function
on
TIL
flash
or
NSOOS
Nikon-dedicated TIL-controlled
performs automatic balanced fill-flash,
is
AF
as
46.)
Center-Weighted Metering
In
manual mode, or when the
exposure modes, the camera automatically switches to CenterWeighted Metering. This secondary metering system places
special emphasis on brightness within the 12mm-diameter
central area of the viewfinder, making the
versatile for a wide variety of subjects.
AEL
button
is
used in auto
NSOOS
exceptional
ly
76
Depth of field
The zone of acceptable sharpness in front of and behind the
subject on which the lens
increased by using sma
focal-length lenses,
To
reduce depth of field, use larger apertures (small f-number),
long focal-length lenses, and/or near subjects.
OX
code
Film information code printed on the film cartridge. The
automatically senses the film speed (1
coded film the instant
is
focused. Depth
ll
apertures (larger f-numbers) or short
or
by taking the picture from farther
it
is
loaded.
80
2S
of
to
field can be
SOOO)
away.
NSOOS
of
DX-
EV
Exposure Value. A number representing the available combinations of shutter speed and aperture that give the same
exposure effect when the scene brightness and 1
the same.
At 180
100,
the combination of a one-second shutter speed
an
aperture of
and
The camera's meter may be used only within
exposure meter.
ing range
is
from
f/1.4
For
EV
is
defined
as
example, with the
0 to
EV
19
at
180
EV1.
NSOOS,
100
Exposure control
Programmed auto: Camera controls both shutter speed and
aperture for correct exposure.
8hutter-priority auto: User selects shutter speed and camera
chooses aperture for correct expoSure.
80
remain
EV
range of the
exposure meter-
with
111.4
l
ens.
Page 77

Aperture-priority auto: User selects aperture and camera
chooses shutter speed for correct exposure.
Manual: User select both shutter speed and aperture with the
meter's recommendations for correct exposure.
Fill-flash
A method of flash photography that combines flash illumination
and ambient light.
Subjects lit from behind or near a window normally appear too
in
photographs, so
dark
fill-in lighting.
(See "Balanced fill-flash.")
it
is
recommended you use a flash for
Flash synchronization
The timing of the flash
of the camera's shutter.
so
it
fires coincident with the operation
f-number
Number that indicates brightness of film plane image.
Increasing/decreasing f-number
ping down lens aperture. The f-number series
5.6,
S,
11,
16,
22,
number
1/2; moving
32, etc.
(Le.,
from
1111
to
to
nearest lower number doubles the brightness.
is
equivalent to opening/stop-
Changing one step to the next larger
1116)
decreases image brightness by
is
1.4,
2,
2.S,
4,
Guide number
The number given to a flash bulb
indicate its power. A guide number may be quoted
feet,
and depends on the speed of the film being used.
or
Guide numbers quoted assuming a relatively efficient reflector
surrounds the flash source, e.
or
electronic flash unit
g.
, an average-sized room.
in
meters
to
ISO film speed
The international standard for representing film sensitivity
(speed with which
greater the sensitivity, and vice versa. A film speed of
is
twice
as
fast as
it
reacts to light). The higher the number, the
ISO
100,
and half the speed of
ISO
ISO
400 film.
200
LED
Light-Emitting Diode.
tions inside the viewfinder and self-timer indication.
For
the N5005, used to provide indica-
Matrix Metering system
An
advanced camera light metering system using a multisegment sensor and computer; available Nikon
F-401x1N5005, F-601/N6006,
and
F-S01/NSOOS.
F-401/N4004 and F-401s/N4004s models. Matrix Metering
an exclusive Nikon feature.
SLR
Single Lens Reflex. A type of camera
the camera's lens
camera functions, such as light metering and flash control, also
operate through the camera's lens.
A basic version
as
F-601
M/N6000,
is
used with the Nikon
you view through the camera finder. Other
in
SLR
models
F4,
F-S01s/NSOOSs
is
which you look through
77
Page 78

TTL
Through-The-Lens. Most
that measure light after
ture that enables exposure readings to be taken from the actual
image about to be recorded on film, whatever the lens' angle of
view and regardless of whether a filter
TTL
auto flash
The camera's light sensor measures flash light,
the subject on the film and shuts off the flash when measure-
ment indicates correct exposure. Because the sensor that
controls the flash receives light through the lens,
can be used for bounce photography, fill-in flash, multiple flash
photography,
that you can use a wide range of aperture settings, while
ensuring correct exposure.
etc.
SLR
cameras have built-in meters
it
has passed through the lens, a fea-
is
used.
as
reflected by
TIL auto flash
An
additional advantage of TIL auto flash
is
78
Page 79

VIEWFINDER INFORMATION
Exposure mode Programmed auto I Shutter-priority auto I Aperture-priority auto Manual
Focus indicator
LED
• lights up
• blinks
• disappears
o lights up
Camera shake
warning
-
-
S8-19 is set
External speed light not
Exposure
indicator
(without flash)
Ready-light LED
LEOs
o blinks
+ lights up
- lights up
+-
blink
alternately
+ 0 light up
O - light up
J blinks
(before (when built-in flash or external speedlight
shooting)
J disappears
J lights up
J blinks
(after shot)
In
focus
Autofocus impossible
in
Rear/front focus (shutter does not lock
Correct exposure
I I
Too
Too
I
I
to
Recharging (shutter does not lock with external speed light)
-
bright for auto exposure Over
dark for auto exposure Under (--1EV)
Lens aperture not set
Over
Under
Flash recommended
8 or 8
(EM)
set
to
TIL
Insufficient light for correct exposure
I
Recharged
I
manual focusing)
Camera shake
warning
to
minimum
(+1-+1/3
(-1/3--1EV)
is
External speedlight not set
OFF)
S8-19
EV)
is
set
to
8 or 8
(+1EV
(EM)
to
-
-)
-
TIL
c::::::::J
Shutter is locked
79
Page 80

No reproduction
whole or in part (except for brief quotation in critical
articles or reviews).
authorization from NIKON CORPORATION.
In
any form of this manual. in
may
be
made
without written
NIKON CORPORATION
FUJI
BLDG
.. 2-3.
PHONE :
MARUNOUCHI 3-CHOME. CHIYODA-KU. TOKYO 100. JAPAN
81
-3-3214-
5311
TELEX: NIKON J22601 FAX: 81-3-3201-5856
Nikon
Printed
in
Japan 9&011 -AD04(S163)
 Loading...