

Page 1
START
DATA READER MV-1
A
C
C
E
S
S
E
R
R
O
R
En
De
Fr
Es
It
MMVV--11
Data Reader MV-1
Instruction Manual PP. 2-25
Datenlesers MV-1
Bedienungsanleitung S. 26-49
Lecteur de données MV-1
Manuel d’instructions P. 50-73
Lector de Datos MV-1
Manual de instrucciones PP. 74-97
Lettore dati Nikon MV-1
Manuale d’istruzioni PP. 98-121
Page 2
2
Index
Introduction ..............................................................................................3
Notices .......................................................................................................4
Nomenclature............................................................................................5
Precautions.............................................................................................6-7
Basic operation ....................................................................................8-16
1. Connecting to camera and inserting memory card ...................8-9
2. Transferring shooting data in the camera to memory card for
storage.......................................................................................10-11
3. Transferring shooting data in the memory card to PC for
storage.......................................................................................12-13
4. Opening shooting data (text file) using spreadsheet
software ....................................................................................14-16
Details of Shooting Data...................................................................17-19
Setting and Changing Recording Mode with the F5/F100 .............20-23
Approved Memory Cards .......................................................................24
Blinking Error Lamp (red).......................................................................25
Specifications...........................................................................................25
Marks used in this manual
This icon marks cautions, information that should be read before use to
prevent damage to the MV-1.
This icon marks notes, information that should be read before using the
MV-1.
This icon marks tips, additional information that may be helpful when
using the MV-1.
This icon indicates that more information is available elsewhere in this
manual.
* Personal computer is abbreviated as “PC” in this manual.
Page 3
3
Introduction
Thank you for purchasing the Nikon Data Reader MV-1. Please read
this document completely to use the MV-1 correctly and enjoy its full
capabilities. After reading, please keep this manual available so you
can refer to it again when needed.
The data reader MV-1 offers the following features:
• Transfer shooting data stored in the Nikon F6, F5 and F100 to a
memory card set in the MV-1 and store.
• Data can be transferred from the memory card to a personal
computer (PC).
• Using the memory card and a PC, recording mode of the F5 and
F100 can be set and changed.
Record setting with the F6 and F100
• It is necessary to set the camera to record shooting data. (Default setting is no
recording.) With the F6, setting is possible with the camera, while with the F100,
the MV-1 and a PC are needed (x 20).
Using shooting data with a PC
• Data is stored to the memory card as a CSV (comma-separated value) format text
file, so it can be easily viewed and manipulated using a spreadsheet application
such as Microsoft® Excel.
• Transferring data stored in the memory card to a PC requires additional equipment
such as the PC Card Adapter EC-AD1, commercial PC card adapter for memory
cards, or memory card reader (Data Reader MV-1 cannot be connected to a
personal computer).
• With the MV-1, CompactFlash™ card is used to copy shooting data stored in the
F6. For a list of approved memory cards, see “Approved Memory Cards” on page
24.
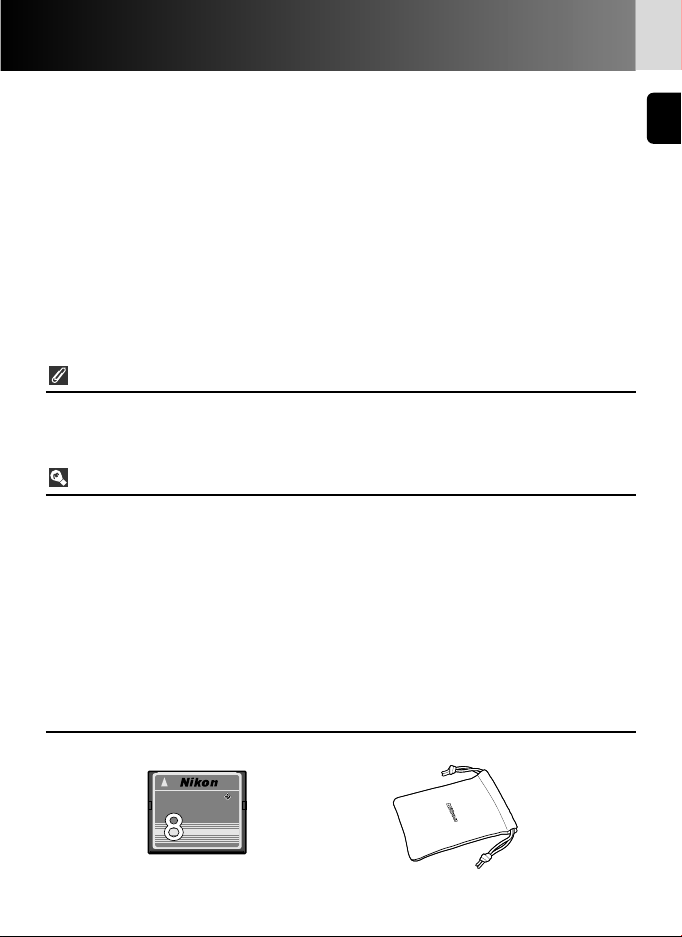
• Accessories
Please verify that the following accessories have been included with this product.
CompactFlash™
memory card (x 8)
Case
PC Card Adapter
TM
CompactFlash Card
EC-8CF
M
B
Page 4

4
Notices
This equipment has been tested and
found to comply with the limits for a
Class B digital device, pursuant to Part
15 of the FCC rules. These limits are
designed to provide reasonable
protection against harmful interference
in a residential installation. This
equipment generates, uses, and can
radiate radio frequency energy and, if
not installed and used in accordance
with the instructions, may cause harmful
interference to radio communications.
However, there is no guarantee that
interference will not occur in a particular
installation. If this equipment does cause
harmful interference to radio or
television reception, which can be
determined by turning the equipment
off and on, the user is encouraged to try
to correct the interference by one or
more of the following measures:
• Reorient or relocate the receiving
antenna.
• Increase the separation between the
equipment and receiver.
• Connect the equipment into an outlet
on a circuit different from that to
which the receiver is connected.
• Consult the dealer or an experienced
radio/television technician for help.
CAUTIONS
Modifications
The FCC requires the user to be notified
that any changes or modifications made
to this device that are not expressly
approved by Nikon Corporation may
void the user's authority to operate the
equipment.
Interface Cables
Use the interface cables sold or provided
by Nikon for your equipment. Using
other interface cables may exceed the
limits of Class B Part 15 of the FCC rules.
Notice for customers in the U.S.A.
Federal Communications Commission (FCC) Radio Frequency Interference Statement
Notice for customers in the State of California
WARNING: Handling the cord on this product will expose you to lead, a chemical
known to the State of California to cause birth defects or other reproductive harm.
Wash hands after handling.
Notice for customers in Canada
CAUTION
This class B digital apparatus meets all
requirements of the Canadian
Interference Causing Equipment
Regulations.
ATTENTION
Cet appareil numérique de la classe B
respecte toutes les exigences du
règlement sur le matériel brouilleur du
Canada.
Page 5
5
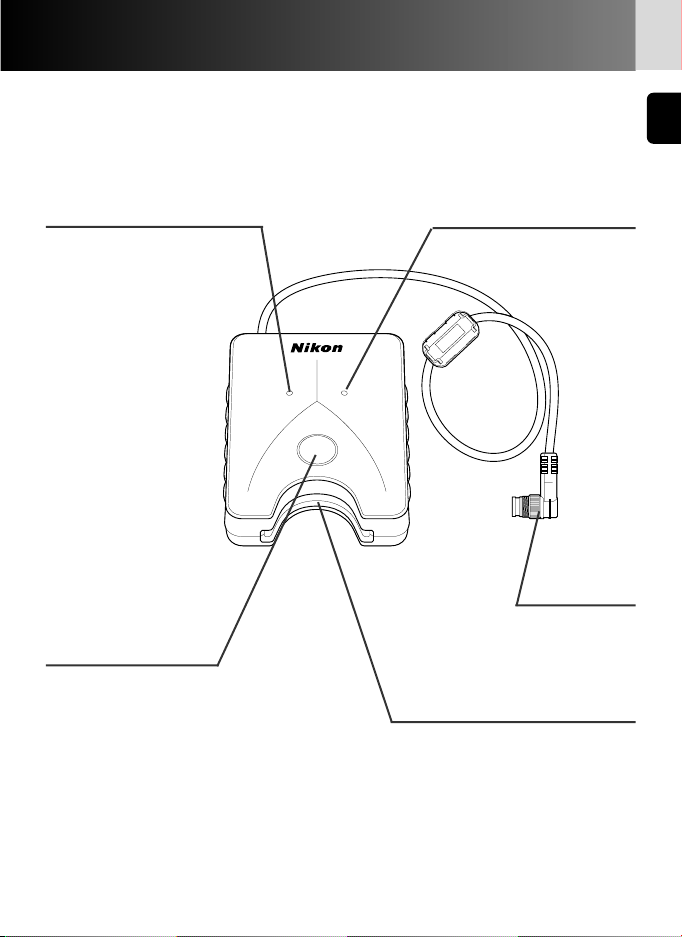
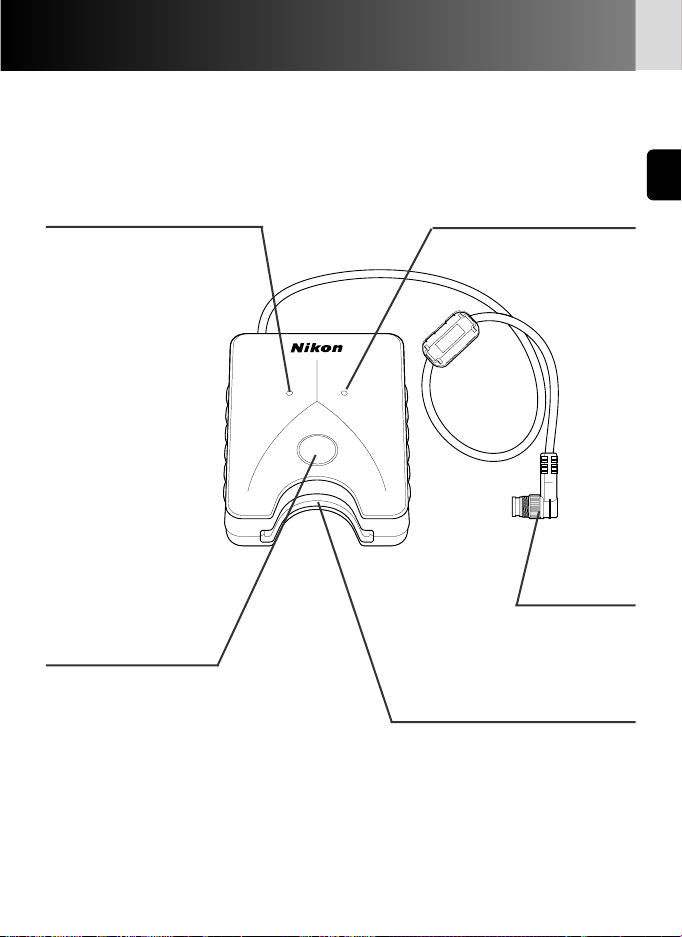
Nomenclature
Access lamp (green) (x 11) Error lamp (red) (x 25)
Start button (x 10)
Plug (x 8)
Memory card slot (x 8)
DATA READER MV-1
E
S
R
S
R
E
START
O
R
C
C
A
Page 6

6
Precautions
• Do not subject the MV-1 to strong shocks
Do not drop or otherwise hit the MV-1. This can cause malfunctions.
• Protect it from water
Take care to protect the MV-1 from water. If water gets inside the case, it may lead
to corrosion. This can be expensive to repair, and in severe cases it may be impossible
to repair at all.
• Avoid sudden temperature changes
If you expose the MV-1 to a sudden temperature change (for example, taking it from
the cold outdoors into a warm house, or vice-versa), water drops may form on the
inside and outside of the case, and can cause damage. Place the MV-1 in a plastic
bag or other container in advance and allow it to adjust to the new temperature
before using it.
• Do not use near strong electromagnetic waves or magnetic fields
In places where strong electromagnetic waves or fields exist, such as near television
broadcasting towers, or where strong static electricity is present, recorded data may
be corrupted or deleted, and the MV-1 may not function normally.
• Always turn camera power off before connecting the MV-1
Always turn camera power off before connecting the MV-1 to the camera, or
disconnecting it.
• Maintain sufficient battery power
Be sure to use the MV-1 with a reasonable level of power in the camera batteries.
Check your camera instruction manual for information on how to check battery
power.
• Caring for the MV-1
Use a blower to remove most of the dust and dirt, then wipe gently with a clean,
soft cloth.
• Store the MV-1 in a cool, dry place
Store the MV-1 in a cool, dry place to prevent mold and malfunctions.
Keep it away from naphthalene or camphor (moth repellent), electric appliances that
generate magnetic fields or any excessively hot place such as inside a vehicle during
the summer or near a heater.
Page 7

7
• Static electricity may interfere with normal operation
While rare, there are cases where an external electrostatic field can affect the
operation of the electronic circuitry, preventing the MV-1 from operating normally. If
this occurs, disconnect the MV-1 from the camera and then reconnect it.
• Avoid operation while access lamp (green) is on
When the access lamp is on (blinking or continuous), do not perform any of the
following operations, as they may corrupt the files or folders stored on the memory
card, or the shooting data in the camera itself. It is possible to damage the memory
card as well.
Prohibited operation when the access lamp is on (blinking or steady):
Removing or inserting a memory card; attaching/detaching plug to the 10-pin
terminal; removing or installing camera batteries; rewinding film; releasing shutter.
The memory card and the plug may be inserted or removed freely while the error
lamp is on, however.
• Timestamp for files and folders
• With F6: The timestamp on folders and shooting data files in the F6 is based on
data received from the internal F6 clock when the start button of the MV-1 is
pressed. The timestamp is applied to every folder and file produced in the memory
card with one operation.
• With F5 and F100: Folders and files in the F5 and F100 use a fixed timestamp for
shooting data “Sep. 1, 2004, 00 hours, 00 minutes and 00 sec.".
• Folders and files other than shooting data (folders such as nikon_dr, modeset,
modelist or files automatically created in those folders) use a fixed timestamp of
“Sep. 1, 2004, 00 hours, 00 minutes and 00 sec." with any camera.
• Other precautions
• The MV-1 cannot be used with cameras other than the F6, F5 or F100, even if they
do have 10-pin terminals (for example, the F90/F90X, D2H or D100+MB-D100).
• The MV-1 does not offer a function to transfer data to a PC.
• Once written to the memory card in the MV-1, shooting data cannot be transferred
back to the camera, or displayed by the camera.
Page 8
8
Basic operation
1. Connecting to camera and inserting memory card
(Illustrations show the F6)
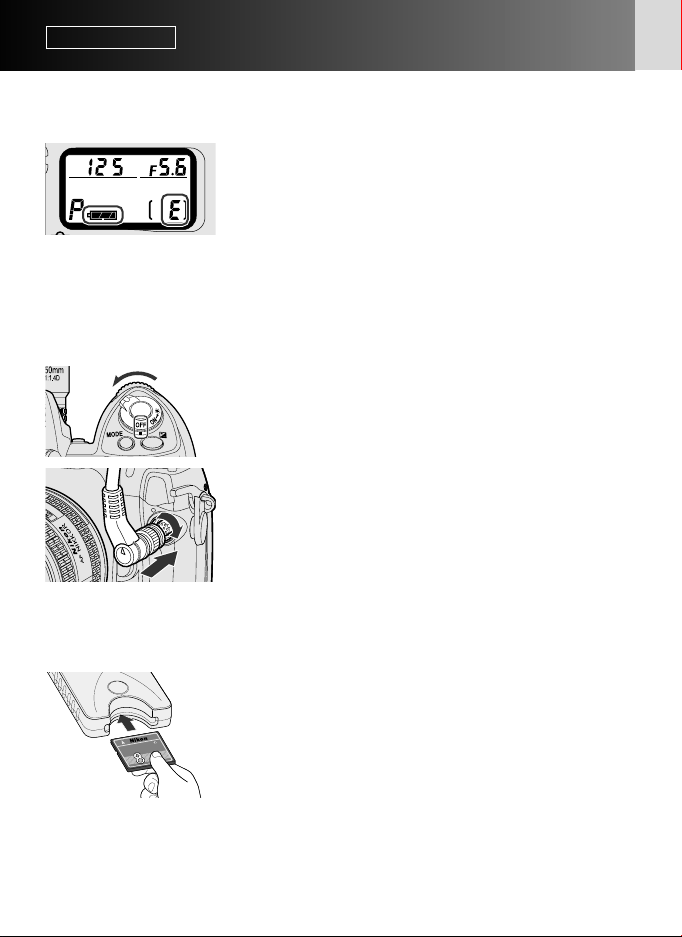
1
Confirm film is not loaded in the camera (E is
displayed in the frame counter) and battery
power is sufficient.
• If shooting data stored in the camera is too large
and/or data remains in the memory card, data
transfer from the camera to the memory card will
take a long time. Change batteries for new ones
when necessary.
xSee camera’s instruction manual for battery
power confirmation.
2
Turn the camera power off.
3
Remove the cap on the 10-pin terminal, insert
the MV-1 plug so that the Ymark on the plug
aligns with the index mark • on the camera
terminal, then rotate in the direction shown to
lock it in place.
• The position of the 10-pin terminal may vary
depending on your camera model. Refer to your
camera’s instruction manual for details.
• The Extension Cord MC-21 cannot be used.
4
Insert the memory card into the memory card
slot.
• Supplied memory card has been formatted in FAT
file system (x 13) and can be used as it is.
• Hold the memory card so that the label is on the
same side as the MV-1 start button, and insert it
pins-first into the memory card slot.
• Use a memory card in which no data remains.
• Refer to the list of supported memory card types
on p. 24 for more information.
START
TM
ard
sh C
la
ctF
a
p
om
C
F
C
8
-
C
E
B
M
Page 9
9
Insert a memory card straight and in the right direction.
• Do not push a memory card bent or in the wrong direction. This may cause damage
to the MV-1 or memory card.
Record setting with the F6 and F100
• It is necessary to set the camera to record shooting data. (Default setting is no
recording.) With the F6, setting is possible with the camera, while with the F100,
the MV-1 and a PC are needed (x 20).
Use a memory card in which no data remains
• If previous shooting data remains in a memory card, it may take a long time to
transfer data from a camera. Refer to "If access lamp keeps blinking for a long
time" (x 11).
Page 10
10
Basic operation
2. Transferring shooting data in the camera to memory card for storage
1
Turn on the camera power.
• Confirm film is not loaded in the camera (E is
displayed in the frame counter) and battery power
is sufficient (x 8).
2
Press start button of the MV-1 for at least one
second.
• The MV-1 access lamp will blink as it
communicates with the camera.
• Folders (x 13) will be automatically created in the
memory card to store shooting data. Shooting
data recorded in the camera will be transferred
here for storage.
• If data transfer completes normally, shooting data
in the camera is deleted, and the access lamp will
change from blinking to continuous for about six
seconds, then go off. Blinking of access lamp may
continue for a long time (x 11).
• If the error lamp (red) blinks, it indicates a fault has
been detected. In this case, by referring to
"Blinking Error Lamp" (x 25), turn off camera
power, make sure access lamp turns off, replace
memory card if necessary, then repeat the above
procedure from step 1.
For F5 and F100 users (setting and changing recording mode)
Besides transferring shooting data, "modelist" and "modeset" folders are created
on the memory card each time the start button of the MV-1 is pressed. When the
start button is pressed, the recording mode of the F5 or F100 is set/changed after
transferring shooting data if certain files in the modelist folder are placed in the
modeset folder beforehand. With the F100, this operation is required at the
beginning since shooting data is set not to be recorded at the default setting (x
20-23).
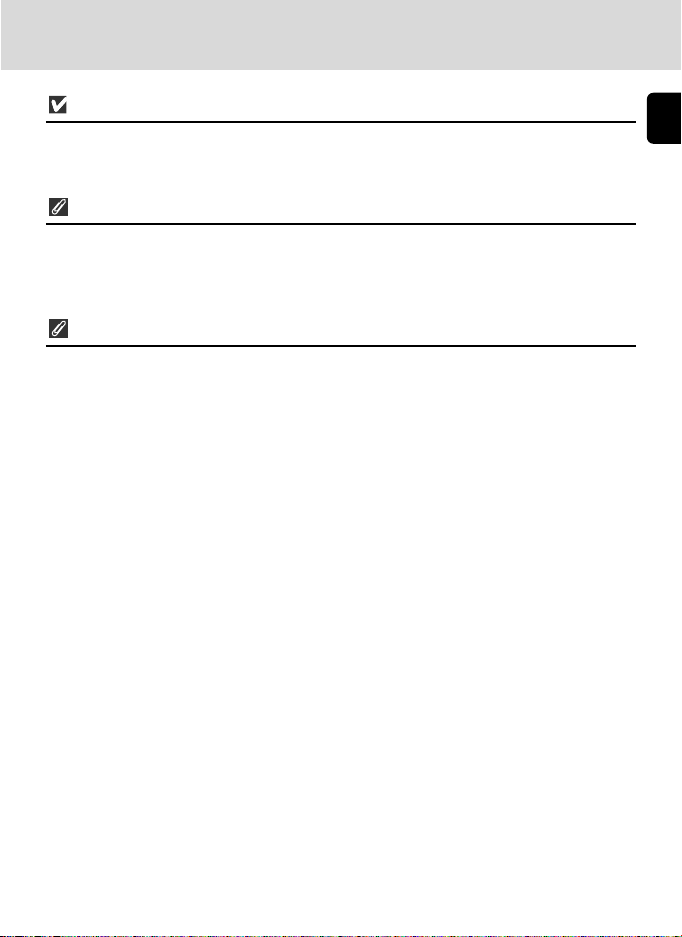
3
Confirm access lamp is off, turn the camera
power off, remove the memory card and
disconnect the MV-1 (x 11).
Start button
Access lamp
Error lamp
DATA READER MV-1
ACCESS ERROR
START
TM
CompactFlash Card
EC-8CF
M
B
Page 11
11
If shooting data is transferred/stored while film is loaded in
camera
• If shooting data is transferred while film is loaded in the camera, processing will be
as below. With the F5 and F100, shooting data is retained in the camera even after
transfer, so we recommend transferring data with no film loaded.
F6
F5
F100
• Shooting data in the camera other than the current film data will be transferred.
• Shooting data in the camera other than the current film data will be deleted (shooting data for the
current film will be left untouched).
• Shooting data in the camera other than the current film data will be transferred.
• No shooting data in the camera including the data of the current film in use will be deleted.
• All shooting data in the camera including the data of the current film in use will be transferred.
• No shooting data in the camera including the data of the current film in use will be deleted.
If access lamp keeps blinking for a long time
In any of the following cases, make sure the access lamp is off before turning the
power off.
• The MV-1 checks the files on the memory card while transferring shooting data. If
the memory card already holds many shooting data (files), it could take a long time
to store data (several dozen minutes for hundreds of files, or even several hours for
thousands of files). To avoid this problem, transfer shooting data from the memory
card to the PC hard disk, and delete it from the memory card when no longer
needed (x 12).
• When large amounts of shooting data are recorded in the camera, even if no data
(file) remains in the memory card, the access lamp may blink for several minutes.
• The F5 is set to always record shooting data regardless of current camera settings,
so even if the MV-1 is being connected for the first time it will automatically
transfer recorded shooting data to the memory card. This may cause blinking of the
access lamp for several minutes.
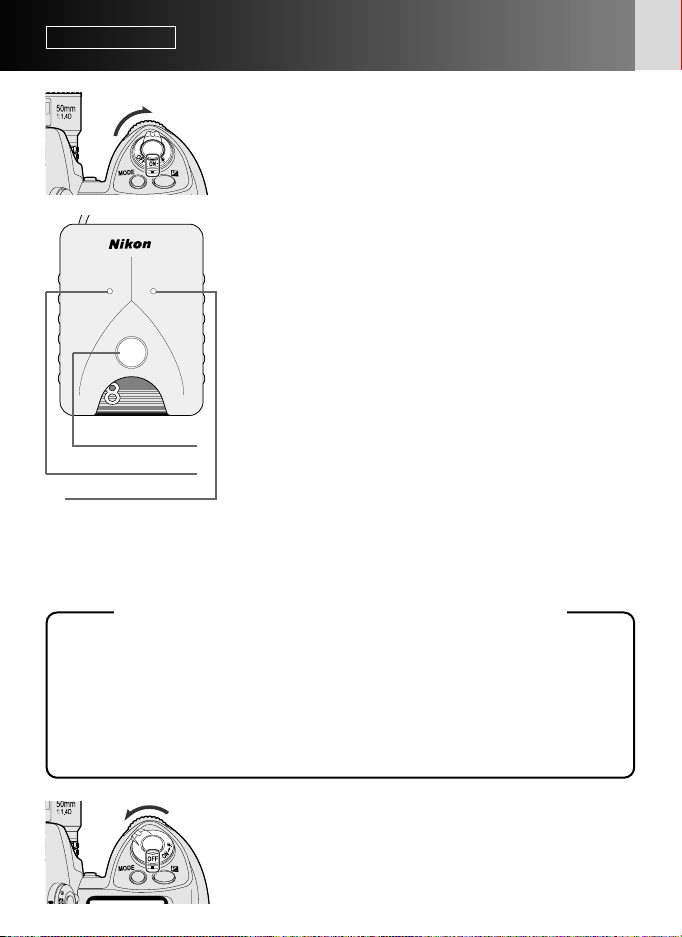
Disconnecting from camera
1. Confirm access lamp is off and turn off camera power.
2. Rotate the MV-1 plug in the opposite direction from that used to connect it, and
then pull the plug out straight when it is sufficiently loose.
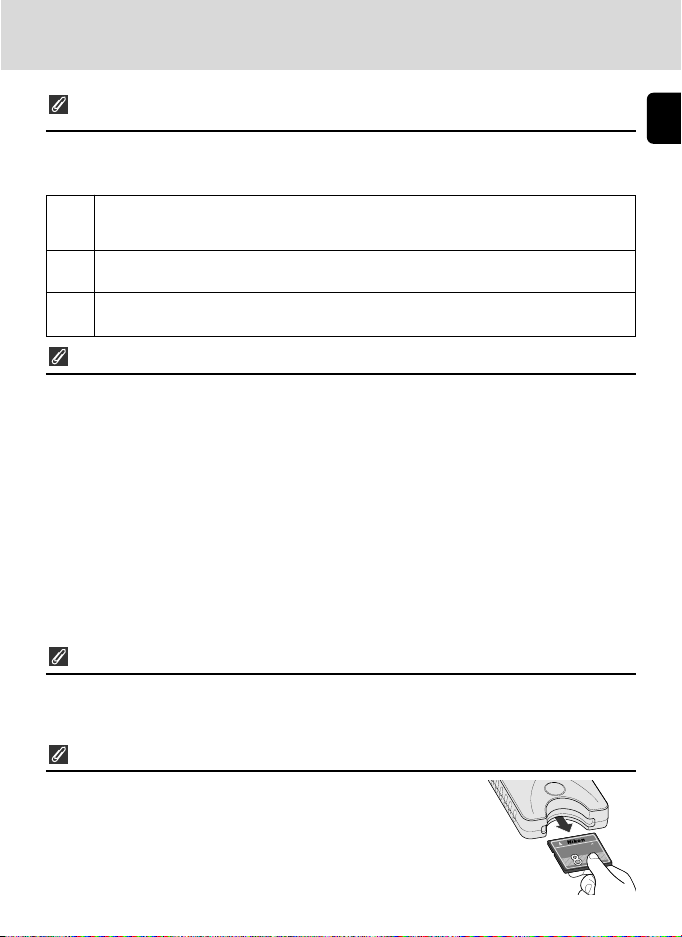
Removing memory cards
• If the MV-1 is connected to the camera;
1. Confirm that the access lamp is off.
2. Turn off camera power and remove the memory card by
holding it with your fingers.
• If the MV-1 is not connected to the camera, the memory card
can be removed with your fingers without any additional
procedure.
ST
TM
ard
lash C
ctF
a
p
m
o
C
F
C
8
-
C
E
B
M
Page 12
12
1
Connect the memory card to the PC.
• Connect the memory card using the Card Adapter
EC-AD1 (sold separately), commercial PC card
adapter for memory cards, or memory card reader.
When connection is completed, memory card will
appear on the PC as a removable disk.
• Refer to the instruction manuals for your PC, PC
card adapter or memory card reader when
connecting the memory card, as details may vary.
• With Windows 95, it may be impossible to
recognize the memory card. Refer to your PC
instruction manual for additional information.
Basic operation
3.
Transferring shooting data in the memory card to PC for storage
(Illustrations show Windows XP Home Edition/Professional operating system.)
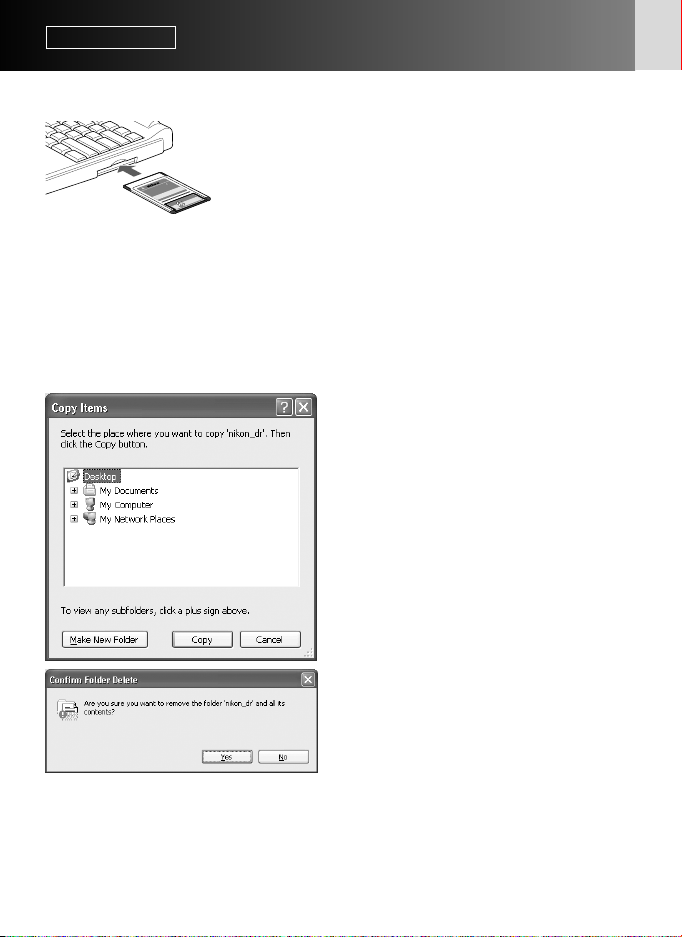
2
Save the "nikon_dr" folder to the
PC.
• To prevent deleting "nikon_dr" folder
saved in the PC by overwriting,
change the name of the folder.
• Refer to your PC instruction manual
for details on how to save the
shooting data for your particular PC
and operating system.
3
Delete the shooting data from the
memory card.
• If the shooting data is no longer
needed, delete it from the memory
card so that you can store the next
batch of shooting data on the card.
• Refer to the instruction manuals for
your specific PC and operating
system for information on deleting
files and folders, as details may vary.
• Shooting data can also be deleted by
formatting the memory card (x 13).
M
T
D1
d
r
a
C
EC-A
h
s
la
F
t
c
a
p
m
R
o
C
E
T
P
M
T
A
d
r
D
a
C
A
h
s
la
EC-8CF
F
t
c
a
p
m
o
B
C
M
Page 13
13
Names of memory cards connected to a PC
• Depending on your specific PC and operating system, the name assigned to the
connected memory card may vary. Common names are "UNTITLED (E:)" and
"NO_NAME".
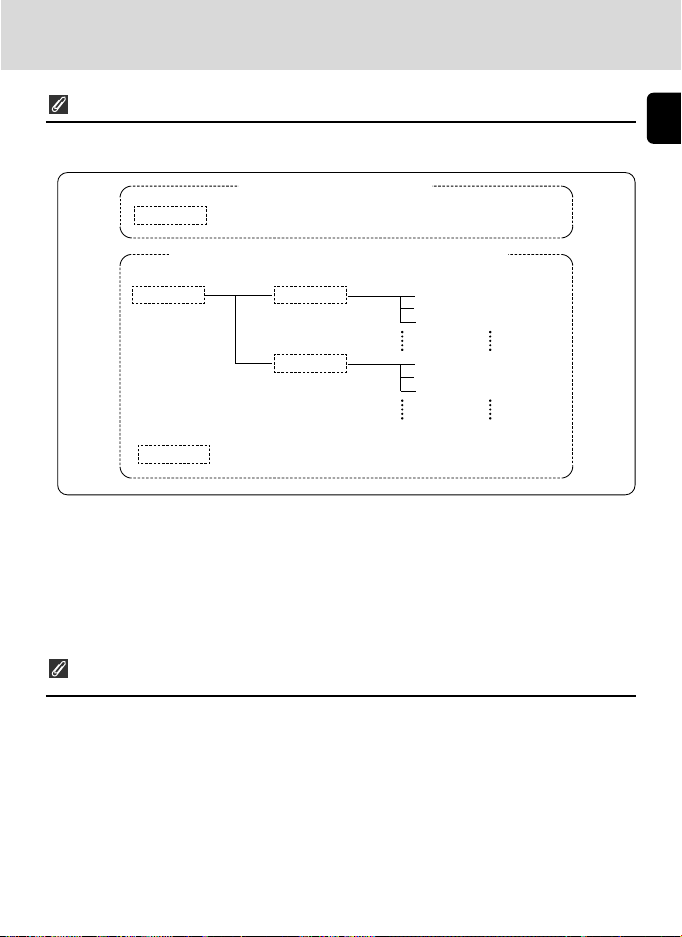
Shooting data folders and files on memory card
• The folders and files used to store the shooting data on the memory card (x 10)
have the following structure (example shown is for the F6):
For shooting data storage
Data reader folder Camera model folder Camera ID folder Shooting data files
nikon_dr F6 ID012 n00001.txt
n00002.txt
n00003.txt
For setting/changing recording mode of F5/F100
For details on these folders (x 21).
modelist
modeset
• The camera model (F6, F5, F100) is automatically detected, and the camera model
folder name automatically set.
• The camera ID folder name identifies the same model type.
The camera ID folder name is "IDxxx" where "xxx" is one of the following:
F6: The ID number of the camera (000~999)
F5: “255” (fixed) (Changed ID number of the camera if the camera ID number
has been changed using the AC-1WE or AC-1ME Photo Secretary for F5*.)
* Photo Secretary for F5 is no longer available.
F100: Three underbars (fixed)
• If there are 8,192 shooting data files in the camera ID folder, a new camera ID
folder of the same name followed by "_xx" (where xx is a number from 01 to 99)
will be created, and new shooting data files stored in that folder.
• The shooting data file names are displayed as "nxxxxx.txt" where xxxxx is a numeral
from 00001 to 09999, and indicates the film number. If a file name already exists in
the folder it will not be rewritten, but the new file will instead have "_xxxx"
appended to it, where xxxx is a numeral from 0001 to 9999.
Memory card formatting (initialization)
• Memory cards should be formatted by a PC using FAT12, FAT16 or FAT32 file
systems (The MV-1 cannot format memory cards). The file system will vary with
your specific PC and operating system. Refer to the corresponding instruction
manuals for details.
Page 14
14
Basic operation
4. Opening shooting data (text file) using spreadsheet software
Shooting data is saved as a CSV text file for each film. This text file can be easily
opened and manipulated with spreadsheet applications such as Microsoft® Excel.
• Text data (example using the F6)
The shooting data for each film is saved as the text data shown here.
• For details on converting your data, refer to the instruction manual for your
spreadsheet application software.
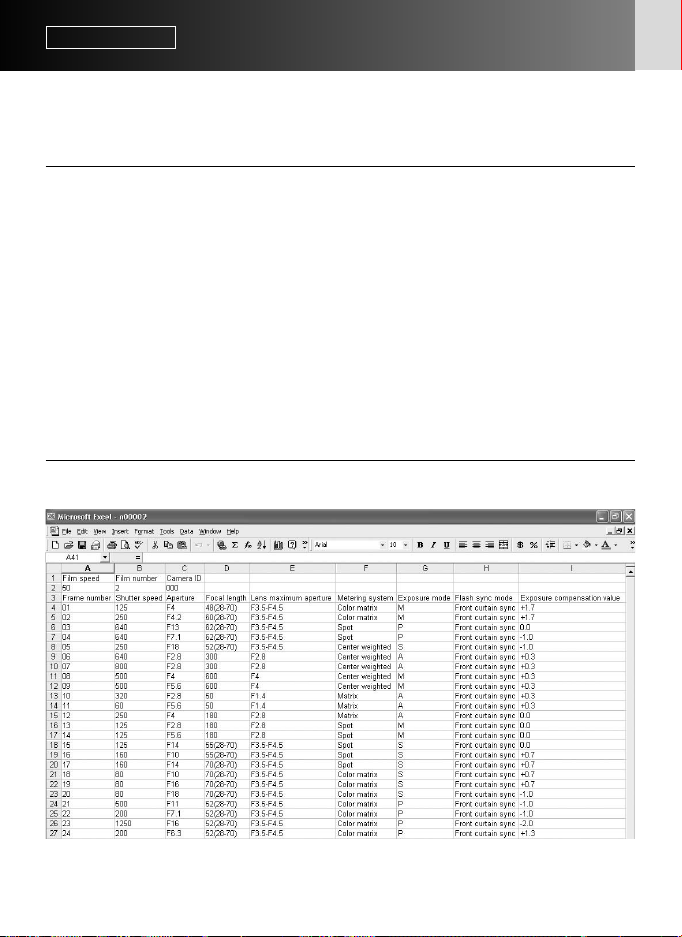
• Using spreadsheet software to make a table (example using the F6)
If the shooting data file is opened in a spreadsheet application such as
Microsoft® Excel, it can be converted for readability very easily.
Film speed,Film number,Camera ID
50,2,000
Frame number,Shutter speed,Aperture,Focal length,Lens maximum aperture,Metering system,Exposure mode,Flash sync mode,Exposure compensation
value,EV difference in Manual,Flash exposure compensation value,Speedlight setting,Multiple exposure,Lock,Vibration Reduction,Date(yy/mm/dd),Time
01,125,F4,48(28-70),F3.5-F4.5,Color matrix,M,Front curtain sync,+1.7,+0.3,0.0,non-TTL auto flash,None,AE Unlock,VR off,2005/07/25,10:01
02,250,F4.2,60(28-70),F3.5-F4.5,Color matrix,M,Front curtain sync,+1.7,0.0,0.0,non-TTL auto flash,None,AE Unlock,VR off,2005/07/25,10:02
03,640,F13,62(28-70),F3.5-F4.5,Spot,P,Front curtain sync,0.0,0.0,0.0,non-TTL auto flash,None,AE Unlock,VR off,2005/07/25,10:04
04,640,F7.1,62(28-70),F3.5-F4.5,Spot,P,Front curtain sync,-1.0,0.0,0.0,non-TTL auto flash,None,AE Unlock,VR off,2005/07/25,10:04
05,250,F18,52(28-70),F3.5-F4.5,Center weighted,S,Front curtain sync,-1.0,0.0,0.0,non-TTL auto flash,None,AE Unlock,VR off,2005/07/25,10:04
06,640,F2.8,300,F2.8,Center weighted,A,Front curtain sync,+0.3,0.0,0.0,non-TTL auto flash,None,AE Unlock,VR off,2005/07/25,10:07
07,800,F2.8,300,F2.8,Center weighted,A,Front curtain sync,+0.3,0.0,0.0,non-TTL auto flash,None,AE Unlock,VR off,2005/07/25,10:07
08,500,F4,600,F4,Center weighted,M,Front curtain sync,+0.3,+0.8,0.0,non-TTL auto flash,None,AE Unlock,VR off,2005/07/25,10:10
09,500,F5.6,600,F4,Center weighted,M,Front curtain sync,+0.3,-0.2,0.0,non-TTL auto flash,None,AE Unlock,VR off,2005/07/25,10:10
10,320,F2.8,50,F1.4,Matrix,A,Front curtain sync,+0.3,0.0,0.0,non-TTL auto flash,None,AE Unlock,VR off,2005/07/25,10:11
11,60,F5.6,50,F1.4,Matrix,A,Front curtain sync,+0.3,0.0,0.0,non-TTL auto flash,None,AE Unlock,VR off,2005/07/25,10:11
12,250,F4,180,F2.8,Matrix,A,Front curtain sync,0.0,0.0,0.0,non-TTL auto flash,None,AE Unlock,VR off,2005/07/25,10:12
Page 15
15
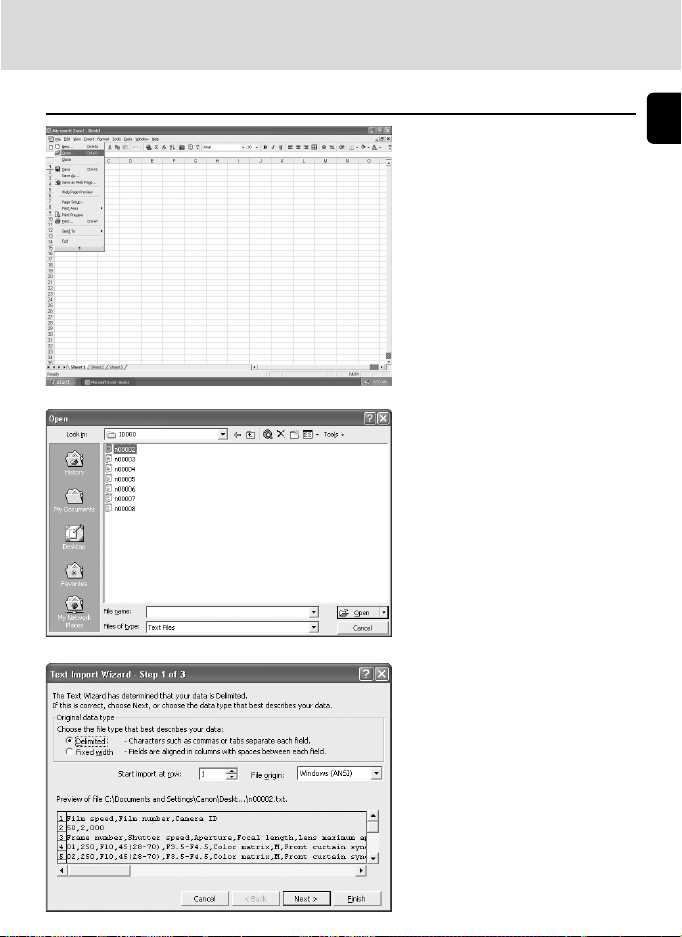
• Example of making a table using Excel 2000
1
Start Microsoft Excel,
and choose ‘Open file’
from file menu.
2
Set file to ‘Text’, and
choose file to be
imported, and click
‘Open’.
3
Choose the file type
‘Delimited—Characters
such as commas or tabs
separate each field’.
Confirming ‘1’ is selected
for ‘Start import at row’
and ‘Windows (ANSI) is
selected for ‘File origin’,
click ‘Next.’
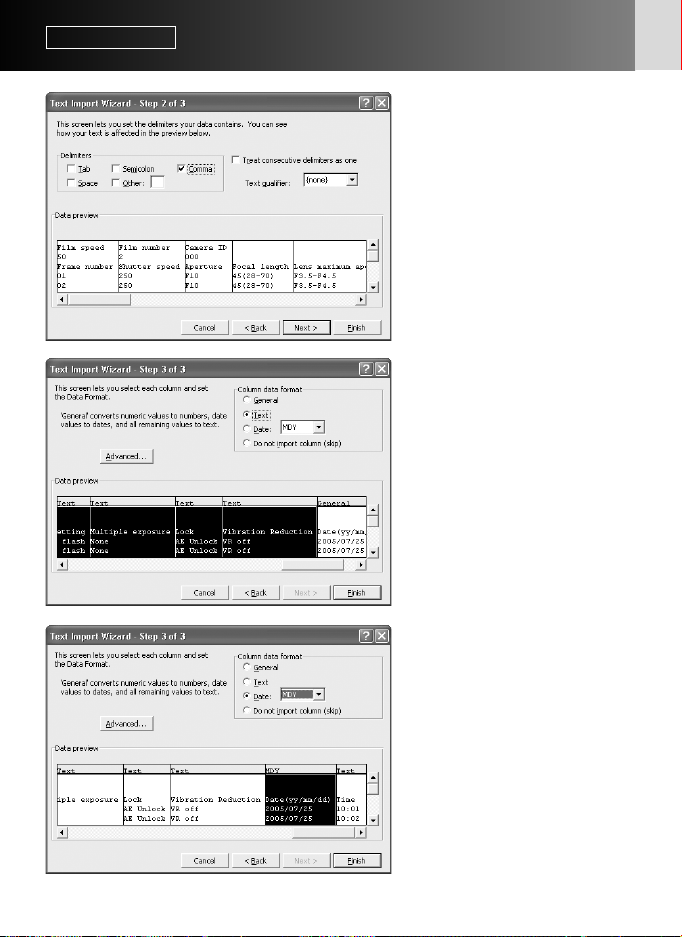
Page 16
16
4
Select ‘Comma’ as
‘Delimiters’ (cancel other
checks), confirm ‘Treat
consecutive delimiters as
one’ is not checked,
‘{none}’ is selected for
‘Text qualifier’, and click
‘Next.’
5
Select all the columns
except for the date
column and set ‘Column
data format’ to ‘Text’.
6
Highlight the date
column and set ‘Column
data format’ to ‘Date’,
then click ‘Finish’.
Import is finished
• If desired, change the date
display order of the date
column. Make adjustments to
column width and character
size for easy viewing.
Basic operation —continued
4. Opening shooting data (text file) using spreadsheet software
Page 17
17
Details of Shooting Data
In the text file stored in the PC, data is recorded according to the
camera and selected recording mode as shown below. Data is
displayed in English.
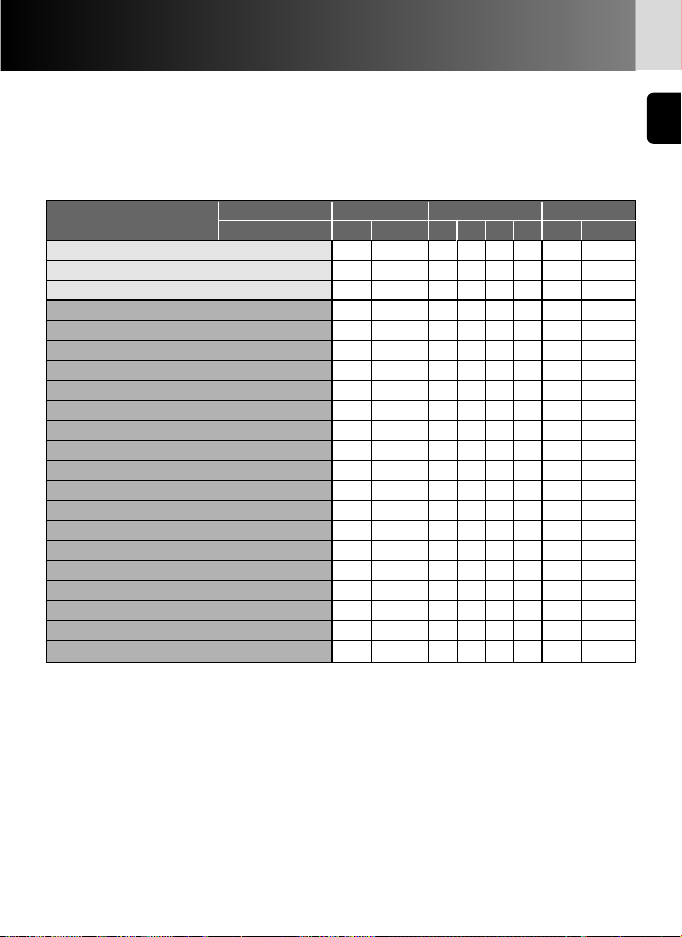
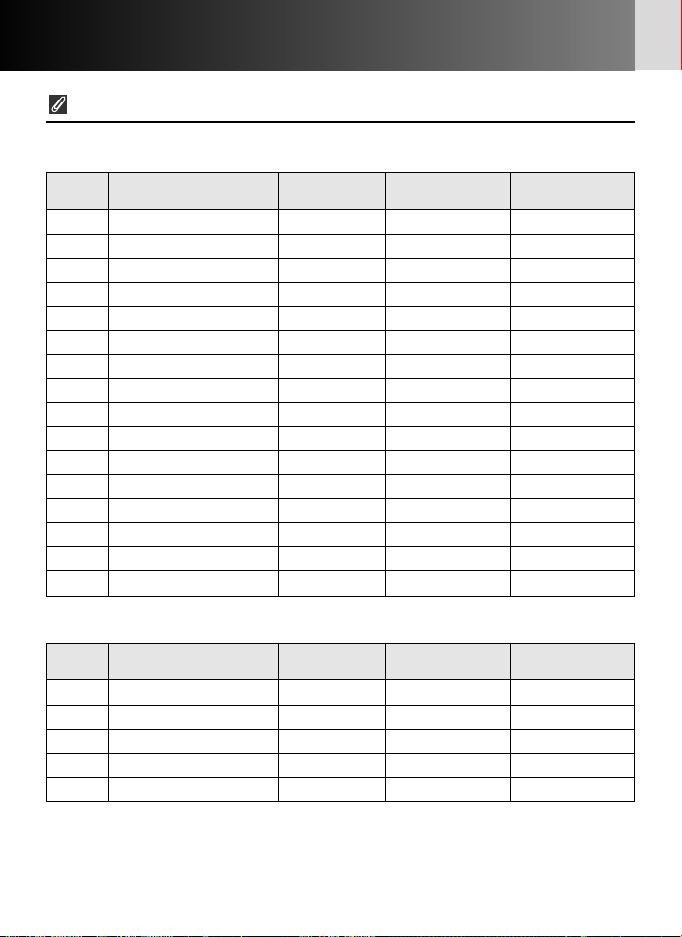
• Shooting data and support by various camera recording modes
Recorded item
Camera F6 F5 F100
Recording mode Basic Detailed A B C D Basic Detailed
Film speed R R RRRR R R
Film number R R RRRR R R
Camera ID R R RRRR
Frame number R R RRRR R R
Shutter speed R R RRRR R R
Aperture R R RRRR R R
Focal length R R RRRR R R
Lens maximum aperture R RRRR R
Metering system RR R R
Exposure mode RR R R
Flash sync mode RRR
Exposure compensation value RR R R
EV difference in Manual RR R R
Flash exposure compensation value RR
Speedlight setting RRR
Multiple exposure R R RRRR R R
Lock R
Vibration Reduction R
Date (yy/mm/dd) RR RRR
Time RRRR
Data imprinting RR
gG indicates data recorded on each film. gG indicates data recorded on each film frame.
Notes
1: For metering system, flash sync mode, speedlight setting, multiple exposure, AE lock and VR
function, refer to record data item on page 19.
2: With the F5, Date (year/month/day), Time (hour/minute/second) and imprinted characters are
recorded when using Multi-Control Back MF-28. Do not use comma for imprinted characters.
3: Lens aperture, focal length and maximum aperture are recorded only when using a CPU lens.
(With the F6, even with non-CPU lens, data can be recorded if the lens data is specified. For
details, refer to the F6 instruction manual.)
4: In Time setting, hour/minute/second is recorded with the F5, and hour/minute with the F6.
5: In multiple exposure with the F6/F100, the data is recorded for first exposure only regardless of
the number of exposures. With the F5, although the number of data is decreased, up to 15
exposure data can be recorded (from the second exposure, data would be the same as "A").
However, for the first exposure, "multiple exposure" is not indicated.
Page 18
18
Details of shooting data—continued
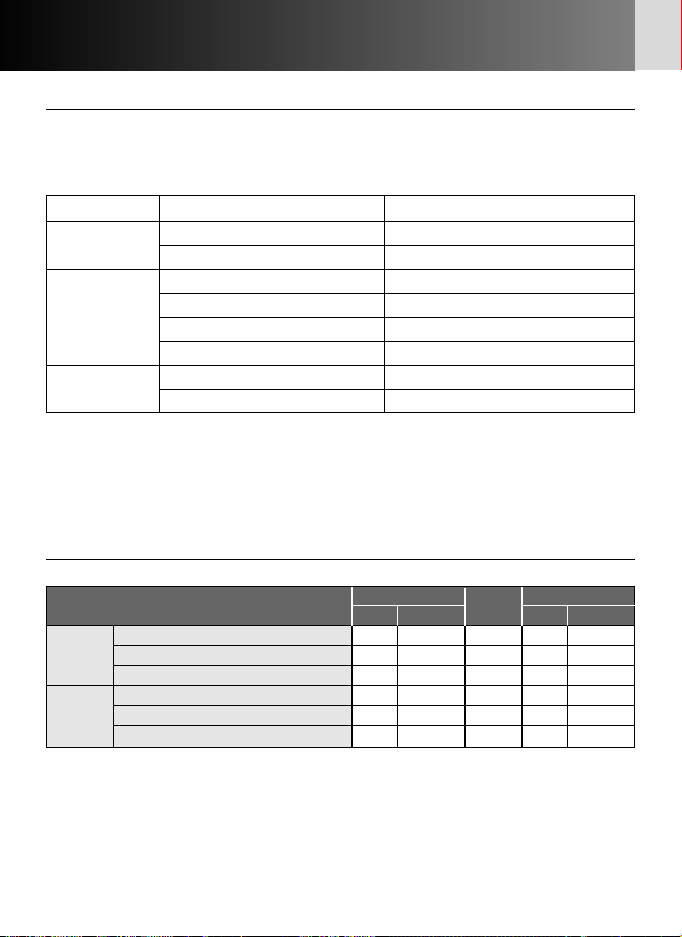
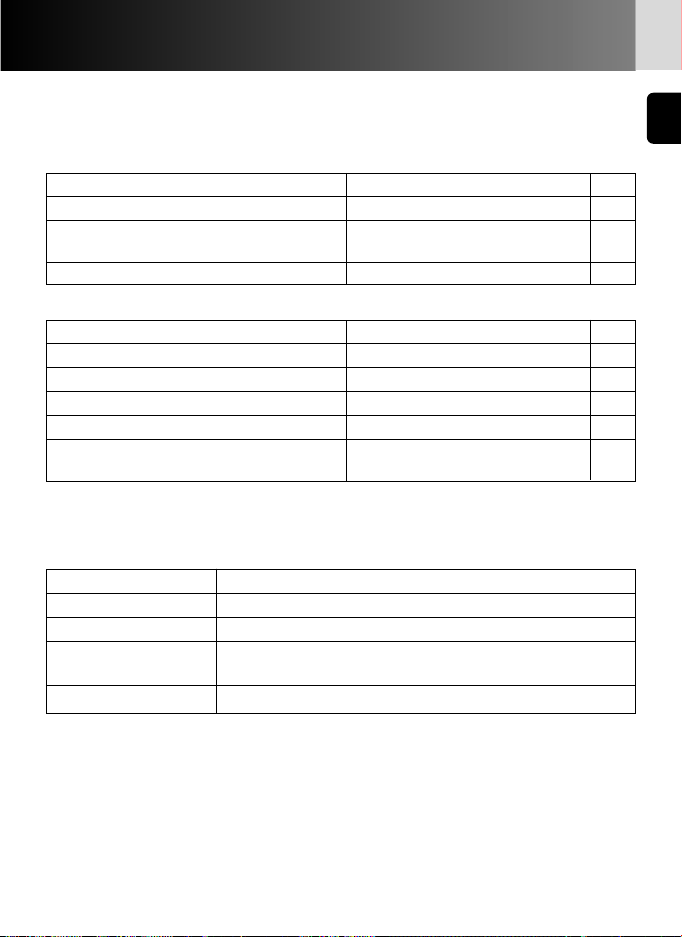
• Camera data record capacity
Record capacity (number of films whose shooting data can be recorded by each
camera) differs with the camera and recording mode.
xFor details on recording modes, refer to instruction manual (F6) or this manual
(F5/F100).
• Examples of recorded data (focal length and maximum aperture using a CPU
zoom lens)
Using 24-50mm f/3.3-4.5 lens at 35mm zoom setting
* Numbers in parentheses can be obtained when using the MF-28.
When using the additional memory, record capacity for the F5 would be
approximately double. In multiple exposure using the F5, the number of films would
be less.
Camera Recording mode Record capacity (36-exposure film)
Basic Approx. 57 rolls
F6
Detailed Approx. 31 rolls
A Approx. 78 rolls
B Approx. 36 (78*) rolls
F5
C Approx. 12 (78*) rolls
D Approx. 10 (39*) rolls
Basic Approx. 70 rolls
F100
Detailed Approx. 30 rolls
F6 F5 F100
Basic Detailed A to D Basic Detailed
Focal length at the time of exposure
RR RRR
Focal
Zoom range
— R —— R
length
Example
35 35 (24-50) 35 35 35 (24-50)
Lens
Maximum aperture at the time of exposure
—— R ——
maximum Maximum aperture within zoom range
— R —— R
aperture
Example
none F3.3-F4.5 F3.8 none F3.3-F4.5
Page 19
19
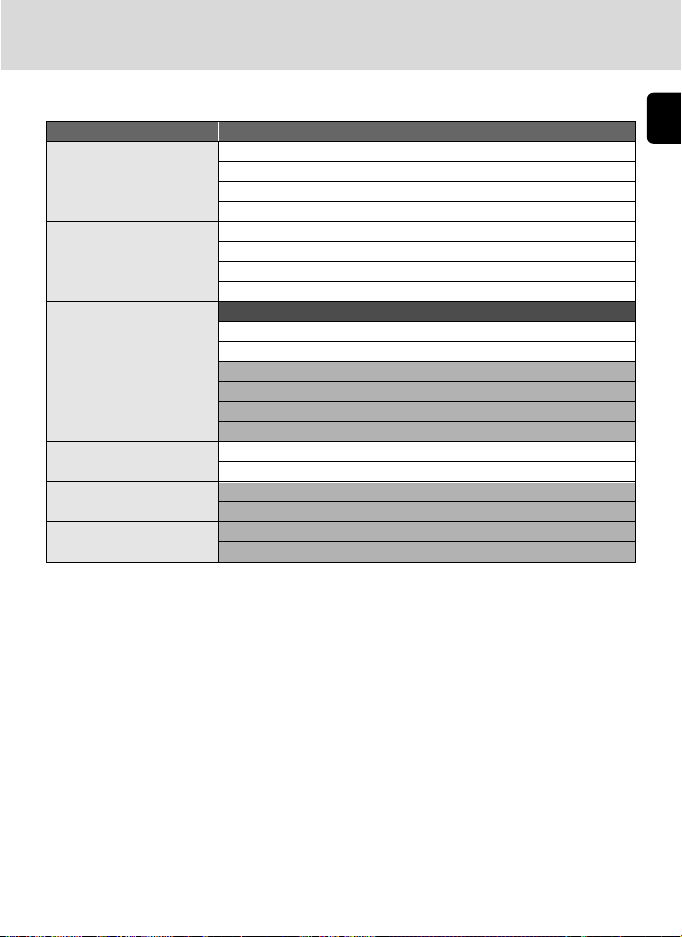
• Recorded data items
Mode Recorded item
Metering system Color matrix
Matrix
Center weighted
Spot
Flash sync mode*
1
Front curtain sync
Slow sync
Rear curtain sync
Red eye reduction
Speedlight setting None
TTL auto flash*
2
non-TTL auto flash*
3
Optional speedlight
Multiple flash
FP sync
FV lock
Multiple exposure None
Multiple exposure
Lock (AE lock) AE unlock
AE lock
Vibration Reduction VR off
VR on
gG is for the F100 only.
gG is for the F6 only.
*1 In Red-Eye Reduction with Slow Sync, both “Red eye reduction” and “Slow sync”
are recorded.
*2 Includes i-TTL Balanced Fill-Flash, Standard i-TTL Flash, 3D Multi-Sensor Balanced
Fill-Flash, Multi-Sensor Balanced-Fill Flash, Center-Weighted Fill-Flash and Standard
TTL Flash.
*3 With the F6, “non-TTL auto flash” is always recorded when the TTL auto flash is
not executed (even when a Nikon Speedlight is not used). “Optional speedlight”
is also recorded when Nikon Speedlight is used.
Page 20
20
Setting and Changing Recording Mode with the F5/F100
(Illustrations show the F100 camera and Windows XP Home Edition/Professional
operating system.)
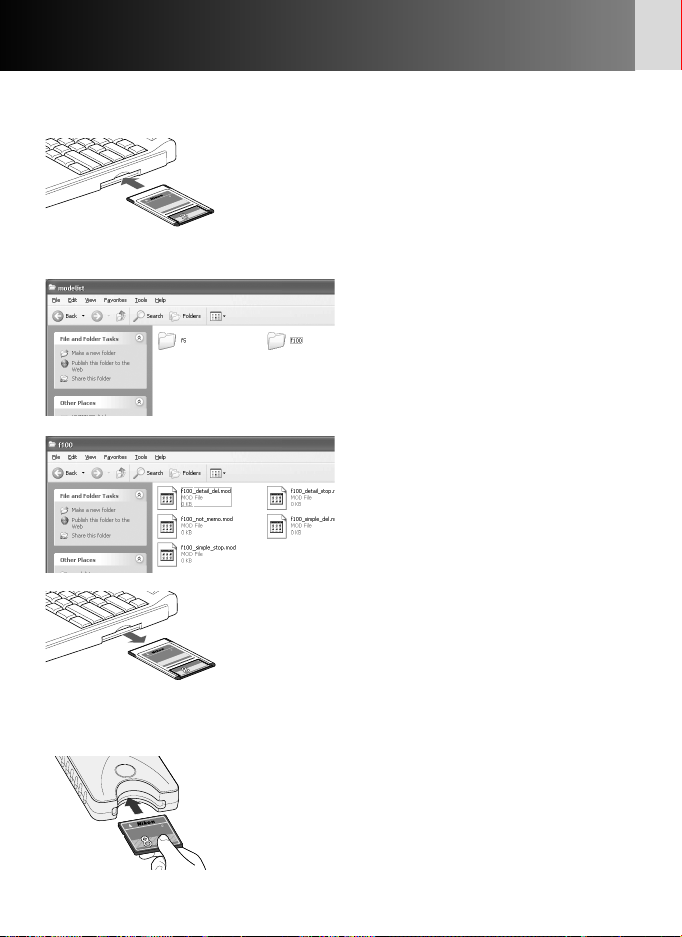
1
Connect the memory card, in which "modelist"
and "modeset" folders are created, to the PC.
• For details on creating folders and files, see page
10.
• For details on connecting the memory card to the
PC, see page 12.
2
Open the ‘modelist’ folder in the
mounted memory card
removable disk and open the
‘f5’ or ‘f100’ camera model
folder, depending on your
specific camera.
3
Select desired recording mode
file from camera model folder
‘f5’ or ‘f100’, and copy or
transfer it in the modeset folder.
xFor details on recording mode
file setting, refer to the chart on
page 22.
4
Remove the memory card from the PC.
• The memory card may be removed differently
depending on your specific PC, operating system,
PC card adapter and memory card reader. Refer to
the respective instruction manuals for more
information.
5
Insert the memory card into the MV-1 attached
the camera (x 8) and set recording mode on
the camera.
• Follow the same procedure as transfer/save
shooting data on memory card (x 10).
• When the recording mode is properly set on
camera, the recording mode file moved in the
"modeset" folder is deleted automatically.
M
T
d
r
a
C-AD1
C
E
h
s
la
F
t
c
a
p
m
R
o
C
E
T
P
M
T
A
d
r
D
a
C
A
h
s
la
EC-8CF
F
t
c
a
p
m
o
B
C
M
M
T
d
r
-AD1
a
C
EC
h
s
la
F
t
c
a
p
m
R
o
C
E
T
P
M
T
A
d
r
D
a
C
A
h
s
a
l
EC-8CF
F
t
c
a
p
m
o
B
C
M
START
TM
rd
a
C
sh
ctFla
pa
m
o
C
F
C
8
-
C
E
B
M
Page 21
21
Folders and files that are created automatically
• The folders and files automatically created in the memory card by the MV-1 are as
shown below.
For shooting data storage
For setting/changing recording mode of F5/F100
• If the MV-1 with memory card is attached to the camera and the start button is
pressed, "modelist" folder, camera model folder ("f5" or "f100") and recording
mode file are overwritten each time. "modeset" folder is created only when it is
not present.
• Do not set/change recording mode while files besides the files in “modelist” folder
are present in the “modeset” folder.
If recording mode set/change is done with a film loaded in the
camera
With the F5
Error indication will not appear, however, recording mode set/change is available from
the next film.
With the F100
Error lamp blinks rapidly (x 25), recording mode cannot be set or changed. Rewind
the film in the camera, remove it, then press the start button of the MV-1 for
approximately one second.
nikon_dr
For details on shooting data storage folders (x 13).
Mode list folder Camera model folder Recording mode files
modelist f100 f100_simple_del.mod
f100_detail_del.mod
f100_simple_stop.mod
f5 f5_a_del_display.mod
f5_b_del_display.mod
f5_c_del_display.mod
Mode set folder
modeset
Page 22
22
Setting and changing recording mode with the F5/F100—continued
Recording mode file
F5:
Priority Recording mode Recording Overwriting Warning lamp
file mode data
1 f5_a_del_display.mod A Yes Displayed
2 f5_b_del_display.mod B Yes Displayed
3 f5_c_del_display.mod C Yes Displayed
4 f5_d_del_display.mod D Yes Displayed
5 f5_a_del_notdisplay.mod A Yes Not displayed
6 f5_b_del_notdisplay.mod B Yes Not displayed
7 f5_c_del_notdisplay.mod C Yes Not displayed
8 f5_d_del_notdisplay.mod D Yes Not displayed
9 f5_a_stop_display.mod A No/Stop recording Displayed
10 f5_b_stop_display.mod B No/Stop recording Displayed
11 f5_c_stop_display.mod C No/Stop recording Displayed
12 f5_d_stop_display.mod D No/Stop recording Displayed
13 f5_a_stop_notdisplay.mod A No/Stop recording Not displayed
14 f5_b_stop_notdisplay.mod B No/Stop recording Not displayed
15 f5_c_stop_notdisplay.mod C No/Stop recording Not displayed
16 f5_d_stop_notdisplay.mod D No/Stop recording Not displayed
Priority Recording mode Record Recording Overwriting
file yes/no mode data
1 f100_simple_del.mod Yes Basic Yes
2 f100_detail_del.mod Yes Detailed Yes
3 f100_simple_stop.mod Yes Basic No/stop recording
4 f100_detail_stop.mod Yes Detailed No/stop recording
5 f100_not_memo.mod No — —
F100:
Page 23

23
Recording mode items
Priority
If more than one recording mode file is copied or transferred to the ‘modeset’ folder,
the recording mode with the higher priority will be used.
• If recording mode files for both F5 and F100 exist in the ‘modeset’ folder, only the
recording mode for the camera being used will be effective.
Record yes/no (F100 only)
Set whether shooting data is recorded or not. (The F5 is always set to record.)
Recording mode
Set the shooting data items to be recorded.
• The shooting data items used will vary with the camera. For details on data items
for each recording mode, see page 17.
Overwriting data
If the film quantity exceeds the storable shooting data limit (x 18), you can specify
whether data will be deleted from the oldest first, or no new shooting data will be
recorded.
• With the F100, if the setting is to stop recording new data, and the film quantity
exceeds the storable shooting data limit, the shutter button will be locked. In this
case, take the following actions:
Turn the power switch off and then back on again to release the shutter lock. You
will be able to take the next shot, but new shooting data will not be recorded.
• The F5 can continue to shoot photographs even though shooting data recording is
halted.
• With either F5 or F100, store the shooting data to the memory card. If you remove
the film from the camera and store the shooting data, shooting data in the camera
will be deleted and it will be possible to record new shooting data.
Warning lamp (F5 only)
You can set whether or not a warning lamp lights on the rear panel (the PC link mark
will flash) when the film quantity exceeds the storable shooting data limit.
Page 24

24
Approved Memory Cards
• In addition to the included CompactFlash card, the following Type I CompactFlash
cards are also supported. Type II CompactFlash cards and Microdrives cannot be
used.
SanDisk:
SDCFB series 16MB, 32MB, 48MB, 80MB, 128MB, 160MB, 192MB, 256MB,
384MB, 512MB, 1 GB
SDCFH series 128MB, 192MB, 256MB, 384MB, 512MB
Lexar Media:
4x USB series 16MB, 32MB, 48MB, 64MB
8x USB series 16MB, 32MB, 48MB, 64MB
10x USB series 160MB
12x USB series 64MB, 128MB, 192MB
16x USB series 192MB, 256MB, 320MB, 512MB, 640MB
24x USB series 256MB, 512MB
24x WA USB series 256MB, 512MB
40x WA USB series 256MB, 512MB, 2 GB
Hitachi (Renesas Technology):
CompactFlash HB28 C8x series 64MB, 80MB
CompactFlash HB28C016C6 (16MB)
CompactFlash HB28D032C6 (32MB)
* Operation is not guaranteed with other makes of memory card. For more details
on the above cards, please contact the manufacturer.
Page 25
25
Blinking Error Lamp (red)/Specifications
• Repeat operation from step 1 on page 10 after the following remedies.
Blinks slow (once a second): Communication error with camera
Cause Remedy Page
Camera power is off Turn camera power on 10
Shutter is released during communication Do not release shutter during 7
with camera communication
Plug is loose Attach plug properly 8
Blinks fast (4 times a second): Memory card error
Cause Remedy Page
Writing error Insert new card 8
Card is not properly inserted into the slot Insert card properly 8
Card’s available memory is insufficient Insert new (empty) card 9
Card is not formatted correctly Insert correctly formatted card 13
With F100, a film in use is loaded when Remove the film in use 21
setting/changing recording data
• The memory card and the plug may be inserted or removed freely while the error
lamp is on.
Specifications and design are subject to change without notice.
• CompactFlash™ is a trademark of SanDisk Corporation.
• Microsoft®, Microsoft® Excel and Windows® are registered trademarks or
trademarks of Microsoft Corporation in the United States and/or other countries.
• Microdrive is a trademark of Hitachi Global Storage Technologies in the United
States and/or other countries.
• Products and brand names are trademarks or registered trademarks of their
respective companies.
Power Supplied by camera
Dimensions (WxHxD) Approx. 78 x 25 x 109mm or 3.1 x 1.0 x 4.3 in.
Cable length Approx. 400mm or 15.7 in.
Weight Approx. 100g or 3.5 oz. (main unit only, excluding
memory card)
Operating conditions Temperature: 0-40°C or 32-104°F, humidity: under 85%
• Specifications
• Blinking Error Lamp (red)
Page 26

26
Inhalt
Vorwort ..............................................................................................27-28
Teilebezeichnung....................................................................................29
Vorsichtsmaßnahmen ........................................................................30-31
Grundlegende Bedienung.................................................................32-40
1. Anschluss an die Kamera und Einsetzen der
Speicherkarten..........................................................................32-33
2. Übertragung von Aufnahmedaten auf die Speicherkarten zur
Speicherung ..............................................................................34-35
3. Übertragung der Aufnahmedaten auf der Speicherkarten zum
PC zur Speicherung...................................................................36-37
4. Öffnen der Aufnahmedaten (Textdatei) mit
Tabellenkalkulationsprogramm...............................................38-40
Aufnahmedaten-Details ....................................................................41-43
Einstellung und Änderung des Aufnahmemodus mit F5/F100.......44-47
Zulässige Speicherkarten........................................................................48
Blinkende Fehleranzeige (rot) ...............................................................49
Technische Daten....................................................................................49
Symbol
Dieses Symbol kennzeichnet wichtige Sicherheitshinweise. Sie sollten die
Sicherheitshinweise vor Gebrauch der Kamera lesen, um Schäden an der
MV-1 zu vermeiden.
Dieses Symbol kennzeichnet Tipps mit zusätzlichen nützlichen
Informationen zur Verwendung der MV-1.
Dieses Symbol kennzeichnet wichtige Hinweise, die Sie vor Gebrauch der
MV-1 ebenfalls lesen sollten.
Dieses Symbol steht vor Verweisen auf andere informative Abschnitte
dieses Handbuchs.
Page 27
27
Vorwort
Vielen Dank in das Vertrauen, das Sie uns mit dem Kauf des NikonDatenlesers MV-1 erwiesen haben. Machen Sie sich bitte gründlich
mit dem Inhalt der vorliegenden Bedienungsanleitung vertraut,
damit stets ein sachgemäßer und optimaler Gebrauch des MV-1
garantiert ist. Nach der Lektüre bewahren Sie bitte diese
Bedienungsanleitung griffbereit auf, damit sie ggf. stets zum
Nachschlagen zur Hand ist.
Der Datenleser MV-1 hat die folgenden Merkmale:
• Übertragung von Aufnahmedaten in der Nikon F6, F5 und F100 auf
eine Speicherkarten im MV-1 zur Speicherung.
• Übertragung der Daten auf der Speicherkarten in einen PC.
• Einstellung und Änderung des Aufzeichnungsmodus der F5 und
F100 mittels Speicherkarten und PC.
Aufzeichnungseinstellung bei F6 und F100
• Die Kamera muss auf die Aufzeichnung von Aufnahmedaten eingestellt werden.
(Die werkseitige Einstellung ist "non-record" (keine Aufzeichnung).) Bei Modell F6
ist die Einstellung über die Kamera möglich, während bei F100 der MV-1 und ein
PC erforderlich sind (x 44).
Nutzung der Aufnahmedaten mit PC
• Die Speicherung von Daten auf der Speicherkarten erfolgt als Textdatei im CSV-
Format (Comma-Separated Value), sodass sie sich mithilfe eines
Tabellenkalkulationsprogramms wie Microsoft® Excel einfach betrachten und
manipulieren lassen.
• Die Übertragung von Daten auf der Speicherkarten in einen PC erfordert
zusätzliches Gerät wie etwa den PC-Kartendapter EC-AD1, einen handelsüblichen
PC-Kartenadapter für Speicherkarten oder einen Speicherkartenleser (der Datenleser
MV-1 ist nicht an PC anschließbar).
• Beim MV-1 dient eine CompactFlash-Karte zum Kopieren von Aufnahmedaten, die
in der F6 gespeichert sind. Eine Liste der zulässigen Speicherkarten finden Sie unter
“Zulässige Speicherkarten” auf Seite 48.
Page 28

28
• Zubehör
Vergewissern Sie sich bitte, dass die folgenden Zubehörteile zum Lieferumfang
gehören.
CompactFlash-Karte (x 32)
Etui
PC Card Adapter
Vorwort —Forts.—
TM
CompactFlash Card
EC-8CF
M
B
Page 29
29
Teilebezeichnung
Zugriffsanzeige (grün) (x 35) Fehleranzeige (rot) (x 49)
Starttaste (x 34)
Stecker (x 32)
Speicherkartenchlitz (x 32)
DATA READER MV-1
E
S
R
S
R
E
START
O
R
C
C
A
Page 30

30
Vorsichtsmaßnahmen
• MV-1 vor heftigen Stößen schützen
Vermeiden Sie unbedingt, dass der MV-1 zu Boden fällt oder Stößen ausgesetzt ist.
Andernfalls drohen Störungen.
• Vor Wassereinwirkung schützen
Vermeiden Sie unbedingt, dass der MV-1 mit Wasser in Berührung kommt. Falls
Wasser in das Gehäuse eindringt, kommt es zu Korrosion. Dies kann zu kostspieligen
Reparaturen führen, wobei in schweren Fällen das Gerät u.U. irreparabel wird.
• Abrupte Temperaturschwankungen unbedingt vermeiden
Wird der MV-1 einem abrupten Temperaturwechsel ausgesetzt (z.B. Transport des
Geräts bei kalter Witterung vom Freien in eine warme Wohnung oder umgekehrt), so
schlägt sich im Inneren und an der Außenseite des Gehäuses Feuchtigkeit nieder,
wodurch u. U. Schäden drohen. Legen Sie in solch einem Fall den MV-1 zuvor in
einen Kunststoffbeutel oder anderen Behälter, damit er sich dort allmählich an die
Umgebungstemperatur anpassen kann.
• Nicht neben Quellen starker elektromagnetischer Wellen oder
Magnetfeldern einsetzen
An Orten, die starken elektromagnetischen Wellen (z. B. neben TV-Sendetürmen)
oder starken elektrostatischen Feldern ausgesetzt sind, werden u. U. die
Aufzeichnungsdaten verfälscht und gelöscht bzw. die Funktion des MV-1 gestört.
• Vor dem Anschluss des MV-1 stets die Stromversorgung der
Kamera ausschalten
Schalten Sie stets die Stromversorgung der Kamera aus, bevor Sie den MV-1 mit der
Kamera verbinden oder von ihr trennen.
• Für ausreichende Batteriekapazität sorgen
Sorgen Sie beim Gebrauch des MV-1 stets für eine ausreichend hohe Kapazität der
Kamerabatterien. Näheres zur Überprüfung der Batteriekapazität finden Sie in der
Bedienungsanleitung der Kamera.
• Pflege des MV-1
Reinigen Sie das Gerät zunächst mit Druckluft weitgehend von Staub und Schmutz
und wischen Sie es dann behutsam mit einem sauberen weichen Tuch ab.
• MV-1 an einem kühlen und trockenen Ort aufbewahren
Bewahren Sie den MV-1 zum Schutz vor Schimmelbefall und Störungen an einem
kühlen und trockenen Ort auf.
Halten Sie das Gerät entfernt von Naphthalin oder Kampfer (Mottenkugeln),
Elektrogeräten mit starken Magnetfeldern oder extrem hohen Temperaturen, wie sie
z.B. in der Nähe einer Heizung oder im Sommer in einem Pkw herrschen.
Page 31

31
• Statische Elektrizität kann den normalen Betrieb stören
In seltenen Fällen kann die Funktion der elektronischen Schaltung durch ein externes
elektrostatisches Feld beeinträchtigt werden, sodass der MV-1 nicht einwandfrei
arbeitet. In solchen Fällen trennen Sie den MV-1 von der Kamera und schließen ihn
dann wieder an sie an.
• Bei leuchtender Zugriffsanzeige (grün) das Gerät nicht einsetzen
Bei leuchtender Zugriffsanzeige (Blinken oder Dauerleuchten) dürfen Sie keine der
nachstehenden Vorgänge ausführen, da sonst die Dateien oder Ordner auf der
Speicherkarten bzw. die Aufnahmedaten in der Kamera verfälscht werden können.
Außerdem droht dabei auch eine Beschädigung der Speicherkarten selbst.
Unzulässiger Vorgang bei aktivierter Zugriffsanzeige (Blinken oder Dauerleuchten):
Herausziehen oder Einsetzen von Speicherkarten; Verbinden/Trennen des Steckers
mit/vom 10-poligen Anschluss; Herausnehmen oder Einsetzen von Kamerabatterien;
Filmrückspulen; Drücken des Auslösers.
Bei leuchtender Fehleranzeige dagegen lassen sich Speicherkarten und Stecker
beliebig einstecken oder herausziehen.
• Zeitstempel für Dateien und Ordner
• Bei F6: Der Zeitstempel bei Ordnern und Aufnahmedatendateien in der F6 basiert
auf Daten von der internen F6-Uhr beim Drücken der Starttaste des MV-1. Alle auf
der Speicherkarten mit einem Vorgang erzeugte Ordner und Dateien werden mit
dem Zeitstempel versehen.
• Bei F5 und F100: Order und Dateien in der F5 und F100 nutzen den festen
Zeitstempel "Sep. 1, 2004, 00 hours, 00 minutes and 00 sec." für Aufnahmedaten.
• Nicht für Aufnahmedaten bestimmte Ordner und Dateien (Ordner wie nikon_dr,
modeset, modelist oder automatisch in solchen Ordnern erzeugte Dateien) nutzen
bei allen Kameras den festen Zeitstempel "Sep. 1, 2004, 00 hours, 00 minutes and
00 sec.".
• Weitere Vorsichtsmaßnahmen
• Der MV-1 ist ausschließlich zum Gebrauch mit Kamera F6, F5 oder F100 ausgelegt;
andere Modelle, auch wenn sie einen 10-poligen Anschluss haben (z.B. F90/F90X,
D2
H oder D100+MB-D100), sind unzulässig.
• Der MV-1 verfügt nicht über eine Funktion zur Übertragung von Daten in einen PC.
• Sobald die Aufnahmedaten auf der Speicherkarten im MV-1 gespeichert sind, ist
eine Rückübertragung zur oder Anzeige an der Kamera nicht mehr möglich.
Page 32

32
Grundlegende Bedienung
1. Anschluss an die Kamera und Einsetzen der Speicherkarte
(Die Abbildungen zeigen die F6.)
1
Vergewissern Sie sich, dass kein Film in die
Kamera eingelegt ist (E erscheint im
Bildzähler) und die Batteriekapazität ausreicht.
• Falls die in der Kamera gespeicherten
Aufnahmedaten zu umfangreich bzw. Daten auf
der Speicherkarten verblieben sind, nimmt die
Datenübertragung von der Kamera zur
Speicherkarten erhebliche Zeit in Anspruch. Die
sind Batterien ggf. austauschen.
xNäheres zur Überprüfung der Batteriekapazität
finden Sie in der Kamera-Bedienungsanleitung.
2
Schalten Sie die Stromversorgung der Kamera
aus.
3
Nehmen Sie die Schutzkappe vom 10-poligen
Anschluss ab, stecken Sie den MV-1-Stecker so
ein, dass die Markierung Yam Stecker mit der
Indexmarkierung • am Kameraanschluss
fluchtet, und drehen Sie ihn dann in der
gezeigten Richtung, bis er einrastet.
• Der Einbauort des 10-poligen Anschlusses richtet
sich dem Kameramodell. Näheres hierzu finden Sie
in der Bedienungsanleitung der Kamera.
• Das Verlängerungskabel MC-21 ist nicht
verwendbar.
4
Führen Sie die Speicherkarten in den für sie
vorgesehenen Schlitz ein.
• Die mitgelieferte Speicherkarten ist im FATDateisystem (x 37) formatiert und kann daher
ohne Weiteres verwendet werden.
• Halten Sie die Speicherkarten so, dass sich das
Etikett auf derselben Seite wie die MV-1-Starttaste
befindet, und führen Sie sie mit der Kontaktseite
voraus in den Schlitz ein.
• Verwenden Sie eine Speicherkarten ohne
verbliebene Daten.
• Näheres hierzu finden Sie in der Liste der
zulässigen Speicherkartenntypen auf Seite 48.
START
TM
rd
a
C
sh
la
actF
p
om
C
F
C
8
-
C
E
B
M
Page 33

33
Führen Sie die Speicherkarten unverkantet in der richtigen
Richtung ein
• Die Speicherkarten darf keinesfalls verkantet oder in umgekehrter Richtung
eingeführt werden. Andernfalls droht u. U. eine Beschädigung des MV-1 oder der
Speicherkarten.
Aufzeichnungseinstellung bei F6 und F100
• Die Kamera muss auf die Aufzeichnung von Aufnahmedaten eingestellt werden.
(Die werkseitige Einstellung ist keine Aufzeichnung). Bei Modell F6 ist die
Einstellung über die Kamera möglich, während bei F100 der MV-1 und ein PC
erforderlich sind (x 44).
Verwenden Sie eine Speicherkarten ohne verbliebene Daten.
• Verbleiben frühere Aufnahmedaten auf der Speicherkarten, so nimmt die
Datenübertragung von der Kamera u. U. erhebliche Zeit in Anspruch. Bei
"Dauerblinken der Zugriffsanzeige" (x 35).
Page 34

34
Grundlegende Bedienung
2. Übertragung von Aufnahmedaten auf die Speicherkarten zur Speicherung
1
Die Stromversorgung der Kamera einschalten.
• Vergewissern Sie sich, dass kein Film in die Kamera
eingelegt ist (E erscheint im Bildzähler) und die
Batteriekapazität ausreicht (x32).
2
Drücken Sie die Starttaste am MV-1 mindestens
eine Sekunde lang.
• Die Zugriffsanzeige am MV-1 blinkt bei der
Kommunikation mit der Kamera.
• Zur Abspeicherung der Aufnahmedaten werden
automatisch Ordner auf der Speicherkarten erzeugt (
x
37). In der Kamera aufgezeichnete Aufnahmedaten
werden hierher zur Abspeicherung übertragen.
• Nach normalem Abschluss der Datenübertragung
werden die Aufnahmedaten in der Kamera gelöscht und
die Zugriffsanzeige wechselt ca. sechs Sekunden lang
zwischen Blinken und Dauerleuchten und erlischt dann.
Das Blinken der Zugriffsanzeige setzt sich u. U. über
längere Zeit fort (x35).
• Durch Blinken (rot) zeigt die Fehleranzeige die Erfassung
einer Störung an. In diesem Fall schalten Sie gemäß
"Blinken der Fehleranzeige (rot)" (x49) die
Stromversorgung der Kamera aus und stellen sicher, dass
die Anzeige erlischt; ggf. tauschen Sie die Speicherkarten
aus und wiederholen dann den obigen Vorgang von
Schritt 1 an.
Für Benutzer von F5 und F100 (Einstellung und Änderung des Aufzeichnungsmodus)
Bei jedem Drücken der Starttaste am MV-1 werden zusätzlich zur Übertragung der
Aufnahmedaten die Ordner "modelist" und "modeset" auf der Speicherkarten
erstellt. Beim Drücken der Starttaste erfolgt Aktivierung/Änderung des
Aufzeichnungsmodus der F5 oder F100 nach Übertragung der Aufnahmedaten,
wenn zuvor bestimmte Dateien vom Ordner „modelist" in den Ordner „modeset"
verschoben worden sind. Im Fall von F100 ist dieser Vorgang gleich am Anfang
erforderlich, da die Aufnahmedaten werkseitig nicht auf Aufzeichnung eingestellt
sind (x 44-47).
3
Vergewissern Sie sich, dass die Anzeige dunkel
ist; schalten Sie die Stromversorgung der
Kamera aus, nehmen Sie die Speicherkarten
heraus und trennen Sie den MV-1 ab (x 35).
Starttast
Zugriffsanzeige
Fehleranzeige
DATA READER MV-1
ACCESS ERROR
START
CompactFlash Card
M
TM
EC-8CF
B
Page 35

35
Bei Übertragung/Abspeicherung der Aufnahmedaten bei eingelegtem Film
• Werden bei in die Kamera eingelegtem Film Aufnahmedaten übertragen, so erfolgt
die Verarbeitung wie nachstehend beschrieben. Bei Modell F5 und F100 bleiben die
Aufnahmedaten auch nach der Übertragung in der Kamera erhalten; daher
empfiehlt sich die Datenübertragung, wenn kein Film eingelegt ist.
F6
F5
F100
• Die Aufnahmedaten in der Kamera außer den aktuellen Filmdaten werden übertragen.
• Die Aufnahmedaten in der Kamera außer den aktuellen Filmdaten werden gelöscht (die
Aufnahmedaten des aktuellen Films bleiben unverändert).
• Die Aufnahmedaten in der Kamera außer den aktuellen Filmdaten werden übertragen.
• Alle Aufnahmedaten in der Kamera samt der Daten des aktuell genutzten Films bleiben unverändert.
• Alle Aufnahmedaten in der Kamera samt der Daten des aktuell genutzten Films werden übertragen.
• Alle Aufnahmedaten in der Kamera samt den Daten des aktuell genutzten Films bleiben unverändert.
Bei Dauerblinken der Zugriffsanzeige
In allen folgenden Fällen muss die Zugriffsanzeige vor dem Ausschalten der
Stromversorgung.
• Der MV-1 prüft die Dateien auf der Speicherkarten während der Übertragung der
Aufnahmedaten. Enthält die Speicherkarten bereits zahlreiche Aufnahmedaten
(Dateien), so nimmt die Datenabspeicherung u.U. erhebliche Zeit in Anspruch
(mehrere Dutzend Minuten für Hunderte Dateien oder sogar mehrere Stunden für
Tausende Dateien). Um dieses Problem zu vermeiden, übertragen Sie die
Aufnahmedaten von der Speicherkarten auf die PC-Festplatte und löschen sie dann
auf der Speicherkarten, wenn sie nicht mehr benötigt werden (x 36).
• Bei der Aufzeichnung großer Mengen an Aufnahmedaten in der Kamera, auch
ohne verbliebene Daten (Datei) auf der Speicherkarten, blinkt die Zugriffsanzeige u.
U. mehrere Minuten lang.
• Unabhängig von den aktuellen Kameraeinstellungen ist die F5 auf die Aufzeichnung
von Aufnahmedaten eingestellt; daher erfolgt automatisch die Übertragung der
aufgezeichneten Aufnahmedaten zur Speicherkarten, auch wenn der MV-1 zum
erstenmal angeschlossen wird. Dadurch kann die Zugriffsanzeige mehrere Minuten
lang blinken.
Abtrennen von der Kamera
1. Vergewissern Sie sich, dass die Zugriffsanzeige dunkel ist, und schalten Sie die
Stromversorgung der Kamera aus.
2. Drehen Sie den MV-1-Stecker entgegengesetzt zu der Richtung beim Anschließen
und ziehen Sie ihn dann unverkantet heraus, nachdem er ausreichend gelöst ist.
Herausnehmen der Speicherkartenn
• Bei Anschluss des MV-1 an der Kamera:
1. Vergewissern Sie sich, dass die Zugriffsanzeige dunkel ist.
2. Schalten Sie die Stromversorgung der Kamera aus und
ziehen Sie die Speicherkarten mit den Fingern heraus.
• Ist der MV-1 nicht mit der Kamera verbunden, so lässt sich
die Speicherkarten ohne Weiteres mit den Fingern
herausziehen.
ST
TM
ard
pactFlash C
m
o
C
F
C
8
-
C
E
B
M
Page 36

36
1
Verbinden der Speicherkarten mit dem PC.
• Verbinden Sie die Speicherkarten über den
Kartenadapter EC-AD1 PC (separat erhältlich), einen
handelsüblichen PC-Kartenadapter für Speicherkartenn
oder Speicherkartennleser. Nach erfolgter Verbindung
erscheint die Speicherkarten auf dem PC als
Wechselfestplatte.
• Richten Sie sich beim Verbinden der Speicherkarten nach
den Bedienungsanleitungen für PC, PC-Kartenadapter
oder Speicherkartennleser, da die Details u. U. variieren.
• Mit Windows 95 ist u. U. die Erkennung der
Speicherkarten nicht möglich. Näheres hierzu finden Sie
in der Bedienungsanleitung des PC.
Grundlegende Bedienung
3. Übertragung der Aufnahmedaten auf der Speicherkarten zum PC zur Speicherung
(Die Abbildungen zeigen das Betriebssystem Windows XP Home Edition/Professional.)
2
Speichern des Ordners "nikon_dr"
auf dem PC.
• Näheres über die Abspeicherung der
Aufnahmedaten auf Ihrem PC und
seinem Betriebssystem finden Sie in der
zugehörigen Bedienungsanleitung.
• Damit ein auf dem PC abgespeicherte
Ordner "nikon_dr" nicht überschrieben
wird, müssen Sie dessen Namen ändern.
3
Löschen der Aufnahmedaten auf
der Speicherkarten.
• Werden die Aufnahmedaten nicht mehr
benötigt, so löschen Sie sie auf der
Speicherkarten, damit sich dort die
nächste Gruppe von Aufnahmedaten
abspeichern lässt.
• Richten Sie sich beim Formatieren von
Speicherkartenn oder Löschen von
Dateien und Ordnern nach der
Bedienungsanleitung für Ihren PC und
seinem Betriebssystem, da die Details u.
U. variieren.
• Die Aufnahmedaten lassen sich auch
durch Formatieren der Speicherkarte
löschen (x 37).
M
T
D1
d
r
a
C
EC-A
h
s
la
F
t
c
a
p
m
R
o
C
E
T
P
M
T
A
d
r
D
a
C
A
h
s
la
EC-8CF
F
t
c
a
p
m
o
B
C
M
Page 37

37
Bezeichnungen der mit PC verbundenen Speicherkarten
• Je nach Ihrem PC und seinem Betriebssystem kann die Bezeichnung der
verbundenen Speicherkarten variieren. Übliche Bezeichnungen sind "UNTITLED (E:)"
und "NO_NAME".
Aufnahmedatenordner und –dateien auf Speicherkarten
• Die Ordner und Dateien zur Speicherung der Aufnahmedaten auf der
Speicherkarten (x 34) haben die folgende Struktur (gezeigtes Beispiel gilt für F6):
Zur Speicherung von Aufnahmedaten
Datenleser-Ordner Kameramodell-Ordner Kamera-ID-Ordner Aufnahmedatendateien
nikon_dr F6 ID012 n00001.txt
n00002.txt
n00003.txt
Zur Einstellung/Änderung des Aufzeichnungsmodus von F5/F100
Näheres über diese Ordner (x 45).
modelist
modeset
• Das Kameramodell (F6, F5, F100) wird automatisch erkannt und der Name des
Kameramodell-Ordners automatisch vorgegeben.
• Der Name des Kamera-ID-Ordners bezeichnet denselben Modelltyp.
Der Name des Kamera-ID-Ordners ist "IDxxx", wobei es für "xxx" folgende
Möglichkeiten gibt:
F6: ID-Nummer der Kamera (000 bis 999)
F5: "255" (fest) (geänderte ID-Nummer der Kamera bei Änderung der Kamera-
ID-Nummer mithilfe von AC-1WE oder AF1ME Photo Secretary für F5*).
* Photo Secretary für F5 ist nicht mehr erhältlich.
F100: Drei Unterbalken (fest)
• Enthält der Kamera-ID-Ordner 8.192 Aufnahmedatendateien, so wird ein neuer
Kamera-ID-Ordner mit demselben Namen, gefolgt von "_xx" (wobei xx eine
Nummer zwischen 01 und 99 ist), erzeugt und die neuen Aufnahmedatendateien
werden in diesem Ordner abgespeichert.
• Die Dateinamen der Aufnahmedaten werden als "nxxxxx.txt" angezeigt, wobei
xxxxx eine Nummer zwischen 00001 und 09999 zur Kennzeichnung des Films ist.
Existiert ein Dateiname bereits im Ordner, so wird er nicht überschrieben, sondern
an die neue Datei wird stattdessen "_xxxx" angehängt, wobei xxxx eine Nummer
zwischen 0001 und 9999 ist.
Formatierung der Speicherkarten (Initialisierung)
• Speicherkartenn sind mithilfe von Dateisystem FAT12, FAT16 oder FAT32 zu
formatieren (Mit dem MV-1 lassen sich keine Speicherkarten formatieren.). Das
Dateisystem richtet sich nach Ihrem PC und seinem Betriebssystem. Näheres hierzu
finden Sie in den zugehörigen Bedienungsanleitungen.
Page 38

38
Grundlegende Bedienung
4. Öffnen der Aufnahmedaten (Textdatei) mit Tabellenkalkulationsprogramm
Bei den einzelnen Filmen werden die Aufnahmedaten als CSV-Textdateien
abgespeichert. Mit Tabellenkalkulationsprogrammen wie Microsoft® Excel lässt sich
diese Textdatei leicht öffnen und manipulieren.
• Textdaten (Beispiel gilt für F6)
Die Aufnahmedaten für die einzelnen Filme werden, wie hier gezeigt, als
Textdaten gespeichert.
• Näheres über die Konvertierung von Daten finden Sie in der Bedienungsanleitung
des Tabellenkalkulationsprogramms.
•
Erstellung einer Tabelle mittels Tabellenkalkulationsprogramm (Beispiel gilt für F6)
Wird die Aufnahmedatendatei in einem Tabellenkalkulationsprogramm wie
Microsoft® Excel geöffnet, so lässt sie sich sehr einfach zum Auslesen konvertieren.
Film speed,Film number,Camera ID
50,2,000
Frame number,Shutter speed,Aperture,Focal length,Lens maximum aperture,Metering system,Exposure mode,Flash sync mode,Exposure compensation
value,EV difference in Manual,Flash exposure compensation value,Speedlight setting,Multiple exposure,Lock,Vibration Reduction,Date(yy/mm/dd),Time
01,125,F4,48(28-70),F3.5-F4.5,Color matrix,M,Front curtain sync,+1.7,+0.3,0.0,non-TTL auto flash,None,AE Unlock,VR off,2005/07/25,10:01
02,250,F4.2,60(28-70),F3.5-F4.5,Color matrix,M,Front curtain sync,+1.7,0.0,0.0,non-TTL auto flash,None,AE Unlock,VR off,2005/07/25,10:02
03,640,F13,62(28-70),F3.5-F4.5,Spot,P,Front curtain sync,0.0,0.0,0.0,non-TTL auto flash,None,AE Unlock,VR off,2005/07/25,10:04
04,640,F7.1,62(28-70),F3.5-F4.5,Spot,P,Front curtain sync,-1.0,0.0,0.0,non-TTL auto flash,None,AE Unlock,VR off,2005/07/25,10:04
05,250,F18,52(28-70),F3.5-F4.5,Center weighted,S,Front curtain sync,-1.0,0.0,0.0,non-TTL auto flash,None,AE Unlock,VR off,2005/07/25,10:04
06,640,F2.8,300,F2.8,Center weighted,A,Front curtain sync,+0.3,0.0,0.0,non-TTL auto flash,None,AE Unlock,VR off,2005/07/25,10:07
07,800,F2.8,300,F2.8,Center weighted,A,Front curtain sync,+0.3,0.0,0.0,non-TTL auto flash,None,AE Unlock,VR off,2005/07/25,10:07
08,500,F4,600,F4,Center weighted,M,Front curtain sync,+0.3,+0.8,0.0,non-TTL auto flash,None,AE Unlock,VR off,2005/07/25,10:10
09,500,F5.6,600,F4,Center weighted,M,Front curtain sync,+0.3,-0.2,0.0,non-TTL auto flash,None,AE Unlock,VR off,2005/07/25,10:10
10,320,F2.8,50,F1.4,Matrix,A,Front curtain sync,+0.3,0.0,0.0,non-TTL auto flash,None,AE Unlock,VR off,2005/07/25,10:11
11,60,F5.6,50,F1.4,Matrix,A,Front curtain sync,+0.3,0.0,0.0,non-TTL auto flash,None,AE Unlock,VR off,2005/07/25,10:11
12,250,F4,180,F2.8,Matrix,A,Front curtain sync,0.0,0.0,0.0,non-TTL auto flash,None,AE Unlock,VR off,2005/07/25,10:12
Page 39

39
• Beispiel für Datenimport mittels Excel 2000
1
Starten Sie Microsoft
Excel und wählen Sie
‘Öffnen’ aus dem
Dateimenü.
2
Setzen Sie die Datei auf
‘Textdateien’ und wählen
Sie die zu importierende
Datei und klicken Sie auf
‘Öffnen’.
3
Wählen Sie den Dateityp
‘Zeichen wie z.B.
Kommas oder Tabstopps
trennen Felder’. Zur
Bestätigung wird ‘1’
gewählt für ‘Import
beginnen in Zeile’ und
‘Windows (ANSI)’ wird
für ‘Dateiursprung’
gewählt; klicken Sie
dann auf ‘Weiter’.
Page 40

40
4
Wählen Sie ‘Komma’ als
‘Trennzeichen’ (die
anderen Kästchen
deaktivieren), sorgen Sie
dafür, dass
‘Aufeinanderfolgende
Trennzeichen als ein
Zeichen behandeln’ nicht
aktiviert und ‘{Kein}’ für
‘Texterkennungszeichen’
gewählt ist; klicken Sie
dann auf ‘Weiter’.
5
Wählen Sie alle Spalten
bis auf die Datumsspalte
und setzen Sie
‘Datenformat der
Spalten’ auf ‘Text’.
6
Markieren Sie die
Datumsspalte und setzen
Sie ‘Datenformat der
Spalten’ auf ‘Datum’;
klicken Sie dann auf
‘Fertig stellen’.
Import abgeschlossen
• Auf Wunsch lässt sich die
Datumsformatanzeige in der
Datumsspalte ändern. Stellen
Sie die Spaltenbreite und die
Zeichengröße so ein, dass die
Anzeige bequem ablesbar ist.
Basic operation —continued
4. Opening shooting data (text file) using spreadsheet software
Page 41

41
In der im PC gespeicherten Textdatei werden die Daten je nach der
Kamera aufgezeichnet und der Aufnahmemodus wird wie
nachstehend gezeigt gewählt. Datenanzeige auf Englisch.
•
Aufnahmedaten und Unterstützung durch verschiedene Kamera-Aufzeichnungsmodi
Aufgezeichneter Kamera F6 F5 F100
Parameter
Aufzeichnungsmodus
Grundlegende
Detailliert
ABCD
Grundlegende
Detailliert
Film speed (Filmempfindlichkeit) R R RRRR R R
Film number (Filmnummer) R R RRRR R R
Camera ID (Kamera-ID) R R RRRR
Frame number (Bildnummer) R R RRRR R R
Shutter speed (Verschlusszeit) R R RRRR R R
Aperture (Blendenöffnung) R R RRRR R R
Focal length (Brennweite) R R RRRR R R
Lens maximum aperture (Maximale Blendenöffnung)
R RRRR R
Metering system (Belichtungsmesssystem) RR R R
Exposure mode (Belichtungssteuerung) RR R R
Flash sync mode (Blitzsynchronisation) RRR
Exposure compensation value (Belichtungskorrekturwert)
RR R R
EV difference in Manual (EV-Diferenz bei manuellem Betrieb)
RR R R
Flash exposure compensation value (Blitzleistungskorrekturwert)
RR
Speedlight setting (Blitzgeräteinstellung) RRR
Multiple exposure (Mehrfachbelichtung) R R RRRR R R
Lock (Messwertspeicher) R
Vibration Reduction (Vibrationsreduzierung) R
Date(yy/mm/dd) (Datum [JJ/MM/TT]) RR RRR
Time (Uhrzeit) RRRR
Data imprinting (Datenaufdruck) RR
gG kennzeichnet die auf den einzelnen Filmen aufgezeichneten Daten.
gG kennzeichnet die auf den einzelnen Filmbildern aufgezeichneten Daten.
Hinweise
1: Für Belichtungsmesssystem, Blitzsynchronisation, Blitzgeräteinstellung, Mehrfachbelichtung, AE-Sperre
und VR-Funktion siehe unter Datenaufzeichnung auf Seite 43.
2: Bei F5 erfolgt die Aufzeichnung von Date (Jahr/Monat/Tag), Time (Stunden/Minuten/Sekunden) und
aufgedruckte Zeichen bei Verwendung von Multi-Control Back MF-28. Außerdem ist das Komma nicht
als aufgedrucktes Zeichen zulässig.
3: Objektivöffnung, Brennweite und maximale Blende werden nur bei Einsatz von CPU-Objektiven
aufgezeichnet. (Bei F6 ist auch bei Objektiv ohne CPU die Datenaufzeichnung möglich, wenn die
Objektivdaten angegeben werden. Näheres hierzu finden Sie in der Bedienungsanleitung von F6.)
4: Bei der Zeiteinstellung werden bei der F5 Stunden/Minuten/Sekunden aufgezeichnet und bei F6
Stunden/Minuten.
5: Bei Mehrfachbelichtung mit F6/F100 werden unabhängig von der Zahl der Belichtungen die Daten nur
für den ersten Belichtungsvorgang aufgezeichnet. Bei der F5 lassen sich trotz verminderter Datenzahl
bis zu 15 Belichtungsdaten aufzeichnen (ab dem zweiten Belichtungsvorgang sind die Daten wie
"A"). Allerdings erfolgt beim ersten Belichtungsvorgang keine Anzeige "multiple exposure".
Page 42

42
Aufnahmedaten-Details —Forts.—
• Aufzeichnungskapazität der Kameradaten
Die Aufzeichnungskapazität (Zahl der Filme, deren Aufnahmedaten von den
einzelnen Kameras aufgezeichnet werden) richtet sich nach Kamera und
Aufzeichnungsmodus.
xNäheres über Aufzeichnungsmodi finden Sie in der zugehörigen
Bedienungsanleitung (für F6 oder F5/F100).
• EBeispiele für Aufzeichnungsdaten (Brennweite und maximaler Blendenbereich
bei CPU-Zoomobjektiv)
Mit Objektiv 24-50mm f/3,3-4,5 bei 35-mm-Zoomeinstellung
* Die Zahlen in Klammern sind bei Verwendung von MF-28 möglich.
Bei Nutzung des Zusatzspeichers lässt sich die Aufzeichnungskapazität für die F5
ungefähr verdoppeln. Bei Mehrfachbelichtung mit der F5 ist die Filmezahl geringer.
Kamera Aufzeichnungsmodus
Aufzeichnungskapazität
(Film für 36 Aufnahmen)
Grundlegende Ca. 57 Rollen
F6
Detailliert Ca. 31 Rollen
A Ca. 78 Rollen
B Ca. 36 (78*) Rollen
F5
C Ca. 12 (78*) Rollen
D Ca. 10 (39*) Rollen
Grundlegende Ca. 70 Rollen
F100
Detailliert Ca. 30 Rollen
F6 F5 F100
Basic Detailed A - D Basic Detailed
Brennweite bei der Belichtung
RR RRR
Brennweite Zoombereich
— R —— R
Beispiel
35 35 (24-50) 35 35 35 (24-50)
Maximale
Maximale Blende bei der Belichtung
—— R ——
Blenden-
Maximale Blende innerhalb des Zoombereichs
— R —— R
öffnung
Beispiel
Keine F3.3-F4.5 F3.8 Keine F3.3-F4.5
Page 43

43
• Aufgezeichnete Daten
Modus Aufgezeichneter Parameter
Metering system Color matrix (Farbmatrix)
(Belichtungsmesssystem) Matrix (Matrix)
Center weighted (Mittenbetont)
Spot (Spot)
Flash sync mode*
1
Front curtain sync (Synchronisation auf den ersten Verschlussvorhang)
(Blitzsynchronisation) Slow sync (Langzeitsynchronisation)
Rear curtain sync (Synchronisation auf den zweiten Verschlussvorhang)
Red eye reduction (Reduzierung des Rote-Augen-Effekts)
Speedlight setting None (Keine)
(Belichtungssteuerung) TTL auto flash (TTL-Blitzautomatik)*
2
non-TTL auto flash (Blitzautomatik ohne TTL-Steuerung)*
3
Optional speedlight (Optionales Blitzgerät)
Multiple flash (Mehrfachblitz)
FP sync (FP-Synchronisation)
FV lock (Blitzbelichtungs-Messwertspeicher)
Multiple exposure None (Keine)
(Mehrfachbelichtung) Multiple exposure (Mehrfachbelichtung)
Lock (AE lock) AE unlock (AE deaktiviert)
(Messwertspeicher) AE lock (AE aktiviert)
Vibration Reduction VR off (VR Aus)
(Vibrationsreduzierung) VR on(VR Ein)
gG gilt nur für F100.
gG gilt nur für F6.
*1 Bei Langzeitsynchronisation mit Reduzierung des Rote-Augen-Effekts werden
sowohl “Red eye rduction” (Reduzierung des Rote-Augen-Effekts) als auch “Slow
sync” (Langzeitsynchronisation) aufgezeichnet.
*2 Umfasst ausgewogener Aufhellblitz mit i-TTL-Steuerung, Standard-i-TTL-Blitz, 3D-
Multi-Sensor-Aufhellblitz, Multi-Sensor-Aufhellblitz, mittenbetonter Aufhellblitz
und Standard-TTL-Blitz.
*3 Bei der F6 erfolgt stets die Aufzeichnung mit “non-TTL auto flash” (Blitzautomatik
ohne TTL-Steuerung), wenn TTL-Blitzautomatik nicht eingestellt ist (auch bei
Nichtgebrauch eines Nikon Speedlight). Bei Einsatz eines Nikon Speedlight wird
auch mit “Optional speedlight” (Optionales Blitzgerät) aufgezeichnet.
Page 44

44
Einstellung und Änderung des Aufnahmemodus mit F5/F100
(Die Abbildungen zeigen das Betriebssystem Windows XP Home Edition/Professional
der F100.)
1
Verbinden Sie die Speicherkarten mit dem PC,
auf der die Ordner "modelist" und "modeset"
erzeugt werden.
• Näheres über die Erstellung von Ordnern und
Dateien finden Sie auf Seite 34.
• Näheres über die Verbindung der Speicherkarten mit
dem PC finden Sie auf Seite 36.
2
Öffnen Sie zunächst Ordner ‘modelist’
auf der Wechselfestplatte (mit
Speicherkarten) und dann je nach
Ihrer Kamera Kameramodellordner
‘f5’ oder ‘f100’.
3
Wählen Sie die gewünschte
Aufnahmemodus-Datei aus dem
Kameramodellordner ‘f5’ oder ‘f100’
und kopieren oder verschieben Sie sie
in den Ordner „modeset".
xNäheres über die Einstellung der
Aufzeichnungsmodus-Datei finden
Sie in der Tabelle auf Seite 46.
4
Trennen der Speicherkarten vom PC.
• Je nach PC, Betriebssystem, PC-Kartenadapter und
Speicherkartennleser lässt sich die Speicherkarten auf
unterschiedliche Art trennen. Näheres hierzu finden
Sie in den zugehörigen Bedienungsanleitungen.
5
Führen Sie die Speicherkarten in den für sie
vorgesehenen Schlitz ein (x 32) und Einstellung
des Aufzeichnungsmodus an der Kamera.
• Gehen Sie genauso vor wie bei der Übertragung/
Abspeicherung von Aufnahmedaten zu/auf
Speicherkarten (x 34).
• Ist der Aufzeichnungsmodus richtig an der Kamera
eingestellt, so wird die in den Ordner "modeset"
verschobene Aufzeichnungsmodus-Datei automatisch
gelöscht.
M
T
d
r
a
C-AD1
C
E
h
s
la
F
t
c
a
p
m
R
o
C
E
T
P
M
T
A
d
r
D
a
C
A
h
s
la
EC-8CF
F
t
c
a
p
m
o
B
C
M
M
T
d
r
-AD1
a
C
EC
h
s
la
F
t
c
a
p
m
R
o
C
E
T
P
M
T
A
d
r
D
a
C
A
h
s
a
l
EC-8CF
F
t
c
a
p
m
o
B
C
M
START
TM
ard
C
sh
la
actF
p
m
o
C
F
C
8
-
C
E
B
M
Page 45

45
Automatisch erstellte Ordner und Dateien
• Die Ordner und Dateien, die von dem MV-1 automatisch auf der Speicherkarten
erstellt werden, sind nachstehend aufgeführt.
Speicherung von Aufnahmedaten
Einstellung/Änderung des Aufzeichnungsmodus von F5/F100
• Ist der MV-1 mit Speicherkarten an der Kamera angebracht und wird die Starttaste
gedrückt, so werden jedes Mal der Ordner "modelist", der Kameramodell-Ordner
("f5" oder "f100") und die Aufzeichnungsmodus-Datei überschrieben. Der Ordner
"modeset" wird nur dann erstellt, wenn er nicht vorhanden ist.
• Keine Einstellung/Änderung des Aufzeichnungsmodus während neben den Dateien
in Ordner "modelist" such Dateien im Ordner "modeset" existieren.
Bei Einstellung/Änderung des Aufzeichnungsmodus mit in der
Kamera eingelegtem Film
Bei F5
Keine Fehleranzeige, allerdings ist Einstellung/Änderung des Aufzeichnungsmodus ab
dem nächsten Film möglich.
Bei F100
Die Fehleranzeige blinkt schnell (x 49), Aufzeichnungsmodus lässt sich nicht
einstellen oder ändern. Spulen Sie den Film in der Kamera zurück, nehmen Sie ihn
heraus und drücken Sie dann die Starttaste am MV-1 für etwa eine Sekunde.
nikon_dr
Näheres über die Ordner zur Abspeicherung von
Aufnahmedaten finden
(x 37).
Moduslisten-Ordner Kameramodell-Ordner Aufzeichnungsmodus-Dateien
modelist f100 f100_simple_del.mod
f100_detail_del.mod
f100_simple_stop.mod
f5 f5_a_del_display.mod
f5_b_del_display.mod
f5_c_del_display.mod
Moduseinstell-Ordner
modeset
Page 46

46
Aufzeichnungsmodus-Datei
F5:
Priorität Aufzeichnungs- Aufzeichnungs- Überschreiben Warnanzeige
modus-Parameter modus von Daten
1 f5_a_del_display.mod A Ja Leuchtet
2 f5_b_del_display.mod B Ja Leuchtet
3 f5_c_del_display.mod C Ja Leuchtet
4 f5_d_del_display.mod D Ja Leuchtet
5 f5_a_del_notdisplay.mod A Ja Leuchtet nicht
6 f5_b_del_notdisplay.mod B Ja Leuchtet nicht
7 f5_c_del_notdisplay.mod C Ja Leuchtet nicht
8 f5_d_del_notdisplay.mod D Ja Leuchtet nicht
9 f5_a_stop_display.mod A
Nein/Aufzeichnungsstopp
Leuchtet
10 f5_b_stop_display.mod B
Nein/Aufzeichnungsstopp
Leuchtet
11 f5_c_stop_display.mod C
Nein/Aufzeichnungsstopp
Leuchtet
12 f5_d_stop_display.mod D
Nein/Aufzeichnungsstopp
Leuchtet
13 f5_a_stop_notdisplay.mod A
Nein/Aufzeichnungsstopp
Leuchtet nicht
14 f5_b_stop_notdisplay.mod B
Nein/Aufzeichnungsstopp
Leuchtet nicht
15 f5_c_stop_notdisplay.mod C
Nein/Aufzeichnungsstopp
Leuchtet nicht
16 f5_d_stop_notdisplay.mod D
Nein/Aufzeichnungsstopp
Leuchtet nicht
Priorität Aufzeichnungs- Aufzeichnung Aufzeichnungs- Überschreiben
modus-Parameter Ja/Nein modus von Daten
1 f100_simple_del.mod Ja Grundlegende Ja
2 f100_detail_del.mod Ja Detailliert Ja
3 f100_simple_stop.mod Ja Grundlegende
Nein/Aufzeichnungsstopp
4 f100_detail_stop.mod Ja Detailliert
Nein/Aufzeichnungsstopp
5 f100_not_memo.mod Nein — —
F100:
Einstellung und Änderung des Aufnahmemodus mit F5/F100 —Forts.—
Page 47

47
Aufzeichnungsmodus-Parameter
Priorität
Werden mehrere Aufzeichnungsmodus-Dateien in den Ordner „modeset" kopiert
oder übertragen, so wird der Aufzeichnungsmodus mit der höheren Priorität
verwendet.
• Existieren Aufzeichnungsmodus-Dateien für F5 und F100 im Ordner „modeset", so
ist nur der Aufzeichnungsmodus für die genutzte Kamera effektiv.
Aufzeichnung Ja/Nein (nur F100)
Einstellung auf Aufzeichnung/Nicht-Aufzeichnung der Aufnahmedaten (F5 ist stets
auf Aufzeichnung eingestellt.)
Aufzeichnungsmodus
Einstellung auf Aufzeichnung der Aufnahmedatenelemente.
• Die genutzten Aufnahmedatenelemente richten sich nach der Kamera. Näheres
über die Datenelemente für die einzelnen Aufzeichnungsmodi siehe Seite 41.
Überschreiben von Daten
Überschreitet das Filmvolumen die Speicherkapazität für Aufnahmedaten (x 42), so
lässt sich festlegen, ob die Daten in umgekehrter chronologischer Folge gelöscht oder
keine neuen Aufnahmedaten aufgezeichnet werden.
• Ist Modell F100 auf das Stoppen der Aufzeichnung neuer Daten eingestellt und
überschreitet das Filmvolumen die maximale Speicherkapazität für Aufnahmedaten,
so wird der Auslöser gesperrt. In diesem Fall gehen Sie wie nachstehend
beschrieben vor.
Schalten Sie die Stromversorgung aus und gleich wieder ein, damit der Auslöser
freigegeben wird. Sie können nun zwar die nächste Aufnahme machen, ohne
dass jedoch neue Aufnahmedaten aufgezeichnet werden.
• Die F5 kann weitere Fotos machen, auch wenn die Aufzeichnung von
Aufnahmedaten unterbrochen ist.
• Speichern Sie entweder mit F5 oder F100 die Aufnahmedaten auf der
Speicherkarten ab. Wird der Film aus der Kamera entnommen und die
Aufnahmedaten abgespeichert, so werden die Aufnahmedaten in der Kamera
gelöscht und die Aufzeichnung neuer Aufnahmedaten ist möglich.
Warnanzeige (nur F5)
Sie können einstellen, ob die Warnanzeige an der Rückseite aufleuchten soll (PCVerknüpfungsmarke blinkt), wenn das Filmvolumen die maximale
Speicherkapazität für Aufnahmedaten überschreitet.
Page 48

48
Zulässige Speicherkarten
•Neben der mitgelieferten CompactFlash-Karte, werden auch die folgenden
CompactFlash-Karten Typ I unterstützt. CompactFlash-Karten Typ II und Microdrives
sind nicht verwendbar.
SanDisk:
Serie SDCFB: 16MB, 32MB, 48MB, 80MB, 128MB, 160MB, 192MB, 256MB,
384MB, 512MB, 1 GB
Serie SDCFH: 128MB, 192MB, 256MB, 384MB, 512MB
Lexar Media:
Serie 4x USB: 16MB, 32MB, 48MB, 64MB
Serie 8x USB: 16MB, 32MB, 48MB, 64MB
Serie 10x USB: 160MB
Serie 12x USB: 64MB, 128MB, 192MB
Serie 16x USB: 192MB, 256MB, 320MB, 512MB, 640MB
Serie 24x USB: 256MB, 512MB
Serie 24x WA USB: 256MB, 512MB
Serie 40x WA USB: 256MB, 512MB, 2GB
Hitachi (Renesas Technology):
Serie CompactFlash HB28 C8x: 64MB, 80MB
CompactFlash HB28C016C6 (16MB)
CompactFlash HB28D032C6 (32MB)
* Näheres über Funktionen und Handhabung der oben beschriebenen
Speicherkarte erfahren Sie beim jeweiligen Hersteller. Nikon übernimmt keine
Garantie für die einwandfreie Funktion von Speicherkarten, die von anderen
Herstellern stammen.
Page 49

• Wiederholen Sie die Schritte ab 1 auf Seite 34 nach den nachstehenden
Abhilfemaßnahmen.
Langsames Blinken (im Sekundentakt): Kommunikationsfehler mit Kamera
Ursache Abhilfe Seite
Stromversorgung der Kamera ausgeschaltet
Schalten Sie die Stromversorgung der Kamera ein.
34
Betätigen des Auslösers während der Während der Kommunikation 31
Kommunikation mit der Kamera nicht den Auslöser betätigen.
Stecker ist locker Den Stecker sicher einstecken. 32
Schnelles Blinken (4 Mal pro Sekunde): Speicherkartennfehler
Ursache Abhilfe Seite
Schreibfehler Neue Karte einsetzen. 32
Karte nicht richtig in den Schlitz eingeführt Die Karte einwandfrei einführen 32
Verfügbare Kartenspeicherkapazität unzureichend Neue Karte (leer) einsetzen. 33
Karte nicht einwandfrei formatiert
Eine einwandfrei formatierte Karte einsetzen
37
Bei F100 wird der aktivierte Film bei Einstellung/ Den aktivierten Film ausstoßen 45
Änderung der Aufzeichnungsdaten geladen
• Bei leuchtender Fehleranzeige lassen sich Speicherkarten und Stecker beliebig
einstecken oder herausziehen.
49
Bei technischen Daten und Design Änderungen vorbehalten.
• CompactFlash™ ist ein Warenzeichen von SanDisk Corporation.
• Microsoft®, Microsoft® Excel und Windows® sind eingetragene Warenzeichen
oder Warenzeichen von Microsoft Corporation in den USA bzw. anderen Ländern.
• Microdrive ist ein Warenzeichen von Hitachi Global Storage Technologies in den
USA bzw. anderen Ländern.
• Produkte und Markennamen sind Warenzeichen oder eingetragene Warenzeichen
der jeweiligen Firmen.
Stromversorgung über die Kamera
Abmessungen (BxHxT) ca. 78 x 25 x 109 mm
Kabellänge Ca. 400 mm
Gewicht Ca. 100 g (nur Leser ohne Speicherkarten)
Betriebsbedingungen Temperatur: 0 bis 40 °C, Luftfeuchtigkeit unter 85 %
• Technische Daten
• Blinkende Fehleranzeige (rot)
Page 50

50
Index
Avant-propos...........................................................................................51
Avertissements ........................................................................................52
Nomenclature..........................................................................................53
Précautions.........................................................................................54-55
Opérations de base............................................................................56-64
1. Connexion à un appareil photo et introduction d'une carte
mémoire ....................................................................................56-57
2. Transfert des données de prise de vue de l’appareil vers une
carte mémoire pour enregistrement.......................................58-59
3. Transfert des données de prise de vue de la carte mémoire
vers un ordinateur pour enregistrement................................60-61
4. Ouverture des données de prise de vue (fichier texte)
grâce à un tableur ....................................................................62-64
Détails des données de prise de vue ................................................65-67
Configuration et modification du mode d’enregistrement avec le
F5/F100................................................................................................68-71
Cartes mémoire supportées ...................................................................72
Témoin d’erreur clignotant (rouge) ......................................................73
Caractéristiques.......................................................................................73
Symboles
Cette icône signale les mesures de précaution dont vous devez avoir
connaissance avant d'utiliser votre MV-1 pour ne pas risquer de
l'endommager.
Cette icône signale les notes à lire avant d'utiliser votre MV-1.
Cette icône signale des informations supplémentaires qui peuvent s'avérer
utiles lors de l'utilisation de votre MV-1.
Cette icône indique qu'il est possible d'obtenir ailleurs dans le manuel des
informations supplémentaires.
Page 51

51
Avant-propos
Merci d’avoir acheté le lecteur de données MV-1 de Nikon. Veuillez
lire ce document dans son intégralité afin d’utiliser correctement le
MV-1 et de savourer toutes ses capacités. Après lecture, veuillez
conserver ce manuel de manière accessible de sorte que vous puissiez
vous y reporter lorsque nécessaire.
Les caractéristiques du lecteur de données MV-1 sont les suivantes:
• Transfert des données de prise de vue enregistrées sur les Nikon F6,
F5 et F100 vers une carte mémoire montée sur le MV-1 et
enregistrement.
• Vous pouvez transférer des données de la carte mémoire vers un
ordinateur.
• Le mode d’enregistrement du F5 et du 100 peut être configuré et
modifié à l'aide d'une carte mémoire et d'un ordinateur.
Configuration d’enregistrement avec le F6 et le F100
• Il faut configurer l’appareil photo pour enregistrer des données de prise de vue. (La
configuration par défaut est "non-record".) Avec le F6, la configuration est possible sur
l'appareil, tandis qu'avec le F100, le MV-1 et un ordinateur sont nécessaires (x 68).
Utilisation des données de prise de vue avec un ordinateur
• Les données sont enregistrées sur la carte mémoire en tant que fichier texte au
format CVS (valeurs séparées par des virgules), de sorte qu’elles sont facilement
visibles et manipulables à l’aide d’un tableur comme Microsoft® Excel.
• Le transfert des données enregistrées sur une carte mémoire vers un ordinateur
nécessite un matériel supplémentaire tel que l’adaptateur de carte pour ordinateur
EC-AD1, adaptateur carte-ordinateur commercial pour cartes mémoire, ou un
lecteur de cartes mémoire (Le lecteur de données MV-1 ne peut pas être connecté à
un ordinateur).
• Avec le MV-1, une carte CompactFlash sert à copier les données de prise de vue
dans le F6. Pour la liste des cartes-mémoire supportées, voir “Cartes mémoire
supportées” page 72.
• Accessoires
Veuillez vérifier que les accessoires suivants accompagnent ce produit.
Carte CompactFlash™ (x 56)
Etui
PC Card Adapter
TM
CompactFlash Card
EC-8CF
M
B
Page 52

52
Avertissements
Cet équipement a été testé et trouvé
conforme aux limites définies pour les
appareils numériques de classe B selon la
partie 15 de la réglementation FCC. Ces
limites assurent une protection
raisonnable contre les interférences
dangereuses lorsque l'équipement est
utilisé en environnement résidentiel. Cet
équipement génère, utilise et peut
irradier des radiofréquences qui peuvent,
en cas d'une installation et d'une
utilisation contraire aux instructions,
provoquer des interférences néfastes aux
communications radio. Cependant, il
n'existe aucune garantie que ce matériel
ne provoquera pas des interférences
dans une installation particulière. Si ce
matériel provoque effectivement des
interférences préjudiciables à la réception
radio ou télévisée, ce qui peut être
déterminé en allumant et en éteignant le
matériel, l'utilisateur est vivement
encouragé à essayer de corriger ces
interférences en ayant recours à une ou
plusieurs des mesures suivantes:
• Réorientez ou repositionnez l'antenne
de réception.
• Augmentez la distance séparant
l'équipement du récepteur.
• Connectez l'appareil photo à une prise
reliée à un circuit différent de celui où
est connecté le récepteur.
• Consultez un revendeur ou un
technicien radio/télévision spécialisé.
ATTENTION
Modifications
Le FCC demande qu'il soit notifié à
l'utilisateur que tout changement ou
modification sur cet appareil qui n'aurait
pas été expressément approuvé par
Nikon Corporation peut annuler tout
droit à l'utilisateur d'utiliser
l'équipement.
Câbles interface
Utilisez les câbles interface vendus ou
fournis par Nikon pour votre appareil
photo. L'utilisation d'autres câbles peut
faire dépasser les limites de la Classe B
Partie 15 du règlement FCC.
A l'attention des utilisateurs américains
Federal Communications Commission (FCC) Radio Frequency Interference Statement
ATTENTION
Cet appareil numérique de la classe B
respecte toutes les exigences du
règlement sur le matériel brouilleur du
Canada.
CAUTION
This class B digital apparatus meets all
requirements of the Canadian
Interference Causing Equipment
Regulations.
A l'attention des utilisateurs canadiens
Page 53

53
Nomenclature
Témoin d’accès (vert) (x 59) Témoin d’erreur (rouge) (x 73)
Touche de démarrage
(x 58)
Prise (x 56)
Fente pour carte mémoire (x 56)
DATA READER MV-1
E
S
R
S
R
E
START
O
R
C
C
A
Page 54

54
Précautions
• Ne faites pas subis de choc important au MV-1
Ne laissez pas tomber et ne frappez pas le MV-1. Ceci peut entraîner des
dysfonctionnements.
• Protégez-le de l’eau
Faites attention à protéger le MV-1 de l’eau. Si des gouttes d’eau entrent à l’intérieur
de l’étui, il en résultera une corrosion. Ceci peut entraîner une réparation coûteuse,
et dans des cas plus graves toute réparation pourrait être impossible.
• Evitez les brusques changements de température
Si vous exposez le MV-1 à un changement de température brusque (par exemple, le
transporter d’un extérieur froid à l’intérieur d’une maison chaude, ou vice-versa), des
gouttes d’eau se formeront à l’intérieur et à l’extérieur de l’étui, et causeront des
dégâts. Mettez à l’avance le MV-1 dans un sac en plastic ou autre récipient et laissezle s’ajuster à la nouvelle température avant de l’utiliser.
• Ne l’utilisez pas à proximité de forts champs électromagnétiques
ou magnétiques
Dans les endroits où il y a de forts champs ou ondes électromagnétiques, tels que les
tours d’émission de la télévision, ou dans les endroits où il y a beaucoup d’électricité
statique, les données enregistrées peut être corrompues ou effacées, et il se peut que
MV-1 ne fonctionne pas normalement.
• Eteignez toujours l’appareil photo avant de connecter le MV-1
Eteignez toujours l’appareil photo avant de connecter ou de déconnecter le MV-1 à
l’appareil photo.
• Conservez toujours assez d’énergie dans les piles
Assurez-vous d'utiliser le MV-1 avec un niveau d'énergie raisonnable dans les piles.
Vérifiez le manuel d’instruction de votre appareil photo pour plus d’informations sur
la façon de vérifier l’énergie des piles.
• Entretien du MV-1
Utilisez une soufflette pour ôter l’essentiel de la poussière et de la saleté, puis
nettoyez doucement avec un chiffon propre et doux.
• Entreposez le MV-1 dans un endroit frais et sec
Entreposez le MV-1 dans un endroit frais et sec pour éviter les moisissures et les
dysfonctionnements.
Tenez-le à distance de la naphtaline ou du camphre (anti-moisissure), des dispositifs
électriques qui sont source de champs magnétiques ou de tout endroit excessivement
chaud comme l’intérieur d’un véhicule en été ou à proximité d’un radiateur.
Page 55

55
• L’électricité statique peut perturber le bon fonctionnement
Bien que rares, il est des cas ou un champ électrostatique externe peut perturber le
fonctionnement des circuits électroniques, empêchant le MV-1 de fonctionner
normalement. Si cela se produit, déconnectez le MV-1 de l’appareil photo puis
reconnectez-le.
• Evitez l’utilisation lorsque le témoin d’accès (vert) est allumé
Lorsque le témoin d'accès est allumé (clignotant ou fixe), n'effectuez aucune des
opérations suivantes, car elles pourraient corrompre les fichiers ou les dossiers
enregistrés sur la carte mémoire, ou les données de prise de vue dans l’appareil
photo lui-même. Il est possible que cela endommage aussi la carte mémoire.
Opérations interdites lorsque le témoin d’accès est allumé (clignotant ou fixe):
Retirer ou introduire une carte mémoire; brancher/débrancher la prise sur le
connecteur à 10 broches; retirer ou mettre en place les piles de l’appareil photo;
rembobiner le film; libérer l’obturateur
Cependant, vous pouvez introduire ou retirer la carte mémoire ou la prise lorsque le
témoin d’erreur est allumé.
• Horodatage des fichiers et dossiers
• Avec le F6: L’horodatage des dossiers et des fichiers de données de prise de vue
dans le F6 se fait en fonction des données reçues de l’horloge interne du F6 lorsque
vous appuyez sur la touche de démarrage du MV-1. L’horodatage est appliqué à
chaque dossier et fichier créé sur la carte mémoire en une opération.
• Avec le F5 et le F100: Les dossiers et fichiers du F5 et du F100 utilisent un
horodatage fixe pour les données de prise de vue : "Sep.1, 2004, 00 heures, 00
minutes et 00 sec.".
• Les dossiers et fichiers autres que les données de prise de vue (dossiers tels que
nikon_dr, modeset, modelist ou les fichiers créés automatiquement dans ces
dossiers) utilisent un horodatage fixe : "Sep.1, 2004, 00 heures, 00 minutes et 00
sec." avec tout appareil photo.
• Autres précautions
• Le MV-1 ne peut pas être utilisé avec des appareils autres le F6, le F5 ou le F100,
même s'ils disposent d'un connecteur à 10 broches (par exemple, le F90/F90X, D2H
ou D100+MB-D100).
• Le MV-1 ne possède pas de fonction de transfert de données vers un ordinateur.
• Une fois écrites sur la carte mémoire du MV-1, les données de prise de vue ne
peuvent ni être transférées à nouveau vers l’appareil photo ni affichées par
l’appareil.
Page 56

56
Opérations de base
1. Connexion à un appareil photo et introduction d'une carte mémoire
(Les illustrations montrent le F6)
1
Vérifiez qu’il n'y a pas de film dans l'appareil
(E s’affiche dans le compteur de photos) et
que l'énergie des piles est suffisante.
• Dans le cas où les données de prise de vue
enregistrées sur l’appareil photo sont trop
nombreuses et/ou des données restent sur la carte
mémoire, le transfert de données de l'appareil
photo vers la carte mémoire prendra beaucoup de
temps. Remplacez les piles par des neuves lorsque
c’est nécessaire.
xVoir le manuel d’instructions de l’appareil photo
pour la vérification de l’énergie des piles.
2
Coupes l’alimentation de l’appareil photo.
3
Otez le capuchon du connecteur à 10 broches,
introduisez la prise du MV-1 de sorte que la
marque Yde la prise soit alignée avec l’index
• sur le connecteur de l’appareil, puis tournez-
la dans la direction indiquée pour la verrouiller.
• La position du connecteur à 10 broches peut
changer selon le modèle de votre appareil.
Reportez-vous au manuel d’instruction de votre
appareil photo pour plus de détails.
• Vous ne pouvez pas utiliser le câble d’extension
MC-21.
4
Introduisez la carte mémoire dans la fente pour
carte mémoire.
• La carte mémoire fournie a été formatée dans le
système de fichiers FAT (x 61) et peut être
utilisée tel quel.
• Tenez la carte mémoire de telle manière que
l’étiquette soit du même côté que la touche de
démarrage du MV-1, puis introduisez-la, côté
broches d'abord, dans la fente pour carte mémoire.
• Utilisez une carte mémoire sur laquelle ne subsiste
aucune donnée.
• Reportez-vous à la liste des types de cartes
mémoire supportés de la page. 72 pour plus
d’informations.
START
TM
rd
a
sh C
la
ctF
pa
m
o
C
F
C
8
-
C
E
B
M
Page 57

57
Introduisez la carte mémoire bien droite dans la bonne direction.
• N’introduisez pas une carte mémoire de travers ou dans le sens contraire. Ceci
pourrait endommager le MV-1 ou la carte mémoire.
Configuration d’enregistrement avec le F6 et le F100
• Il faut configurer l’appareil photo pour enregistrer des données de prise de vue. (Par
défaut la configuration est sur aucun d’enregistrement.) Avec le F6, la configuration
est possible sur l'appareil, tandis qu'avec le F100, le MV-1 et un ordinateur
personnel sont nécessaires (x 68).
Utilisez une carte mémoire sur laquelle ne subsiste aucune
donnée
•S'il reste des données de prises de vue précédentes sur la carte mémoire, le transfert
des données depuis l'appareil photo peut prendre beaucoup de temps. Reportezvous "Dans le cas où le clignotement du témoin d’accès se prolonge beaucoup"
(x 59).
Page 58

58
Opérations de base
2. Transfert des données de prise de vue vers une carte mémoire pour enregistrement
1
Allumez l’alimentation de l’appareil photo.
• Vérifiez qu’il n’y a pas de film dans l’appareil (E
s’affiche dans le compteur de photos) et que
l’énergie des piles est suffisante (x 56).
2
Appuyez sur la touche de démarrage du MV-1
pendant au moins une seconde.
• Le témoin d’accès du MV-1 clignote quand il
communique avec l’appareil photo.
• Les dossiers (x 61) sont automatiquement créés
sur la carte mémoire pour enregistrer les données
de prise de vue. Les données de prise de vue
enregistrées dans l’appareil photo sont transférées
ici pour enregistrement.
• Si le transfert se termine normalement, les
données de prise de vue sont effacées de l’appareil
photo, et le témoin d’accès passe du clignotement
à un éclairage fixe pendant six secondes environ,
puis s'éteint. Le clignotement du témoin d’accès
peut se prolonger pendant longtemps (x 59).
• Si le témoin d’erreur (rouge) clignote, cela signifie
qu’une défaillance a été détectée. Dans ce cas, en
vous reportant à "Dans le cas où le témoin
d’erreur (rouge) clignote" (x 73), coupez
l’alimentation de l’appareil photo, assurez-vous
que le témoin d’accès s’éteint, remplacez la carte
mémoire si nécessaire, puis recommencez la
procédure ci-dessus depuis l’étape 1.
Pour les utilisateurs de F5 et de F100 (configuration et modification du mode d’enregistrement)
En plus du transfert de données de prise de vue, les dossiers "modelist" et
"modeset" sont créés sur la carte mémoire à chaque fois que vous appuyez sur la
touche de démarrage du MV-1. Lorsque vous appuyez sur la touche de
démarrage, le mode d’enregistrement du F5 ou F100 est configuré/modifié après
avoir transféré les données de prise de vue si certains fichiers du dossier modelist
sont auparavant placés dans le dossier modeset. Avec le F100, cette opération est
requise au début puisque les données de prise de vue sont configurées par défaut
pour ne par être enregistrées (x 68-71).
3
Vérifiez que le témoin d’accès est éteint,
coupez l’alimentation de l’appareil photo, ôtez
la carte mémoire et déconnectez le MV-1 (x
59).
Touche de démarrage
Témoin d’accès
Témoin d’erreur
DATA READER MV-1
ACCESS ERROR
START
TM
CompactFlash Card
EC-8CF
M
B
Page 59

59
Dans le cas où les données de prise de vue sont transférées/
enregistrées alors que le film est en place dans l'appareil photo
• Si vous transmettez des données de prise de vue alors que le film est en place dans
l’appareil photo, il se produira ce qui est décrit ci-dessous. Avec les F5 et F100, les
données de prise de vue sont conservées dans l'appareil photo même après le transfert,
c'est pourquoi nous vous recommandons de transférer les données sans film en place.
F6
F5
F100
• Les données de prise de vue autres que celles du film en cours sont transférées.
• Les données de prise de vue dans l'appareil autres que celles du film en cours sont effacées (les
données de prise de vue du film en cours restent intactes).
• Les données de prise de vue autres que celles du film en cours sont transférées
• Toutes les données de prise de vue dans l’appareil, y compris celles du film en cours, restent intactes.
• Toutes les données de prise de vue dans l’appareil, y compris celles du film en cours, sont transférées.
• Toutes les données de prise de vue dans l’appareil, y compris celles du film en cours, restent intactes.
Dans le cas où le clignotement du témoin d’accès se prolonge
beaucoup
Dans n’importe lequel des cas suivants, assurez-vous que le témoin d’accès est éteint
avant d’allumer l’alimentation.
• Le MV-1 vérifie les fichiers sur la carte mémoire tout en transférant les données de
prise de vue. Si la carte mémoire comporte déjà beaucoup de données de prise de
vue (fichiers), l’enregistrement des données peut prendre du temps (plusieurs
douzaines de minutes pour des centaines de fichiers, ou même plusieurs heures
pour des milliers de fichiers). Pour éviter de problème, transférez les données de la
carte mémoire sur le disque dur du PC, puis effacez-les de la carte mémoire lorsque
vous n'en avez plus besoin (x 60).
• Lorsqu’un grand nombre de données de prise de vue sont enregistrées dans
l'appareil photo, même s'il ne reste pas de données (fichiers) sur la carte mémoire,
le témoin d'accès peut clignoter pendant plusieurs minutes.
• Le F5 est configuré pour toujours enregistrer les données de prise de vue quel que
soit la configuration actuelle de l’appareil photo, donc même si le MV-1 est
connecté pour la première fois il transfert automatiquement les données de prise de
vue enregistrées sur la carte mémoire. Ceci peut faire clignoter le témoin d’accès
pendant plusieurs minutes.
Déconnexion de l’appareil photo
1. Vérifiez que le témoin d’accès est éteint puis coupez l’alimentation de l’appareil photo.
2. Tournez la prise du MV-1 dans le sens contraire de celui utilisé pour la connecter,
puis tirez-la bien droit lorsqu’elle est suffisamment lâche.
Retrait des cartes mémoire
• Si le MV-1 est connecté à l’appareil photo;
1. Vérifiez que le témoin d’accès est éteint.
2. Coupez l’alimentation de l’appareil photo et ôtez la carte
mémoire en la tenant par les doigts.
• Si le MV-1 n’est pas connecté à l’appareil photo, la carte
mémoire peut être retirée avec les doigts sans autre
procédures.
ST
TM
ard
pactFlash C
m
o
C
F
C
8
-
C
E
B
M
Page 60

60
1
Connectez la carte mémoire à l’ordinateur.
• Connectez la carte mémoire en utilisant l’adaptateur de carte
pour ordinateur EC-AD1 (vendu séparément), l’adaptateur
carte-ordinateur commercial pour cartes mémoire, ou un
lecteur de cartes mémoire. Lorsque la connexion est
effectuée, la carte mémoire apparaît sur l’ordinateur comme
disque amovible.
• Reportez-vous aux manuels d’instructions de votre ordinateur,
de votre adaptateur de carte ou de votre lecteur de cartes
mémoire lorsque vous connectez la carte mémoire, car les
détails peuvent être différents.
• Avec Windows 95, il est possible que la carte mémoire ne soit
pas reconnue. Reportez-vous au manuel d’instruction de votre
ordinateur pour des informations supplémentaires.
Opérations de base
3. Transfert des données de prise de vue de la carte mémoire vers un ordinateur pour enregistrement
(Les illustrations montrent le système d’exploitation Windows XP Edition familiale/Professionnelle.)
2
Enregistrez le dossier "nikon_dr"
sur l’ordinateur.
• Pour éviter d’effacer le dossier "nikon_dr"
enregistré sur votre ordinateur en l’écrasant,
renommez-le.
• Reportez-vous au manuel d’instructions de
votre ordinateur pour plus de détails sur la
façon d'enregistrer les données de prise de
vue avec votre propre ordinateur et système
d’exploitation.
3
Effacez les données de prise de vue
de la carte mémoire.
• Si vous n’avez plus besoin des données de
prise de vue, effacez-les de la carte mémoire
de sorte que vous puissiez y enregistrer le
lot suivant de données de prise de vue.
• Reportez-vous aux manuels d’instructions de
votre ordinateur et de votre système
d’exploitation pour plus d’informations sur
l'effacement des fichiers et des dossiers, car
beaucoup de détails peuvent être différents.
• Les données de prise de vue peuvent aussi
être effacées en formatant la carte mémoire
(
x
61).
M
T
D1
d
r
a
C
EC-A
h
s
la
F
t
c
a
p
m
R
o
C
E
T
P
M
T
A
d
r
D
a
C
A
h
s
la
EC-8CF
F
t
c
a
p
m
o
B
C
M
Page 61

61
Noms des cartes mémoire connectées à l'ordinateur
• En fonction de votre ordinateur et de votre système d’exploitation, le nom assigné à
la carte mémoire peut changer. Les noms communs sont "UNTITLED (E:)" et
"NO_NAME".
Dossiers des données de prise de vue et fichiers sur une carte mémoire
• Les dossiers et fichiers servant à enregistrer les données de prise de vue sur la carte
mémoire (x 58) ont la structure suivante (l’exemple illustré concerne le F6):
Pour les données de prise de vue
Dossier du lecteur de données Dossiers du modèle d’appareil photo Dossier ID d’appareil photo Fichiers de données de prise de vue
nikon_dr F6 ID012 n00001.txt
n00002.txt
n00003.txt
Pour configurer/modifier le mode d’enregistrement du F5/F100
Pour plus de détails sur ces dossiers (x 69).
modelist
modeset
• Le modèle d’appareil photo (F6, F5, F100) à est détecté automatiquement, et le
nom du dossier du modèle d’appareil photo est configuré automatiquement.
• Le dossier d’ID de l’appareil photo identifie le type dans un même modèle.
Le nom du dossier ID de l’appareil photo est "IDxxx" où "xxx" représente ce qui suit:
F6: Le numéro d’ID de l’appareil (000~999)
F5: "255" (fixé) (Numéro d’ID de l'appareil photo modifié si le numéro d'ID de
l'appareil a été modifié en utilisant AC-1WE ou AC-1ME Photo Secretary
pour F5*.)
* Photo Secretary for F5 n’est plus disponible.
F100: Trois barres de soulignement (fixes)
• S’il y a 8192 fichiers de données de prise de vue dans le dossier d’ID de l’appareil
photo, un nouveau dossier d’ID d’appareil photo portant le même nom suivi de
"_xx" (où xx est un nombre de 01 à 99) est- créé, et les nouveaux fichiers de
données de prise de vue sont enregistrés dans ce dossier.
• Les noms de fichier de données de prise de vue sont affichés sous la forme
"nxxxxx.txt" où xxxxx est un nombre de 00000 à 09999 qui indique le numéro du
film. Si un nom de fichier existe déjà dans le dossier il ne sera pas écrasé, mais le
nouveau fichier se verra accoler "_xxxx", où xxxx est un nombre de 0001 à 9999.
Formatage de carte mémoire (initialisation)
• Les cartes mémoires doivent être formatées avec un ordinateur utilisant les systèmes
de fichiers FAT12, FAT16 ou FAT32 (The MV-1 ne peut pas formater les cartes
mémoires). Le système de fichiers varie en fonction de votre ordinateur et de votre
système d’exploitation. Reportez-vous aux manuels d’instructions correspondants
pour plus de détails.
Page 62

62
Opérations de base
4. Ouverture des données de prise de vue (fichier texte) grâce à un tableur
Les données de prise de vue sont enregistrées comme fichier texte CVS pour chaque
film. Ce fichier texte peut être facilement ouvert et manipulé avec tableur comme
Microsoft® Excel.
• Données texte (exemple avec le F6)
Les données de prise de vue de chaque film sont enregistrées comme le texte
affiché ci-dessous.
• Pour plus de détails sur la conversion de vos données, reportez-vous au manuel
d’instructions de votre tableur.
• Utilisation d’un tableur pour construire un tableau (exemple avec le F6)
Si le fichier de données de prise de vue est ouvert dans un tableur comme
Microsoft® Excel, il peut être très facilement converti pour une meilleure lisibilité.
Film speed,Film number,Camera ID
50,2,000
Frame number,Shutter speed,Aperture,Focal length,Lens maximum aperture,Metering system,Exposure mode,Flash sync mode,Exposure compensation
value,EV difference in Manual,Flash exposure compensation value,Speedlight setting,Multiple exposure,Lock,Vibration Reduction,Date(yy/mm/dd),Time
01,125,F4,48(28-70),F3.5-F4.5,Color matrix,M,Front curtain sync,+1.7,+0.3,0.0,non-TTL auto flash,None,AE Unlock,VR off,2005/07/25,10:01
02,250,F4.2,60(28-70),F3.5-F4.5,Color matrix,M,Front curtain sync,+1.7,0.0,0.0,non-TTL auto flash,None,AE Unlock,VR off,2005/07/25,10:02
03,640,F13,62(28-70),F3.5-F4.5,Spot,P,Front curtain sync,0.0,0.0,0.0,non-TTL auto flash,None,AE Unlock,VR off,2005/07/25,10:04
04,640,F7.1,62(28-70),F3.5-F4.5,Spot,P,Front curtain sync,-1.0,0.0,0.0,non-TTL auto flash,None,AE Unlock,VR off,2005/07/25,10:04
05,250,F18,52(28-70),F3.5-F4.5,Center weighted,S,Front curtain sync,-1.0,0.0,0.0,non-TTL auto flash,None,AE Unlock,VR off,2005/07/25,10:04
06,640,F2.8,300,F2.8,Center weighted,A,Front curtain sync,+0.3,0.0,0.0,non-TTL auto flash,None,AE Unlock,VR off,2005/07/25,10:07
07,800,F2.8,300,F2.8,Center weighted,A,Front curtain sync,+0.3,0.0,0.0,non-TTL auto flash,None,AE Unlock,VR off,2005/07/25,10:07
08,500,F4,600,F4,Center weighted,M,Front curtain sync,+0.3,+0.8,0.0,non-TTL auto flash,None,AE Unlock,VR off,2005/07/25,10:10
09,500,F5.6,600,F4,Center weighted,M,Front curtain sync,+0.3,-0.2,0.0,non-TTL auto flash,None,AE Unlock,VR off,2005/07/25,10:10
10,320,F2.8,50,F1.4,Matrix,A,Front curtain sync,+0.3,0.0,0.0,non-TTL auto flash,None,AE Unlock,VR off,2005/07/25,10:11
11,60,F5.6,50,F1.4,Matrix,A,Front curtain sync,+0.3,0.0,0.0,non-TTL auto flash,None,AE Unlock,VR off,2005/07/25,10:11
12,250,F4,180,F2.8,Matrix,A,Front curtain sync,0.0,0.0,0.0,non-TTL auto flash,None,AE Unlock,VR off,2005/07/25,10:12
Page 63

63
• Exemple d’importation de données avec Excel 2000
1
Démarrez Microsoft
Excel et choisissez
‘Ouvrir’ à partir du menu
fichier.
2
Configurez le fichier sur
‘Texte’, et choisissez un
fichier à importer puis
cliquez sur ‘Ouvrir’.
3
Choisissez le type de
fichier ‘Délimité—Des
caractères tels que des
des virgules ou des
tqbulations séparent
chaque champ’. Vérifiez
que ‘1’ est sélectionné
pour ‘Commencer
I’importation à la ligne’
et que ‘Windows (ANSI)
est sélectionné pour
‘Origine du fichier’, puis
cliquez sur ‘Suivant’.
Page 64

64
4
Sélectionnez ‘Virgule’
comme ‘Séparateurs’
(annulez les autres
coches), vérifiez que
‘Interpréter des
séparateurs identiques
consécutifs comme
uniques’ n’est pas coché,
‘{aucun}’ est sélectionné
pour ‘Identificateur de
texte’, puis cliquez sur
‘Suivant’.
5
Sélectionnez toutes les
colonnes à l’exception
de la colonne de date et
configurez 'Format des
données en colonne' sur
'Texte'.
6
Mettez en surbrillance la
colonne de la date et
configurez ‘Format des
données en colonne’ sur
‘Date’, puis cliquez sur
‘Terminer’.
L’importation est terminée
• Si vous le souhaitez, changez
l’ordre de l'affichage de la date
de la colonne date. Effectuez
les ajustement concernant la
largeur des colonnes et la taille
des caractères pour une lecture
facile.
Opérations de baset -suite-
4. Ouverture des données de prise de vue (fichier texte) grâce à un tableur
Page 65

65
Détails des données de prise de vue
Dans le fichier texte enregistré sur l'ordinateur, les données sont
enregistrées en fonction de l'appareil photo et du mode d'enregistrement
sélectionné comme illustré ci-dessous. Les données sont affichées en anglais.
•
Données de prise de vue et support par plusieurs modes d’enregistrement d’appareil photo
Elément enregistré
Appareil photo F6 F5 F100
Mode d’enregistrement
basique
détaillé A B C D
basique
détaillé
Film speed (Vitesse du film) R R RRRR R R
Film number (Numéro du film) R R RRRR R R
Camera ID (ID de l’appareil photo) R R RRRR
Frame number (Numéro de la photo) R R RRRR R R
Shutter speed (Vitesse d’obturation) R R RRRR R R
Aperture (Ouverture) R R RRRR R R
Focal length (Focale) R R RRRR R R
Lens maximum aperture (Ouverture maximale de l’objectif)
R RRRR R
Metering system (Système de mesure) RR R R
Exposure mode (Mode d’exposition) RR R R
Flash sync mode (Mode synchro flash) RRR
Exposure compensation value (Valeur de correction d’exposition)
RR R R
EV difference in Manual (Différence EV dans le manuel)
RR R R
Flash exposure compensation value (Valeur de correction d’exposition du flash)
RR
Speedlight setting (Réglage des flashes) RRR
Multiple exposure (Expositions multiples) R R RRRR R R
Lock (Verrouillage) R
Vibration Reduction (Stabilisateur d'image) R
Date (yy/mm/dd) (Date [aa/mm/jj]) RR RRR
Time (Heure) RRRR
Data imprinting (Impression de la date) RR
gG
Indique les données enregistrées sur chaque film.gGIndique les données enregistrées sur chaque cliché.
Remarques
1: Pour le système de mesure, le mode synchro flash, la configuration des flashes, l’exposition multiple, le
verrouillage AE et la fonction VR, reportez-vous l’enregistrement des données page 67.
2: Avec le F5, la Date (année/mois/jour), Time (heure/minute/seconde) et des caractères imprimés sont enregistrés
lorsque vous utilisez Multi-Control Back MF-28. Aussi, n’utilisez pas de virgule comme caractères imprimés.
3: L’ouverture d’objectif, la focale et l’ouverture maximale sont enregistrées uniquement si vous utilisez un objectif à
microprocesseur. (Avec le F6, même avec des objectifs sans microprocesseur, les données peuvent être enregistrées
si les données de l’objectif sont spécifiées. Pour plus de détails, reportez-vous au manuel d’instructions.)
4: Dans la configuration de Time les heure/minute/seconde sont enregistrées avec le F5, et les heure/minute avec le F6.
5: En exposition multiple avec le F6/F100, les données sont enregistrées pour la première exposition seulement
quel que soit le nombre d’expositions. Avec le F5, bien que le nombre de données soit moins important, jusqu’à
15 données d’exposition peuvent être enregistrées (à partir de la deuxième exposition, les sont les mêmes que «
A »). Cependant, pour la première exposition, "multiple exposure" n’est pas indiqué.
Page 66

66
Détails sur les données de prise de vue –suite-
• Capacité d’enregistrement des données de l’appareil photo
La capacité d’enregistrement (nombre de films dont les données de prise de vue sont
enregistrées par chaque appareil) varient en fonction de l’appareil photo et du mode
d’enregistrement.
xPour plus de détails sur les modes d’enregistrement, reportez-vous au manuel
d’instructions (F6) ou à ce manuel (F5/F100).
• Exemples de données enregistrées (focale et ouverture maximale avec un
objectif à microprocesseur)
Objectif 24-50mm f/3,3-4,5 avec zoom réglé sur 35mm
* Les nombres entre parenthèses peuvent être obtenus en utilisant le MF-28.
Lorsque vous utilisez la mémoire supplémentaire, la capacité du F5 double environ.
En exposition multiple avec le F5, le nombre de films est moins important.
Camera Mode d’enregistrement
Capacité d’enregistrement (film 36 vues)
basique Env. 57 rouleaux
F6
détaillé Env. 31 rouleaux
A Env. 78 rouleaux
B Env. 36 (78*) rouleaux
F5
C Env. 12 (78*) rouleaux
D Env. 10 (39*) rouleaux
basique Env. 70 rouleaux
F100
détaillé Env. 30 rouleaux
F6 F5 F100
basique
détaillé A-D
basique
détaillé
Focale pour la durée d’exposition
RR RRR
Focale Portée du zoom
— R —— R
Exemple
35 35 (24-50) 35 35 35 (24-50)
Ouverture
Ouverture maximale pour la durée d’exposition
—— R ——
maximale Ouverture maximale dans la portée du zoom
— R —— R
l’objectif
Exemple
aucun F3.3-F4.5 F3.8 aucun F3.3-F4.5
Page 67

67
• Elément enregistré
Mode Elément enregistré
Metering system Color matrix (Matrice couleur)
(Système de mesure) Matrix (Matrice)
Center weighted (Pondéré central)
Spot (Spot)
Flash sync mode Front curtain sync (Synchro sur le premier rideau)
(Mode synchro flash)*
1
Slow sync (Synchro lente)
Rear curtain sync (Synchro sur le second rideau)
Red eye reduction (Réduction des yeux rouges)
Speedlight setting None (Aucun)
(Réglage des flashes) TTL auto flash (Flash auto TTL)*
2
non-TTL auto flash (Flash auto non TTL)*
3
Optional speedlight (Flash optionnel)
Multiple flash (Flash multiple)
FP sync (Synchro FP)
FV lock (Verrouillage FV)
Multiple exposure None (Aucun)
(Expositions multiples) Multiple exposure (Expositions multiples)
Lock (AE lock) AE unlock (Déverrouillage AE)
(Verrouillage [verrouillage AE])
AE lock (Verrouillage AE)
Vibration Reduction VR off (Arrêt VR)
(Stabilisateur d'image) VR on (Marche VR)
gG est pour le F100 uniquement.
gG est pour le F6 uniquement.
*1 En réduction des yeux rouges avec la synchro lente, “Red eye reduction”
(Réduction des yeux rouges) et “Slow sync” (Synchro lente) sont enregistrés.
*2 Comprend le dosage automatique flash/ambiance i-TTL, le flash i-TTL standard, le
dosage automatique flash/ambiance multi capteurs 3D, le dosage automatique
flash/ambiance multi capteurs, le dosage automatique flash/ambiance pondéré
central et le flash à dosage standard.
*3 Avec le F6, “non-TTL auto flash” (Flash auto non TTL) est toujours enregistré
lorsque le flash auto TTL n’est pas exécuté (même lorsqu’un Speedlight Nikon
n’est pas utilisé). “Optional speedlight” (Flash optionnel) est aussi enregistré
lorsque Speedlight Nikon est utilisé.
Page 68

68
Configurez et modifiez le mode d’enregistrement avec le F5/F100
(Les illustrations montrent l’appareil photo F100 et le système d’exploitation Windows
XP Edition familiale/Professionnelle.)
1
Connectez à l’ordinateur la carte mémoire, sur laquelle
ont été créés les dossiers "modelist" et "modeset".
• Pour plus de détails sur la création des dossiers et des fichiers,
voir page 58.
• Pour plus de détails sur la connexion de la carte mémoire au
ordinateur, voir page 60.
2
Ouvrez le dossier ‘modelist’ du disque
amovible où est montée la carte
mémoire puis ouvrez le dossier du
modèle de l’appareil photo ‘f5’ ou
‘f100’, selon votre appareil.
3
Sélectionnez le fichier du mode
d’enregistrement choisi à partir du
dossier du modèle de l’appareil photo
‘f5’ or ‘f100’, et copiez-le ou
transférez-le dans le dossier modeset.
x
Pour plus de détails concernant sur la
configuration du fichier de mode
d'enregistrement, reportez-vous à la
page 70.
4
Otez la carte mémoire de l’ordinateur.
• La carte mémoire peut être enlevée de manière différente
selon votre ordinateur, système d’exploitation, votre
adaptateur de carte PC et votre lecteur de carte. Reportezvous aux manuels d’instructions respectifs pour plus de
détails.
5
Introduisez la carte mémoire dans le MV-1 (x56) et
configurez le mode d’enregistrement de l’appareil photo
• Suivez la même procédure que pour le
transfert/l’enregistrement des données de prise de vue sur
une carte mémoire (x58).
• Lorsque le mode d’enregistrement est bien configuré sur
l’appareil photo, le fichier de mode d’enregistrement déplacé
dans le dossier "modeset" est effacé automatiquement.
M
T
d
r
a
C-AD1
C
E
h
s
la
F
t
c
a
p
m
R
o
C
E
T
P
M
T
A
d
r
D
a
C
A
h
s
la
EC-8CF
F
t
c
a
p
m
o
B
C
M
1
M
T
d
r
a
C
EC-AD
h
s
a
l
tF
c
a
p
m
R
o
C
E
T
P
M
T
A
d
r
D
a
C
A
h
s
la
EC-8CF
F
t
c
a
p
m
o
B
C
M
START
TM
ard
C
actFlash
p
m
o
C
F
C
8
-
C
E
B
M
Page 69

69
Dossiers et fichiers créés automatiquement
• Les dossiers et les fichiers créés automatiquement sur la carte mémoire par le MV-1
sont illustrés ci-dessous.
Enregistrement des données de prise de vue
Configurer/modifier le mode d’enregistrement du F5/F100
• Si le MV-1 avec la carte mémoire est monté sur l'appareil et que le bouton de
démarrage est enfoncé, le dossier "modelist", le dossier du moddèle de l’appareil
photo ("f5" ou "f100") et le fichier du mode d'enregistrement sont écrasés à
chaque fois. Le dossier "modeset" n’est créé que lorsqu’il n’est pas présent.
• Ne configurez/modifiez pas le mode d’enregistrement lorsque des fichiers, en plus
des fichiers du dossier "modelist" sont présents dans le dossier "modeset".
Dans le cas où une configuration/modification du mode
d’enregistrement est effectuée avec un film en place dans l’appareil
Avec le F5
Aucune indication d’erreur n’apparaît, cependant, la configuration/modification du
mode d’enregistrement est accessible pour le film suivant.
Avec le F100
Le témoin d’erreur clignote rapidement (x 73), le mode d’enregistrement ne peut
pas être modifié. Rembobinez le film dans l’appareil photo, ôtez-le, puis appuyez sur
le bouton de démarrage du MV-1 pendant une seconde environ.
nikon_dr
Pour plus de détails sur les dossiers d’enregistrement des données de prise de vue (x 61).
Dossier de liste des modes Dossier du modèle d’appareil photo Fichiers du mode d’enregistrement
modelist f100 f100_simple_del.mod
f100_detail_del.mod
f100_simple_stop.mod
f5 f5_a_del_display.mod
f5_b_del_display.mod
f5_c_del_display.mod
Dossier de configuration du mode
modeset
Page 70

70
Setting and changing recording mode with the F5/F100—continued
Fichier du mode d’enregistrement
F5:
Priorité Fichier du mode Mode Ecrasement Témoin
d’enregistrement
d’enregistrement
des données d’avertissement
1 f5_a_del_display.mod A Oui Affiché
2 f5_b_del_display.mod B Oui Affiché
3 f5_c_del_display.mod C Oui Affiché
4 f5_d_del_display.mod D Oui Affiché
5 f5_a_del_notdisplay.mod A Oui Non affiché
6 f5_b_del_notdisplay.mod B Oui Non affiché
7 f5_c_del_notdisplay.mod C Oui Non affiché
8 f5_d_del_notdisplay.mod D Oui Non affiché
9 f5_a_stop_display.mod A
No/Arrêt de l’enregistrement
Affiché
10 f5_b_stop_display.mod B
No/Arrêt de l’enregistrement
Affiché
11 f5_c_stop_display.mod C
No/Arrêt de l’enregistrement
Affiché
12 f5_d_stop_display.mod D
No/Arrêt de l’enregistrement
Affiché
13 f5_a_stop_notdisplay.mod A
No/Arrêt de l’enregistrement
Non affiché
14 f5_b_stop_notdisplay.mod B
No/Arrêt de l’enregistrement
Non affiché
15 f5_c_stop_notdisplay.mod C
No/Arrêt de l’enregistrement
Non affiché
16 f5_d_stop_notdisplay.mod D
No/Arrêt de l’enregistrement
Non affiché
Priorité Fichier du mode Enregistrer Mode Ecrasement
d’enregistrement oui/no
d’enregistrement
des données
1 f100_simple_del.mod Oui basique Oui
2 f100_detail_del.mod Oui détaillé Oui
3 f100_simple_stop.mod Oui basique
No/Arrêt de l’enregistrement
4 f100_detail_stop.mod Oui détaillé
No/Arrêt de l’enregistrement
5 f100_not_memo.mod No — —
F100:
Page 71

71
Eléments du mode d’enregistrement
Priorité
Si plus d’un fichier de mode d’enregistrement est copié ou transféré dans le dossier
‘modeset’, le mode d’enregistrement avec la plus haute priorité sera utilisé.
• Si les fichiers du mode d’enregistrement du F5 et du F100 existent dans le dossier
‘modeset’, seul le mode d’enregistrement pour l’appareil utilisé sera effectif.
Enregistrer oui/no (F100 uniquement)
Configurez si les données de prise de vue doivent être enregistrées ou pas. (Le F5 est
toujours configuré pour enregistrer.)
Mode d’enregistrement
Configurez les éléments des données de prise de vue à enregistrer.
• Les éléments de données de prise de vue utilisés varient en fonction de l’appareil
photo. Pour plus de détails sur les éléments des données pour chaque mode
d’enregistrement, voir page 65.
Ecrasement des données
Si la quantité de film dépasse la limite des données de prise de vue enregistrable (x
66), vous pouvez spécifier si les données les plus anciennes doivent être d’abord
effacées, sinon aucune nouvelle donnée de prise de vue ne sera enregistrée.
• Avec le F100; si la configuration est d’arrêter l’enregistrement de nouvelles
données, et si la quantité de film dépasse la limite des données de prise de vue
enregistrables, le bouton de l’obturateur sera verrouillé. Dans ce cas, effectuez l’une
des actions suivantes.
Appuyez sur le bouton d'alimentation pour éteindre puis rallumez pour libérer le
bouton de l'obturateur. Vous pourrez prendre la photo suivante, mais aucune
nouvelle donnée de prise de vue ne sera enregistrée.
• Le F5 peut continuer à prendre des photographies même si l’enregistrement des
données de prise de vue est arrêté.
• Avec le F5 ou le F100, enregistrez les données de prise de vue sur la carte mémoire.
Si vous retirez le film de l’appareil photo et enregistrez les données de prise de vue,
les données de prise de vue dans l’appareil photo seront effacées et il sera possible
d‘enregistrer de nouvelles données.
Témoin d’avertissement (F5 uniquement)
Vous pouvez configurer ou non si un témoin d’avertissement s’allume sur le panneau
arrière (le symbole de liaison ordinateur clignote) lorsque la quantité de film
dépasse la limite des données de prise de vue enregistrables.
Page 72

72
Cartes mémoire supportées
• En plus de la carte CompactFlash comprise, les cartes CompactFlash Type I suivantes
sont aussi supportés. Les cartes CompactFlash Type II et Microdrives ne sont pas
utilisables.
SanDisk:
Série SDCFB: 16MB, 32MB, 48MB, 80MB, 128MB, 160MB, 192MB, 256MB,
384MB, 512MB, 1 GB
Série SDCFH: 128MB, 192MB, 256MB, 384MB, 512MB
Lexar Media:
Série 4x USB: 16MB, 32MB, 48MB, 64MB
Série 8x USB: 16MB, 32MB, 48MB, 64MB
Série 10x USB: 160MB
Série 12x USB: 64MB, 128MB, 192MB
Série 16x USB: 192MB, 256MB, 320MB, 512MB, 640MB
Série 24x USB: 256MB, 512MB
Série 24x WA USB: 256MB, 512MB
Série 40x WA USB: 256MB, 512MB, 2GB
Hitachi (Renesas Technology):
Série CompactFlash HB28 C8x: 64MB, 80MB
CompactFlash HB28C016C6 (16MB)
CompactFlash HB28D032C6 (32MB)
* Pour plus de détails sur les fonctions et opérations des cartes mémoire
mentionnées ci-dessus, consultez les fabricants respectifs. Nikon ne garantit par le
fonctionnement pour des cartes mémoire fournies par d’autres constructeurs.
Page 73

Alimentation Fournie par l’appareil photo
Dimensions (LxHxP) Env. 78 x 25 x 109mm
Longueur du câble Env. 400mm
Poids Env. 100g (unité principale seule, sans carte mémoire)
Conditions de Température: 0~40°C, humidité: Moins de 85%
fonctionnement
73
Témoin d’erreur clignotant (rouge)/Caractéristiques
Répétez l’opération depuis l’étape 1 de la page 58 après chaque remède.
Clignote lentement (une fois par seconde): Erreur de communication avec l’appareil photo
Cause Remède Page
L’alimentation de l’appareil photo est coupée
Mettez en marche l’alimentation de l’appareil photo.
58
L’obturateur est libéré pendant la communication Ne libérez pas l’obturateur pendant 55
avec l’appareil photo la communication
La prise est lâche Fixez-la correctement. 56
Clignote rapidement (4 fois par seconde): Erreur de carte mémoire
Cause Remède Page
Erreur d’écriture Introduisez une nouvelle carte 56
La carte est mal introduite dans la fente Introduisez-la correctement 56
La mémoire disponible sur la carte n’est pas suffisante
Introduisez une nouvelle carte (vide) 57
La carte n’est pas formatée correctement
Introduisez une carte correctement formatée
61
Avec le F100, un film en usage est chargé lorsque la
Déchargez le film en usage 69
configuration/modification des données d’enregistrement
• Vous pouvez introduire ou retirer la carte mémoire ou la prise lorsque le témoin
d’erreur est allumé.
Les caractéristiques et le design sont susceptibles de changer sans préavis.
• CompactFlash™ est une marque commerciale de SanDisk Corporation.
• Microsoft®, Microsoft® Excel et Windows® sont des marques déposées ou des
marques commerciales de Microsoft Corporation aux Etats-Unis d’Amérique et/ou
autres pays.
• Microdrive est une marque commerciale de Hitachi Global Storage Technologies aux
Etats-Unis d’Amérique et/ou autres pays.
• Les produits et marques sont des marques commerciale ou des marques déposées
de leurs compagnies respectives.
• Caractéristiques
• Témoin d’erreur clignotant (rouge)
Page 74

74
Contenido
Introducción ............................................................................................75
Avisos .......................................................................................................76
Nomenclatura..........................................................................................77
Precauciones.......................................................................................78-79
Operaciones básicas...........................................................................80-88
1. Conexión a la cámara e inserción de la tarjeta de
memoria ....................................................................................80-81
2. Transferencia de datos de disparo en la cámara a
la tarjeta de memoria para guardarlos...................................82-83
3. Transferencia de datos de disparo en la tarjeta de
memoria al ordenador para guardarlos .................................84-85
4. Visualización de datos de disparo (archivo de texto)
usando un software de hoja de cálculo..................................86-88
Detalles de los datos de disparo ......................................................89-91
Configuración y cambio del modo de grabación con la F5/F100...92-95
Tarjetas de memoria compatibles..........................................................96
Indicador de error parpadeando (rojo).................................................97
Especificaciones.......................................................................................97
Símbolo
Este símbolo indica una advertencia: información que debería leer antes
de utilizar el MV-1 para no estropearla.
Este símbolo indica una observación: información que se recomienda leer
antes de utilizar el MV-1.
Este símbolo indica un consejo: información adicional que podría serle
útil al utilizar el MV-1.
Este símbolo indica que en otra sección del manual dispone de más
información.
Page 75

75
Introducción
Gracias por comprar el Lector de Datos MV-1 de Nikon. Por favor lea
este documento en su totalidad para usar correctamente el MV-1 y
disfrutar de todas sus prestaciones. Después de leerlo, tenga este
manual a mano para que pueda consultarlo otra vez de ser necesario.
El lector de datos MV-1 ofrece las siguientes prestaciones:
• Transfiere datos de disparo guardados en las Nikon F6, F5 y F100 a
una tarjeta de memoria colocada en el MV-1 y los guarda.
• Los datos pueden transferirse desde la tarjeta de memoria a un
ordenador.
• Usando la tarjeta de memoria y un ordenador, puede configurarse
y cambiarse el modo de grabación de la F5 y la F100.
Configuración de grabación con la F6 y la F100
• Es necesario configurar la cámara para grabar datos de disparo. (La configuración
predeterminada es "no grabar".) Con la F6, es posible hacer la configuración con la
cámara, mientras que con la F100, se necesitan el MV-1 y un ordenador (x 92).
Uso de los datos de disparo con un ordenador
• Los datos se guardan en la tarjeta de memoria como un archivo de texto en formato
CSV (valores separados por comas), de forma que pueda visualizarse y manipularse
fácilmente usando una aplicación de hoja de cálculo como Microsoft® Excel.
• La transferencia al ordenador de los datos guardados en la tarjeta de memoria requiere
equipos adicionales como un adaptador de tarjeta para PC EC-AD1, un adaptador
comercial de tarjeta para ordenador para tarjetas de memoria, o un lector de tarjetas
de memoria (el Lector de Datos MV-1 no puede conectarse a un ordenador).
• Con el MV-1, la tarjeta CompactFlash se utiliza para copiar datos de disparo
guardados en la F6. Para ver la lista de las tarjetas de memoria compatibles,
consulte "Tarjetas de memoria compatibles" en la página 96.
• Accesorios
Por favor verifique que los siguientes accesorios hayan sido incluidos en este producto.
Tarjeta CompactFlash™ (x 80)
Funda
PC Card Adapter
TM
CompactFlash Card
EC-8CF
M
B
Page 76

76
Avisos
Este equipo ha sido probado y es
conforme con los límites establecidos
para los aparatos digitales de la clase B,
según la sección 15 de las normas de la
FCC. Estos límites se han diseñado para
proporcionar una protección razonable
contra interferencias peligrosas en
instalaciones residenciales. Este equipo
genera, utiliza y puede emitir
radiofrecuencias y, si no se instala y
utiliza como señalan las instrucciones,
puede causar interferencias con las
comunicaciones por radio. Sin embargo,
no se puede garantizar que no producirá
interferencias en una instalación
determinada. Si este aparato causa
interferencias en la recepción de la
televisión o la radio, que pueden
comprobarse encendiendo y apagando el
equipo, intente corregir las interferencias
tomando una o varias de las siguientes
medidas:
• Reorientar o colocar en otro lugar la
antena de recepción.
• Aumentar la separación entre el equipo
y el aparato receptor.
• Conectar el equipo a una toma de un
circuito diferente al que está conectado
el aparato receptor.
• Consultar al distribuidor o a un técnico
profesional de televisión / radio.
ADVERTENCIAS
Modificaciones
La FCC exige que se notifique al usuario
que cualquier cambio o modificación
que se realice en aparato, que no esté
aprobado expresamente por Nikon
Corporation, podría invalidar el derecho
del usuario de utilizar el equipo.
Cables de interfaz
Con este equipo, utilice los cables de
interfaz vendidos o suministrados por
Nikon. El uso de otros cables de interfaz
podría hacer sobrepasar los límites de la
sección 15 de la clase B de las normas
de la FCC.
Aviso para los clientes de EE UU
Declaración de interferencias con radiofrecuencias de la Federal Communications
Comisión (FCC)
AVISO
Este aparato digital de la clase B cumple
los requisitos del reglamento canadiense
sobre equipos que provocan
interferencias.
ATTENTION
Cet appareil numérique de la classe B
respecte toutes les exigences du
règlement sur le matériel brouilleur du
Canada.
Aviso para los clientes de Canadá
Page 77

77
Nomenclatura
Indicador de acceso (verde) (x 83) Indicador de error (rojo) (x 97)
Botón start (x 82)
Enchufe (x 80)
Ranura para tarjeta de memoria
(x 80)
DATA READER MV-1
E
S
R
S
R
E
START
O
R
C
C
A
Page 78

78
Precauciones
• No someta al MV-1 a impactos fuertes
No permita que el MV-1 caiga ni reciba golpes. Esto puede causar fallos.
• Protéjalo del agua
Asegúrese de proteger el MV-1 del agua. Si penetran gotas de agua dentro de la
funda, se producirá corrosión. La reparación puede ser cara, y en casos severos puede
que la misma sea imposible.
• Evite los cambios súbitos de temperatura
Si expone al MV-1 a un cambio súbito de temperatura (por ejemplo, pasándolo del
exterior frío al interior cálido de una casa, o viceversa), se formarán gotas de agua
dentro y fuera de la funda, lo cual puede causar daño. Coloque por anticipado el
MV-1 en una bolsa plástica o en otro recipiente y antes de usarlo permita que se
ajuste a la nueva temperatura.
•
No lo use cerca de campos magnéticos u ondas electromagnéticas potentes
En los lugares con presencia de campos u ondas electromagnéticas potentes, como
cerca de torres de transmisión de televisión, o donde existe electricidad estática
potente, los datos grabados pueden dañarse o borrarse, y puede que el MV-1 no
funcione correctamente.
•
Apague siempre la alimentación de la cámara antes de conectar el MV-1
Apague siempre la alimentación de la cámara antes de conectar o desconectar el
MV-1 a la misma.
• Mantenga suficiente energía en las pilas
Asegúrese de usar el MV-1 con un nivel razonable de energía en las pilas de la
cámara. Para la información sobre cómo comprobar la energía de las pilas consulte el
manual de instrucciones de su cámara.
• Cuidado del MV-1
Use un soplador para quitar la mayor parte del polvo y la suciedad, y luego pase
cuidadosamente un trapo limpio y suave.
• Guarde el MV-1 en un lugar fresco y seco
Guarde el MV-1 en un lugar fresco y seco para evitar moho y desperfectos.
Manténgalo alejado de naftalina o alcanfor (repelente contra polillas), equipos
eléctricos que generan campos magnéticos o de lugares excesivamente calientes
como dentro de un vehículo durante el verano o cerca de un calentador.
Page 79

79
• La electricidad estática puede interferir el funcionamiento normal
Aunque no son frecuentes, hay casos en los cuales un campo electrostático externo
puede afectar el funcionamiento del sistema de circuitos electrónicos, impidiendo que
el MV-1 funcione normalmente. Si esto ocurre, desconecte el MV-1 de la cámara y
conéctelo otra vez.
•
Evite la operación mientras el indicador de acceso (verde) esté encendido
Cuado el indicador de acceso esté encendido (parpadeando o sólido), no ejecute
ninguna de las siguientes operaciones, ya que pueden dañarse los archivos o carpetas
guardados en la tarjeta de memoria, o los datos de disparo guardados en la propia
cámara. También puede dañarse la tarjeta de memoria.
Operaciones que están prohibidas cuando el indicador de acceso está encendido
(parpadeando o sólido):
Sacar o insertar una tarjeta de memoria; acoplar/desacoplar el enchufe al terminal de
10 clavijas; sacar o instalar pilas en la cámara; rebobinar película; liberar el disparador
Sin embargo, la tarjeta de memoria y el enchufe pueden insertarse o sacarse
libremente mientras el indicador de error está encendido.
• Marca de tiempo para archivos y carpetas
• Con la F6: La marca de tiempo en carpetas y en archivos de datos de disparo en la
F6 se basa en los datos recibidos desde el reloj interno de la F6 cuando se pulsa el
botón start del MV-1. La marca de tiempo es aplicada a cada carpeta y archivo
producido en la tarjeta de memoria con una operación.
• Con la F5 y la F100: Las carpetas y archivos en la F5 y en la F100 usan una marca
de tiempo fija para datos de disparo "Sep. 1, 2004, 00 horas, 00 minutos y 00
seg.".
• Las carpetas y archivos que sean de datos de disparo (carpetas como nikon_dr,
modeset, modelist o archivos creados automáticamente en esas carpetas) usan una
marca de tiempo fija de "Sep. 1, 2004, 00 horas, 00 minutos y 00 seg." con
cualquier cámara.
• Otras precauciones
• El MV-1 no puede usarse con otras cámaras que no sean F6, F5 o F100, incluso
aunque tengan terminales con 10 clavijas (por ejemplo, las F90/F90X, D2
H o
D100+MB-D100).
• El MV-1 no tiene función de transferencia de datos a un ordenador.
• Una vez que se escriben en la tarjeta de memoria en el MV-1, los datos de disparo
no pueden ser transferidos de regreso a la cámara, ni ser visualizados por la
cámara.
Page 80

80
Operaciones básicas
1. Conexión a la cámara e inserción de la tarjeta de memoria
(Las ilustraciones muestran la F6)
1
Confirme que la cámara no tenga una película
instalada (en el contador de cuadros se visualiza
E) y que la energía de las pilas sea suficiente.
• En caso de que existan demasiados datos de
disparo guardados en la cámara y/o queden datos
en la tarjeta de memoria, la transferencia de datos
de la cámara a la tarjeta de memoria tomará largo
tiempo. Cambie las pilas por otras nuevas cuando
sea necesario.
xPara la confirmación de la energía de las pilas,
consulte el manual de instrucciones de la cámara.
2
Apague la alimentación de la cámara.
3
Quite la tapa del terminal de 10 clavijas,
inserte el enchufe del MV-1 de forma que la
marca
Y
en el enchufe quede alineada con la
marca de índice • en el terminal de la cámara
y a continuación hágalo girar en la dirección
mostrada para que quede seguro en su lugar.
• La posición del terminal de 10 clavijas puede variar
dependiendo del modelo de su cámara. Para
mayor información consulte el manual de
instrucciones de la cámara.
• No puede usarse el cable de extensión MC-21.
4
Inserte la tarjeta de memoria en la ranura para
tarjeta de memoria.
• La tarjeta de memoria suministrada ha sido
formateada en el sistema de archivos FAT (x 85)
y puede usarse como está.
• Sostenga la tarjeta de memoria de forma que la
etiqueta esté en el mismo lado que el botón start
del MV-1, e insértela con las clavijas primero en la
ranura para tarjeta de memoria.
• Use una tarjeta de memoria en la cual no queden
datos
• Para mayor información, consulte la lista de los
tipos de tarjetas de memoria compatibles en la
p. 96.
START
TM
rd
a
sh C
la
ctF
pa
m
o
C
F
C
8
-
C
E
B
M
Page 81

81
Inserte una tarjeta de memoria de forma recta en la dirección
correcta.
• No empuje la tarjeta de memoria en forma inclinada ni en la dirección incorrecta.
Esto puede causar daño del MV-1 o de la tarjeta de memoria.
Configuración de grabación con la F6 y la F100
• Es necesario configurar la cámara para grabar datos de disparo. (La configuración
predeterminada es no grabar.) Con la F6, es posible hacer la configuración con la
cámara, mientras que con la F100, se necesitan el MV-1 y un ordenador (x 92).
Use una tarjeta de memoria en la cual no queden datos
• Si en una tarjeta de memoria quedan datos de disparo anteriores, la transferencia
de los datos a la cámara puede demorar largo tiempo. Consulte "En caso de que el
parpadeo del indicador de acceso continúe durante largo tiempo" (x 83).
Page 82

82
Operaciones básicas
2. Transferencia de los datos de disparo en la cámara a la tarjeta de memoria para guardarlos
1
Encienda la alimentación de la cámara.
• Confirme la cámara no tenga una película
instalada (en el contador de cuadros se visualiza E)
y que la energía de las pilas sea suficiente (x 80).
2
Pulse el botón start del MV-1 durante al menos
un segundo.
• El indicador de acceso del MV-1 parpadeará
mientras el mismo se comunica con la cámara.
• Se crearán carpetas (x 85) automáticamente en
la tarjeta de memoria para guardar datos de
disparo. Aquí se transferirán, para guardarlos, los
datos de disparo grabados en la cámara.
• Si la transferencia de datos se termina sin
problemas, los datos de disparo en la cámara se
eliminan, y el indicador de acceso cambiará de
parpadeando a encendido sólido durante
aproximadamente seis segundos, y luego se
apagará. El parpadeo del indicador de acceso
puede continuar durante largo tiempo (x 83).
• Si el indicador de error (rojo) parpadea, esto indica
que se ha detectado un fallo. En este caso,
consultando "Si el indicador de error (rojo)
parpadea" (x 97), apague la alimentación de la
cámara, asegúrese de que el indicador de acceso
se haya apagado, reemplace la tarjeta de memoria
de ser necesario, y repita el procedimiento anterior
comenzando por el paso 1.
Para usuarios de la F5 y la F100 (configuración y cambio del modo de grabación)
Además de transferir datos de disparo, en la tarjeta de memoria se crean las
carpetas "modelist" y "modeset" cada vez que se pulsa el botón start en el MV-
1. Cuando se pulsa el botón start, el modo de grabación de la F5 o la F100 es
configurado/cambiado después de transferir los datos de disparo si determinados
archivos en la carpeta modelist se colocan por anticipado en la carpeta modeset.
Con la F100, esta operación se requiere al comenzar porque la configuración
predeterminada establece que no se graben datos de disparo (x 92-95).
3
Confirme que el indicador de acceso esté
apagado, apague la alimentación de la cámara,
saque la tarjeta de memoria y desconecte el
MV-1 (x 83).
Botón start
Indicador de acceso
Indicador de error
DATA READER MV-1
ACCESS ERROR
START
TM
CompactFlash Card
EC-8CF
M
B
Page 83

83
En caso de transferencia/guardado de datos de disparo mientras
la película está instalada en la cámara
• Si se transfieren datos de disparo estando la película instalada en la cámara, el
procesamiento será el siguiente. Con la F5 y la F100, los datos de disparo quedan
retenidos en la cámara incluso después de la transferencia, por tanto es
recomendable que no exista película instalada al transferir los datos.
F6
F5
F100
• Se transferirán datos de disparo en la cámara que no son los datos en la película existente.
• Se eliminarán datos de disparo en la cámara que no son los datos en la película existente (los datos
de disparo de la película que se está usando quedarán inalterados).
• Se transferirán datos de disparo en la cámara que no son los datos en la película existente.
•
Todos los datos de disparo en la cámara incluyendo los datos de la película que se está usando quedarán inalterados.
•
Se transferirán todos los datos de disparo en la cámara incluyendo los datos en la película que se está usando.
•
Todos los datos de disparo en la cámara incluyendo los datos de la película que se está usando quedarán inalterados.
Si el indicador de acceso se mantiene parpadeando durante largo tiempo
En cualquiera de los siguientes casos, antes de apagar la alimentación, asegúrese de
que el indicador de acceso esté apagado.
• El MV-1 verifica los archivos en la tarjeta de memoria mientras transfiere los datos
de disparo. Si la tarjeta de memoria ya contiene muchos datos de disparo (archivos),
el guardado de los datos puede demorar bastante tiempo (varias docenas de
minutos para cientos de archivos, o incluso varias horas para miles de archivos).
Para evitar este problema, transfiera los datos de disparo desde la tarjeta de
memoria al disco duro del ordenador, y elimínelos de la tarjeta de memoria cuando
no sean necesarios (x 84).
• Cuando en la cámara hay una gran cantidad de datos de disparo grabados, aunque
no queden datos (archivos) en la tarjeta de memoria, el indicador de acceso puede
parpadear durante varios minutos.
• La F5 está ajustada para grabar siempre datos de disparo independientemente de la
configuración existente en la cámara, por tanto, incluso si el MV-1 está siendo
conectado por primera vez, transferirá automáticamente datos de disparo grabados
a la tarjeta de memoria. Esto puede causar parpadeo del indicador de acceso
durante varios minutos.
Desconexión de la cámara
1. Confirme que el indicador de acceso esté apagado y apague la alimentación de la cámara.
2. Haga girar el enchufe del MV-1 en dirección opuesta a la utilizada para conectarlo,
y saque el enchufe en forma recta después que esté suficientemente flojo.
Para sacar tarjetas de memoria
• Si el MV-1 está conectado a la cámara;
1. 1. Confirme que el indicador de acceso esté apagado.
2. 2. Apague la alimentación de la cámara y saque la tarjeta
de memoria sosteniéndola con los dedos.
• Si el MV-1 no está conectado a la cámara, la tarjeta de
memoria puede quitarse usando los dedos sin necesidad de
ningún procedimiento adicional.
ST
TM
ard
pactFlash C
m
o
C
F
C
8
-
C
E
B
M
Page 84

84
1
Conecte la tarjeta de memoria al ordenador.
• Conecte la tarjeta de memoria usando el adaptador
de tarjeta para PC EC-AD1 (se vende por separado),
un adaptador comercial de tarjeta para ordenador
para tarjetas de memoria, o un lector de tarjetas de
memoria. Luego de completar la conexión, la tarjeta
de memoria aparecerá en el ordenador como un
disco extraíble.
• Al conectar la tarjeta de memoria, consulte los
manuales de instrucciones de su ordenador,
adaptador de tarjeta para PC o lector de tarjetas de
memoria, porque los detalles pueden variar.
• Con Windows 95, puede que no sea posible
reconocer la tarjeta de memoria. Para mayor
información consulte el manual de instrucciones de
su ordenador.
Operaciones básicas
3. Transferencia de datos de disparo en la tarjeta de memoria al ordenador para guardarlos
(Las ilustraciones corresponden al sistema operativo Windows XP Home Edition/Professional.)
2
Guarde la carpeta "nikon_dr" en el
ordenador.
• Para información sobre cómo guardar
los datos de disparo con su
ordenador y sistema operativo
específicos, consulte el manual de
instrucciones de su ordenador.
• Para evitar que se sobrescriba y se
borre la carpeta "nikon_dr" guardada
en el ordenador, cambie el nombre
de la carpeta.
3
Elimine los datos de disparo de la
tarjeta de memoria.
• Si los datos de disparo ya no son
necesarios, elimínelos de la tarjeta de
memoria para que pueda guardar el
siguiente lote de datos de disparo en
la tarjeta.
• Para información sobre la eliminación
de archivos y carpetas, consulte los
manuales de instrucciones para su
ordenador y sistema operativo
específicos, ya que los detalles
pueden variar.
• Los datos de disparo también pueden
eliminarse formateando la tarjeta de
memoria (x 85).
M
T
D1
d
r
a
C
EC-A
h
s
la
F
t
c
a
p
m
R
o
C
E
T
P
M
T
A
d
r
D
a
C
A
h
s
la
EC-8CF
F
t
c
a
p
m
o
B
C
M
Page 85

85
Nombres de las tarjetas de memoria conectadas a un ordenador
• Dependiendo de su ordenador y sistema operativo específicos, el nombre asignado
a la tarjeta de memoria conectada puede variar. Ejemplos de nombres comunes son
"UNTITLED (E:)" y "NO_NAME".
Carpetas y archivos de datos de disparo en la tarjeta de memoria
• Las carpetas y archivos utilizados para guardar los datos de disparo en la tarjeta
memoria (x 82) tienen la siguiente estructura (el ejemplo mostrado es para la F6):
Para guardar datos de disparo
Carpeta del lector de datos Carpeta de modelo de la cámara Carpeta de ID de la cámara Archivos de datos de disparo
nikon_dr F6 ID012 n00001.txt
n00002.txt
n00003.txt
Para configurar/cambiar el modo de grabación de F5/F100
Para mayor información sobre esas carpetas (x 21).
modelist
modeset
• El modelo de la cámara (F6, F5, F100) es detectado automáticamente, y se
configura automáticamente el nombre de la carpeta de modelo de la cámara.
• El nombre de la carpeta de ID de la cámara identifica al mismo tipo de modelo.
El nombre de la carpeta de ID de la cámara es "IDxxx" donde "xxx" es uno de los
siguientes:
F6: El número de ID de la cámara (000~999)
F5: "255" (fijo) (Número de ID cambiado de la cámara si el número de ID de la
cámara se cambió usando AC-1WE o AC-1ME Photo Secretary para F5*.)
* Photo Secretary para F5 ya no está disponible.
F100: Tres subrayados (fijo)
• Si hay 8.192 archivos de datos de disparo en la carpeta de ID de la cámara, se
creará una nueva carpeta de ID de la cámara, la cual tendrá el mismo nombre
seguido por "_xx" (donde xx es un número entre 01 y 99), y los nuevos archivos de
datos de disparo se guardarán en esa carpeta.
• Los nombres de los archivos de datos de disparo se visualizan como "nxxxxx.txt"
donde xxxxx es un número entre 00001 y 09999, e indica el número de película. Si
en la carpeta ya existe un archivo con ese nombre, el mismo no será sobrescrito, en
su lugar, al nuevo archivo se le adicionará "_xxxx", donde xxxx es un número entre
0001 y 9999.
Formateo de la tarjeta de memoria (inicialización)
• Las tarjetas de memoria deben formatearse usando sistemas de archivo FAT12,
FAT16 o FAT32(El MV-1 no puede formatear tarjetas de memoria). El sistema de
archivo será diferente de acuerdo con el ordenador y sistema operativo específicos.
Para mayor información consulte los manuales de instrucciones correspondientes.
Page 86

86
Operaciones básicas
4. Visualización de datos de disparo (archivo de texto) usando software de hoja de cálculo
Los datos de disparo se guardan como un archivo de texto CSV para cada película.
Este archivo de texto puede abrirse y manipularse fácilmente con aplicaciones de hoja
de cálculo como Microsoft® Excel.
• Datos de texto (ejemplo usando la F6)
Los datos de disparo para cada película se guardan como datos de texto,
según se muestra aquí.
• Para mayor información sobre la conversión de los datos, consulte el manual de
instrucciones de su programa de aplicación de hoja de cálculo.
•
Uso de software de hoja de cálculo para hacer una tabla (ejemplo usando la F6)
Si el archivo de datos de disparo se abre en una aplicación de hoja de cálculo
como Microsoft® Excel, el mismo puede ser convertido a forma legible muy
fácilmente.
Film speed,Film number,Camera ID
50,2,000
Frame number,Shutter speed,Aperture,Focal length,Lens maximum aperture,Metering system,Exposure mode,Flash sync mode,Exposure compensation
value,EV difference in Manual,Flash exposure compensation value,Speedlight setting,Multiple exposure,Lock,Vibration Reduction,Date(yy/mm/dd),Time
01,125,F4,48(28-70),F3.5-F4.5,Color matrix,M,Front curtain sync,+1.7,+0.3,0.0,non-TTL auto flash,None,AE Unlock,VR off,2005/07/25,10:01
02,250,F4.2,60(28-70),F3.5-F4.5,Color matrix,M,Front curtain sync,+1.7,0.0,0.0,non-TTL auto flash,None,AE Unlock,VR off,2005/07/25,10:02
03,640,F13,62(28-70),F3.5-F4.5,Spot,P,Front curtain sync,0.0,0.0,0.0,non-TTL auto flash,None,AE Unlock,VR off,2005/07/25,10:04
04,640,F7.1,62(28-70),F3.5-F4.5,Spot,P,Front curtain sync,-1.0,0.0,0.0,non-TTL auto flash,None,AE Unlock,VR off,2005/07/25,10:04
05,250,F18,52(28-70),F3.5-F4.5,Center weighted,S,Front curtain sync,-1.0,0.0,0.0,non-TTL auto flash,None,AE Unlock,VR off,2005/07/25,10:04
06,640,F2.8,300,F2.8,Center weighted,A,Front curtain sync,+0.3,0.0,0.0,non-TTL auto flash,None,AE Unlock,VR off,2005/07/25,10:07
07,800,F2.8,300,F2.8,Center weighted,A,Front curtain sync,+0.3,0.0,0.0,non-TTL auto flash,None,AE Unlock,VR off,2005/07/25,10:07
08,500,F4,600,F4,Center weighted,M,Front curtain sync,+0.3,+0.8,0.0,non-TTL auto flash,None,AE Unlock,VR off,2005/07/25,10:10
09,500,F5.6,600,F4,Center weighted,M,Front curtain sync,+0.3,-0.2,0.0,non-TTL auto flash,None,AE Unlock,VR off,2005/07/25,10:10
10,320,F2.8,50,F1.4,Matrix,A,Front curtain sync,+0.3,0.0,0.0,non-TTL auto flash,None,AE Unlock,VR off,2005/07/25,10:11
11,60,F5.6,50,F1.4,Matrix,A,Front curtain sync,+0.3,0.0,0.0,non-TTL auto flash,None,AE Unlock,VR off,2005/07/25,10:11
12,250,F4,180,F2.8,Matrix,A,Front curtain sync,0.0,0.0,0.0,non-TTL auto flash,None,AE Unlock,VR off,2005/07/25,10:12
Page 87

87
• Ejemplo de importación de datos usando Excel 2000
1
Inicie Microsoft Excel, y
seleccione ‘Abrir archivo’
en el menú archivo.
2
Configure archivo a
‘Texto’, seleccione el
archivo que será
importado, y haga clic en
‘Abrir’.
3
Seleccione el tipo de
archivo ‘Delimitados—
Caracteres como comas o
tabulaciones separan
campos’. Confirme que ‘1’
está seleccionado para
‘Comenzar a importar en
la fila’ y ‘Windows (ANSI)’
está seleccionado para
‘Origen del archivo’, haga
clic en ‘Siguiente.’
Page 88

88
4
Seleccione ‘Coma’ como
‘Separadpres’ (cancele las
otras marcas de
verificación), confirme
que ‘Considerar
separadores consecutivos
como uno solo’ no esté
activado,‘ninguno’ está
seleccionado para
‘Calificador de texto’, y
haga clic en ‘Siguiente.’
5
Seleccione todas las
columnas excepto la
columna de la fecha y
configure ‘Formato de
los datos en columnas’ a
‘Texto’.
6
Resalte la columna de la
fecha y configure
‘Formato de los datos en
columnas’ a ‘Fecha’, a
continuación haga clic
en ’Finalizar’.
La importación ha terminado
• Si lo desea, cambie el orden de
visualización de la fecha de la
columna de la fecha. Para una
mejor visualización, ajuste el
ancho de las columnas y el
tamaño de los caracteres.
Operaciones básicas —continuación—
4. Visualización de datos de disparo (archivo de texto) usando software de hoja de cálculo
Page 89

89
Detalles de los datos de disparo
En el archivo de texto guardado en el ordenador, los datos se graban
según la cámara y el modo de grabación seleccionado según se
muestra a continuación. Los datos aparecen en inglés.
•
Datos de disparo y compatibilidad con los modos de grabación de diversas cámaras
Ítem de grabación
Cámara F6 F5 F100
Modo de grabación
Básico
Detallado
A B C D Básico
Detallado
Film speed (Velocidad de la película) R R RRRR R R
Film number (Número de la película) R R RRRR R R
Camera ID (ID de la cámara) R R RRRR
Frame number (Número del cuadro) R R RRRR R R
Shutter speed (Velocidad del disparador) R R RRRR R R
Aperture (Abertura) R R RRRR R R
Focal length (Distancia focal) R R RRRR R R
Lens maximum aperture (Abertura máxima del objetivo)
R RRRR R
Metering system (Sistema de medición) RR R R
Exposure mode (Modo de exposición) RR R R
Flash sync mode (Modo de sincronización del flash)
RRR
Exposure compensation value (Valor de compensación de la exposición)
RR R R
EV difference in Manual (Diferencia EV en Manual)
RR R R
Flash exposure compensation value (Valor de compensación de la exposición del flash
)
RR
Speedlight setting (Ajuste del speedlight) RRR
Multiple exposure (Exposiciones múltiples ) R R RRRR R R
Lock (Bloqueo) R
Vibration Reduction (Reducción de la vibración)
R
Date (yy/mm/dd) (Fecha [aa/mm/dd]) RR RRR
Time (Hora) RRRR
Data imprinting (Impresión de datos) RR
gG
indica datos grabados en cada película.gGindica datos grabados en cada cuadro de película.
Notas
1: Para el sistema de medición, modo de sincronización del flash, ajuste del speedlight, exposiciones
múltiples, bloqueo AE y función VR, consulte los ítems de datos de grabación en la página 91.
2: Con la F5, la fecha (año/mes/día), la hora (hora/minuto/segundo) y los caracteres impresos se graban
cuando se usa un multi-control back MF-28. Además, no se usan comas en los caracteres impresos.
3: La abertura del objetivo, la distancia focal y la abertura máxima se graban solamente cuando se usa un
objetivo CPU. (Con la F6, incluso con objetivo no CPU, los datos pueden grabarse si se especifican los
datos del objetivo. Para mayor información, consulte el manual de instrucciones de la F6.)
4: En la configuración de la hora, con la F5 se graban hora/minuto/segundo y con la F6 hora/minuto.
5: En exposiciones múltiples con la F6/F100, los datos solamente se graban para la primera exposición,
independientemente del número de exposiciones. Con la F5, aunque el número de datos se reduce, se
pueden grabar hasta 15 datos de exposiciones (a partir de la segunda exposición, los datos serán los
mismos que "A"). Sin embargo, para la primera exposición, no se indica "exposición múltiple".
Page 90

90
Detalles de los datos de disparo —continuación—
• Capacidad de grabación de datos de la cámara
La capacidad de grabación (cantidad de películas cuyos datos de disparo son grabados
por cada cámara) varía dependiendo de la cámara y del modo de grabación.
xPara mayor información sobre los modos de grabación, consulte el manual de
instrucciones (F6) o este manual (F5/F100).
• Ejemplos de datos grabados (distancia focal y abertura máxima usando un
objetivo zoom CPU)
Usando un objetivo 24-50mm f/3,3-4,5 con ajuste de zoom 35mm
* Los números entre paréntesis pueden obtenerse cuando se usa el MF-28.
Cuando se usa la memoria adicional, la capacidad de grabación de la F5 será
aproximadamente el doble. Con exposiciones múltiples usando la F5, la cantidad de
películas pudiera ser menor.
Camera Modo de grabación
Capacidad de grabación (película de 36 exposiciones)
Básico
Aproximadamente
57 carretes
F6
Detallado
Aproximadamente
31 carretes
A
Aproximadamente
78 carretes
B
Aproximadamente
36 (78*) carretes
F5
C
Aproximadamente
12 (78*) carretes
D
Aproximadamente
10 (39*) carretes
Básico
Aproximadamente
70 carretes
F100
Detallado
Aproximadamente
30 carretes
F6 F5 F100
Básico Detallado A a D Básico Detallado
Distancia focal en el momento de la exposición
RR RRR
Distancia
Intervalo de zoom
— R —— R
focal
Ejemplo
35 35 (24-50) 35 35 35 (24-50)
Abertura
Abertura máxima en el momento de la exposición
—— R ——
máxima del
Abertura máxima en el momento de la exposición
— R —— R
objetivo
Ejemplo ninguna
F3.3-F4.5 F3.8
ninguna
F3.3-F4.5
Page 91

91
• Ítems de datos grabados
Modo Elemento grabado
Metering system Color matrix (Matriz de color)
(Sistema de medición) Matrix (Matriz)
Center weighted (Ponderada central)
Spot (Puntual)
Flash sync mode*
1
Front curtain sync (Sincronización a la cortinilla delantera)
(Modo de sincronización Slow sync (Sincronización lenta)
del flash) Rear curtain sync (Sincronización a la cortinilla trasera)
Red eye reduction (Reducción de pupilas rojas)
Speedlight setting None (Ninguna)
(Ajuste del speedlight) TTL auto flash (Flash automático TTL)*
2
non-TTL auto flash (Flash automático no TTL)*
3
Optional speedlight (Speedlight opcional)
Multiple flash (Flash múltiple)
FP sync (Sincronización FP)
FV lock (Bloqueo FV)
Multiple exposure None (Ninguna)
(Exposiciones múltiples ) Multiple exposure (Exposiciones múltiples)
Lock (AE lock) AE unlock (Desbloqueo AE)
(Bloqueo [Bloqueo AE]) AE lock (Bloqueo AE)
Vibration Reduction VR off (VR desactivada)
(Reducción de la vibración) VR on (VR activada)
gG es solamente para la F100.
gG es solamente para la F6.
*1 En reducción de pupilas rojas con sincronización lenta, se graban la “Red eye
reduction” (Reducción de pupilas rojas) y la “Slow sync” (Sincronización lenta).
*2 Incluye flash de relleno equilibrado i-TTL, flash i-TTL estándar, flash de relleno
equilibrado con multisensor 3D, flash de relleno equilibrado con multisensor, flash
de relleno ponderado central y flash TTL estándar.
*3 Con la F6, siempre se graba “non-TTL auto flash” (flash automático no TTL)
cuando no se ejecuta el flash automático TTL (incluso cuando no se utiliza un
Speedlight de Nikon). “Optional speedlight” (Speedlight opcional) también es
grabado cuando se utiliza el Speedlight de Nikon.
Page 92

92
Configuración y cambio del modo de grabación con la F5/F100
(Las ilustraciones muestran la cámara F100 y el sistema operativo Windows XP Home
Edition/Professional.)
1
Conecte la tarjeta de memoria, en la cual se crearon las
carpetas "modelist" y "modeset", al ordenador.
• Para mayor información sobre la creación de carpetas y
archivos, consulte la página 82.
• Para mayor información sobre la conexión de la tarjeta de
memoria al ordenador, consulte la página 84.
2
Abra la carpeta ‘modelist’ en el disco
extraíble tarjeta de memoria instalada
y abra la carpeta de modelo de la
cámara ‘f5’ o ‘f100’, dependiendo de
su cámara específica.
3
Seleccione el archivo de modo de
grabación deseado en la carpeta de
modelo de la cámara ‘f5’ o ‘f100’, y
cópielo o transfiéralo a la carpeta
modeset.
x
Para mayor información sobre la
configuración del archivo de modo de
grabación, consulte el cuadro en la
página 94.
4
Saque la tarjeta de memoria del ordenador.
• La tarjeta de memoria puede sacarse de diversas formas
dependiendo de su ordenador, sistema operativo adaptador
de tarjeta de ordenador y lector de tarjeta de memoria
específicos. Para mayor información, consulte los respectivos
manuales de instrucciones.
5
Inserte la tarjeta de memoria en la MV-1 (x80) y
configuración del modo de grabación en la cámara.
• Siga el mismo procedimiento que para transferir/guardar
datos de disparo en la tarjeta de memoria (
x
82).
• Cuando el modo de grabación está correctamente configurado
en la cámara, se elimina automáticamente el archivo de modo
de grabación movido en la carpeta "modeset".
M
T
d
r
a
C-AD1
C
E
h
s
la
F
t
c
a
p
m
R
o
C
E
T
P
M
T
A
d
r
D
a
C
A
h
s
la
EC-8CF
F
t
c
a
p
m
o
B
C
M
M
T
d
r
-AD1
a
C
EC
h
s
a
l
F
t
c
a
p
m
R
o
C
E
T
P
M
T
A
d
r
D
a
C
A
h
s
la
EC-8CF
F
t
c
a
p
m
o
B
C
M
START
TM
rd
a
lash C
actF
p
m
o
C
F
C
8
-
C
E
B
M
Page 93

93
Carpetas y archivos que se crean automáticamente
• Las carpetas y archivos que el MV-1 crea automáticamente en la tarjeta de memoria
se muestran a continuación.
Guardado de datos de disparo
Configuración/cambio del modo de grabación en F5/F100
• Si el MV-1 con tarjeta de memoria está acoplado a la cámara y se pulsa el botón
start, cada vez que se hace esto se sobrescriben la carpeta "modelist", la carpeta
de modelo de la cámara ("f5" o "f100") y el archivo de modo de grabación. La
carpeta "modeset" se crea solamente cuando no existe.
• No configure/cambie el modo de grabación si en la carpeta "modeset" hay otros
archivos además de los de la carpeta "modelist".
En caso de que la configuración/cambio del modo de grabación
se haga con una película instalada en la cámara
Con la F5
No aparecerá indicación de error, sin embargo, la configuración/cambio del modo de
grabación estará disponible a partir de la siguiente película.
Con la F100
El indicador de error parpadea rápidamente (x 97), el modo de grabación no puede
configurarse ni cambiarse. Rebobine la película en la cámara, retírela y a continuación
pulse el botón start del MV-1 durante aproximadamente un segundo.
nikon_dr
Para mayor información sobre las carpetas para
guardar datos de disparo (x 85).
Carpeta de lista de modos Carpeta de modelo de la cámara Archivos de modo de grabación
modelist f100 f100_simple_del.mod
f100_detail_del.mod
f100_simple_stop.mod
f5 f5_a_del_display.mod
f5_b_del_display.mod
f5_c_del_display.mod
Carpeta de configuración de modo
modeset
Page 94

94
Configuración y cambio del modo de grabación con la F5/F100—continuación—
Archivo modo de grabación
F5:
Prioridad
Archivo modo Modo de Sobrescritura Indicador de
de grabación grabación de datos advertencia
1 f5_a_del_display.mod A Sí Visualizada
2 f5_b_del_display.mod B Sí Visualizada
3 f5_c_del_display.mod C Sí Visualizada
4 f5_d_del_display.mod D Sí Visualizada
5 f5_a_del_notdisplay.mod A Sí No visualizada
6 f5_b_del_notdisplay.mod B Sí No visualizada
7 f5_c_del_notdisplay.mod C Sí No visualizada
8 f5_d_del_notdisplay.mod D Sí No visualizada
9 f5_a_stop_display.mod A No/Parar grabación Visualizada
10 f5_b_stop_display.mod B No/Parar grabación Visualizada
11 f5_c_stop_display.mod C No/Parar grabación Visualizada
12 f5_d_stop_display.mod D No/Parar grabación Visualizada
13 f5_a_stop_notdisplay.mod A No/Parar grabación No visualizada
14 f5_b_stop_notdisplay.mod B No/Parar grabación No visualizada
15 f5_c_stop_notdisplay.mod C No/Parar grabación No visualizada
16 f5_d_stop_notdisplay.mod D No/Parar grabación No visualizada
Prioridad
Archivo modo Grabación Modo de Sobrescritura
de grabación sí/no grabación de datos
1 f100_simple_del.mod Sí Básico Sí
2 f100_detail_del.mod Sí Detallado Sí
3 f100_simple_stop.mod Sí Básico No/Parar grabación
4 f100_detail_stop.mod Sí Detallado No/Parar grabación
5 f100_not_memo.mod No — —
F100:
Page 95

95
Ítems del modo de grabación
Prioridad
Si a la carpeta ‘modeset’ se copian o transfieren más de un archivo de modo de
grabación, se utilizará el modo de grabación con la prioridad más alta.
• Si en la carpeta ‘modeset’ existen archivos de modo de grabación para la F5 y la
F100, solamente será efectivo el modo de grabación de la cámara que esté en uso.
Grabación sí/no (solamente F100)
Seleccione si los datos de disparo se grabarán o no. (La F5 siempre está configurada
para grabar.)
Modo de grabación
Ajuste los ítems de datos de disparo que serán grabados.
• Los ítems de datos de disparo usados variarán según la cámara. Para mayor
información sobre los ítems de datos para cada modo de grabación, consulte la
página 89.
Sobrescritura de datos
Si la cantidad de película excede el límite de datos de disparo que pueden guardarse
(x 90), usted puede especificar si se eliminarán datos comenzando por el más
antiguo, o si no se grabarán nuevos datos de disparo.
• Con la F100, si la configuración está ajustada para dejar de grabar nuevos datos, y
la cantidad de película excede el límite de datos de disparo que pueden guardarse,
se bloqueará el disparador. En este caso, haga lo siguiente.
Apague el interruptor de alimentación y vuelva a encenderlo nuevamente para
liberar el bloqueo del disparador. Podrá hacer la siguiente fotografía, pero no se
grabarán nuevos datos de disparo.
• La F5 puede continuar fotografiando incluso aunque se interrumpa la grabación de
datos de disparo.
• Con la F5 o la F100, guarde los datos de disparo en la tarjeta de memoria. Si retira
la película de la cámara y guarda los datos de disparo, se borrarán los datos de
disparo en la cámara y será posible grabar nuevos datos de disparo.
Indicador de advertencia (solamente F5)
Usted puede configurar si desea o no que en el panel posterior se encienda un
indicador de advertencia (destellará la marca de conexión al PC ) cuando la
cantidad de película exceda el límite de datos de disparo que pueden guardarse.
Page 96

96
tarjetas de memoria compatibles
• Además de la tarjeta CompactFlash incluida, también son compatibles las siguientes
tarjetas CompactFlash Tipo I. No pueden utilizarse tarjetas CompactFlash Tipo II ni
Microdrives.
SanDisk:
Serie SDCFB: 16MB, 32MB, 48MB, 80MB, 128MB, 160MB, 192MB, 256MB,
384MB, 512MB, 1 GB
Serie SDCFH: 128MB, 192MB, 256MB, 384MB, 512MB
Lexar Media:
Serie 4x USB: 16MB, 32MB, 48MB, 64MB
Serie8x USB: 16MB, 32MB, 48MB, 64MB
Serie10x USB: 160MB
Serie12x USB: 64MB, 128MB, 192MB
Serie16x USB: 192MB, 256MB, 320MB, 512MB, 640MB
Serie24x USB: 256MB, 512MB
Serie24x WA USB: 256MB, 512MB
Serie40x WA USB: 256MB, 512MB, 2 GB
Hitachi (Renesas Technology):
Serie CompactFlash HB28 C8x: 64MB, 80MB
CompactFlash HB28C016C6 (16MB)
CompactFlash HB28D032C6 (32MB)
* Para información sobre las funciones y operaciones de la tarjeta de memoria
mencionada anteriormente, consulte con el fabricante correspondiente. Nikon no
garantizará el funcionamiento de tarjetas de memoria suministradas por otros
fabricantes.
Page 97

97
Indicador de error parpadeando (rojo)/Especificaciones
•
Después de ejecutar las soluciones, repita el procedimiento a partir del paso 1 en la página 82.
Parpadea lentamente (una vez por segundo): Error de comunicación con la cámara
Causa Solución Pág.
La alimentación de la cámara está apagada Apague la alimentación de la cámara 82
El disparador se libera durante l No libere el obturador durante 79
a comunicación con la cámara la comunicación
El enchufe está flojo Conecte el enchufe adecuadamente. 80
Parpadea rápidamente (4 veces por segundo): Error de la tarjeta de memoria
Causa Solución Pág.
Error de escritura Inserte una tarjeta nueva 80
La tarjeta no está insertada correctamente en la ranura
Inserte correctamente la tarjeta 80
Insuficiente memoria disponible en la tarjeta Inserte una tarjeta nueva (vacía) 81
La tarjeta no está formateada correctamente
Inserte una tarjeta formateada correctamente
85
Con la F100, hay una película cargada que se está usando
Quite la película que se está usando 93
mientras se configuran/cambian los datos de disparo
• La tarjeta de memoria y el enchufe pueden insertarse o retirarse libremente
mientras el indicador de error está encendido.
Las especificaciones y el diseño están sujetos a cambio sin previo aviso.
• CompactFlash es una marca comercial de SanDisk Corporation.
• Microsoft®, Microsoft® Excel y Windows® son marcas registradas o marcas comerciales
de Microsoft Corporation en Estados Unidos y/o en otros países.
• Microdrive es una marca comercial de Hitachi Global Storage Technologies en Estados
Unidos y/o en otros países.
• Los nombres de productos y marcas son marcas comerciales o marcas registradas de sus
respectivas compañías.
Alimentación Suministrada por la cámara
Dimensiones (AnxAlxPr)
Aprox. 78 x 25 x 109mm
Longitud del cable Aprox. 400mm
Peso Aprox. 100g (solamente la unidad principal, sin considerar
la tarjeta de memoria)
Condiciones de Temperatura: 0~40°C, humedad: menos de 85%
funcionamiento
• Especificaciones
• Indicador de error parpadeando (rojo)
Page 98

98
Indice
Premessa...........................................................................................99-100
Nomenclatura........................................................................................101
Precauzioni.....................................................................................102-103
Funzionamento di base.................................................................104-112
1. Collegamento alla fotocamera e inserimento della scheda di
memoria ...............................................................................104-105
2. Trasferimento dei dati di ripresa contenuti nella fotocamera su
scheda di memoriaper la memorizzazione.........................106-107
3. Trasferimento dei dati di ripresa sulla scheda di memoria su PC
per la memorizzazione.........................................................108-109
4. Apertura dei dati di ripresa (file di testo) mediante foglio
elettronico.............................................................................110-112
Dettagli dei dati di ripresa............................................................113-115
Impostazione e modifica della modalità di registrazione
con F5/F100 ....................................................................................116-119
Schede di memoria supportate............................................................120
Spia luminosa di segnalazione errori lampeggiante (rossa)..............121
Specifiche...............................................................................................121
Simboli
Questa icona segnala avvertenze o informazioni che è necessario leggere
per evitare danni alla MV-1.
Questo simbolo indica suggerimenti e informazioni aggiuntive utili
durante l'impiego della MV-1.
Indica note e informazioni da leggere prima di utilizzare la MV-1.
Vi rimanda ad un'altra parte del manuale, dove potrete trovare maggiori
informazioni sull'argomento.
Page 99

99
Premessa
Grazie per aver acquistato il lettore dati Nikon MV-1. Per utilizzare il
prodotto in modo corretto e usufruire appieno della sue potenzialità,
si prega di leggere il presente documento in tutte le sue parti. Dopo
la lettura, si raccomanda di tenerlo a portata di mano per eventuali
riferimenti futuri.
Il lettore dati MV-1 presenta le seguenti caratteristiche:
• Trasferimento dei dati di ripresa memorizzati su Nikon F6, F5 e
F100 su scheda di memoria inserita nel lettore MV-1 e
memorizzazione.
• I dati possono essere trasferiti dalla scheda di memoria su un
personal computer.
• Utilizzando la scheda di memoria e un personal computer, è possibile
impostare e modificare la modalità di registrazione di F5 e F100.
Impostazioni di registrazione relative a F6 e F100
• Per registrare i dati di ripresa, è necessario impostare la fotocamera (l’impostazione
di default corrisponde a "non-record" ("nessuna registrazione"). Con F6, è possibile
effettuare le impostazioni dalla fotocamera, mentre con F100, è necessario utilizzare
l’MV-1 e un PC (x 116).
Utilizzo dei dati di ripresa mediante PC
• I dati vengono memorizzati sulla scheda di memoria come file di testo formato CSV
(comma-separated value), in modo tale sia possibile visualizzarli e gestirli facilmente
utilizzando un foglio elettronico, tipo Microsoft Excel.
• Per trasferire i dati memorizzati sulla scheda di memoria su un personal computer, è
necessario disporre di un ulteriore apparecchiatura, quale adattatore schede PC ECAD1, adattatore schede di memoria per PC commerciale o lettore di schede di
memoria (il lettore dati MV-1 non può essere collegato ad un personal computer).
• Con l’ MV-1, è possibile utilizzare la scheda CompactFlash per copiare i dati di ripresa
memorizzati su F6. Per l’elenco delle schede di memoria utilizzabili, vedi il paragrafo
"Schede di memoria supportate" a pagina 120.
Page 100

100
• Accessori
Verificare che il prodotto comprenda i seguenti accessori.
Scheda CompactFlash™ (x 104)
Custodia morbida
PC Card Adapter
Premessa —segue—
TM
CompactFlash Card
EC-8CF
M
B
 Loading...