

Page 1

Network Interface
User Manual
Page 2

Trademark and Copyrights
• Muratec, the Muratec logo and all Muratec product names contained herein are trademarks of Murata Machinery, Ltd.
• Microsoft®, Windows®, Windows® 3.1, Windows® 95, Windows® 98, Windows® Me, Windows
NT® 4.0, Windows® 2000 and Windows® XP are registered trademarks of the Microsoft
Corporation.
All other products referenced are trademarks or registered trademarks of their respective
companies.
Page 3

Contents
1. Getting ready ........................................................................................................ 1-1
1.1 System requirements ..................................................................................1-1
2. Installation ............................................................................................................ 2-1
2.1 Cable connection .........................................................................................2-1
2.2 Setting the IP Address ................................................................................2-2
2.3 Installing the driver ....................................................................................2-3
2.3.1 Activating the optional second paper cassette ..................................2-6
3. Printer driver settings ....................................................................................... 3-1
3.1 Open the printer properties ........................................................................3-1
3.1.1 From the application software ...........................................................3-1
3.1.2 From the printer icon ..........................................................................3-1
4. Network scanner feature ................................................................................... 4-1
4.1 Operation summary ....................................................................................4-1
4.2 Getting ready to use the scan box ..............................................................4-1
4.2.1 Setup a scan box .................................................................................4-1
4.2.2 Modify a scan box ................................................................................4-2
4.3 Scanning the document into a scan box .....................................................4-3
4.4 Importing a document from a scanned box ................................................4-6
4.4.1 Manually erasing a document stored in a scan box ..........................4-9
4.4.2 Printing a list of documents stored in the scan boxes ....................4-10
4.5 Changing the default settings ..................................................................4-11
4.5.1 Printing a list of scanner settings ....................................................4-12
5. Internet fax features ........................................................................................... 5-1
5.1 Internet communication .............................................................................5-1
5.1.1 Internet fax transmission (Scan to e-mail) ........................................5-1
5.1.2 Internet mail reception .......................................................................5-1
5.2 Basic parameters ........................................................................................5-2
5.3 Internet parameter settings .......................................................................5-3
5.4 Configuring the e-mail environment ..........................................................5-4
5.4.1 Time zone setting ................................................................................5-4
5.4.2 e-mail environment settings ..............................................................5-5
5.5 Registering an e-mail address ....................................................................5-8
5.5.1 One-touch key registration .................................................................5-8
5.5.2 Speed-dial number registration .........................................................5-9
5.6 Configuring from the Internet browser ....................................................5-10
5.6.1 Internet FAX configuration screen ..................................................5-10
5.6.2 Configuring an IP address ................................................................5-11
5.6.3 Configuring the SMTP/POP settings ...............................................5-11
5.6.4 Configuring the e-mail settings ........................................................5-12
Page 4

5.6.5 Registering or editing a one-touch number .....................................5-13
5.6.6 Registering or editing a speed-dial number ....................................5-14
5.7 Internet fax transmission .........................................................................5-15
5.7.1 Using numeric keys ..........................................................................5-15
5.7.2 Using a one-touch key .......................................................................5-15
5.7.3 Using a speed-dial number ...............................................................5-15
5.7.4 Broadcasting .....................................................................................5-16
5.8 Internet fax reception ...............................................................................5-17
5.8.1 Receiving e-mail from a POP server ................................................5-17
5.8.2 Manual reception from a POP server ..............................................5-17
6. Troubleshooting ................................................................................................... 6-1
6.1 Troubles in network printer and scanner .............................................6-1
6.2 Troubles in TCP/IP environment ..........................................................6-2
6.3 Troubles in Internet fax communication ..............................................6-2
7. Appendix ................................................................................................................ 7-1
7.1 Specifications ...............................................................................................7-1
7.2 Entering characters ....................................................................................7-2
Page 5
Network Interface 1-1
1. Getting ready
1.1 System requirements
The following operating environment is required in order to use the network
interface.
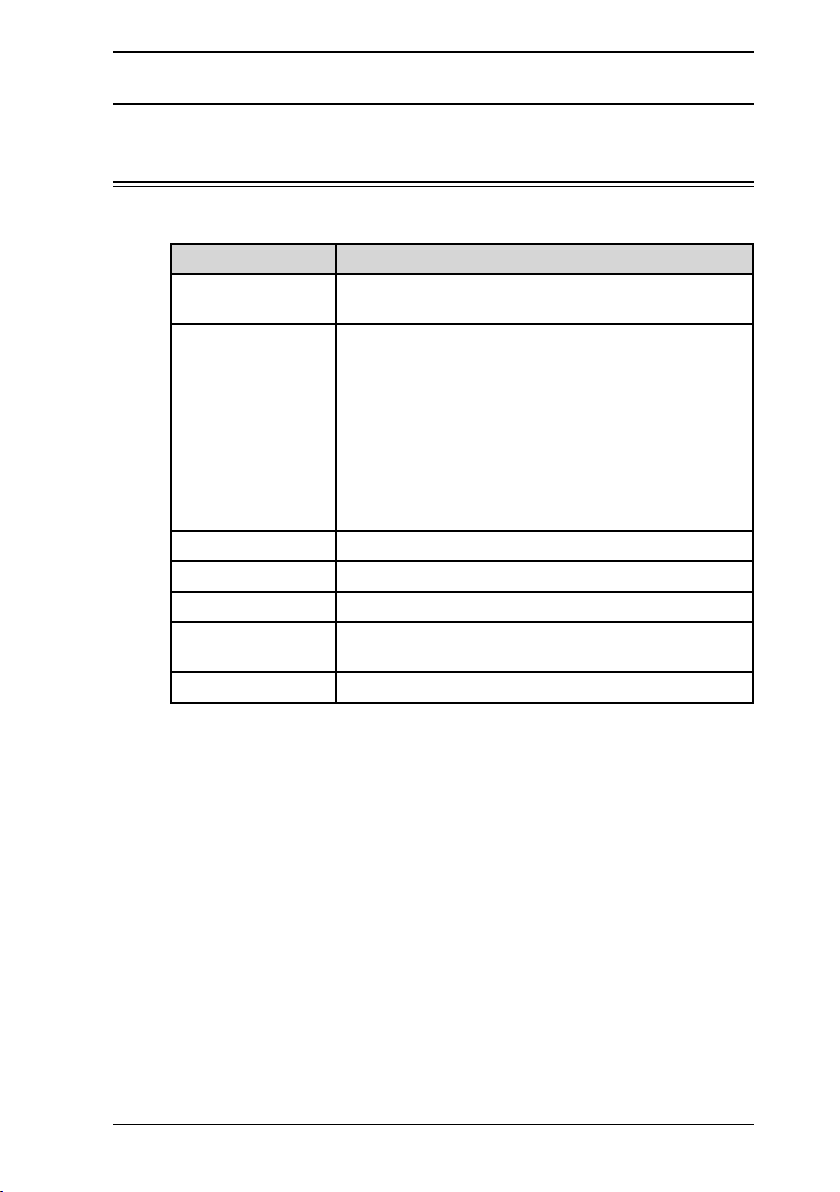
Item Requirements
PC Type IBM’s PC-AT compatible machine loaded with one of
the following operating systems.
Operating System
• Windows XP
• Windows 2000 professional
• Windows NT 4.0 workstation
• Windows Me
• Windows 98
• Windows 95
* Only English version Operating System is guaranteed.
* Operation with Windows 98/Me upgraded from Windows 95/3.1 cannot be
guaranteed.
* Not compatible with command prompt of MS-DOS and Windows and DOS
prompt.
CPU and Memory Depends on the operating system
Disk space 10 MB for driver install
Interface Ethernet 10 Base-T, 100 Base-TX
Network Protocols TCP/IP on Windows
LPD(LPR), Port 9100 on Windows NT4.0/2000/XP
CD-ROM CD-ROM drive
Page 6

1-2 Network Interface
Page 7
2-1Network Interface
2. Installation
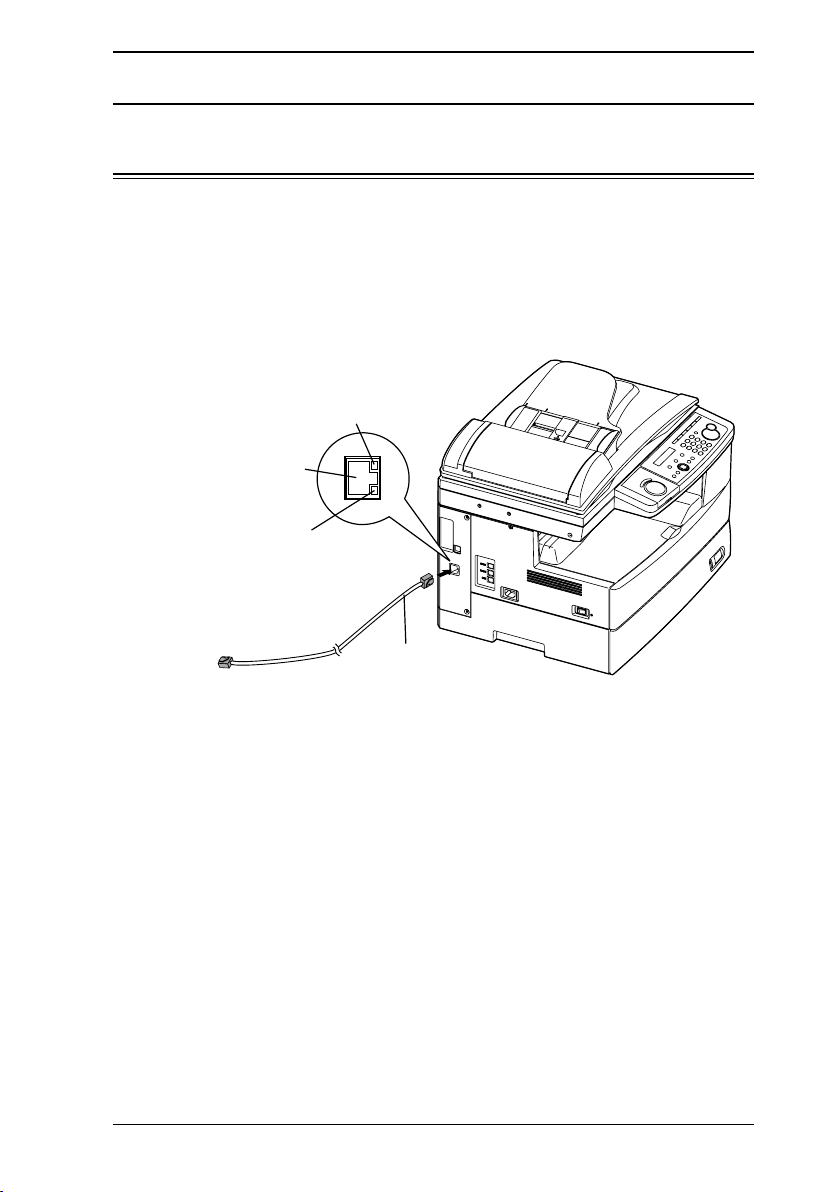
2.1 Cable connection
∗
To connect the machine to an Ethernet network, a LAN cable (twist pair cable with
RJ-45 type modular connector) is required. (A LAN cable is not included with this
kit.)
1
Turn your machine off.
2
Plug one end of the 10Base-T/100Base-TX LAN cable (category 5) into
the LAN connector on the left side of the machine.
LINK lamp:
Illuminates when connected to the LAN.
LAN Connector
LAN cable:
10Base-T/100Base-TX cable
RJ-45 connector
ACTIVITY lamp:
Blinks when there is data trafic
on the LAN.
Connect to the Ethernet hub.
3
Plug the other end of the LAN cable into the 10Base-T/100Base-TX Ethernet hub.
4
Turn your machine on.
Page 8
2-2 Network Interface
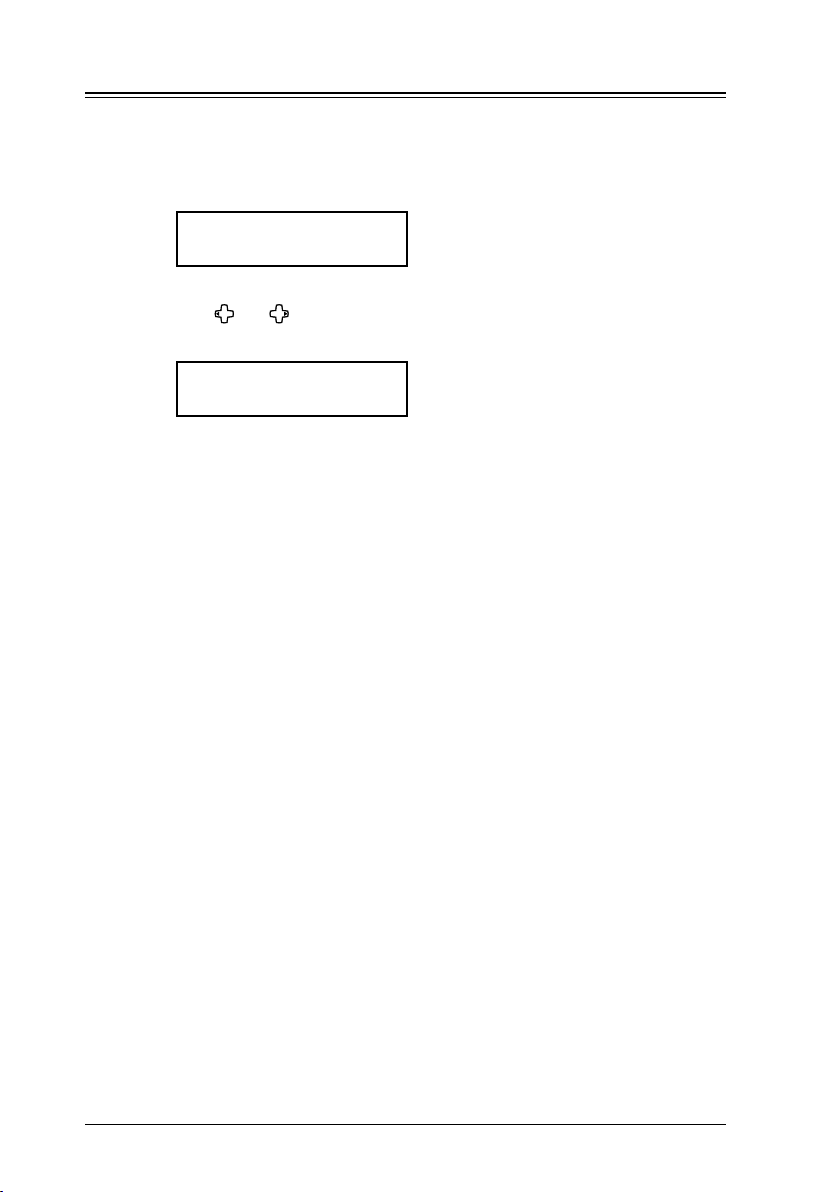
2.2 Setting the IP Address
An IP address is required to install the network driver and use your machine
as a network printer and network scanner. You need to obtain the IP address
from your network administrator and register it as shown below.
1
On your machine’s control panel, press [Menu], [6], [1], [1], then [Enter].
IP Address
192.168. 1. 10
2 Use the numeric keys to enter the IP address.
Use [ ] or [ ] to move the cursor. Press [Cancel] to delete a digit.
3
Press [Enter].
Subnet mask
255.255.255. 0
4 If necessary, change the subnet mask address.
5 Press [Enter]. The machine will show the settings for the Internet fax.
For now, press [Reset] to return to the Standby mode.
If you want to use the Internet fax feature, you must register these set-
tings. (See “5. Internet fax features” page 5-1.)
6 To enable the IP address please turn the main unit “Off”. After a few
moments turn the unit back “On”.
Page 9
2-3Network Interface
2.3 Installing the driver
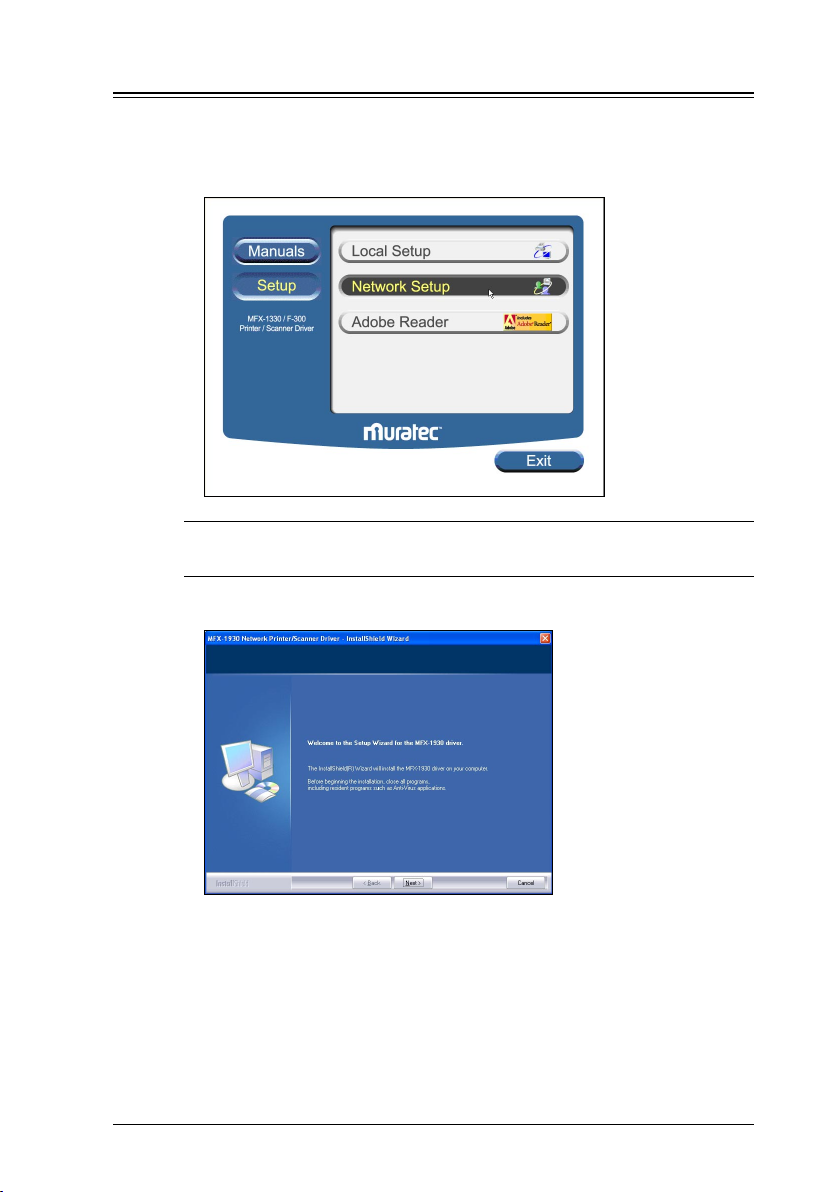
1 Insert the CD supplied with your machine into your CD-ROM drive.
The CD-ROM main menu will be displayed automatically.
2 Click [Setup], then [Network Setup].
NOTE: If this window does not appear, run the “Setup.exe”
located on the
root directory of the supplied CD-ROM.
3
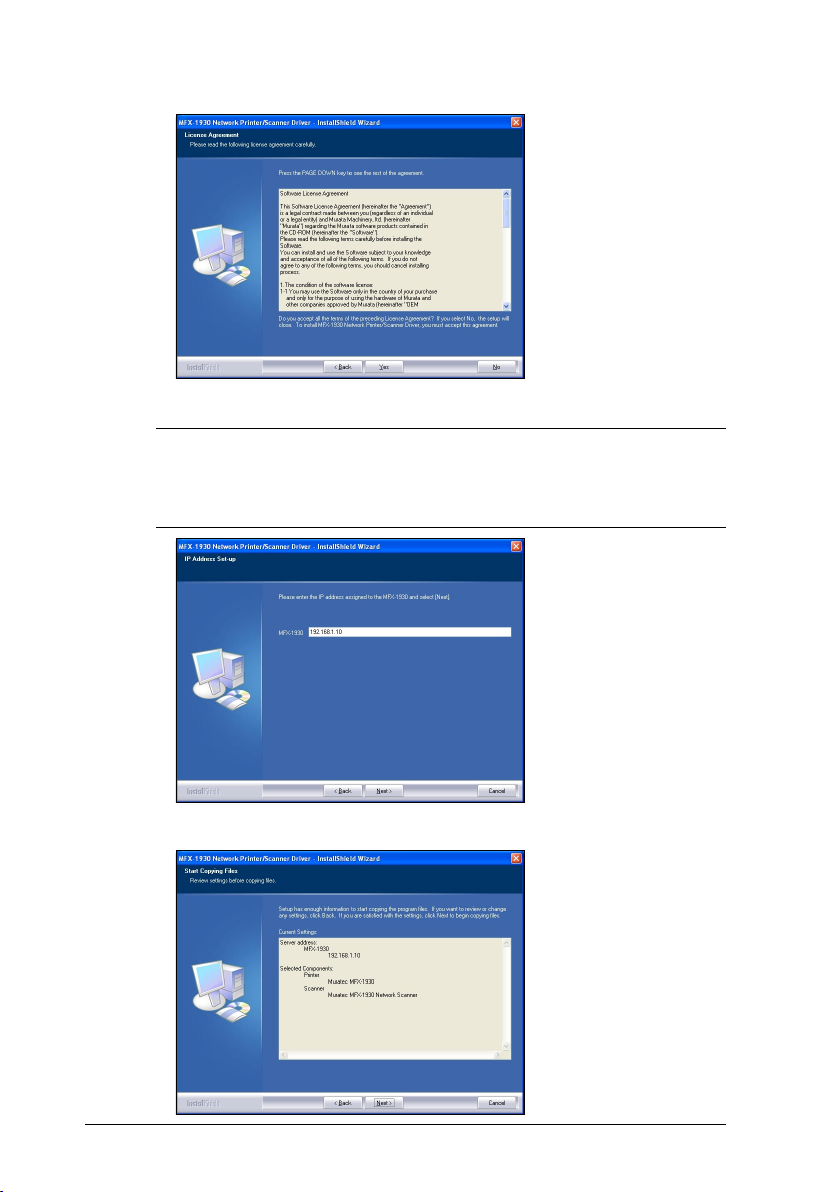
Click [Next] when the following screen appears.
Page 10
2-4 Network Interface
4 After reading and accepting the License Agreement click [Yes].
Otherwise, click [No] to cancel the installation.
5 Enter the machine’s IP address and click [Next].
NOTE: The IP address entered here is used for creating the lpr port for
printers or as the address for performing network scanning. Be
sure that the IP address entered here matches the address on the
machine
page
.
6 Confirm the displayed contents and click [Next].
(see “5.3 Internet parameter settings” on
5-3)
Page 11
2-5Network Interface
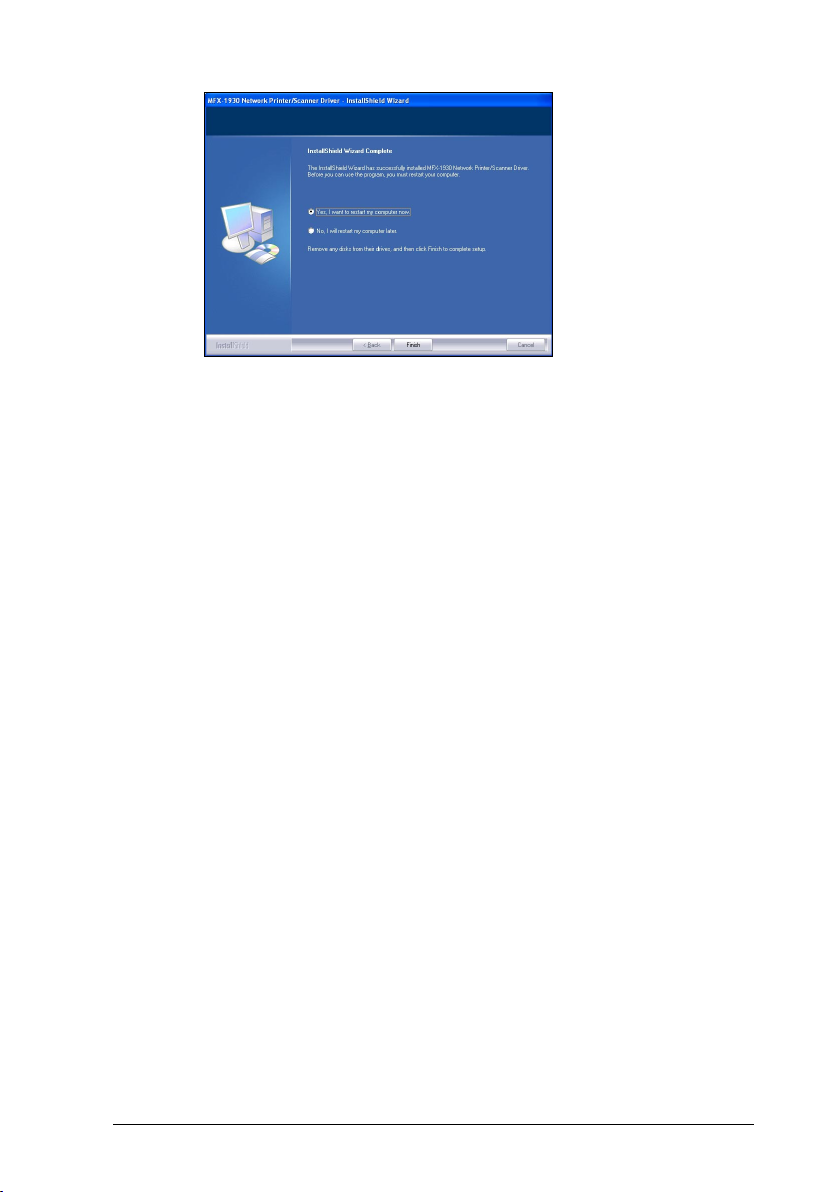
7 Restart the PC to finish installation.
Page 12

2-6 Network Interface
2.3.1 Activating the optional second paper cassette
If an optional device has been installed on your machine, you must open the
driver and activate it.
To activate the optional device:
1 Click [Start] [Settings] [Printer].
2 Right-click the “Muratec MFX-1930” icon, then click [Properties] (Win-
dows 98/Me), or [Printing Preference] (Windows 2000/XP).
3 Click the “Device Option” tab.
4 Select the optional device installed to your machine.
5 Click [OK], then close the printer properties.
Page 13

3-1Network Interface
3. Printer driver settings
3.1 Open the printer properties
There are two ways to open the printer properties:
• From your application software
• From the printer icon
NOTE: Changing the printer properties from the printer icon will change
them for all documents you print on this printer. To change the
printer properties for one document, change them from the application software.
3.1.1 From the application software
Opening the printer properties screen varies by application software. See your
application software user’s manual for assistance.
The following example utilizes Microsoft® Notepad on Windows XP.
1 Select “Print” from the File menu.
2 The Print dialog box will appear. In the “Select Printer” field, select the
“Muratec MFX-1930”, then click [Properties].
3 The printer properties window will appear.
For details of the printer driver settings, please see the “Printer & Scanner Manual” included in this CD.
3.1.2 From the printer icon
1 Click [Start] [Settings] [Printers].
Windows XP Professional, click [Start] [Printers and Faxes].
Windows XP Home edition, click [Start] [Control Panel] [Printers
and Other Hardware] [Printers and Faxes].
2 Right-click the “Muratec MFX-1930” icon, and then click [Properties] (for
Windows 98/Me), [Printing Preferences] (for Windows 2000/XP).
3 The printer properties window will appear.
For details of the printer driver settings, please see the “Printer & Scanner Manual” included in this CD.
Page 14

3-2 Network Interface
Page 15

4-1Network Interface
4. Network scanner feature
4.1 Operation summary
This scanner driver is used to import scanned images stored in the scan-box
of the machine to TWAIN compatible applications operating on Windows
environment.
The operation for this scan driver is summarized as follows:
1 Setup the scan box on you machine. (See “4.2.1 Setup a scan box”, below.)
2 Scan the document using your machine. The scanned images will be
stored into a scan box. (See “4.3 Scanning the document into a scan box”
page
3 Import the scanned images stored in the scan-box to TWAIN compatible
applications on your computer. (See “4.4 Importing a document from a
scanned box” page 4-6.)
4.2 Getting ready to use the scan box
The scan box must be set-up on your machine prior to using the network
scanning feature.
The scan box specifications are as follows:
• Number of scan boxes: Your machine has 20 scan boxes.
• Number of files in scan box: You can store up to 10 files per box
• Number of pages in a file: The number of pages which can be stored
in a file depends on your machine’s memory capacity, the resolution
and type of document(s).
• ID Code: Each box has an ID Code. Set by four-digits from 0001 to
9999.
4.2.1 Setup a scan box
Your machine has 20 scan boxes and you can store the box’s name and security I.D. code for each scan box.
1 Press [Menu], [3], [7], [1], then [Enter].
Select Scan Box
01:01
2 Press [ ] or [ ] to select the scan box, then press [Enter].
on
4-3.)
Page 16

4-2 Network Interface
3 The machine prompts you to enter the name of the scan box.
01:Box Name;Upper
01_
4 The box number is pre-installed as the box name. Press [Cancel] to delete
it and enter your desired name by using the numeric keys. Names can
contain up to 16 characters.
5 Press [Enter]. The machine now prompts you to enter the four-digit secu-
rity I.D. code for your scan box. If you set the I.D. code to anything other
than 0000, you will be required to enter it when you access the scan box
to modify the settings or download a scanned file to your computer.
01:Set Scan Box
Enter I.D. Code:
0000
6 Use the numeric keys to enter the four-digit I D. code (0001 to 9999) and
don’t forget your security I.D. code.
If you do not want to set the security I D. code, enter 0000.
7 Press [Enter] to save the setting.
8 To setup another scan box, repeat the procedures from step 2.
To exit, press [Reset].
4.2.2 Modify a scan box
1 Press [Menu], [3], [7], [1], then [Enter].
2 Press [ ] or [ ] to select the scan box.
3 Press [Enter].
If the I.D. code is anything other than 0000, the machine asks you to
enter the four-digit number.
01:Set Scan Box
Enter I.D. Code:
****
4 Use the numeric keys to enter the proper I.D. code and then press
[Enter].
A valid I.D. code must be entered to continue the operation.
5 Modify the scanbox name.
6 Press [Enter]. The machine prompts you to enter the I.D. code.
7 If you want to change the I.D. code, enter a new code.
If you want to disable the password requirement, enter 0000.
8 Press [Enter] to save the settings and press [Reset] to exit and return to
standby mode.
Page 17

4-3Network Interface
4.3 Scanning the document into a scan box
1 Press [COPYFAXSCAN]
to change to Scan mode.
When the machine is in the scan mode, the machine shows:
Scan Ready 200dpi
A4 100%
Resolution
Zoom ratio
Scanning size
2 Set the document face up in the ADF or face down on the document glass.
3 Adjust the following settings, if necessary.
• Scanning size — Press [Doc. Size] to select the scan size.
Inch version: Letter (8.5" × 11"), Legal (8.5" × 14"),
Half-letter (5.5" × 8.5")
Metric version: A4 (210 × 297 mm), A5 (148 × 210 mm),
F4 (216 × 356 mm)
When you use the ADF, you can also select “Auto”. When you select
“Auto”, custom size documents (up to 900 mm in length) can be automatically scanned.
• Resolution — Press [Doc. Resolution] to select the resolution from 200
dpi, 300 dpi or 600 dpi.
• Zoom ratio —
Press [ ] or [ ] to select a preset ratio.
Inch version Metric version
• 50%: Min.
• 64%: (8.5" × 11") (5.5" × 8.5")
• 78%: (8.5" × 14") (8.5" × 11")
• 100%
• 129%: (5.5" × 8.5") (8.5" × 11")
• 200%: Max.
• 50%: Min.
• 70%: (A4 A5)
• 81%: (B5
JIS
A5)
• 86%: (A4 B5
JIS
)
• 100%
• 115%: (B5
JIS
A4)
• 122%: (A5 B5
JIS
)
• 141%: (A5 A4)
• 200%: Max.
Page 18

4-4 Network Interface
50%, 64% and 70% are not available in 200dpi.
– or –
Press [Advanced Functions] repeatedly until “Zoom” appears, then
press [Enter]. Press [ ] or [ ] to adjust the zoom ratio.
– or –
Enter your desired ratio (50 to 200 %) using the numeric keys.
NOTE: • Enlargement scanning can only be performed using the docu-
ment glass.
• The minimum reduction ratio is 75 % at 200 dpi.
• To reset the settings to the default, press [Reset].
• Document type — Press [Doc. Resolution] then press [
] or [ ]
to
select the document type:
Text — Select this mode when scanning text.
Photo&Text — Select this mode when scanning documents containing
photographs or drawings and text.
Photo — Select this mode when scanning photographs or drawings.
• Contrast — Press [Contrast] to set how light or dark you want the
documents to be. To avoid confusing the Light and Dark settings,
just remember — “Light lightens” and “Dark darkens” — to keep it
straight.
4 Press [Start].
Select Scan Box
01:01
5 Press [ ] or [ ] to select the scan box, then press [Enter].
If the scan box has an I.D. code other than 0000, the following display
will appear, and go to step 6. Otherwise, skip to step 7.
01:Store Document
Enter I.D. Code:
****
6 Use the numeric keys to enter the scan box’s four-digit I D. code, then
press [Enter].
If you enter an invaild I.D. code the machine will return to the Standby
mode.
7 The machine will start scanning.
01:Store Doc.File: 1
A4 Mem100%
A file number is assigned to every document scanned into the scan box
(1 to 10).
File number
Page 19

4-5Network Interface
If you are using the ADF, proceed to step 8.
If you are using the document glass, skip to step 9.
8 If you have more documents to scan, press [Next Doc.] while scanning
and proceed to step 9. Otherwise, the machine will return to the standby
mode after it has finished scanning.
9 When scanning has completed the machine will show:
Start Scan NextDoc
End Scan
Enter
If you want to scan more pages, proceed to step 10.
Otherwise, press [Enter] to finish scanning.
10 Place the next page.
If you want to change the scanner settings, repeat from step 3.
11 Press [Next Doc.] to start scanning.
To scan more pages, repeat steps 9 and 10.
Otherwise, press [Enter] in step 9 to finish scanning, and the machine
will return to the standby mode.
Page 20

4-6 Network Interface
4.4 Importing a document from a scanned box
Follow the steps below to access the TWAIN driver from your application
software:
1 Select the PC software program (Imaging, Photoshop, etc.). This proce-
dure uses Microsoft Imaging as an example.
NOTE: The process of selecting a scan device varies by application
software, please refer to your application software user’s guide for
assistance.
2 Click [File] [Select Device…].
3 Choose “Muratec MFX-1930 Network Scanner” from the dialog box, then
click [OK].
4 Click [File] [Acquire Image…].
5 Select the scan box you want to access.
If the scan box has an I.D. code other than 0000, the following dialog box
will appear. Enter the proper 4-digit I.D. code then click [OK].
6 The files in the selected scan box will be shown on the center frame.
If there is no file currently stored, nothing will be displayed in this frame.
7 Select the file you want to download, and then click [Download].
The selected file will be downloaded to your software application.
Page 21

4-7Network Interface
2
1
3 4
5
12
15
16
6
7
8
9
10
11
13
14
No. Item Comments
1 Scan box list Click the scan box you want to access. Your machine has 20 scan
boxes.
2 File Number Displays the allocated number to differentiate files.
3 Date/Time Displays the date and time when a file was saved.
4 Page Displays each page within a file.
5 Preview display Displays a preview of the selected file.
To display the next or previous page, click arrow button or directly
input the page number into the text box.
6 Download Imports the selected file from the scan box.
7 Select scanner When you want to access another Muratec network scanner, click
this button and enter the IP Address, and click [OK].
8 Refresh Displays the current documents available in the selected scan box.
9 Save Saves the current settings.
10 Default Adjusts the settings to the factory default settings.
11 Exit Closes the scan box.
12 Pixel type According to the application software, it may need to change the
pixel type to import (download) the scanned document. In this
case, you can change the pixel type either “B/W” (black&white) or
“Grayscale” without re-scanning the document.
13 Page range Set the page range of the file you want to download.
Page 22

4-8 Network Interface
No. Item Comments
14 Resolution According to the application software, it may need to change the
linear resolution to import (download) the scanned document. In
this case, you can change the resolution without re-scanning the
document.
15 Fixed Image
Size
According to the application software, when documents of variable
sizes are scanned together they may not import correctly. In this
case, select “On” and select the size according to your scanned document size. If each scanned page sizes are not the same, select the
size of the largest document.
16 Erase
document(s)
When selected this mode will automatically delete a document from
the scan box after it has been downloaded.
Page 23

4-9Network Interface
4.4.1 Manually erasing a document stored in a scan box
To erase a file from the computer
• In the scanner dialog box, select the file and click on the right mouse
button. Then select “Delete” from the pop-up menu to delete the
selected file.
To erase a file from the machine
1 Press [Menu], [4], [2], [4], then [Enter].
Select Scan Box
01:01
2 Press [ ] or [ ] to select the scan box that stores the file you want to
erase.
3 Press [Enter].
If you have set 0000 for the I D. code of this scan box, skip to step 5.
Otherwise, the machine prompts you to enter the I.D. code.
01:Scan Box Document
Enter I.D. Code:
****
If the scan box is empty the following screen will appear. Proceed to step
2 if this appears.
Select Scan Box
No Document Stored
Page 24

4-10 Network Interface
4 Use the numeric keys to enter the scan box’s four-digit I D. code. Then
press [Enter].
If you enter an invalid I.D. code the machine will return to the standby
mode.
5 The machine shows:
01:Select File No.
00:All Documents
6 Press [ ] or [ ] to select the file number (1 to 10) of the file you want to
erase.
If you want to erase all the documents stored in the scan box, enter 00.
7 Press [Enter].
00:All Documents
Erase
Enter
00:All Documents
Not Erase
Cancel
If you want to quit without erasing any documents in the scan box, press
[Cancel].
The machine will return to the standby mode.
If the file you selected in step 6 does not exist the following screen will
appear and you will be redirected to the standby screen.
01:Select File No.
No Document Stored
8 Press [Enter] to erase the file and return to the standby mode.
4.4.2 Printing a list of documents stored in the scan boxes
To print a list of document stored in your scan boxes, press [Menu], [5], [1],
[2], [0], then [Enter].
Page 25

4-11Network Interface
4.5 Changing the default settings
The default settings offer the most common scan settings, please try using
these settings prior to adjustment.
Item Available setting Default setting
Document type Text, Photo&Text, Photo Text
Resolution 200, 300, 600 dpi 200 dpi
Contrast Lightest, Light, Normal, Dark,
Darkest
Normal
Auto reset time Auto reset timer: 1 to 10 minutes
Reset after scan: On, Off
3 minutes
Off
Scan parameters
Set the default setting for document type, resolution, contrast and scan size.
1 Press [Menu], [2], [4], [1], [Enter]. The machine prompts you to select the
default document type setting.
Doc. Type:Text
//Enter
2 Use [ ] or [ ] to select the setting.
3 Press [Enter]. The machine prompts you to select the default resolution
setting.
Resolution :200dpi
//Enter
4 Use [ ] or [ ] to select the setting.
5 Press [Enter]. The machine prompts you to select the default contrast
setting.
Contrast :Normal
//Enter
6 Use [ ] or [ ] to select the setting.
7 Press [Enter] to save the settings.
To return to standby mode, press [Reset].
Page 26

4-12 Network Interface
Scanner auto reset
The scanner settings are initially set to return to their default condition automatically after the machine has been idle for 3 minutes. You can, however,
change this time from 1 to 10 minutes. Also, you can program the settings to
return to their default condition as soon as the scanning has been completed.
1 Press [Menu], [2], [4], [2], then [Enter].
Auto Reset Time
(01-10)
03 min.
2 Use the numeric keys to enter the auto reset time. Then, press [Enter].
Enter a leading zero when entering a quantity less than 10. (Ex. 01.)
3 The machine will ask you whether the machine should reset to the
default settings after the scan job has been completed.
Reset After Scan:Off
//Enter
4 Use [ ] or [ ] to select the setting.
5 Press [Enter] to save the setting.
To finish, press [Reset].
4.5.1 Printing a list of scanner settings
To print a list of your scanner settings, press [Menu], [5], [1], [1], [9], [Enter].
Page 27

5-1Network Interface
5. Internet fax features
5.1 Internet communication
5.1.1 Internet fax transmission (Scan to e-mail)
Paper documents, such as hand-written letters, can be transmitted by e-mail
using the existing e-mail environment just like sending a fax. All you have to
do is load your document and designate the recipient’s e-mail address using a
one-touch key, speed-dial number or numeric keys.
Scanned documents are converted into TIFF-S, TIFF or PDF format, then
transmitted as an attachment file to a remote e-mail address using MIME
encoding.
NOTE: PDF format is only available when the recipient is a PC-based
e-mail inbox, not a remote Internet Fax terminal.
E-mail
Original
document
LAN
PC
Internet FAX
Internet
PC
Internet FAX
5.1.2 Internet mail reception
Your machine allows you to receive and print an e-mail from a PC or internet
fax machine automatically. However, if the received e-mail includes a file
attachment in a format other than TIFF-F, TIFF-S or PDF, your machine will
send an error notification to the e-mail sender.
NOTE: PDF reception is only available if the sending machine is a
Muratec Internet fax terminal.
P
r
i
n
t
o
u
t
E-mail
LAN
PC
Internet FAX
Internet FAX
Internet
PC
Internet FAX
Page 28

5-2 Network Interface
5.2 Basic parameters
The following are basic parameters for using the Internet Fax feature. Please
contact your network administrator for the required information and connection to the LAN.
Print this page and ask your network administrator to fill in the required
information.
Basic parameters for Internet fax
IP address
assigned to your
machine
Subnet mask
address
Primary default
gateway address
Secondary default
gateway address
Primary DNS
server address
Secondary DNS
server address
E-mail address
assigned to your
machine
SMTP server name
or IP address
POP3 server name
or IP address
POP user name
(Mail account)
POP password
(Mail password)
(for security, do not write it here, but keep it in a safe place.)
If required, the MAC address of your machine can be displayed by pressing
[Menu], [6], [1], [2], then [Enter].
Page 29

5-3Network Interface
5.3 Internet parameter settings
1
On your machine’s control panel, press [Menu], [6], [1], [1].
[Program] No.611
1 TCP/IP Setting
2
Press [Enter].
IP Address
192.168. 1. 10
3 Use the numeric keys to enter the IP address.
Use [ ] or [ ] to move the cursor. Press [Cancel] to delete a digit.
4
Press [Enter].
Subnet Mask
255.255.255. 0
5 Use the numeric keys to enter the subnet mask address.
6
Press [Enter].
Gateway 1
. . .
7 Use the numeric keys to enter the primary gateway address.
8
Press [Enter].
Gateway 2
. . .
9 Use the numeric keys to enter the secondary gateway address.
10
Press [Enter].
DNS Server 1
. . .
11 Use the numeric keys to enter the primary DNS server address.
12
Press [Enter].
DNS Server 2
. . .
13 Use the numeric keys to enter the secondary DNS server address.
14
To enable the network settings, the machine should be rebooted.
Please turn the machine “OFF” and then back “ON”.
Page 30

5-4 Network Interface
5.4 Configuring the e-mail environment
5.4.1 Time zone setting
The Time Zone is required as part of the e-mail header information when
sending Internet faxes.
1
On your machine’s control panel, press [Menu], [9], [Enter].
[Program] No.9
9 User Install
2
Press [Enter] repeatedly until the time zone setting is displayed.
Time Zone
+
00:00
3
Use the numeric keys to enter your time zone.
To change + or –, press [
] or [ ]
.
Example of Time Zone:
(GMT –11:00) Midway Island
(GMT –10:00) Hawaii
(GMT –09:00) Alaska
(GMT –08:00) Pacific Time (US & Canada)
(GMT –07:00) Mountain Time (US & Canada)
(GMT –06:00) Central Time (US & Canada)
(GMT –05:00) Eastern Time (US & Canada)
(GMT –04:00) Atlantic Time (Canada)
(GMT –03:30) Newfoundland
(GMT) Greenwich Mean Time: Dublin, Edinburgh, Lisbon, London
(GMT +01:00) Amsterdam, Berlin, Bern, Rome, Stockholm, Vienna
(GMT +01:00) Belgrade, Bratislava, Budapest, Ljubljana, Prague
(GMT +01:00) Brussels, Copenhagen, Madrid, Paris
(GMT +09:00) Osaka, Sapporo, Tokyo, Seoul
(GMT +10:00) Guam
4
Press [Enter] to save the setting.
The machine will show the next “User Install” procedure. If you want to
go back to the previous step, press [Back]. Otherwise, press [Reset] to exit
and return to standby mode.
Page 31

5-5Network Interface
5.4.2 e-mail environment settings
These are important settings that allow the system to send and receive
e-mail. Please consult your system operator and/or network administrator
before entering these settings. Entering improper settings can prevent system
operation and may cause lost or delayed mail.
1
On you machine’s control panel, press [Menu], [6], [2].
[Program] No.62_
2 Mail Environment
2
Press [Enter].
[Program] No.6201
01 Name
3
Press [
] or [ ]
to select the desired parameter and press [Enter].
For example, SMTP server settings:
[Program] No.6203
03 SMTP Server
4 Press [Enter].
SMTP Server;Lower
_
5
Use the numeric keys to enter the SMTP server IP Address or SMTP
server name and press [Enter].
The Port No. setting display will appear.
6
Use the numeric keys to enter the port number and press [Enter].
Normally, set to “25”.
Port No.(25)
(00000-65535) 00025
7
For some providers, POP authentication is required before sending (send
request to SMTP server). In this case, set to on.
POP before SMTP :Off
//Enter
8
Press [Enter]. To set other parameter go back to step 3. To return to
standby, press [Reset].
Page 32

5-6 Network Interface
E-mail environment parameters
No. Parameter Default Comments
01 Name — The name that is displayed in the sender field
(From) when sending e-mail.
Up to 40 characters.
02 Mail Address — The e-mail address assigned to your machine
for sending and receiving.
Up to 50 characters.
03 SMTP Server SMTP Server — The IP address or domain name for the SMTP
server used for sending e-mail.
Up to 50 characters can be set for a domain
name.
Port No. (25) 25 The SMTP port number. (00000–65535)
Normally, set to “25”.
POP before
SMTP
Off For some providers, POP authentication is
required before sending (send request to
SMTP server). In this case, set this to “On”.
04 SMTP AUTH Authentica-
tion
None Selects the SMTP method when the SMTP
server requires authentication. SMTP name
and password are used for authentication.
Select either “None”, “PLAIN”, “LOGIN”, or
“CRAM-MD5”.
“None” is not use SMTP authentication.
User ID — The SMTP authentication name.
Up to 50 characters
Password — The SMTP authentication password.
Up to 50 characters
05 POP3 Server POP3 server — The IP address or domain name for the POP3
server used for receiving e-mail.
Up to 50 characters can be set for a domain
name.
Port No. (110) 110 The POP port number. (00000–65535)
Normally, set to “110”.
Use APOP Off When available “APOP”, it will encrypt the
protocol for the POP password security when
connecting with the POP server..
06 Mail Account Account — The POP user name assigned to your
machine.
Up to 50 characters.
07 Mail Password Password — The POP password assigned to your machine.
Up to 50 characters
08 Check
New Mail
Check
Interval
00:10:00
Enter the interval to check and retrieve email from POP3 server. (00:00:05 to 99:59:59)
00:00:00 is not check for e-mail.
Page 33

5-7Network Interface
No. Parameter Default Comments
09 File Format TIFF Select whether the document is converted
into a “TIFF” (ITU-T T.37 full mode), “TIFF-S”
(ITU-T T.37 simple mode), or “PDF” format
when sending an Internet Fax.
Note that a PDF file is only available if sending the documents to a PC.
10 Encoding
Method
TIFF
Encoding
MMR The image encoding method for sending docu-
ments with “TIFF” (ITU-T T.37 full mode).
Select “MH”, “MR”, “MMR”, or “JBIG”.
11 Insert Text Insert Text On Select whether to attach the following fixed
subject and text when sending an e-mail.
Subject: Internet facsimile message
Text: This is an internet facsimile message.
AttachSender
Info
On Select whether to attach the sender informa-
tion (see parameter 01 and 02) to the text
when the “Insert Text” is on.
12 Request
Receipt
Request DSN Off Select whether to request the receiver to
return DSN (Delivery Status Notification) for
delivery confirmation.
Request MDN Off Select whether to request the receiver to
return MDN (Message Disposition Notification) for reading confirmation.
13 Received
MDN
Return MDN Off Select whether to return a MDN (message dis-
position notification) when e-mail is received
for which the sending side requests an MDN.
The “MailAddress” setting (see below) allows
you to set up the mail address.
MailAddress — This is set for replying to MDN checks only
for e-mail received from specific e-mail
addresses or domain names. Up to five can be
registered.
Register the e-mail address or domain name
for which MDN replies are allowed.
Up to 50 characters.
14 Received
Invalid
Return Error
Notice
In some cases, received e-mail cannot be correctly printed due to the format of a received
attached file. (For example, documents created
with application software such as Microsoft
Word) This sets whether to return such e-mail
to the author.
“Error Notice”: Returns an error notice to
the author.
“Original Mail”: Returns the original e-mail
to the author.
Page 34

5-8 Network Interface
5.5 Registering an e-mail address
You can register a recipient’s e-mail address into the one-touch keys or speeddial numbers. When communications are frequent with a certain recipient,
this setting can save cumbersome entry jobs.
5.5.1 One-touch key registration
To register an e-mail address into a one-touch key:
1
Press [Menu], [1], [1], [1], then [Enter].
Select One-Touch
01:No Number Stored
2 Select a one-touch number, then press [Enter].
Fax Number
//Enter
3 Select “Mail Address”.
Mail Address
//Enter
4 Press [Enter].
01:Address ;Lower
_
5 Enter an e-mail address using the numeric keys. (Up to 50 characters).
Then press [Enter].
01:Name ;Upper
_
6 Enter the destination name using the numeric keys (up to 24 characters).
Then press [Enter].
7 To enter another one-touch key, repeat this procedure from step 2.
To return to standby, press [Reset].
NOTE:
page
To erase a one-touch key:
1 Press [Menu], [1], [1], [2], then [Enter].
2 Select the one-touch key that you want to erase.
3 Press [Enter] twice.
4 To erase another one-touch key, repeat this procedure from step 2.
To return to standby, press [Reset].
Refer to “Entering characters” on
7-2, if necessary.
Page 35

5-9Network Interface
5.5.2 Speed-dial number registration
1
Press [Menu], [1], [2], [1], then [Enter].
Enter Speed-Dial No.
001:No Number Stored
2 Select a speed-dial number, then press [Enter].
Fax Number
//Enter
3 Select “Mail Address”.
Mail Address
//Enter
4 Press [Enter].
01:Address ;Lower
_
5 Enter an e-mail address using the numeric keys. (Up to 50 characters).
Then press [Enter].
01:Name ;Upper
_
6 Enter the destination name using the numeric keys (up to 24 characters).
Then press [Enter].
7 To enter another speed-dial number, repeat this procedure from step 2.
To return to standby, press [Reset].
NOTE:
page
To erase a speed-dial number:
1 Press [Menu], [1], [2], [2], then [Enter].
2 Press [ ] or [ ] to select a speed-dial number.
You can also select a speed-dial number by directly entering that threedigit identifier code.
3 Press [Enter] twice.
If you want to quit without erasing, press [Cancel].
4 To erase another speed-dial number, repeat this procedure from step 2.
To return to standby, press [Reset].
Refer to “Entering characters” on
7-2, if necessary.
Page 36

5-10 Network Interface
5.6 Configuring from the Internet browser
You can configure the network environment and register contacts from your
Internet browser.
5.6.1 Internet FAX configuration screen
1 Start up your Internet browser.
NOTE: You will need the Microsoft® Internet Expolorer version 6 or later.
2 Enter “http://(IP address that is assigned to your machine)” in the address
bar, then press [Enter] on your keyboard. The “Internet FAX Configuration” screen will appear.
NOTE: If the Internet FAX Configuration screen does not appear, insure
that an IP address has been registered to the machine. Refer to
page
3
Select the setting you wish to configure.
“5.3 Internet parameter settings” on
5-3.
Page 37

5-11Network Interface
5.6.2 Configuring an IP address
1 Open the “Internet FAX configuration” screen. (Refer to the
page
2 Click [TCP/IP] to open the “TCP/IP Settings” screen.
3 Configure the IP address.
4 Click [Save] to save the settings.
If you want to quit without saving, click [Close].
5
To enable the IP address, the machine should be rebooted. Please
turn the machine “OFF” and then back “ON”.
5.6.3 Configuring the SMTP/POP settings
1 Open the “Internet FAX configuration” screen. (Refer to the
page
2 Click [SMTP/POP] to open the “SMTP/POP Settings” screen.
3 Configure the settings.
(Refer to parameter No. 01 to 08 of the “E-mail environment parameters”
page
4 Click [Save] to save the settings.
If you want to quit without saving, click [Close].
5-10.)
5-10.)
on
5-6.)
Page 38

5-12 Network Interface
5.6.4 Configuring the e-mail settings
1 Open the “Internet FAX configuration” screen. (Refer to the
page
2 Click [E-mail Settings] to open the “E-mail Settings” screen.
3 Configure the settings.
(Refer to parameter No. 09 to 14 of the “E-mail environment parameters”
page
4 Click [Save] to save the settings.
If you want to quit without saving, click [Close].
on
5-7.)
5-10.)
Page 39

5-13Network Interface
5.6.5 Registering or editing a one-touch number
1 Open the “Internet FAX configuration” screen. (Refer to the
page
2 Click [Address Book] to open the “One-touch dialling” screen.
3 Click the one-touch number you want to register or edit.
4
You can register either a fax number or an e-mail address.
To register a fax number, click “Fax number” then enter the fax
number and destination name.
To register an e-mail address, click “Mail Address” then enter an
e-mail address and destination name.
Also, you can set the dialling group. Group dialing information can be
found in chapter 3 of your user’s manual.
5 Click [Save] to save the settings.
If you want to quit without saving, click [Close].
To erasing a one-touch number:
1
Select the one-touch number you want to erase.
To select all one-touch numbers, click the check box next to “No.”.
2 Click [Erase].
5-10.)
Page 40

5-14 Network Interface
5.6.6 Registering or editing a speed-dial number
1 Open the “Internet FAX configuration” screen. (Refer to the
page
2 Click [Address Book] to open the “One-touch dialling” screen.
3 Click “Speed dialing” to open the “Speed dialing” screen.
4 Click the speed-dial number you want to register or edit.
5
You can register either a fax number or an e-mail address.
To register a fax number, click “Fax number” then enter the fax
number and destination name.
To register an e-mail address, click “Mail Address” then enter an
e-mail address and destination name.
Also, you can set the dialling group. Group dialing information
can be found in chapter 3 of your user’s manual.
6 Click [Save] to save the settings.
If you want to quit without saving, click [Close].
To erase a speed-dial number:
1 Select the speed-dial number you want to erase.
To select all speed-dial numbers, click the check box next to “No.”.
2 Click [Erase].
5-10.)
Page 41

5-15Network Interface
5.7 Internet fax transmission
5.7.1 Using numeric keys
1 Switch to the Fax mode by pressing [COPYFAXSCAN].
2 Load the document in the ADF or the document glass. When you use the
document glass, select the document size by pressing [Doc. Size].
3 Adjust the document resolution and contrast, if necessary.
4 Press [Advanced Functions] repeatedly until “Address Entry” appears.
Address Entry
//Enter
5 Press [Enter].
Address ;Lower
To :_
6 Use the numeric keys to enter an e-mail address.
page
7 Press [Start].
5.7.2 Using a one-touch key
1 Switch to the Fax mode by pressing [COPYFAXSCAN].
2 Load the document in the ADF or the document glass. When you use the
document glass, select the document size by pressing [Doc. Size].
3 Adjust the document resolution and contrast, if necessary.
4 Open the one-touch key panel and press the one-touch key in which you
have stored the e-mail address.
5.7.3 Using a speed-dial number
1 Switch to the Fax mode by pressing [COPYFAXSCAN].
2 Place the document in the ADF or the document glass. When you use the
document glass, select the document size by pressing [Doc. Size].
3 Adjust the document resolution and contrast, if necessary.
4 Press [Speed Dial /Group] once.
Enter Speed Dial No.
S_
Refer to “7.2 Entering characters” on
7-2, if necessary.
Page 42

5-16 Network Interface
5 Use the numeric keys to enter the three-digit identifier for the speed-dial
number you want to dial. The machine shows the name (or mail address)
you have stored:
6 Press [Start].
5.7.4 Broadcasting
Your machine allows simultaneous communication with normal G3 fax and
Internet fax.
1 Switch to the Fax mode by pressing [COPYFAXSCAN].
2 Load the document in the ADF or the document glass. When you use the
document glass, select the document size by pressing [Doc. Size].
3 Adjust the document resolution and contrast, if necessary.
4 Press [Advanced Functions] until “Broadcast” appears on the LCD,
Broadcast
/
/Enter
then press [Enter].
– or –
Select the “Broadcast” soft key.
5 Enter the first destination using either a one-touch key, speed-dial num-
ber, or the numeric keys. If you want to enter an e-mail destination using
page
ABCD
[01]
6 To add more destinations, repeat the step 5.
If you want to enter the next destination using the numeric keys, you
should enter a comma by pressing [Broadcast] (see step 4) before entering next destination. (If you select a one-touch key or speed-dial number
the machine will insert a comma automatically.).
You can send up to 230 destinations (40 one-touch keys, 160 speed-dial
numbers and 30 directly entries) for a broadcast.
Address ;Lower
[01],S001,To :_
7 Press [Start]. Your machine scans the document into memory and then
sends it to each destination you have entered.
NOTE: • For details of the soft key, see Chapter 10 of your machine’s user
manual.
• If you enter characters by mistake, press [Cancel] to delete them.
• If you frequently broadcast documents to the same location, use
the call group dialling for your convenience. (See Chapter 3 of
your machine’s user manual.)
the numeric keys, see “5.7.1 Using numeric keys” on
5-15.
Page 43

5-17Network Interface
5.8 Internet fax reception
5.8.1 Receiving e-mail from a POP server
As a default setting, your machine will query the POP server for new e-mail
at 10 second intervals and if the new e-mail has arrived, it will retrieve the
mail and automatically print it.
For information on setting POP parameters, refer to “5.4.2 e-mail environ-
pages
5.8.2 Manual reception from a POP server
When you set the interval time to query the POP server for new e-mail to
00:00:00 second, or you want to query the POP server immediately, use the
following procedure for manual POP server retrieval.
1 Press [Menu], [6], [3].
[Program] No.63
3 POP Rx
2 Press [Eenter].
If the POP server has received new e-mail, it will retrieve the mail and
automatically print it.
** Receiving Mail **
If mail has not arrived the message “No new mail” will appear and the
machine will return to the stand-by mode.
No New Mail
ment settings,”
5-5 to 5-7.
Page 44

5-18 Network Interface
Page 45

6-1Network Interface
6. Troubleshooting
6.1 Troubles in network printer and scanner
Symptom Possible Cause Remedy
Cannot print Has the machine
been turned on?
Check that the power cord is firmly connected and that the | (on) side of the power
switch has been pressed.
The LAN cable is not
connected firmly.
Check whether LAN cable is firmly connected.
The LINK lamp of the LAN connector
illuminates when connected to the LAN (
page
may defective.
The wrong printing port has been
selected
Open the printer properties dialog and
check that the printing port is correct. The
same IP address set on the machine should
be selected for the printing port.
Has the correct IP
address been set on
the machine?
Confirm the correct IP address with network administrator to set the correct one.
“Muratec MFX-1930
Network Scanner” is
not shown in scanner
device selection dialog
on an application
software.
Muratec network
scanner driver has
not been installed.
Install the driver.
“2 Installation” page 2-1.
Cannot open the scanner dialog.
Has IP address on
the machine been
changed?
Confirm the correct IP address with the network administrator to set the correct one.
While attempting to
download a document
using the network
scanner (with the
same subject in the
same scan box from
another computer)
the document cannot
be seen from the networked computer, only
the directly connected
PC.
Has the “Delete
after download” been
selected?
If this box has been checked, multiple users
cannot check the same document.
“2 Installation”
2-1.) If not, LAN cable
Page 46

6-2 Network Interface
6.2 Troubles in TCP/IP environment
Symptom Possible Cause Remedy
Port cannot be added
in Windows NT 4.0,
Windows 2000, or
Windows XP
Have you logged on
as a user belonging
to an Administrator
group or as Administrator?
If you are not authorized Administrator, you
cannot add any port.
Log on with user account authorized for
Administrator group or as Administrator
and repeat the steps.
[LPR Port] is not
shown in list for
“Available printer
port” in Windows NT
4.0
Has Microsoft TCP/
IP Print service been
built in Windows NT
4.0?
Install the “Microsoft TCP/IP Printing
service”.
In case of sending
large capacity of print
job in Windows XP
or Windows 2000, a
message “Failed to
print this document.”
sometimes appears.
Standard TCP/IP
Port protocol has
been set for “Raw”.
Take the following steps to deal with it.
1. Open printer properties dialog.
2. Click [Port] tab.
3. Click [Configure Port] to show “Configure
Standard TCP/IP Port Monitor” dialog.
4. Select “LPR” in “Protocol”.
5. Check the box for “LPR Byte Counting
Enabled” in “LPR Settings”.
6.3 Troubles in Internet fax communication
Symptom Possible Cause Remedy
Cannot received Received data is in
a format that is not
supported.
Ask the originator to resend with a supported file attached format, TIFF-F or
TIFF-S.
Cannot connect to the
POP server
POP server IP Address
/Domain name is
not correctly or POP
server is down.
Check the POP server IP Address/Domain name.
E-mail environment parameter No.05,
page
Contact the network administrator.
POP user name
or password is not
correct.
Check the POP user name and password.
E-mail environment parameter No.06
and No.07, on page 5-6.
Contact the network administrator.
Received an error
response from DNS
server
DNS server IP
Address is not correctly.
Check the DNS server IP Address.
Page 5-3.
Contact the network administrator.
Returns an error
report from the remote
Internet FAX.
The document was
sent to the Internet
FAX in an incompatible file format.
Change the E-mail environment parameter
No.09 “File format” to “TIFF” or “TIFF-S”.
Page 5-7.
Cannot authenticate
when connecting the
SMTP server.
Setting of SMTP
server is not correctly.
Check the SMTP authentication, User name
and password.
E-mail environment parameter No.04,
page 5-6.
Contact the network administrator.
5-6.
Page 47

7-1Network Interface
7. Appendix
7.1 Specifications
Specifications
Standard Compliance 10 Base-T Ethernet (IEEE 802.3)
100 Base-TX Fast Ethernet (IEEE 802.3u)
Connector Interface Ethernet 10 Base-T port: RJ-45
Fast Ethernet 100 Base-TX port: RJ-45
Network Connection LAN (Local Area Network)
Compatibility ITU-T T.37
Network Protocol TCP/IP
E-mail transmission
protocol
SMTP/ESMTP
E-mail reception protocol POP3
E-mail Format MIME Base64
File Format Sending
TIFF-S, TIFF or PDF
Note: PDF format is only available when the recipient is a
PC-based e-mail inbox, not a remote Internet Fax terminal.
Receiving
TIFF-S, TIFF or PDF
Note: PDF reception is only available if the sending
machine is a Muratec Internet fax terminal.
E-mail receiving width Maximun A3
Page 48

7-2 Network Interface
7.2 Entering characters
To enter letters or other characters, use the following guidelines:
By pressing the numeric key repeatedly, you can access the following characters as shown in the table below.
Numeric keys Character
1 . @ – _ , / : & ' ! ?
A B C 2
D E F 3
G H I 4
J K L 5
M N O 6
P Q R S 7
T U V 8
W X Y Z 9
0
Special characters
Caps lock
When you want to enter the character that share the same numeric key, press
[ ] to move the cursor to the right.
Correct the character
If you entered an incorrect letter or digit, press [Cancel] to erase to the left.
To change just one character or digit, press [ ] or [ ] to move the cursor to
that character or digit. Then press [Cancel] to erase it. Re-enter the character
or digit correctly.
( means space.)
Page 49

7-3Network Interface
To change upper and lower case
Press [ ] to toggle upper case and lower case.
Your Name ;Upper
_
Your Name ;Lower
_
The word “Upper” means the machine will enter only upper-case letters.
The word “Lower” means the machine will enter only lower-case letters.
Entering a symbol
You can also enter special characters or symbols.
1 When the machine prompts you to enter a name, press [ ].
The LCD changes to:
////
Enter
2 Select the character you want to enter using [ ], [ ], [ ] or [ ]
key.
3 To enter the character, press [Enter].
4 If you want to enter other character, repeat steps 1 to 3.
Otherwise, go to next step.
5 Press [Enter] to save it..
Page 50

7-4 Network Interface
 Loading...