

Page 1

Nikon Motor Drive
www.mynikon.com.pl
MD-4
INSTRUCTION MANUAL
1
Page 2
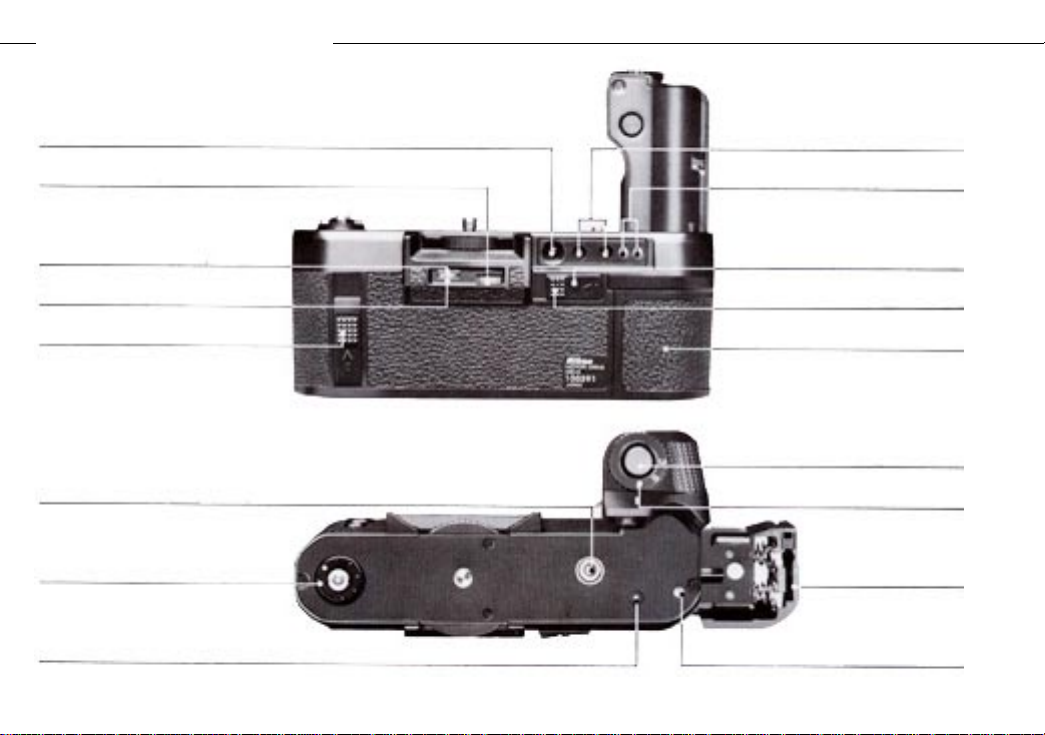
NOMENCLATURE
www.mynikon.com.pl
(1) Battery check button
(2) Counter setting dial
(3) Frame counter setting index
(4) Frame counter
(5) Rewind slide (R2)
(6) Motor drive coupling prong
(7) Electrical contacts
(8) Rewind button pin
LED indicators (9)
Auto rewind-stop terminals (10)
Rewind slide 1 lock button (11)
Rewind slide 1 (R1) (12)
Battery chamber with
Battery clip
Trigger button (14)
S-C mode selector (15)
Motor drive
coupling cover
compartment
Camera positioning pin (17)
(13)
storage
(16)
2
Page 3
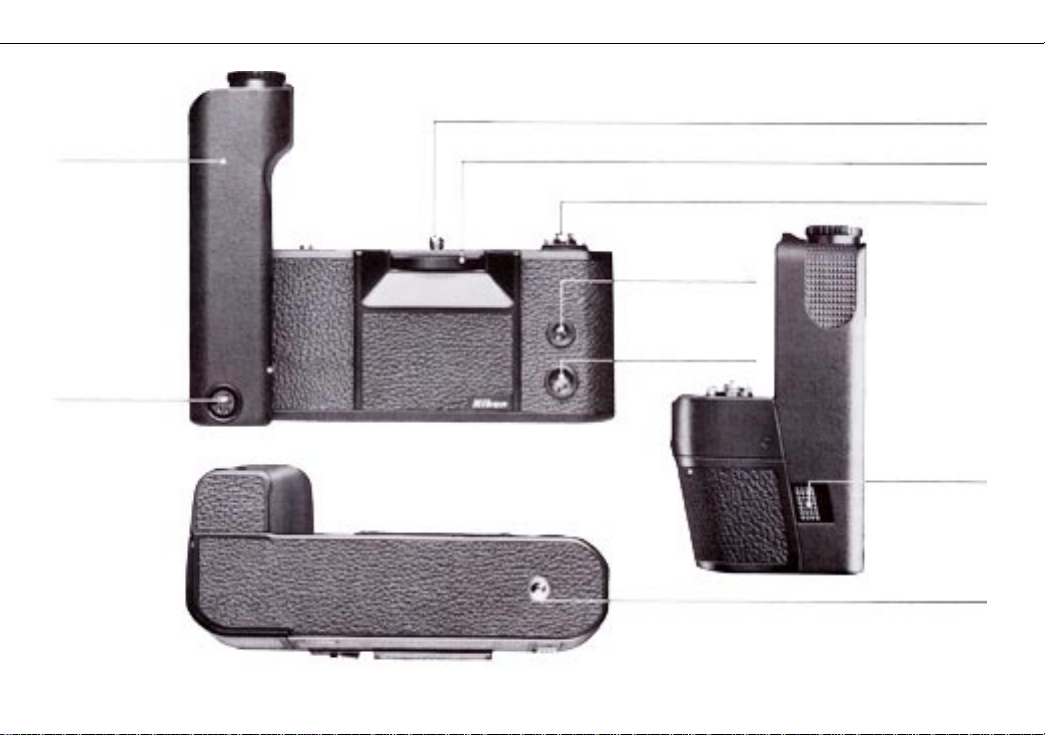
(18) Anatomical
www.mynikon.com.pl
grip
Mounting screw (20)
Attachment wheel (21)
Automatic film rewind fork (22)
(19) Maganize back
terminal
External power
terminal
Remote terminal (24)
(23)
Battery
clip release
catch
(25)
Tripod socket (26)
3
Page 4

CONTENTS FOREWORD
www.mynikon.com.pl
NOMENCLATURE . . . . . . . . . . . . . . . . . . . 2-3
FOREWORD . . . . . . . . . . . . . . . . . . . . . . 4
BASIC OPERATION . . . . . . . . . . . . . . . . . . 5-9
CONTROLS IN DETAIL . . . . . . . . . . . . . . . 10-16
Anatomical Grip . . . . . . . . . . . . . . . . . 10
S-C Mode Selector . . . . . . . . . . . . . . 10-11
(including Mulliple exposures)
Trigger Button. . . . . . . . . . . . . . . . . . 12
Frame Counter . . . . . . . . . . . . . . . . 12-13
Rewind Slides 1 (R1) and 2 (R2) . . . . . . . . . 14
Battery Chamber . . . . . . . . . . . . . . . . . 15
Battery Check Button and LED Indicators . . . . . 16
ElectricalTerminals . . . . . . . . . . . . . . . 16
(Magazine back terminal/External power
terminal/Remote terminal)
ACCESSORIES . . . . . . . . . . . . . . . . . . 17 - 21
PowerAccessories. . . . . . . . . . . . . . . . . 17
(MN-2 NiCd Battery Unit and MH-2 Quick Charger/
MA-4 AC/DC Converter and MC-ll External
Power Cord)
ConvenientAccessories . . . . . . . . . . . . . . 18
(MF-6 Camera Back/Pistol Grip Model 2 and MC-3
Connecting Cord/AH-2 Tripod Adapter)
Remote Control Accessories. . . . . . . . . . 19-20
(MC- 12 Remote Cord with Button Release
/MW-1 Radio Control Set and MC-S Connecting Cord/
ML-1 Modulite Remote Control Set and
MC-8 Connecting Cord/ MR-2 Terminal Release)
Simultaneous and Time Lag Shooting Accessories. . 21
(MC-4 Remote Cord/MT-1 Intervalometer and MC-S
Connecting Cord/
SPECIFICATIONS . . . . . . . . . . . . . . . . . . . 22
OPTIMUM BATTERY PERFORMANCE . . . . . . . . . . . . . 23
Time-lapse exposures
)
Congratulations. You now own the MD4 Motor
Drive, an accessory designed to advance
the film automatically through the Ni*on
F3 camera. The MD-4 offers either "Single"
or "Continuous" operation. At "S," the
film advances to the next frame as soon
as the picture is taken. At "C, "it will
be advanced at 4 frames per second with
penlight batteries or at 6 fps when using the optional MN-2 NiCd Battery Unit.
In addition, the MD-4 offers automatic
film rewind. Even though the MD4 is extremely easy to use, you should still
familiarize yourself with its basic operation as presented in the first section. For more detailed explanations and
special picturetaking situations, refer
to the sections CONTROLS IN DETAIL and
ACCESSORIES. A few minutes wisely invested now will pay off in years of rewarding photographic experiences.
4
Page 5
BASIC OPERATION
www.mynikon.com.pl
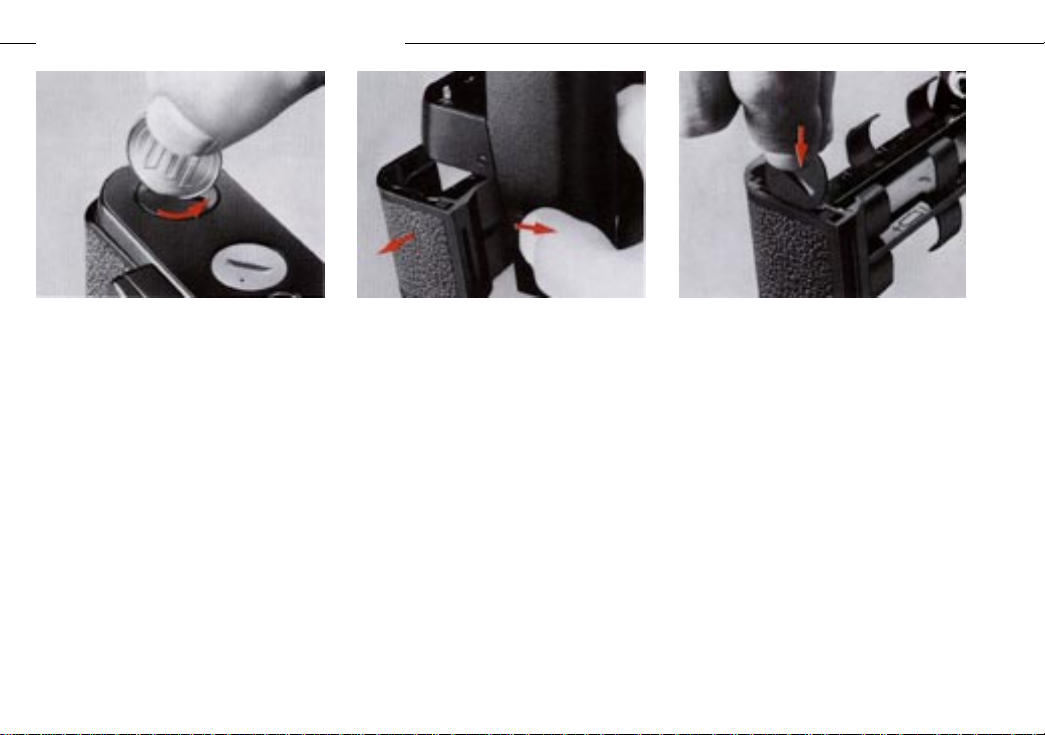
1.Unscrew the camera's motor
drive coupling cover.
First make sure the camera's
power switch is turned off. Then
turn the camera upside down and
use a coin to unscrew the
cover.Remove the motor drive's
battery clipG). Slide the release catch ~to the right and
the battery clip will pop out.
2.Remove the motor drive's battery clip(13).
Slide the release catch (25)to
the right and the battery clip
will pop out.
3.Store the cover in the
compartment (16) provided.
To prevent the cover from being
misplaced, slip it into the storage compartment on the end of the
battery clip. To remove the motor
drive coupling cover, push the
small catch to the outside as you
turn the battery clip upside down.
The cover will then fall out.
5
Page 6
BASIC OPERATION continued
www.mynikon.com.pl
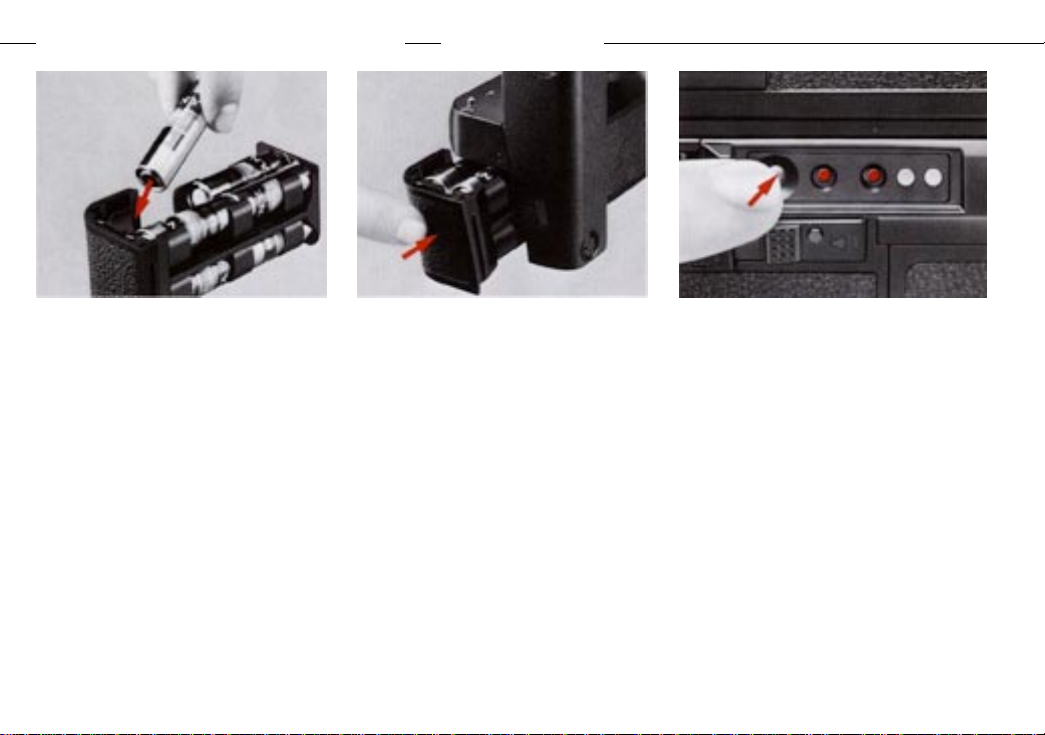
4.Load the batteries.
Install 8 AA-type penlight batteries into the clip following
the " + " and "-" indications.
5.Install the battery clip.
Put the clip back in the battery chamber (13). Push it until it snaps into place.
6.Check the battery power.
Push the battery check button (1)
If both LED's (9) light up, the
batteries have been loaded properly and their power is sufficient. If one LED glows, the batteries should be replaced with a
fresh set. If none go on, this
indicates that the batteries have
not been loaded correctly or are
completely dead.
6
Page 7
BASIC OPERATION continued
www.mynikon.com.pl
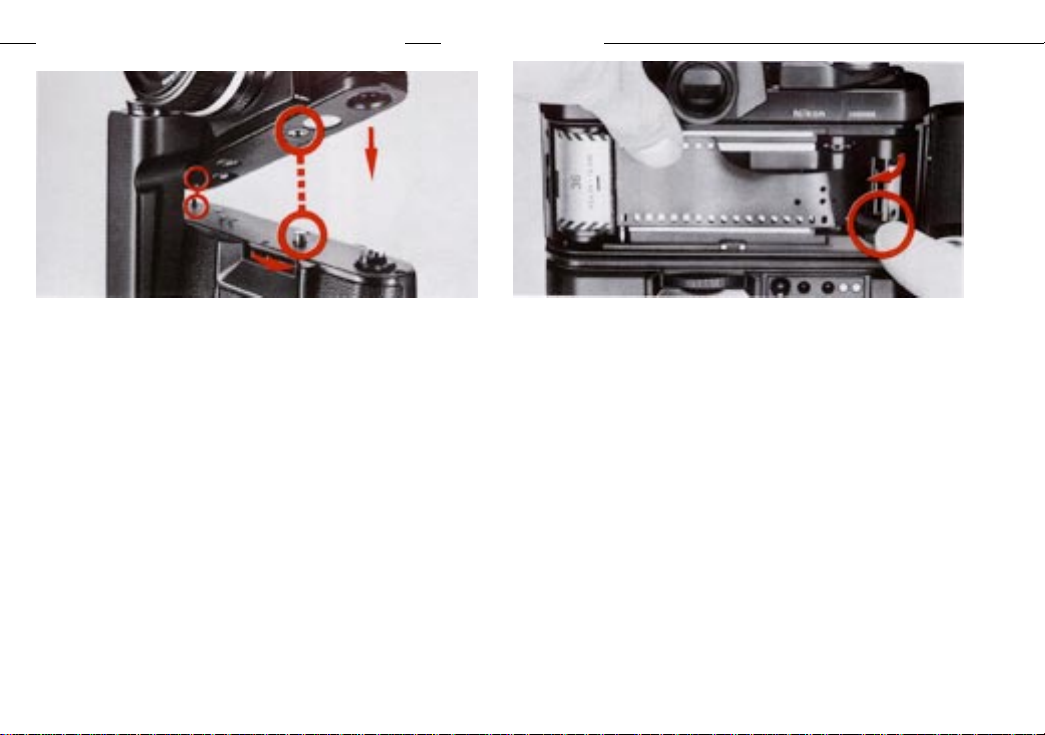
7.Attach the motor drive to the camera body.
Make sure the S-C mode selector (15) of the
motor drive is set to L (Lock) before attaching
the camera. Otherwise the motor might start
operating. Place the camera body on top of the
motor drive so that the motor drive's mounting
screw (20) lines up with the camera's tripod
socket and the camera positioning pin (17) is
aligned with the motor drive coupling hole.
Then turn the attachment wheel (21) counterclockwise until the two units are screwed tightly
together.
8.Load the camera with film.
Load film into the camera in the normal way.
Note:
Do not detach the motor drive from the
camera while it's still loaded with film. Unless
you are in o darkroom. the film might become
exposed to liqht entering through the bottom of
the camera.
7
Page 8

BASIC OPERATION continued
www.mynikon.com.pl
9.Set the frame counter (4) to
the orange dot.
Turn the counter setting dial
(2) until the frame counter
reaches the orange dot.
10.Set the S-C mode selector
(15).
Lift up and set the S-C mode
selector for either S (SINGLE)
or C (CONTINUOUS) operation.
11.Take the picture(s).
Depress the trigger button (14)
halfway to switch on the meter.
If you're satisfied with the
reading, push the button all
the way down to take the shot
(s).
8
Page 9

BASIC OPERATION continued
www.mynikon.com.pl
12.Rewind the film automatically.
When the film reaches the end
of the roll, it will automatically stop and one LED will light
up. Depress the lock button (11)
on rewind slide I (R1) (12) and
push the slide to the left. Then,
while holding it, push rewind
slide 2 (R2) (5) up. Immediately the film starts rewinding. When the sound becomes more
high-pitched, push rewind slide
2 back down to stop film rewinding.
13.Remove the film cartridge.
Unload the camera in the normal
manner.
14.Turn the S-C mode selector
to the L-setting.
To prevent the shutter from
being accidentally tripped between shooting sessions, turn
the S-C mode selector to the L
(LOCK) position.
9
Page 10

CONTROLS IN DETAIL
www.mynikon.com.pl
Anatomical Grip (18)
The MD-4 features a new anatomical grip to permit
the photographer to shoot either horizontal or
vertical pictures comfortably. For horizontal
shooting, hold the grip so that your thumb is
behind the camera and your forefinger is on the
trigger button. In this way, you can change quickly
from horizontal to vertical shooting. However,
another way to hold the motor drive vertically is
to balance the grip in your palm with your thumb
over the trigger button. This position is recommended for onehanded shooting over an extended
period of time, such as when using a bracketmount flash unit off-camera.
S-C Mode Selector (15)
Concentric with the trigger button for easy
access, this dial sets the motor drive for either single frame (S) or continuous (C) operation. There is also a lock (L) position.
At "S" (Single Frame)
At all shutter speeds, except "B" and "T," the
motor drive trips the shutter and winds the
film in a single sequential step. At the same
time, one LED lights up to indicate film advance. At~the "B" setting, when the trigger
button is pushed, the shutter fires and remains
open until you take your finger off the button.
Then the film advances automatically to the
next frame. At "T," the shutter remains open
until the shutter speed dial is rotated off the
"T" setting.
Note: With the camera's power switch turned on, you can take
motordriven single frame shots by using the camera's shutter
release button. When you depress the button, the shot is taken,
and when you release pressure from the button, the Rlm B wound
to the next frame. This occurs with the S-C mode selector set
to either "S" or "C."
10
Page 11

CONTROLS IN DETAIL continued
www.mynikon.com.pl
At “C” (Continuous)
As long as you hold the trigger button down, shots
will be taken rapidly in succession. Any shutter
speed setting, except "B" and "T," can be used. At
shutter speeds slower than 1/125 sec., the firing
rate automatically slows down to match the shutter speed in use.
Motor-driven multiple exposures are possible by
holding the multiple exposure lever in position
while firing off a short burst (see the picture
above). After you're finished, make a blank shot
by covering the lens with a lens cap. This will
advance the film to the next unexposed frame without
adding another shot to the multiple exposure just
completed.
Caution: Do nat hold down the backup mechanical release lever
while shooting on Continuous, as the shutter will not open properly.
At “L” (Loc)
The trigger button is locked and the motor drive
will not operate. However, by turning on the
camera's power switch, you can use the shutter
release button to trip the shutter and advance
the film manually just as if the MD-4 were not
attached.
11
Page 12

CONTROLS IN DETAIL continued
www.mynikon.com.pl
Trigger Button (14)
The MD-4's trigger button, because it is an electromagnetic release, operates in exactly the same
manner as the camera's shutter release button. It
not only trips the shutter but serves as a meter
switch as well. When depressed halfway, it turns
on the meter and activates the LCD exposure information in the viewfinder. If the button is not
touched again, the meter will turn itself off
automatically after 16 sec. to conserve battery
power.
With the MD-4 attached, it makes no difference
whether the camera's power switch is turned on or
not. In fact, you might find it easier to leave
the switch in the OFF position and control the
camera's meter entirely with the trigger button.
Frame Counter (4)
A subtractive-type frame counter is built into
the MD-4. For normal shooting, set the counter to
the orange dot and forget it. At this setting, the
counter is disengaged and the motor drive stops
automatically when the film tension increases at
the end of the roll.
However, in below-freezing temperatures, film
becomes brittle and easy to break. Therefore, to
prevent the film from being accidentally torn,
set the frame counter to the number of fraEr es on
the roll. When the counter reaches "0," the motor
drive automatically shuts off before the film is
damaged. One LED also lights up as a visual indication. To set the counter, turn the counter setting dial to the right until the desired number is
aligned with the white index (3). 36, 24, 20, and
12 are in red corresponding to the number of
12
Page 13

CONTROLS IN DETAIL continued
www.mynikon.com.pl
frames in commercially-available cartridges. You
can also shoot short bursts by setting the counter
to the number you want (Fig. 1). When the counter
reaches "O," the motor drive stops and one LED
lights up (Fig. 2). To reset the frame counter for
another burst, first turn the counter setting
dial to the orange dot and the LED will go out
(Fig. 3). Then you can rotate the counter to the
desired number. Before resetting the counter, make
sure to check the camera's frame counter to determine whether there are enough exposures left
on the roll for the next burst.
Note: If you rewind the film before the frame counter reaches
"O," the counter will not reset properly to the orange dot.
Therefore, before starting to shoot your next roll of film,
make sure to reset the counter to the desired setting.
The film becomes brittle in low temparatures. In cold climate,
be careful not to overestimote the number of frames remaining
on a roll of film since thismayresultin the motor pulling the
Rlm offthe supplyspool or damaging its perforated edges. R may
be a good practice to set the frame counter to one less than the
number af frames remaining on a roll of film. For example, if
you food a fresh S6-exp. roll, set the frame caunter to 35.
13
Page 14

CONTROLS IN DETAIL continued
www.mynikon.com.pl
Rewind Slides 1 (R1) and 2(R2) (5)
When one LED lights up to signal that the film is
at an end, you must rewind the film. To simplify
this operation, the MD-4 features completely automatic film rewinding. Depress the lock button
on R1 and push the slide to the left. Then while
holding R1 in position, push R2 up. Immediately
the film will start rewinding. When the sound
becomes more high-pitched, this indicates the
leader has been completely rewound back into the
cartridge. To stop the rewinding action, push R2
back down and immediately R1 will spring back
into its original position.
If you were using the frame counter, it moves
from "O" to the orange dot position as soon as
R2 is pushed up.
Rewinding time for a 36-exposure roll of film
with alkalinemanganese batteries is approximately 8 sec.; with the optional MN-2 NiCd Battery Unit, it is reduced to 4.5 sec.
Note: If the film is automabcally rewound in cold weather,
static electncity charges may cause accidental expasures resembling lightningLalts to appear an the film. To prevent this
from happening, push R1 to the leff and rewind the film slowly
by hand with the camera's film rewind crank.
14
Page 15

CONTROLS IN DETAIL continued
www.mynikon.com.pl
* Possible when shutter speed is 1/125 sec. or above and
the mirror is locked in the “up” position.
Battery Chamber (13)
Instead of using a separate battery pack, the MD4 houses its batteries in a built-in battery chamber. The standard MS-3 Battery Clip accepts 8 AAtype penlight batteries to power the motor drive
up to 4 frames per second. Once the motor drive is
attached, the camera gets all its power from the
batteries in the motor drive. In this way, the
camera is able to run on high capacity batteries.
As a separate accessory, the MD-4 accepts the MN2 NiCd Battery Unit for extremely high-speed shooting up to 6* fps. Since NiCd batteries are better
able to maintain their peak performance in cold
temperatures, the camera/motor drive combination
will still operate down to -20°C. The following
table lists the firing rates according to power
source (Table 1), while the bar graph gives you
the expected life of various battery types under
ordinary temperatures (Table 2).
Table 1 (frame/sec.)
Shutter speed AA penlight AA penlight MN-2 MA-4(AC/DC
range (sec.) batteries batteries battery converter)
1/125 - 1/2000 3.8 3.8 5.5 5
1/125 - 1/2000 4 4 6 5.5
mirror up
(Zinc-carbon) (Alkaline- (NiCd)
Power source
manganese)
Table 2 (Number of 36-exposure rolls)
Zinc-Carbon
Alkaline-
manganese)
NiCd Battery
Unit MN-2
The range of guaranteed firing rates
The range within operative battery power but
without gurantee of the specified firing rates
60 100
60 140
60 70
15
Page 16

CONTROLS IN DETAIL continued
www.mynikon.com.pl
Battery Check Button(1) and LED Indicators(9)
To check battery power, depress the battery check
button. If both LED's light up, the power is
sufficient to provide the fastest firing rates.
If only one LED comes on, you can still use the
MD-4, but at slower rates. If neither LED lights
up, the batteries should be changed for a fresh
set. The LED's also indicate other camera functions. One LED will light up: 1) each time the
film is wound after a shot is taken; 2) when the
film reaches the end of the roll and needs rewinding; 3) when the frame counter reaches "0"; or 4)
when auto-rewinding is stopped with the optional
MF-6 Camera Back.
Note: One LED will also hght up if the batteries become so weak
that the motor dNve can no longer advance the hlm and just stops
during the course of shooting.
Electrical Terminals
The MD-4 is provided with three separate electrical terminals.
1) Magazine back terminal (19)
Located at the bottom of the motor drive's grip,
the magazine back terminal allows a magazine back
to be connected to the MD-4's electrical system.
2) External power terminal (23)
The smaller of the two terminals on the front of
the motor drive's base, the externalpower terminal allows the MA-4 AC/DC Converter to be connected to the MD-4 for extended studio shooting.
3) Remote terminal (24)
The larger of the two, the remote terminal allows
a variety of remote control devices to be attached.
16
Page 17

ACCESSORIES
www.mynikon.com.pl
Power Accessories
MN-2 NiCt Battery Unit and MH-2 Quick Charger
Optional battery unit and companion charger for
the fastest firing rate. Also recommended when
using the MD-4 under extremely cold weather conditions. Three to four hour recharging is possible.
MA-4 ACIDC Converter and MC-ll External Power
Cord
Especially recommended when using the MD-4 for
extended studio sessions. Supplies a constant 15V
DC current to the motor drive. The new MC-ll Cord
plugs into the external power terminal of the MD-
4.
Note that the motor drive MD-4 cannot be fired by
using the release button on the MA-4 AC/DC Converter.
17
Page 18

ACCESSORIES continued
www.mynikon.com.pl
Convenient Accessories
MF-6 Camera Back
Attached to the F3 in place of the standard camera
back, the MF-6 provides automatic film rewindstop with the film leader left outside the cartridge for ease in darkroom handling.
Pistol Grip Model 2 and MC-3 Connecting Cord
Nikon's special pistol grip can be screwed into
either the camera's tripod socket or the tripod
mounting collar of a supertelephoto lens to provide more stable handheld shooting. The MC-3 Cord
plugs into the MD-4's remote terminal.
AH-2 Tripod Adapter (Not pictured)
A plate screwing into the bottom of the MD-4
repositions the tripod socket in the middle.
18
Page 19

ACCESSORIES continued
www.mynikon.com.pl
Remote Control Accessories
MC-12 Remote Control with Button Release
For remote control up to 3 meters away, the MC-12
has a handgrip and trigger release button for
convenient operation. Depressing the button halfway turns on the camera's exposure meter; depressing it further releases the shutter. After
finger pressure is removed, the meter stays on
for 16 sec., automatically turning itself off to
conserve battery power.
MW-1 Radio Control Set and MC-5 Connecting Cord
Provides interference-free remote control up to
0.7km. Three separate channels allow three motordriven cameras to be operated automatically. Easy
to handle. MC-S Cord plugs into the MD-4's remote
terminal.
19
Page 20

ACCESSORIES continued
www.mynikon.com.pl
ML-1 Modulite Remote Control Set and MC-B Connecting Cord
Utilizes modulated light to control up to two
motor-driven cameras automatically. Compact and
easy to handle. Can be used up to 60 meters away.
MC-8 Cord plugs into motor drive's remote terminal.
MR-2 Terminal Release
Allows the MD-4 to be triggered with the AR-2
Cable Release. Does not provide viewfinder display of the shutter speed when depressed halfway.
20
Page 21

ACCESSORIES continued
www.mynikon.com.pl
Simultaneous and Time Lag Shooting Accessories
MC-4 Remote Cord
With plus and minus banana plugs, the MC-4 Cord
can be used to fire up to three motor-driven F3s
simultaneously. Follow the diagram for proper
connection.
Note: For proper operation, the common electNcal leads (indicated
by bold lines in the diagram) should be kept as short as possib/
e.
MT-1 Intervalometer and MC-5 Connecting Cord
Provides time lag shooting with the F3.
Time-lapse exposures
You can trigger the motor drive for time-lapse
exposures by connecting an intervalometer or similar device to the trigger circuit in place of the
ON/OFF switch. In this case, there will be a
slight time delay between the moment the trigger
circuit is closed and the shutter is released.
Delay time
Mirror locked-up—30 milliseconds
Mirror operating—40 milliseconds
21
Page 22

SPECIFICATIONS
www.mynikon.com.pl
Camera fitting Nikon F3
Shooting modes Choice of single-frame (S) or continu-
ous (C) firing via S-C mode selector;
lock (L) position also provided
Shutter release By electromagnetic trigger button; also
switches on camera meter when depressed
halfway; meter remains on for 16 sees.
after finger is lifted off button
Firing rate Up to 6 frames per second (fps) with
NiCd Battery Unit MN-2, up to 4 fps
with 8 penlight AA-type batteries; firing rates decrease at shutter speeds
slower than 1/125 sec.
Automatic winding Motor shuts off at film's end
stop with LED indication; frame counter also
provided to automatically stop film
winding after preset number of exposures—useful in very low temperatures
Number of 36-exp. Guaranteed firing rate: approx.
rolls per fresh battery 60 with all types of batteries;
set slower firing rates, but still us-
able: approx. 70 with NiCd Battery
Unit MN-2, approx. 100 with zinccarbon batteries; approx . 140 with
alkaline - manganese batteries
Automatic film 4.5 sees. with NiCd Battery Unit
rewind MN-2 and 8 sees. with AA-type pen-
light batteries for 36exposure film;
automatic film rewind stop with optional MF-6 Camera Back
Shutter speeds 8 to 1/2000 sec. including "X"
( 1/80 sec. )
Dimensions 146.5mm(W)x 115.0mm(H)x 71.0mm(D)
Weight 480g
22
Page 23

OPTIMUM BATTERY PERFORMANCE
www.mynikon.com.pl
1. New batteries: Between manufacturing and first
use, all batteries exhibit some drain. Therefore,
care should be taken to purchase the newest (and
freshest) ones possible. To help you do this,
some manufactures stamp the date of manufacture
on the bottom of each battery. Ask your camera
dealer for assistance in interpreting the codes.
2. Temperature: Battery life ratings are based on
operation at around 20°C (68°F). At other temperatures, battery life is shortened. At 0°C, for
instance, battery life is shortened by as much as
2/3. Spare batteries should therefore be kept
available if operation in low temperatures is
anticipated.
3. Continuous use: Batteries are drained much more
quickly by continuous use than by intermittent
use.
4. Storage: When not in use, the batteries should be
removed to prevent damage from leakage. To minimize drain during the period of disuse, store the
batteries in a cool, dry place.
5. Battery brands: Do not use mixed brands of batteries, nor batteries with different model numbers.
Also, avoid mixing new and old batteries since
proper performance will not be obtained and battery leakage into your MD-4 may occur.
6. Disposal: Do not dispose of batteries by burning.
Also, for safety's sake, do not disassemble batteries when disposing.
7. Polarity: When installing batteries, observe the
voltage polarities carefully. Reversal of the positive (+) and negative (-) terminals will result
in leakage. If leakage should occur, clean carefully or take your MD-4 to your dealer.
23
 Loading...